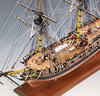
vulcanbomber Posted February 15, 2013 #1 Posted February 15, 2013 This was my very first build. It is the original version of the San Francisco, not to be confused with the San Francisco II, there are slight differences, the main one being the hull which is double planked with basswood and Sapeli veneer, whereas the San Fran II is single planked with mahogany. I didn't like the gun carriages that came with the kit and with help from other members made my own which were more in keeping with the era of the ship. I also made changes to the rigging, the kit instructions, for me, were too simplified so I did a lot of research and added more accurate rigging. I learnt a lot from this build and she now sits in pride of place in my lounge. The box: The Box: Inside the box: First the bulkheads were dry fitted, checking for fit and adjusting if neccessary before gluing in place. It is important to make sure the keel is straight and the bulkheads are at a 90deg angle to the keel to prevent problems with planking later. mtbediz, Hook's hand and ronald305 3 First Completed Build: San Francisco (Original Version) Current build: Victory Models HMS Pegasus Cross Stitch Project (Finished): Battle Of Agamemnon and Ca Ira Cross Stitch Project : Victory & Temeraire
vulcanbomber Posted February 15, 2013 Author #2 Posted February 15, 2013 The next stage was to plank the decks, there were three the lower one, the beak, the forcastle, the main and the poop deck. I wanted to simulate calking and the easiest method I seemed to find was by running a pencil down one edge of each plank. I cut the planks to a scale length and staggered them (I now know the pattern is incorrect, but it was a learning curve. ) The trenails I made by using a sharp pointed object (actually a pickle fork!) then turned the point of a pencil in the hole to darken it slightly. The results you can see below: I added the decks to the keel and bulkhead assembly: The bulkhead at the bow and under the poop deck were planked with sapeli: A close up of the main deck: mtbediz and maddog33 2 First Completed Build: San Francisco (Original Version) Current build: Victory Models HMS Pegasus Cross Stitch Project (Finished): Battle Of Agamemnon and Ca Ira Cross Stitch Project : Victory & Temeraire
vulcanbomber Posted February 15, 2013 Author #3 Posted February 15, 2013 Next the quarter deck and poop deck were planked and added and the poop bulkhead planked: The beak had the decorative strips added: mtbediz 1 First Completed Build: San Francisco (Original Version) Current build: Victory Models HMS Pegasus Cross Stitch Project (Finished): Battle Of Agamemnon and Ca Ira Cross Stitch Project : Victory & Temeraire
vulcanbomber Posted February 15, 2013 Author #4 Posted February 15, 2013 Next the keel and bulkheads were sanded in preparation for attaching the bulwarks and hull planking: The bulwarks were planked on the inside: Next I attached the bulwark (rubber bands are your friends!) The beak and gunport snapped (See red circles): The crack near the gunport: It was at this stage and with the damaged bulwark that I lost my confidence and began to dispair, No matter how I tried I couldn't seem to get it right, at this point I received so much help, support and encouragement from MSW members that they picked me up and helped me through it all. If it hadn't been for this great site, the model would have ended up in the bin! mtbediz, maddog33 and edmay 3 First Completed Build: San Francisco (Original Version) Current build: Victory Models HMS Pegasus Cross Stitch Project (Finished): Battle Of Agamemnon and Ca Ira Cross Stitch Project : Victory & Temeraire
vulcanbomber Posted February 15, 2013 Author #5 Posted February 15, 2013 With encouragement from my new found friends and some confidence returning I attached the port side bulwark: This is one of the differences between my San Fran and the San Fran II. The beak. The bulwarks don't end at the side of the forcastle as they do on the San Fran II, but continue all the way forward creating the beak: The rear of the ship and the bulwarks: mtbediz 1 First Completed Build: San Francisco (Original Version) Current build: Victory Models HMS Pegasus Cross Stitch Project (Finished): Battle Of Agamemnon and Ca Ira Cross Stitch Project : Victory & Temeraire
Shazmira Posted February 15, 2013 #6 Posted February 15, 2013 Caroline, So happy to see you had this log backed up and saved. Although I am currently building a II, I have been refering often to your log for inspiration and guidance. Robbyn If you risk nothing, you risk everything! Current builds Syren (Model Shipways) version 2.0 AL San Francisco II Mordaunt (Euro Model) Completed Builds 18th Century Longboat designed by Chuck Passaro In the closet Battle Station Al Charles Morgan (1980s version)
mtaylor Posted February 16, 2013 #7 Posted February 16, 2013 Hi Caroline, Great to see you and your San Francisco back. Mark "The shipwright is slow, but the wood is patient." - me Current Build: Past Builds: La Belle Poule 1765 - French Frigate from ANCRE plans - ON HOLD Triton Cross-Section NRG Hallf Hull Planking Kit HMS Sphinx 1775 - Vanguard Models - 1:64 Non-Ship Model: On hold, maybe forever: CH-53 Sikorsky - 1:48 - Revell - Completed Licorne - 1755 from Hahn Plans (Scratch) Version 2.0 (Abandoned)
hamilton Posted February 16, 2013 #8 Posted February 16, 2013 Glad you're reposting this!! I built this kit last year and your log was a great help - I'm only sorry I never said anything about it before - but thank you!! A beautiful build looking good atop the fish tank if I remember correctly! hamilton current builds: Corel HMS Bellona (1780); Admiralty models Echo cross-section (semi-scratch) previous builds: MS Phantom (scuttled, 2017); MS Sultana (1767); Corel Brittany Sloop (scuttled, 2022); MS Kate Cory; MS Armed Virginia Sloop (in need of a refit); Corel Flattie; Mamoli Gretel; Amati Bluenose (1921) (scuttled, 2023); AL San Francisco (destroyed by land krakens [i.e., cats]); Corel Toulonnaise (1823); MS Glad Tidings (1937) (refit, 2024); HMS Blandford (1719) from Corel HMS Greyhound; Fair Rosamund (1832) from OcCre Dos Amigos (missing in action); Amati Hannah (ship in a bottle); Mamoli America (1851); Bluenose fishing schooner (1921) (scratch); Off-Centre Sailing Skiff (scratch); Admiralty Models HMS Echo (1781), cross-section. under the bench: MS Emma C Barry; MS USS Constitution; MS Flying Fish; Corel Berlin; a wood supplier Colonial Schooner Hannah; Victory Models H.M.S. Fly; CAF Models HMS Granado; MS USS Confederacy
vulcanbomber Posted February 16, 2013 Author #9 Posted February 16, 2013 Thanks guys, Yes, I'm going to repost my San Fran again in full. Mark, yup, we're back! It's certainly bringing back memories re-posting this log. Will also start on my Pegasus soon too. Robbyn, I'm glad my log helped you with your build. How far are you along and I'll try and catch up as quick as I can for you. Hamilton, It's good to know that it was a help to you and yes you remebre correctly, she is on top of the fish tank. First Completed Build: San Francisco (Original Version) Current build: Victory Models HMS Pegasus Cross Stitch Project (Finished): Battle Of Agamemnon and Ca Ira Cross Stitch Project : Victory & Temeraire
newbuilder101 Posted February 16, 2013 #10 Posted February 16, 2013 Your San Francisco is something to be proud of! She's beautiful! I'm glad you are re-posting the log of a finished ship...that encourages me to post mine again. Sherry Every goodbye is the birth of a memory... Current Build: San Felipe Finished Builds: Mayflower Build Log Gallery: Mayflower
vulcanbomber Posted February 16, 2013 Author #11 Posted February 16, 2013 I decided to put another layer of planking inside the bulwarls, mainly to disguise the damage by the gunport and also to strengthen it: Next I planked the transom and attached it to the stern: mtbediz 1 First Completed Build: San Francisco (Original Version) Current build: Victory Models HMS Pegasus Cross Stitch Project (Finished): Battle Of Agamemnon and Ca Ira Cross Stitch Project : Victory & Temeraire
vulcanbomber Posted February 16, 2013 Author #12 Posted February 16, 2013 I was getting nearer and nearer to having to start the first planking, it was making me nervous, so to put it off for as long as I could i decided to make my own ship's boat as I hated the ugly metal one included in the kit: First I made it from off cuts of the deck planking strips. I made rough keel and a set of bulkheads, cuting them as narrow as I could and then planked the outside. before trying to reduce the 'ribs' the bulkheads made: I wasn't happy with it and so I scrapped it, reused the keel and made new bulkheads and planked it all again, I was happier with this one and proceeded to kit it out and stain it: mtbediz 1 First Completed Build: San Francisco (Original Version) Current build: Victory Models HMS Pegasus Cross Stitch Project (Finished): Battle Of Agamemnon and Ca Ira Cross Stitch Project : Victory & Temeraire
vulcanbomber Posted February 16, 2013 Author #13 Posted February 16, 2013 Encouraged by a very good friend who donated some cheery I made a better version, I again made a keel by gluing strips of the cherry together and made some rough bulkhead (Not shown) then I planked it. Once the planking was complete, I carefully removed the bulkheads and cut some thin strips of cherry and glued them in to simulate the 'ribs': Once they were glued in I added a strip around the inside and a capping on top, just to neaten the top edge: Next I added the seats at the stern and bow and the flooring then stained the inside with cherry stain: mtbediz 1 First Completed Build: San Francisco (Original Version) Current build: Victory Models HMS Pegasus Cross Stitch Project (Finished): Battle Of Agamemnon and Ca Ira Cross Stitch Project : Victory & Temeraire
vulcanbomber Posted February 16, 2013 Author #14 Posted February 16, 2013 Finally the rest of the seats were added: Next to version number two: Stained and varnished.... Finished! Now I couldn't put it off any longer, it was time to start the planking, this is where the planking tutorial helped me. msberkman and mtbediz 2 First Completed Build: San Francisco (Original Version) Current build: Victory Models HMS Pegasus Cross Stitch Project (Finished): Battle Of Agamemnon and Ca Ira Cross Stitch Project : Victory & Temeraire
Shazmira Posted February 17, 2013 #15 Posted February 17, 2013 Caroline, Just finished the first layer of planking, I have been asking for adivice in another post as to whether my pattern is good enough to repeat for the second layer. Hoping that following the first (while avoiding the earlier troubles) will make that second layer go easier and smoothly So looking forward to your reposts of your planking pics. Robbyn If you risk nothing, you risk everything! Current builds Syren (Model Shipways) version 2.0 AL San Francisco II Mordaunt (Euro Model) Completed Builds 18th Century Longboat designed by Chuck Passaro In the closet Battle Station Al Charles Morgan (1980s version)
Jim Lad Posted February 17, 2013 #16 Posted February 17, 2013 Hey, Caroline, great to see your log up and running again! John
vulcanbomber Posted February 17, 2013 Author #17 Posted February 17, 2013 Hi Robbyn, I'll try and do the planking stage for you. Hi John, Yes, I'm getting there, slowly but surely! First Completed Build: San Francisco (Original Version) Current build: Victory Models HMS Pegasus Cross Stitch Project (Finished): Battle Of Agamemnon and Ca Ira Cross Stitch Project : Victory & Temeraire
vulcanbomber Posted February 17, 2013 Author #18 Posted February 17, 2013 Now came time for planking. After reading the tutorial I followed the advice of several members and used balsa to fill in the bow and stern to give more surface area to attach the planking to: Next I attached the garboard planks (The first plank next to the keel) and the first planking strip below the bulwarks. Then I measured the halfway point on the bulkhead between these two planks: Then I attached a plank along this line: It was after posting these pics that a member pointed out that the ends finished too far up and would make the bow too crowded. I corrected this as you can see in the next pic: Next i measured the largest distance between the middle and the bulwark planks and divided it by the width of the planking material, this gave me the number of planks needed to fill that area. The next stage was to measure the other bulkheads and divide the result by the number of planks used, that then gave the width the plank needed to be trimmed to. Bearing in mind you shouldn't trim them to less than half their width. You can see how much the planks need to be tapered at the bow: mtbediz 1 First Completed Build: San Francisco (Original Version) Current build: Victory Models HMS Pegasus Cross Stitch Project (Finished): Battle Of Agamemnon and Ca Ira Cross Stitch Project : Victory & Temeraire
vulcanbomber Posted February 17, 2013 Author #19 Posted February 17, 2013 The stern needed less trimming: I continued planking the gap and when it was closed started the gap between the midway point and the keel: Once the planking was finished, I gave it a really good sanding. It is important to get the surface as smooth as possible to have a good base for the second planking, otherewise every dip and bump will be noticible when the second planking is finished: Flying Carp and mtbediz 2 First Completed Build: San Francisco (Original Version) Current build: Victory Models HMS Pegasus Cross Stitch Project (Finished): Battle Of Agamemnon and Ca Ira Cross Stitch Project : Victory & Temeraire
vulcanbomber Posted February 17, 2013 Author #20 Posted February 17, 2013 After ensuring a smooth surface I gave the hull a liberal coat of diluted PVA glue to ensure the planks were firmly attached in preparation for the gunports, I had to plan where to place the gunports, I used a piece of tracing paper and traced the upper part of the ship and the location of the ports and transferred this to the ship, then cut the ports out: Next I attached the keel: Thank planked the transom: And added the rudder post: Now it was time for the second planking. I followed the same rules at the first planking by measuring and marking the sections, then placed the first strip of second planking tight up under the beak and let the plank run naturally along the hull to the stern: mtbediz 1 First Completed Build: San Francisco (Original Version) Current build: Victory Models HMS Pegasus Cross Stitch Project (Finished): Battle Of Agamemnon and Ca Ira Cross Stitch Project : Victory & Temeraire
vulcanbomber Posted February 17, 2013 Author #21 Posted February 17, 2013 I quickly found that the markings I placed on the hull didn't help me at all and it was a case of 'make it up as I go along'! The first nine planks I didn't taper or tapered very little: It was here that I realised the planking wouldn't go as planned, the thin veneer really had to lie naturally along the hull, it couldn't as easily be shaped without it breaking. So I placed the next strips and let them lay naturally and trimmed them to fit: I continued planking, allowing the strips to follow the hull naturally: First Completed Build: San Francisco (Original Version) Current build: Victory Models HMS Pegasus Cross Stitch Project (Finished): Battle Of Agamemnon and Ca Ira Cross Stitch Project : Victory & Temeraire
vulcanbomber Posted February 17, 2013 Author #22 Posted February 17, 2013 Now was the easy part, planking the bulwarks, I breathed a sigh of relief, but the planking wasn't as bad as I'd feared! Now it was time for the fun parts, I completed the bow and added the capping rails: Also the wales, rubbing rails and other decoration: mtbediz 1 First Completed Build: San Francisco (Original Version) Current build: Victory Models HMS Pegasus Cross Stitch Project (Finished): Battle Of Agamemnon and Ca Ira Cross Stitch Project : Victory & Temeraire
tkay11 Posted February 17, 2013 #23 Posted February 17, 2013 Thanks a lot for reposting this, Caroline. I'm thinking about making the ship's boat, and your build has been very useful. Tony === First build: Caldercraft HM Cutter Sherbourne 1763 FINISHED 2nd build: Triton cross-section COMPLETED 3rd build: La Chaloupe Armée / 42ft Armed Longboat of 1834 by tkay11 – scale 1:36, plans by M. Delacroix COMPLETED 4th build: Allège d’Arles 1833 (Ancre) POB by tkay11 – scale 1:100, plans by F. Fissore COMPLETED Working on La Jacinthe 1:96 POB (ANCRE publications)
msberkman Posted February 17, 2013 #24 Posted February 17, 2013 I like the second plank; looks perfect... I will follow your log... Currently buildingSan Francisco II by Artesania Latina My first wooden model ship Next building San Francisco II Section by Artesania Latina Wish List US Constellation by Artesania Latina
rlb Posted February 17, 2013 #25 Posted February 17, 2013 Caroline, It's fun to revisit your build of SF. After that little (not at the time!) setback at the start, and trials with the ships boat, we can see your confidence just take off! Thanks for re-posting. Ron Building: US Brig Oneida (1809) HMS Euryalus (1803) Completed: John Alden Sloop
marktime Posted February 18, 2013 #26 Posted February 18, 2013 Yeah. good to see you here Caroline. Al "San Fransisco I ", Bashed Al "Santa Maria", Scratch-built Chinese Trading Junk
vulcanbomber Posted February 24, 2013 Author #27 Posted February 24, 2013 Thanks for looking in on my log guys, your continued support is always welcome. Now where was I? Ah yes, planking finished and decorations attached, I moved on to the guns and their carriages. As I mentioned in my first post, I didn't like the carriages provided, infact they were more like sleds, so after some discussion with other members and some research, I came up with a more probable design., based loosley on the Mary Rose cannon carriages. They were made out of balsa which was easy to carve, but also very fragile, but I liked the end results. First prototype, unstained: First five stained and completed with rope bindings: Size comparison: In position on the deck: Next I painted the brass shields and decorations: mtbediz 1 First Completed Build: San Francisco (Original Version) Current build: Victory Models HMS Pegasus Cross Stitch Project (Finished): Battle Of Agamemnon and Ca Ira Cross Stitch Project : Victory & Temeraire
vulcanbomber Posted February 24, 2013 Author #28 Posted February 24, 2013 Next i added the little shaped posts and the rubbing rails and other bits and pieces on the hull: mtbediz 1 First Completed Build: San Francisco (Original Version) Current build: Victory Models HMS Pegasus Cross Stitch Project (Finished): Battle Of Agamemnon and Ca Ira Cross Stitch Project : Victory & Temeraire
vulcanbomber Posted February 24, 2013 Author #29 Posted February 24, 2013 Next was making the balcony and rudder. And yes the brass pins were a little tight when it came to attaching the rudder, I'll remember to check that the next time! mtbediz 1 First Completed Build: San Francisco (Original Version) Current build: Victory Models HMS Pegasus Cross Stitch Project (Finished): Battle Of Agamemnon and Ca Ira Cross Stitch Project : Victory & Temeraire
vulcanbomber Posted February 24, 2013 Author #30 Posted February 24, 2013 I didn't like the metal lantern either (what a surprise, what did I like? ) so I made another from balsa: Next I varnished the hull in clear varnish: Then came time to fit the balcony and its supports: And the metal decoration at the stern: mtbediz 1 First Completed Build: San Francisco (Original Version) Current build: Victory Models HMS Pegasus Cross Stitch Project (Finished): Battle Of Agamemnon and Ca Ira Cross Stitch Project : Victory & Temeraire

Recommended Posts
Create an account or sign in to comment
You need to be a member in order to leave a comment
Create an account
Sign up for a new account in our community. It's easy!
Register a new accountSign in
Already have an account? Sign in here.
Sign In Now