Don Quixote
-
Posts
1,689 -
Joined
-
Last visited
Content Type
Profiles
Forums
Gallery
Events
Everything posted by Don Quixote
-
That's just it though. I have the marks in the right place, I'm sure... Did you have to force yours in place at all? If I let mine lay naturally, they're a ways off. I can easily bend them in place, but being so new, I worry about every detail. Bottom line I guess... Is it ok to bend the battens as much as it appears to me I'll have to?
-
Yes, but mine trips me when I'm cooking. I think it's something that's taught as a puppy through the teat. On mine is black in the few places she's not grey. Click here and select "more" to see some funny dog stuff. Seriously entertaining. Nice job. Why is everyones model so clean looking. Mines not.
-
LOL. They're such small strips! 29 planks each side. That's not including the area around the gun ports/sweeps. It should be noted though, this is my first wooden model and wood and I have a love hate relationship. Wood loves to make me hate it! I've rebuilt car engines, I can fix anything. Restoring a '69 GTO now. No sweat! Wood? Major smelly sweaty arm pits, ya know? Thanks for looking in. Check out greatgalleon's log. He's built dozens of ships, and see what he did with the hull... I 'spect I'll be buying some bondo soon. This guy however, did a fantastic job! Welcome to the niagara club. Got a log?
-
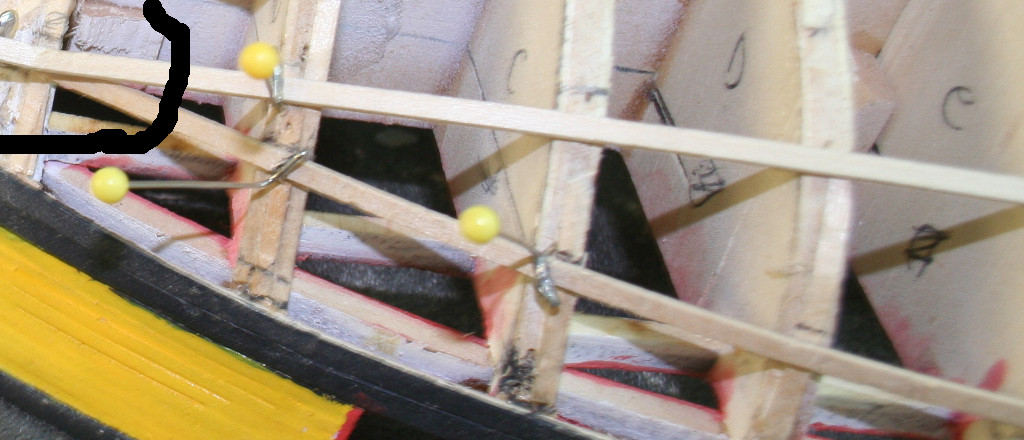
If I lay the battens per the plans I get the image shown where the battens are not crossed. If I allow them to lay naturally, I get the image showing them crossed. I used a digital calliper from the plans to masking tape, then to the hull... I also tried measuring the width of the planks between the strakes from the plan and adding them up placing them all across the hull with the same result. Naturally the same results. For giggles and grins, I even tried a cloth tape from my wife's sewing kits. THAT was worse:) sup wit dat? The planks are so narrow I don't thin I'll get any clinker effect, but it sure is a no-no from everything I've read. Anyone? Even if it's not Larry that answers?


-
If I lay the battens per the plans (shown above) I get the image shown where the battens are not crossed. If I allow them to lay naturally, I get the image showing them crossed. I used a digital calliper from the plans to masking tape, then to the hull... I also tried measuring the width of the planks between the strakes from the plan and adding them up placing them all across the hull with the same result. Naturally the same results. For giggles and grins, I even tried a cloth tape from my wife's sewing kits. THAT was worse:) sup wit dat? The planks are so narrow I don't thin I'll get any clinker effect, but it sure is a no-no from everything I've read.


-
Good god y'all. Working out how to do the planking on my Niagara, I've come to appreciate what the fantastic job you've done, Larry!
-
At about 2 am this morning I figured out the views on page 2 of the plans are THAT accurate and required measuring. Figured out the widths from that. For the millionth time during this build I said "You have GOT to be kidding me!" And I haven’t even started the rigging yet. Could have saved you and me some time if I'd remember there's a booklet. I actually read the booklet front to back before I started, but one must needs remember what one sees. Memory issues can be found under shore leave / what happens when you get old. Thanks MUCH. Pages 16 and 17, required reading.
-
I was thinking of a bright green metal flake with orange flames on the sides. Now, some of those fake bullet holes might be okay too. I could turn it into a steam boat with some P235/50 tires on some good old fashion craiger rims.
- 287 replies
-
- 1
-

-
- niagara
- Model Shipways
- (and 1 more)
-
Do you recall what size planks are that are used for strakes a and b? And do you recall what the width at the stem and stern were? Better yet, what rate they should decrease in width? Thanks much! I take it you haven't worked on yours lately? Got some glue on the carpet and the Admiral came "unglued"? I bought this ship because I'm familiar with it, having lived in Michigan most of my life and having camped up and down the St Lawrence, both sides. My brother lived in up State N.Y. on the river too. Hence all the camping on the way there and back. Had no idea what I was getting into. Recently Model Expo had the Golden Hind on sale so I snatched it. Soon as I have the hull, deck and coamings in, I'll switch to that one and the HMS Victory, both solid hulls. I want to get a little experience in on rigging before going back to the Niagara. I might even do the Rattlesnake first. Picked those up AFTER I got in over my head with this one. Again, thanks!
-
Hi, Rich. Hoping you or someone else following this can answer a question for me. Getting ready to plank the hull and I see the width at BHD H is wider than the stem and stern. How am I supposed to know the width at the ends and at what rate should the width decrease?
-
Hey, you still working on this one?
-
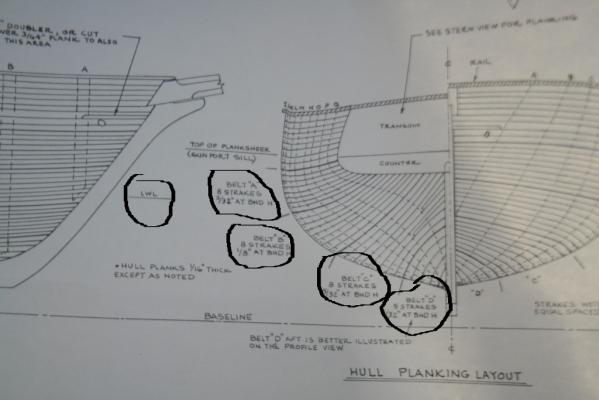
Thanks, guys. Per the picture... IS LWL the water line? Does this mean lower water line? That would seem odd to me since no one could ever guess what the weight would be when fully loaded. If I look real close at the box, it looks like there is a "stripe" along the side near the water line. Greatgallions build has one. I don't see it on the plans, nor the directions. Bigger question. If I understand correctly, the planks are wider at bulkhead H (1/8") and tapers down at the stem and stern? Homey aint EVEN gonna try that! And, they say both hull and deck use 1/16" thick planks. I have 3/32X1/16" and 3/16"X1/16" and 1/4"X3/16". My educated guess, (G.E.D.) is 3/16" for the hull and 3/32" for the deck. But I don't see anywhere that the 1/4" planks would be used. ???
- 287 replies
-
- 1
-
-
- niagara
- Model Shipways
- (and 1 more)
-
My condolences as well.
-
Okay, Larry. I'm ready to start planking the hull. Several questions: I've been studying "Simple hull planking techniques for beginners". By kelvin12. (THAT'S cold!!!) It uses the term "battens". Is this the same as a strake? What is the water line? Is this just where the color of the hull differs? What is its importance? How do I know where it belongs? Nice work! I've been working on mine for 6 months now. I think I reworked the sweeps and ports a half dozen time before I figured out the plans didn't match the build.
-
Hope someone is reading this. I'm ready to start planking the hull. I've been studying "Simple hull planking techniques for beginners". It uses the term "battens". Is this the same as a strake? What is the water line? Is this just where the color of the hull differs? What is its importance? How do I know where it belongs? Brian
-
I love the last 4 pics, something to look forward to. Thanks a he** of a lot. Which way did you bevel the planks? If I understand correctly you pencilled in the caulk on top of the seams between planks after installation? If the bevel is to the inside, top narrower than the bottom, I might try a pencil on the edge of the planks where the bevel is. If I've learned anything from reading these logs, I'll test it first:) What kind of stain did you use?
-
Hello Johann. I was asking around about how to make the hammock cranes and was told to check your log on pages around 17. 1st, I hope to have a fraction of the patients you have some day! Regarding your table saw. Does it tilt? Where did you get it, what make and model...ect? I appreciate it. And your work. WOW!
-
Advice on disc sander
Don Quixote replied to Don Quixote's topic in Modeling tools and Workshop Equipment
I have every episode. Have you seen Boston Legal? Turns out old William can act after all. Thanks! -
Advice on disc sander
Don Quixote replied to Don Quixote's topic in Modeling tools and Workshop Equipment
Nice. Thanks, Proteus. What was that, the 2nd pilot, Captain Pike? -
Advice on disc sander
Don Quixote replied to Don Quixote's topic in Modeling tools and Workshop Equipment
Obviously you get a consistent angle then... What grit(s) and at what progression. E.g. 220, then 320, then 400, then 600...? I cant imagine starting with something very coarse... -
New to model ships.I want to bevel one edge of the hull planking, but of course I'm going to get a most inconsistent result running it across my dewalt palm sander. What are folks using, or how does one sand small items like that?
-
That was it. Z-poxy. I think I'll use that because I suspect the hull will need some sanding and being so thin, there's little to back stop it. I call this ship a bach ship. As I go and when I'm done I'm getting a million pictures. Then I'm going to bash it and toss it in the trash. Just a learning experience. 900 thousand things not to do ever again, and counting. Brian
-
Tool for bending metal strips or wire
Don Quixote replied to Don Quixote's topic in Modeling tools and Workshop Equipment
O.M.G!!! I'm assuming he has some kind of micro table saw, to made the jig? I'm a toy-aholic, any recommendations for a micro table saw and a belt or disk sander? And what's better, belt or disk sander? Thanks a BUNCH, Grant! Maybe my 3rd or 4th model I'll be ready to build a test lab. I wouldn't even have the room. Barely enough room as it is and a b**** to keep clean it's so small. Cluttered. Next spring I'm adding onto the garage. Can't wait. This is my first ship. I've already learned 976,342.2 things I'll never do again. Brian -
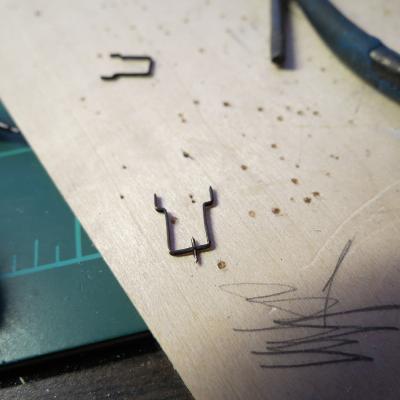
The picture is of hammock rails / stantions for the Niagara 1:64. I'd like a tool (or advice) on how to bend things like this. Or things like Pintels and gudgeons. <sp?> Brian
-
I know I read in here a discussion on epoxy, but If you'd reiterate what you'll use, I appreciate it. Good timing. I'd have started the deck this evening. What about diluting wood glue with water? Hm... Epoxy is still holding the handle to open the gate on my truck so I can open it. Thanks!