robnbill
-
Posts
841 -
Joined
-
Last visited
Content Type
Profiles
Forums
Gallery
Events
Everything posted by robnbill
-
 Actually, I am using a Delta floor mounted drill press. I purchased the 6 inch XY table from Harbor Freighr. Looking at the reviews if the various tables. Unless I was going to spend a great deal more (hundreds more) money, this one got the best reviews. I went to the store and looked at it and tested it for smoothness before I purchased it. So hopefully I will not have the wondering bit issue. If i do, I will have to regroup and look at dedicated mills. To support this, I am building a jig to allow me to mount the work piece in the table and turn it independently of the XY table. I will post how that comes along. I purchased the various hardware pieces I needed today.
- 335 replies
-
- 2
-

-
- Constitution
- Mamoli
- (and 3 more)
-
Wooden Ship's Wheel - moved by moderator
robnbill replied to RandyEvers's topic in Wood ship model kits
The Connie's weeks is a dual wheel set. I have attached my CAD drawings of the wheel as it was before the 1927 restoration. It is at a 3" =1' scale. This drawing is based upon the Navy's drawings from that period. FYI, this is a 10 spoke wheel. I know the Mamoli metal wheel supplied in my kit was an 8. I plan on trying to fabricate this from wood to replace the Mamoli supplied wheel with one I make based upon the TFFM. Constitution Double Ships Wheel.pdf -
Thanks. I will let you know how it goes.
-
It will be a bit of a challenge since it is so small and has so many parts. I am planning on setting up my drill press with an XY vise. Then I will make a circular base on a ball bearing mount. I should be able set index holes in it to lock it. This should allow me to mount the workpiece to the round base, set it in the XY vise. align it to the center, then offset it for the round cuts. Then old it with the indexing pins to cross cut the 10 slots needed for each circle. Easier said than done, but it will be a fun challenge. FYI, I realized when I did this, that my existing wheel ( the metal one from Mamoli) had only 8 spokes. Bill
- 335 replies
-
- 1
-
-
- Constitution
- Mamoli
- (and 3 more)
-
So things have been a bit slow in the shipyard. Many household projects to get done during the great weather we have been having as well as still having issues with my shoulder. However, thanks to Popeye2Sea and the great folks over at http://www.1812marines.org, I have obtained a piece of the real Connie to add to my build. Since the hull is completed, I can certainly add it to the ship's boats, but I would like to add it to the ship's furniture. One way I could do this is to build a ship's wheel (al la TFFM). Not sure if I can pull it off at 1:93 but I want to try. I will build one first out of normal hardwood then if all goes well< I will use the Connie's wood to build the wheel. In pursuit of this I used the Navy plans of the ship's double wheel (pre 1927) done for the 1927 restoration. It was as the ship had on it before the 27 work was done. I used the Navy plans to draw it up in CAD. This is at the same scale as the original drawing 3" = 1'. Anyway, if any one is interested, here is the PDF of the double wheel. Constitution Double Ships Wheel.pdf
-
These were unlashed from the inner booms where they were stored. Then they were pushed outward. They were supported by halyards from above. So they probably only had the foot of the boom end still in the ring on the end of the boom. Since these were used in light airs, that is all they needed.
-
Take a glass jar, and shred beeswax into it. Add enough turpentine to cover well and let it set overnight. You can shake it occasionally. If all of the wax has dissolved, add more. The idea is to add as much wax as it will dissolve. This becomes a thin pudding.
-
Hey Rich, Based upon the AOS, I used a combination of double and single blocks to rig the canon. The line would start on a double (attached to a ring on the bulkhead), go to the single mounted on the cannon, back to the double then coiled the remainder on the deck. I calculated with 2 bow chasers I needed 86 single and 86 doubles. Each carronade had two sets of tackle on each side plus the breeching line. The Bow Chasers had one set of tackle each side plus one set attached from the stern to a deck ring near the mast. Of course they too had the breeching cables. Bill
- 1,756 replies
-
- 1
-
-
- constitution
- constructo
- (and 1 more)
-
Mamoli also only included the line for the breeching lines. Just draped them over the ends of the cannons. So I ordered all the blocks and line I needed to rig them from Chuck. Drilling the blocks is a great idea. Your ship is looking great.
-
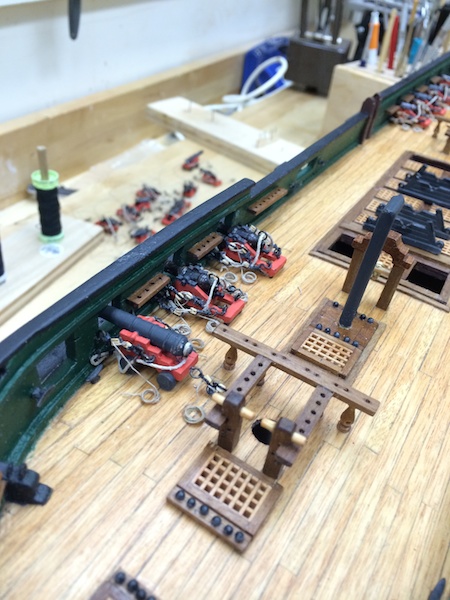
I settled on two ways to skin the cat. First was to solder them on. I used a micro torch and paste solder. The other way was epoxy. If you are blackening your cannon with blacken it, or similar, you have to use the solder. If you are painting the canon, you can use the epoxy and cover it. Since these do not take any stress (once you have the line through them, it does not take a great deal of holding power. I have attached a photo of my starboard forward cannon set showing both the long gun and the two carronades.

- 1,756 replies
-
- 2
-
-
- constitution
- constructo
- (and 1 more)
-
Rich, the carronades also had a ring at the top of the cascabel for the breech line to go through. The long guns had the breech line wrapped around the cascabel. I soldered rings onto each of the carronade barrels for this.
- 1,756 replies
-
- 1
-
-
- constitution
- constructo
- (and 1 more)
-
I got so tired of cannon. It was a happy day when I rigged my last one.
- 1,756 replies
-
- 2
-
-
- constitution
- constructo
- (and 1 more)
-
It also keeps some of the fuzzies at bay.
-
Since the cannon carriages on the Mamoli Connie were metal I used a spot of epoxy under each cannon. I could not possibly have done any of the rigging on the cannon without first gluing the cannon firmly in place.
- 1,756 replies
-
- 1
-
-
- constitution
- constructo
- (and 1 more)
-
You are looking great. There re a number of threads on stirrups and various methods for making them. Some use wire, for my Connie, I used thread and superglue.
-
I like the beeswax and turpentine.It easily soaks through the line, then the turpentine evaporates leaving the wax evenly distributed. The only downside I have found is it is if you apply too much, it turns white after the turpentine is gone. Not a big issue and solvable with a brush and a turpentine wash. As long as I wipe the line down with a paper towel after using the mix on it I have not had the issue. The issue of whether the wax has a slight acidic content that could degrade the line over time is possible, but I think that it will still well outlast me. So I am not so concerned about it.
-
Welcome! There are a number of USS Constitution kits out there. In addition to the Constructo and Model Shipways, there are also Bluejacket and Mamoli kits. The most popular Connie kit being built on this forum is that made by MS, but each vendor brings their own positives and negatives. All of these kits are a substantial multiyear undertaking. You will need to be ready to live with this model and still be excited about building it throughout the course of the build. There are a wealth of logs for these ships on the forum that you should read through. You should be able to get a measure of the skills and time each model takes by reviewing the build logs. The other advice would be to first take a smaller bite and get a model that you would enjoy building, but one that you could test your skills on before jumping into a big build. This would be a build of weeks or months rather than years. Either way, this forum will be here to assist in any way short of coming to your shop and building it for you.
- 2 replies
-
- 2
-
-
- Constructo
- Model Shipways
- (and 2 more)
-
So today I started re-rigging the forward mast. I was able to create and install all of the reformed cross trees based upon the drawings I created using the AOS information. These turned out pretty well. Now I have all of the deadeyes installed for the futtocks and have the forward most pair rigged. I decided after reviewing the literature as well as looking at the photos of the current ship, that I would use black threads for lacing the deadeyes. Originally I used beige. I should be able to get the formats back to where it was by Monday. Then I will try to get some photos for the before and after shots.
-
Here is the Boat's report from the Connie's site. I am still not sure whether this makes it clear that there were no whaleboats on the ship perhaps someone with more knowledge on the specific types of boats listed here could elucidate. ConstitutionBoatsReport.pdf
-
How is the cat getting on with her new stern light?
-
Welcome to the Connie builders! There is quite a few build logs here of those being built. Each modeler brings their own unique perspective to the build. If you have not figured this out yet, the exact configuration of the Connie is dependent on the year you are targeting. However, the material that informs us on how she looked is sometimes sparse and sometimes conflicting. This surprised me when I started working on the ship, but it something that allows you as your own researcher to decide what you want to include on the ship and why. The specific number of boats on your model is really up to you. The Connie carried more boats than is typically shown in models. They did this by stacking the boats over the main hatch. You also have the three hanging on davits around the stern. Most modelers tend to only have 4 boats on the Connie, preferring to add more detail to those 4 than just stacking hulls on the deck. The number and type of ships boats could change while she was on a single voyage since these did not fare well with a cannonball. SO when one was destroyed, it would be replaced as time and budgets allowed. What it was replaced with was up to the captain. How you rig the boats is also a personal choice. Most of these boats were designed so they could also sail. So in addition to the oars, they had a mast and spar. They also would have included an anchor, lines, sails, etc. The problem is if you put all of that in the boat you cannot see the inside of the boat at all. So choices are made on what will be included and how it will be arranged. The rudder being shipped or not is also up to the modeler. There is also a question on which boats to include. There are any numbers of combinations you can include on the model. The number and type of boats aboard were at the depression of the captain. These also tended to get destroyed during battles so were being replenished as necessary. There is a basic list of the types of boats they had as well as the size of the oars for each. These came from the Anatomy of Ship. Constitution Ship's Boats and Oars.pdf
-
That is an interesting point. I did not use the common eyebolt and wondered if I should have. Water under the bridge for me at this point.
- 1,756 replies
-
- 1
-
-
- constitution
- constructo
- (and 1 more)
-
Equally important for the painted version of the model, they add a great deal of interest in what would be a black area of the hull. There is a lot of black on the Connie! I originally had the lower studding sail booms black and recently stripped them and stained them for the same reason. They just blended into the black.
- 335 replies
-
- 1
-
-
- Constitution
- Mamoli
- (and 3 more)