
Supplies of the Ship Modeler's Handbook are running out. Get your copy NOW before they are gone! Click on photo to order.
×


Cuda1949
-
Posts
194 -
Joined
-
Last visited
Reputation Activity
-

 Cuda1949 got a reaction from GrandpaPhil in Cutty Sark by Cuda1949
Thanks for the tips. I might try to carve it first to see if it comes out ok. I haven't carved anything other then some hulls for my ships in bottles and a Santa Claus I made for my wife many years ago. I will keep you posted. Hoping to get back to work tomorrow on the rigging. Merry Christmas and a Happy New Year.
-
 Cuda1949 got a reaction from mtaylor in Back at it
Welcome back from Lower Slower Delaware. Merry Christmas
-
 Cuda1949 reacted to Hank in Converting a Backyard Shed into a Model Workshop
Well, I actually did get some unexpected work done yesterday (Christmas) afternoon and continued with it today. It has been in the upper 50s low 60s and I took advantage of this mild weather. Yesterday I finished drilling holes in studs for elec. receptacle wiring and then cleaned things up and made a list for a supply run to Lowe's. Today's run included alum. drip edge trim and receptacles and a few odds & ends. Once CaddyWagon was moored at her normal anchorage, I began work on repairing the roof eaves - a 3' section of shingles on the 1st course was missing (it should always be doubled up) so that was replaced and the new drip edge trim installed along both sides the entire length of the roof. I also filled in a couple slots in the shingles where the underlayment was visible and obviously wet. Having that completed, I then made notes for the continuation of latticework/mulch on the left side and back of the shed. We have rain forecast for Sunday so I want this all completed by then.
It was then time to go inside and pick up where I left off - finishing the elec. wiring circuit for the receptacles and then on to applying foam insulation to all the joints where siding meets framework, etc. Tomorrow I will continue on the ladder to complete the upper wall where the roof meets the studs/plate and make sure those joints are all sealed.
Then, it will be on to replacing the back window. I have a small amount of work done on new framing, so this will continue once the old window is out for good.
-
Cuda1949 reacted to Hank in Converting a Backyard Shed into a Model Workshop
Ron,
Yes, I can caulk along that edge and will. I've done so inside, as well. Another thing is that I've applied the expandable foam insulation into all the cracks/joints along the inside studs & plates and where ever the siding joints meet up. Good idea, by the way.
Stuglo,
Really don't have an answer - perhaps you could start a new thread with your question.
So, today's report is:
After watching 3 quarters of the Panthers getting their butts handed to them by the Colts, I went out back and started once again relocating "stuff" from the right side of the shed to other areas in order to continue with the receptacle wiring circuit on the right wall coming forward. While moving "stuff" I took notice at the amount of laminate flooring I had been able to retain from our 2018 house renovation and I do believe I will have more than enough to do the shop floor in the back half of the bldg. The front portion of the floor will be carpeted with the roll of berber carpet that was also removed & retained from the small bedrooms. It is in excellent condition and will work well in the front portion of the bldg. I plan to use laminate at the entrance in an 8'wide x 6' deep area at the doors. Using the recycled materials also cuts down on the cost of this whole thing which is one of the secondary goals - not spending more than I have to in this whole project. So here's what it looks like this evening:
I put in a chit with my neighbor for a supply run to Lowe's tomorrow morning and he (being a retired E-9 Aviation Chief) handily approved it. His F-150 will be warmed up and ready for a morning sojourn into M'ville, probably TAD until lunch. This is a rather large supply run including porch decking/trusses/framing, latticework, mulch, and possibly a couple more evergreens for our natural border which is also in progress.
Of course, Tuesday going forward will be Admiralty time and we all know what THAT means, right?!!! I doubt that I will see the inside of the shed until after Christmas so this project will pick up sometime next week.
Hank
Monday Update:
Well, it's been raining steady since very early morning and the mulch/latticework did NOT work as planned. The inside back corner and both door corners are wet inside and I'm scratching my head!!! Later this week (providing I can escape the Xmas scrutiny of the Admiral) when dry weather is back, I will see if Ron's caulking suggestion is feasible. I'm also going to contact my realtor/contractor friend and squarely place the blame on him - I mean, isn't that what we do these days? LOL!!!! - seriously, I will contact him for further advice and see what we can come up with to dry these areas out.
-
Cuda1949 got a reaction from mtaylor in Cutty Sark by Cuda1949
Ok I am about to carve the figure for the fore of the ship. I really have no idea haw to accomplish this. Would it be easier to carve it or shape it from plasticine? Any idea accepted.
Thanks
-
Cuda1949 reacted to shipman in Cutty Sark by Cuda1949
Just blown the dust off my copy of the Longridge book, now there you go, that seems to be a comprehensive definitive thesis on the rigging of his famous rendition.
The model used to be in London's Science Museum; shame it's gone. I think you can count the photo's of it online on one finger!
-
.thumb.jpeg.fc5d633a7b34428fcf19419a73d56d55.jpeg) Cuda1949 got a reaction from EricWilliamMarshall in Cutty Sark by Cuda1949
Cuda1949 got a reaction from EricWilliamMarshall in Cutty Sark by Cuda1949
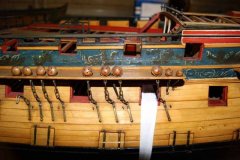
So my wife and I went away for a Christmas visit with friends. Our grandson house and dog sat. So what a surprise to come home and find my Cutty sark out of the building cradle. My granddaughter moved my work station and slightly damaged the rear spanker and bent a few spars, Quick fix and now she owes me big time. Gotta lover her shes grandpops baby ( 19 YRS old) So after fixing the minor issues I started the running rigging for the rest of the ship.
-
 Cuda1949 got a reaction from samson in Cutty Sark by Cuda1949
So my wife and I went away for a Christmas visit with friends. Our grandson house and dog sat. So what a surprise to come home and find my Cutty sark out of the building cradle. My granddaughter moved my work station and slightly damaged the rear spanker and bent a few spars, Quick fix and now she owes me big time. Gotta lover her shes grandpops baby ( 19 YRS old) So after fixing the minor issues I started the running rigging for the rest of the ship.
-
Cuda1949 reacted to John Allen in Converting a Backyard Shed into a Model Workshop
Hank,
Really looking good. Do not let the Missus see how much room you have back there, tell her you saw some snakes and not to walk back there.
Close to Christmas and she would think "we have downsized Love, would that not be a nice place to store all our yard art for Easter, Christmas, and Halloween. There's enough room there Dear for all the gardening tools, pots, chemicals, and pesticides for my flower garden I want to build. There is so much space you can have that little area in the corner for that modeling thing you do. Thanks Love."
Its like a little sniffle that turns into full blown pneumonia overnight.
-
Cuda1949 reacted to Hank in Converting a Backyard Shed into a Model Workshop
Thanks for the comments...so far. The Frollicky One is being mailed a box of soap with which to wash his mouth out with as his insolence will not be tolerated on this otherwise Proper Forum. Monty Python antics will NOT be allowed on this thread!! LOL!!!! (I haven't figured out how to do Smileys or I'd add one or two!!)
Joe - One of the factors in our buying this property was the shed itself. Didn't add/subtract in the value of the property, but since it was there, that helped make the decision. YES - AC/heating will be added next year as well as insulation in the walls and probably some type of inexpensive paneling on the inside. That's one of the reasons for redoing CORRECTLY the back window - it was framed/installed by an idiot and needs to be outta there!!
Continuing the voyage:
A couple of notes left out of the initial post - the sub panel is wired for 50amps with 6 slots. I have 15A going to the equipment shed (lights/recept) and the remaining here in the workshop for lights, receptacles, and eventually HVAC. My intent is to keep things simple and most, if not all my model power tools can be run off a single circuit. I will probably put a 20A CB on that circuit and that should work out well. I've thought about a built-in vacuum system and will discuss that with another of my modeler friends who has a nice shop in place and is knowledgeable about these systems.
When we renovated our house last year, the old laminate flooring was removed and is stacked in the front of the shed - I didn't take a count of how much is there, but hopefully, enough to do the floor in the shed and that will save a bundle! Not exactly my favorite color (dk. brown) but the cost can't be beat!!!
Exterior-wise I plan to build a 8'x8' front porch and remove the old ramp which doesn't match up with the new double door unit that was installed early last summer (2018) to replace the rotted out original single door. Next spring/summer will also be the time to paint and later next year perhaps re-roof with proper eaves, etc.
So, it's one step at a time and eventually I'll be back building models - here's a couple other up to date photos of the shed/shop and also one of it's primary occupants once it's finished:
Exist. 8' fixture relocated. No further overhead lighting planned at the moment.
Sloop of War PEACOCK will be one of the primary residents of the bldg. once the shop has passed it's builder's trials!
Tomorrow afternoon (after the bird has been consumed) I hope to get out and get a bit of caulking/sealant applied around and under the front door unit. Time permitting, possibly some further electrical work, as well.
Hank
-
Cuda1949 reacted to Julie Mo in Endeavour 1934 by Julie Mo - Amati - Scale 1:35 - America's Cup UK J-Class Challenger
Forging ahead with this idea, I took the floor from the helm station and proceeded to lay down the "teak" decking.
It was pretty time consuming. I started at the center by placing 2 planks with a strip of binding between them and applied acetone. It held pretty well. This was followed by binding, plank, acetone, hold in place for about 10 seconds and repeat. While I know many here are amazing working with tiny parts but that is not my skill.
After several planks had been laid, I realized I needed a better tool to hold the pieces in place for both the application of acetone and keeping pressure until it set. The first attempt was taking a piece of wood and cutting a dado slightly narrower than the plank width and slightly shallower than the plank thickness.
It worked well enough for this job but something better needs to be designed for the main part of the deck. Other things that would help is the binding being closer to the thickness of the plank.
-
Cuda1949 reacted to Julie Mo in Endeavour 1934 by Julie Mo - Amati - Scale 1:35 - America's Cup UK J-Class Challenger
I just ran the test with the acetone. I used 5 plank pieces and 4 binding strips (all 3" long) and put them on a cedar shim. Then I pinned them in place and dropped acetone on the joints. I waited until the acetone evaporated on top and took a violin plane to the binding. Bad idea. Then I used a card scraper. Not good either. Finally I just sanded the binding level with the planking.
The planks and binding are glued pretty well to the cedar shim. But I should have waited longer for the acetone to do it's job. I had pretty well soaked the test piece because I wanted to make sure it got through to the base. Some of the uneven appearance is due to the binding still being soft when I was knocking it down.
The plane would probably work fine as long as the binding has hardened. Same with the card scraper. I think this could be what I was looking for.
-
Cuda1949 reacted to Julie Mo in Endeavour 1934 by Julie Mo - Amati - Scale 1:35 - America's Cup UK J-Class Challenger
Next thing was what to do with the caulking? While I was trying to see how to make the deck plank work with the above idea, I opened the drawer under the workbench top looking for some tape, I saw guitar binding. I bought some for an acoustic but never used it. The thinnest is 0.0115" but sold as 0.01". The deck planks and binding aren't as tight as they would be finished but it seems to work and the plastic won't bleed.
When using plastic binding on guitars, acetone is used to glue it to the wood parts on the guitar. Not sure how this would work for the decking but I'll experiment.
-
Cuda1949 got a reaction from mtaylor in Hello from Philadelphia
Welcome Aboard from lower Slower Delaware. (Formerly of Philadelphia. ) Go Eagles!!!!
Al
-
Cuda1949 reacted to mtaylor in Licorne 1755 by mtaylor - 3/16" scale - French Frigate - from Hahn plans - Version 2.0 - TERMINATED
Thanks for the likes and comments. Time for a proof of life update.
Life has gotten quite a bit quieter lately, which is good. So I focused on these little boats. The barge (the middle sized one) jig went well and so deciding to be bold and do both at the same time, I started on the cutter jig. Hmm... not so good. It's smaller and everything is proportionally more fragile. So.... spent a lot of time remake parts that I broke in the fitting. I solved the breakage problem by reducing down the laser marking in thickness and expanding the "bits" that hold the pieces together. Ended up coating many of them with 2 coats of white glue and water. Seems to work and tests say I'll be able to snap those naughty bits on the lines without damage.
The jigs are built, the keels installed with few other necessary bits and pieces and I'm ready to start actually building the boats. So, I'm off to fix the ribs and start planking. Here's a photo of the jigs and the larger boat (finished). The Longboat (finished) is 6 inches long (152.4mm), the barge is 5 inches (127mm), and the cutter is 4 inches (101.6mm) long.
-
Cuda1949 got a reaction from EricWilliamMarshall in Cutty Sark by Cuda1949
Back at it. With a day of rain I decided to start (finish) the last shroud. I had 6 ratlines to do. Finished and started the rigging.
-
Cuda1949 got a reaction from mtaylor in Cutty Sark by Cuda1949
Back at it. With a day of rain I decided to start (finish) the last shroud. I had 6 ratlines to do. Finished and started the rigging.
-
Cuda1949 reacted to Vane in In what order do you build your ships in?
I do guess there are many ways to do it, but how does the build process look for you? Do u always start from page 1 in the instruction manual and work through everything in the "right order" or do you jump randomly back and forwards in the plans? Do you work on several kits in parallel?
-
Cuda1949 reacted to RBohlman in Completed Ships in Bottle Models
Here are two(2) photos of my completed Ship in Bottle models.
The Charlotte B and the Charles W. Morgan outbound in the rain to hunt the whale fish.
Hope you enjoy the photos.
-
Cuda1949 got a reaction from mtaylor in mast height on cutty sark
According to The Cutty Sark book by Longridge the actual length of the masts from deck to cap is
Fore 613/4 feet
Main 64 3/4 feet
Mizzen mast 55 3/4
The book by C. Nepean Longridge is available through abe books and very helpful resource.
Bow sprit is 20 ft long outside the knightheads. Hope this works for you
-
Cuda1949 got a reaction from mtaylor in Cutty Sark by Cuda1949
Thanks right now things are at a stand still. Hope to get back soon. Weather is too nice to be cooped up in doors. Golfing Beach and lawn care eating up my free time as well as back to Physical Therapy for my hip replacement last year.
-
Cuda1949 got a reaction from EricWilliamMarshall in Cutty Sark by Cuda1949
Still tying ratlines but I have 4 finished and two shrouds left. Also working on the upper spanker boom. almost ready to be mounted to the mast.
-
Cuda1949 reacted to mtaylor in Licorne 1755 by mtaylor - 3/16" scale - French Frigate - from Hahn plans - Version 2.0 - TERMINATED
Thanks for the comments, the likes, and sticking with this journey. No worries on the dime anymore... I spent it.
I made the chocks and installed them into the Licorne. I've since been attacking the drawings making fixes for error areas discovered on this boat. Here's some pictures of it in place. It's not glued in yet as I need access to the area astern where the mainmast goes. Once I'm done figuring out if I need to pre-installed suitable lengths of line for rigging the mast, I'll do that. I suspect this will keep me off the streets and out of trouble for a few days.
-
Cuda1949 reacted to mtaylor in Licorne 1755 by mtaylor - 3/16" scale - French Frigate - from Hahn plans - Version 2.0 - TERMINATED
Cleaned up and dyed the oarlocks and then installed them. Also made the cannon (let's call them "popguns" ) mounts and installed them. The only thing left is the sheave and supports on the stern. The catch is I'm tad undecided as there's three distinct types... there's a sheave on top of the stern, or a sheave hanging off the stern to the rear (not onto) or there's no sheave. I'll ponder this a bit longer while I work on the chocks for putting this boat into the hull. I'm also working and tweaking the plans for the barge which is smaller, unarmed (no cannon mounts) and looks essentially like the barge. I put a dime and Pierre into the second picture to give a sense of scale.
Here's the pictures. Not perfect but I'm pretty happy with it. So unless I get a sudden "ah-hah.. I can do this better" moment, on the next barge.
-
 Cuda1949 got a reaction from prutser in The Golden Swan by Cuda1949 - BOTTLE - based on the 1588 English Galleon
I have started to plank the hull and am working on a method to attach the planking to the upper deck where it separates for insertion in to the bottle. I also reworked the upper decks so the top deck is the only one that will be separated.