HOLIDAY DONATION DRIVE - SUPPORT MSW - DO YOUR PART TO KEEP THIS GREAT FORUM GOING! (Only 51 donations so far out of 49,000 members - C'mon guys!)
×


SawdustDave
-
Posts
1,770 -
Joined
-
Last visited
Content Type
Profiles
Forums
Gallery
Events
Everything posted by SawdustDave
-
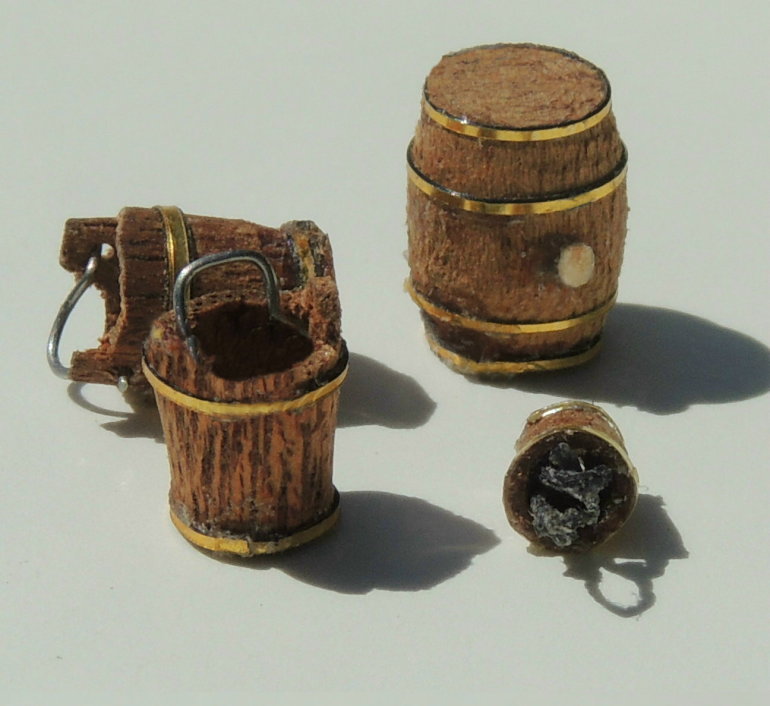
 The powder kegs are traditionally barrel-shaped and noticeably larger than the swab buckets. Also, having four banding straps and a wooden peg in the center of one side of the keg. Note, the smaller bucket seen here will be used on the upper decks around the dime-cannons. Question.... Would the powder keg have been used laying on it's side in some type of cradle or with simple chocking blocks?
- 962 replies
-
- 13
-

-
- sovereign of the seas
- ship of the line
- (and 1 more)
-
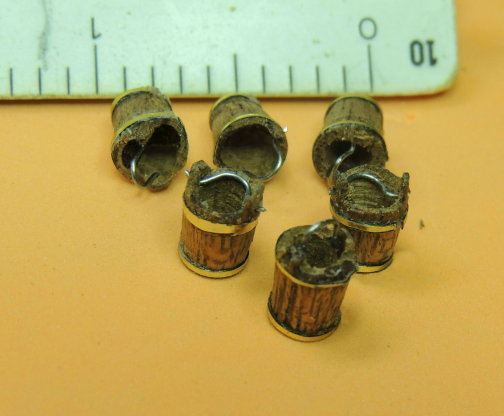
Getting the proper scale of these little swab buckets was most critical. Fairly easy to create out of walnut dowel....the brass strapping and wire handle makes them pretty time intensive. Only sixteen more to go!

- 962 replies
-
- 16
-
-
- sovereign of the seas
- ship of the line
- (and 1 more)
-
Tiny little swab buckets are the current challenge. Five down, fifteen to go. Update soon.....
- 962 replies
-
- 6
-
-
- sovereign of the seas
- ship of the line
- (and 1 more)
-
Similar findings here Greg. Played around with both and concluded, I like the look of fixed shot garlands just above the base of the bulwarks and tend to believe that would have been the method used on the SOS..... sticking to it. lol Thanks for the input Mate.
- 962 replies
-
- 8
-
-
- sovereign of the seas
- ship of the line
- (and 1 more)
-
Bill....beautiful figures. I'm guessing the lady on the left must be at least a 38DD cup.
- 382 replies
-
- 2
-
-
- sovereign of the seas
- carving
- (and 1 more)
-
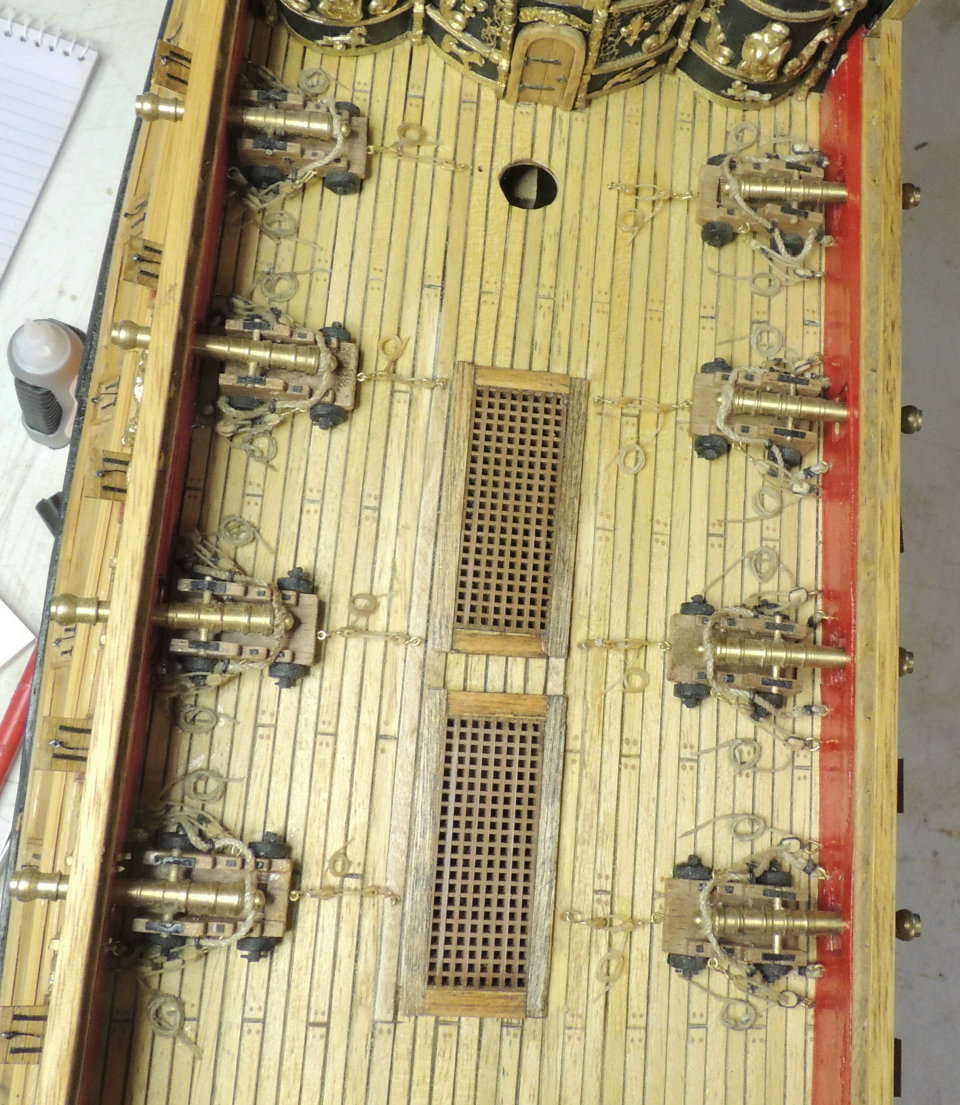
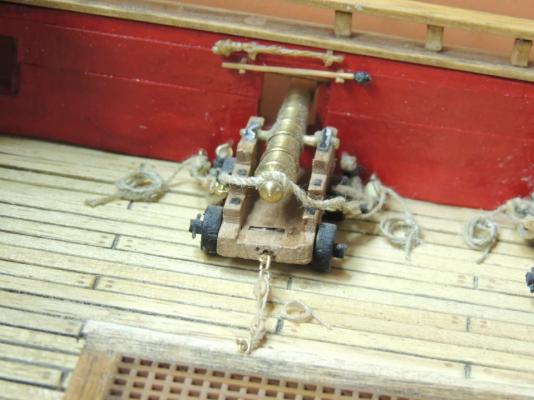
Progress update..... Couple of quickie shots after finishing up all the gun ports....also note the tree nailing finally done. Then, moving inboard, all of the main deck cannons have now been rigged. Next, I'll be adding the tiny swabs and rams (so often neglected in models of war ships)...,. Note: This shot reminded me, I still need to add the quoins to each cannon carriage. Trying to decide on the use of shot garlands, or brass monkey's for this ship. I'm leaning toward shot garlands mounted on the bulwarks. I can't find anything to tell me when brass monkey's came into use. Would appreciate any input from some of the historians on that issue. Also playing around with some very small swab buckets and powder boxes. From what I'm reading, the smaller deck demi cannons on the upper decks would have been supplied with shot boxes, rather than shot garlands or brass monkeys. We'll cross that bridge whinst we arrive there.


- 962 replies
-
- 19
-
-
- sovereign of the seas
- ship of the line
- (and 1 more)
-
Great little pumps..... as always. Your Confederacy pumps are still my personal favorite.
- 1,051 replies
-
- 4
-
-
- cheerful
- Syren Ship Model Company
- (and 1 more)
-
A little blood goes with the territory guys. Just clean it, throw a band aid on it, and carry on. But then, of course, if you wish to OVER BANDAGE any little scrape, in order to gain sympathy from the Admiral .... Or use it to avoid the dreaded "honey do" .... That's just another ball game altogether. Make the bandage large....use reddish paint to add blood stains....make it easy to remove and put back on.
- 382 replies
-
- 3
-
-
- sovereign of the seas
- carving
- (and 1 more)
-
Cutty Sark by NenadM
SawdustDave replied to NenadM's topic in - Build logs for subjects built 1851 - 1900
Nothing wrong with using card stock for such fine cuts Nenad. Looks same when stained or painted, and makes life much more simple for sure.- 4,152 replies
-
- 9
-
-
- cutty sark
- tehnodidakta
- (and 1 more)
-
The crew will appreciate the accommodations of the heads Bill. Good to see the beak bulkhead developing. Lovely work.
- 382 replies
-
- 2
-
-
- sovereign of the seas
- carving
- (and 1 more)
-
Playing catch up on this build Chuck. The ropes look great....very natural. Question about the red carriage trucks. Forget that question....I plowed back to #647 where you addressed the issue of truck color. My two cents, for what it's worth.... black trucks break up all that red and add definition to the profile of each truck. Going through your log makes me want to build her again....much slower of course. Cheers Dave
- 1,051 replies
-
- 4
-
-
- cheerful
- Syren Ship Model Company
- (and 1 more)
-
Bill....As you know, we all tend to be our own worst critic....right? While seeing virtually every single flaw in our own work, and wishing we had done a little different (cleaner, more precise, more accurate, etc.), we look at the clean perfect work of a fellow modeler as flawless examples of how we SHOULD have done it. Personally, I consider this as a very good thing about having MSW friends. Otherwise, how would we ever improve our skills.
- 962 replies
-
- 12
-
-
- sovereign of the seas
- ship of the line
- (and 1 more)
-
Not much to report this morning. I guess this posting is mainly just to say "good morning" to my MSW friends after a few days of not posting any progress. Finally finished installing all of the gun port lids to the port side.... both sides now completed. I'm not going to bore you with redundant pics of the same result seen in my earlier posting of the starboard side. Planning to rig a few more main weather deck cannons today before moving back to sculpting the figures for the beak cowling. I'm sure you all agree, it's great to see our friend Bill Short back in the shop after a long absence. His SOS has been such an inspiration to me in my feeble effort.
- 962 replies
-
- 6
-
-
- sovereign of the seas
- ship of the line
- (and 1 more)
-
Welcome back Vivian.... we look forward to seeing new pics of your progress, once you are able to take them again.
-
So clean.... so beautiful. But I still refuse to rip my bulkhead off and start over Bill. Loving to see you back in production my friend.
- 382 replies
-
- 3
-
-
- sovereign of the seas
- carving
- (and 1 more)
-
Ok.....nuff of the fun chat. My Tarheels lost a heartbreaker at the buzzer....heck of a basketball game. I'm exhausted. Back to ship building early in the morning.
- 962 replies
-
- 5
-
-
- sovereign of the seas
- ship of the line
- (and 1 more)
-
Dave B.... Good Q.... Considered melting down some of the Admiral's necklace's, ear rings, etc. (she would never miss them...RIGHT?) Na.... What a foolish question! After experimenting with several different gold metallic paint options, looking for the brightest gold on the market, I landed on RUST-OLEUM - AMERICAN ACCENTS - 2X ULTRA COVER.... METALLIC bright gold (spray can). I found it to be a noticeably brighter gold than any other I tried. Purchased at Lowe's Home Improvement stores anywhere. I first spray the parts by sticking them, face up, onto a piece of masking tape inside a paper plate. After thirty minutes, carefully remove the sprayed parts, clean any paint flash from the edges, then lightly brush on a finish coat with my smallest detail brush. Occasionally, the camera will point out a flaw in the way light is reflected on the surface, and I can refinish the flaw, even after the piece has been glued in place.
- 962 replies
-
- 10
-
-
- sovereign of the seas
- ship of the line
- (and 1 more)
-
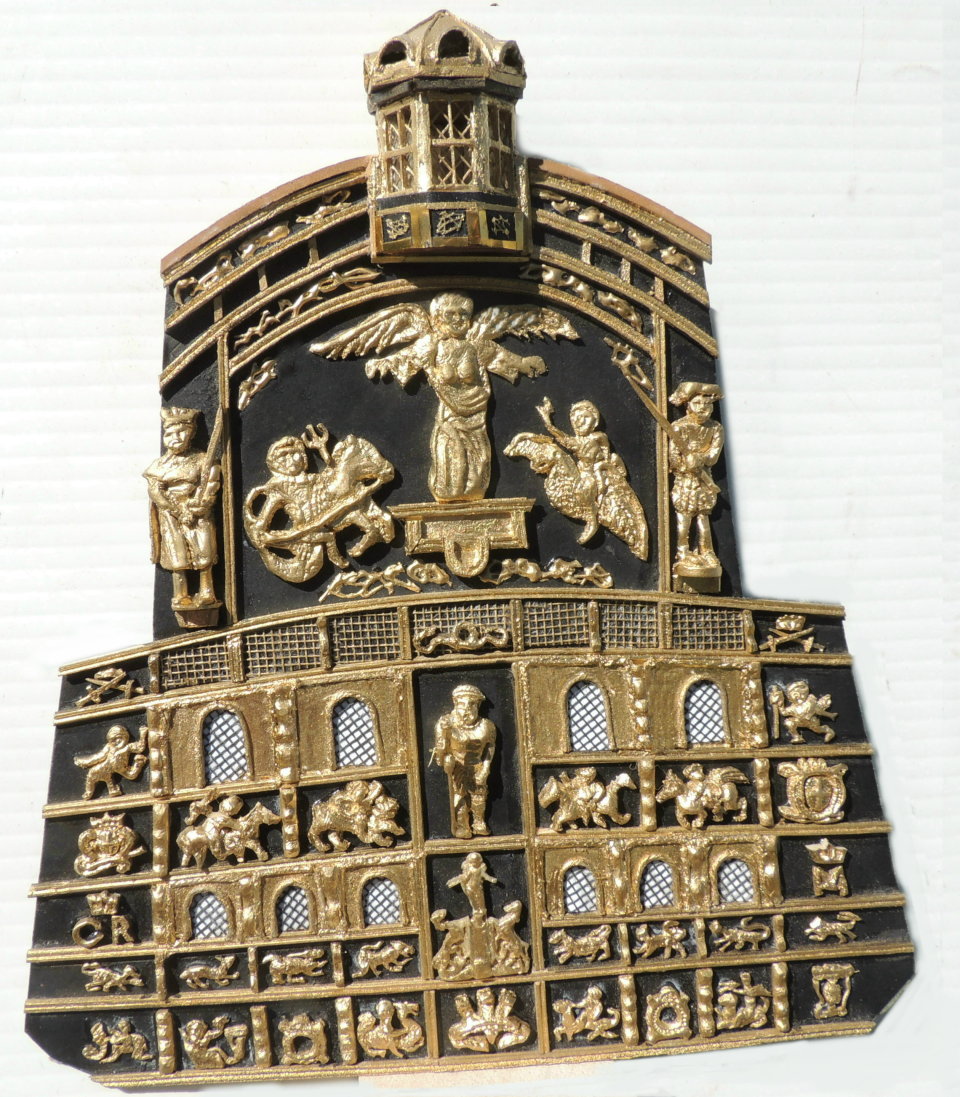
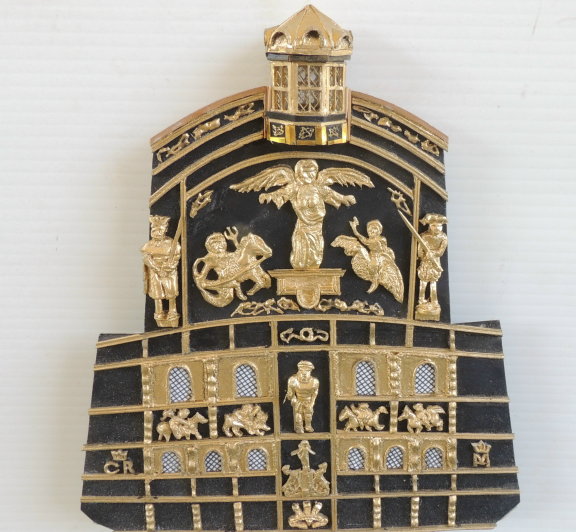
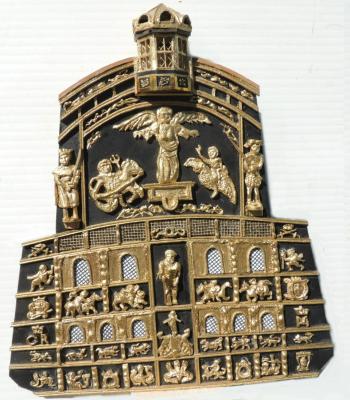
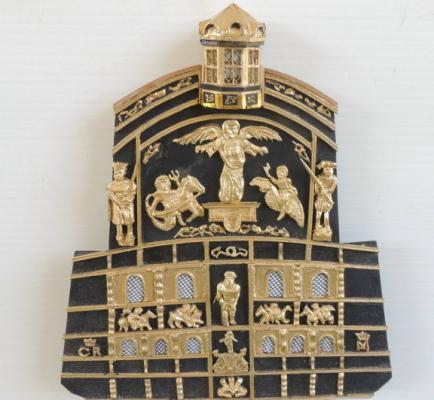
Transom Complete........ All transom carvings completed and the lantern now fitted. Think I might should take a little break before I begin to tackle the transom counter. It appears to be pretty straight forward. Mostly, I just need to do a few more cannon ports and some tree nailing as a change of routine.
- 962 replies
-
- 22
-
-
- sovereign of the seas
- ship of the line
- (and 1 more)
-
I'm so glad you pointed that out Bill. Love the new beak construction. Beautiful work as usual. Dave
- 382 replies
-
- 1
-
-
- sovereign of the seas
- carving
- (and 1 more)
-
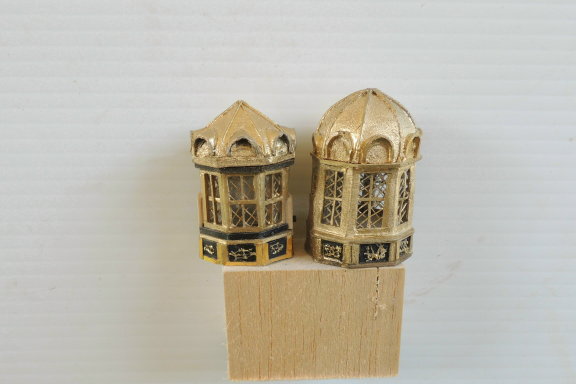
I too preferred the more rounded dome shape Pete.... I lost the contour with all the grinding I did to keep the 8-sided shape tapering from bottom to top. Anyhow.... AIN'T DOING HER AGIN!
- 962 replies
-
- 9
-
-
- sovereign of the seas
- ship of the line
- (and 1 more)
-
Thanks for the visit BV, Patrick, Greg, Bill and Mobbsie. Most say, the transom lantern is such a critical piece to the overall appearance of the iconic stern of the SOS, if necessary, I would have built it several more times to get it right. As model fixtures go, I would put this one among the most difficult scratch builds I personally have ever tackled. Bill might agree with that assessment.... told me he did the little top three times. Off to a good morning... Three new carvings to fill in the panels on the transom.....only 25 to go before I can attach the transom module to the stern. Had to interrupt progress in order to chase a little round ball around a course with sticks ill designed for the appointed task.
- 962 replies
-
- 11
-
-
- sovereign of the seas
- ship of the line
- (and 1 more)
-
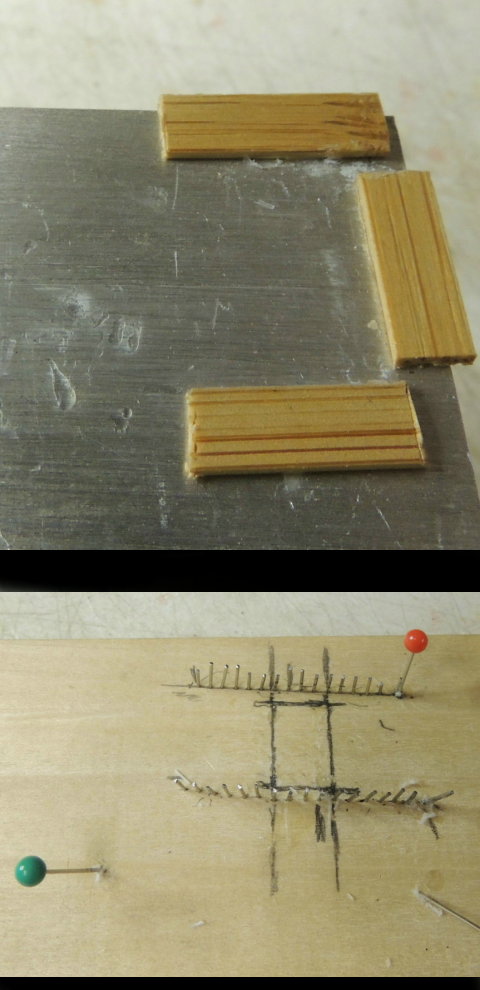
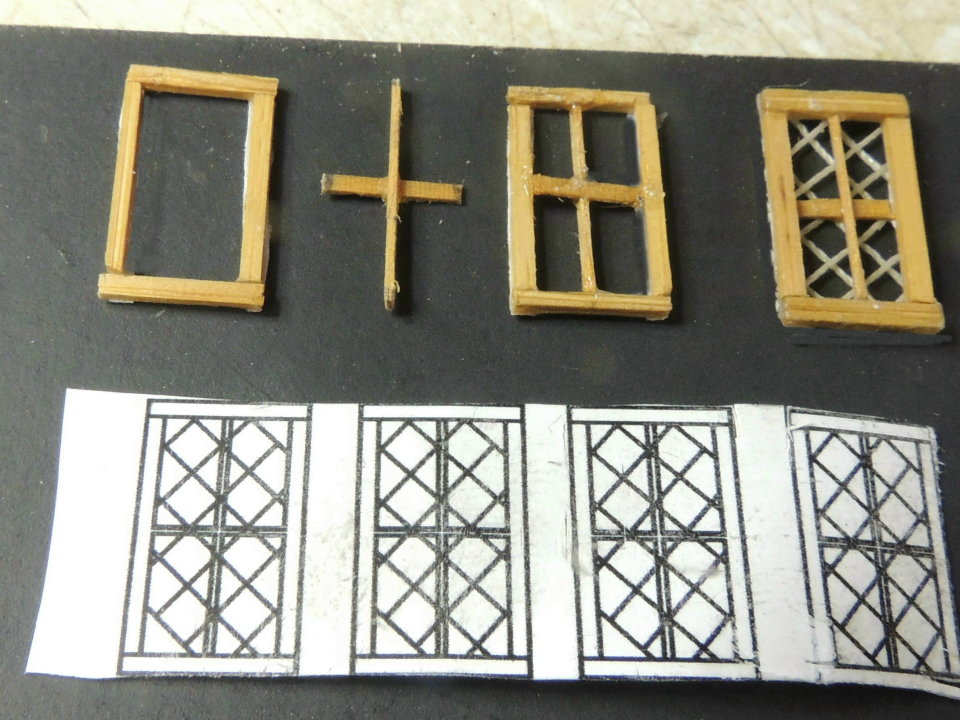
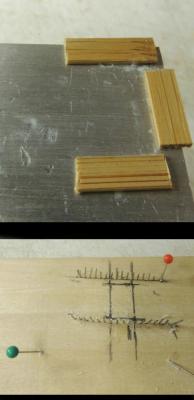
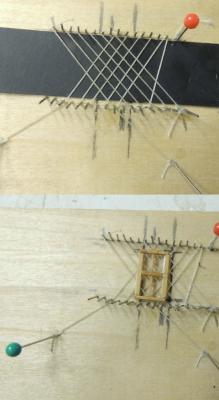
Lantern.... Version II I took a much more deliberate approach to rebuilding the lantern housing. Went to Autocad and created a template for the windows. Then made a jig to insure exact size and squareness of each unit and a pin jig to insure string spacing for the window screens. The overall result of the second lantern is much closer to being acceptable in terms of scale and quality. Here's a comparison to the two units.... And here's the new lantern dry fitted to the transom.... Took only three days for the second unit considering everything went pretty smoothly. Now....Back to a few more transom carvings.

- 962 replies
-
- 22
-
-
- sovereign of the seas
- ship of the line
- (and 1 more)
-
We build.... We tear out.... And we re-build. That's what we do!
- 382 replies
-
- 4
-
-
- sovereign of the seas
- carving
- (and 1 more)
-
Cutty Sark by NenadM
SawdustDave replied to NenadM's topic in - Build logs for subjects built 1851 - 1900
Very nice job Nenad. Very nice!- 4,152 replies
-
- 7
-
-
- cutty sark
- tehnodidakta
- (and 1 more)
-
Thanks guys....appreciate the nice comments. However, after taking a good long afternoon nap, came back to the shop to re-study this most important piece. Unless I change my mind after a nights sleep, I will likely begin version II of this fixture tomorrow morning. What the hey! Bill Short's postings has a quote I cannot argue with.... "Mediocrity will never do. You are capable of something better.” ― Gordon B. Hinckley Thanks for the reminder Bill
- 962 replies
-
- 7
-
-
- sovereign of the seas
- ship of the line
- (and 1 more)