-
Posts
853 -
Joined
-
Last visited
Content Type
Profiles
Forums
Gallery
Events
Everything posted by _SalD_
-
The two masts were temporarily assembled as per the instructions in order to position the fore and main chains and deadeyes. Trestle and cross trees Fore chains and deadeyes: The one deviation from the instructions was the spacing of the fore deadeyes. Instead of the 5/16" spacing called for I used 9/32". The 5/16" brought the last deadeye too far into the sponsons on my ship. Main chains and deadeyes: The mast hoops were also assembled but instead of using the card stock that came with the kit I used a manilla folder. The folder was stained to darken it a bit with varnish (hard to see in the photo). I used the manilla folded so I wouldn't need to paint the loops. To form the loops I used a 5/16" drill bit for the lower loops and a 3/16" bit for the upper.
- 144 replies
-
- Harriet Lane
- Model Shipways
-
(and 1 more)
Tagged with:
-
First, I would like to thank everyone for all the likes, comments and for following along. Finishing a few odds and ends before starting on the masts. Chain trusses for the sponson support were added. Aft chains: Fore chains: Funnel support guy wires were added. I had some gray thread left over from a model plane I had made that worked out fine. and the ship's bell. Added a pull cord into the cabin. Then there were a couple additions that I chose to add. First, to coverup the laser etch guide lines in the deck planking adjacent to the aft companion ways I decided to make a couple of brass monkeys for cannon ball storage. Cannon balls were made using the ends of straight pins painted black. Before: After Last but not least I added her name to the stern.
- 144 replies
-
- Harriet Lane
- Model Shipways
-
(and 1 more)
Tagged with:
-
Anchors and stocks: My kit came with two options for the anchor stocks, one wood the other britiannia metal. I chose to use the wooden stocks. I used some of the card stock painted black and glued to the wood stock to represent metal strapping. I also decided to use a smaller size block for the cathead block and tackle than the 7 mm block provided. I went a little rogue with the placement of the anchors and didn't follow the instructions too closely. On one side I decided to show the anchor in its raised position lashed to the cap rail. For this option I needed to add an additional cleat to the inside bulwark in order to secure the lashing to. On the other side I decided to show the anchor still being raised.
- 144 replies
-
- Harriet Lane
- Model Shipways
-
(and 1 more)
Tagged with:
-
Thanks rcmdrvr, appreciate the comments and all the likes.
- 144 replies
-
- Harriet Lane
- Model Shipways
-
(and 1 more)
Tagged with:
-
She has her teeth! After installing the gun ports lids the cannons were added. I had the same problem as rcmdrvr had in his build that the cannons were too high for the port openings. I used a suggestion made by Snug Harbor Johnny in rcmdrvr's build to file down the carriage bottoms and the carriage wheels in order to gain some room. This worked out well and you can hardly notice the flattened wheels with the guns on deck. I had some 2mm blocks left over from another build so I decided that I would add the out haul rigging. Rope coils were made to be added later. I also decided on this build that I would show the in haul rigging as well. Aft cannons Forward cannons All her teeth
- 144 replies
-
- Harriet Lane
- Model Shipways
-
(and 1 more)
Tagged with:
-
Bowsprit & bowsprit cap: I shaped and fitted the bowsprit as called for in the instructions along with the bowsprit cap. The card bands and gammoning strap were added. I chose to paint the bands black instead of white as shown in the instructions. I like the contrast and how they show up better. Bobstays: The two bobstay chains were added. Bow fairlead: Things were going along well until I got to this step. As you can see in the picture below my two attempts at bending this piece ended up in failure. The two pieces were both soaked AND steamed but they still broke as I tried to bend them around the 1/8" dowel. I do believe however that the way the pieces are positioned on the wood sheet makes them almost impossible the bend without breaking. The piece is layout so you are bending it along the grain instead of across the grain (if that make sense). I made my own piece so the bend was across the grain and I had no problem bending it. Fairlead painted and installed.
- 144 replies
-
- Harriet Lane
- Model Shipways
-
(and 1 more)
Tagged with:
-
Congratulations on completing the ship, she goods great. Nicely done.
- 25 replies
-
- Harriet Lane
- Model Shipways
-
(and 1 more)
Tagged with:
-
Small update. The aft companion ways and skylights were assembled and installed along with the rudderhead housing and compass pedestal. The companion ways are a little smaller than the laser etched guidelines in the deck used to position them so the lines do show a bit at the ends. For future reference to myself, I like the simulated decking but I wish I hadn't showed the butt ends of the planking. It came out too dark. The bulwark rails were fitted and glued in place. I chose to stain the railing. Ship as of today. I need a better background I also would like to thank everyone for all the likes.
- 144 replies
-
- Harriet Lane
- Model Shipways
-
(and 1 more)
Tagged with:
-
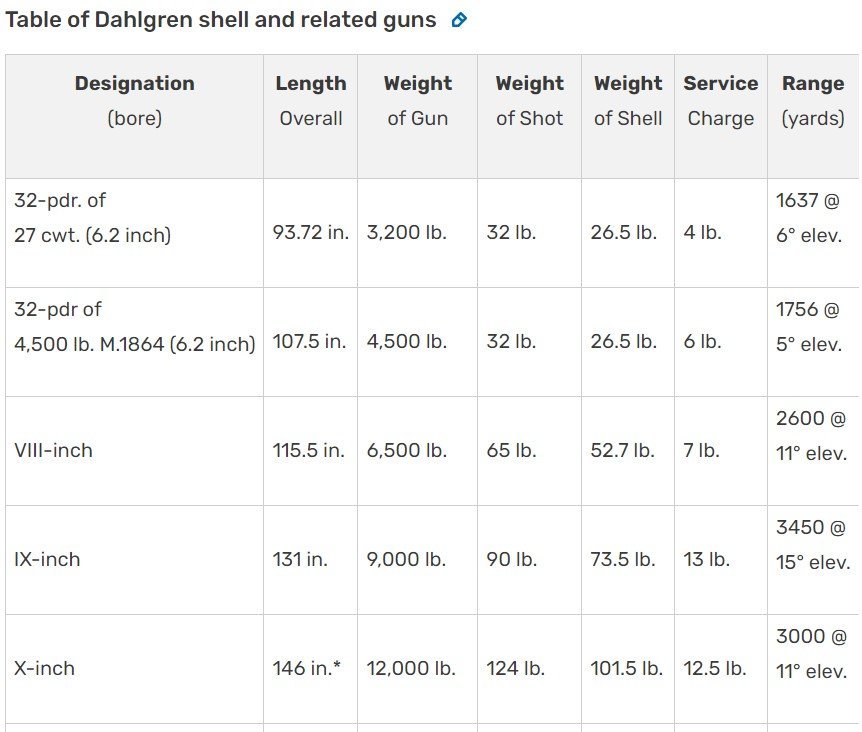
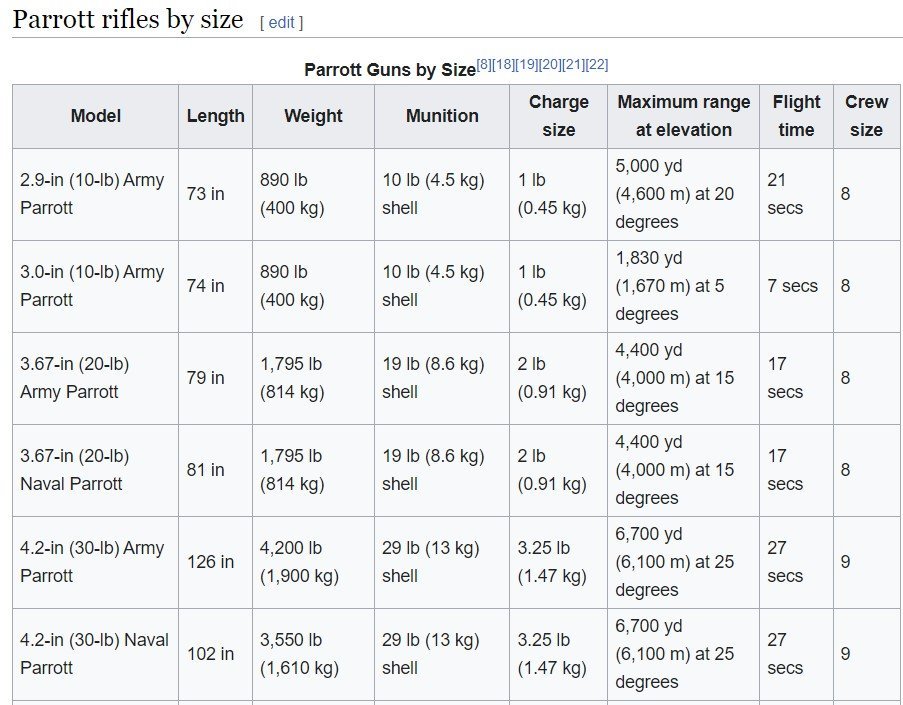
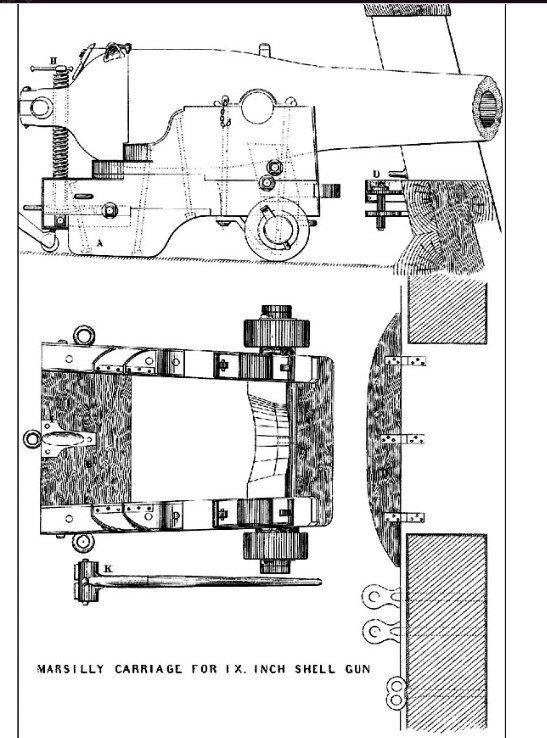
My next task was to install the eyebolts for the gun tackle into the bulwarks. I wanted to make sure that I positioned them correctly so I decided to assemble the gun carriages first. After assembling the carriages I decided that I might as well complete the assembly by adding the cannons. I was a little dishearten by the size of the cannons, as I think most of the people working on this kit are, because they just look to big for the ship. I did a little research, and I do mean little, and I found that the overall length of the 9" Dahlgren gun is 131" (10'-11") and the 4" Naval Parrott rifle is 102" (8'-6"). Tables below. Using my trusty engineer's scale (please excuse it's rough shape) I scaled the cannons and found that at 1/8" to the foot, they are in fact very close to the actual dimensions. This made me feel better using these cannons and not having to purchase new ones. Dahlgren gun Parrott rifle Cannons cleaned up, and the cannons I received the barrels were not bored out so I drilled the ends of each one. Completed gun carriages. It's hard to see but I did add the elevating screw at the rear of each Dahlgren gun. I also found a nice picture of the Marsilly carriage that I used for reference.
- 144 replies
-
- Harriet Lane
- Model Shipways
-
(and 1 more)
Tagged with:
-
The bridges and the main mast bitts were the next task. After reading bobandlucy's build and seeing how Bob had a problem with the two access ladders for the bridges being too short I decided to move the two platforms inboard a little so the ladders would reach. I chose not to paint the platforms but left them natural. I also scored them to simulate planks. The main mass bitts were assembled, painted and glued in place.
- 144 replies
-
- Harriet Lane
- Model Shipways
-
(and 1 more)
Tagged with:
-
Cabin Skylights: After assembling the aft cabin skylight I noticed that the laser etched positioning guidelines on the roof were way to big for the skylight. I chose to fill in three of the four guidelines with wood filler and then repaint the roof. Repainted roof Skylights glued to roof Funnel assembly: The funnel assembly was next and the first thing I did was to clean up the britiannia steam pipe and whistle. After cleaning and straightening. The funnel was assembled per the instructions using the card stock wrapped around a wooden dowel. I used a scrap piece of dowel inserted in the upper part of the funnel to keep me from crushing the card stock while handling it. Painted funnel The two ventilators were cleaned up and painted Completed funnel assembly
- 144 replies
-
- Harriet Lane
- Model Shipways
-
(and 1 more)
Tagged with:
-
I like that idea Snug, I'll have to remember it. Thanks.
- 144 replies
-
- Harriet Lane
- Model Shipways
-
(and 1 more)
Tagged with:
-
Mounting the cabin & pilothouse: I ran into a little problem when setting the cabin on the deck. I think I must have a slight dip in the deck because there's a gap between it and the cabin floor. I had already installed the base molding so I couldn't adjust that. In the end I used a bit of wood filler to fill the gap. Looks a little rough in the closeup but at viewing distance it's not too bad. My next issue was the ladders located at the rear of the cabin. The platform extension was not long enough. Bobandlucy's build mentioned this problem but I read about it after the fact. I decided to extend the platform in order to fit the ladders. The handrail holes were redrilled and the platform was repainted. Being a retired structural engineer I had to add a couple knee braces for looks. Ladders painted and installed Forward ladders installed.
- 144 replies
-
- Harriet Lane
- Model Shipways
-
(and 1 more)
Tagged with:
-
Thanks druxey. I'm assuming you're talking about the boat because I'm far from well adjusted. 😁😉 Thanks rcmdrvr. The fit may have had something to do with me building the walls first. I had to modify the base quite a bit to make it fit. The outer card layer didn't fit to well though. Thanks to everyone also for all the likes.
- 144 replies
-
- Harriet Lane
- Model Shipways
-
(and 1 more)
Tagged with:
-
Cabin & pilothouse: I started the cabin and pilothouse assembly following the instruction booklet but after gluing a few of the wall sections to the base I found that they just didn't fit the base correctly. The wall sections were too short. Good, bad, right or wrong, I chose to I disassembled what I had done and to then glue all the wall sections together first and then adjust the base to fit. Completed cabin and pilothouse Although I did not have a problem with the Photo-Etched pilothouse window frames fitting I did have an issue with the cardstock panel that wraps around the exterior of pilothouse. In the second photo down you can see that the door and the first window cutout do not match up with the wood cutout underneath. My fix was to cut the door off right at the window frame opening and move it back. I also removed the first window mullion and moved that back also. I then fill the gaps with small pieces of wood. I did this on both sides of the pilothouse. Cardstock door and window relocated.
- 144 replies
-
- Harriet Lane
- Model Shipways
-
(and 1 more)
Tagged with:
-
Thanks druxey, appreciate the feedback. Thanks for the heads up rcmdrvr. I'm working on the cabin and pilothouse now and starting to understand your frustrations.
- 144 replies
-
- Harriet Lane
- Model Shipways
-
(and 1 more)
Tagged with:
-
Populating the deck: The inner hawse pieces, the bowsprit step, the catheads and windlass assembly were all installed as per the instructions. I added a few extra details to the windlass assembly not included with the kit including a crossover bar with handles, the purchase rods and a pawl. I know the handles are usually stored but I just decided to show them on this ship (or until they get broken off). Companion way A was assembled and added to the deck. Fore mast bitts: After assembling the pieces of the fore mast bitts an before painting I filled the holes with pieces of wire to keep them from getting filled with paint. Finally the upper paddle unit was glued in place.
- 144 replies
-
- Harriet Lane
- Model Shipways
-
(and 1 more)
Tagged with:
-
Thanks rcmdrvr. I've started placing some of the forward deck pieces onto the deck and the scribed deck is making the location scribes a little less noticeable.
- 144 replies
-
- Harriet Lane
- Model Shipways
-
(and 1 more)
Tagged with:
-
The Deck Since the deck comes in two pieces instead of individual planks I decided to embellish it a bit by scribing the pieces to simulate planking. I used the same procedure that I used on my pilot boat build where the deck pieces were given four coats of polyurethane and then scored with a steel point. The deck was then painted with an acrylic paint and wiped off also most immediately. Prior to the scribing the deck pieces they were dry fitted in place to insure they fit. After having a little difficulty fitting the deck in beneath the spirketting board the one thing I would do differently is not install it until after the deck is in place. The only reason I can see why you would install it before the deck goes in is so it can be painted. For the planking layout I decided to use a 10" wide plank with a three butt shift. I then drew up a scaled representation of what the deck would look like. Each deck half was taped down adjacent to the deck layout and scribed. Both halves scribed. Paint applied and wiped off. The decking was then glued in place. I also finished the base and mounted ship.
- 144 replies
-
- Harriet Lane
- Model Shipways
-
(and 1 more)
Tagged with:
-
After fitting the lower paddle wheel sections in place they were removed from the ship and painted along with the upper paddle wheel enclosures. In between coats of paint I started to work on the support stand. One issue I had while assembling the stand was that the guide marks etched into the parts used for aligning the pieces were a little off. I also decided that I was going to use copper tubing to support the ship instead of the 1/8" diameter dowel called for. I plugged the holes in the stand with pieces of dowel and redrilled for 3/32" dia. tubing. The britiannia metal eagle figure head was cleaned up and painted, then glued to the underside of the beakhead.. I thought I would add a little 'bling' to the ship so I download a 3D eagle emblem and had my daughter's fiancé ( who has a 3D printer) print out two eagles for me. At this scale there isn't a lot of detail but they were fine. After cleaning and painting them they were glued in place on the upper paddle wheel covers.
- 144 replies
-
- Harriet Lane
- Model Shipways
-
(and 1 more)
Tagged with:
-

Eagle Emblem
_SalD_ replied to _SalD_'s topic in Discussion for a Ship's Deck Furniture, Guns, boats and other Fittings
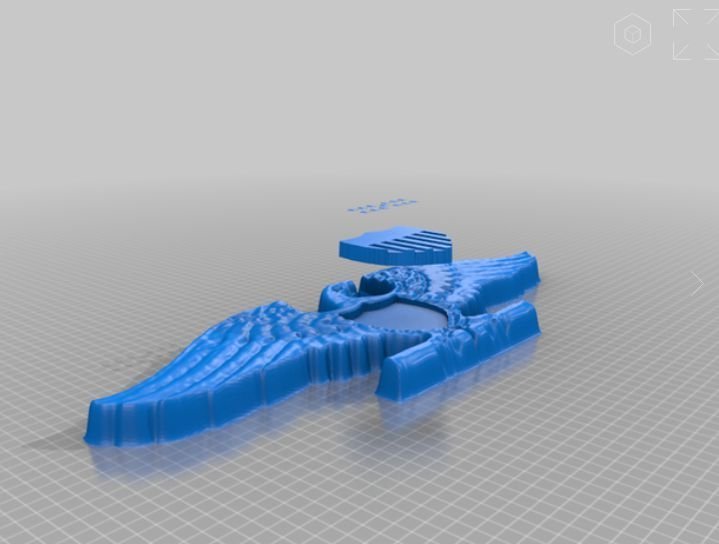
Just a little update on the eagle search. Using the link from Keith of the USS Constitution by ERS Rich - Model Shipways I found a file for a 3D printed eagle. My daughters fiancé has a 3d printer and was able to print out two eagles for me. 3D file eagle picture. Printed eagles. At the scale I needed there isn't a lot of detail but I think they'll work fine. Just need to clean them up a bit. Eagle in temporary position. Needs to be painted and then glued in place. -
Moving right along, I started to assemble the lower paddle wheels. First the paddle wheel spokes were glued into the lower paddle box and then the paddles were fitted in-between. The curved skirt around the edge of the sponson was then attached. The straight portion of the skirt was glued first and then after it dried the ends were wetted and bent to fit to the curved edges. The photo etched front of the upper paddle box was glued in place using ac glue. Then I opted to add the decorative moldings to the inside edges of the paddle boxes. To help keep the lower paddle boxes in position while the sponson support struts were glued in place I screwed a temporary support to the bulkhead support pieces. The lower paddle wheel assemblies were dry fitted in position and the struts were added.
- 144 replies
-
- Harriet Lane
- Model Shipways
-
(and 1 more)
Tagged with:
-

Eagle Emblem
_SalD_ replied to _SalD_'s topic in Discussion for a Ship's Deck Furniture, Guns, boats and other Fittings
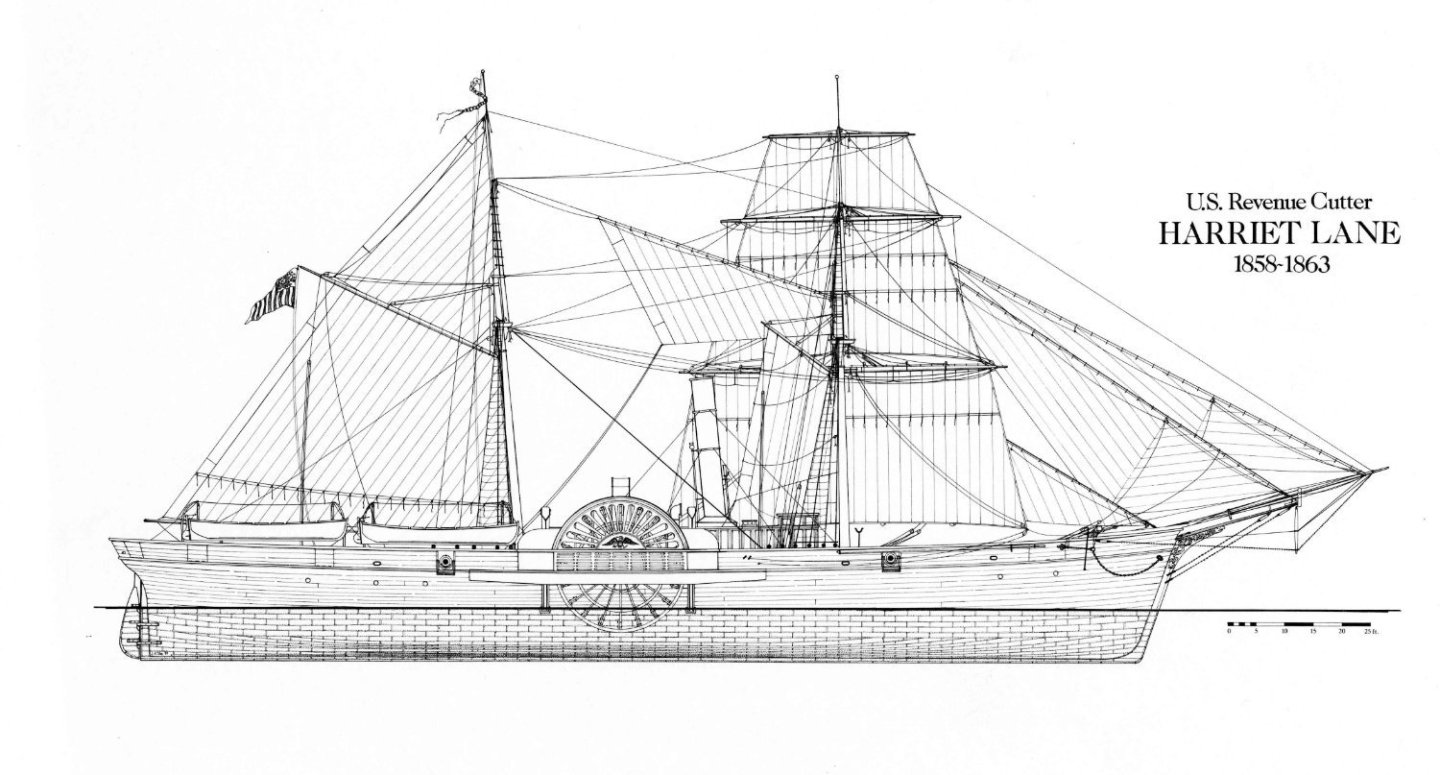
Gregory, my current build is the USCG Harriet Lane. The image is on the paddle wheel cover from the drawing below. Allan, The bottom image may work if I can't find something closer to what I need. I do have AutoCad (2004) so I could use the dxf file. Thanks Keith, I need to check if the size will work for me. Thank you all for helping. -

Eagle Emblem
_SalD_ replied to _SalD_'s topic in Discussion for a Ship's Deck Furniture, Guns, boats and other Fittings
Gregory thanks for the link to the emblems but as Keith mentioned most of the eagles are shown with the wings in the up position. Keith if you happen to recall the supplier let me know. I always forget about 3D printing, I'll have to look into that.
About us
Modelshipworld - Advancing Ship Modeling through Research
SSL Secured
Your security is important for us so this Website is SSL-Secured
NRG Mailing Address
Nautical Research Guild
237 South Lincoln Street
Westmont IL, 60559-1917
Model Ship World ® and the MSW logo are Registered Trademarks, and belong to the Nautical Research Guild (United States Patent and Trademark Office: No. 6,929,264 & No. 6,929,274, registered Dec. 20, 2022)
Helpful Links
About the NRG
If you enjoy building ship models that are historically accurate as well as beautiful, then The Nautical Research Guild (NRG) is just right for you.
The Guild is a non-profit educational organization whose mission is to “Advance Ship Modeling Through Research”. We provide support to our members in their efforts to raise the quality of their model ships.
The Nautical Research Guild has published our world-renowned quarterly magazine, The Nautical Research Journal, since 1955. The pages of the Journal are full of articles by accomplished ship modelers who show you how they create those exquisite details on their models, and by maritime historians who show you the correct details to build. The Journal is available in both print and digital editions. Go to the NRG web site (www.thenrg.org) to download a complimentary digital copy of the Journal. The NRG also publishes plan sets, books and compilations of back issues of the Journal and the former Ships in Scale and Model Ship Builder magazines.


