
MORE HANDBOOKS ARE ON THEIR WAY! We will let you know when they get here.
×


_SalD_
-
Posts
818 -
Joined
-
Last visited
Reputation Activity
-

.thumb.jpeg.fc5d633a7b34428fcf19419a73d56d55.jpeg) _SalD_ got a reaction from EricWilliamMarshall in US Brig Syren by _SalD_ – FINISHED - 3/16" scale
_SalD_ got a reaction from EricWilliamMarshall in US Brig Syren by _SalD_ – FINISHED - 3/16" scale
Richard thanks for the advice, you saved me from breaking some drill bits. I did break one because I guess I wasn't going slow enough, though I thought I was. What I finally did was when lowering the drill bit I would barely touch the surface with the bit until it bit into the copper then very slowly advanced the bit. I found also that even though I scribed a mark at each hole location the bit would still wander somewhat. I used plenty of 3 in 1 oil too. Now I just need to find some tiny nails.
Drilled and all cleaned up Pre-bent the gudgeons to fit the hull.
I would like the thank everyone for all the 'likes' also.
-
 _SalD_ got a reaction from Duanelaker in US Brig Syren by _SalD_ – FINISHED - 3/16" scale
Richard thanks for the advice, you saved me from breaking some drill bits. I did break one because I guess I wasn't going slow enough, though I thought I was. What I finally did was when lowering the drill bit I would barely touch the surface with the bit until it bit into the copper then very slowly advanced the bit. I found also that even though I scribed a mark at each hole location the bit would still wander somewhat. I used plenty of 3 in 1 oil too. Now I just need to find some tiny nails.
Drilled and all cleaned up Pre-bent the gudgeons to fit the hull.
I would like the thank everyone for all the 'likes' also.
-
 _SalD_ got a reaction from canoe21 in US Brig Syren by _SalD_ – FINISHED - 3/16" scale
Richard thanks for the advice, you saved me from breaking some drill bits. I did break one because I guess I wasn't going slow enough, though I thought I was. What I finally did was when lowering the drill bit I would barely touch the surface with the bit until it bit into the copper then very slowly advanced the bit. I found also that even though I scribed a mark at each hole location the bit would still wander somewhat. I used plenty of 3 in 1 oil too. Now I just need to find some tiny nails.
Drilled and all cleaned up Pre-bent the gudgeons to fit the hull.
I would like the thank everyone for all the 'likes' also.
-
 _SalD_ got a reaction from j21896 in US Brig Syren by _SalD_ – FINISHED - 3/16" scale
Richard thanks for the advice, you saved me from breaking some drill bits. I did break one because I guess I wasn't going slow enough, though I thought I was. What I finally did was when lowering the drill bit I would barely touch the surface with the bit until it bit into the copper then very slowly advanced the bit. I found also that even though I scribed a mark at each hole location the bit would still wander somewhat. I used plenty of 3 in 1 oil too. Now I just need to find some tiny nails.
Drilled and all cleaned up Pre-bent the gudgeons to fit the hull.
I would like the thank everyone for all the 'likes' also.
-
 _SalD_ got a reaction from jdbradford in US Brig Syren by _SalD_ – FINISHED - 3/16" scale
Richard thanks for the advice, you saved me from breaking some drill bits. I did break one because I guess I wasn't going slow enough, though I thought I was. What I finally did was when lowering the drill bit I would barely touch the surface with the bit until it bit into the copper then very slowly advanced the bit. I found also that even though I scribed a mark at each hole location the bit would still wander somewhat. I used plenty of 3 in 1 oil too. Now I just need to find some tiny nails.
Drilled and all cleaned up Pre-bent the gudgeons to fit the hull.
I would like the thank everyone for all the 'likes' also.
-
 _SalD_ reacted to rtropp in US Brig Syren by _SalD_ – FINISHED - 3/16" scale
Sal,
Looking great. I like the way you fabricated the pieces. Very sharp.
I found that if I did not have the drill bits with high rpm they would break. At first I was working very slowly but went through too many bits until I got some good advice. High speed, slow feed. Also, use an awl or similar to not only mark the hole but also create a slight indent to guide the drill bit. keep the piece on a hard surface while marking it to make sure it does not bend.
I went through copper like crazy but finally figured it out. I put the copper ring on the gudgeon on the inside of the bend. I had seen some like that but putting it on the outside looks like it makes more sense. Its a good idea to dry fit the pieces to see how much distance there is between the rudder and the sternpost. I think mine had a little too much space between them but did not look too bad.
Right now my ship club has a group build going on. It is the 18th century longboat and to make it interesting I have it at double the size and working it as a scratch build. I plan to switch between it and the Syren as soon as I get the longboat planks cut.
I look forward to following along with your build.
Richard.
-
_SalD_ reacted to augie in USF Confederacy by Augie & Moonbug - FINISHED - Model Shipways - 1:64
The main railings, along with the hances, volutes and beaded moldings have been completed:
With the bulwarks (finally) sealed off, it's almost time to start on the planking of the quarterdeck. But first we'll be adding some hatches, coamings and companionways.
Hope everyone is feeling shipshape and being productive!
-
_SalD_ got a reaction from canoe21 in US Brig Syren by _SalD_ – FINISHED - 3/16" scale
Thanks Thomas, I made quite a pile of scrap trying different methods of cutting the copper before I tried scoring it. I tried tin snips, jewelers saw, hacksaw, dremel cutting blade. This method gave me the cleanest cut and smoothest edge. I also finally found out what bent nose pliers are for. I've had one for years and never knew what it was for.
-
_SalD_ got a reaction from EricWilliamMarshall in US Brig Syren by _SalD_ – FINISHED - 3/16" scale
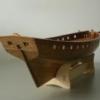
I sanded the rudder to the tapered shape called for in the instructions and then applied the copper plates. The top was painted black prior to placing the plates. The false keel was fastened to the keel and to the rudder. I used the brass nails that were included with the kit to secure the false keel in place, they’re a little oversized but not too many people are going to see them once the ship is finished and mounted.
After reading Richard’s (rtropp) log trying to use the brass strip covered with the copper foil for the pintles and gudgeons I decided to forgo that headache and use copper strips. I discovered however, as Richard did, that it’s impossible to buy copper strips small enough to make them. After some internet searching I came up with a method for making my own strips. I purchased a copper sheet from Hobby Lobby and using a carpenter’s triangle (quick square) to hold the sheet in position I scored the sheet using a utility knife. After running the blade along the copper sheet 4 to 5 times I used a bent nose pliers to break off the strip by gently bending it back and forth along the score line. The strip needs a little sanding along its edges but you can make several strips rather quickly.
For the gudgeons I soldered a 1/16” diameter copper tube to the strip. For the pintles I soldered a piece of 22 gauge wire to the strip. I still need to drill the holes, cut the straps to length and clean them up a bit but I’m waiting for my drill bits to arrive in the mail.
-
_SalD_ got a reaction from canoe21 in US Brig Syren by _SalD_ – FINISHED - 3/16" scale
I sanded the rudder to the tapered shape called for in the instructions and then applied the copper plates. The top was painted black prior to placing the plates. The false keel was fastened to the keel and to the rudder. I used the brass nails that were included with the kit to secure the false keel in place, they’re a little oversized but not too many people are going to see them once the ship is finished and mounted.
After reading Richard’s (rtropp) log trying to use the brass strip covered with the copper foil for the pintles and gudgeons I decided to forgo that headache and use copper strips. I discovered however, as Richard did, that it’s impossible to buy copper strips small enough to make them. After some internet searching I came up with a method for making my own strips. I purchased a copper sheet from Hobby Lobby and using a carpenter’s triangle (quick square) to hold the sheet in position I scored the sheet using a utility knife. After running the blade along the copper sheet 4 to 5 times I used a bent nose pliers to break off the strip by gently bending it back and forth along the score line. The strip needs a little sanding along its edges but you can make several strips rather quickly.
For the gudgeons I soldered a 1/16” diameter copper tube to the strip. For the pintles I soldered a piece of 22 gauge wire to the strip. I still need to drill the holes, cut the straps to length and clean them up a bit but I’m waiting for my drill bits to arrive in the mail.
-
 _SalD_ got a reaction from WackoWolf in US Brig Syren by _SalD_ – FINISHED - 3/16" scale
Thanks Thomas, I made quite a pile of scrap trying different methods of cutting the copper before I tried scoring it. I tried tin snips, jewelers saw, hacksaw, dremel cutting blade. This method gave me the cleanest cut and smoothest edge. I also finally found out what bent nose pliers are for. I've had one for years and never knew what it was for.
-
 _SalD_ got a reaction from Canute in US Brig Syren by _SalD_ – FINISHED - 3/16" scale
Thanks Thomas, I made quite a pile of scrap trying different methods of cutting the copper before I tried scoring it. I tried tin snips, jewelers saw, hacksaw, dremel cutting blade. This method gave me the cleanest cut and smoothest edge. I also finally found out what bent nose pliers are for. I've had one for years and never knew what it was for.
-
 _SalD_ got a reaction from augie in US Brig Syren by _SalD_ – FINISHED - 3/16" scale
Thanks Thomas, I made quite a pile of scrap trying different methods of cutting the copper before I tried scoring it. I tried tin snips, jewelers saw, hacksaw, dremel cutting blade. This method gave me the cleanest cut and smoothest edge. I also finally found out what bent nose pliers are for. I've had one for years and never knew what it was for.
-
_SalD_ reacted to Gahm in US Brig Syren by _SalD_ – FINISHED - 3/16" scale
Those gudgeons and pintles look great! I like your method of making those copper strips!
Thomas
-
_SalD_ reacted to usedtosail in USS Constitution by usedtosail - FINISHED - Model Shipways - scale 1/76
OK George, first thing I did last night was mask off the area behind the last gun ports for the white strip. Each side got a first coat. This was after I removed the masking tape on the starboard side for the pilaster extensions.
Then it was back to those first two cannons for the gun deck. The girl got her first two teeth tonight. I glued the barrels and quoins to the carriages in the little jig I made, then added caps over the trunnions using black paper strips. I glued the guns into place using CA on the pins and white glue under the wheels. I am really happy how well those pins hold the guns in place, as I don't have to worry about them coming loose as I work around them. It is a little tricky getting them in place and flat to the deck, but some gentle bending of the pin gets the job done. Once in place, I drilled holes for the eye bolts on the ends of the breaching ropes and for eye bolts for the side and training tackles. The eye bolts on the breaching ropes were pretty hard to get into the holes, as they are short and wanted to twist in the tweezers. But after many attempts I was able to get them glued in. The other eye bolts were much easier to glue into place as they didn't have any line on them yet. I was then able to hook the tackles to these eye bolts and those on the carriages. This also took some practice as it was hard to keep enough tension on the tackle after the first hook was place while trying to get the second hook in place. Again, after a number of tries it got easier. Once the tackle was tightened the hooks stayed in place nicely. This is the first time I have made these tackles up before installing them and I found it much easier than trying to thread the tackle lines with the blocks already in place. I was also happy to see that I had enough distance between the blocks on the tackles, which was helped by adding the eye bolts towards the center of the area between the gun ports, which is how they are on the real ship today. I was also happy that the angle of the two barrels look about the same. Hopefully this will continue as I put the rest of them in place.
I still have to figure out how I want to finish those tackle lines, but I have some ideas I want to try out first. Two down, 14 yet to go.
-
_SalD_ got a reaction from jdbradford in US Brig Syren by _SalD_ – FINISHED - 3/16" scale
I sanded the rudder to the tapered shape called for in the instructions and then applied the copper plates. The top was painted black prior to placing the plates. The false keel was fastened to the keel and to the rudder. I used the brass nails that were included with the kit to secure the false keel in place, they’re a little oversized but not too many people are going to see them once the ship is finished and mounted.
After reading Richard’s (rtropp) log trying to use the brass strip covered with the copper foil for the pintles and gudgeons I decided to forgo that headache and use copper strips. I discovered however, as Richard did, that it’s impossible to buy copper strips small enough to make them. After some internet searching I came up with a method for making my own strips. I purchased a copper sheet from Hobby Lobby and using a carpenter’s triangle (quick square) to hold the sheet in position I scored the sheet using a utility knife. After running the blade along the copper sheet 4 to 5 times I used a bent nose pliers to break off the strip by gently bending it back and forth along the score line. The strip needs a little sanding along its edges but you can make several strips rather quickly.
For the gudgeons I soldered a 1/16” diameter copper tube to the strip. For the pintles I soldered a piece of 22 gauge wire to the strip. I still need to drill the holes, cut the straps to length and clean them up a bit but I’m waiting for my drill bits to arrive in the mail.
-
 _SalD_ got a reaction from Ol' Pine Tar in US Brig Syren by _SalD_ – FINISHED - 3/16" scale
I sanded the rudder to the tapered shape called for in the instructions and then applied the copper plates. The top was painted black prior to placing the plates. The false keel was fastened to the keel and to the rudder. I used the brass nails that were included with the kit to secure the false keel in place, they’re a little oversized but not too many people are going to see them once the ship is finished and mounted.
After reading Richard’s (rtropp) log trying to use the brass strip covered with the copper foil for the pintles and gudgeons I decided to forgo that headache and use copper strips. I discovered however, as Richard did, that it’s impossible to buy copper strips small enough to make them. After some internet searching I came up with a method for making my own strips. I purchased a copper sheet from Hobby Lobby and using a carpenter’s triangle (quick square) to hold the sheet in position I scored the sheet using a utility knife. After running the blade along the copper sheet 4 to 5 times I used a bent nose pliers to break off the strip by gently bending it back and forth along the score line. The strip needs a little sanding along its edges but you can make several strips rather quickly.
For the gudgeons I soldered a 1/16” diameter copper tube to the strip. For the pintles I soldered a piece of 22 gauge wire to the strip. I still need to drill the holes, cut the straps to length and clean them up a bit but I’m waiting for my drill bits to arrive in the mail.
-
 _SalD_ got a reaction from rtropp in US Brig Syren by _SalD_ – FINISHED - 3/16" scale
I sanded the rudder to the tapered shape called for in the instructions and then applied the copper plates. The top was painted black prior to placing the plates. The false keel was fastened to the keel and to the rudder. I used the brass nails that were included with the kit to secure the false keel in place, they’re a little oversized but not too many people are going to see them once the ship is finished and mounted.
After reading Richard’s (rtropp) log trying to use the brass strip covered with the copper foil for the pintles and gudgeons I decided to forgo that headache and use copper strips. I discovered however, as Richard did, that it’s impossible to buy copper strips small enough to make them. After some internet searching I came up with a method for making my own strips. I purchased a copper sheet from Hobby Lobby and using a carpenter’s triangle (quick square) to hold the sheet in position I scored the sheet using a utility knife. After running the blade along the copper sheet 4 to 5 times I used a bent nose pliers to break off the strip by gently bending it back and forth along the score line. The strip needs a little sanding along its edges but you can make several strips rather quickly.
For the gudgeons I soldered a 1/16” diameter copper tube to the strip. For the pintles I soldered a piece of 22 gauge wire to the strip. I still need to drill the holes, cut the straps to length and clean them up a bit but I’m waiting for my drill bits to arrive in the mail.
-
 _SalD_ got a reaction from GuntherMT in US Brig Syren by _SalD_ – FINISHED - 3/16" scale
I sanded the rudder to the tapered shape called for in the instructions and then applied the copper plates. The top was painted black prior to placing the plates. The false keel was fastened to the keel and to the rudder. I used the brass nails that were included with the kit to secure the false keel in place, they’re a little oversized but not too many people are going to see them once the ship is finished and mounted.
After reading Richard’s (rtropp) log trying to use the brass strip covered with the copper foil for the pintles and gudgeons I decided to forgo that headache and use copper strips. I discovered however, as Richard did, that it’s impossible to buy copper strips small enough to make them. After some internet searching I came up with a method for making my own strips. I purchased a copper sheet from Hobby Lobby and using a carpenter’s triangle (quick square) to hold the sheet in position I scored the sheet using a utility knife. After running the blade along the copper sheet 4 to 5 times I used a bent nose pliers to break off the strip by gently bending it back and forth along the score line. The strip needs a little sanding along its edges but you can make several strips rather quickly.
For the gudgeons I soldered a 1/16” diameter copper tube to the strip. For the pintles I soldered a piece of 22 gauge wire to the strip. I still need to drill the holes, cut the straps to length and clean them up a bit but I’m waiting for my drill bits to arrive in the mail.
-
 _SalD_ got a reaction from Gahm in US Brig Syren by _SalD_ – FINISHED - 3/16" scale
I sanded the rudder to the tapered shape called for in the instructions and then applied the copper plates. The top was painted black prior to placing the plates. The false keel was fastened to the keel and to the rudder. I used the brass nails that were included with the kit to secure the false keel in place, they’re a little oversized but not too many people are going to see them once the ship is finished and mounted.
After reading Richard’s (rtropp) log trying to use the brass strip covered with the copper foil for the pintles and gudgeons I decided to forgo that headache and use copper strips. I discovered however, as Richard did, that it’s impossible to buy copper strips small enough to make them. After some internet searching I came up with a method for making my own strips. I purchased a copper sheet from Hobby Lobby and using a carpenter’s triangle (quick square) to hold the sheet in position I scored the sheet using a utility knife. After running the blade along the copper sheet 4 to 5 times I used a bent nose pliers to break off the strip by gently bending it back and forth along the score line. The strip needs a little sanding along its edges but you can make several strips rather quickly.
For the gudgeons I soldered a 1/16” diameter copper tube to the strip. For the pintles I soldered a piece of 22 gauge wire to the strip. I still need to drill the holes, cut the straps to length and clean them up a bit but I’m waiting for my drill bits to arrive in the mail.
-
_SalD_ got a reaction from WackoWolf in US Brig Syren by _SalD_ – FINISHED - 3/16" scale
I sanded the rudder to the tapered shape called for in the instructions and then applied the copper plates. The top was painted black prior to placing the plates. The false keel was fastened to the keel and to the rudder. I used the brass nails that were included with the kit to secure the false keel in place, they’re a little oversized but not too many people are going to see them once the ship is finished and mounted.
After reading Richard’s (rtropp) log trying to use the brass strip covered with the copper foil for the pintles and gudgeons I decided to forgo that headache and use copper strips. I discovered however, as Richard did, that it’s impossible to buy copper strips small enough to make them. After some internet searching I came up with a method for making my own strips. I purchased a copper sheet from Hobby Lobby and using a carpenter’s triangle (quick square) to hold the sheet in position I scored the sheet using a utility knife. After running the blade along the copper sheet 4 to 5 times I used a bent nose pliers to break off the strip by gently bending it back and forth along the score line. The strip needs a little sanding along its edges but you can make several strips rather quickly.
For the gudgeons I soldered a 1/16” diameter copper tube to the strip. For the pintles I soldered a piece of 22 gauge wire to the strip. I still need to drill the holes, cut the straps to length and clean them up a bit but I’m waiting for my drill bits to arrive in the mail.
-
_SalD_ got a reaction from augie in US Brig Syren by _SalD_ – FINISHED - 3/16" scale
I sanded the rudder to the tapered shape called for in the instructions and then applied the copper plates. The top was painted black prior to placing the plates. The false keel was fastened to the keel and to the rudder. I used the brass nails that were included with the kit to secure the false keel in place, they’re a little oversized but not too many people are going to see them once the ship is finished and mounted.
After reading Richard’s (rtropp) log trying to use the brass strip covered with the copper foil for the pintles and gudgeons I decided to forgo that headache and use copper strips. I discovered however, as Richard did, that it’s impossible to buy copper strips small enough to make them. After some internet searching I came up with a method for making my own strips. I purchased a copper sheet from Hobby Lobby and using a carpenter’s triangle (quick square) to hold the sheet in position I scored the sheet using a utility knife. After running the blade along the copper sheet 4 to 5 times I used a bent nose pliers to break off the strip by gently bending it back and forth along the score line. The strip needs a little sanding along its edges but you can make several strips rather quickly.
For the gudgeons I soldered a 1/16” diameter copper tube to the strip. For the pintles I soldered a piece of 22 gauge wire to the strip. I still need to drill the holes, cut the straps to length and clean them up a bit but I’m waiting for my drill bits to arrive in the mail.
-
 _SalD_ got a reaction from usedtosail in US Brig Syren by _SalD_ – FINISHED - 3/16" scale
I sanded the rudder to the tapered shape called for in the instructions and then applied the copper plates. The top was painted black prior to placing the plates. The false keel was fastened to the keel and to the rudder. I used the brass nails that were included with the kit to secure the false keel in place, they’re a little oversized but not too many people are going to see them once the ship is finished and mounted.
After reading Richard’s (rtropp) log trying to use the brass strip covered with the copper foil for the pintles and gudgeons I decided to forgo that headache and use copper strips. I discovered however, as Richard did, that it’s impossible to buy copper strips small enough to make them. After some internet searching I came up with a method for making my own strips. I purchased a copper sheet from Hobby Lobby and using a carpenter’s triangle (quick square) to hold the sheet in position I scored the sheet using a utility knife. After running the blade along the copper sheet 4 to 5 times I used a bent nose pliers to break off the strip by gently bending it back and forth along the score line. The strip needs a little sanding along its edges but you can make several strips rather quickly.
For the gudgeons I soldered a 1/16” diameter copper tube to the strip. For the pintles I soldered a piece of 22 gauge wire to the strip. I still need to drill the holes, cut the straps to length and clean them up a bit but I’m waiting for my drill bits to arrive in the mail.
-
_SalD_ got a reaction from Canute in US Brig Syren by _SalD_ – FINISHED - 3/16" scale
I sanded the rudder to the tapered shape called for in the instructions and then applied the copper plates. The top was painted black prior to placing the plates. The false keel was fastened to the keel and to the rudder. I used the brass nails that were included with the kit to secure the false keel in place, they’re a little oversized but not too many people are going to see them once the ship is finished and mounted.
After reading Richard’s (rtropp) log trying to use the brass strip covered with the copper foil for the pintles and gudgeons I decided to forgo that headache and use copper strips. I discovered however, as Richard did, that it’s impossible to buy copper strips small enough to make them. After some internet searching I came up with a method for making my own strips. I purchased a copper sheet from Hobby Lobby and using a carpenter’s triangle (quick square) to hold the sheet in position I scored the sheet using a utility knife. After running the blade along the copper sheet 4 to 5 times I used a bent nose pliers to break off the strip by gently bending it back and forth along the score line. The strip needs a little sanding along its edges but you can make several strips rather quickly.
For the gudgeons I soldered a 1/16” diameter copper tube to the strip. For the pintles I soldered a piece of 22 gauge wire to the strip. I still need to drill the holes, cut the straps to length and clean them up a bit but I’m waiting for my drill bits to arrive in the mail.
-
 _SalD_ got a reaction from CaptMorgan in US Brig Syren by _SalD_ – FINISHED - 3/16" scale
I sanded the rudder to the tapered shape called for in the instructions and then applied the copper plates. The top was painted black prior to placing the plates. The false keel was fastened to the keel and to the rudder. I used the brass nails that were included with the kit to secure the false keel in place, they’re a little oversized but not too many people are going to see them once the ship is finished and mounted.
After reading Richard’s (rtropp) log trying to use the brass strip covered with the copper foil for the pintles and gudgeons I decided to forgo that headache and use copper strips. I discovered however, as Richard did, that it’s impossible to buy copper strips small enough to make them. After some internet searching I came up with a method for making my own strips. I purchased a copper sheet from Hobby Lobby and using a carpenter’s triangle (quick square) to hold the sheet in position I scored the sheet using a utility knife. After running the blade along the copper sheet 4 to 5 times I used a bent nose pliers to break off the strip by gently bending it back and forth along the score line. The strip needs a little sanding along its edges but you can make several strips rather quickly.
For the gudgeons I soldered a 1/16” diameter copper tube to the strip. For the pintles I soldered a piece of 22 gauge wire to the strip. I still need to drill the holes, cut the straps to length and clean them up a bit but I’m waiting for my drill bits to arrive in the mail.