HOLIDAY DONATION DRIVE - SUPPORT MSW - DO YOUR PART TO KEEP THIS GREAT FORUM GOING! (Only 51 donations so far out of 49,000 members - C'mon guys!)
×


mtdoramike
-
Posts
2,094 -
Joined
-
Last visited
Content Type
Profiles
Forums
Gallery
Events
Everything posted by mtdoramike
-
Well. The finish of this build was supposed to have started in 2013 So hows the finishing coming.
-
Ok, it's summer time, any progress on this model?? Mike
-
Mark, there are a few builds on the MSW on the Constructo Victory. It makes into a nice Victory with quite a bit of modifications. I'm really itching to build the Constructo Prince as well. It looks like a fun project for sure, but like I have found with Constructo, accuracy isn't their main concern. So when it comes to Constructo, I build them mainly for the fun of it and the beauty of the naturally finished wood. I was also looking quite strongly at the Artesania Latina Santa Ana, but after really studying the lines of this model, I came to the realization that all Latina did was to use the HMS Victory kit and made a few mods to the Vic kit and came out with the Santa Ana. mike
-
Hi Mark, I also built the Constructo Bounty as well as their Pandora, Cutty Sark, Mayflower and San Mateo. All were fun kits to build. But not really accurate, but close enough for government work. One thing I would have to say about Constructo, is they supply some of the nicest wood in their kits or at least they used to. Their kits beg to be naturally finished, which is the way I built all of them. Good luck on the Couronne build, it's a nice model. mike
-
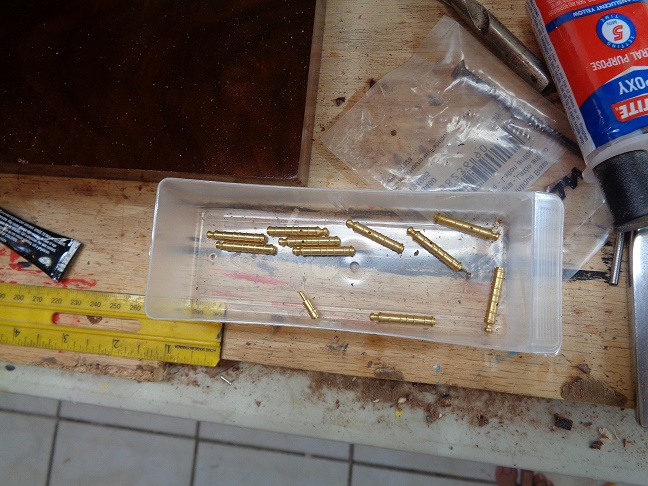
I would also like to mention here that the cannon carriages provided are not wood, they are preformed metal, which I do not care for and might look to replace them with wood carriages if I can find any suitable replacements. If not I will use what is supplied. mike
-
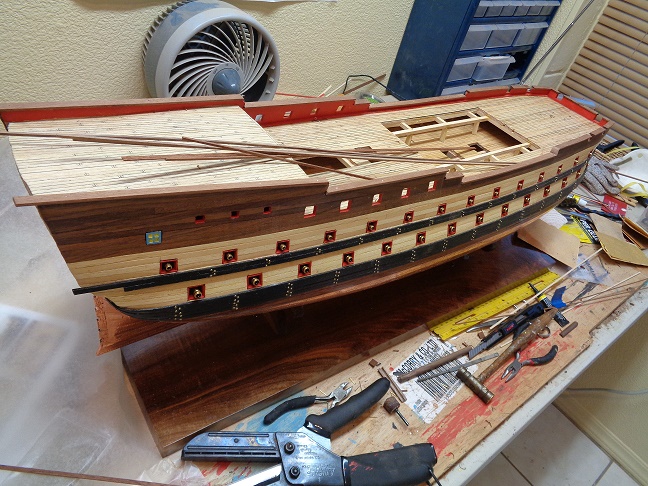
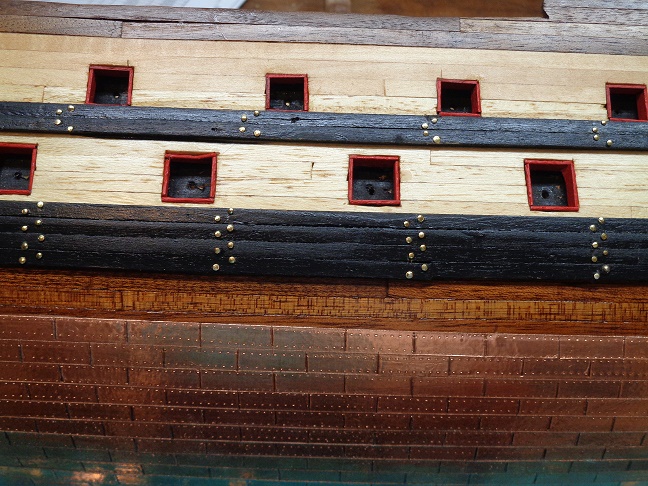
OK, I got down to the nut and bolt of why I was shorted like 7 of the small caliber dummy cannon that were to be placed inside the upper gun deck. I contacted OcCre and was told that this kit when first manufactured was supposed to have dummy cannon on bother lower and upper decks, but they had received requests for the ability to actually use rigged cannon and carriages on the upper deck mid-ship where the center deck has been cut out. This is why there is a lot of full sized cannon and well as ample enough carriages provided to do this if you want. But the instructions don't give you this option, it shows dummies to be installed on both upper and lower decks. They offered to send me the missing dummy cannon at no charge even though I explained how I bought this kit second hand. They said it was most likely an older kit, which I have to agree. But either way, I like the look of the dummies and it saves a bit of time having to mount and rig the cannon and carriages in that area so no harm done. I just want to make sure that if anyone who see's this build and buys this kit and wants to build it that there is two ways of doing it and it seems the manufacture is leaning more towards the 8 rigged and installed cannon mid-ship. mike
-
Francis, how many ship model kits have you built? An experienced modeler who would have built half of this kit or model would have finished it no matter how poor the contents were. Like I said in my previous post, no matter how good or bad a kit is really shouldn't make too much of a difference to an experienced modeler, who should have come across a number of kits great or poor before even attempting a model such as the Victory by which ever kit manufacture. They surely wouldn't have gotten it half built only to give it away due to poor materials to become someone else's problem, they would have replaced the poor quality components with better aftermarket components or scratch build your own materials. I'm not the best modeler in the world nor due I claim to be, but I could hold my own against most and up to now I have built about 30 ship models for myself as well as to sell and on commission basis. During this time I have come across most if not all of the major kit manufactures and I would admit that all of them have some issues. But all in all I have never come across a BAD kit from any manufacture no matter how cheap or expensive the kit cost. I have even built kits that were furnished to me that was found in dark wet basements from the 40'-60's and felt that for the time period they were good kits. But I also understand that a kit no matter who it's from is only a starting point and it is up to the modeler to take it and make as good a representation out of the subject chosen as possible. mike
-
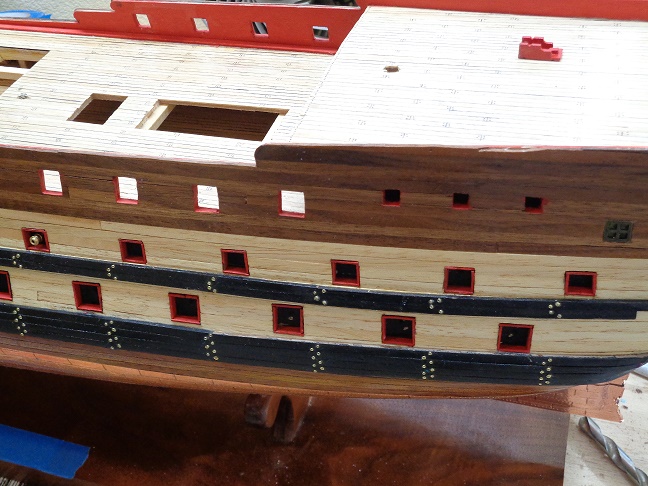
Well, well, well, I should have checked this BEFORE I started installing the guns, but you know the old saying "would a, should a, could a, hind sight is 20/20. But once I started installing the upper cannon on the opposite side of the Monte, I quickly although not quickly enough realized that OcCre failed to supply enough of the smaller dummy cannon. I'm missing like 7 dummy cannon. But in it's place, I have an over abundance of standard length cannon of the same caliber as the small dummies. So what to do, what to do? I decided to back up and punt and made a MUCH larger hole inside of the cannon port so that I could slip the length of the full sized cannon into the gun port and then using 5 minute epoxy and bracing around the cannon as to make sure it points in the right direction and doesn't move while it dries. With this option, no one really knows about this punt except for me, wellllll and now you. The only difficult this about this is, you have to make sure and keep the same amount of gun barrel protruding out of the cannon port as you look down the side and make any adjustments BEFORE the epoxy dries.
-
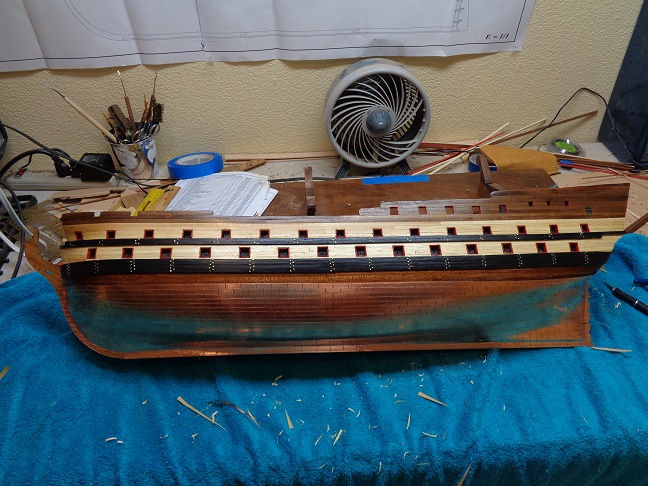
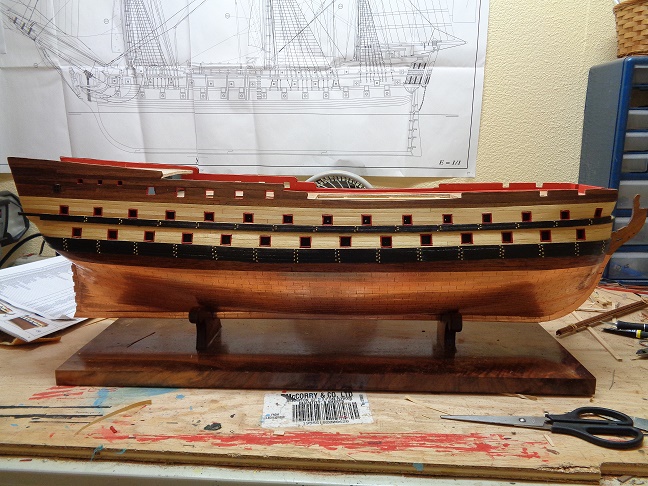
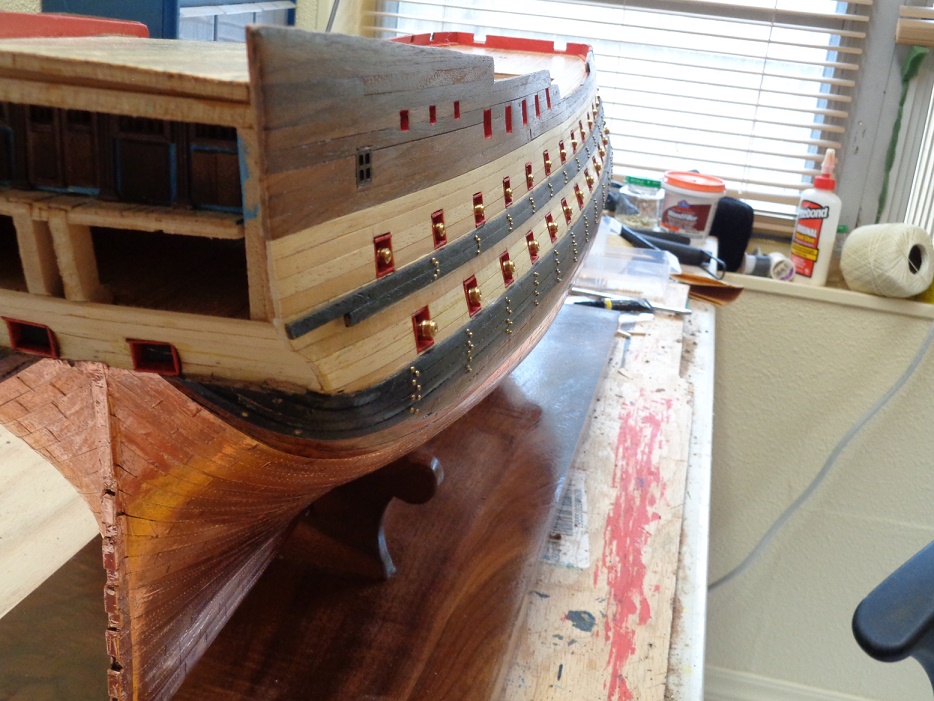
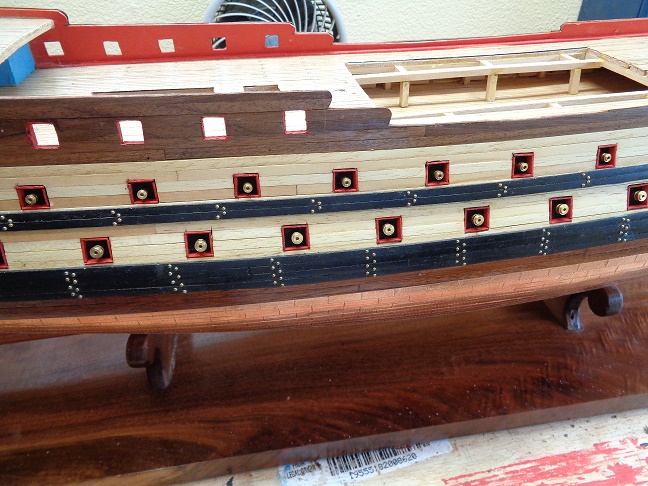
The Monte is now actually mounted to the display board and not just sitting in it's cradle. I started installing the dummy cannon upper and lowers. You can see how much they protrude out of the gun ports, which is about 1/8th of an inch. They would have stuck out a bit further, but this is the result after I elected to inset the cannon mounts a little bit further into the hull. I really like this look a lot better than the suggested option that was instructed by the kit instructions. But I must say, I was a bit concerned for a while not knowing what the final result was going to be before hand. But I like the result better. mike
-
Thanks Don, but what I always like to point out is that with a cheap camera and the right amount of lighting you can make a souse ear look like a silk purse. hahahahahahahahaha mike
-
I have had a couple of great offers, but I stood fast and declined. I had a couple of offers to buy the SOS Sovereign of the Seas kits and although it was hard to do, I said no thanks. But it was a tough call. Then I had a fellow that wanted a Dos Amigos plank on frame with the side cut out to show the slaves inside the hold of the ship as a commission work and I turned it down as well and referred them else where. Fortunately or unfortunately, I intend on this being the last model I build. mike
-
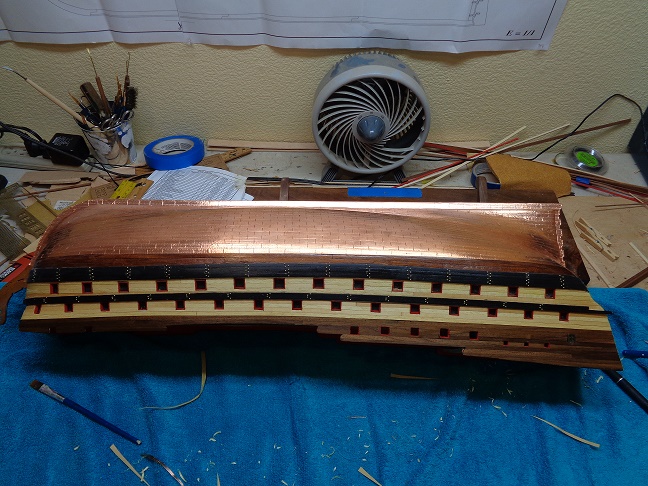
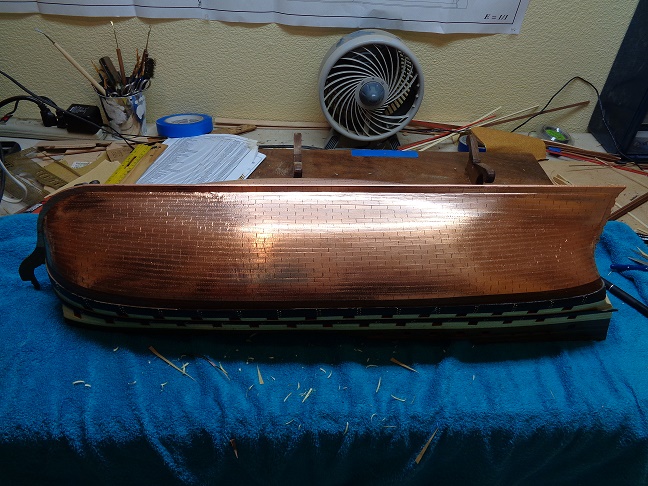
I make the rivet marks before placing the tape onto the hull. But once the tape is applied, I go back and measure out the first row with a marked ledger board at what ever the length is for each plate, which in this instance is 3/4 of and inch. Then I mark it out and then score it with the xacto knife. Then I just more or less eye ball the rest of the plates offsetting each row from the last. But you could just as easily make the rivet marks once the tape is applied. But to me, I find it easier to just set down, and pull tape and mark it down the length with the rivet wheel I use. I can mark a third of the roll of tape in about 15 minutes, then roll it back onto the spool of tape, which usually enough to work with for one sitting. mike
-
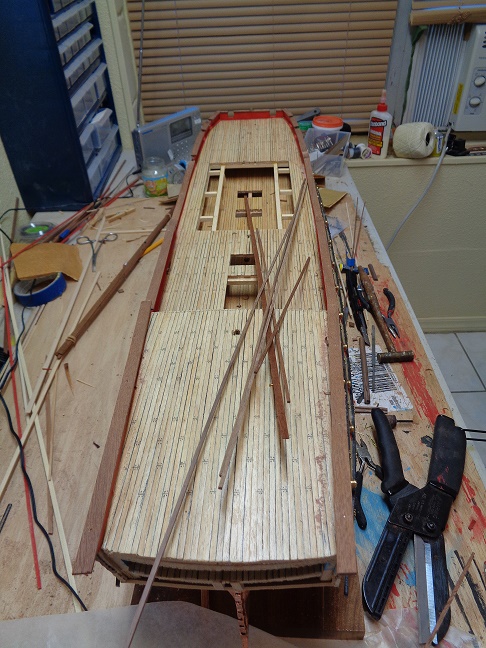
Thanks Tom, the next thing is to install the bulwark caps/railings and the dummy cannon. mike
-
Its a blast planking over a solid hull kit, i have done a few and the only way i would do a solid hull would be to plank over it. Now if there were a dos amigos slaver kit in the bunch, that would be just my game. I know Marine models did one. Mike
-
Yep, they should face the same direction as the belaying lines run. Mike
-
Good luck if that is what you are intending, take a look on ebay, old Model Shipways kits and Marine Model kits go for next to nothing if they sell at all. On the classifieds here they wouldn't sell unless it's a really rare kit. Most of those kits you are referring too are more than likely solid hull kits, which kind of went out of fashion once plank on frame came onto the market. I for one love these old kits and wish I had time to build every one of them, but I don't. I would offer him $100.00 for the lot and he should be glad to get that offer unless the foreign kits are newer kits that have a pretty high retail figure. It's a shame people take these fine kits off the market not intending to build them at all but just to collect them like they think there will be a chance they will increase in value, BUT THEY NEVER DO, for the most part such as in this case, the kits are so outdated that you can't give them away. But if your intent is to buy them and resell them for your club, save your money and see if they will donate them to your club, if they say no, just wait for a bit, they will be back when they realize they are sitting on a pink elephant. Mike
-
OK kidding aside, I don't use bolts on the yards UNLESS IT'S CALLED FOR, I usually tie them directly to the yard. If there is no space shown between the yard and the block, I just tie them on with a small knot, which usually not really visible. But if there is a space shown between the yard and the block, I will wrap it, tie it off with a single knot and then seize it or wrap it around the line between the block and yard. There are books available to show the the proper way of rigging a yard or the ship, which I would suggest getting one if you are a purist and want to do it exactly by the book. mike
-
get some string and tie a knot. mike
-
So YOU are the scoundrel that has been sniping all the Mamoli kits on ebay. mike
-
Well we are back from the Islands, but my Mother In law still was recouping from Pneumonia when we left. But got a call that she might not be doing as well as we had hoped so might have to fly back down within the next few days. mike
-
Sorry for no updates in a while, im down in the islands due to family emergency and will not be back for a few more weeks. Mike