72Nova
-
Posts
675 -
Joined
-
Last visited
Content Type
Profiles
Forums
Gallery
Events
Everything posted by 72Nova
-
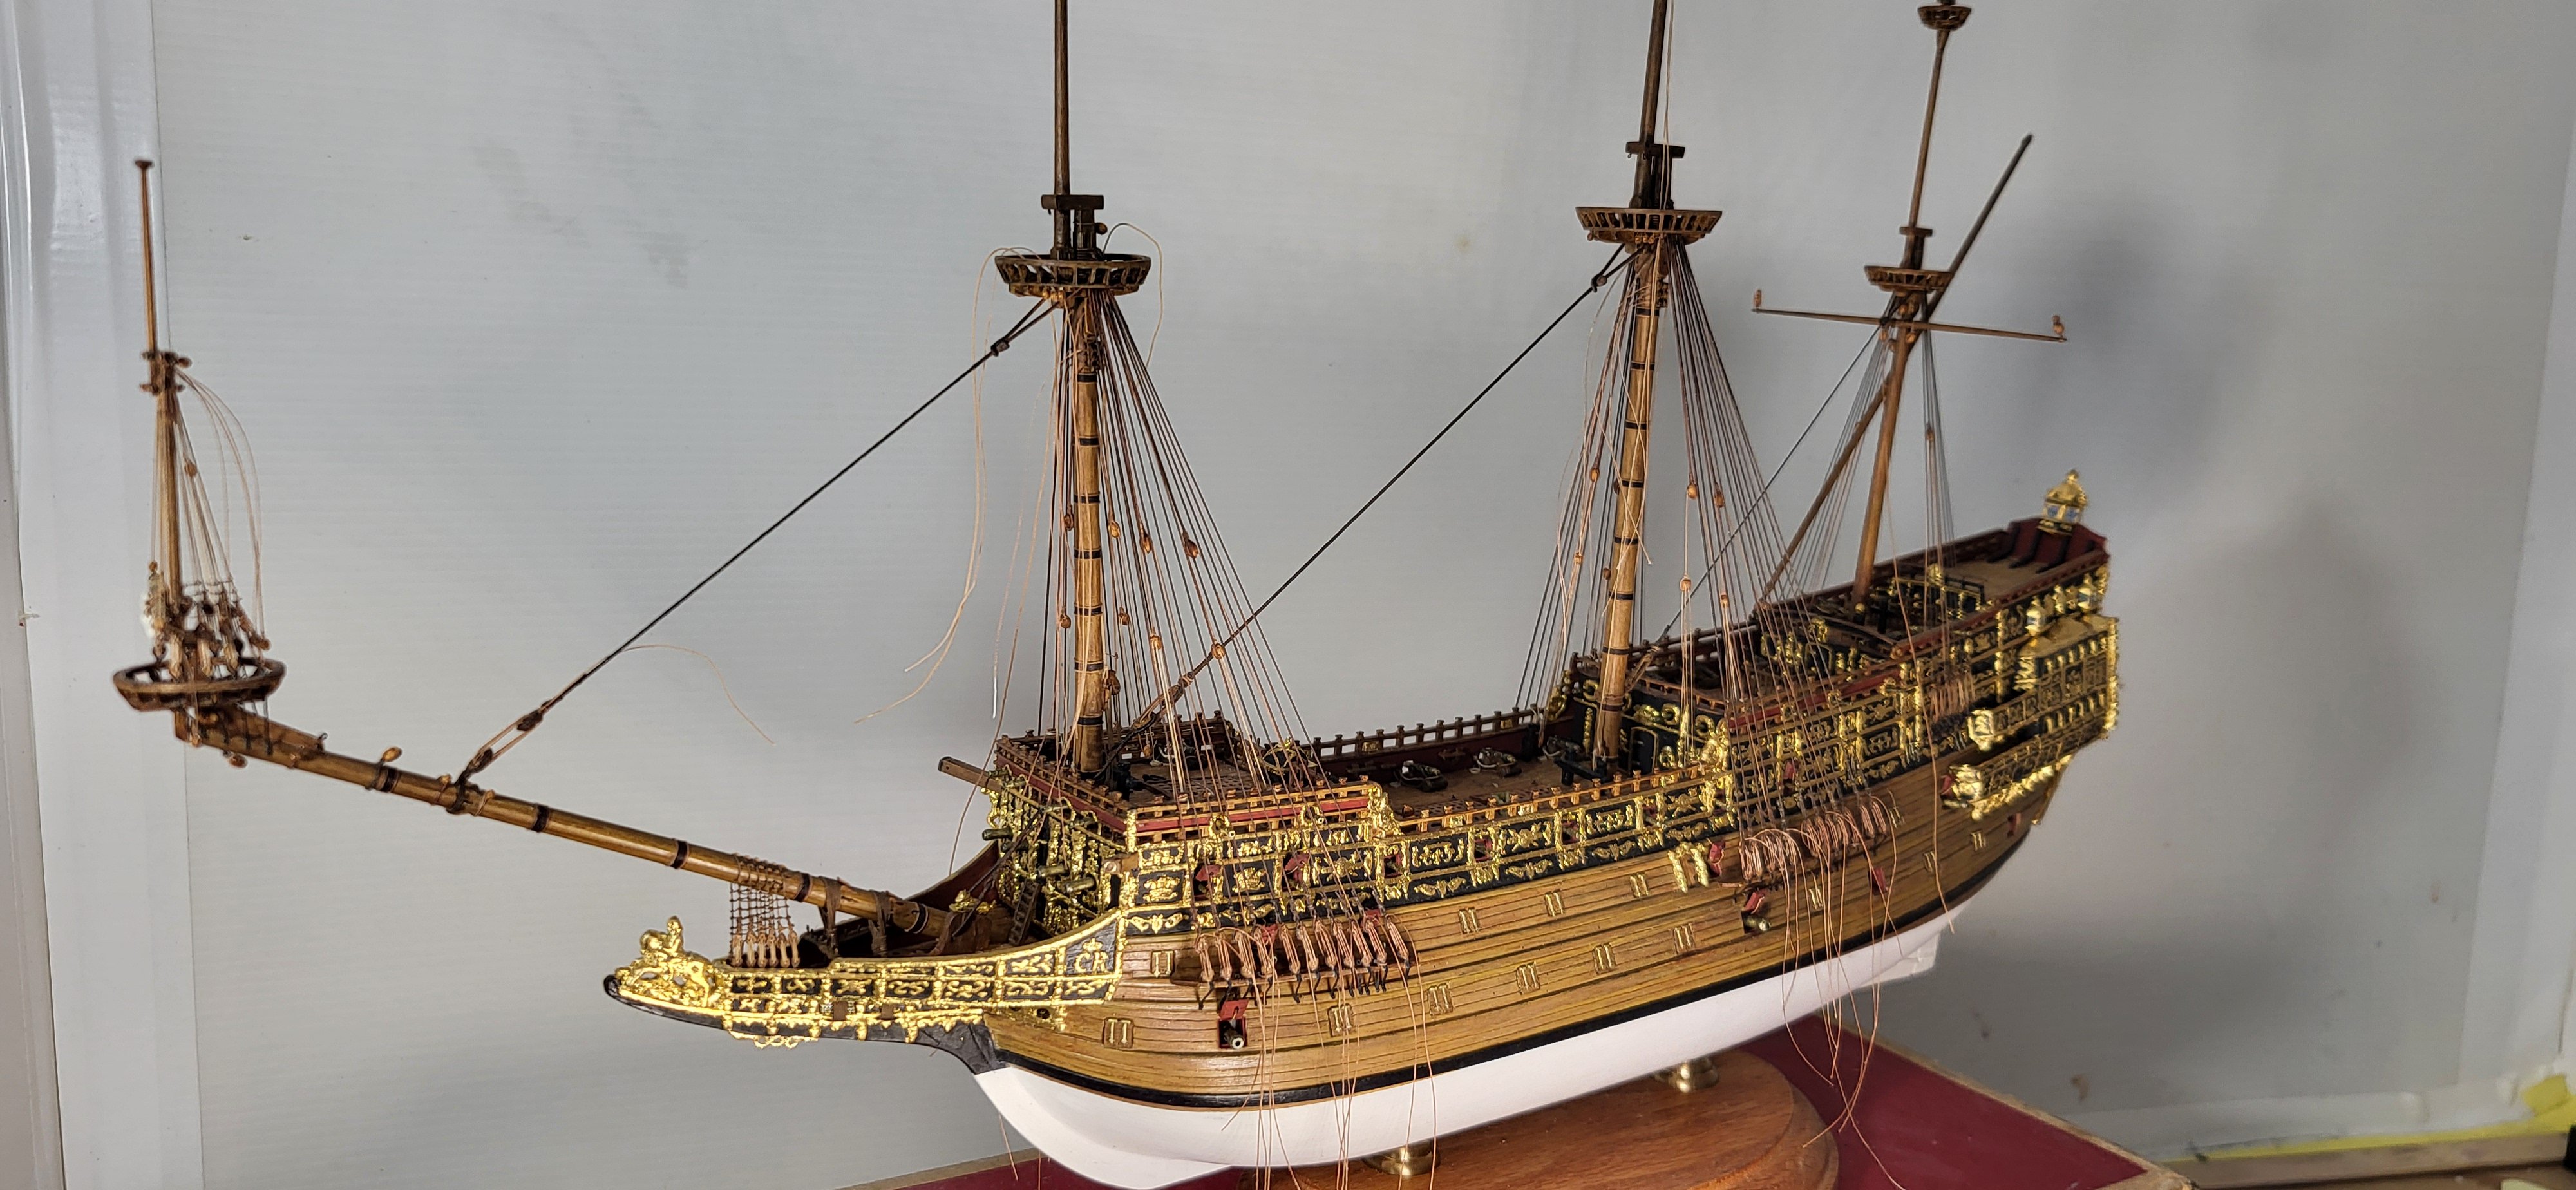
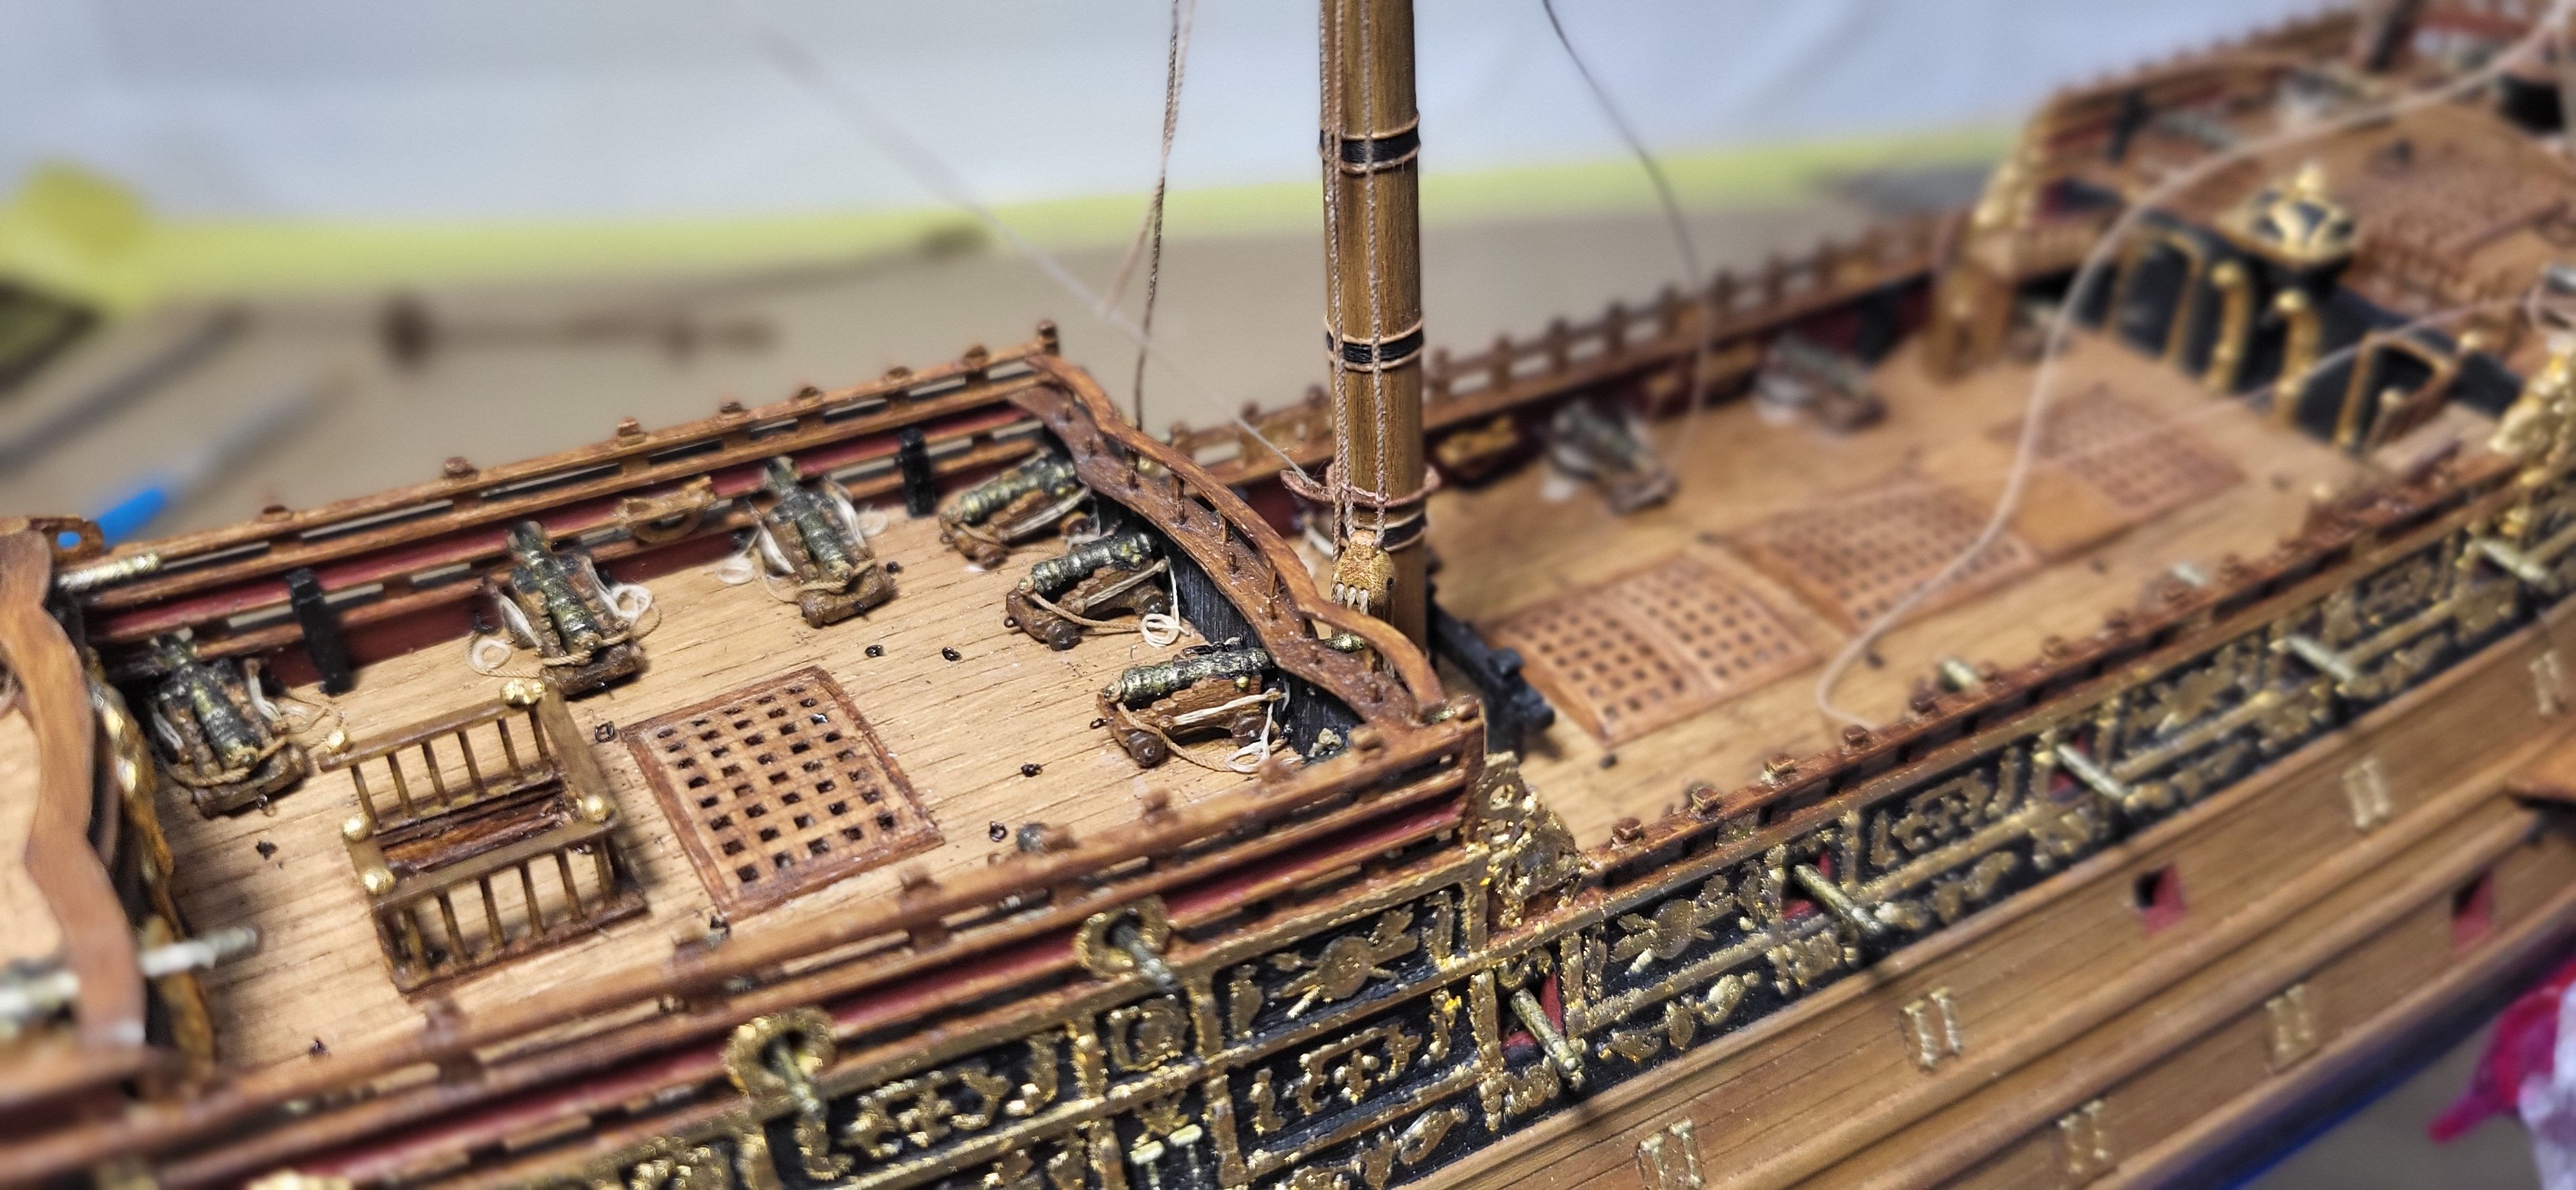
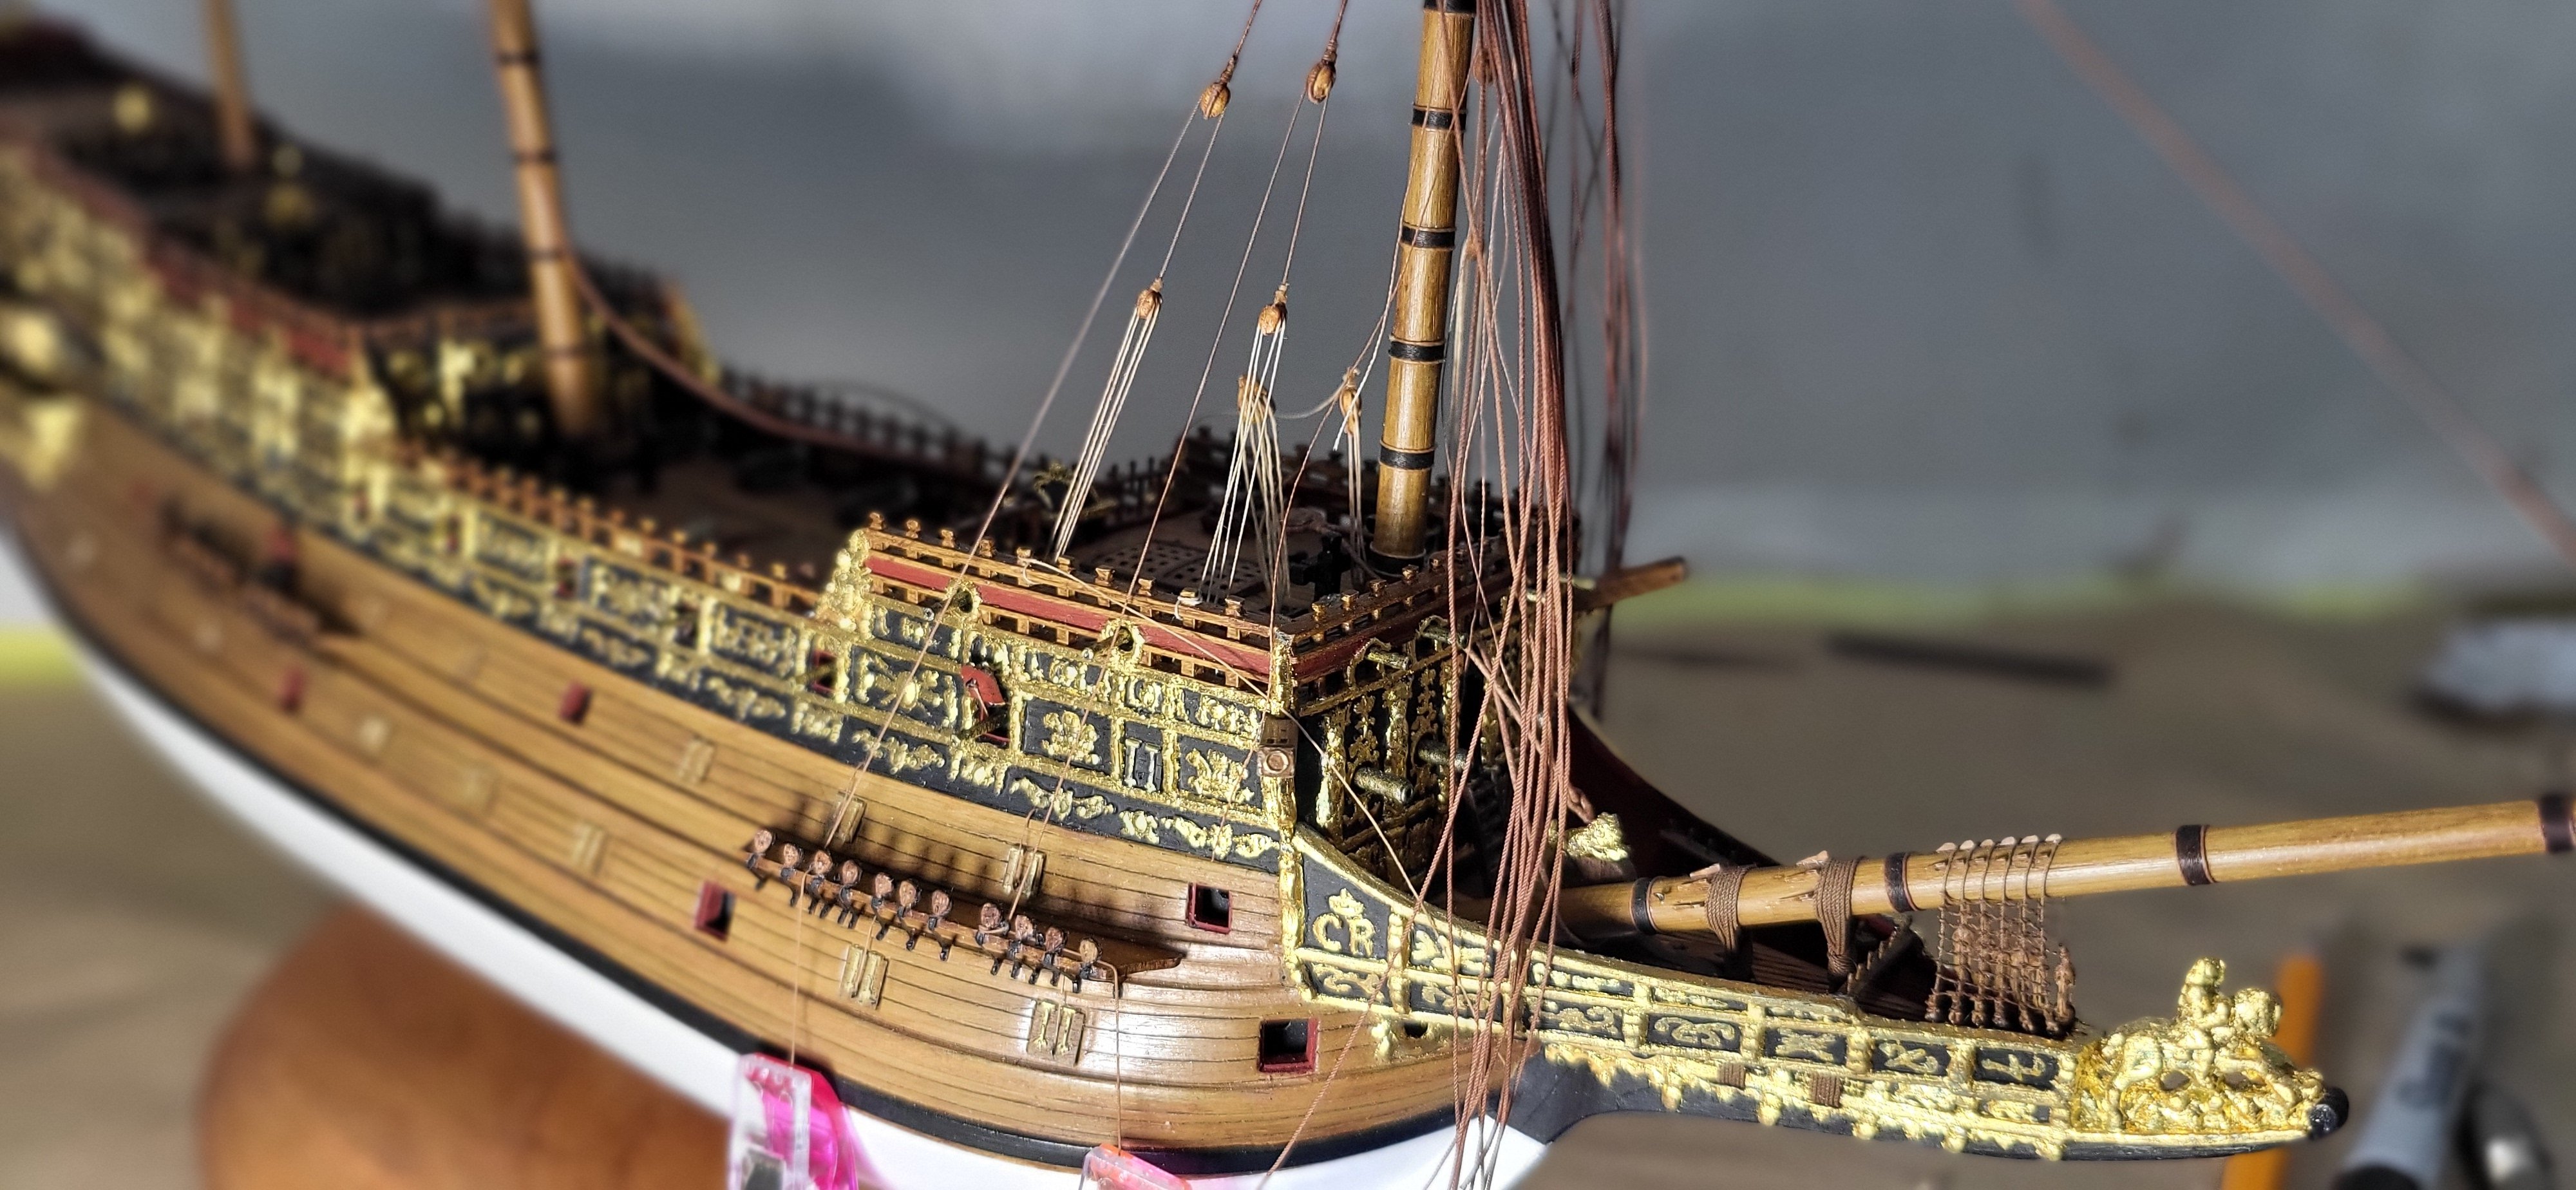
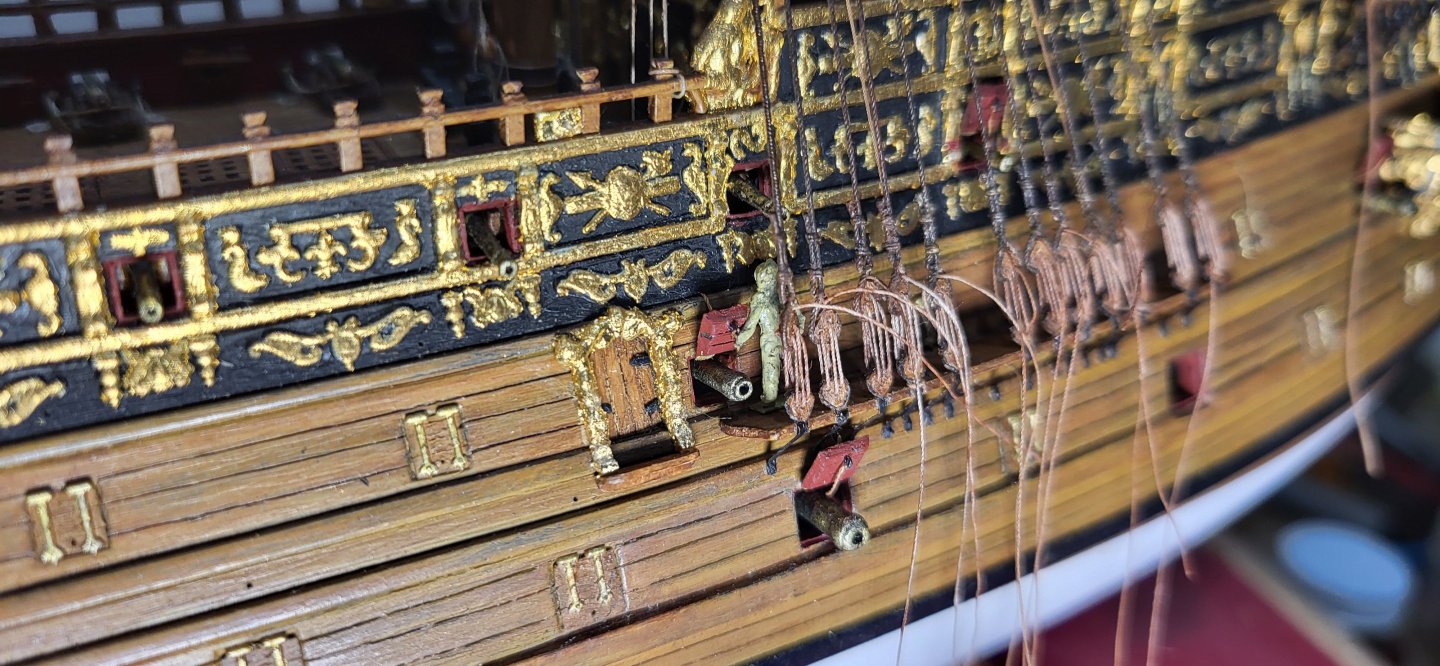
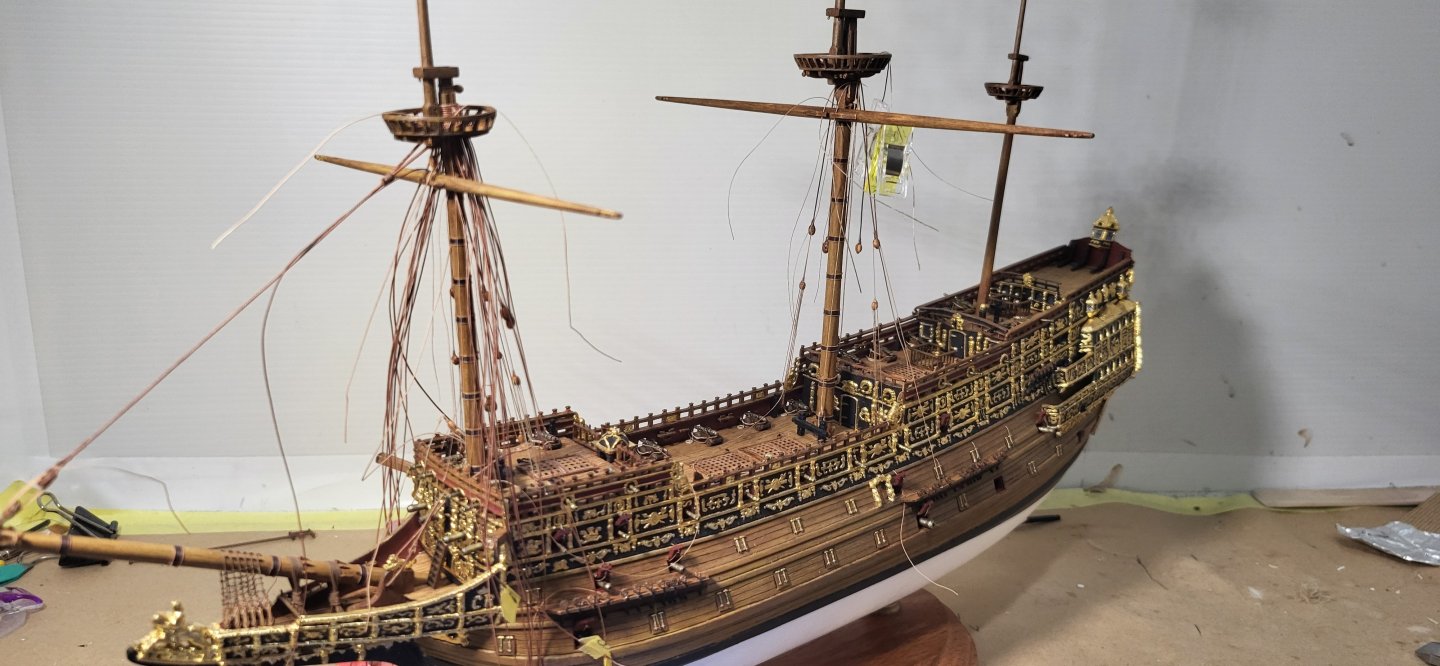
 The lower shrouds are completed, and the lanyards are rigged but not yet tied, using sculpey clay I made up the tack fairlead, finished up the entry port by adding a step/landing. Thanks for looking. Michael D.
- 324 replies
-
- 6
-

-

-
- Sovereign of the Seas
- Airfix
- (and 1 more)
-
Looks like she's ready to set sail into the horizon, you did a very nice job!. I have the same kit in my stash that I'll get to one of these days. Michael D.
- 46 replies
-
- 7
-

-
-
- Golden Hind
- airfix
- (and 2 more)
-
I finally completed the lower stays, threading the 5-hole dead eyes for the Mizen stay was quite tricky even with the shrouds out of the way but I was able to get it eventually in the tight space. The Main and Mizen lower shrouds are also completed with the fore shrouds still left to complete, then on to the topmasts. Thanks for taking the time to stop by and look, very much appreciated as always. Michael D.


- 324 replies
-
- 9
-
-
-
- Sovereign of the Seas
- Airfix
- (and 1 more)
-
About halfway done with the Mizen shrouds, using .25mm shroud laid rope for these along with the pendants, for the tackle I'm using 2mm single blocks with the lower one hooked to an eye bolt on the side of the hull, kind of hard to see given the scale and the other end is led trough an eye bolt on the deck and tied to the railing using 50wt thread, lanyards are 100wt thread and the dead eyes measure out at around 1.75mm, things are pretty tight in this area but looking acceptable and thanks for looking, Cheers! Michael D.

- 324 replies
-
- 9
-
-
-
- Sovereign of the Seas
- Airfix
- (and 1 more)
-
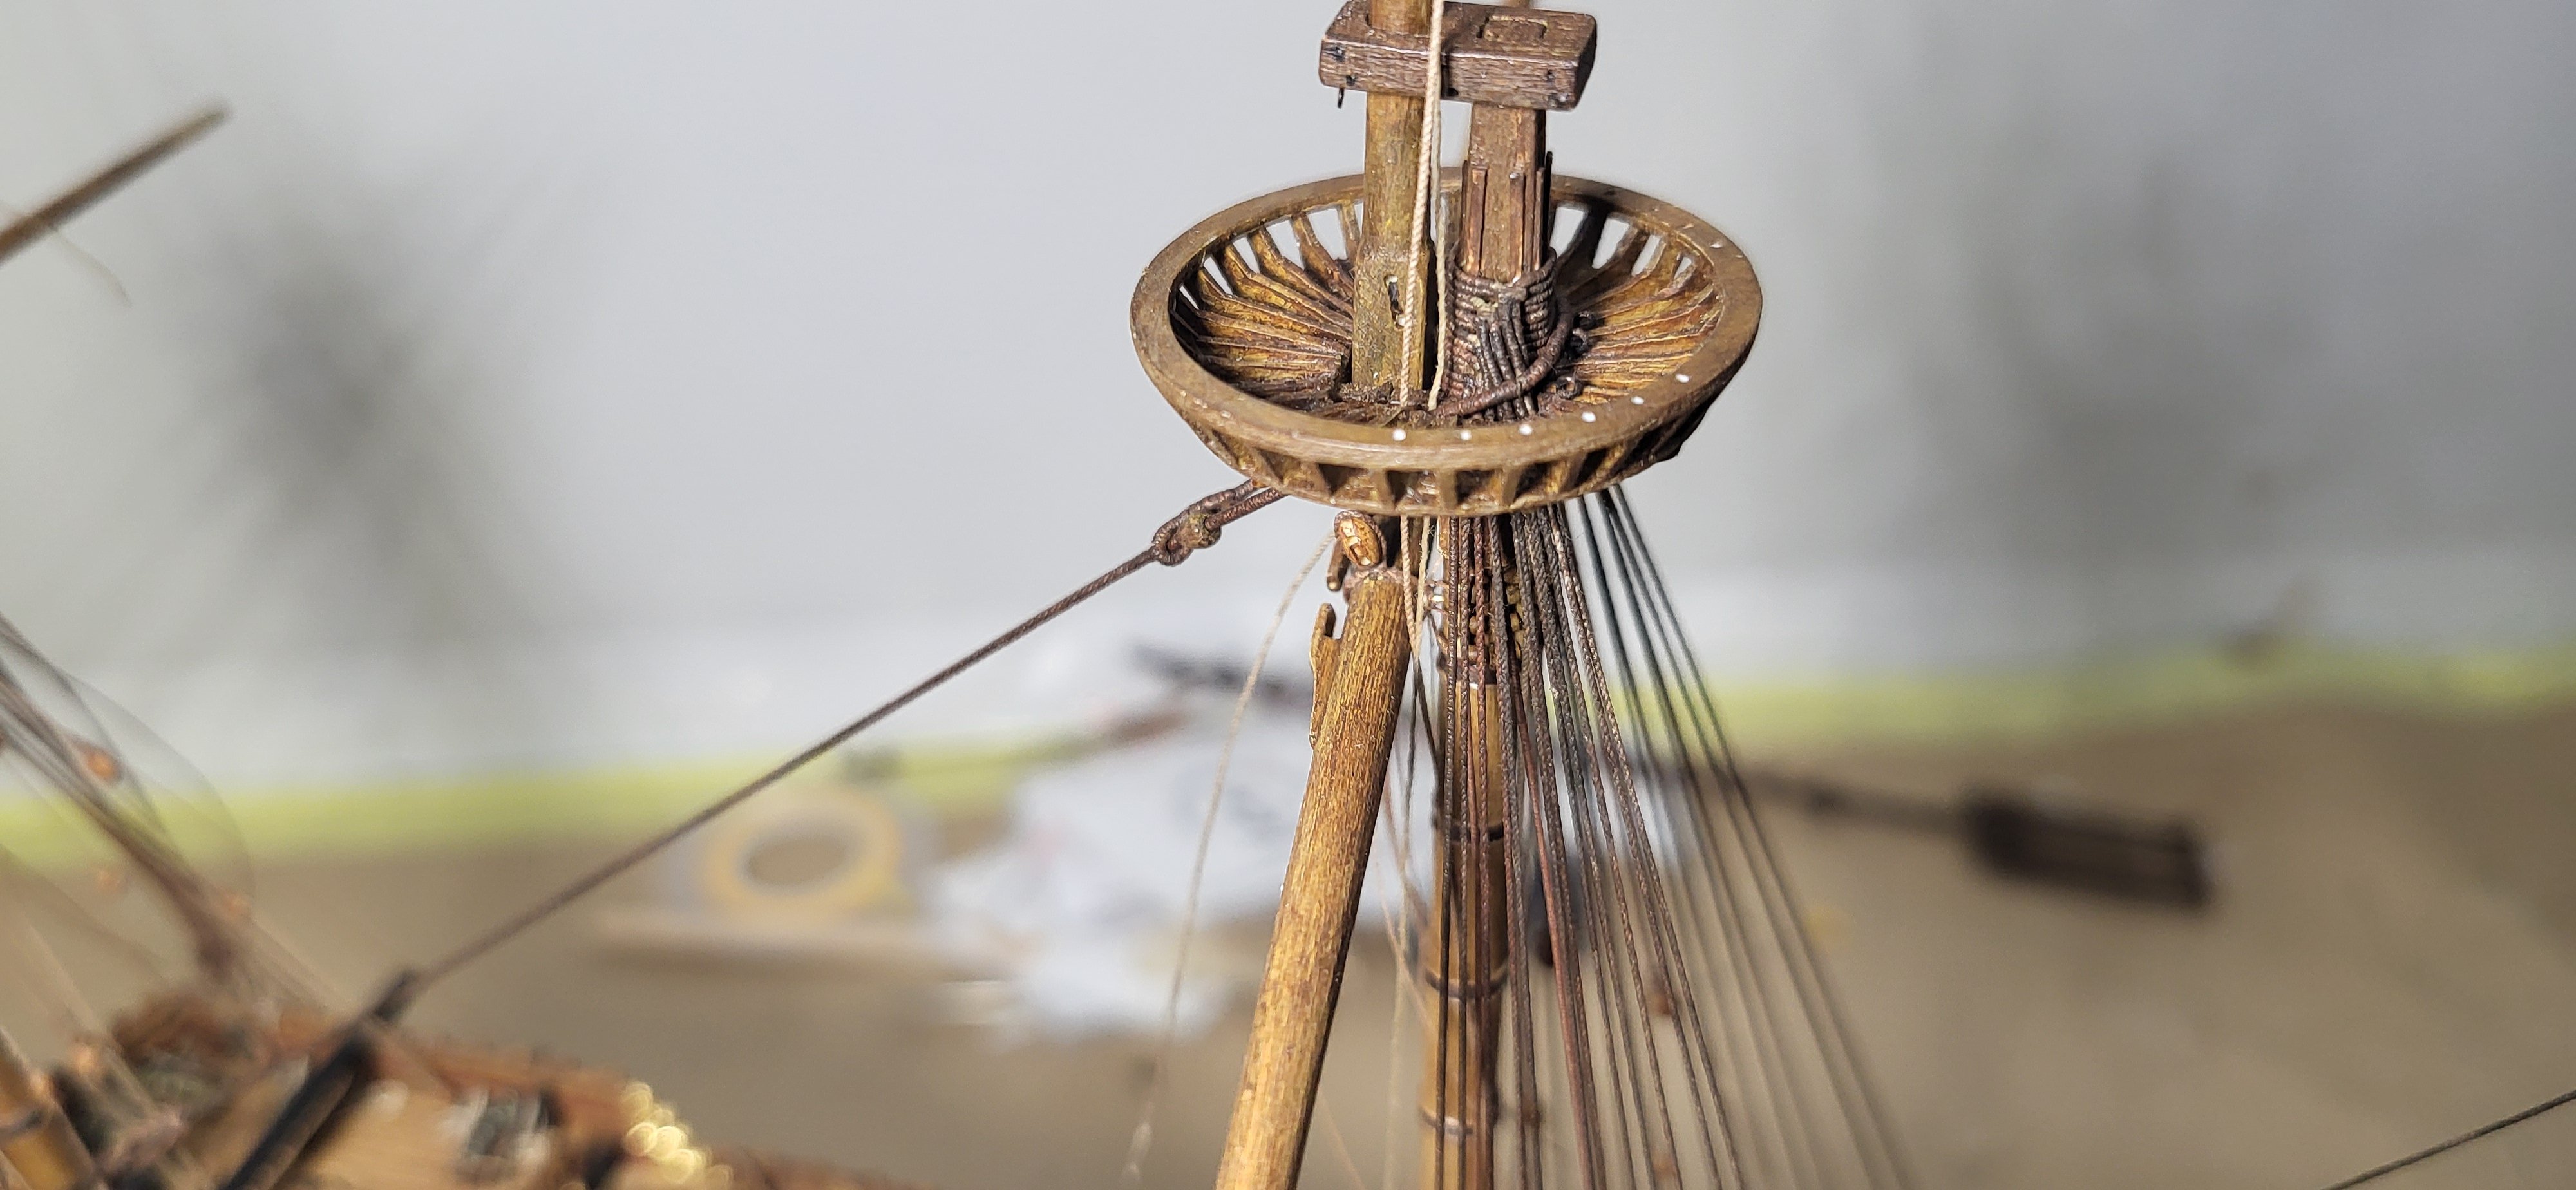
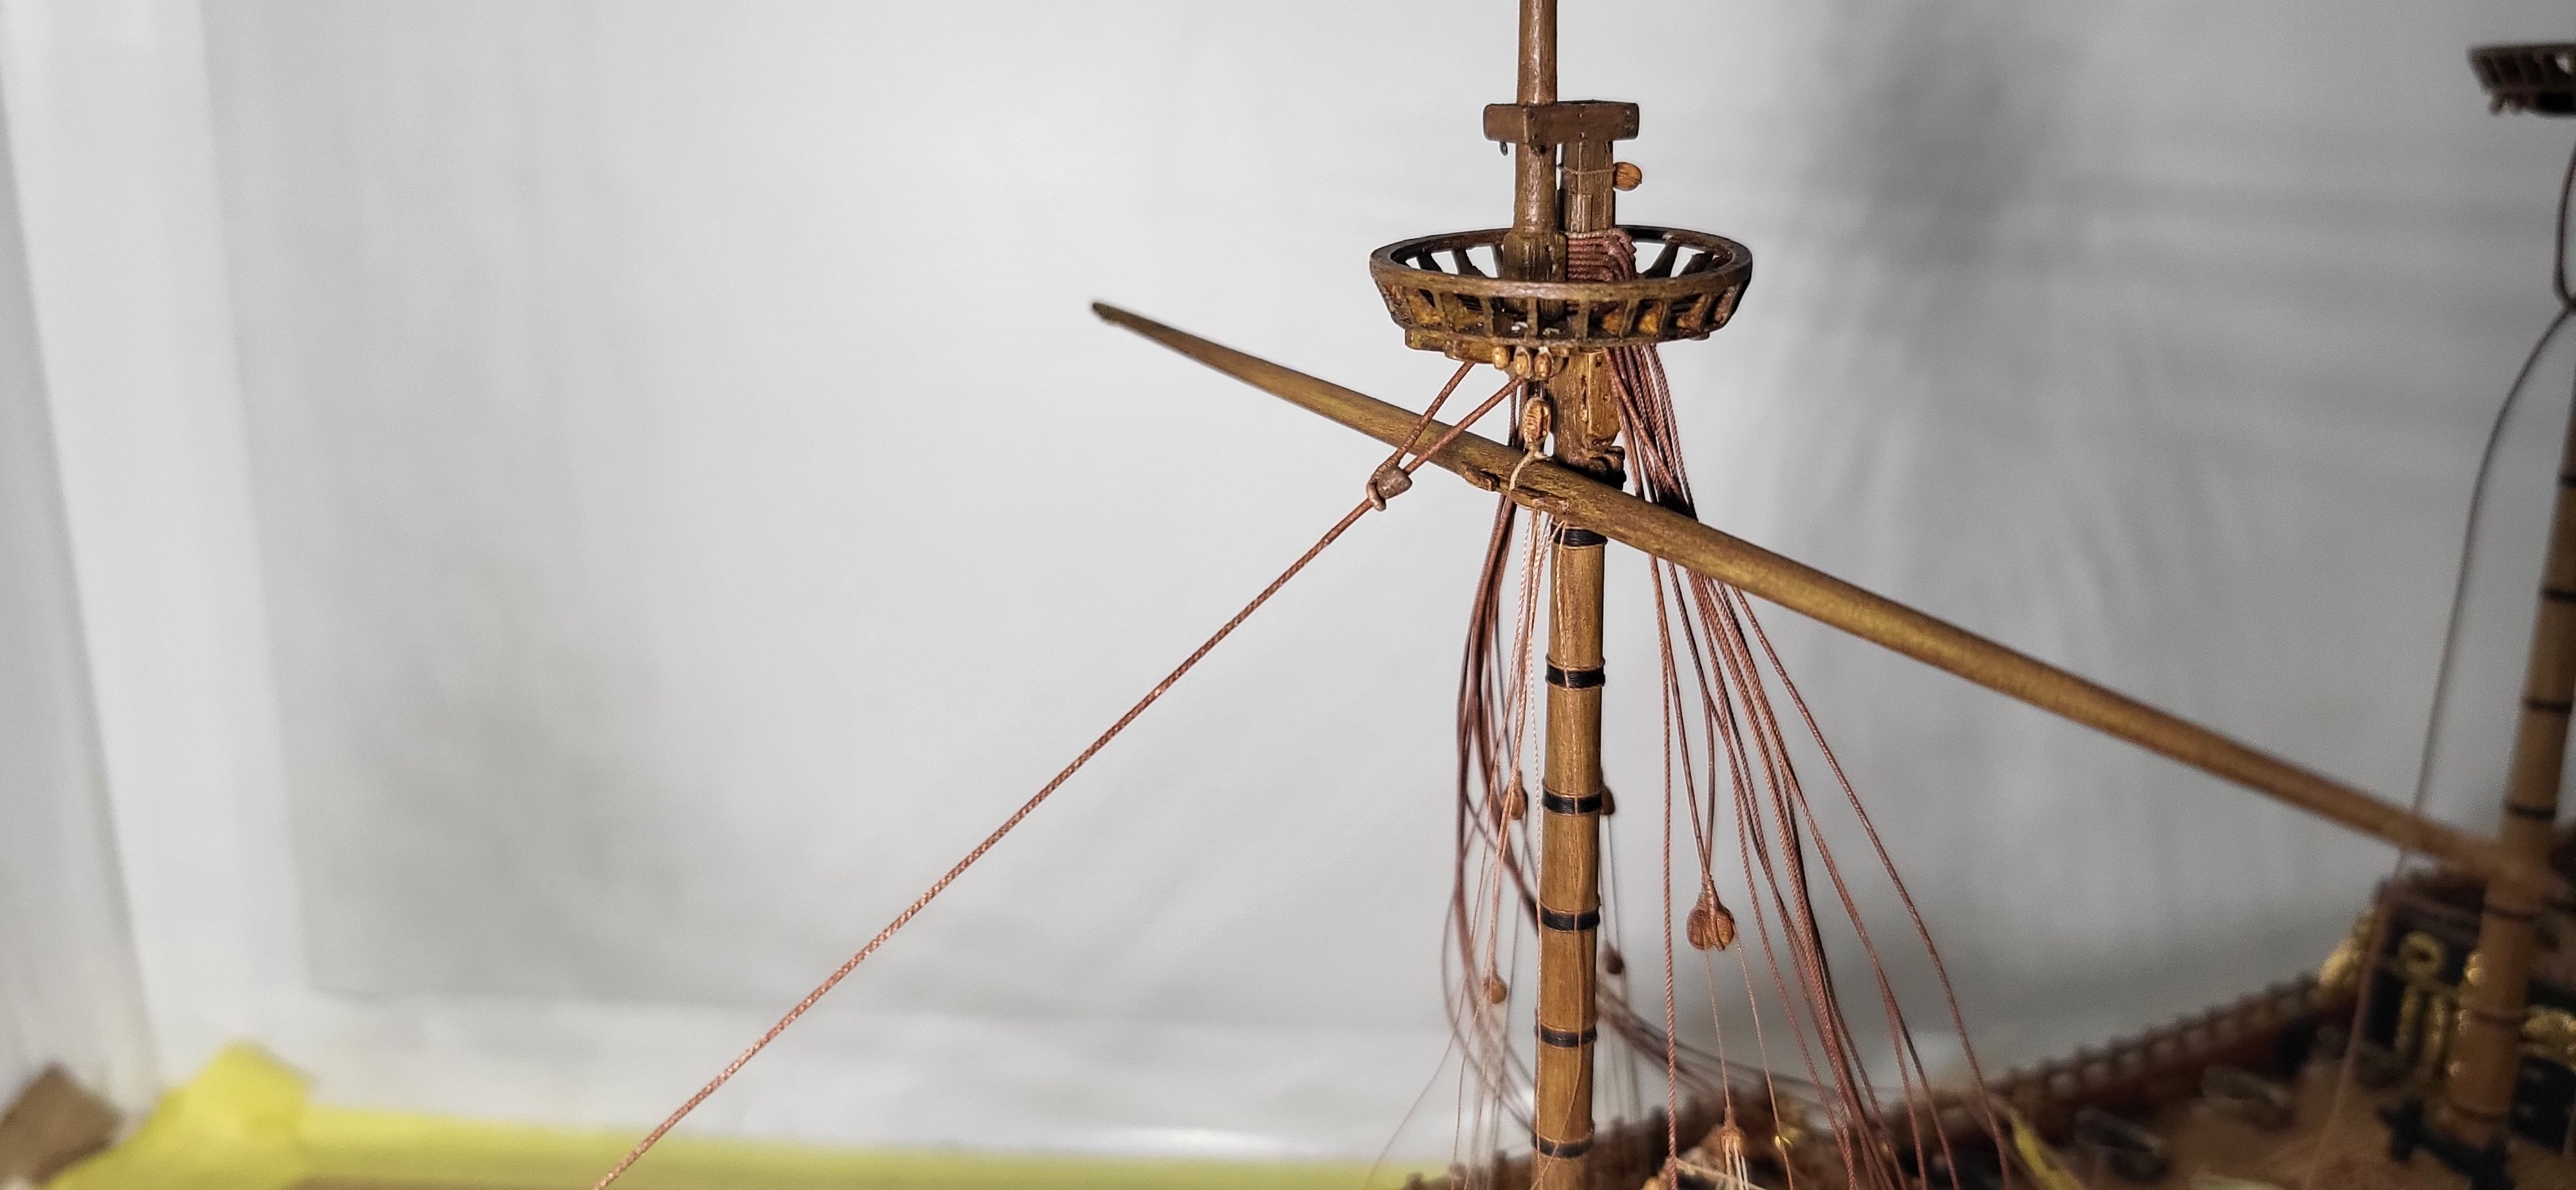
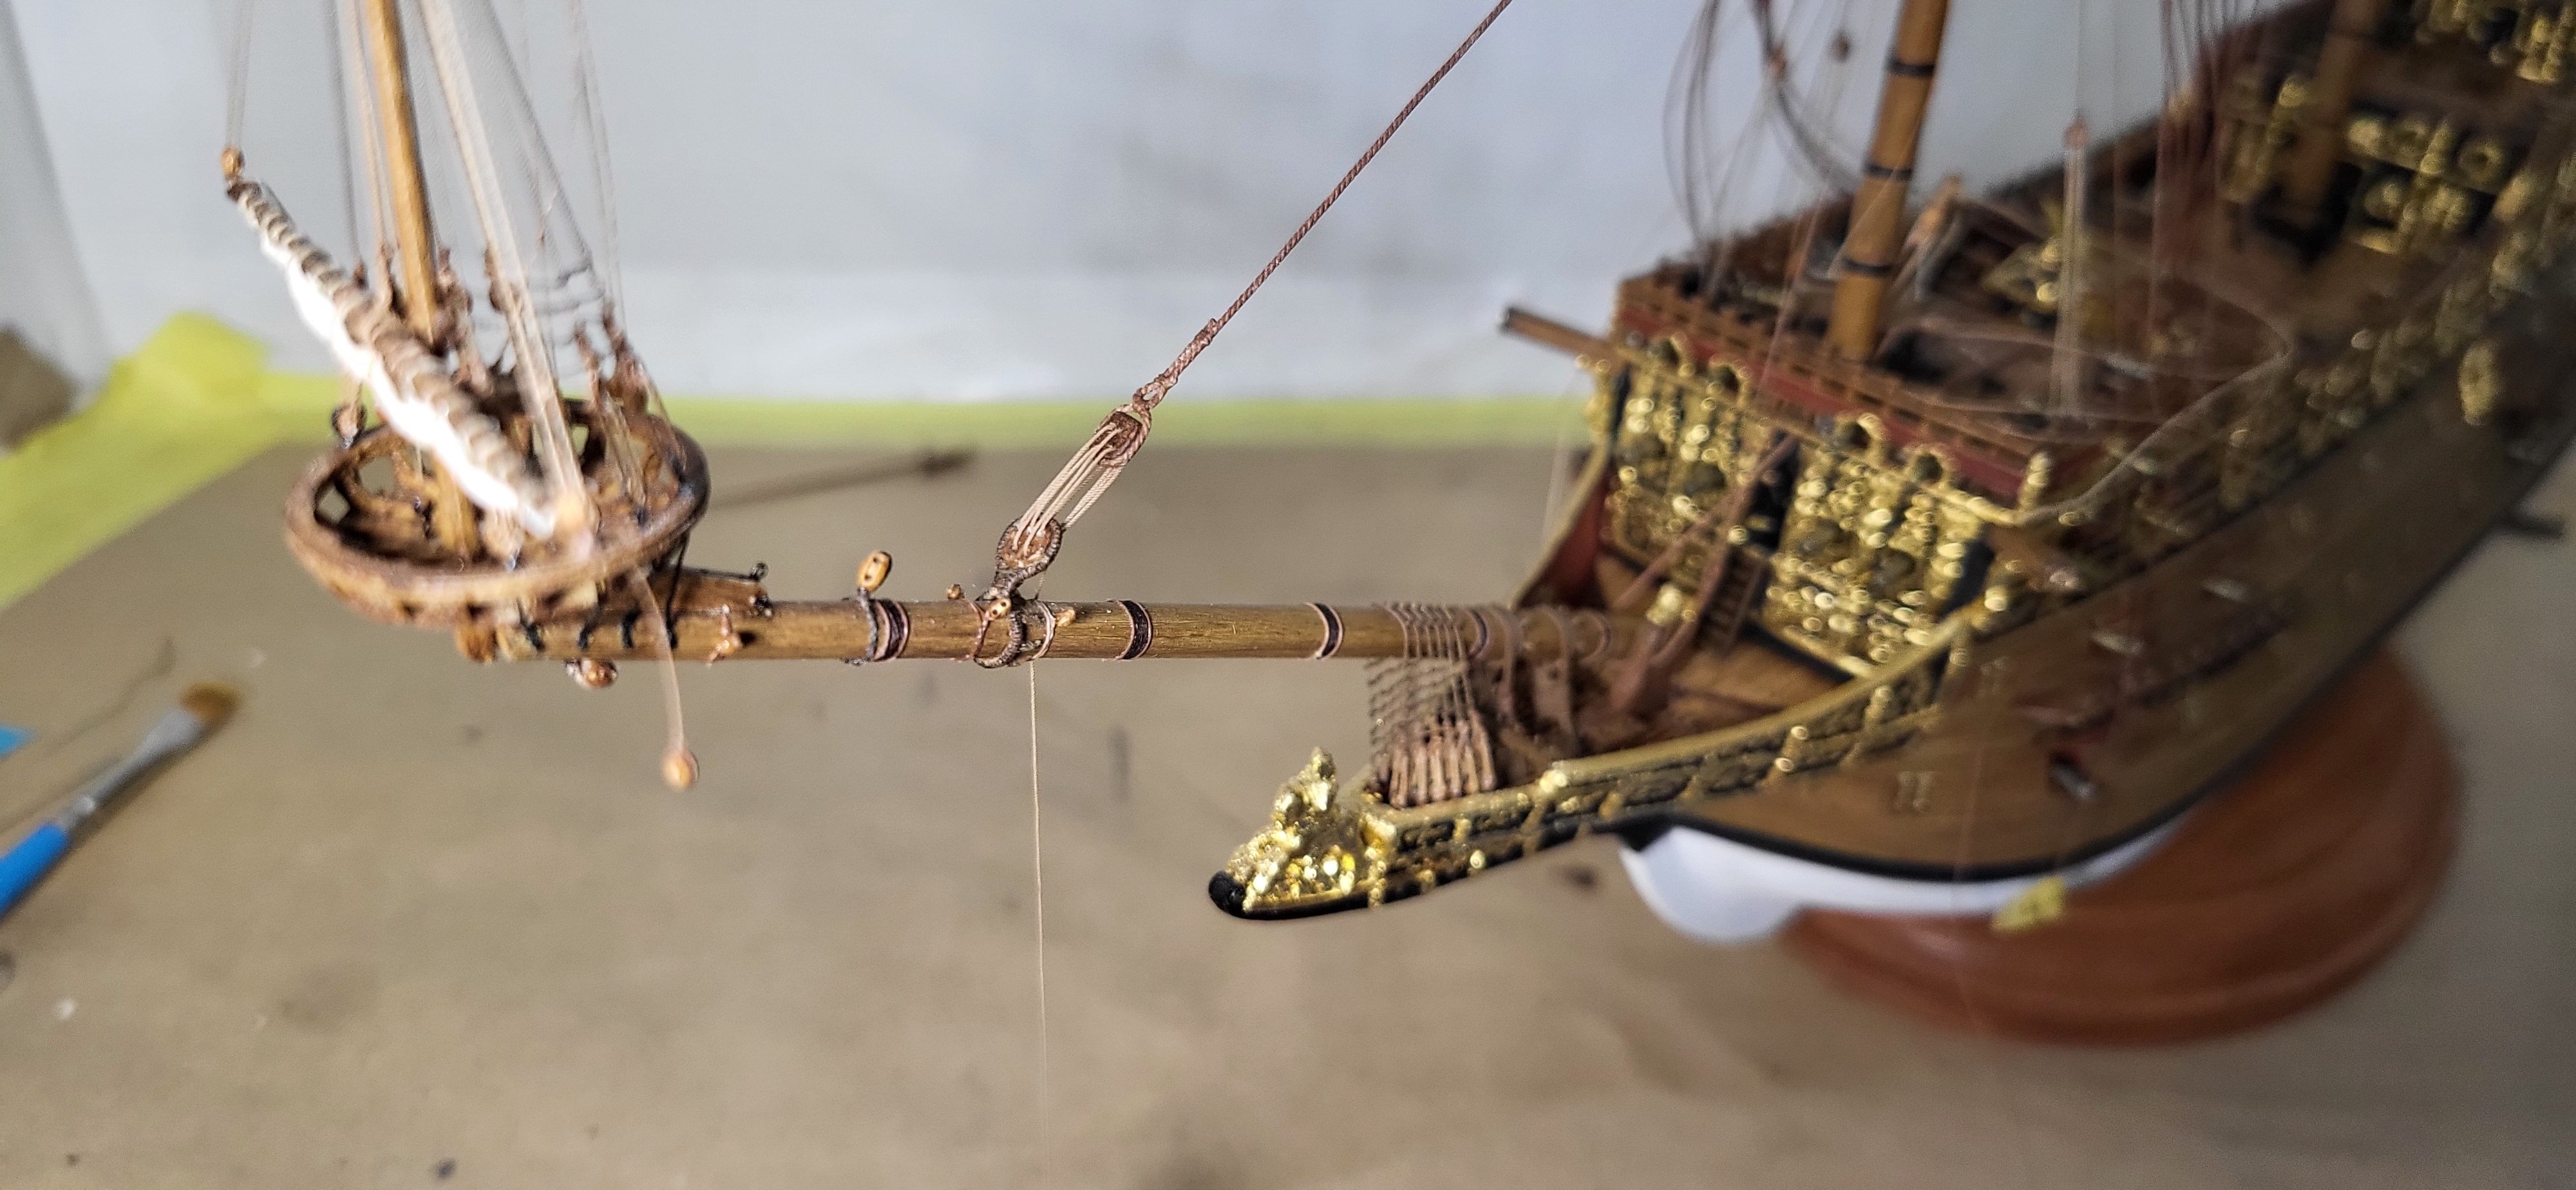
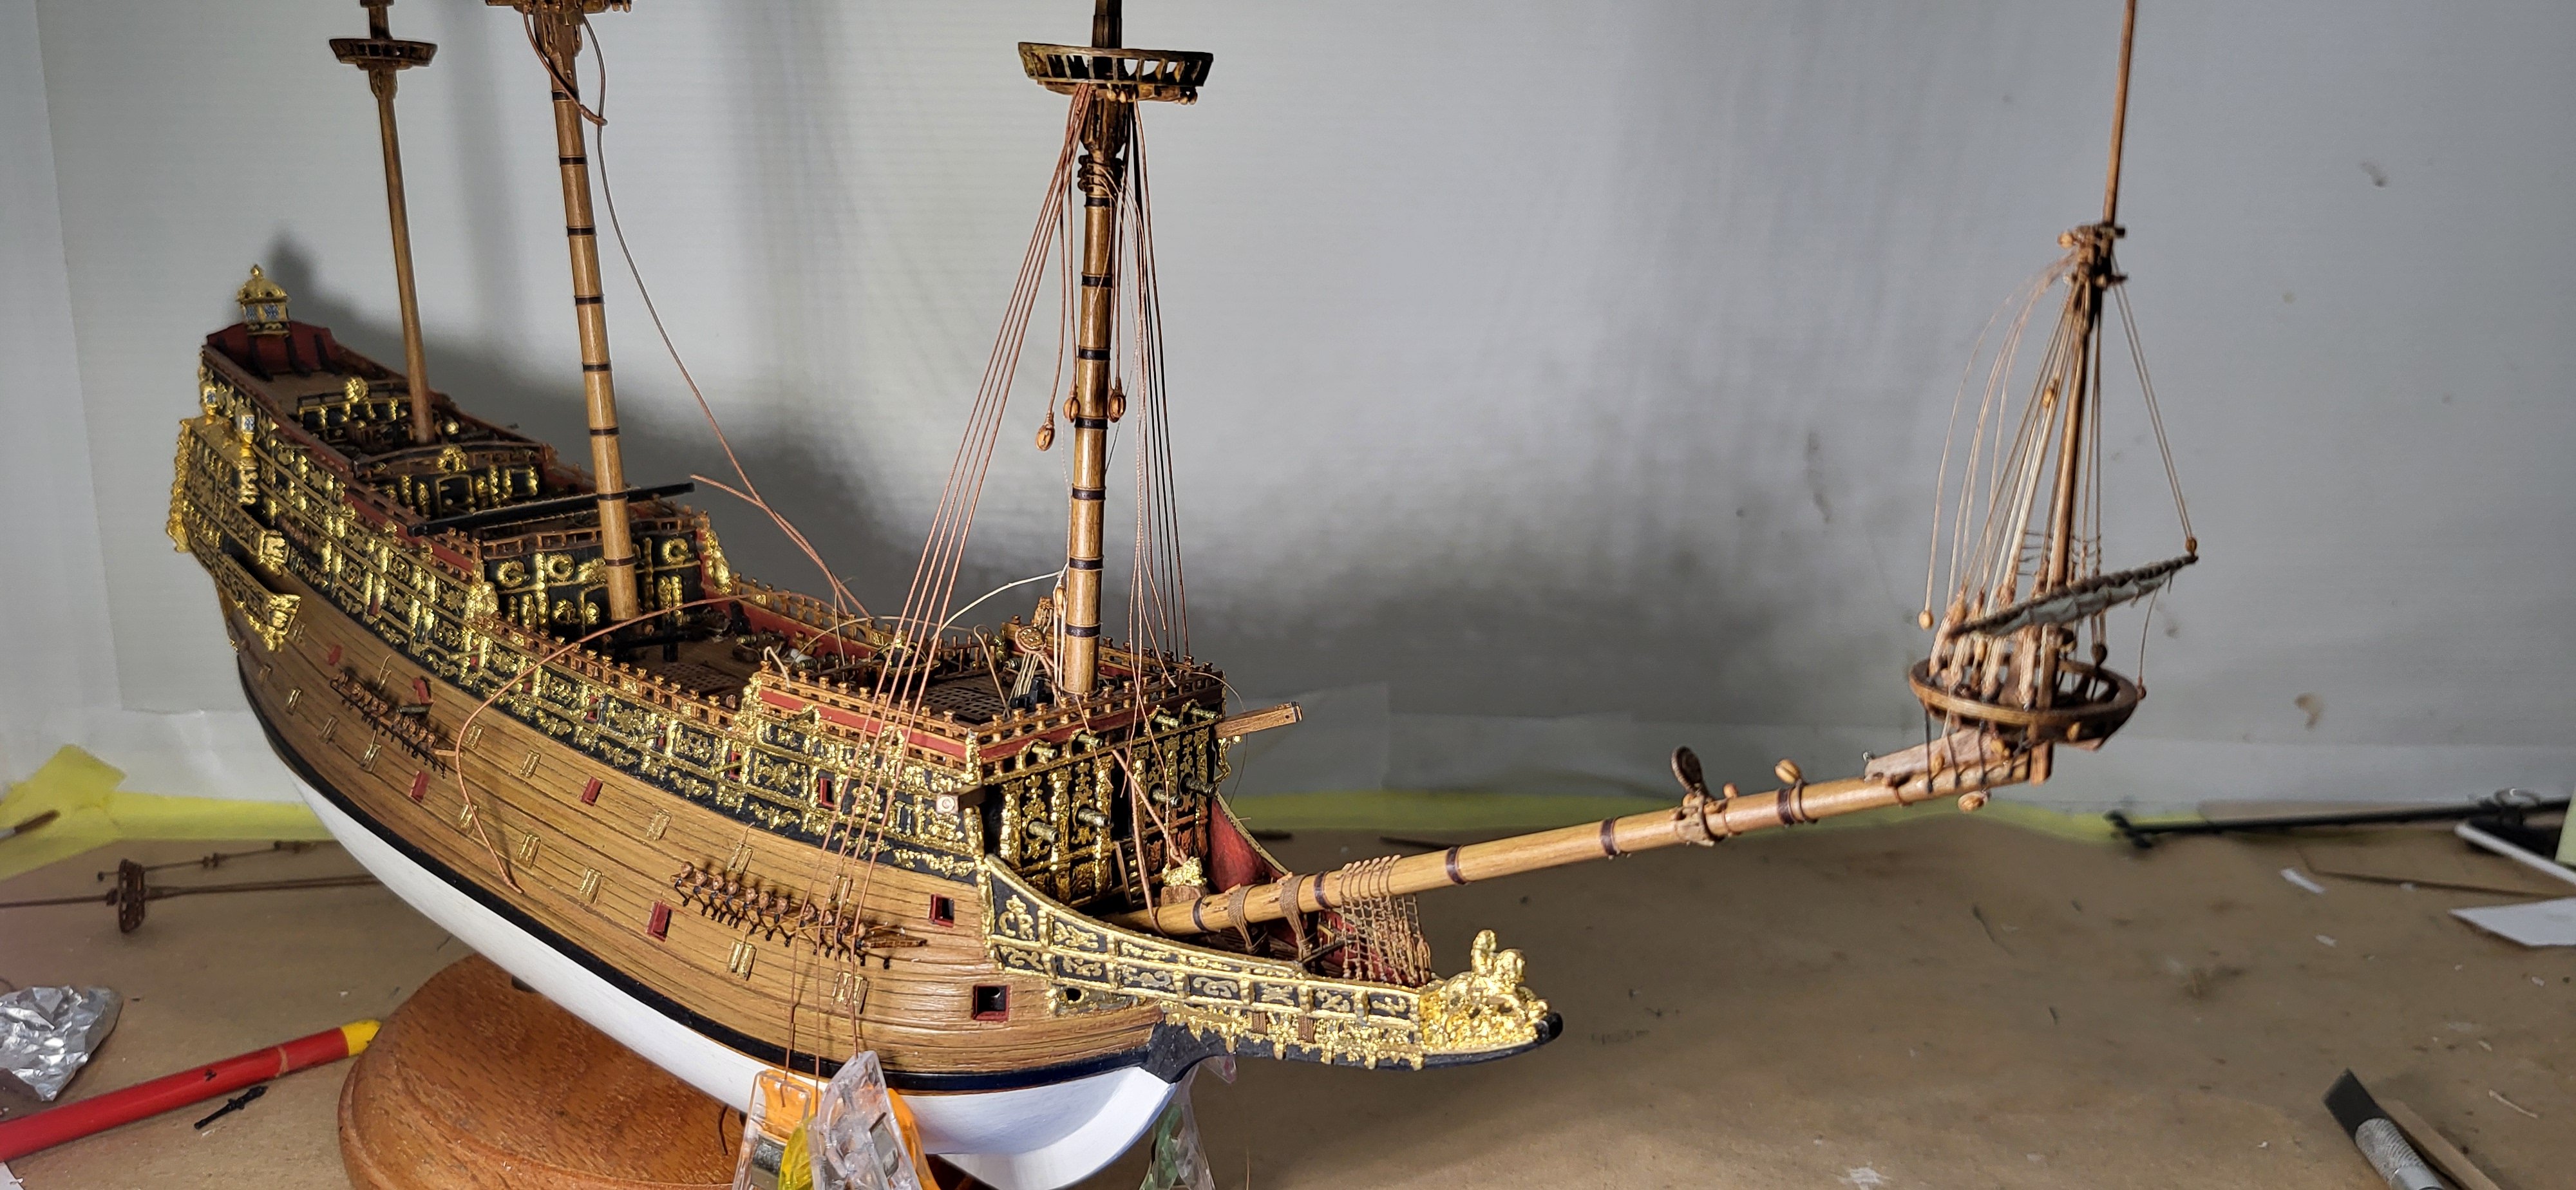
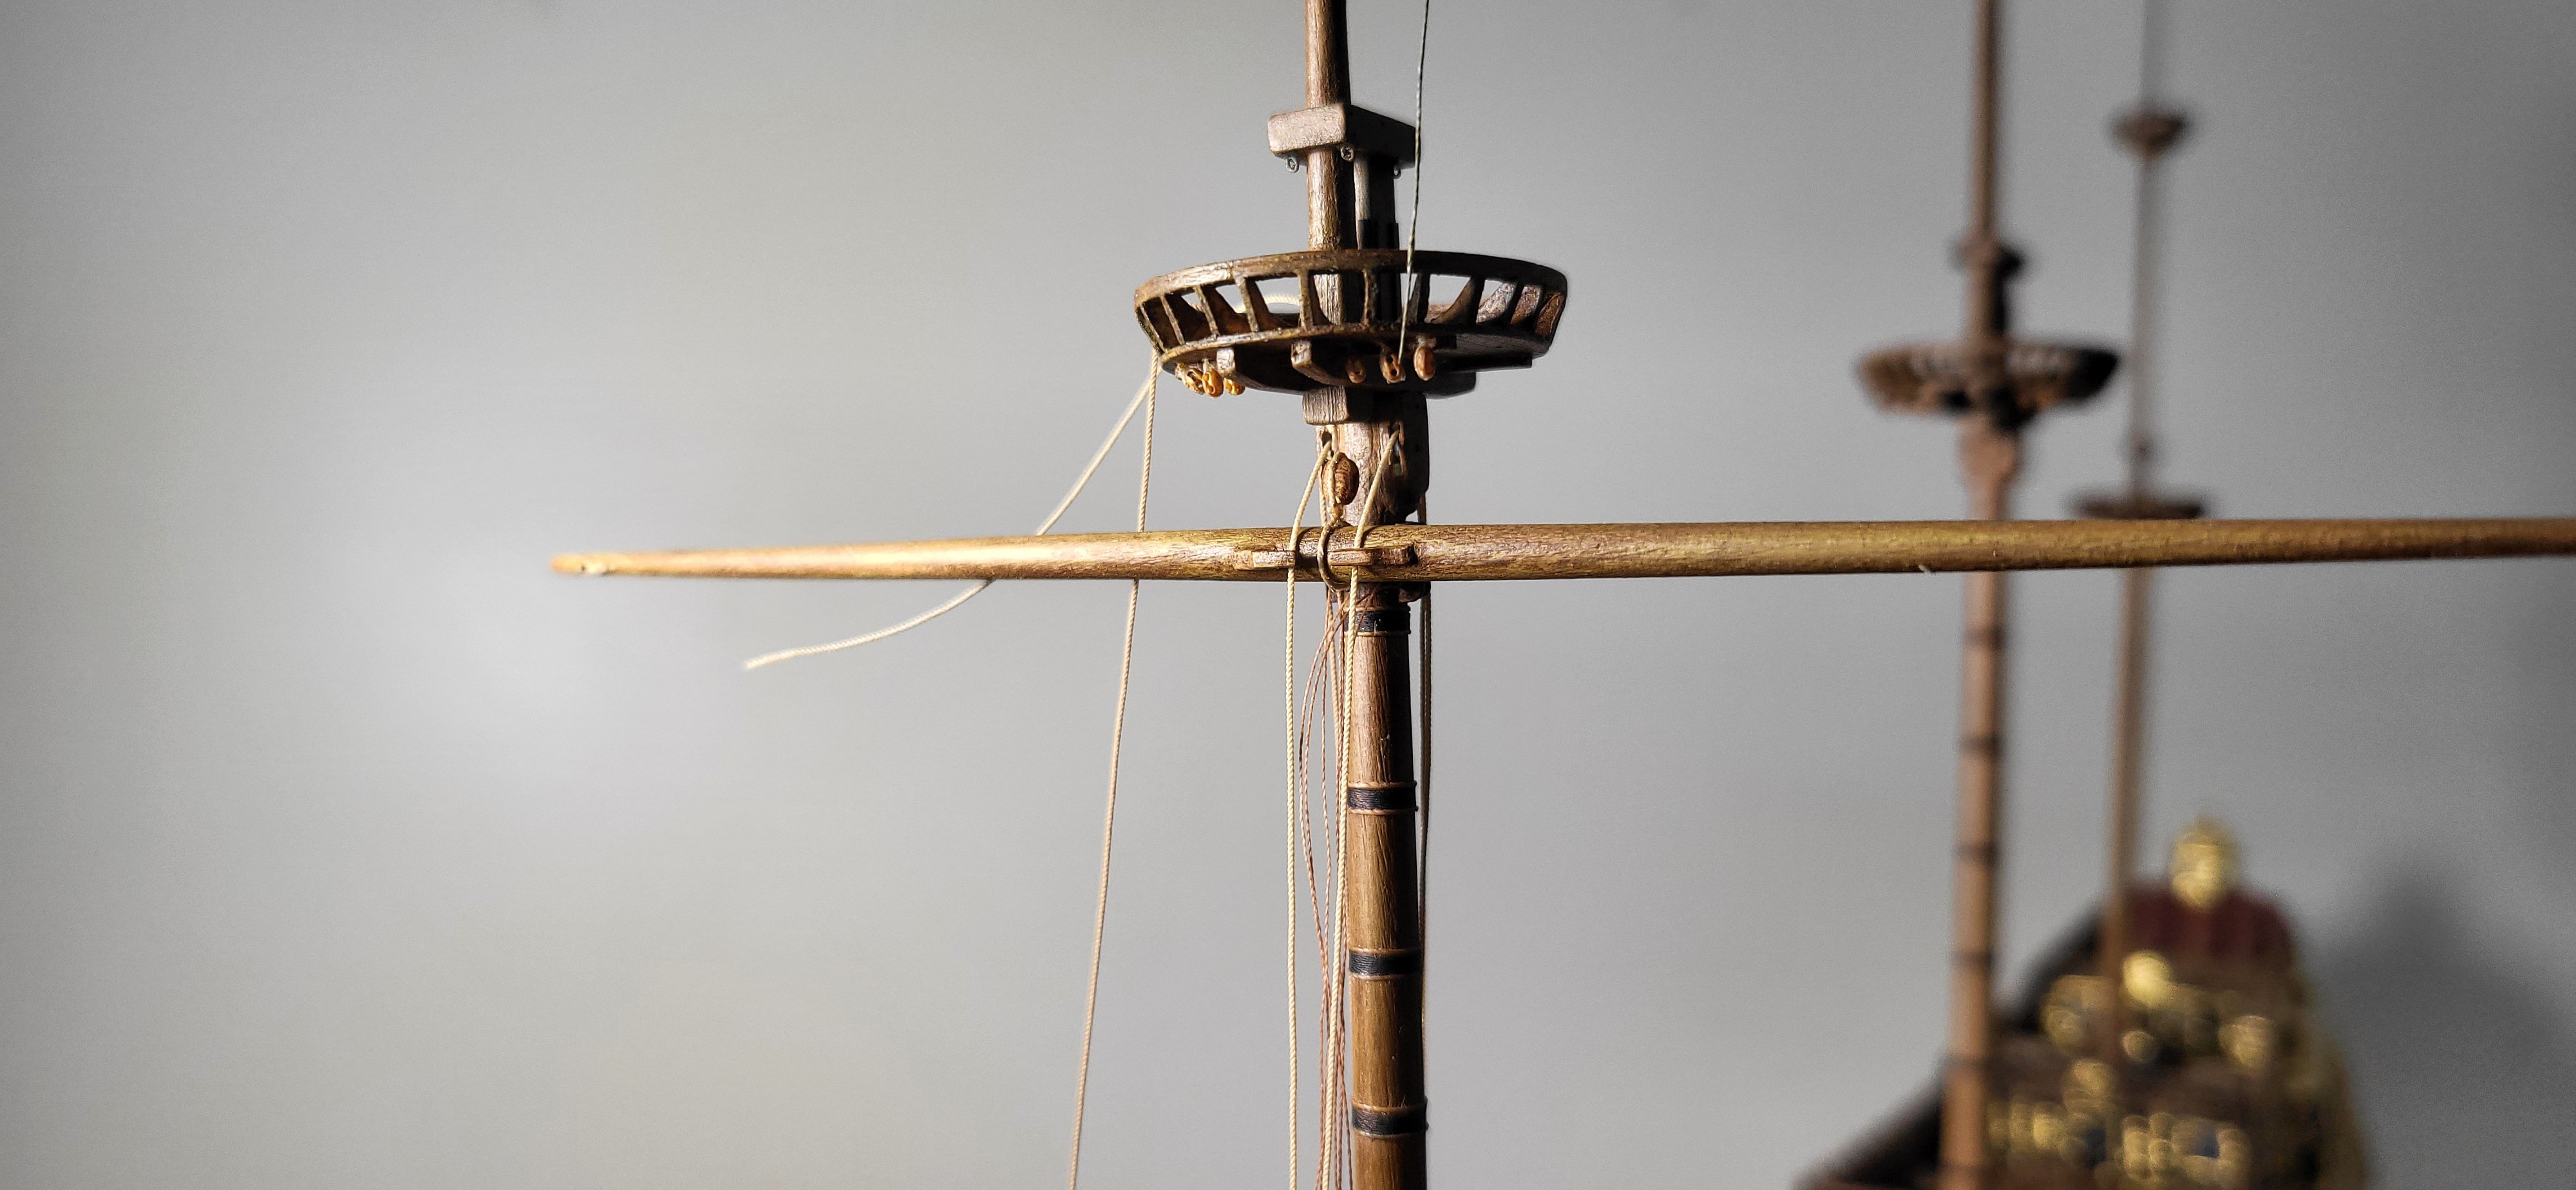
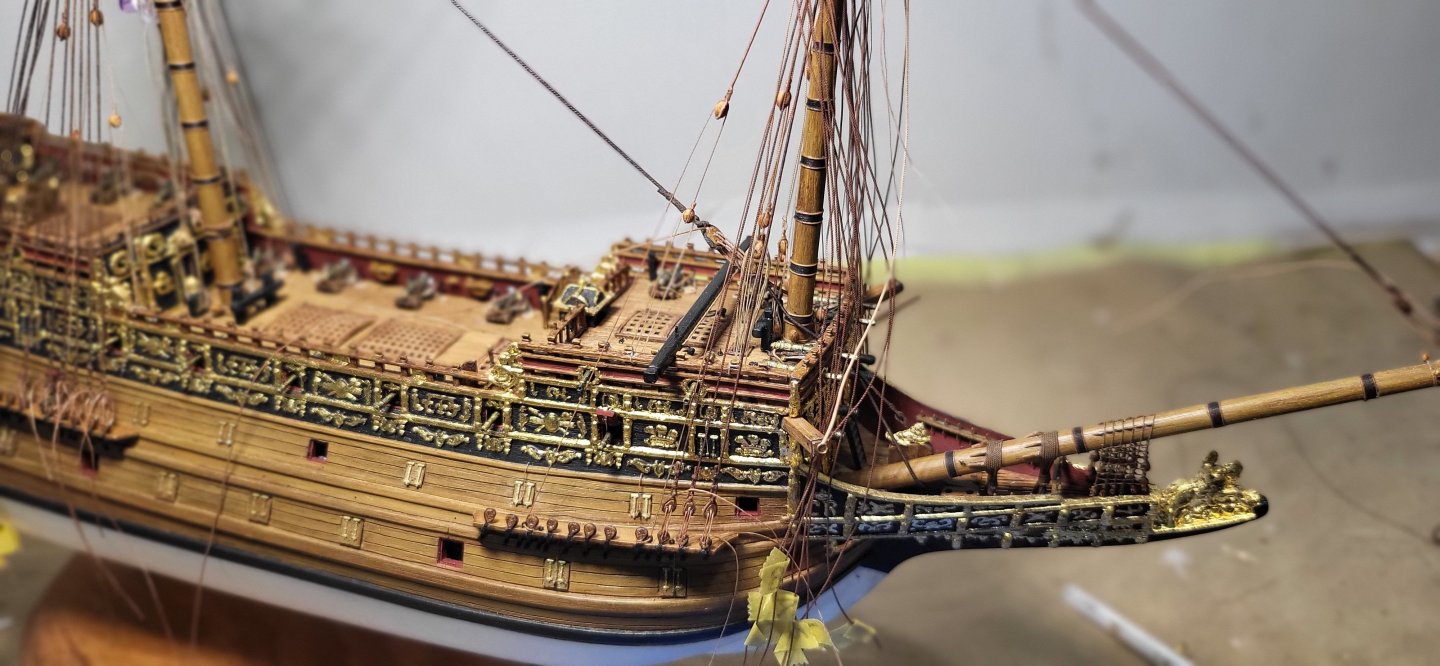
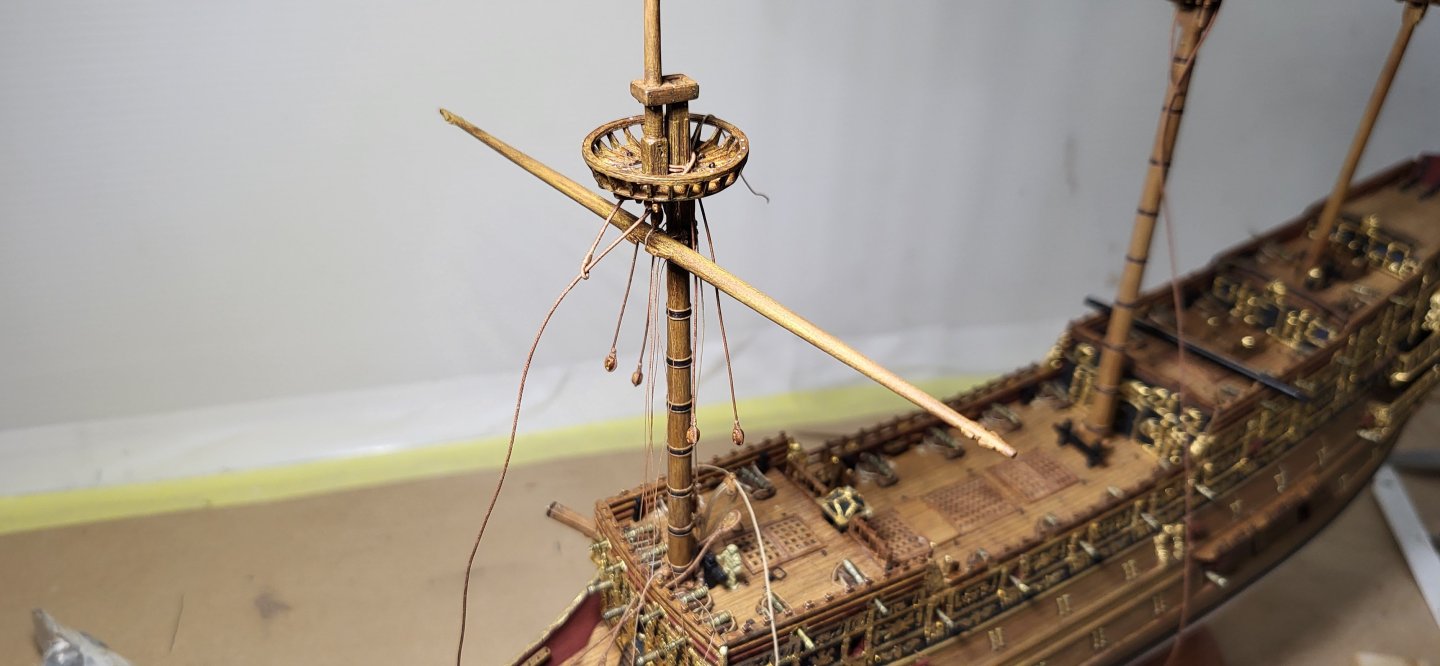
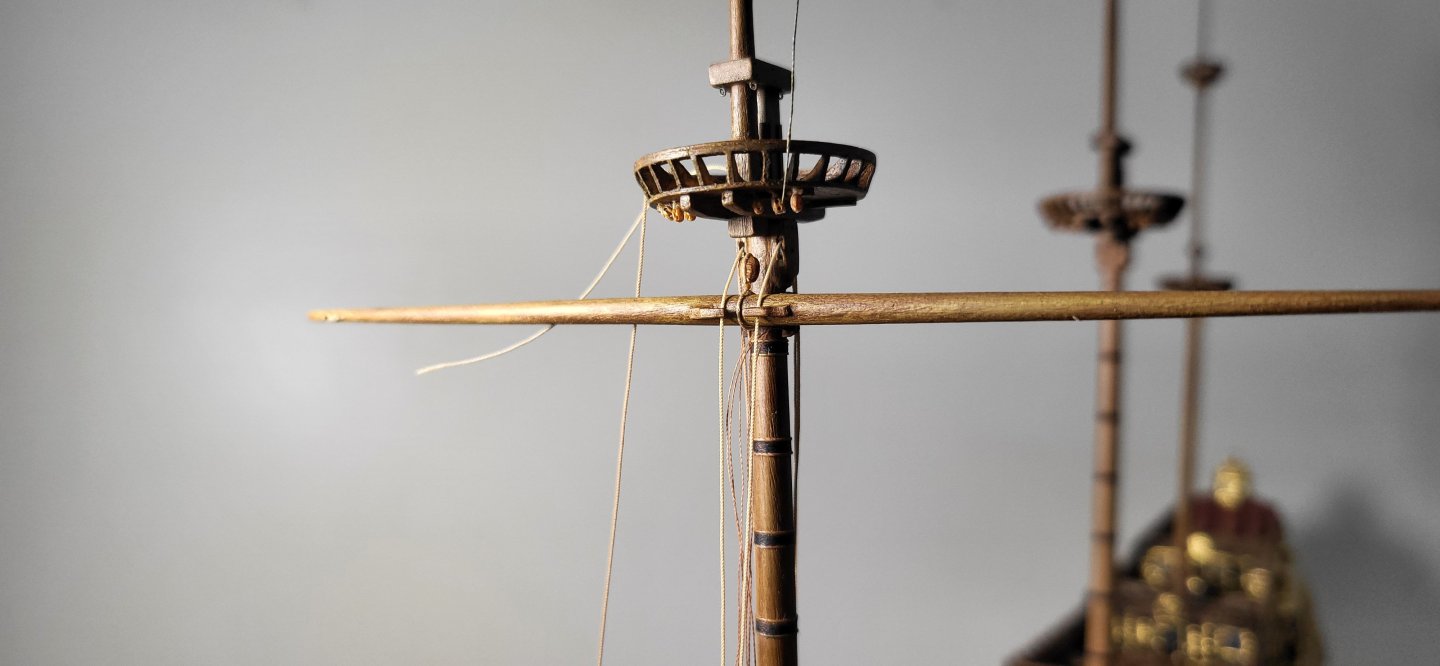
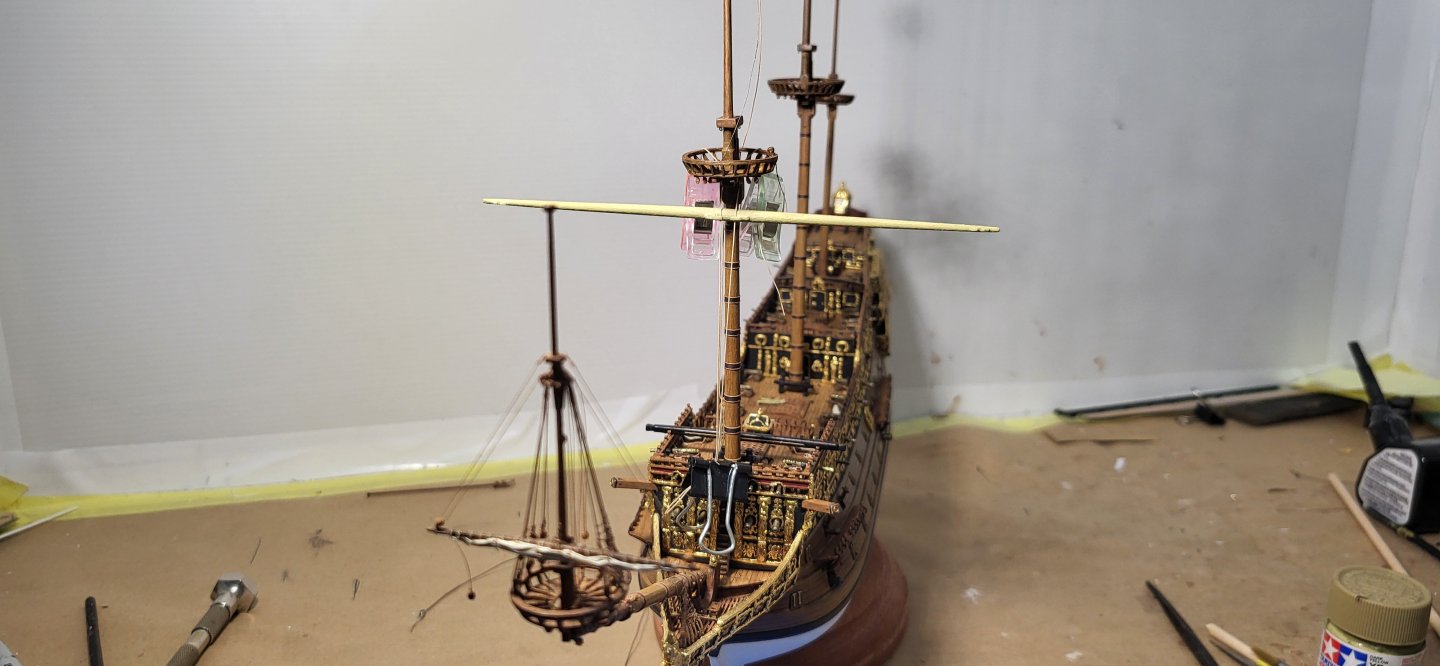
I stropped the necessary blocks on the crossjack, the topsail sheet blocks are 2.5mm...19" at scale, lift blocks are 1.5mm and the mizen course bowline block are 2mm,16" at scale. Still contemplating if I want to rig the peak brails instead of the martnets, this will date it at around 1640 but yet Payne shows them, we shall see and thanks for looking. Michael D.


- 324 replies
-
- 10
-
-
- Sovereign of the Seas
- Airfix
- (and 1 more)
-
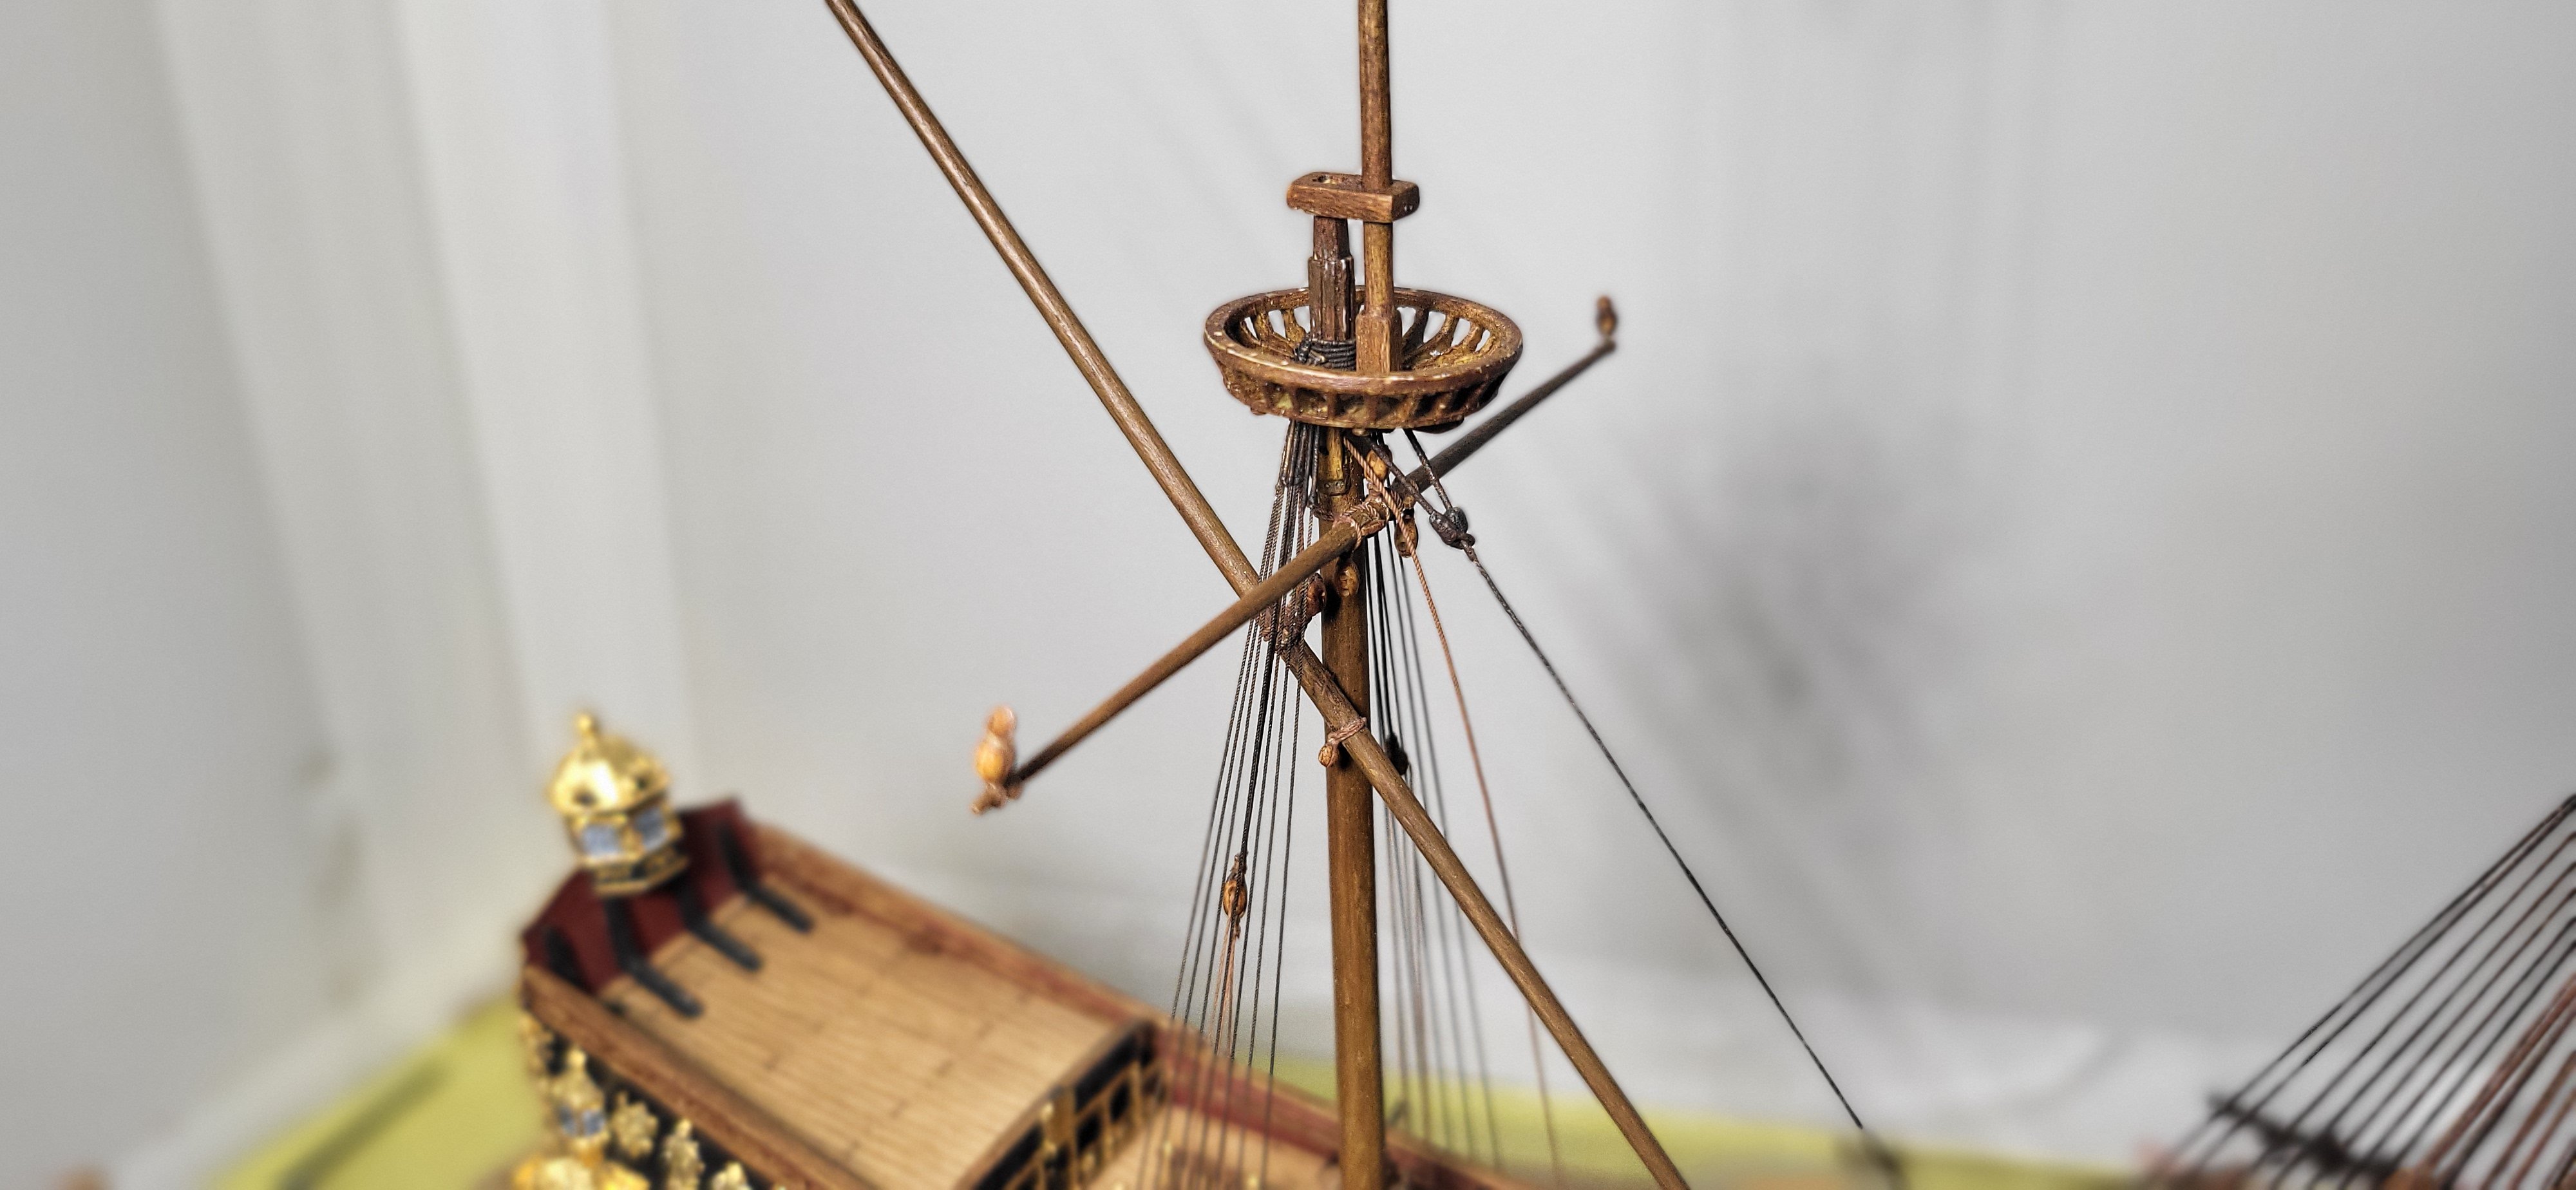
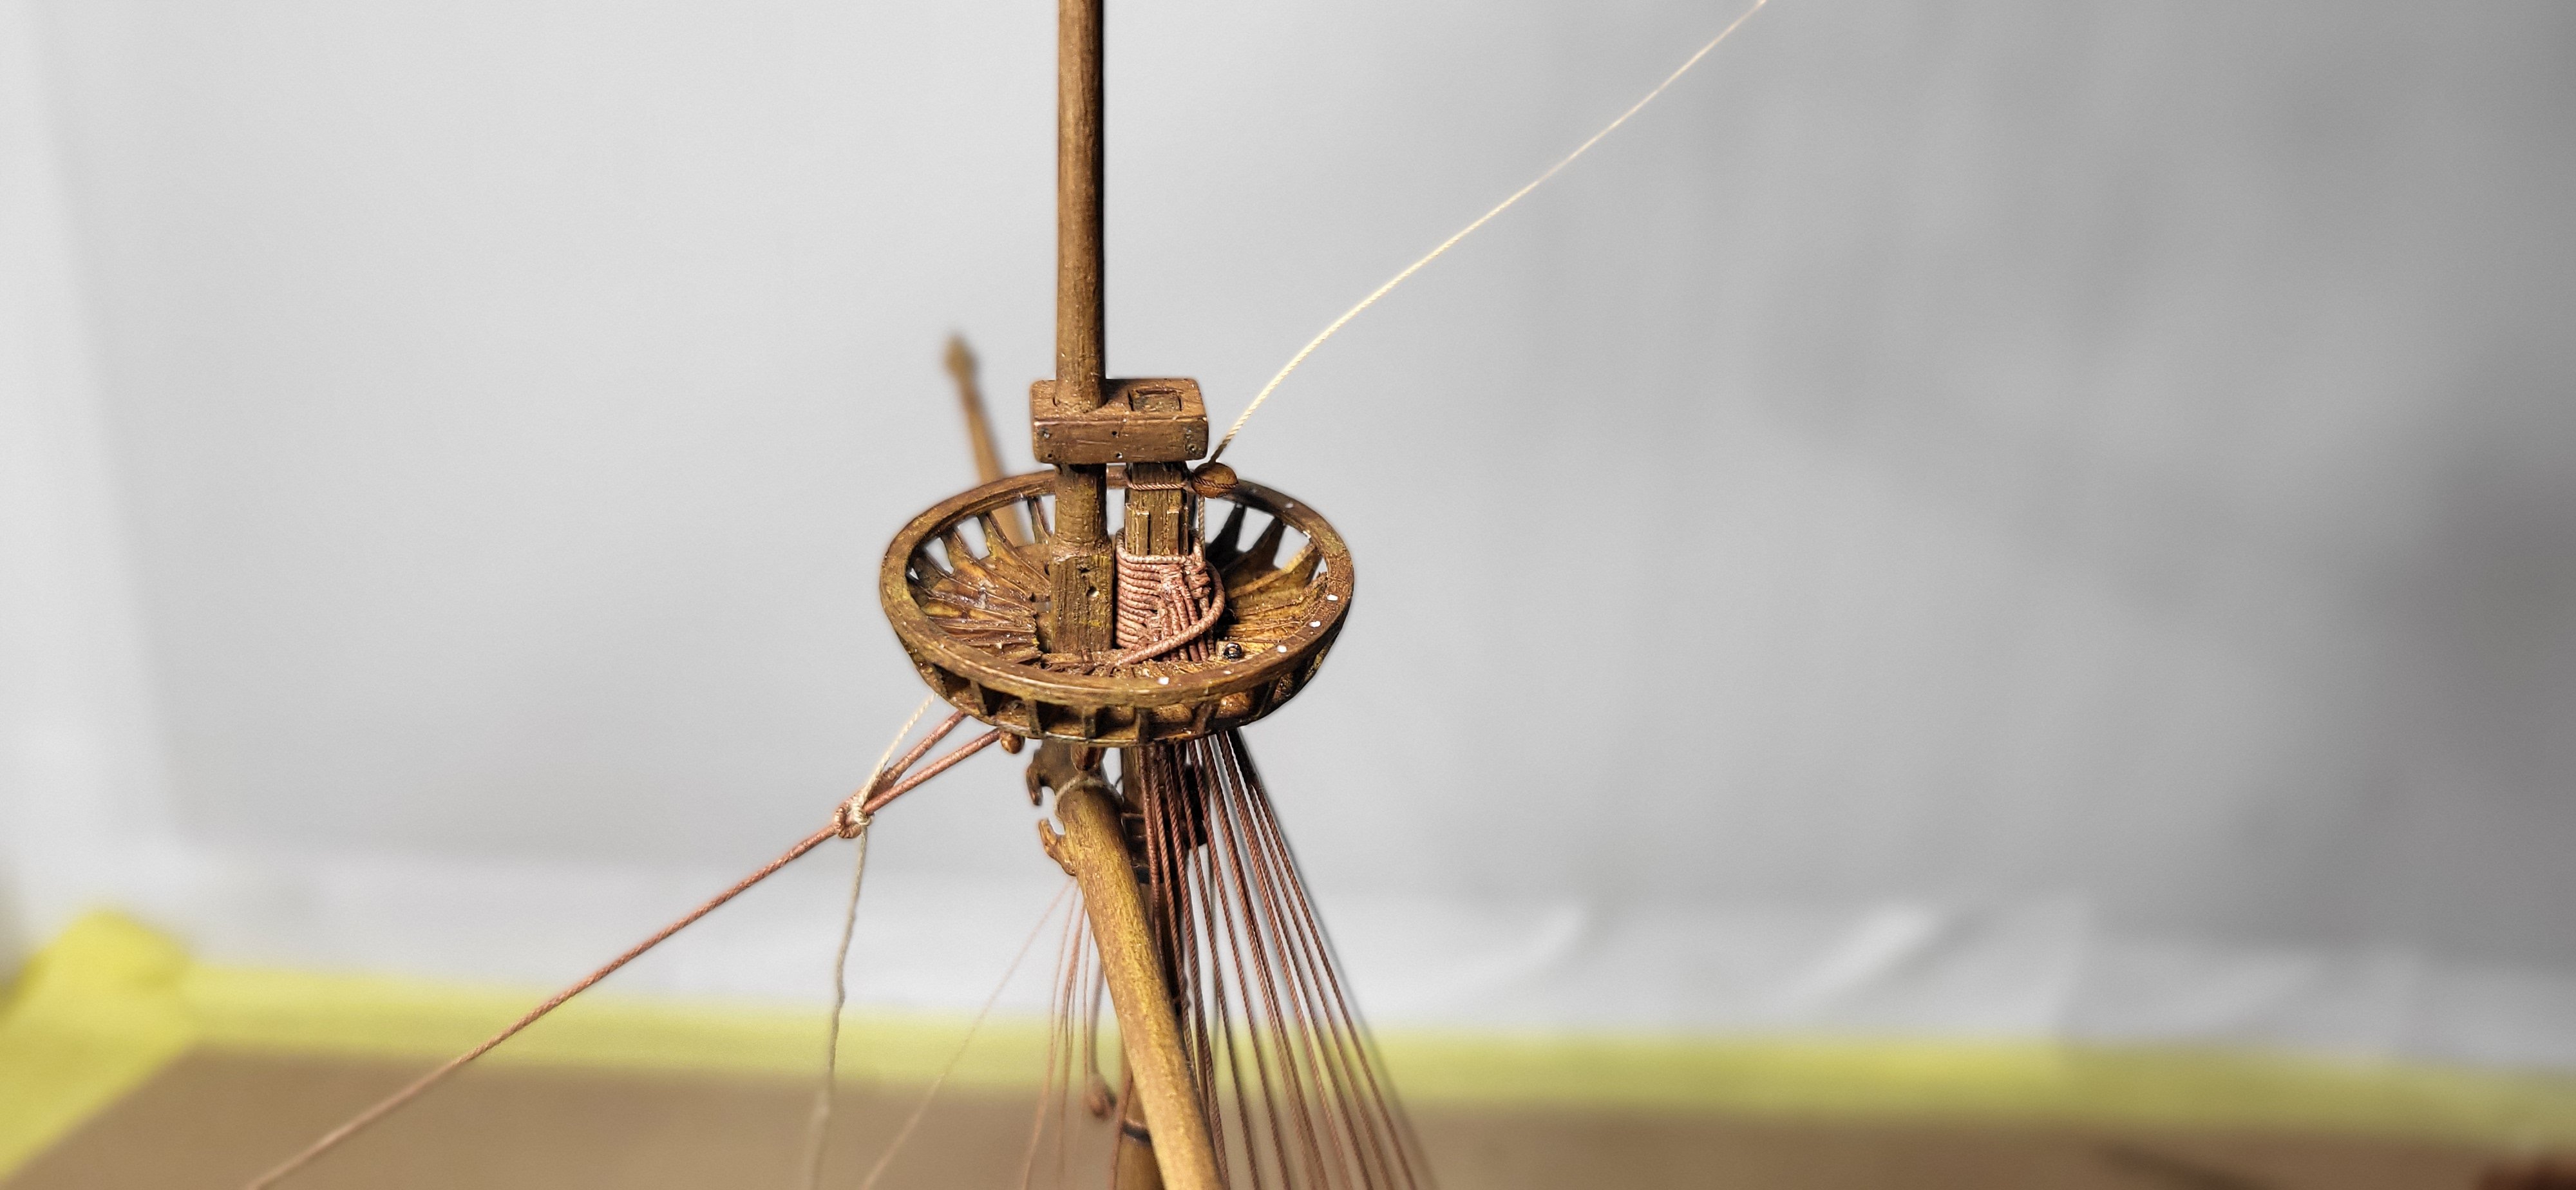
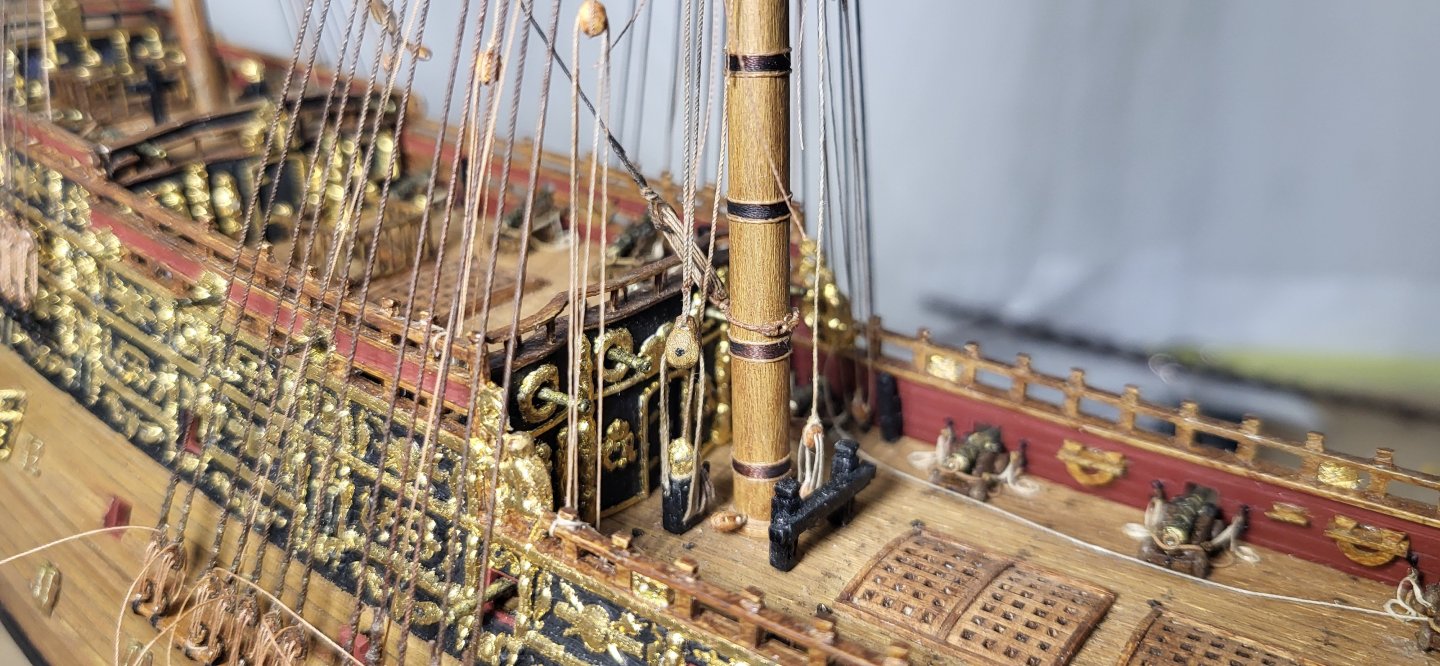
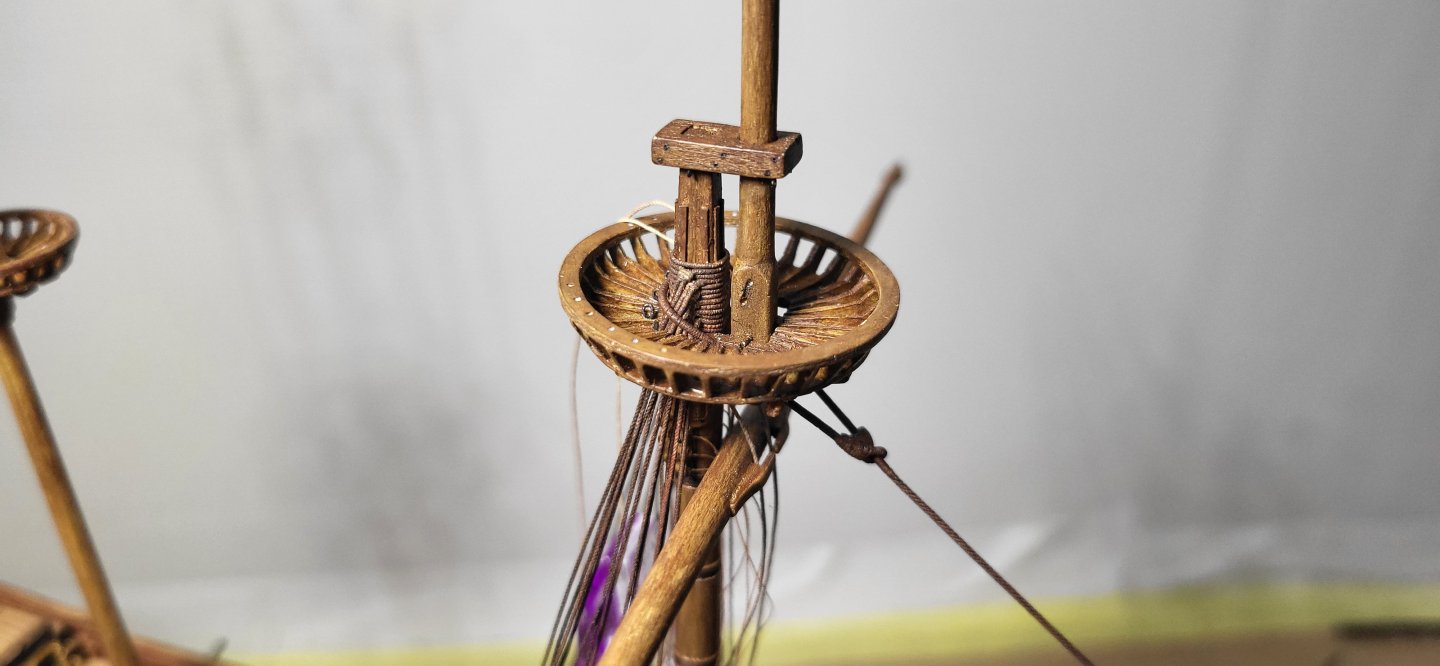
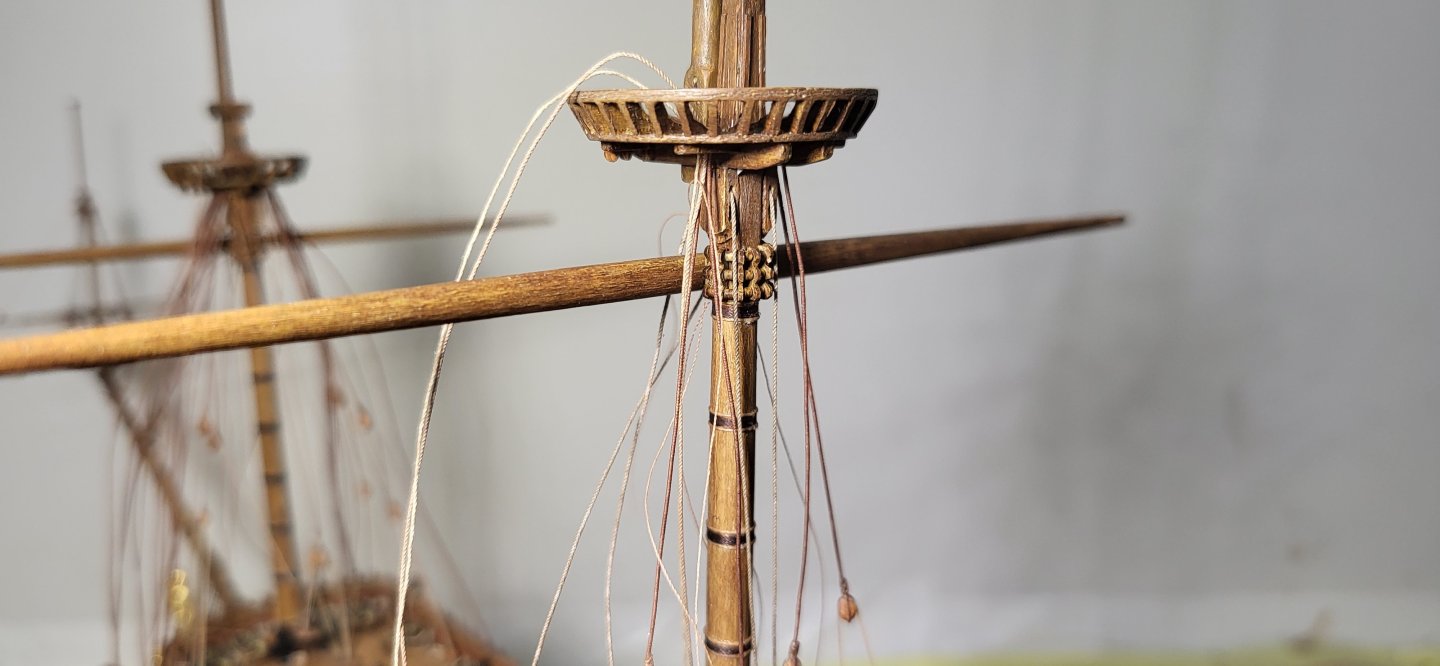
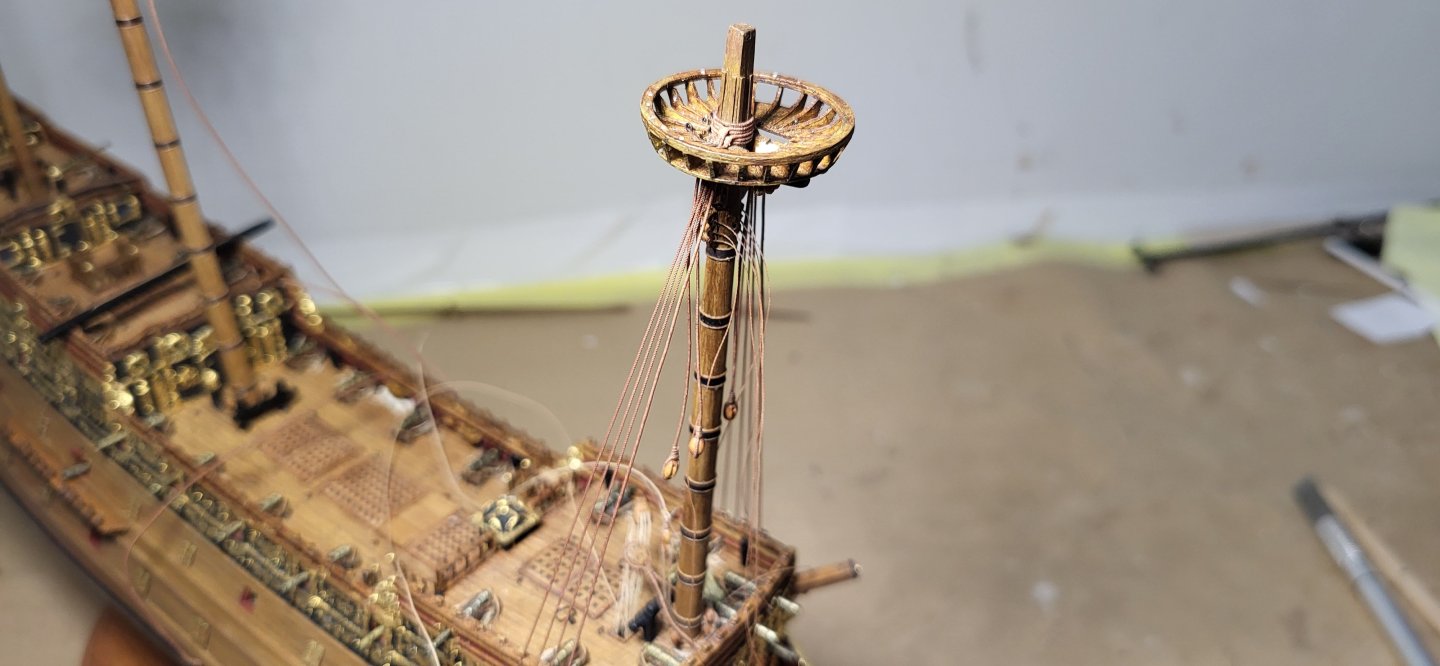
Small update regarding the parrel, I'm pretty happy with the first attempt and will keep it, it will be glued to the mast once it's painted, thanks for looking. Michael D.


- 324 replies
-
- 8
-
-
-
-
- Sovereign of the Seas
- Airfix
- (and 1 more)
-
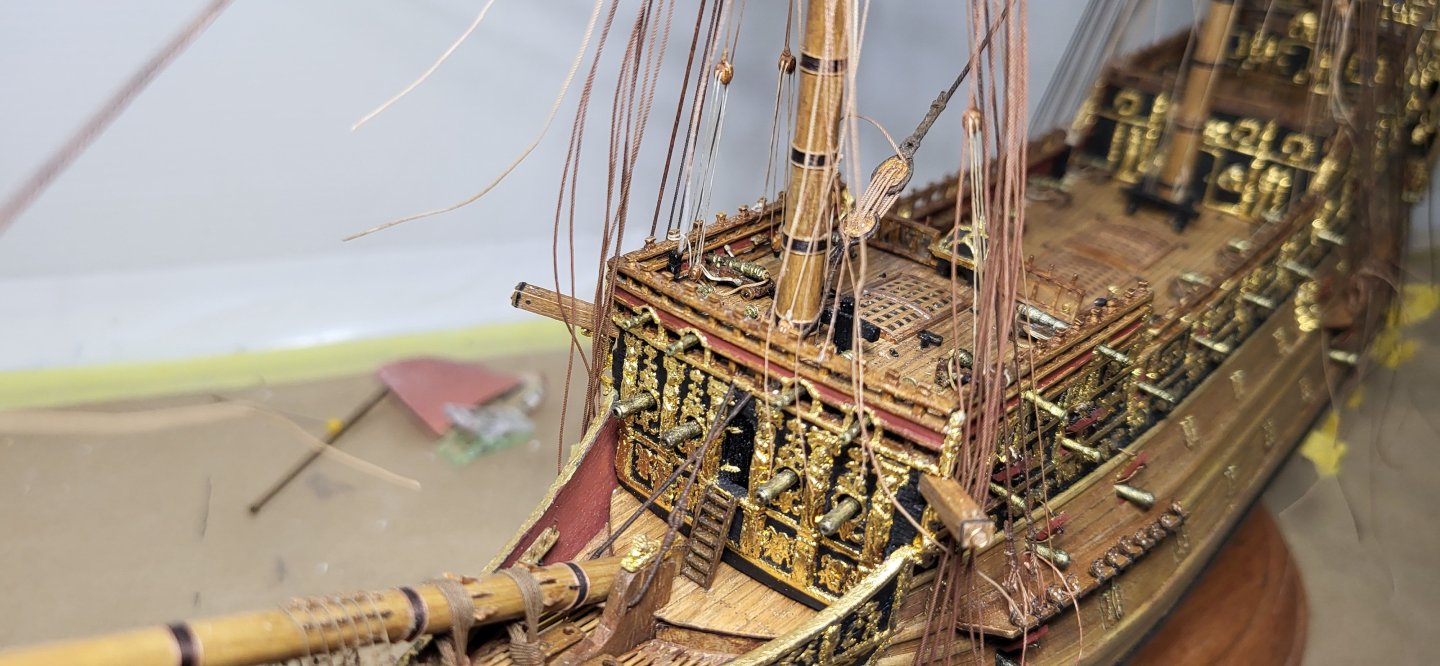
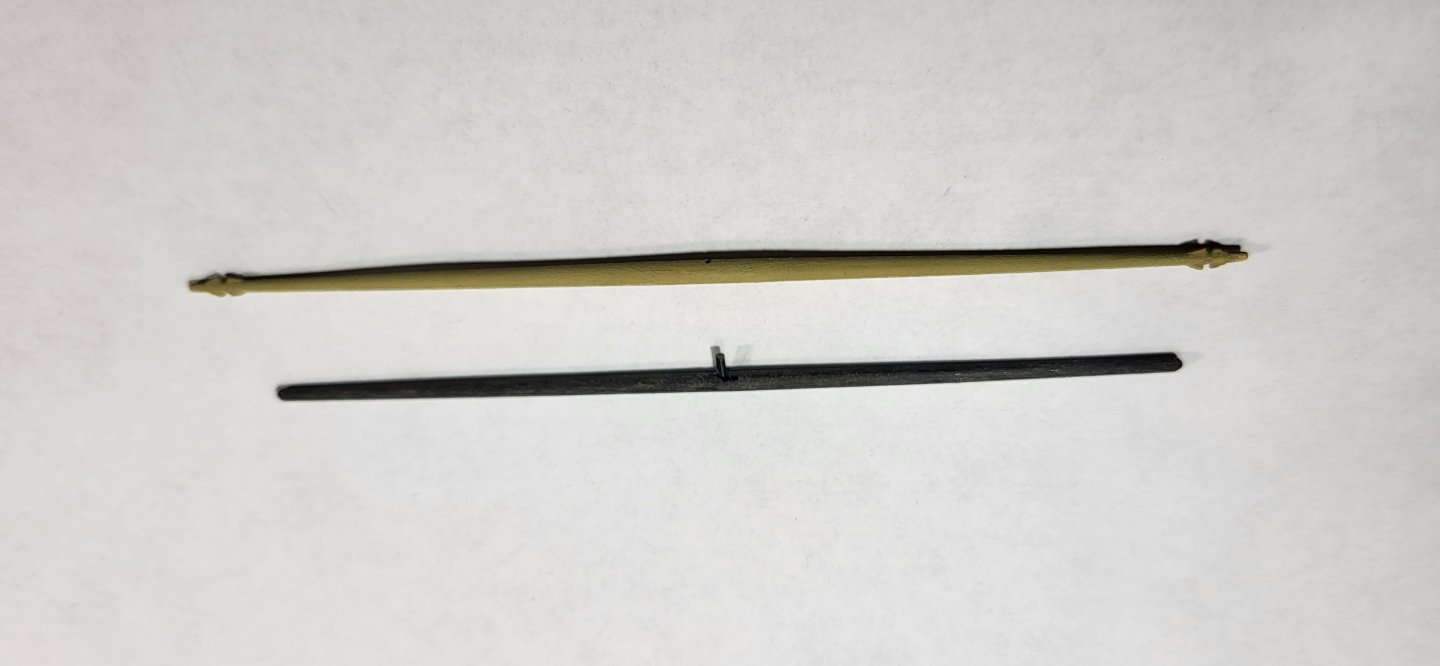
I made up the Lateen yard and crossjack, as with the fore and main courses the Mizen course will use the tie in conjunction with the jeer, the block is 3mm and just a bit under scale and the crossjack sling block is 2.5mm, again slightly under scale. This is all in the mockup stage and still a ton of work left to do before permanently attaching the yards to the lower mast prior to gluing it in place. Michael D.


- 324 replies
-
- 11
-
-
- Sovereign of the Seas
- Airfix
- (and 1 more)
-
I finished up the lower main shrouds to the point of getting them around the mast head so I could rig the lower main stay and lanyard, up next I'll be working on stepping the lower mizen mast in place and the mizen stay before completing the lower shrouds. Thanks for looking. Michael D.

- 324 replies
-
- 10
-
-
-
- Sovereign of the Seas
- Airfix
- (and 1 more)
-
The main pendant tackles are completed and started rigging the fore lanyards, trying to rig these correctly using a throat seizing is fiddly to say the least, I think they look okay. I'll only do a few per side before moving on to the main shrouds so I can then set the lower main stay in place before finishing up the fore lanyards. Thanks for looking. Michael D.
- 324 replies
-
- 9
-
-
-
- Sovereign of the Seas
- Airfix
- (and 1 more)
-
Glad you like it thus far Kirill, good to hear from you. A few different phases going on in this update, glued in the main lower mast, turned a new main lower course yard, this measures out at 187.7mm, 103'-6" at scale, fabricated the parrel, the pendants of tackle are .40mm line served with 3mm single blocks and the falls are taken to the main deck close to the bulwarks using 2.5mm double and single blocks and finally rigged up the parrel rope and tackle using a 2mm double and single block, that's it for this retina straining update and thanks for looking. Michael D.


- 324 replies
-
- 8
-
-
-
- Sovereign of the Seas
- Airfix
- (and 1 more)
-
Thank you, Frank, nice to hear from you. I ended up redoing the knighthead for the main lower tie to a four sheave, I used .4mm line for the ties and top rope and .2mm for the fall, the rams head measures approximately 4.5mm, 30" at scale, also I needed to install the Mizen lower stay collar and fabricate a 1.70mm 5-hole dead eye, 9.75" at scale to check the clearance at the railing, next Ill fabricate the parral before finally gluing in the lower main mast. Thanks for looking. Michael D.


- 324 replies
-
- 10
-
-
-
- Sovereign of the Seas
- Airfix
- (and 1 more)
-
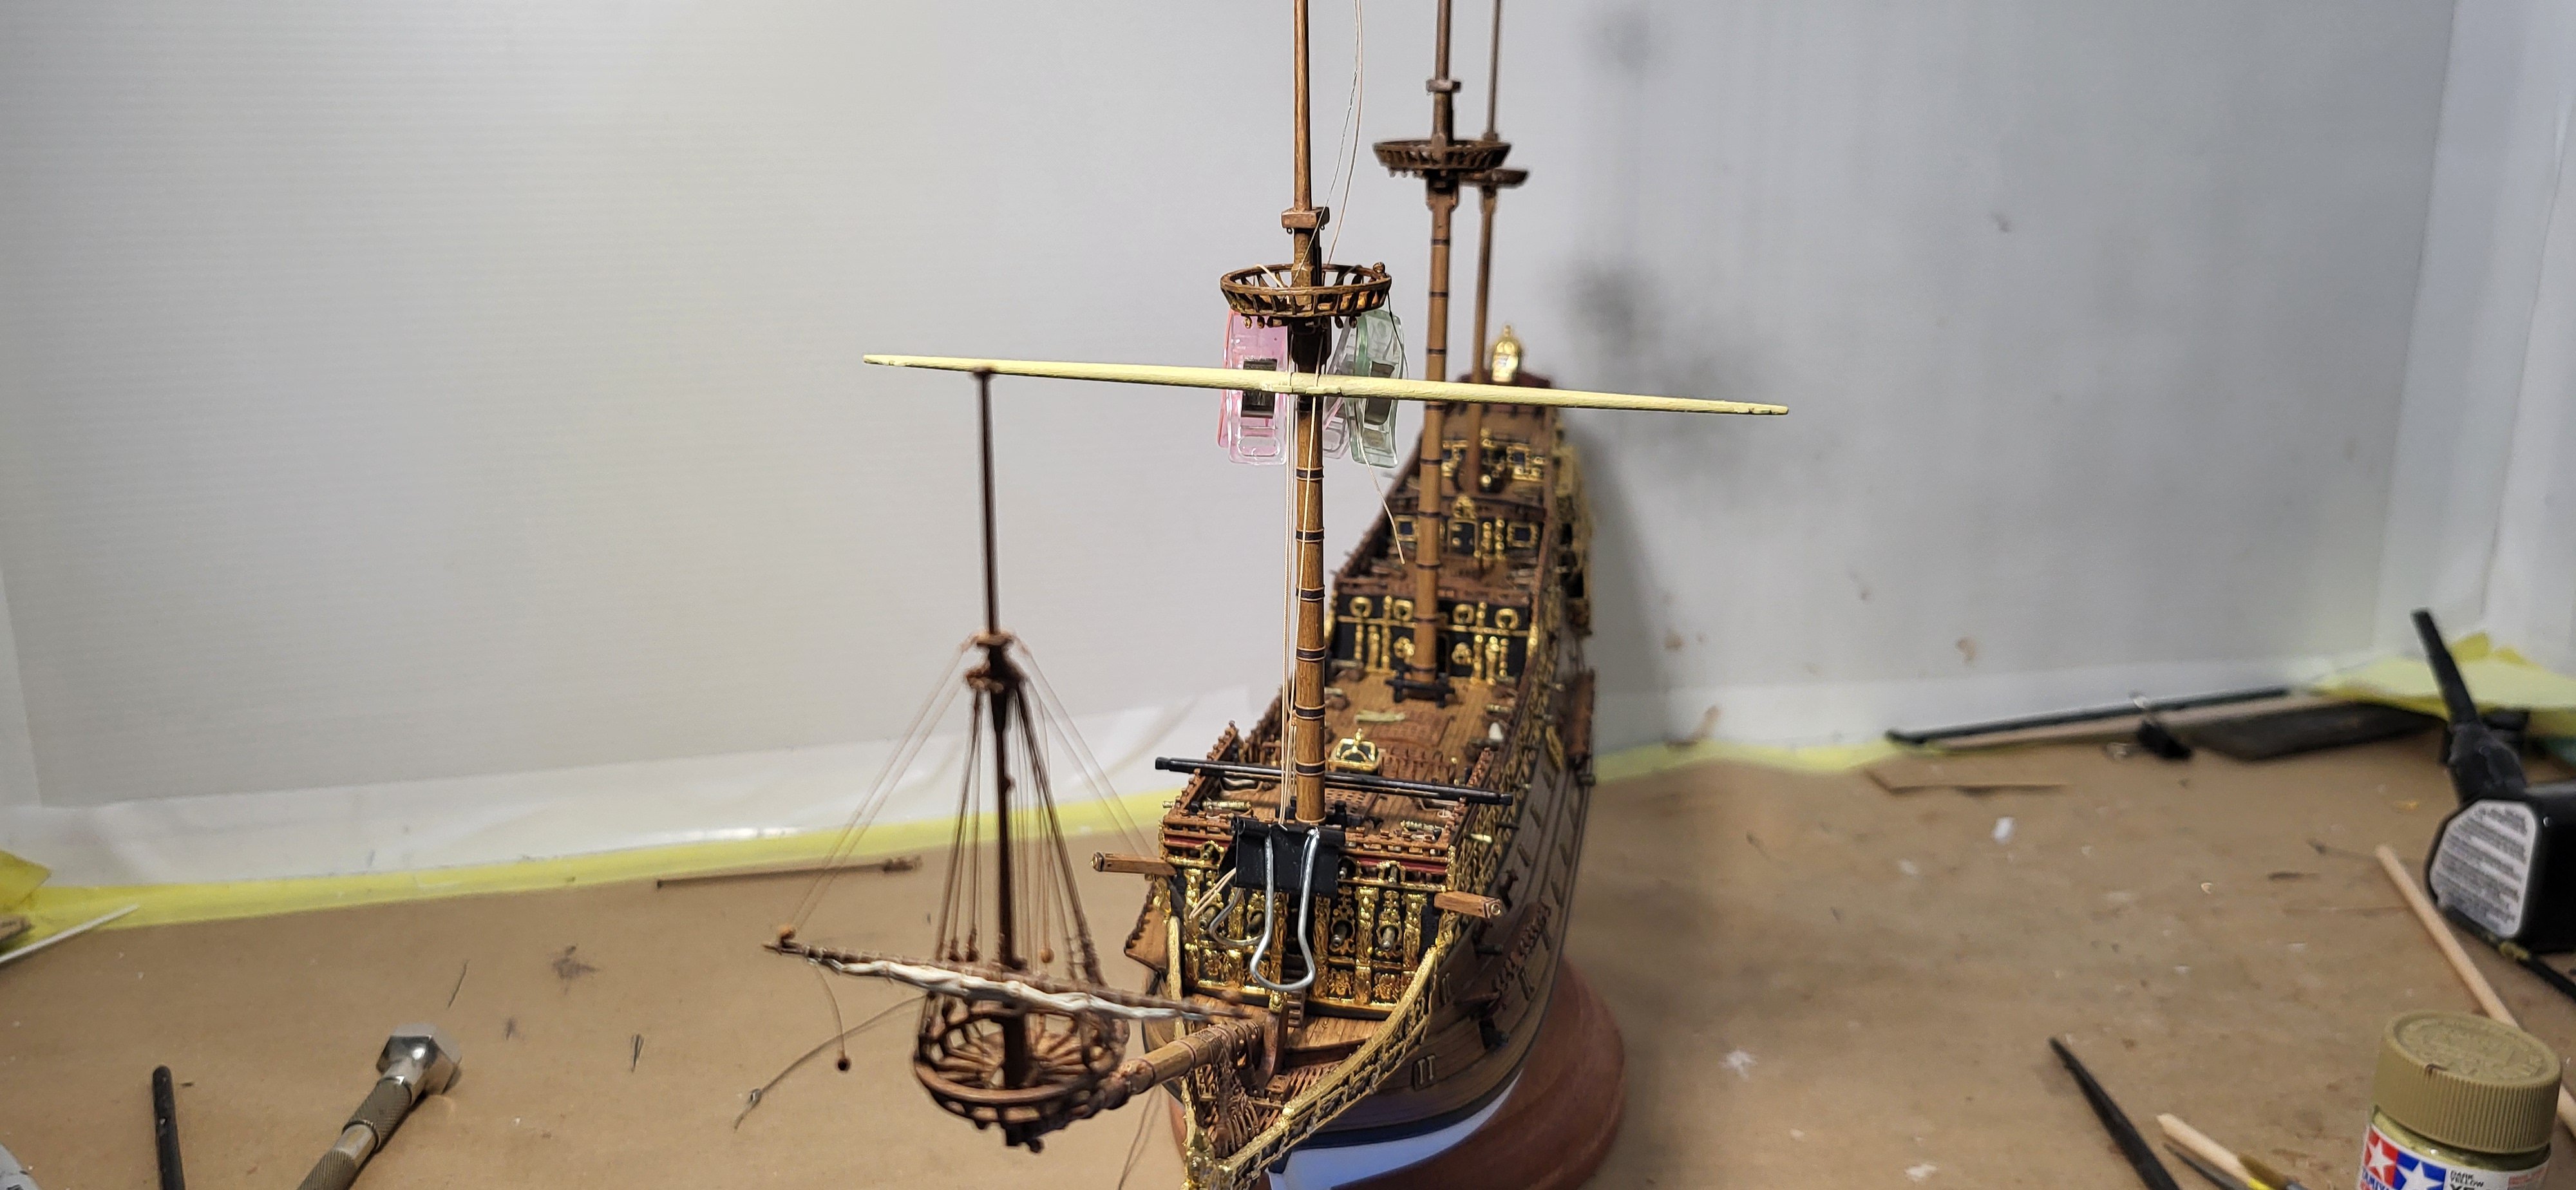
The fore stay is finally in place, the mouse is made up using 1/8" rod pared down to the appropriate size, visually anyways, this was done on the drill bit in the pin vase, the lanyard is rigged but not yet tied off, I'll let it sit for a few days before that, also the lower tackles are just about complete, thanks for looking. Michael D.


- 324 replies
-
- 8
-
-
- Sovereign of the Seas
- Airfix
- (and 1 more)
-
Thank you so much Ian, means a lot coming from a long-time follower. Frequent breaks are mandatory working at this scale. The tackles are coming along pretty good, using 2.5mm double blocks on the runners that are led through an eye bolt and tied to a dead eye on the channels and 2.5mm single blocks hooked to eye bolts on the deck. Michael D.
- 324 replies
-
- 8
-
-
- Sovereign of the Seas
- Airfix
- (and 1 more)
-
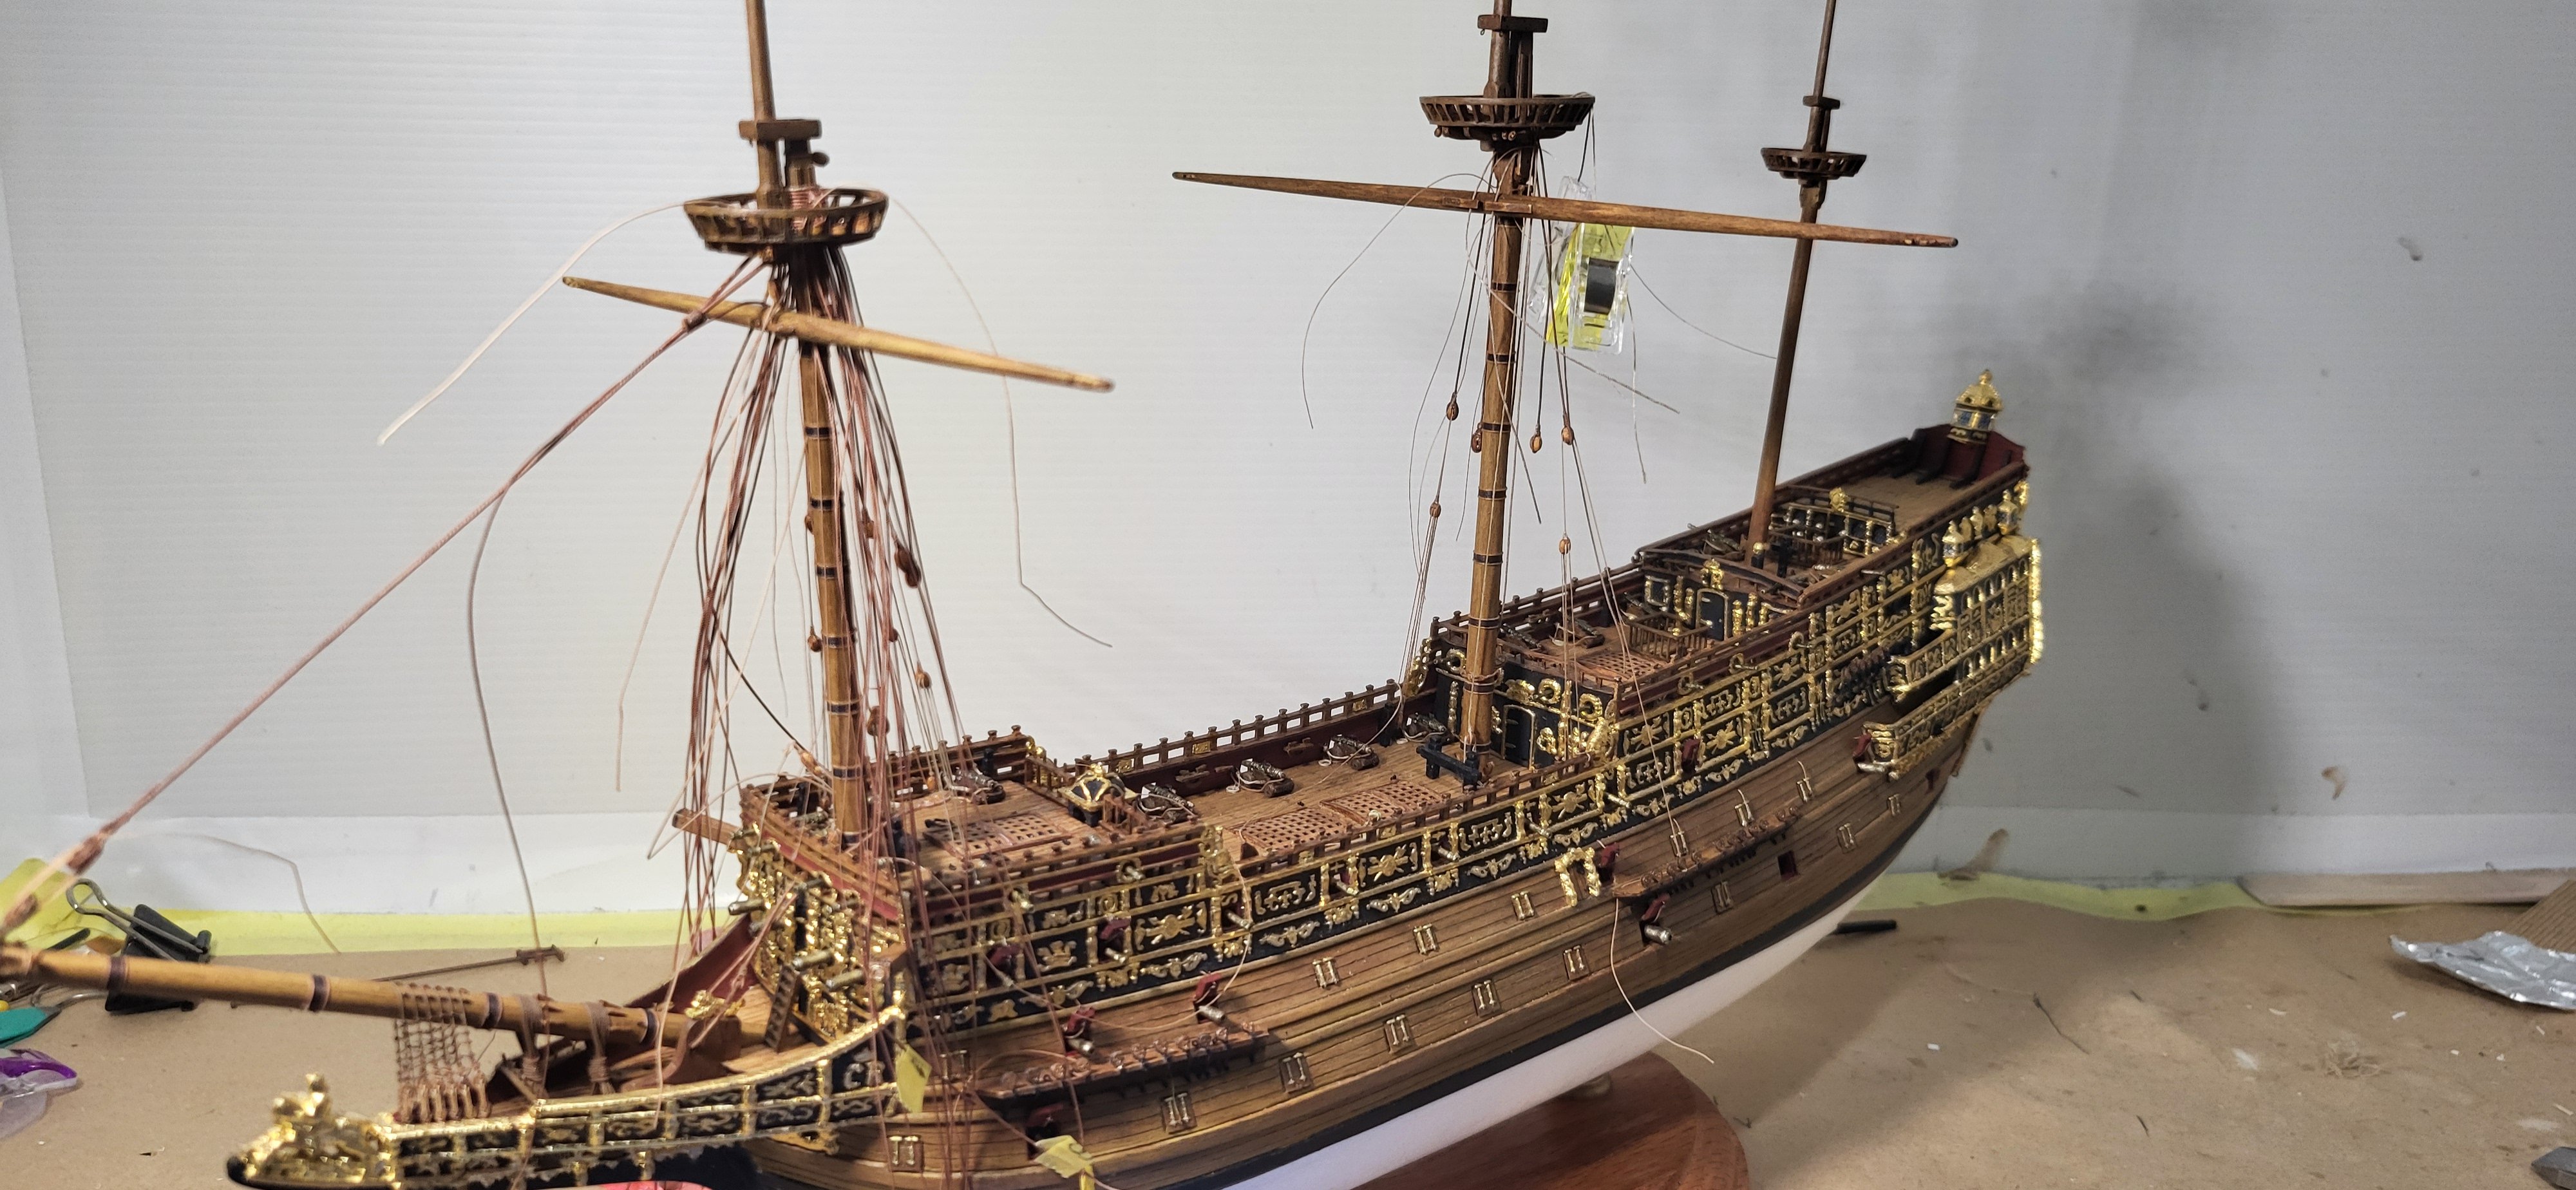
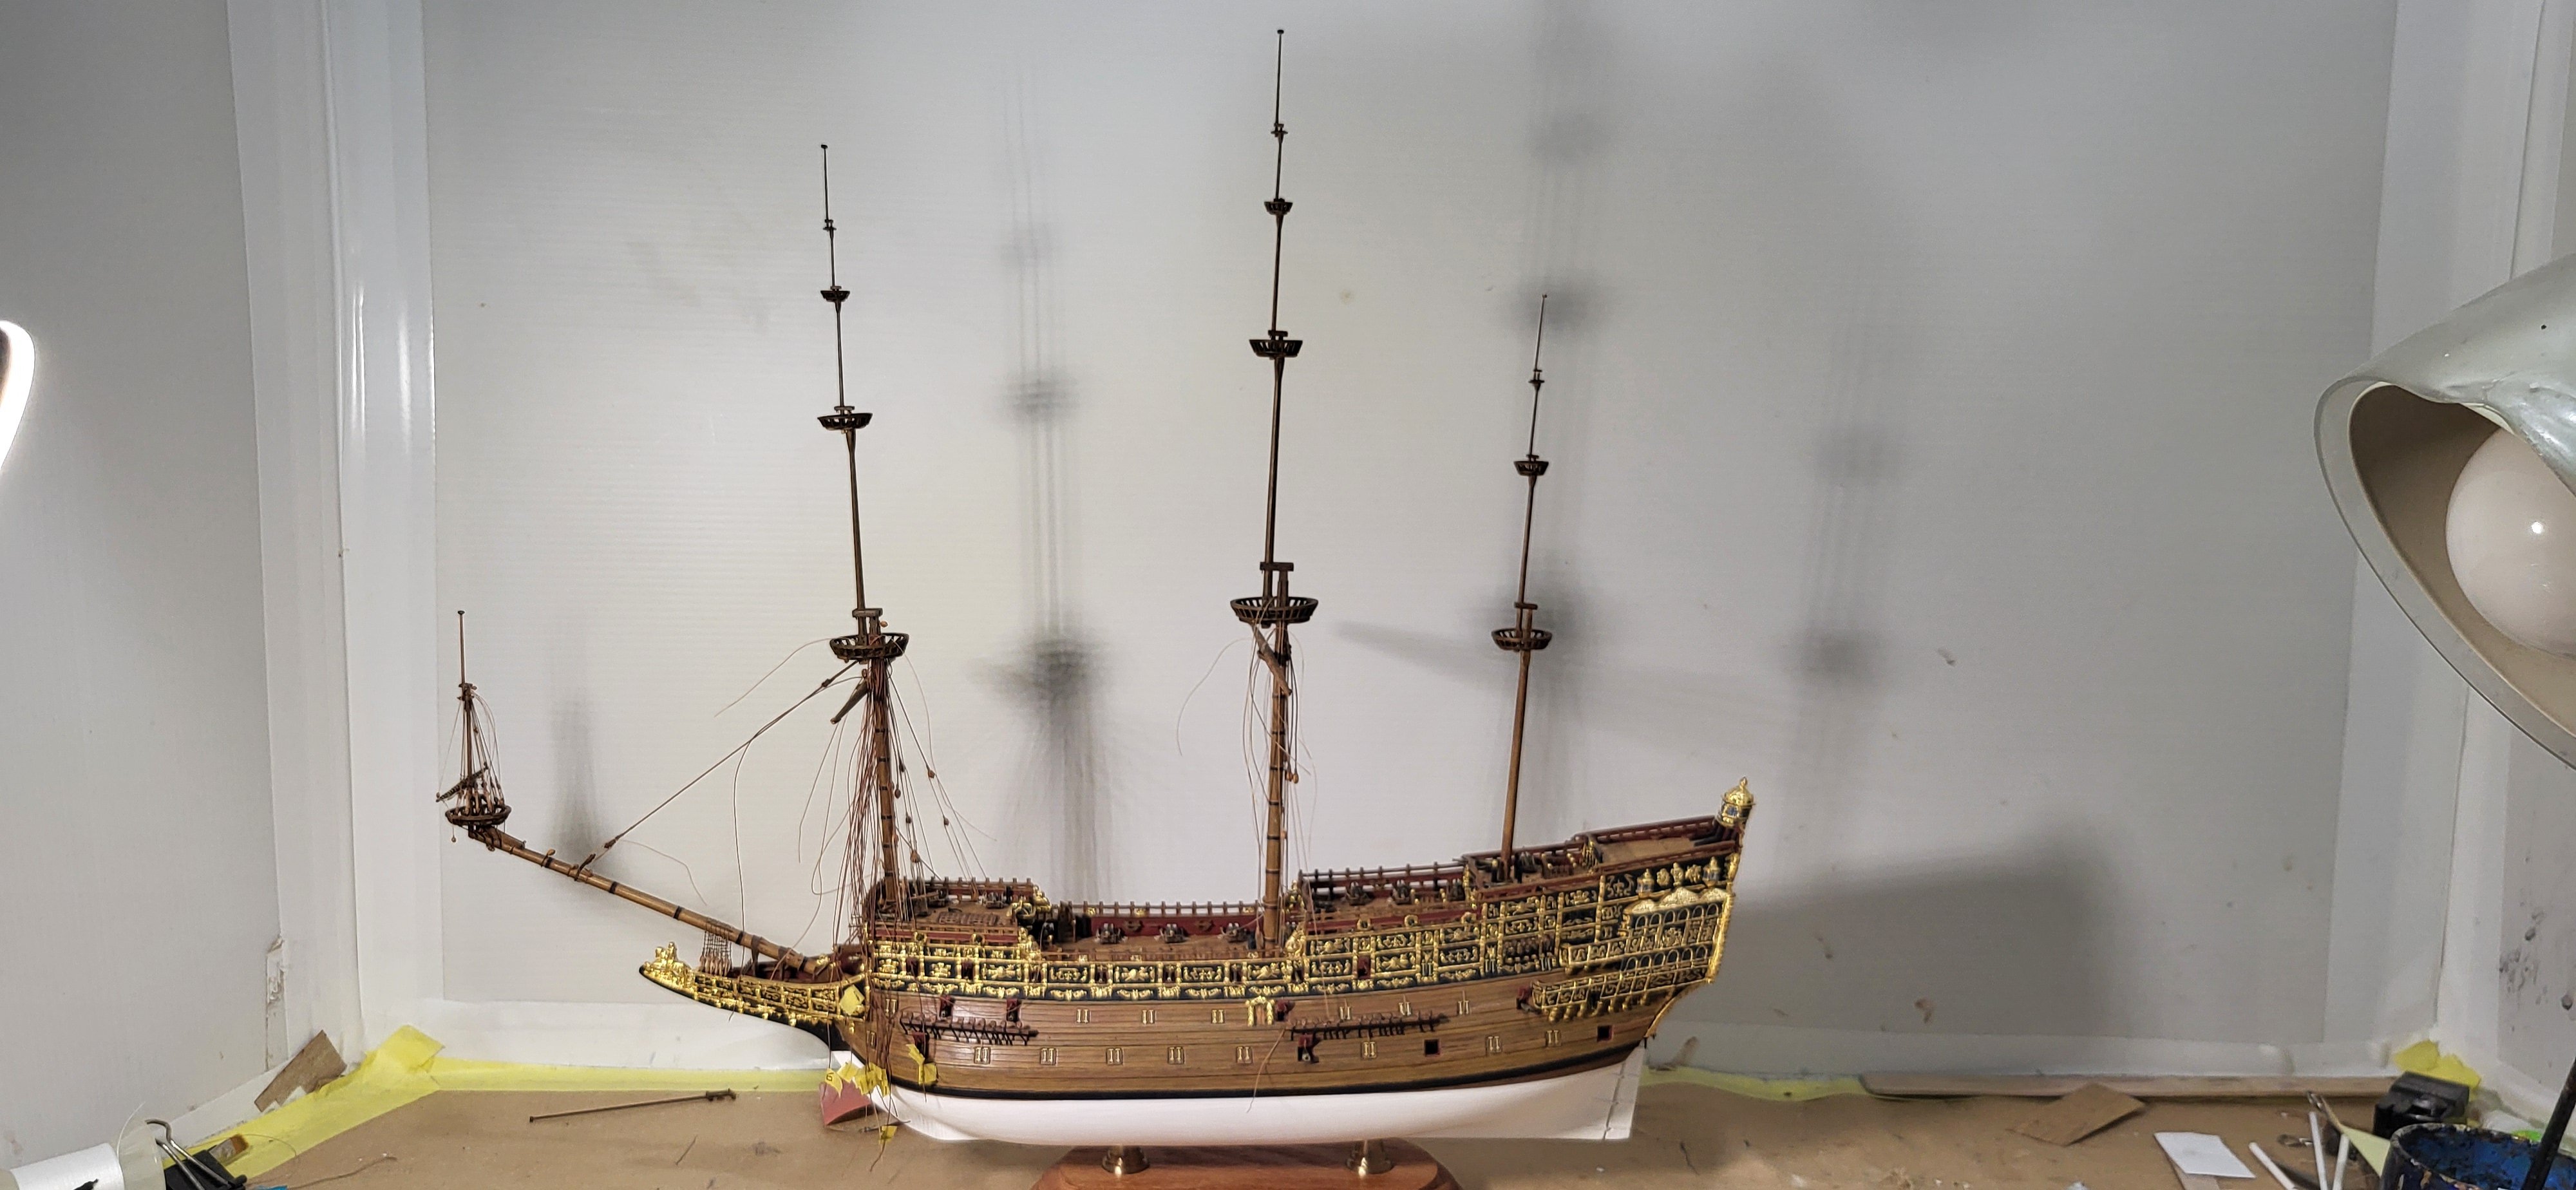
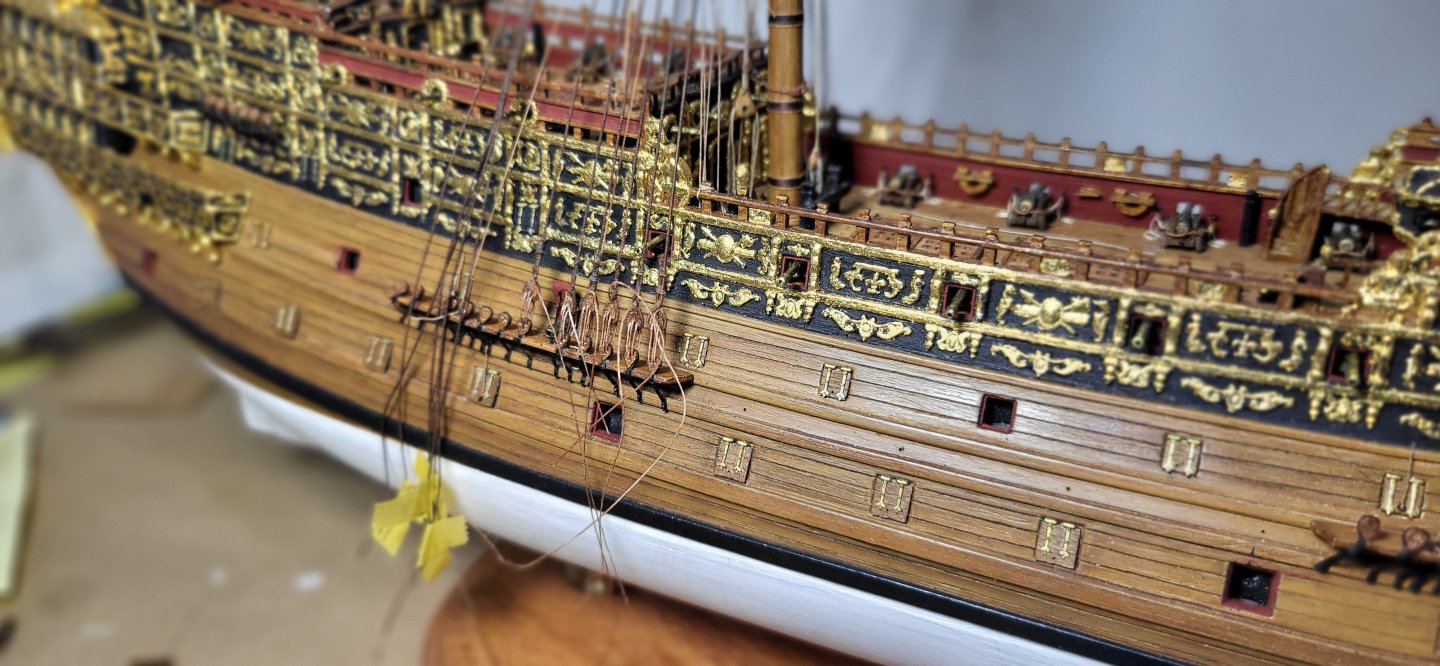
Work on the lower fore shrouds continues, the swifter shroud was a little challenging getting the eye splice to fit around the mast head and look somewhat decent, not perfect but looks good, also a 3mm single block is stropped to the mast head for the main topmast stay. All of this is just in the test fitting stage to make sure the shrouds are not fouling anything like the guns, fish davit etc, still lots of work ahead like fabricating the mouse, gun port lids and pendant tackles, speaking of which I'll lead the runners down to the channel but the falls will be belayed on the deck close to the bulwarks rather than on the channels. Thanks for looking and the likes. Michael D.

- 324 replies
-
- 5
-
-
-
- Sovereign of the Seas
- Airfix
- (and 1 more)
-
I was able to lay up 4 pairs of shrouds, I'm using shroud laid rope for these, with the exception of the foremost shrouds which are served their entire length, the rest are served 14.4mm from center either side. I forgone using the bolsters at this scale. Michael D.

- 324 replies
-
- 5
-
-
-
- Sovereign of the Seas
- Airfix
- (and 1 more)
-
I made up the fore and main stays minus the mouse, mocked them up and I think they'll suffice, the main stay at scale is just under 5.5" in diameter and the fore stay is just over 4.5" at scale and looks about right next to the scale figure. The pendant of tackles are completed using .35mm line served with 100 wt thread and 3mm single blocks, long-tackle blocks where in use from 1733 to around 1773 in the aft pair. Test fitting revealed the main top gallant stay did have enough clearance to pass behind the stay and pendants, so I had to open up the cutout in the top just a bit. Michael D.

- 324 replies
-
- 6
-
-
-
- Sovereign of the Seas
- Airfix
- (and 1 more)
-
I made up the main stay collar using .63mm line served with 100wt thread, the main stay will be .76mm line, these are just slightly undersized, but not noticeable to the eye, this was done before setting the lower fore mast as it was easier to seize the dead eye in the bight, I also rigged the parrel tackle prior, up next will be rigging the lower fore stay using .63mm line while setting in the lower main mast along with setting up the shrouds, all in all, this old tiny vintage model is looking fairly convincing for what it is, thanks for looking. Michael D.


- 324 replies
-
- 6
-
-
-
- Sovereign of the Seas
- Airfix
- (and 1 more)
-
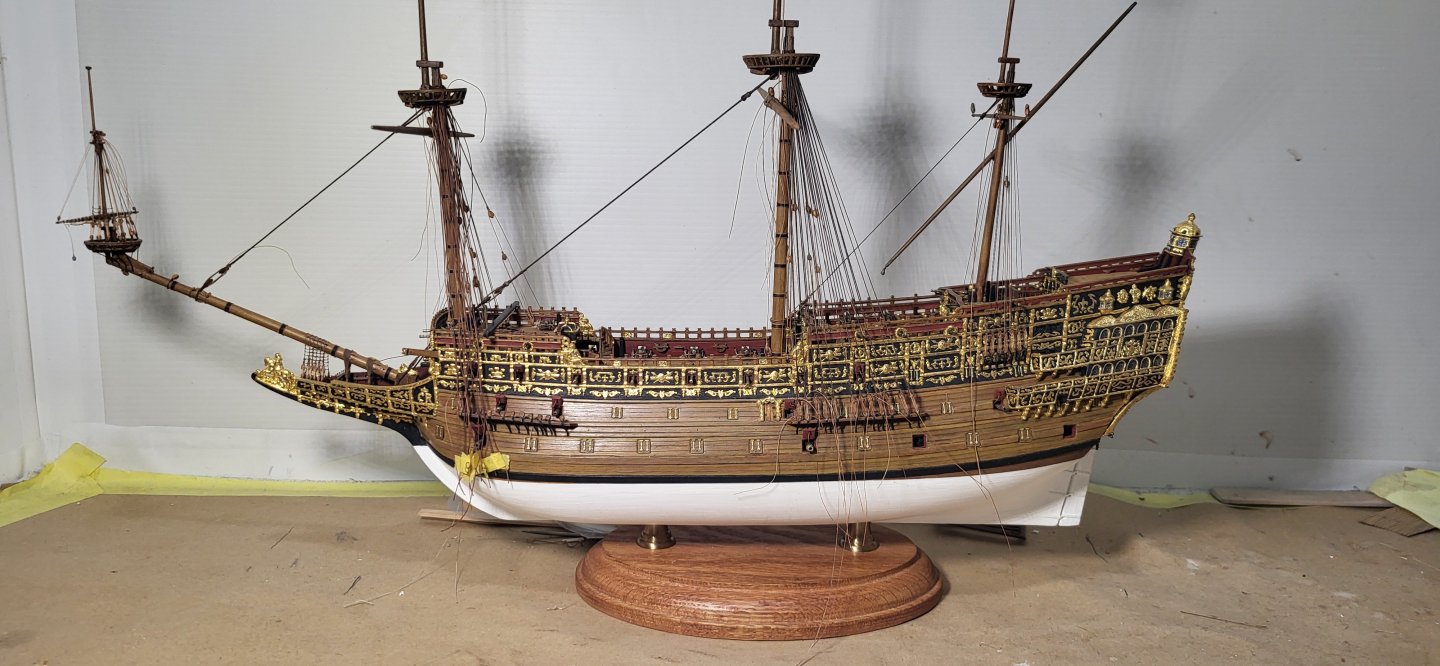
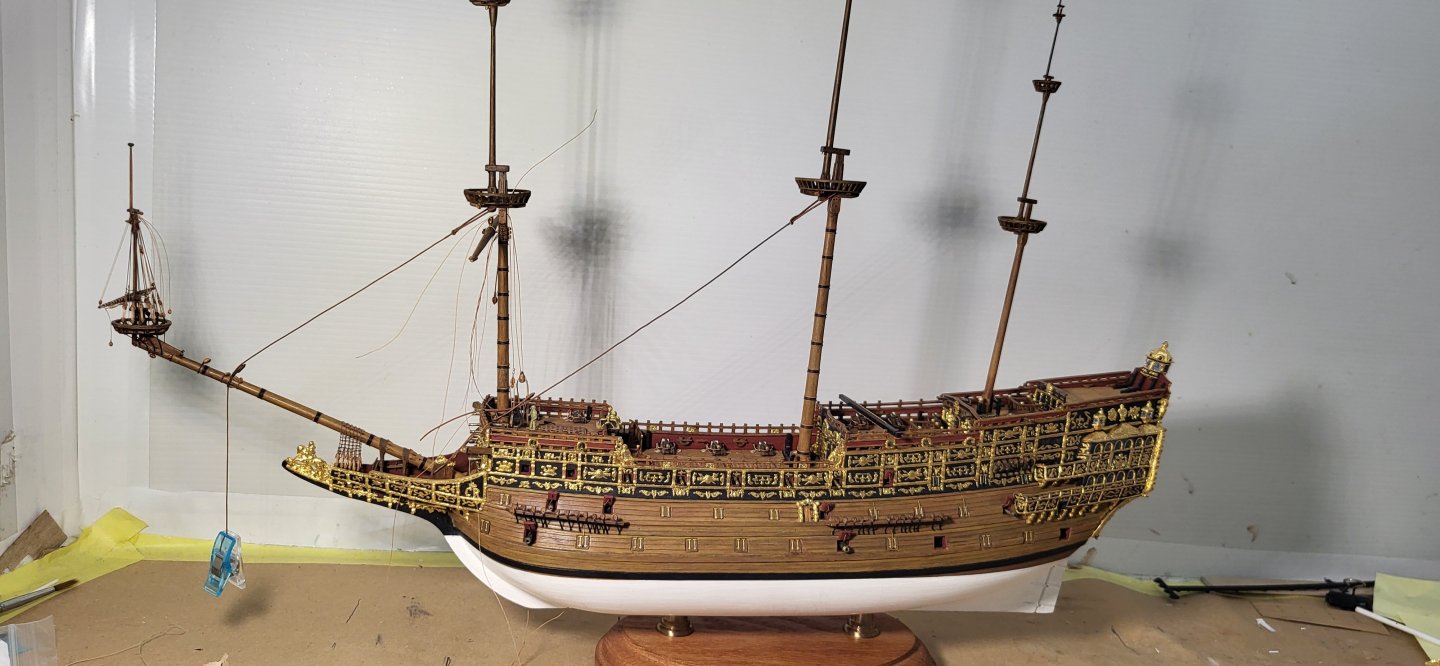
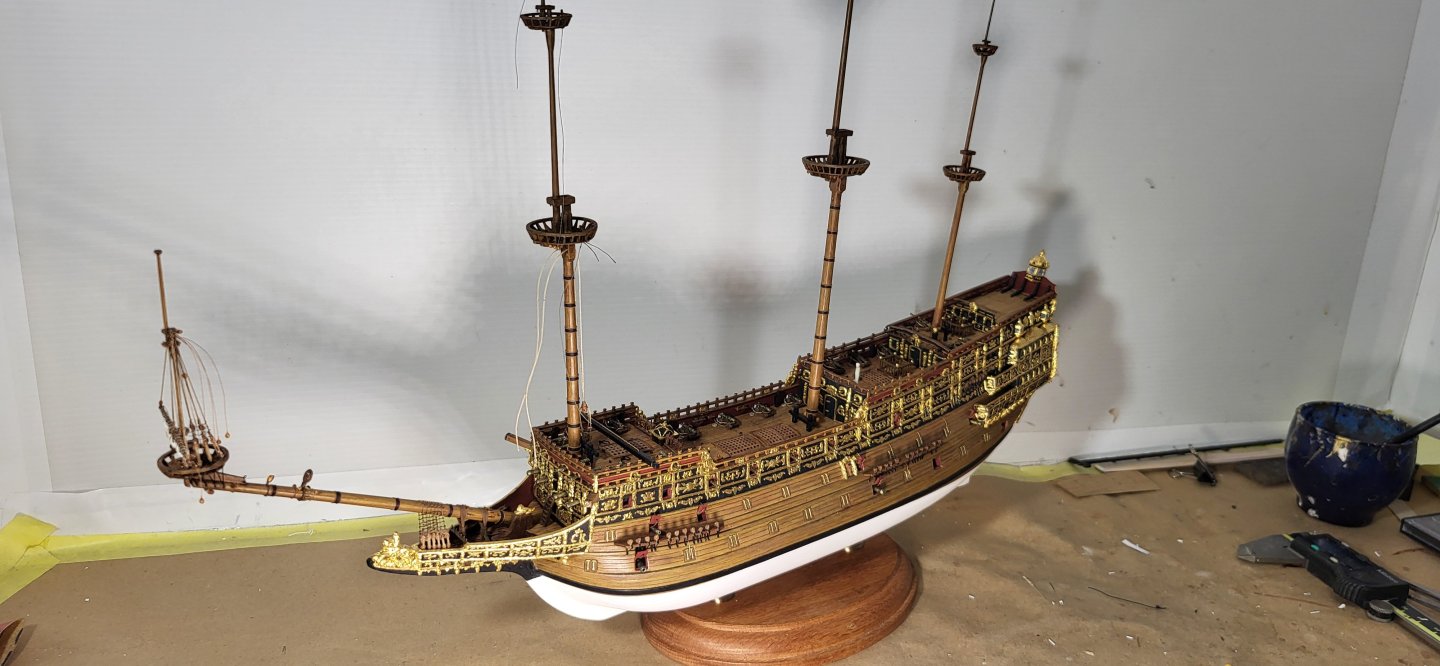
Exquisite work!!. What's the finished length going to be, 40 plus inches? Michael D
-
The parral is completed using 0.5mm thick styrene for the ribs and 1.0mm rod for the trucks, I did consider doing something different and forming the trucks out of sculpy clay but settled on my usual method at this scale. the parral measures out just under 5mm in height. I did strop the jeer block to the yard using a 3mm single block, 24" at scale. Thanks for looking as always. Michael D.

- 324 replies
-
- 5
-
-
-
- Sovereign of the Seas
- Airfix
- (and 1 more)
-
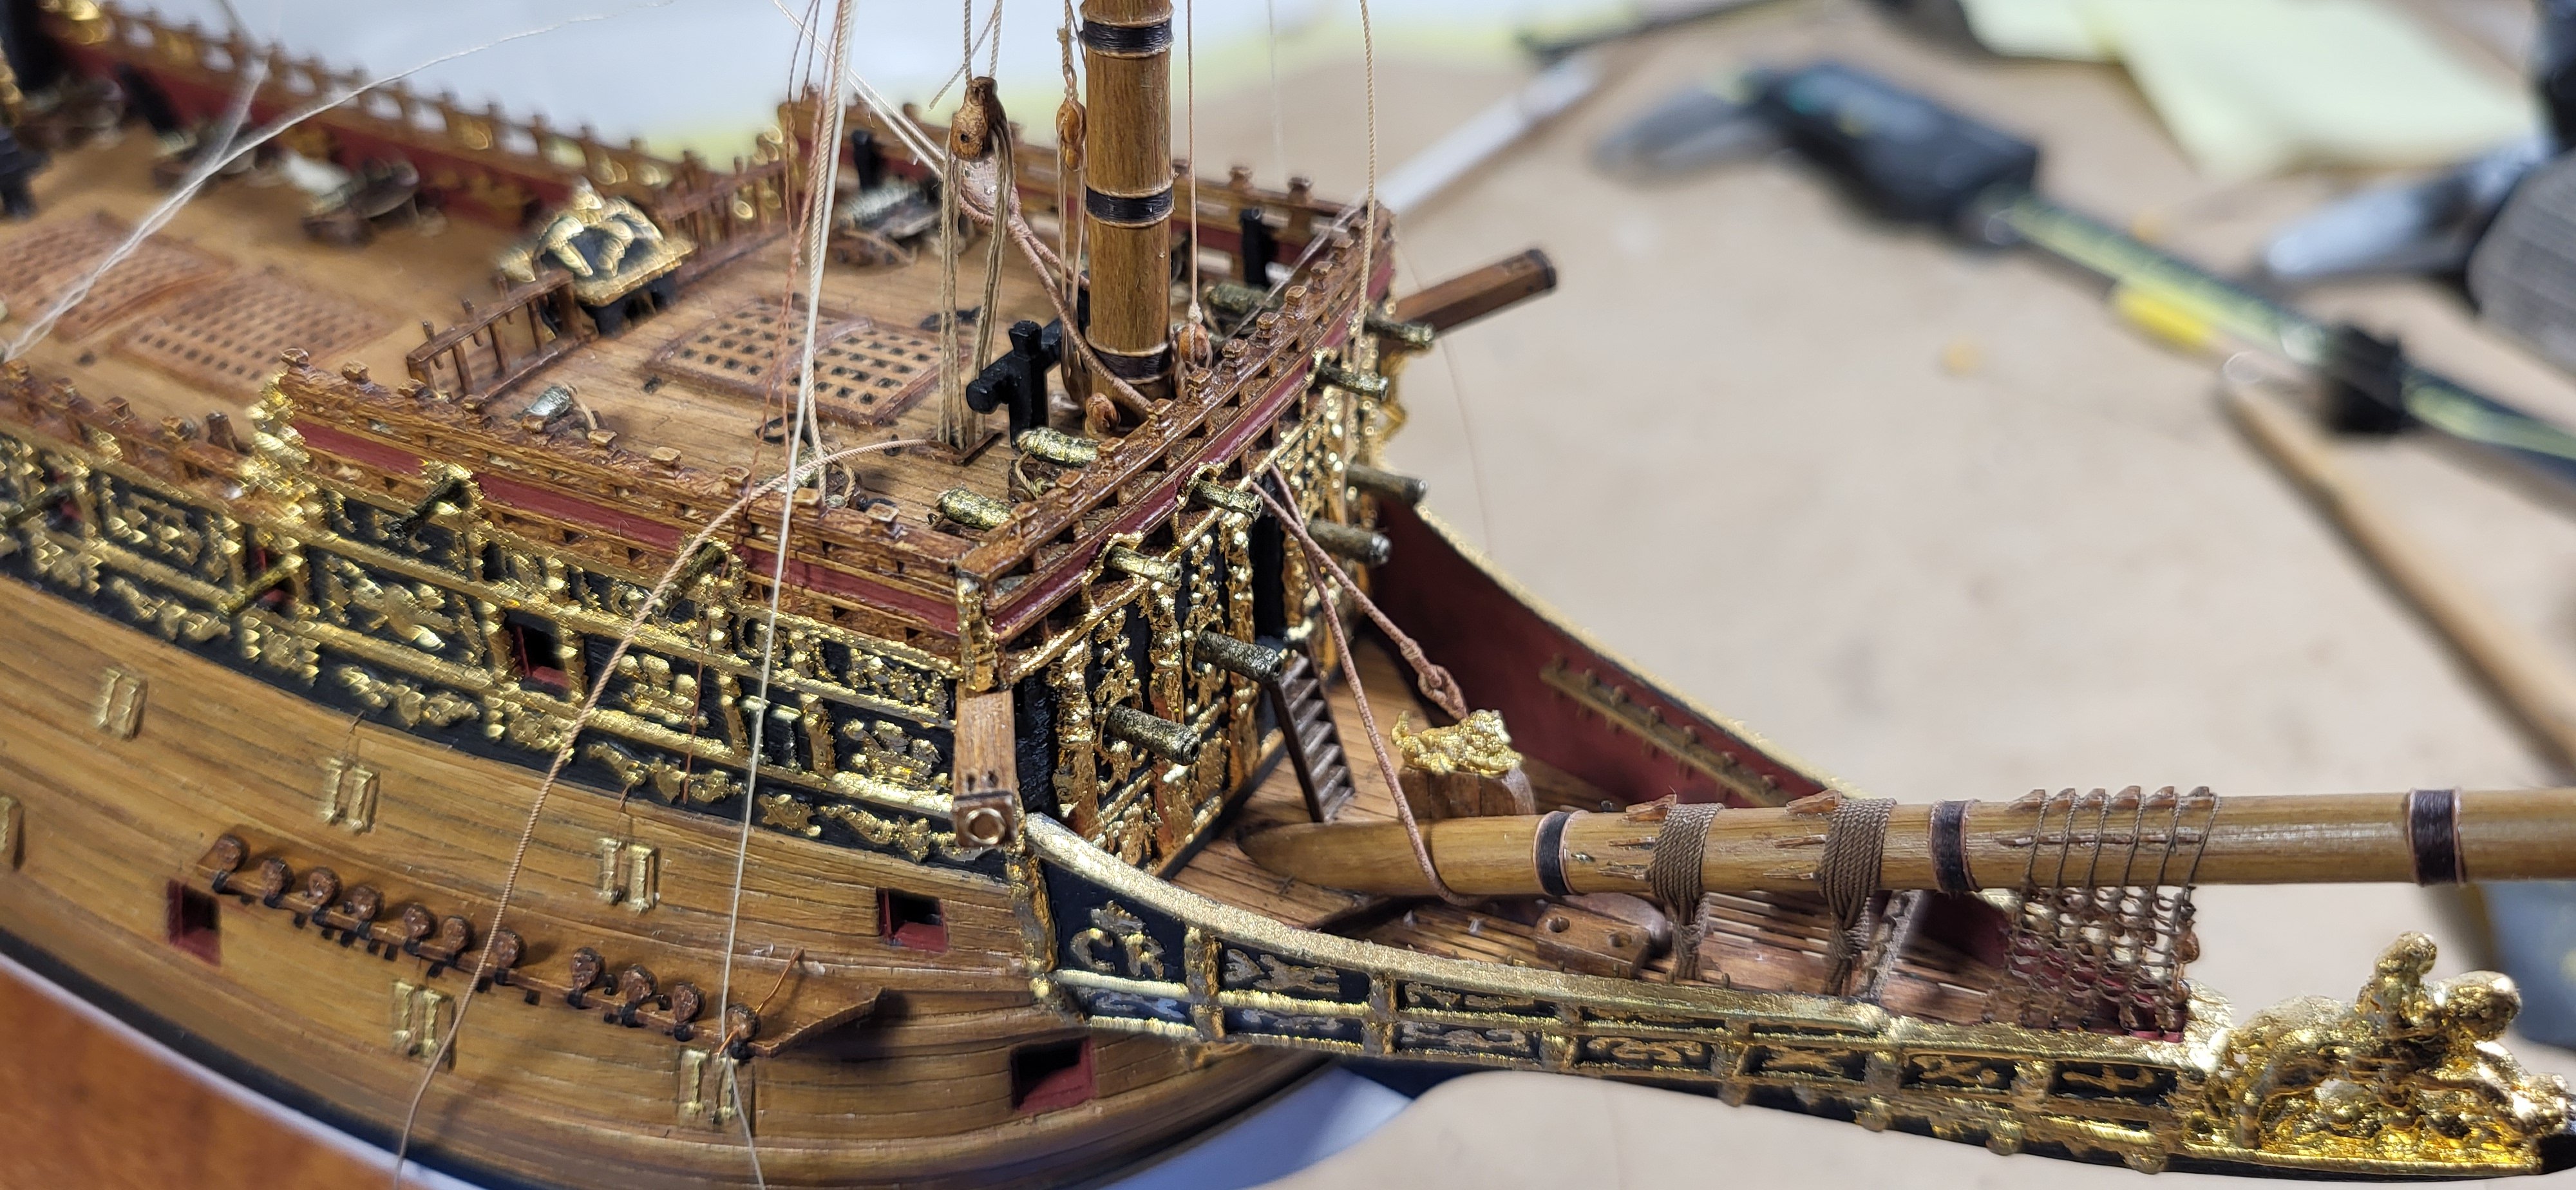
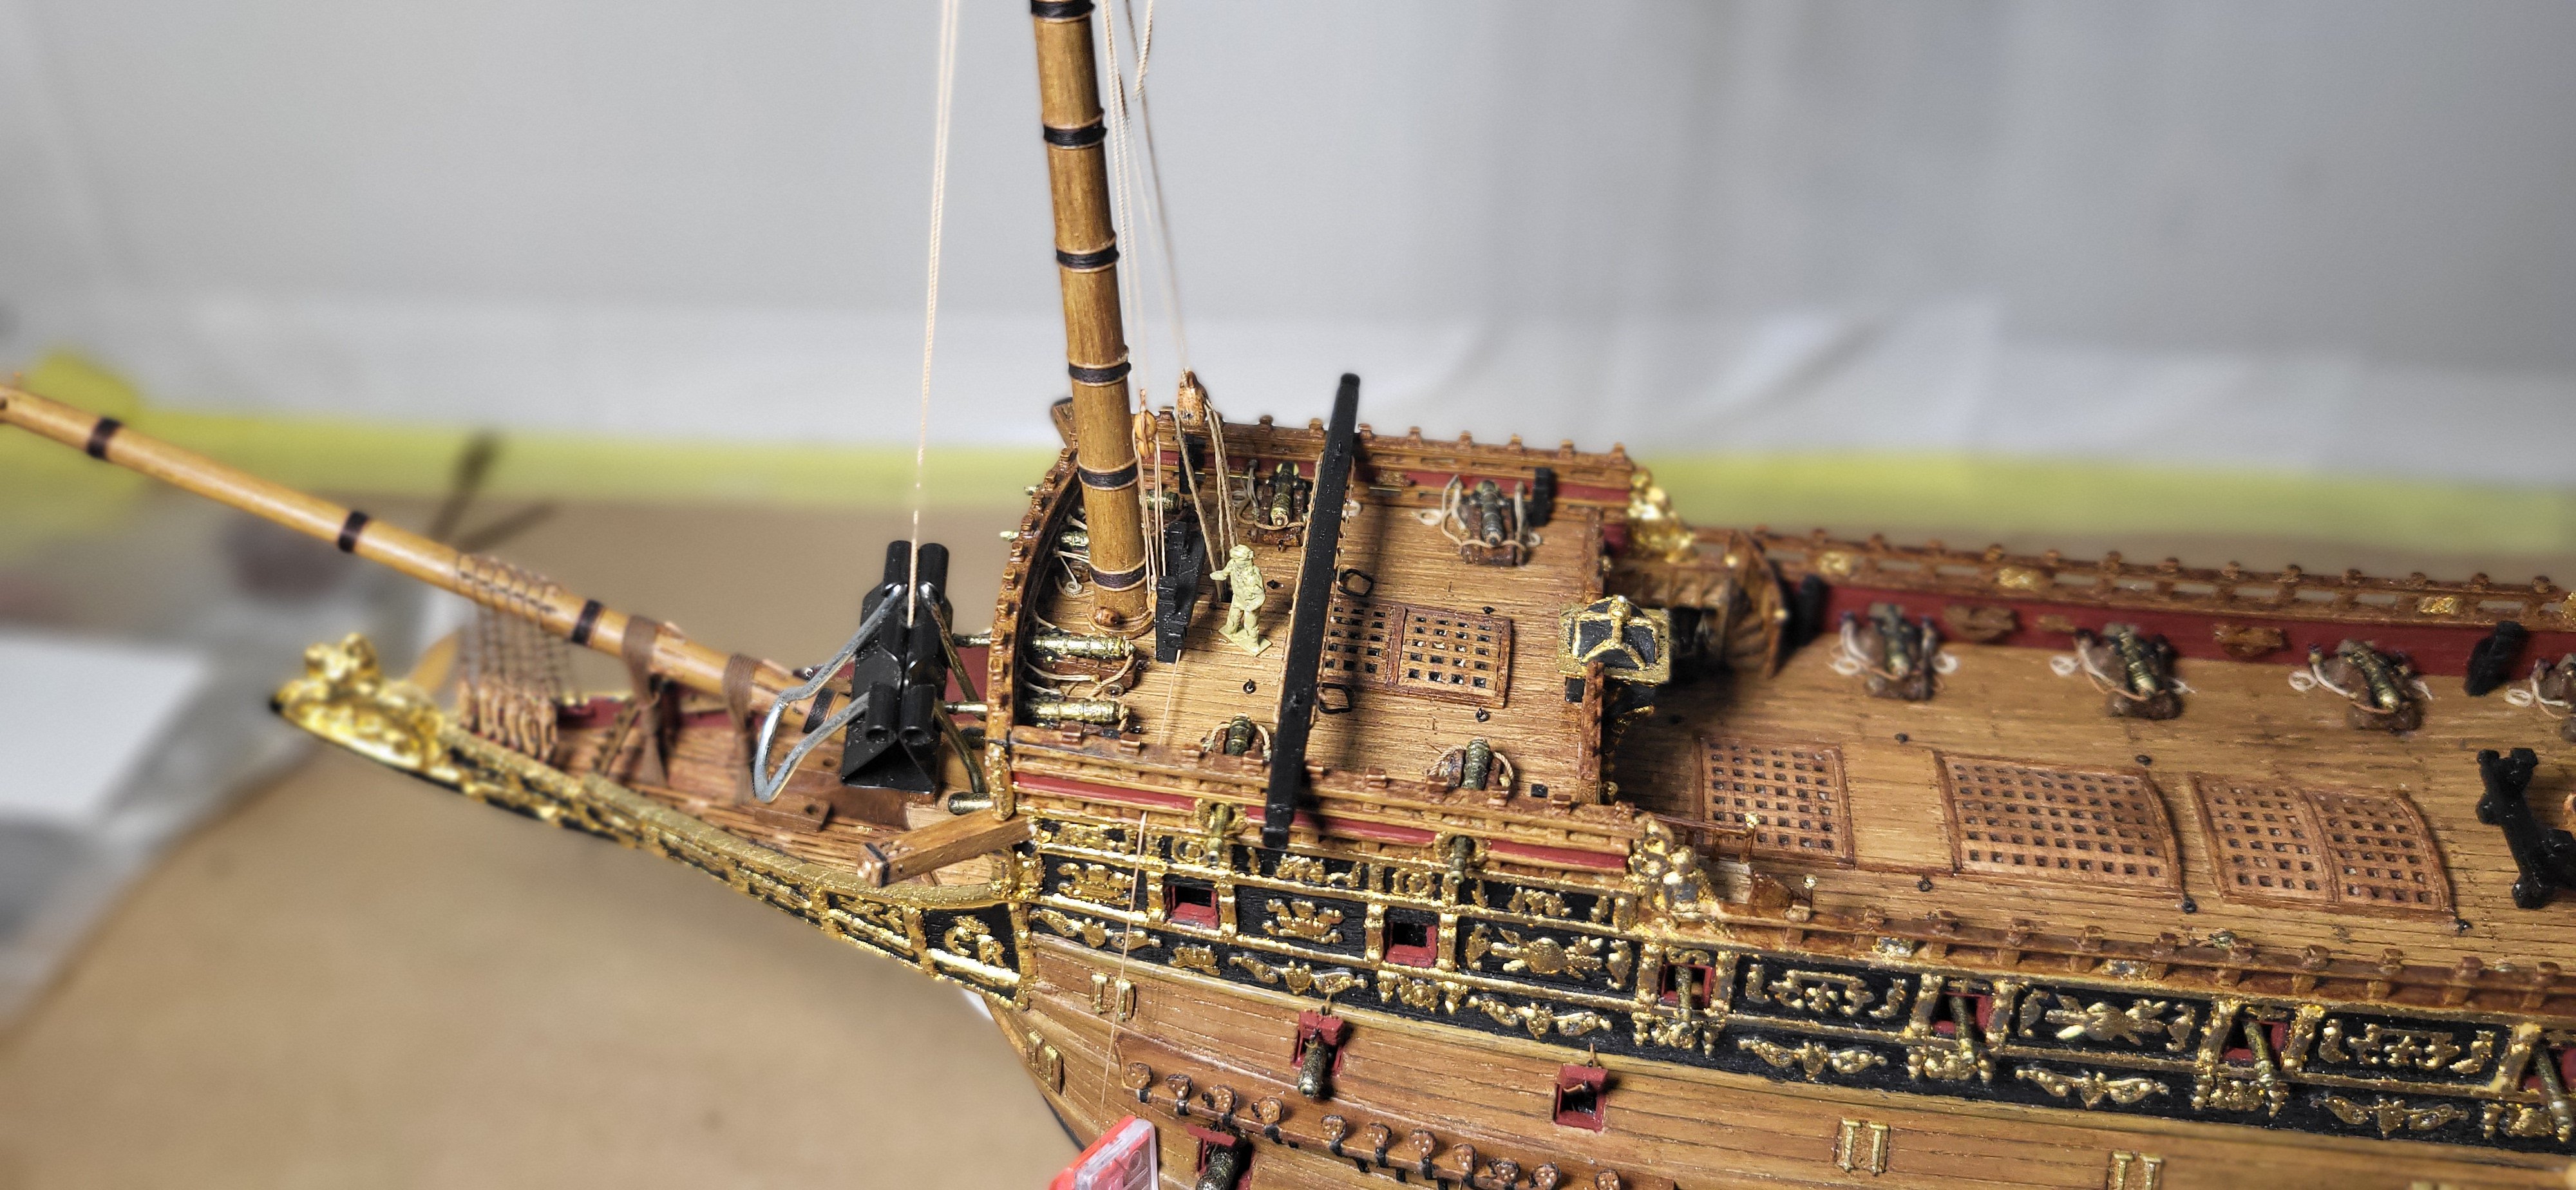
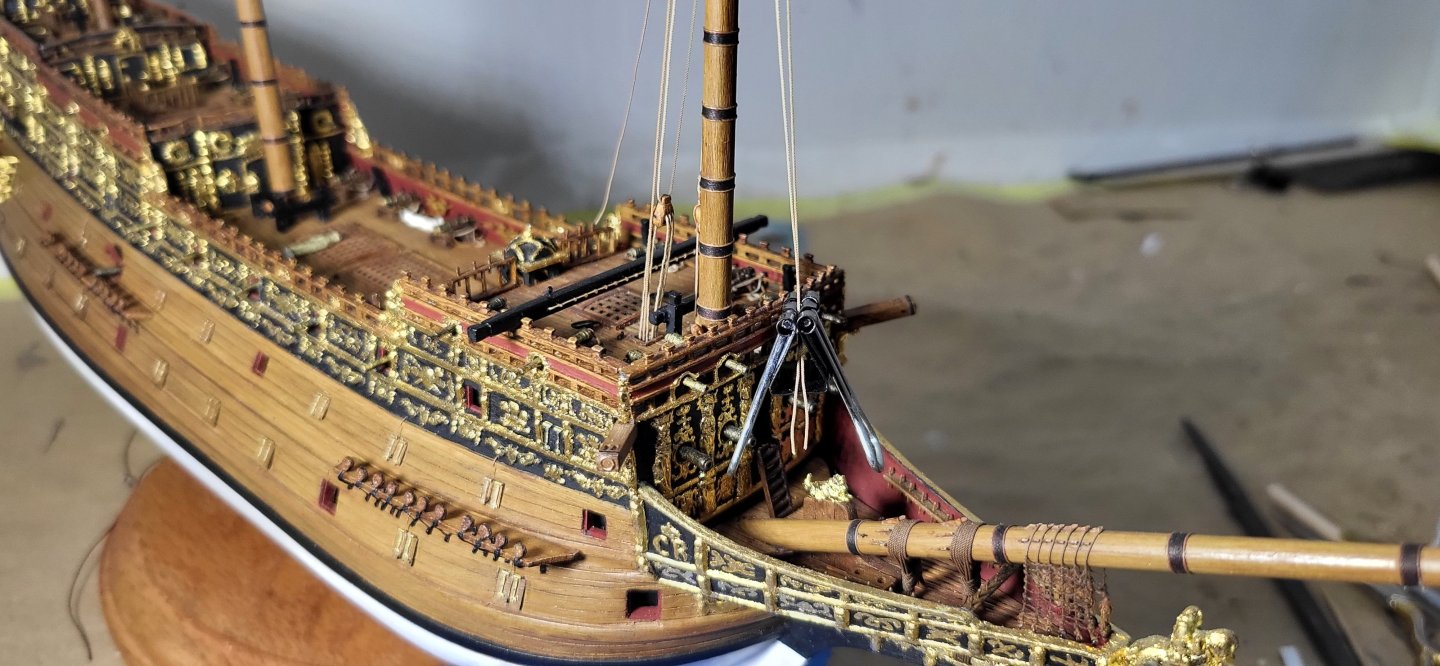
I was hoping to use the kit supplied fore course yard, but it is far too short as you can see, new one measures out to approximately 6-1/8", at scale is 86', mocking up the top rope I forgot early on when rigging the hallaird for the tie, the deception looks pretty good, up next I'll be fabricating the parral. Michael D.
- 324 replies
-
- 8
-
-
- Sovereign of the Seas
- Airfix
- (and 1 more)
-
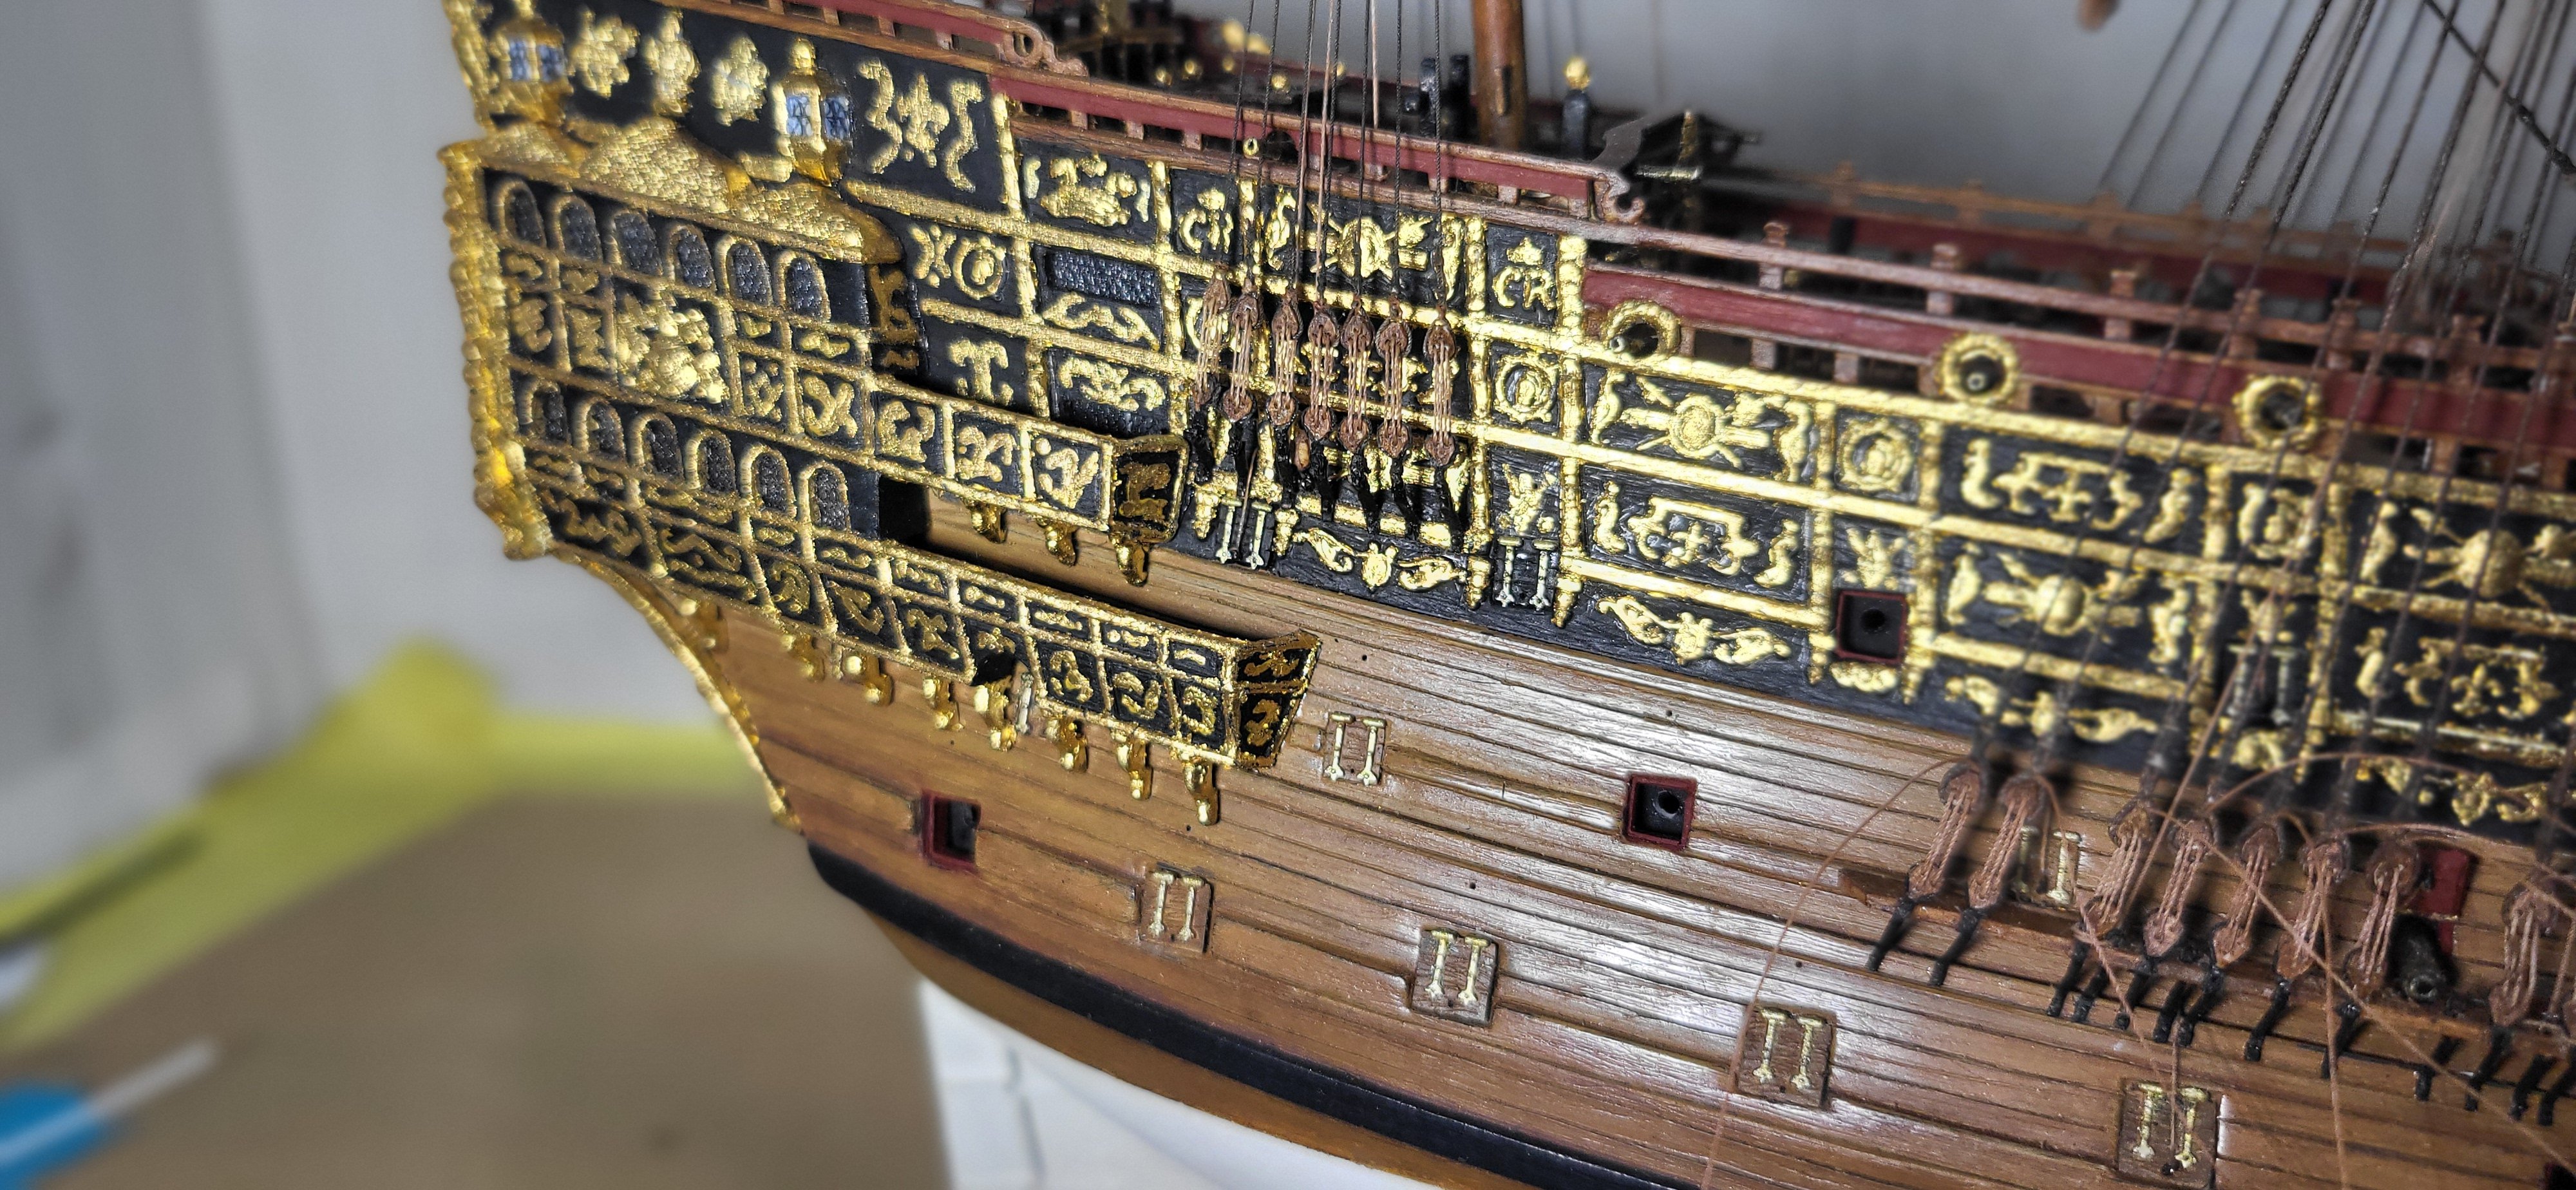
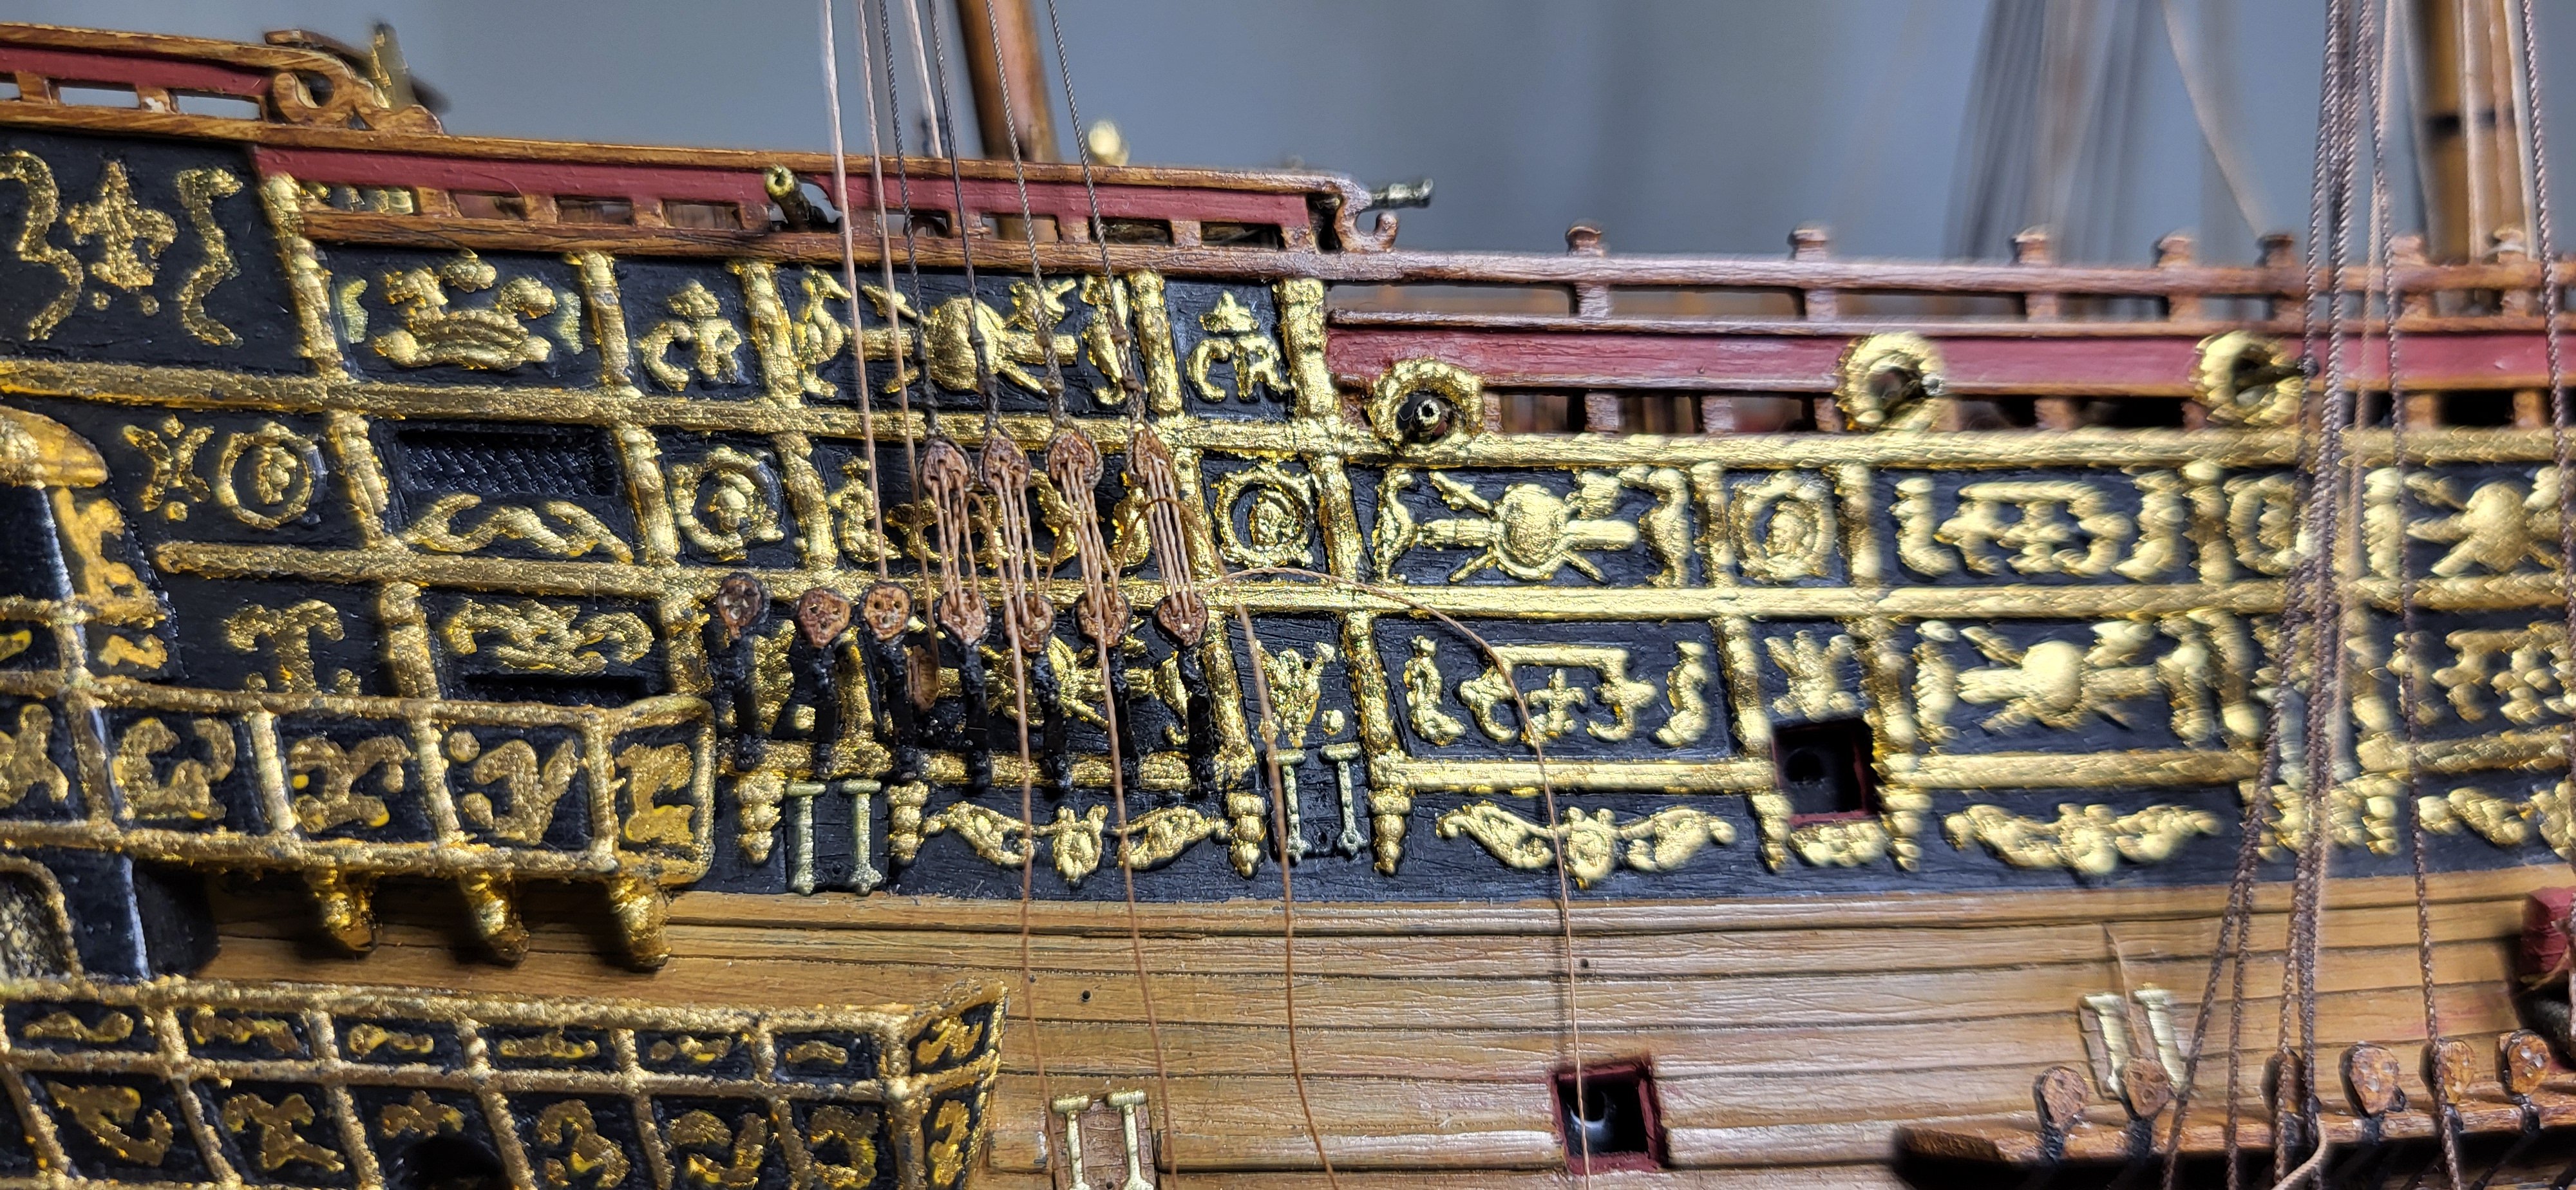
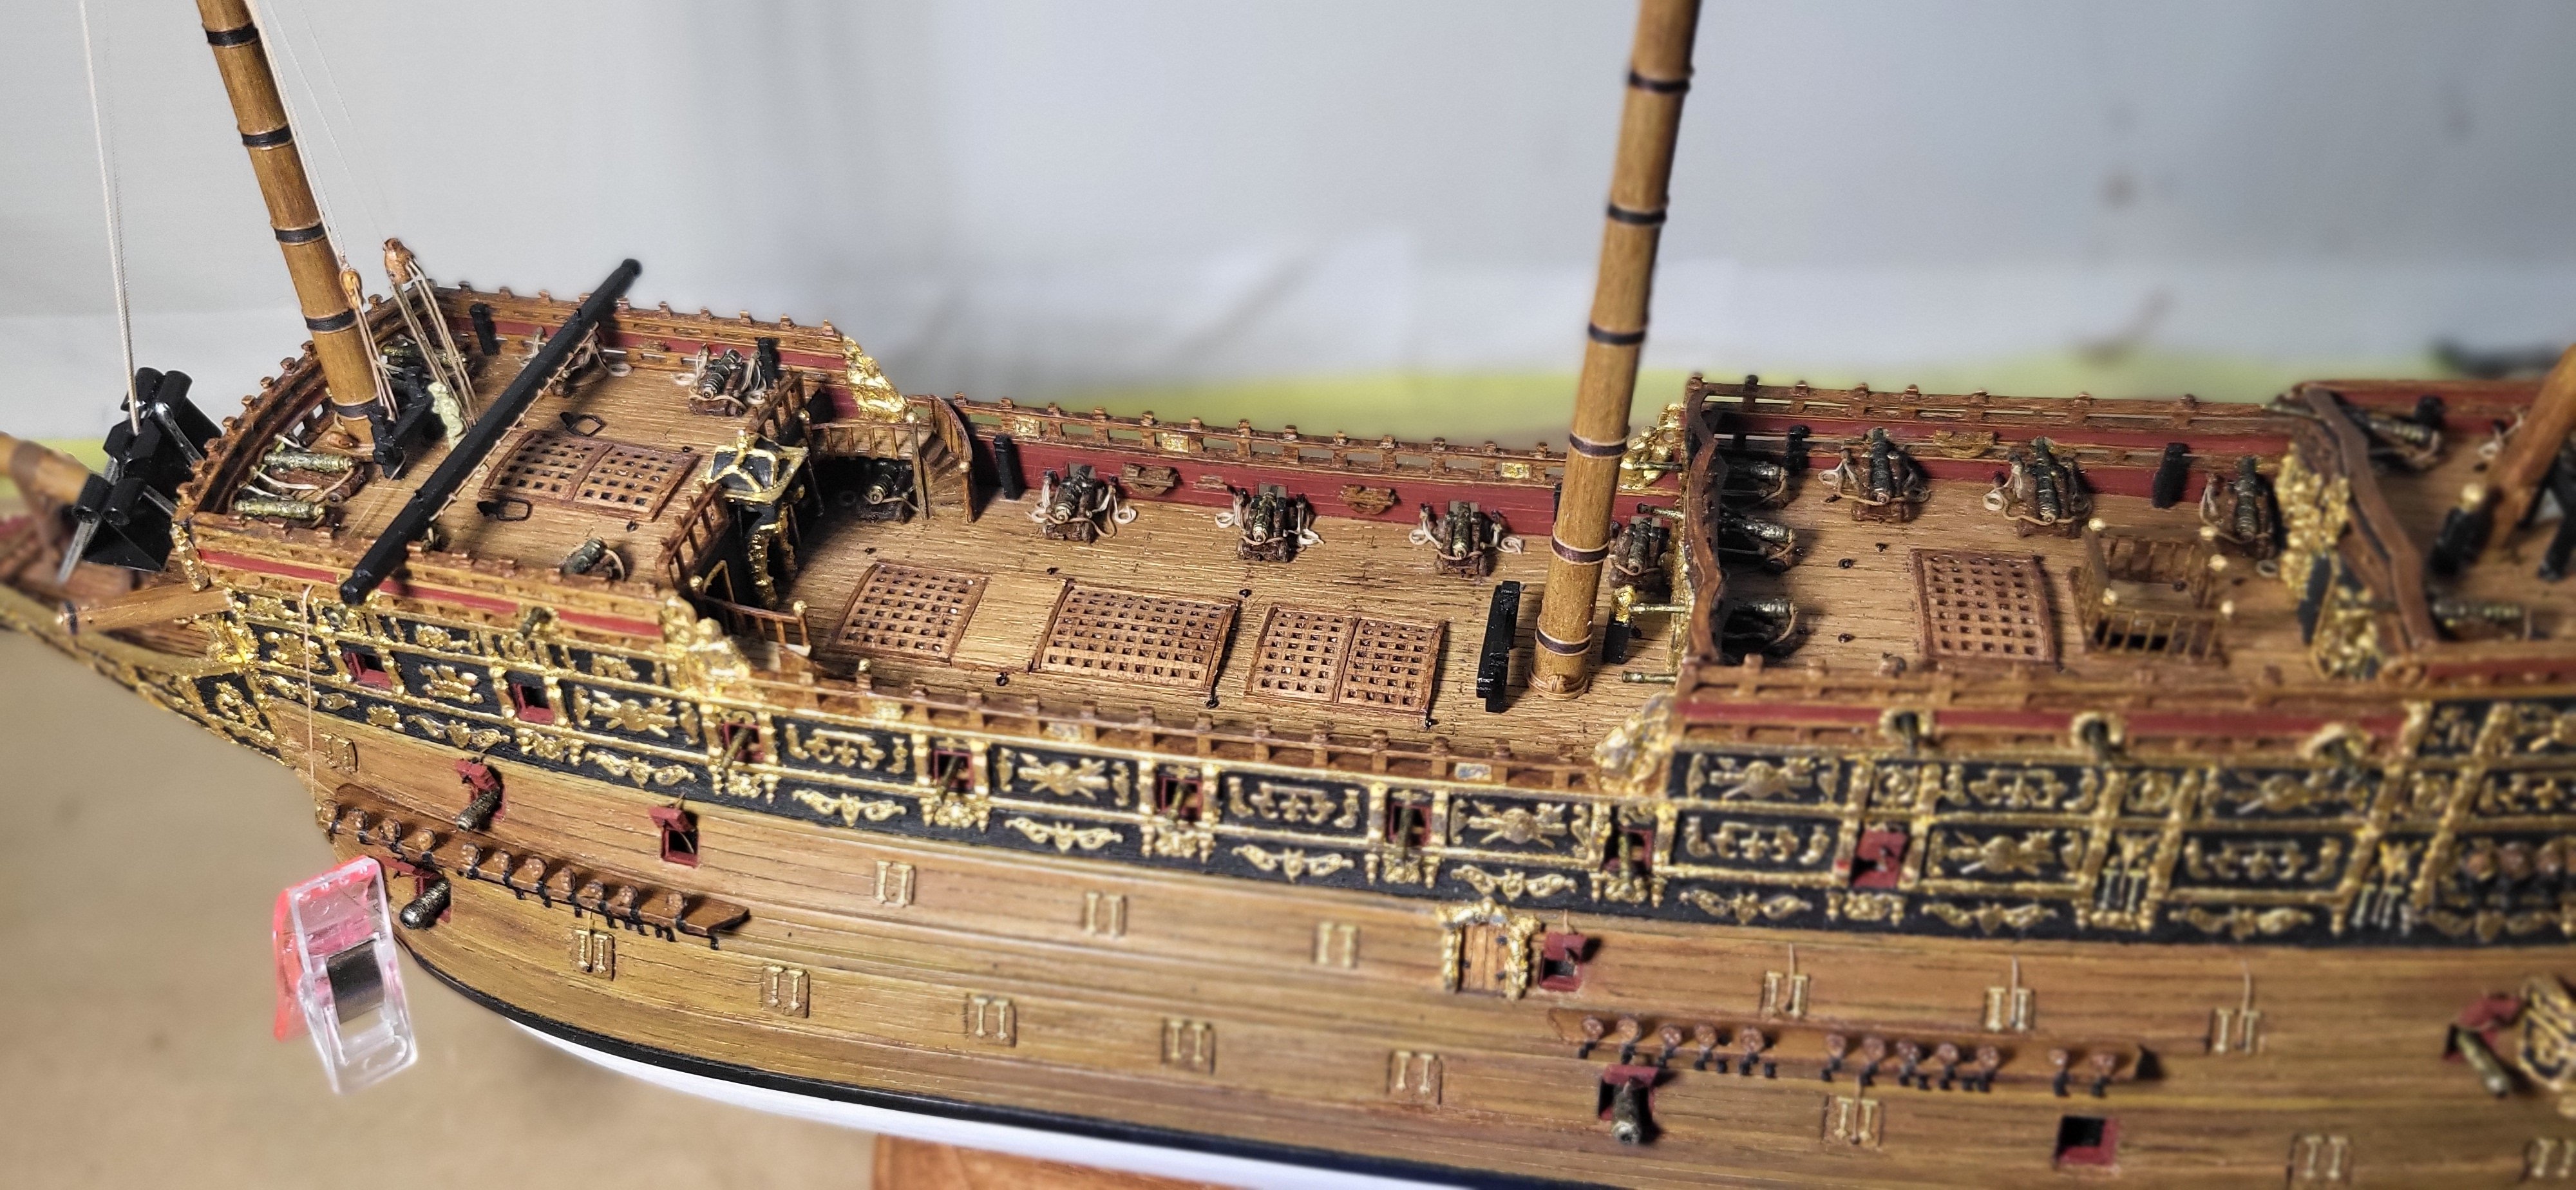
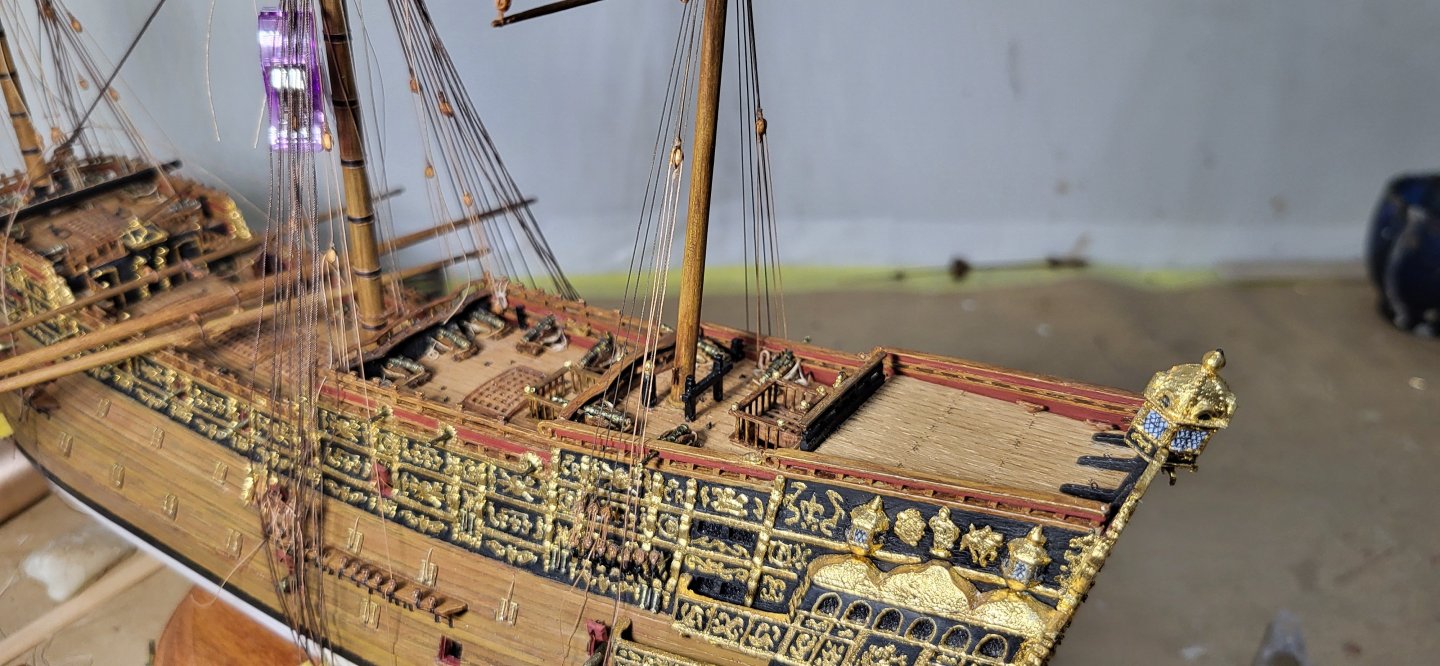
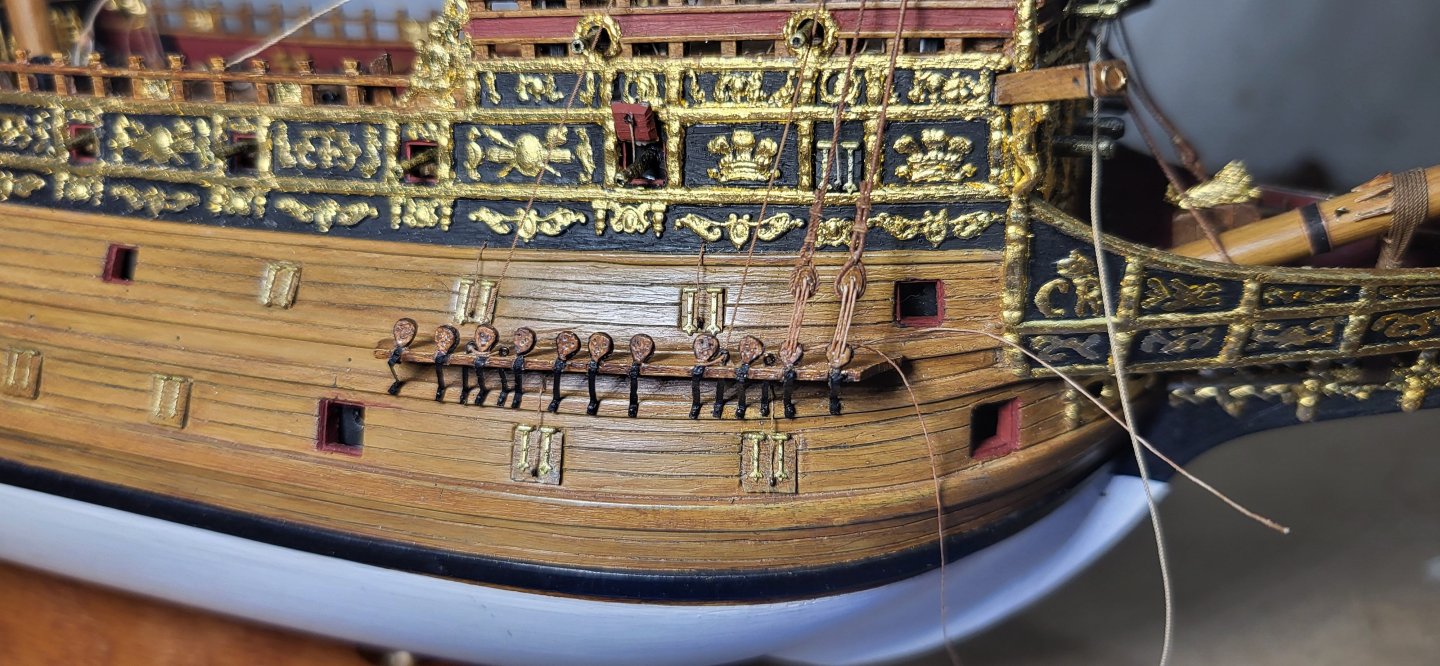
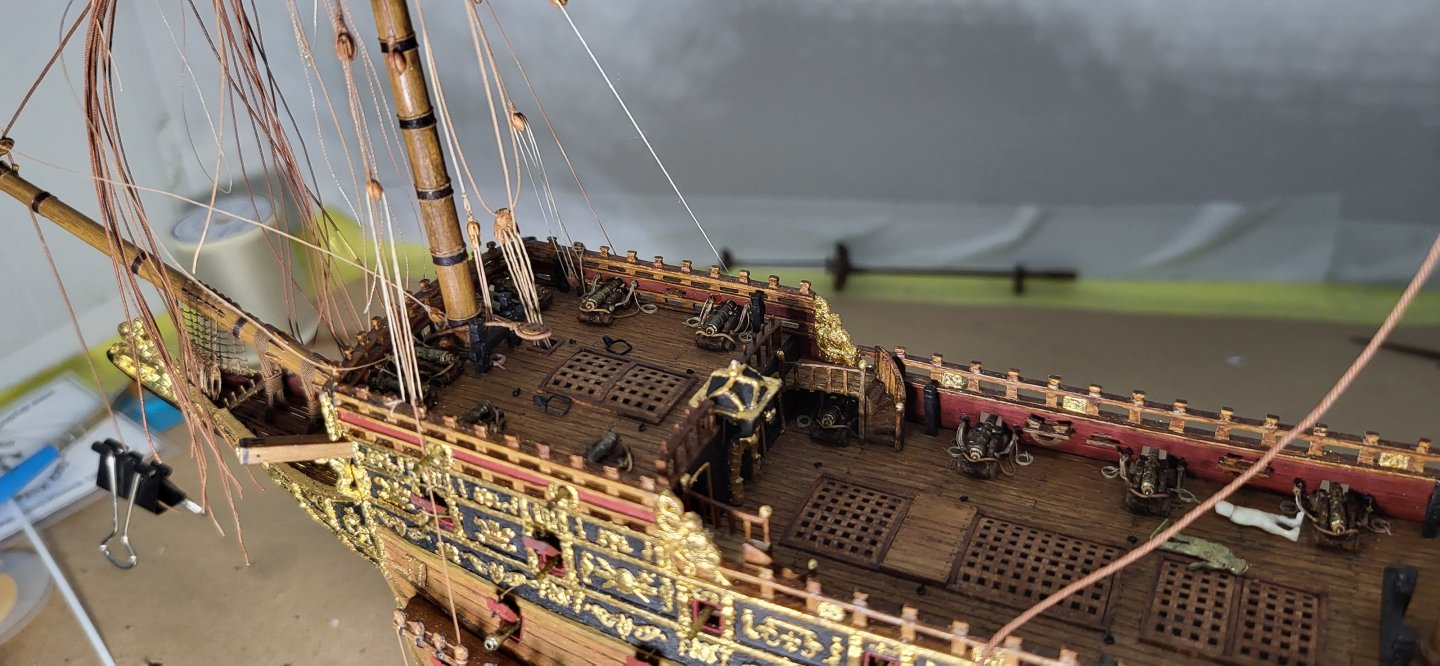
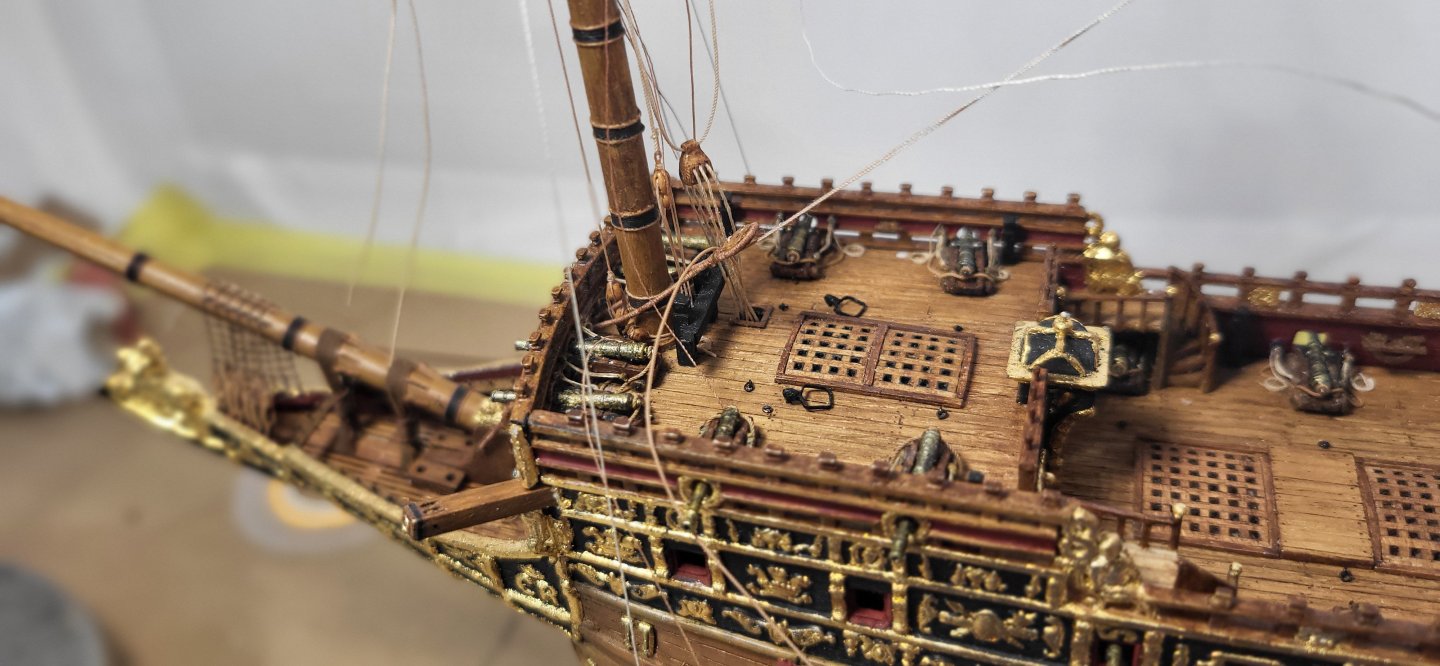
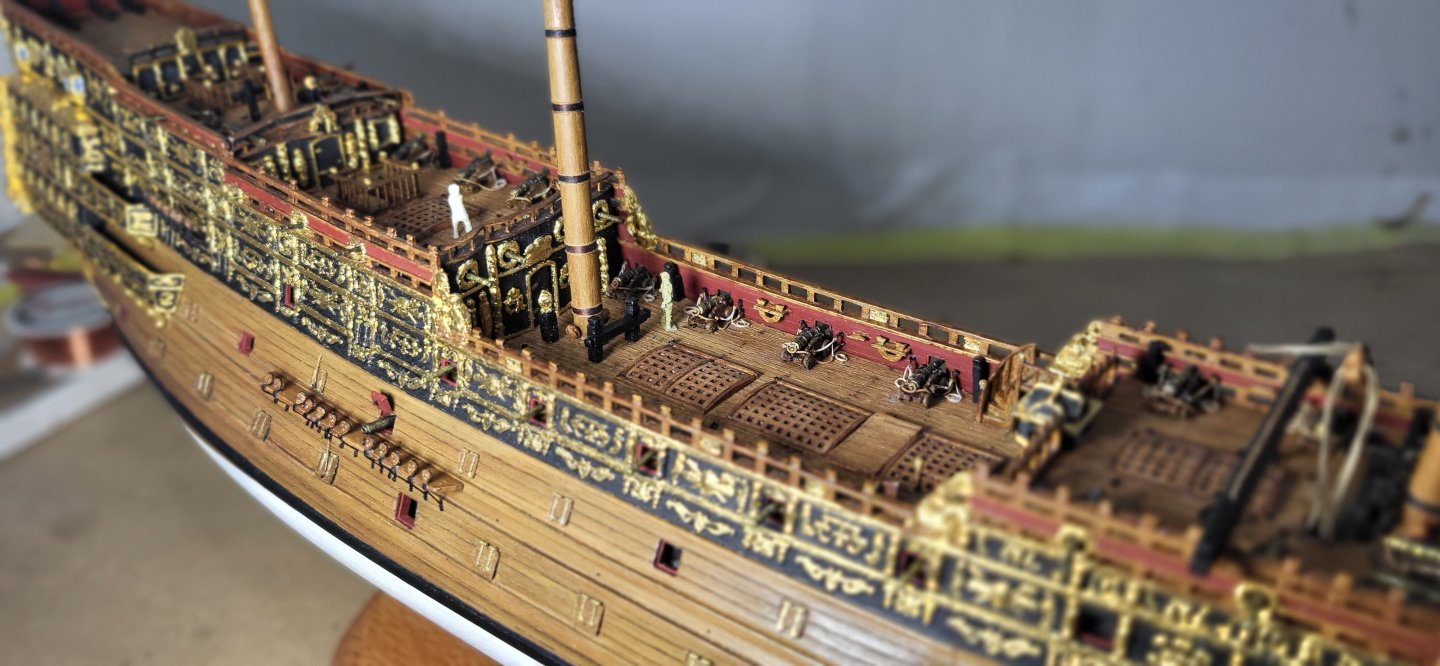
The timberheads on the portside waste railing are finally competed, along with gluing in the bitts and knightheads, also rigged up the main topmast stay tackle and falls, I was a little concerned with the tight space between the mast and bitts, but the 2mm single block fit nicely. Michael D.

- 324 replies
-
- 7
-
-
-
- Sovereign of the Seas
- Airfix
- (and 1 more)
-
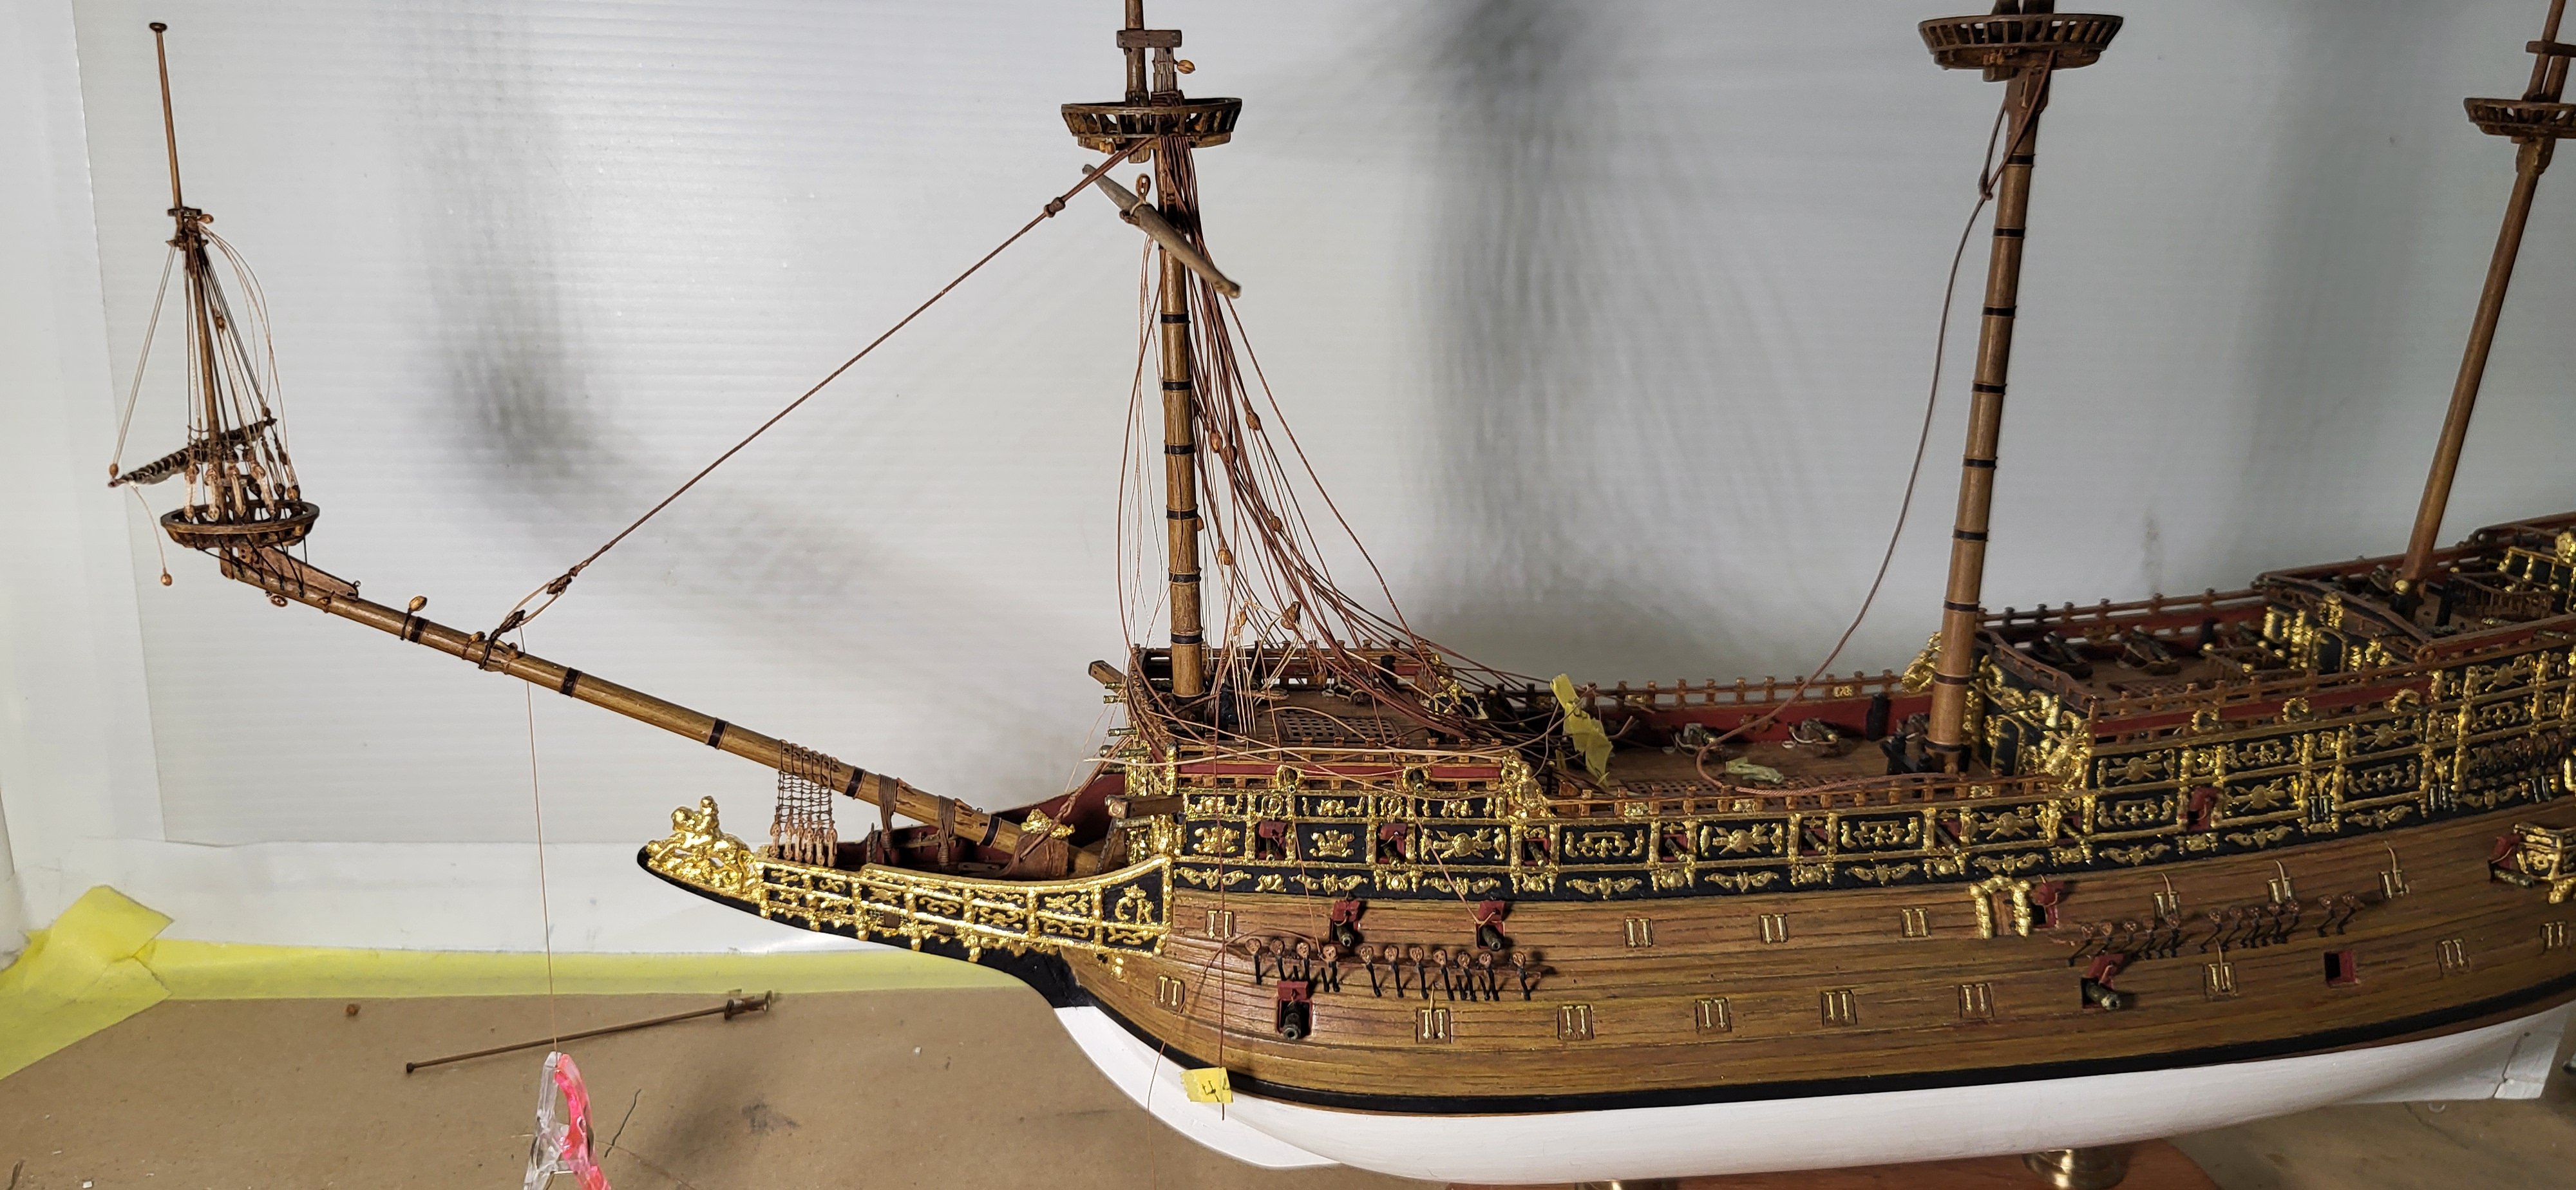
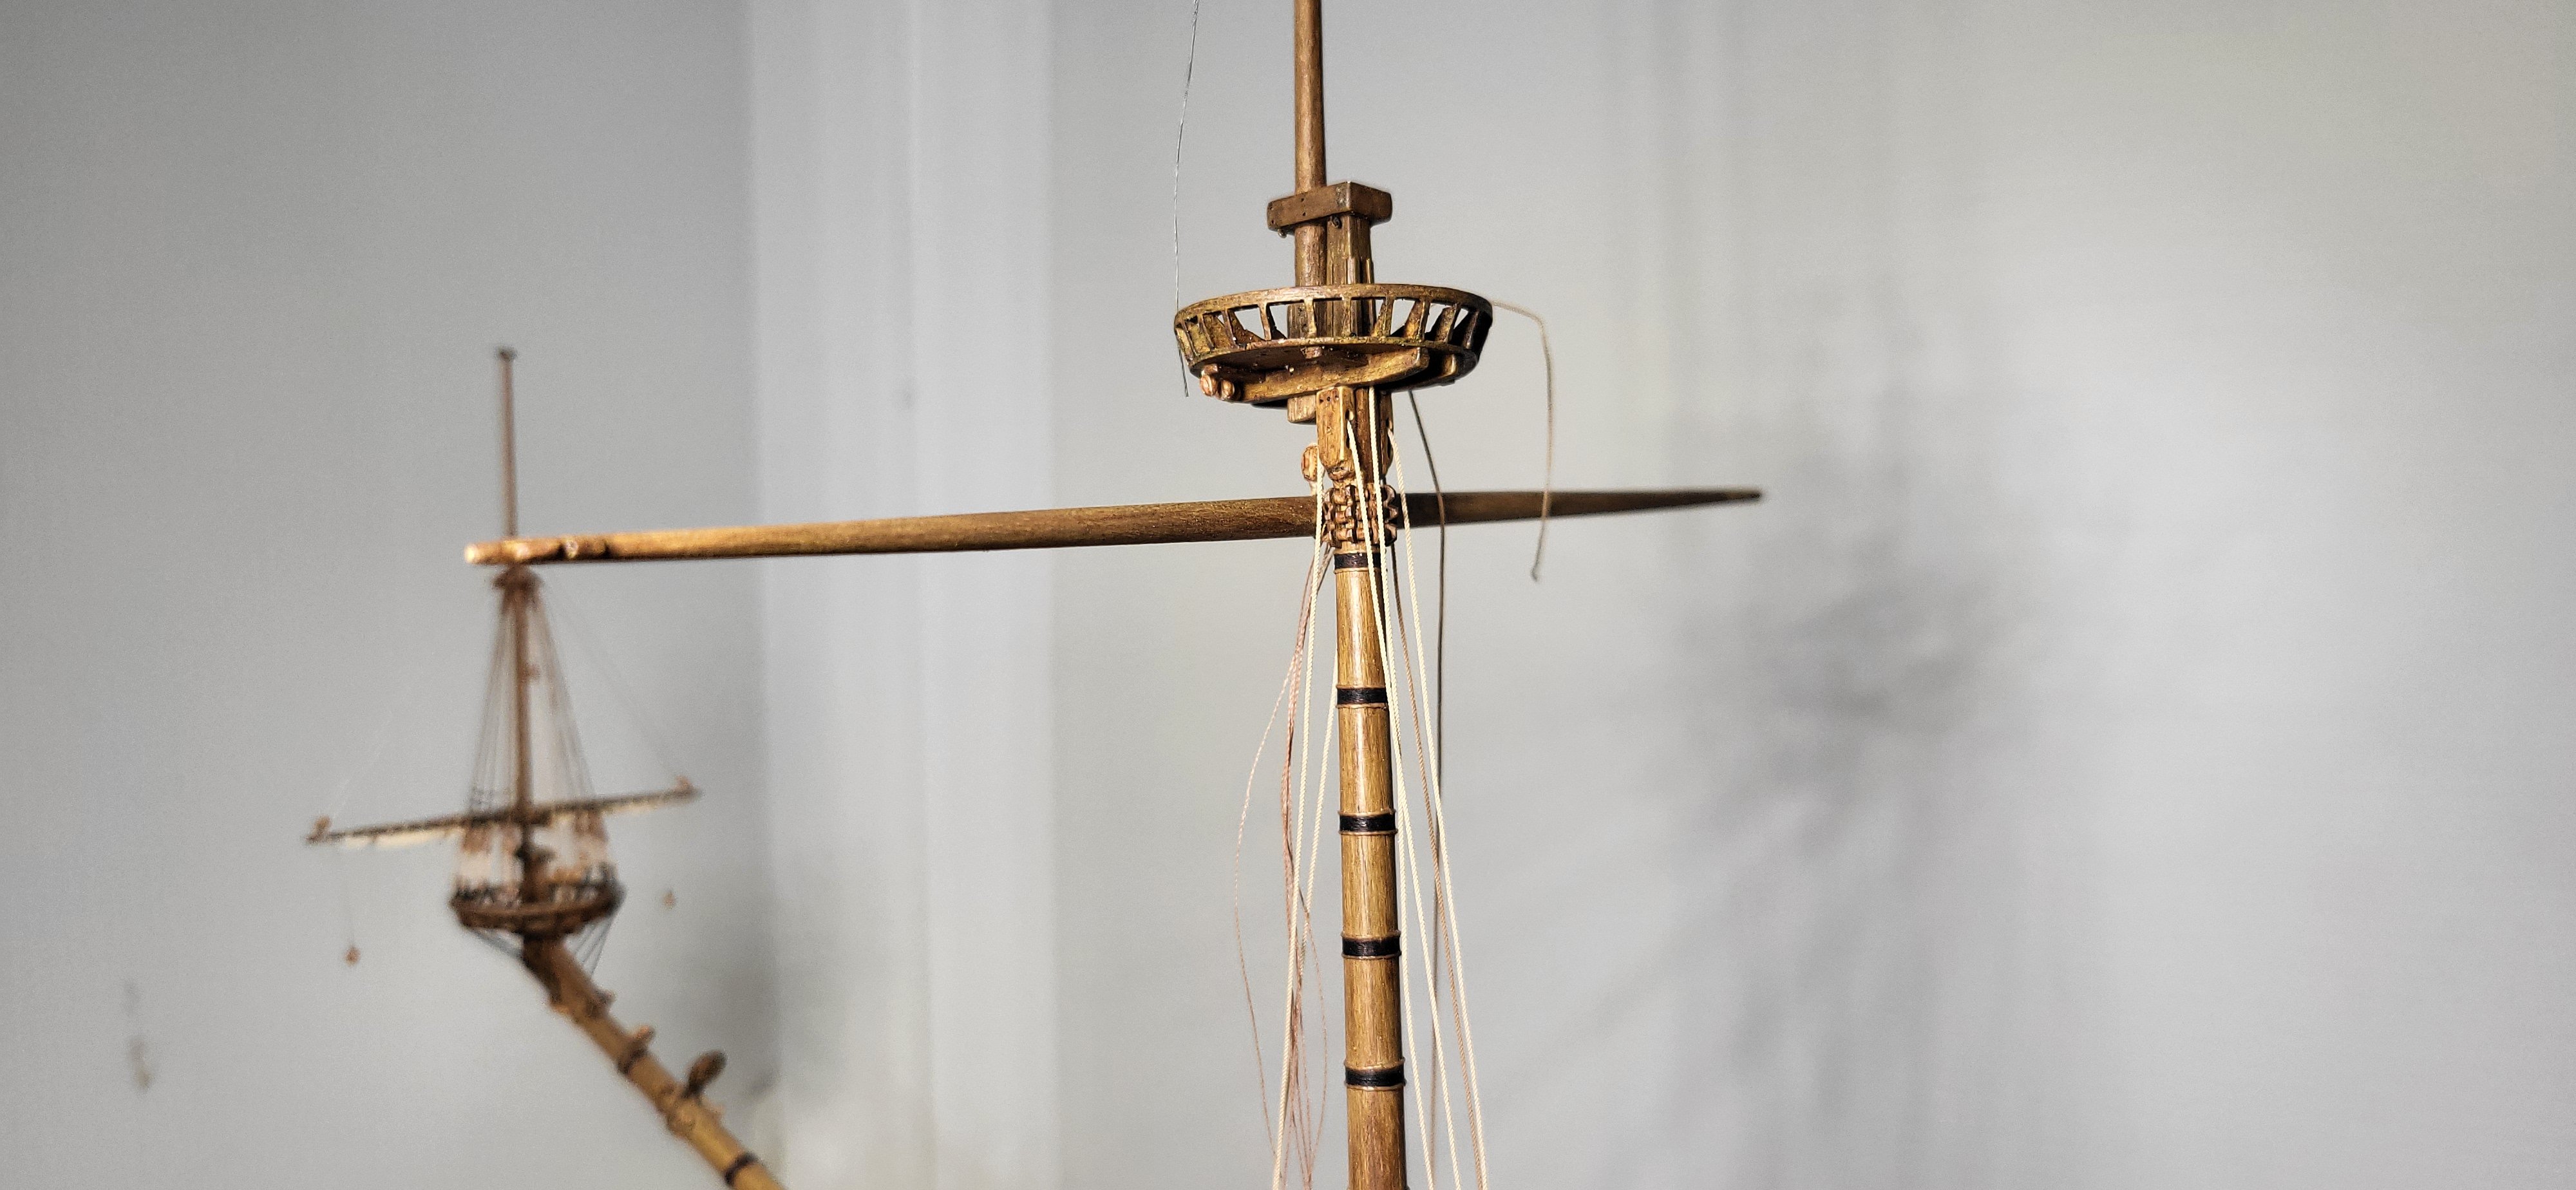
The link on rigging techniques by Mr. Dressel and his beautiful model I've had for a while and refer to it often, my rigging will be based on a combination of James Lee's, RC Anderson and John McKay mainly for the construction of the masts and more detailed illustrations of the rigging, like everything else they all have their varying differences and can be quite vague at times, and one needs to interpret that in a logical way. A few examples: bow sprit shrouds, Don mentions they weren't in use until around 1702, but Paynes engraving clearly shows them, yet Lee's and Anderson never mentions them, also in Paynes engraving all the running rigging runs down the bowsprit terminating in the beakhead area instead of running thru gammoning blocks and up to the fore castle/beakhead rails, what would they be belaying to? It's a fact that the Vasa had belaying pins in this area and seems quite logical to me that SOTS had them, again based on Paynes engraving. Regarding the jeers, I've read of no instances of them being rigged on the upper yards, course yards on early bigger ships perhaps used two jeers with 3 single blocks, this the route I'll be taking. The picture you posted from Andersons showing the early English jeers can be confused for a trestle tree, but I interpret it as the floor of the lower top. This is all good stuff and appreciate you taking the time to look and comment and I love the work you're doing on your SOTS. Michael D.
- 324 replies
-
- 1
-
-
- Sovereign of the Seas
- Airfix
- (and 1 more)
-
The colors are striking on this fabulous build. Michael D.
-
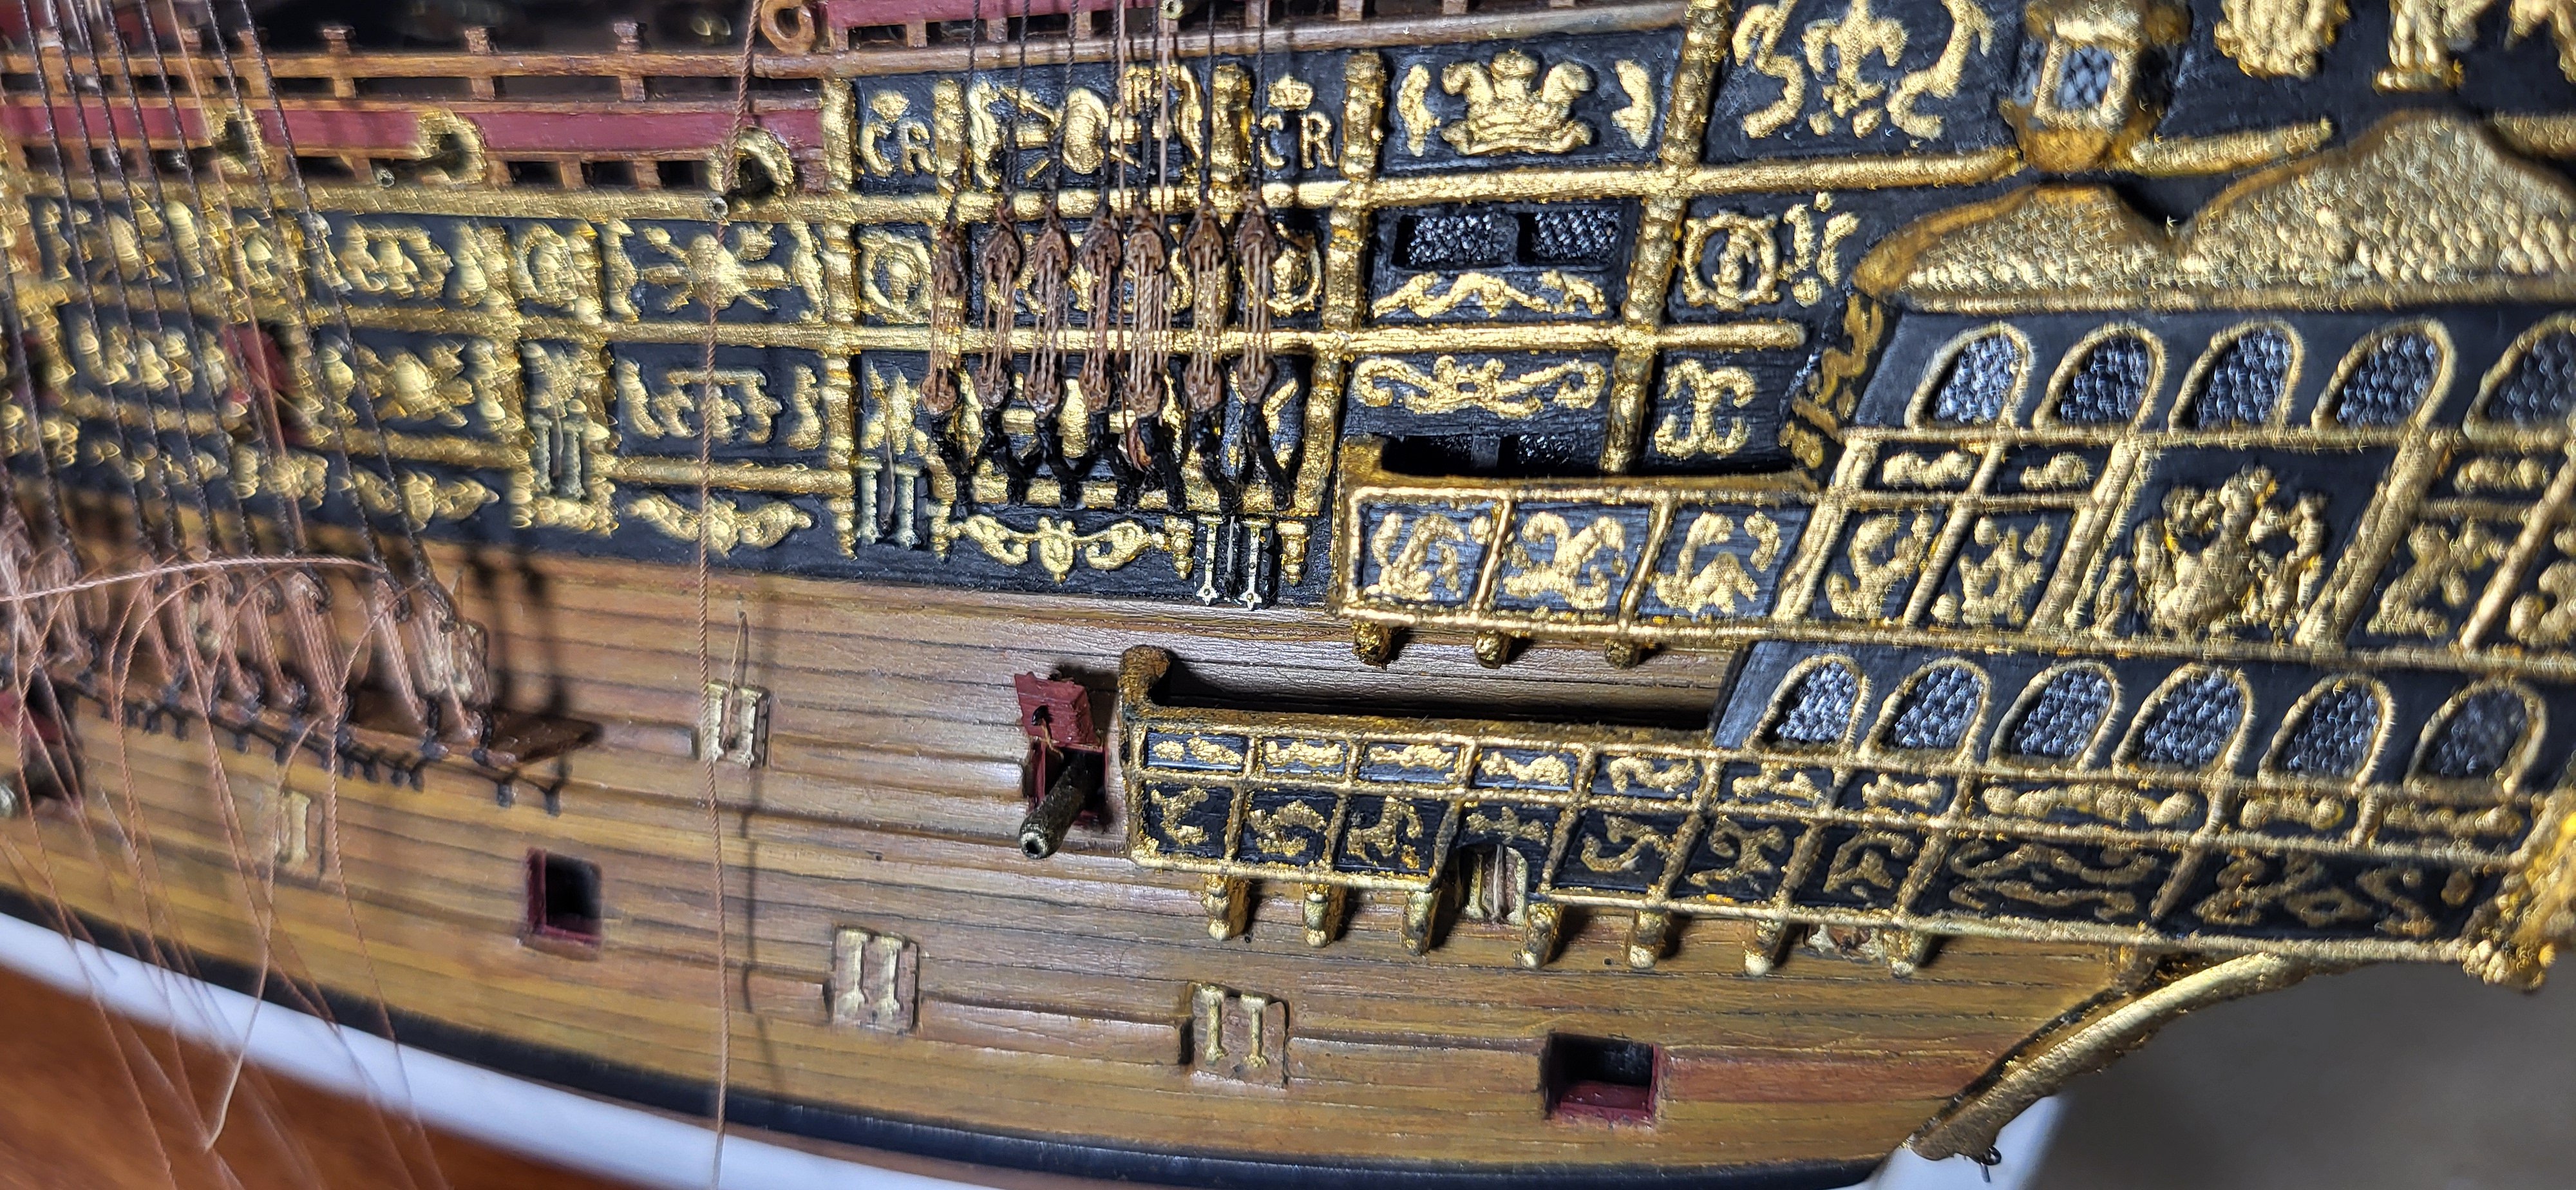
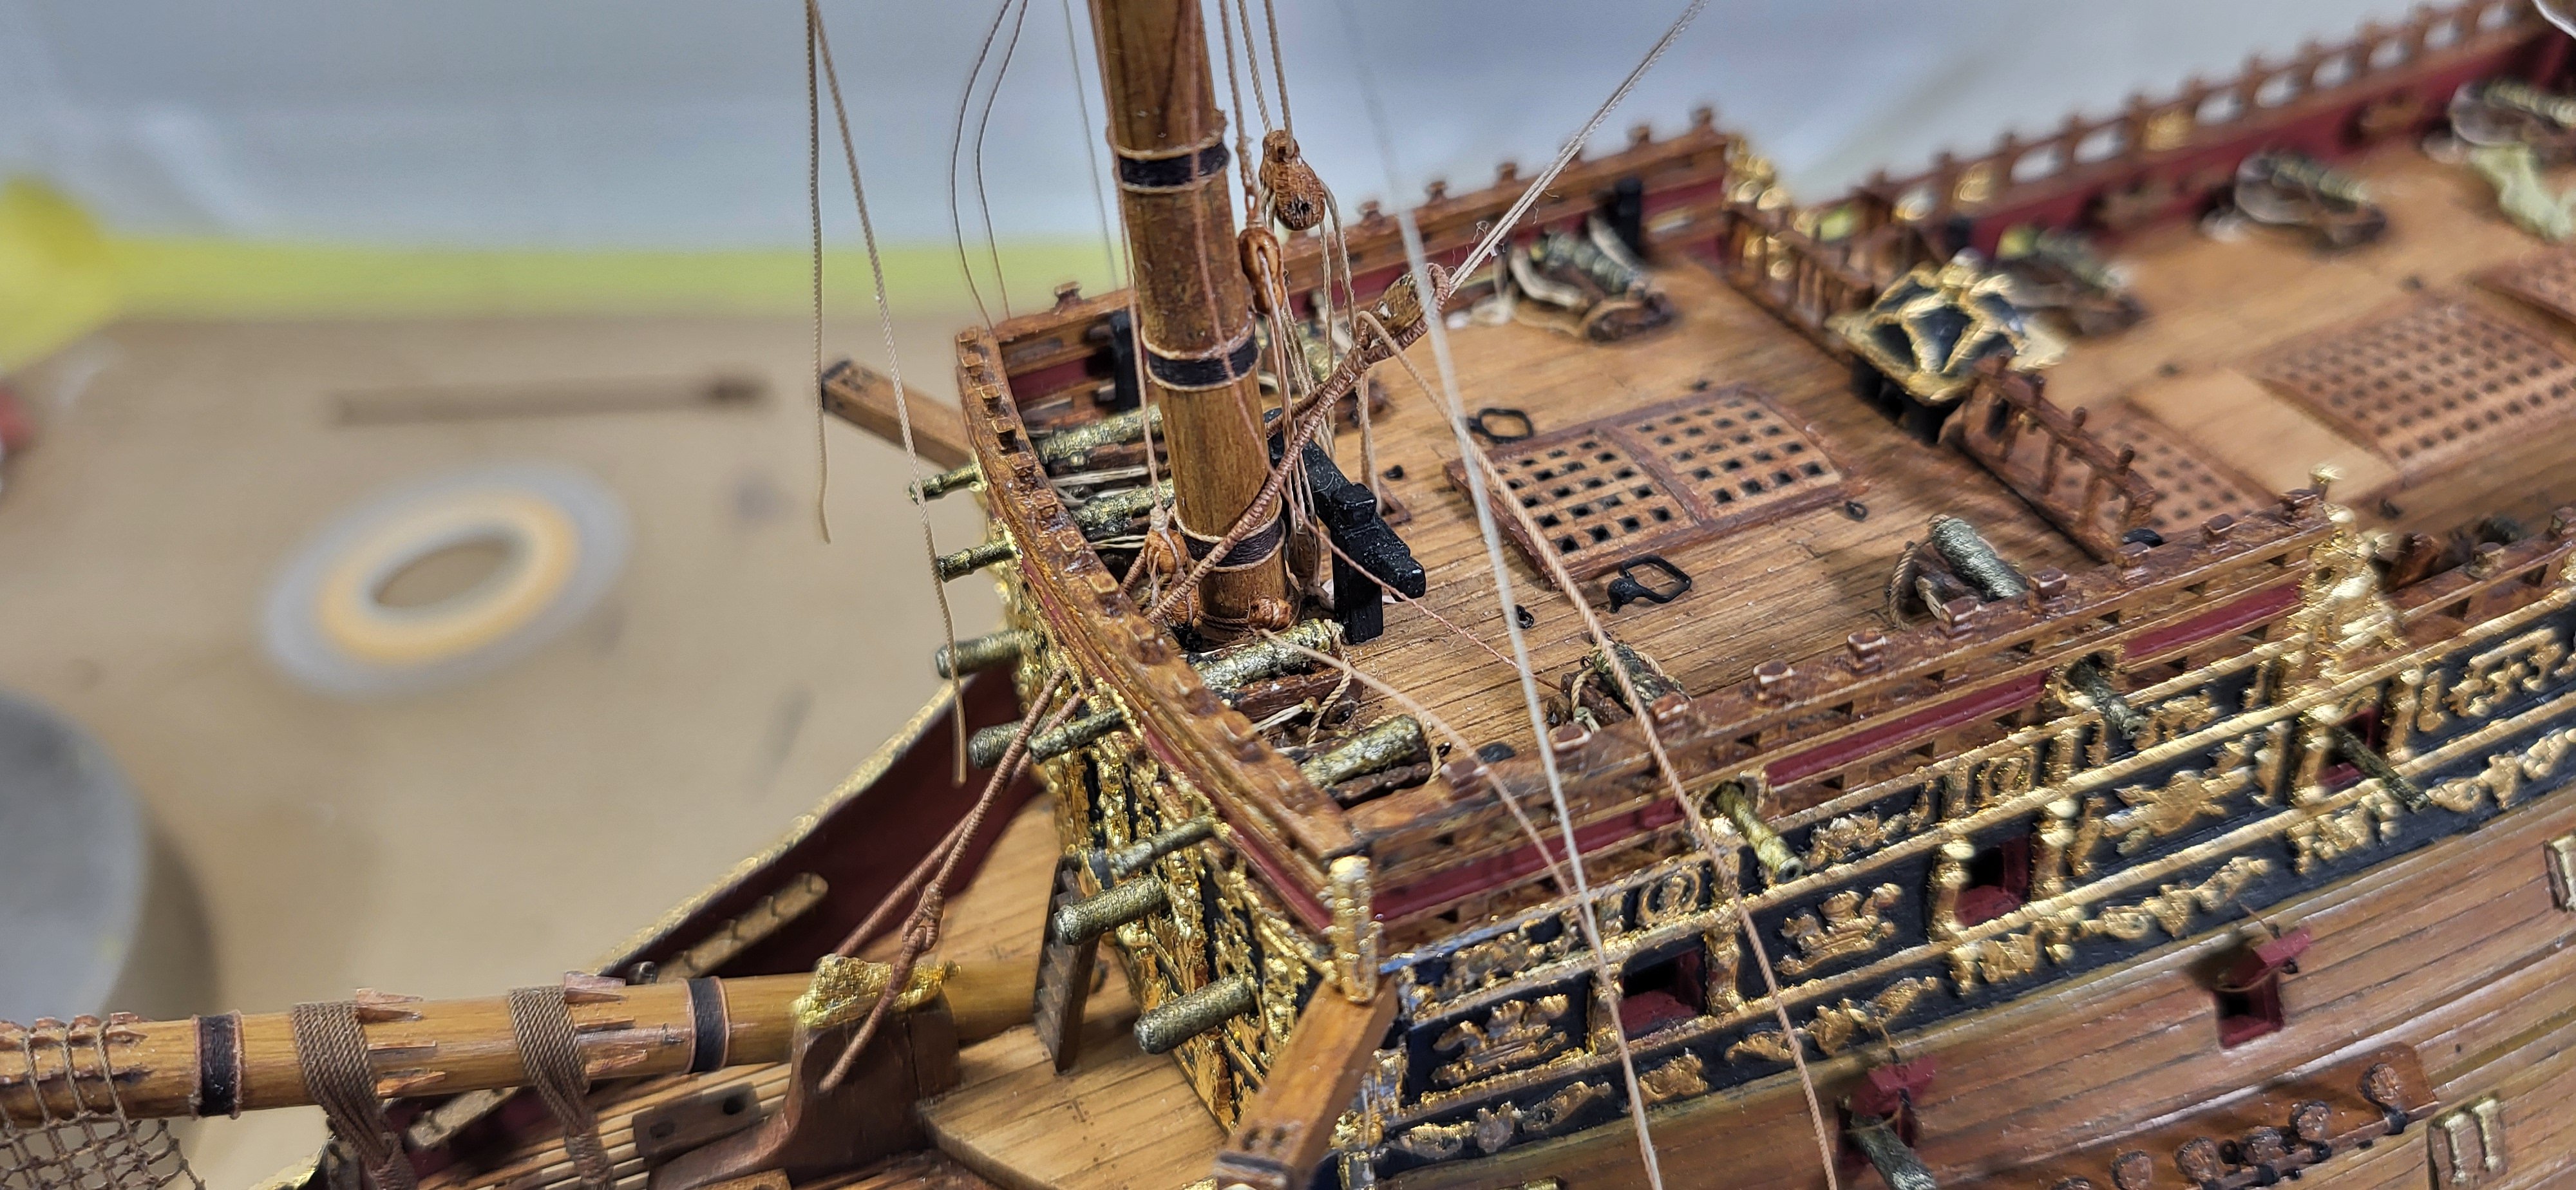
I have completed the timberheads on the starboard main deck railing along with the main bitts, knighthead for the tie and the 3mm single blocks stropped to the base of the mast for the jeers, these are slightly under scale, but look good, this would date the rigging around 1640, but it's conceivable SOTS already employed the use of the jeers at the time of launch, these blocks at scale would be around 30." Thanks for looking. Michael D.
- 324 replies
-
- 8
-
-
-
- Sovereign of the Seas
- Airfix
- (and 1 more)
-
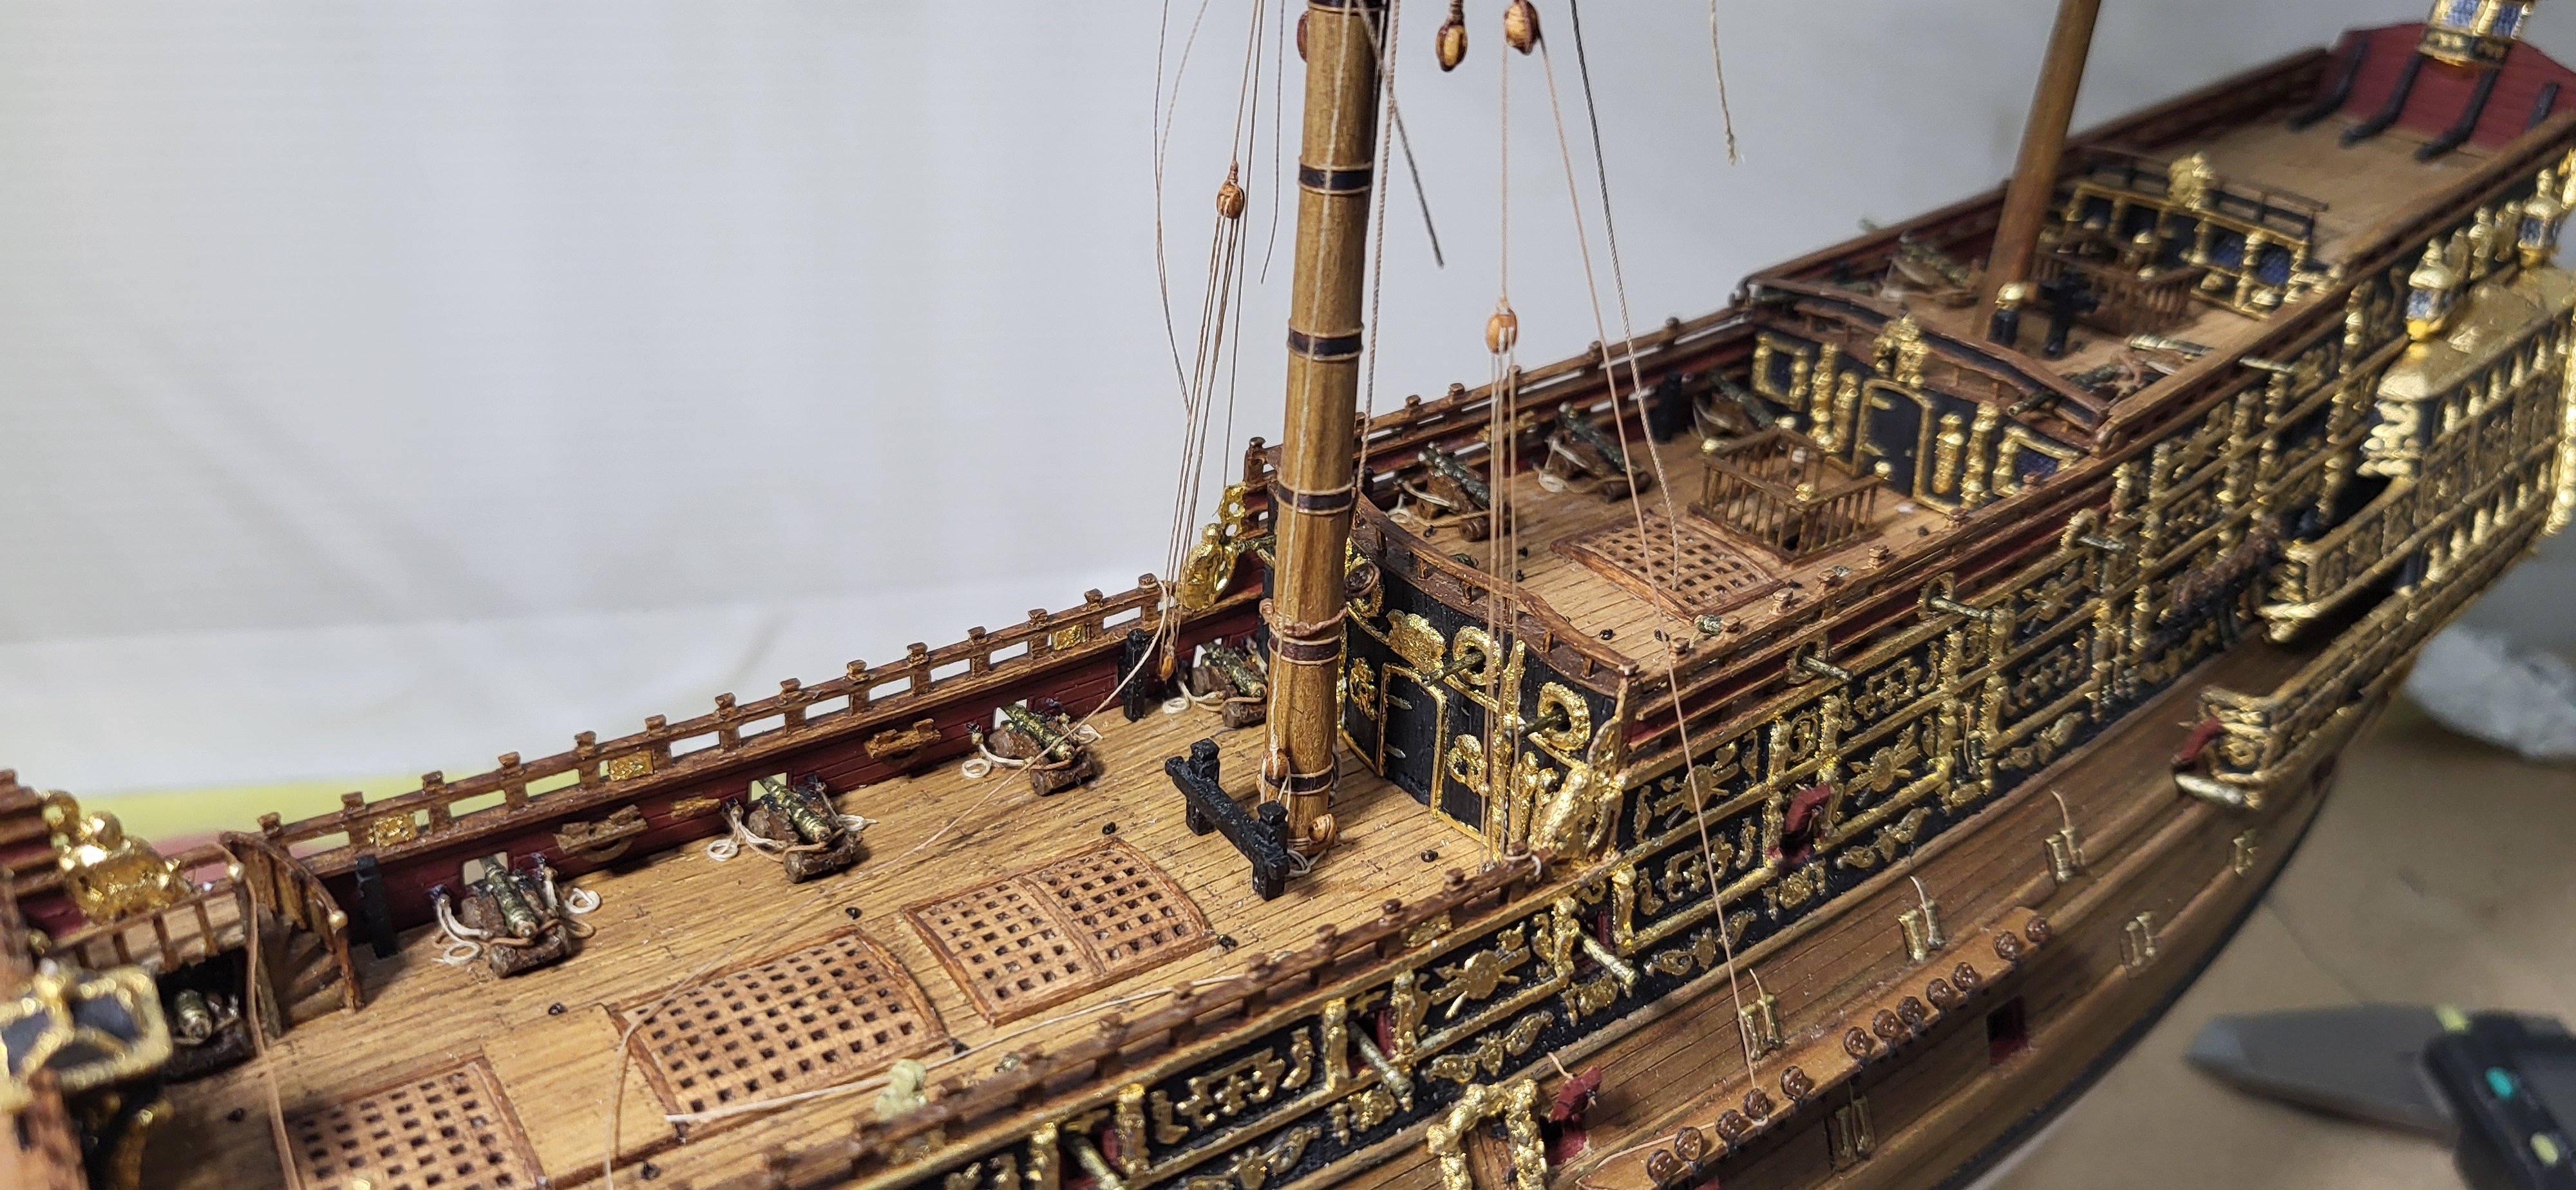
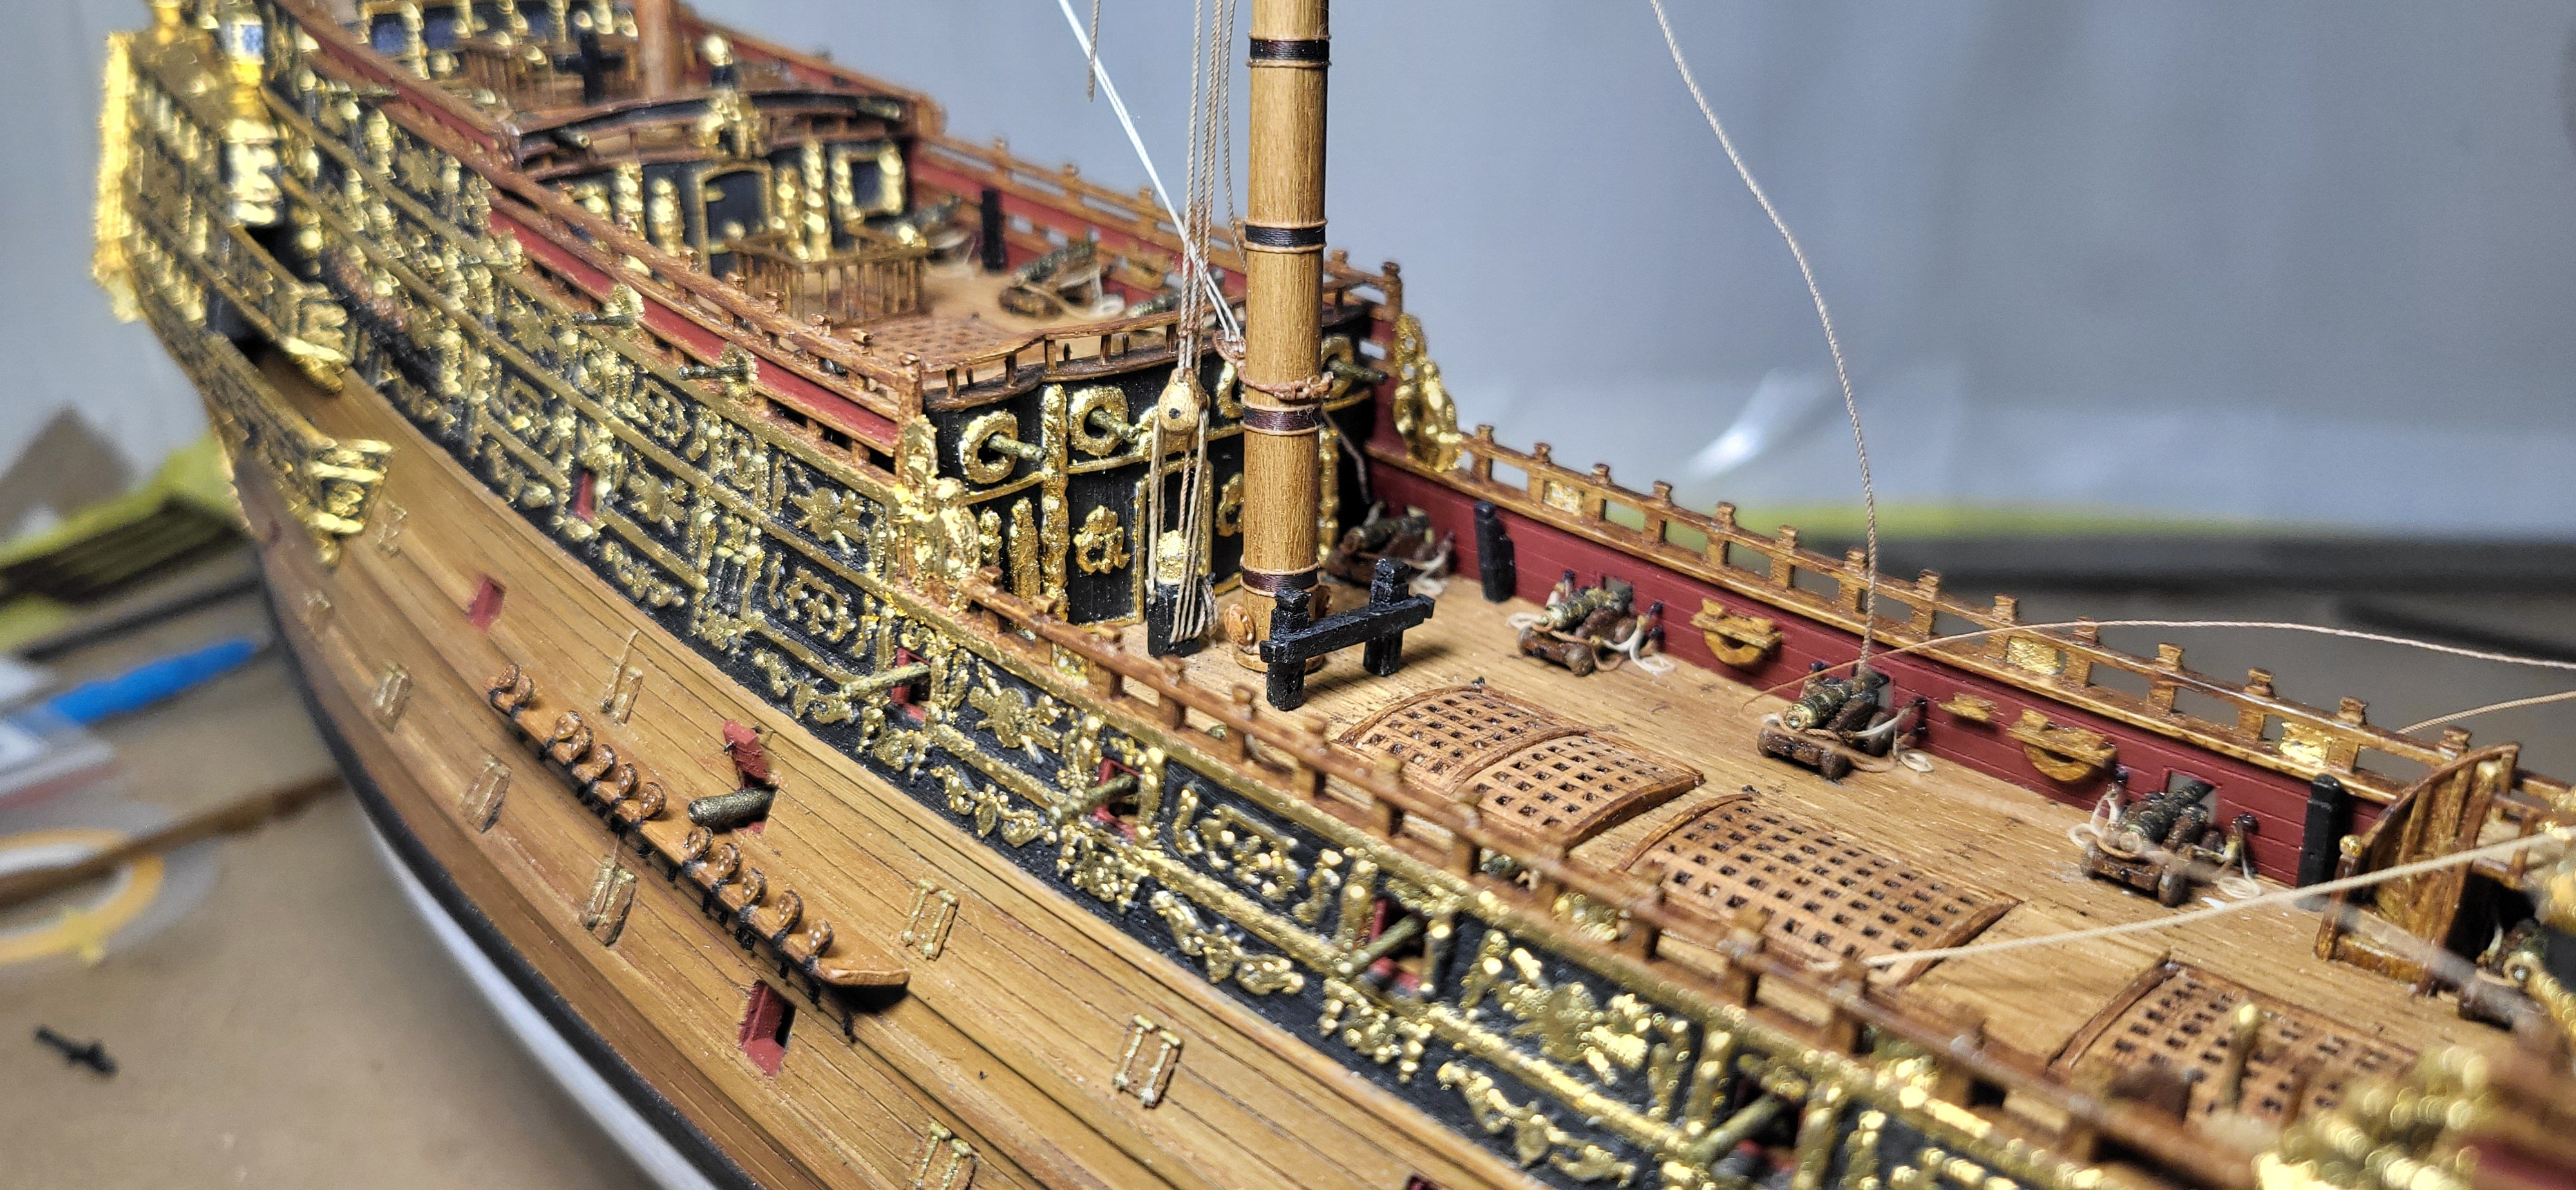
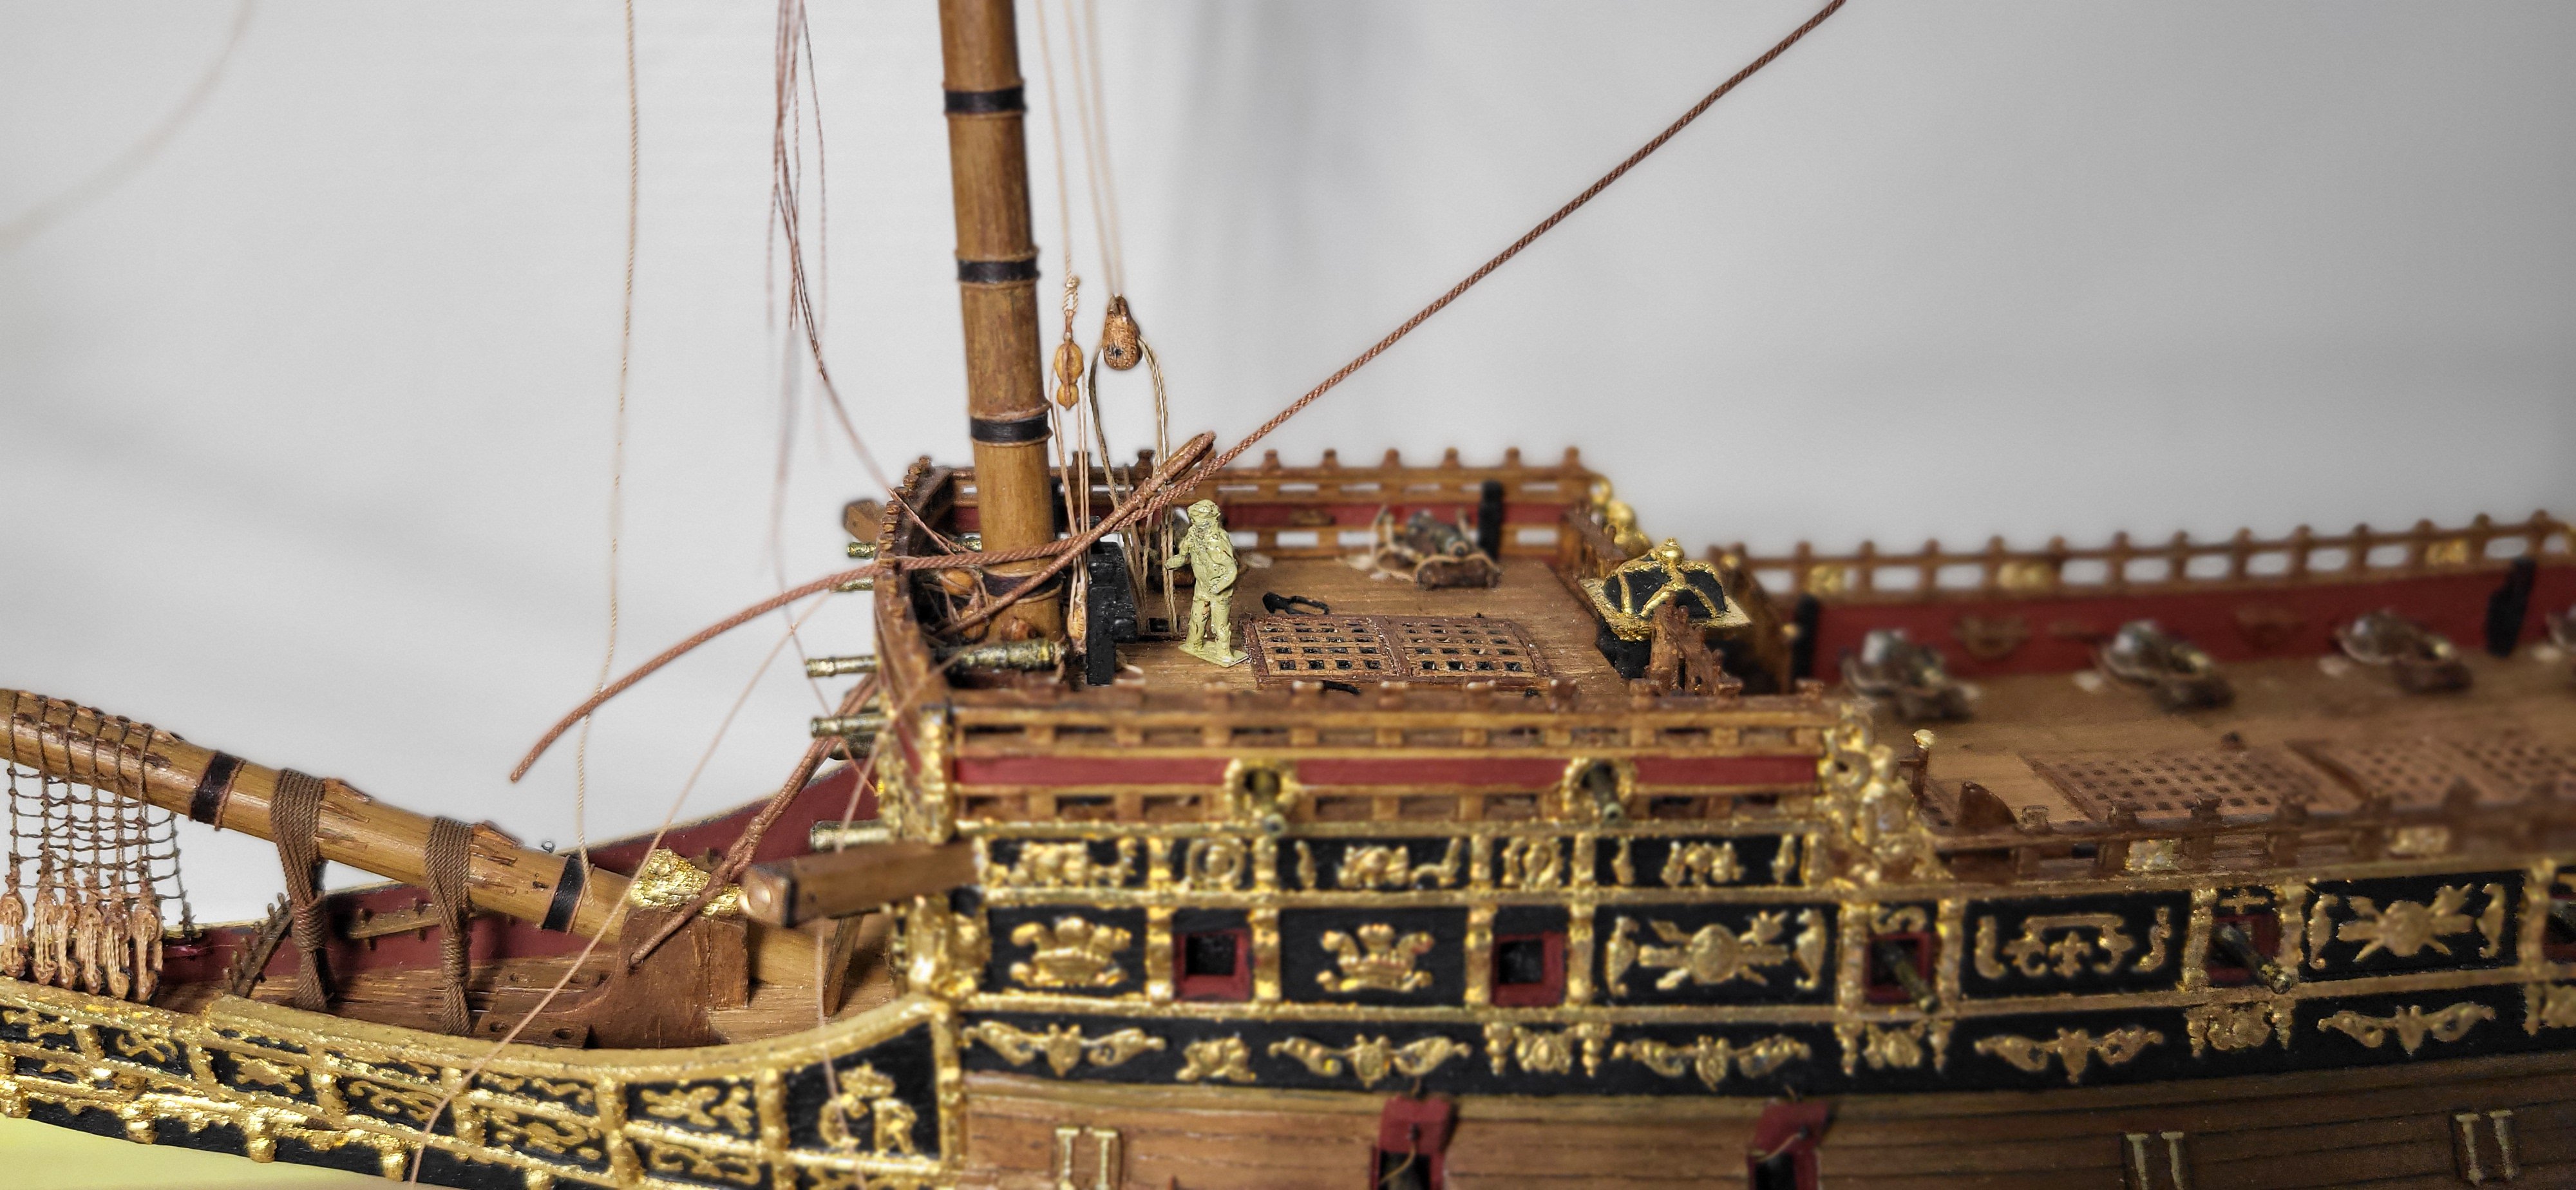
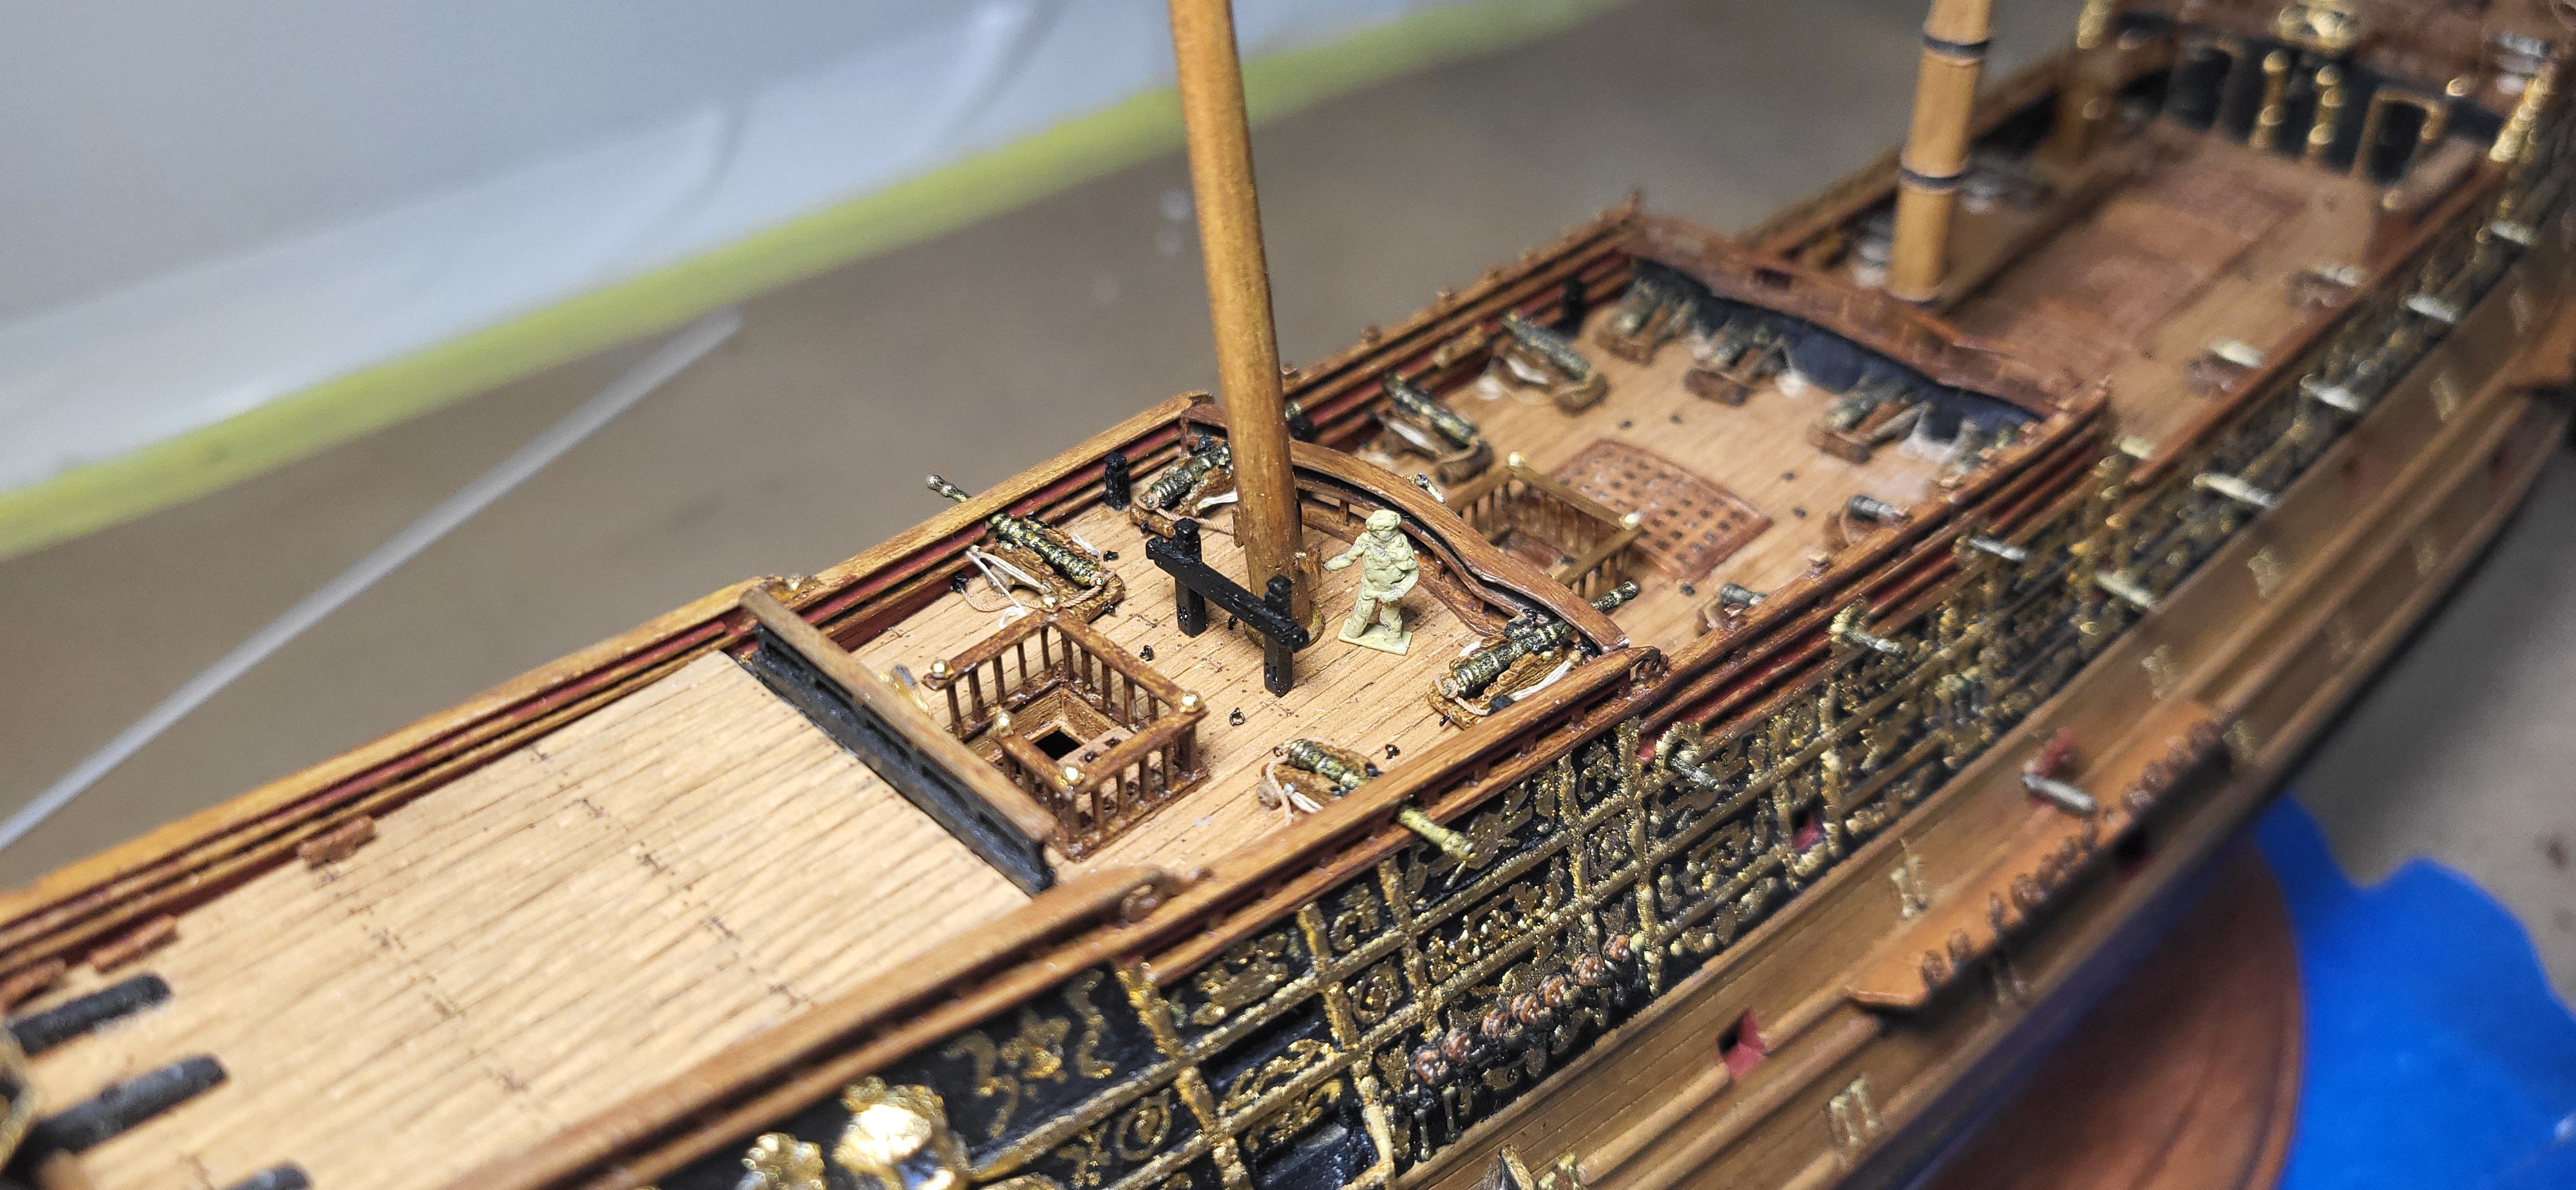
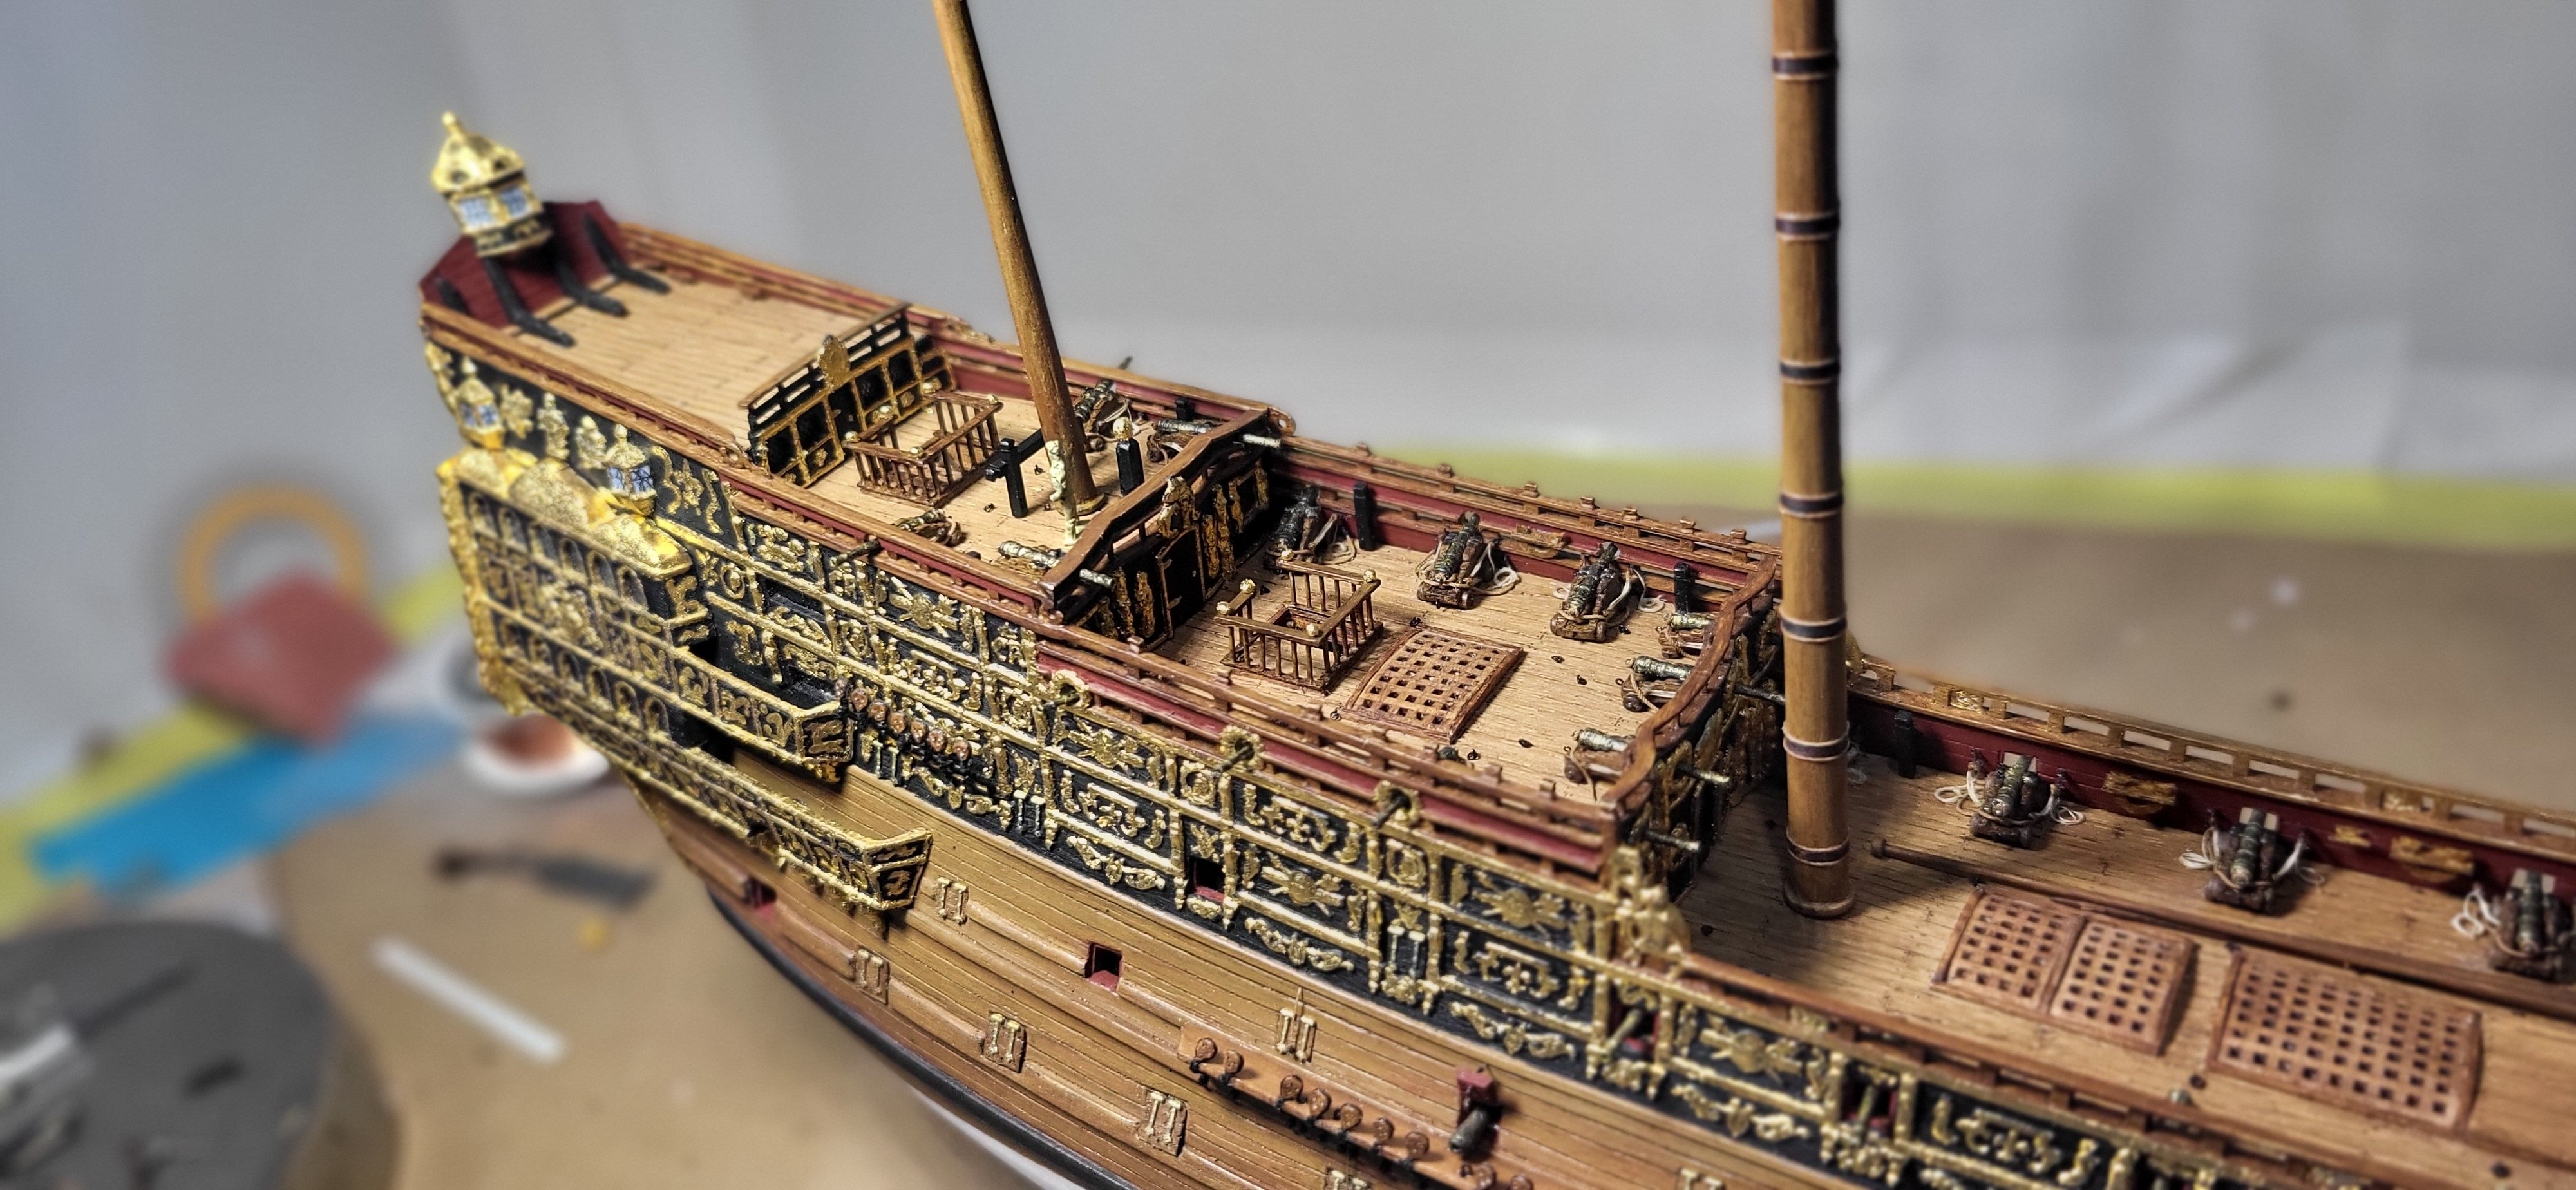
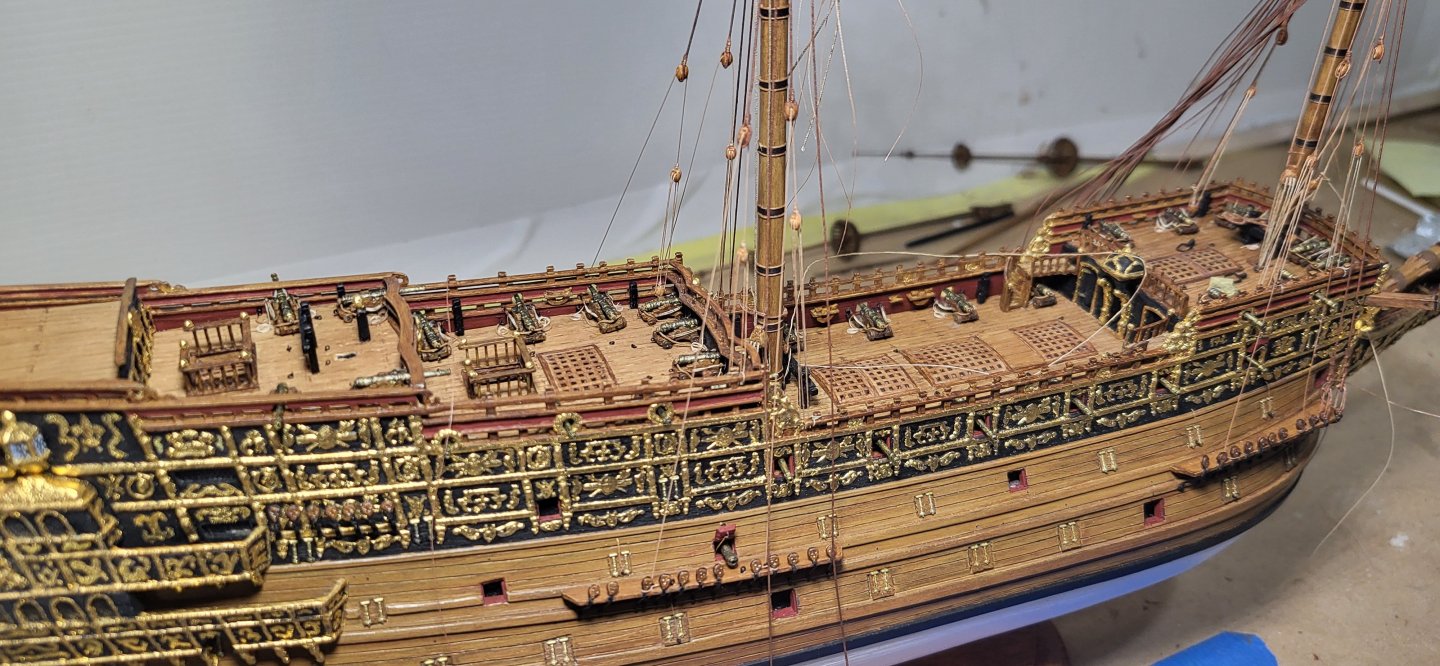
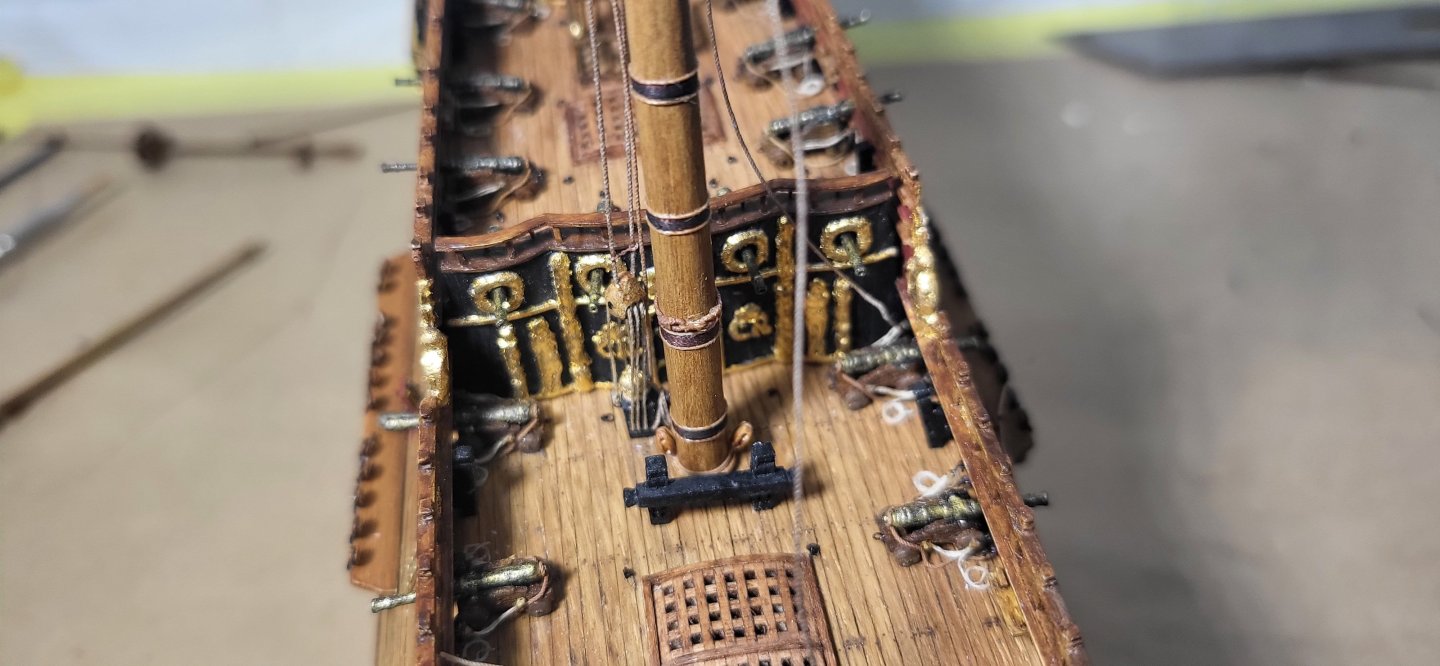
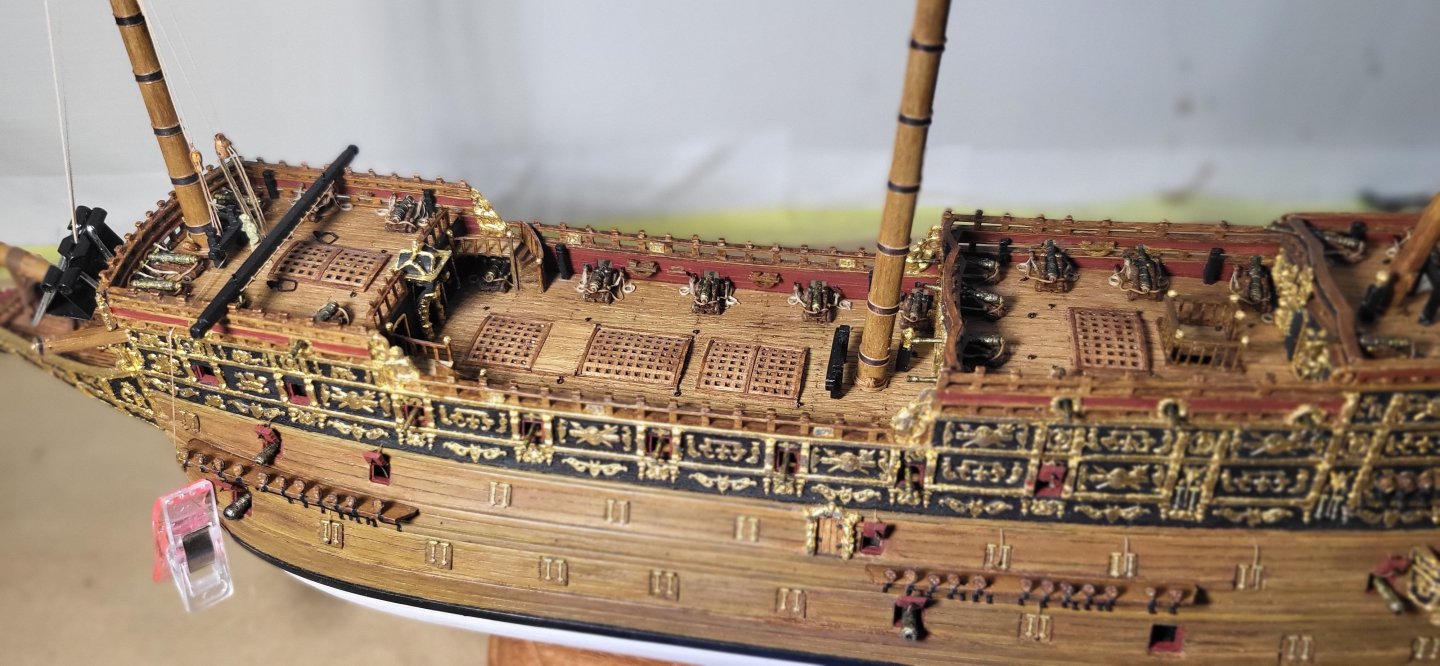
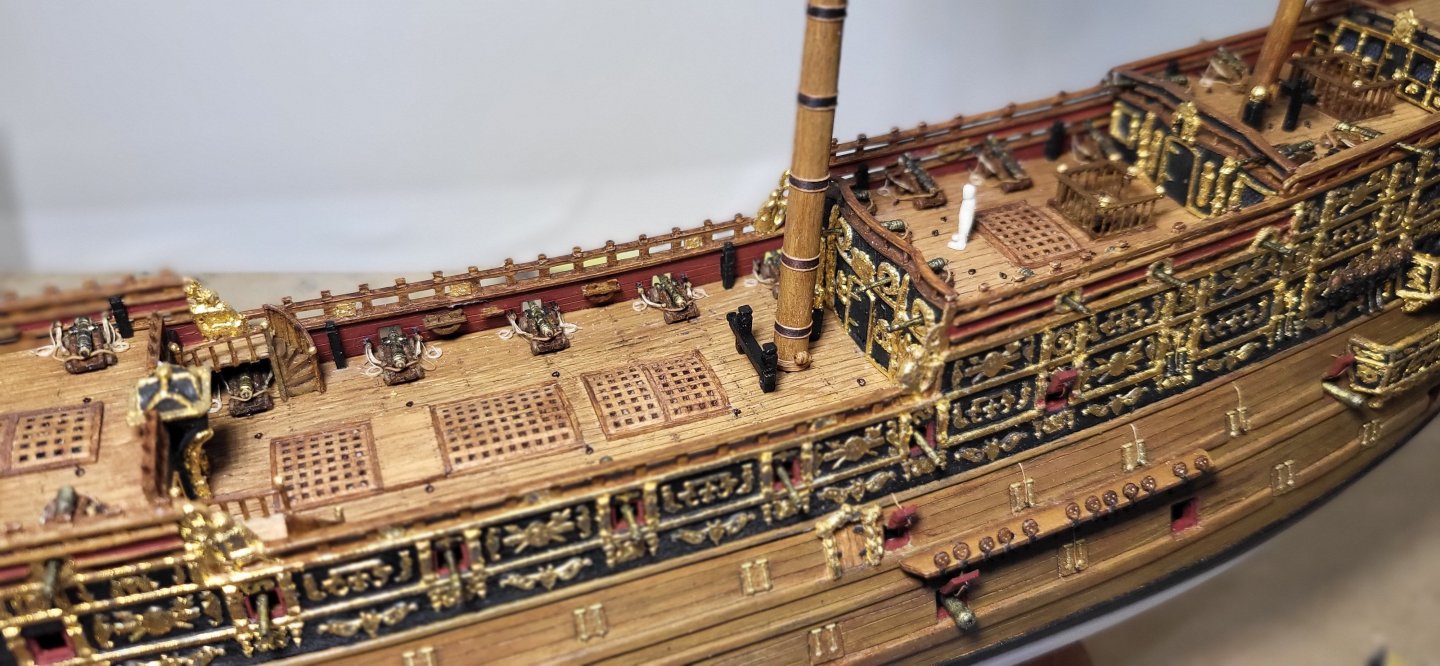
The fitting out of the upper Qtr deck is just about complete minus the ladders leading to the poop deck, next I need to finish up the poop deck then fabricating the main bitts etc, thanks for looking. Michael D.
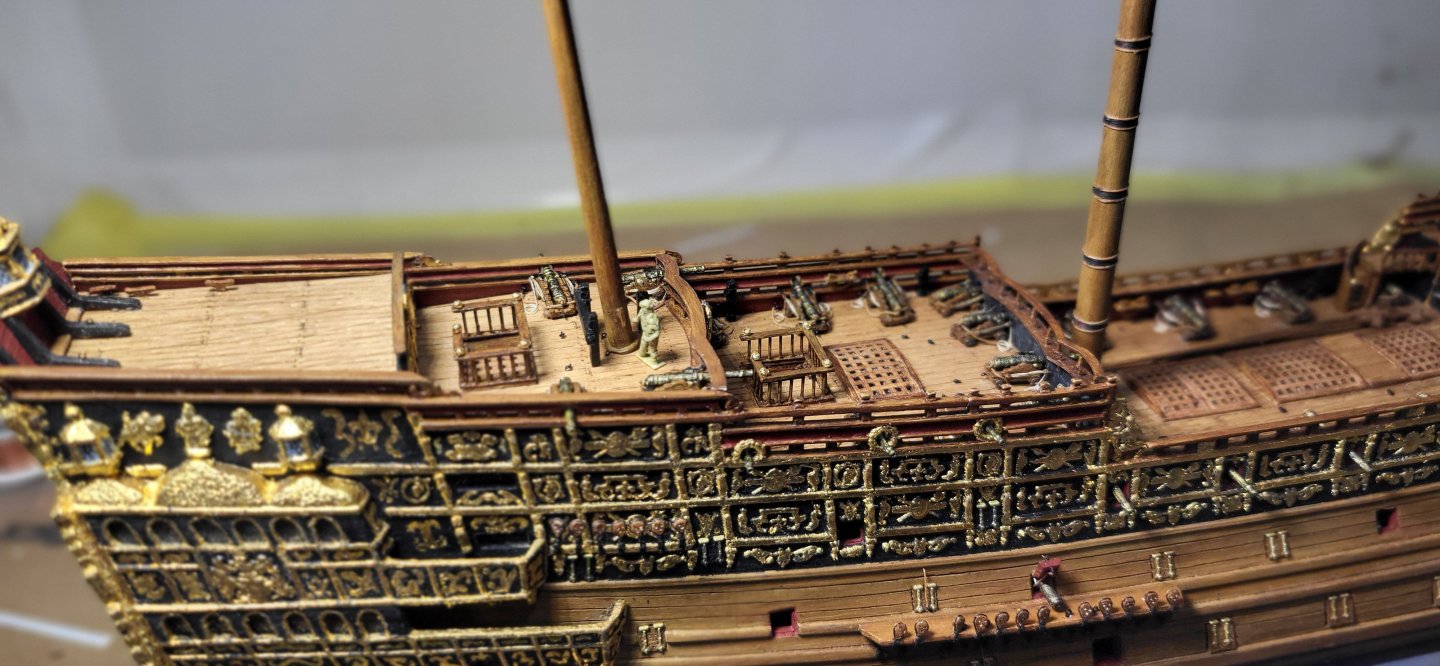


- 324 replies
-
- 8
-
-
-
- Sovereign of the Seas
- Airfix
- (and 1 more)