HOLIDAY DONATION DRIVE - SUPPORT MSW - DO YOUR PART TO KEEP THIS GREAT FORUM GOING!
×


Piet
-
Posts
3,568 -
Joined
-
Last visited
Content Type
Profiles
Forums
Gallery
Events
Everything posted by Piet
-
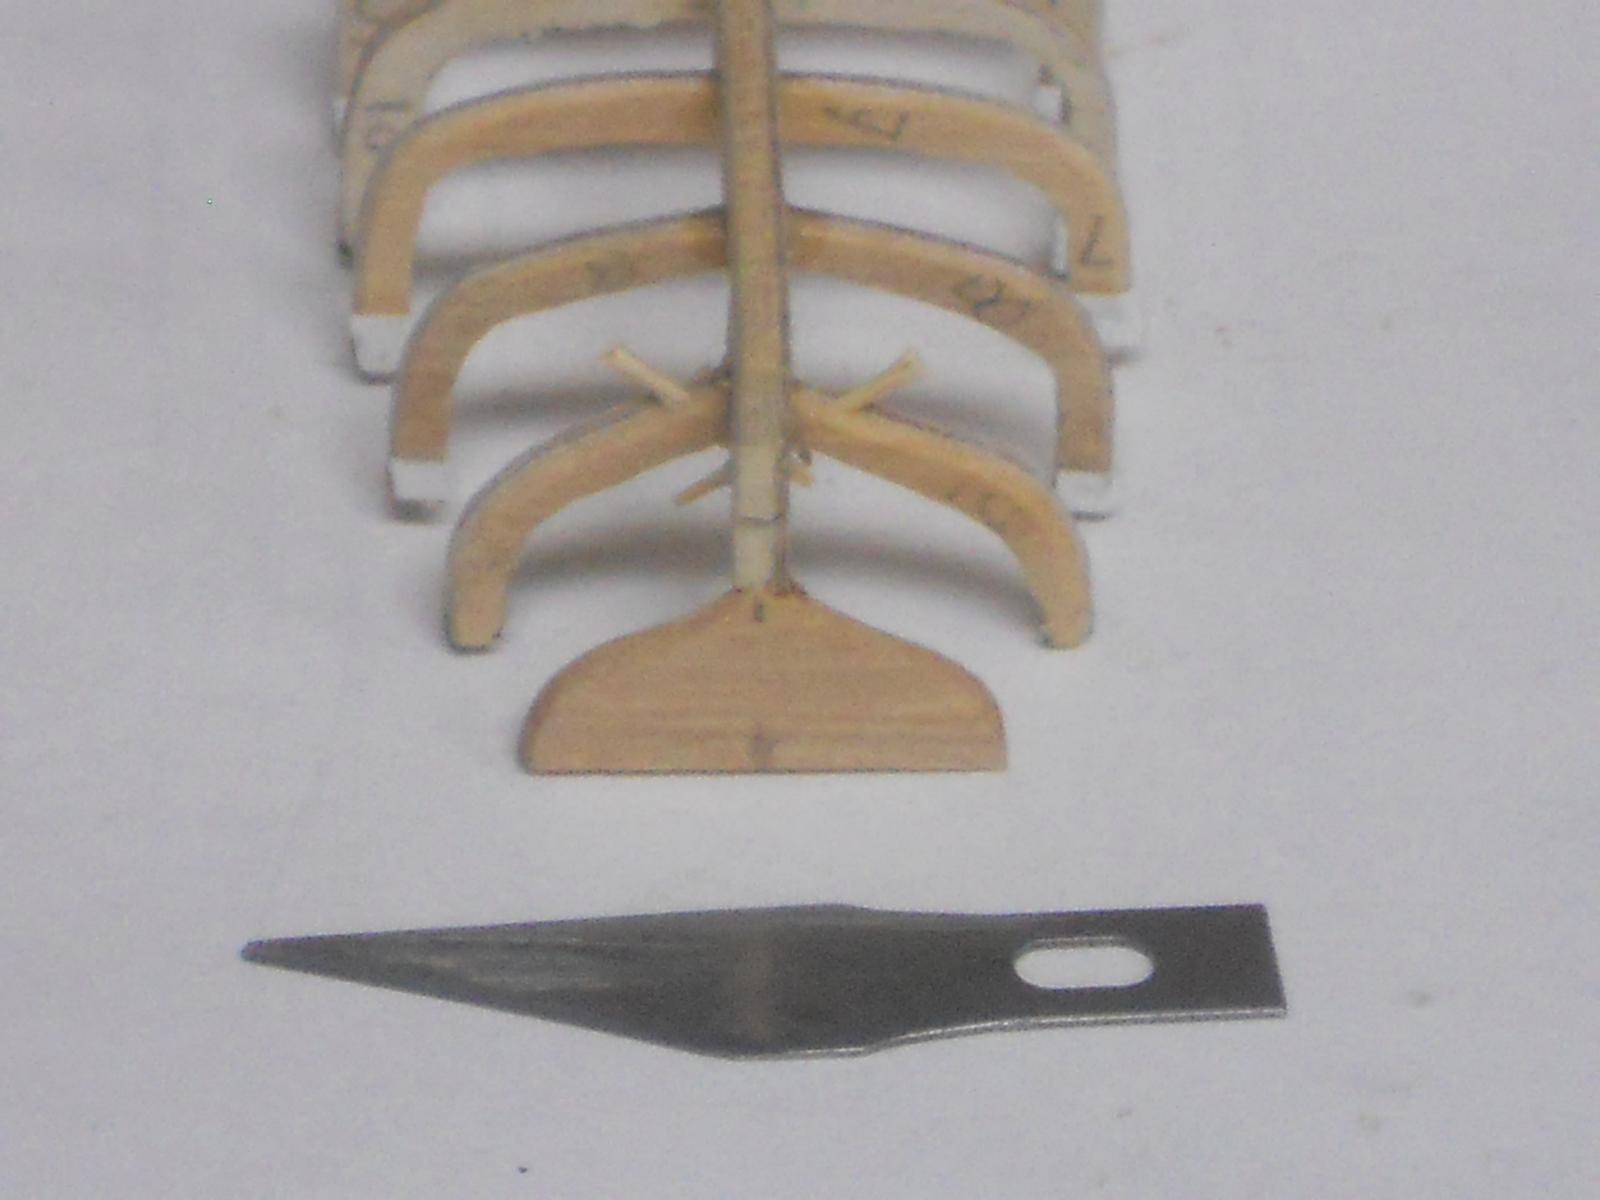
 Thanks to everyone for your like votes, I appreciate it very much. Today was the Lobster Smack kit day but while the glue was curing on mounting the frames to the center keel frame I decided to try and put treenails into the last frames of the dinghy. As mentioned in my last post that fame is only 1.5 mm thick so I had to pick a drill bit small enough to still have enough meat left. I picked a #75 drill bit and used my small electric hand drill and carefully drilled the holes slightly angled so as not te interfere with the opposite one. This worked okay and the frames remained glued to the keel and they didn't break. Lucked out again. I then split a bamboo skewer and spilt a thin sliver off of it. With a #11 blade i scraped it further down to size so it would slide into the holes. With some PVA on the treenails I managed to push the first one in okay. Doing the second one on the opposite side I ran into a snag, the glue started to grab a hold on the treenail before I had it all the way through. Hmmmm, re-drilling but with some whet sticky glue inside the hole? Visions of a shattered frame flashed through my mind - - - - - - But I lucked out again and was able to clean the hole Okay, make a new treenail and try again. Well, the second one slipped in okay. So then, tomorrow is dinghy time and I'll be busy dressing all the glued in parts and check the fairing of the frames. Hey, this all the same procedures as you would do for a large scale ship, just smaller a lot more delicate. Then, If there is time left I'll start working on the planks. The poplar seems to work out okay for this application. It's strong enough and shapes nicely when whet and then holds its shape after it has dried. Okay, here is a pic of the treenails in the frames. The close-up made it a little fuzzy but yuns get the idea that the operation was a success. These two frame parts should now be a lot stronger and hold up under the planking operation. This shows the treenails glued in place. Using bamboo for treenails at this small size is preferred because they don't brake as easy when pushing them into a hole. They are also very strong with sheer loads. Cheers,
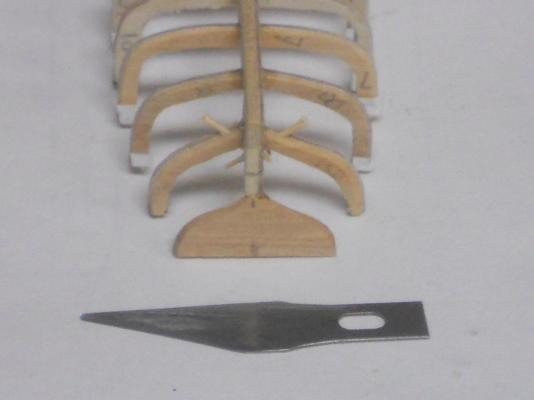
-
Hello everyone and hope all yuns have or had a very great Thanksgiving day! @ George: Thank you for your kind comments and best wishes. We also wish you and your family a great T day. @ Mark: Head hurting??? At least it's not from the booze Although that may come tomorrow morning. Thank you too Mark for your compliment, the dinghy or jol is coming along, sloooooooowly. @ Michael: Thank you Michael for dropping in and yes, I should have changed my avatar a long time ago. Thanks for noticing. @ Sjors: Yeah, pictures why not. I try to work one day on the dinghy / jol and the next day on the lobster smak kit. Actually, today was the lobster smak's turn but I did get some dinghy time in. Well, compared to Omega's plank on frame dinghy this is a giant boat Yup, the palnking will be a challenge but I seem to thrive on that. I'm using poplar wood . I cut 1.5 mm planks from a poplar board that I need to sand down some and then make into lapstrake or klinker planks. These planks will eventually be about 0.5 mm thick. I still need to remake my scraper tool from a razor blade to carve that little step into it.. Hey, version 2.0 has to be the cat's meow @ Popeye: Yup, it's going - - - very slowly but surely. @ Nenad: Thank you my friend. @ Adriaan: Thank you. It's rather fun though once I had figured out not to repeat the same mistakes I made on version 1.0. Nothing like a learning curve. @ Joe, Thank you very much for your kind words. Oh come on now Joe, I am aiming at doing my lobster smak as well as your little day sailer. Thank you also for your best wishes and we also wish you and your family a belated happy T-day. @ Augie: Good to see you here and thanks for the best wishes and your compliment. Cheers,
-
Yaaayy Popeye, a man after my own heart, making his own planks! That's what I did too, making my own plywood. Hey, a man has to do what a man has to do - - - uh, that goes equally for the femenis here Can't find the size of wood you need, make your own. From way down here in chilly Florida, at least for the next few days, the thingies you cut out look good. Cheers,
-
OUTSTANDING Nenad. Understanding now that I'm working with small stuff I really appreciate your efforts in the stern decorations. Your brushwork on the name is fantastic, even when enlarged! Kudos my friend. Cheers,
- 4,152 replies
-
- 1
-

-
- cutty sark
- tehnodidakta
- (and 1 more)
-
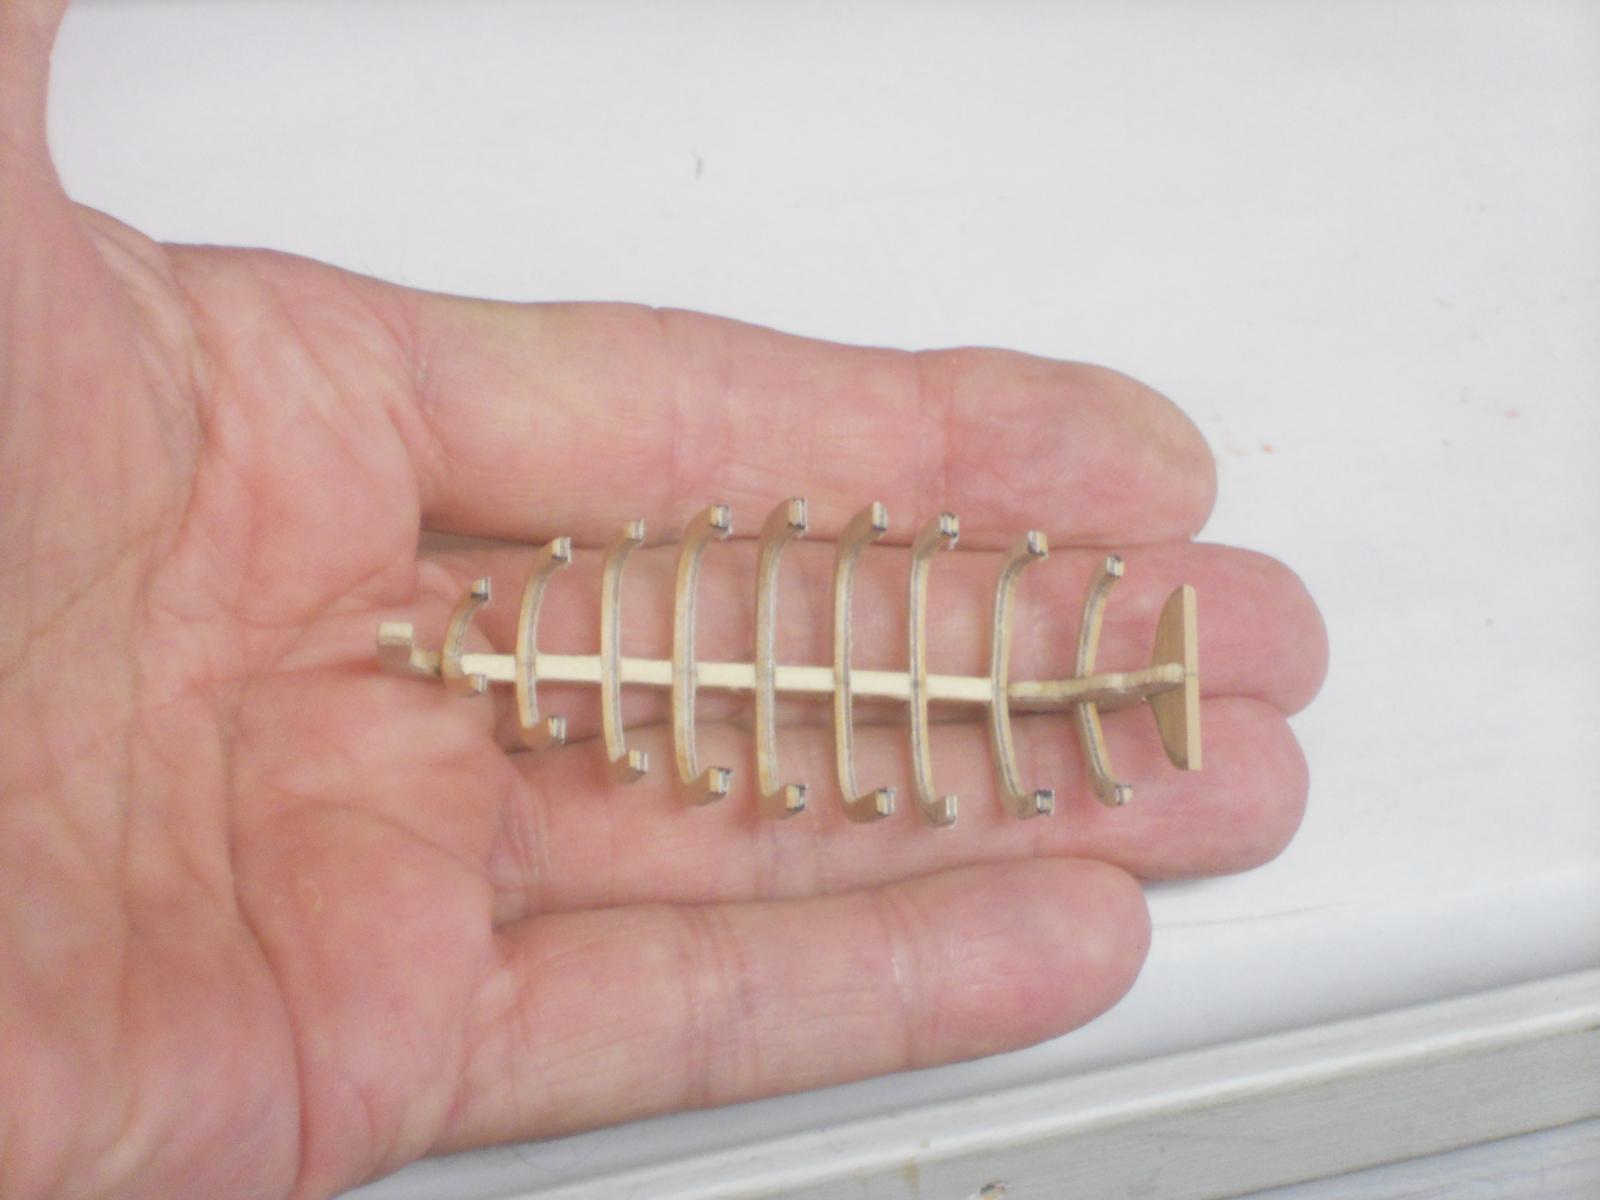
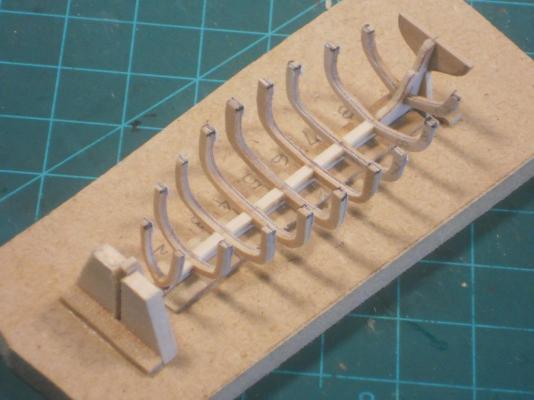
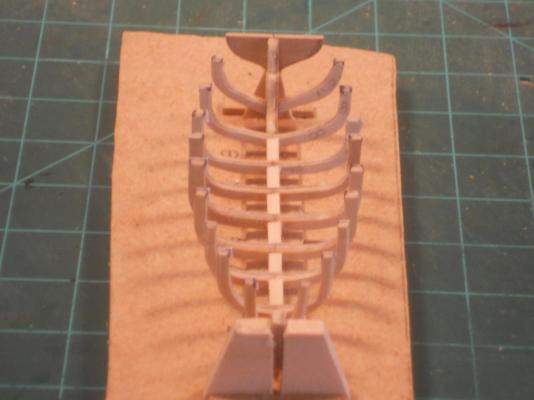
Hello all and Gwen and I wish all a very happy and healthy Thanksgiving. And to all non Americans have a great and healthy day! Between all the chores around the house I did manage to cement the frames to the v.2.0's keel. The only problem I had was with frame 9. I didn't want to cut a slot into the sternpost knee and decided to cut that frame in the center and but cement it to the keel. Ill drill a few holes in it so I can pin the two sides to the keel with a bamboo pin. This in itself will be adventure because of the grain at that point. Right now it's not strong enough to hold up to all the handling that'll take place with the planking. I have pre-faired all the frames but will check the fairing and adjust it as necessary. As you can see on the pics below I have added small strips of about 1 mm between the frames to give them a little more strength. I may have to run a thin strip over all the frame bottoms like a keelson. All these frames are still rough and will be dressed down after the planking is on. Compared to Omega's dinghy this is a giant vessel Okay, here are the pics of the progress I made. Cheers,

-
Hello John, thank you for the best wishes and of course Gwen and I wish you and Diane also a very blessed Thanksgiving. Cheers,
-
Hi Adriaan, I understand your dilemma. It seems that the instructions are not quite clear or in error. I would think that it should follow the sheer and if the strake is the sheer then run it parellel to it. Cheers,
-
Thank you all for visiting and your comments. And to all dropped in and clicked like, thank you. Hi there Hexnut. Wow, what a nice set of drawings, mind if I safe them? One never knows if at some future date I want to scratch build this lovely little sloop. It saves me of taking off the lines - - - oh forget about that idea - - - It sure looks very similar to my self design of a friendship sloop. My wife and I were going to build a 1:1 sloop of 25 ft that's called a "Friendship" sloop which is a simplified take on the Freedom sloop. I did quite some research on this type at that time. I did that one to get back to small ship modeling and to prep me for the VOC ship I have always wanted to build. Sorry to say that I don't have the Freedom sloop build log as a hot link, I'll have to ask someone more computer literate for assistance. I hope you understand that I really can't go hog wild in bashing it to make it like they originally were. There are time constraints and some other factors. I must keep it all rather simple. Hi bdglantman2, Yup, that balsa is also a real problem, all the wood in the kit would be my very last choice. The poplar I have been using is a lot better but also not my real choice of wood, my economics comes into play here I'll try using it and because of the woodtypes used in this kit I have bought a wood conditioner by Minwax and is called "Wood Hardener." It penetrates into the wood and actually reinforces the wood fibers and hardens it. With all your experiences with this kit and whatever I come up with it should be helpful for any novice model builder to cope with the material in the kit. Hey, that's why they can sell these kits so cheap. Although the actual fabrication of the parts is pretty well done. As a challenge to me, I have to try and work with the wood in the kit so others can hopefully benefit from our collective experiences. Hello Dee_Dee, Thank you too for the input and I'll be looking at your pics. I'll also be looking for Howard Chapelle's book. As mentioned I can't go into a major batch on this build, I have to keep it as simple as I can but yet make it look more like a working boat. The only thing I'll make working is the rudder as mentioned in my previous post. I won't lower the working deck / floor as it should but it should still look quite decent. I did actually think about adding fake frames and lower the deck / floor but I might as well scratch build it then. No, kiss is the way I have to go but am sure to glean some things I can incorporate from your builds. Thank you all for your input, I really appreciate it. Cheers,
- 176 replies
-
- 3
-
-
- muscongus bay lobster smack
- Midwest Products
- (and 1 more)
-
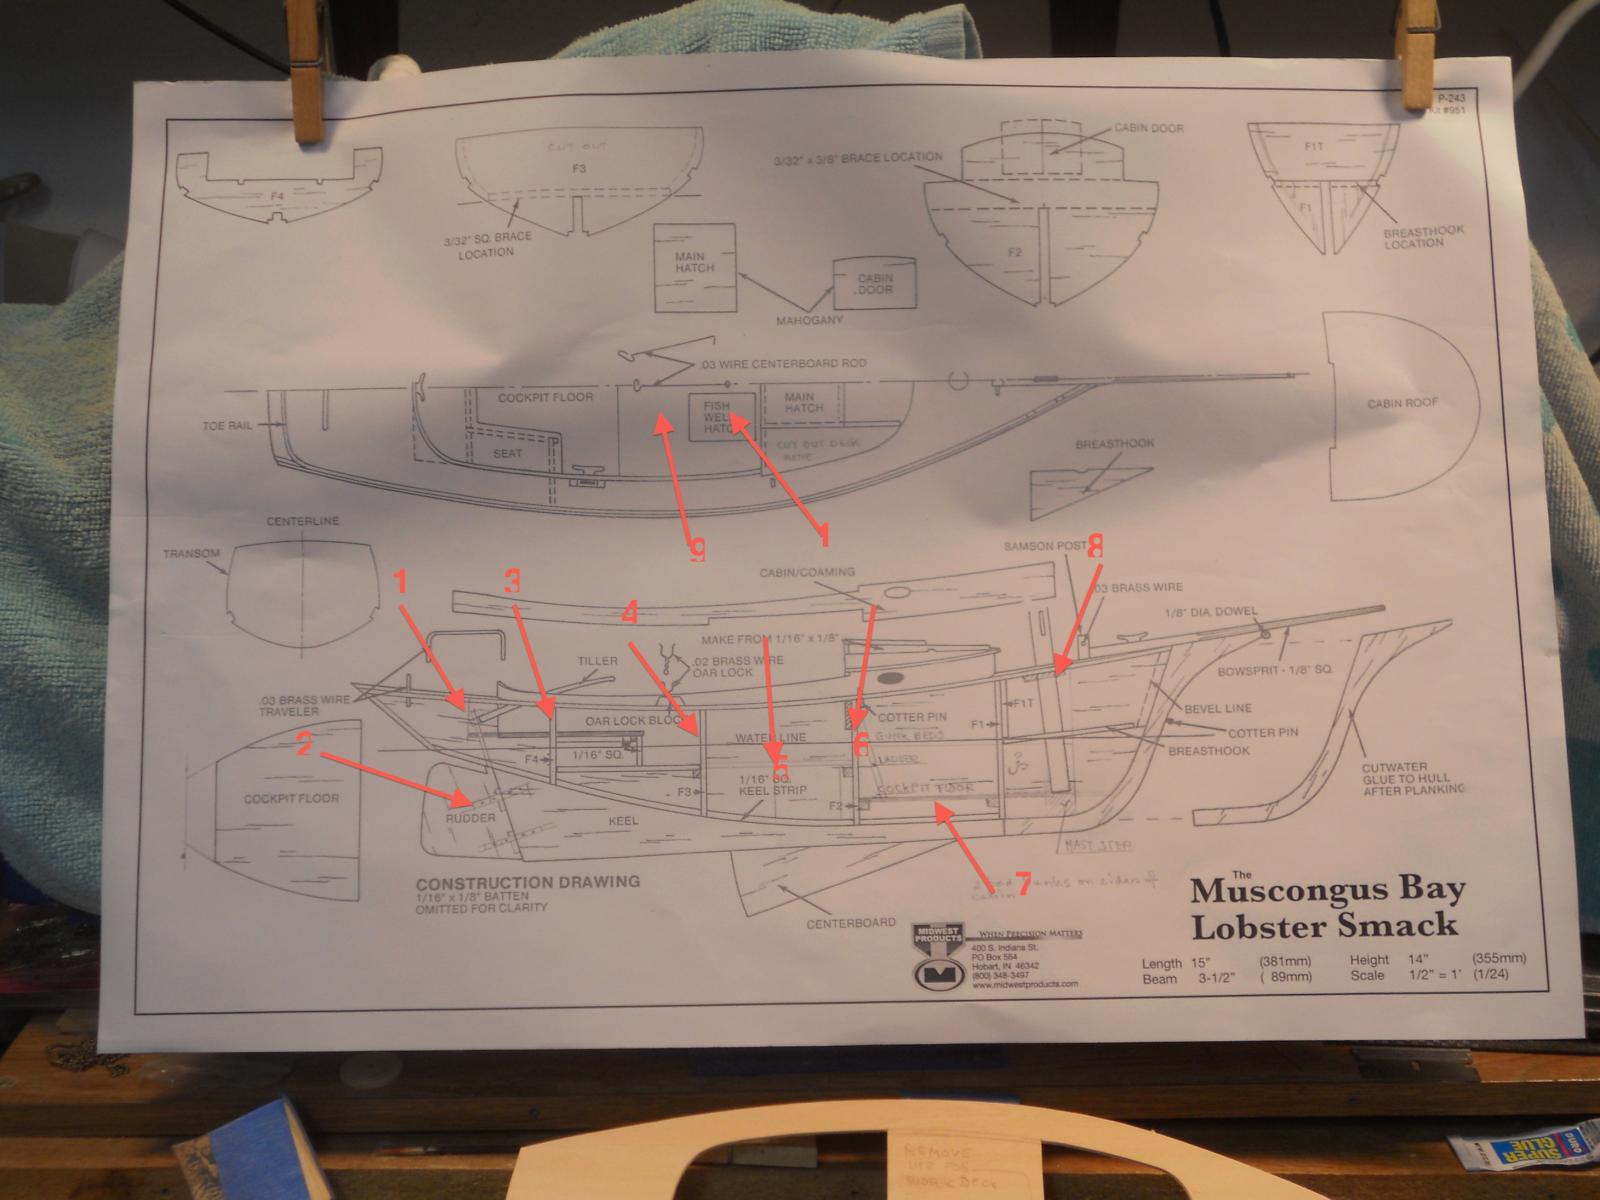
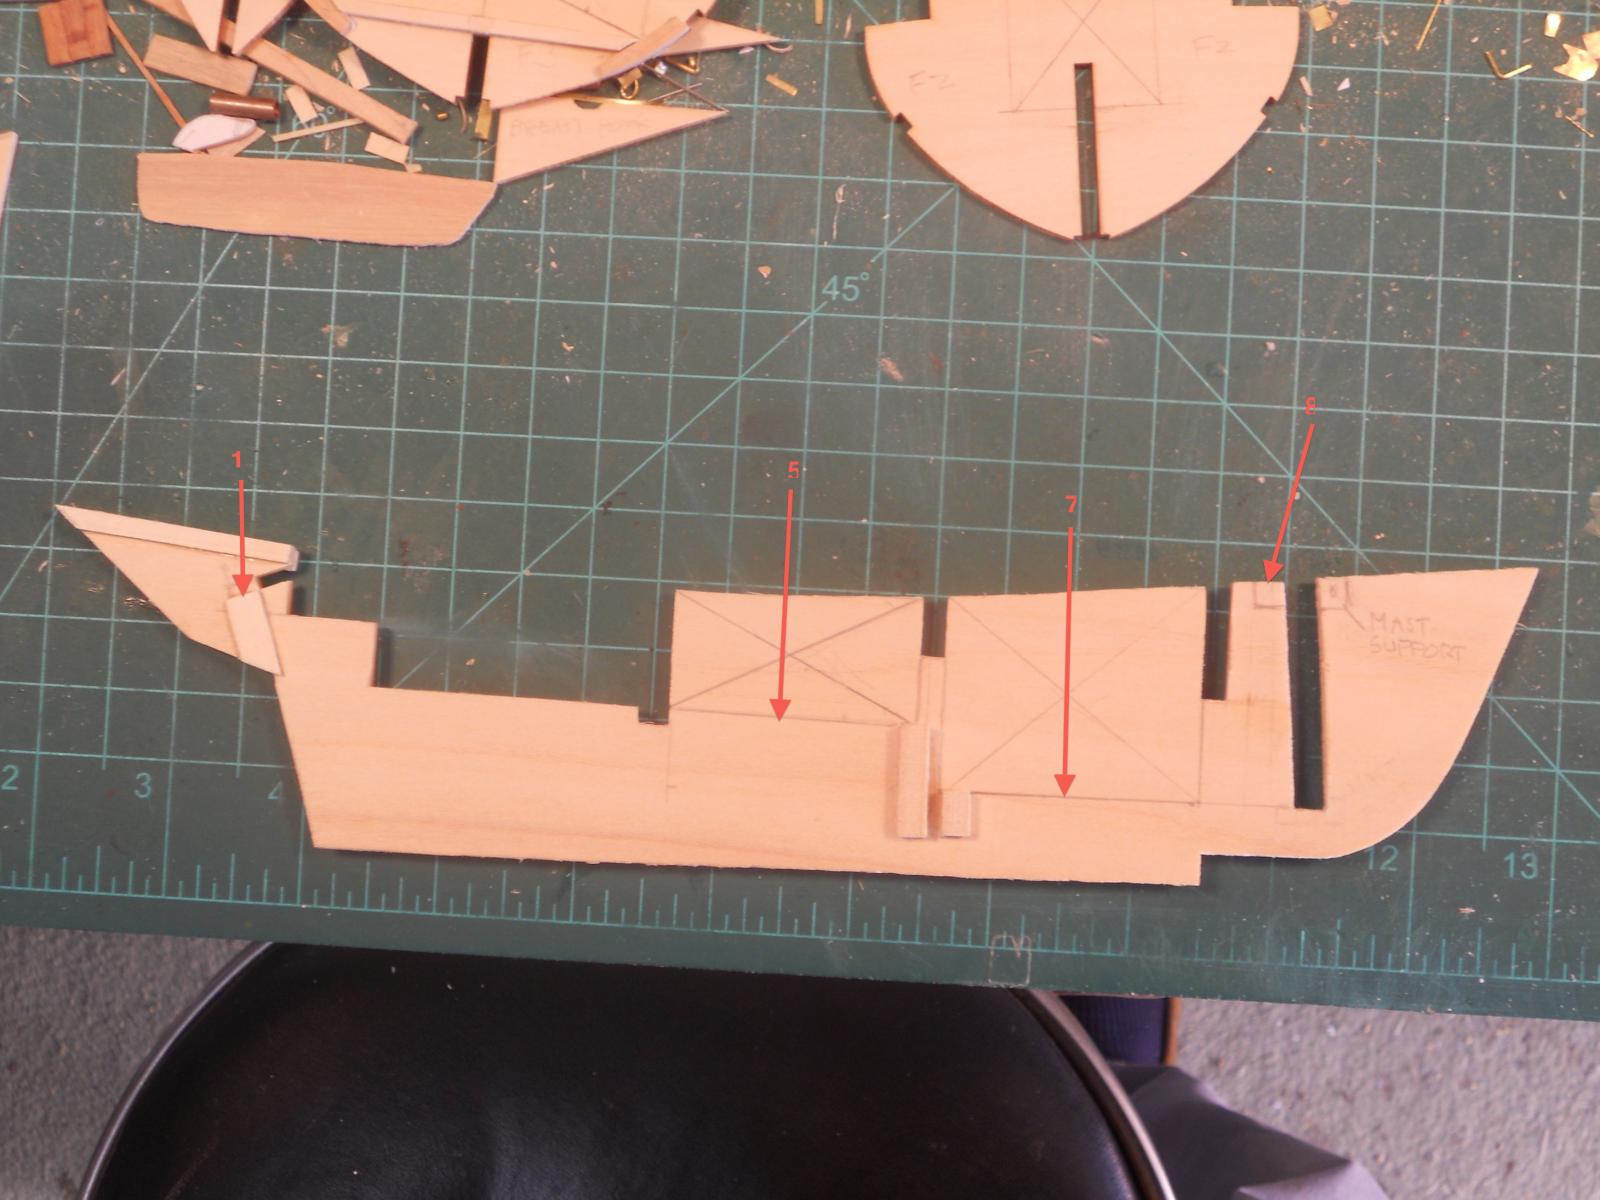
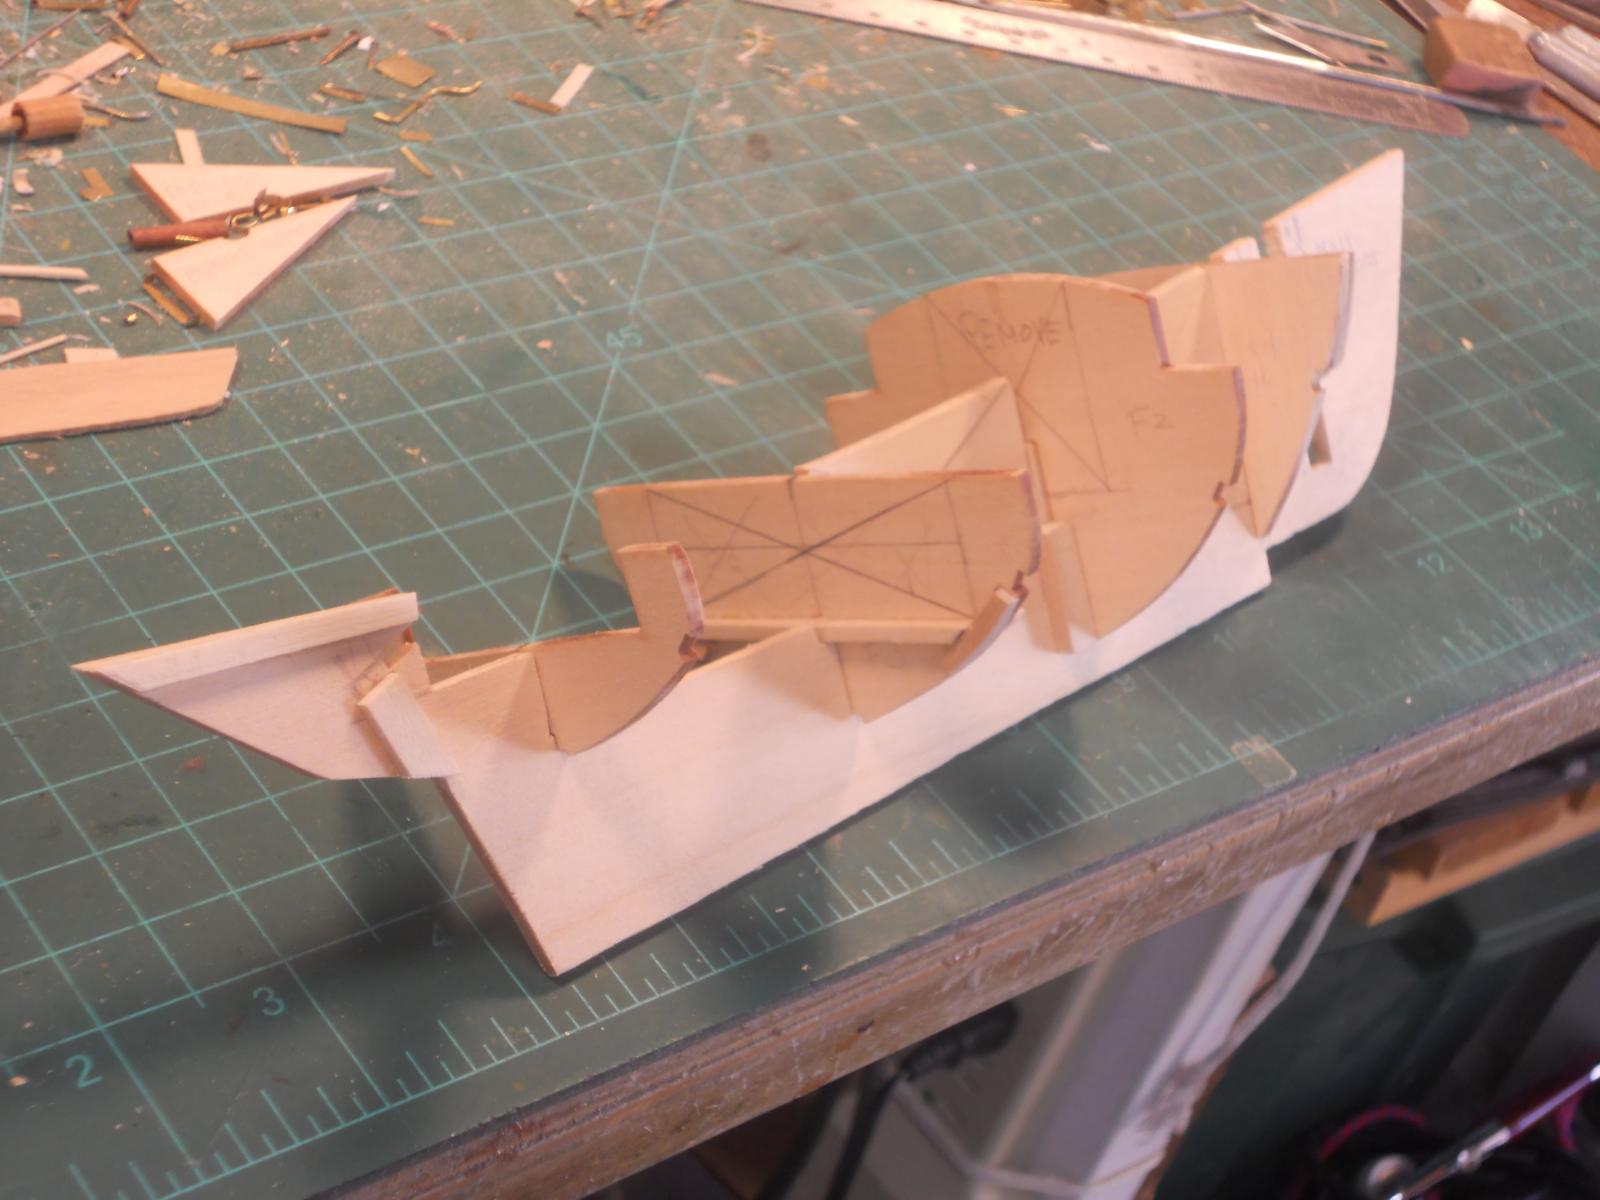
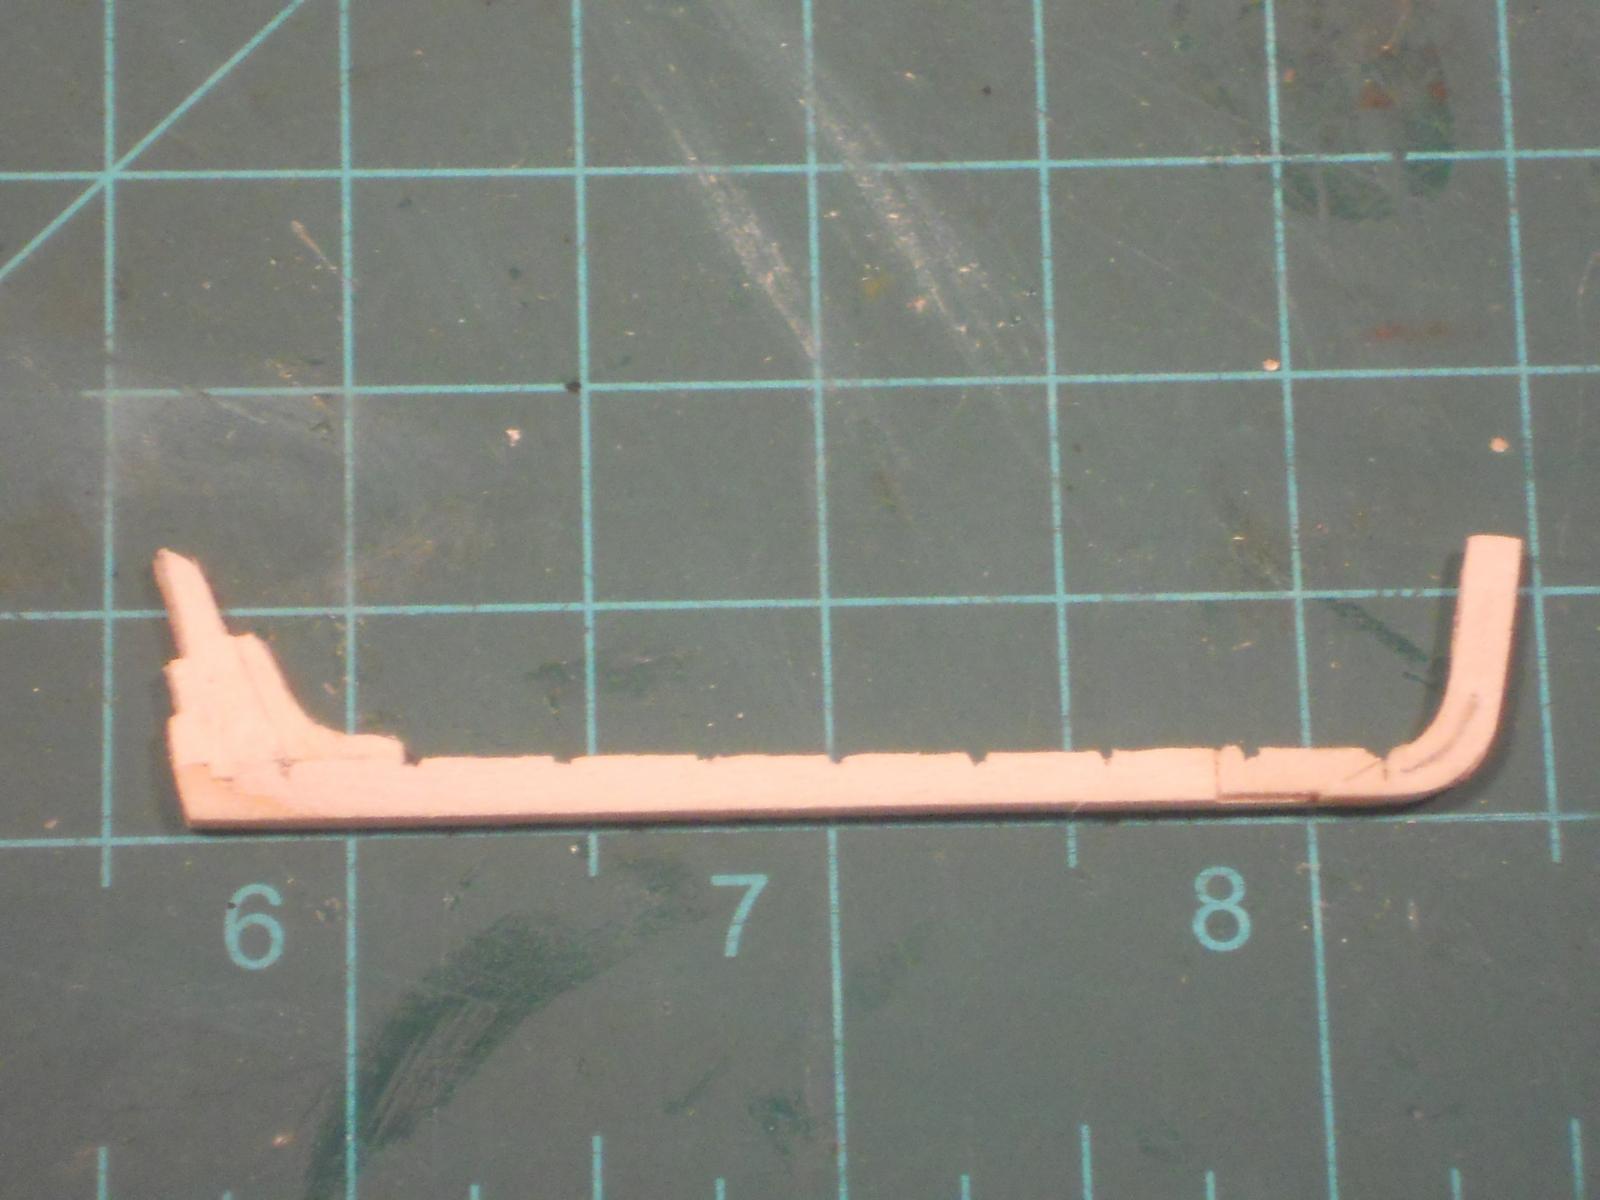
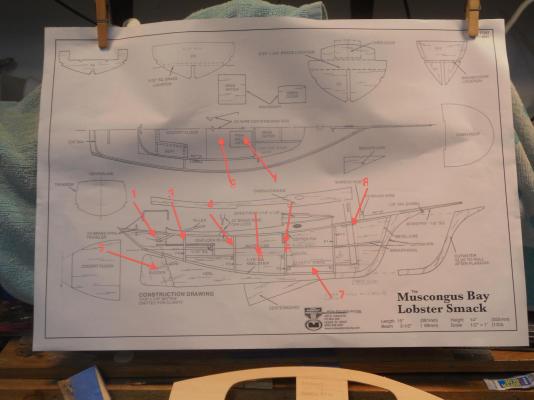
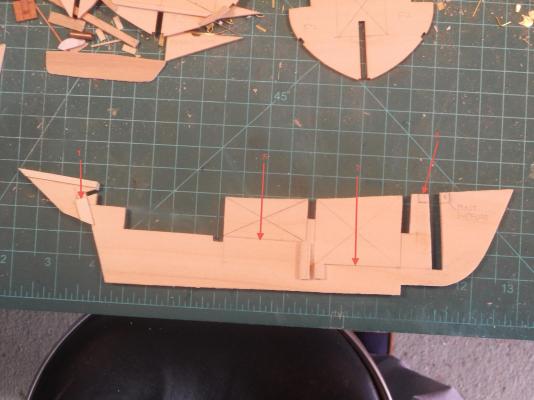
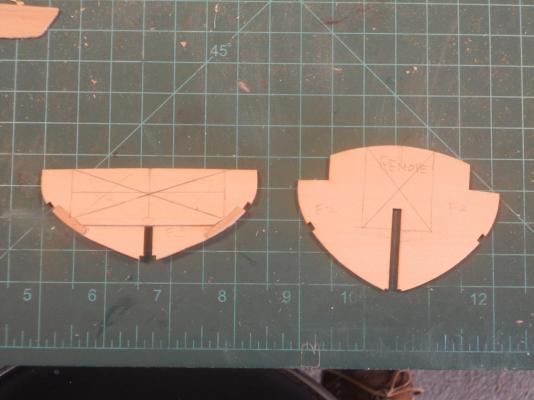
This is really a belated post because the pics I'll be showing is work I did last Minday when it was raining here in Palm Coast, Florida. I started to mark the drawing where I wanted to make the immediate areas for the mods. There are of course a few more as I start thinking about te different sections. To help yuns in following along I have annotated the drawing with numbers that'll be explained on each picture. I can't add all the things I think I should change right now but we'll get to tem in due time. As I mentioned before I wanted to make the actual work area as it should be. The kit has part of this area closed off with the deck. Then I want to make the small cabin visible through the entry way with possible bunk beds and a table. I don't know yet how far I will go with dolling this baby up Okay then here are the pics I took last Monday. #1 is a little involved. I have to drill a hole through the keel frame for the rudder pivot shaft and cut the helm slot a little further back. I reinforced the keel frame with 2 mm blocks of poplar. That hole doesn't leave much meat in the keel frame # 2, I had to make a new rudder because the kit rudder is too skinny to allow me to drill a 1.2 mm hole in it for the pivot pin. I made the new rudder from the same material as the keel frame. This way the gudgeons and pintels for the rudder hinges will flow naturally together. It also gives me the thickness for the helm pivot pin, which will be made from 1.2 mm brass tube. The helm will have a 0.8 mm brass rod at the end that'll slide in a small piece of 1.2 mm brass tube that'll be soldered on top of the rudder pivot pin. I'll show a pic when I have made that. #3, That's bulkhead #4 and the plan is to cut some away on the sides to make it look more like a frame. That area will be reinforced with 1 mm plywood to prevent it from breaking off. #4, is bulkhead 3 and the center part will be removed so I can extend the deck to the next bulkhead. #5, is the position of the new deck piece. #6, is bulkhead 2 and will have the an entry way opening cut into it for getting into the cabin. #7, is the cabin deck (floor for the non maritime oriented folks). #8, is a reinforcement piece for the mast. I found this area a little weak. #9, is what I'll cut away from the kit supplied deck plate to open up the work area. Thoughts of planking the work area deck and cabin deck are floating through my mind or just scribe them in and blacken them with pencil. #10, are the two lobster holding bins. I'll move them aft a little so we have access to the cabin. Originally this boat had a movable centerboard that is housed in a pocket inside the keel. I won't that far but do as the plans call for, cement the centerboard to the keel. Too much work and would be a good project for a scratch build, then the engineering can be thought-out beforehand. This shows just a hint of the changes I'll make to these two bulkheads. There'll be more, like reenforcing and added upright blocks to secure the bulkheads. The numbers follow the ones on the drawing pic above. This shows just a few of the changes to these bulkheads. We'll show more of them when I have made them. This shows the area on the kit supplied deck plate with the planned change. Here I have temporarily installed all the bulkheads on the keel frame. If anyone has batched this kit and want to add suggestions please feel free to do so. I have certain ideas and don't want to go too far overboard with details (pun intended ) Cheers,


- 176 replies
-
- 6
-
-
- muscongus bay lobster smack
- Midwest Products
- (and 1 more)
-
Hello all and thanks for visiting and your like votes and comments. Hey Dave, good seeing you here and your very kind words, you make me blush I'll try to live up to your expectations. Hello George, yeah please come join us, there is plenty of room and coffee with cookies. Thank you as well for adding me to your friend list. It's as I have in my signature, it's not the quantity of friends but the quality that counts. Cheers,
- 176 replies
-
- 1
-
-
- muscongus bay lobster smack
- Midwest Products
- (and 1 more)
-
Hello Mark, that'll be great, glad to have on board, so to speak. You learning from me????? But thank you for the compliment, that is appreciated. This'll be a little different then my previous builds. I have to work with that crappy basswood but will give it a try. And as with several other kit builders who are not satisfied with the basic kit I too have to add some more detail and that means bashing this thing. Most of it I have to improvise as I go along but make notes on the drawings and the build guide. Hey, it's all fun and am enjoying all this ship building immensely, too much actually, neglecting my artwork. Cheers,
- 176 replies
-
- 1
-
-
- muscongus bay lobster smack
- Midwest Products
- (and 1 more)
-
Thank you all for visiting and "liking" my work, it's really much appreciated. Hi Joe, good seeing you again and your kind words. I was hoping to have the model finished on his birthday, which was the 22 but things didn't work out that way. Yeah, that little dinghy was a part of the essential equipment on board so I couldn't leave it out. This was really not the plan when i started this model though. Originally it was just gong to be a static model as seen from the outside without any frills ut one thing leads to another and before I knew it I added a lot more "stuff." Hey, did you check my new kit model I'm making? The Muscongus bay Lobster Smack. A What a nice little model and I hope I can do as good a job on her as you are doing on your day sailer. Hello Omega, thanks for the compliment. I'm still in awe about your 1 cm dinghy - - - and no, I'm not going to make one that small Hi George, welcome to my busy shipyard and thanks for browsing my build log and your kind words. Drop in any time, the coffee is always on. No work doe on any of the models today. The weather was dry and 85 degrees F so I did some heavy pruning on the hedge ate the side of our backyard. It looks kinda awful right now but they will grow back in with a vengeance here in Florida. Then more trimming. Cheers to all,
-
Thanks Jan and Hans for dropping in. The Surabaya will be worked on soon but right now I have two little boats working right in front of her and it's a mess. Two build docks and lots of wood pieces and parts. Yeah Jan, that dinghy was a real challenge but I learned a lot with it. Plank on frame with klinker build planking was not easy. I'm striving to do better with version 2.0 and wish me luck. Cheers,
-
Thanks everybody for visiting my new kit build and your comments. Hi Dee Dee, Oh I would love to get Chapelle's book, I'll check with Amazon or other book stores. I have two books by him, "The Search for Speed Under Sail" and "The History of American Sailing Ships." My bashing will probably not be into the extreme but just making it interesting. Coffee bar is okay, there is plenty in the Bunn brewer thingy and cookies too No popcorn though, Sjors is the keeper of that one. Hi Brian, good to see you too and thanks for the welcome in the kit section. Thank you also for your generosity in offering your input. Yup, I like to get any input you have to offer. I'll be checking in on your build log if that's okay. Aviation is a real challenging way of earning a living, there is a lot of money in it - - - I know, I left a lot of it there I have been in it since 1952. Started out as an airframe and engine mechanic, got authorized by the FAA to certify aircraft airworthy after work was done to them. From there I just moved up the ladder and enjoyed the trip. Yeah, I actually was instrumental in creating new rules and special inspections recommended by the NTSB. It's been interesting. Hoi there Adriaan, good to see you in my new dockyard right next to the VOC ship and my father's O19 submarine. As mentioned in my short intro this kit is meant for a good cause and instead of offering version 1.0 of the O19 dinghy or making a larger version of a Dutch dinghy I was contemplating of making for Dave's shindig I thought it better to make a true American fishing boat from the days before engines. I hope that with what I have gained in experience building the three ships scratch this should not pose too many problems. Cheers to all,
- 176 replies
-
- 7
-
-
- muscongus bay lobster smack
- Midwest Products
- (and 1 more)
-
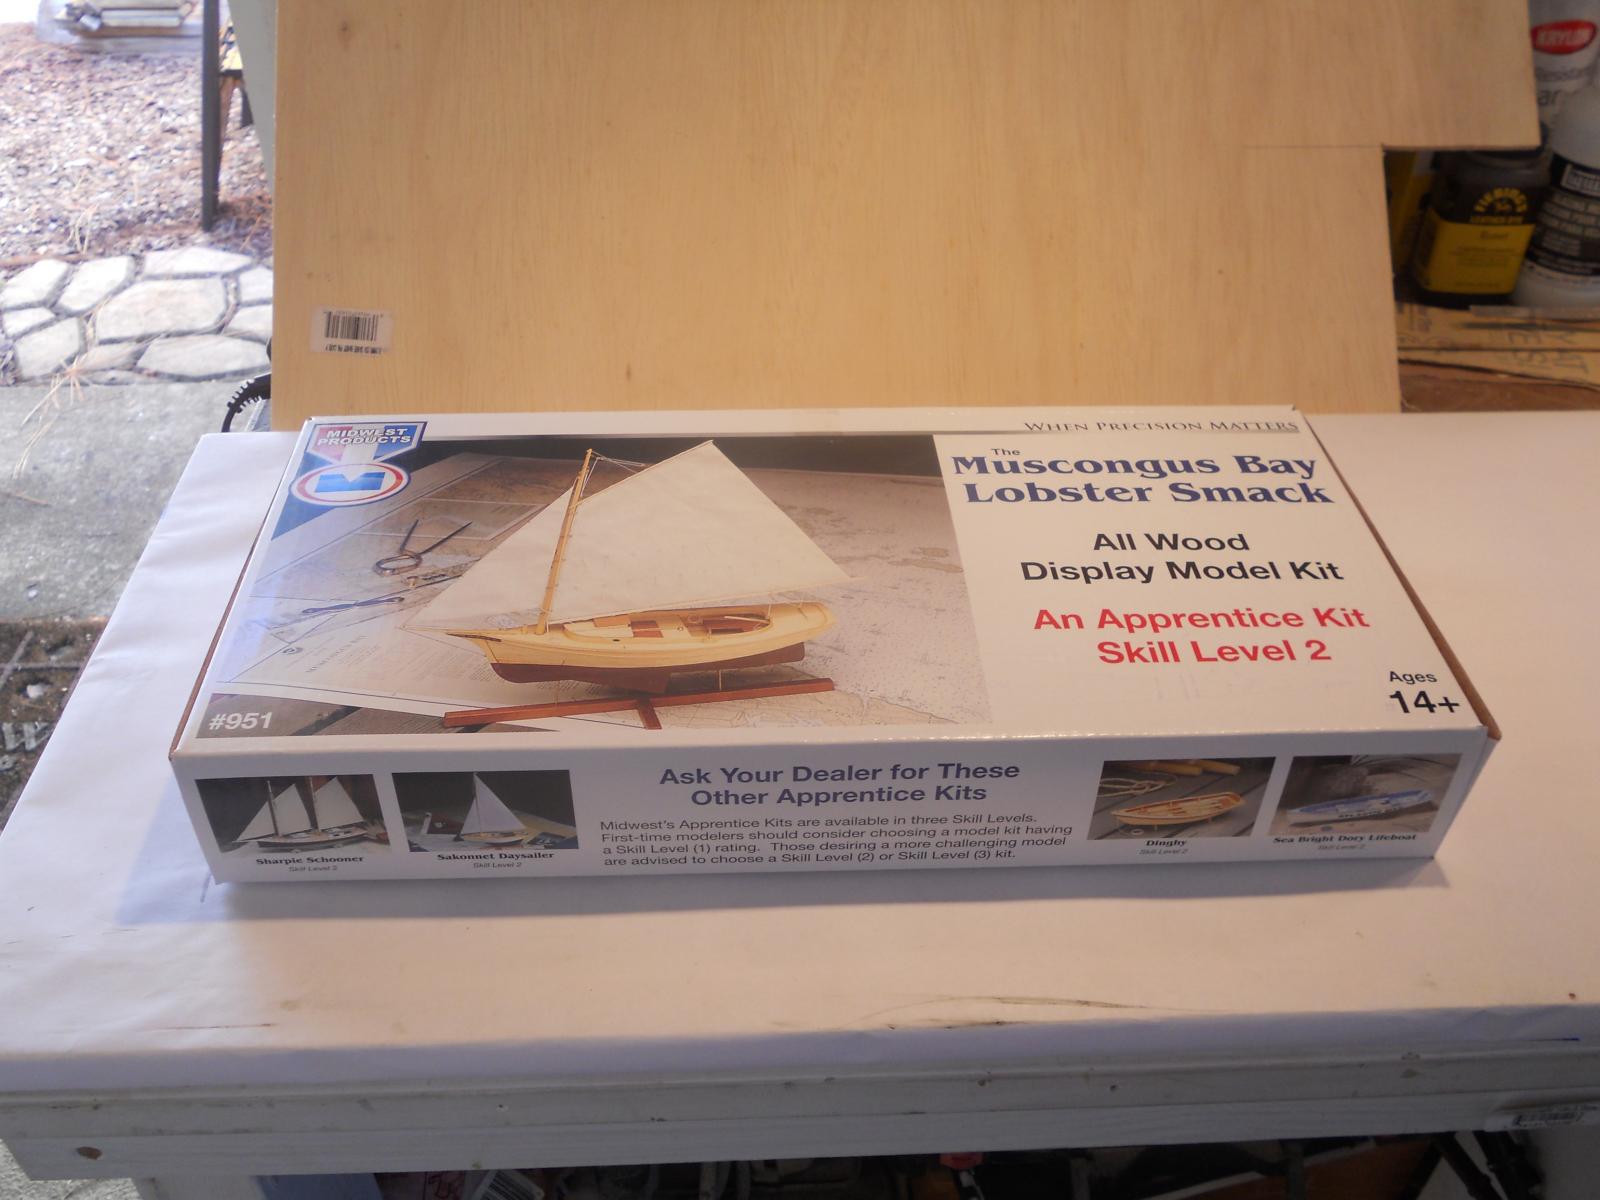
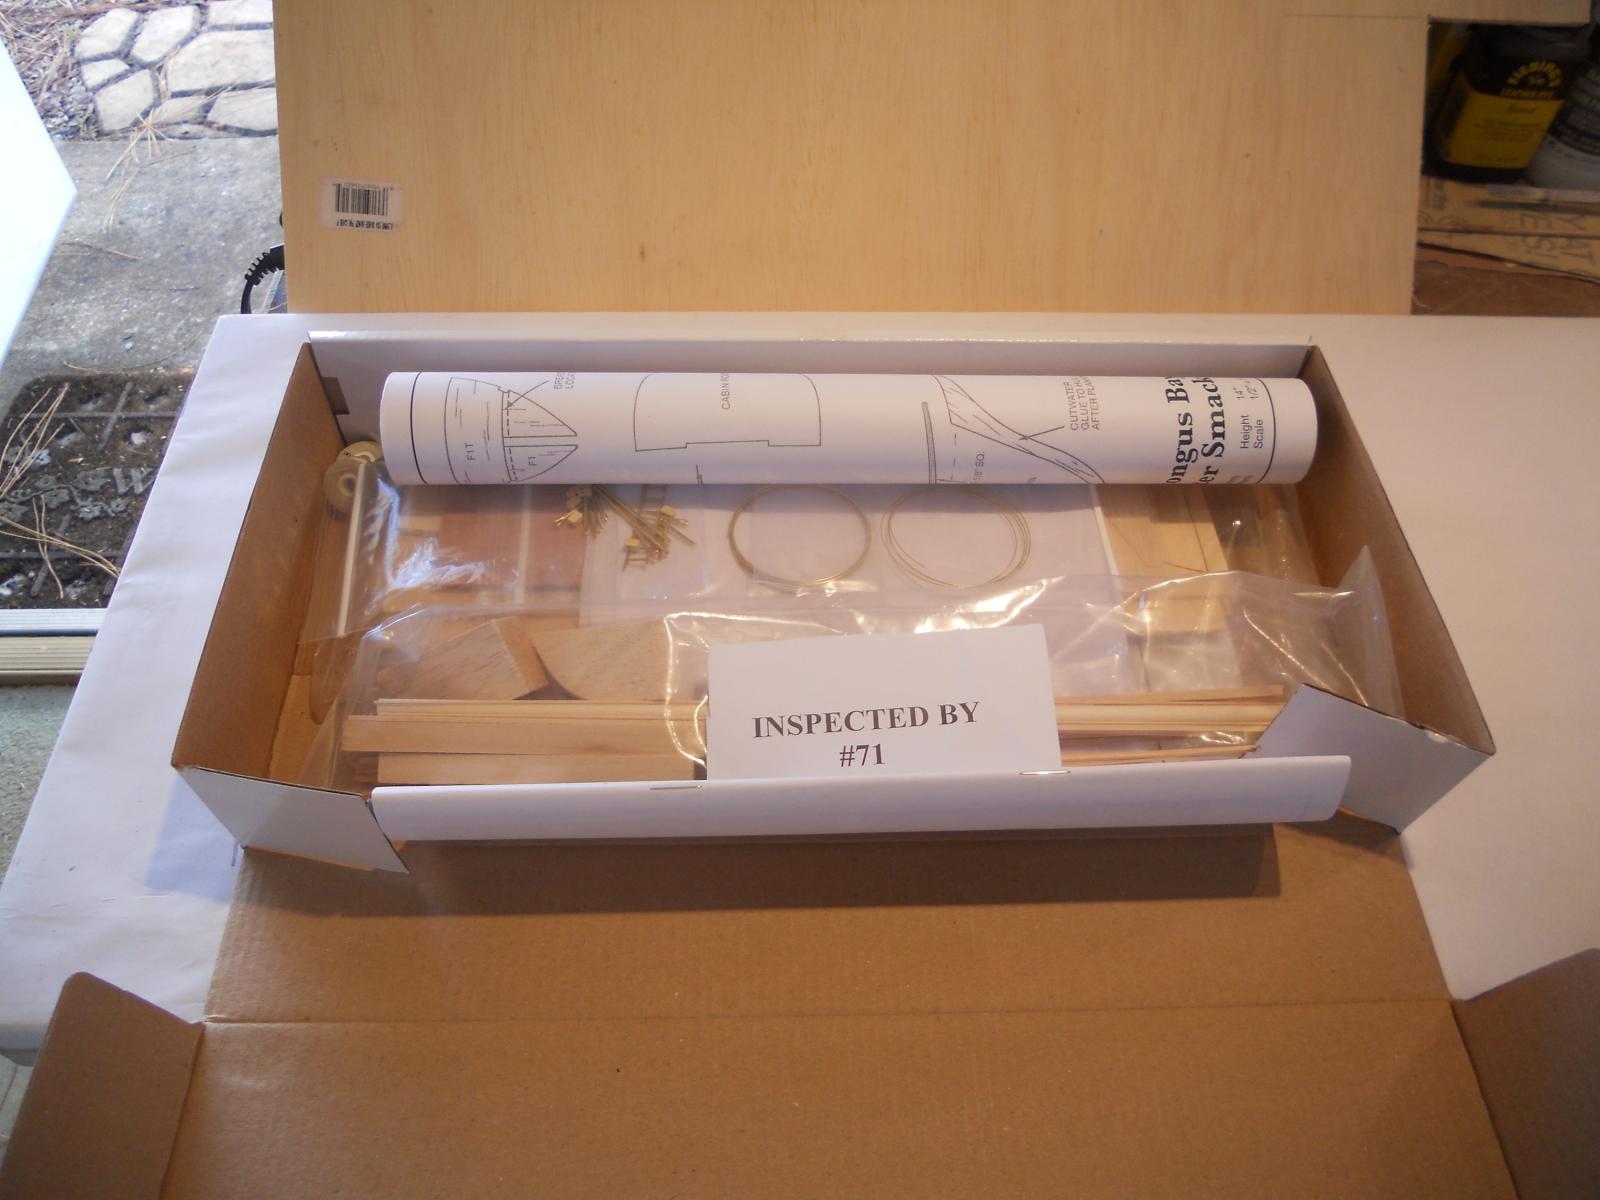
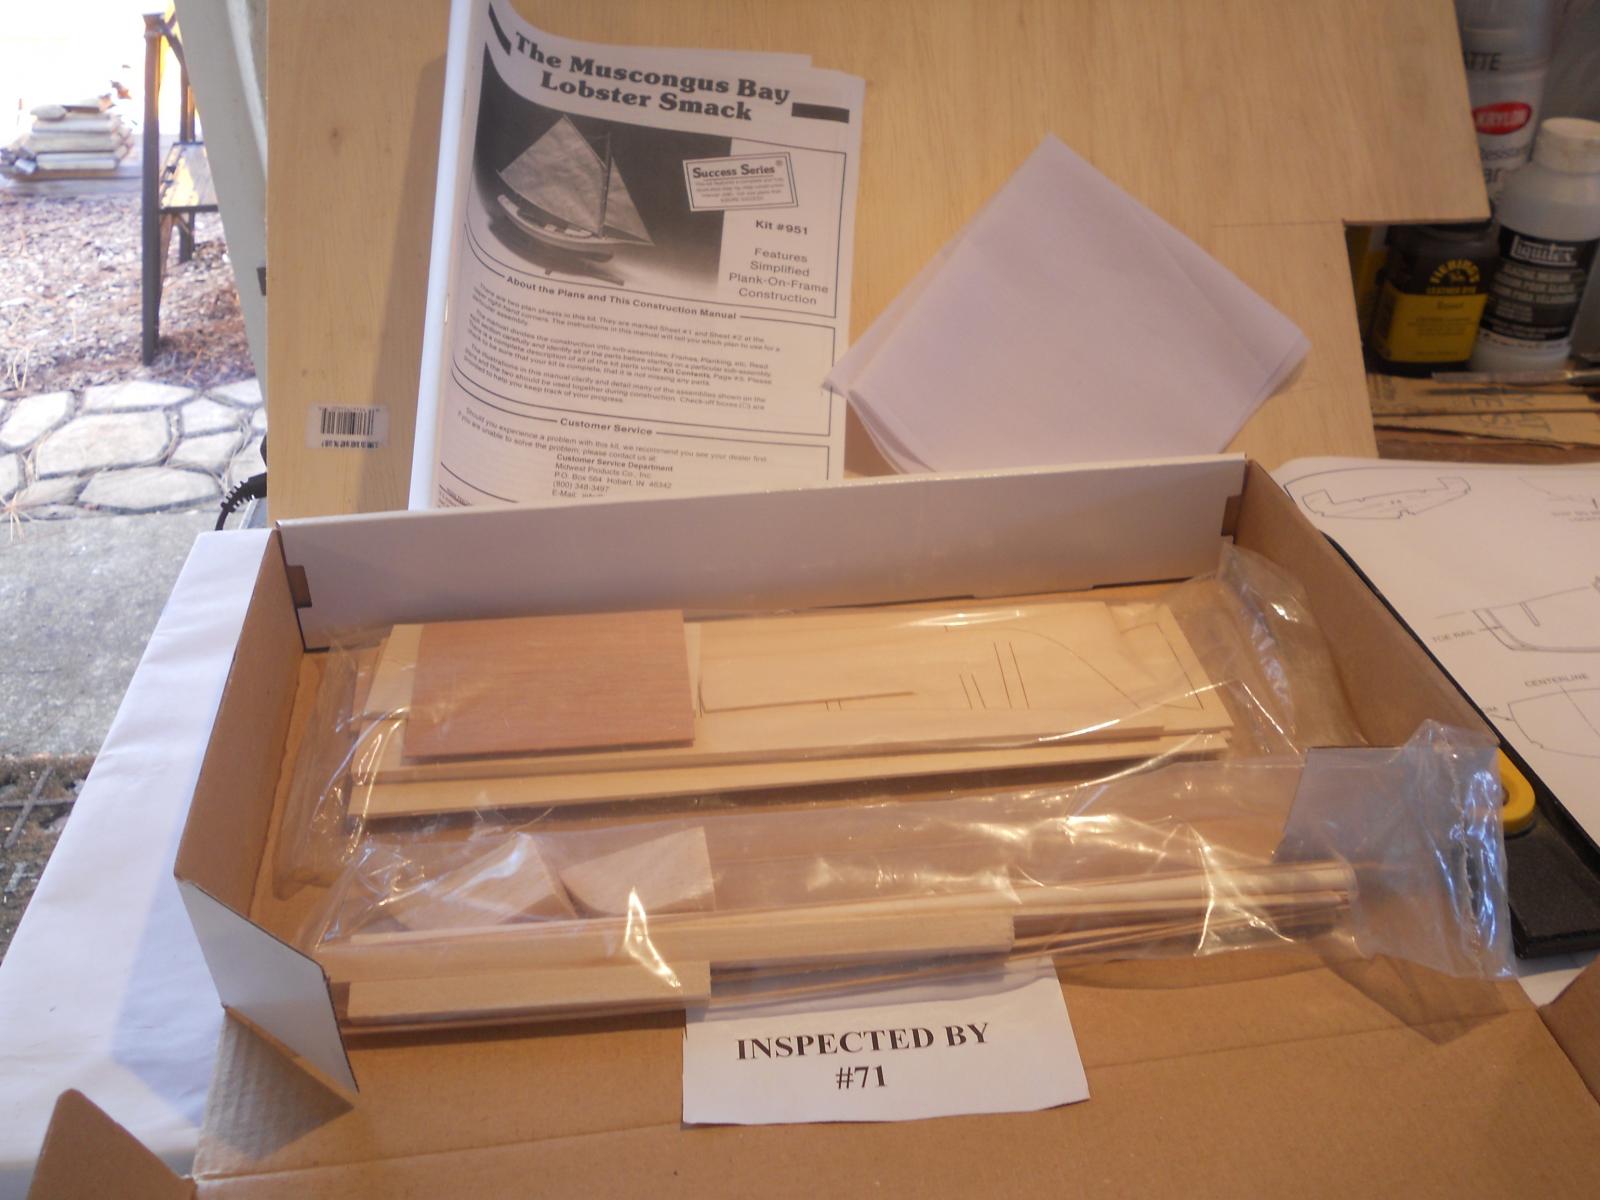
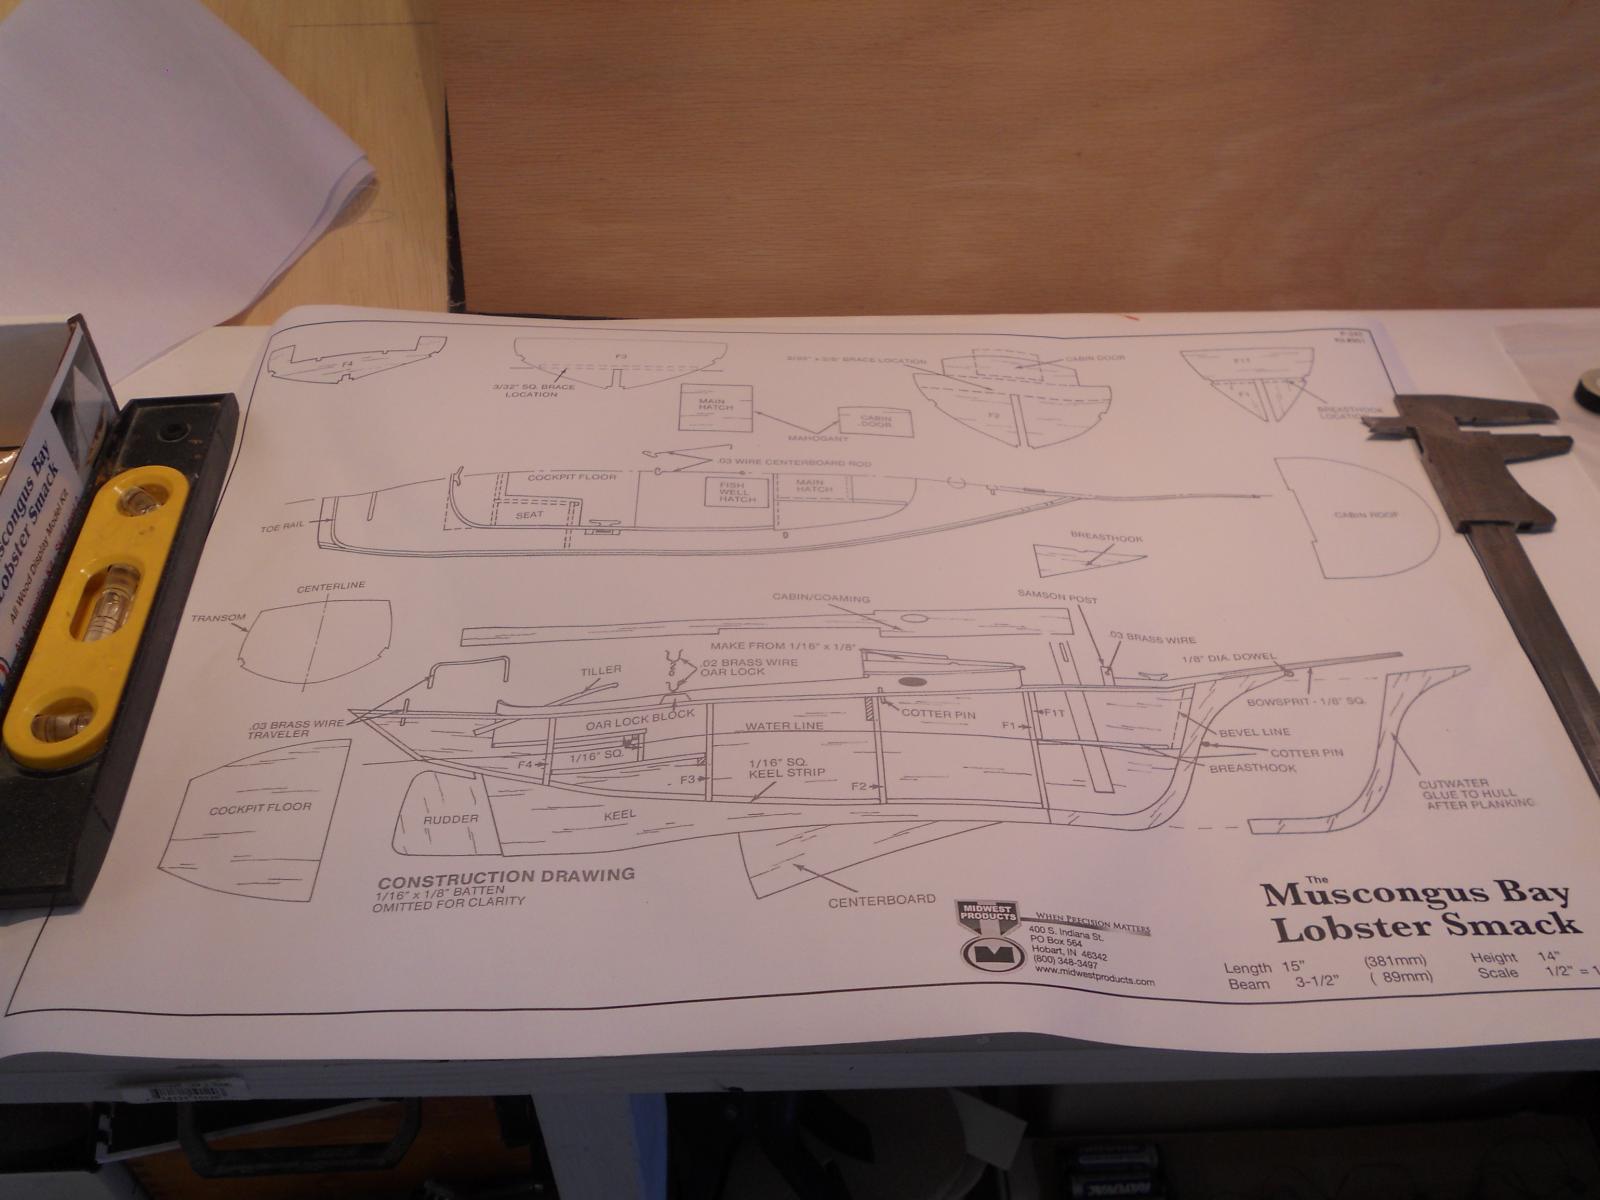
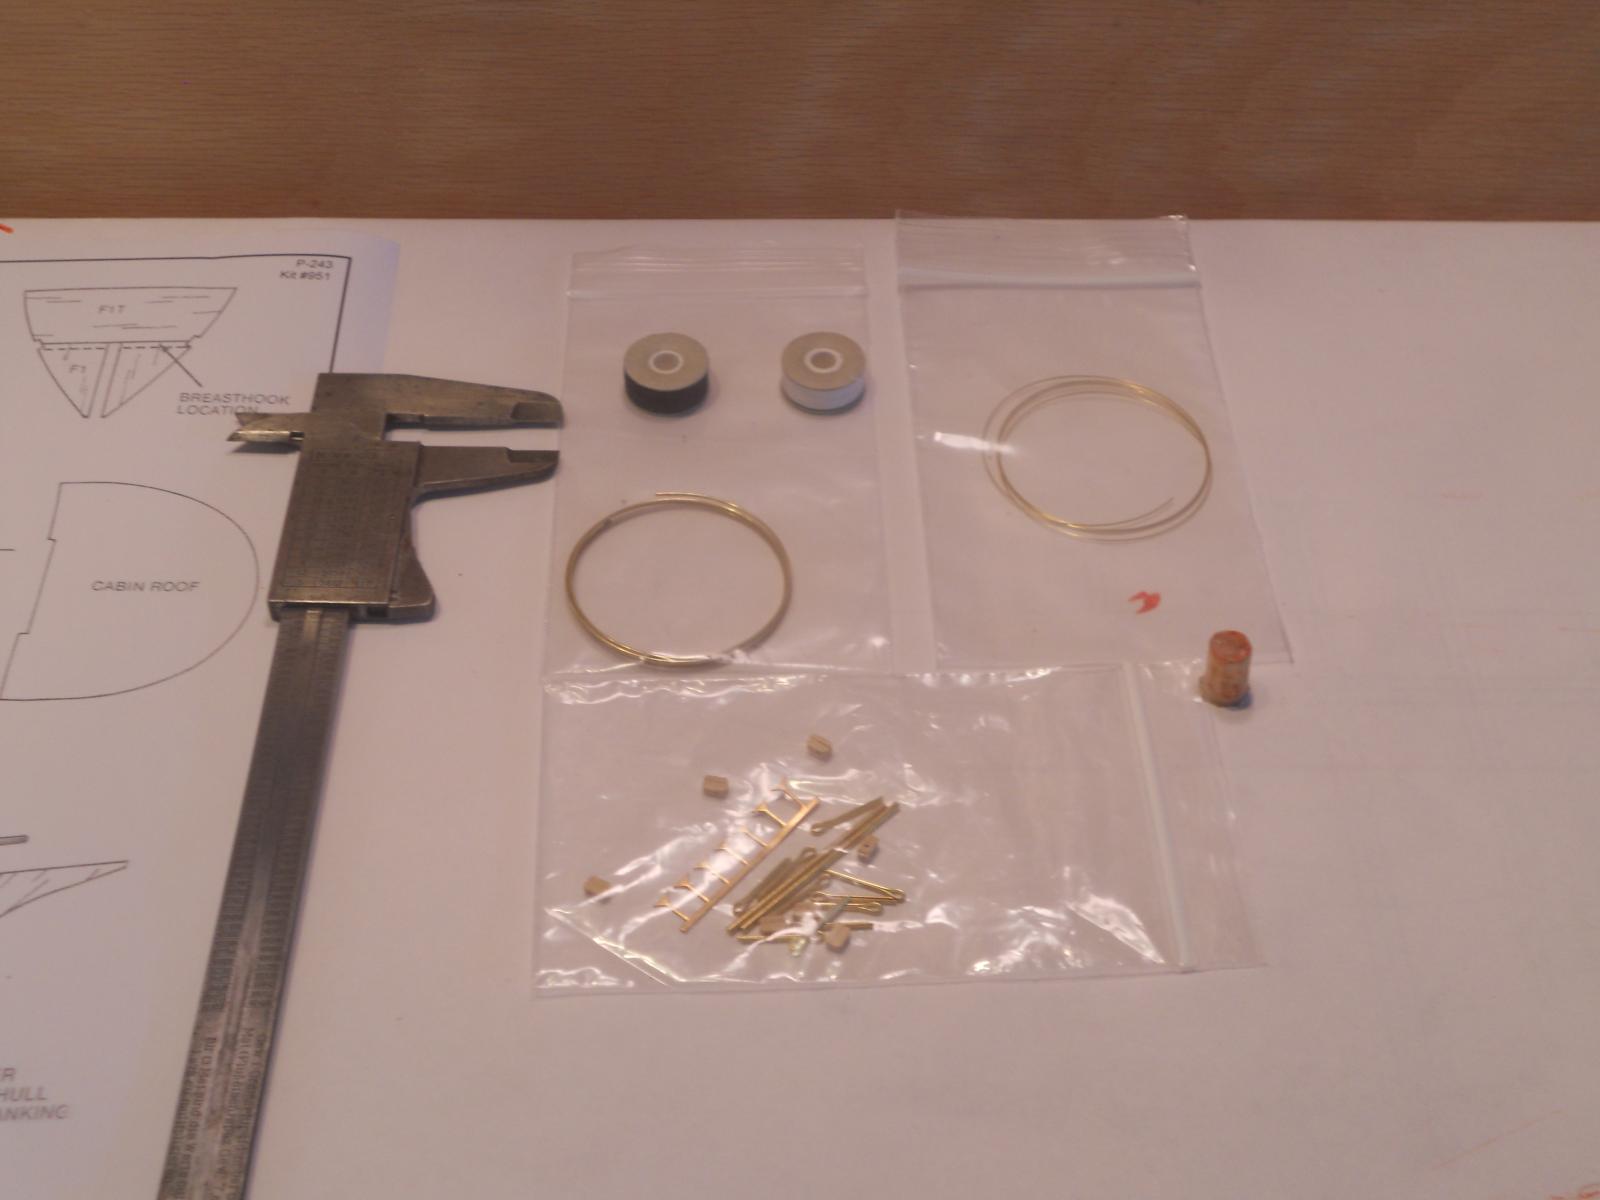
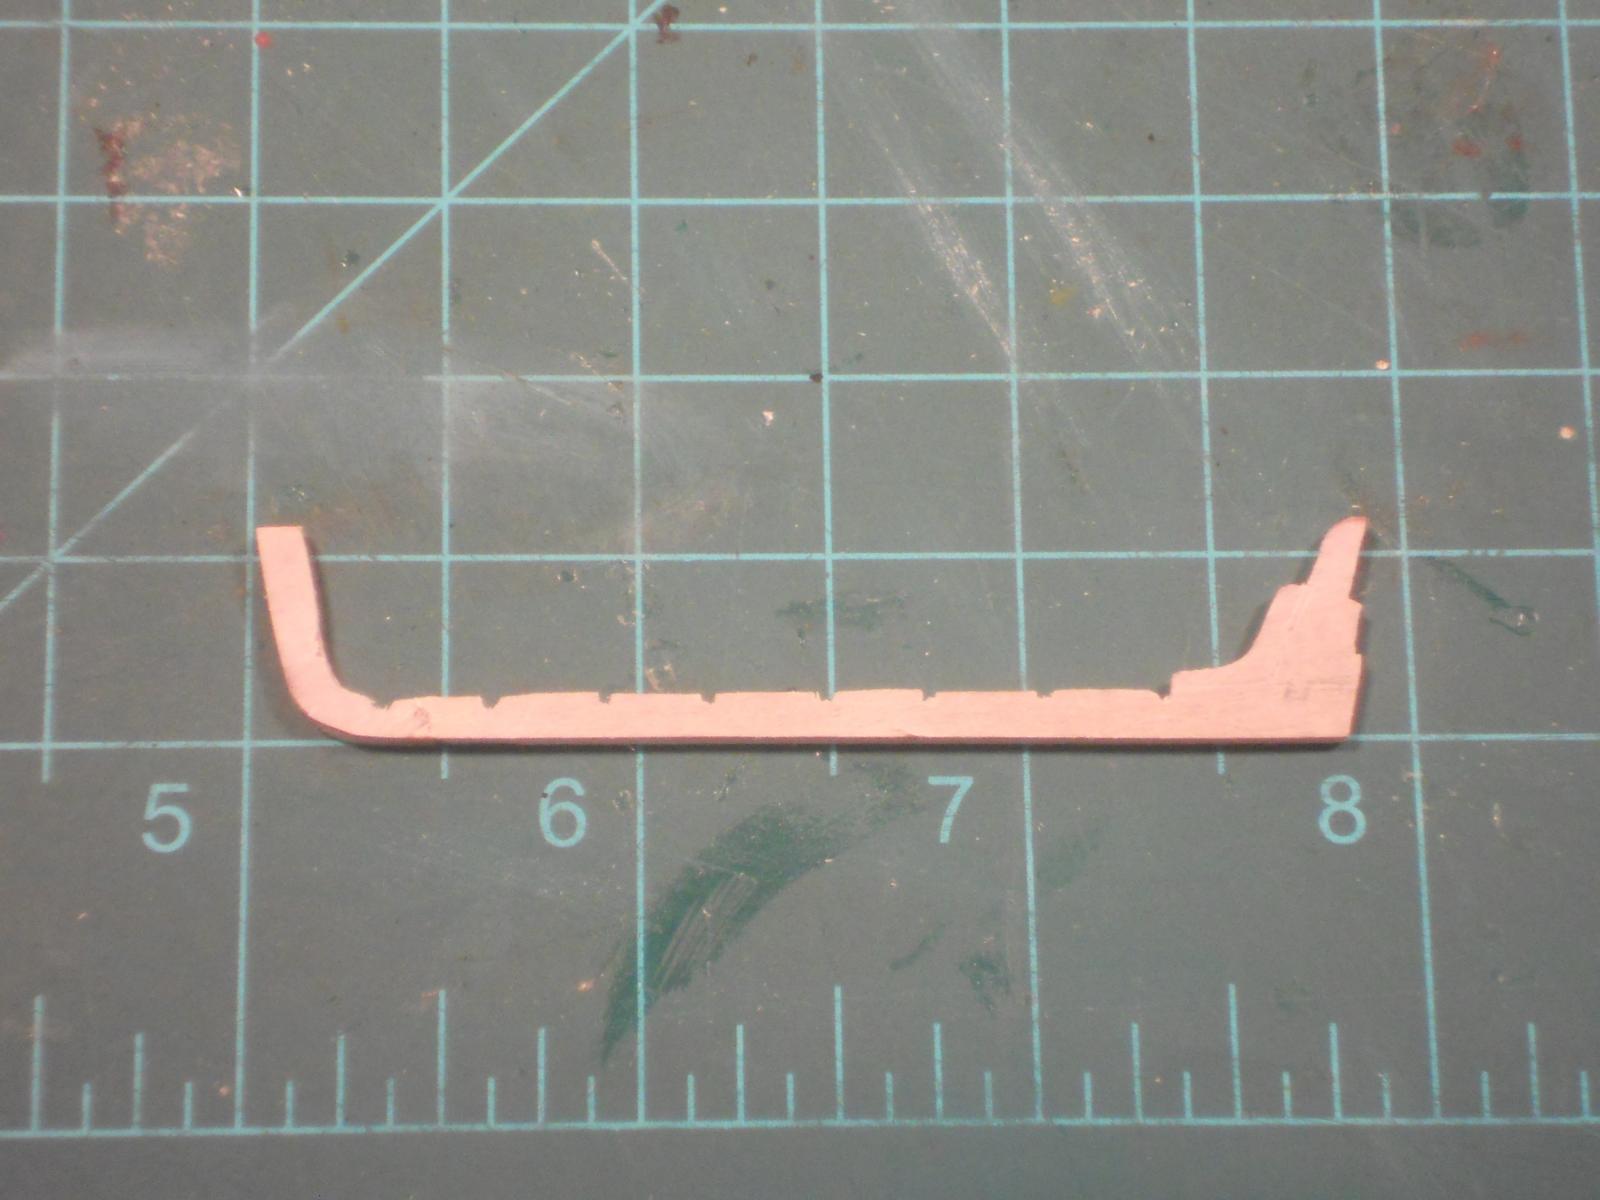
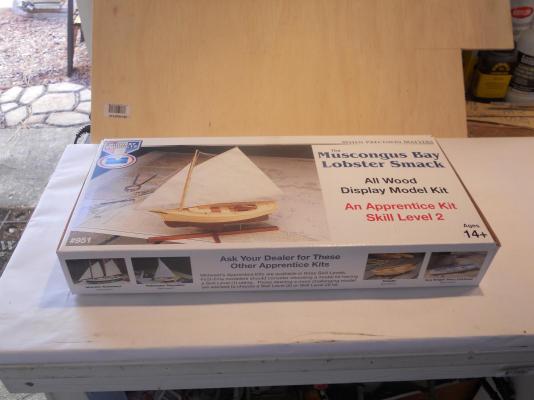
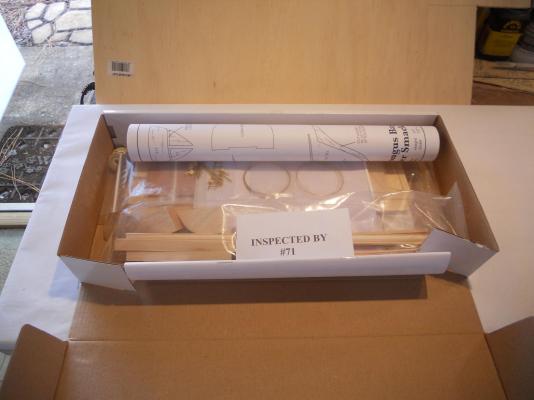
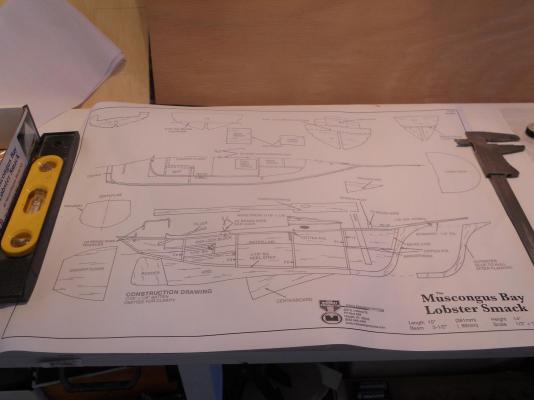
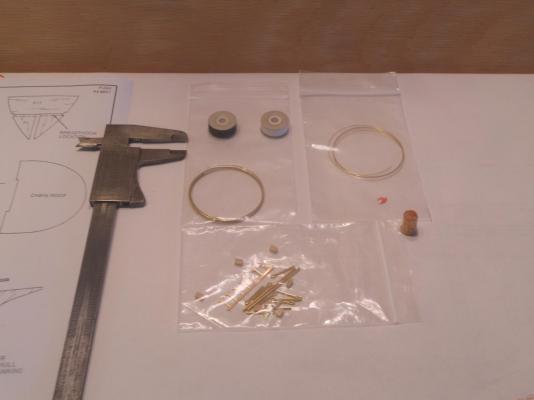
Hello all you marvelous ship builders. I am new to the kit build section of MSW but not new to building models. My name is Petrus W. van Warmerdam and live in Palm Coast Florida. I retired in 20o9 from Federal service with the Federal Aviation Administration as an Airworthiness safety Inspector. My wife and I moved from the Pittsburgh, PA area to get out of the cold. Having finished one scratch build of my own design and then started a self design of a Dutch VOC ship, also scratch build and currently in the finishing stage of a scratch build Dutch submarine, I thought trying my hand at a wooden boat kit. This is not the first wooden ship kit I have tackled and a few plastic models but those are all a long time ago. I chose a mid 19th century fishing boat, the Muscongus Bay Lobster Smack. It's an apprentice level 2 kit and I think that it won't be too difficult for me to tackle. I'm also going to be daring and bash it some. There are few things I like to be able to show like the cabin, the actual working area and make the rudder movable. There'll be some other changes I think in making but we'll cross that bridge when we get to it. I just hope that I can do as well as PiperJoe! Did all y'all see his little sloop? When we lived in Bangor, Maine from 1979 to 1987, we had a friend who was a lobster fisherman but he worked with powerboats though. I like the looks of this little boat, much like the Friendship sloop I designed and scratch build but smaller. This boat will be donated to the "Injured Warrior" program. A bunch of folks from MSW will attend in April, 2015. If you are not familiar with this event then check with SawdustDave. It'll be in North Carolina right off I-95 and anyone willing and capable to attend, please contact Dave. We can also bring our builds to show (off ) He has a beautiful model going himself. This is my first page of the build log and will tweak it in the next few days. I'll need some help from Administrator Mark T with name, avatar and the signature. Hey, I'm an aircraft guy not a computer wiz like many of you. Here are a few pics of the kit box. I bought it from Model Expo, it was on sale for a very handsome price and being a frugal Dutchman (my kids used to call me cheap ) I could not refuse it and it's for a good purpose. I'll add my impressions and comments with each picture, in case someone else would like build this very nice looking boat. This is the box with the kit inside. Love the picture. First impression when I opened the box was that everything was packed very neatly with the two-sided drawing rolled up, instead of folded. The wood used is primarily bass wood. Im not a fan of bass wood and would exchange it in a heartbeat for a better quality wood, if I had more time. However, I'll work with te bass wood so I can learn how to manage it and give my impressions in case someone else wants to buy this nice kit. Overall though I am rather impressed with the quality of the packing and lazer and die cuts. They use balsa for for the hull planking, ugh. But I have some stuff that will harden it up. I'll have some comments I'm sure when we get to actually working with all this stuff. I'll most likely use some of my own wood for different applications. As mentioned, I really appreciate them rolling up the drawing. I don't have to worry about the folds tearing. The sail and rigging plans are on the reversed side. The build instruction booklet is also very nicely laid out and in simple steps even I can understand it. As a scratch builder I have the tendency to do things my way but I try to follow their process. This will be difficult to do because I am bashing it. The hardware is also very nice and plenty of it. Cheers, Piet, the Flying Dutchman.

- 176 replies
-
- 9
-
-
- muscongus bay lobster smack
- Midwest Products
- (and 1 more)
-
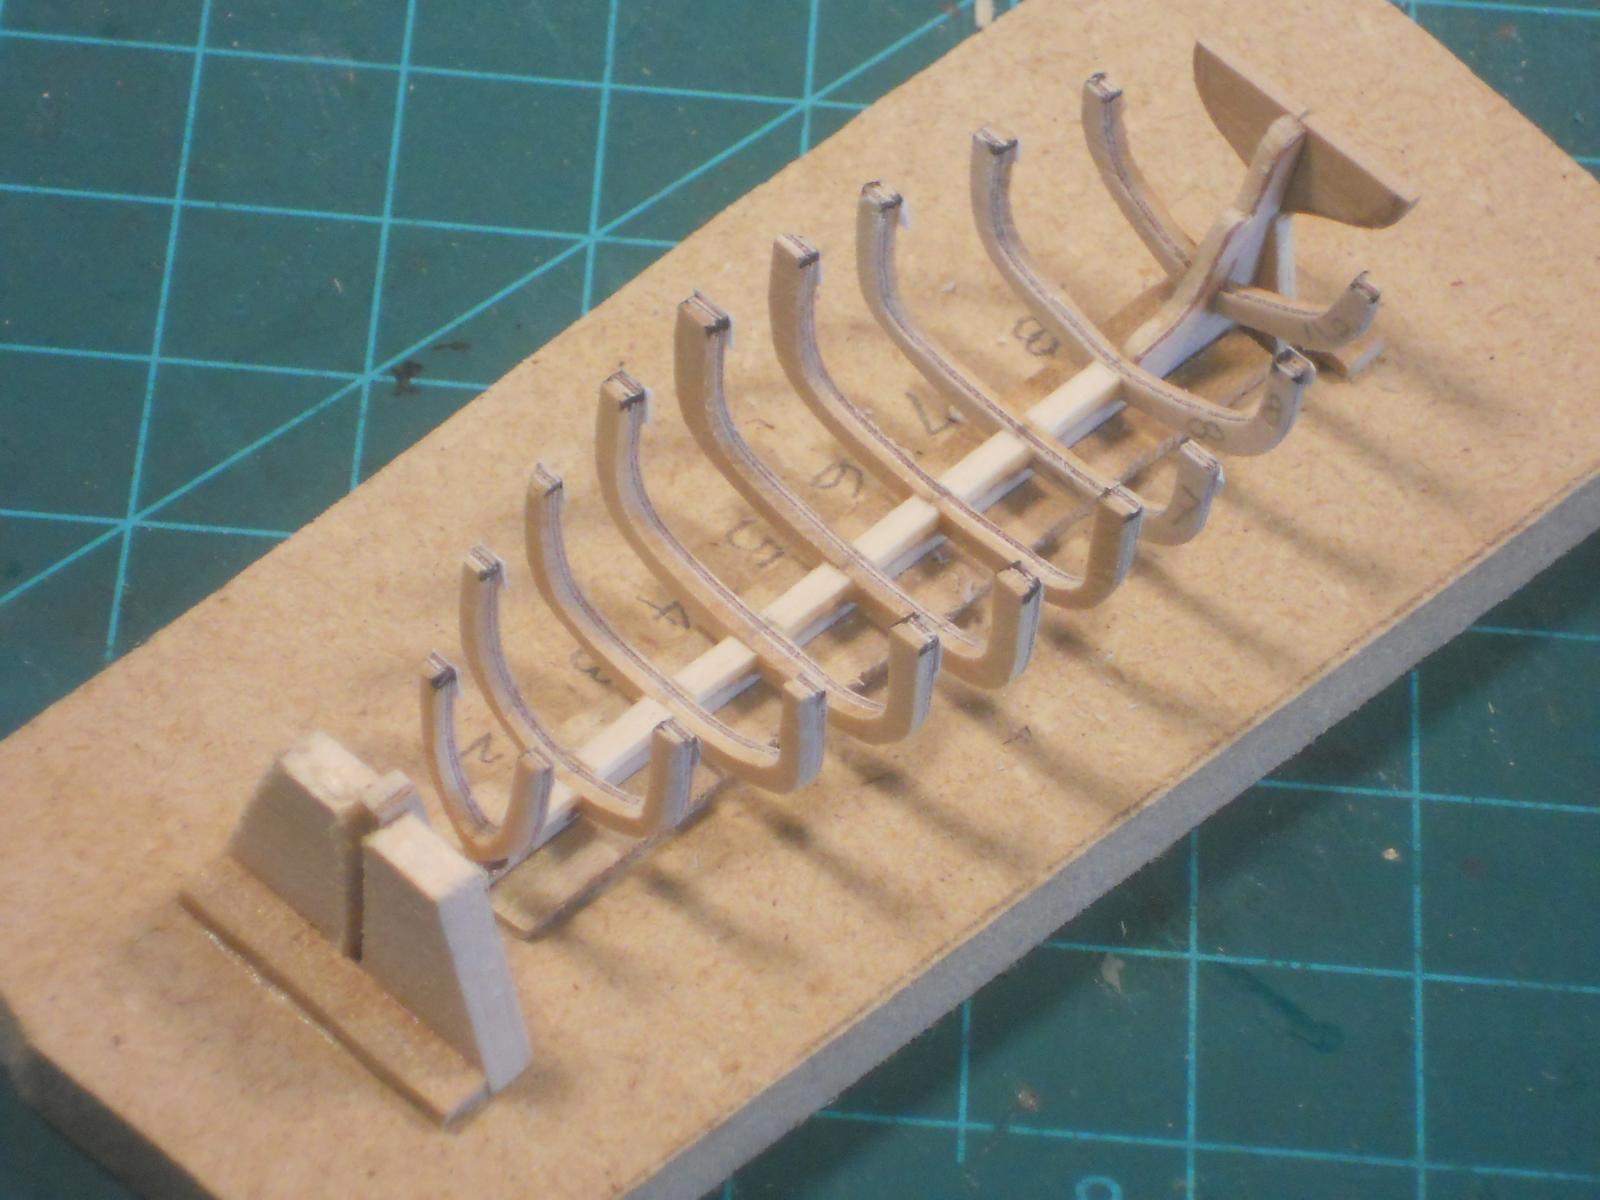
Hello all, didn't do much on v. 1.0 dinghy. Have another project going with it and seem to spend more time with that one. I make a build dock for the v.2.0 dinghy though to aid in keeping everything square. I also made the slots in the keel to fit the frames and they all fit snug. I still need to check all of them for plank alignment so that all are on the same plain. I think that instead of carving rabbet in the bow post for a hold-down for the planks I'll glue a piece of tapered strip of wood there. That way the planks have something to hold on to. Well, I may change my mind on this - - - - - - This was actually garden day for me but everything was to wet so I spend the time in the shipyard. If the weather is dry tomorrow then I'll have to to the garden work. Some major pruning of two hedges and I'm using an electric chain saw, therefore things have to be dry. I don't like fry myself Here are a few pics of my crude build dock. Cheers,
-
Hello Omega, thanks for dropping in and your approval. Yeah, I tested them after I cut them out, no more worries of breaking. It'll be slow going. I'm in a quandary right now with the last frame, #9. It straddles the stern post knee. I may have to make it in two pieces and glue and tree nail them to the keel and knee. On version 1.0 I slotted the knee which is not the correct way but is hidden from sight by the seat. Hi John, good seeing you here too and glad to be able to give you ideas. It sure is a challenge but a lot "easier" then Omega's 2 cmm POF dinghy Cheers,
-
Ooooooh, that's beginning to look really nice Adriaan. Cheers,
-
Great shot of a great boat, well done Freek. Cheers,
-
Magic, pure magic! That's really some unreal modeling Omega, well done. That'll make my 7 cm dinghy a giant! Oh, I had visions of mono filament for the frames and paper for the planking but your idea works great. Congrats. I'm just thinking here, where does it stop in making tiny POF boats or ships even smaller - - - - - - Cheers,
- 120 replies
-
- 1
-
-
- mystic
- motor yacht
- (and 2 more)
-
Hey Nenad great job on the star of India, it's a keeper. Also as a coincident, my father was born on the 22 of November in 1898 in a small town near Amsterdam, the Netherlands. A great ship and (to me) a great man born on the same day. Keep up the great work my friend. Cheers,
-
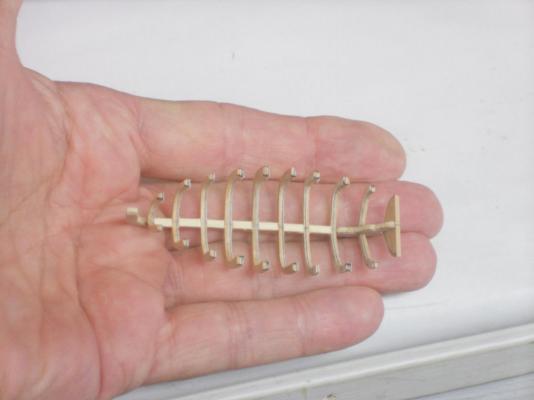
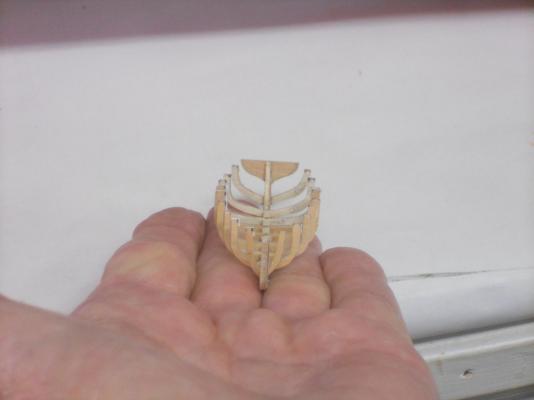
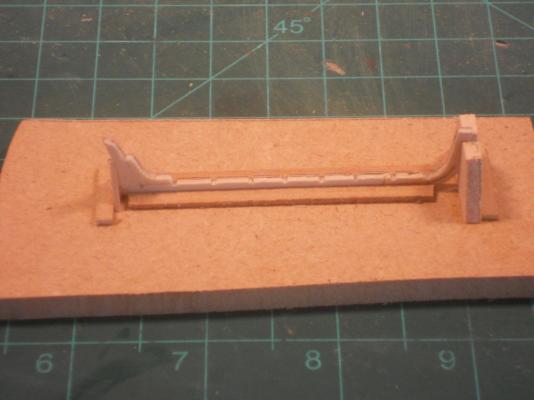
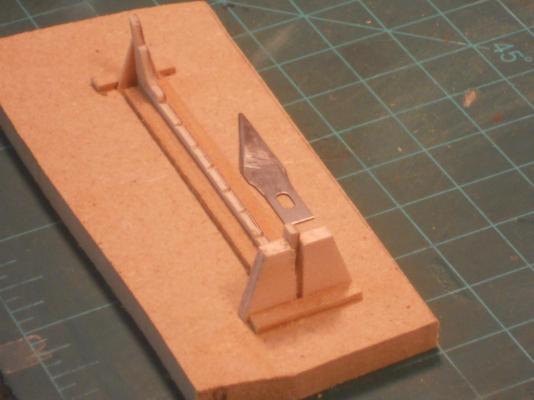
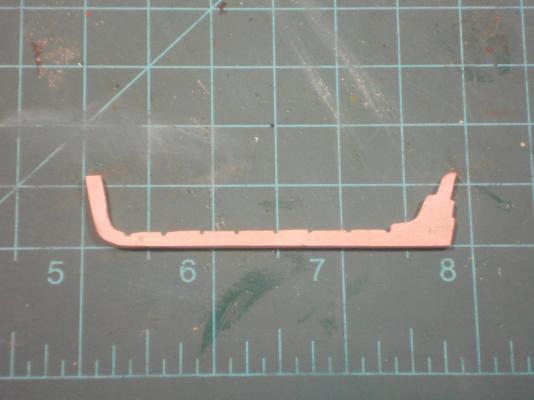
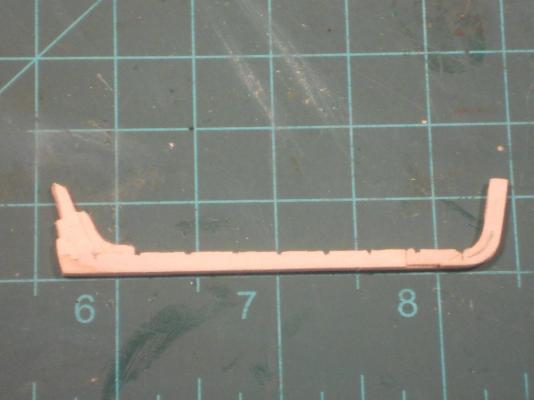
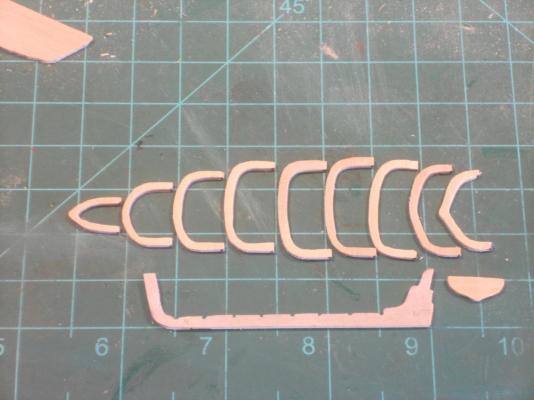
Hello all. Sjors'll be thrilled, here is another update on version 2.0 of the dinghy/jol. I remade the keel yesterday and cut-out nine of the frames.. The keel looks much better now and is very strong. I did use the poplar again but this time I glued a piece of 0.65 mm to it. As mentioned before I glued a piece of 0.65 mm ply to the 1.2 mm boxwood plank I made for the frames. I cut them out on the Proxxon scroll saw and shaped the outside on my Sears sanding machine but finished sanding by hand following the template lines, with a small home-made sanding block with 320 grit paper. I cut the inside out with my antique jeweler's coping saw with metal a cutting blade, 80 teeth per inch. I kept the frames a little deeper and plan to file them down with a rotary file in my Proxxon snake adaptor after the planks are glued on as I did with version 1.0. I also shaved then down width wise to an width of about 1.5 mm. I need some meat for the planks to glue to. Next will be making the frame slots in the keel and a keelson like reinforcing strip. I also need to make a better build board, then I can proceed glueing the frames to the keel. After that I'll have to shape the planks. I thought in using that 0.65 mm plywood but think I'll stick with the poplar, it's easier to bend and shape then the stiff plywood. I just need to work slow and careful with these thin poplar planks. Yeah, I'll soak them in water for a day and then clamp them on the frames wet and let it dry in place. That's what takes to much time. I guess I could soak them in alcohol but it dries too quick for me, I like to have more time in laying them up and clamping them. I'll sand them down some more after each plank is glued on. I did the same on version 1.0 and worked fine for me. I found some very small clothes pin like clamps that seems ideal for this project. I just hope there are strong enough. Okay, here are a few pics of what has been accomplished so far. Cheers,
-
Thanks David B that's very good to hear puts my mind at ease. I have made a note for my files so I won't forget. I'll certainly use it. Now that I have glued 0.65 mm birch ply to the boxwood I have some very strong frames. Cheers,
-
Magnificent looking yacht Omega! 2 cm long POF dinghy hmmmm - - - yup, you can do it man. I'm looking forward to your plan. Cheers,
- 120 replies
-
- 1
-
-
- mystic
- motor yacht
- (and 2 more)
-
Hello Omega, thanks for the tip on liquid CA. Yes, I have read about that same process but have not tried it yet. I'll keep a tube of that stuff handy or paste a note in front of my nose as a reminder I keep forgetting al these helpful hints I don't know if TiteBond glue will hold once that CA is applied. TiteBond or any of the good wood glues need untreated wood to be able to penetrate into. I'll have to run a test. Don't particularly like to use CA on open grain wood though. Hey Harvey, yes, I wanted my father's submarine as my avatar and Merk T helped me out with it. Dinghy version 1.0 is currently hanging on the loading strap and loading boom, looks okay Version 2.0 is progressing slowly. Finished cutting the frames out and reducing their width, they are a little too thick. I also need to make a build board for mounting the frames to the keel. Pics tomorrow. Cheers,