Piet
-
Posts
3,568 -
Joined
-
Last visited
Content Type
Profiles
Forums
Gallery
Events
Everything posted by Piet
-
 Thank you all for dropping in and your likes. Hello Michael, yes, I am aware of all the difficulties bending and cementing plexy glass. Because of the length a heating gun may be impossible to use. My thought is to use a resistance wire and heat it up that way. This way there is less or no distortion. In my neck of the woods are no places with the expertise to bend this stuff but I'll have to do some shopping on the Net. I'm just beginning with this part of the project. The "case" must be 6 feet long. Yeah, the ends need to fit really good to get good looking "welds". There is a gap filling cement I'm thinking of using there. Hi there Remco, yeah, that was really nice of him to offer doing the lines via CAD. So I guess I'll do do some carving to make a plug first and build the dingy on top of it. I need to do some reading in the how to's. Thank you for agreeing that I need to install the low frequency antennas on the boat. That's the way my father knew her when he took the O19 to the colonies in 1939. That's really not that much of a job but will make the model more realistic for that time period. Cheers,
 -
Outstanding Kees. Glad seeing you as well on the beech holding that beautiful model. Cheers,
-
Hello everyone. I hope that all y'all had a great weekend. There was a nice air show in Daytona Beach, sponsored by Embrey Riddle University. It was supposed to be a very nice one but I didn't go. Too crowded, problems parking the car and problems with frequent body functions In any case, I have been busy with a few domestic chores and taking some measurements for the display board and the dust cover. I begin to like the idea of making that from acrylic plastic sheet. i could even paint ocean and sky on the "wall side." A couple of seagulls or perhaps a MLD sea plane Daniel (harvey1847) from Madrid Spain read my post where I showed my first attempt in making the lines drawings for the dingy and offered to draw them for me with CAD. I gratefully accepted his offer, even though he was very busy himself, he went right to it and in a few days he was done. They look magnificent. This just show you what a great place this is where people help each other. When I wanted to make prints with my copier that &%#*@ thing ran out of back ink grrrr, grrrr Have not been able to go to the store to buy some, just to busy with domestic chores. We'll do that tomorrow for sure and then make an attempt with the dingy. Some of you have given me some good advice and we'll see what comes out of it. I'll have to make some more plywood and veneer for this simple little boat. Simple? Not in a long shot, at least not to me. Here are the drawings Daniel made for me. There are a few more in color no less, that show the individual stations. Piet Dingy A4_1_50 BW copy.pdf Piet Ding keel 1_50 BWy.pdf Piet Ding Water lines 1_50 BW.pdf Cheers,
-
Hello Carl, hey, thanks for the URL. Very impressive work and yes, I could follow what he was doing. May have to go the same route but I would still need the lines to make the forms to check against the solid plug, yes? I know, it may be a little anal of me trying to get this dingy or jol exactly the same as was on the O19. Asking too much maybe? Well, I'm having fun giving it a jolly good try Hi Jan, good to see back and visiting my shipyard. Been missing you my friend. Thanks for the compliments and yes, she's almost finished. Beside the dingy there are still a few odds and ends to do. Am seriously thinking of adding the low frequency transmitter antenna as well. That's what I see in the photos of the time my father served on her. I have held off with that but it keeps coming back at me having to do it. Obviously the model appears in will be from the summer of 1939 and marked as such on the display plaque. Hello Dave, thank you for reading my stories about my father. Yes, I think he was an exceptional person and proud to be his son. Okay, I have been doing a few other things besides working on the model but that'll change soon. Im now also seriously thinking about the display board and cover. The mounting board is not a big problem, it's how to do the dust cover. I am leaning towards making it out of one sheet of plexy glass. Cut to fit the length of the board then bend the sides up 90 degrees to make tunnel. Then close the ends off. I'll need a 4 X 8 piece for that operation and it doesn't have to be very thick. Just thinking mind you Cheers,
-
Yup, that looks about right Omega Hey, who am i to say, I'm an aircraft guy - - - come to think of it, lot's of wire rigging on old airplanes - - - i did a few. Cheers,
-
Makes perfect sense - - - now, Popeye. Cheers,
-
Mayflower by SawdustDave - Finished
Piet replied to SawdustDave's topic in - Build logs for subjects built 1751 - 1800
WOWEDEWOW-WOW Dave. That really looks fantastic. Love them tops! -
Looks just fine from here Kevin. You are the best judge for a redo and knowing you, it'll be great. I personally like it just shy of perfect, then it looks being used, if you understand what I mean. Cheers,
-
Welcome back Adriaan and thanks for visiting my O19 shipyard, catching up a little. You're not planning on a build log for the Black Pearl here? Looks like a fun project. Stay in good health and cheers,
-
Hello John and Diane, so good to see you back in the shipyard. Missed your updates and friendly banter. Have fun modeling my friend and Gwen says hi to yuns. Cheers,
-
Now that cleat is THE cat's meow. I can already see a scratch build in the near future. Sorry to hear about that temperature. It's 83 F here in sunny Palm Coast, Florida and need to mow the backyard tomorrow. Not complaining mind you. Cheers,
-
That worked out just very nifty Joe, new chocks are looking great! Cheers,
-
Thanks for the link Freek and how Paul did the frames for his motor sloop. His model is otherwise very professional looking. I like it that he has made most if not all his own metalwork. I'm still mulling things over right now. Have a few other projects to do and will come back to my dingy in a few days. Cheers,
-
Mayflower by SawdustDave - Finished
Piet replied to SawdustDave's topic in - Build logs for subjects built 1751 - 1800
Good thinking on your part Dave in making the top. Are you an airplane guy perhaps? They are cleaver people you know Seriously though, your top looks very nice. Just wondering why the angled planks. Very clear tutorial, thanks for sharing it. Cheers, -
Hey Freek, that boathook is copyrighted No, not really and thanks for mentioning me, twice no less That water shot came out great, looks almost real. Cheers,
-
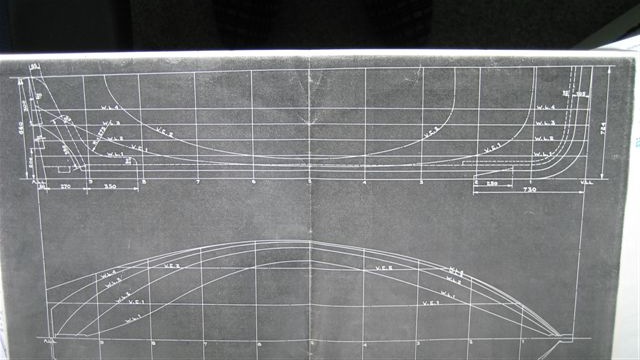
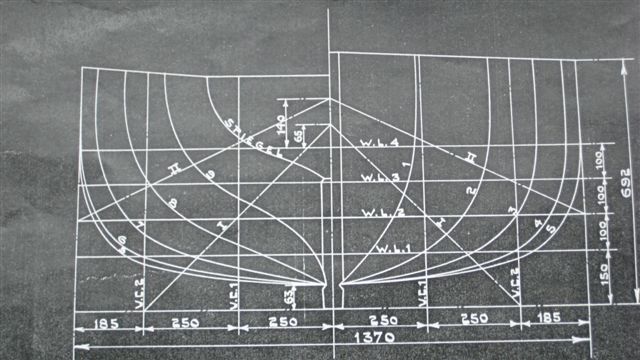
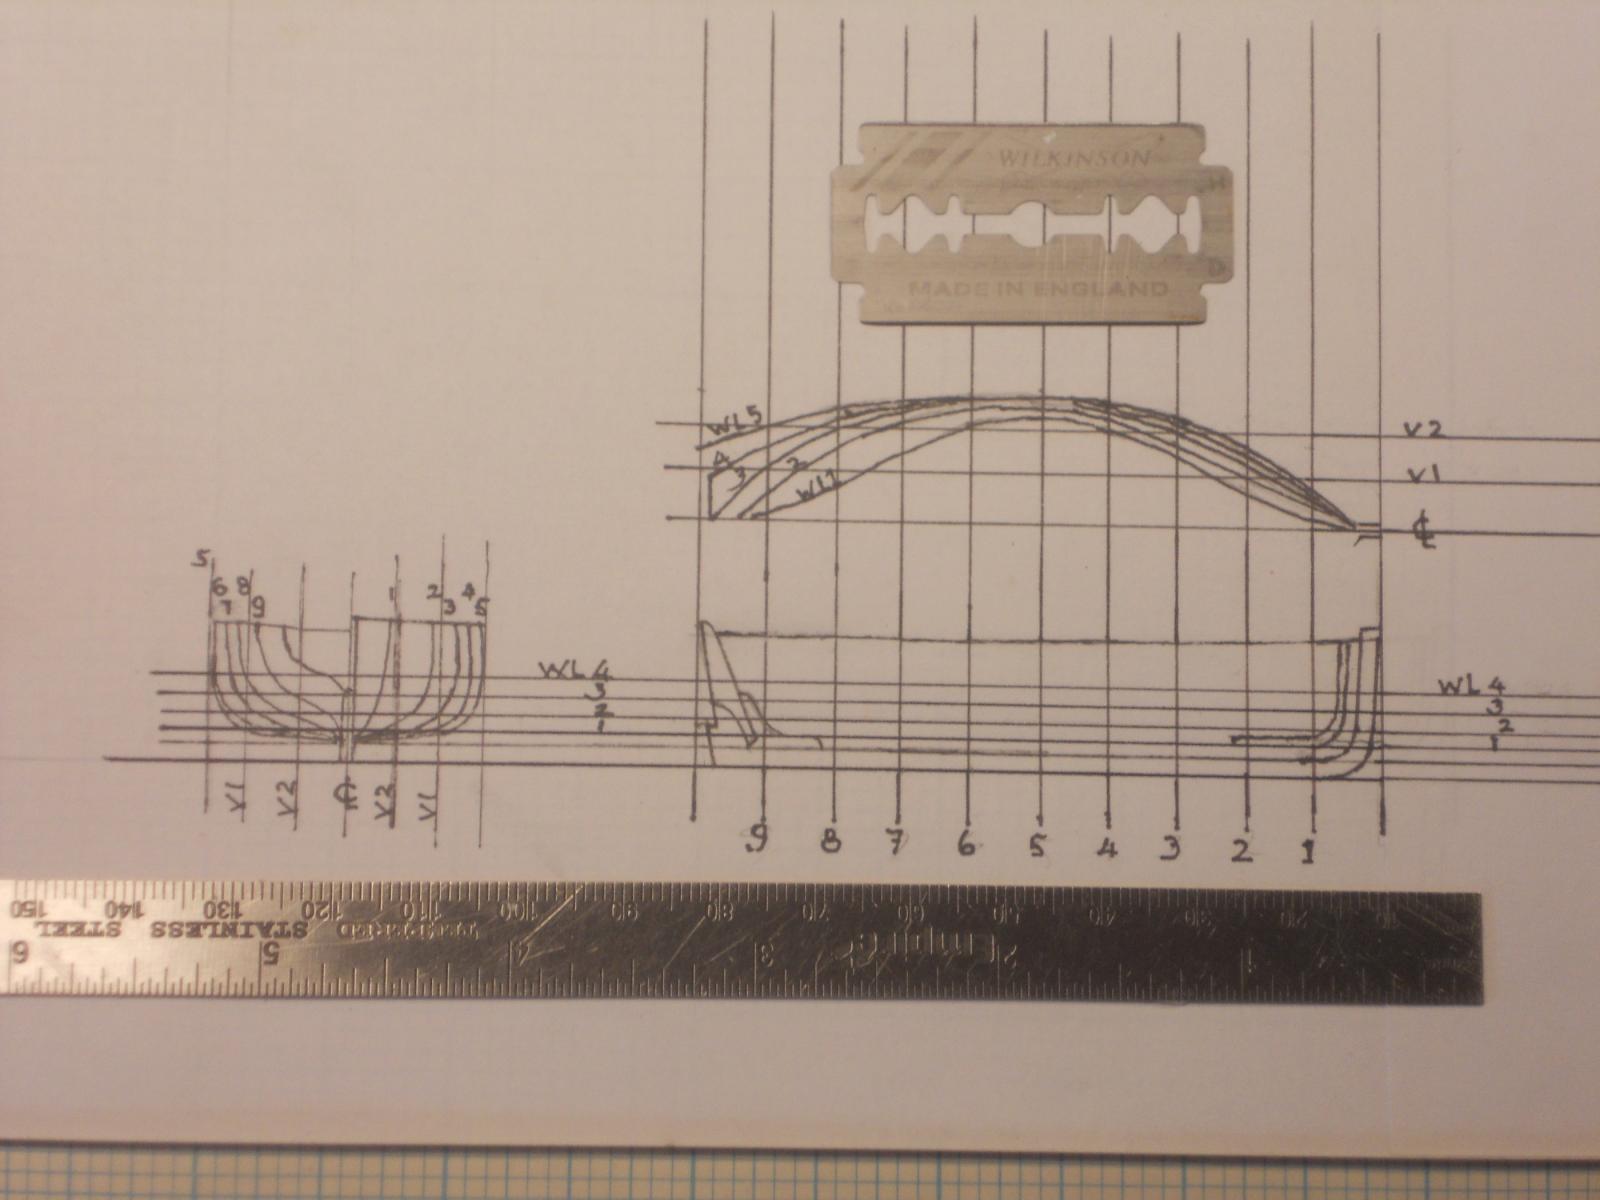
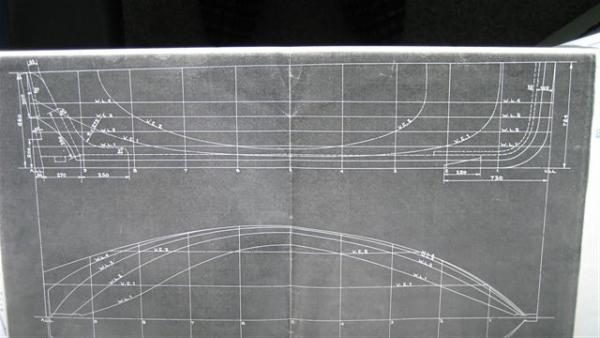
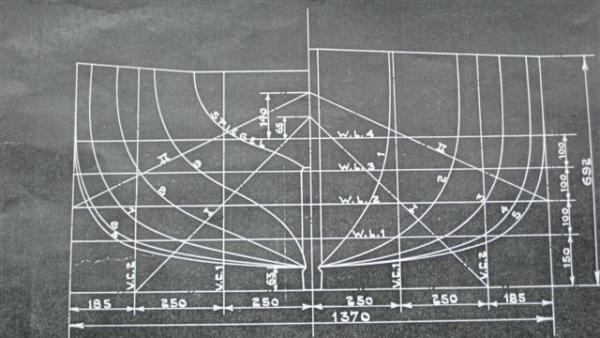
Hello everyone, The last few days I have been trying to make a set of work drawings for the dingy. I am rescaling a set I obtained some time ago and transferring it to a blank sheet of paper. I'm not being very successful with it due to the small scale. If I go with these then I'll use the trial and error method. Making the frames a little larger and then shaping the form with a sanding block. I can also remove extra wood from the inside with a small rotary file in my flex drive adaptor. I'll have to do that after the planking is on to have some rigidity. Another way would be to draw a set in a larger format and then reducing the drawing to my scale. I'm planning to use boxwood for the keel and all the frames. The planking will most likely be done with veneer that'll remove from some maple plywood. I have a few nice blocks of boxwood and can slice off a 1 mm board on my 10 inch table saw. Well, actually I'll cut a 1.5 mm slice off so I can sand it down nice a smooth. To show that the dingy was not flat bottomed but had some rather nice lines I'll attach a few pics of the original manufacturer's drawings. I'll also show my first attempt at drawing a 1:1 drawing for the dingy. Most was done by eye and hand from the actual lines. As you can see this is a photograph of the drawing because of the distortion. It's the measurements though that count. Nice looking body plan. This is my hand-drawn version 1.0. Not too bad but unusable as is. Just for the halibut I'll draw one up to a larger size and then reduce it on my printer. I have nowhere else to go except for some standard home maintenance and cooking a few meals for my dear bride Gwen. Cheers,

-
Hello all and thanks for your comments and likes. Hi Daniel, yes, that little dingy doesn't carry many people but it was mainly used to ferry officers to shore and do outside maintenance on the boat. Hoi Jan, yeah, that sounds like what the airlines said, "we've always done it this way, so why change." I ran into that same philosophy with the US Government. When I was operating my aircraft repair facility in New Jersey and wanted to use a new and proven product I had to jump through many hoops and paperwork before they would approve it. I'm still wondering why they didn't stow a few rubber life rafts on board during WW Ii. They must have seen plenty of the US and Ausy boats when based there. Yeah, I guess it could have been made from steel but looking at the drawings it seems difficult to do. Hoi Carl, no, it's not flat bottomed, at least not according to the drawings I have. See next post. It's quite a sophisticated little boat. Yes, they made an error and lost the boat. It was the thickness of a pencil line on the chart. And that just a few weeks before the war ended. Oh well, stuff happens. Cheers to all,
-
Mayflower by SawdustDave - Finished
Piet replied to SawdustDave's topic in - Build logs for subjects built 1751 - 1800
Very nice work on the top Dave, looks superb! Cheers, -
It's getting better and better Joe! Love the extra detail you add to that lovely little boat. The different colored wood really makes it a classy boat the rich and famous would be proud of owning. You keep that up and before you know it you'll be doing scratch builds Cheers,
-
Brilliant work Dan. Cheers,
-
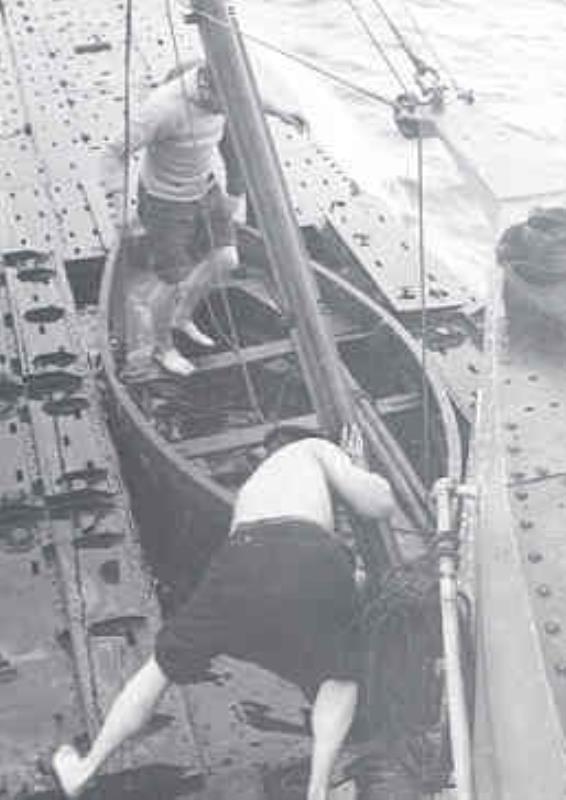
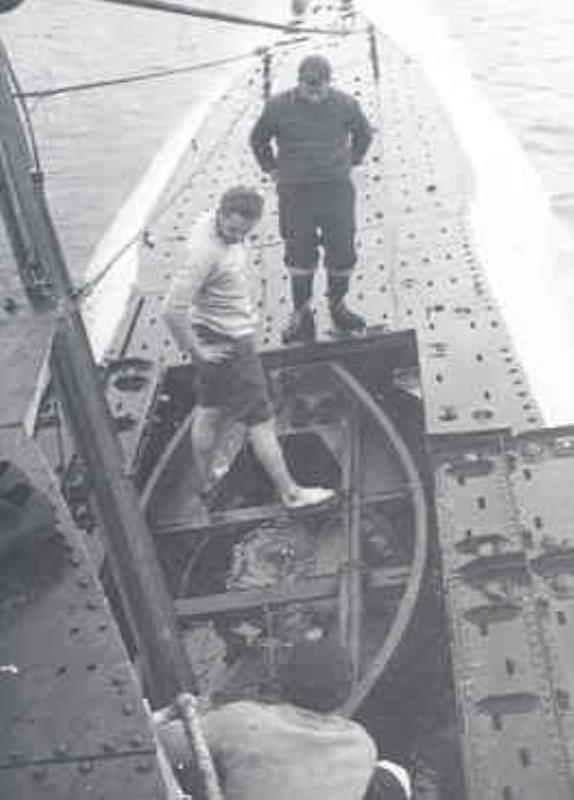
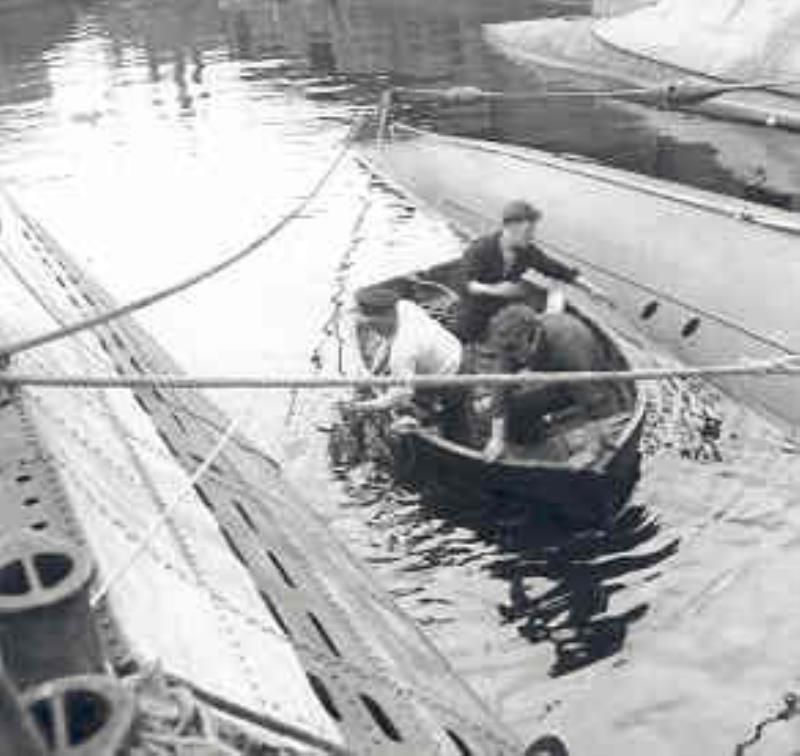
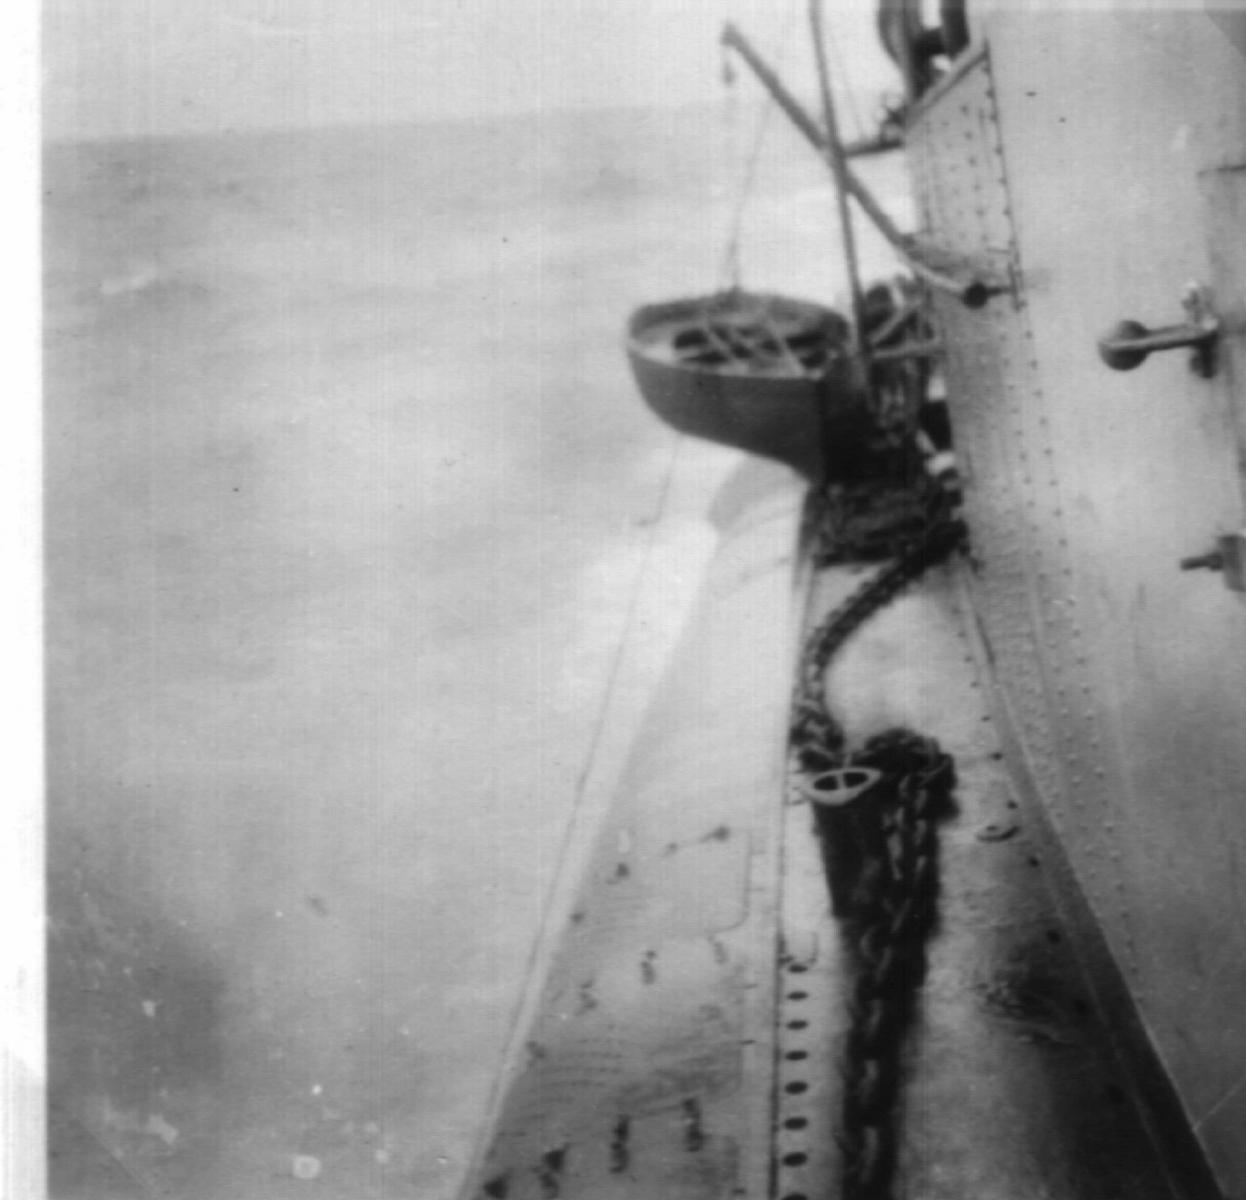
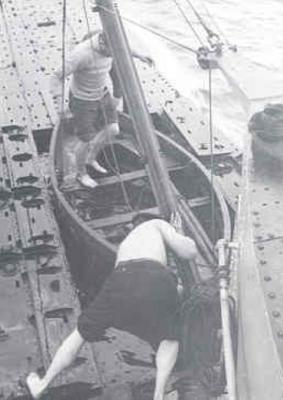
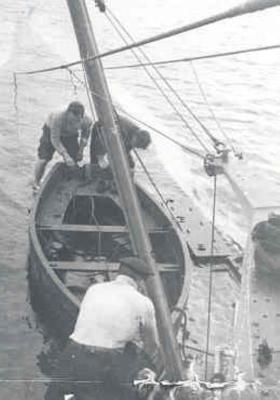
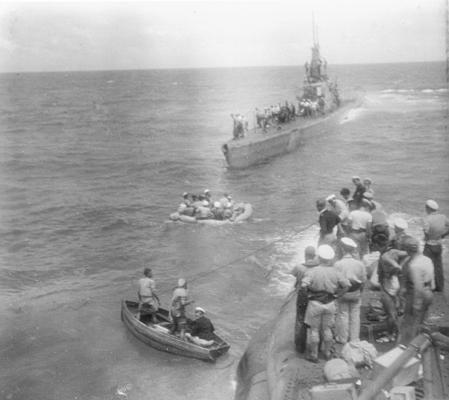
Thanks Carl, I'll have to keep that in mind for when I need to make a model of a rubber raft, however - - - there is one difference and a big one with the O19 dingy or jol - - - it's a little rowboat! It's 4 meters long and 1.4 meters wide. "A noten dop," or "nut shell." Here are few pics of what the KM (Royal Navy) Submarine Service used. These are the same type that was on the O19. Even the crew of the Cod were surprised to see a little rowboat. Dingy (jol in Dutch) on the O21 Dingy (jol in Dutch) on the O21 Dingy (jol in Dutch) on the O21 Dingy (jol in Dutch) on the O27 The O19 dingy (jol) being lowered during the rescue by USS Cod, July, 1945, when O19 ran on Ladd reef in the Spratly Islands. O19 dingy (jol) in the water helping transferring O19 crew during rescue by USS Cod, Joly, 1945. The rubber boats are from the USS Cod. Cheers,


-
Beautiful Joe! My yes, that brings back very fond memories sailing in Loosdrecht, the Netherlands when I was in High School. What a nice model Joe. Cheers,
-
Well, I'll certainly be looking forward to be unconfused when you explain all this I'm still scratching my poor head but whatever you have done so far looks great. Like the scuppers! Cheers,
-
Thank you folks for your comments and suggestions. Also my thanks to all who visited and clicked the like button. Hi John, yes indeed would the Musi make a real nice model. That way my dear bride has also something tangible to link it with her father. Hello Daniel, you just cracked me up with your blue bucket comment, that is very funny indeed Yeah, a scale of 1:50 will make a nice BIG model, problem is - - where to put it The KPM had patents on their loading boom system, quite ingenious. I can buy a lot of stuff off the shelf for that project, which would help. But, but, but - - - wait a minute now, we are talking like I'm actually going to build her Well, it's nice to talk about it and dream. I would also need the plans and right now I'm hitting a brick wall. Hi Carl, Yeah, it would make a nice model but - - - Hey, she would be an easy target for the O19 In one of my next posts I'll show you a photo of a Jap Maru type she sunk. I haven't decided yet how I'm going to tackle the dingy. Most likely the hard way. You can explain how you made yours from balsa, yes? Cheers to all,