HOLIDAY DONATION DRIVE - SUPPORT MSW - DO YOUR PART TO KEEP THIS GREAT FORUM GOING! (Only 13 donations so far - C'mon guys!)
×


Piet
-
Posts
3,568 -
Joined
-
Last visited
Content Type
Profiles
Forums
Gallery
Events
Everything posted by Piet
-
 Hello George, actually all the attaboys go to Sawdust Dave, he is the one who dreamed it up. But, I'm glad to be able to participate in a small way and hope that Dave's event draws a large crowd with success in raffling off all the models that are being made for donations. Cheers,
- 176 replies
-
- 1
-

-
- muscongus bay lobster smack
- Midwest Products
- (and 1 more)
-
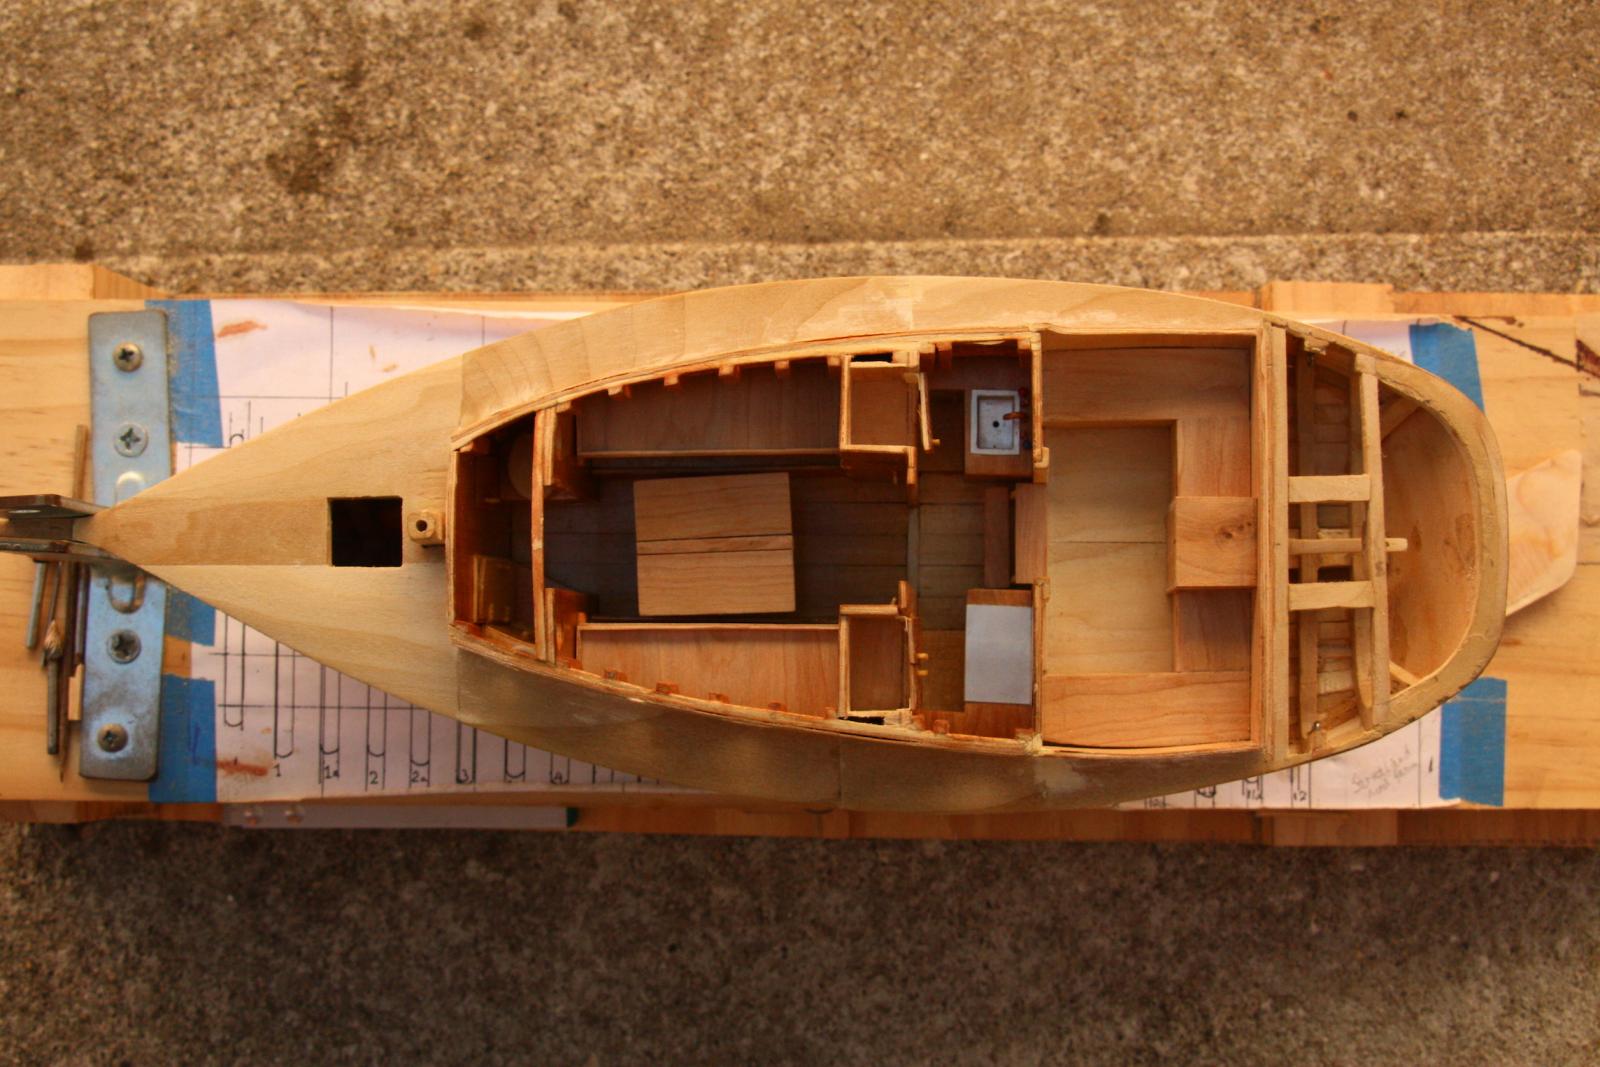
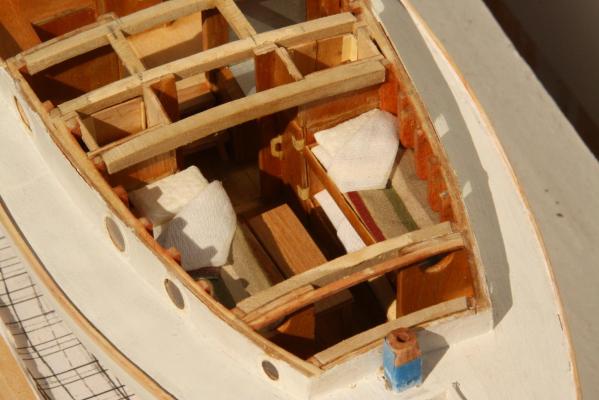
Hello Popeye, yep, this is a special project for the "Wounded Warrior" program that Sawdust Dave cooked up for next April. First I thought in making a larger version of my O19 dinghy but that wouldn't ring a bell here. So I thought building a small model of an old Yankee work boat of the mid to late 1800ds. I just love this style of boats anyway and fall in love with the kit. I purchased it from Model Shipworld. Yeah, the balsa was a bear to work with but wanted to find out what a novice kit builder has to face using it. Yes, the drawings and instructions are really very nice and could easily be used for a scratch build. Thanks for the kind words. Hi Hexnut, thanks for the kind words my friend, appreciate it coming from you. Thanks also for the heads-up about the bunk being on the starboard side. I did plan on planking the inside and adding a few knees for under the deck I guess just one bunk, right? There is a way for people seeing the inside through the entry door and sliding hatch so a little detail would be nice. I have 0.65 mm plywood that'll be good for the interior. The bunk can be cemented to a pair of cleats to the bulkheds. I did make and installed the cabin deck / floor but forgot to scribe the plank lines in it. I'll have to try and do that as well. I may just place the hypothetical centerboard well just aft of the cabin with the two fish wells next to it. I'm still kinda in a quandary about the cockpit area, haven't made up my mind how to proceed. Am thinking though to lower the floor somewhat though as you have done but as an after thought it's not that simple. I'm also going to plank the actual "floor" of the work area with 1 X 6 mm poplar planks. Then some extra fake frames on the sides. Happy to hear that you like the hull shape. Yeah, I kinda like it myself I pulled a few pics from my own designed Friendship sloop model for you to look at. This is looking straight down into the cabin area. There is a dry-chem toilet with a sink in the head, there are 4 bunk beds with the top ones sliding out to the center, the galley has a cooking area with a propane 3 burner grid on the port side, a sink, refrigerator on the starboard side and plenty storage. There is more storage under the cockpit deck with access behind the entry steps. I have no engine in it just an electric outboard motor run off batteries. That's just for mooring. If I were actually going to build this 1:1 scale I'd get a small diesel generator to run all the electric stuff. They have them now that run really very quiet. This is another view looking aft. I have a table in the center with folding blades on each side. Here it's almost ready for the cabin roof. Cheers,
- 176 replies
-
- 5
-
-
- muscongus bay lobster smack
- Midwest Products
- (and 1 more)
-
Mayflower by SawdustDave - Finished
Piet replied to SawdustDave's topic in - Build logs for subjects built 1751 - 1800
Yes indeed, they are really very good looking models. Cheers, -
Yup, rainy, windy, cold and gray - that's how I remember Holland alright I still have the scars where my gills used to be Have patience Sjors, blue is coming but don't blink, you may miss the event Cheers,
- 1,616 replies
-
- 1
-
-
- caldercraft
- agamemnon
- (and 1 more)
-
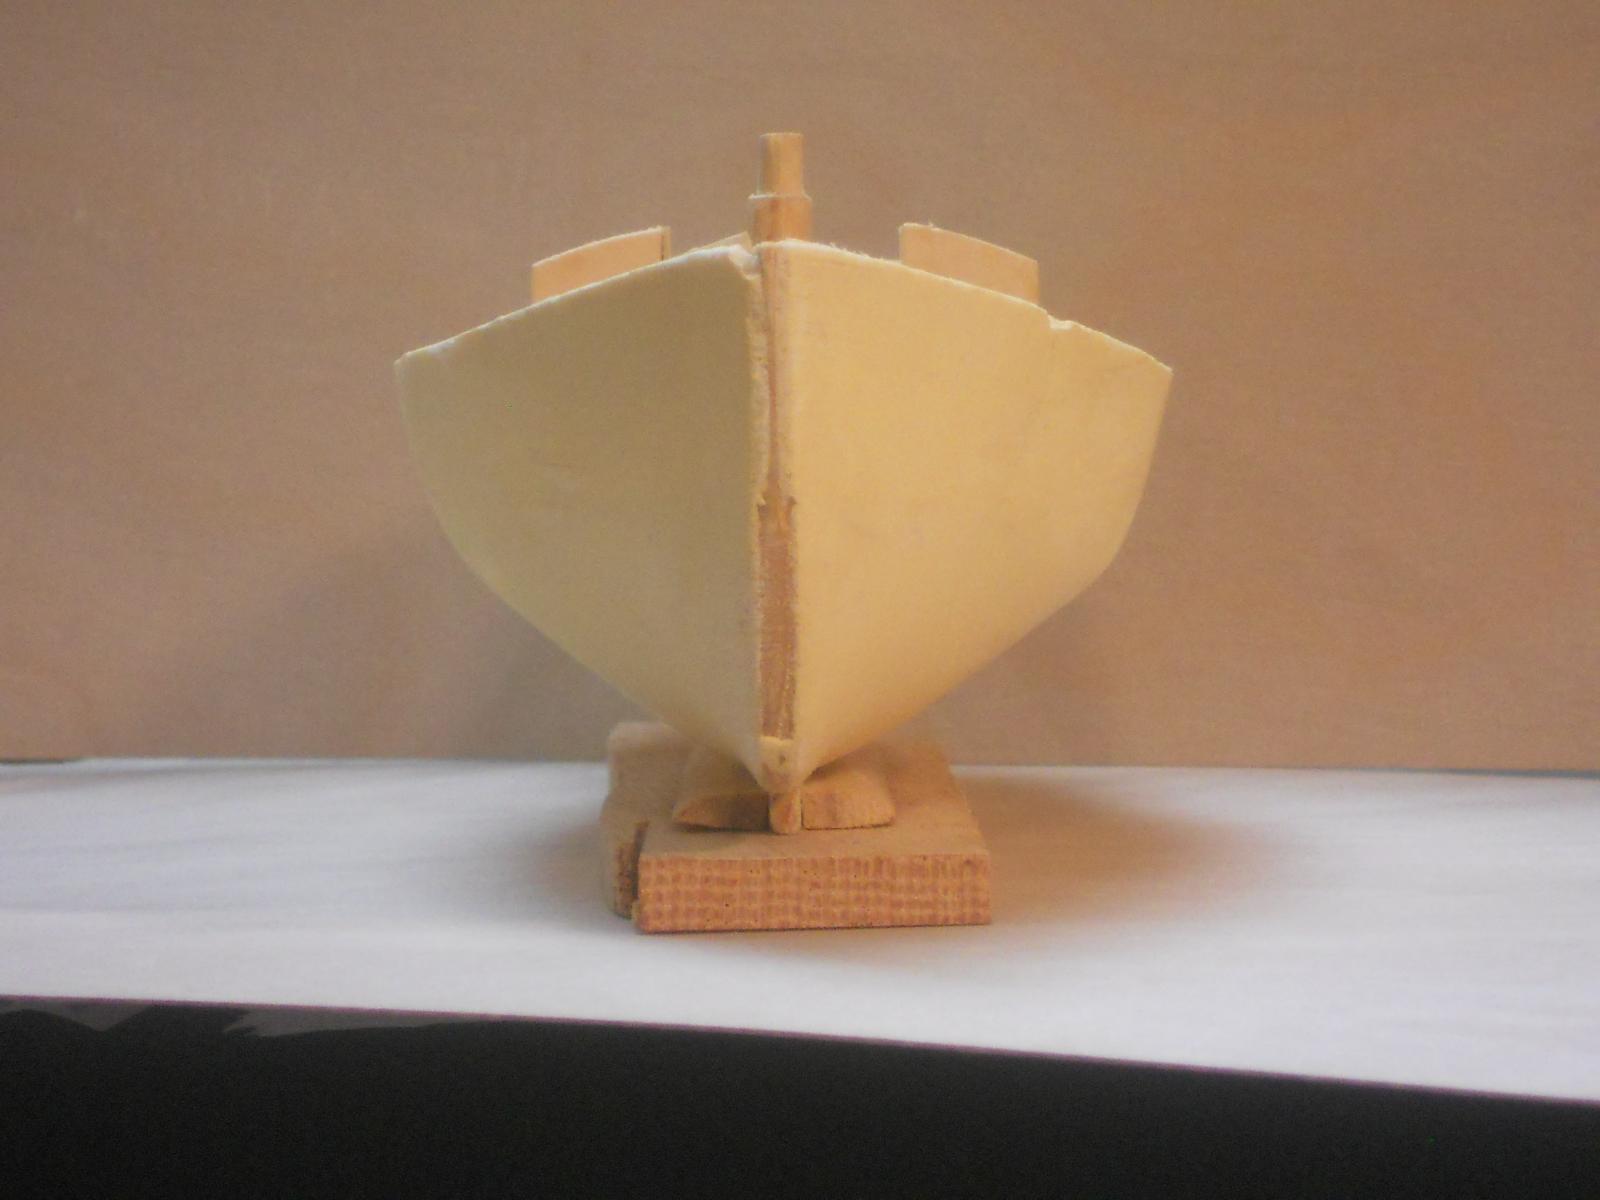
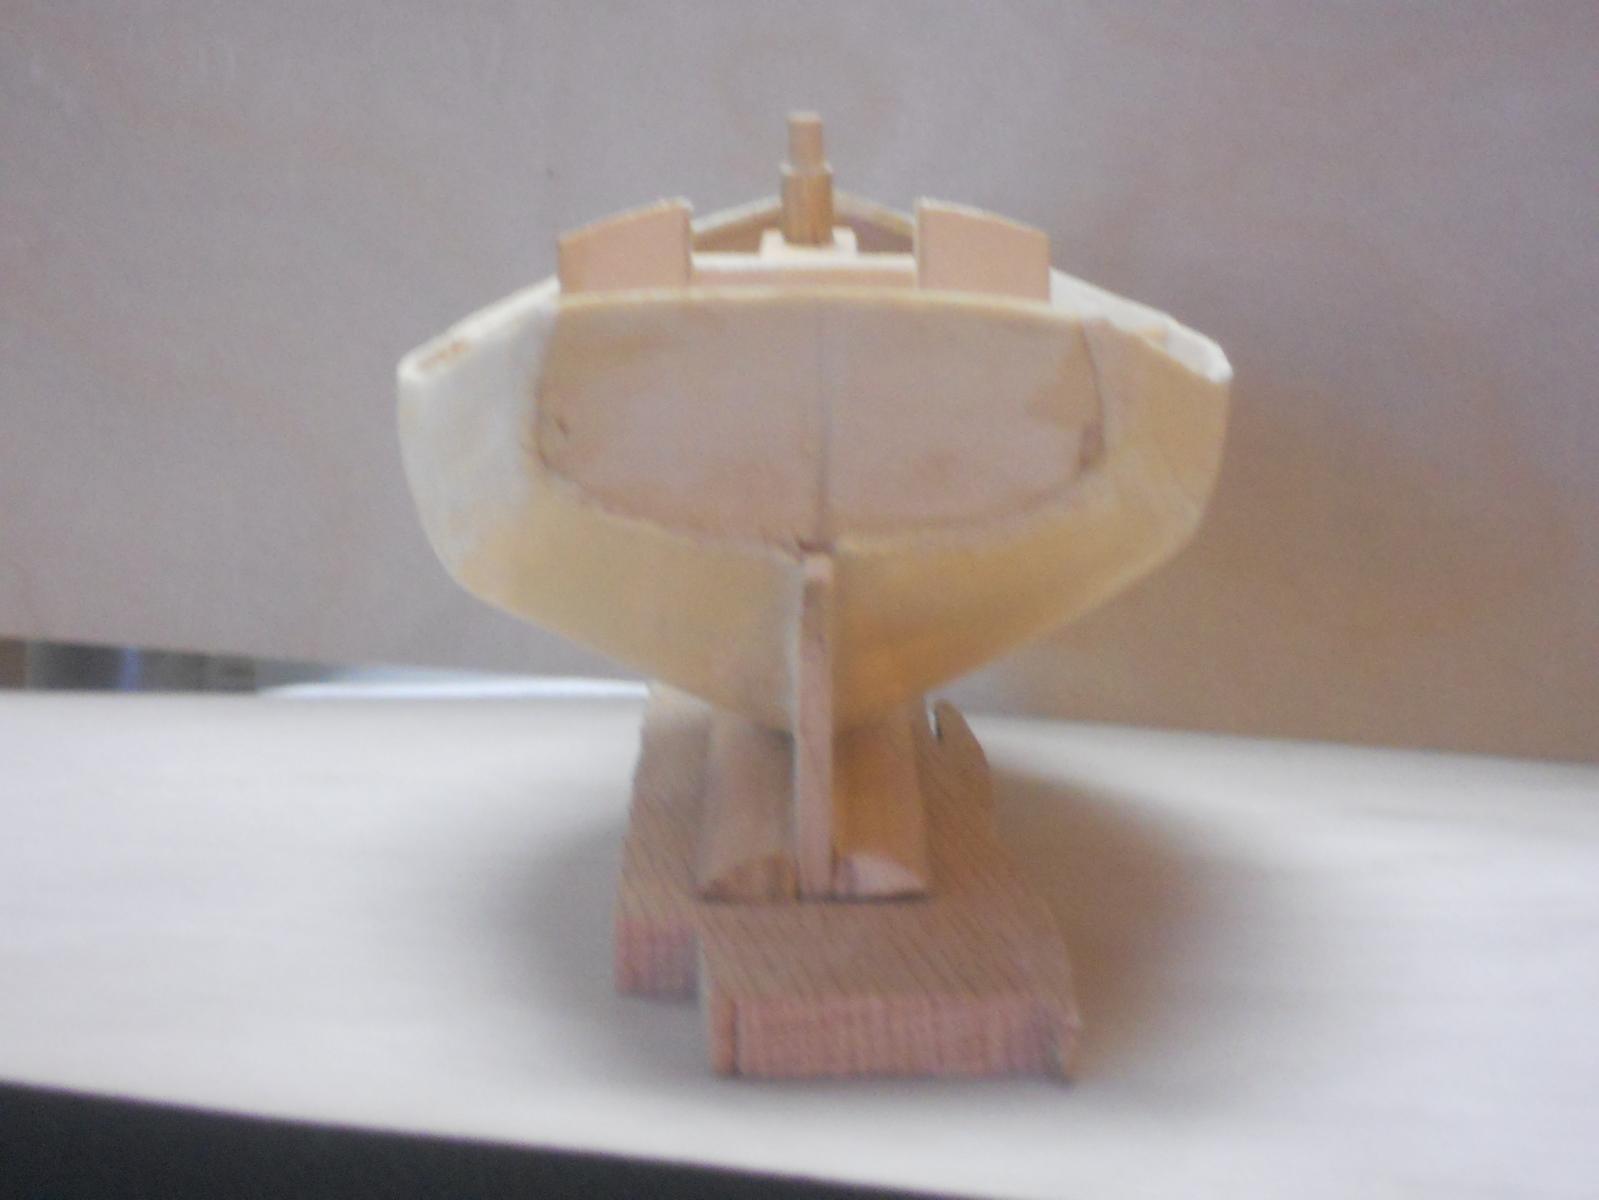
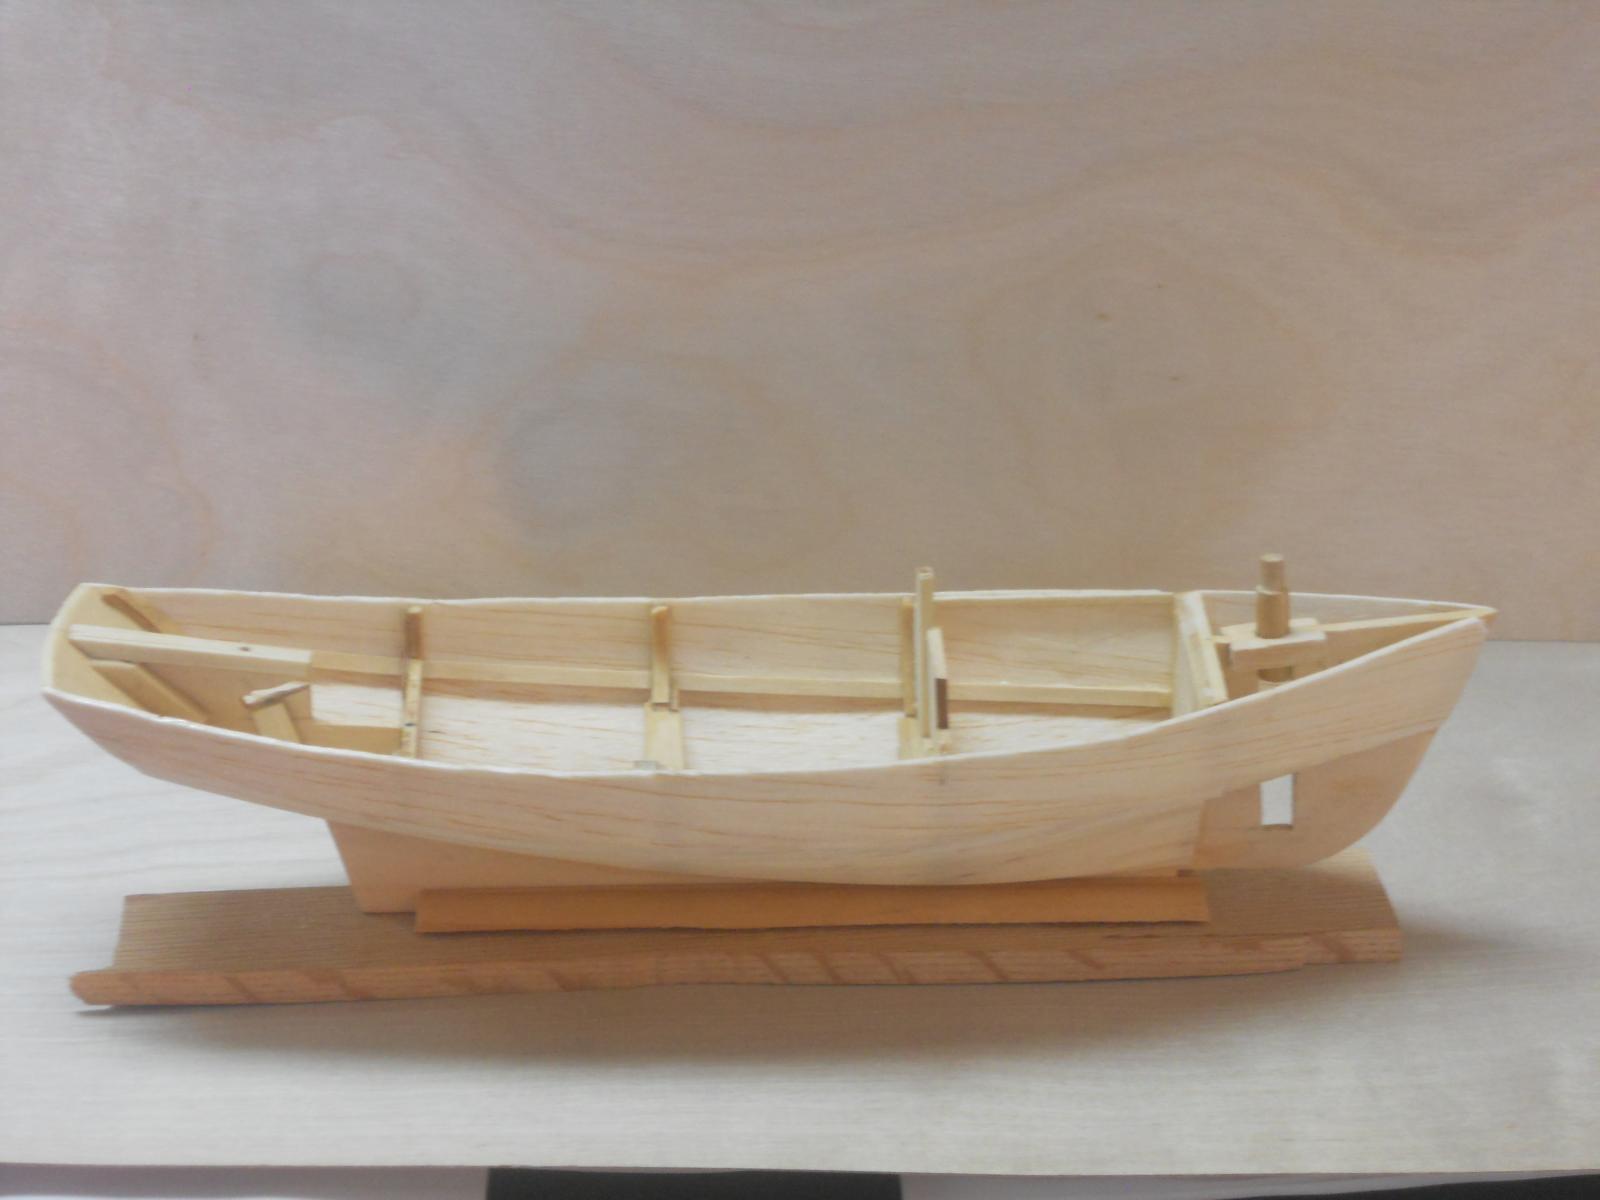
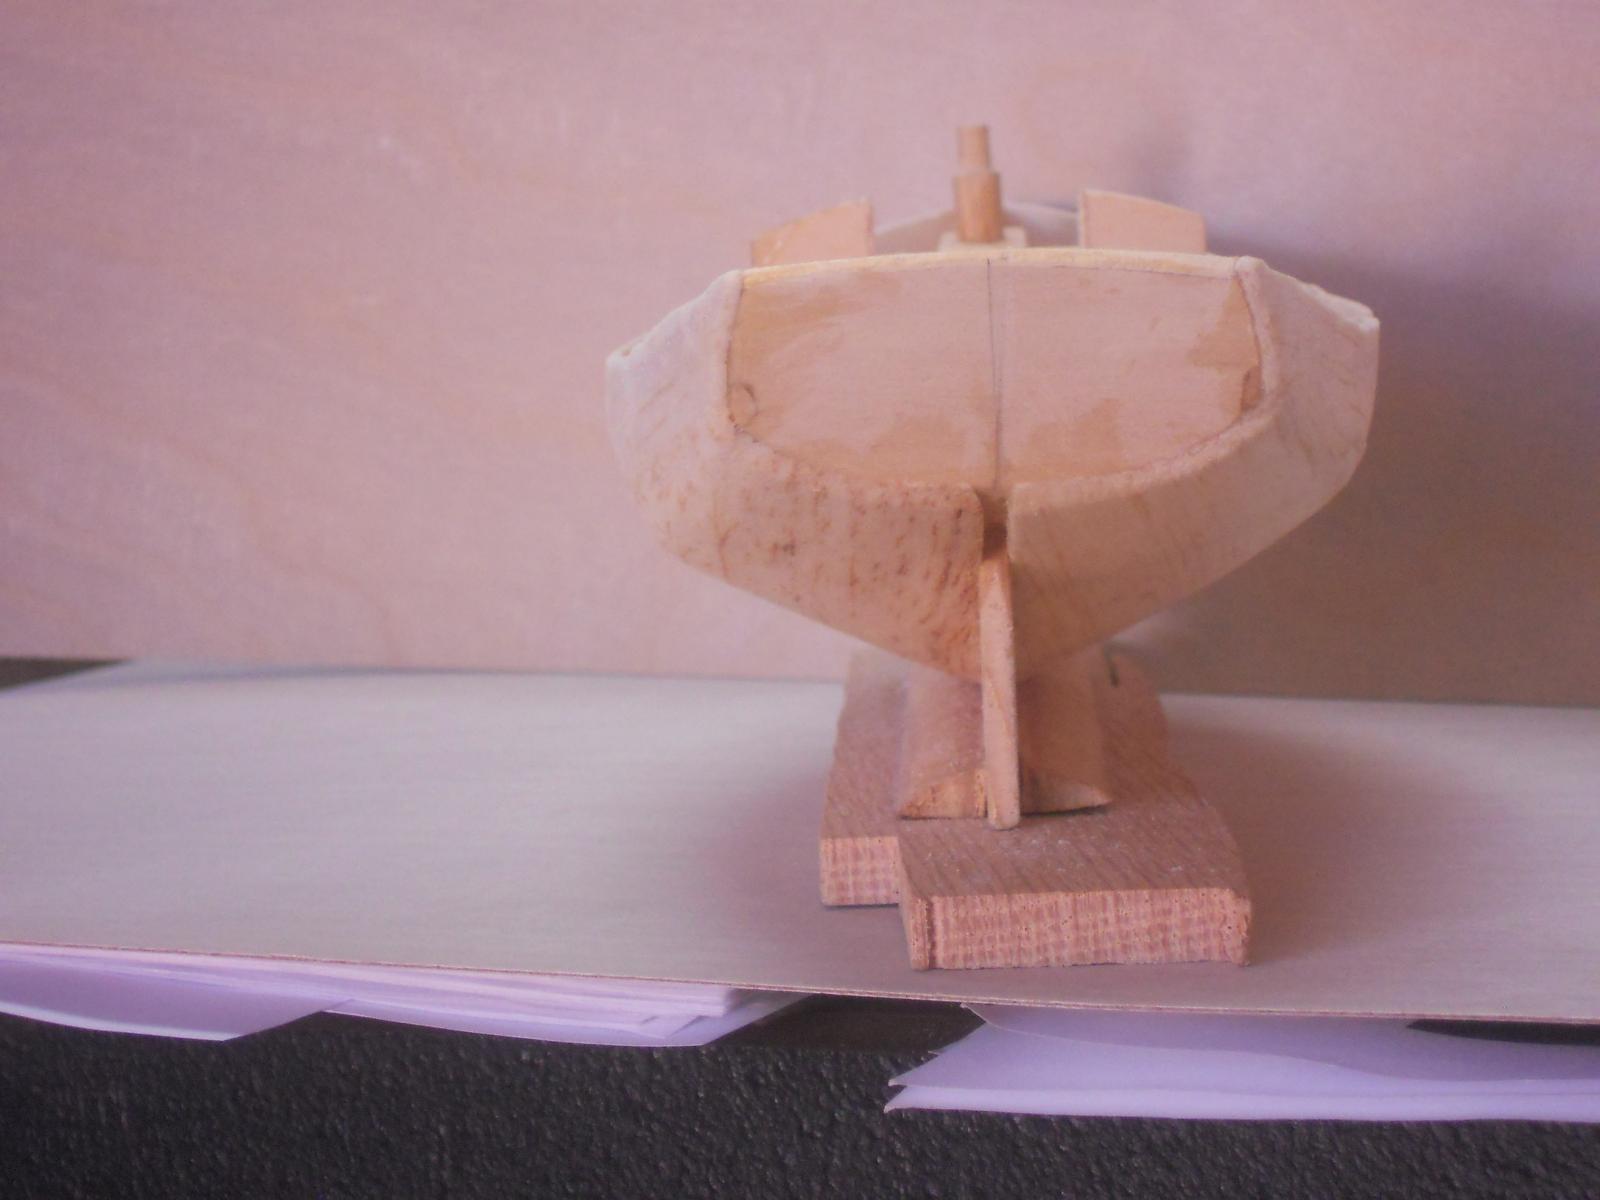
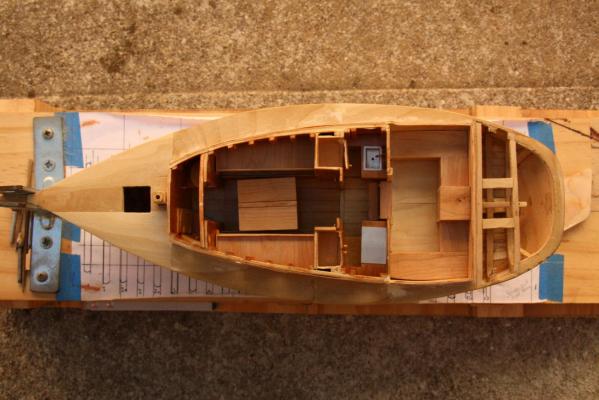
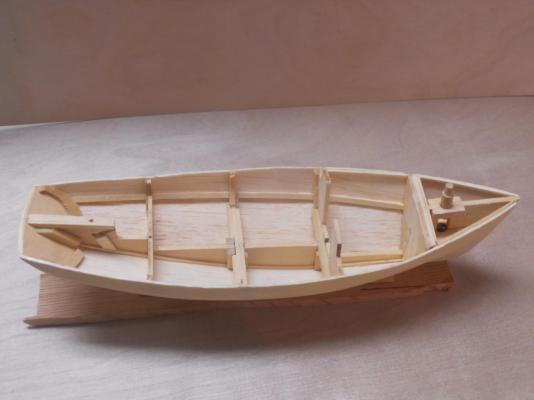
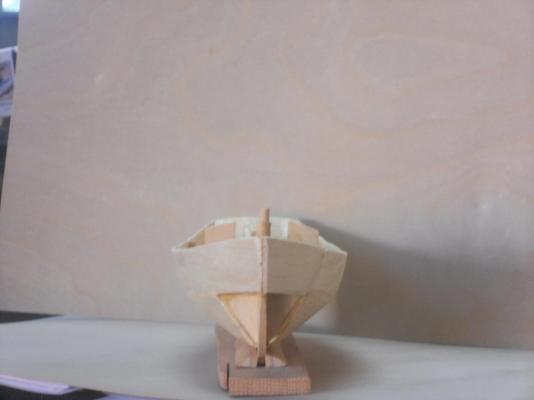
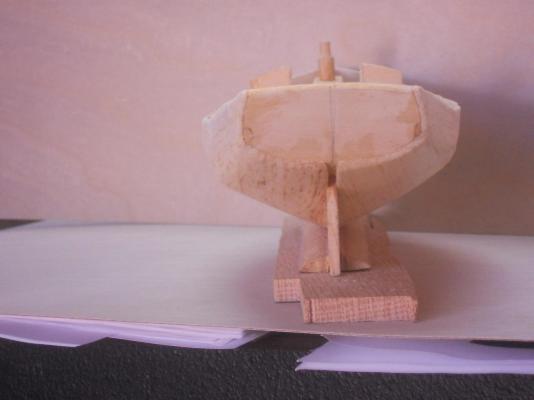
Hello all and thanks to all who dropped by and visited and also your likes. In found that this Minwax wood hardener really works like a charm. I finished shaping the bow filler blocks and really like the way the bow came out. I did some more light fairing with a sanding stick and then proceeded by smearing a light coat of water based wood putty over it, which has a nice buttery consistency. It dries real fast when using thin coats so I can sand away the high spots. There was not much filling in needed but it is hiding the balsa grain nicely. The only way to tell if the hull is nice and smooth is to spray a coat of white primer on the hull. I'll wait with that till after I have completed everything inside the hull, which is next on the agenda. Here are a few pics of the progress so far. A bow shot with most of the shaping done. A shame you can't see the slight concave entrance of the bow. That raggedy stuff you see at the top of the bow will be covered by the shearwater that'll be cemented to the keel / bow. Stern view This is the area of the small cabin. Yup, this cabin will be small but it's a working boat and not a weekend sailer. This is the area of the cockpit. More changes are in the works. A general view from above. I put a small stump on the mast hole when I used the deck to run of the side planking and now also as an added handhold. Cheers,


- 176 replies
-
- 10
-
-
- muscongus bay lobster smack
- Midwest Products
- (and 1 more)
-
Nice progress there Jesse! I like the "state of the art" planking clamps, rubber bands and masking tape! That's also one of my methods Let's hope and pray that this lyme thing won't bother you come April. Cheers,
- 33 replies
-
- 1
-
-
- finished
- midwest products
- (and 1 more)
-
Nicely done Sjors. Blue is also my favorite color, that's why the sky is blue so I can cavort in it Cheers,
- 1,616 replies
-
- 2
-
-
- caldercraft
- agamemnon
- (and 1 more)
-
I managed to cement all the planking sheets to the hull yesterday and today. Wow, anyone in his / her right mind using balsa wood for planking should see a shrink with me as numero uno. That's one tough job and do it right. I like to see a 12 year old tackle this one, not easy!!! The instruction manuel tels us to put the "sloe acting" CA on all the frames and strakes. Well, that doesn't work to well because there is just too much area and curves. When holding one end down and working to the other end the first part starts to op back up and then the CA dried up. I worked only small parts at a time which worked okay for me. Of course the added difficulty is that I did it without the deck already glued on. It's the top planking piece I needed to be particularly careful with not to snap pieces off or cracking the edges, which did happen but was reparable with some CA gel. On top of that, the upper hull plank has compound curves at the bow and stern ends, complicating things quite a bit. Being the typical stubborn old Dutchman I had to try using the balsa just to find out what a novice would be facing. If I would scratch build this little smack I will plank it the old fashioned way with 1 mm thick planks from some decent wood. That's what I did with my Friendship sloop "Gwenfra." Yup, I named it after my dear wife. If using balsa for the side planking I would consider glueing paper over it bonding it with an acrylic polymer like Liquitex glazing medium. I have used this with great success in the past. The paper gives the balsa extra strength. If not then at least follow the advice in the construction manual and use Floquil glaze. I have a can of Minwax Wood hardener that works great in strengthening soft woods. It also gives the wood a good base for wood putty and any kind of pant. CA adheres to it also quite well. After the hull was planked I trimmed it all nice and neat and sanded it down some. After that I brushed this Minwax wood hardener on all the wood, inside and outside and let it dry. The instruction booklet also mentions that there may be areas that need some wood filler. Yep, indeed, they are correct in that. No matter how careful one is it'll never come out perfect. So, hopefully I can proceed to to just that tomorrow. This way I can work on both this smack and the O19 dinghy between filler and glue drying I also managed to glue both now filler blocks and started shaping them. I thought in giving the bow concave sides, looks nicer I think then the straight sides. Okay, that's it for today and now a few pics. Cheers,

- 176 replies
-
- 7
-
-
- muscongus bay lobster smack
- Midwest Products
- (and 1 more)
-
Hello Captain Bob and welcome to my shipyard. It's kinda busy around here with three builds going on but there is plenty of space for all yuns on MSW. Well, the changes I'll be making are not going to be very drastic but with the help I already received from Hexnut, Dee Dee and Pete 48 I'll try to make it presentable enough to be auctioned off at Sawdust Dave's event for the benefit of the "Wounded Warrior" program. I love these beautiful little working boats. Cheers,
- 176 replies
-
- 2
-
-
- muscongus bay lobster smack
- Midwest Products
- (and 1 more)
-
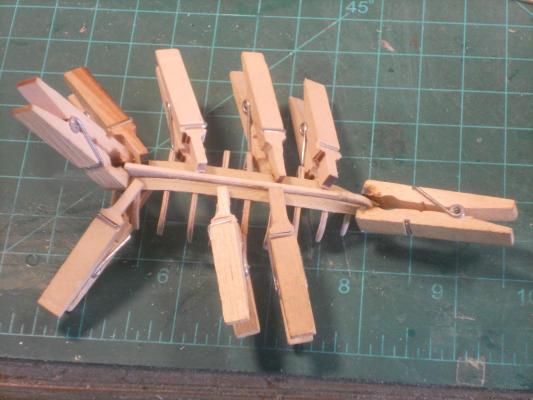
Hello everyone. Just a very small update on the dinghy v. 2.2 dinghy saga. I am soaking a bunch of "planks" in water so I can shape them over the hull frames and this morning I laid-uo the wet garboard strake. I used a bunch of small wooden cloths pins to hold it in shape. When the wood had dried I cemented it to the hull using CA. Hopefully I can cement the next two planks on tomorrow. I have already two wet ones clamped to the hull to shape them. As with version 1.0 I can only install two in one day, unless I soak them in alcohol and may just give that a try. Okay here is one pic to show yuns what it looks like. Cheers,
-
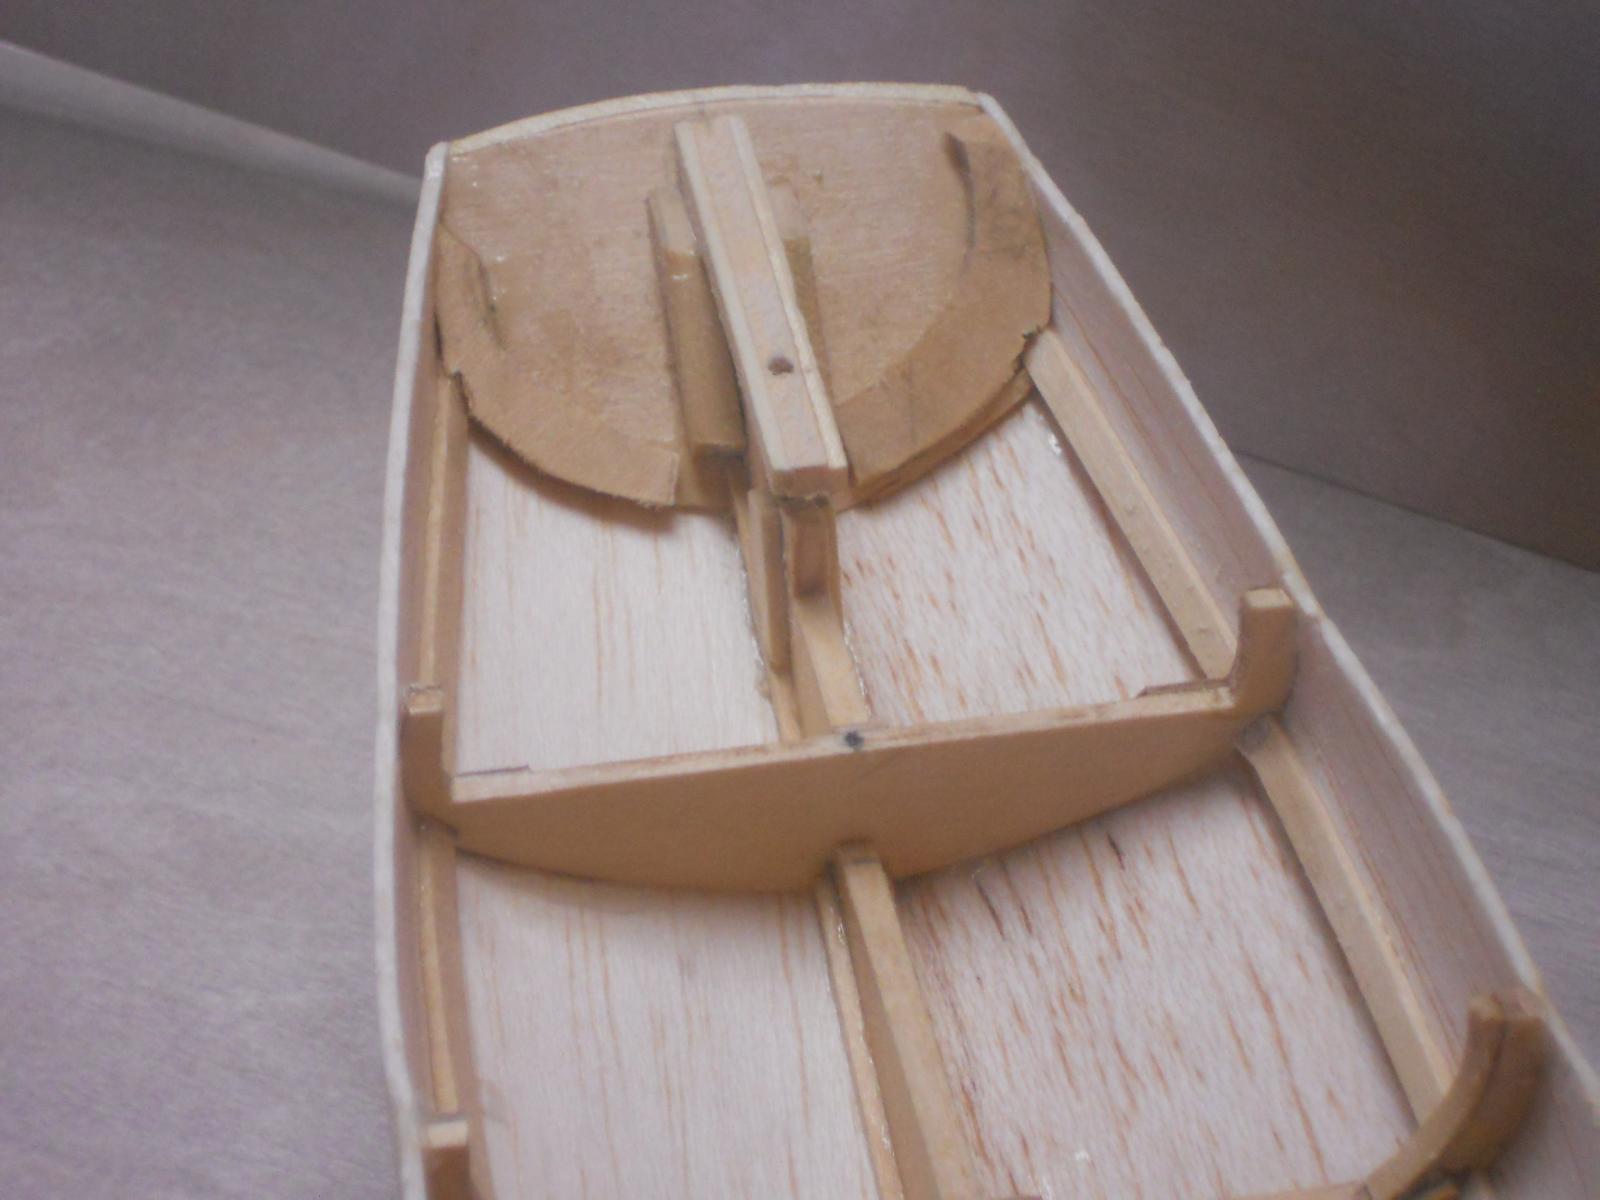
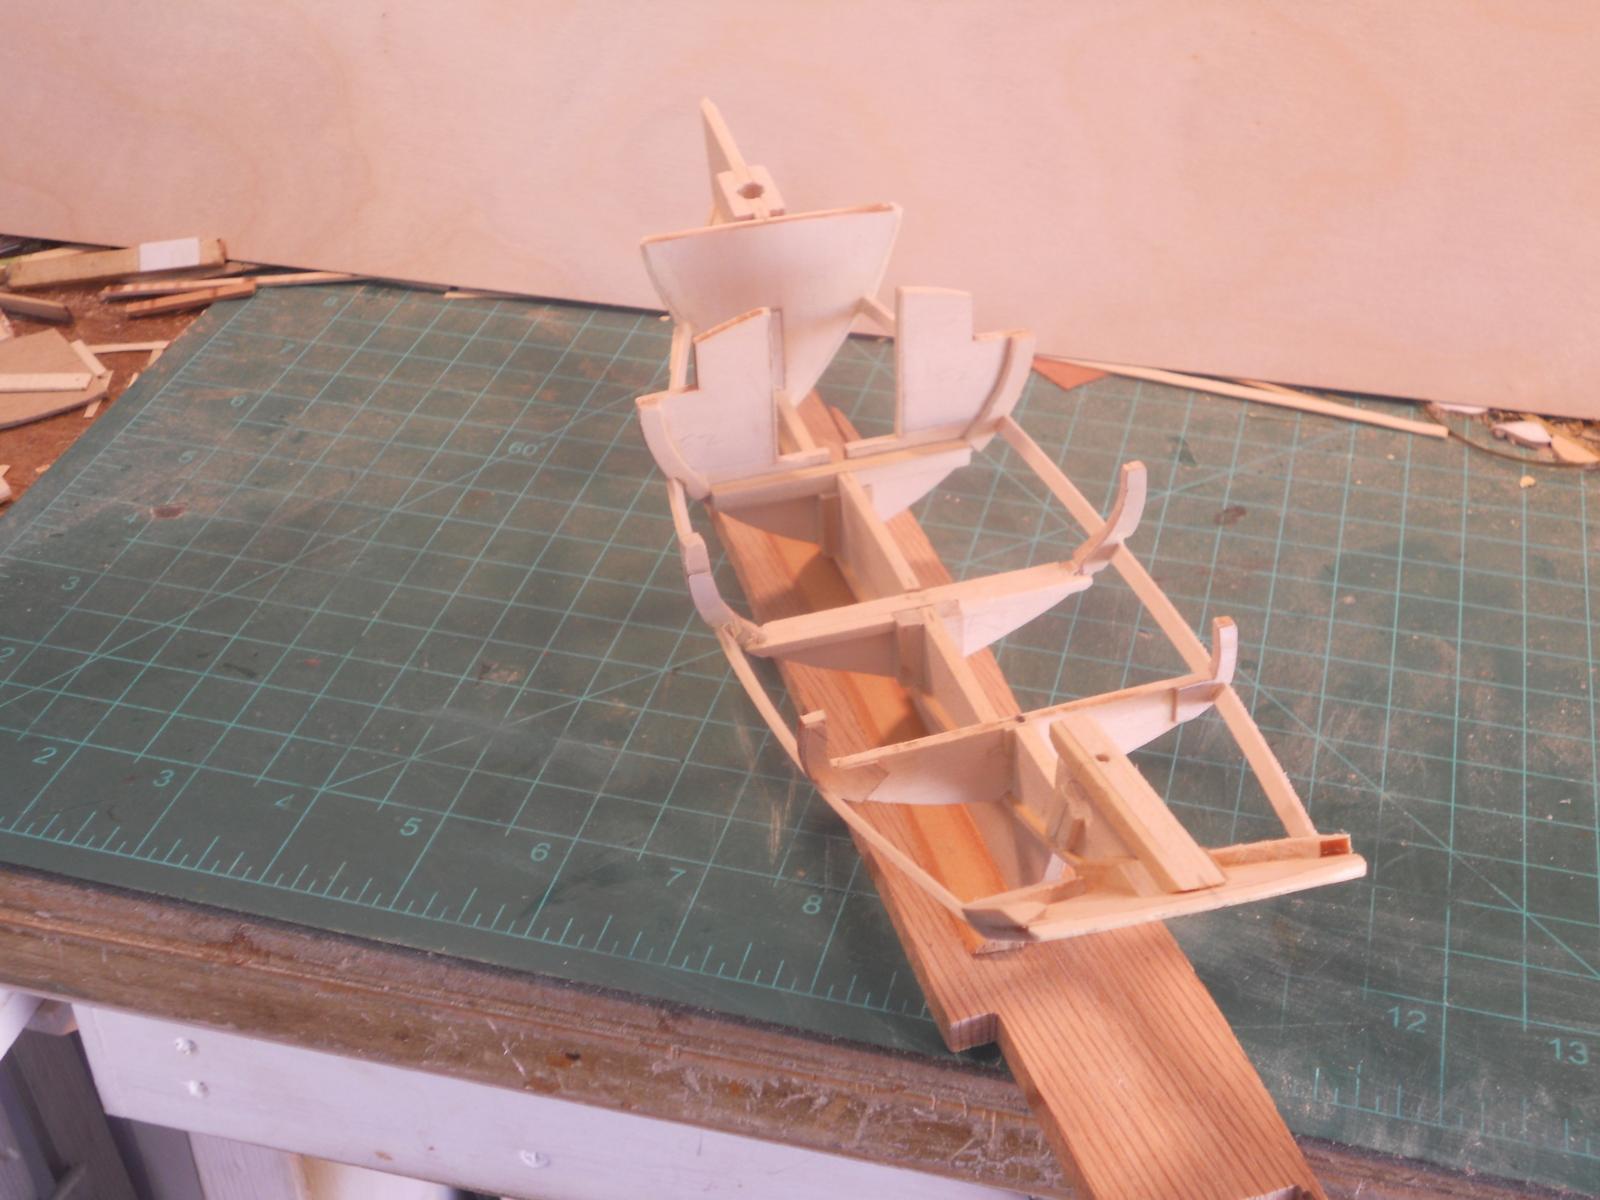
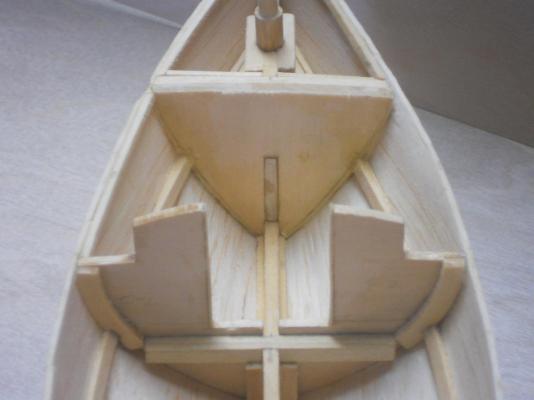
Hello boys and girls and my thanks to all who dropped in and left a like vote, much appreciated. I managed to install the keel strip and side battens. I had to make a few adjustments in the notches and also added a few reinforcements to the now weekend frame ends. I started with the fairing and according the instructions I can expect areas that may not fair out quite right. Well, they are right and I'll have to add strips of basswood to the battens and bulkhead sides in several locations as wel as the transom. At least the kit producer has added this note, which is appropriate and expected. I'll try to do just that tomorrow between working on the O19 dinghy. I am now soaking the planks for that project and plan to start planking that little dinghy. While the glue cures on that project I can devote some time on the lobster smack. Here are a few pics of the work done so far. Cheers,

- 176 replies
-
- 7
-
-
- muscongus bay lobster smack
- Midwest Products
- (and 1 more)
-
Hi David B, thanks for your understanding my friend Yup, good fortune is what I'll need alright but also skill and patience. Hello Row, no prob with the delay in answering and thank you for your very kind words. I know all about being computer challenged. I look at them and they break You could start a build log for your J class Enterprise here on MSW and transfer your build. I believe that the members here would love to see your magnificent build of your J Class Enterprise. I did the same with my Friendship sloop a few years ago. It took some time to enter the log posts but it was a rather fun project. There may be folks here who could use your technique ad some of the additional advice and input. I already picked out a few things after reading your log. Some of the stuff I already knew about but forgot I even used it in my work repairing aircraft. Please drop by again when you have the time. Hi George, yup, making the planking is now all done and ready to be glued to the dinghy. I finished the rest this morning between some glue jobs on the lobster smack kit. I was toying with the idea of using CA to cement these little planks to the dinghy but decided to stick with Titebond. It'll give me a little more time positioning the planks without cementing my fingers to the dinghy I have plenty miniature clothe pins to clamp the planks to the frames. I used the same method with version 1.0 and it worked for me. The poplar I indeed bought at either Home Depot or Lowes. I have a lot of that stuff still kicking around from making the bulkheads for the O19 and the VOC ship. It's more a matter of economics for me then what I really would like to use. It works okay, at least it's much better then bass wood. I have a Sears "Craftsman" 12 " bandsaw. model # 119-224000. It's bigger then I really need now but it works okay for me. My wife and I planned to build a "Friendship" sloop after my retirement and she had thoughts of building furniture so we bought a 10 inch bench saw and a large enough bandsaw for all that. But all that went by the wayside after she developed a back problem. Building that 25 foot sloop is not a one man job and besides, space became also a problem. Cheers to all,
-
Bravo Nenad! That looks very nice - you have done a splendid job! Cheers,
-
VERY nice work Hans and I like the weathering of the oak you did. I think you are right in not adding stain to it, perhaps a clear mat sealer to preserve the wood? Cheers,
-
Wow, nice work space Adriaan and so much space. Looking forward to the Black Pearl work! Th GF looks very spiffy and the portholes - - - they'll also look okay, the difference is too little to worry about Or notice. Cheers,
-
Nice going there Jesse! What a nice looking little boat and can't wait seeing you and it next April. I am building a Main lobster smack for that same event! Cheers,
- 33 replies
-
- 2
-
-
- finished
- midwest products
- (and 1 more)
-
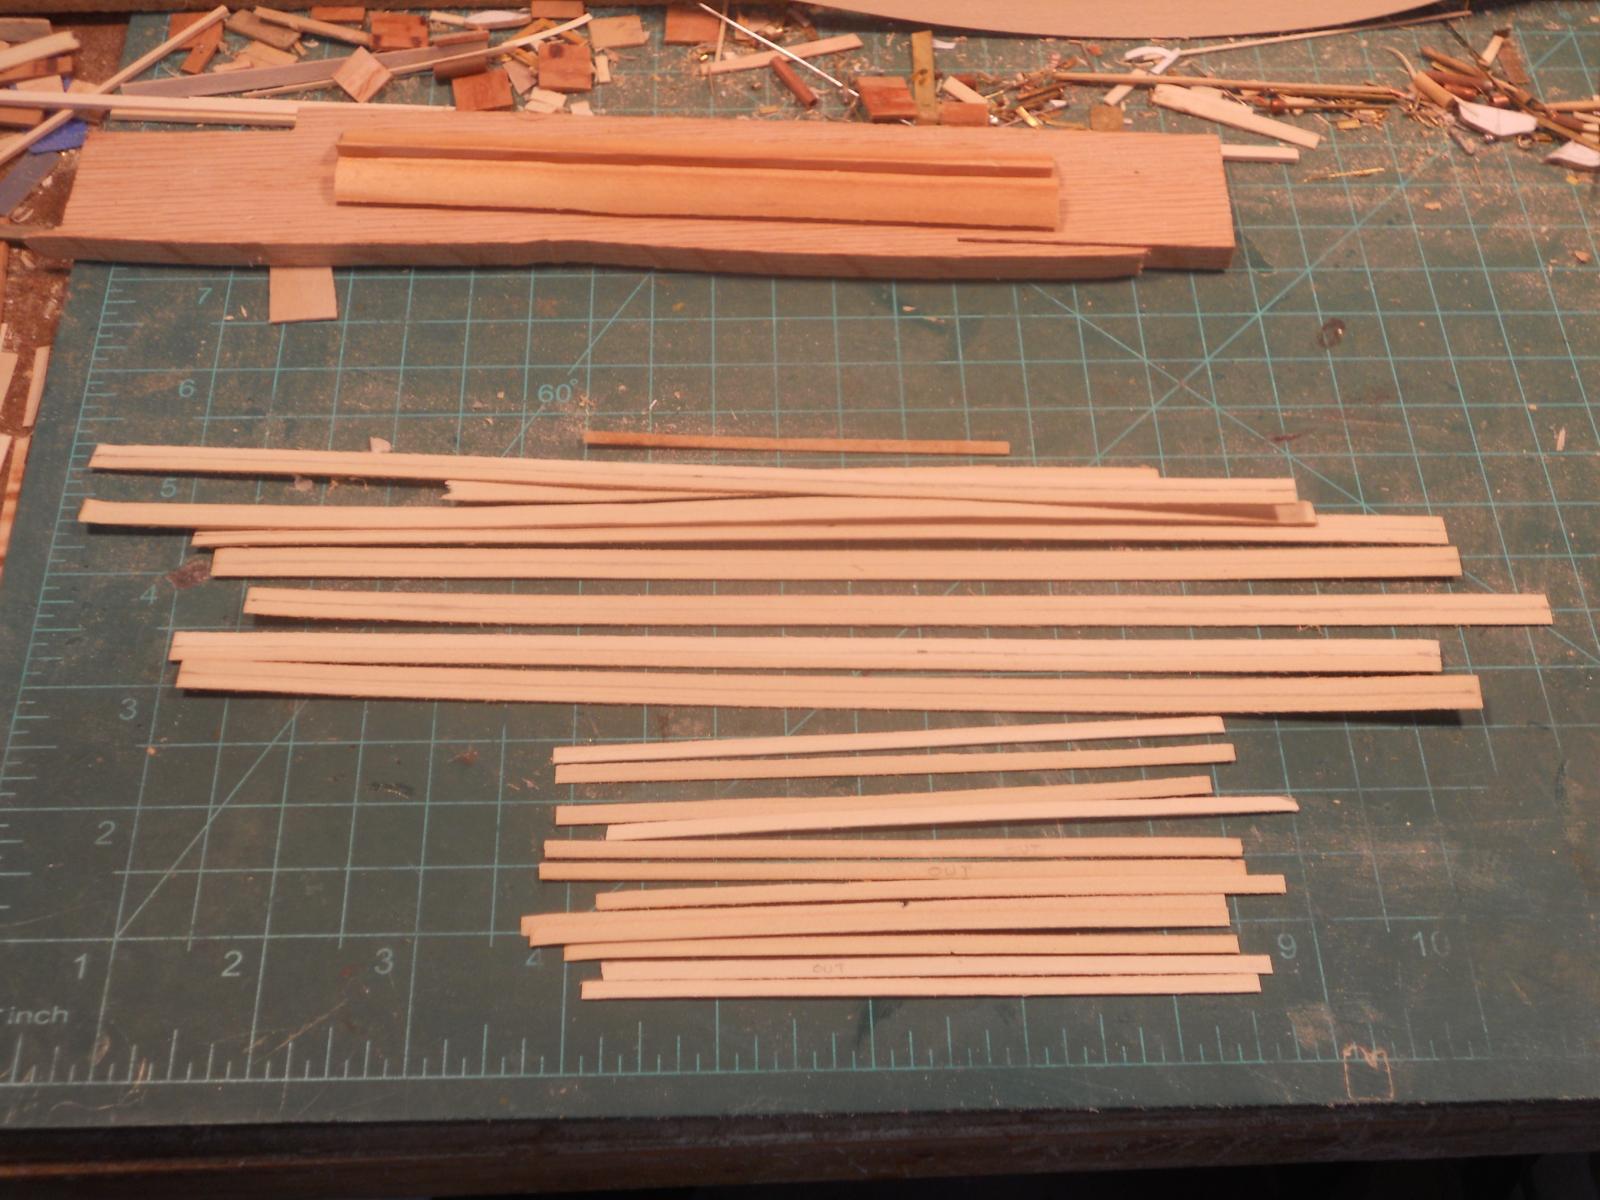
Today's task was - - - making planks for the dinghy. I already cut several "planks" from a 1/4 inch thick poplar board that I ripped off at the band saw. I cut them about 2 mm thick, way too thick for the dinghy planks but I planned in sanding them down quite bit anyhow. Well, that's what I started on today working between a few tasks on the lobster smack kit. I used a sanding disc in my Proxxon hand tool (Dremmel like ) and a sanding block and took them down to 1/2 mm. Then I proceeded to sand down both edges to give each plank a wedge shape and cut them in half length wise. Thus one edge is 1/2 mm thick and the other edge is a knife edge with a width of 3.2 mm. This way I can lay the following plank on the "knife like" edge of the previous plank to simulate a klinker lay-up. Scraping a step in a 1/2 mm edge is not possible with poplar wood, so I abandoned that idea. With version 1.0 I sanded each plank after it was glued onto the frames but I thought doing this off the boat. It's a lot easier to work it this way then on the dinghy. I only got not quite haf way through all al the planks but tomorrow is another day. Each plank is now 1/8 inch or 3.2 mm wide and 0.5 mm at the "thick" side. I did manage to drill a hole into the bow keel and inserted a bamboo treenail. This whole framed assembly turned out quite strong. It so happened that it got - - - hmmm - - manhandled a little but came through with flying colors. Here is a picture of the work I managed to do today. Yeah, my little work area is a little messy but I'm working on three models there and need all that "stuff." This shows the pile of planks for the dinghy. The short pieces in front are ready for a soak in water to make them pliable to shape them on the dinghy. Cheers,

-
First of all, my sincerest thanks to all the likes and thanks for visiting. Hello David B, thanks for your suggestion, I appreciate it. Now then, don't you think that using a plug at this stage of the game will work? The dinghy is framed out already and rather sturdy now that I have tree-nailed a few frames and the bow beam. If I understand the plug method correctly the plug should be made first and then the keel and planking can be laid up on it. The frames come after the planking is done and the shell pulled from the plug. In actuality then my framed dinghy acts as the plug for the planking. This suggestion has been brought up before when I made version 1.0. I explained then that I took this as a challenge to me to try and build a PoF boat at this scale and forego the plug method. It's also good practice for my planned ship in a 6 inch lamp globe. I just wanted to see if it could be done and I now know that it is possible, even at a smaller scale. It's not a matter of doing it the easier way and preventing the frames to break but rather to see if it actually can be done. Omega also challenged himself and did a PoF dinghy at about 10 mm in length. So, we are looking at two methods and Omega and I chose the PoF method. Hope you understand my motif behind it. Hi Kevin, thanks for dropping in and your kind comments. Cheers,
-
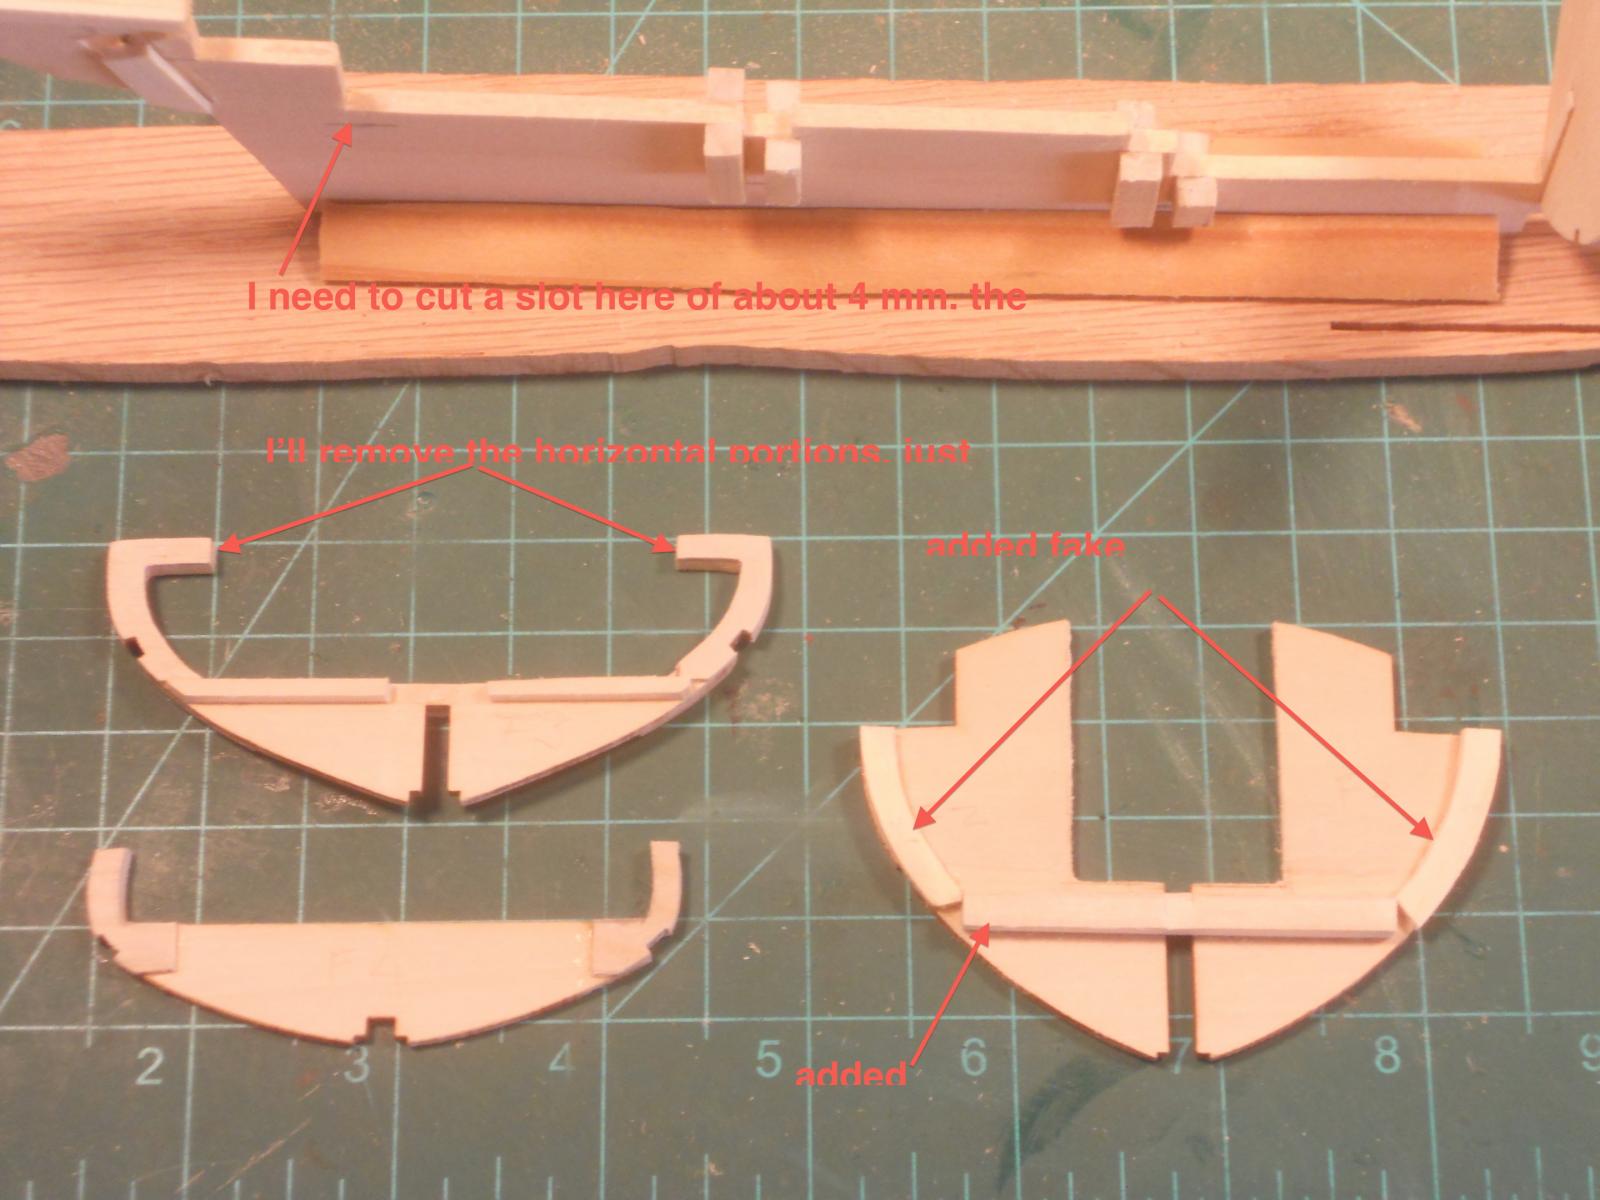
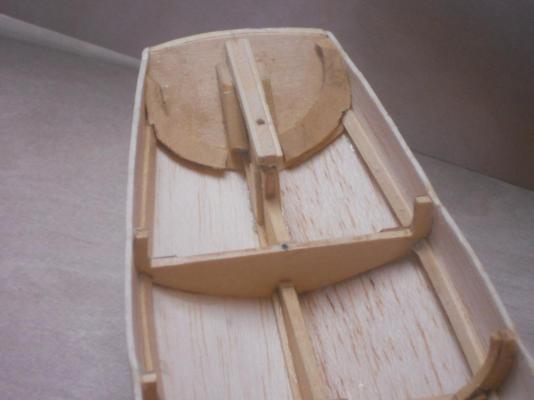
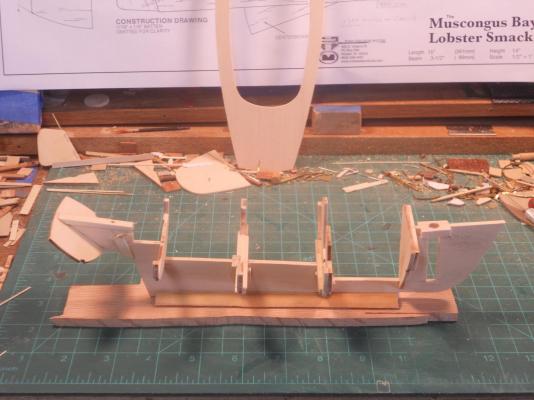
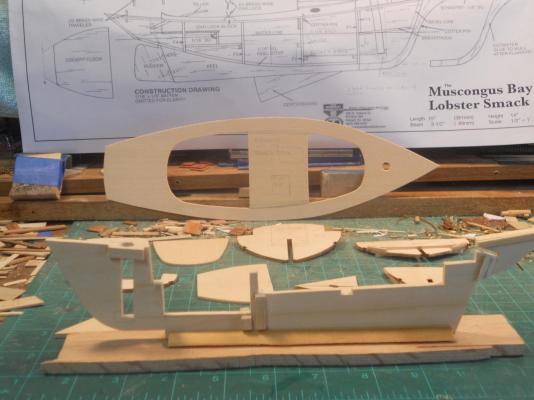
Hello everyone and thanks to all for visiting and your likes. I trust that all had a great Thanksgiving and a great Thursday for the non-Yanks. I finished modding the bulkheads, at least to the point of gluing them to the keel frame, which I then did do. It turned out that the most aft bulkhead, #4, sat too high on the keel frame by roughly 4 mm. This is the location assigned to it per the drawing and instruction manual. I should have checked all the bulkheads for proper positioning before gluing them to the keel frame an not trust the kit maker for accuracy. Turned out that kit provided location for that bulkhead is in error, they should have slotted the keel frame a little. Lesson learned, check positions of all parts before permanently cementing to whatever they are supposed to go. I found this out when I tried to fit the "Keel Strip" per step 18 of the instruction manual. At this #4 bulkhead the strip actually bowed upwards instead of making a nice positive bow down. So, I removed #4 bulkhead and cut a notch into the keel frame to lower the bulkhead to the desired position and checked it again before gluing the bulkhead back on. I also found that the 1/16 notches in the bulkheads for these strips are not deep enough, at least not to my liking. I had to enlarge then just a smidgen. The instructions have you used slow setting CA and only to apply the CA to the notches in the bulkheads. To me that would make it too springy for the hul planking plates. I think that I'll glue them on with PVA and clamp them, along the entire length of these strips and them fairing them following the rounded contours of the bulkheads. I also found that the notches in frame 1 needed to be shaped in order for the 1/16 X 1/8 center battan to fit properly. There is also an error in step 23 of the manual calling this battan 1/16 X 1/18 instead of 1/16 X 1/8 inch. Yeah, okay, I'm picky but I keep thinking about the novice builder. Just wondering here. If this kit is supposed to be a Novice level 2 kit, who will these novices be? Young people in their early teens? Totally inexperienced adults who have nu clue about terms, tools and how to solve some of these annoying little inconsistencies? Would they have experienced help nearby? This could very well be very discouraging for them and ready to give up. The error with bulkhead #4 may not be noticeable by a true novice and he or she would happily forge ahead with the result of an odd looking hull at the stern end. I mention all this in case some inexperienced novice builder want to build this lovely little boat. It's my humble opinion that the instructions lack extra notes and warnings to help the novice along. Okay, let me add two pics to show the progress with a few notes attached. This shows the modified bulkheads numbered 4 at left bottom, # 2 at left top and # 3 at the right. The keel frame sits nicely in it's dock. I have annotated a few areas of interest. At the keel, I have indicated where I cut a 4 mm slot to lower bulkhead 4 to it's proper position in the keel for a nice flowing bottom hull planking. It's now also obvious that I will also lower that section of the keel frame aft of bulkhead 4. There may be other changes in that area but I'll get to that later when I put the benches in. It also shows the added blocks to give the bulkheads something to glue to after the keel frame was cut down for work area. On bulkhead 3 I'll remove the two small horizontal pieces where the deck is supposed to be glued to and just make the leftover parts look more like frames. On bulkhead 2 I added a few curved pieces of wood to simulate frames. Now I'm thinking of adding a bunch more fake frames between bulkheads #4 and #2. That means that the supplied deck plate will also be changed to just a cap rail over these frames. Here I have glued all four bulkheads and the transom to the keel frame. I'll most likely treenail the transom to the keel. It's in my opinion not strong enough, it already popped off when trying to fit the 1/16 X 1/16 lower keel strip. Cheers,

- 176 replies
-
- 7
-
-
- muscongus bay lobster smack
- Midwest Products
- (and 1 more)
-
Hoi Carl, now that's a thought! Yup, I could try that and with my luck it'll shatter in a gezillion pieces when removing it from that piece of wood. Let me tink about it and toy with it. I did manage to clean the jol up nicely and fared all the frames. I may have to treenail the bow bost to the keel though. It seems to have a week spot and making it sturdier would make the handling better. Gwen and I had a very quitte Thanksgiving, just the two of us. Daughter Marianne and the grandson Troy are 900 miles up the road near Pittsburgh, PA. Also busy with school and no time for a family get-together. Thanks to everyone for dropping by and your likes! Cheers,
-
That looks vert nice Nenad, bravo! Cheers,
-
Mayflower by SawdustDave - Finished
Piet replied to SawdustDave's topic in - Build logs for subjects built 1751 - 1800
Beautifully done Dave. Shrouds and a gezillion clove hitches coming up. Cheers, -
Mayflower by SawdustDave - Finished
Piet replied to SawdustDave's topic in - Build logs for subjects built 1751 - 1800
Hi Dave, glad to see you back at the Mayflower. She's really looking good! Cheers, -
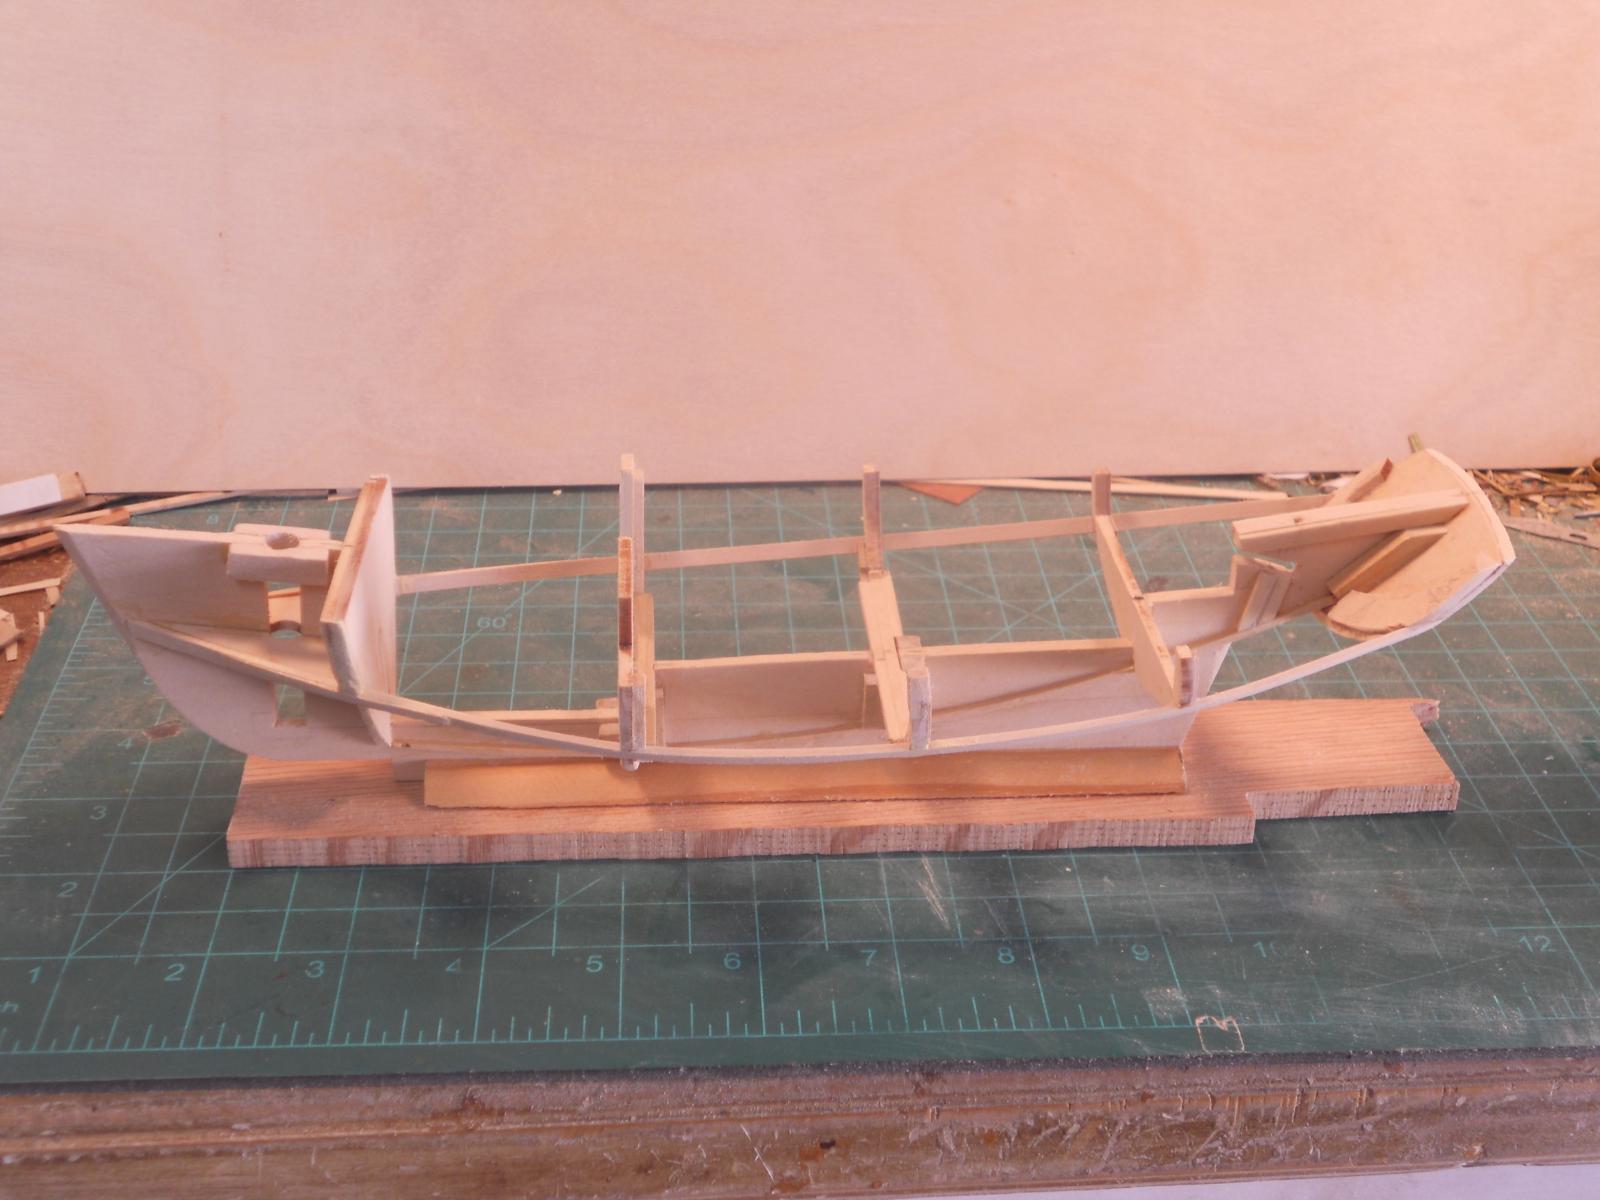
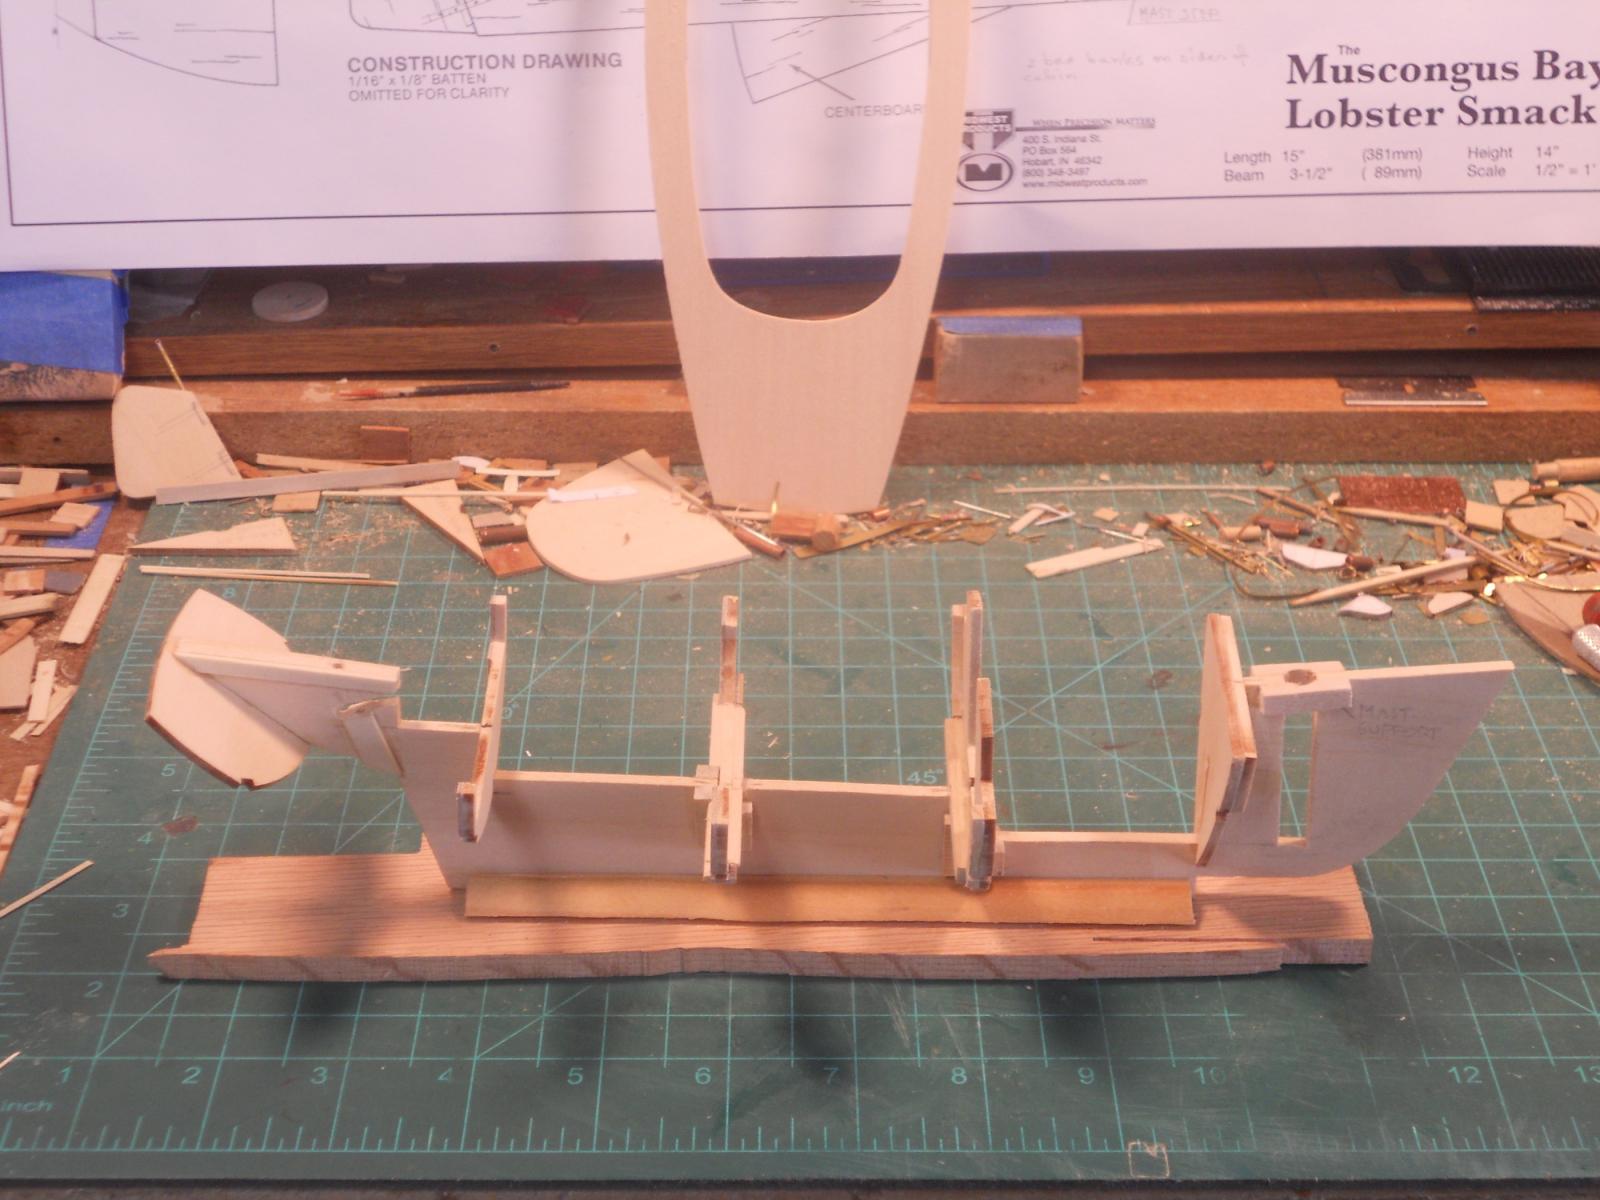
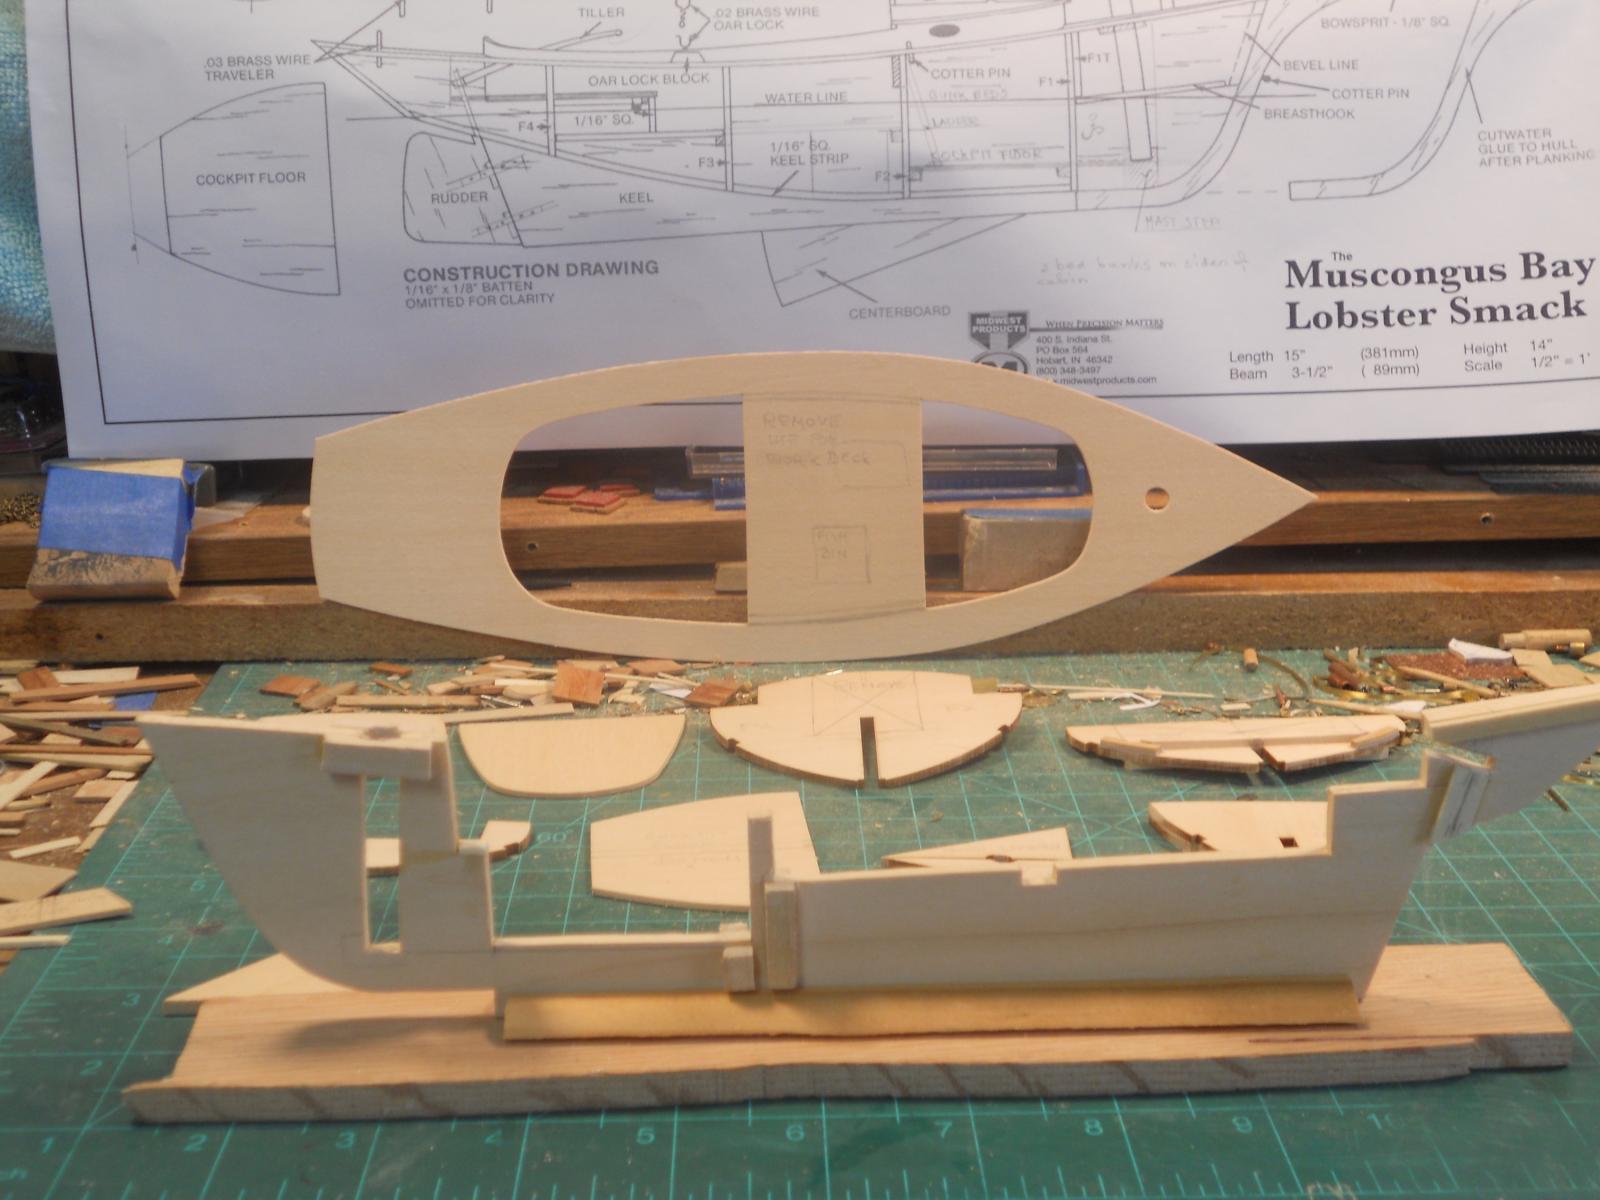
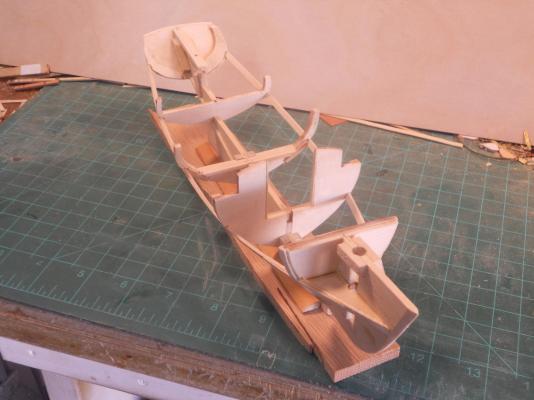
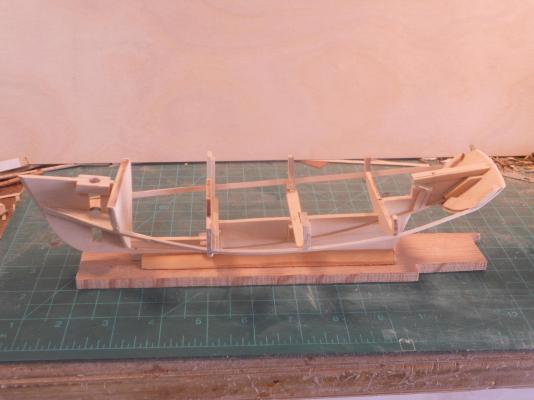
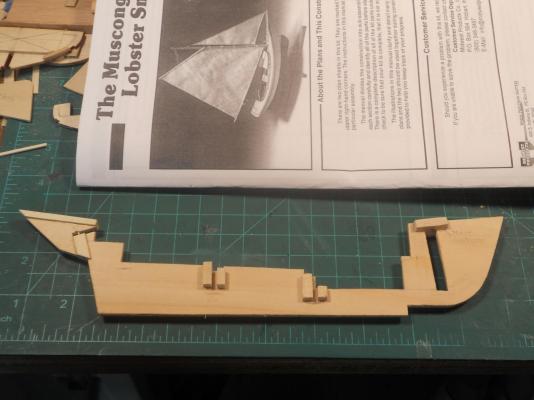
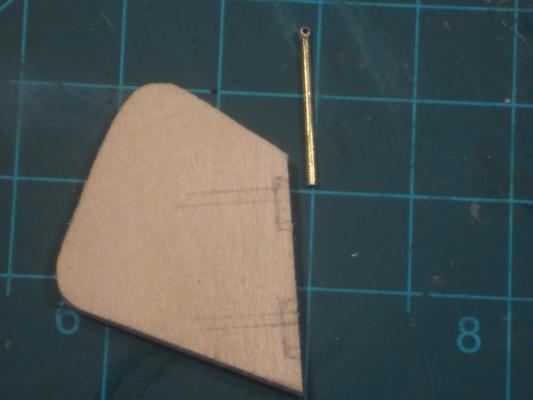
Hello every one. I made a start with cutting away the parts I don't want in my mod. First order of business was to make a working dock. I didn't like the idea of using the box. I'm cheep but that is below my standards. I like a small and maneuvering dock where I can also check vertical and square, not that it seems to be needed but hey, I'm used to it. I started with removing that part of the center keel where the little cabin will be and the center [art of the working deck. There won't be much of a deck (floor) in the cabin but enough to get around in for the crew. If I'm not mistaken there were only men working these small boats. I also glued a few extra blocks to the keel for the modded bulkheads . As mentioned before, I will make the rudder workable and made a new rudder from poplar. I used one of the extra stanchions for the O19 deck railing for the rudder pivot shaft. Waste not want not The tiller will have a brass pin at the end that'll slide into the horizontal brass tube part on top of the stanchion (see pic 3 below). I need to figure out how to secure that so it won't pull out by some eager sailor. Right now I'm thinking of glueing the side planking on first so I can mount the rudder hardware and rudder to the keel and have access to that helm stick attachment. I can then cement a small ball on the aft end. Also, with all these alterations inside the hull it's better to have the side planking on and the top open. Okay, enough of my banter and a few pics to show the progress. I am dividing my time between the dinghy for the O19 model and this model. I'm switching days between the two. Here we see my build dock with the slightly modded keel frame. Here i have removed the cabin and the center portion of the work area from the keel frame. Granted that this whole are should be lower but for my purposes this'll have to suffice. In the background you'll see the deck plate with my proposed section for removal. This shows the keel frame outside the dock with the portions of the keel removed and added mounting blocks for the bulkheads. If you squint real hard you can see the rudder pivot pin in the slot made for the helm. As mentioned before I had to reinforce that are for the pin hole. I also added a few strips for the deck plate. Perhaps not needed but I had to back-drill through the top to make the rudder pivot pin hole and it really needed some extra beef there. This is the new rudder and I have placed the pivot pin next to it so yuns can see how it's made. Cheers,
- 176 replies
-
- 8
-
-
- muscongus bay lobster smack
- Midwest Products
- (and 1 more)
-
Hello Adriaan and you are so welcome. Yeah, When looking at pics of ships that seems to be the norm, running that strake parellel to the sheer. I also think that the portholes may not always follow the sheer line but rather parellel to the deck where the cabins are. This will only be noticeable at the stern and bow ends of the ship. Love the looks of the portholes! Cheers,