HOLIDAY DONATION DRIVE - SUPPORT MSW - DO YOUR PART TO KEEP THIS GREAT FORUM GOING!
×


Piet
-
Posts
3,568 -
Joined
-
Last visited
Content Type
Profiles
Forums
Gallery
Events
Everything posted by Piet
-
 Hello Omega, finally caught up with your build! Great looking model, lovely lines. Cheers,
 -
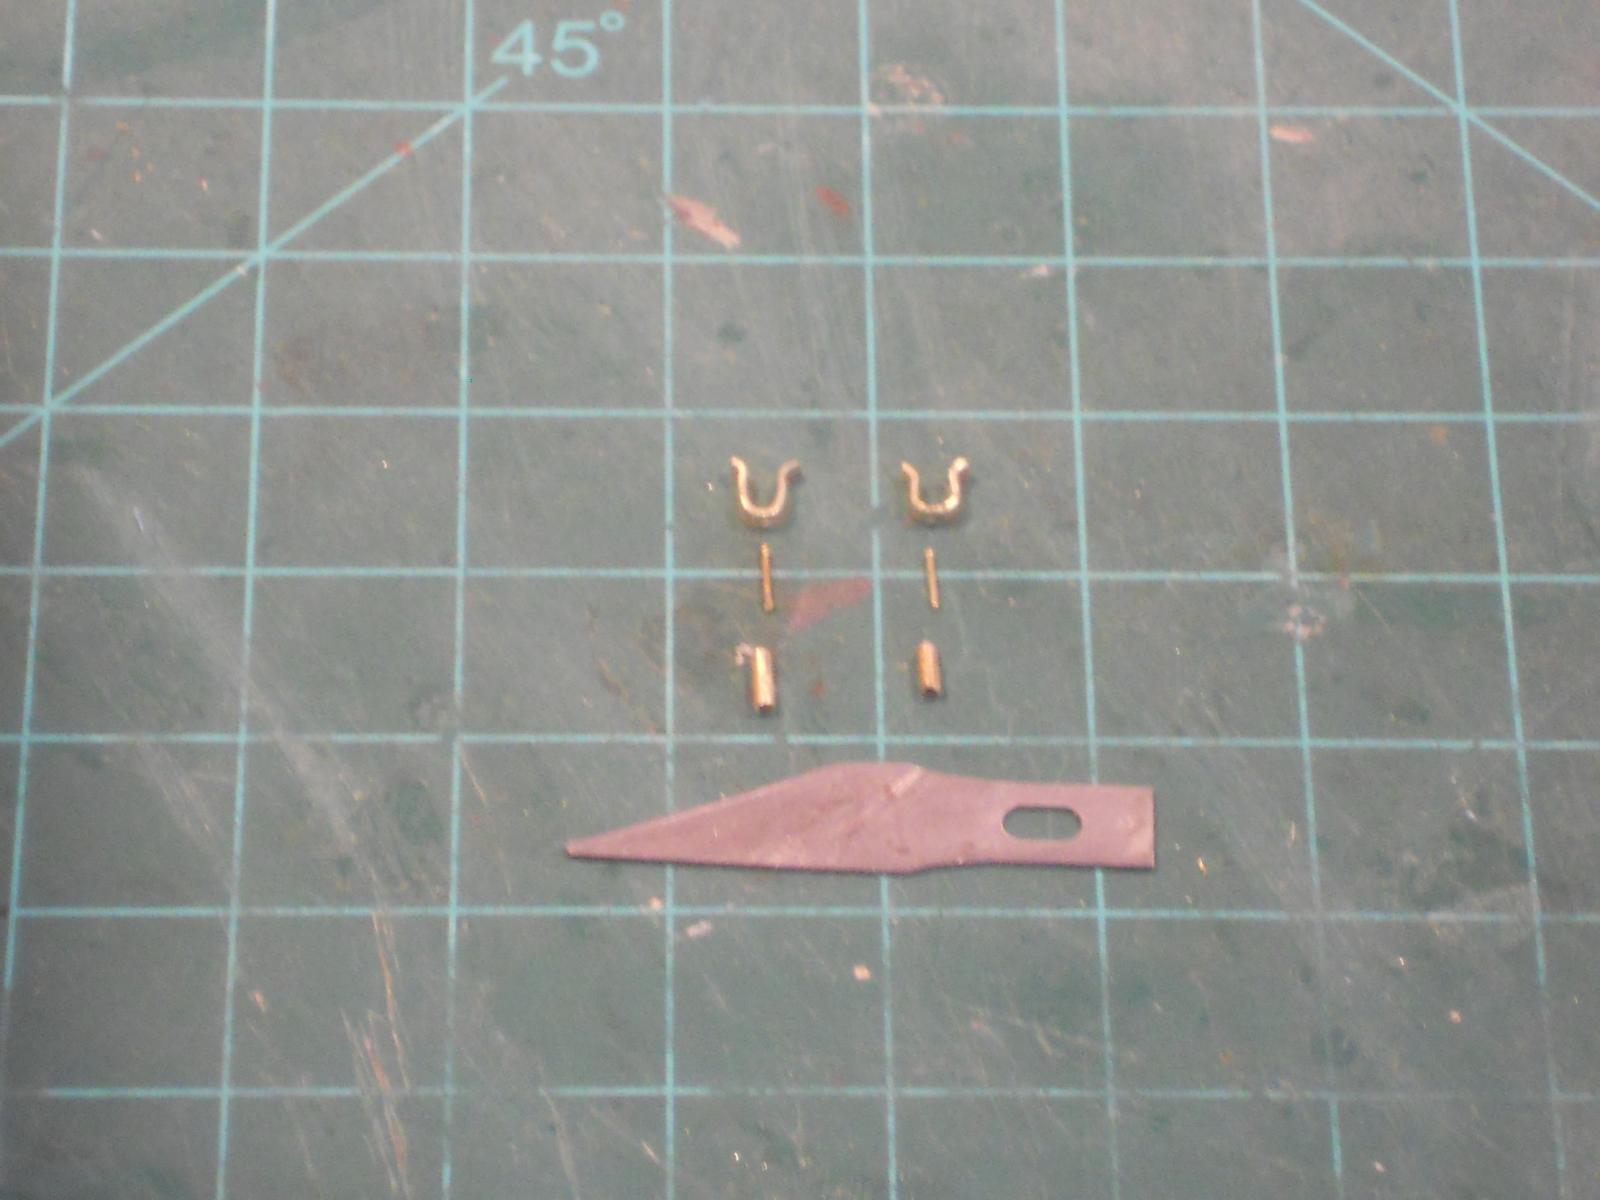
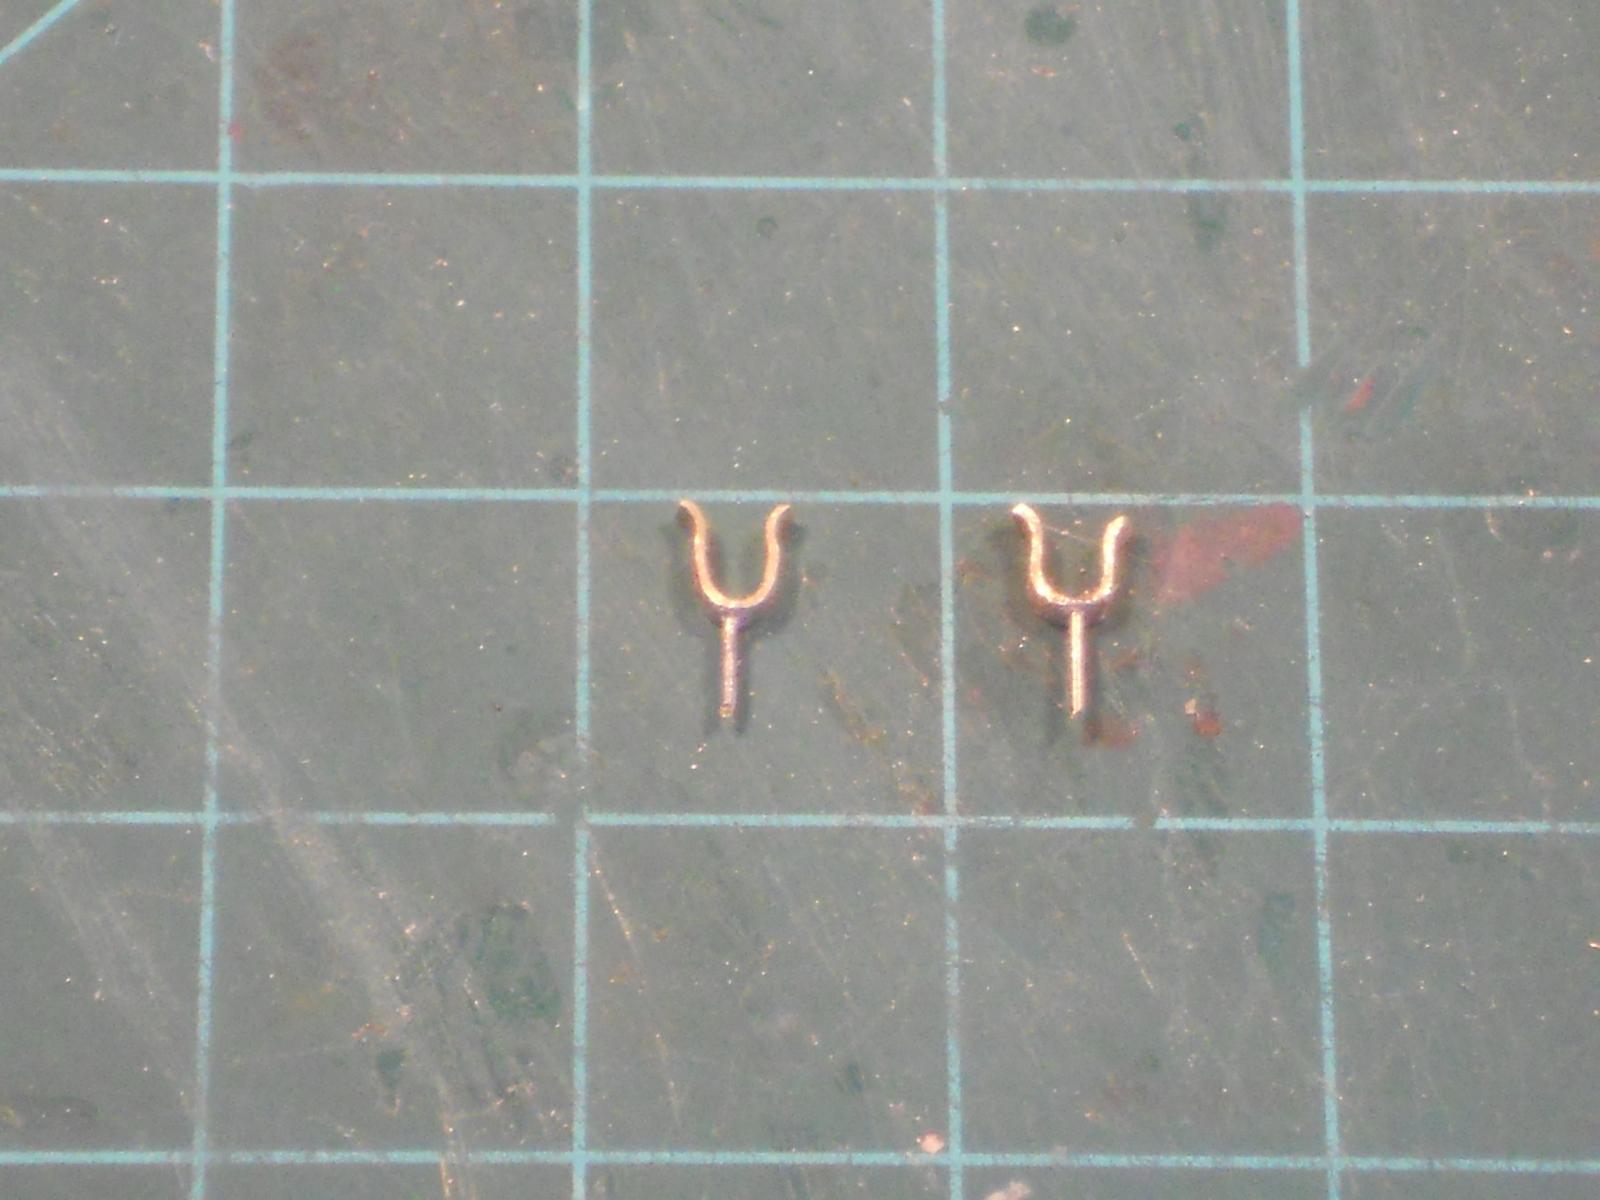
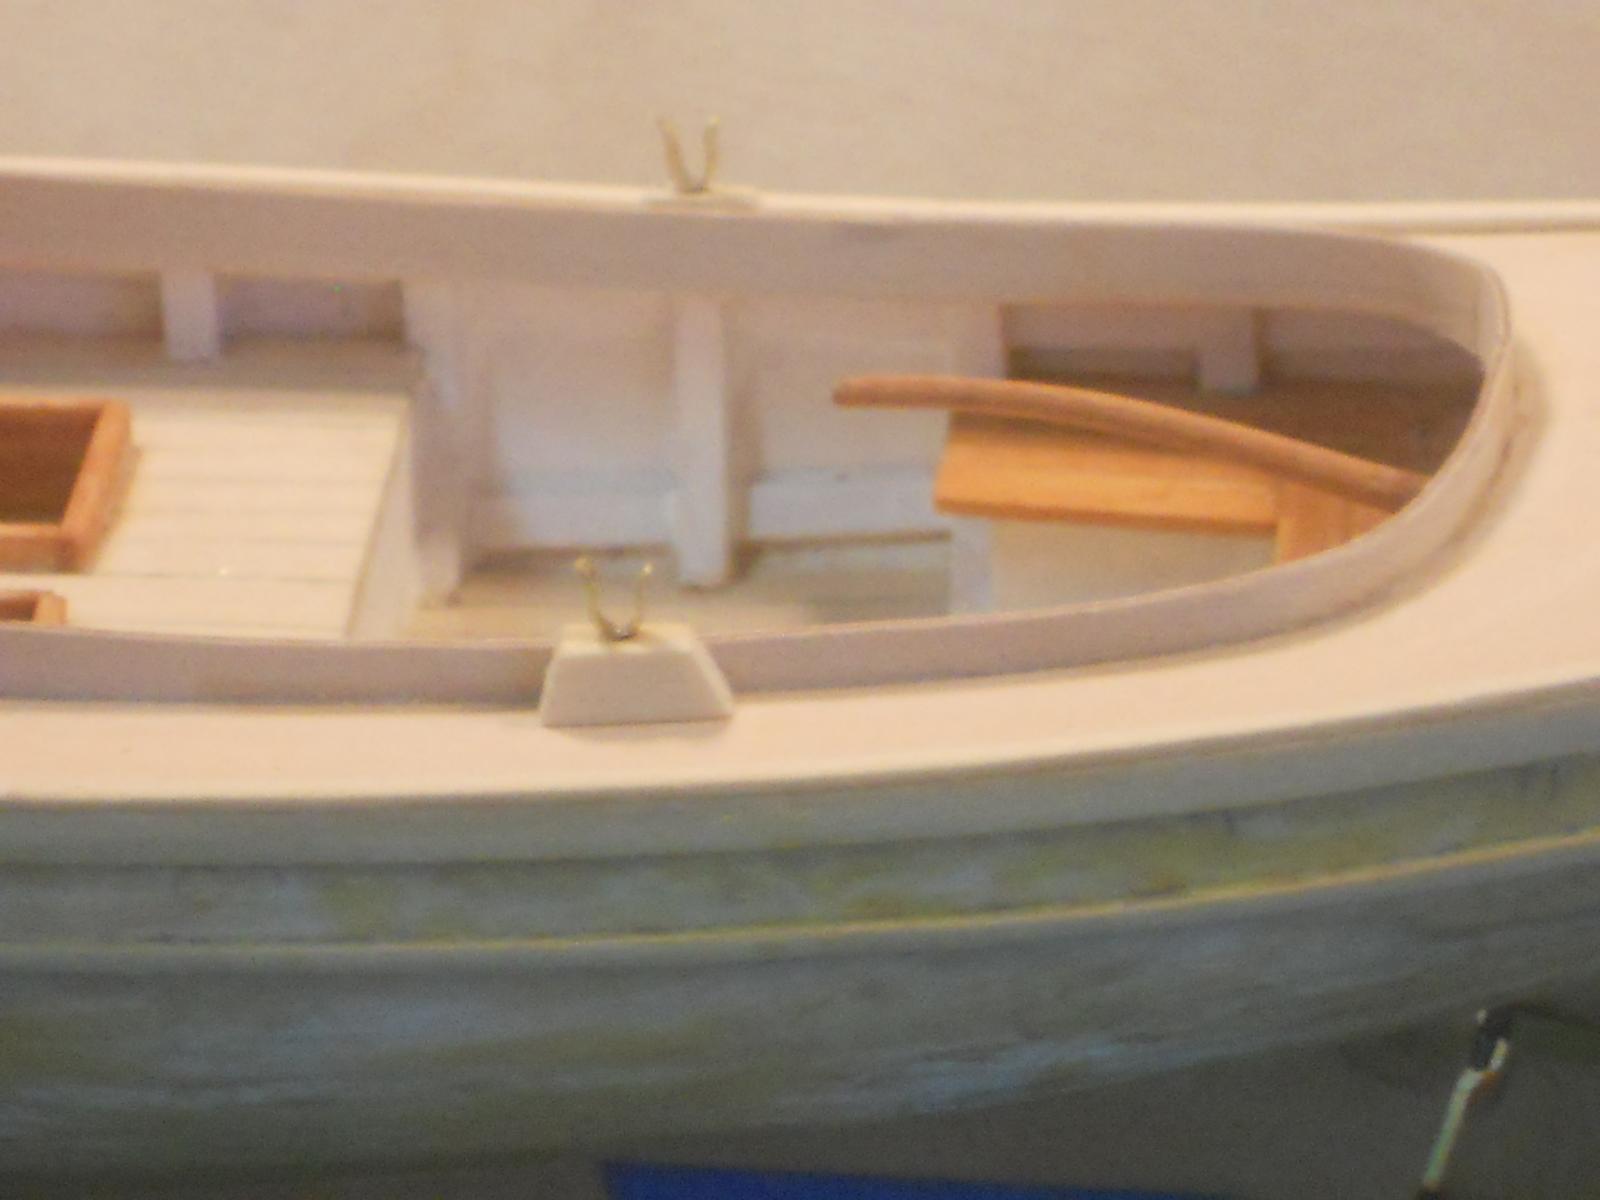
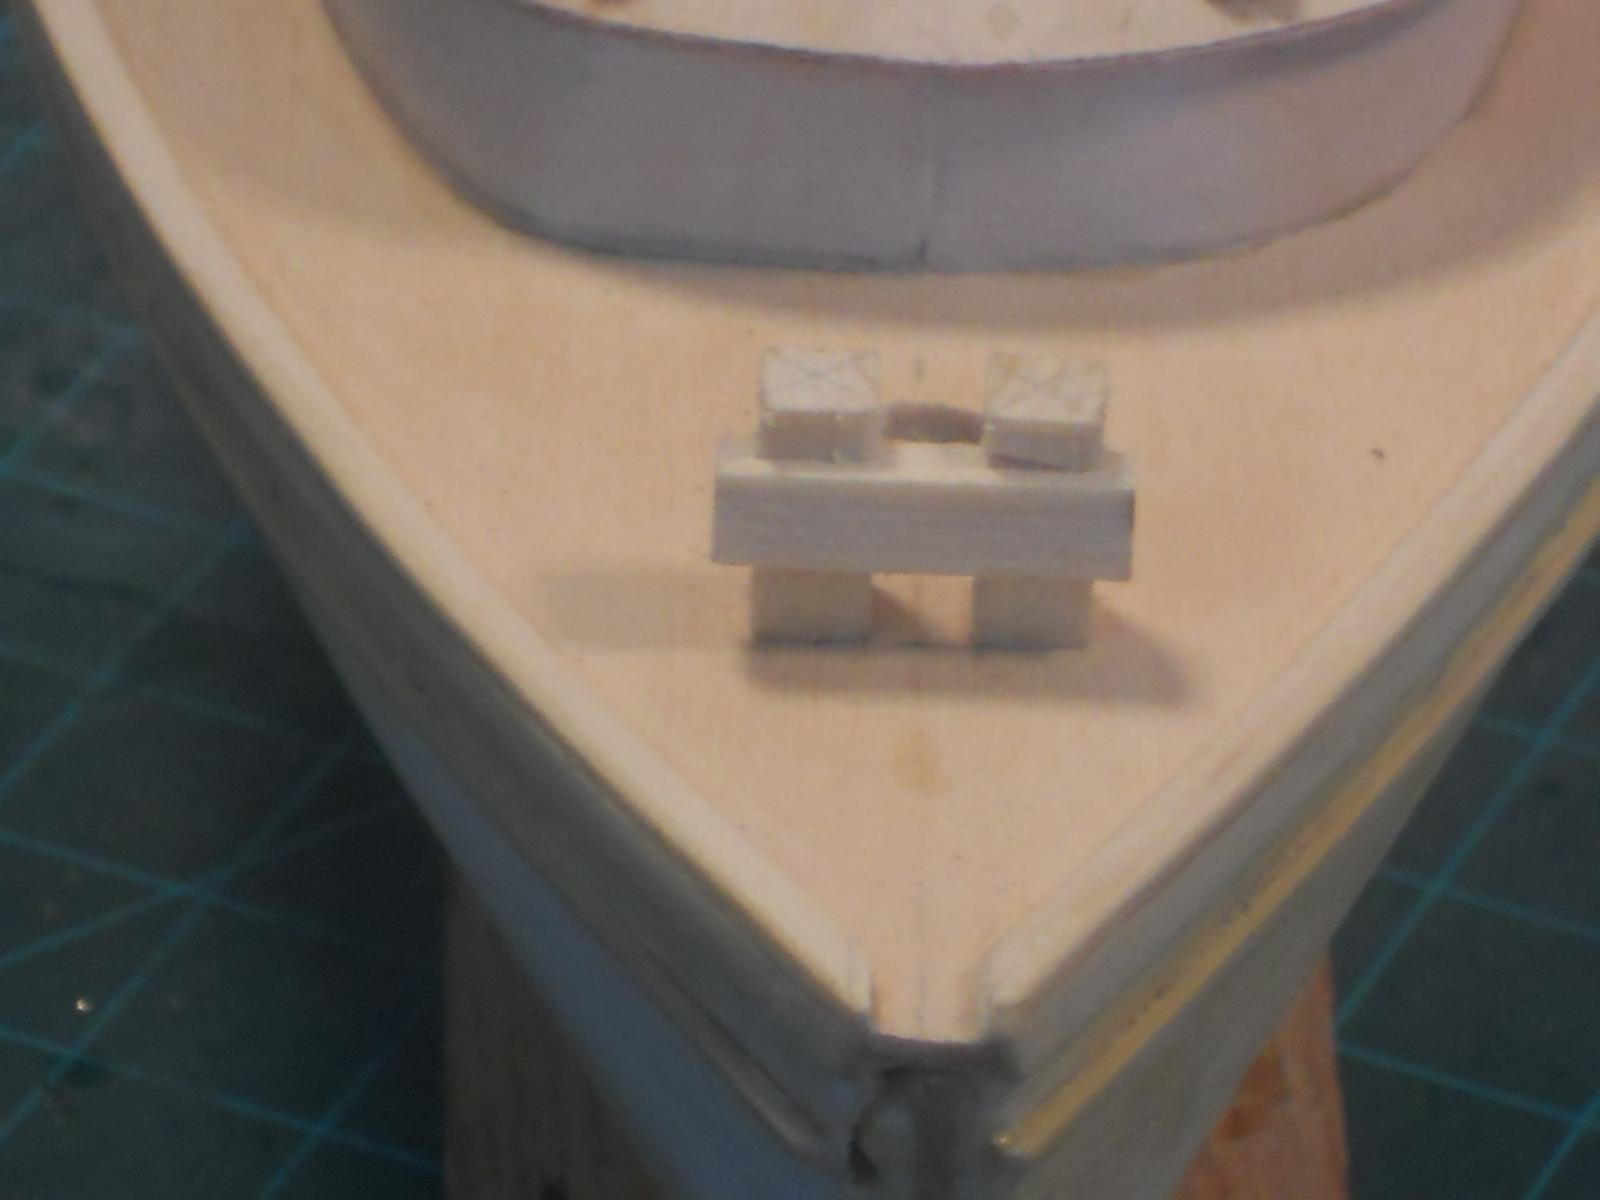
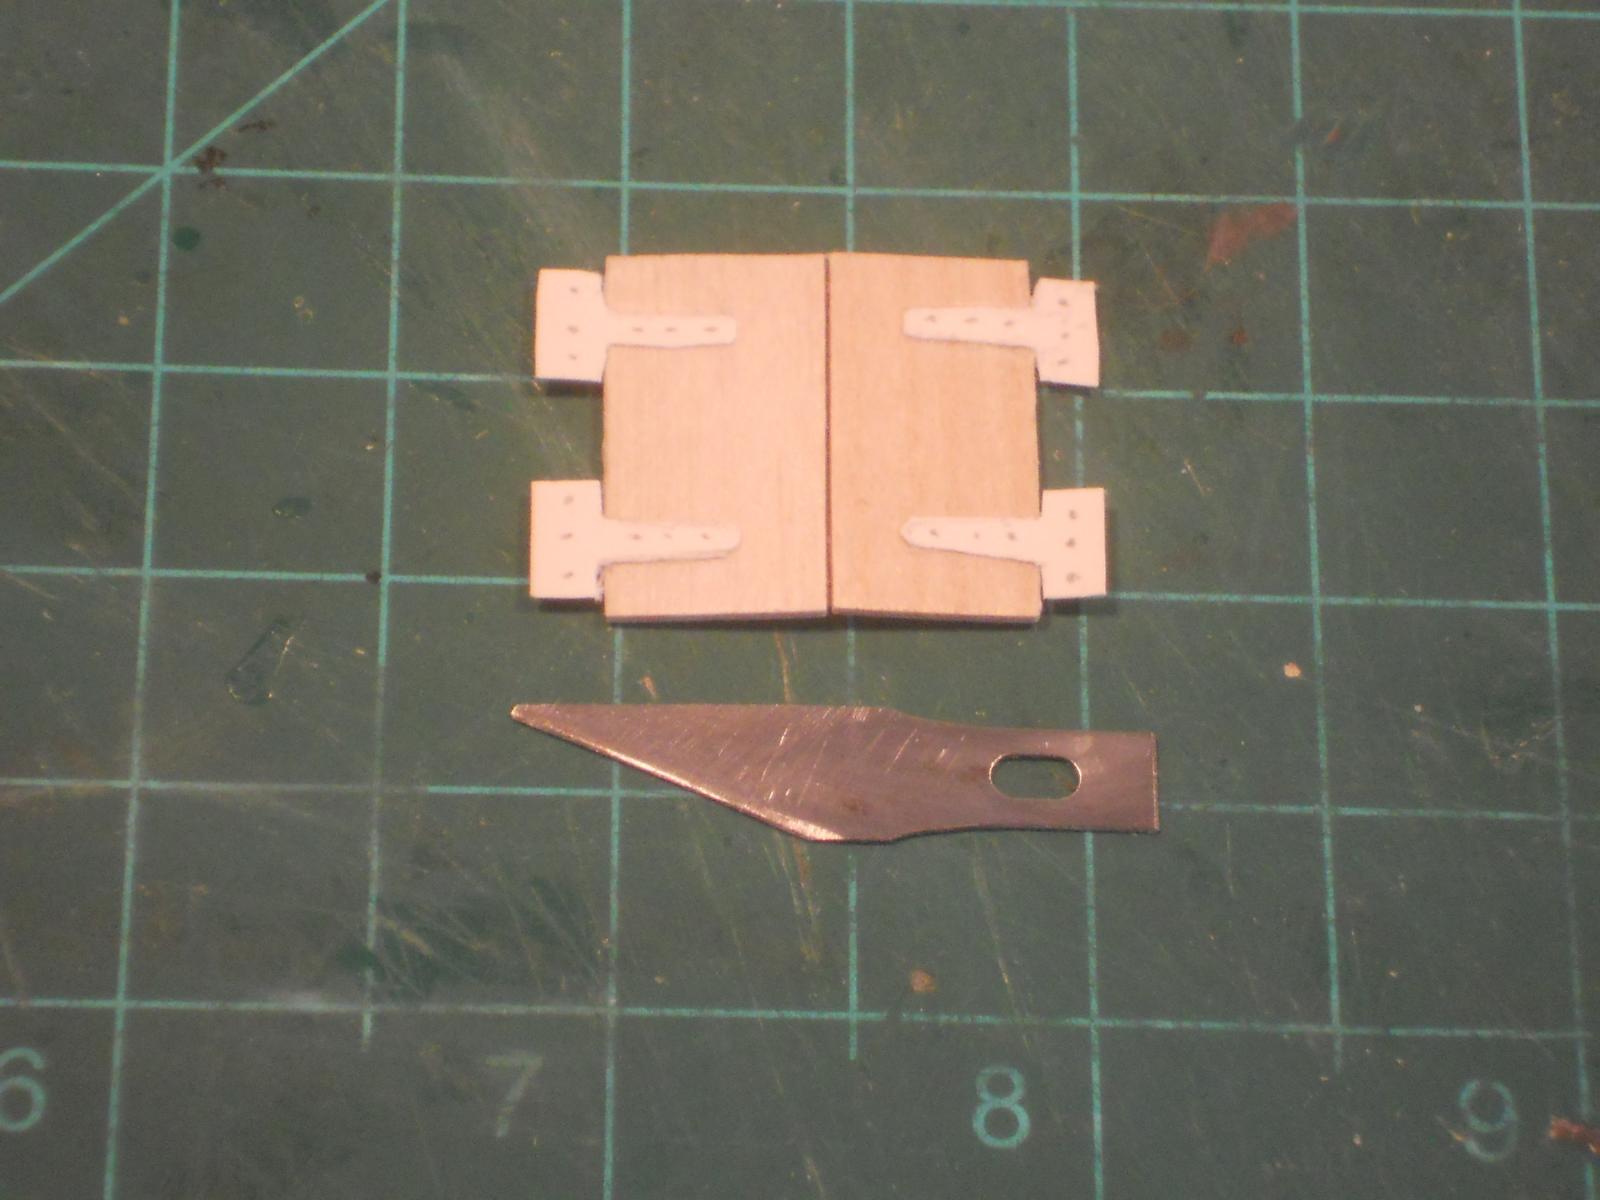
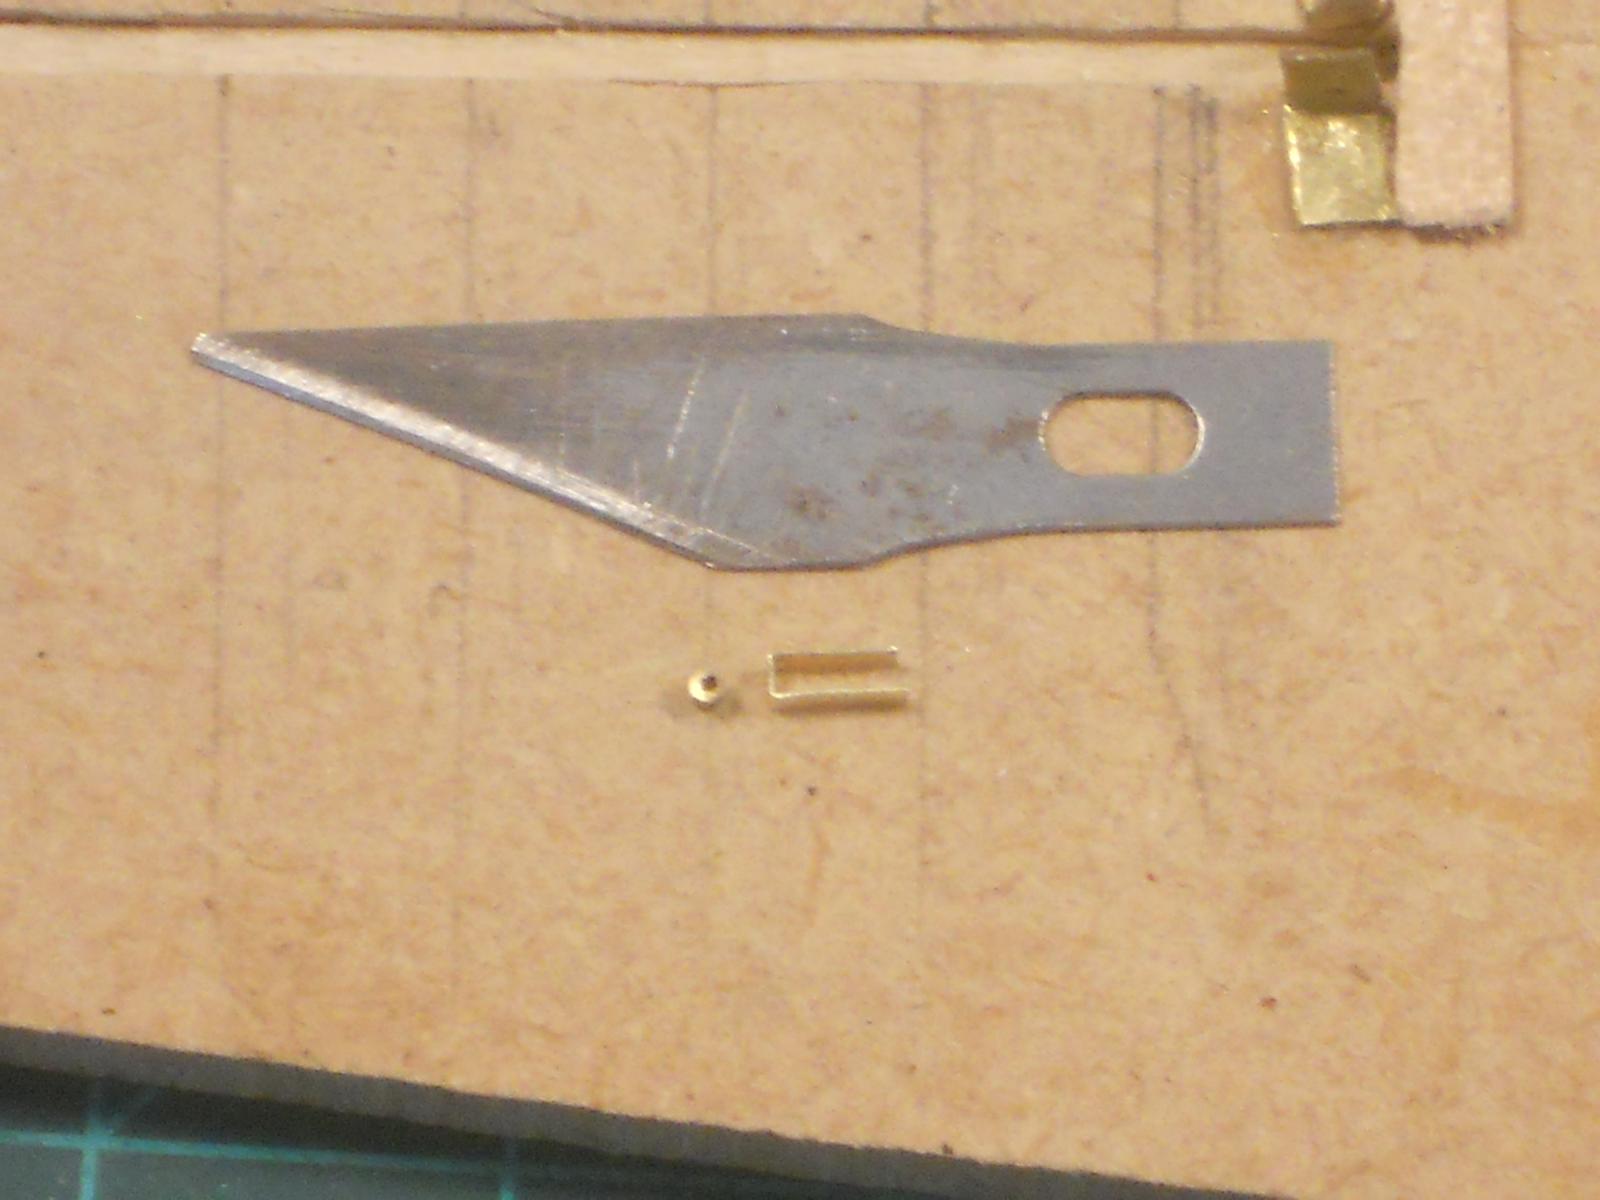
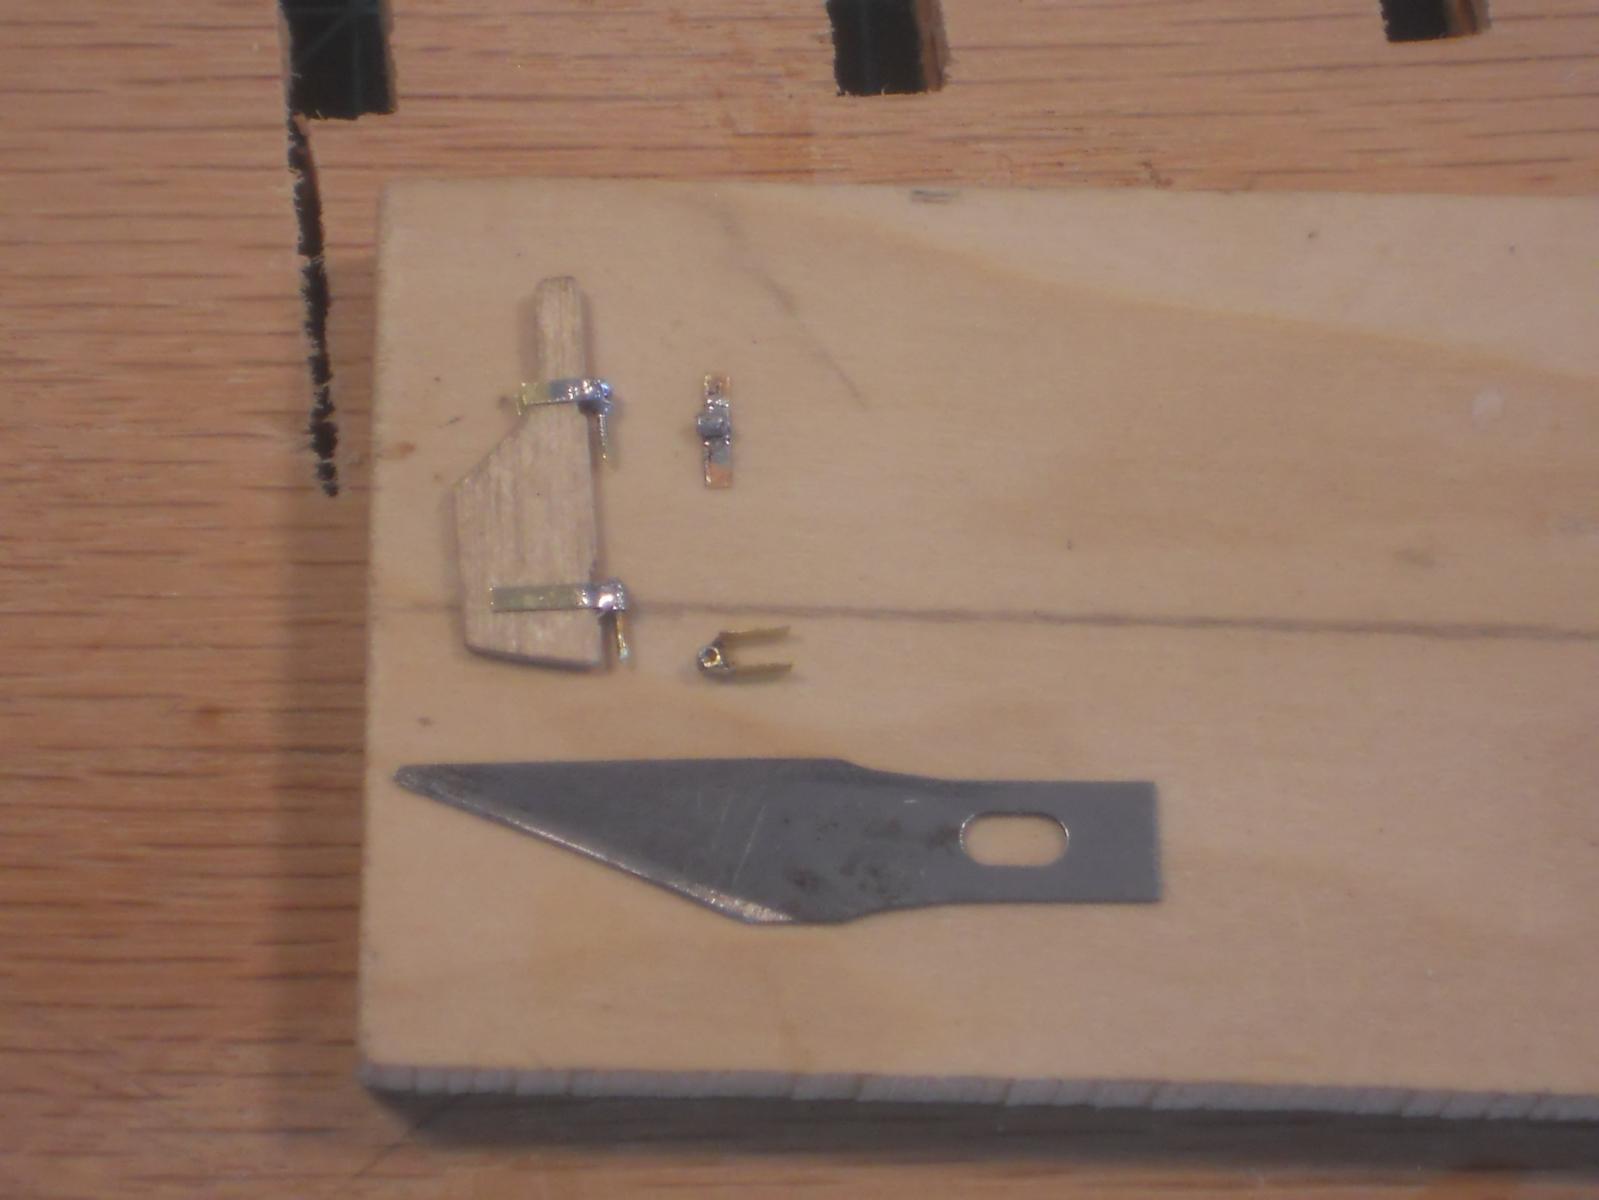
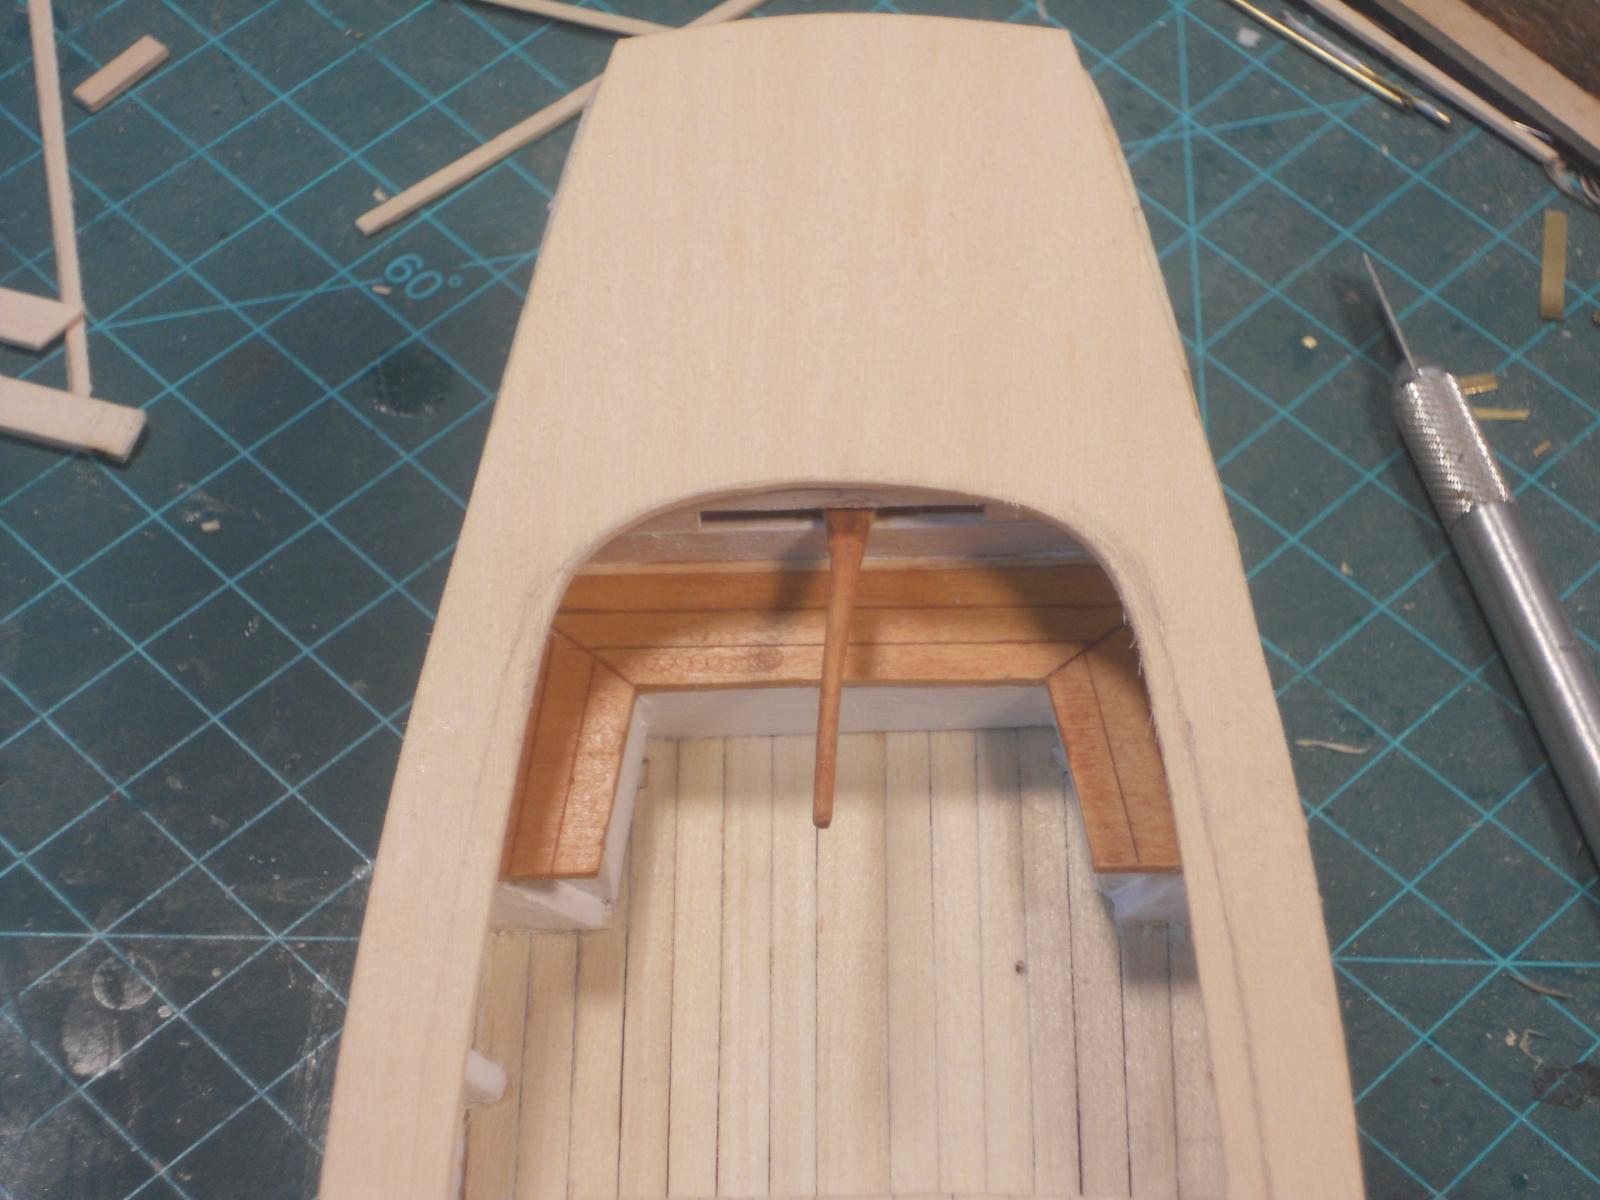
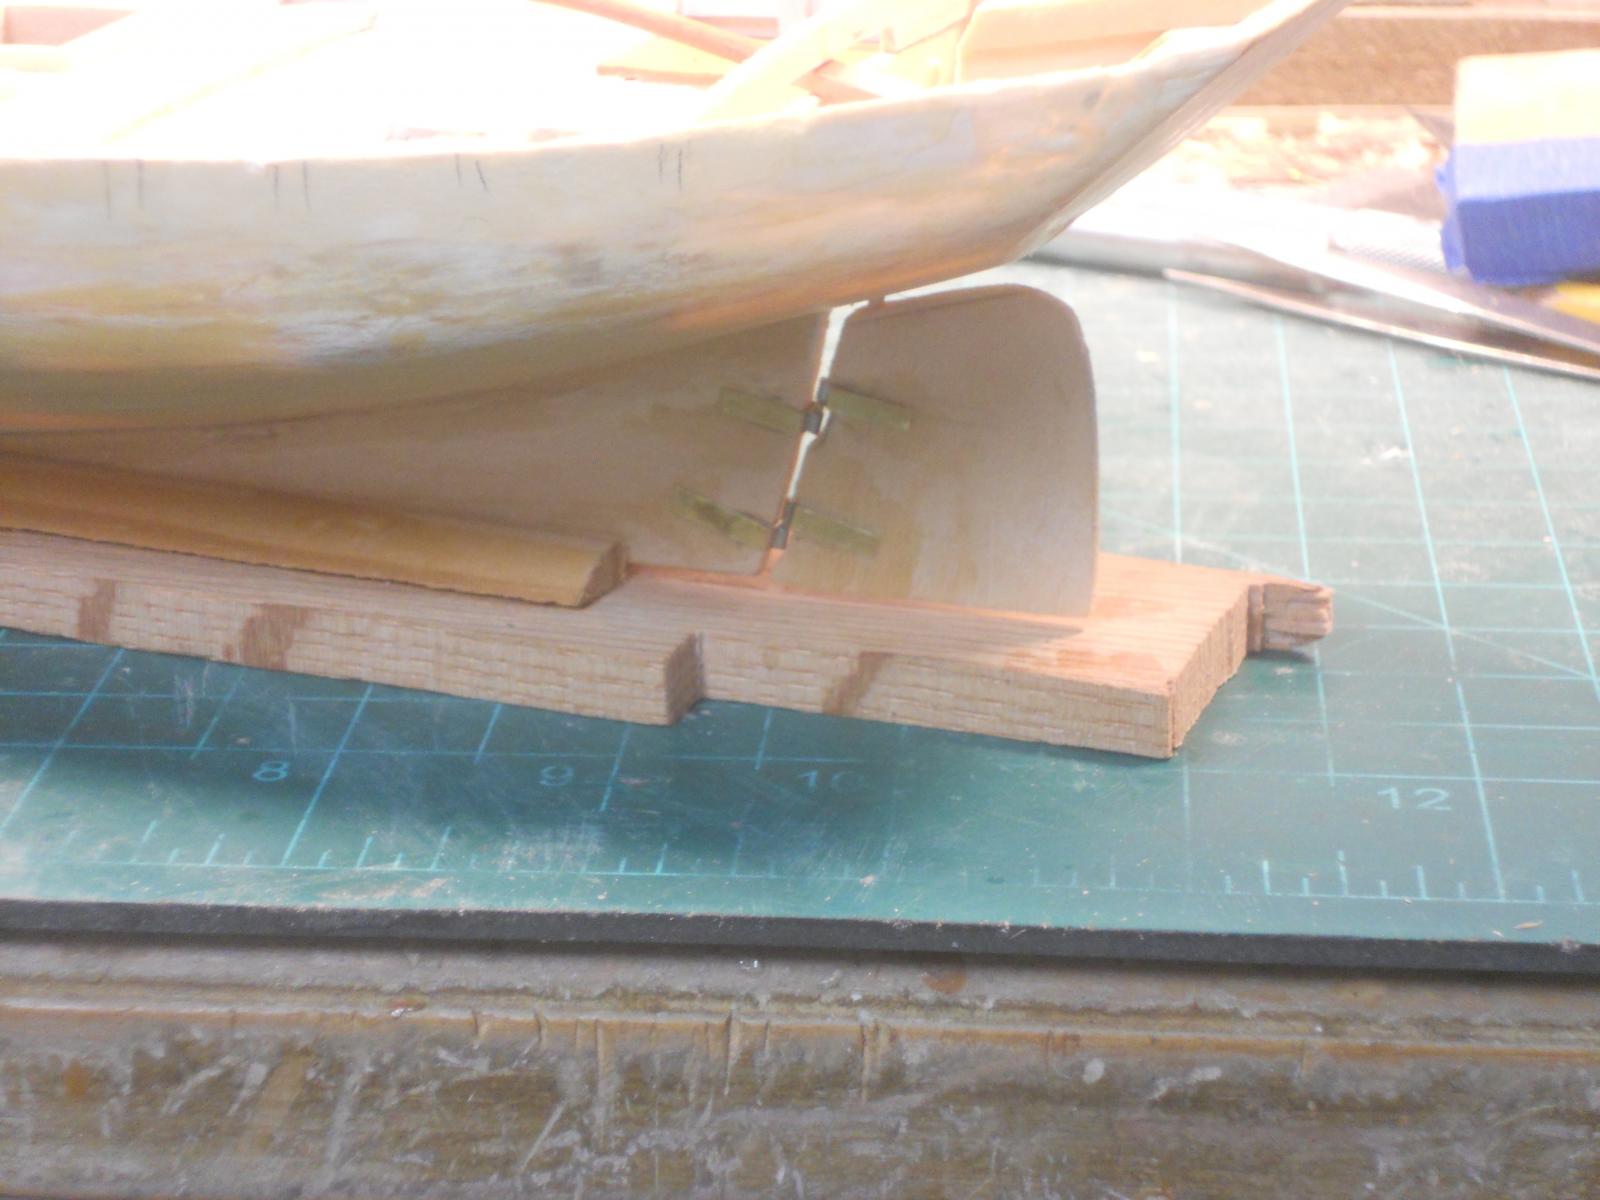
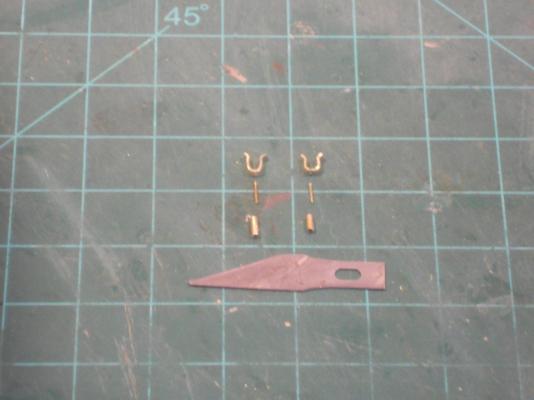
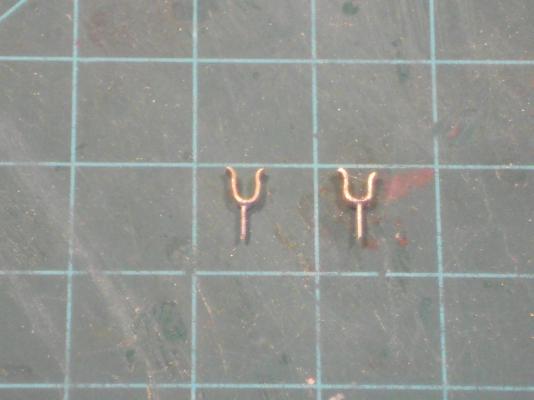
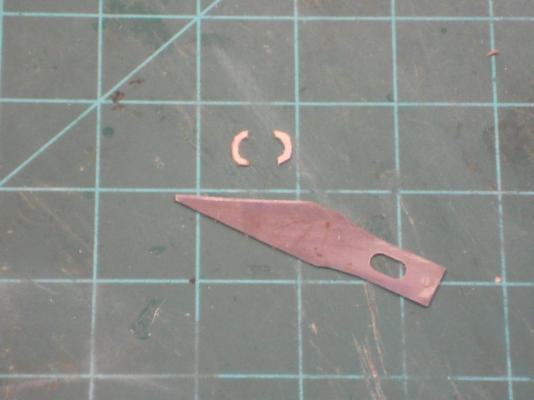
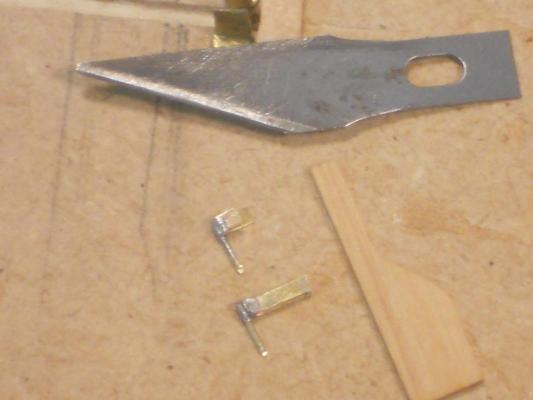
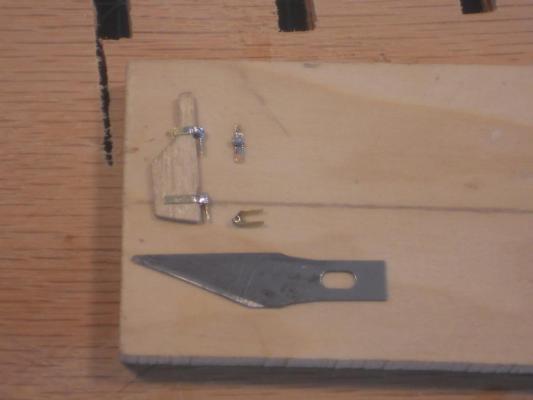
Not much done today. This morning I had an appointment with my oncologist / surgeon doctor for a check how my bod is doing. He was very happy and encouraged. Well, that made two of us. I'll have to see him again the 20th for an actual look-see inside. I glued the two oarlock blocks to the deck as well as the modified samson post. Now it was time to make the oarlocks. I decided to make them from narrow strips of 0.5 mm brass shim and 0.5 mm brass rod for the posts. I also cut two small pieces of 1 mm brass tubing for the receptacles that'll go into the blocks. The kit instructions have you make the oarlocks by twisting two pieces of wire together for the post and then bend the two loose ends into a U shape. The oarlocks will be permanently installed going it the kit's way and that's not the way it is in the real world. You should be able to remove them when not in use otherwise they'll get in the way when hauling in the lobster traps in. This just didn't suit me so I made tem the same way as I did for my sub model dinghy. For the running rigging line guides they give you split-pins or cotter-keys. Also not acceptable. I'll make eyebolts from brass rod . I did some more fiddling around, trying to remove some of those pesky wood fibers that keep popping up. Well, that's what to expect with basswood and poplar. That wood hardener stuff works okay but there is always some things that need to be cleaned up. I am also not happy at all with the cabin door hinges so I'll redo them as well. Here are a few pics of today's efforts. Here you see the three parts that make up the oarlocks and the receptacle. I hand filed the oarlocks narrower after the pins were soldered in. The two bushing are cemented into the wooden blocks. Both oarlocks are now completed, rather simple. This shows both oarlocks placed in there receptacles and ready for use. This is the way I made my samson post for the bowsprit. It'll slide between the uprights and under the cross beam. Then it'll be "bolted" secure through the uprights posts. In the real world the bowsprit is removable and I'd like to do the same here. I guess I'll have to add a lower stay too. Cheers,


- 176 replies
-
- 12
-

-
- muscongus bay lobster smack
- Midwest Products
- (and 1 more)
-
Thanks to all who clicked the like button, appreciate it. Hey George, thank you. All the details keeps me off the street No, I did not make my own plywood this time. ! mm and 0.65 mm is too thin for me to make with the equipment I have or the lack of it I bought these sheets at Michaels Craft store at a discount. Okay, the CC is coming up, uhhh, if I only know what it is I know what an RC is though. Hi Popeye, nice of you to drop in and thank you for your kind words, appreciate it. Hello Nils,good to see you too and thank you as well. Masting? Not yet, I need to cement the cutwater on first and then paint the hull. Am still thinking about the color scheme. I see the sloop BD posted, looks nice. Hi BD, thanks for showing your model, looks very nice. I' still contemplating the red below the waterline though, may just go for it. It will show the waterline, which is a nice feature. More to come in a following post. Cheers to all,
- 176 replies
-
- 3
-
-
- muscongus bay lobster smack
- Midwest Products
- (and 1 more)
-
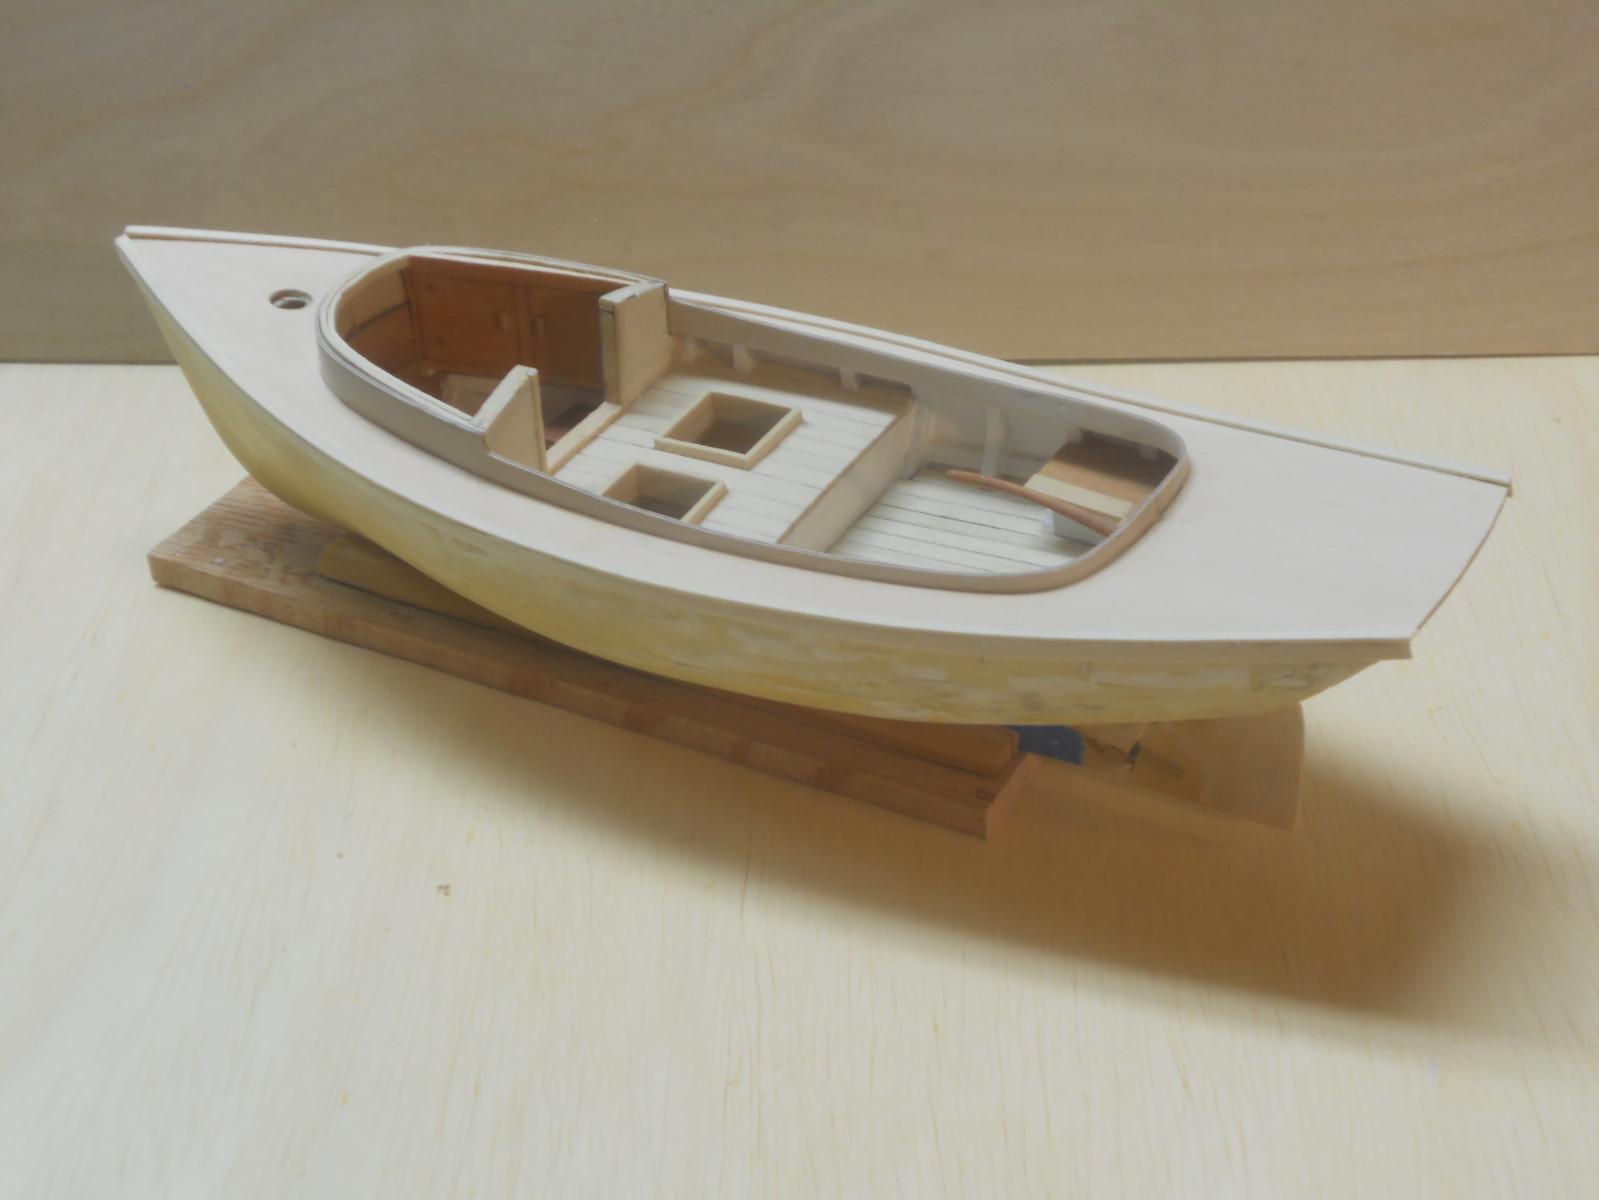
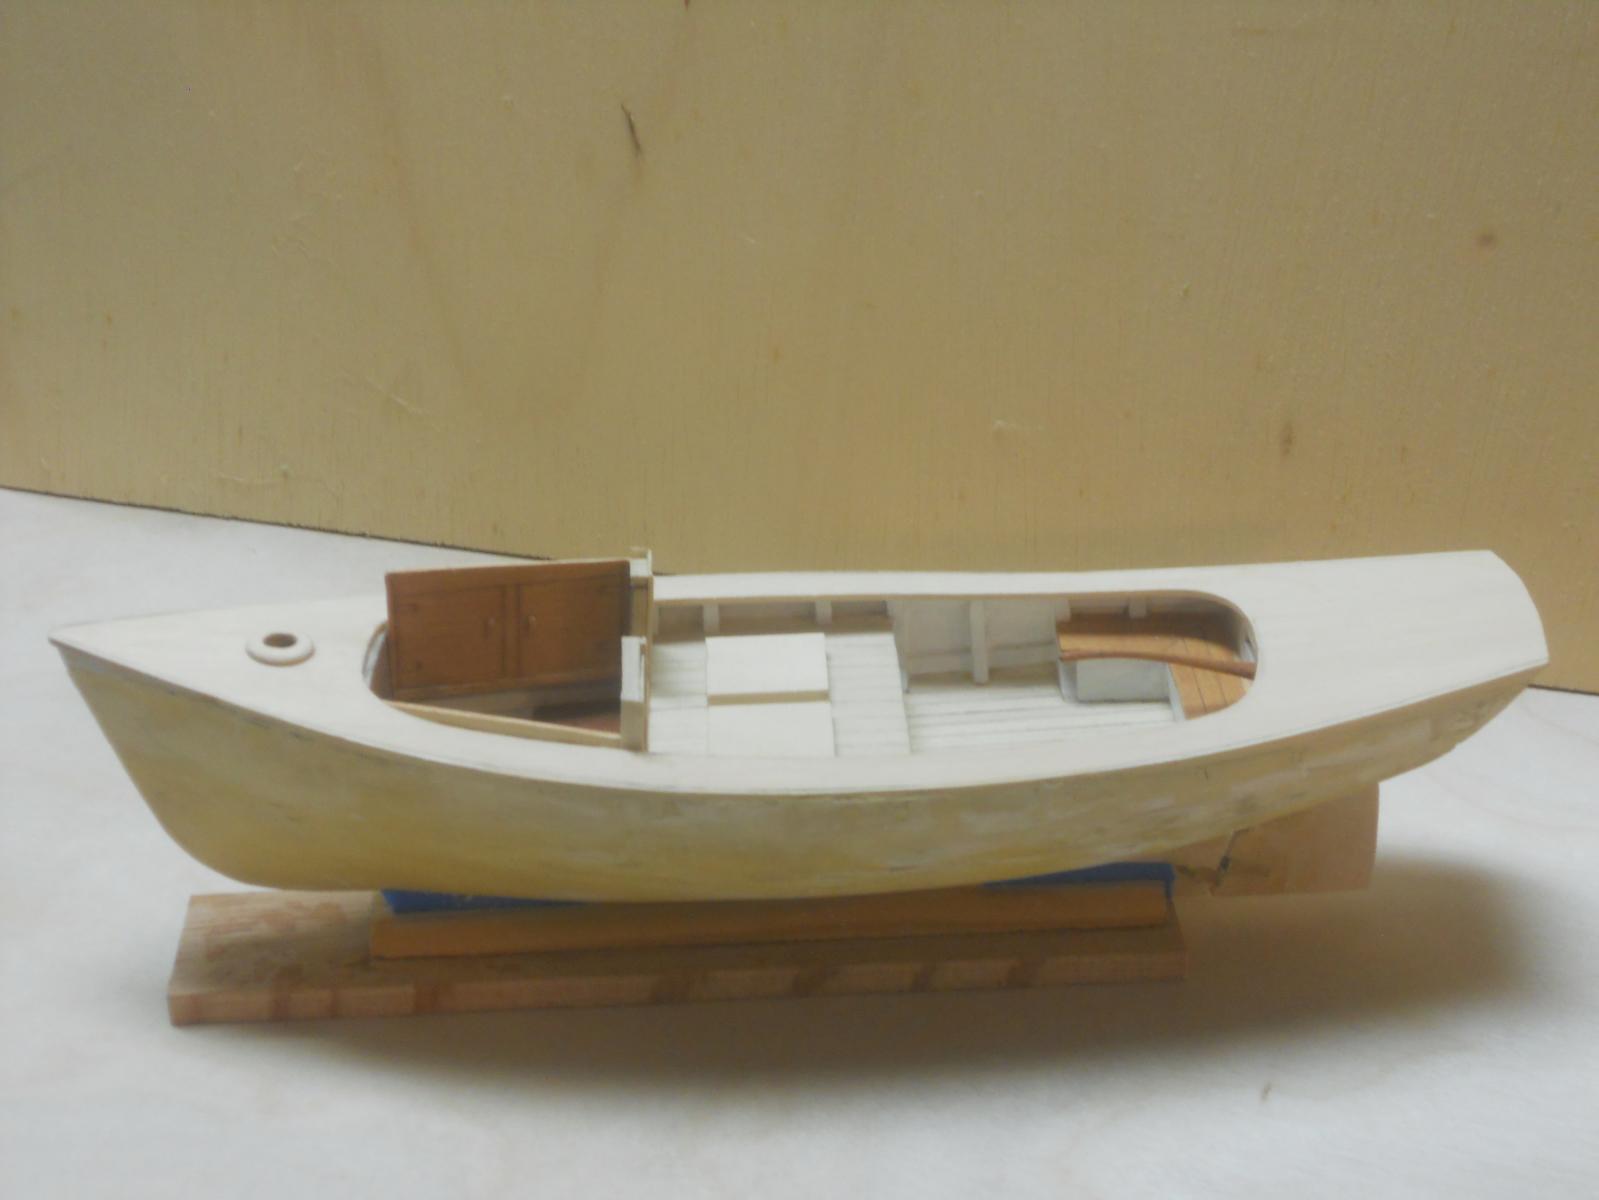
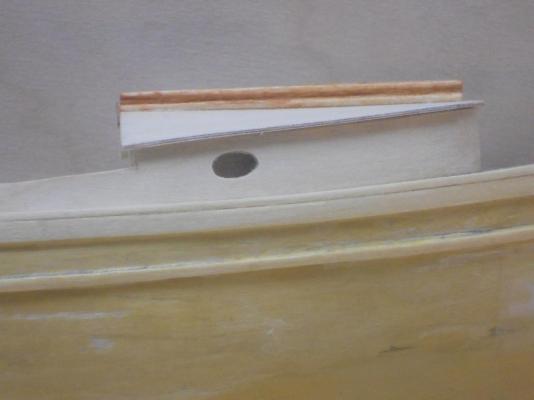
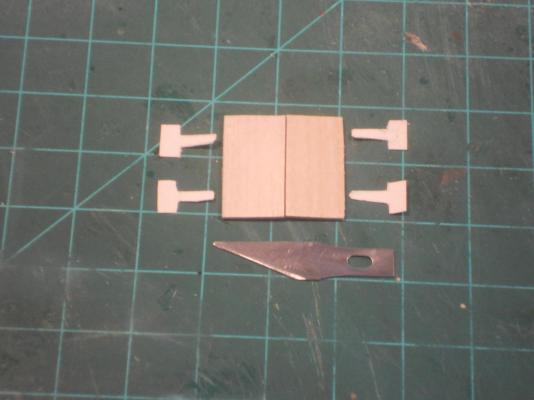
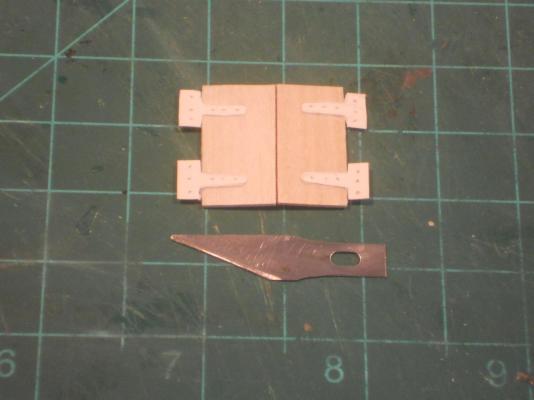
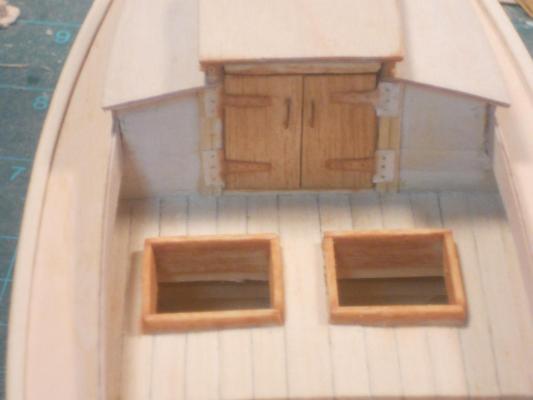
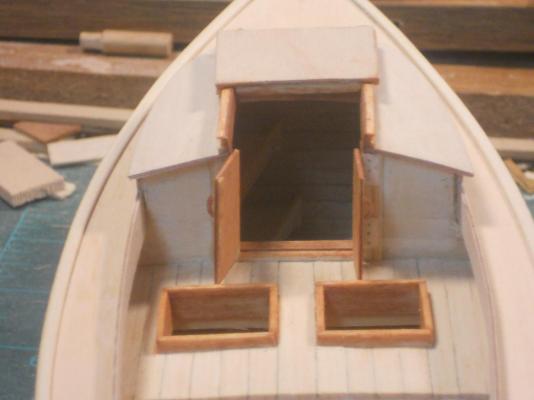
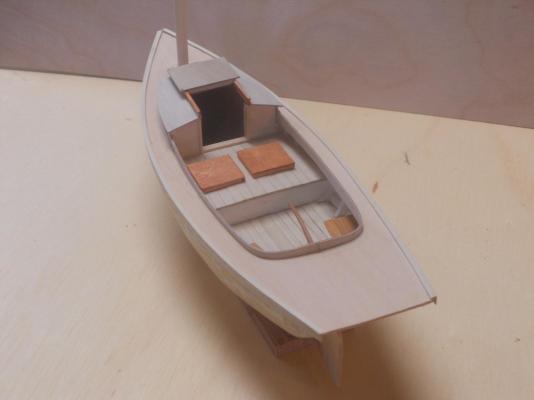
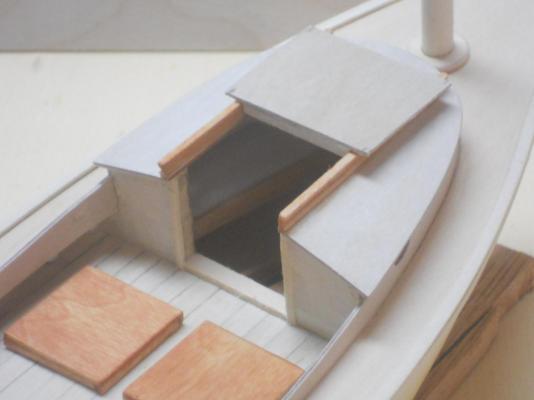
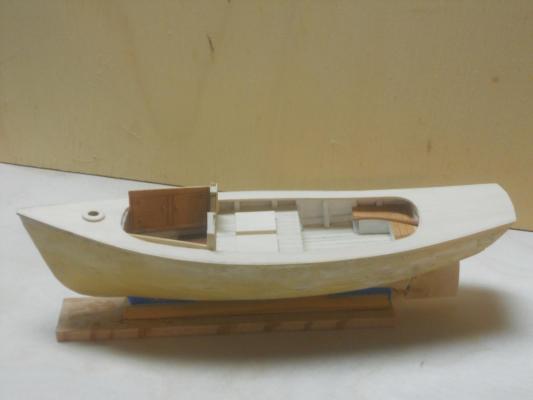
More fiddling work done this morning like more sanding on the hull after I added another coat of wood hardener on, painted the aft-outside of the cabin bulkhead before starting the wrestle with the sliding hatch. I decided to use 1 mm birch ply for the track guides instead of brass shim. I felt that the brass would not hold up with the CA. After the four small pieces were cut and CA'd on the hatch side braces I tried the fit. Hmmm, not good, so I had to fiddle with the track width some more and that finally worked out okay. Hatch slides nice and easy now. I have made a few pics to show what it looks like. After this was done I turned to the cabin doors. I am using paper for the hinges. After they are painted black it'll look like wrought iron I glued them on with a little thinned down TiteBond and let it cure. Next step was to make mounting blocks for the oar locks that'll go on the deck just aft of the fish well, per the kit instructions. The actual oarlocks I'll made tomorrow after I come back from the oncologist's visit. Then I made the three parts that'll make the bowsprit samson post. I deviated from the drawing and made it the same way as I did on my Friendship Sloop model. The bowsprit will slide between the verticals and cross beam and is secured with a bolt that'll run horizontal through the vertical posts. These will be pinned and CA cemented to the deck. I used poplar wood for these things instead of the kit supplied basswood. I dislike that stuff and it was also what gave me greef with the hatch tracks. I think that after these things are done I can finally cement the cutwater to the bow. I'll be using a few bamboo pins to help secure it to the keel frame. This shows the hatch track with the groove for the track guides. This shows the bottom or inside of the hatch with the four track guides cemented to the side braces. Paper door hinges in a rough cut. I'll dress them up after they are glued to the doors. Door hinges glued to the doors. They'll be ready for final trimming after te glue has set. These are the door handles, also still in the rough. Cabin doors are now installed and working. This shows the doors in the closed position with the hatch closed. Here the doors are open with the hatch slid forward, welcome into the cabin and enjoy a drink from the wet bar Pillows on the bunk mattresses. Cheers,

- 176 replies
-
- 16
-
-
- muscongus bay lobster smack
- Midwest Products
- (and 1 more)
-
Great looking hole thingies Nenad! Sorry about the snow and low temps, -13 is obscene! We had +23 C here today in sunny Florida! But that may change in a few days to cold, like 15C or so. Cheers,
- 4,152 replies
-
- 1
-
-
- cutty sark
- tehnodidakta
- (and 1 more)
-
Thank you Russ and George, your compliments are appreciated. Yeah Russ, what the hey, I thought, a few more hours of work and we have a sliding hatch A wet bar eh George - hmmmm, we'll see. Next you want some pictures on the forward bulkhead Yup, blankets and pillows. I got the material for the blankets - - - I'm wearing it It's an old shirt that needs to be donated to the rag bin and it has the right colors in it Today was mostly taken up with piddling wrk, like cleaning up, fine sanding the extra strip on the side of the hull below the wale. I also did some work on the doors but not quite ready to mount them, am waiting for the hatch to be finished.. Added some more trim in the doorway with 0.65 birch plywood and messed some more with the hatch. It's giving me more of a headache then I anticipated. I was about to rip it all off and start over but being a stubborn old Dutchman I'm trying to make it work anyhow. Right now it seems that I'm winning Okay, that's all for today - I also had to do some gardening work, raking up leaves. Weather has been nice and warm, 83 F or 23 C, not bad for January but we may get that cold spell from the Midwest and Texas. Thanks to all who visited and clicked the like button Cheers,
- 176 replies
-
- 2
-
-
- muscongus bay lobster smack
- Midwest Products
- (and 1 more)
-
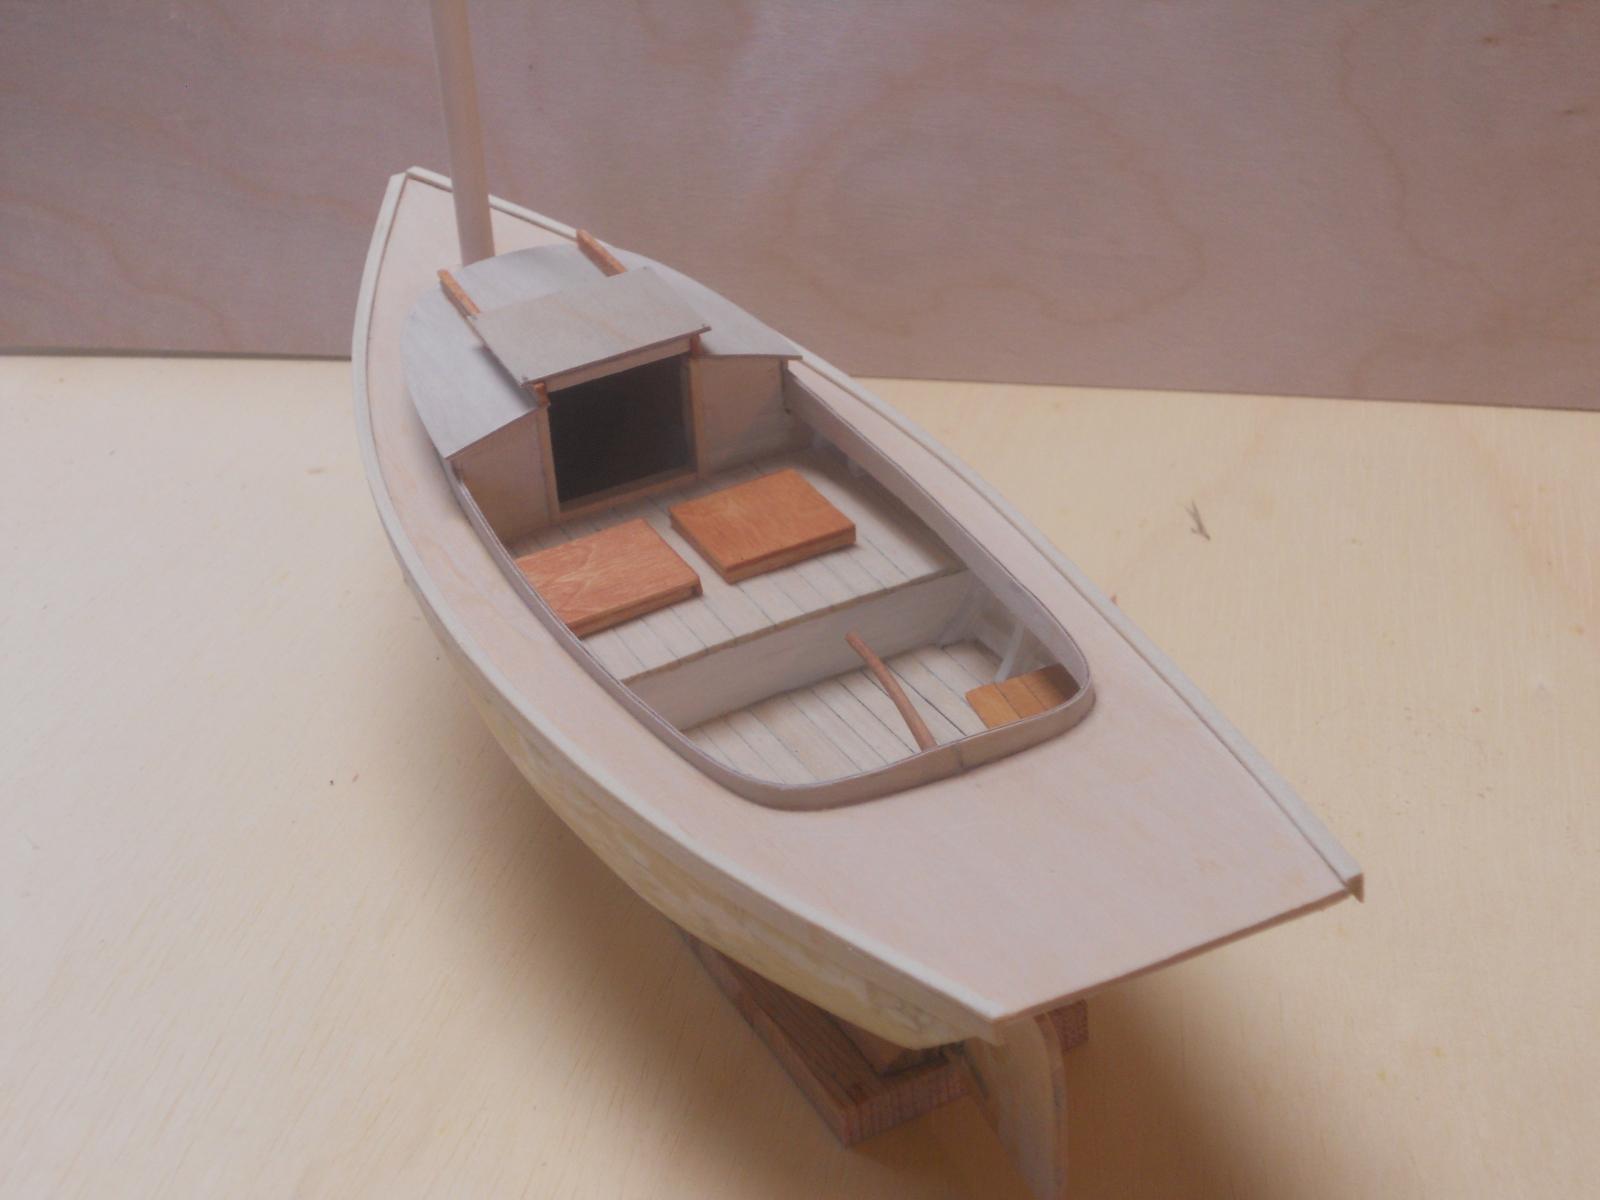
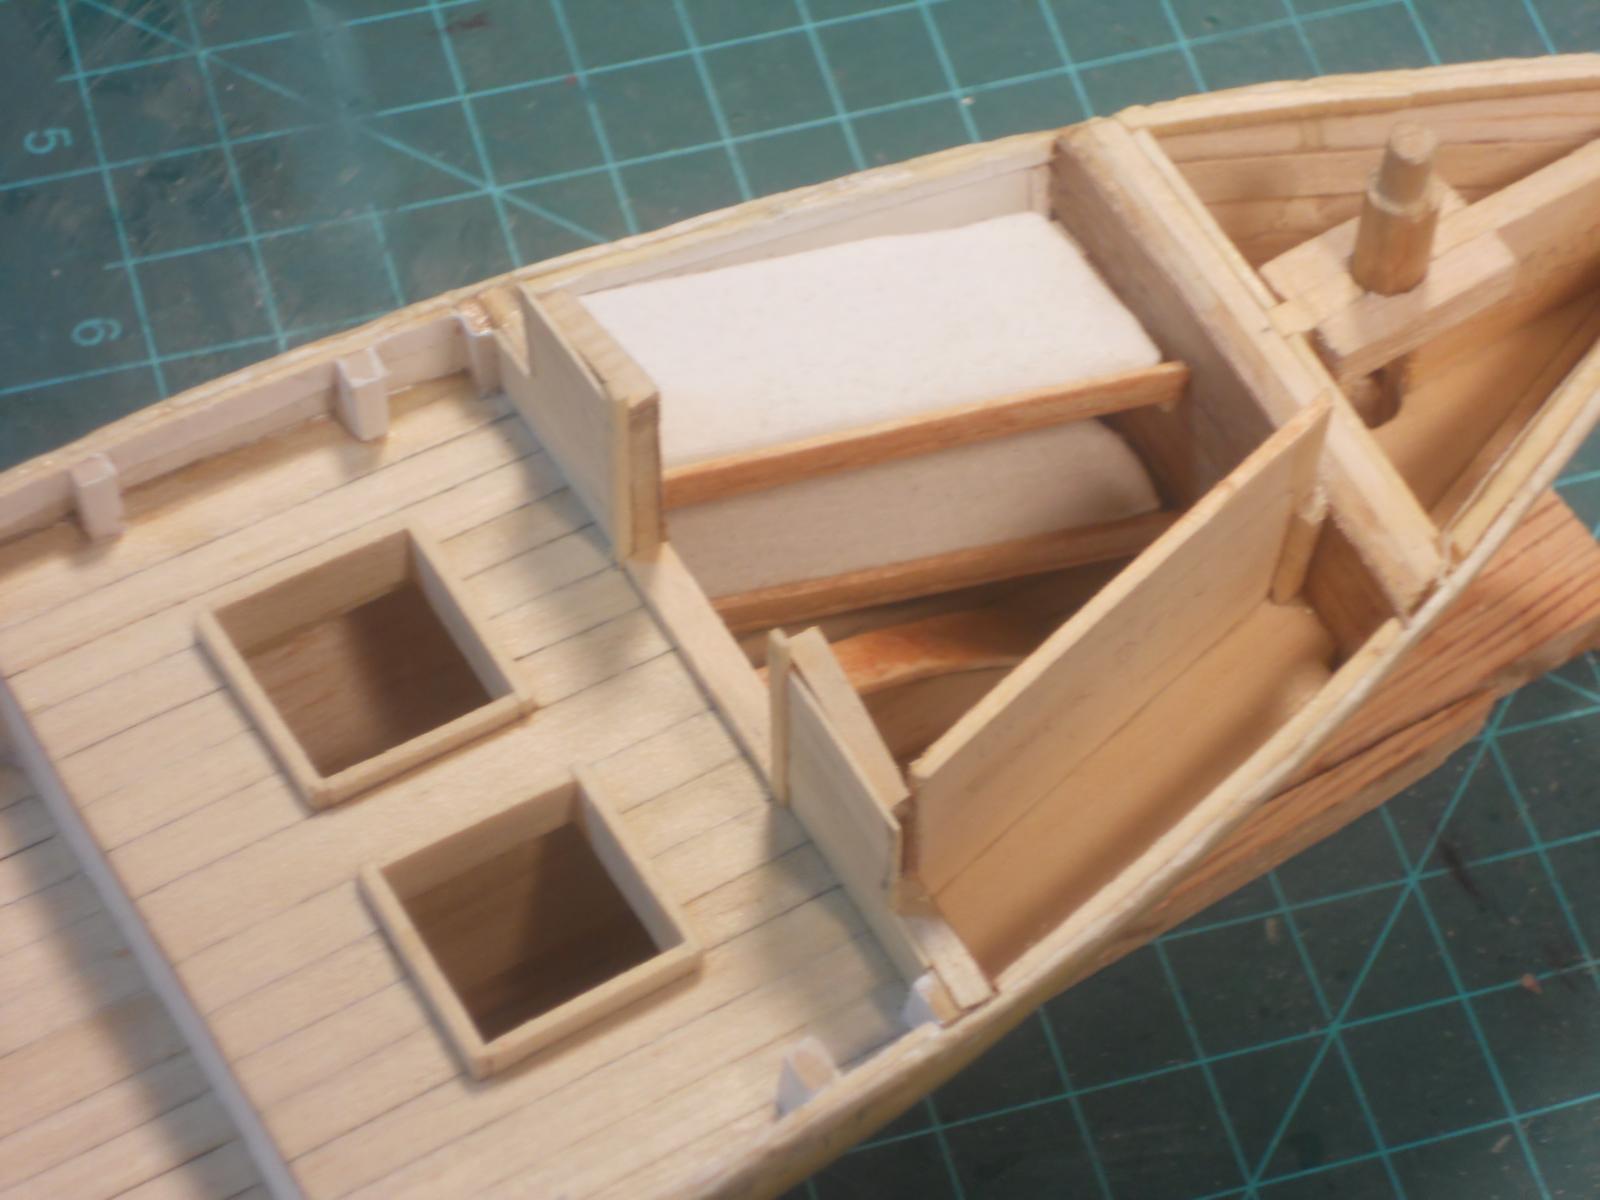
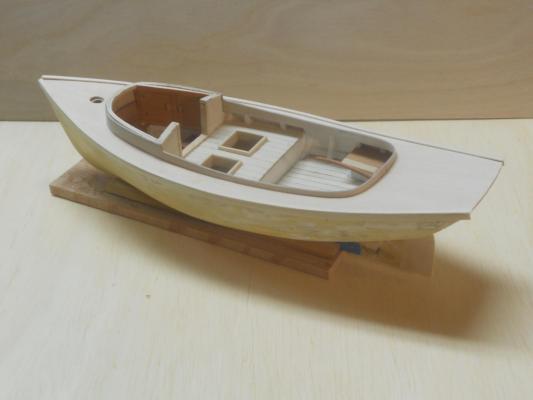
Hello everyone, I had to make a new cabin roof for this little boat and also a working hatch. I could not use the kit supplied wood, it was just too flimsy to my liking. I used the 1 mm birch plywood. As is usual I made a paper template for the roof outline and the entry opening. I also made the sliding hatch in the rough. I had to wait till the roof was secure to install the sliding hatch rails. The kit does not have a working hatch or working doors. Oh yeah, I also put the "glass" in for the portholes before the roof was permanently on cemented. First I had to glue the extra moulding in on the top of the cabin coaming for a better glue surface for the roof. Then fairing everything for a good fit of the roof. After the TiteBond glue had set enough I could then cement the roof on using the "slow set" CA. I had to use all ten fingers to hold it down. At this point I made the sliding roof rails. I cut a groove in them on the outboard side for the slider hardware. These will be made from 0.2 mm brass shim stock cemented to the hatch sides. The hatch has stop strips on the forward and aft sides to prevent it from sliding off. The slider hardware and doors will be my next project. I did cut the doors out and started to fit them when it was time to close shop. There is always another day. The doors will be hinged. Okay, here are a few pics for you to peruse, This shows the cabin roof installed with the sliding hatch in the closed position. It's still loose and waiting for the slider hardware. This hows the sliding hatch in the open position. You can see here the aft stop strip cemented to the underside of the hatch. A peek inside. I still have to make pillows and blankets for the bunks. Here is a bow view. This shows the prototype cabin doors being fitted. Cheers,


- 176 replies
-
- 14
-
-
- muscongus bay lobster smack
- Midwest Products
- (and 1 more)
-
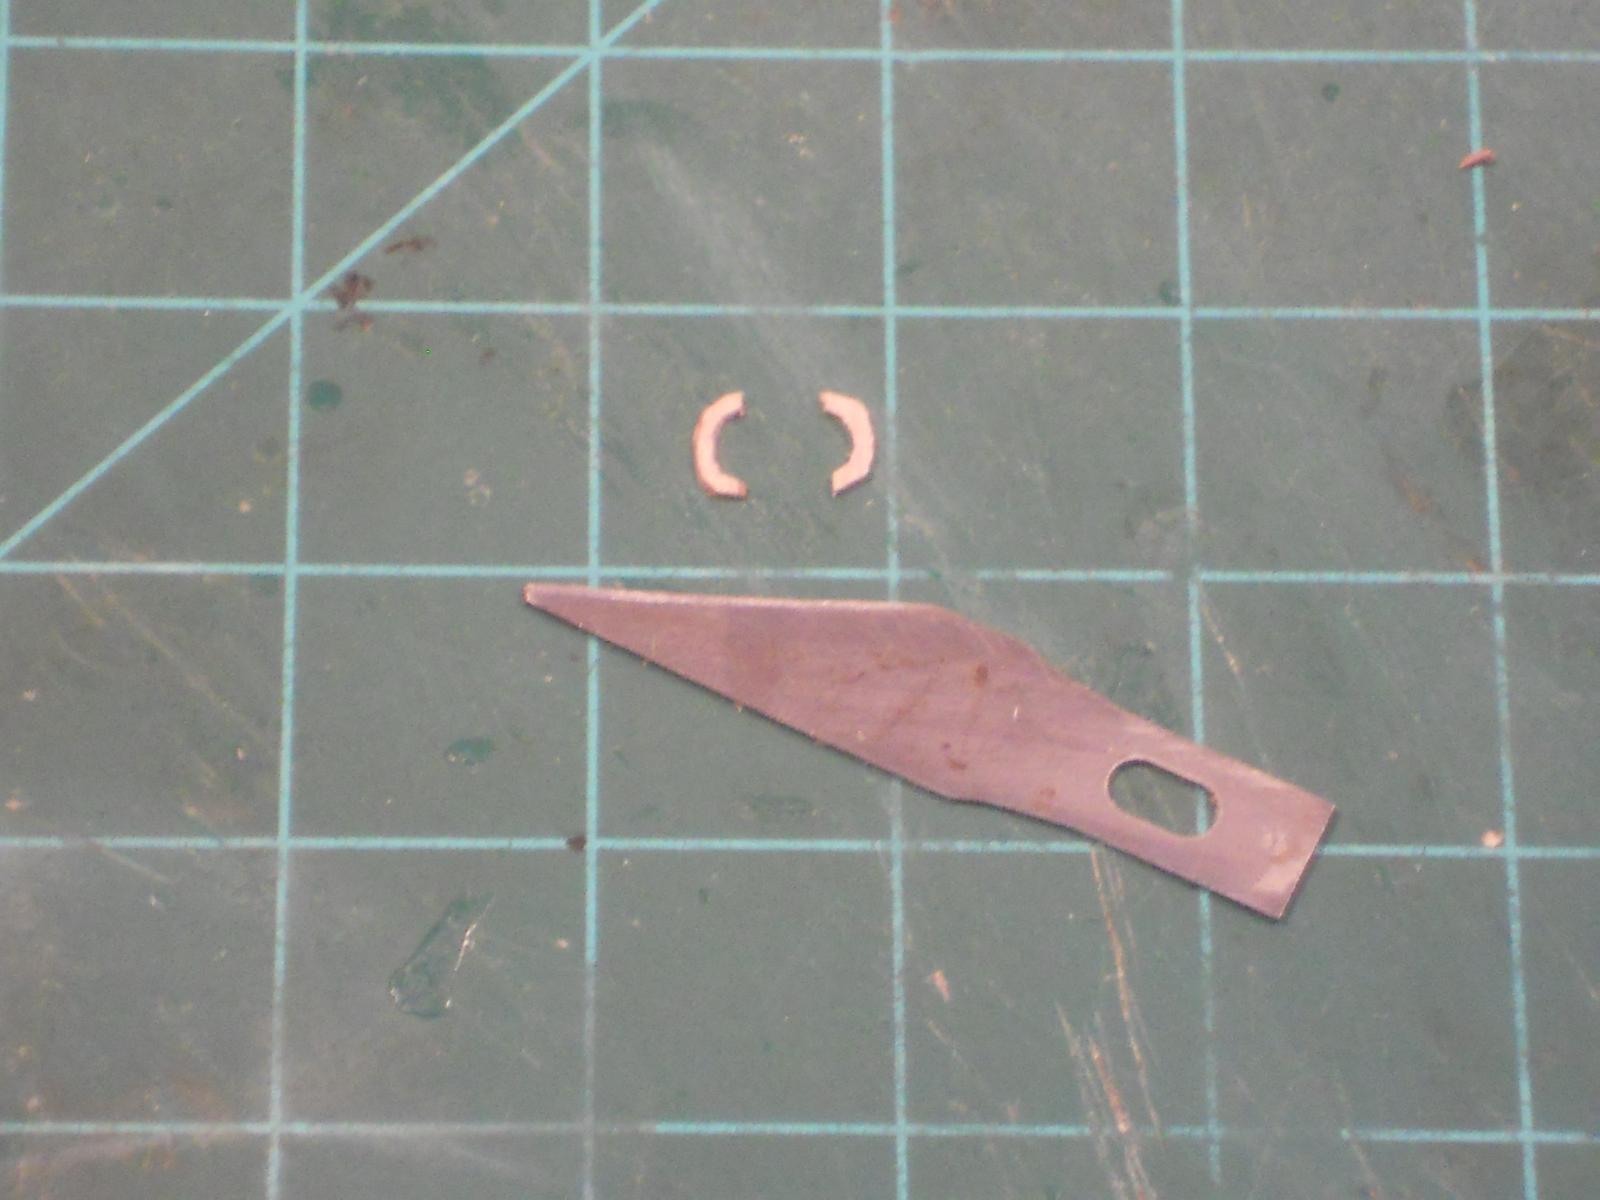
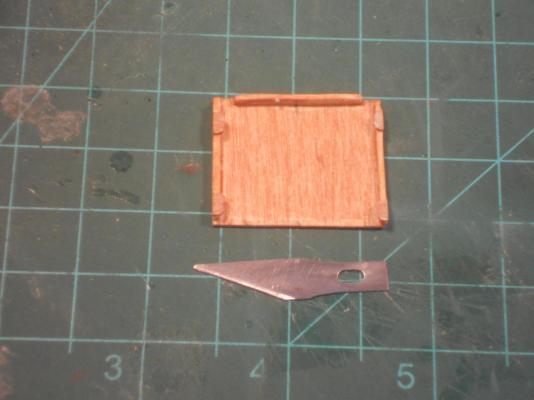
Thank you all who dropped in and for your like votes, it's really very appreciated. Hi Russ and thank you for your kid words. This is actually the first time I have used CA that much. On all my other builds I have used water proof TiteBond or professional carpenter's glue, also water and weather proof. even that tiny dinghy for my O19 model, except for the rudder gudgeons and pintles. For this kit I bought "slow curing" CA, well, actually the bottle said 5 to 10 seconds - - - but that's a lie Once the part is on and I tried to position it it was already stuck. The only way was to undo it with alcohol and try again. For some of the jobs I found that when my fingers are wetted down with alcohol I could handle it without fear of glueing my fingers to the boat Hey, I learned how to work with it, being extremely careful with positioning and very steady hands worked for me. It's not my favorite glue, I can you that. Hello George, good to see you again and thanks for the compliments. Extras always make models nicer to look at. Hi BD, thank you too for your kid words. The gudgeons and pintles for the rudder I made. I used strips of 0.2 mm thick brass shim stock that I cut to 2.5 mm wide. I bend these into a U shape to fit the keel post and two to fit the rudder. The legs of these U shaped pieces is 8 mm. I then cut four pieces of 2.5 mm brass tubing that I soldered to the U's with two 6 mm brass rod of 0.5 mm thickness. I didn't make any picks of the process here because I posted a few pics when I made the gudgeons ad pintles for my O19 sub dinghy and figured everybody knows how to make these little suckers. I'll add a few pics below to show what and how i did things. Hello Pete, thank you. Yeah, the color scheme. I think that I'll paint below the waterline red and above the waterline white. The cabin roof will be white as are the bulwarks. The wale and toe rail will be green as are the coamings. A few items are stained with New England maple stain. Nothing fancy. The red for below the water line is the suggested color from the kit. The deck I'll keep clear with a poly coat on it. I could also paint the entire outside of the hull white or any other color below the waterline. Any suggestions? This shows the basic parts for the gudgeons. These are a lot smaller then the ones for the lobster smack, these are for the O19 dinghy but the method is the same. It may look like that hole in the tube is off-center but that's still the burr from the cut. This shows the pintles soldered but still in the rough state. I first soldered the brass pins into the brass tubes so I could hold it between a pair of tweezers while I soldered it to the U piece. This shows all the completed parts but still in the rough state. I had to do some filing to remove some solder to make it look presentable. At that small scale any roughness really stands out like a sore thumb. Cheers,

- 176 replies
-
- 5
-
-
- muscongus bay lobster smack
- Midwest Products
- (and 1 more)
-
Beautiful work Jesse. looking forward seeing them on the ship. Cheers,
- 607 replies
-
- 1
-
-
- scottish maid
- artesania latina
- (and 1 more)
-
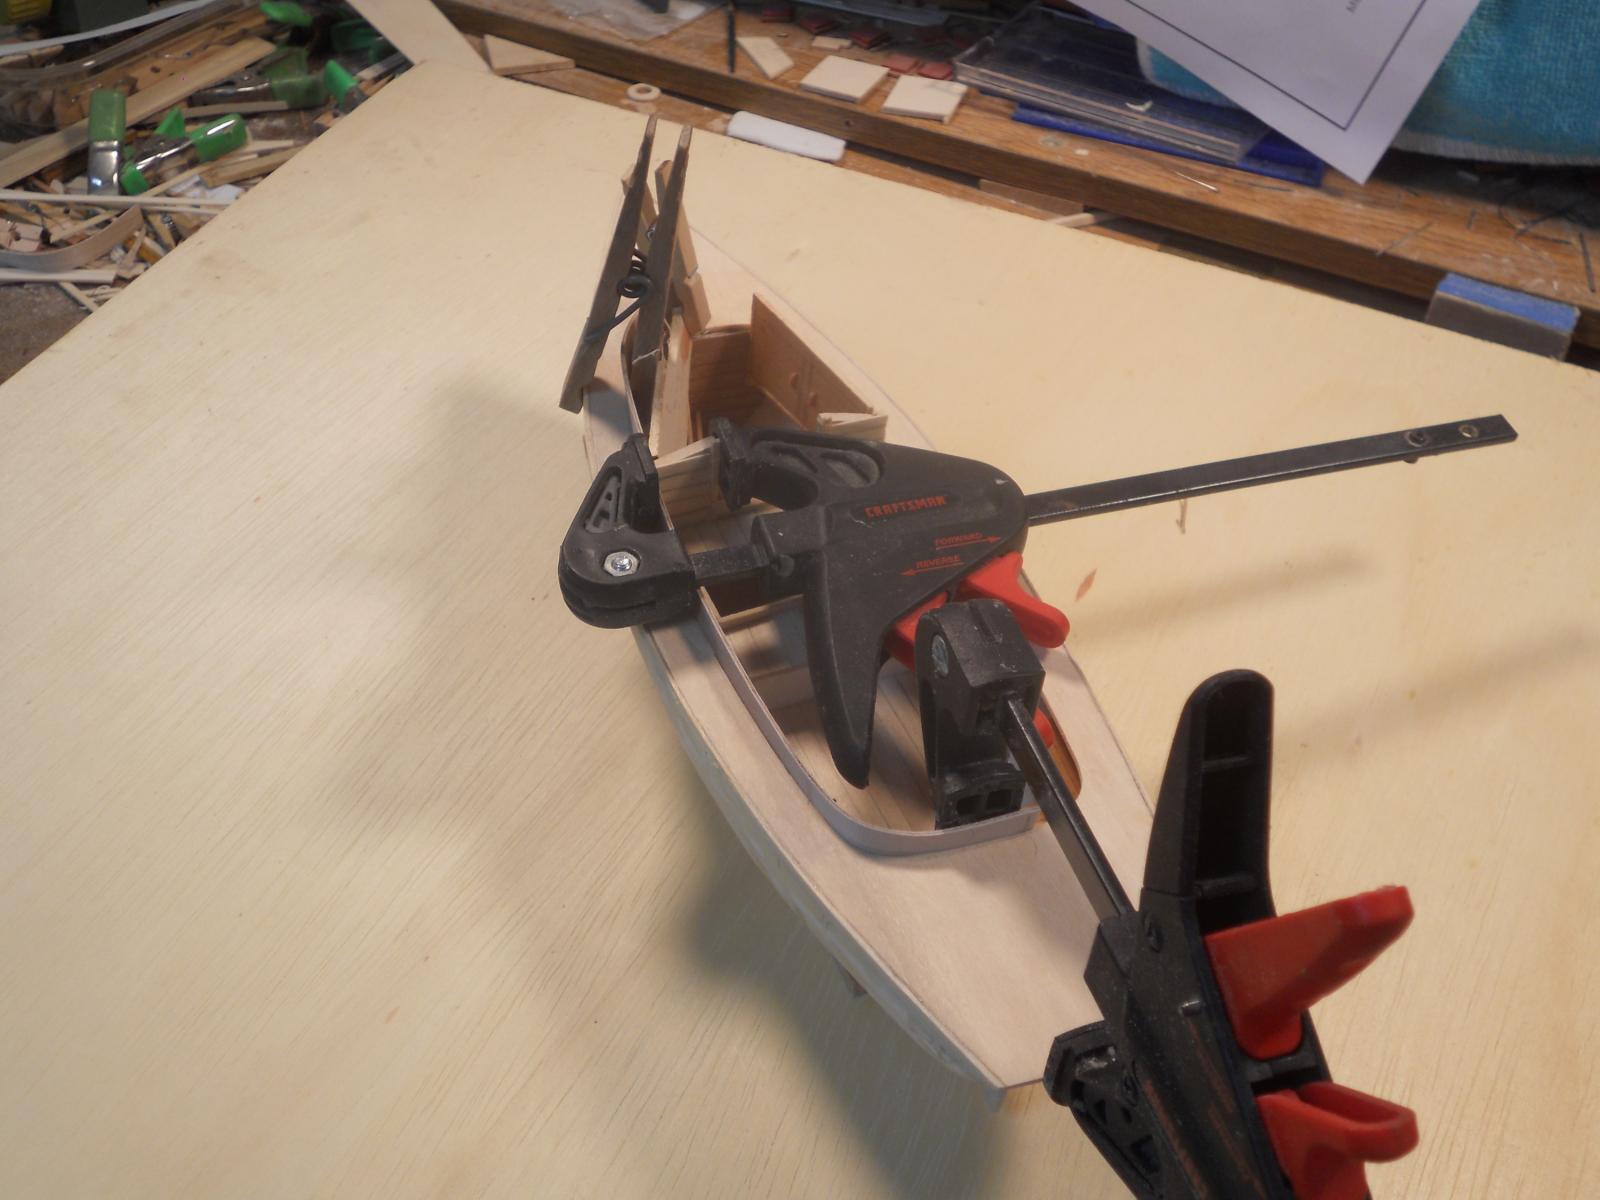
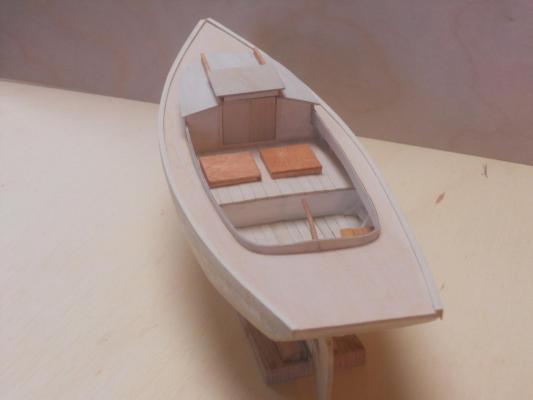
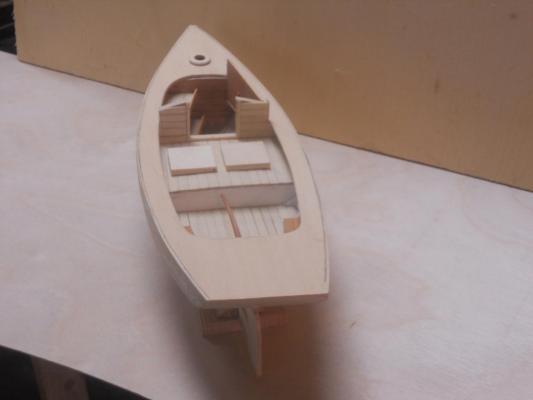
Today was rather successful. I managed to cement both the port and starboard coamins on using CA. I again applied the CA in sections so I can hold each one in place to help it hold its location. I used a toothpick this time to apply the CA only where it's needed. This way it didn't come into contact with my fingers - - - much After the CA had set I measured the height and marked it off with a soft pencil, then proceeded to sand it down using my Proxxon moto tool with a disc sander. The final sanding was done with a small home made sanding block. I decided against cutting the deck narrower in the work area and just followed te kit plan for the most part. That meant that I had to add one extra plank to the side seats. All this worked out so nice and faster then I anticipated so I went ahead and cemented the wales on and after the CA had set I also cemented the toe rails on. A little bit of dressing them, removing a few spots where the CA had oozed out and sanded them down with 300 grit sandpaper. I also managed to make a new cabin roof and added a top moulding inside the cabin so the roof has something to glue to. That 1 mm ply is not enough as far as I'm concerned. It's not glued in yet, that I'll do tomorrow before I go grocery shopping. All in all I'm quite leased with the results. Here are a few pics of today's effort. Starboard side view. the wale and toe rail are hard to see on this side but at least the toe rail is visible on the port side. You can also see why I had to make the mast partner / collar. The deck was further back then I wanted it so the forward part of the coaming would be flush with the forward bulkhead. You can also see the added planks to the seats. The next picture shows the added moulding at the top of the cabin coaming. I'll be using 1 mm birch ply again for the cabin roof. Oh yeah, I still have to put the portholes in the cabin coaming yet. Cheers.
- 176 replies
-
- 9
-
-
- muscongus bay lobster smack
- Midwest Products
- (and 1 more)
-
Thanks to everyone for dropping in and clicking the like button Hi Mark, thank you and yes, she rocks, especially on rough seas Happy new year to you and your dear bride with our best wishes and good health. Hey George, thank you and yes, I did hoist one, a Dutch genever (gin). Happy new year to you are yours. Hello Popeye, thank you. Yup, maple stain - might as well use New England maple cause the boat was designed and build in Maine. While you're squeezing the maples for stain squeeze some good maple syrup for me Cheers,
- 176 replies
-
- 3
-
-
- muscongus bay lobster smack
- Midwest Products
- (and 1 more)
-
Mayflower by SawdustDave - Finished
Piet replied to SawdustDave's topic in - Build logs for subjects built 1751 - 1800
Looking really very nice and even Dave and a happy and healthy new year. Cheers, -
ROYAL CAROLINE 1749 by Doris - 1:40 - CARD
Piet replied to DORIS's topic in - Build logs for subjects built 1501 - 1750
Hello Doris and a happy New Year. Congratulations with your new job. Superb work on the rigging parts my dear friend. Cheers,- 883 replies
-
- 1
-
-
- royal caroline
- ship of the line
- (and 1 more)
-
That's really looking fantastic Remco. Happy New Year! Cheers,
- 1,214 replies
-
- 1
-
-
- sloop
- kingfisher
- (and 1 more)
-
Nice progress Popeye. I'm beginning to see what she's suppose to look like. Crooked drums are okay, they get banged around a lot and most wind up dented anyhow. You are just makin then authentically dented Hey, decals on the drums would be the cat's meow! Use a few different bands too. Cheers,
- 956 replies
-
- 2
-
-
- andrea gail
- trawler
- (and 1 more)
-
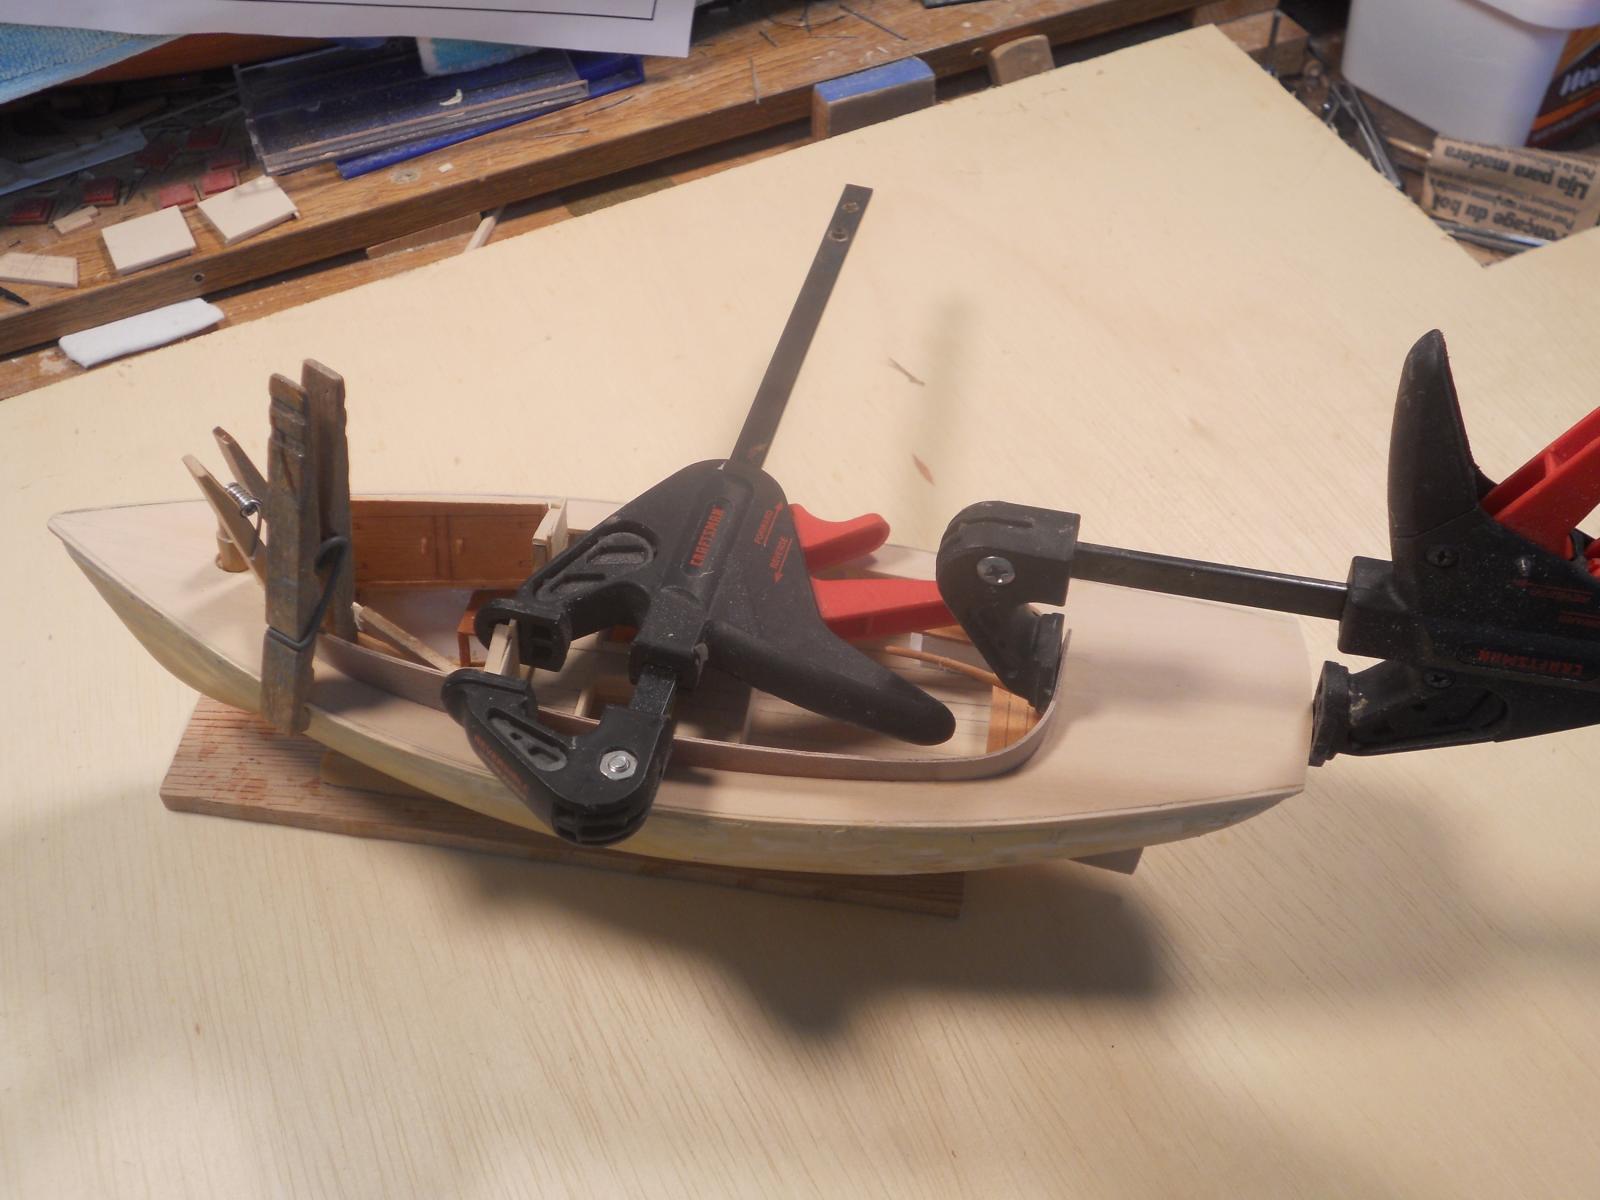
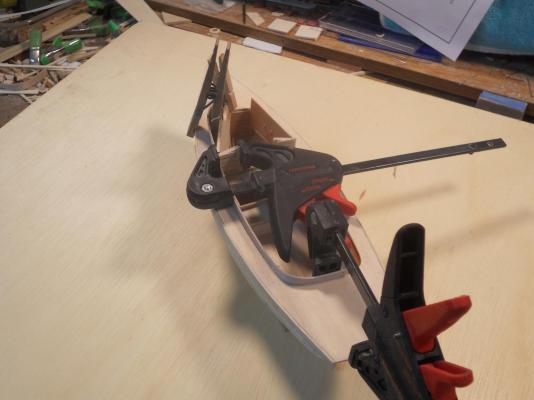
Hello friends, Gwen and I wish all of you a very happy and prosperous and above all a healthy 2015. Well, today I made the two coamings out of 1 mm birch plywood. I left them a little oversize for a fudge actor. I started with the port side and soaked it first in water. Then I used small round jars to make the bends at the fron and the aft end. This didn't work to too well, it also twisted the coamings so I had to cut another one out. This time I used the boat itself as a guide, which worked out mush better. The starboard coaming is now clamped in he model to shape it. I'll see tomorrow how that one looks. As the coamings are soaking I made the fish bin lids. They still need to be finished and I thing I'll stain them to give that are of the deck some color. I also soaked and shaped both toe rails. I keep finding little things to fiddle with. I little filing here, a little sanding there, you know the routine, never satisfied. There is one more spot that's been bothering me some and I'll have to attend to that to morrow, hope it works for me. As all this soaked stuff is clamped and taped to the boat I started sanding down the mast to taper it. Then it was time to close the shipyard and feed my koi fish and call it a day. Here are a few pics of today's work. Port view - both fish bin covers or hatches are completed and installed, just waiting for the New England maple stain. Stern view - look into the cabin. Starboard side - I had to make a mast partner or collar because the pre-made mast hole was too far forward so I had to elongate the hole aft. These last two pics show how I clamped the port coaming. Cheers.

- 176 replies
-
- 8
-
-
- muscongus bay lobster smack
- Midwest Products
- (and 1 more)
-
Happy New Year to you too Kevin and Ruth and not to forget the wabbits. Best wishes from Piet, Gwen and Ivana the cat. Cheers,
- 1,319 replies
-
- 1
-
-
- caldercraft
- Victory
- (and 1 more)
-
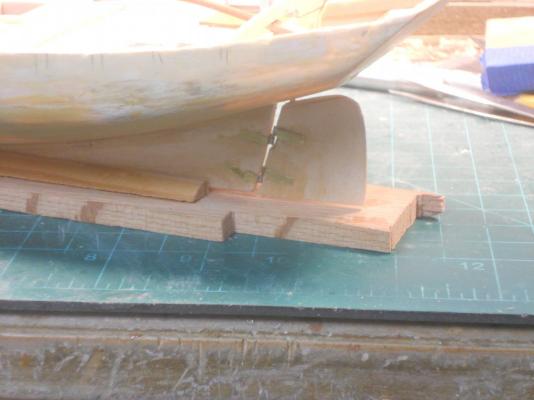
Thanks everyone for dropping in and your like votes, it's much appreciated. @ George: The booze is in the cupboard with the glasses. No ice though but we can chill the bottles in the cold sea @ Popeye: Tanks my friend. @ John: Welcome aboard and happy modeling and learning. That dory model is quite nice but can be a bear because of the lapstrake. I did a lapstrake planking job on the poop deck side planking on my VOC model. I made the planks the traditional way but at a scale of 1:80 it was rather tedious. Fortunately it was all straight planks, not like the curved ones you are doing. Basswood, I dislike working with basswood and balsa but this being a kit I bought for the Wounded Warrior auction next year April, that's what I have to work with. I find it to produce too many "hairs" when sanding te edges. I'm using a wood conditioner and hardener made by Minwax. That kinda holds things together and can be painted over. It also takes CA pretty well. I am more at ease with scratch building models rather then kits. Nothing wrong with kits but that's just me, it gives me more freedom and when I screw up I can redo it easily. Due to budget constraints I can't just buy the wood I really want, like boxwood, Swiss pear and such, I am using poplar from the local Home Depot or Lowe's and cut out what I need on my Sears bandsaw. I also make my own plywood from the veneer on cheap 1/4 inch plywood out of the same stores. I strip the veneer layers off and glue them together sandwich stile, crossing the gains with each layer. Hey, I'm retired and time is all mine. Poplar is harder then basswood and doesn't produce as many pesky hairs. The best way to finish the basswood is to treat it first with a good wood treatment product like the Minwax "high Performance Wood Hardener." Then primer paint before the finish coats, if you are going to paint that is. If you are going to stain the wood then I suggest to stain it first before using the wood hardener, although I didn't see any problem on this little boat. It also depends if the stain is oil based or water based. Suggest to try it on some scrap pieces, that's what I did too. Also, when staining make sure you have removed all glue from the areas where it's not needed. I try to wash the PVA glue off with water. CA is another story, just be careful applying that suff. In certain locations I use a thin piece of brass rod or sewing pin to apply a tiny drop of that stuff. Any glue left on planking or whatever you want to stain will stand out like a sore thumb. Hope this helps. @ Capt'n Rob: No cord needed, I'm using a small diesel generator to run all my electrical thingies That's what I was going to use on the 30 foot Friendship sloop my wife and I were going to build. Alas, circumstances beyond our control forced us to abandon that project but I did build a model though. @ Pete: Yup, I love sloops and I have drawn up a chair in your dockyard to watch the build of your next one. Well, I finally got the nerve up and glued the deck on. I used CA and worked in sections. The deck could still be lifted up enough from the stern to feed the CA between the deck and frame stubs with a sewing pin. I started at the bow to the aft of the cabin, holding it tight with five fingers on both sides, yeah, two hands Then moving aft. I had to make wales from 1/2 X 2.5 mm to cover the ugly edges of the balsa where it buts under the deck. Due all the handling it developed a few ragged edges. Now I also had to make new toe rails to finish it all off. These are 1/2 X 2mm. I used poplar for all those, the wood supplied in the kit was just too small. Well, that's what happens when you batch a kit, there is always a lot more scratching to do. I'll have a few pics tomorrow. I also have to make new coamings and will use 1 mm birch plywood, was on sale at Michaels. That saved me a lot of work and besides, I don't think I can make 1 mm plywood. The best I ever did was 1.5 mm. Cheers to all,
- 176 replies
-
- 4
-
-
- muscongus bay lobster smack
- Midwest Products
- (and 1 more)
-
I'm pulling up a chair Pete and watch your build. Cheers,
- 112 replies
-
- 1
-
-
- buzzards bay
- herreshoff
- (and 1 more)
-
Fantastic looking job Popeye, love the details. Where did you pick up those railings and what scale are they? When I do Gwen's father's ship "Musi" I'll need railings and fuel drums and other stuff. That scale will be 1:50. Cheers,
- 956 replies
-
- 1
-
-
- andrea gail
- trawler
- (and 1 more)
-
Hey George, good to see you here again and thanks for your kind words. Hmmm, satilite TV? Microwave oven, toaster oven, coffee maker, - - - what else do we need? Cheers,
- 176 replies
-
- 2
-
-
- muscongus bay lobster smack
- Midwest Products
- (and 1 more)
-
Hey Pete48, thanks for stopping by and the good words. Also thanks for the pic of your model and yes, they are a fun boat to build. Your's looks really very nice. I didn't go so far as retracting the centerboard on mine. I think I am already doing way too much but I'm having a ball with it. And Russ, thanks you too for your compliments. Cheers,
- 176 replies
-
- 1
-
-
- muscongus bay lobster smack
- Midwest Products
- (and 1 more)
-
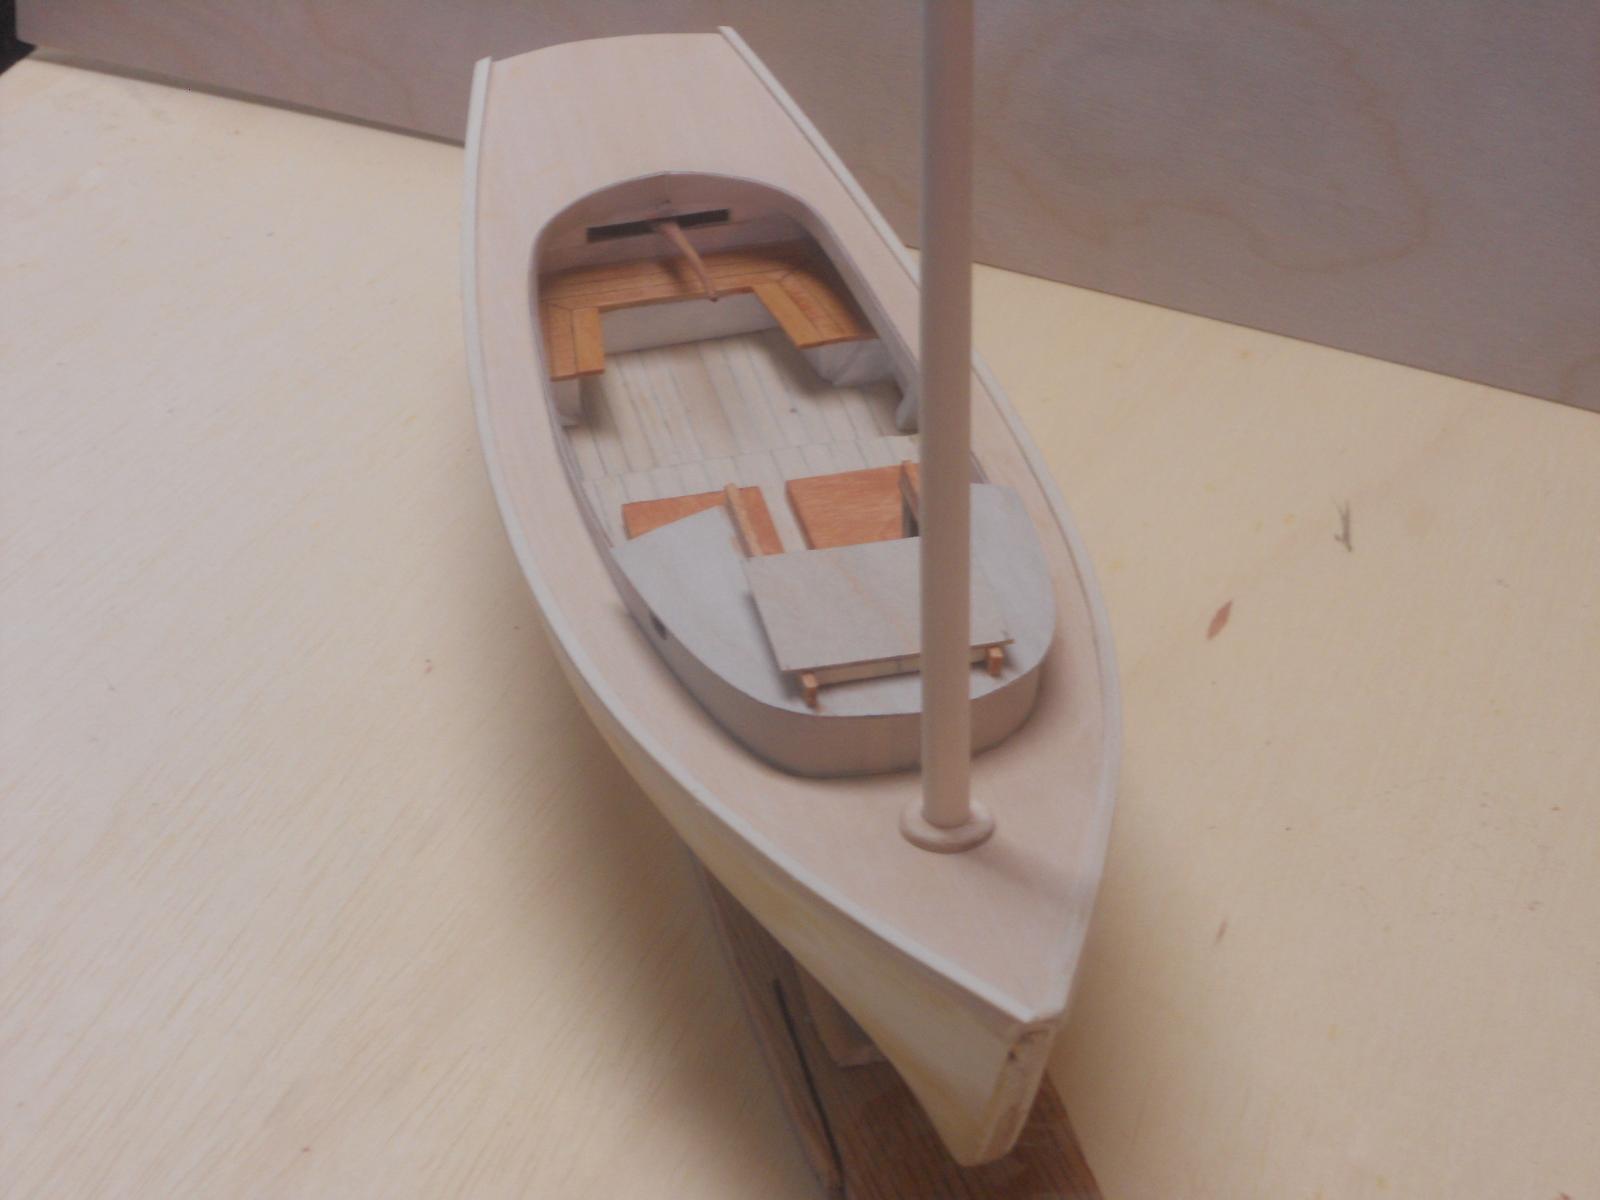
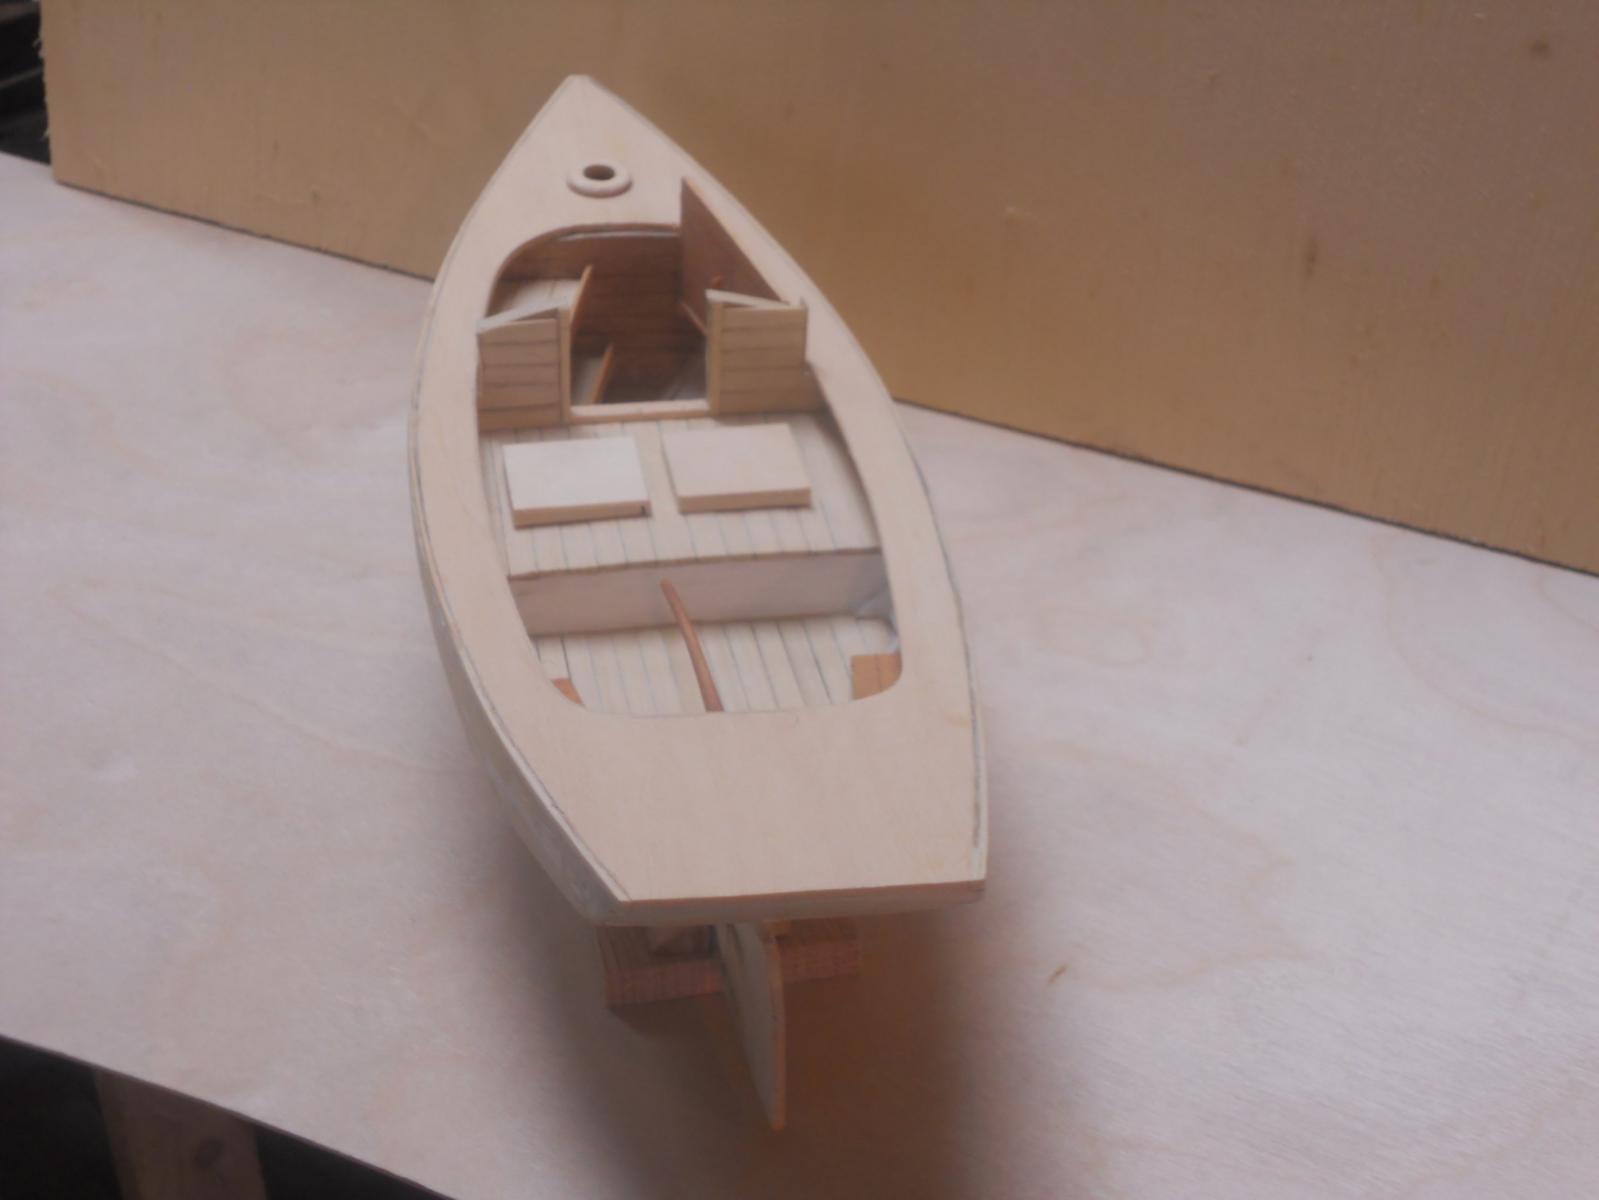
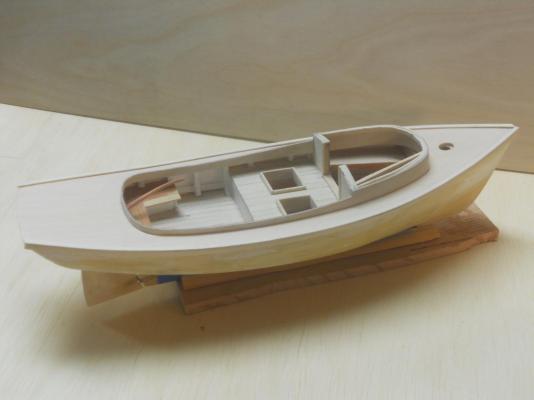
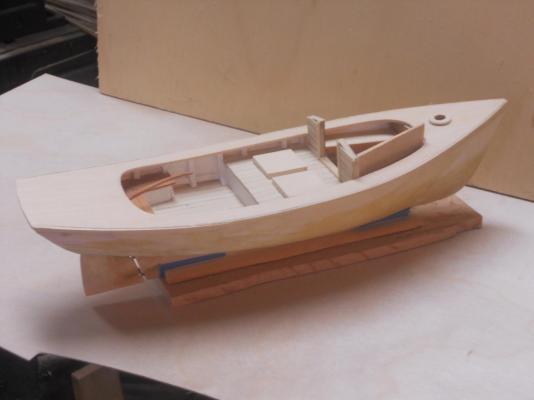
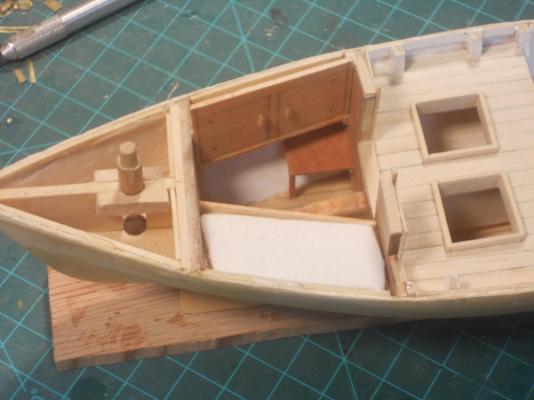
Progress report. I have been messing around in the cabin and made two bunks with mattresses on the port side. Then I made a fake cabinet on the starboard side with a little table. The cabinet is just a plank with the cabinet doors and mouldings scribed into it. I am looking for some material for the blankets. I may have to go to the fabric store and see if they can give me a a few square inches. For the mattresses I used small pieces of styrofoam and wrapped pieces of an old handkerchief around it. With the blankets over it it should look quite nice. I made the helm from boxwood and soaked it in water overnight and bend it around my coffee cup and clamped it till it was dry. I stained it in New England MapleI and used the same stain for the cockpit benches and the cabin furniture. I painted the cabin walls white as the bulwarks. I used Testors flat white, looks okay. I installed the rudder and helm. It works I am ready to cement the deck to the hull but am rather apprehensive doing it. The kit plans call for using slow acting CA but even with that I am afraid that I don't have enough time to position the deck properly. I have done a few dry runs and I do need more time positioning it properly then the CA gives me. I'm really leaning towards using Titebond glue and plenty of elastic bands to clamp it down. Right now I'm not committed yet to which glue I'll be using. Okay, here are a few pics of how the sloop looks like as of today. This shows the finished benches and the helm. The deck is just laying loose on top of the hull. Thinking about the paint scheme, I may just paint the frames, bulwarks and bulkheads green. I'll use the same green for the cabin coamings, toe rails, trail boards and wales. I think to paint it red below the waterline and white above the waterline. Just thinking ahead right now. You may also see a pencil outline to where I thought in trimming some decking away. This too is still up in the air. It seems strange to me to have such a wide deck area where they man-handle lobster traps in and out. But then again, why make extra work for me. This hows the two bunks with the mattresses. Yup, it's a fist class cabin, nothing but the best. This shows the starboard side of the cabin with the fake cupboard and table. The cupboard is still made to fit after the coaming and roof are being installed. Thinking of adding a strip of wood around the top of the coaming for extra glue area for the cabin roof. Cheers.


- 176 replies
-
- 11
-
-
- muscongus bay lobster smack
- Midwest Products
- (and 1 more)
-
Thanks for dropping in Russ and BD, and for your kind words and info, it's much appreciated. Yeah, I remember the stories from my friend up in Maine, he was / is a professional lobster fisherman. Of course he used a power boat and always came back to shore in the evening. However, there were times he went out further north and stayed overnight. He would anchor in a sheltered cove and overnight there. He had one of them Coleman thingies and cooked a simple one pot meal. I already decided not to put a wood-burning stove in the cabin for exactly he reasons mentioned. I did embellish on it though but only for the fun of it. The same things could have happened way back in the mid 1850's so I just wanted to play with this idea with this little boat. This model is also to be donated for auction where the proceeds go to the "Wounded warrior" funds and deviate enough from the kit plans to make it unique. I wanted to have some fun with this build and deviate a little from making it a replica of how a real 1850's lobster smack looks like. It kinda, sorta does but with some added "artistic license." If I wanted to build one for me then I would scratch-build it using the plans from Howard Chapelle's book. Do the research on it to find exactly how they looked like, how the were equipped, etc. But I have already build a Friendship sloop model for my wife and am now finishing my father's submarine and am half way through a VOC ship. Okay, up for a progress report in the next post. Cheers,
- 176 replies
-
- 2
-
-
- muscongus bay lobster smack
- Midwest Products
- (and 1 more)
-
The pilot house and console look jim dandy Popeye and so do the barrels. Oh, I'm sure you'll add the details to the barrels to make them look real, or close to real - - - knowing you Cheers,
- 956 replies
-
- 1
-
-
- andrea gail
- trawler
- (and 1 more)