


michael101
-
Posts
441 -
Joined
-
Last visited
Reputation Activity
-

 michael101 got a reaction from EJ_L in HMS Victory by michael101 - Caldercraft - Scale 1:72
Hello there
Just for the record ...
in the post no.3-4 i wrote about problem with bulkhead no.13 that i had to open the slot in about 1.5-2mm
to push it in for getting that bulkhead in the same line of the first deck as the other bulkheads!
after doing that i had to fair this bulkhead a lot at the downstairs
but now ... because i had to push it down i got an issue in the upstairs aria of that bulkhead ... now its a bit in from the line (about 1.5mm) ...
and i need to glue over there a strip of plank and than to start fairing that aria...
my build going very slow for right now ... Because I finish the work every day very late
and to do that burring job of correcting and fairing the hull its not the best option after a lot of hours at work lol...
i know that after i will past this process i will found more hours to work with the ship
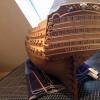
here is a picture of the bulkhead that i need to fill up :
now i need to find the perfect way of bending the plank as the curve of the bulkhead for gluing it into the side of the bulkhead
ANY ADVISES WILL BE MORE THAN WELCOME
Regards ,
Michael .
-
 michael101 got a reaction from Tallshiptragic in HMS Victory by michael101 - Caldercraft - Scale 1:72
Hello there
Just for the record ...
in the post no.3-4 i wrote about problem with bulkhead no.13 that i had to open the slot in about 1.5-2mm
to push it in for getting that bulkhead in the same line of the first deck as the other bulkheads!
after doing that i had to fair this bulkhead a lot at the downstairs
but now ... because i had to push it down i got an issue in the upstairs aria of that bulkhead ... now its a bit in from the line (about 1.5mm) ...
and i need to glue over there a strip of plank and than to start fairing that aria...
my build going very slow for right now ... Because I finish the work every day very late
and to do that burring job of correcting and fairing the hull its not the best option after a lot of hours at work lol...
i know that after i will past this process i will found more hours to work with the ship
here is a picture of the bulkhead that i need to fill up :
now i need to find the perfect way of bending the plank as the curve of the bulkhead for gluing it into the side of the bulkhead
ANY ADVISES WILL BE MORE THAN WELCOME
Regards ,
Michael .
-
.thumb.jpeg.fc5d633a7b34428fcf19419a73d56d55.jpeg) michael101 got a reaction from EricWilliamMarshall in HMS Victory by michael101 - Caldercraft - Scale 1:72
michael101 got a reaction from EricWilliamMarshall in HMS Victory by michael101 - Caldercraft - Scale 1:72
Here is a little update of the stern block fillers
to make these blocks was a bit tricky
because there is 2 curves in a very small aria
the planks must touch the stern at least in 30 degrees because you need after all sand the stern and making hem 3 mm include the first plank ! So after making the curve between the bulkhead to the stern you must make a a other curve in the end of the first curve i mean in the aria were the block filler meeting the stern ...
by the way i didnt glue the gallery supports until now ...
and after all thanks God im very happy that i didnt do it until now ! There was a very massive sanding work in that aria of the block filler so without the gallery suport it was easy to work and also by doing the sanding /fairing work without the gallery supports it keep me from making any damage to the gallery supports !
Cheers ,
Michael.
-
 michael101 got a reaction from sonicmcdude in HMS Victory by michael101 - Caldercraft - Scale 1:72
UPDATE :
after thinking a lot about the block fillers
i have to post a little guide / tips how to build that fillers but firs of all i want to Thank to Matti Pilola ! that help me a lot with thinking and approve that guide
i saw some tutorial and some comments over the internet , there is a lot of people that making the block fillers by pieces of wood (and not made them as a one piece )
that is the best way i have found ,
the only problem with that is : that they taking the angle of the curve with a plank and marking some card with that plank and after all they cutting the piece of wood as the mark on the card...
that method NEVER be a proper because when you will take the second curve it will never be the same as the first one !!!
and if you can make the same perfect curve as the firs curve , you not need a block fillers
for that i was thinking to make the same curve from above to the end i mean to cut all the pieces on the same line : and for to be more proper its better to take the deck shape ...
in my case i took the shape of the last plywood filler that is supporting the gun ports template ..
i
now after we have all the pieces ready we will need to mark lines on the bulkhead / keel (the lines that will be between the pieces that we made before )
and now we need to measure the lines ! and note them on list :
after we have that list we need to fit the pieces inside NOW IS THE TRICK !!!
befor i will give the tip i will explain the problem with what we want ... for example if we have a corner of 7cm by 5 cm and the piece that we cut before is 10cm by 8cm
the firs idea is to cut 3cm from the 10 cm to get 7cm as the side of the corner but if it was a square we was doing that without any problem !in our case that we dealing with kind of "triangle" if we will cut it like that 3cm from the side of the 10cm we will lose also from the 8cm because we will touch the corner of the "triangle"....
i was thinking a lot what to do...
and thank God at the end i got the idea :
you need to make a ruler 90 degrees like a corner on some plastic paper or something transparent and mark the measurements that we took from the lines like this :
than put the 90 degrees that we made on the piece that we need to cut in the same distance from the edge of the piece all over the line than mark the lines in the piece and cut (the best way is with table saw to get straight line !)
than cut all the pieces as the lines and start sanding them as the shape ... (i was sanding them a bit before gluing them together and also i took about 1 mm more from the sides when i was measuring .. like instead to make the corner 7 cm i mark 71mm for getting space to sanding them without mistakes ...)
after all this is the result for the first sanding :
now the next stag:
block fillers for the second bulkhead:
i was marking the lines outside of a strip 1.5 mm to get enough space to sand without mistakes :
after cutting and sanding the second block fillers :
i glue some small pieces of 5mm between the first and the second block fillers to get the exact same space as a bulkhead and i glue the blocks in the same position as they need to be on the ship and i start to sand them , in that method after sanding the blocks together i knew how mach i need to fair the first bulkhead !
note : first put the second block filler before sanding and mark the lines of the first bulkhead in the front and the second bulkhead in the back of the block
when you will sand that you need to be flash with the line of the back but leave about 2-3 mm out of the line of the first bulkhead ! you will need it for the next stage!!!
after sanding the blocks disconnect the little pieces between them and put it to the first and the second bulkhead check if its looks ok , if you made the sanding to deep don't worry you can move a bit the block filler down on the bulkhead and you will get the less space between the bulkhead to the filler ..
now after all we can start fairing the bow section !
but very important !!! when you fair the first bulkhead don't fair it all the way! leave about 1mm without fairing ! in all over the bulkhead also in the sauced bulkhead fair only half way ! with that you will have a guid how to fair the angel without passing losing the shape of the bulkhead , that also will help you to fare both sides identical !!! but if you will fair the bulkhead all the way you maybe will past the line! and you will lose the shape
here is the final result :
-
 michael101 got a reaction from Rich.F in HMS Victory by michael101 - Caldercraft - Scale 1:72
Here is a little update of the stern block fillers
to make these blocks was a bit tricky
because there is 2 curves in a very small aria
the planks must touch the stern at least in 30 degrees because you need after all sand the stern and making hem 3 mm include the first plank ! So after making the curve between the bulkhead to the stern you must make a a other curve in the end of the first curve i mean in the aria were the block filler meeting the stern ...
by the way i didnt glue the gallery supports until now ...
and after all thanks God im very happy that i didnt do it until now ! There was a very massive sanding work in that aria of the block filler so without the gallery suport it was easy to work and also by doing the sanding /fairing work without the gallery supports it keep me from making any damage to the gallery supports !
Cheers ,
Michael.
-
michael101 got a reaction from EJ_L in HMS Victory by michael101 - Caldercraft - Scale 1:72
Thank you Heinz !
That is true there is 2 planks so because that i not need to wary too much .. but i just tryingto do my best for improving my experience and learning how much i can ...
i think the first plank is the time for learning because as you wrote the second plank will cover all the mistakes
Best regards,
Michael.
-
 michael101 got a reaction from Shipyard sid in HMS Victory by michael101 - Caldercraft - Scale 1:72
Thank you Heinz !
That is true there is 2 planks so because that i not need to wary too much .. but i just tryingto do my best for improving my experience and learning how much i can ...
i think the first plank is the time for learning because as you wrote the second plank will cover all the mistakes
Best regards,
Michael.
-
michael101 got a reaction from EJ_L in HMS Victory by michael101 - Caldercraft - Scale 1:72
Here is a little update of the stern block fillers
to make these blocks was a bit tricky
because there is 2 curves in a very small aria
the planks must touch the stern at least in 30 degrees because you need after all sand the stern and making hem 3 mm include the first plank ! So after making the curve between the bulkhead to the stern you must make a a other curve in the end of the first curve i mean in the aria were the block filler meeting the stern ...
by the way i didnt glue the gallery supports until now ...
and after all thanks God im very happy that i didnt do it until now ! There was a very massive sanding work in that aria of the block filler so without the gallery suport it was easy to work and also by doing the sanding /fairing work without the gallery supports it keep me from making any damage to the gallery supports !
Cheers ,
Michael.
-
michael101 got a reaction from Shipyard sid in HMS Victory by michael101 - Caldercraft - Scale 1:72
Here is a little update of the stern block fillers
to make these blocks was a bit tricky
because there is 2 curves in a very small aria
the planks must touch the stern at least in 30 degrees because you need after all sand the stern and making hem 3 mm include the first plank ! So after making the curve between the bulkhead to the stern you must make a a other curve in the end of the first curve i mean in the aria were the block filler meeting the stern ...
by the way i didnt glue the gallery supports until now ...
and after all thanks God im very happy that i didnt do it until now ! There was a very massive sanding work in that aria of the block filler so without the gallery suport it was easy to work and also by doing the sanding /fairing work without the gallery supports it keep me from making any damage to the gallery supports !
Cheers ,
Michael.
-
 michael101 got a reaction from Heinz6672 in HMS Victory by michael101 - Caldercraft - Scale 1:72
Thank you Heinz !
That is true there is 2 planks so because that i not need to wary too much .. but i just tryingto do my best for improving my experience and learning how much i can ...
i think the first plank is the time for learning because as you wrote the second plank will cover all the mistakes
Best regards,
Michael.
-
michael101 got a reaction from Heinz6672 in HMS Victory by michael101 - Caldercraft - Scale 1:72
Here is a little update of the stern block fillers
to make these blocks was a bit tricky
because there is 2 curves in a very small aria
the planks must touch the stern at least in 30 degrees because you need after all sand the stern and making hem 3 mm include the first plank ! So after making the curve between the bulkhead to the stern you must make a a other curve in the end of the first curve i mean in the aria were the block filler meeting the stern ...
by the way i didnt glue the gallery supports until now ...
and after all thanks God im very happy that i didnt do it until now ! There was a very massive sanding work in that aria of the block filler so without the gallery suport it was easy to work and also by doing the sanding /fairing work without the gallery supports it keep me from making any damage to the gallery supports !
Cheers ,
Michael.
-
 michael101 got a reaction from mort stoll in HMS Victory by michael101 - Caldercraft - Scale 1:72
Here is a little update of the stern block fillers
to make these blocks was a bit tricky
because there is 2 curves in a very small aria
the planks must touch the stern at least in 30 degrees because you need after all sand the stern and making hem 3 mm include the first plank ! So after making the curve between the bulkhead to the stern you must make a a other curve in the end of the first curve i mean in the aria were the block filler meeting the stern ...
by the way i didnt glue the gallery supports until now ...
and after all thanks God im very happy that i didnt do it until now ! There was a very massive sanding work in that aria of the block filler so without the gallery suport it was easy to work and also by doing the sanding /fairing work without the gallery supports it keep me from making any damage to the gallery supports !
Cheers ,
Michael.
-
 michael101 got a reaction from Tim Curtis in HMS Victory by michael101 - Caldercraft - Scale 1:72
Here is a little update of the stern block fillers
to make these blocks was a bit tricky
because there is 2 curves in a very small aria
the planks must touch the stern at least in 30 degrees because you need after all sand the stern and making hem 3 mm include the first plank ! So after making the curve between the bulkhead to the stern you must make a a other curve in the end of the first curve i mean in the aria were the block filler meeting the stern ...
by the way i didnt glue the gallery supports until now ...
and after all thanks God im very happy that i didnt do it until now ! There was a very massive sanding work in that aria of the block filler so without the gallery suport it was easy to work and also by doing the sanding /fairing work without the gallery supports it keep me from making any damage to the gallery supports !
Cheers ,
Michael.
-
 michael101 got a reaction from John Allen in Concord Stagecoach by Dan Vadas - FINISHED - Model Trailways - 1:12 scale - circa 1862 "Cobb & Co"
Hello Dan very nice job !!!
It was my last finished project
i have a link in my signature to my model (youtube)
Best regards
Michael.
-
 michael101 got a reaction from popeye the sailor in Concord Stagecoach by Dan Vadas - FINISHED - Model Trailways - 1:12 scale - circa 1862 "Cobb & Co"
Hello Dan very nice job !!!
It was my last finished project
i have a link in my signature to my model (youtube)
Best regards
Michael.
-
 michael101 got a reaction from Canute in Concord Stagecoach by Dan Vadas - FINISHED - Model Trailways - 1:12 scale - circa 1862 "Cobb & Co"
Hello Dan very nice job !!!
It was my last finished project
i have a link in my signature to my model (youtube)
Best regards
Michael.
-
michael101 got a reaction from EJ_L in HMS Victory by michael101 - Caldercraft - Scale 1:72
Thank you David for your advices !
-
michael101 got a reaction from EricWilliamMarshall in HMS Victory by michael101 - Caldercraft - Scale 1:72
Hell friends now im working on the fairing process and i have some point to talk about the basic rule is to put some plank on the bulkheads and to see wetch bulkhead need to be sanded ... the problem with that is : when you trying to curve a natural plank in one side the other side automatically will get some curve i mean for example if in the middle of the ship the line between the bulkheads is almost straight and in the stern there is a deep curve when you will curve the planks on the stern aria automatically just after that curve the plank will get some bow ! and it will not touch the bulkheads after that deep curve ! as the nature of the wood when you making some curve in the right side the left side will try to get the same angel as the right .... so most of the builders just pushing the plank to the bulkhead for making the plank touching all the bulkheads .... the problem with that is : sometimes you can push a little bit inside of the line then you will get an hole ... or sometimes when you pushing the plank a little out of the line you will have a little "hill" and its very hard to detect it with only one plank ! but after 4-5 planks (i mean after planking ) you will see the problem .... im doing it in other way ..(its my firs time doing that "new" method ) im just puling the plank side ways i mean one hand holding the plank on the first bulkhead and the other hand holding in the last bulkhead but not only holding im also puling the end of the plank for avoiding all the nature spaces that created after the curve ! so if there is a bulkhead that is out of the line i can see that and than i can fix that bulkhead ! the good thing on it is that we using a wood plank and not a rubber or other material that can get stretched ! so if there is one bulkhead out or in you can detect it quickly and the test will give you 100 % of correction ! then when i will plank the ship i will work bulkhead by bulkhead i mean to glue and nail the plank on the first bulkhead then push it in to the second bulkhead with a little bit of puling for avoiding any nature space between the bulkhead to the plank .... and to do the same process for all the rest of the bulkheads i will be more than happy if you have some note or comment about that i wrote above best regards Michael. -
michael101 got a reaction from EJ_L in HMS Victory by michael101 - Caldercraft - Scale 1:72
You welcome Lon
-
michael101 got a reaction from Canute in Wood filler
Thank you ,
but i will do what ever i can without cutting that corner , to do this it will be the last option hope no getting there...
today i went to some carpenter in my city and i show them the case ..
he told me about some liquid(resin) that you need to mix with wood powder (i have a lot of that powder in all over my room lol )
so i bought that liquid and just waiting to finish my work for getting home to check this out
here is the link for that product they told me that it will hold on it carpenter glue and its very hard when it get dry .....
http://www.bormawachs.com/dettaglio_new.php?idprod=0052&cat1=1
i hope to update that post with good news God willing
best regards
Michael.
-
 michael101 reacted to Jaager in Wood filler
Rather than use filler, why not scab it?
Get a flat at the spot and PVA glue a piece of hardwood to it and shape that.
-
michael101 got a reaction from Canute in Wood filler
Hello there
i did some mistake when doing the fairing proces on the last bulkhead (only in the corners )...
i sanded not to the right angle ..
there is a filler the will be able to hold the glue for the planks on that spots ?
I have some wood filler but it water base and im afraid to use it over ther ( that spots need to hold the planks with some pressure ...
and also i dont know if the filler can hold glue at all ...
i will be more than happy to hear more idias for how to fix that corners and bring then tonthe right angle
Best regads
Michael.
-
 michael101 got a reaction from mtaylor in block fillers at the bow
Hello there
i just wrote a little tutorial for the bow block fillers
you can find it here :
-
michael101 got a reaction from mort stoll in HMS Victory by michael101 - Caldercraft - Scale 1:72
Thank you Graham!
b.t.w WOW you did a beautiful work
-
michael101 reacted to LON in HMS Victory by michael101 - Caldercraft - Scale 1:72
Excellent tip on bow fillers. Thank you,
Lon