

michael101
-
Posts
441 -
Joined
-
Last visited
Reputation Activity
-

 michael101 got a reaction from mikiek in How to Caulk the planks of the hull
The second plank its dark walnut do you think the pencil can do the job ?
-
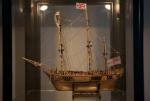
 michael101 got a reaction from sonicmcdude in HMS Victory by michael101 - Caldercraft - Scale 1:72
UPDATE :
after thinking a lot about the block fillers
i have to post a little guide / tips how to build that fillers but firs of all i want to Thank to Matti Pilola ! that help me a lot with thinking and approve that guide
i saw some tutorial and some comments over the internet , there is a lot of people that making the block fillers by pieces of wood (and not made them as a one piece )
that is the best way i have found ,
the only problem with that is : that they taking the angle of the curve with a plank and marking some card with that plank and after all they cutting the piece of wood as the mark on the card...
that method NEVER be a proper because when you will take the second curve it will never be the same as the first one !!!
and if you can make the same perfect curve as the firs curve , you not need a block fillers
for that i was thinking to make the same curve from above to the end i mean to cut all the pieces on the same line : and for to be more proper its better to take the deck shape ...
in my case i took the shape of the last plywood filler that is supporting the gun ports template ..
i
now after we have all the pieces ready we will need to mark lines on the bulkhead / keel (the lines that will be between the pieces that we made before )
and now we need to measure the lines ! and note them on list :
after we have that list we need to fit the pieces inside NOW IS THE TRICK !!!
befor i will give the tip i will explain the problem with what we want ... for example if we have a corner of 7cm by 5 cm and the piece that we cut before is 10cm by 8cm
the firs idea is to cut 3cm from the 10 cm to get 7cm as the side of the corner but if it was a square we was doing that without any problem !in our case that we dealing with kind of "triangle" if we will cut it like that 3cm from the side of the 10cm we will lose also from the 8cm because we will touch the corner of the "triangle"....
i was thinking a lot what to do...
and thank God at the end i got the idea :
you need to make a ruler 90 degrees like a corner on some plastic paper or something transparent and mark the measurements that we took from the lines like this :
than put the 90 degrees that we made on the piece that we need to cut in the same distance from the edge of the piece all over the line than mark the lines in the piece and cut (the best way is with table saw to get straight line !)
than cut all the pieces as the lines and start sanding them as the shape ... (i was sanding them a bit before gluing them together and also i took about 1 mm more from the sides when i was measuring .. like instead to make the corner 7 cm i mark 71mm for getting space to sanding them without mistakes ...)
after all this is the result for the first sanding :
now the next stag:
block fillers for the second bulkhead:
i was marking the lines outside of a strip 1.5 mm to get enough space to sand without mistakes :
after cutting and sanding the second block fillers :
i glue some small pieces of 5mm between the first and the second block fillers to get the exact same space as a bulkhead and i glue the blocks in the same position as they need to be on the ship and i start to sand them , in that method after sanding the blocks together i knew how mach i need to fair the first bulkhead !
note : first put the second block filler before sanding and mark the lines of the first bulkhead in the front and the second bulkhead in the back of the block
when you will sand that you need to be flash with the line of the back but leave about 2-3 mm out of the line of the first bulkhead ! you will need it for the next stage!!!
after sanding the blocks disconnect the little pieces between them and put it to the first and the second bulkhead check if its looks ok , if you made the sanding to deep don't worry you can move a bit the block filler down on the bulkhead and you will get the less space between the bulkhead to the filler ..
now after all we can start fairing the bow section !
but very important !!! when you fair the first bulkhead don't fair it all the way! leave about 1mm without fairing ! in all over the bulkhead also in the sauced bulkhead fair only half way ! with that you will have a guid how to fair the angel without passing losing the shape of the bulkhead , that also will help you to fare both sides identical !!! but if you will fair the bulkhead all the way you maybe will past the line! and you will lose the shape
here is the final result :
-
 michael101 got a reaction from Paul Le Wol in Riva Aquarama runabout by michael101 - Amati - 1/10
Hello friends
I’m very exited to start sharing with you my build log of the Riva Aquarama 1/10 of Amati
my review for the kit
its outstanding beautiful kit everything it’s high class
I hope you guys enjoy the work and the process of my build log
and please feel free to add your comments
First of all I had to send the box for framing 😎 (even the box made of high class material and beautiful printing )
For starting I saw the manual that told you to plank the boat over the keel and totally cover it at the bow on this why :
But I didn’t found it aesthetic and after searching pictures of the original boat I did found that the original boat do have keel :
so I decided to add a keel for the boat ..
the thickness of the plywood it’s 4mm so I decided to add a keel of 2mm wide as following :
first of all I made a template of the exact curve of the bow by marking the hull on 18mm plywood than I cut it by scroll saw
and after all I made a notch with the router for putting the strips inside the template without having a problem of banding side way by mistake
this banding must be flat for side way because we want to add it exactly at the middle all over the hull and making a beautiful keel
I have cut the first strip from walnut because I didn’t want to spend a lot from the mahogany planks that came with the kit
and anyway the first strip will be covered by the bout planks from the sides
the first cut was 2*2 And all the rest was 1.5*2 from mahogany I made in total 1 strip of 2*2 and 3 strips of 1.5*2 so the new keel it’s 6.5mm (it’s a lot more than what I need but after the 2nd plank I will sand it down to be flat with the 2nd plank
After banding the strips I add them to the hull by insert planks of 1mm underneath for gluing the new keel exactly at the middle of the hull
Here you can see the new keel I (took the hull out of the stand for shooting a picture )
-
 michael101 got a reaction from JpR62 in Riva Aquarama runabout by michael101 - Amati - 1/10
Hello friends
I’m very exited to start sharing with you my build log of the Riva Aquarama 1/10 of Amati
my review for the kit
its outstanding beautiful kit everything it’s high class
I hope you guys enjoy the work and the process of my build log
and please feel free to add your comments
First of all I had to send the box for framing 😎 (even the box made of high class material and beautiful printing )
For starting I saw the manual that told you to plank the boat over the keel and totally cover it at the bow on this why :
But I didn’t found it aesthetic and after searching pictures of the original boat I did found that the original boat do have keel :
so I decided to add a keel for the boat ..
the thickness of the plywood it’s 4mm so I decided to add a keel of 2mm wide as following :
first of all I made a template of the exact curve of the bow by marking the hull on 18mm plywood than I cut it by scroll saw
and after all I made a notch with the router for putting the strips inside the template without having a problem of banding side way by mistake
this banding must be flat for side way because we want to add it exactly at the middle all over the hull and making a beautiful keel
I have cut the first strip from walnut because I didn’t want to spend a lot from the mahogany planks that came with the kit
and anyway the first strip will be covered by the bout planks from the sides
the first cut was 2*2 And all the rest was 1.5*2 from mahogany I made in total 1 strip of 2*2 and 3 strips of 1.5*2 so the new keel it’s 6.5mm (it’s a lot more than what I need but after the 2nd plank I will sand it down to be flat with the 2nd plank
After banding the strips I add them to the hull by insert planks of 1mm underneath for gluing the new keel exactly at the middle of the hull
Here you can see the new keel I (took the hull out of the stand for shooting a picture )
-
 michael101 got a reaction from yvesvidal in Riva Aquarama runabout by michael101 - Amati - 1/10
Thank you Alan
I think it will be much better with a nice keel to give a flat line for the connecting planks all over the boat
-
 michael101 reacted to gsdpic in Riva Aquarama runabout by michael101 - Amati - 1/10
Looks like you are off to a good start on this beauty. I'll follow along.
-
michael101 reacted to king derelict in Riva Aquarama runabout by michael101 - Amati - 1/10
You are doing a great job of improving the kit to something more like real life
Alan
-

 michael101 got a reaction from king derelict in Riva Aquarama runabout by michael101 - Amati - 1/10
Hello friends
I’m very exited to start sharing with you my build log of the Riva Aquarama 1/10 of Amati
my review for the kit
its outstanding beautiful kit everything it’s high class
I hope you guys enjoy the work and the process of my build log
and please feel free to add your comments
First of all I had to send the box for framing 😎 (even the box made of high class material and beautiful printing )
For starting I saw the manual that told you to plank the boat over the keel and totally cover it at the bow on this why :
But I didn’t found it aesthetic and after searching pictures of the original boat I did found that the original boat do have keel :
so I decided to add a keel for the boat ..
the thickness of the plywood it’s 4mm so I decided to add a keel of 2mm wide as following :
first of all I made a template of the exact curve of the bow by marking the hull on 18mm plywood than I cut it by scroll saw
and after all I made a notch with the router for putting the strips inside the template without having a problem of banding side way by mistake
this banding must be flat for side way because we want to add it exactly at the middle all over the hull and making a beautiful keel
I have cut the first strip from walnut because I didn’t want to spend a lot from the mahogany planks that came with the kit
and anyway the first strip will be covered by the bout planks from the sides
the first cut was 2*2 And all the rest was 1.5*2 from mahogany I made in total 1 strip of 2*2 and 3 strips of 1.5*2 so the new keel it’s 6.5mm (it’s a lot more than what I need but after the 2nd plank I will sand it down to be flat with the 2nd plank
After banding the strips I add them to the hull by insert planks of 1mm underneath for gluing the new keel exactly at the middle of the hull
Here you can see the new keel I (took the hull out of the stand for shooting a picture )
-
 michael101 got a reaction from gsdpic in Riva Aquarama runabout by michael101 - Amati - 1/10
Hello friends
I’m very exited to start sharing with you my build log of the Riva Aquarama 1/10 of Amati
my review for the kit
its outstanding beautiful kit everything it’s high class
I hope you guys enjoy the work and the process of my build log
and please feel free to add your comments
First of all I had to send the box for framing 😎 (even the box made of high class material and beautiful printing )
For starting I saw the manual that told you to plank the boat over the keel and totally cover it at the bow on this why :
But I didn’t found it aesthetic and after searching pictures of the original boat I did found that the original boat do have keel :
so I decided to add a keel for the boat ..
the thickness of the plywood it’s 4mm so I decided to add a keel of 2mm wide as following :
first of all I made a template of the exact curve of the bow by marking the hull on 18mm plywood than I cut it by scroll saw
and after all I made a notch with the router for putting the strips inside the template without having a problem of banding side way by mistake
this banding must be flat for side way because we want to add it exactly at the middle all over the hull and making a beautiful keel
I have cut the first strip from walnut because I didn’t want to spend a lot from the mahogany planks that came with the kit
and anyway the first strip will be covered by the bout planks from the sides
the first cut was 2*2 And all the rest was 1.5*2 from mahogany I made in total 1 strip of 2*2 and 3 strips of 1.5*2 so the new keel it’s 6.5mm (it’s a lot more than what I need but after the 2nd plank I will sand it down to be flat with the 2nd plank
After banding the strips I add them to the hull by insert planks of 1mm underneath for gluing the new keel exactly at the middle of the hull
Here you can see the new keel I (took the hull out of the stand for shooting a picture )
-
michael101 reacted to yvesvidal in Riva Aquarama runabout by michael101 - Amati - 1/10
Nice and more realistic change to the kit. I do not understand why they would have designed the kit in this way. The keel may be very subtle on a Riva, but it does exist no matter what.
Other thing: Amati shows these horrible staples/nails to hold the planks.... The real RIVA is assembled using clamps, as shown on the picture.
Yves
-
michael101 got a reaction from yvesvidal in Riva Aquarama runabout by michael101 - Amati - 1/10
Hello friends
I’m very exited to start sharing with you my build log of the Riva Aquarama 1/10 of Amati
my review for the kit
its outstanding beautiful kit everything it’s high class
I hope you guys enjoy the work and the process of my build log
and please feel free to add your comments
First of all I had to send the box for framing 😎 (even the box made of high class material and beautiful printing )
For starting I saw the manual that told you to plank the boat over the keel and totally cover it at the bow on this why :
But I didn’t found it aesthetic and after searching pictures of the original boat I did found that the original boat do have keel :
so I decided to add a keel for the boat ..
the thickness of the plywood it’s 4mm so I decided to add a keel of 2mm wide as following :
first of all I made a template of the exact curve of the bow by marking the hull on 18mm plywood than I cut it by scroll saw
and after all I made a notch with the router for putting the strips inside the template without having a problem of banding side way by mistake
this banding must be flat for side way because we want to add it exactly at the middle all over the hull and making a beautiful keel
I have cut the first strip from walnut because I didn’t want to spend a lot from the mahogany planks that came with the kit
and anyway the first strip will be covered by the bout planks from the sides
the first cut was 2*2 And all the rest was 1.5*2 from mahogany I made in total 1 strip of 2*2 and 3 strips of 1.5*2 so the new keel it’s 6.5mm (it’s a lot more than what I need but after the 2nd plank I will sand it down to be flat with the 2nd plank
After banding the strips I add them to the hull by insert planks of 1mm underneath for gluing the new keel exactly at the middle of the hull
Here you can see the new keel I (took the hull out of the stand for shooting a picture )
-
michael101 reacted to paul ron in Mahogany vs walnut
i love mahogany for its rich red color. im sure it will work nicely if its not going to be bent... probably a mild bend will hold up. scribe the shape from a solid piece to fit so you dont have to make any bends... hope to see how it turns out?
-
michael101 reacted to barkeater in Mahogany vs walnut
To work with, I like walnut a little better than mahogany. However, color wise, mahogany gets my nod and the color contrast in your case might be more attractive than walnut alone. Since I don't see a big difference in usage between the two, I would favor going with mahogany.
Richard
-
michael101 reacted to Gregory in Mahogany vs walnut
If y
If you had a choice between mahogany or walnut, which is what michael101 asked about, which would you choose?
-
michael101 reacted to Dziadeczek in Mahogany vs walnut
Neither one, in my opinion.
Why don't you try to use some fruitwood, like cherry, apple or pear. Much better...
-
michael101 reacted to Gregory in Mahogany vs walnut
My experience is that mahogany tends to be less brittle than walnut.
-
 michael101 got a reaction from mtaylor in Mahogany vs walnut
Hello friends ,
I’m about to start a new project ,
and I need to add 2*2mm strip to the keel (all over the the keel ..)
the boat will be use mahogany so the natural choice it’s to use the same wood for the finished keel
but to be honest I never used this kind of wood
and for me the best wood it’s walnut for making the finish shape of the boat ! The only problem it will not be the same colore of the planks
so what do you think is it Mahoney good wood for shaping 2*2 mm to be like a triangular or it’s not hard and compressed as walnut ?
I will be more than happy to hear your advice before starting the project (tomorrow morning I have a free day to start working on my new Riva aquarama project )
-
michael101 got a reaction from mtaylor in Planking without clamps, clean up, or drying time - a new way to use Titebond Original
The big question it’s how it will work on double plank .. you don’t want the first plank to move away
also the glue between planks ,if you will not glue them between you can get problem after a year (summer and winter time are changing the plank wide so you can get black spaces between planks )
-
michael101 got a reaction from mtaylor in Planking without clamps, clean up, or drying time - a new way to use Titebond Original
Interesting !
-
 michael101 got a reaction from Quimp Slattery in Planking without clamps, clean up, or drying time - a new way to use Titebond Original
The big question it’s how it will work on double plank .. you don’t want the first plank to move away
also the glue between planks ,if you will not glue them between you can get problem after a year (summer and winter time are changing the plank wide so you can get black spaces between planks )
-
 michael101 got a reaction from Nirvana in Planking without clamps, clean up, or drying time - a new way to use Titebond Original
Interesting !
-
michael101 got a reaction from Quimp Slattery in Planking without clamps, clean up, or drying time - a new way to use Titebond Original
Interesting !
-
 michael101 got a reaction from Keith Black in Mahogany vs walnut
Hello friends ,
I’m about to start a new project ,
and I need to add 2*2mm strip to the keel (all over the the keel ..)
the boat will be use mahogany so the natural choice it’s to use the same wood for the finished keel
but to be honest I never used this kind of wood
and for me the best wood it’s walnut for making the finish shape of the boat ! The only problem it will not be the same colore of the planks
so what do you think is it Mahoney good wood for shaping 2*2 mm to be like a triangular or it’s not hard and compressed as walnut ?
I will be more than happy to hear your advice before starting the project (tomorrow morning I have a free day to start working on my new Riva aquarama project )
-

 michael101 got a reaction from Canute in Professional Building Slip - Hobbyzone
The only thing I can say about this ..
it’s a piece of carton ! (I don't want to use ugly words out of respect for the forum)
today I worked all a day for square the main jig ! And nothing !!!!!! (I’m using the best square over the world the Kinex one !!!)
So if you working with that piece of carton don’t blame yourself why your ship it’s twisted !!!!
also it’s good for you to know about the “new model “ it’s made of 2 pieces and not from one solid piece !
so this post not relevant anymore
I’m very disappointed ! ! ! !
do a favor for yourself don’t spend your money on it !
-
michael101 got a reaction from mtaylor in Professional Building Slip - Hobbyzone
The only thing I can say about this ..
it’s a piece of carton ! (I don't want to use ugly words out of respect for the forum)
today I worked all a day for square the main jig ! And nothing !!!!!! (I’m using the best square over the world the Kinex one !!!)
So if you working with that piece of carton don’t blame yourself why your ship it’s twisted !!!!
also it’s good for you to know about the “new model “ it’s made of 2 pieces and not from one solid piece !
so this post not relevant anymore
I’m very disappointed ! ! ! !
do a favor for yourself don’t spend your money on it !