HOLIDAY DONATION DRIVE - SUPPORT MSW - DO YOUR PART TO KEEP THIS GREAT FORUM GOING! (89 donations so far out of 49,000 members - C'mon guys!)
×


Jason
-
Posts
202 -
Joined
-
Last visited
Content Type
Profiles
Forums
Gallery
Events
Everything posted by Jason
-
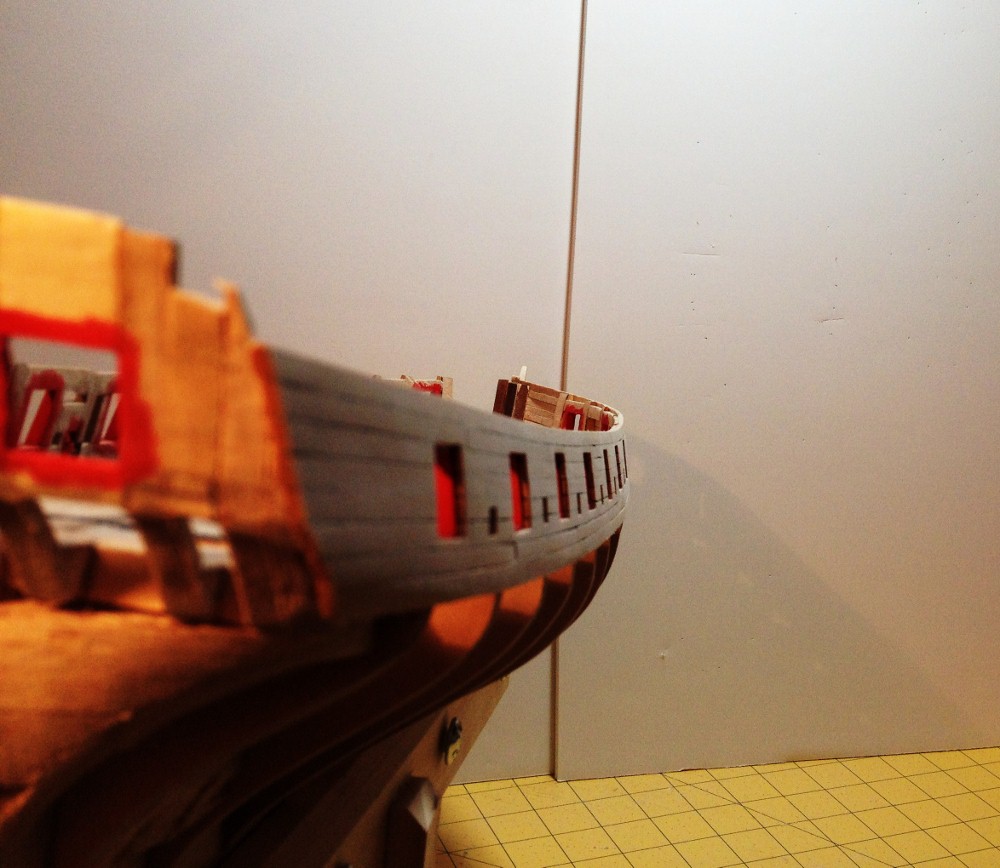
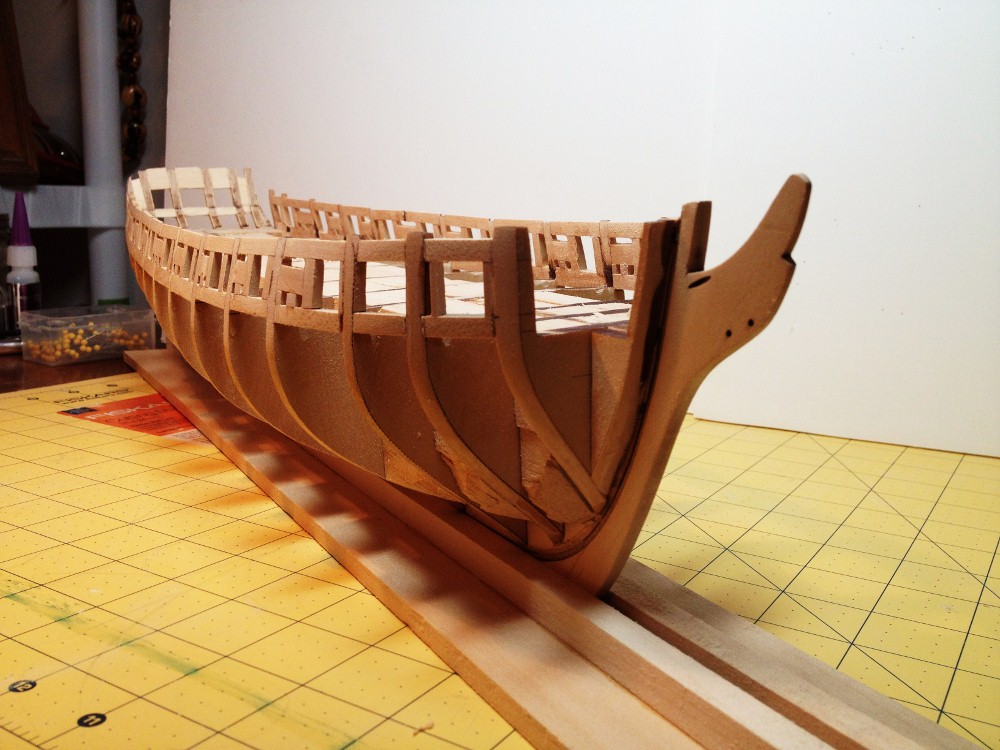
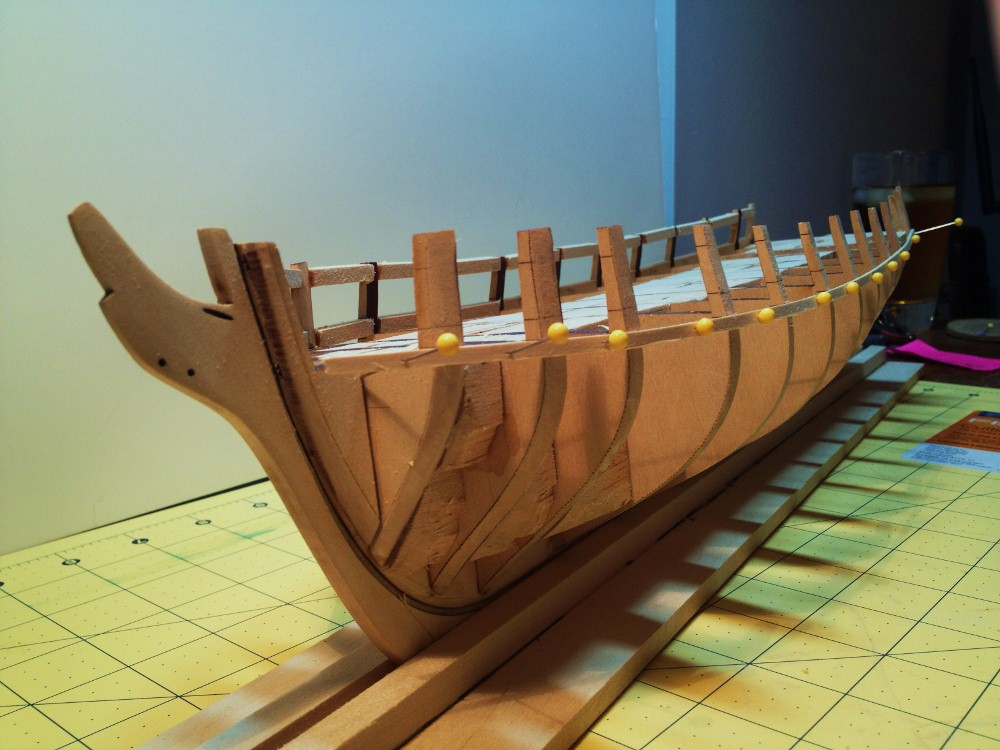
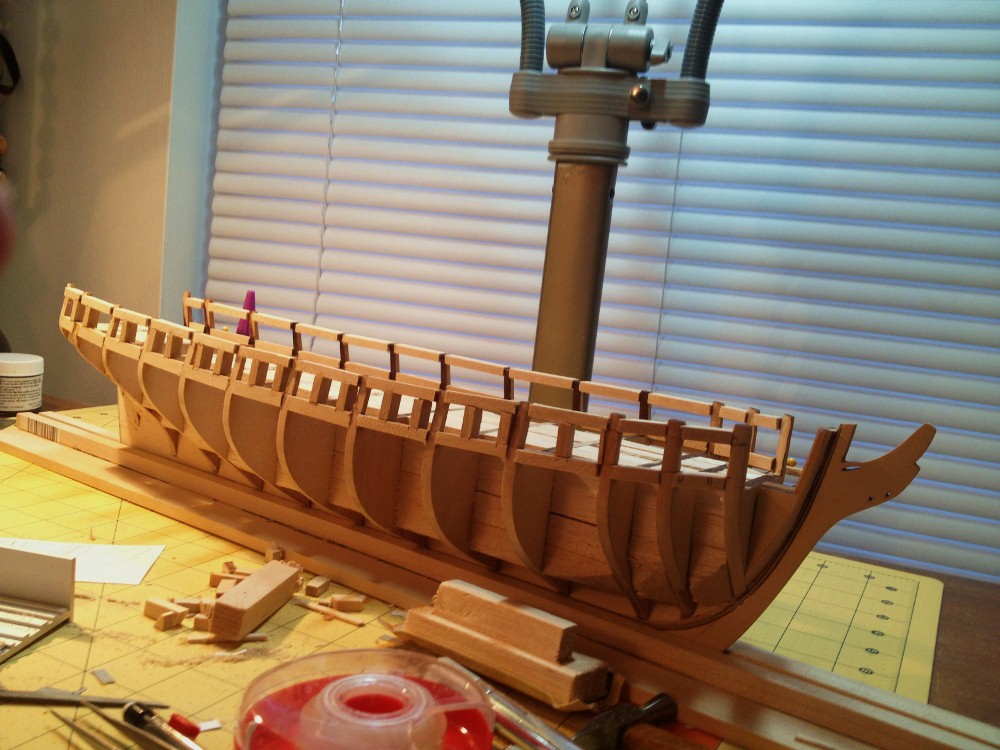
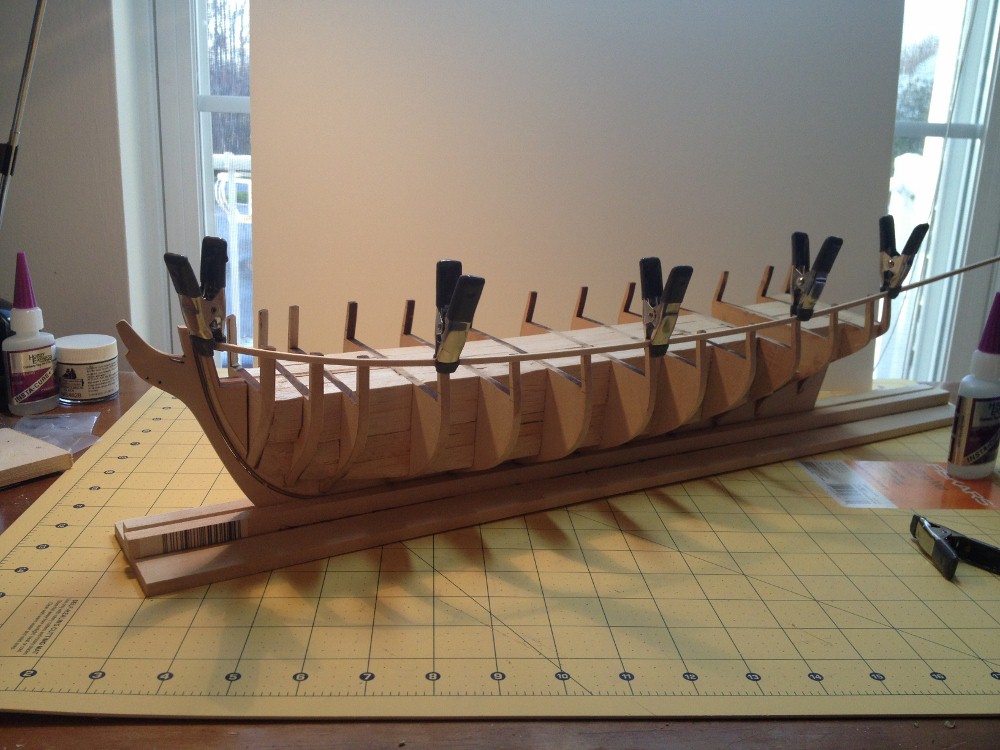
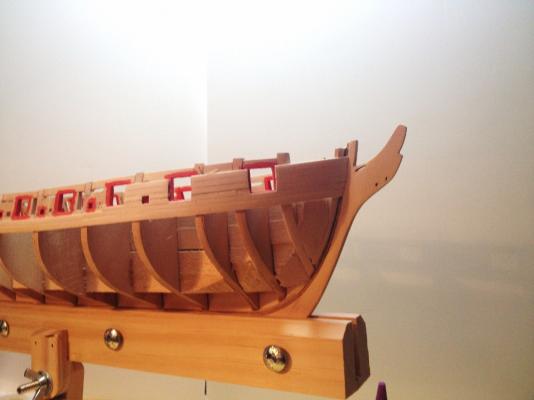
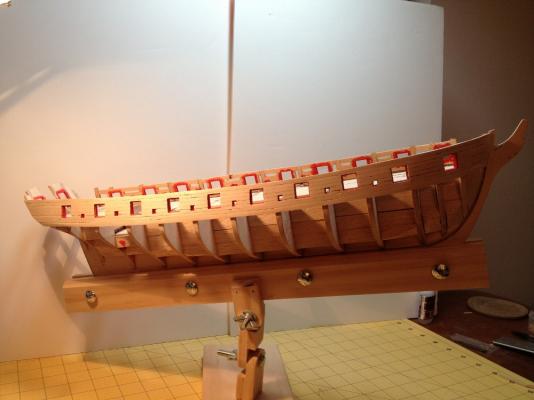
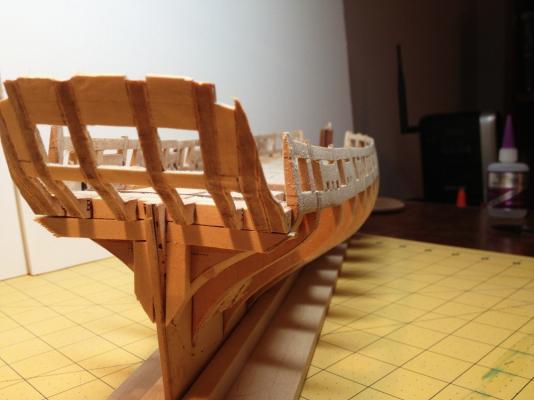
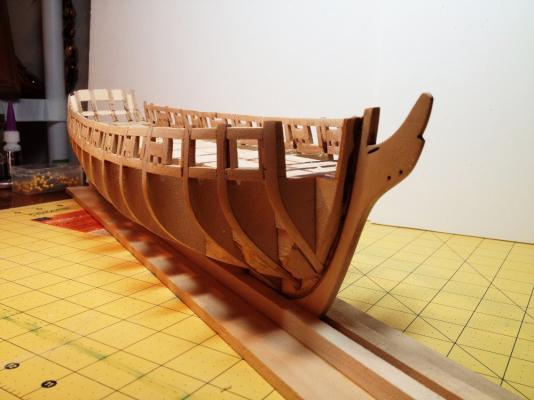
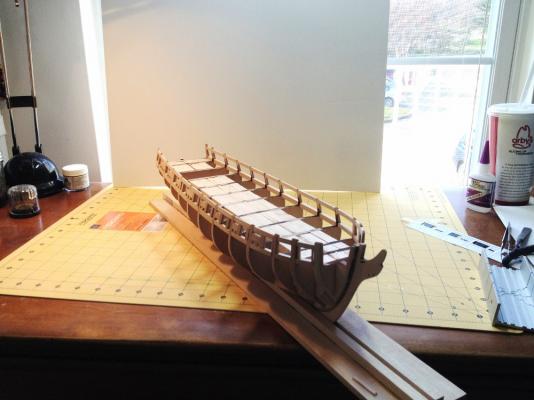
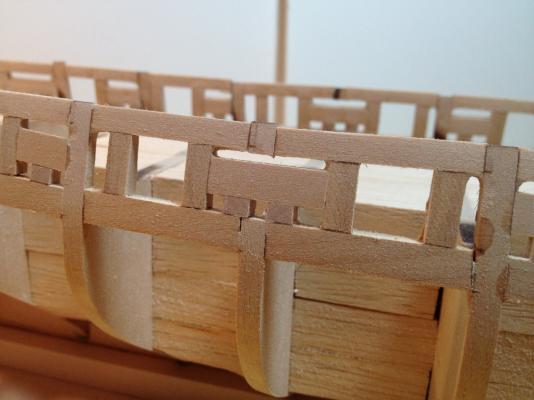
 The begining of planking: I have not been able to devote much time to my ship yard lately, as the demands of the workplace have been great. However, i have been able to start my planking on the Syren, so I wanted to update what I have done... Mean while the longboat sits idle on the shelf. I knew those inspirational winds would blow against my intentions One thing I have to say first of all, is that I am a little confused by the wood provided in the kit. I have not had the dimension problem that others are posting about, though I think that perhaps I do not work to the same tolerances. What I am having a problem with, is the woods grain and consistancy. Putting a fine edge on it has been a real challenge seemingly no matter what tool or grit of sandpaper I use. It just seems to slough off in big pieces. Perhaps I am doing something wrong? I pinned the wales onto the frame to mark the location of the upper edge on both sides, being careful to sight along each side, and not having any bumps in the line. I used my digital caliper to assure that each station was identical on both sides. Once the locations were marked, I pre-bent the wales using the following technique. After soaking the wood for 5 minutes, I would clamp it around the outside of a mason jar for another 5 min. I found that this left the wood rather supple, with just about the right amount of curve in it. I then sanded the end to be placed in the rabbit to fit. I did make a nice mistake here, I installed the port wale with the wrong dimension of planking, so off it came and round two was better. Starting on the starboard side at the bow I began to plank from the wale up. When I came to a gun or sweep port I used a sharp knife and a needle file to make the required notches around the port. For this process, I just eyeballed. They came out decently consistent for my taste. Personaly I am more in the representation rather than replication school of thinking, though I greatly admire extremely fine work. Besides creating a small pile of unsatisfactory pieces, the rest of the process went smoothly, except for knocking out the middle filler block out of the transom during trimming of the planks at the stern. The beginnings of a nice sheer line!


-
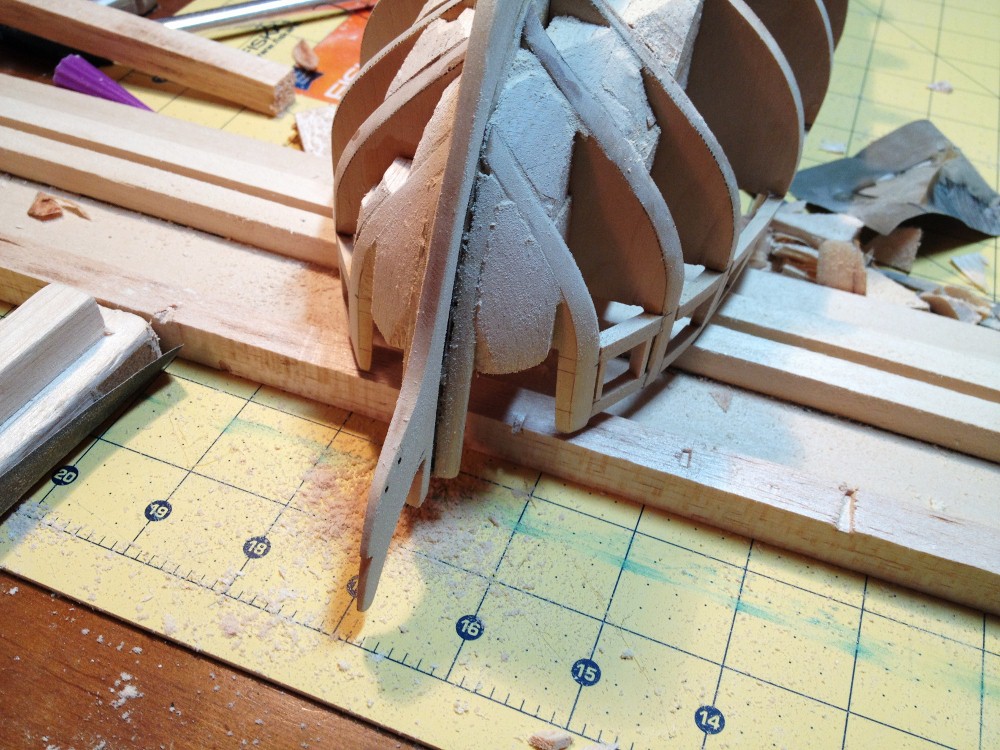
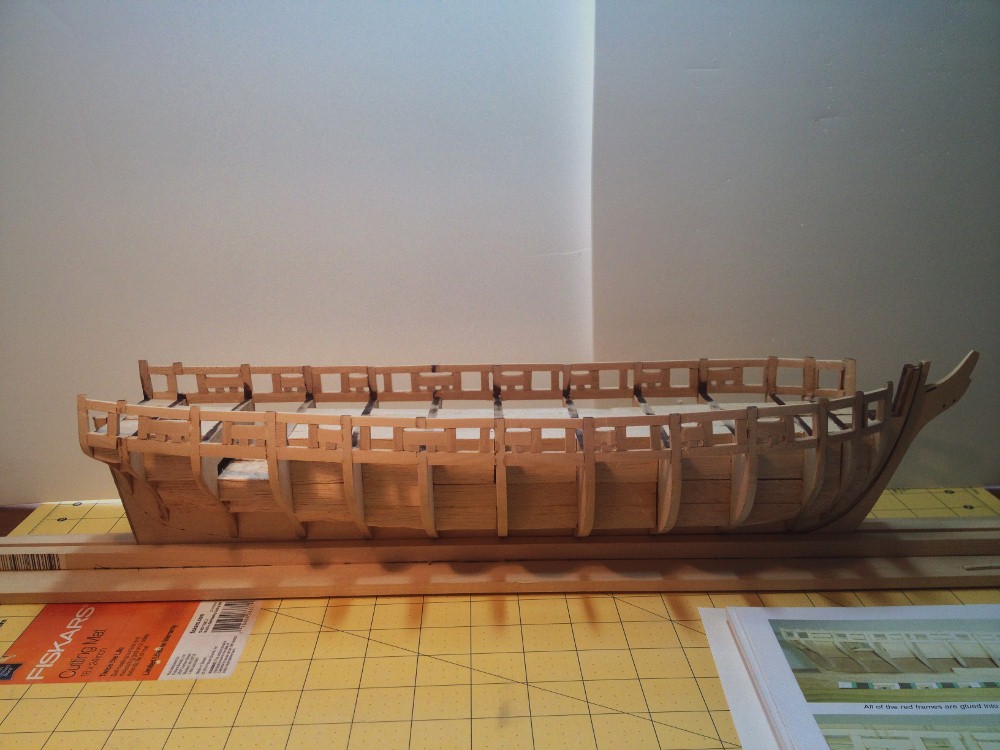
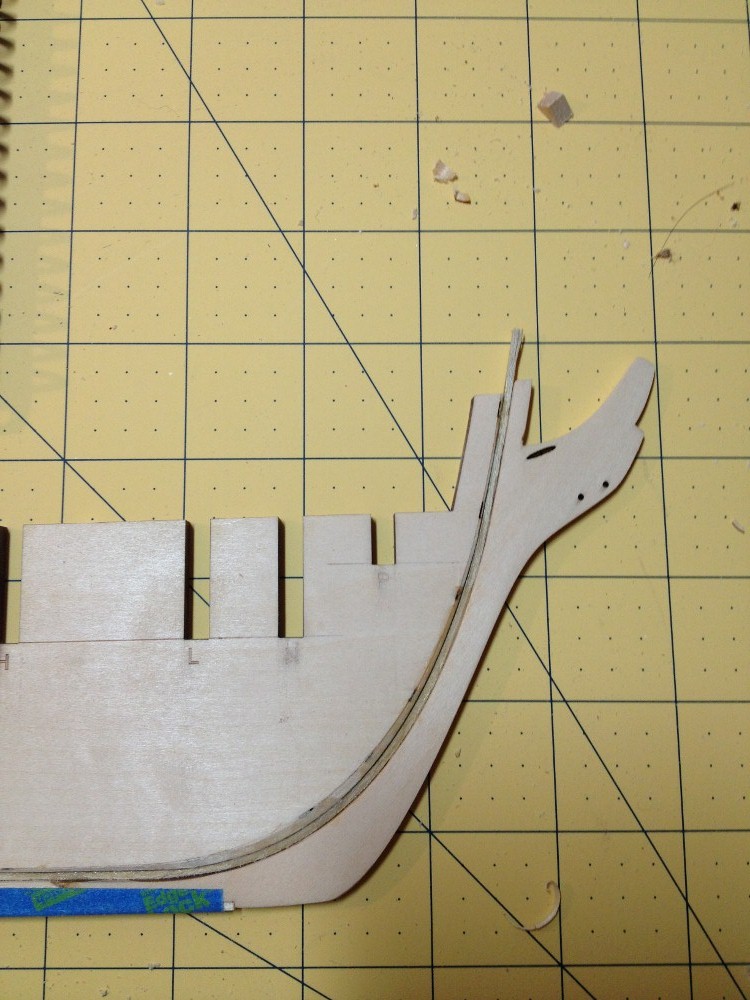
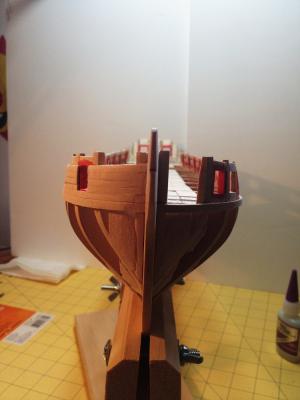
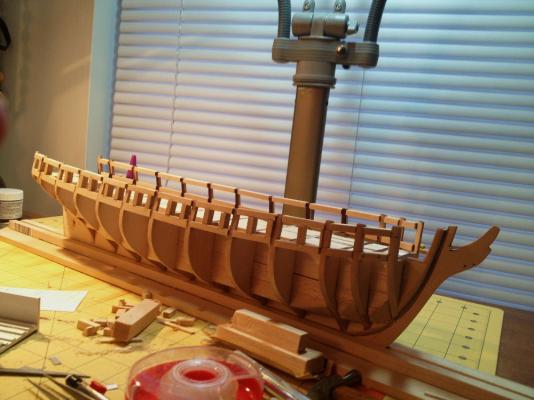
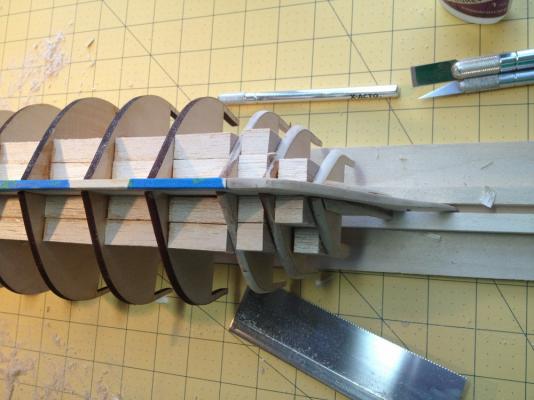
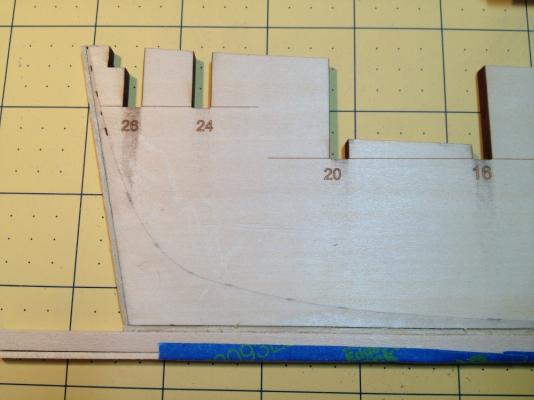
Bow and Stern Filler Blocks: With this entry in the build log I will be caught up to where I currently am in the building process for the Syren. The bow and the stern were giving me a lot of problems in getting the correct shape. First the Bow... I started to dry fit a plank along several places on the bow, when i realized that the filler blocks were not in the correct position. They were too far astern to correctly back a plank sitting in the rabbit, so they had to come off. In the process I re-faired the blocks, and installed balsa fillers between the first bulkhead and the bow filler blocks. I used 1/2" by 1/2" balsa and sanded to shape. Now the Stern... I started by using the technique described in the instructions, but I had two problems. The first being, by framing the adjacent sides of the triangle only, I was having a very hard time fairing the blocks to conform to the correct compound curve. The second, being that the supplied wood was just too hard for my taste. I wanted something softer. So, I removed the already installed stern filler blocks, and replaced them with the same balsa stock that I used in the bow. The soft wood shaped up nicely in a few minutes.


-
Thanks Keith and Augie. @ Kevin, Yes the jig was a block, cut to the width / height of the port and a handle glued on to it for easy maneuvering. I was pleased with how it worked. @ Augie, I am trying to be patient and take my time with all of these framing details, to help out I purchased a micrometer to help out in the filing. And I have looked at your Syren as close as the photography allows, it looks very good to me!
-
Excellent work Juergen. I will be following your progress on this build. I really like the way you made the hybrid, frame / bulkheads. How did you pick your subject?
-
Great Work! and such an interesting subject! I am rereading the Aubrey Maturin series now, and I have to say that the Sophie has been an interest of mine as a modeling subject. Thank you for the inspiration, I may just have to act upon the inclination after seeing your work.
-
Great Work! That is a pretty amazing, and precise, planking job.
-
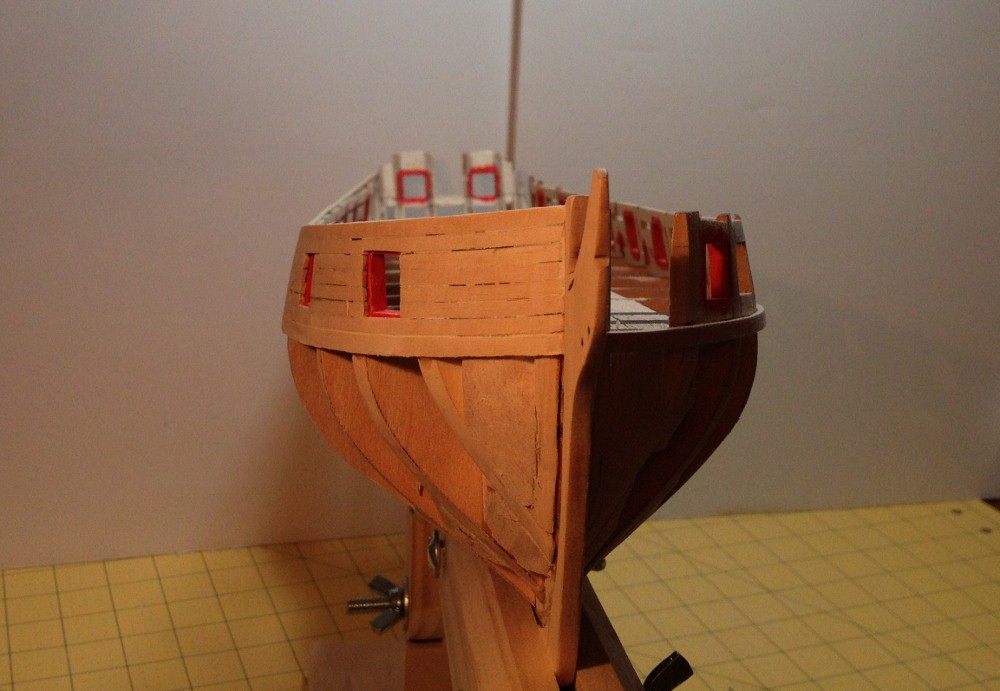
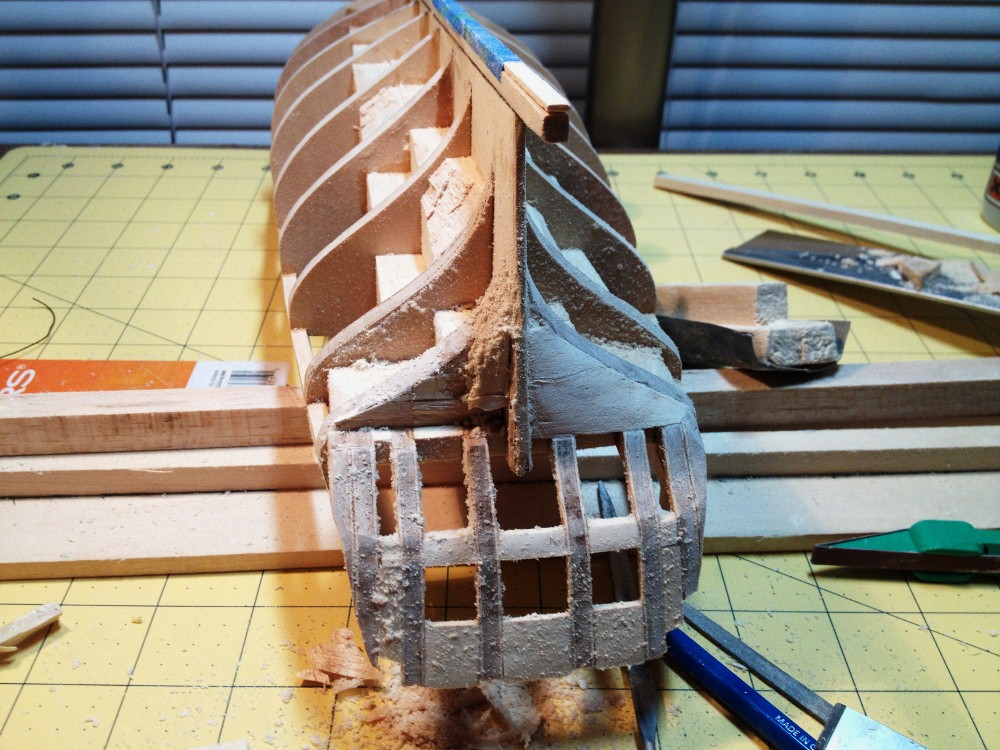
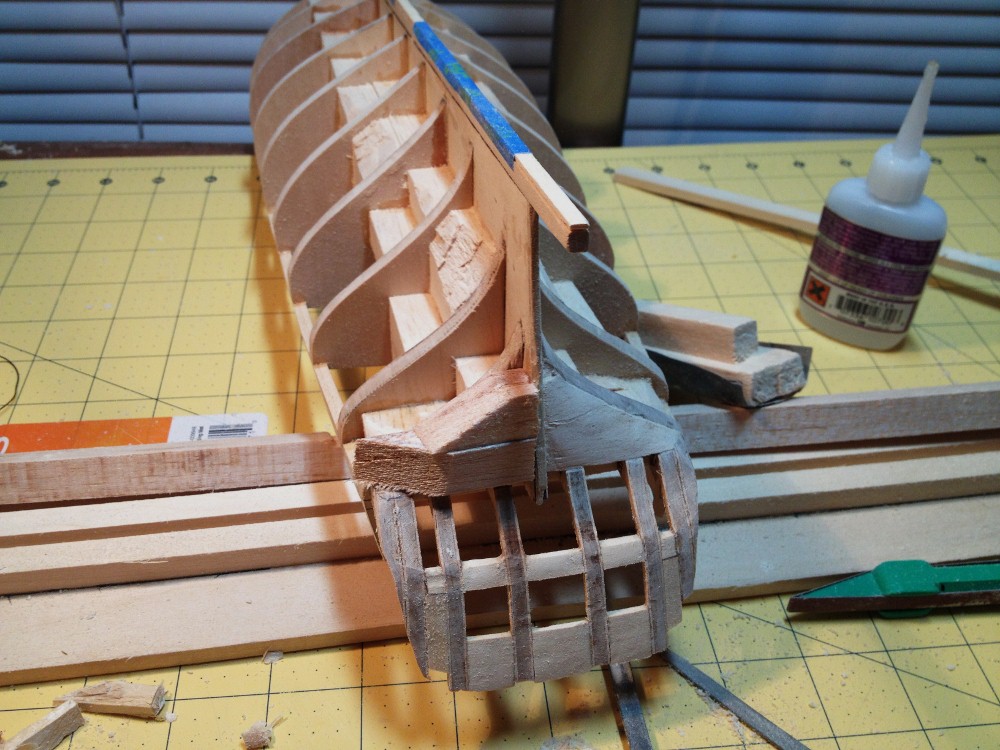
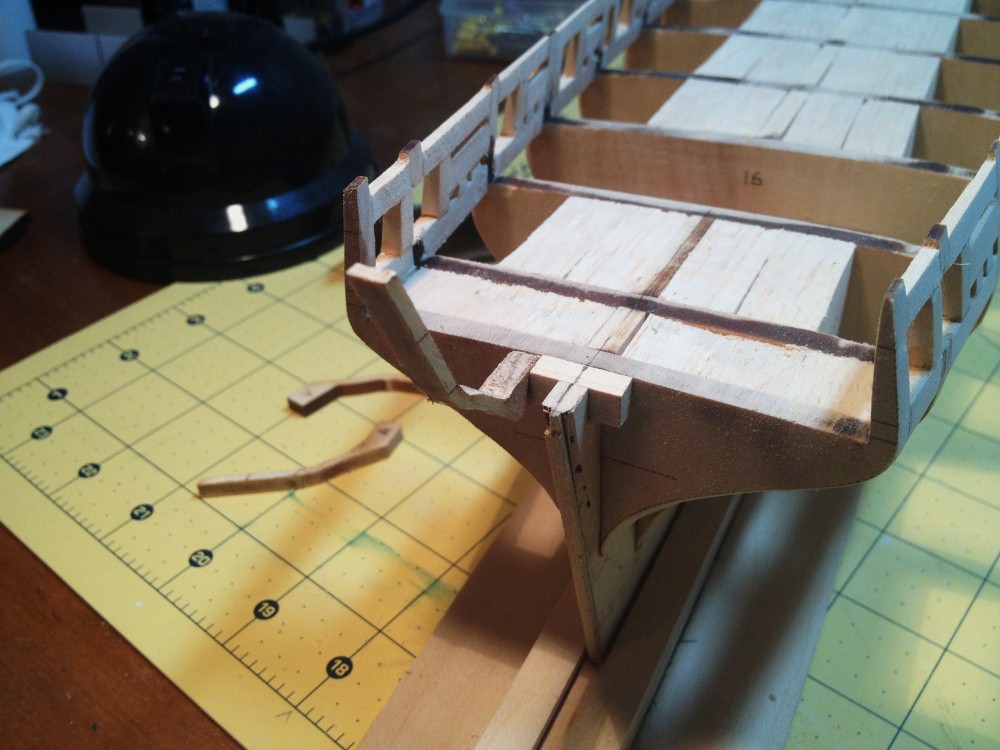
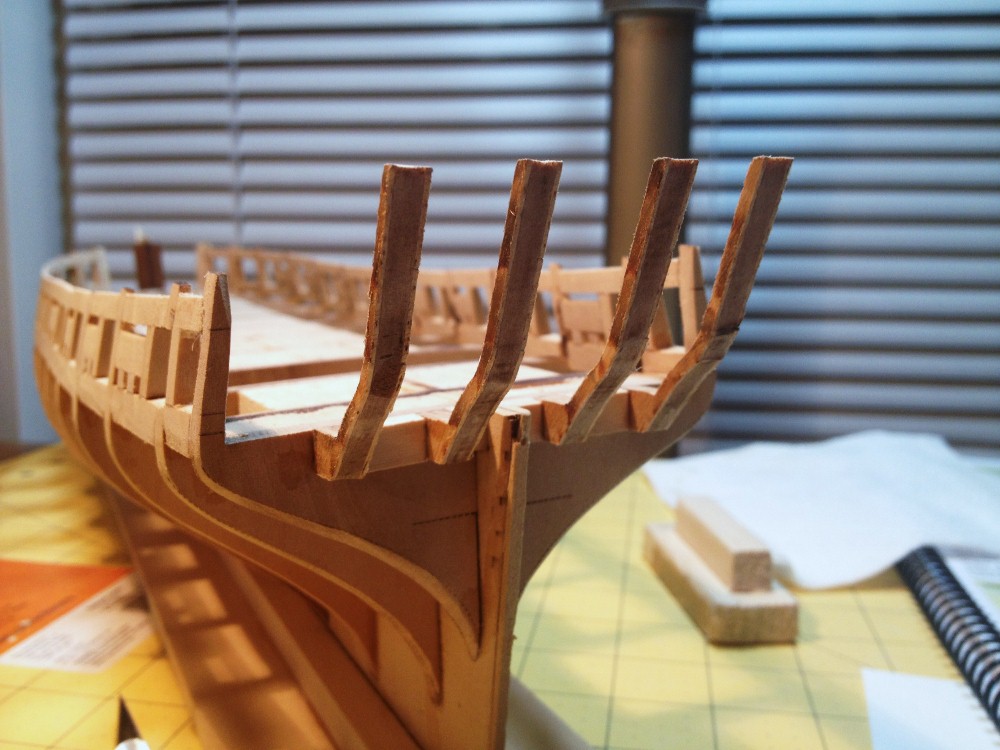
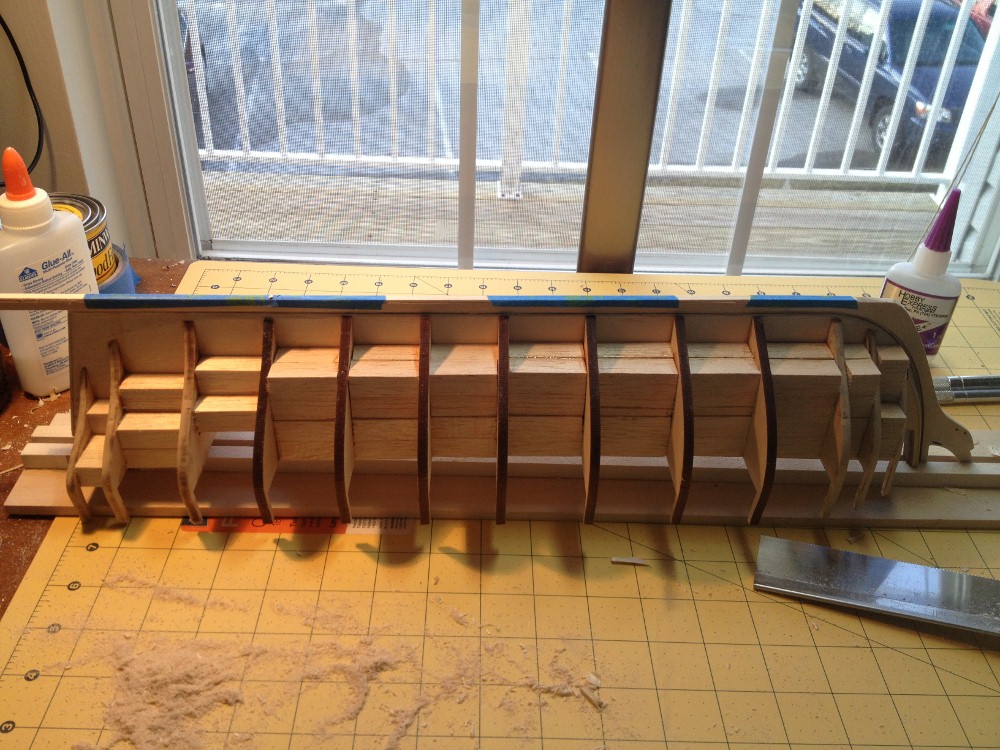
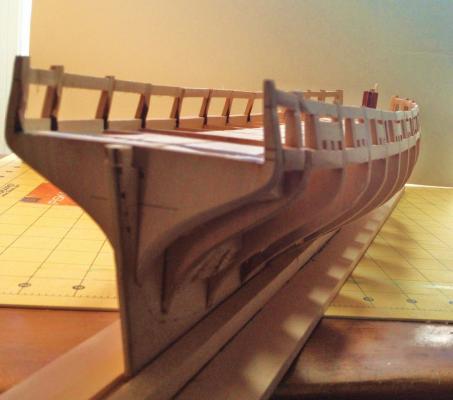
Transom Framing: Retrospectively, I would have done this stage a little differently than what was executed. Somehow being more precise with the framing. Using the provided template, the gunports came out a little out of true, though I am able to fix it with some creative filing. Perhaps the most difficult part of this process for me was the fairing. I sanded in fear of the whole assembly breaking under the strain, though I managed to get through it without breaking anything.


-
Thank you Geoffrey! Ben, I used the marks the first time around, then I switched to battens when I redid the sills and lintels. Even so, I made a few mistakes, though I will accept them as part of the learning process. These being the first gunports I have ever modeled.
-
Thank you Alistair! I hope to get back to finish this model soon. I have had an unusually large work load over the last couple of weeks, which has put a crimp in things at my shipyard.
-
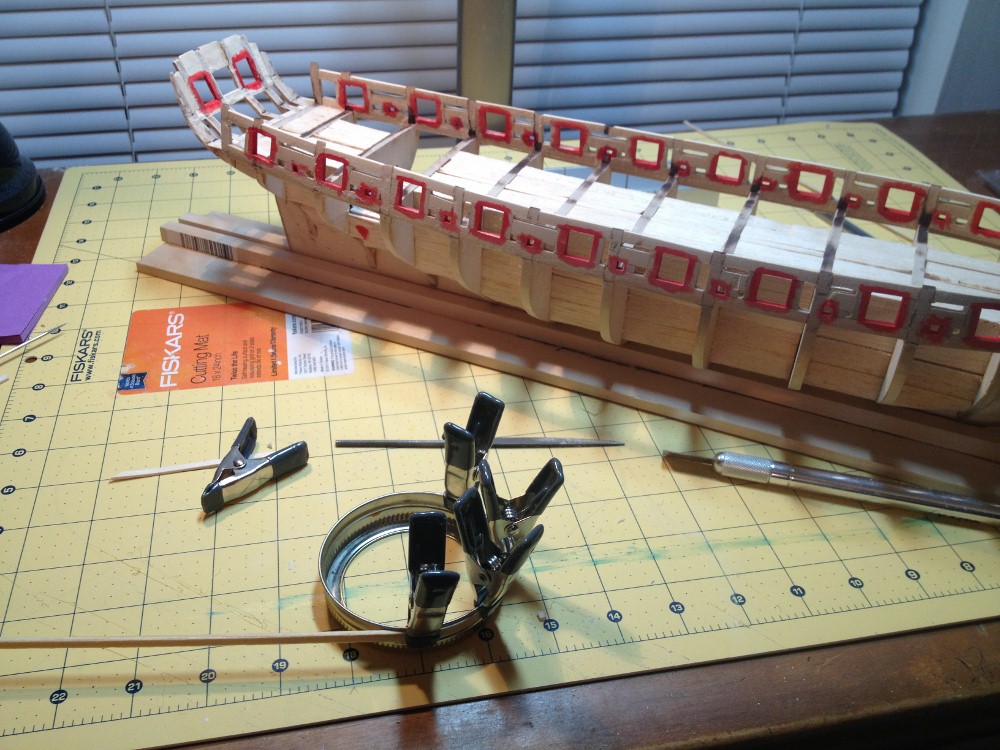
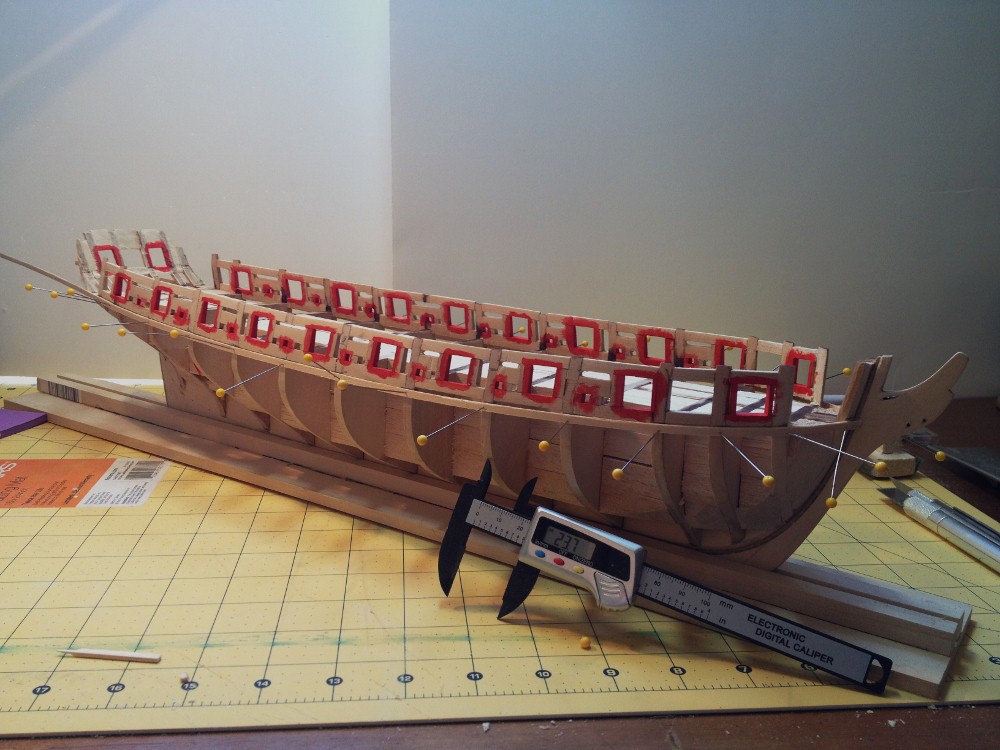
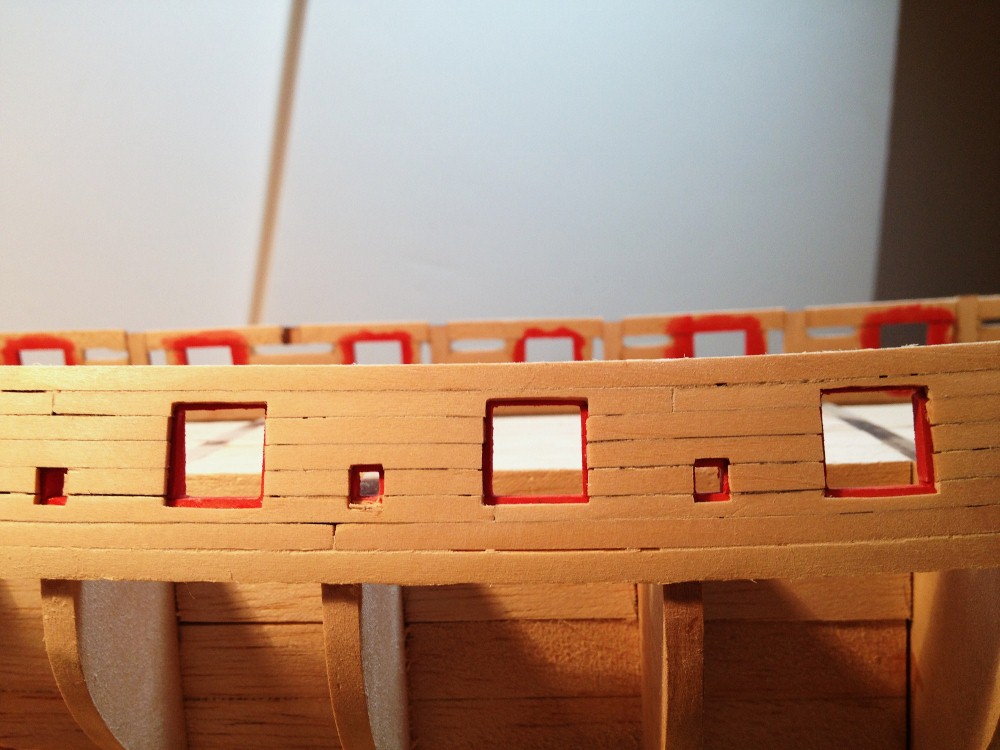
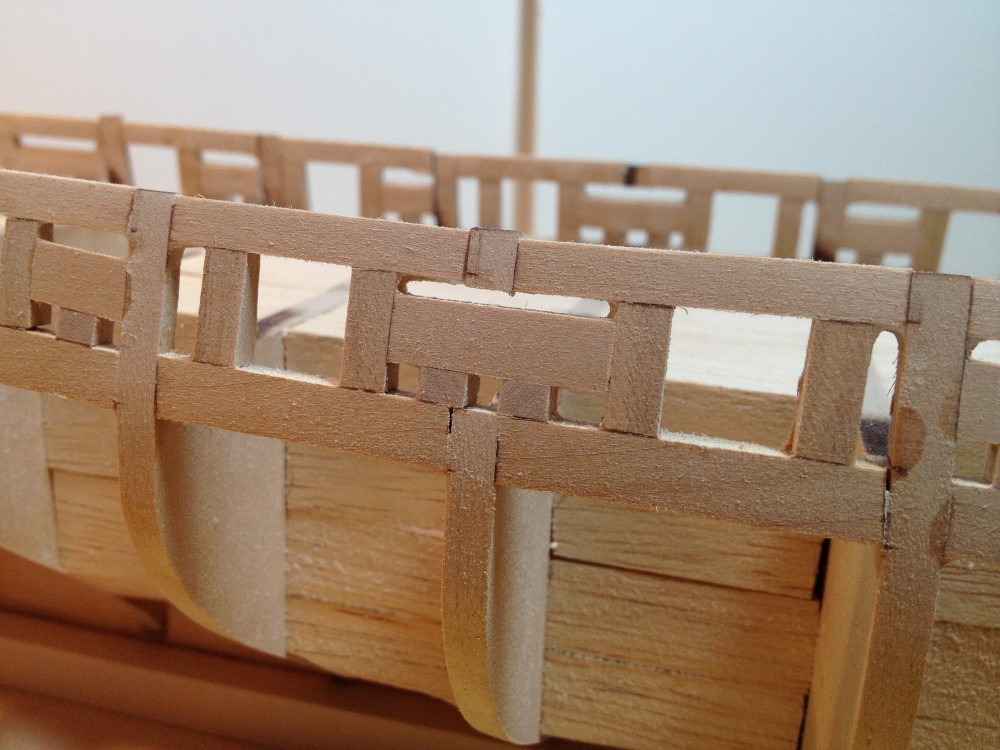
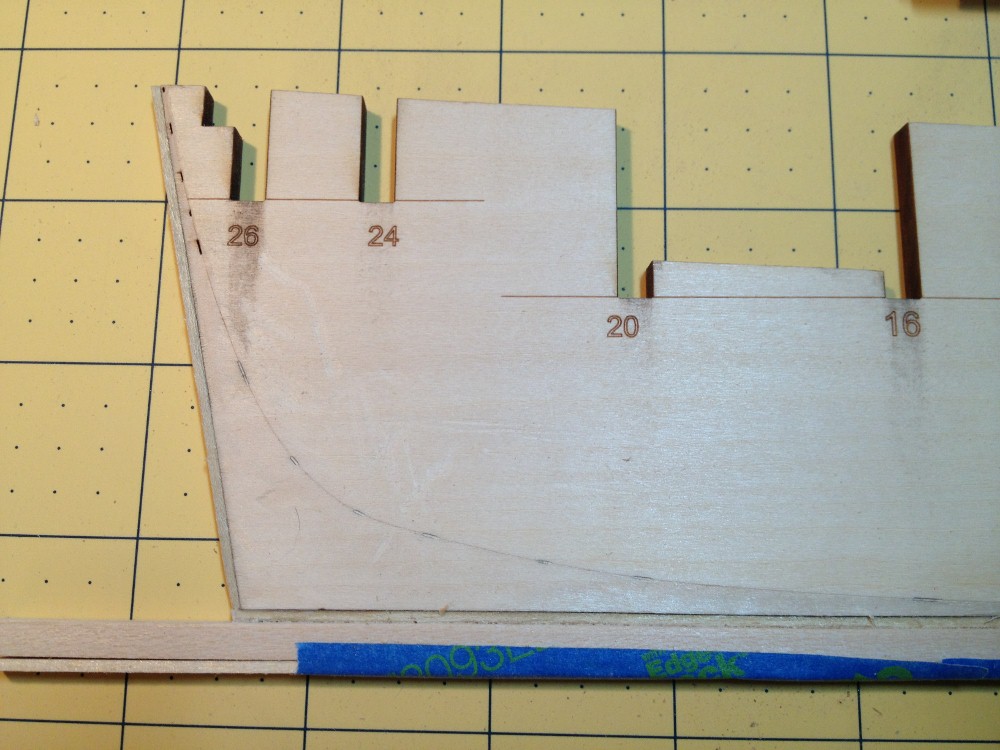
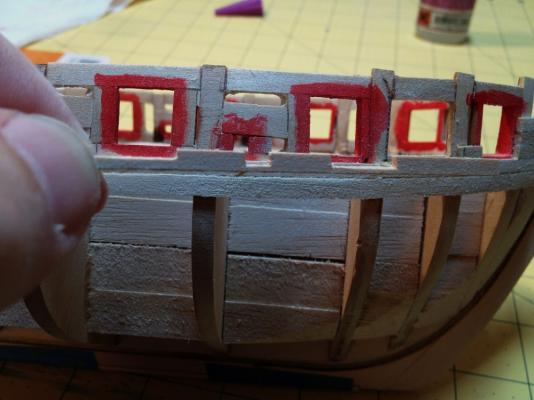
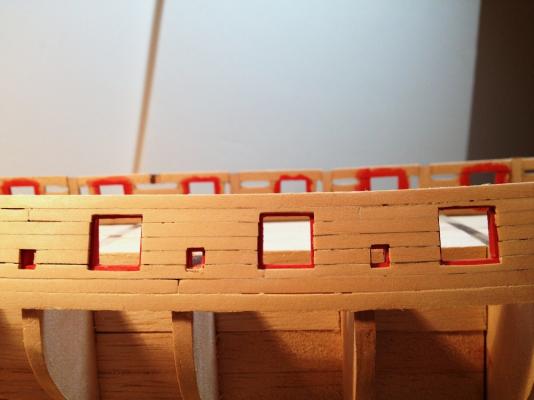
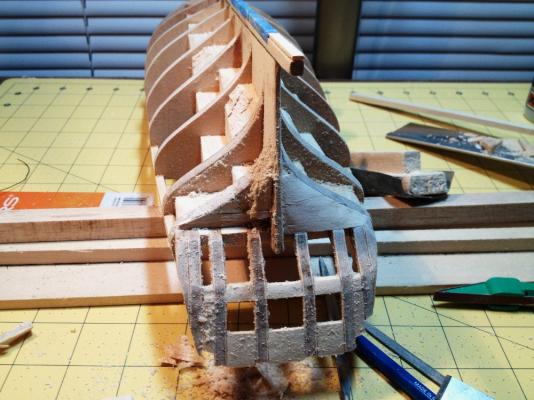
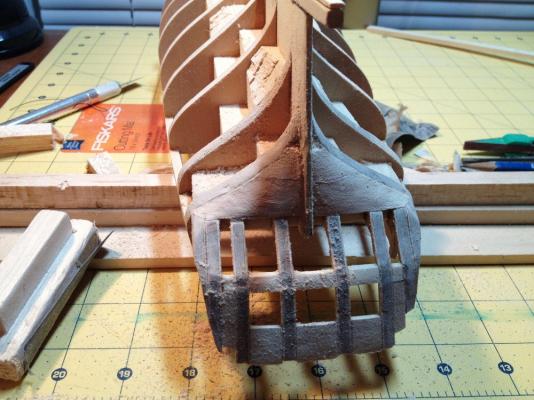
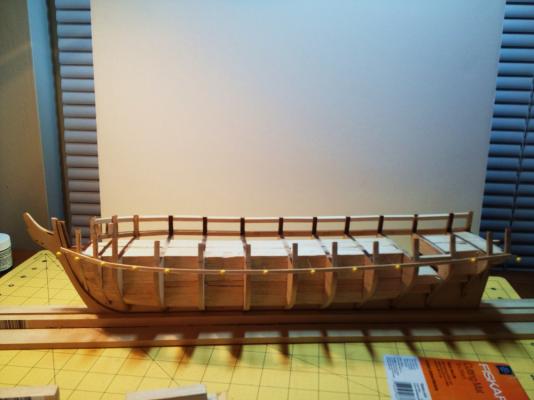
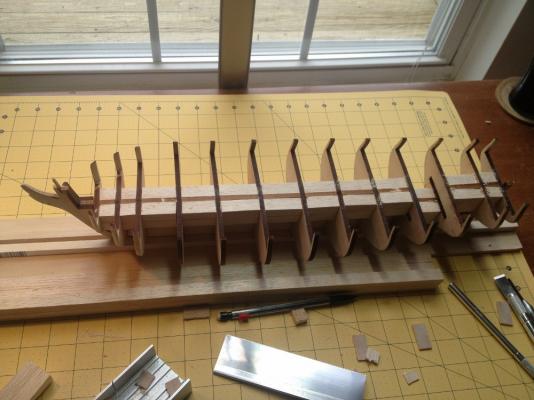
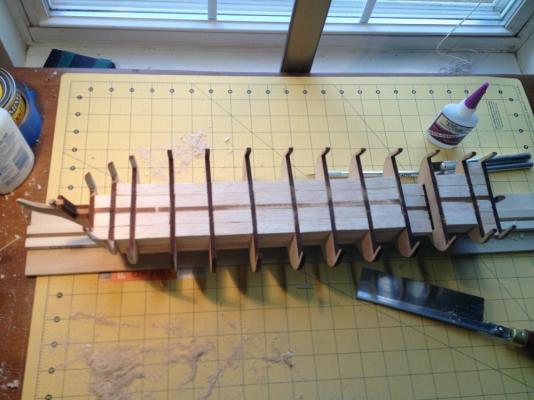
Gun Port Framing: I still have a couple of posts to go to catch up to where I am actually at with this build, So hopefully I will get caught up this week. The gun port framing on my Syren was a challenge for me. I started it because I wanted to do some "rough" work instead of continuing with the "fine" details of my longboat. What I did not know, was the "rough" work has some pretty tight tolerances in it to make it right. In the end I know I will have issues down the road with some of the ports. Although, I did just purchase a digital micrometer, and after taking measurements all over the framing I can say that they are pretty remarkably consistent One thing to keep track of during the framing process, would be to check and double check your alignment of the sills and lintels against the markings on the bulkheads. There are a few places where I am noticeably off despite being aware of this alignment during construction. Something That I did that I would say worked well, is that i made jigs for the gun and sweep ports, that were the correct dimensions for the opening of the respective ports. While installing the posts, I would insert the jig into the port space, and set the posts accordingly to the jig.


-
Thank You Geoffrey and Eric. I look forward to feedback.
-
Thank You Augie! I have been following your build log, it was a major motivator at getting my Syren underway. You are welcome David. They do make the model very strong, and give it a nice heft. I try to put at least one thing that I learned along the way in each of my posts in hopes that they will help others in the hobby.
-
Filler Blocks and Fairing: The filler blocks that I used are put together from several 1/2" X 1/2" pieces of balsa. I did not have access to anything larger in any store within an hour from here, and the tools that I have at present are really not capable of cutting much thicker, so I decided to have a go by making compound blocks. This is the first time I have had to put filler blocks into anything, but I think I might have hit upon something good by using the compound blocks at the bow and stern. As the profile of the ship sweeps in toward the center, or toward the keel, I was able to subtract blocks instead of cutting large chunks out of a single mass. Fairing was an easy process until I stopped paying attention to what I was doing, I think something my four year old was doing in the next room caught my attention, and Snap! My stem piece was laying on the floor. That makes me two for two in breaking off stems on wooden models. The upside is, that it was a clean break, and the seam will be hidden by copper eventually.


-
Thank You Augie!
-
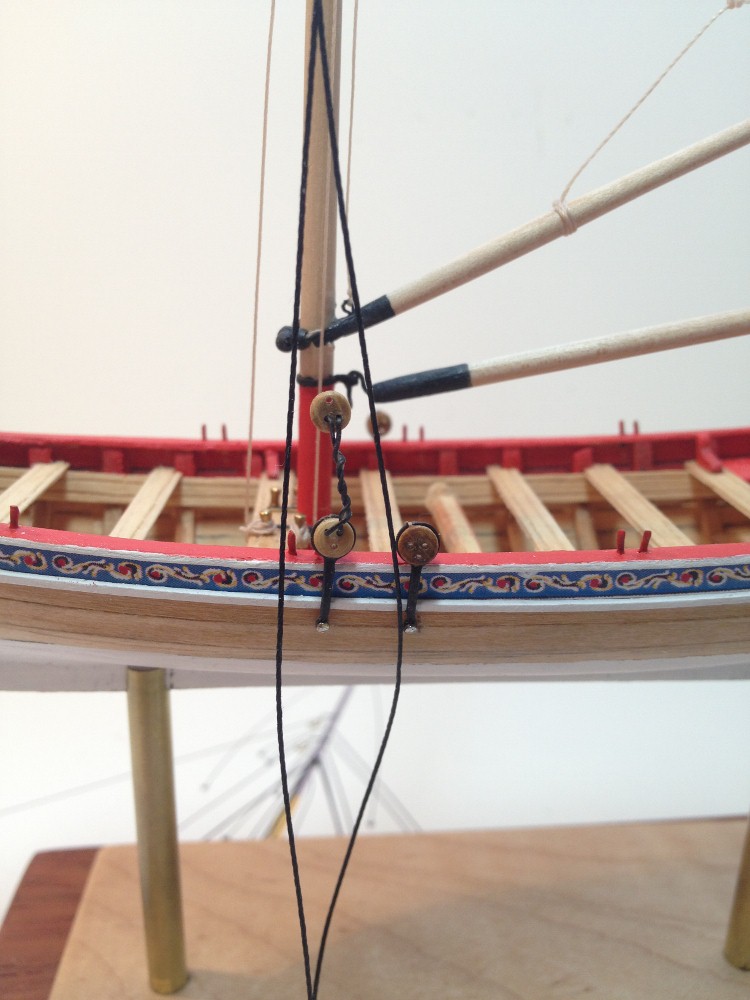
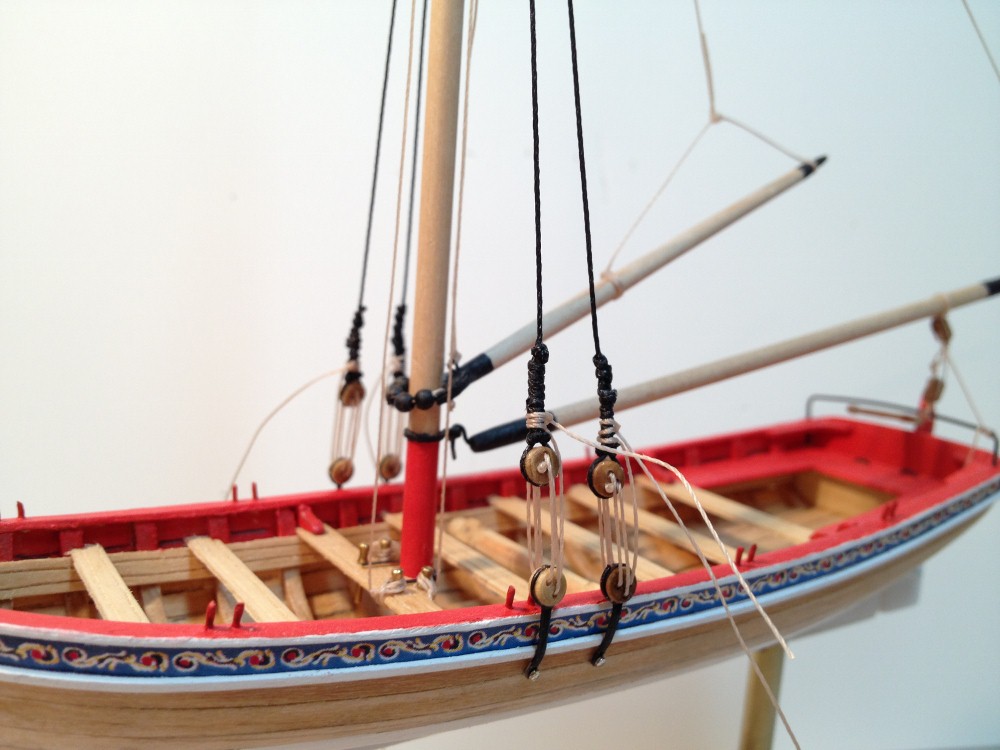
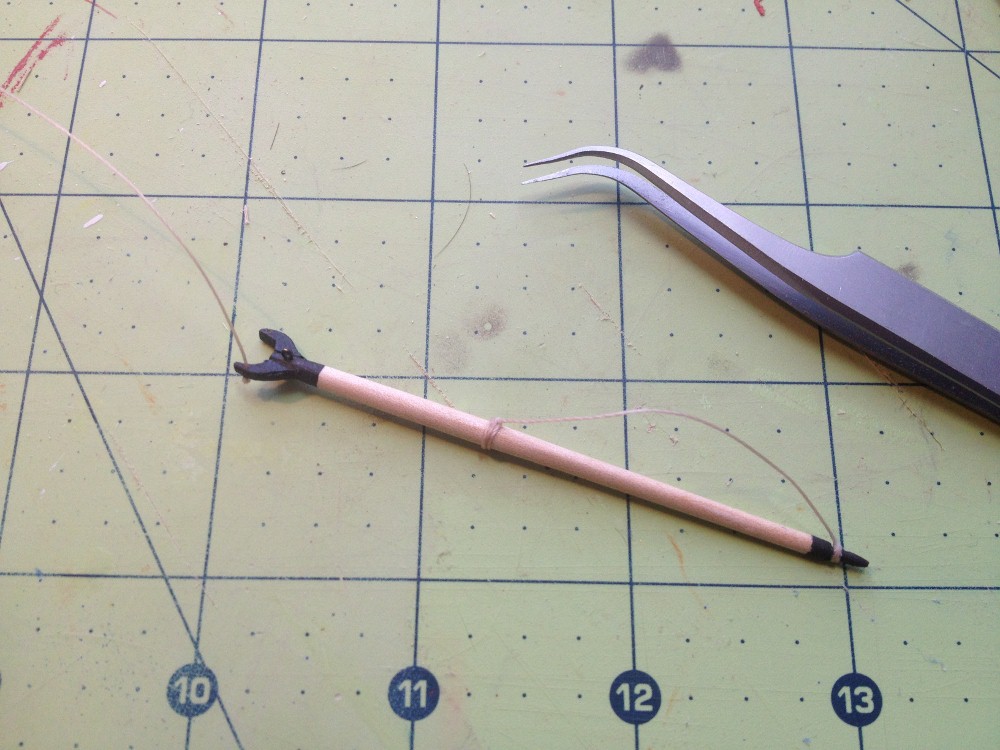
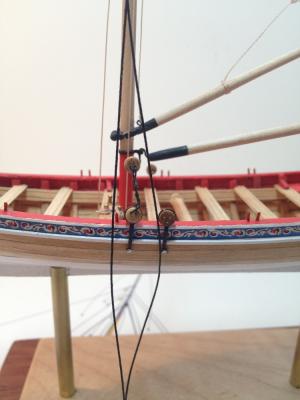
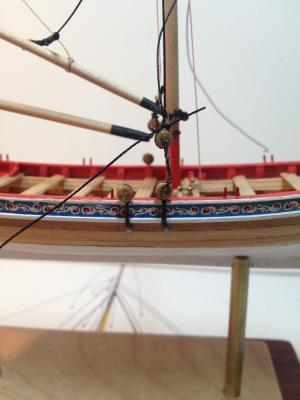
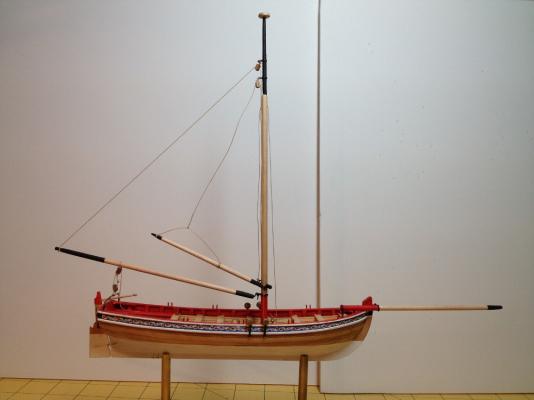
Shrouds: After repairing the peak halyard, and making an afternoon run to the local hobby store to buy some dental tools to help with the rigging process, I tackled the shrouds. I have to say as rigging goes, by following the instructions provided by Chuck, it was an easy process. I definitely deviated a little in what "seizing" means to me perhaps, but overall I am very happy with the results! As I have stated before in this log, wooden ships and rigging are a new thing for me, so some of the work is klunky compared to some of the excellent work on this forum, but that is what its all about for me, to learn by doing. A little note on process: I used the "claw" method described in the instructions to ensure the uniform distance of the deadeyes. It worked great, and it only took my about three minutes to make the claw out of some wire and a drop of CA glue. Once I had the shroud wrapped around the deadeye and secured, I took the claw off, and continued the seizing using both hands. The one down side here. Perhaps I used the wrong material, but there was nowhere near enough black thread to do both sets of shrouds. In fact, there was only enough to do one, and nothing else. So I raided the Syren kit for some identical material.

-
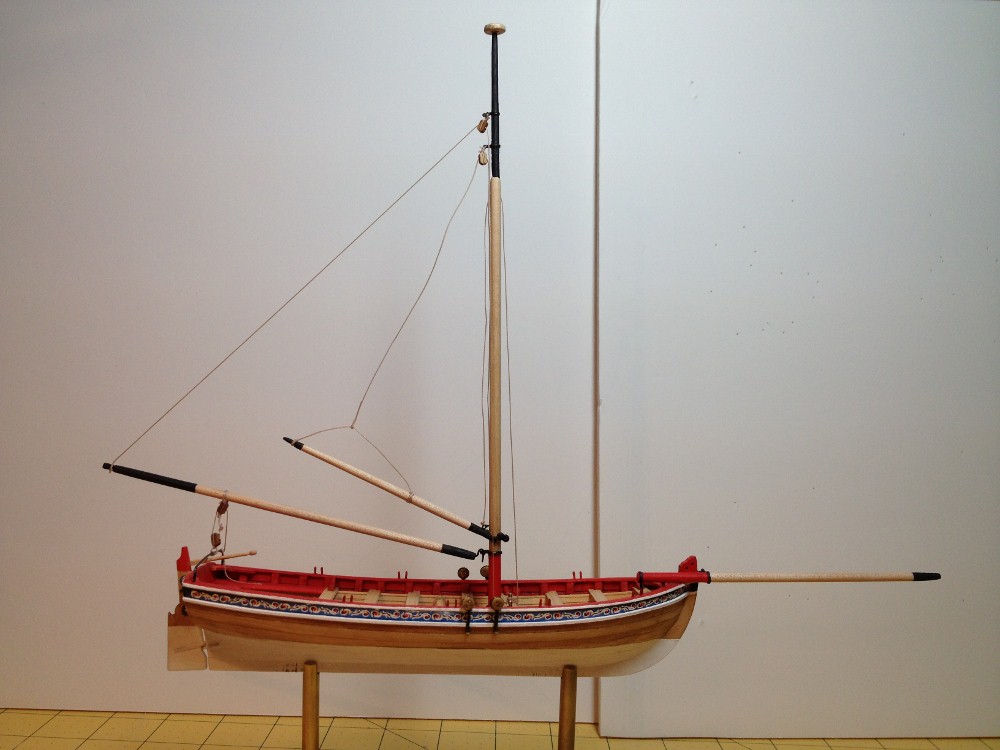
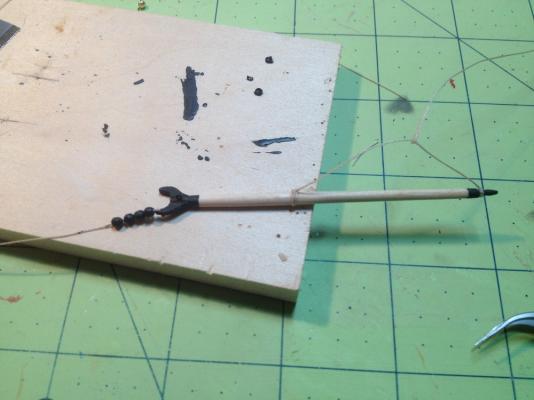
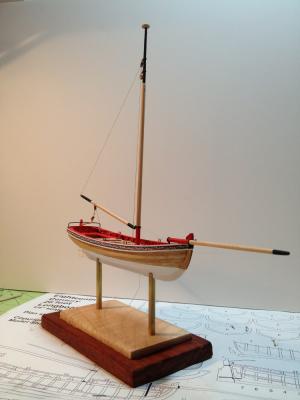
Thank You Toni and Chuck. I went back and re-rigged the gaff using both relaxing the thread, and gluing the jaws of the gaff to the mast. The results were much better than what I had. It's not up to a expert level by any means, but I am happy with it. The Repaired Gaff Rigging:
- 58 replies
-
- 1
-

-
- model shipways
- 18th century longboat
- (and 2 more)
-
Hello All, This kit has been languishing in my study for almost a year, waiting patiently in the box for me to start it. As I have noted in my 18 Century Longboat build log, this kit was a consolation buy for me during a move. I have long wanted a Model Shipways kit, and this one was available at my local hobby store. Not that Syren was my only option, I chose this one because I found the subject compelling, and the model quite beautiful. Once we moved, I found that my new work space was on the small side, so I chose smaller projects to work on in my free time. However, after building the longboat, and seeing so many other great builds on here, I was inspired to begin Syren regardless of the less than ideal space. To begin the build, I made short work of the false keel, keel, and stem assembly. Taking time of course to make sure that all of the parts were properly aligned, and fitted. I unfortunately do not have any pictures of the bulkhead installation, not sure how that happened. I have seen many great and ingenious ways of making sure one's bulkheads are aligned on this site, and I decided to follow suit by borrowing some of my Son's Duplo blocks to use as squares. They worked great! Over the next few days, I will be adding to this log, up to the point at which the build is currently. (transom framing) However, my building efforts over the coming weeks will be to wrap up the long boat. Unless of course the winds of inspiration blow contrary to the best of intentions.


-
Rigging the Gaff: I was able to construct the gaff from the provided kit parts fairly easy, though I wish that I had a mini lathe. I ran into problems with rigging the peak halyard, which you will see from the photos below. I am not happy with the current job, so I will be redoing the peak halyard soon. I was fairly frustrated so I have been spending my building time lately, getting my Syren kit framed up. I will be returning to the longboat this week in the push to complete the model. Any tips that can be given about making rigging lines look taught with out putting too much pressure on the lines would be greatly appreciated.


- 58 replies
-
- 2
-
-
- model shipways
- 18th century longboat
- (and 2 more)
-
Thank you Hopeful. And indeed you are correct, the Syren is already on the ways here in my shipyard. I reached a point in my longboat build where I was having problems due to a lack of rigging technique, which I will explain, and ask for suggestions in my next post here. Look for the Syren in a new log here soon. --Jason
-
Thank you Gentlemen! I really appreciate the compliments, especially from such accomplished modelers such as yourselves.
-
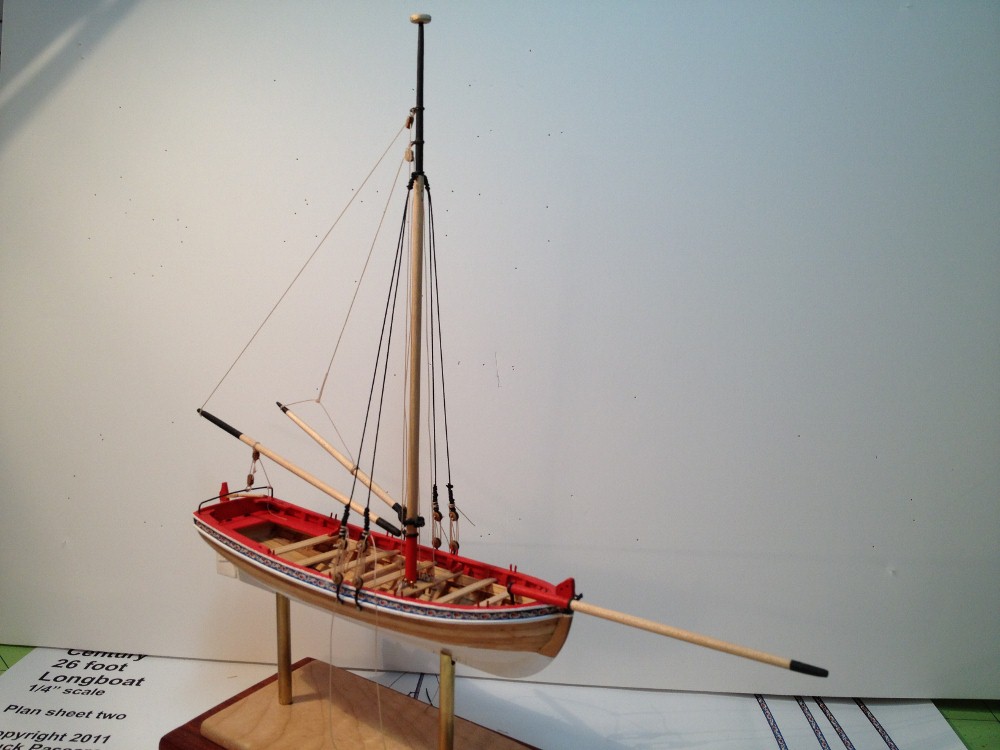
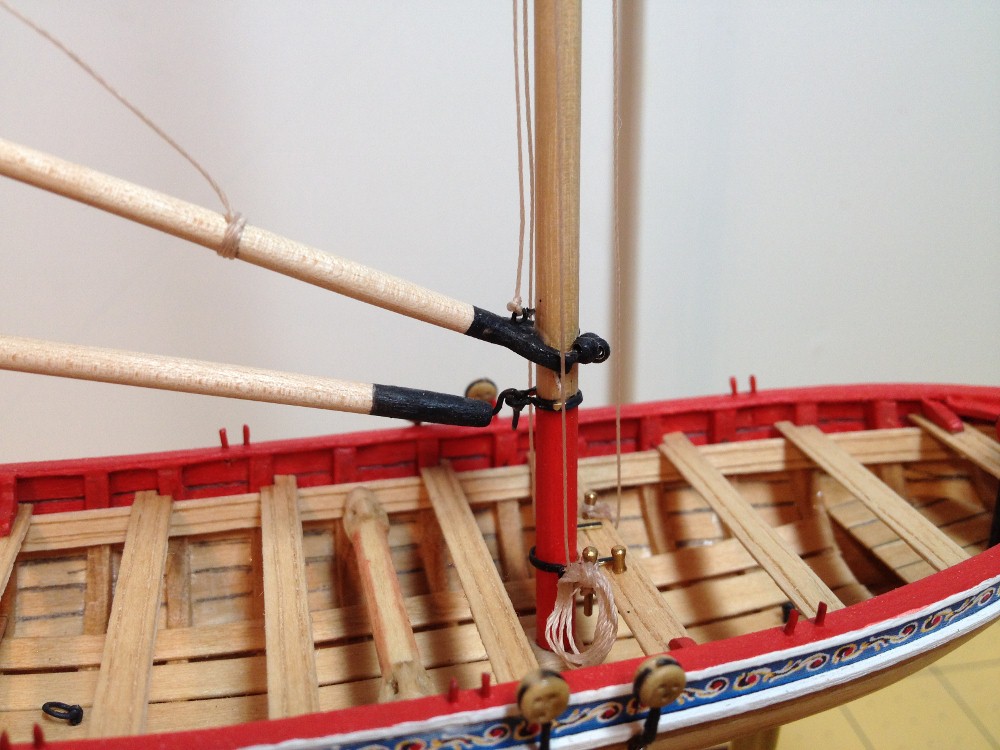
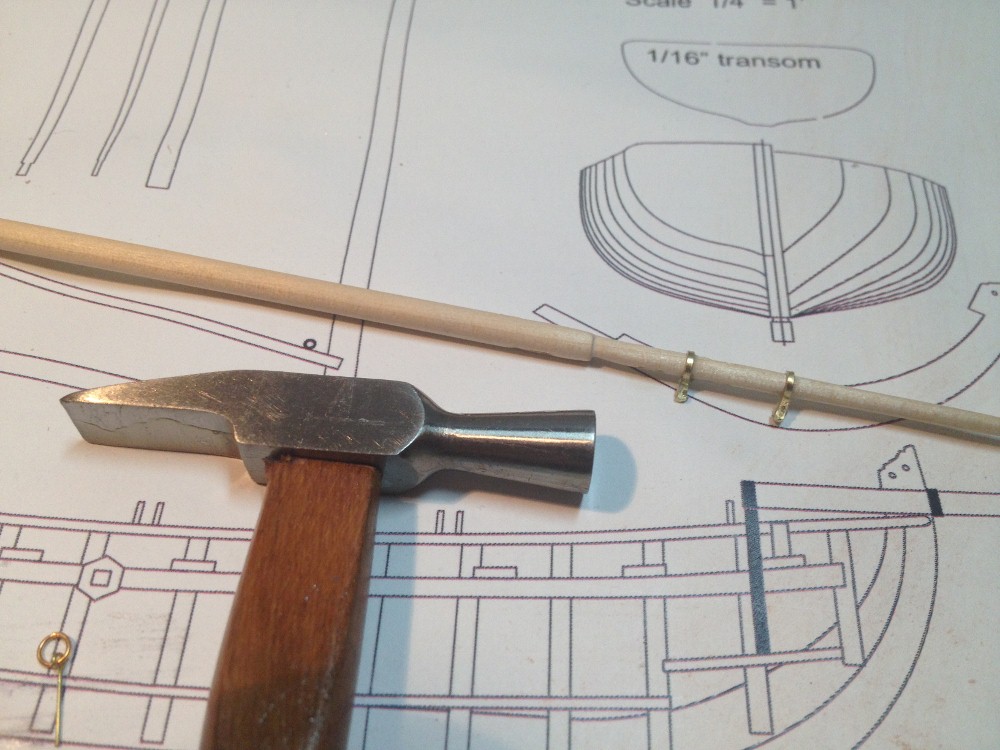
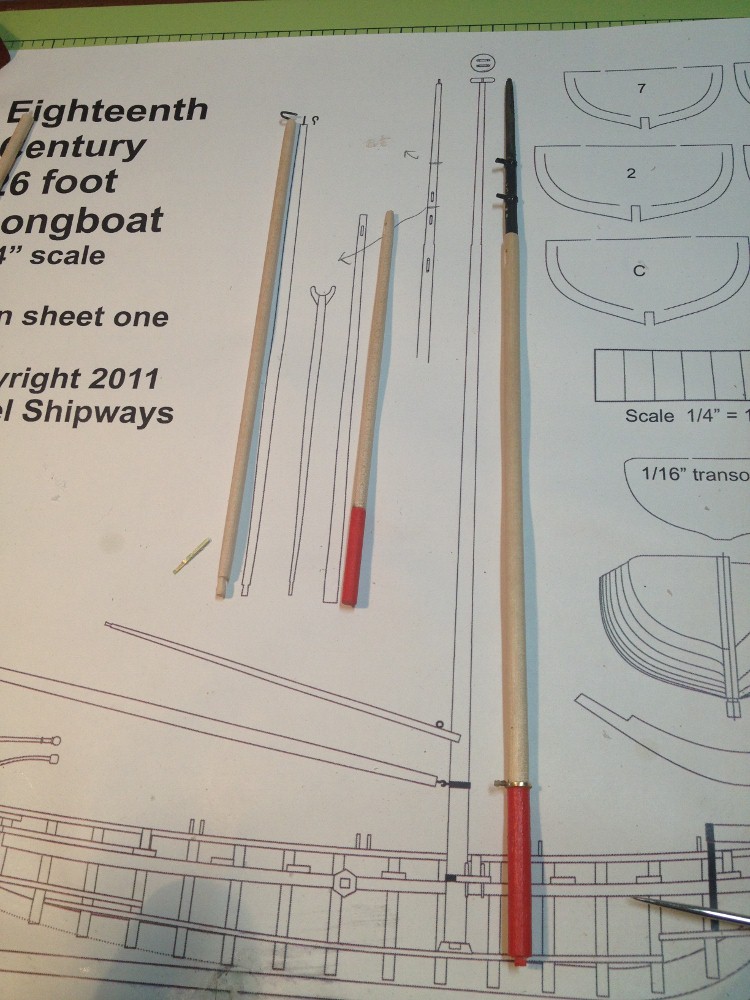
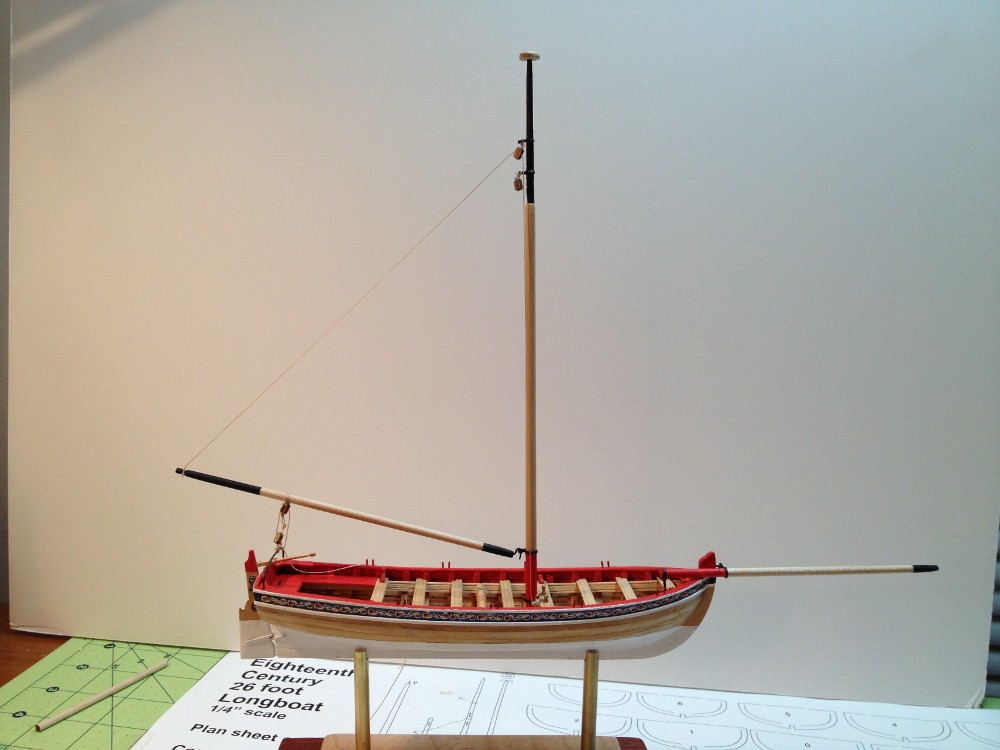
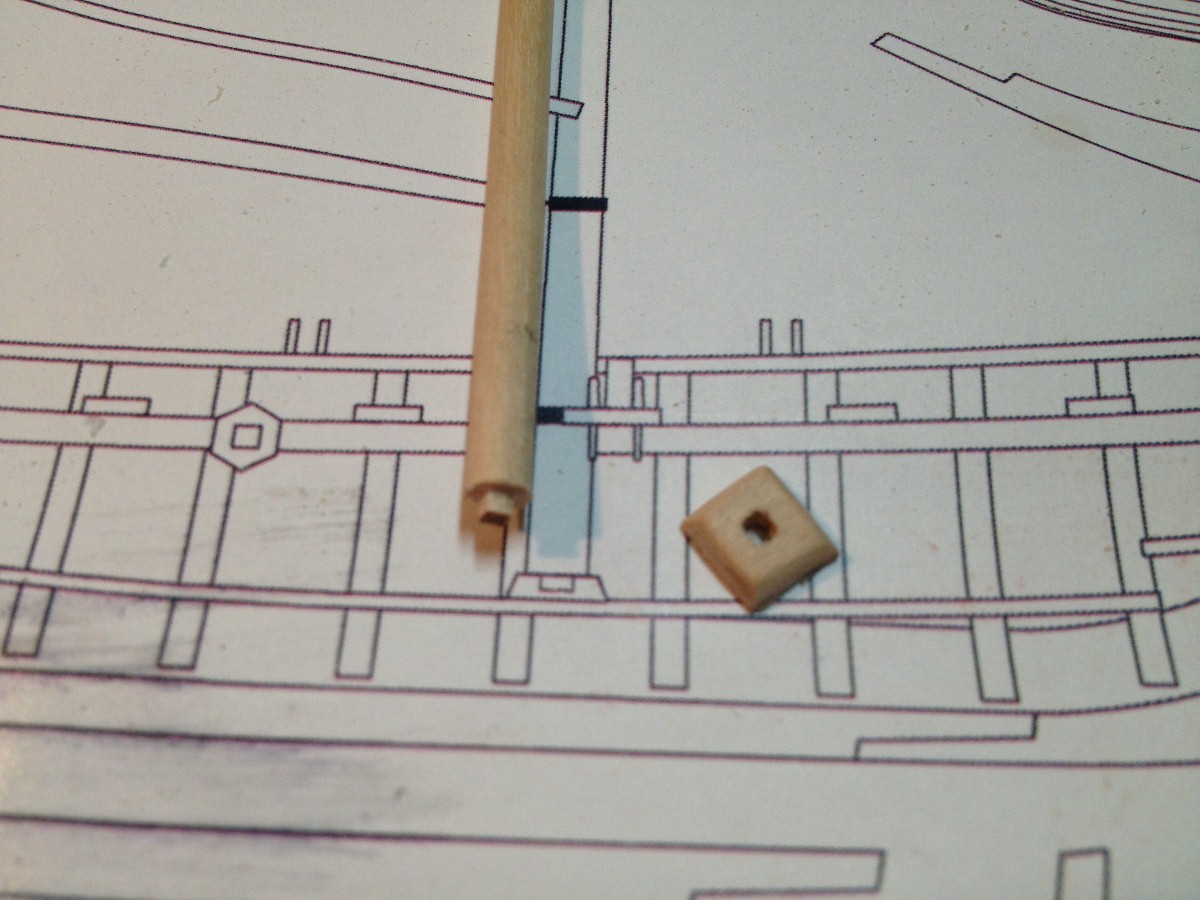
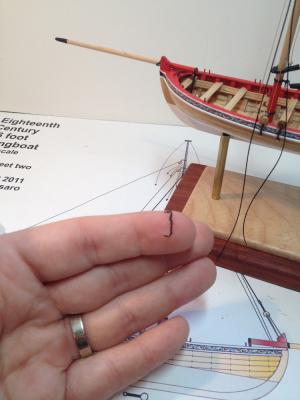
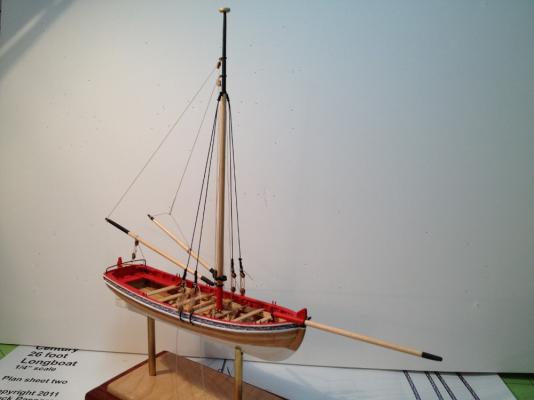
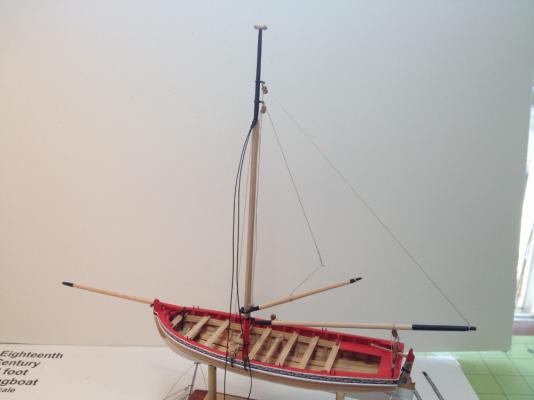
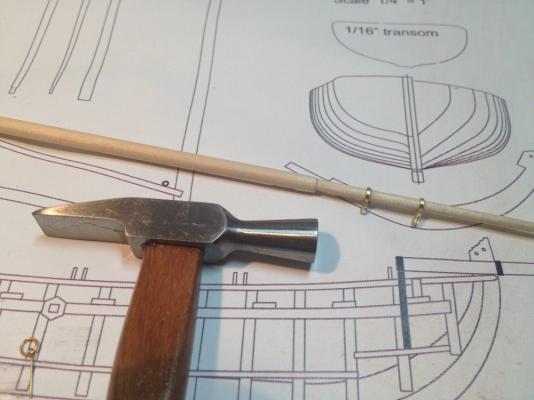
Masting Update: After acquiring the requisite diminutive drill bits I was able to continue towards completion of the longboat, but I must admit, that this phase is completely alien to me, as I have always given rigging a wide berth on any plastic kit that I have ever worked on.. And I am finding the learning curve on seizing blocks, and making sure that lines run straight to be rather steep. After the first round I am happy with how the mast and bow spirit came out, but the sheet tackle needs reworked. I knew it wasn't going to work right when I first seized the block to the horse, which didn't sit right. So I will be re-doing that part in the near future. One tip that I can perhaps pass on, a helpful to me, trick for getting the holes through the brass mast fittings. Even with an awl, I was at first having problems with getting the necessary sized hole in the fitting. So, I made the fitting wider by striking it with a small hammer. I didn't need to work it very much because the brass is soft. but it gave me some extra room to work. Once the hole was drilled, and the CA set, I ground the excess material off with a rotary tool.


- 58 replies
-
- 5
-
-
- model shipways
- 18th century longboat
- (and 2 more)
-
Thanks 42rocker. Chuck, thank you for the pastels technique, I am going to apply it to the windlass. Unfortunately, I will not be able to take into account the advice on the horse. I risk too much damage to the cap and hull planking as the horse passes through the cap and right along the planking to the bench, and it is attached with CA. Even with using debonder, I don't want to risk breaking something else. However, I do want to ask if you know of any extant examples of a period boat, full size, that has a horse on it? I would be interested in what the real boats used. I am unfortunately paused in my progress at the moment, as I discovered in the early stages of rigging that I do not possess small enough drill bits to accomplish the necessary holes. So I have ordered the correct bits, and impatiently await their arrival in the mail later this week. In the interim, I have started my US Brig Syren kit, despite the small size of my work space, so I will be starting a build log for that kit shortly. --Jason
-
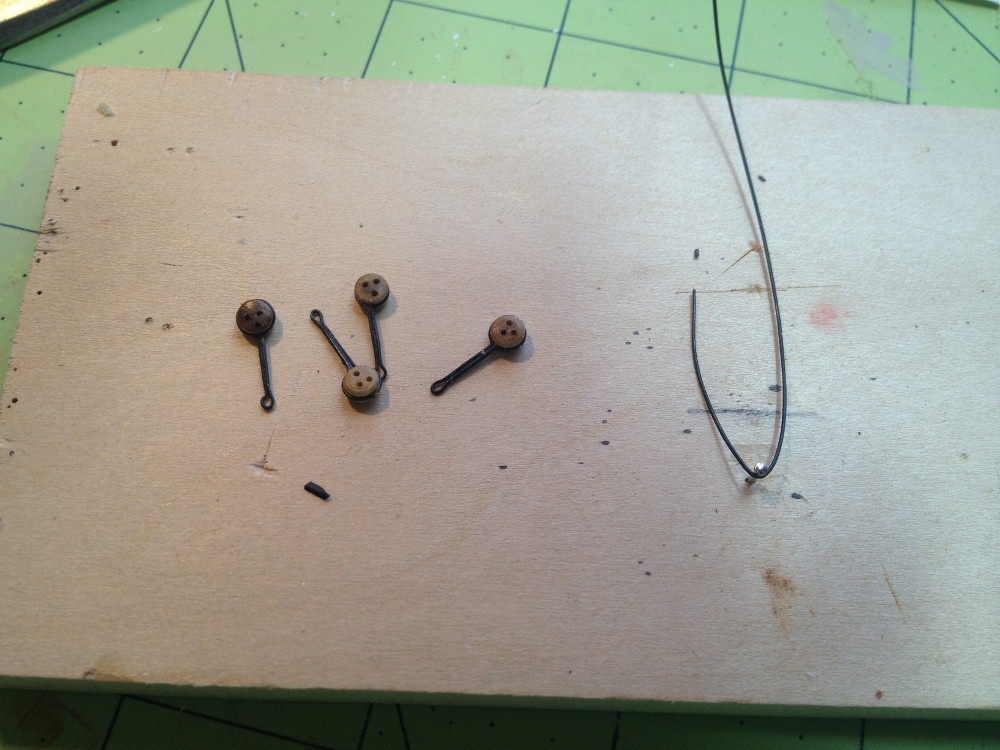
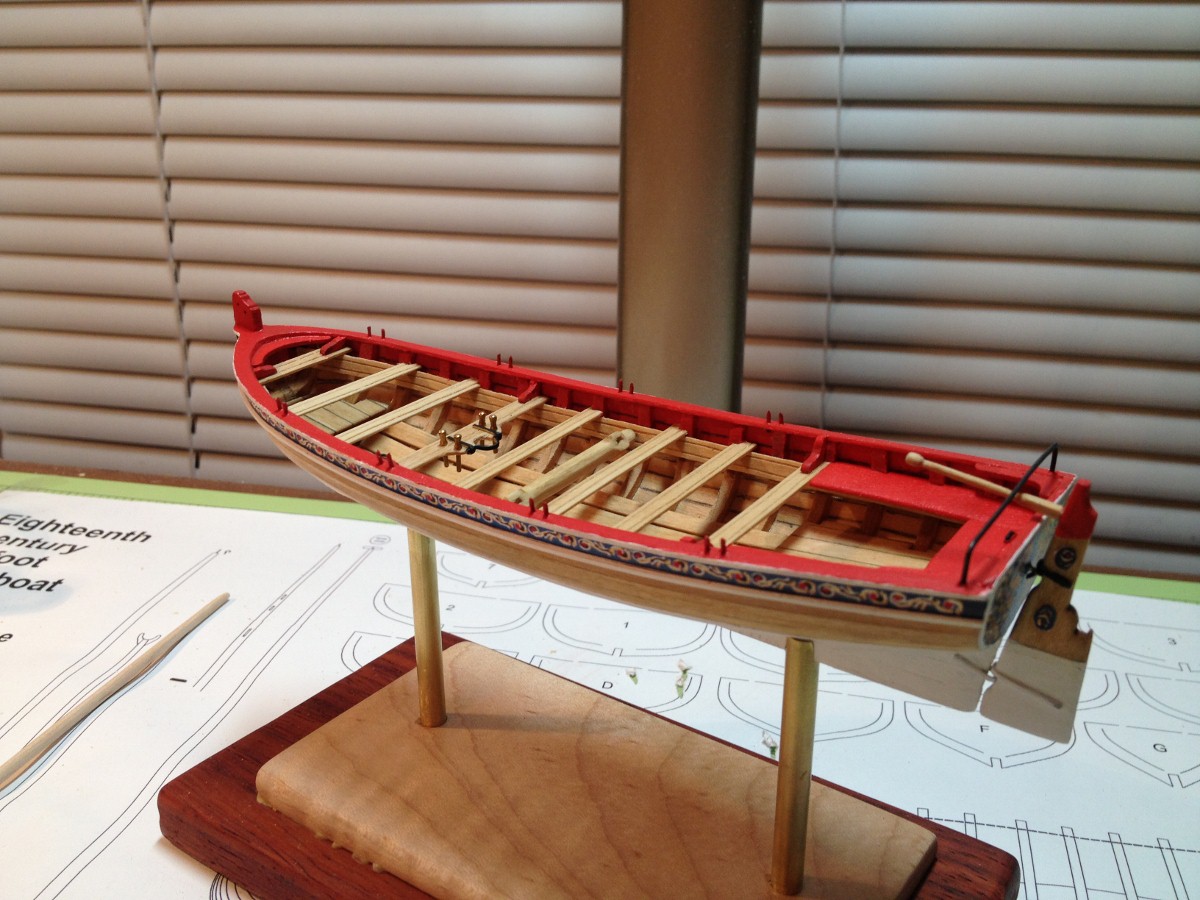
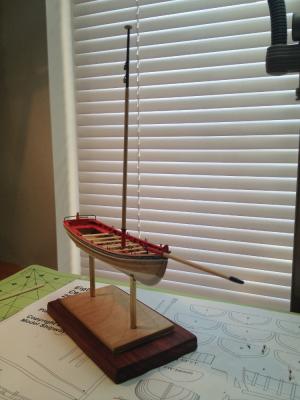
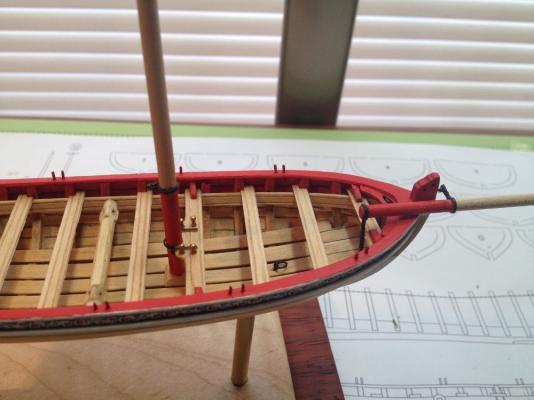
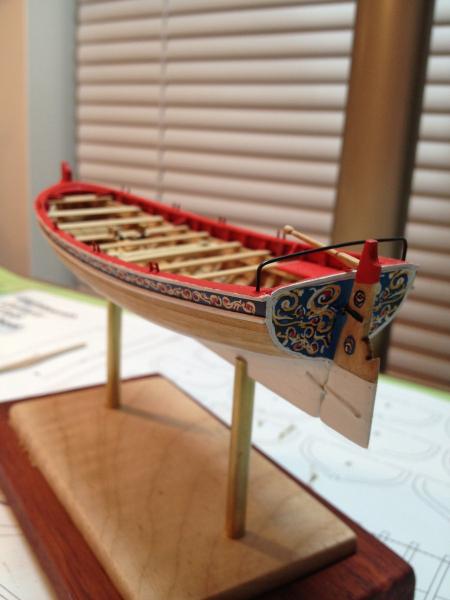
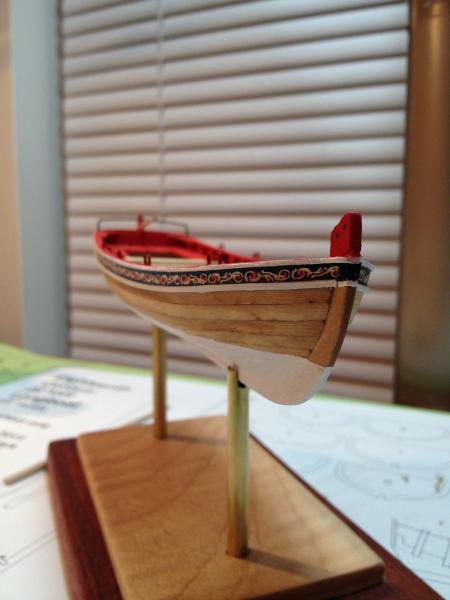
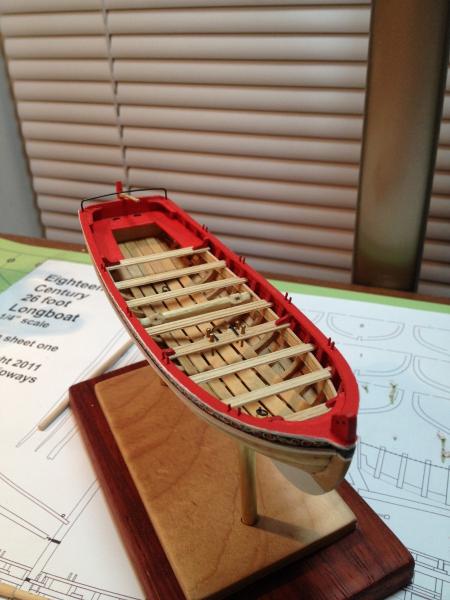
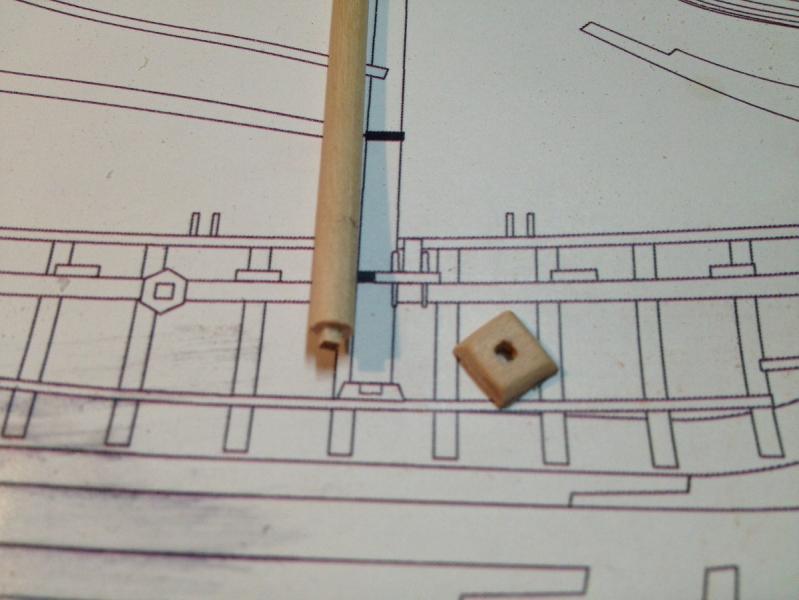
Finishing the Hull Details, and Preparing for Masting: Since the last build update, I have finished the details related to the hull, including oarlocks, windlass, rudder, horse, and eye rings. I am still not especially happy with the windlass, in terms of how it's finish looks. Even though the facets of the piece are relatively sharp, being filed into the wood, they are not well, defined, at least not under any light I have seen it under yet. Does anybody know of a finishing technique to bring out sharp facets in such a small piece of wood? The handles for the windlass have been made, but I will not put them on until the finishing details of the model are being installed. The projecting handles just seemed too susceptible to being damaged at this point if I were to put them on. A tip that I can perhaps offer about the installation of the Windlass. I was wondering how I was going to get it into the riser without scratching the wood with the wire axle. Instead of installing the wire into the windlass, I put pieces on each side through the riser, then positioned the windlass with drops of glue in the axle holes, then with fine tweezers pulled the axle wires through the riser and into the windlass. It worked pretty well. I also sanded the cap rail paint, and trim strip slightly, and put a few wash coats of paint to even it out a little. When installing the horse, I chose to go with one that spans over the tiller rather than under it. It may not look as clean from a presentation perspective, but I think it makes much more practical sense. In the instructions to the kit, Chuck does mention that boats of a later decade did have this raised horse, so I will call my example from a later decade in the 18th century. I have also started the main mast, and have opted to carve a mast step, like that shown in the plans.

- 58 replies
-
- 1
-
-
- model shipways
- 18th century longboat
- (and 2 more)
-
Thank you Sarah, I can't wait to finish it. Ben, I may try Newton and Windsor on a future build, especially since they are easy to get at the local craft stores. I may be a millennial, but I still like to buy things from brick and mortar stores rather than the web.
-
Hello Ben, Thank you, I did use the Model Expo paints, and I have mixed feelings about them. I'm not incredibly happy with the finish, yet it does look smoother to the naked eye than on camera. I typically use Vallejo paints, which are much thinner to begin with than the ME paints, that being said I did use some water just not nearly enough. As I go through the masting and rigging I will be trying smooth it out a little, but not with too much contrast in finish to the hull. I have to say, there are some great paint jobs here on modelshipworld with mirror finishes, but I am going to need another 20 years or so to gain the patience to accomplish that.
- 58 replies
-
- 1
-
-
- model shipways
- 18th century longboat
- (and 2 more)