HOLIDAY DONATION DRIVE - SUPPORT MSW - DO YOUR PART TO KEEP THIS GREAT FORUM GOING! (Only 27 donations so far out of 49,000 members - C'mon guys!)
×

Jason
-
Posts
202 -
Joined
-
Last visited
Content Type
Profiles
Forums
Gallery
Events
Everything posted by Jason
-
 I agree as well! I have this book on my shelf, and it is a favorite. The amount of information provided is outstanding including things like documentation of the productivity of the shipwrights in the yard, to a list of items needed to fit out the vessel. A treasure to look at with all of the illustrations, and to read with all of the information provided.
 -
That tuck frame is a really cool detail. The red counter is a great example of how colorful ships could be in period.
- 1,051 replies
-
- 1
-

-
- cheerful
- Syren Ship Model Company
- (and 1 more)
-
Excellent build! The addition of the figures and interior details is brilliant, and brings the model to life! Very well executed figures as well.
-
ancre La Salamandre by tadheus - 1:24
Jason replied to tadheus's topic in - Build logs for subjects built 1751 - 1800
Looking very good! I am enjoying following your build. -
Patrick O'Brian's Aubrey/Maturin series is a body of literature that has helped to shape who I am. Perhaps that sounds extreme, but those books have influenced my life in many ways; from giving me a much greater vocabulary, to helping me discover some of my favorite music. I was introduced to the series in 1994 when I was a freshman in high school, and since that time I have read the series through 5 times. I have read the first four books many more times than that. I think that a comparison to the other related series, Bolitho, Hornblower, etc... can only be done superficially at best. In this, only that they share the same time and place. There is certainly not a comparison to be made in terms of language or grasp of the period. O'Brian spent much of his youth immersed in the Gentleman's magazine and Naval Chronicle. In one of the videos posted earlier in this thread, O'Brian talks about how he poured through the Gentleman's Magazine, giving him a foundation in the period style, language, and events. The only way to get a more authentic feel would be to have an author from the period, such as Jane Austen, who also happened to be one of O'Brian's influences. For those who do not know what the Gentleman's magazine was, it was a variety publication that featured public events, literature, poetry, science, politics, and a host of other topics. It's publication ran from 1731 to 1922. You can read about it here: Additionally, as a body of work, I think that they are less sea story, and more examination of the human condition. At their heart, they search the depths of what it is to be human from the male perspective. Career, companionship, politics, food, love, hatred, music, disappointment, true friendship, utter ruin, hope, and how men cope with these and a host of other topics are the real back bone of the Aubrey/Maturin series. Yes they are back dropped in the Royal Navy during the long wars with France at the beginning of the 19th century, but they are about so much more than Cochrane's exploits in the Mediterranean, the capture of the Spanish treasure fleet, or Dance's action in the Indian ocean against Linois. I do enjoy some of the other series out there, particularly Bolitho, but to me those books are exciting, linear stories that entertain you from point A to point B. Escapist fiction similar to Cornwell's Richard Sharpe. Great yarns, but they are not literature in the higher sense. Hornblower was once a favorite, but I have since developed a repugnance to the self effacing or even self loathing character. So for me, O'Brian will remain the undisputed king of my fiction section.
-
Simulated Keel Bolts: For the simulated keel bolts I used brass wire @ 0.45mm in Diameter. Once the wires were all cut and installed, I used a flat file to gently sand the outside profile into a more gentle dimple, rather than the harsh break left by the wire cutters. And that brings me up to the present state of my cross section. Hopefully, I will have time to advance the progress of this model in the next month. If not, I will have to content myself with looking at everybody else's great builds on this forum!

-
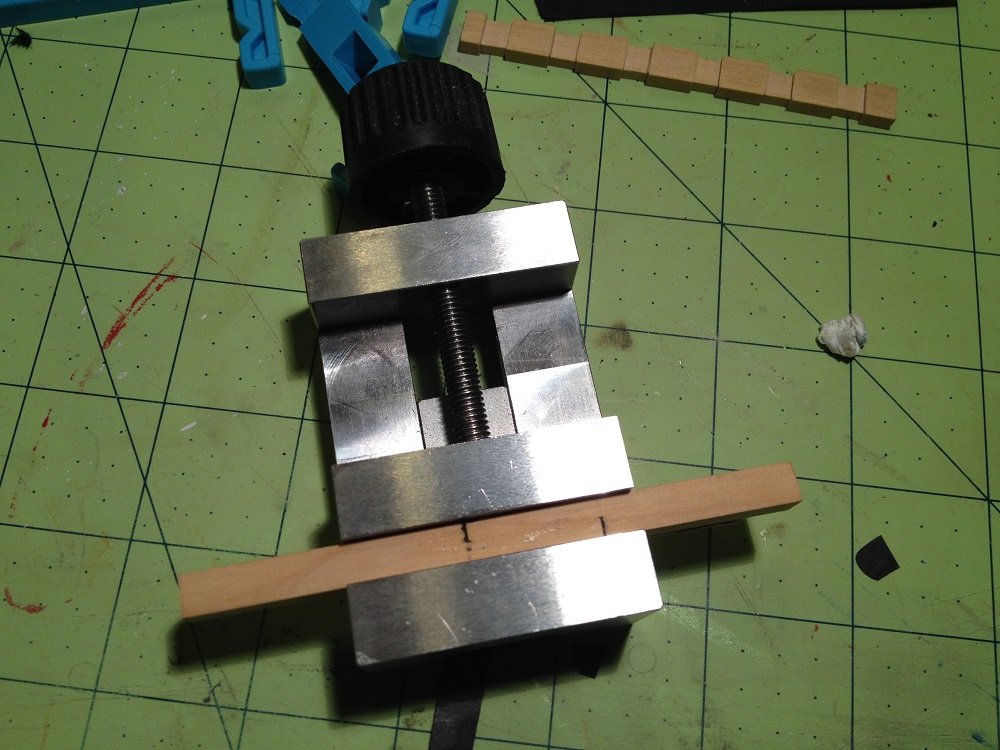
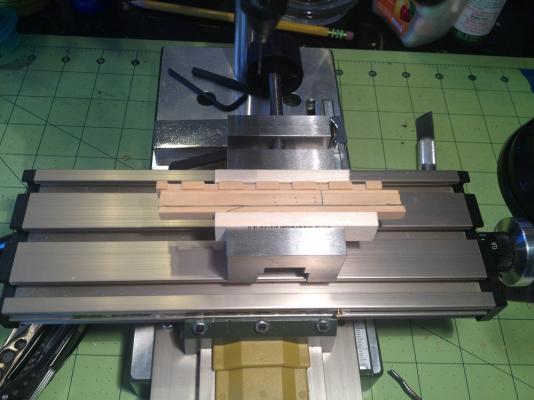
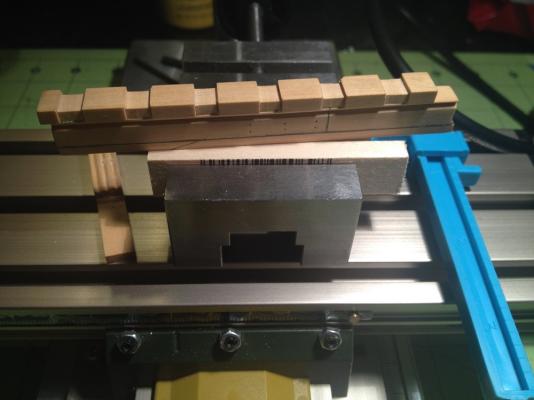
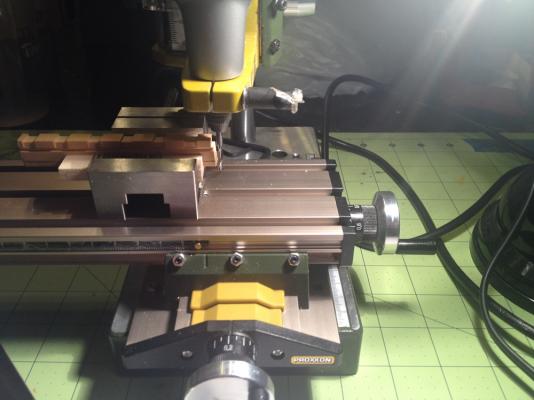
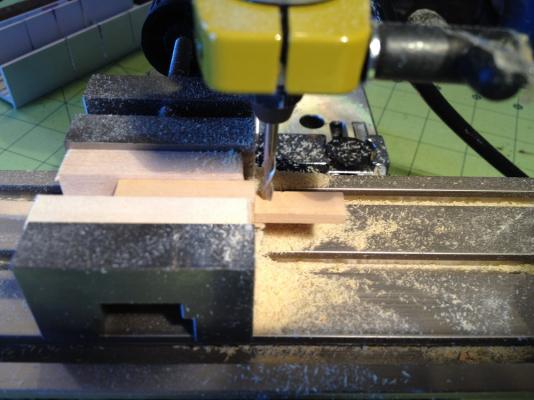
Installing the Rising Wood: The rising wood was installed by gluing it on to the keel assembly, and placing the entire structure in a vise overnight to cure. At this stage, both the keel and rising wood are oversized. Once the entire assembly was cured, I clamped the structure onto my X/Y table and used an end mill to cut to the final length. Next I will add the simulated bolts to the keel scarph.
-
Thank you everybody! It has been awhile since I have been able to work on any fun projects. Moving, working on a house, sickness, and even starting a new business has all got in the way of building time. But I do have a few updates to share today.
-
Really Fantastic build Siggi! I am looking forward to see this one grow.
-
Lesson learned Druxey! I have been around and worked with power tools since boyhood. This was a small lapse that I hope dispelled a complacency that I was unaware of. Keel Rabbet: Practice, practice, practice! This small, yet very important step was a little nerve wracking to undertake. I used a piece of keel wood from my first attempt at the scarf joint to practice on. I tried multiple techniques, and put multiple rabbets in each surface of the piece of wood. It was this practice that enabled me to get a good result that I am happy with. I used a dockyard 2mm micro V gauge to produce the first cut on each rabbet. However, this tool just does not produce a very crisp V profile. Perhaps it was user error? So, in order to produce that crisp V profile, I first used a square section micro file to deepen the rabbet. Then to finish it, I used a new #11 exacto blade, with a corner of the cutting blade lodged in the bottom of the rabbet as a scraper. This technique did produce the crisp 90 degree profile needed for the rabbet. Practice piece: The real rabbet: Unfortunately I do not have a picture of using the #11 blade as a scraper, and doubly unfortunate the picture that I do have of the finished product is not quality. Hopefully I will get a better one in a future post:

-
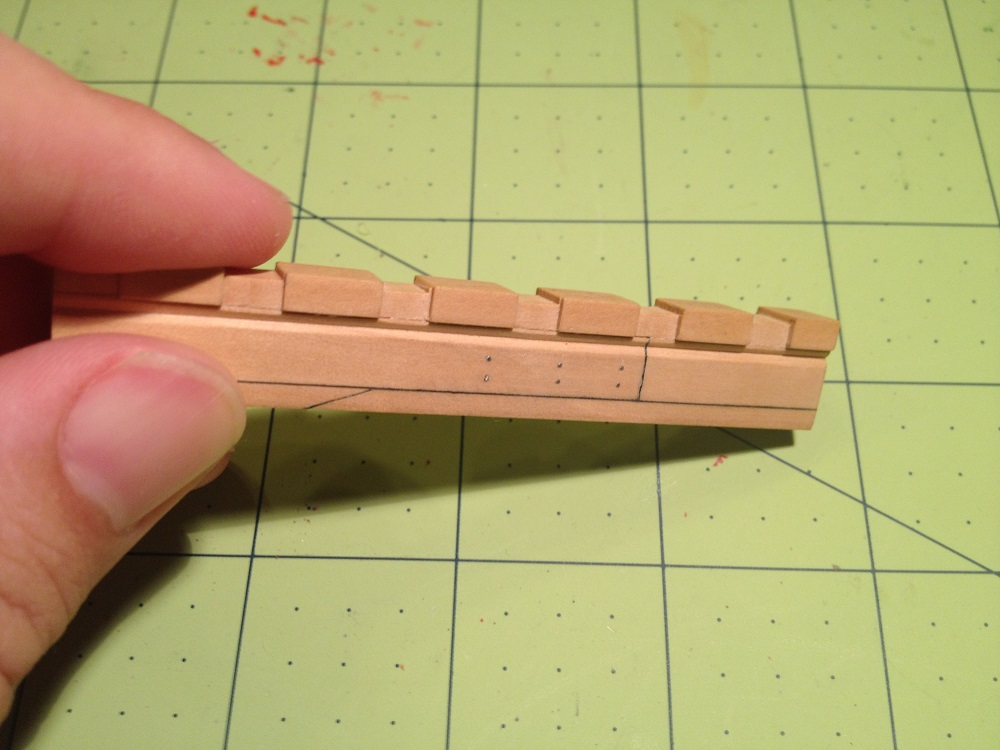
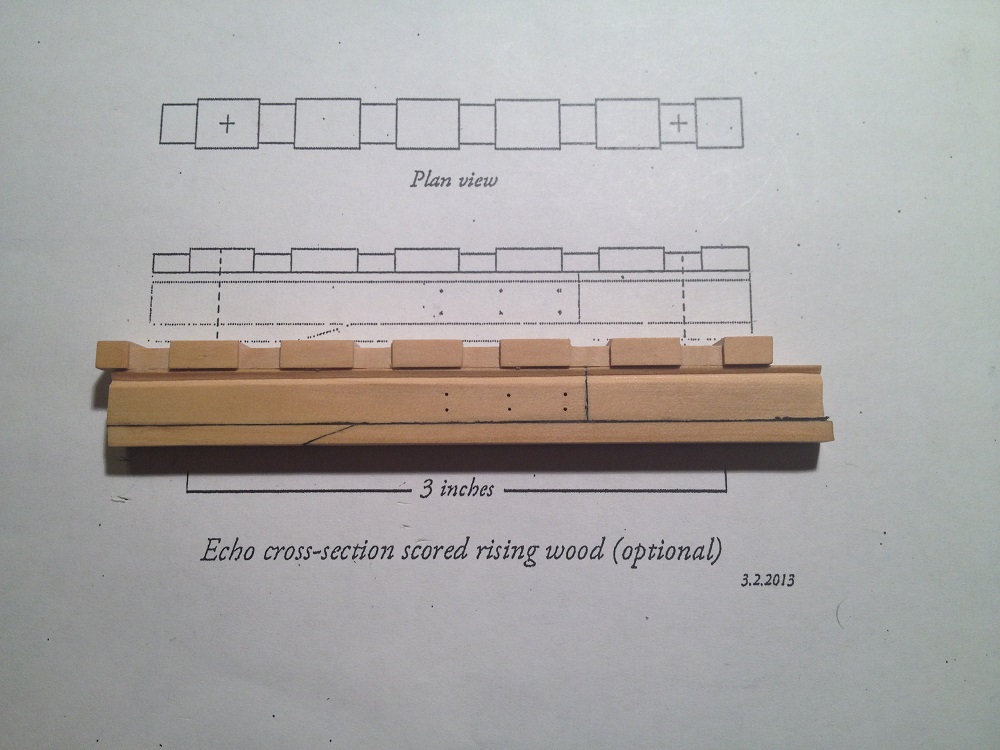
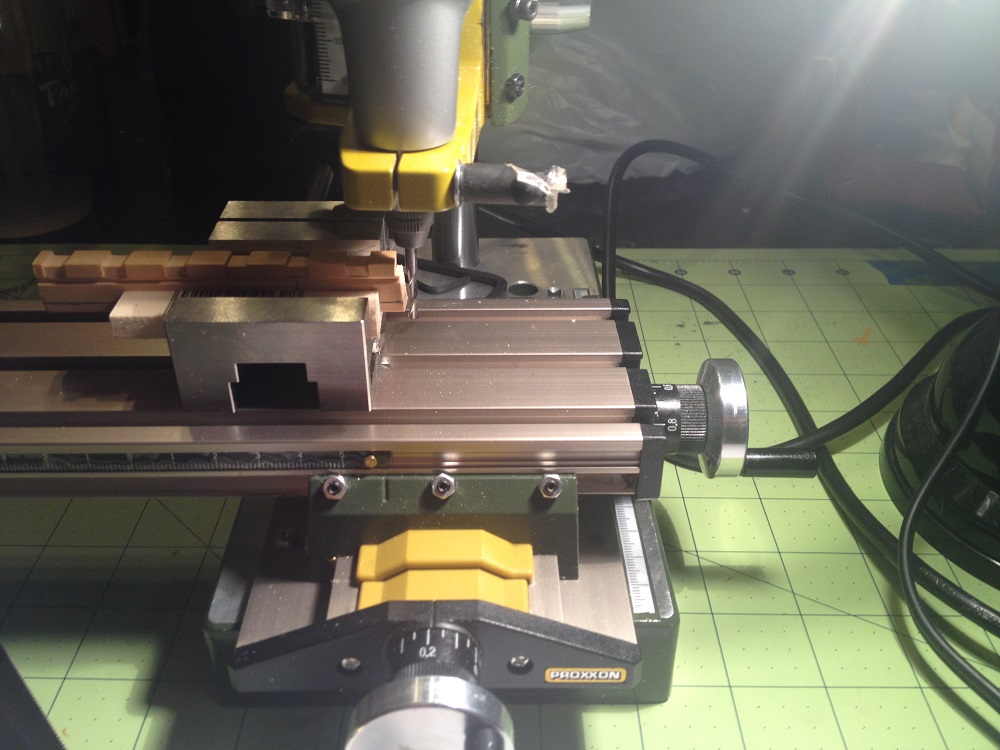
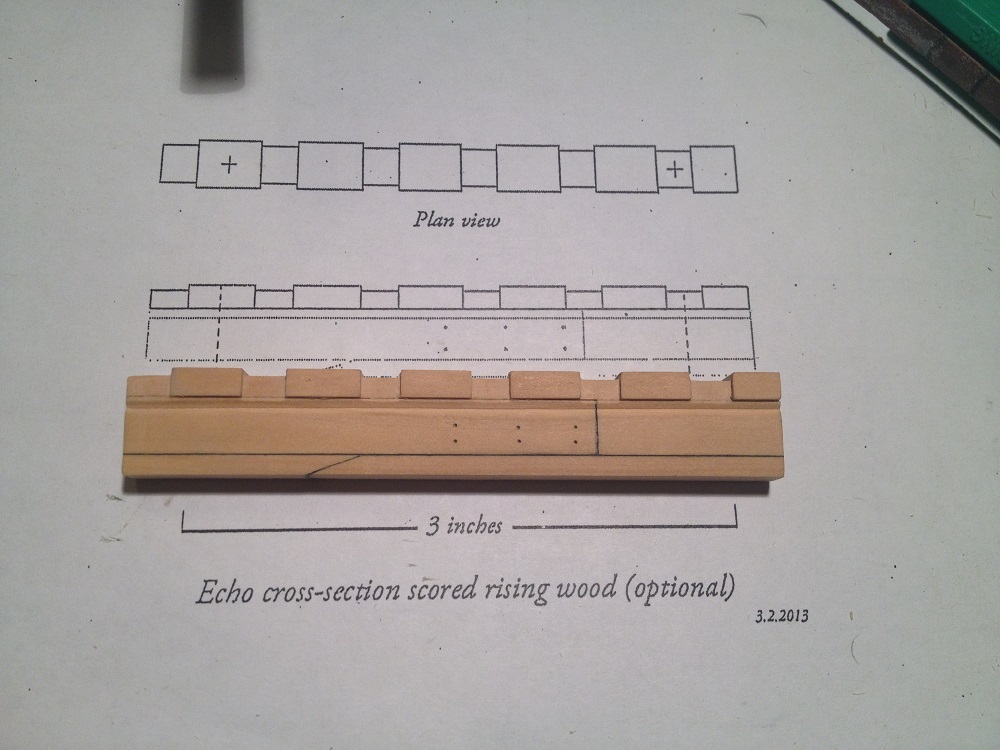
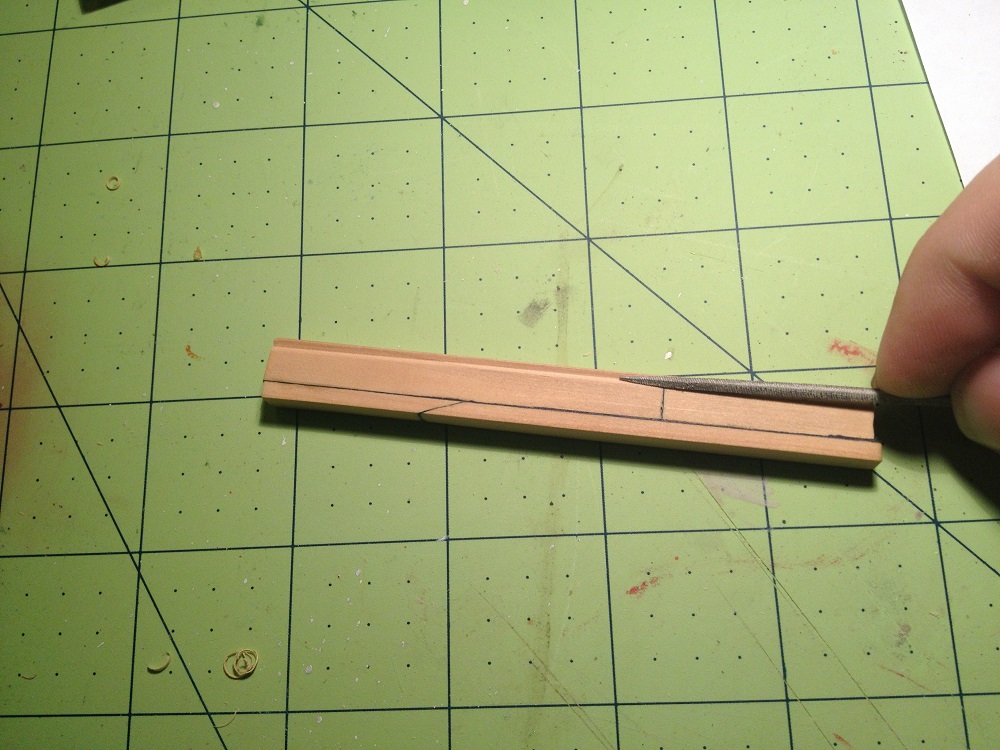
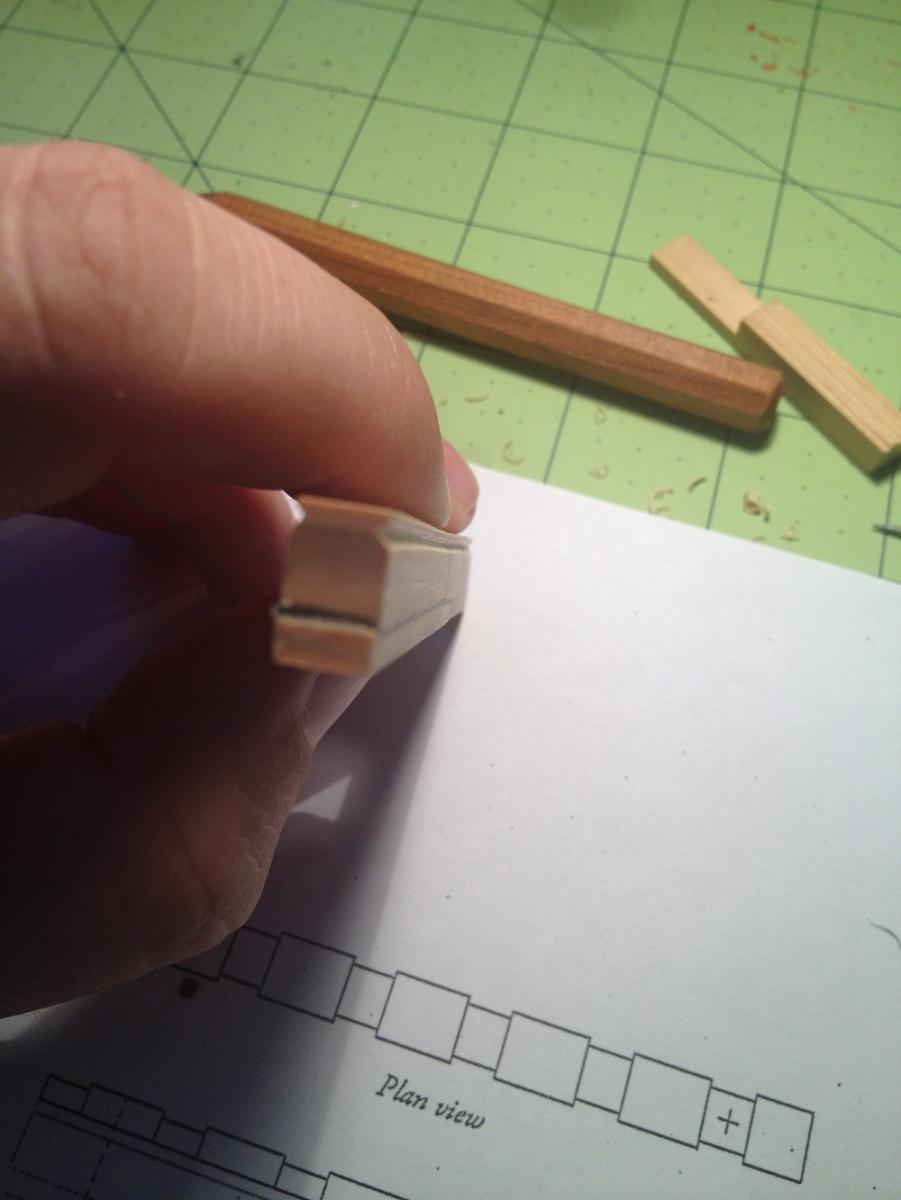
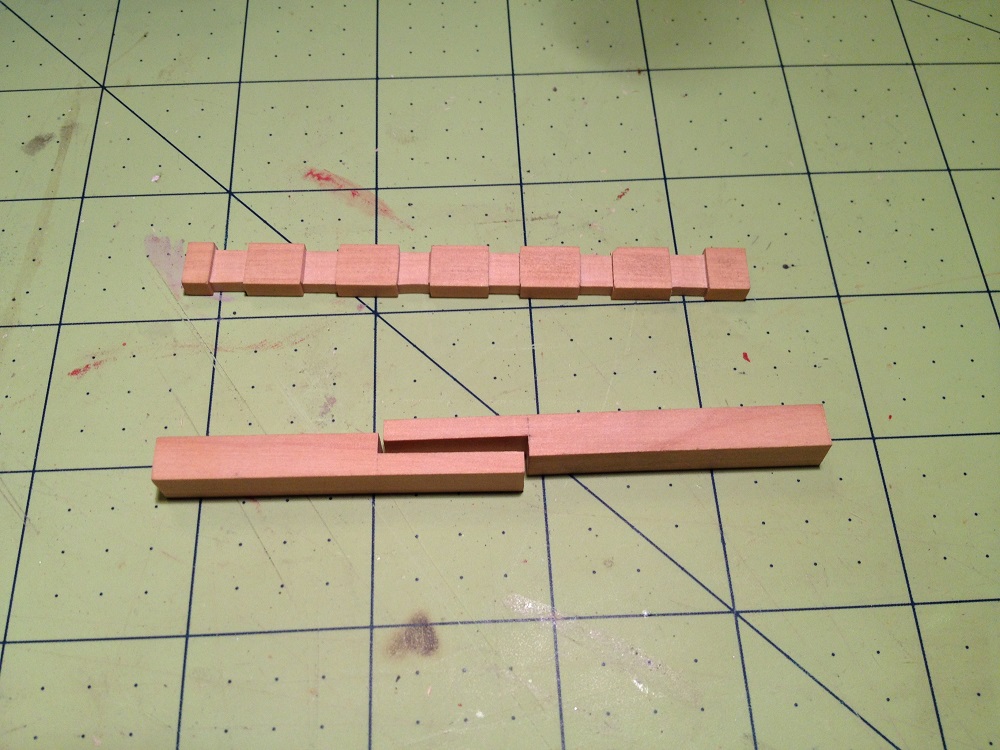
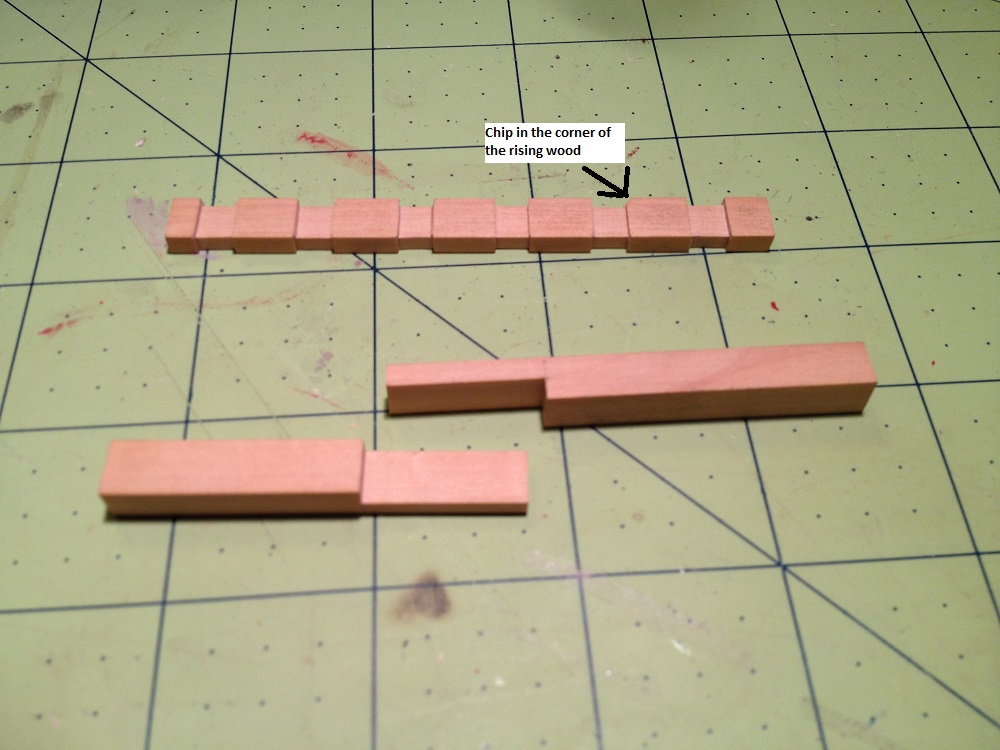
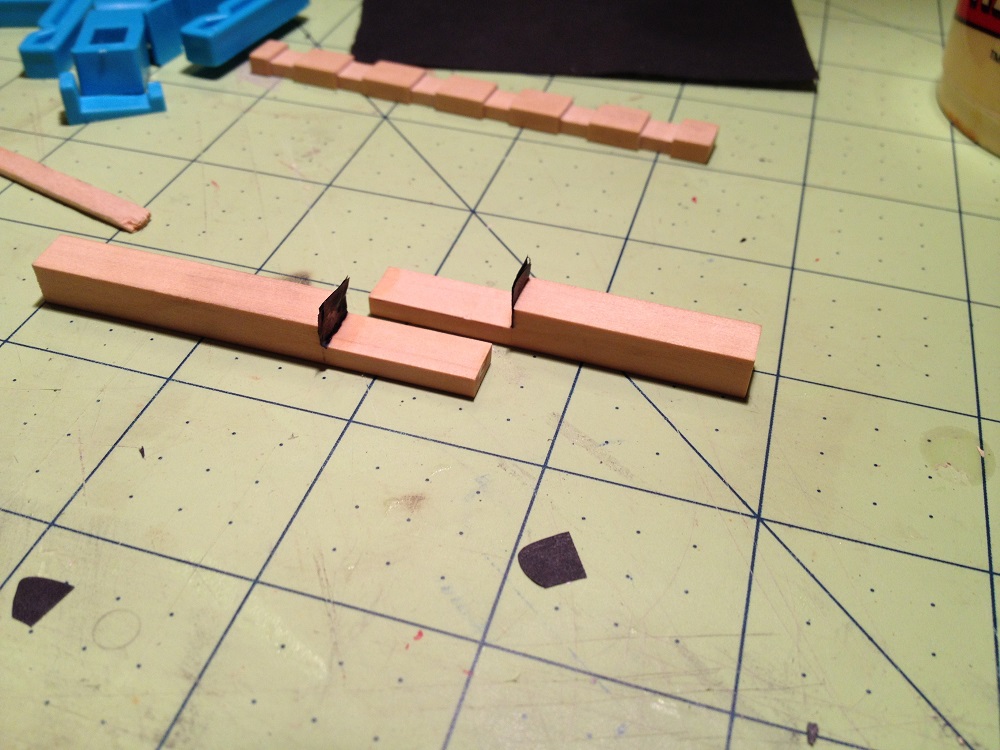
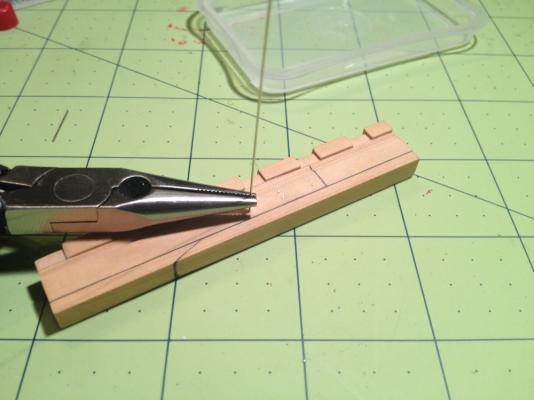
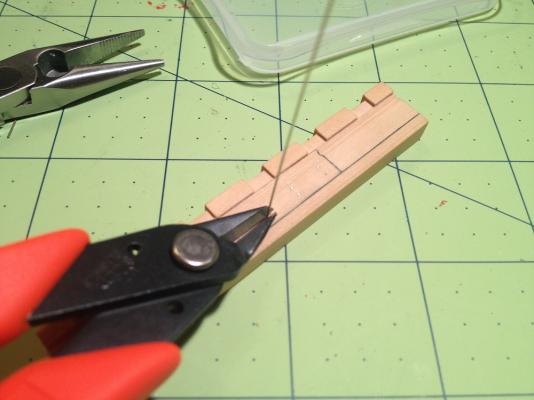
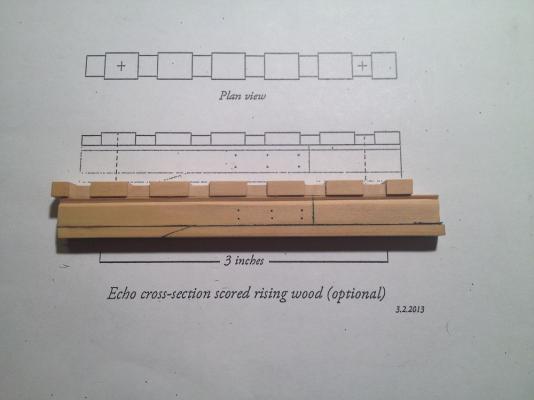
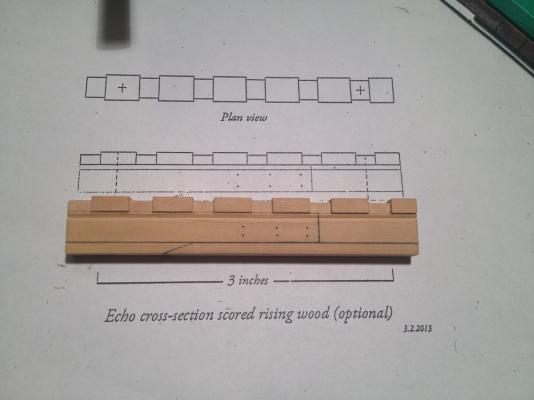
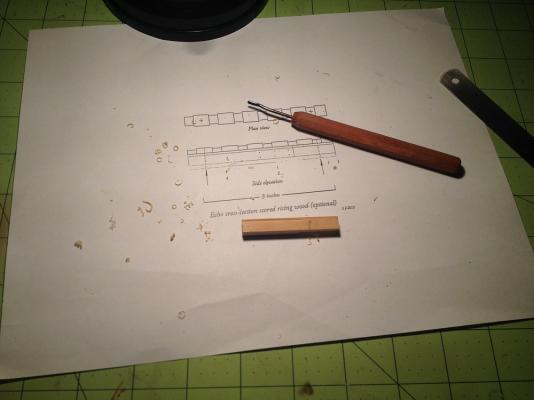
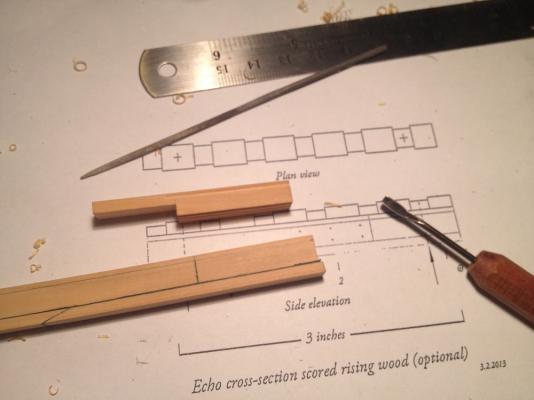
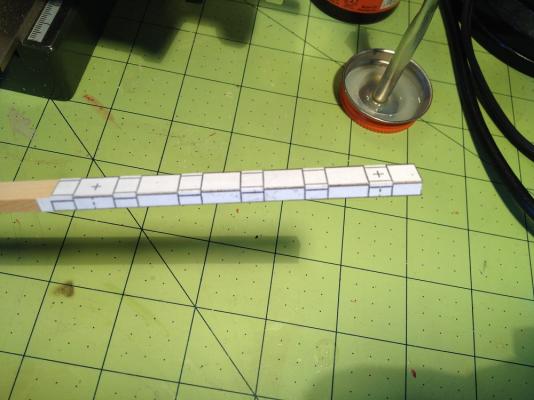
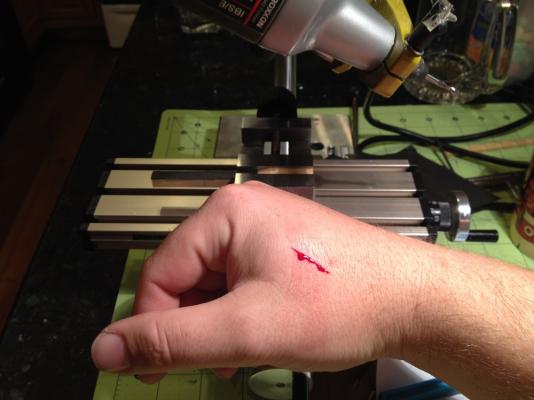
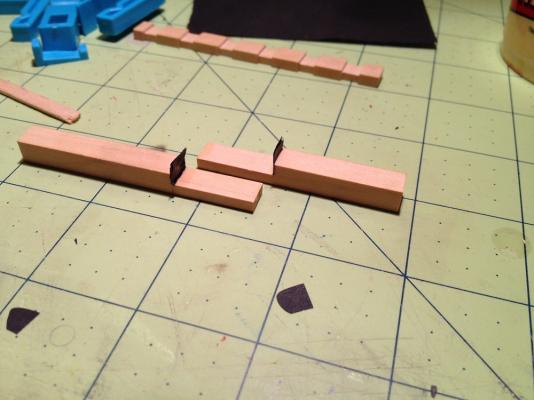
Thank you Greg and Peewee! I am very glad to be aboard on this build. Rising Wood The rising wood was another demonstration in "learning curve". The first attempt was abandoned after milling one side of the notches for the floors. I chose to mill the optional scores in the rising wood, because I first wanted to be as accurate as I could according to the original sloop and second to test my technical ability. The patterns were cut out and affixed to the wood with rubber cement. The rest is just cutting. I used a 3mm end mill to cut the scores, rotating the piece in the vice for each facet. There was one mistake on this second attempt that almost made me launch into a third. During cutting of the last score on the last facet, I made a mistake. I turned the motor on without realizing that it was in contact with the corner of the piece. The end mill immediately chipped the corner in contact. After finishing the piece, I decided to use it anyway It should be noted here, that I cut both the keel timbers and the rising wood long on both ends. In the next installment I will describe the finishing process to get the final dimensions. An additional note of caution: Be aware of your tools at all times! It should go without saying that if it cuts wood, it will cut you. I had a close encounter with my end mill bit, that precipitated from being tired and in a hurry. I did not even feel it when it happened, only feeling the bold on my hand afterwards. Somehow I managed to drag my hand across one of the cutting tips. Lesson: Be aware of your cutting tools at all times!


-
Hi Brian. "The Seventy Four Gun Ship" is a wonderful series, and I would imagine that it would shed a lot of light on your subject. However, Boudriot, in his forward to volume 1, he states that the series is a window into the French 74 circa 1780. Undoubtedly, L'Entreprenant would have been slightly different in design and construction being built nearly three decades prior.
-
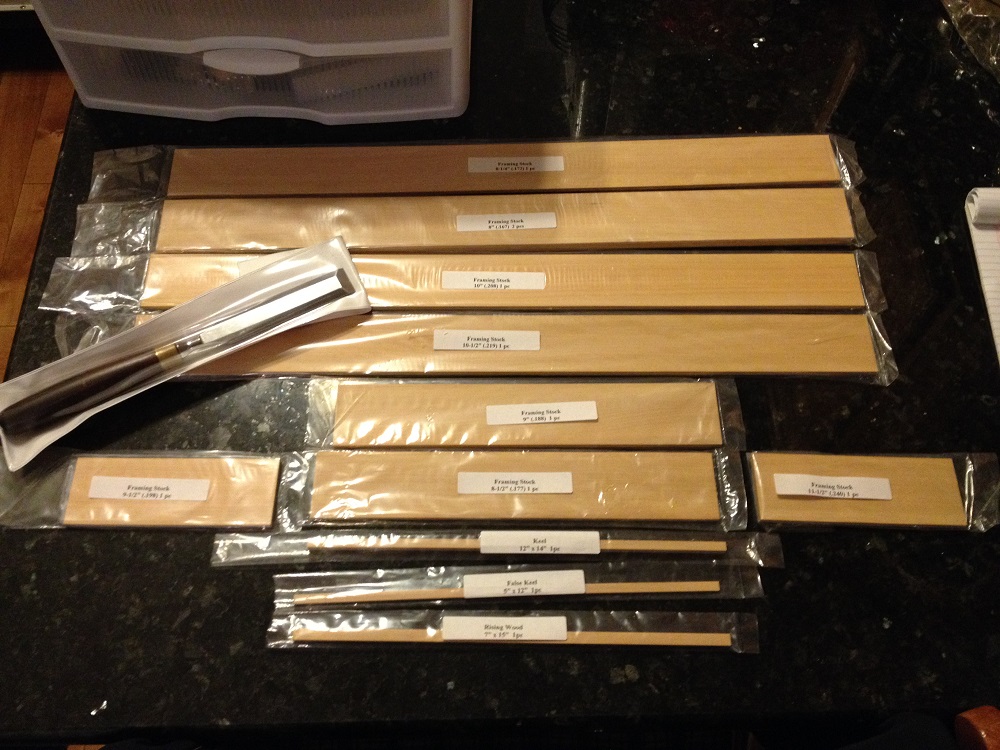
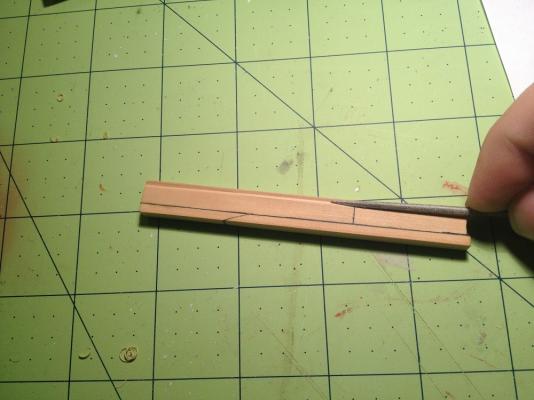
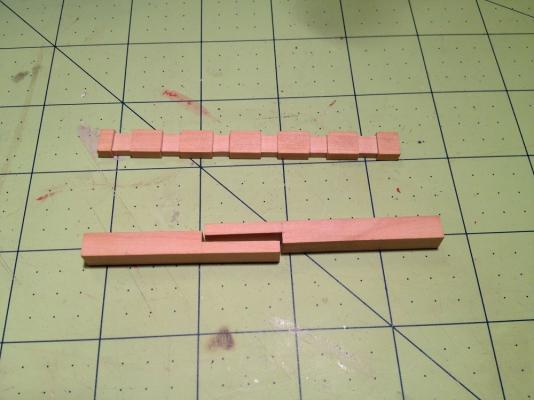
It has come to pass that I am to join the august company of the scratch builders on this forum. I stand in amazement of the skill and craftsmanship here. Humbly I begin my maiden scratch building adventure. Please give me truthful feedback on this adventure, I hope to improve my skills along the way. This build is associated with the group build project of the Ship Model Society of New Jersey. I have been keeping my eye on this project since I joined MSW, and I am very excited to participate. First, let us see the beautiful timbering package from Hobby Mill: Now on to the build! The first attempt on the keel ended in disaster. This was owing to the fact that all of my workshop is packed up in boxes in up to three different locations at the moment, as I am in the middle of a move. So I tried to start with as few tools as possible, a chisel, a hand saw and some files. Unfortunately, the very first half lap joint ended in asymmetrical folly. Luckily, the supplied wood provided almost three opportunities to create modern art from boxwood. Rather than waste anymore of the precious stuff to cabin fever induced exuberance, I decided to hunt for my milling setup. Once that was found, so also was symmetry in the lap joint. Once the pieces were finished to a near Palladian symmetry, I used three layers of black tissue paper to simulate the tarred flannel. After the glue dried, I placed the two keel pieces, glued together in a vice to set. After removal from the vice, I trimmed the excess "flannel" with a new #11 blade. Hopefully, I will be able to add another post tomorrow. Best Regards,


-
Wonderful metal work! Your build is verily amazing, and a work of art. I always enjoy catching up on your build log.
-
ancre Le Commerce de Marseille by Zbigniew
Jason replied to Zbigniew's topic in - Build logs for subjects built 1751 - 1800
WOW! Fantastic build! I see these section models of the larger ships becoming popular in the coming years. -
ancre La Belle 1684 by Nenseth - 1:36 scale
Jason replied to Nenseth's topic in - Build logs for subjects built 1501 - 1750
I will be looking forward to your build, the ANCRE publications make great projects. I wish you good building! -
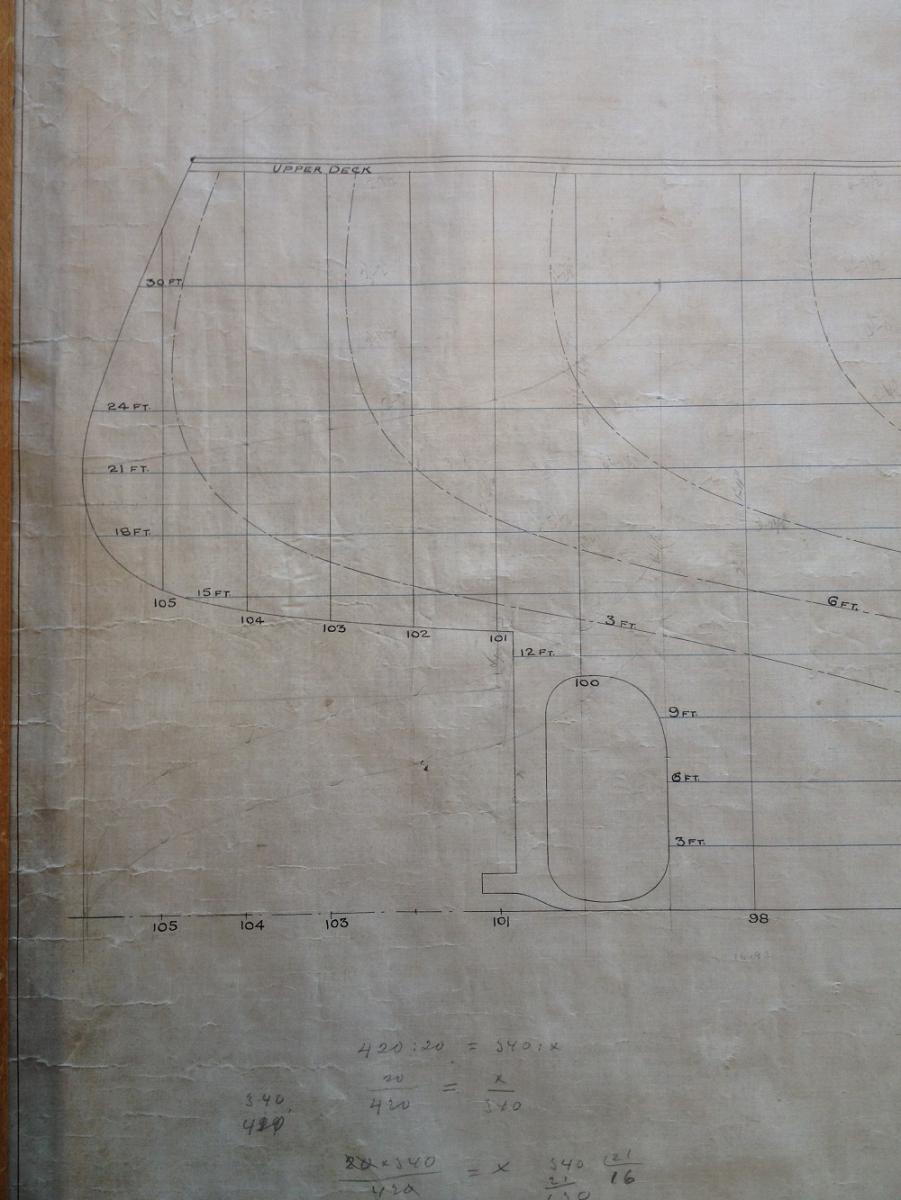
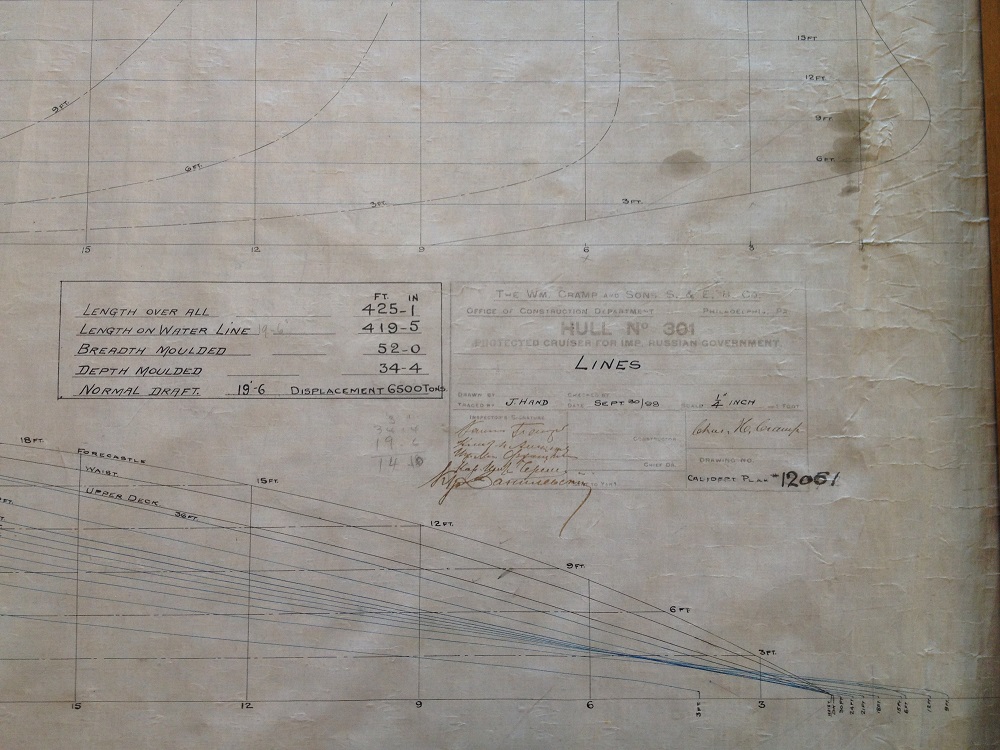
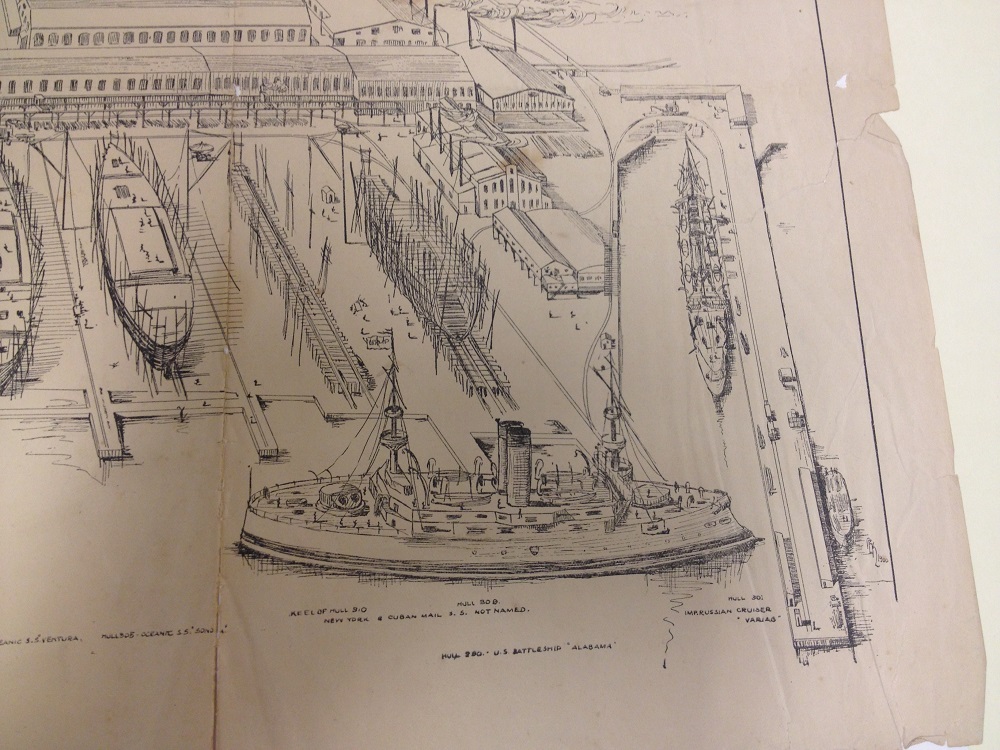
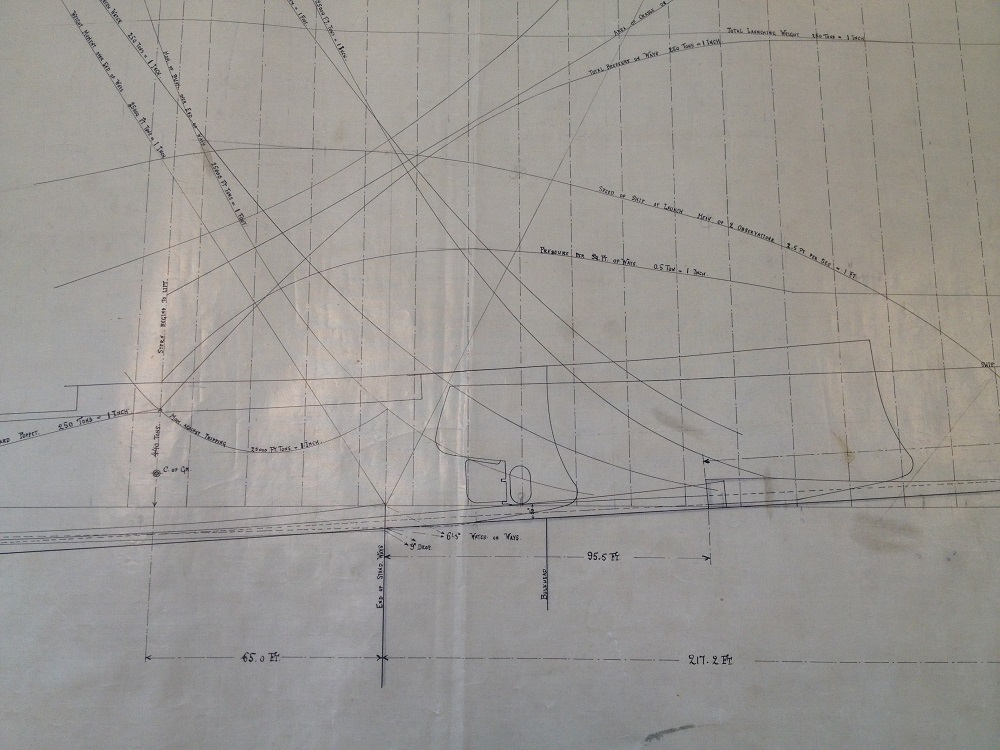
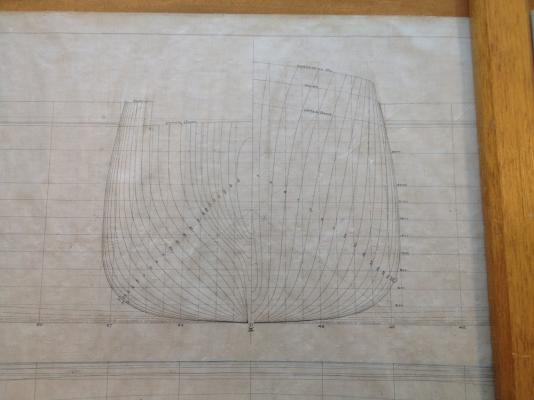
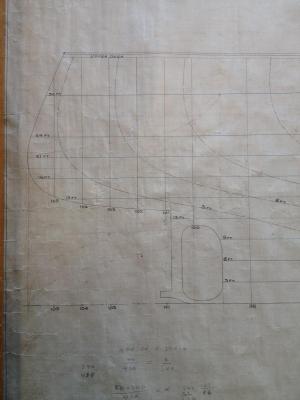
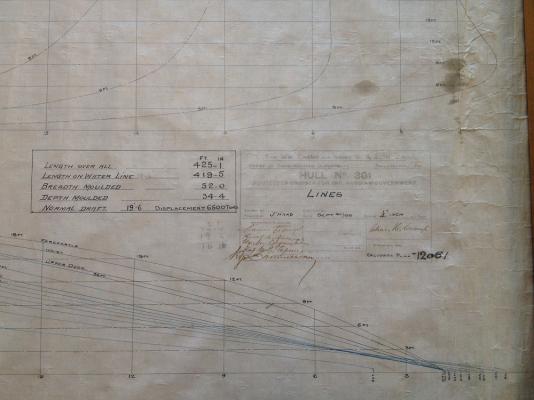
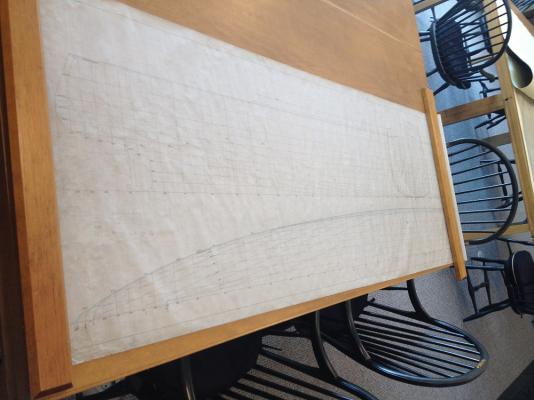
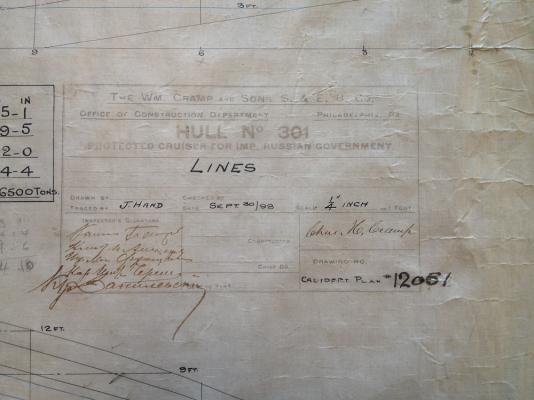
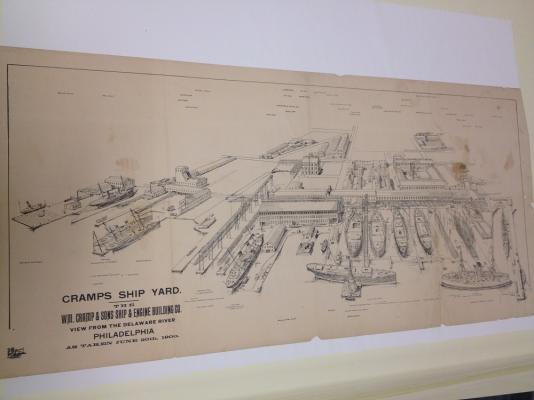
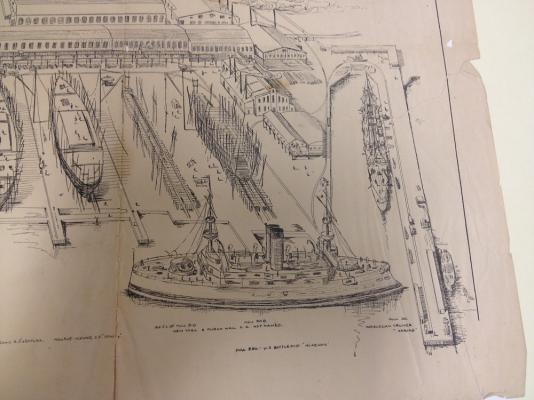
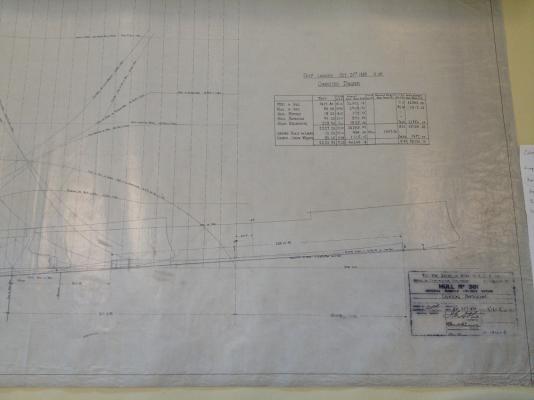
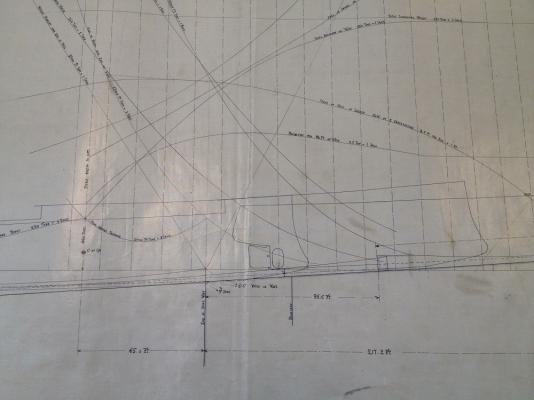
Lines Drawing: The other plan that was available at the museum, was the lines drawing. I plan on using the information on this plan to measure the hull to see how close it is to the original plans, but that has to wait until it is unpacked from storage... At first glance, it appears that the hull is pretty accurate at least in shape to the actual vessel. The exception to this, is that the line, and station drawing indicates that the vessel had a slight tumble home above extreme breadth. I do not believe that the model shows this, but rather has vertical sides above the extreme breadth line. But, again, measurement must wait. Stations: Stern: As you can see, this was a really large document, so a picture of the whole thing was not practical: Title Block: After I was done perusing the plans collection, the artifacts collection manager took me for a behind the scenes tour of the collections vault! What a great experience. I got to see the museum's entire collection of ship models, including a few bone prisoner of war models from the Napoleonic Wars! I also got to see prints going back the American War for Independence, and a Medal of Honor awarded to a sailor aboard the USS Constitution in 1879. The award was given for bravery of sailors entering the water to repair the damaged rudder at sea on a voyage to Paris. You can read about it here. Even in this collection there were a couple of items relevant to the Variag. In particular, there was a print from 1900 AD that depicts the Cramp & Sons Yard. The Variag can be seen floating at one of the yard's docks, with the US Battleship Alabama afloat in the river astern of the Variag.
- 5 replies
-
- 8
-
-
- varyag
- protected cruiser
- (and 2 more)
-
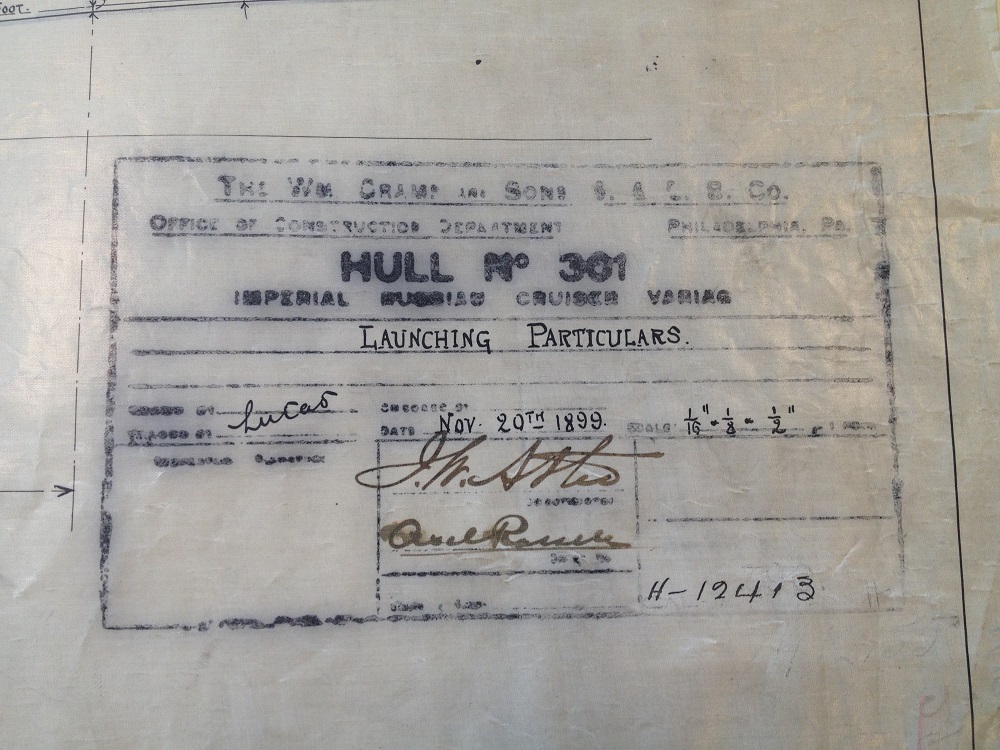
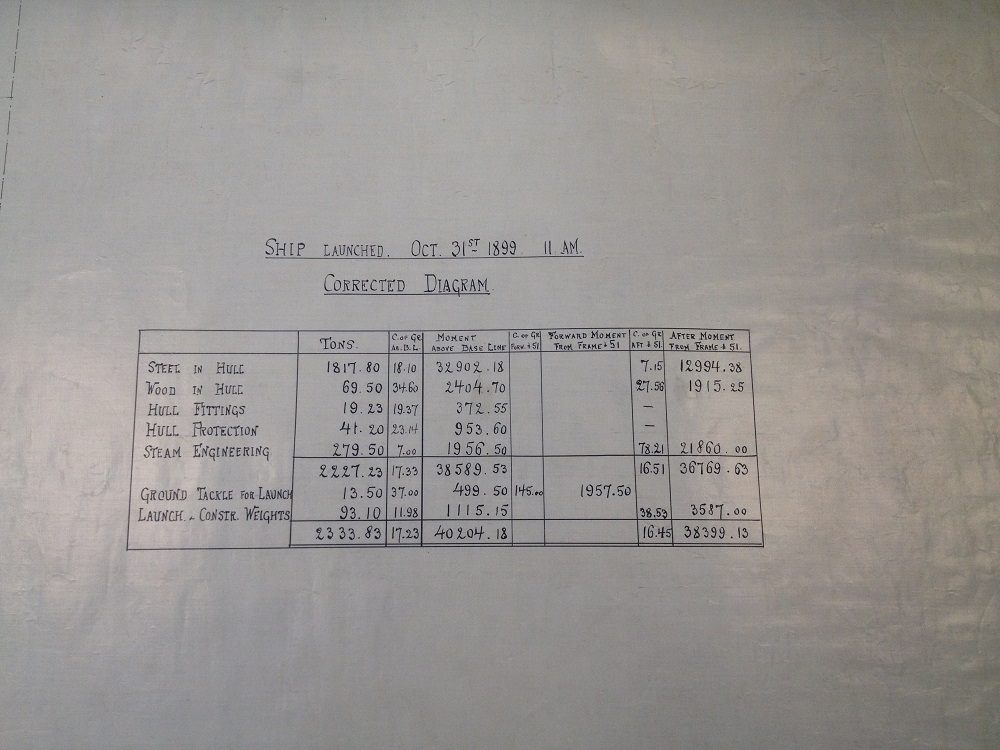
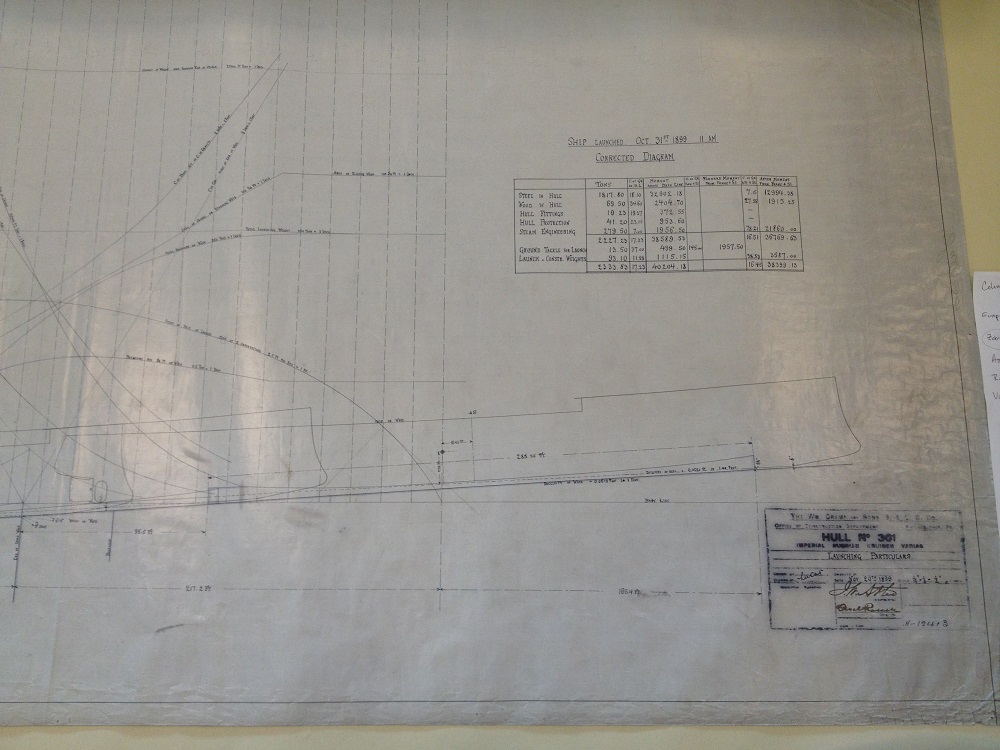
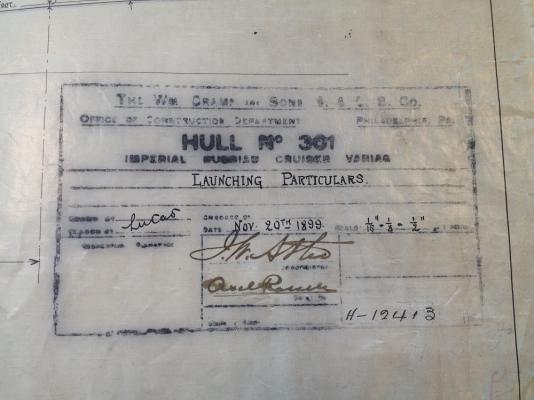
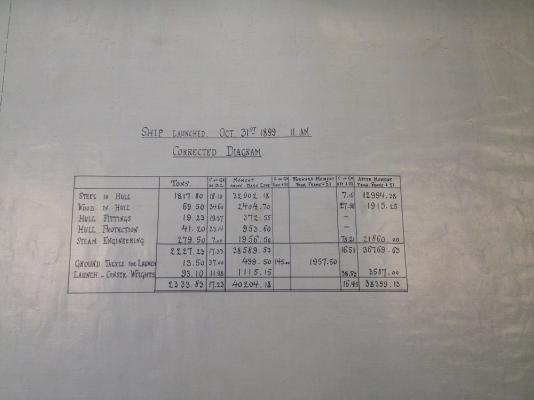
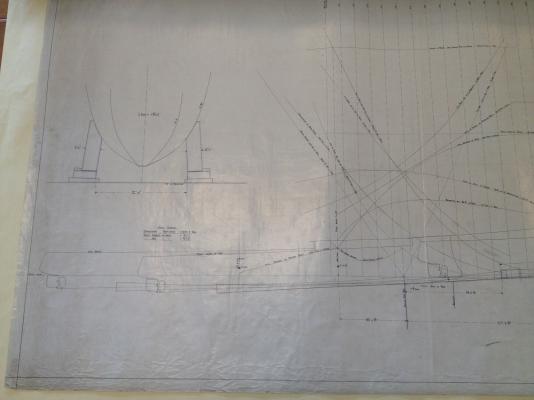
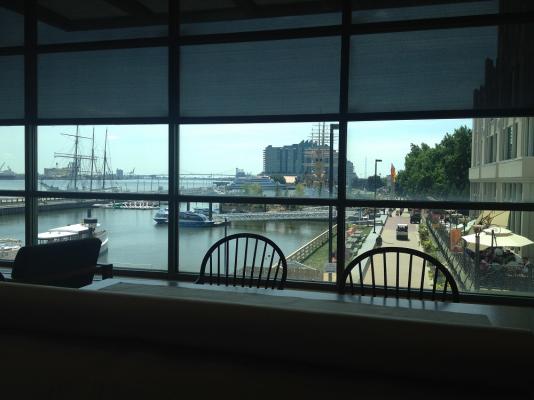
Hello Greg, I am sorry, but this does not look like it is going to be a fast project! Research Trip To The Independence Seaport Museum: Since the introductory post on this build log, many things have happened in life that have prevented me from working on this or any project for that matter. The fact of the matter is, that this kit is currently in storage, as my family and I have moved and are waiting to get into our new house. However, on the last day that we lived in our old location, I was able to do something that was a first for me. I went to the Independence Seaport Museum in Philadelphia, where some of the original plans for this vessel still exist. Back in March, I made an acquaintance through a living history group that I participate in. This person happens to be the collections manager at this museum, and in chatting with him he informed me that the museum had in it's collection plans for this particular vessel. So, excited, yet intimidated, I planned my visit to do a research trip at the museum. The archivist was very helpful. Before my arrival, she pulled all of the relevant documents and plans, as well as, prepared a list of all of the related items that I might want to see. Needless to say I spent a very pleasant day viewing a lot of original documents that related to various types vessels from abut 1860 - 1910. One of the most unique set of plans that I viewed, where that of the curious USS Vesuvius. Take a moment to follow the link provided for this vessel, as it is truly a unique piece of naval history. When Originally built, its armament consisted of three pneumatic guns that shot projectiles of dynamite! Any way, on to the Varyag, or the (Variag) as all of the documents at the museum referred to her. There were only two plans available from the collection, and neither are extremely useful to this modeling effort. However, they are really interesting in their own right. The first was a launching plan. This plan featured the calculations necessary for launching the vessel into the river from the building ways. It shows the hull of the Variag at several different points along the path of launching, and it gives the various weights, centers of gravity and buoyancy, and the moment at which the vessel becomes completely buoyant. It also provides the speed vs. time of the launching process. Again, not very useful for producing the model, but very interesting. Title Block: On Board Weights: Various Views: View from the Research Room, the vessel with the buff super structure is the USS Olympia Next post, the line drawing...
- 5 replies
-
- 4
-
-
- varyag
- protected cruiser
- (and 2 more)
-
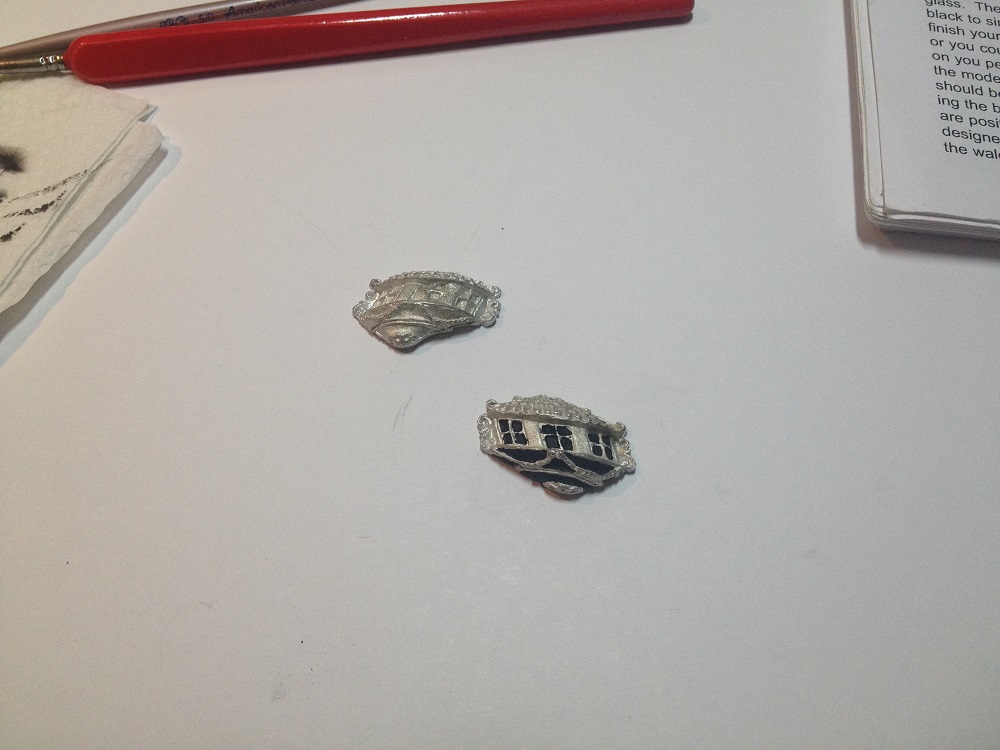
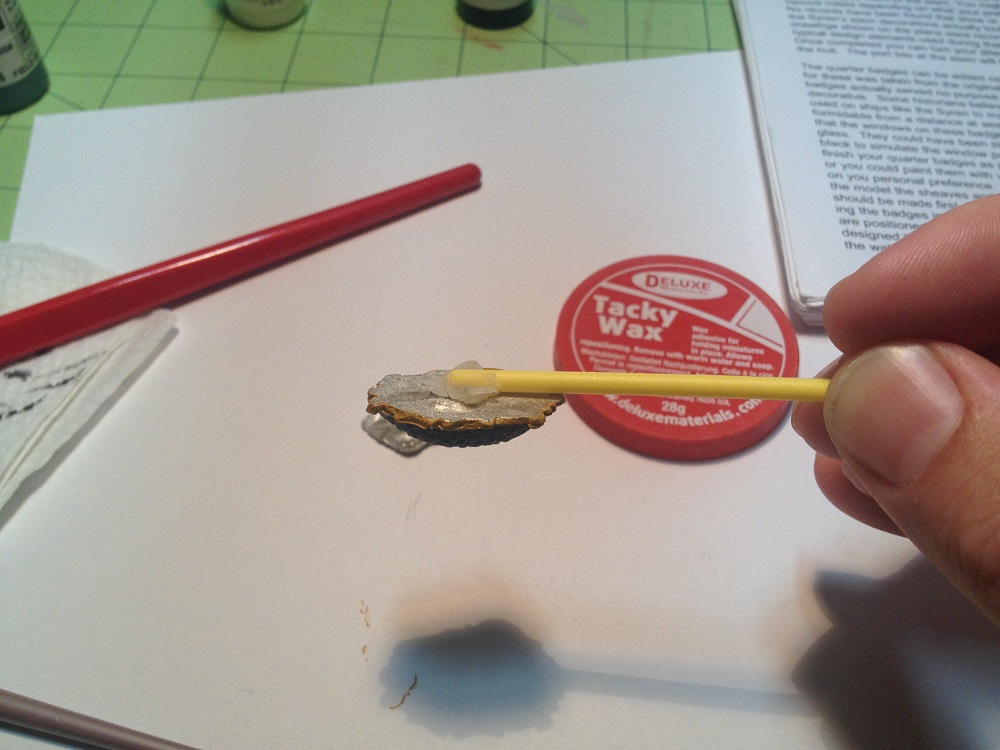
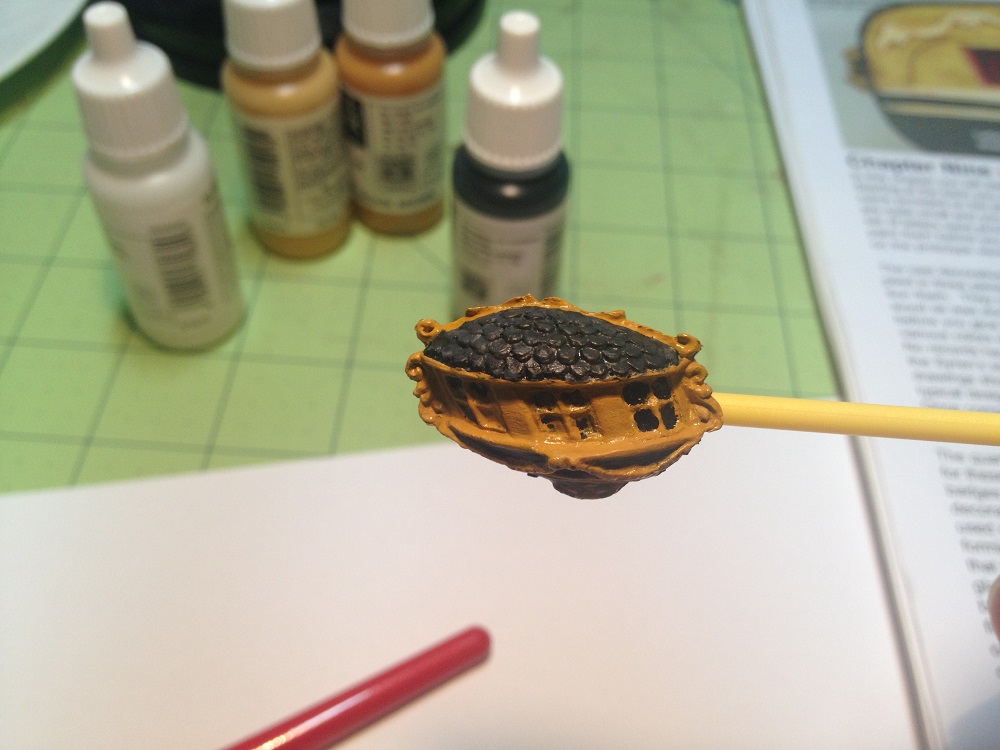
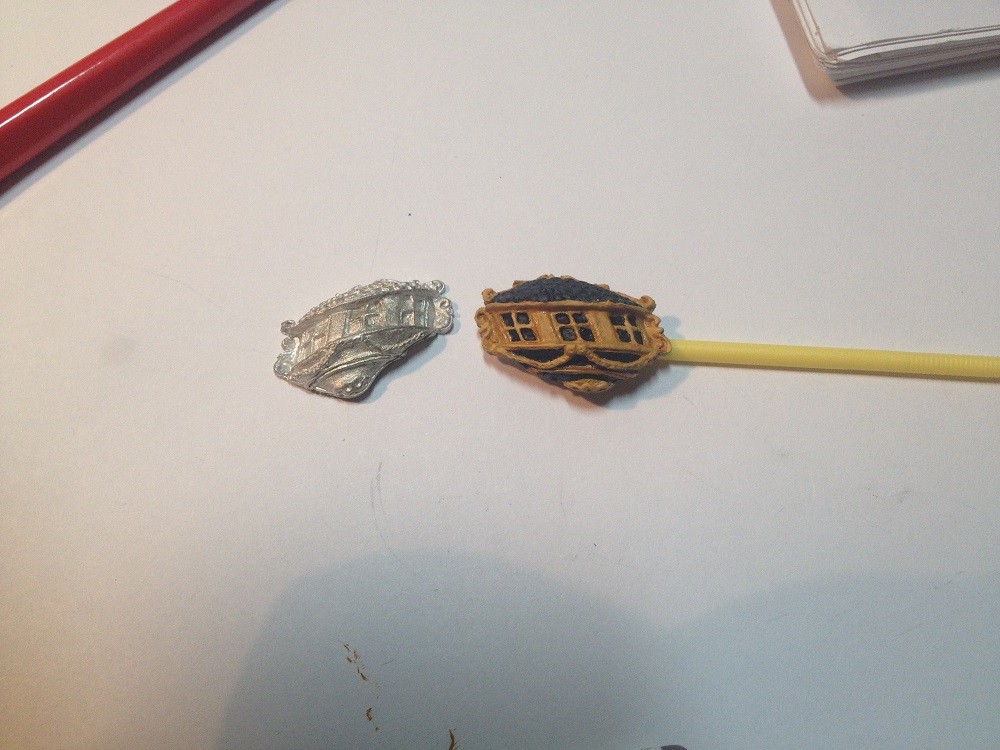
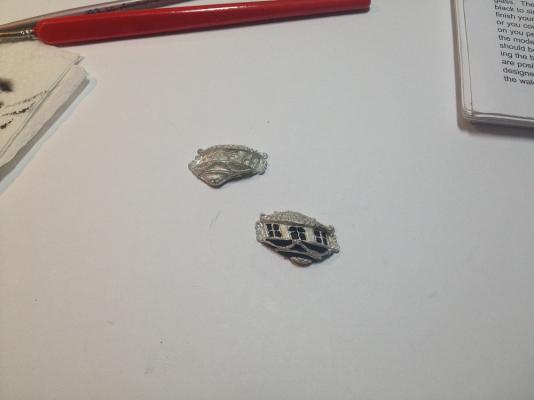
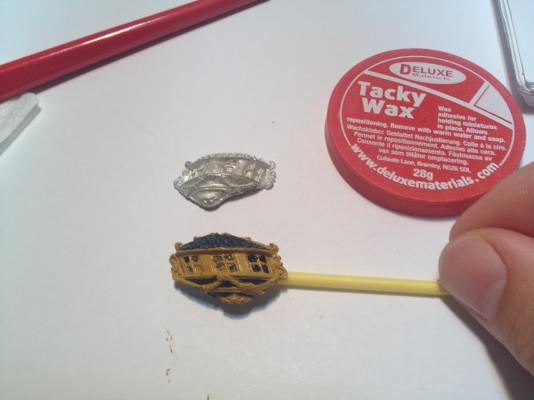
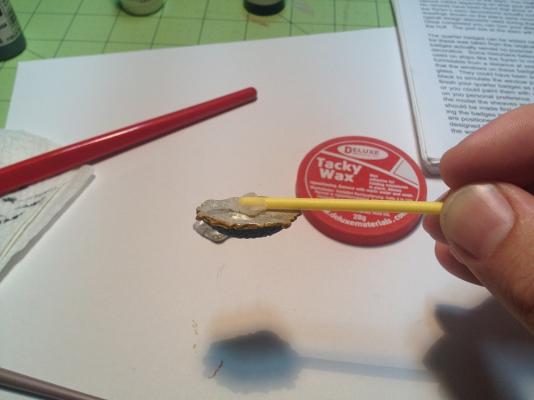
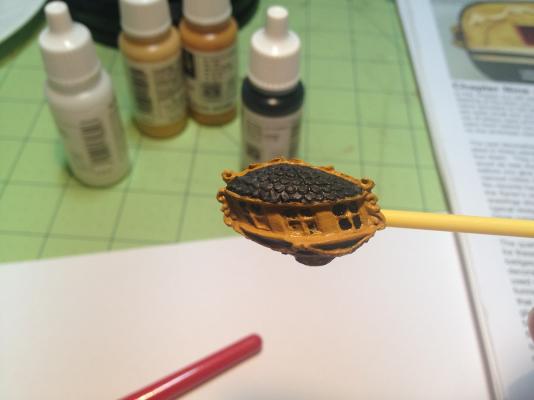
Thank you Scott, It has been awhile since the last post, and a lot has happened in the interim. Though the happenings have little to do with ship building, and mostly to do with big life changes, including an out of state move. So we have been really busy. One of the many good things to come out of the move, is our new house, when we can finally move in, has a conditioned outbuilding that will be the new model ship yard. Looking forward to that! In the interim, I was able to do a few things model related. Such as paint the quarter galleries. For quite some time I thought that I was going to scratch build the quarter galleries. However, the more I thought about it, the more using the kit supplied pieces appealed to me. I now have a supply of premium woods available to me, but there was something about the idea of a certain tradition that won me over. When I was growing up, any exposure to these kinds of kits always had their white metal pieces. And for some reason I was always enamoured of them. I feel that they are a part of the tradition of model ship building going back at least a century, and for some reason I find a sort of resonance in my being toward that kind of thing. That being said, in the future, I plan on doing scratch builds, using traditional and cutting edge materials and techniques. So I do not see these types of castings in my future. But, I am proud to have them on my first serious model. Now, on to the painted quarter galleries... I employed the same technique used in painting the transom molding. Using three close shades of the same colour. However, I varied from the prototype in that I wanted to add some colour to the galleries. I painted the drop and the roof as if they were real quarter galleries on a frigate. With the roof, I scumbeled together black and a very little German field blue. These pictures are of the process, and an almost finished product. This was literally the last thing I did before all of my hobby stuff was packed away. Once it is unpacked, I will edit the post with the finished product.

-
ancre La Salamandre by tadheus - 1:24
Jason replied to tadheus's topic in - Build logs for subjects built 1751 - 1800
Great work Tadheus! Thank you very much for sharing. At this scale, one can really start to get an impression of how the real vessel would look and feel. Your craftsmanship, I think, replicates what the timbering and planking looks like on a real vessel. At least it does according to all of the historic vessels I have ever been on. Keep up the great work, Best Regards, -
Superlative work! Your artistic use of the different wood species according to their color is masterful. Best Regards,
-
Beautiful work Bob!
-
The problem is that there are actually two sites. editions-ancre.com is the old site. Ancre.fr is the new page. I am using Internet Explorer now to access both sites.
-
To follow Hans, Not only have they updated their website, and quite spectacularly I think. Ancre now accepts Paypal!
-
Thanks Dirk and Thomas! 18 pounders it shall be!