

nobotch
-
Posts
55 -
Joined
-
Last visited
Reputation Activity
-

 nobotch got a reaction from Archi in The Byrnes Saw "inside and around"
Length stop for the miter gage.
The cam clamp mechanism in the second picture fixes it to the miter extension.
Cheers,
Markus
-
 nobotch got a reaction from AntonyUK in The Byrnes Saw "inside and around"
Length stop for the miter gage.
The cam clamp mechanism in the second picture fixes it to the miter extension.
Cheers,
Markus
-
nobotch got a reaction from Archi in The Byrnes Saw "inside and around"
Well Tim, convincing one's wife of the eminent importance of a less than cheap tool we "need" is normally not a mission impossible, but certainly easier to achieve if embedded into a generic long-term endeavor regarding tool-and-toy acquisitions.
While getting familiar with THE saw, I noted that when adjusting blade height for non cut-through tasks it lowered by almost 1 mm when locking it in with the long Allen key. It turned out that the underside of the Allen screw head scratches and therefor catches the washer between the screw and the aluminum bar the blade (its axle and bearing, that is) is mounted on. So I added two thin washers with the smooth and burr-less faces against each other.
Even if this unwanted movement when tightening the screw is not completely eliminated, it is now at least limited to about 0.1 mm (0.004") after rising the blade (tightening the locking screw after lowering the blade will always add quite a bit due to the play of the adjusting threaded rod to this difference, which is normal).
I left the original thick washer in place because my smooth washers are somewhat too thin that I would feel sure they protect enough the aluminum part.
Then there is my latest small addition which makes it a bit easier to raise or lower the blade by more than just a bit. I added a brass crank to the adjusting knob. It is screwed into a threaded hole I tapped in the knob, and secured by a bit of epoxy on the threads and a counter nut. I really don't want to get it loose because the threads in the aluminum know would be shredded quickly I guess.
Cheers,
Markus
-
 nobotch got a reaction from Landlubber Mike in The Byrnes Saw "inside and around"
Length stop for the miter gage.
The cam clamp mechanism in the second picture fixes it to the miter extension.
Cheers,
Markus
-
 nobotch got a reaction from cristikc in The Byrnes Saw "inside and around"
Length stop for the miter gage.
The cam clamp mechanism in the second picture fixes it to the miter extension.
Cheers,
Markus
-
 nobotch got a reaction from WackoWolf in The Byrnes Saw "inside and around"
Length stop for the miter gage.
The cam clamp mechanism in the second picture fixes it to the miter extension.
Cheers,
Markus
-
 nobotch got a reaction from mtaylor in The Byrnes Saw "inside and around"
Length stop for the miter gage.
The cam clamp mechanism in the second picture fixes it to the miter extension.
Cheers,
Markus
-
nobotch got a reaction from WackoWolf in The Byrnes Saw "inside and around"
Well Tim, convincing one's wife of the eminent importance of a less than cheap tool we "need" is normally not a mission impossible, but certainly easier to achieve if embedded into a generic long-term endeavor regarding tool-and-toy acquisitions.
While getting familiar with THE saw, I noted that when adjusting blade height for non cut-through tasks it lowered by almost 1 mm when locking it in with the long Allen key. It turned out that the underside of the Allen screw head scratches and therefor catches the washer between the screw and the aluminum bar the blade (its axle and bearing, that is) is mounted on. So I added two thin washers with the smooth and burr-less faces against each other.
Even if this unwanted movement when tightening the screw is not completely eliminated, it is now at least limited to about 0.1 mm (0.004") after rising the blade (tightening the locking screw after lowering the blade will always add quite a bit due to the play of the adjusting threaded rod to this difference, which is normal).
I left the original thick washer in place because my smooth washers are somewhat too thin that I would feel sure they protect enough the aluminum part.
Then there is my latest small addition which makes it a bit easier to raise or lower the blade by more than just a bit. I added a brass crank to the adjusting knob. It is screwed into a threaded hole I tapped in the knob, and secured by a bit of epoxy on the threads and a counter nut. I really don't want to get it loose because the threads in the aluminum know would be shredded quickly I guess.
Cheers,
Markus
-
nobotch reacted to Landlubber Mike in Harbor Freight Workbench
I see a lot of people have these benches against the wall with power tools on them, but I found that I needed more depth than what these benches give (I think it's 20") to safely use my Byrnes table saw and thickness sander (depth is ok for things like the disc sander, mill and lathe).
What I ended up doing was putting two of these benches back to back, with one side against the wall - essentially, building out a workspace island where I could access the drawers on both tables, and access the machines on each of the tables. On the side against the wall, I attached a power strip to one of the benches, as well as a couple of swing arm lamps. That gave me more useable space than putting the two tables alongside one wall, or building an "L" configuration with the two benches in a corner.
-
nobotch reacted to lkimmins in Harbor Freight Workbench
Just redone my work area over the winter, used solid wood cores as tops plenty of room and solid.
-
nobotch reacted to Landlubber Mike in Harbor Freight Workbench
Hi folks - thanks again for the recommendation. I received the bench in the mail a week ago and put it together today. One of the drawer pieces was a bit dinged up, but it put together really easily and is of very sturdy construction. One criticism I've read is that the drawers didn't glide very well, but mine seem to glide fine. I'm very happy with the purchase, especially for only costing about $127. I saw that they were running a 25% off sale on July 4th so I would have saved a few bucks had I waited, but all in all, a good deal.
Here is a picture of the bench, with a few ship modeling tools and other items on it - Sherline mill, Dremel workstation and Proxxon mini-lathe so far, will likely add some Byrnes tools as well (Dewalt scroll saw next to the bench). It's in my HVAC utility room, so hence a few of the pipes, etc. in the picture Better than trying to explain to the admiral why I'm using power tools on the kitchen or living room table
So thanks again everyone!
-
 nobotch got a reaction from themadchemist in The Byrnes Saw "inside and around"
Well Tim, convincing one's wife of the eminent importance of a less than cheap tool we "need" is normally not a mission impossible, but certainly easier to achieve if embedded into a generic long-term endeavor regarding tool-and-toy acquisitions.
While getting familiar with THE saw, I noted that when adjusting blade height for non cut-through tasks it lowered by almost 1 mm when locking it in with the long Allen key. It turned out that the underside of the Allen screw head scratches and therefor catches the washer between the screw and the aluminum bar the blade (its axle and bearing, that is) is mounted on. So I added two thin washers with the smooth and burr-less faces against each other.
Even if this unwanted movement when tightening the screw is not completely eliminated, it is now at least limited to about 0.1 mm (0.004") after rising the blade (tightening the locking screw after lowering the blade will always add quite a bit due to the play of the adjusting threaded rod to this difference, which is normal).
I left the original thick washer in place because my smooth washers are somewhat too thin that I would feel sure they protect enough the aluminum part.
Then there is my latest small addition which makes it a bit easier to raise or lower the blade by more than just a bit. I added a brass crank to the adjusting knob. It is screwed into a threaded hole I tapped in the knob, and secured by a bit of epoxy on the threads and a counter nut. I really don't want to get it loose because the threads in the aluminum know would be shredded quickly I guess.
Cheers,
Markus
-
nobotch got a reaction from Archi in The Byrnes Saw "inside and around"
Baseplate and outfeed table:
-
nobotch reacted to Perls in The Byrnes Saw "inside and around"
Hi All,
At the risk of being off topic, I'm new to the idea of a riving knife. I've got two questions; Wouldn't one need an appropriate width knife to match the kerf of different blades? and, Can riving knife be retro-fitted to an old table saw? I have a old, solid, workhorse of a table saw. It's an old Rockwell (pre-Delta) saw which was completely overhauled with a new motor etc. by the previous owner. Thanks.
Best,
Steve
-
nobotch reacted to mtaylor in The Byrnes Saw "inside and around"
Mike,
I'll give the answer a shot.... they do things like that because "that's the way they've always been done".
The high fence fits over the normal fence and normally is full length. I've cut the high fence down. Here's a pic from a different angle.
What Jim and Jeff at Hobbymill have said seems to work for their saws. I know Grant Dale modified his using some aluminum to get the result I'm using. If you look at what Nobotch (Markus) posted in the PDF's and links, the fences do not run the full length. See my answer above for the reasoning... I think that's probably it.
The MicroMark does come with a splitter but with the blade guard (I'm asking for a blast on this) I took it off for two reasons:
1) It's too thin (smaller than the kerf) to do any good.
2) The blade guard gets in the way big time when working with small bits of wood.
To work properly, several splitters would need to be provided for each kerf width..
One could also put the feed stock in next to the fence and have the cut off wood come off the non-fence side. Being lazy (I am and obviously others) moving the fence for every cut and getting it exact is a pain so we have the cut wood come off the fence side. If the cut comes off the non-fence side, kickback shouldn't (he holds his breath) be an issue but the feed stock could still kickback.
I've done some more testing, I couldn't induce any kind of kickback using the modified fence.
And here's a link to the topic that has Grant's mod: http://modelshipworld.com/index.php/topic/6978-help-with-a-byrnes-saw-end-of-cut-problem/?hl=byrnes
Edit: Oh.. if anyone's curious, I'm left handed and I stand to the right normally. However, I have been known to put the fence on the other side use it like "normal" folks.
-
nobotch got a reaction from Archi in The Byrnes Saw "inside and around"
My "Jim Saw" it arrived this week a mere 19 days after having placed the order!
Although this little beauty would work out of the box I have scheduled some task-specific add-ons of which I have completed three so far.
The first one is a provisional splitter (permanently integrated in a zero clearance insert) which in the first place served to figure out the dimensions of its parts but also is fully functional:
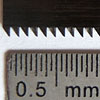
The splitter itself is made of "1 mm" birch plywood which in reality is 1.2 mm thick. This is the perfect thickness for the 36 teeth blade whose disk is a bit over 0.9 mm and which leaves a kerf of about 1.5 mm. As plywood is not really stiff I did not want to make it too big. I hope it will do its job until I'll have made a better one. Even if noise is on the low side with the Byrnes saw, the next modification I made reduces noise . The belt guard is made of a sheet of aluminium which acts as a resonator. So I lined it inside with some cardboard (glued on with epoxy). This was my standard procedure for silencing the tower case of all computers I ever owned. In the following pictures you also can see how the belt guard can be slid off and on after only loosening four screws through dedicated holes, without completely removing them - a feature I almost always missed on computer cases... You can further see that the more expensive of my two Phillips N°1 screwdrivers did not fit through the holes, I had to use the cheaper one which obviously complies better with international standards!
I don't like spinning parts that theoretically could be touched by accident, even if it is very unlikely to happen. This is why my third modification was covering the opend side of the belt guard, leaving open only a slot big enough to grab the axle with a wrench when changing the blade. The cover fits snugly but gets secured with a single screw which only has to be removed (3 full turns) when changing the belt - that is, almost never. I thought the following picture might be an interesting view for those technically inclined who are lusting for a Byrnes Saw
Well, I think that's it for today.
No, wait! I forgot to say that after having made a few cuts it really looks like this saw will meet my high expectations I had. A couple of long and thin rip cuts were all within half a tenth of a millimeter tolerance, without having used any more sophisticated add-ons than a to the "fence extension" clamped short fence, and the zero clearance insert with splitter.
Cheers,
Markus
-
nobotch reacted to Stefonroman in Byrnes Thickness Sander?
Hello:
I am new to the board and building. I was looking into purchasing the Byrnes Thickness Sander since his tools are praised on every board I've looked at. Does anyone have any video of the sander in acition? I wanted to see it run before I made the purchase. His machines look awesome!.
Also , can this thickness sander handle hardwoods?
Thanks
Stefon
-
 nobotch got a reaction from Bill Hime in The Byrnes Saw "inside and around"
My "Jim Saw" it arrived this week a mere 19 days after having placed the order!
Although this little beauty would work out of the box I have scheduled some task-specific add-ons of which I have completed three so far.
The first one is a provisional splitter (permanently integrated in a zero clearance insert) which in the first place served to figure out the dimensions of its parts but also is fully functional:
The splitter itself is made of "1 mm" birch plywood which in reality is 1.2 mm thick. This is the perfect thickness for the 36 teeth blade whose disk is a bit over 0.9 mm and which leaves a kerf of about 1.5 mm. As plywood is not really stiff I did not want to make it too big. I hope it will do its job until I'll have made a better one. Even if noise is on the low side with the Byrnes saw, the next modification I made reduces noise . The belt guard is made of a sheet of aluminium which acts as a resonator. So I lined it inside with some cardboard (glued on with epoxy). This was my standard procedure for silencing the tower case of all computers I ever owned. In the following pictures you also can see how the belt guard can be slid off and on after only loosening four screws through dedicated holes, without completely removing them - a feature I almost always missed on computer cases... You can further see that the more expensive of my two Phillips N°1 screwdrivers did not fit through the holes, I had to use the cheaper one which obviously complies better with international standards!
I don't like spinning parts that theoretically could be touched by accident, even if it is very unlikely to happen. This is why my third modification was covering the opend side of the belt guard, leaving open only a slot big enough to grab the axle with a wrench when changing the blade. The cover fits snugly but gets secured with a single screw which only has to be removed (3 full turns) when changing the belt - that is, almost never. I thought the following picture might be an interesting view for those technically inclined who are lusting for a Byrnes Saw
Well, I think that's it for today.
No, wait! I forgot to say that after having made a few cuts it really looks like this saw will meet my high expectations I had. A couple of long and thin rip cuts were all within half a tenth of a millimeter tolerance, without having used any more sophisticated add-ons than a to the "fence extension" clamped short fence, and the zero clearance insert with splitter.
Cheers,
Markus
-
nobotch reacted to Remcohe in The Byrnes Saw "inside and around"
Marcus, that are some interesting modifications.
"For modifications, i like this one, a simplified version which appeared in NRG journal."
Can somebody elaborate on this mod?
Remco
-
nobotch reacted to mtaylor in The Byrnes Saw "inside and around"
I'm headed off topic only that I don't have a Jim Saw but the MM (old style) tablesaw.
This topic got me to get off my butt and do something I've been meaning to do.
The Micromark saw has a high fence with featherboard option.
What I did was cut it down like this (a bit more than half) :
A brief test with some scrap and I'm happy....
-
nobotch got a reaction from Bill Hime in The Byrnes Saw "inside and around"
Its purpose is to prevent kickback.
Kickback can happen when the wood gets in contact with the rising teeth of the blade, which then will grab the wood and throw it back to the operator, most likely hitting him in the chest, shoulder or face.
The splitter sits at a fixed spot on the table respectively in the insert plade and has the disadvantage that as you lower the blade the distance between it and the splitter widens, so that the splitter can not do its job until the wood has overcome this distance. As the height of the splitter is fixed it does not allow cuts shallower that the wood thickness.
Whereas a riving knife always keeps the same distance and height in relation to the blade. When using a guard that is not attached to the riving knife the latter one even allows cuts shallower than the wood thickness.
In the video on this page the whole thing gets explained pretty well (with the exception that he apparently is not aware of the fact that a piece of wood that has gotten caught by the blade's teeth does not travel horizontally but rises up at about a 30° - 45° angle. Only long pieces of wood that got caught between the fence and the blade get ejected horizontally).
Edit:
Another thing the guy in the video gets wrong is when he says that the riving knife without the guard simply gets used to "offer a better view to the blade". That's a bit a weird statement indeed! Why would someone want to look at the blade? Of course, the blade is beautiful, but once the fence is set or the wood is positioned on the miter gauge the cut gets made, no need to watch the blade! If one needs to watch the running blade to make a cut it means that the setup has not been done properly!
-
 nobotch got a reaction from Jeronimo in The Byrnes Saw "inside and around"
My "Jim Saw" it arrived this week a mere 19 days after having placed the order!
Although this little beauty would work out of the box I have scheduled some task-specific add-ons of which I have completed three so far.
The first one is a provisional splitter (permanently integrated in a zero clearance insert) which in the first place served to figure out the dimensions of its parts but also is fully functional:
The splitter itself is made of "1 mm" birch plywood which in reality is 1.2 mm thick. This is the perfect thickness for the 36 teeth blade whose disk is a bit over 0.9 mm and which leaves a kerf of about 1.5 mm. As plywood is not really stiff I did not want to make it too big. I hope it will do its job until I'll have made a better one. Even if noise is on the low side with the Byrnes saw, the next modification I made reduces noise . The belt guard is made of a sheet of aluminium which acts as a resonator. So I lined it inside with some cardboard (glued on with epoxy). This was my standard procedure for silencing the tower case of all computers I ever owned. In the following pictures you also can see how the belt guard can be slid off and on after only loosening four screws through dedicated holes, without completely removing them - a feature I almost always missed on computer cases... You can further see that the more expensive of my two Phillips N°1 screwdrivers did not fit through the holes, I had to use the cheaper one which obviously complies better with international standards!
I don't like spinning parts that theoretically could be touched by accident, even if it is very unlikely to happen. This is why my third modification was covering the opend side of the belt guard, leaving open only a slot big enough to grab the axle with a wrench when changing the blade. The cover fits snugly but gets secured with a single screw which only has to be removed (3 full turns) when changing the belt - that is, almost never. I thought the following picture might be an interesting view for those technically inclined who are lusting for a Byrnes Saw
Well, I think that's it for today.
No, wait! I forgot to say that after having made a few cuts it really looks like this saw will meet my high expectations I had. A couple of long and thin rip cuts were all within half a tenth of a millimeter tolerance, without having used any more sophisticated add-ons than a to the "fence extension" clamped short fence, and the zero clearance insert with splitter.
Cheers,
Markus
-
 nobotch got a reaction from CaptainSteve in The Byrnes Saw "inside and around"
Its purpose is to prevent kickback.
Kickback can happen when the wood gets in contact with the rising teeth of the blade, which then will grab the wood and throw it back to the operator, most likely hitting him in the chest, shoulder or face.
The splitter sits at a fixed spot on the table respectively in the insert plade and has the disadvantage that as you lower the blade the distance between it and the splitter widens, so that the splitter can not do its job until the wood has overcome this distance. As the height of the splitter is fixed it does not allow cuts shallower that the wood thickness.
Whereas a riving knife always keeps the same distance and height in relation to the blade. When using a guard that is not attached to the riving knife the latter one even allows cuts shallower than the wood thickness.
In the video on this page the whole thing gets explained pretty well (with the exception that he apparently is not aware of the fact that a piece of wood that has gotten caught by the blade's teeth does not travel horizontally but rises up at about a 30° - 45° angle. Only long pieces of wood that got caught between the fence and the blade get ejected horizontally).
Edit:
Another thing the guy in the video gets wrong is when he says that the riving knife without the guard simply gets used to "offer a better view to the blade". That's a bit a weird statement indeed! Why would someone want to look at the blade? Of course, the blade is beautiful, but once the fence is set or the wood is positioned on the miter gauge the cut gets made, no need to watch the blade! If one needs to watch the running blade to make a cut it means that the setup has not been done properly!
-
nobotch reacted to GuntherMT in The Byrnes Saw "inside and around"
Come to MSW to build little model boats, learn how table saws work.
-
 nobotch got a reaction from Jack12477 in The Byrnes Saw "inside and around"
Its purpose is to prevent kickback.
Kickback can happen when the wood gets in contact with the rising teeth of the blade, which then will grab the wood and throw it back to the operator, most likely hitting him in the chest, shoulder or face.
The splitter sits at a fixed spot on the table respectively in the insert plade and has the disadvantage that as you lower the blade the distance between it and the splitter widens, so that the splitter can not do its job until the wood has overcome this distance. As the height of the splitter is fixed it does not allow cuts shallower that the wood thickness.
Whereas a riving knife always keeps the same distance and height in relation to the blade. When using a guard that is not attached to the riving knife the latter one even allows cuts shallower than the wood thickness.
In the video on this page the whole thing gets explained pretty well (with the exception that he apparently is not aware of the fact that a piece of wood that has gotten caught by the blade's teeth does not travel horizontally but rises up at about a 30° - 45° angle. Only long pieces of wood that got caught between the fence and the blade get ejected horizontally).
Edit:
Another thing the guy in the video gets wrong is when he says that the riving knife without the guard simply gets used to "offer a better view to the blade". That's a bit a weird statement indeed! Why would someone want to look at the blade? Of course, the blade is beautiful, but once the fence is set or the wood is positioned on the miter gauge the cut gets made, no need to watch the blade! If one needs to watch the running blade to make a cut it means that the setup has not been done properly!