

nobotch
-
Posts
55 -
Joined
-
Last visited
Reputation Activity
-
 nobotch reacted to cristikc in Disc sander
First of all, i'll try to put again all the ideas and photos i have, from the old site.
Sorry to hear that you lost everything.
Here is a new "tool" i made from an old Hard disk
It is a simple "disk sander". You have to use an old IDE hard disc and a power supply from old computers
You can add any type of sandpaper, and glue
I have prepared some discs with 100, 150, 180 and 220 type of sandpaper
The top picture is an example of the force of this disk sander
The bottom picture is how it is made, and a second Hard dirive (SATA) type prepared
Al the best to all
Cristi
-
nobotch reacted to Stefonroman in Byrnes Table Saw Rip Capacity
What is the rip capacity on the Byrnes Table Saw?
I am just about to place my order but can't find the information on the website.
Thanks
-
 nobotch got a reaction from Bill Hime in The Byrnes Saw "inside and around"
Its purpose is to prevent kickback.
Kickback can happen when the wood gets in contact with the rising teeth of the blade, which then will grab the wood and throw it back to the operator, most likely hitting him in the chest, shoulder or face.
The splitter sits at a fixed spot on the table respectively in the insert plade and has the disadvantage that as you lower the blade the distance between it and the splitter widens, so that the splitter can not do its job until the wood has overcome this distance. As the height of the splitter is fixed it does not allow cuts shallower that the wood thickness.
Whereas a riving knife always keeps the same distance and height in relation to the blade. When using a guard that is not attached to the riving knife the latter one even allows cuts shallower than the wood thickness.
In the video on this page the whole thing gets explained pretty well (with the exception that he apparently is not aware of the fact that a piece of wood that has gotten caught by the blade's teeth does not travel horizontally but rises up at about a 30° - 45° angle. Only long pieces of wood that got caught between the fence and the blade get ejected horizontally).
Edit:
Another thing the guy in the video gets wrong is when he says that the riving knife without the guard simply gets used to "offer a better view to the blade". That's a bit a weird statement indeed! Why would someone want to look at the blade? Of course, the blade is beautiful, but once the fence is set or the wood is positioned on the miter gauge the cut gets made, no need to watch the blade! If one needs to watch the running blade to make a cut it means that the setup has not been done properly!
-
 nobotch got a reaction from Archi in The Byrnes Saw "inside and around"
My "Jim Saw" it arrived this week a mere 19 days after having placed the order!
Although this little beauty would work out of the box I have scheduled some task-specific add-ons of which I have completed three so far.
The first one is a provisional splitter (permanently integrated in a zero clearance insert) which in the first place served to figure out the dimensions of its parts but also is fully functional:
The splitter itself is made of "1 mm" birch plywood which in reality is 1.2 mm thick. This is the perfect thickness for the 36 teeth blade whose disk is a bit over 0.9 mm and which leaves a kerf of about 1.5 mm. As plywood is not really stiff I did not want to make it too big. I hope it will do its job until I'll have made a better one. Even if noise is on the low side with the Byrnes saw, the next modification I made reduces noise . The belt guard is made of a sheet of aluminium which acts as a resonator. So I lined it inside with some cardboard (glued on with epoxy). This was my standard procedure for silencing the tower case of all computers I ever owned. In the following pictures you also can see how the belt guard can be slid off and on after only loosening four screws through dedicated holes, without completely removing them - a feature I almost always missed on computer cases... You can further see that the more expensive of my two Phillips N°1 screwdrivers did not fit through the holes, I had to use the cheaper one which obviously complies better with international standards!
I don't like spinning parts that theoretically could be touched by accident, even if it is very unlikely to happen. This is why my third modification was covering the opend side of the belt guard, leaving open only a slot big enough to grab the axle with a wrench when changing the blade. The cover fits snugly but gets secured with a single screw which only has to be removed (3 full turns) when changing the belt - that is, almost never. I thought the following picture might be an interesting view for those technically inclined who are lusting for a Byrnes Saw
Well, I think that's it for today.
No, wait! I forgot to say that after having made a few cuts it really looks like this saw will meet my high expectations I had. A couple of long and thin rip cuts were all within half a tenth of a millimeter tolerance, without having used any more sophisticated add-ons than a to the "fence extension" clamped short fence, and the zero clearance insert with splitter.
Cheers,
Markus
-
nobotch got a reaction from Archi in The Byrnes Saw "inside and around"
Maybe the following is more useful for most of you than precision measurments on a precision saw.
Of course, it is not confined to the Byrnes saw, hence a bit off-topic.
I usuallyy cut such tiny pieces using a chisel (a mirror sheen on its flat side makes cutting 90° and 45° angles really easy).
But when the Byrnes saw is already on the bench and in use it is very tempting doing such cuts with the new toy...
Hence, using "hinged chopsticks" instead of chopping off a fingertip may be a good idea (you may want to click on the pictures to enlarge).
Or simply use a chisel.
Cheers,
Markus
-
nobotch got a reaction from Archi in The Byrnes Saw "inside and around"
Hi Steve,
I am not trying to find a fault, but everything in mechanical industry is machined to tolerances, not to "perfection". This is because perfection is a term in relativity. Knowing the magnitude of the tolerances the Byrnes saw is made to may or may not be in your interest, but it is in mine, and probably in other's too.
Even if Jud's reply to your post (curiosity is part of my motivation to measure tolerances) is spot on with part of my answer. Inquiring minds want to know, and without this attitude (which is very typical to manhood) we most probably still would shave with a sharp stone which would be prefectly possible as an avid "youtuber" shows here.
But for me, there is more to it.
As Jeff from Hobbymill states here it is necessary to use a 0.040" blade for doing precise cuts on stock thicker than 4.5 mm. Now I want to cut 6.5 mm and I would love to use a 0.020" blade to cut evenly thin strips of 1.0 mm, one meter long. Yes, I want to push the limits. Needless to say that this is hardly achieveable by feeding the stock manually, but that will be a task which requires to know the variables, one of them being manufacturing tolerance of parallelism of the blade, another one being stock feed rate, and so on, you get the picture.
Now you may ask why I would want to cut such long strips to this accuracy, and you would be correct assuming that it will not be for planking, and maybe not even for ship modelling. I need this accuracy for making herringbone pattern strips used in musical instrument building (see attached picture). When making herringbone strips accuracy is critical for several reasons, one being that an error in thickness will double and a strip sitting in a groove that is 0.2 mm wider than the strip will be plain ugly hence unacceptable. If the saw blade can not constantly "eat away" the error as stock is fed there will be an error of 0.1 mm over the length of a guitar side and this strip would be ready to be binned. Up to now I have thicknessed the strips like it has been done ages ago, using a handplane. But this method takes a high toll regarding waste (shavings) produced. Using a precision saw (0.040" blade) instead of thicknessing strips with a handplane or a thickness sander reduces waste by about 50%. If I can use a 0.020" blade instead of a 0.040" blade I can reduce waste by another 50% (when cutting 1 mm strips for 2 mm herringbones) which would be great because the material to be cut is not just wood but rather a laborious glue-up of many veneers (similar to plywood, obliquely cut and again glued together). So waste is an issue.
I'm sorry that the driving force behind my tolerance measurments is not directly shipmodel related, but all this is really not a question about how many angels can dance on the head of of a pin.
-
 nobotch got a reaction from alangr4 in The Byrnes Saw "inside and around"
Maybe the following is more useful for most of you than precision measurments on a precision saw.
Of course, it is not confined to the Byrnes saw, hence a bit off-topic.
I usuallyy cut such tiny pieces using a chisel (a mirror sheen on its flat side makes cutting 90° and 45° angles really easy).
But when the Byrnes saw is already on the bench and in use it is very tempting doing such cuts with the new toy...
Hence, using "hinged chopsticks" instead of chopping off a fingertip may be a good idea (you may want to click on the pictures to enlarge).
Or simply use a chisel.
Cheers,
Markus
-
 nobotch got a reaction from cristikc in The Byrnes Saw "inside and around"
Maybe the following is more useful for most of you than precision measurments on a precision saw.
Of course, it is not confined to the Byrnes saw, hence a bit off-topic.
I usuallyy cut such tiny pieces using a chisel (a mirror sheen on its flat side makes cutting 90° and 45° angles really easy).
But when the Byrnes saw is already on the bench and in use it is very tempting doing such cuts with the new toy...
Hence, using "hinged chopsticks" instead of chopping off a fingertip may be a good idea (you may want to click on the pictures to enlarge).
Or simply use a chisel.
Cheers,
Markus
-
 nobotch got a reaction from themadchemist in The Byrnes Saw "inside and around"
Hi Steve,
I am not trying to find a fault, but everything in mechanical industry is machined to tolerances, not to "perfection". This is because perfection is a term in relativity. Knowing the magnitude of the tolerances the Byrnes saw is made to may or may not be in your interest, but it is in mine, and probably in other's too.
Even if Jud's reply to your post (curiosity is part of my motivation to measure tolerances) is spot on with part of my answer. Inquiring minds want to know, and without this attitude (which is very typical to manhood) we most probably still would shave with a sharp stone which would be prefectly possible as an avid "youtuber" shows here.
But for me, there is more to it.
As Jeff from Hobbymill states here it is necessary to use a 0.040" blade for doing precise cuts on stock thicker than 4.5 mm. Now I want to cut 6.5 mm and I would love to use a 0.020" blade to cut evenly thin strips of 1.0 mm, one meter long. Yes, I want to push the limits. Needless to say that this is hardly achieveable by feeding the stock manually, but that will be a task which requires to know the variables, one of them being manufacturing tolerance of parallelism of the blade, another one being stock feed rate, and so on, you get the picture.
Now you may ask why I would want to cut such long strips to this accuracy, and you would be correct assuming that it will not be for planking, and maybe not even for ship modelling. I need this accuracy for making herringbone pattern strips used in musical instrument building (see attached picture). When making herringbone strips accuracy is critical for several reasons, one being that an error in thickness will double and a strip sitting in a groove that is 0.2 mm wider than the strip will be plain ugly hence unacceptable. If the saw blade can not constantly "eat away" the error as stock is fed there will be an error of 0.1 mm over the length of a guitar side and this strip would be ready to be binned. Up to now I have thicknessed the strips like it has been done ages ago, using a handplane. But this method takes a high toll regarding waste (shavings) produced. Using a precision saw (0.040" blade) instead of thicknessing strips with a handplane or a thickness sander reduces waste by about 50%. If I can use a 0.020" blade instead of a 0.040" blade I can reduce waste by another 50% (when cutting 1 mm strips for 2 mm herringbones) which would be great because the material to be cut is not just wood but rather a laborious glue-up of many veneers (similar to plywood, obliquely cut and again glued together). So waste is an issue.
I'm sorry that the driving force behind my tolerance measurments is not directly shipmodel related, but all this is really not a question about how many angels can dance on the head of of a pin.
-
nobotch reacted to jud in The Byrnes Saw "inside and around"
The ad var, the measurements taken and the tools indicate that Francis is a machinist. a tool maker or something along those lines. Don't think he is looking for faults, he's having fun using his interests, knowledge and abilities to explore a machine that he admires.
Keep it up Francis, I'm enjoying and learning from your journey through a good machine while making it do what you want as you go. So far I see no damage to the machine that arrived at you house not long ago.
jud
-
nobotch reacted to jud in The Byrnes Saw "inside and around"
Sounds to me like it needs adjusting 0.0072° = 0°00'26", just using the old rifleman's formula, that's almost a half inch at a 100 yards. My total station measures to one second, I can accept a 5' difference between direct and reversed, 26" would indicate the gun needed to be sent in for cleaning and adjustment. That saw has more precision than I would expect, blade distortion because of heat would be greater. Nice dial indicator you have there. Thanks for using it to measure and report on the precision of that saw. Impresses me.
jud
-
nobotch got a reaction from Archi in The Byrnes Saw "inside and around"
Length stop for the miter gage.
The cam clamp mechanism in the second picture fixes it to the miter extension.
Cheers,
Markus
-
nobotch got a reaction from Archi in The Byrnes Saw "inside and around"
It's nothing new that the Byrnes saw is ready to use out of the box, ready to do precision cuts. No doubt about that, and I honestly have to say that I was as impressed as many other before me were.
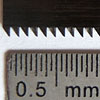
And yet, I wanted to know how precise it is. "Very precise" is one thing, and attaching some numbers that describe the precision is another one. So I thought I would use the classical approach for measuring parallelism between the blade and the miter slots (measure the distance of the same blade tooth at the same height above the table at the rear (rising) and front position, see first attached picture). Well, this is easier said than done because it turned out that the measuring device by itself interferes, so that I made as many measurements until a clear majority of the results coincided.
The numbers I got are approximately 0.0075 millimeters (that is 3/4 of 1/100 mm) deviation over a distance of 60 mm, which is the same as 0.125 mm (1.25 tenth) over 1 meter, which translates to an angle of 0.0072° off perfectly parallel. I find it pretty hard to imagine such a shallow angle, and I can't help thinking that this "error" has very few if any impact at all on real cutting action when using the saw. For example, any slightly uneven pressure from the push sticks will create an error that is easily about ten times bigger than the blade alignment tolerance I have measured.
In the following pictures you can further see my newest addition to the saw, which is a sandpaper lined wooden frame that pops into precise position over the miter extension, which helps to avoid that the work piece moves while (or before) being cut. Of course I could have glued the sandpaper directly onto the miter extension, but sometimes it may be necessary to lay a finished surface against the miter extension and in this case having the latter one lined with sandpaper would be less than ideal. Of course I also made a length stop which fits the "sandpaper-frame".
Thanks for reading and watching.
- Markus
-
nobotch reacted to Mike Y in The most silent disk sander
I also thought of buying Byrnes sander, but it is too big, and do not justify the cost (incl shipping plus custom taxes). If I ship something outside of EU - it is ridiculously expensive in the end. I don't need any precision or fine adjustments from disk sander - I just need it to be small and quiet, that is all.
Table saw is another story, and I will definitely buy Byrnes table saw. I need a precision from the saw, plus lots of tilting tables and adjustable angles. It is expensive, but justifies the cost.
-
nobotch reacted to Landlubber Mike in Model Machines 4" Table Saw
Well I managed to find a coupling of two adapters that provide a really good seal without using duct tape. I have a Fein shop vac, which is in metric and has a 35mm hose. The Byrnes machines' dust port is in inches (I believe 1.75" outer diameter, 1.5" inner diameter).
I ended up buying the following two items:
Shop-Vac 906-87-19 Universal Tool Adapter: http://www.amazon.com/gp/product/B00004RHKU/ref=oh_details_o01_s00_i02?ie=UTF8&psc=1
Bosch VAC003 35mm hose-to-1-1/4" port adapter: http://www.amazon.com/gp/product/B0000AV77S/ref=oh_details_o01_s00_i01?ie=UTF8&psc=1
I first cut off the largest section (including that square section) and the two smallest sections of the Shop-Vac adapter. Then I slipped the smaller end of the modified adapter into the machine's dust port. The Bosch adapter fits onto the vacuum's hose, and then is inserted into the larger end of the modified adapter. The Shop-Vac adapter is rubber, and the Bosch adapter is plastic, so as you slide the Bosch adapter into the Shop-Vac adapter, you not only are ensuring a tight seal between the two adapters, but also between the Shop-Vac adaptor and the machine's dust port. The fit is very snug when all is said and done, without needing duct tape or other solution.
Anyway, just thought I'd share as I spent hours trying to find a solution. Hopefully this helps out others with Byrnes machines that might be using a shop-vac that is in metric size.
-
nobotch got a reaction from themadchemist in The Byrnes Saw "inside and around"
It's nothing new that the Byrnes saw is ready to use out of the box, ready to do precision cuts. No doubt about that, and I honestly have to say that I was as impressed as many other before me were.
And yet, I wanted to know how precise it is. "Very precise" is one thing, and attaching some numbers that describe the precision is another one. So I thought I would use the classical approach for measuring parallelism between the blade and the miter slots (measure the distance of the same blade tooth at the same height above the table at the rear (rising) and front position, see first attached picture). Well, this is easier said than done because it turned out that the measuring device by itself interferes, so that I made as many measurements until a clear majority of the results coincided.
The numbers I got are approximately 0.0075 millimeters (that is 3/4 of 1/100 mm) deviation over a distance of 60 mm, which is the same as 0.125 mm (1.25 tenth) over 1 meter, which translates to an angle of 0.0072° off perfectly parallel. I find it pretty hard to imagine such a shallow angle, and I can't help thinking that this "error" has very few if any impact at all on real cutting action when using the saw. For example, any slightly uneven pressure from the push sticks will create an error that is easily about ten times bigger than the blade alignment tolerance I have measured.
In the following pictures you can further see my newest addition to the saw, which is a sandpaper lined wooden frame that pops into precise position over the miter extension, which helps to avoid that the work piece moves while (or before) being cut. Of course I could have glued the sandpaper directly onto the miter extension, but sometimes it may be necessary to lay a finished surface against the miter extension and in this case having the latter one lined with sandpaper would be less than ideal. Of course I also made a length stop which fits the "sandpaper-frame".
Thanks for reading and watching.
- Markus
-
nobotch reacted to Mike Y in Proper light for a modelling table
Gaetan, thanks! Could you please point me to a right discussion than? I honestly searched by "light" or "lamp" keyword in that forum before creating a new topic..
-
 nobotch got a reaction from GuntherMT in The Byrnes Saw "inside and around"
It's nothing new that the Byrnes saw is ready to use out of the box, ready to do precision cuts. No doubt about that, and I honestly have to say that I was as impressed as many other before me were.
And yet, I wanted to know how precise it is. "Very precise" is one thing, and attaching some numbers that describe the precision is another one. So I thought I would use the classical approach for measuring parallelism between the blade and the miter slots (measure the distance of the same blade tooth at the same height above the table at the rear (rising) and front position, see first attached picture). Well, this is easier said than done because it turned out that the measuring device by itself interferes, so that I made as many measurements until a clear majority of the results coincided.
The numbers I got are approximately 0.0075 millimeters (that is 3/4 of 1/100 mm) deviation over a distance of 60 mm, which is the same as 0.125 mm (1.25 tenth) over 1 meter, which translates to an angle of 0.0072° off perfectly parallel. I find it pretty hard to imagine such a shallow angle, and I can't help thinking that this "error" has very few if any impact at all on real cutting action when using the saw. For example, any slightly uneven pressure from the push sticks will create an error that is easily about ten times bigger than the blade alignment tolerance I have measured.
In the following pictures you can further see my newest addition to the saw, which is a sandpaper lined wooden frame that pops into precise position over the miter extension, which helps to avoid that the work piece moves while (or before) being cut. Of course I could have glued the sandpaper directly onto the miter extension, but sometimes it may be necessary to lay a finished surface against the miter extension and in this case having the latter one lined with sandpaper would be less than ideal. Of course I also made a length stop which fits the "sandpaper-frame".
Thanks for reading and watching.
- Markus
-
nobotch reacted to mikeaidanh in Sander drum
Hello Markus,
Sorry for the delay in replying to your question but I have been away in an area with little or no phone and broadband coverage. Bliss!
The dust extraction on my sanding rig is fairly good though not perfect. Lots of dust does get pulled passed the tool but not all of it. I have never used this set up on ply thicker than 12mm so the height problem does not exist. The possibility of limiting the amount of dust escaping was there so I took it. It may be worth adding a half shell at the back of the tool, also extracted, to catch the dust that spins off from the tool. Yes, I like that and I will add it.
Mike.
-
 nobotch got a reaction from mikeaidanh in Sander drum
Anthony, these are some sturdy looking sanding drums at a very reasonable price. Thanks for the link.
Mike, I am most curious about how good dust extraction through that box is. It looks very neat, but I'm a bit skeptical about its efficiency, especially when the piece to be sanded is taller than just a few millimeters I'm afraid that most of the dust will not make its way to the vacuum. I hope I'm wrong though. Please let us know.
Cheers,
Markus
-
 nobotch got a reaction from AntonyUK in The Byrnes Saw "inside and around"
Length stop for the miter gage.
The cam clamp mechanism in the second picture fixes it to the miter extension.
Cheers,
Markus
-
nobotch got a reaction from Archi in The Byrnes Saw "inside and around"
Baseplate and outfeed table:
-
nobotch got a reaction from Archi in The Byrnes Saw "inside and around"
Well, it took a bit longer than just some hours on last weekend. Short fence, high and low profile:
Switch from high to low, and to the left the dedicated push stick: The handle assembly screwed to the push stick has an protruding rear pin which prevents the handle from being run into the blade: The push stick (or maybe I'd better call it push board) has a squared front edge, and the piece of wood to be ripped is supposed to be narrower than the push board and to have a squared rear edge. With this, when sliding the push stick along the fence the tendency of the ripped pieces rotate once the lateral push stick is released (shortly before the cut is completed) gets minimized or even eliminated, so that also the las millimeters of the cut should be perfectly accurate. Here some details of the fence and push board, after a completed cut: The next item on my to-do list is an out-feed table. Thanks for watching. Cheers, Markus
-
nobotch reacted to mikeaidanh in Sander drum
Further to Antony's post. I have used various sizes of sander drums mounted as shown in the following image for shaping plywood sections
The various size drums are matched to their own table which is square to the drum axis. The tables can be easily removed and replaced. The base of the unit is attached to a vacuum dust extractor.
I have not used this set up for model work...yet.
Mike.
-
nobotch reacted to AntonyUK in Sander drum
Hi.
Found this while looking at sanders.
http://www.axminster.co.uk/axminster-large-drum-sanders?sel=500185
It's made by Jet tools.
Should be available throughout the globe.
Going to order one to look at the quality and uses.
Regards Antony.