MORE HANDBOOKS ARE ON THEIR WAY! We will let you know when they get here.
×


CharlieZardoz
-
Posts
969 -
Joined
-
Last visited
Content Type
Profiles
Forums
Gallery
Events
Everything posted by CharlieZardoz
-
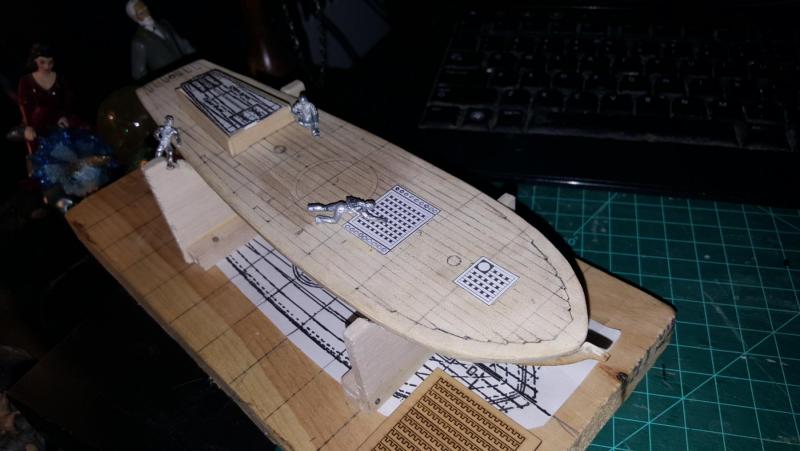
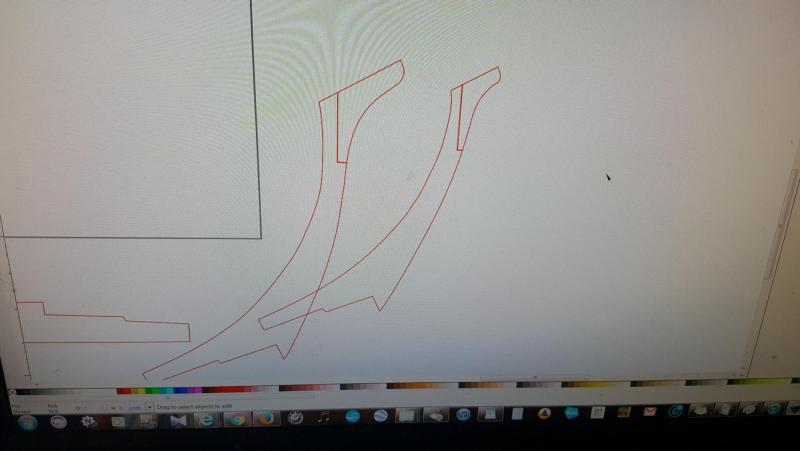
 Well here is a new pattern, the front still square is only 4 by 4 now. This puts the galley stack closer to the center and looks a bit more in perspective to the larger grating in the back.
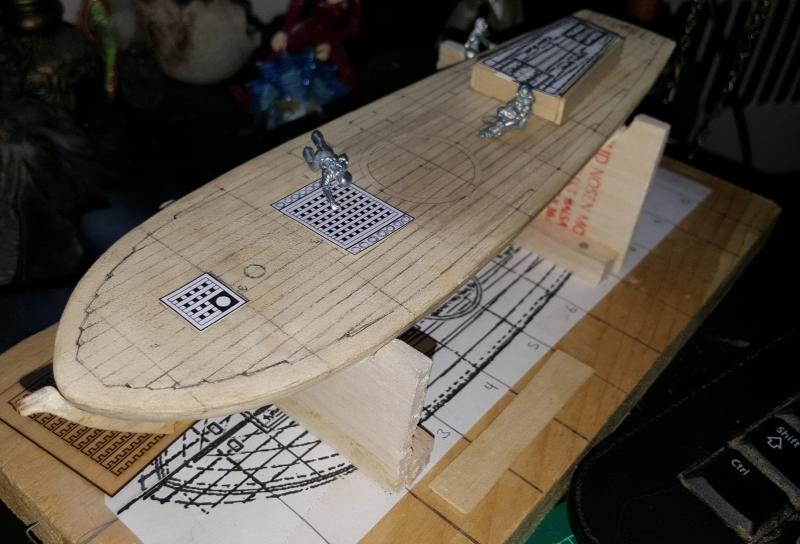
- 362 replies
-
- 7
-

-
- active
- revenue cutter
- (and 1 more)
-
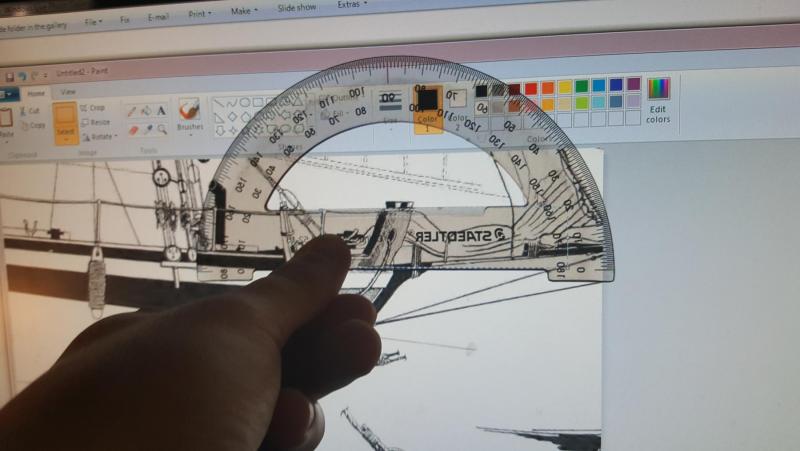
The syren gratings make holes that are about 1.1mm which is around 3" according to Chuck.
- 362 replies
-
- 1
-
-
- active
- revenue cutter
- (and 1 more)
-
Thanks Doc! Maybe you're right many of the models ive seen use that set up and having a square hatch simply makes more practical sense. Ill double check some examples but I appreciate your imput.
- 362 replies
-
- 2
-
-
- active
- revenue cutter
- (and 1 more)
-
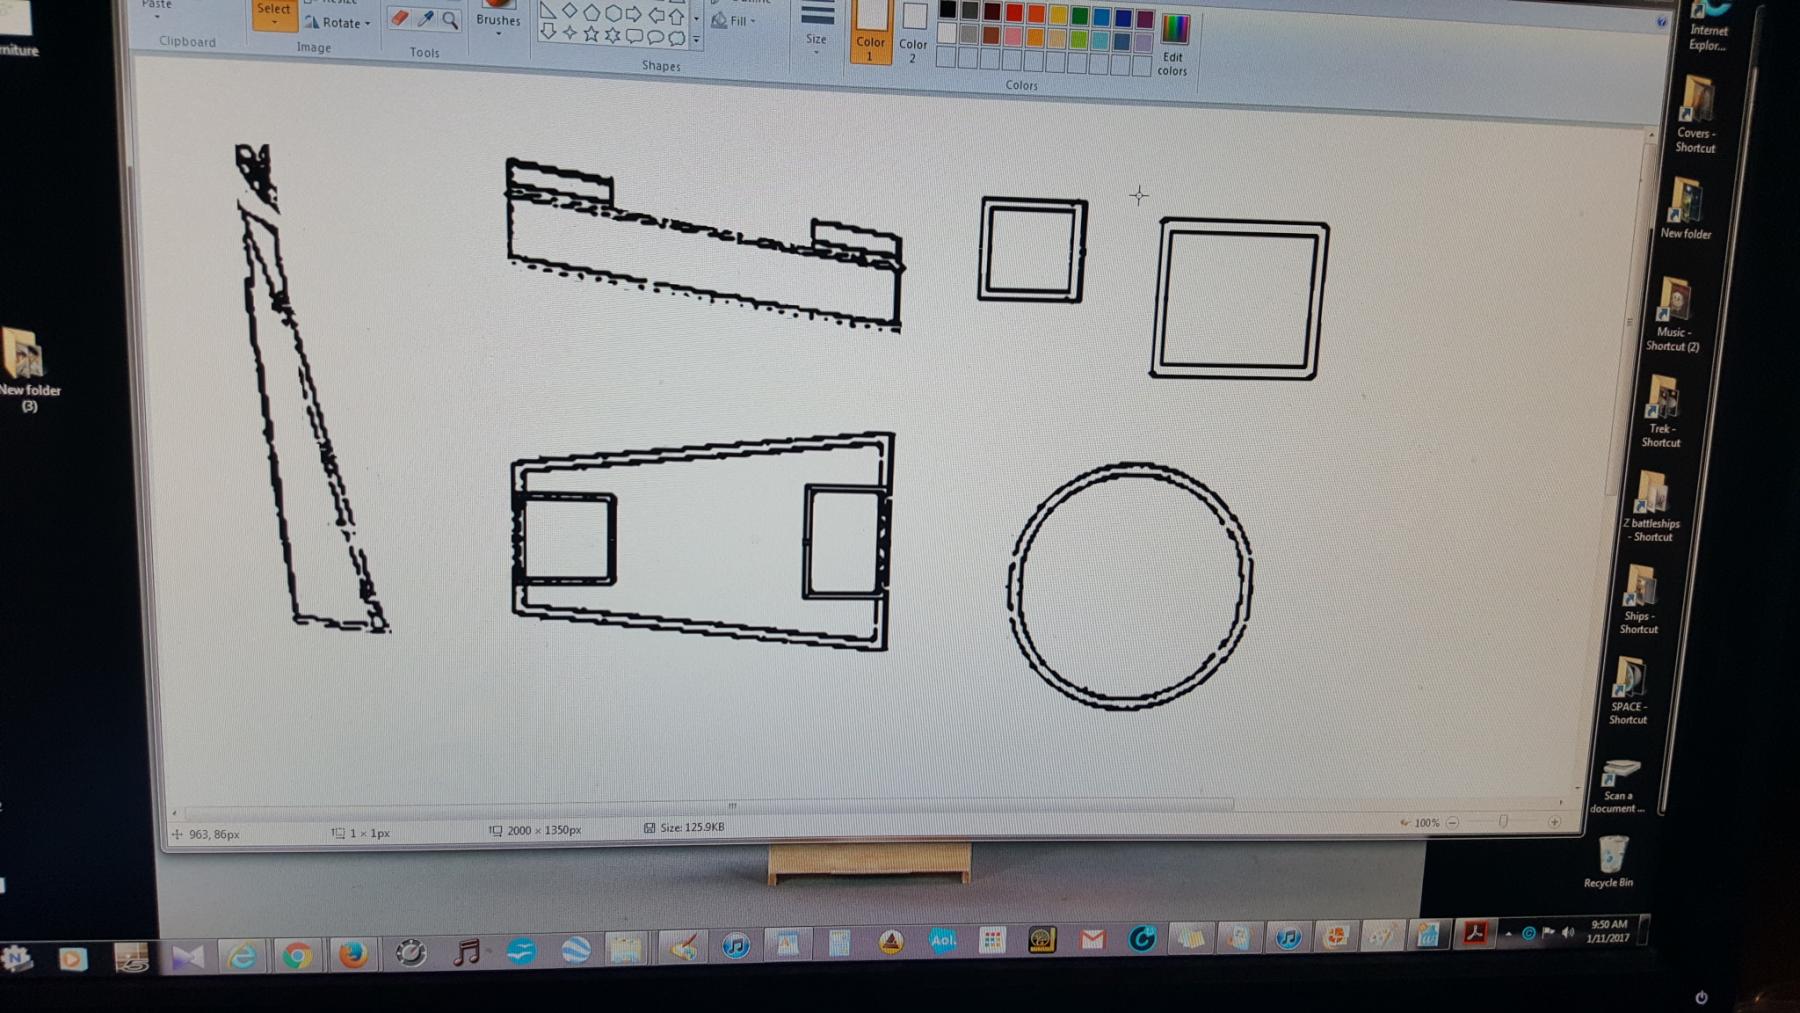
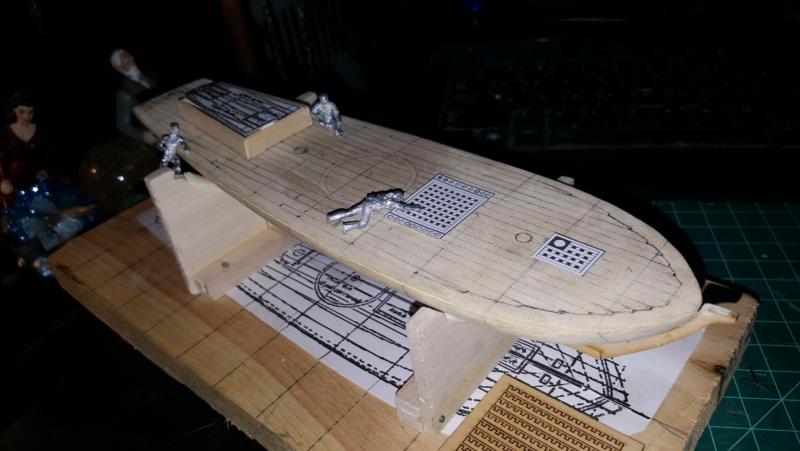
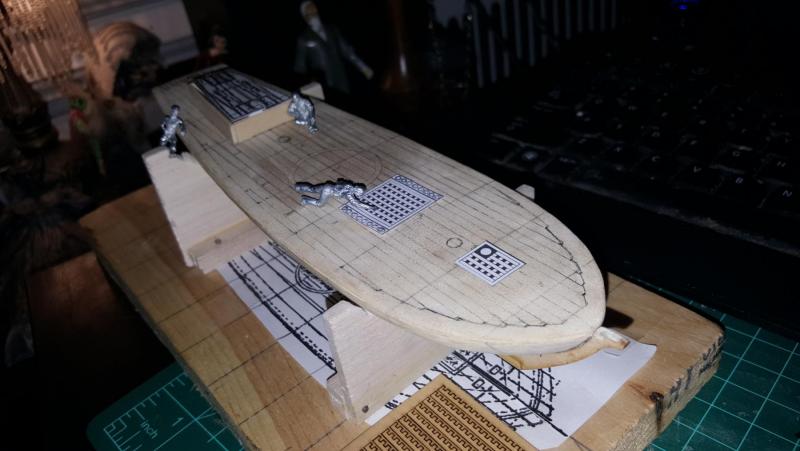
Second is a more modified version the one is front is 5 by 5 holes and the one in back 8 by 8 holes. This one is similar in dimensions to various kits mamoli/krick/AL etc and honestly looks the best in my opinion. The other option would be to vary them up, last pic shows the one in front 4 by 5 and the 8 by 8 in the back. I'm open to opinions which do you all think looks best? Otherwise I'll probably pick option 3 with the mixed approach since to my eyes it just right. Also what about the size of the grating holes do they look to scale?
- 362 replies
-
- 6
-
-
- active
- revenue cutter
- (and 1 more)
-
Small update today. I made some test gratings based on the scale gratings I got from Syren. So question here is what looks best. The first set up is what is measured exactly from Chapelle plans. Using this grating the one is front is 4 by 5 holes the bigger one is 7 by 8 holes. This could work but the rear grating seems a tad small.
- 362 replies
-
- 3
-
-
- active
- revenue cutter
- (and 1 more)
-
What is the most EPIC kit available???
CharlieZardoz replied to Rossi46's topic in Wood ship model kits
Also that HMS Warrior kit by Billing Boats like 60" looks pretty epic. -
There is a post on here somewhere about buying a kit and replacing all the kit wood and metal with higher quality materials. My Sultana I invested probably 1000 already so its a very relative question.
-
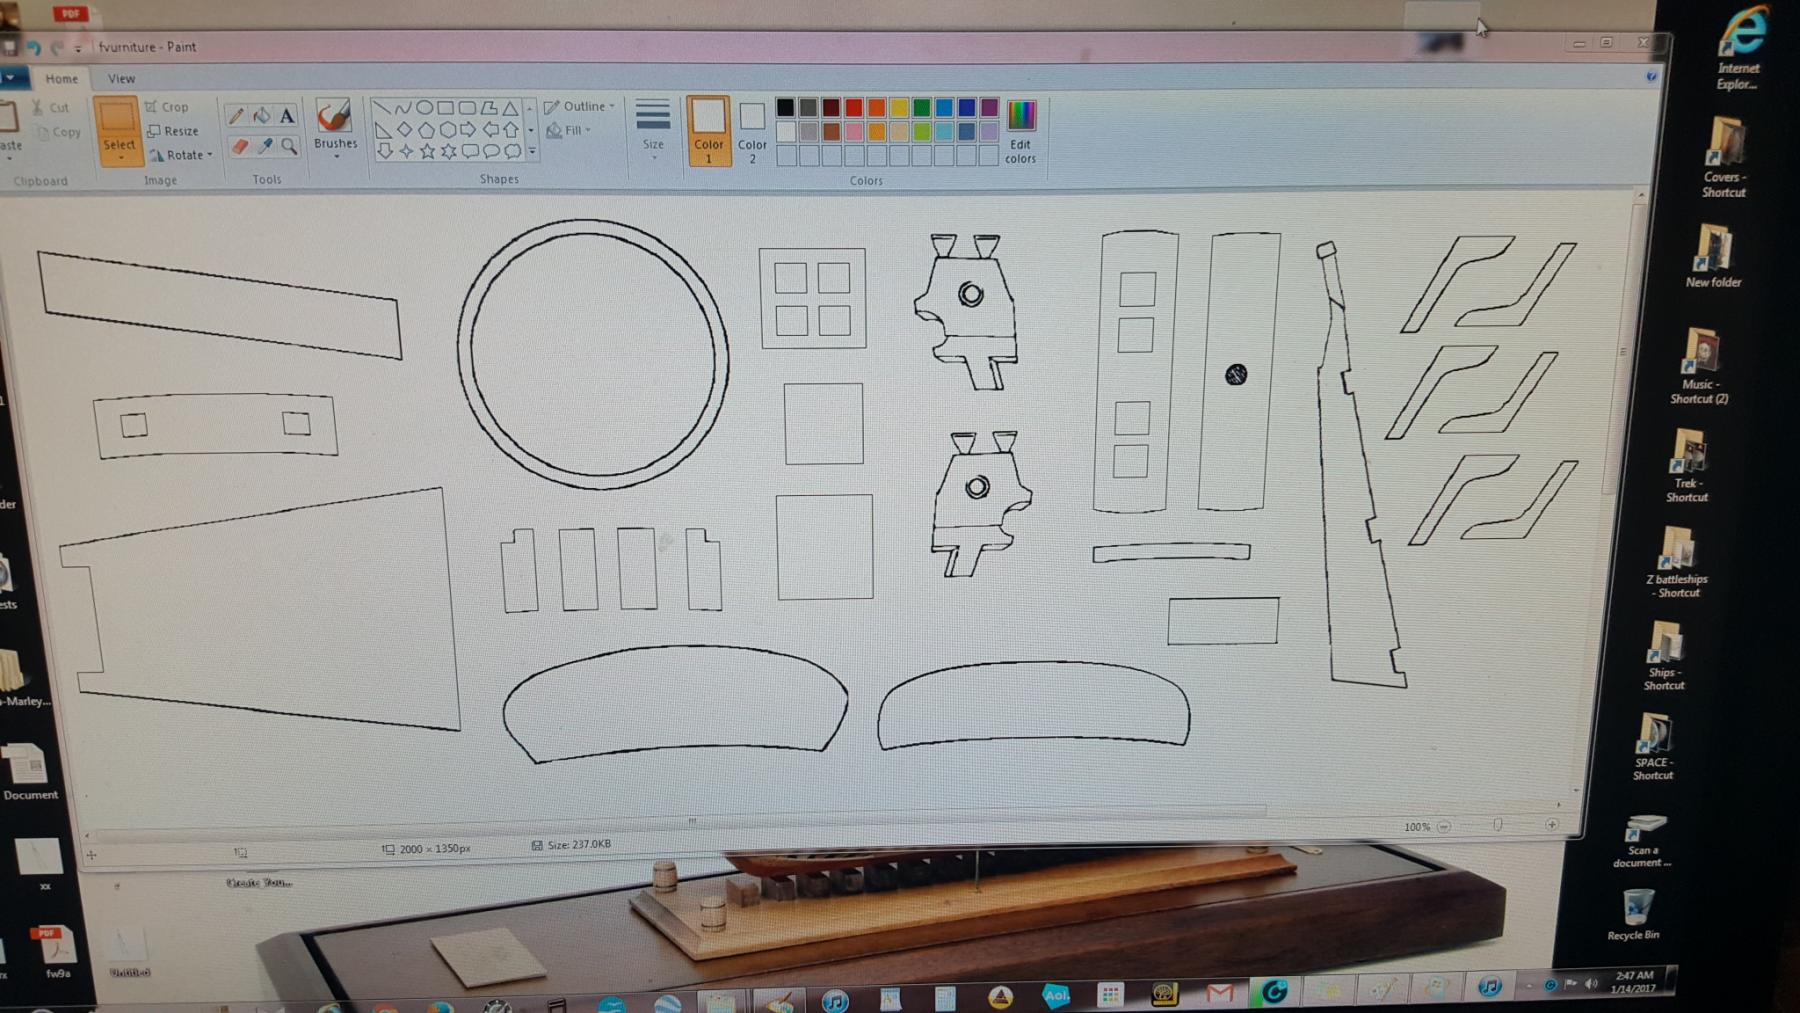
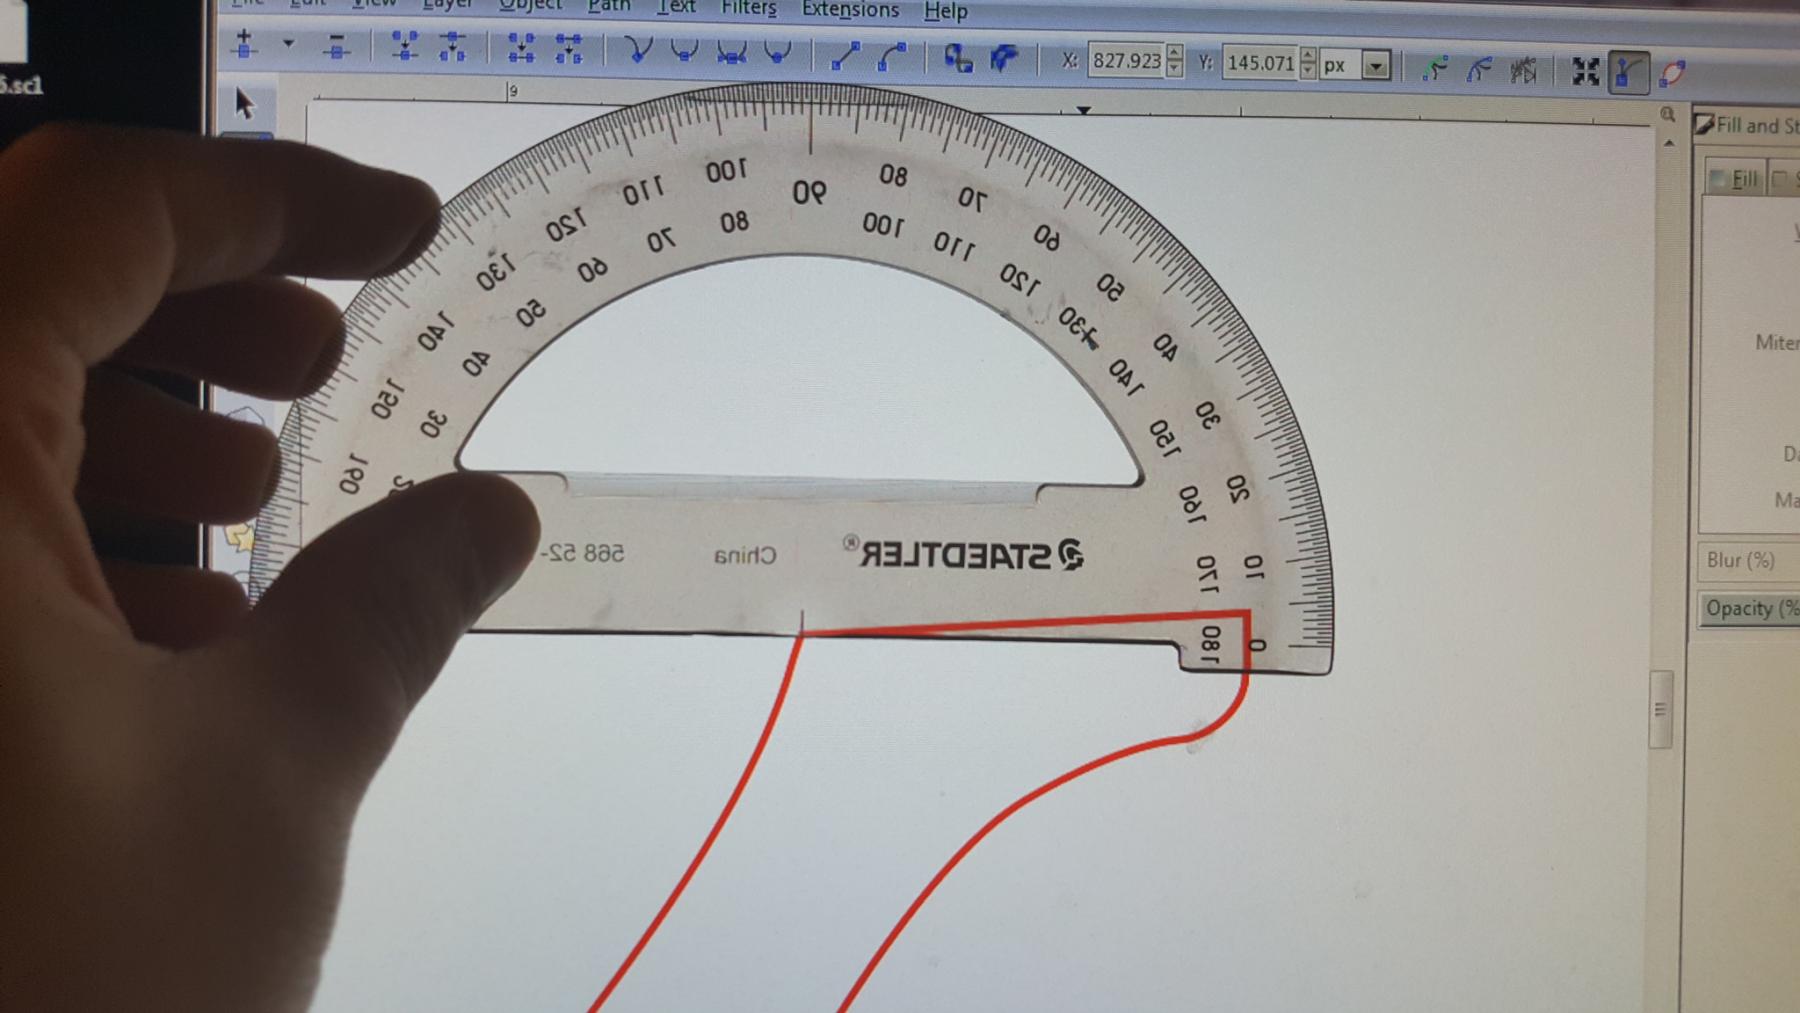
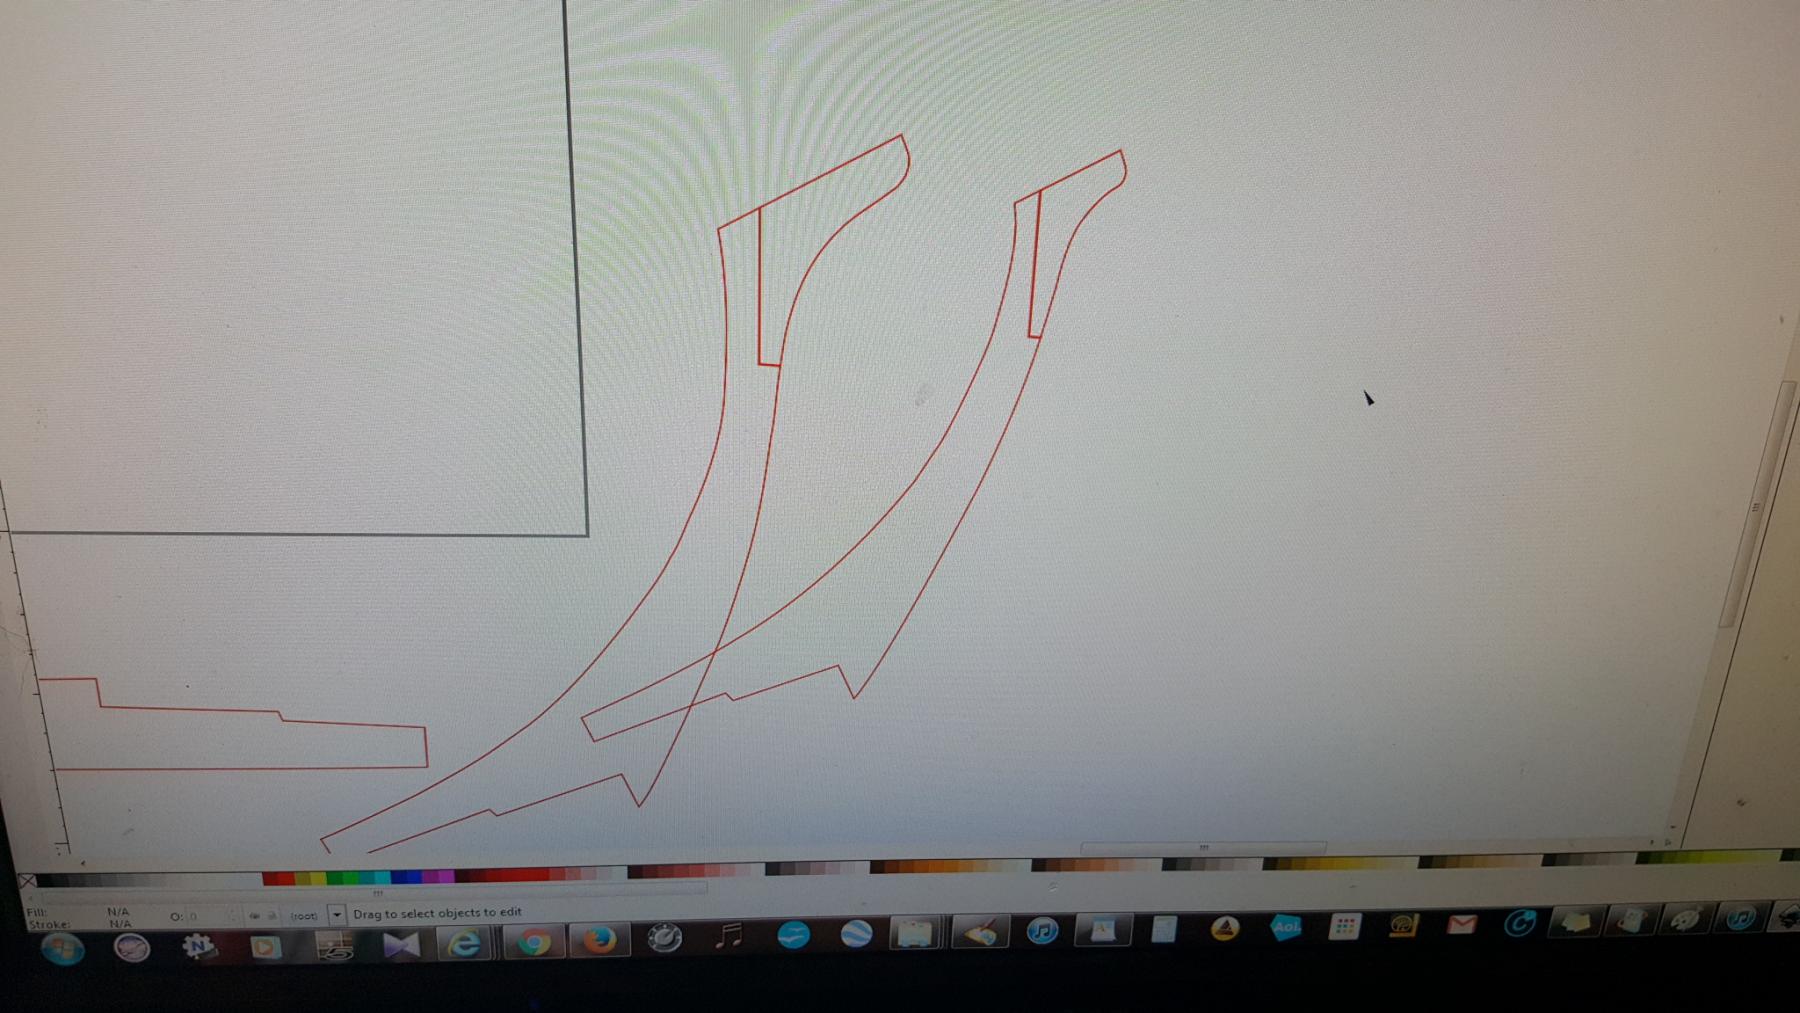
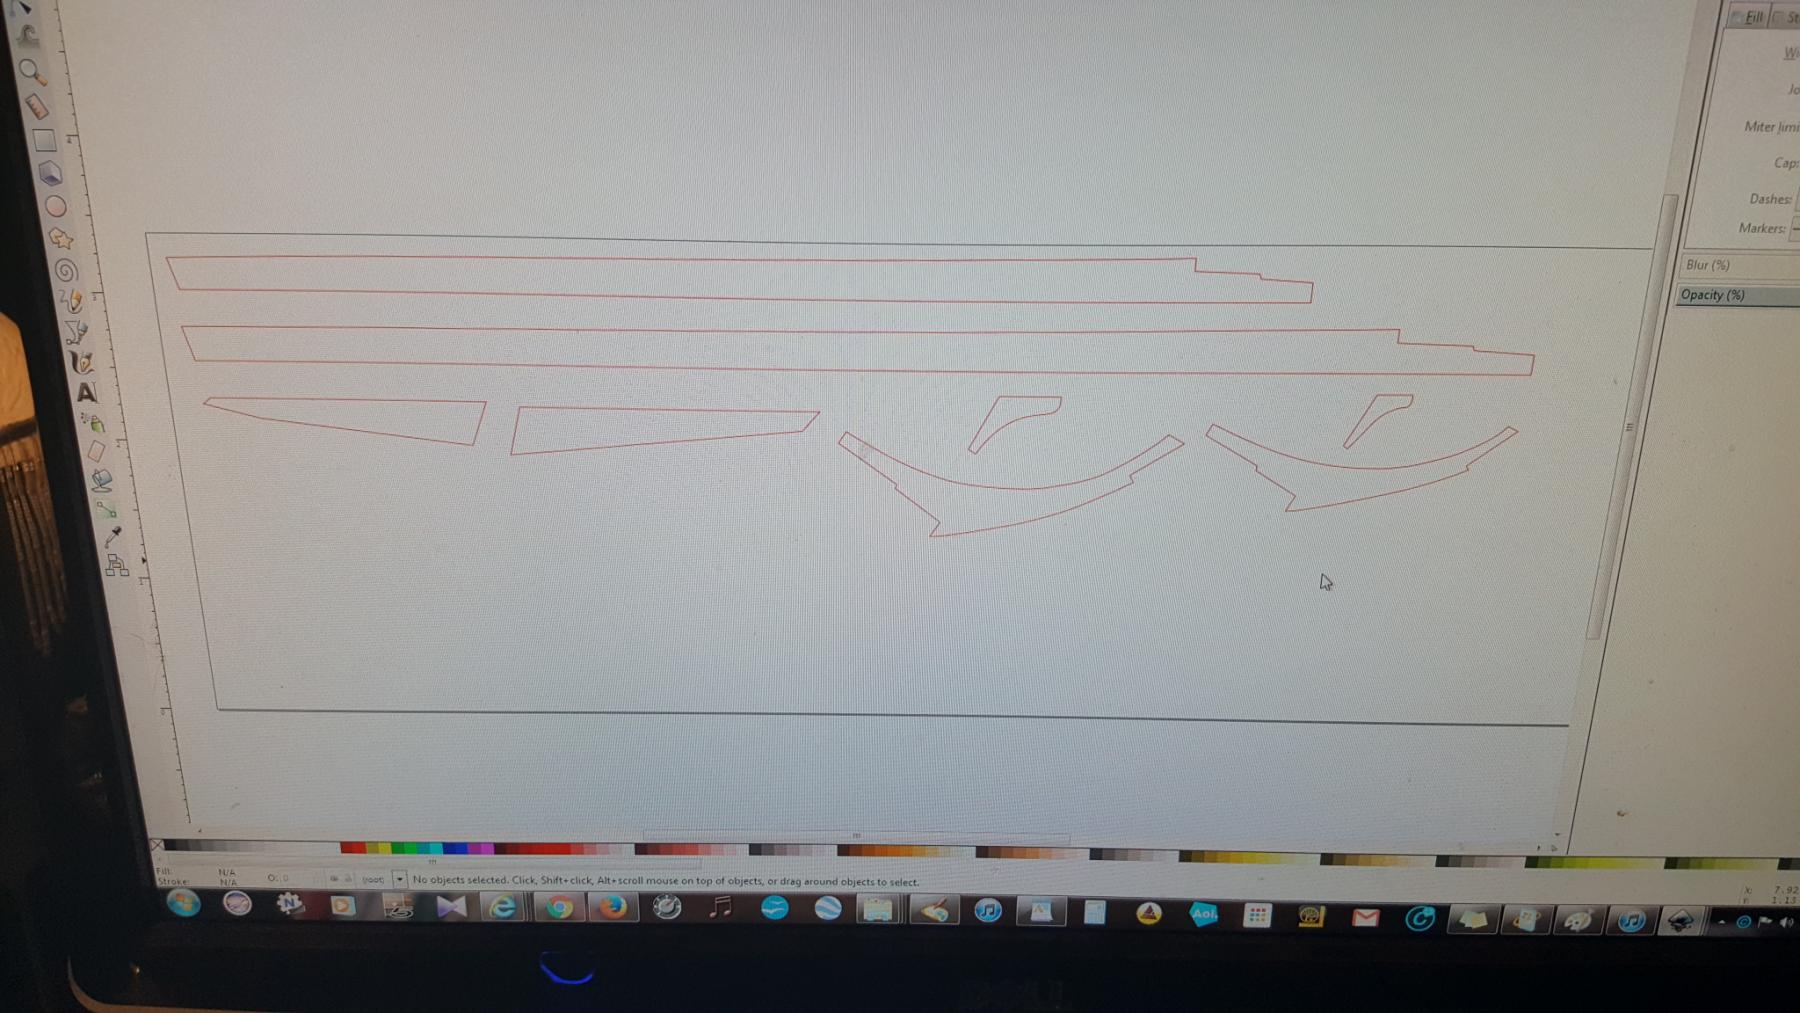
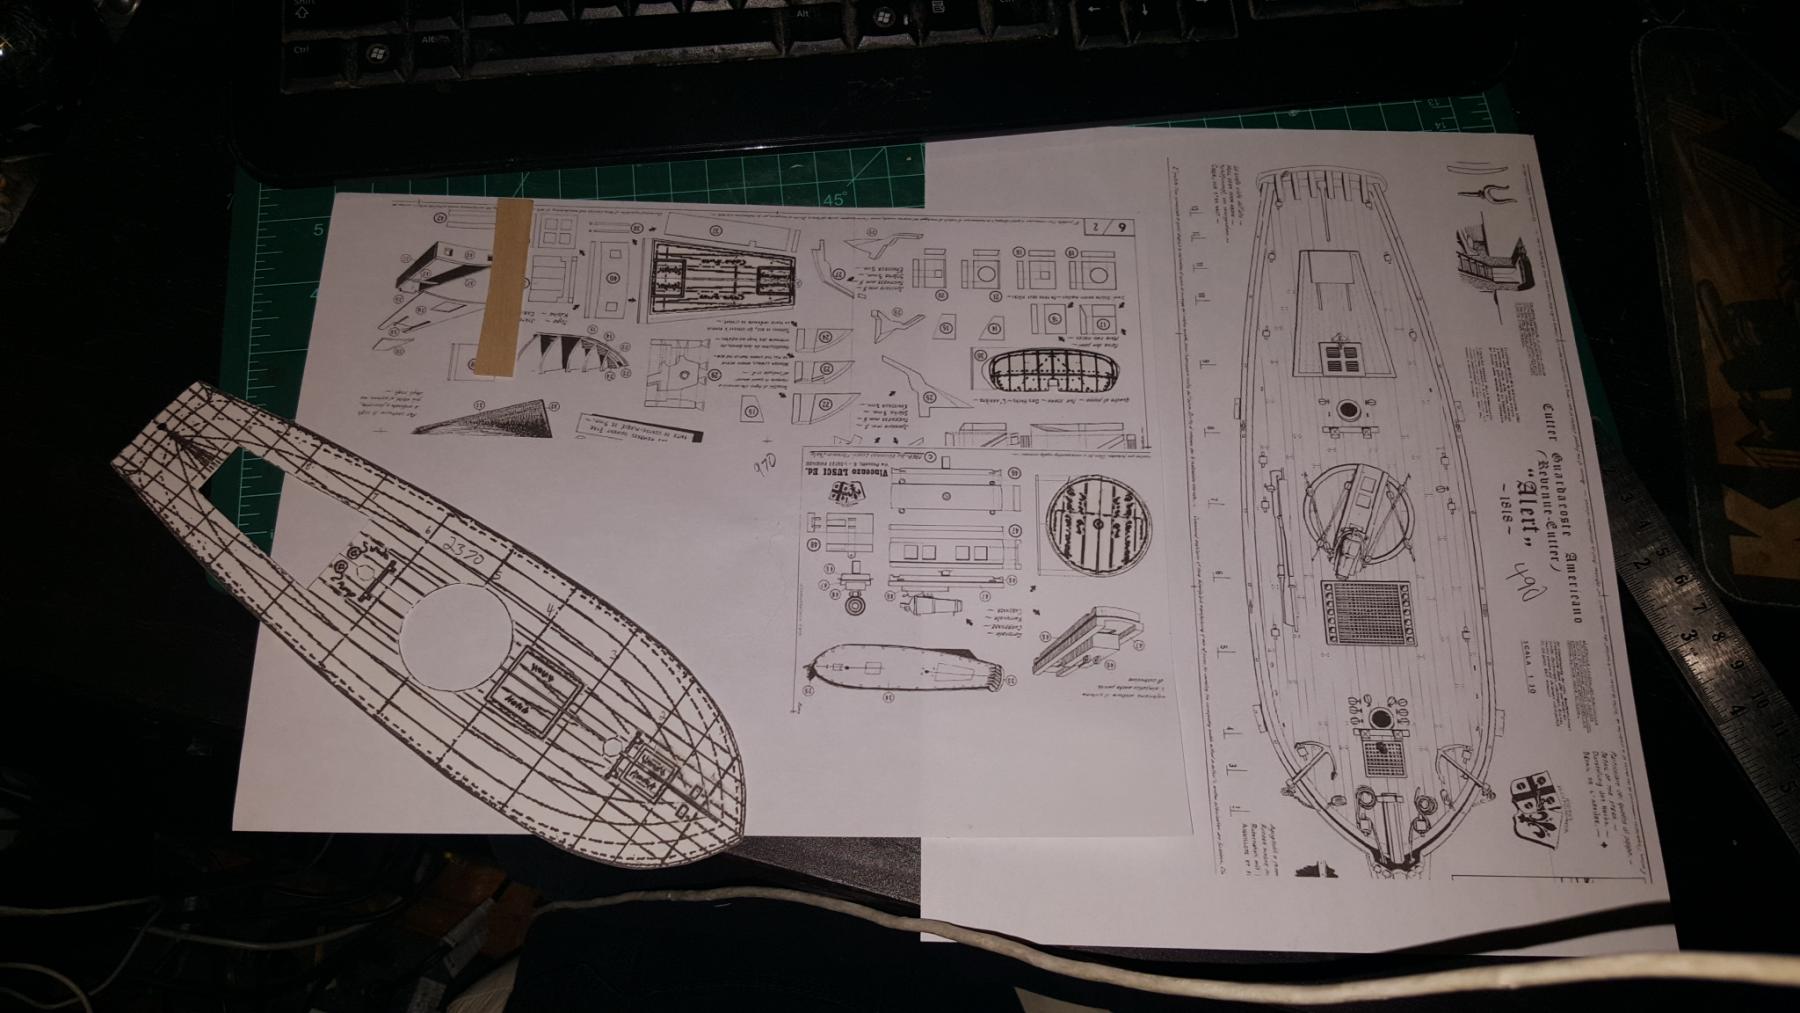
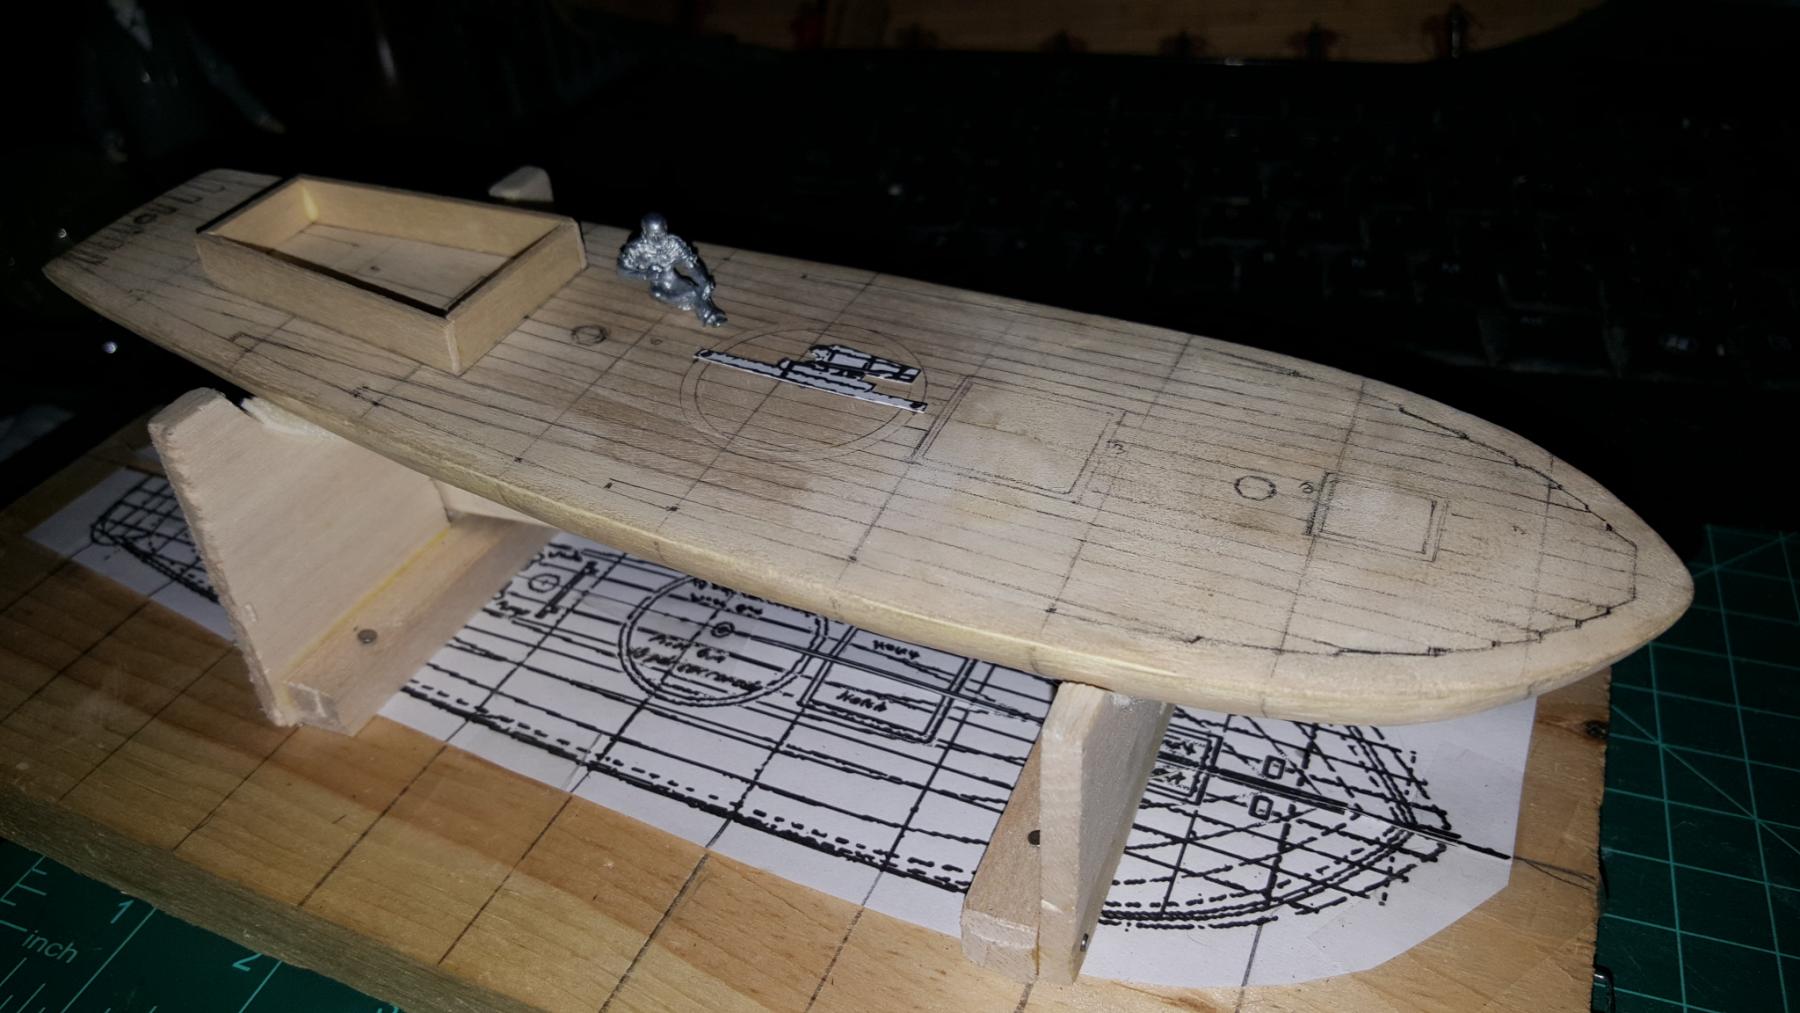
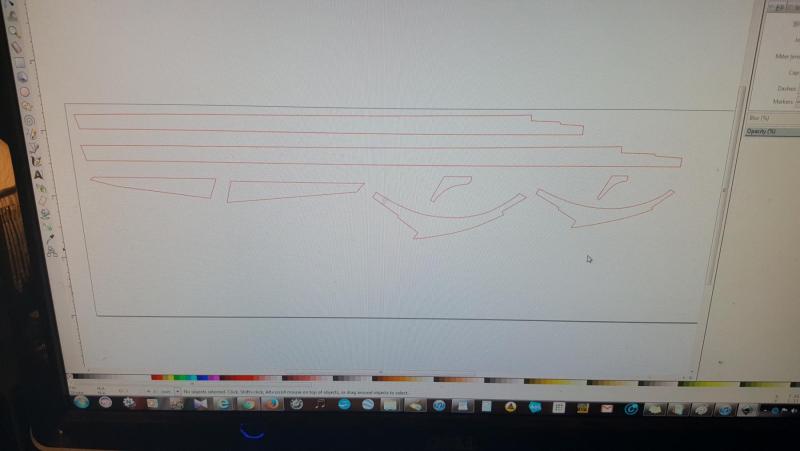
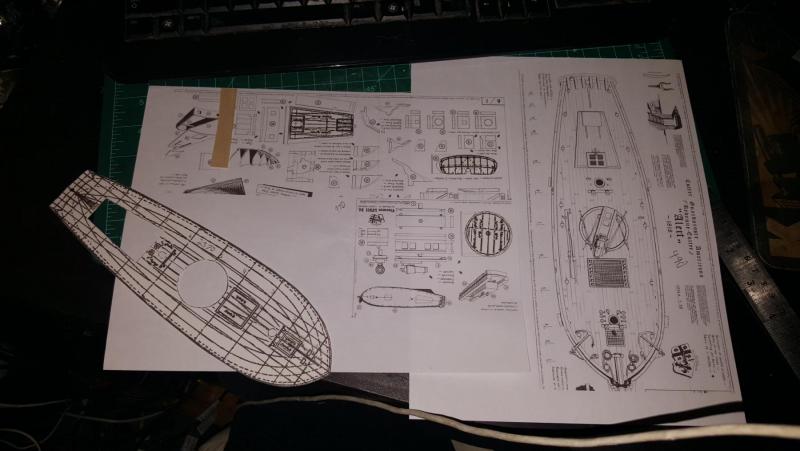
Ok so thought Id show a bit of what ive been up to. Basically all these parts will be laser made. What I did in many instances was took the plans from Chapelle's book, the bluejacket kit and the Italian plan downloadable off the Internet and mixed and matched what parts work best. For example look at the 3 rudders the Alert is on the right so I chose that one then modified it to fit my keel. The cabin is a mix of all 3 the sides need to be rhombis shaped not a rectangle like in the italian plan (the follow the inclone of the deck). The carriage is from the Italian plan and the stern is from bluejacket but modified by the doughty plans. Once the laser renderings are finished, I will separate them to their various wood thicknesses. Also taking the scan of the deck to make the edging so it fits precisly.
- 362 replies
-
- 7
-
-
- active
- revenue cutter
- (and 1 more)
-
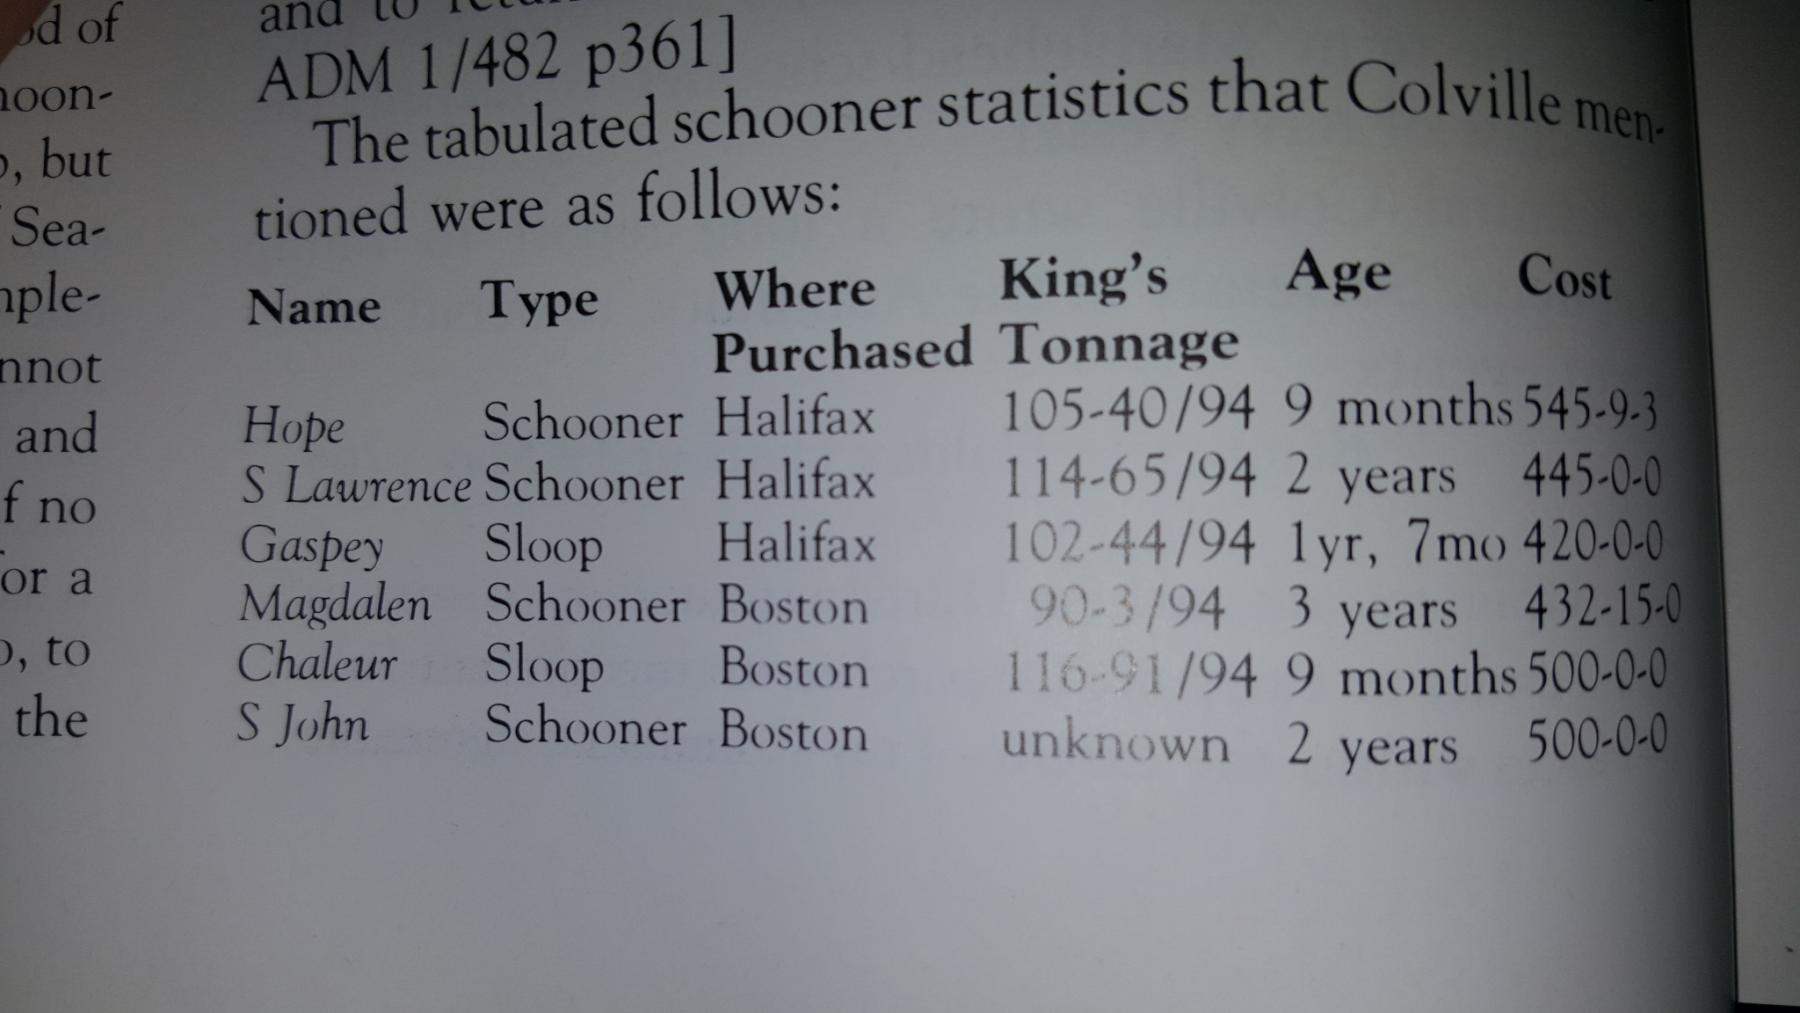
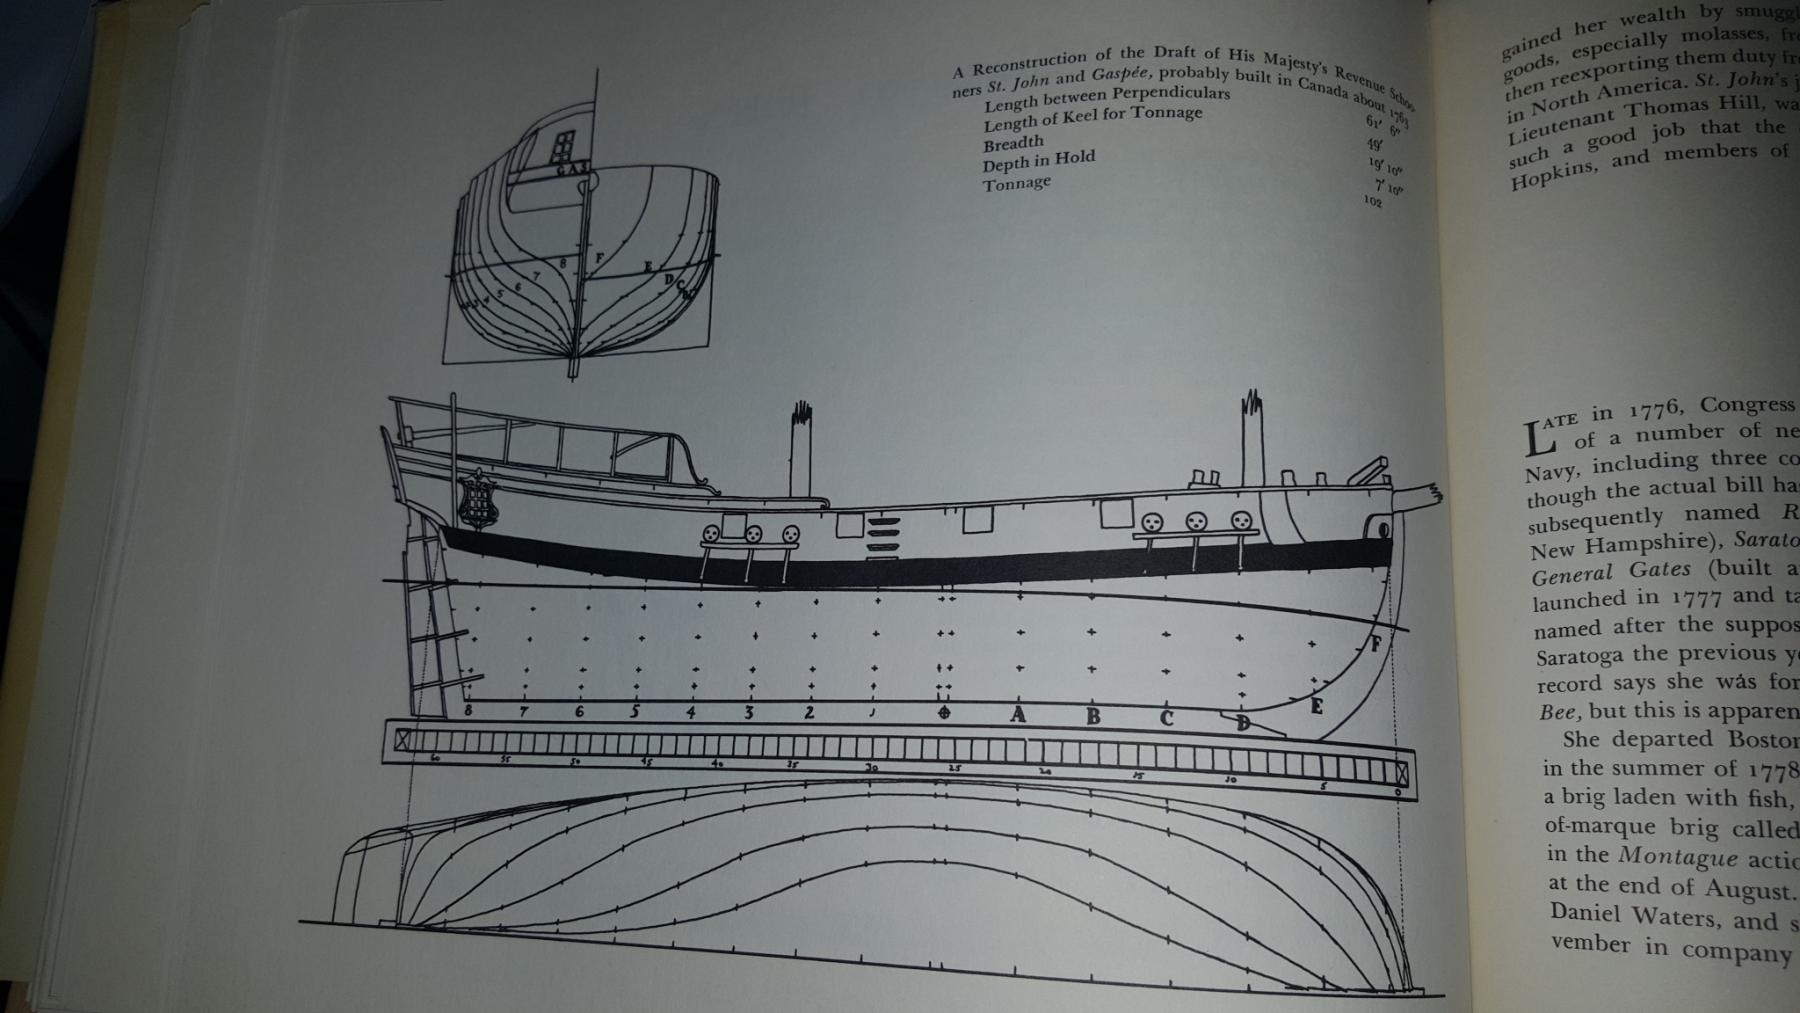
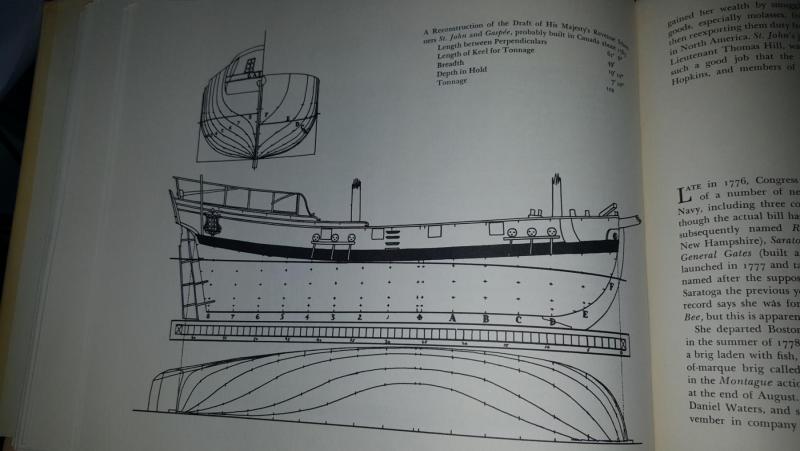
Hi Doc! Regarding quarter badges for the ship I would say yes she should have them or at least I would add them. Reason is 1 most ships at that time with a quarterdeck had them in the cabin and also the Halifax and similar type ships were all standard merchant schooners which were converted for battle so they all had that apple shape heavy design vs the other type of ship the Bermuda sloop or other sloops and galleys which would have probably lacked such a cabin space. Aside from that regarding name there are a few options if you are looking for one. There were two Independence's active at the same time the 1776 Rhode Island sloop of 8 guns and the 1776 Massachusetts brigantine of 10 guns. Neither really fit a Halifax/Sultana style schooner however no measurements are on record so nothing against naming her Independence. Hahn's colonial schooner book mentions a list of armed schooners employed at that time Hope, S Lawrence, Gaspey, Magdalen, Chaleur and St John. I imagine many of these looked like Chaleur or maybe Edward Hawke (the Marblehead schooner). Gaspee is depicted in Millar's book on the Continental Navy looking something similar to the schooner Baltick or Franklin. He also shows a few other schooners in that book of similar lines to your kit. Not exact but these are of course all conjecture. That said ive seen a version of Gaspee using either the kit or Halifax and it looked rather nice. Some pics below

-
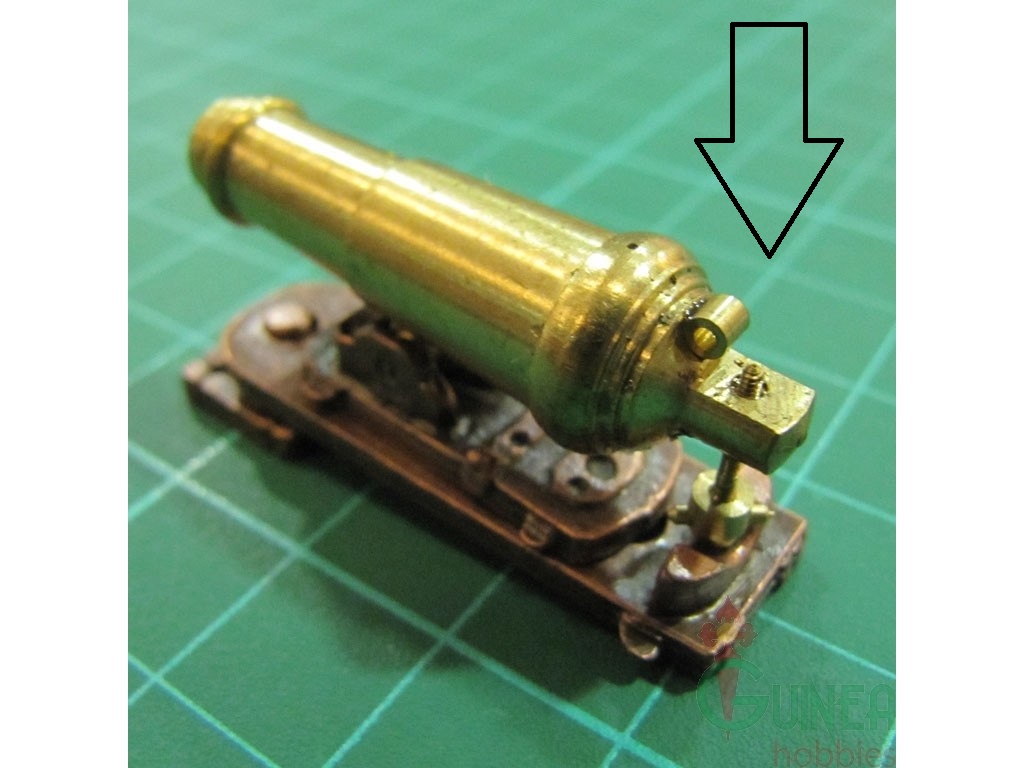
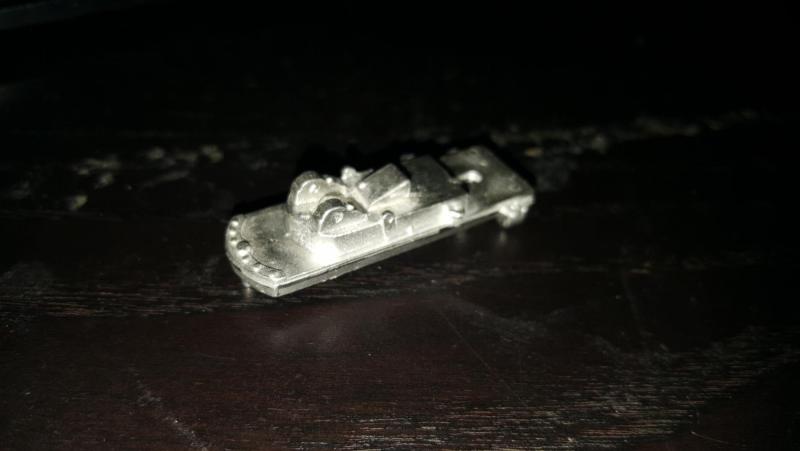
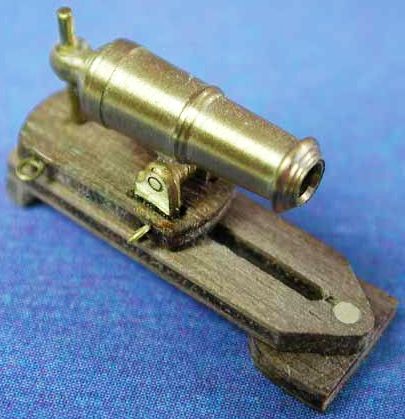
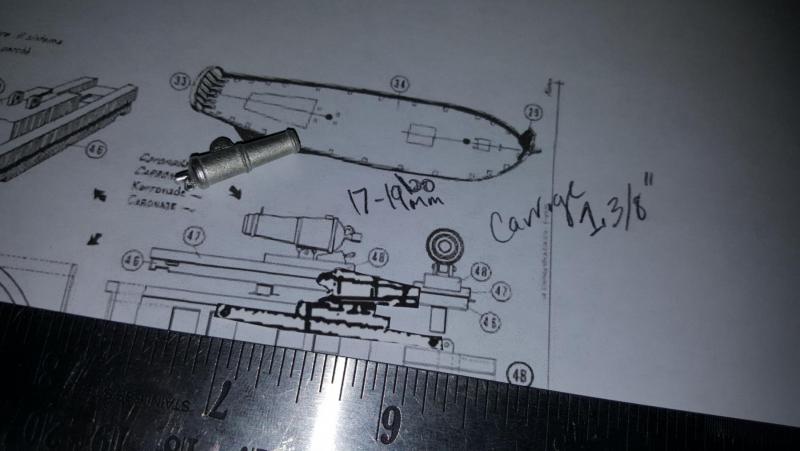
The photo is sufficient for me to understand how the pin/screw is supposed to connect to the carriage. Thank you so much this will give me what I need to complete the carronade
- 362 replies
-
- 2
-
-
- active
- revenue cutter
- (and 1 more)
-
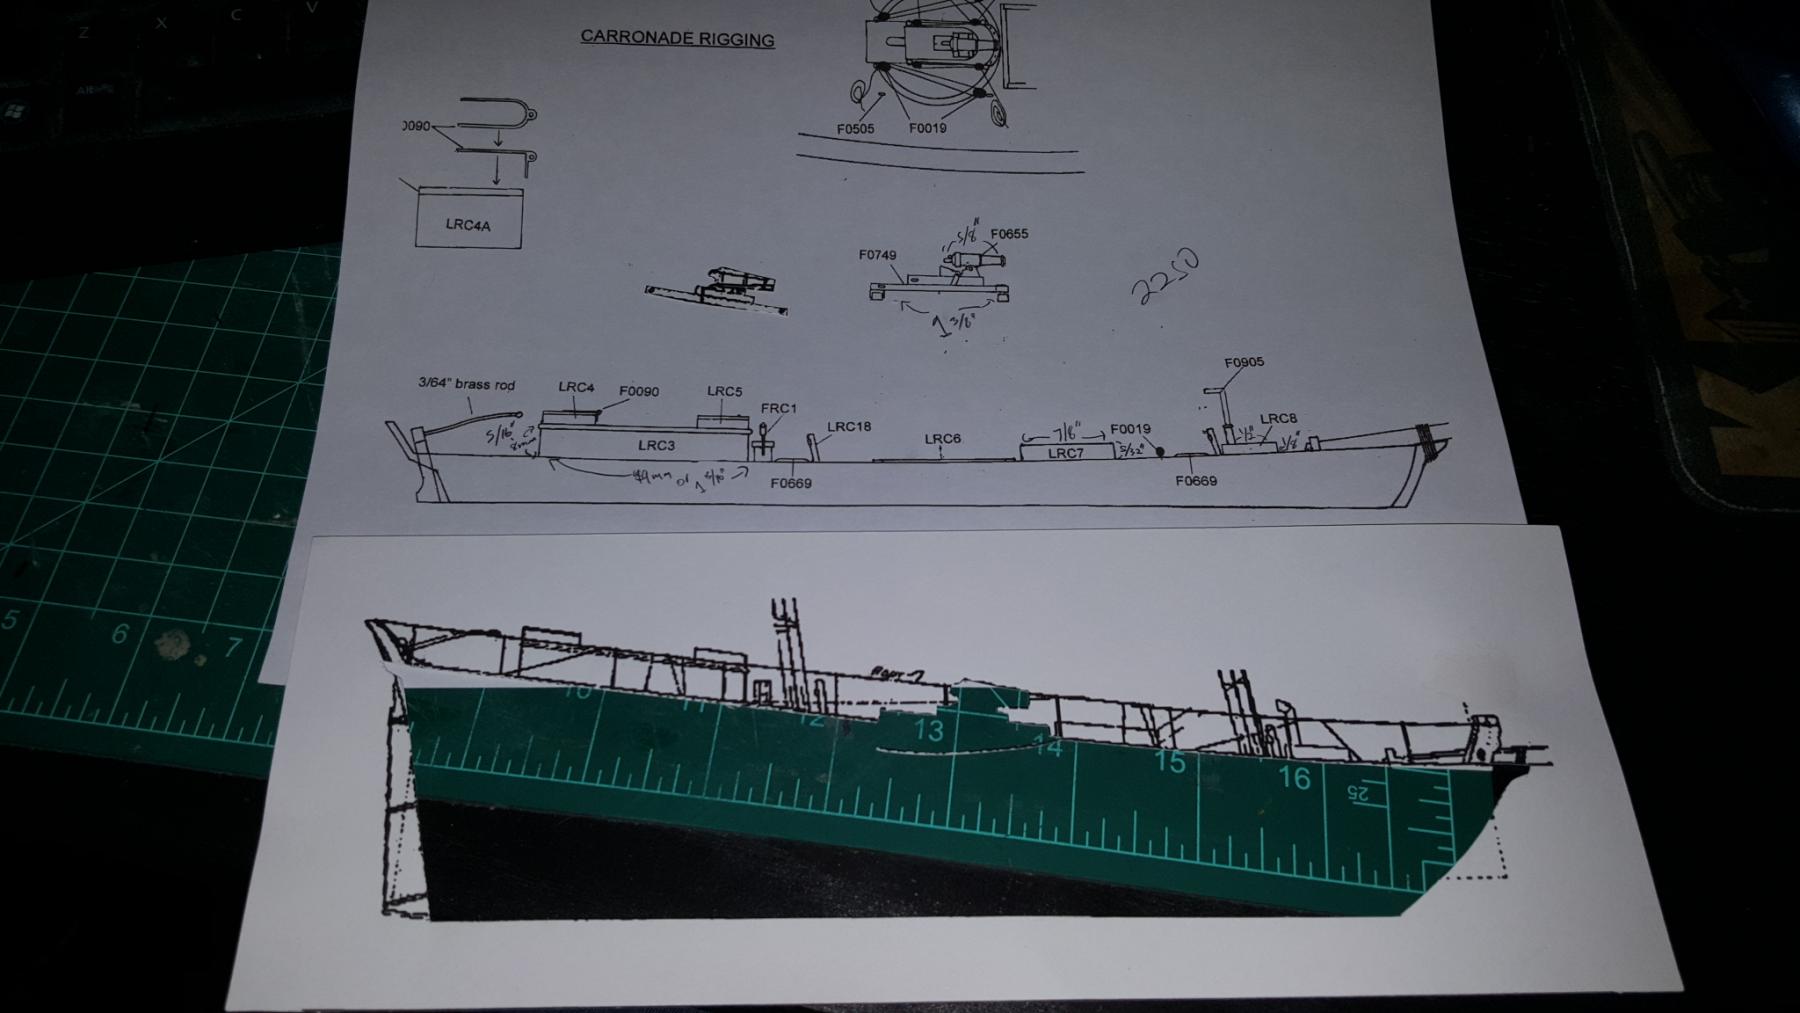
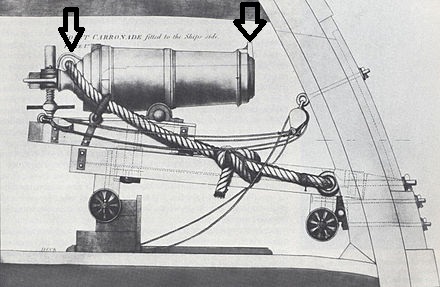
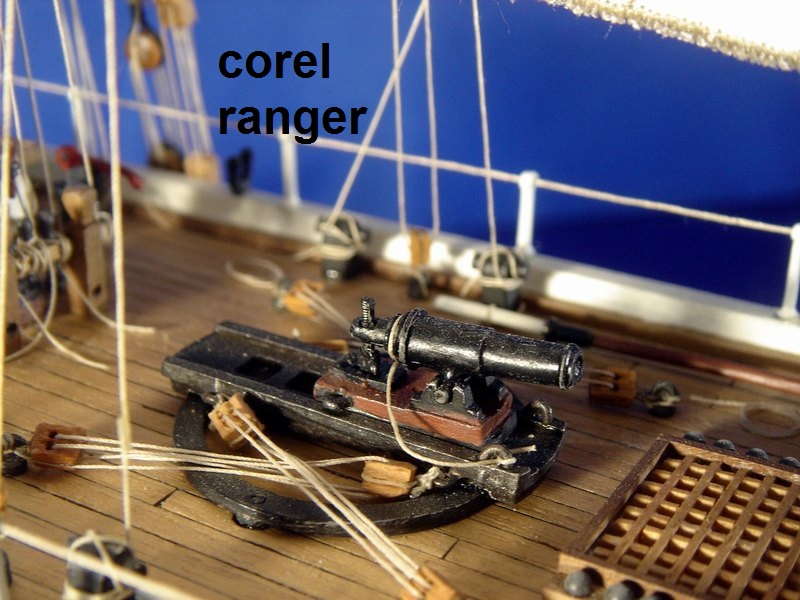
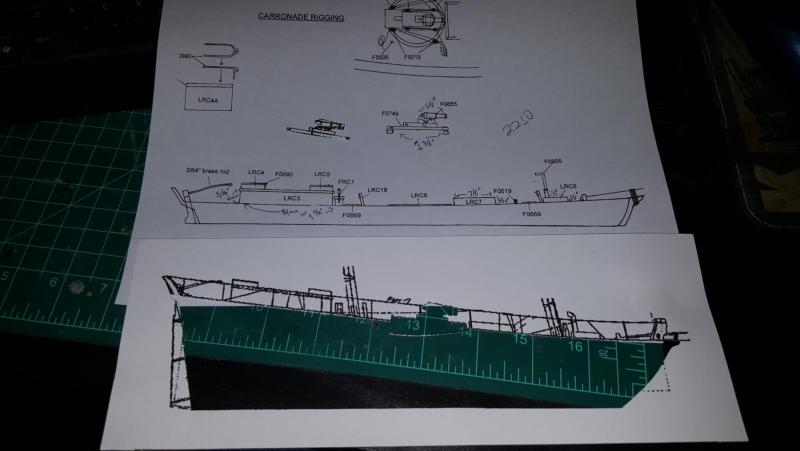
Great article very informative. Not many images of carriage evolution but the British and American carronades look essentially identical at least enough so that the small caldercraft carronade can work. I've already made a laser pattern for the carriage based of the alert plans and will add a screw design based of the plans of corel Ranger.
- 362 replies
-
- 3
-
-
- active
- revenue cutter
- (and 1 more)
-
I was just in Bayside today! Good bagels I'm familiar with Vallejo so will give that a try. The tung, woodcraft and miniwax are all what I used before they seem to be the best (or most preferred) out there. For the lacquer I may try testors and see what I think of those. It may be a case of using certain finishes in certain places on a model and others elsewhere and mix it up. I liked the tung on the cherry more than miniwax, which just made it look dullish. Also I agree about the walnut the color is very nice so hoping cherry will come off similar
- 362 replies
-
- 2
-
-
- active
- revenue cutter
- (and 1 more)
-
Haha it's a nice place to live! I may try varnish and lacquer as well and add that to the list. Any brands you recommend? The holly was extremely grey almost green so a bit of yellow was actually a good thing. The poly gave the holly a basswoodlike color though tung and natural stain was too much for the wood. With cherry the oils look nice, boxwood and pear it was 50/50. But it all gave me an idea of what approach I plan on using I mean mixing stains with paint is another option, so there is more experimenting to be had.
- 362 replies
-
- 1
-
-
- active
- revenue cutter
- (and 1 more)
-
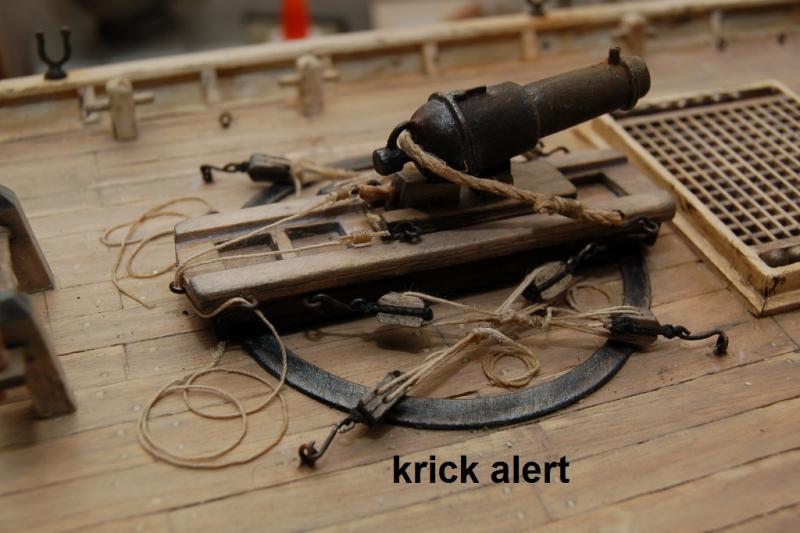
Chapelle shows these ships with the -er "quoins" on his plan for the revenue cutters. So does the Mamoli and Krick models, but Corel ranger shows the screw design. Yet the Bluejacket kit has a different design for the truck (with wheels) and the corel doesn't have the "extended muzzle" while Krick and Alert does. Also Chapelle shows Fair Rosamond with a pin/screw design dated 1833 and caldercraft has the pin design for it's hms Pickle and hms Ballahoo of 1802... so the bottom line is I'm quite confused. Not in what you are saying jbshan but in how these kits are all over the map with armament. All I really need to know is when was the pin/screw invented at least then I will know if it was in service by 1818-1825. Guess some research is in order.
- 362 replies
-
- 2
-
-
- active
- revenue cutter
- (and 1 more)
-
Gluing a breech hook to the carronade is no problem imo and I can add a teeny gunsight in the front using a metal wire. That's the plan anyways this carronade is eensie weensie 13.5 mm I'm going to assume that unless someone tells me otherwise that having a pin screw is a wholly acceptable for this model
- 362 replies
-
- 1
-
-
- active
- revenue cutter
- (and 1 more)
-
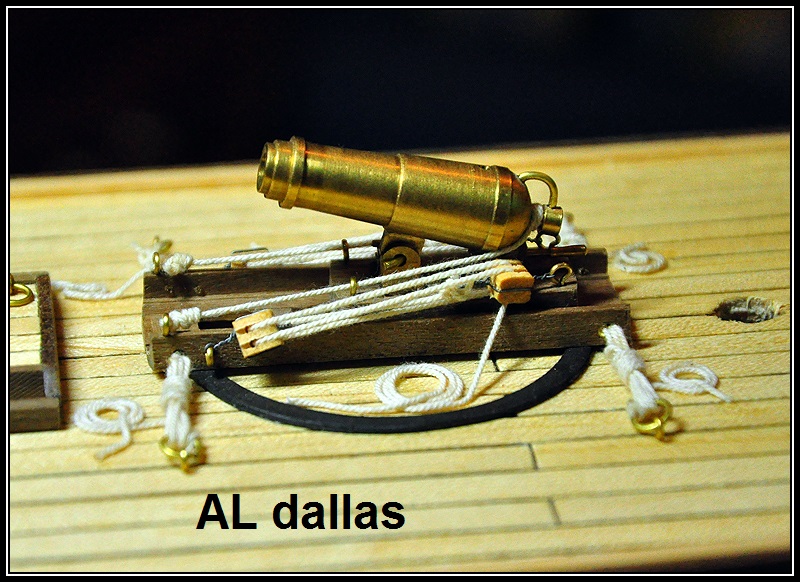
Here I pointed to the hook and bump. If the pin came into use later then that is a good thing, however I see the chock on the Louisiana cannon so maybe they are meant to have them.
-
Well yeah I'll definitely make the unique carriage from scratch I can see it just won't do. The barrel itself has some variation but it generally looks acceptable. The main issue is finding a carronade 14-15mm or so in size as the ship used a 12 pounder so at that size options (and detailing) is limited. However look at some of the revenue cutter kits and what do we see? Krick is of course the most detailed but the main concern I have is that only the corel ranger has that pin looking thing in the back. The rest have only the hook. Now adding a hook to the carronade I purchased would be easy, as would drilling in a teeny powder hole up top and whatever that bump in the front is. But removing the pin would mean removing the whole back which sounds like a pain so anyone know if the corel kit with its pin cannon was correct? If not aside from renting a metalwork lathe and making my own are there other options out there for teeny weeny carronades anyone is aware of? I've already checked corwall uk.

- 362 replies
-
- 3
-
-
- active
- revenue cutter
- (and 1 more)
-
Hi guys. So today I picked up a caldercraft 12 pounder carronade kit which has a barrel of 13.5mm the correct size for the ship. My question is this is from likely the Ballahoo kit and dated 1775ish. Did 12 pounder carronade barrels change much from 1775 to 1818? If not what about the carriage?
- 362 replies
-
- 1
-
-
- active
- revenue cutter
- (and 1 more)
-
What is the most EPIC kit available???
CharlieZardoz replied to Rossi46's topic in Wood ship model kits
I mean if by epic you mean covered in ornamentation cannons rigging and carvings then the answer is Sovereign of the Seas or Wasa. Both could probably cause a mental breakdown while building but what a way to go! -
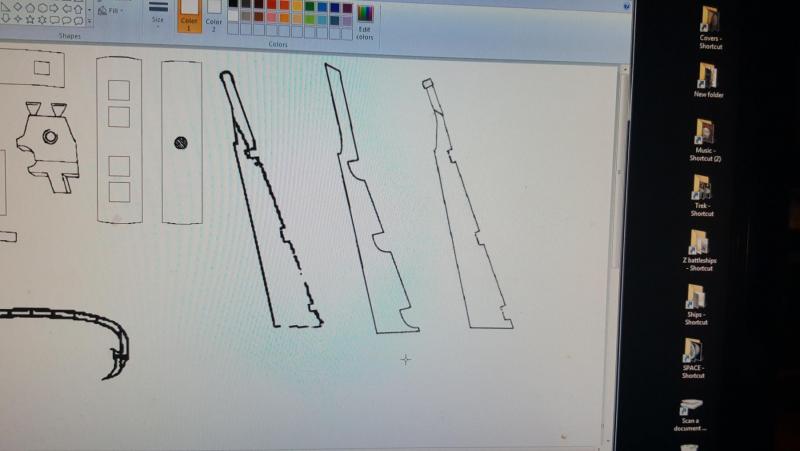
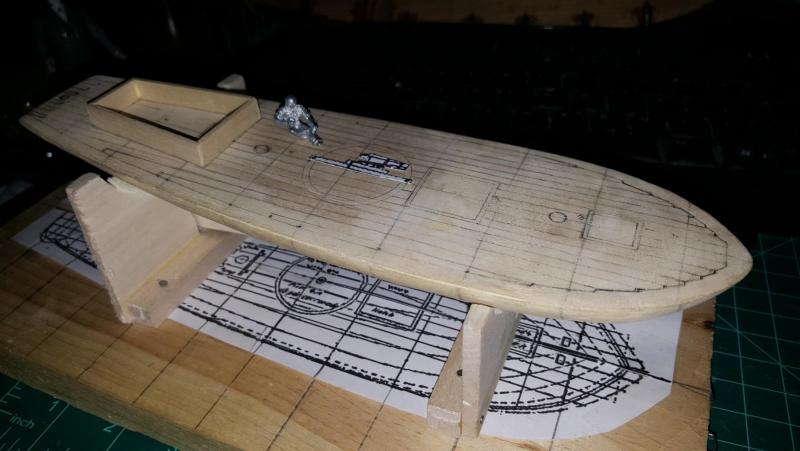
So the keel needed a few modifications. I decided to separate the little sprit piece in the front as I noticed in diagrams of the ship Louisiana (from the color scheme a bit back). This allows me two things. One I can vary the color from the keel which is black and have that piece natural wood to make it fancy. And more functionally I realized the masts are raised about 4 degrees and while the keels take that into account when the model comes together it might not work out and if that happens I can just redo the front piece rather than have to do the whole keel.

- 362 replies
-
- 2
-
-
- active
- revenue cutter
- (and 1 more)
-
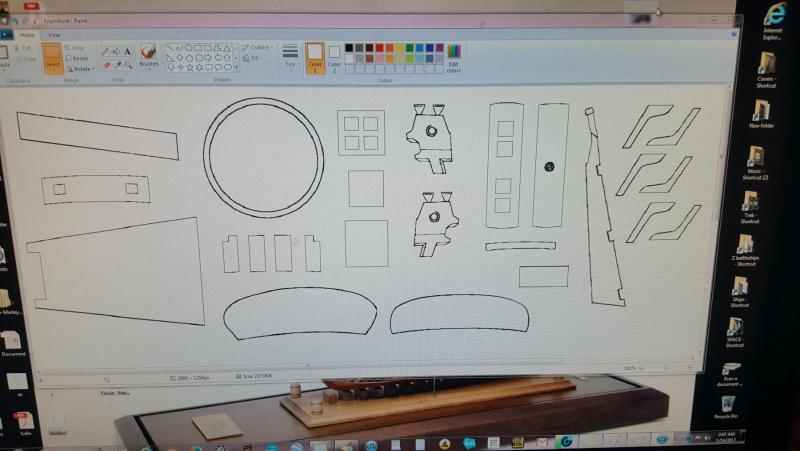
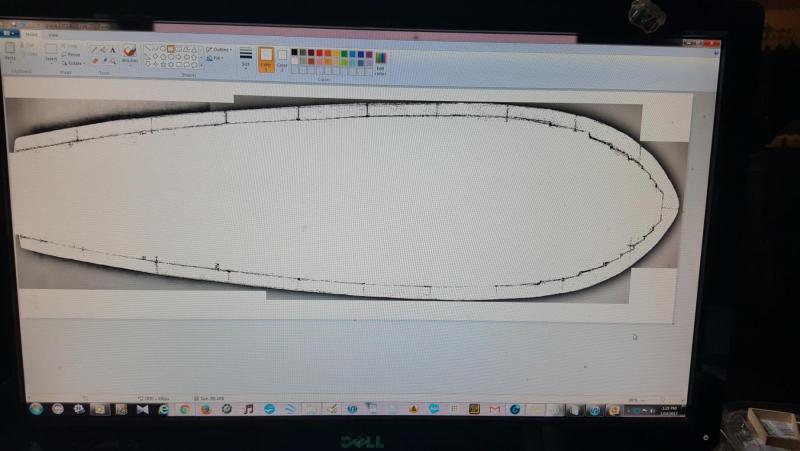
So basically I am preparing for another laser run. This time the parts will be made from cherry and holly woods ie the keel and rudder etc. In the diagram I did some measurements of how big everything should be. The hatch covers will just be strips of wood of the appropriate lengths so they don't need laser work but the cabin is a complicated wedge shaped thing with windows and a door. To help me I downloaded and rescaled the old Italian plans of Alert to give me a basic idea of shape and construction of these parts, the cabin needs to match the camber of the deck. Also to help me is Dirk's "Dubz" very detail picasa construction images of his krick Alert. The holly is for the deck coaming for that I am going to take the scan of the hull from above and just render those into the program that way it fits perfectly to the hull I'm, also in the market for an appropriate scale carronade if anyone has any suggestions?


- 362 replies
-
- 2
-
-
- active
- revenue cutter
- (and 1 more)
-
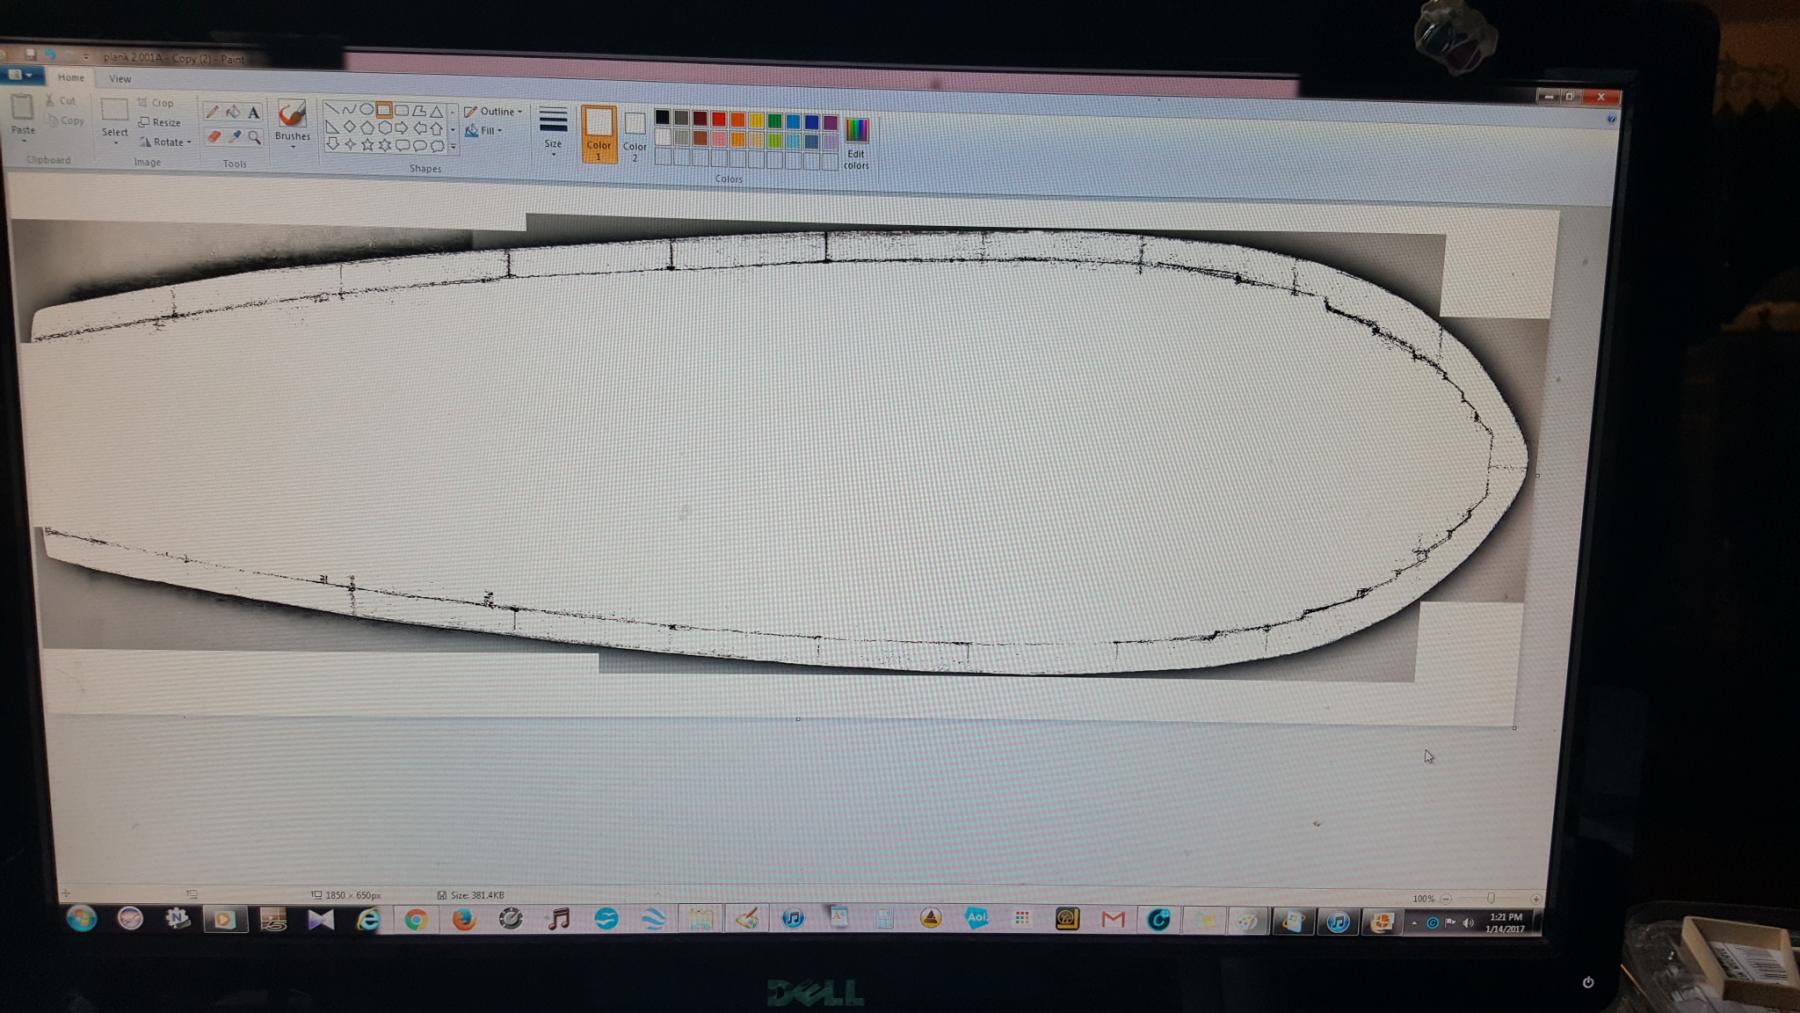
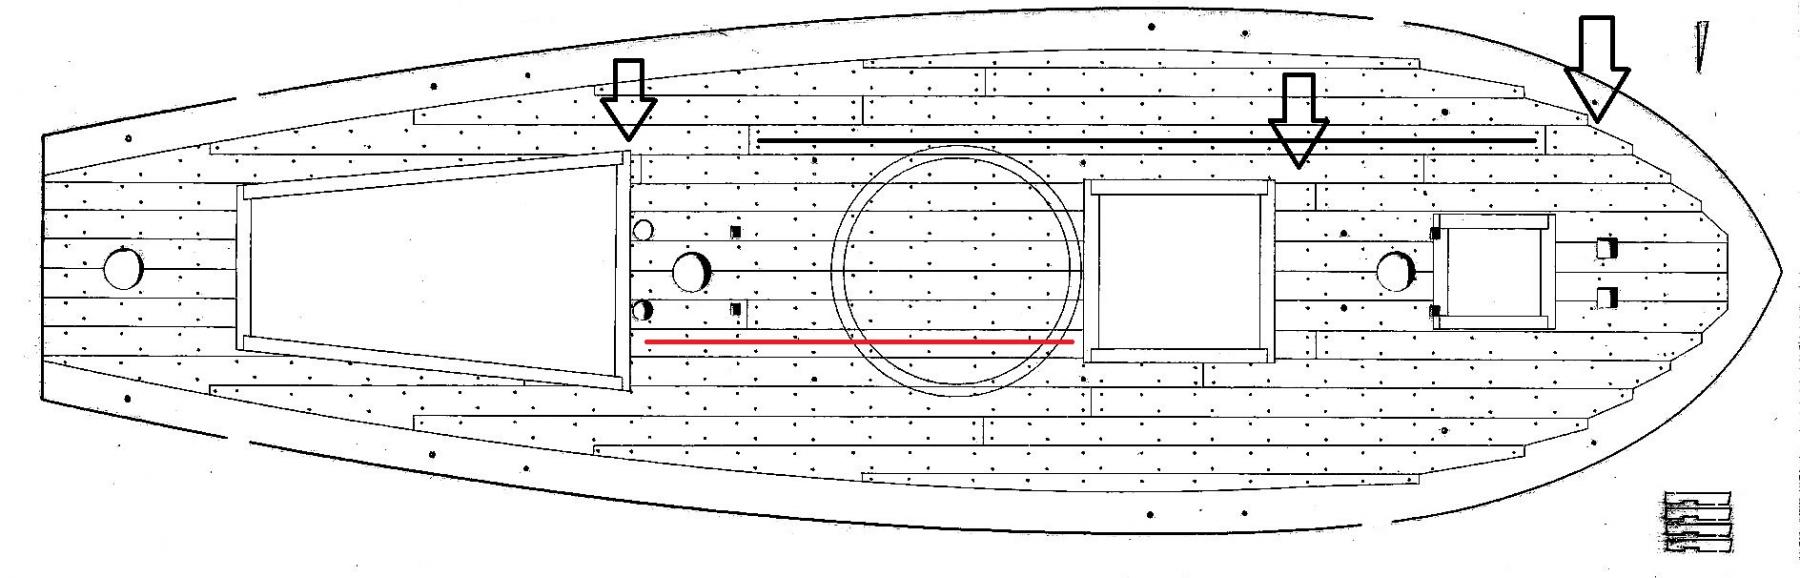
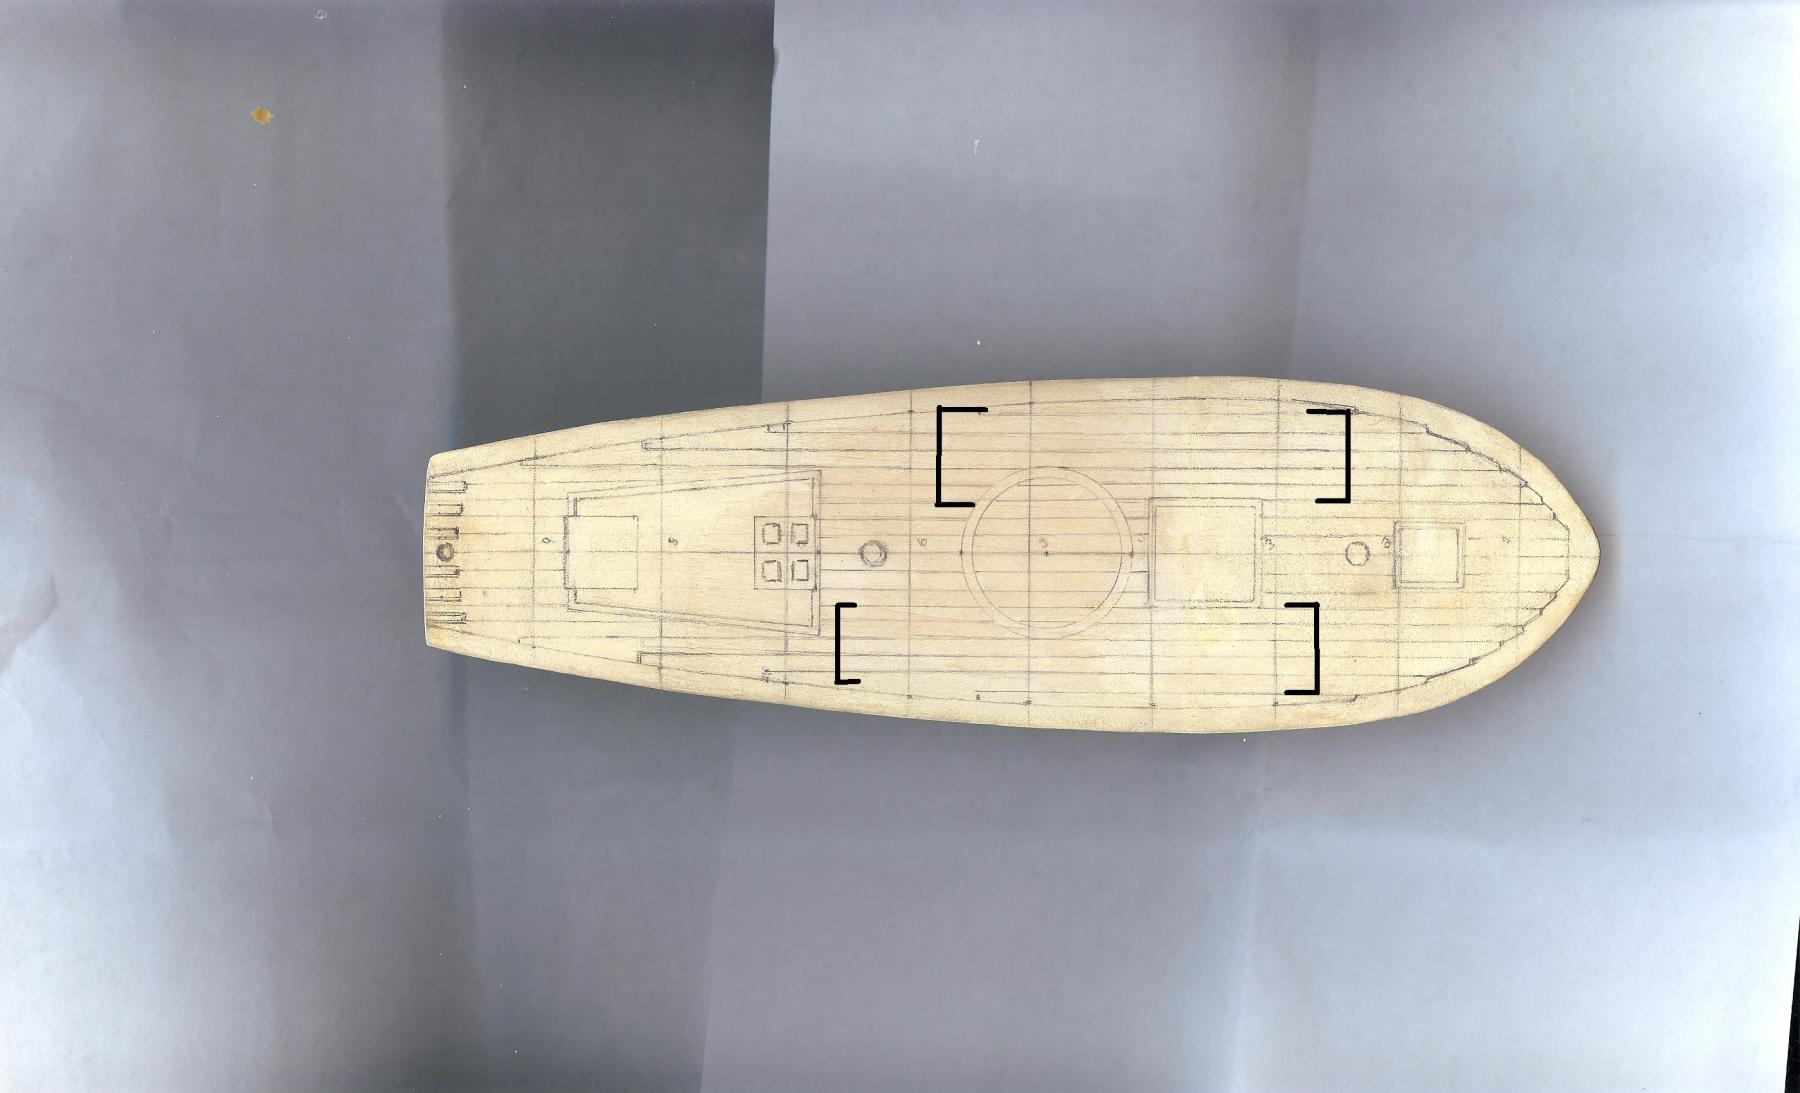
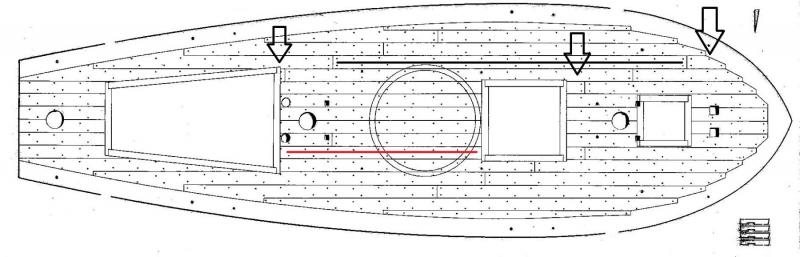
Ok thank you everybody! So first, Greg that's a lovely model right there of the HMS Alert of 1777! druxey yes I am aware the lines have already been erased just haven't gotten around to redrawing them just yet And Dan I believe this image is what you mean in the areas I pointed the silly tiny pieces of plank which follow the edges to the hatches. While the diagonal flow is correct (though I'm thinking backwards) I'm only using this as a basic guide as the planks I'm using will be thinner than on this diagram (1/8" vs 9/64") which was just an easier width, therefore my model has 18 planks across the deck vs 16. But this brings up an interesting question regarding plank length. That Dilligence model you worked on has plank lengths of 2.7" (14' to scale) the diagram below has lengths of 4" (21' to scale). Is there a standard plank length? I'm feeling for this model they shouldn't be much longer than the red line and really there is only 3 to 5 planks that even need planking breaks in the areas I bracketed. I agree a wood and finish shop note would be highly useful The ink marker vs pencil, I believe you use pencil for me it wouldn't color the wood but maybe the led isn't soft enough? Is there a led type preferred maybe I should try again. And Greg caulking only one side sounds interesting I may see how I like that. Same question regarding the butt joints I'm not sure what approach will work best but we can discuss next time I'm abouts. Anywhoo that's that now onto a few new updates....

- 362 replies
-
- 1
-
-
- active
- revenue cutter
- (and 1 more)
-
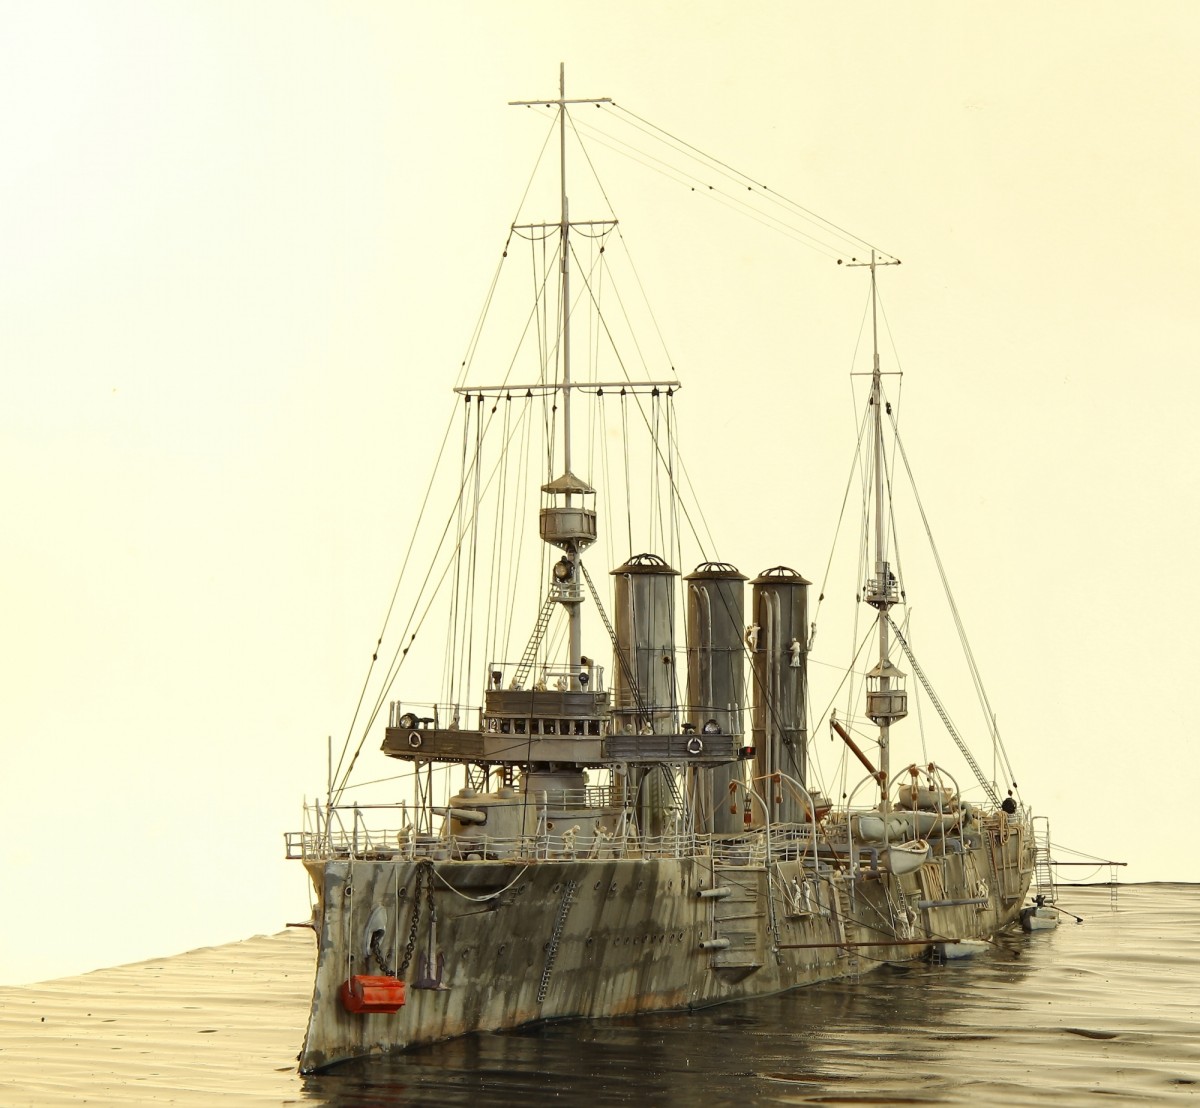
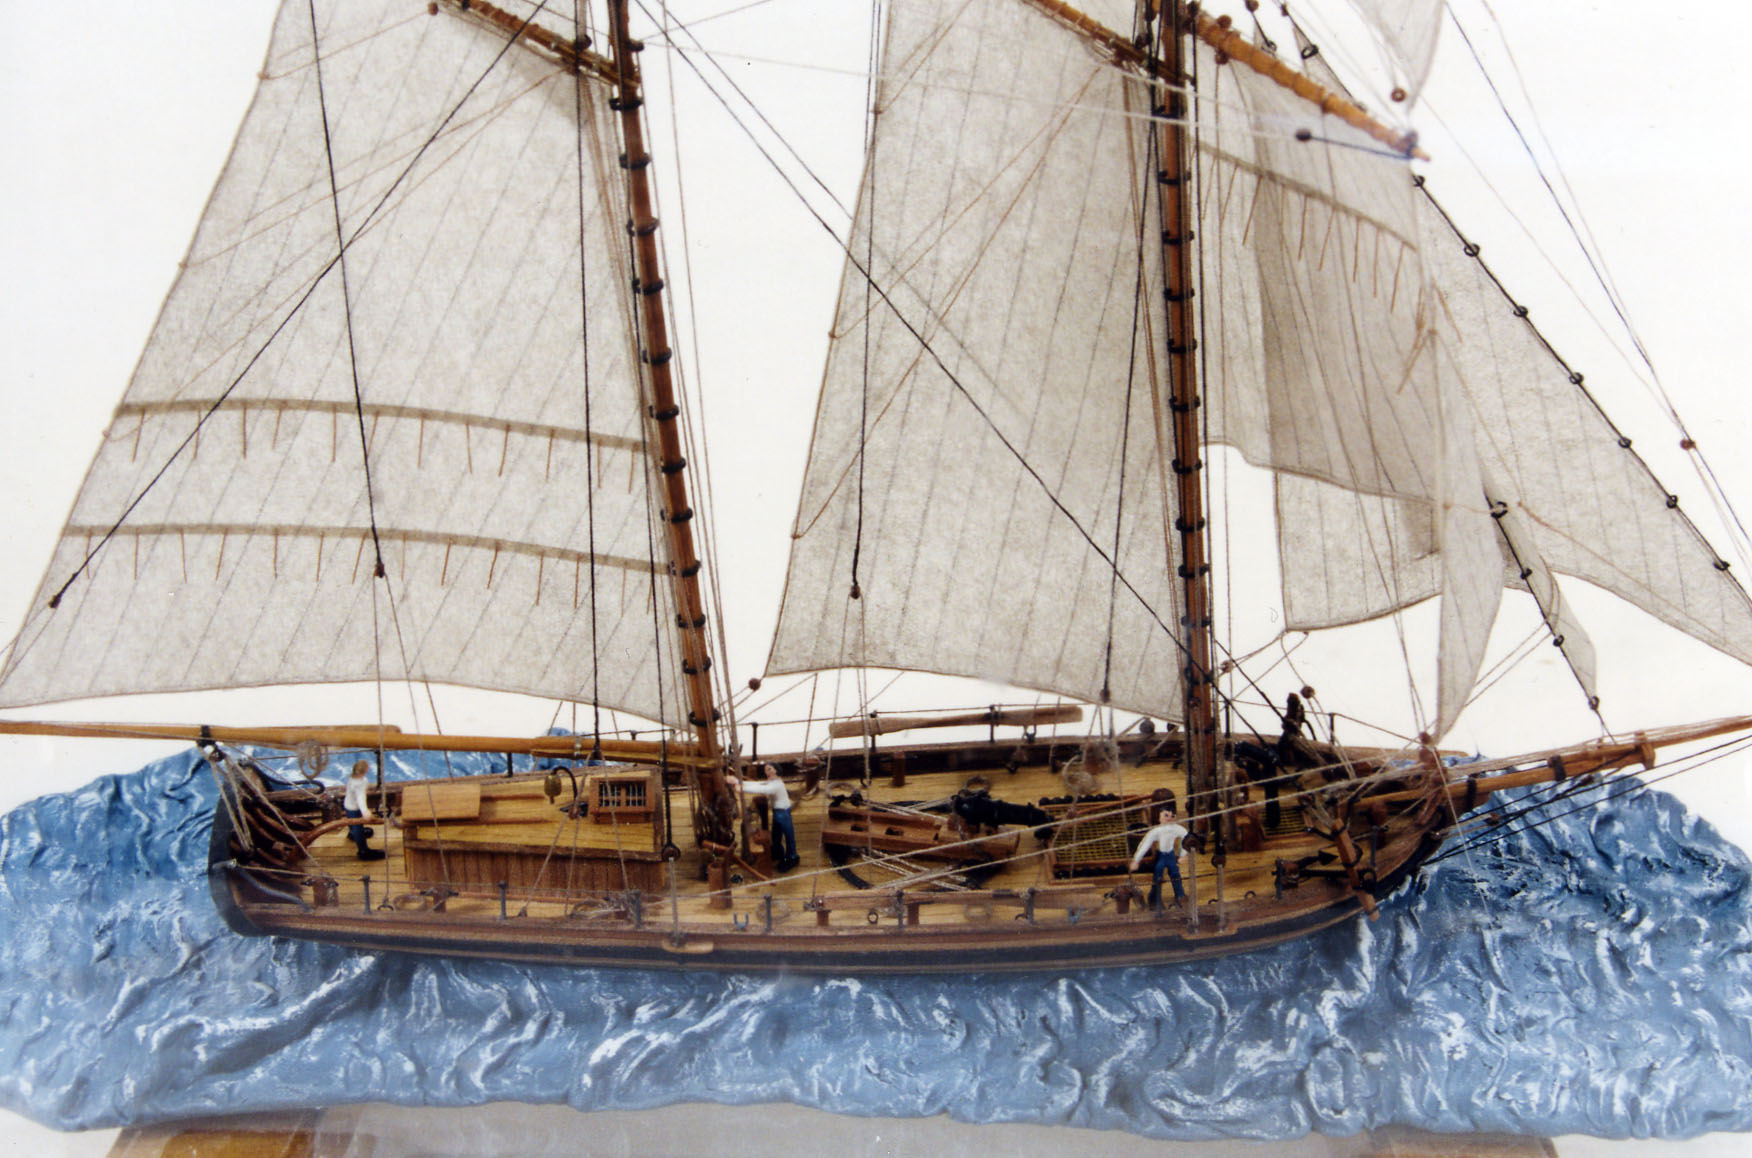
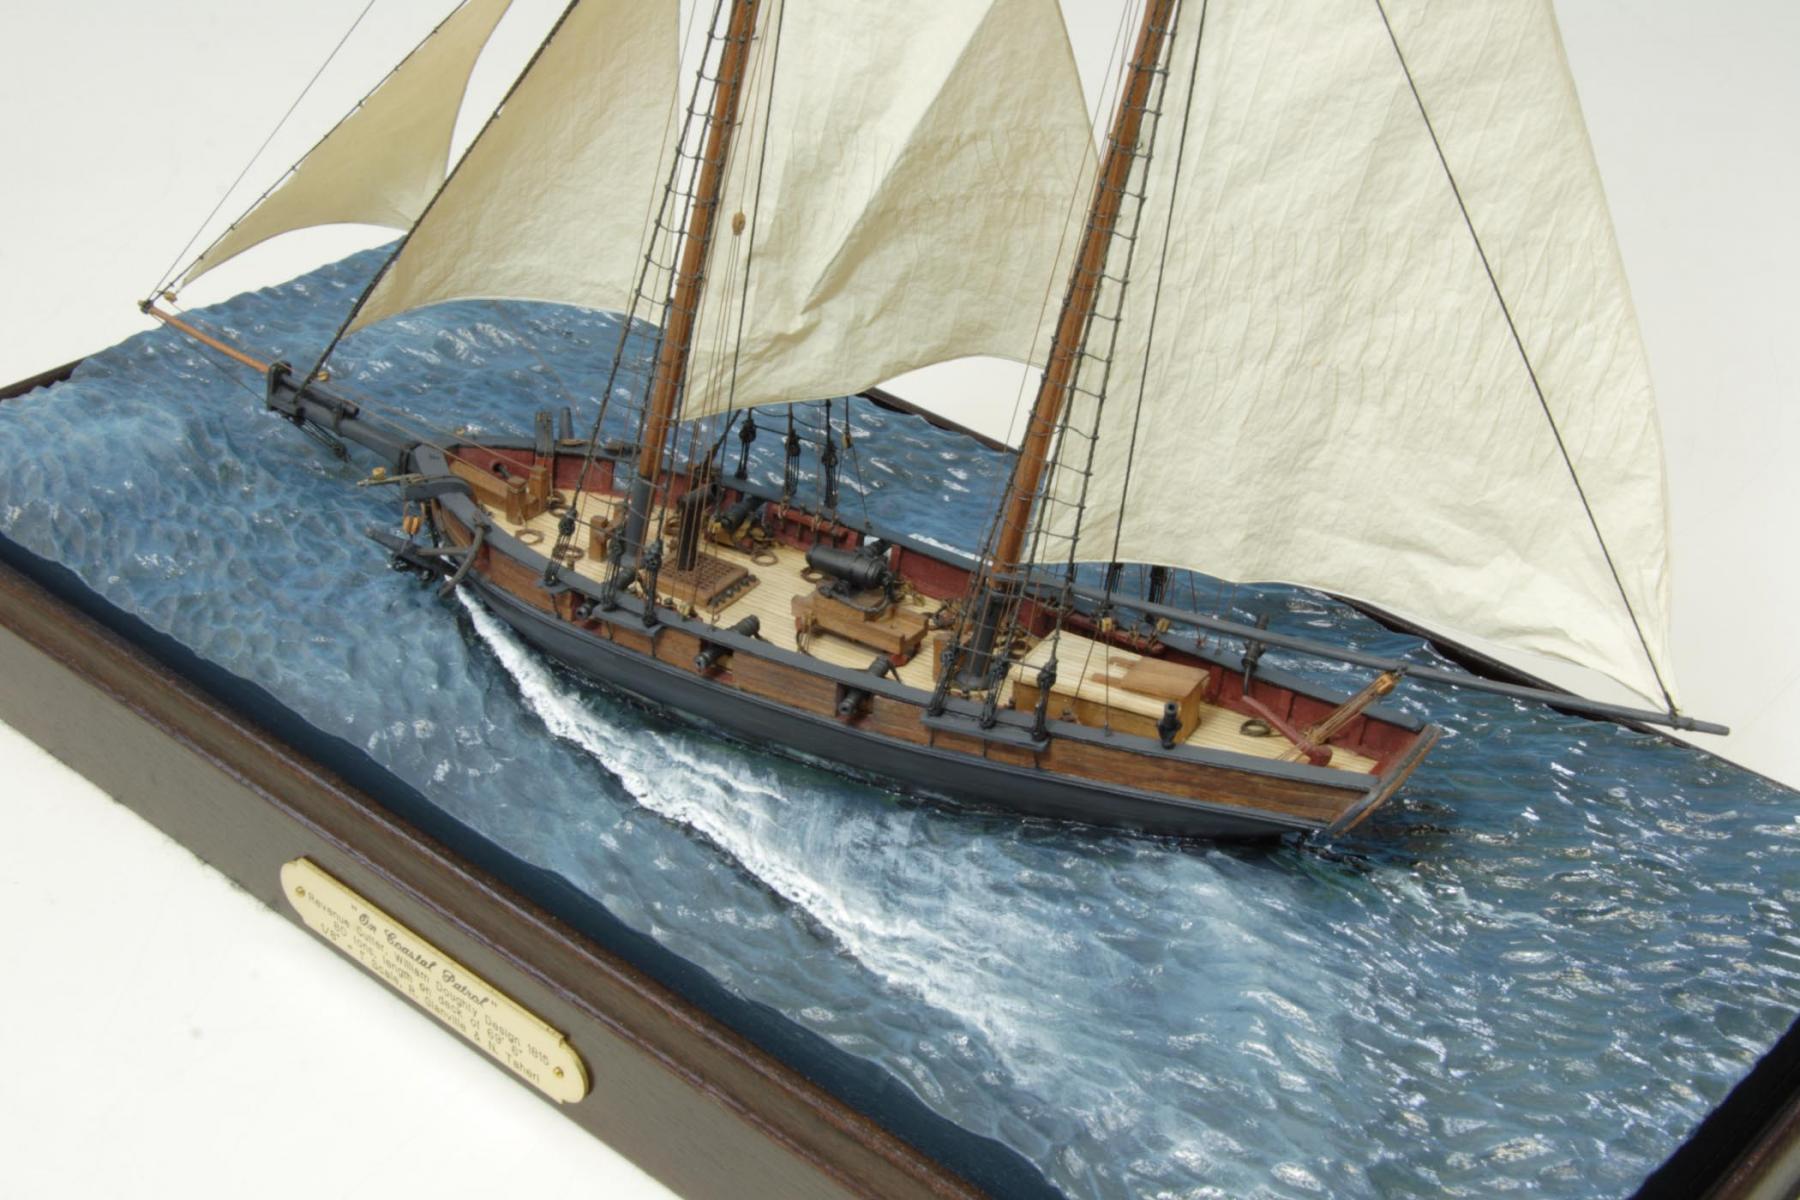
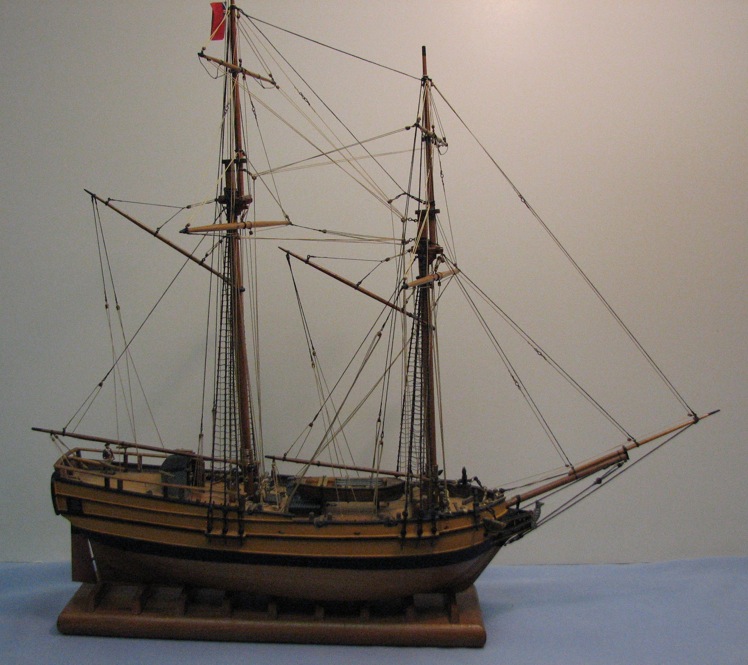
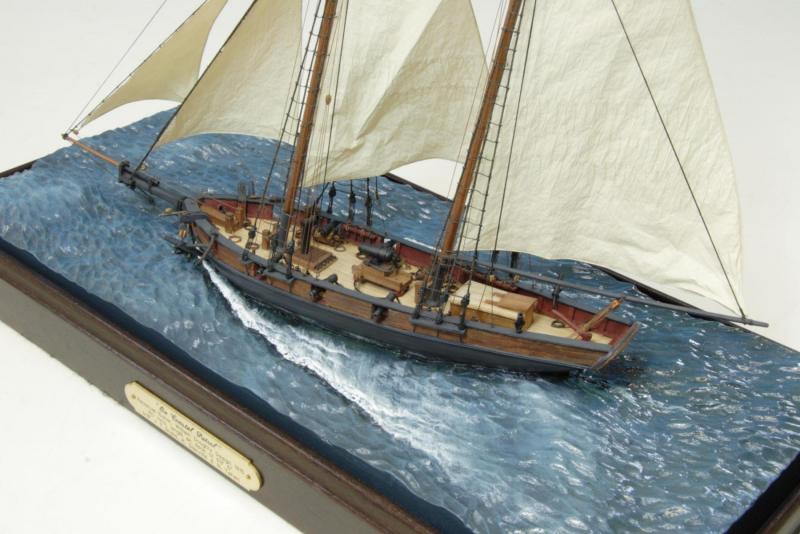
Well everyone a lot of this is a matter of preference. Some people I've seen like their models to be essentially wood sculptures, basically a form to display the beauty of wood. Models where coloring is very uniform and clean, nothing wrong with this approach it's just preference and reflects that traditional way of building. Then there are models which emphasize realism in action. A lot of these models have a rugged and weathered look sometimes coloring is exaggerated to create false shadows like a scene from a film. This is sort of how I like to build if at the end my fingers are covered in paint, putty and lacquer then I'm happy, like a 3d painting. So the holly turning a bit yellow and uneven when I'm done will actually work well in this approach (though it's dark as it is so have to be careful). I added a few examples of what I'd like to accomplish as time and experience allows these revenue cutter models looks much like what I am hoping to achieve. Also if anyone knows plastic models and is familiar with Kostas he is truly amazing in how he adds all this energy to his builds that resin water I plan on learning how to do that!


- 362 replies
-
- 8
-
-
- active
- revenue cutter
- (and 1 more)
-
Thank you will look into it! But how may I ask is that different from the miniwax polyurethane?
- 362 replies
-
- 2
-
-
- active
- revenue cutter
- (and 1 more)
-
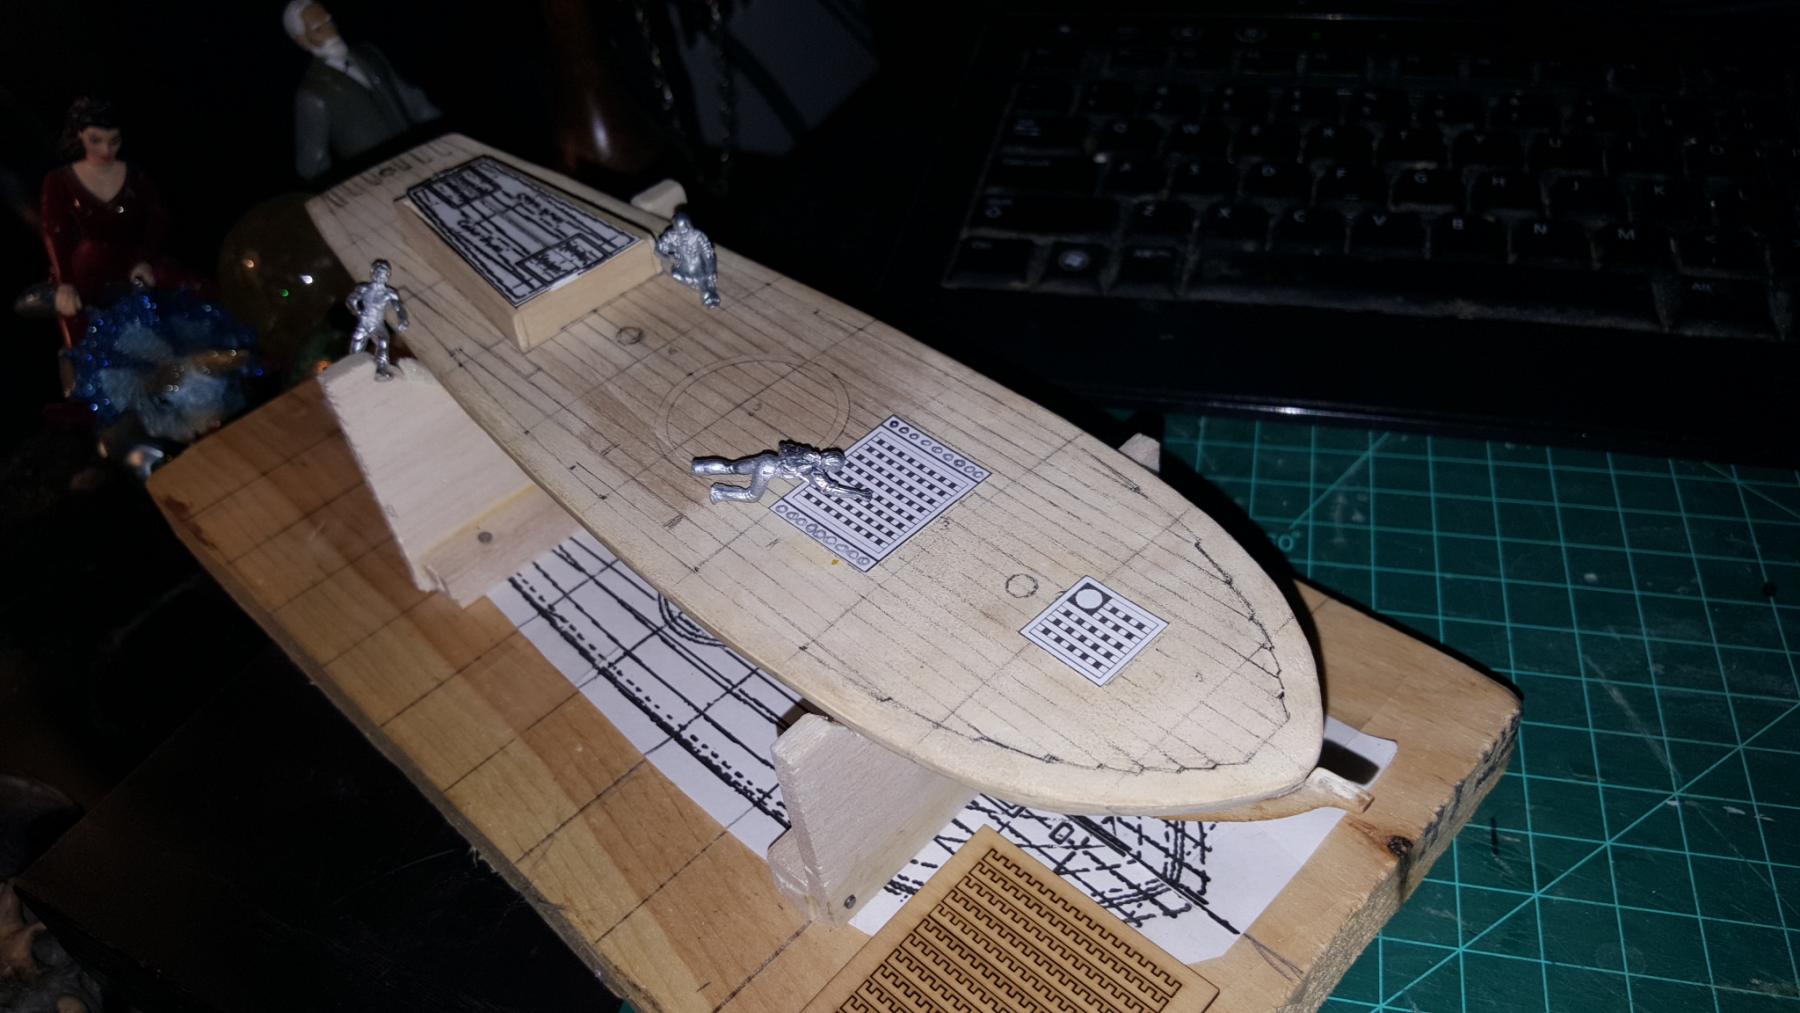
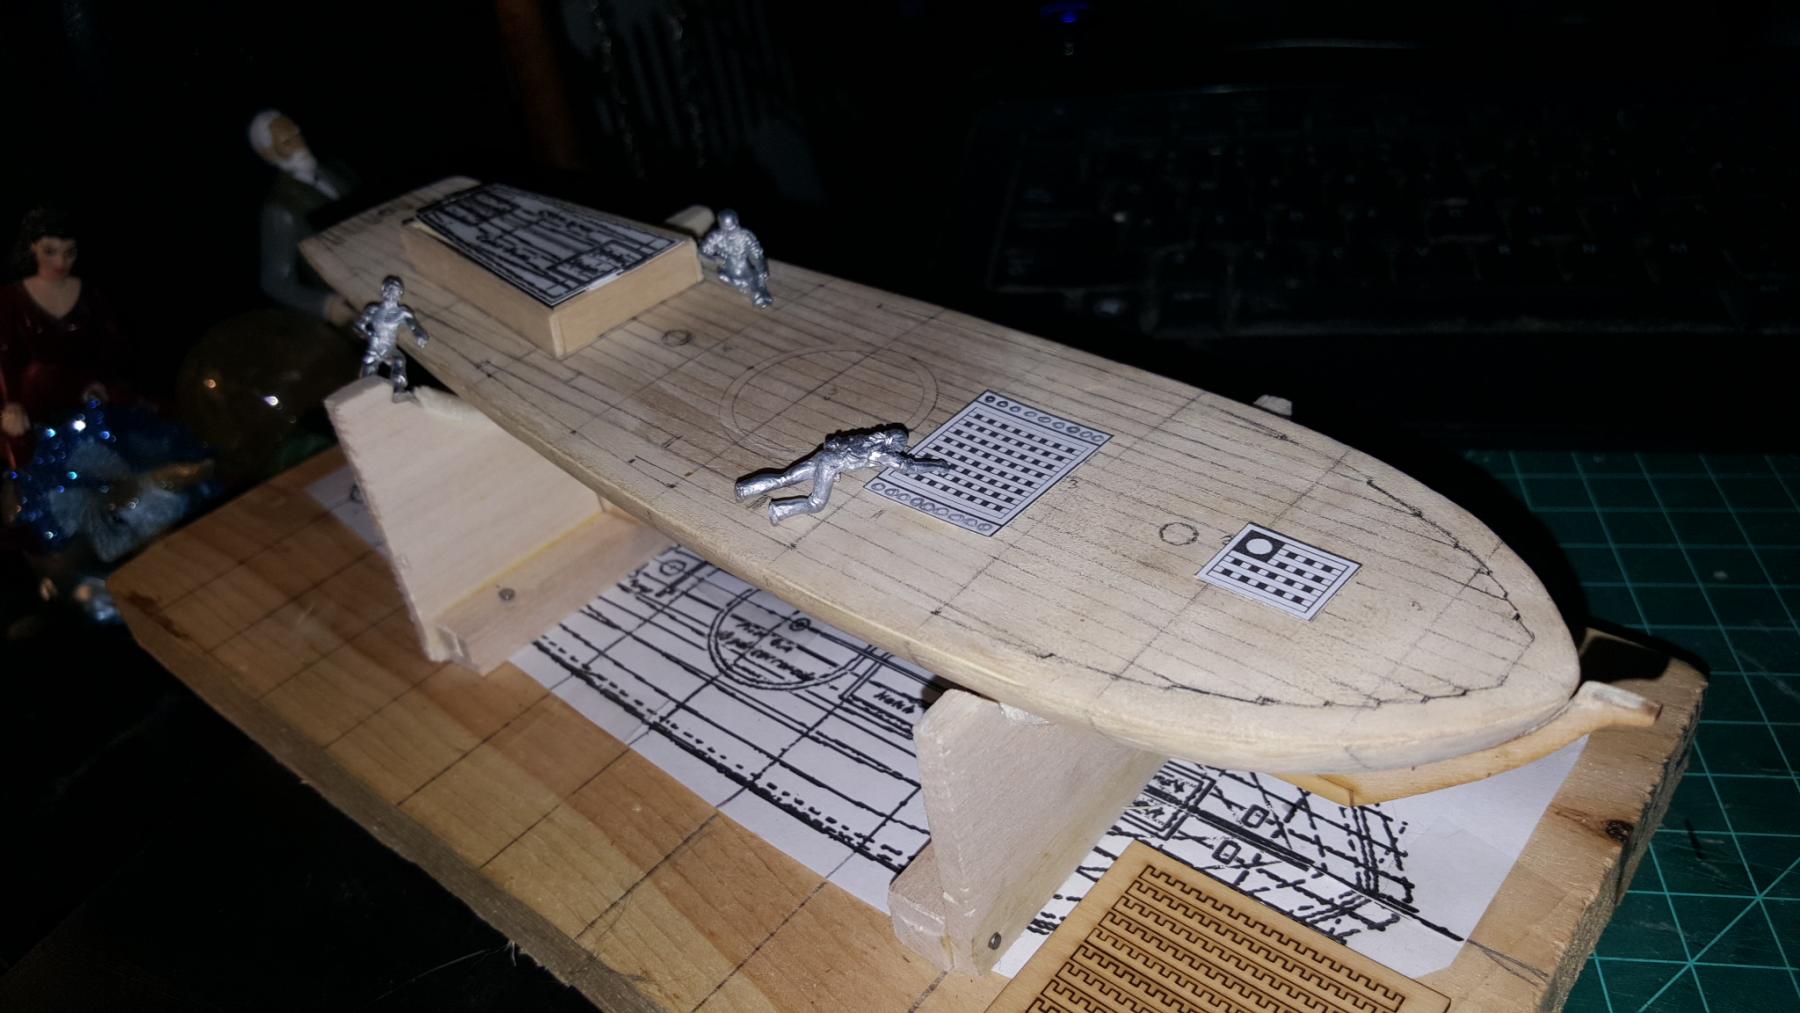
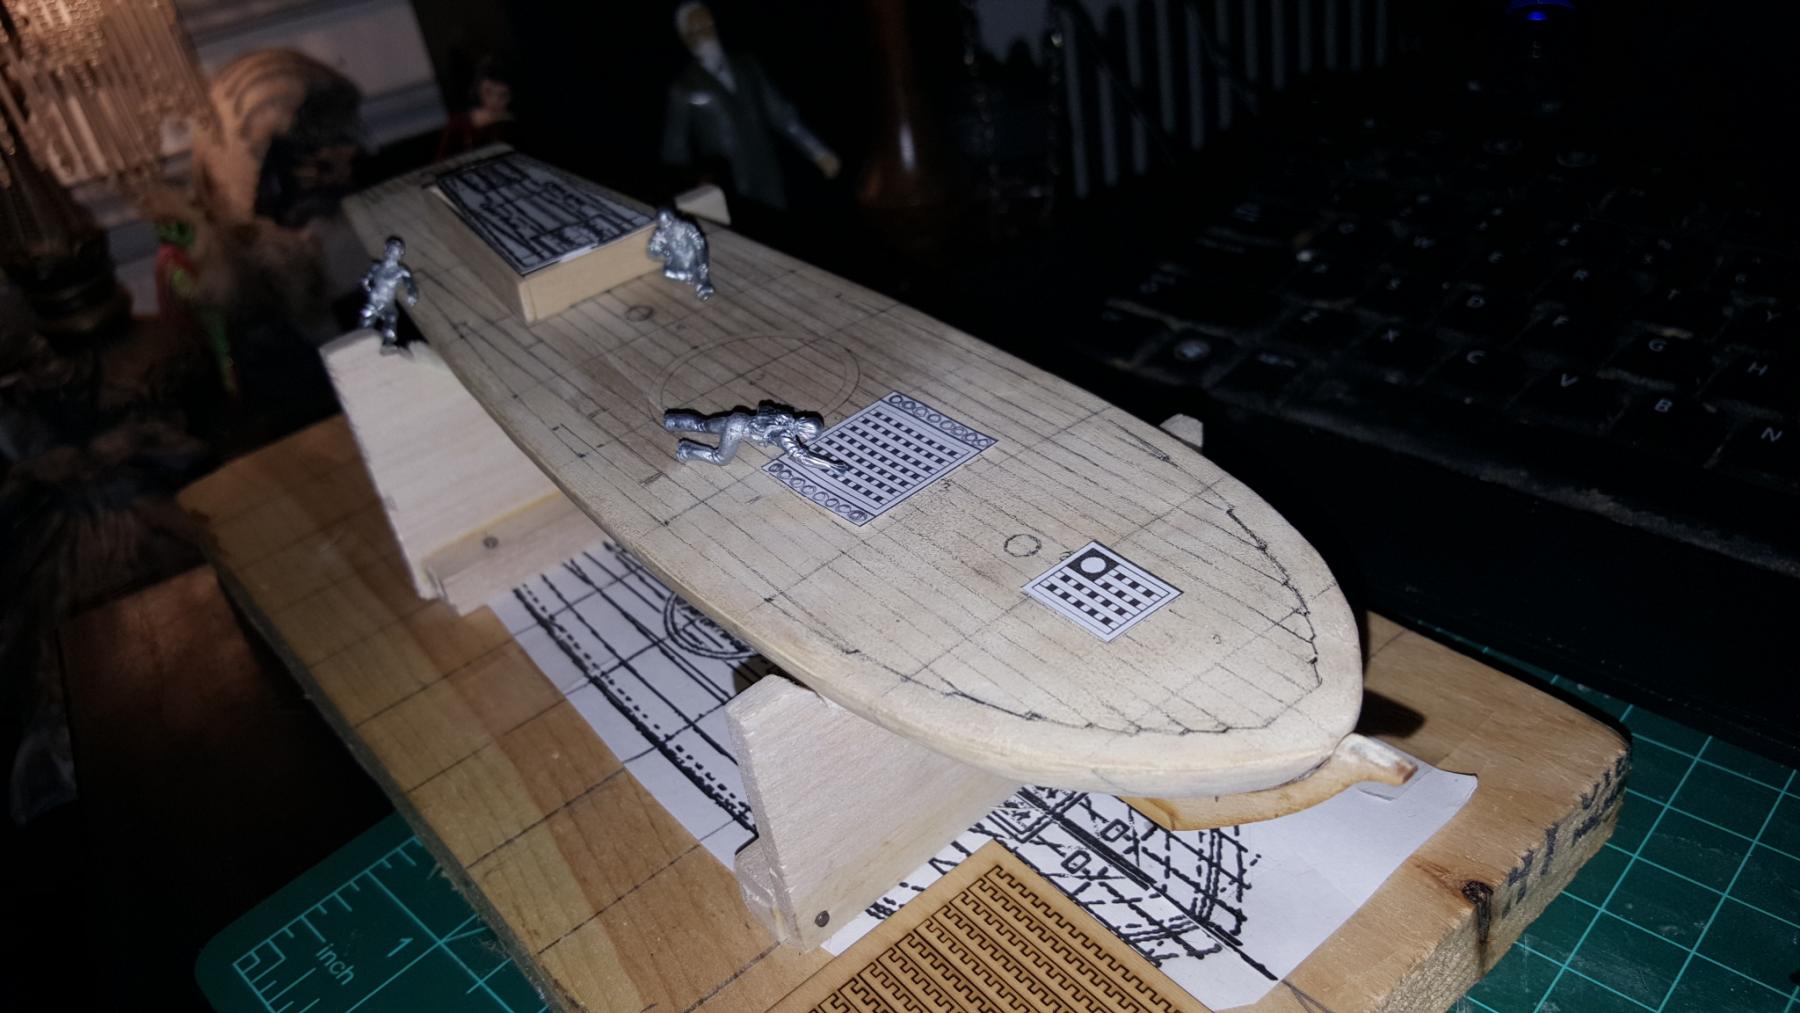
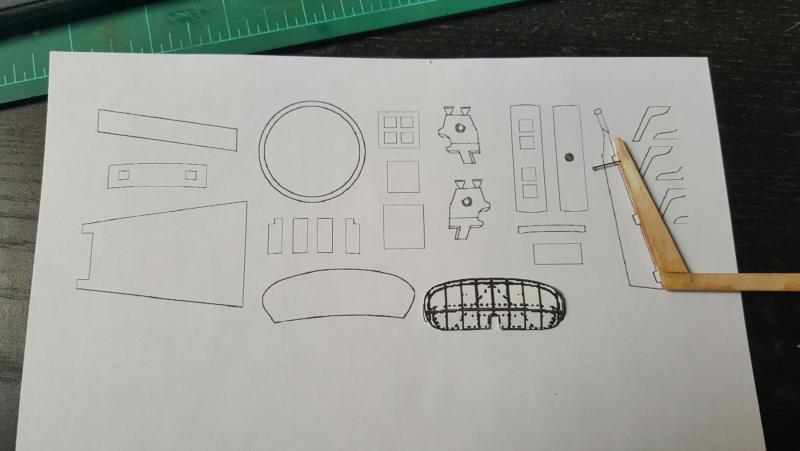
Two more quick updates. Ive started looking into construction of the deck furniture. Made measurements on a plan (altered from the bluejacket kit), then put a prototype cabin in place. I may make the real one with the laser to be more precise not sure. But not bad and the cannon pic shows scale (need to find alacart caronnades) pew pew!
- 362 replies
-
- 6
-
-
- active
- revenue cutter
- (and 1 more)