


MRJG
-
Posts
33 -
Joined
-
Last visited
Reputation Activity
-

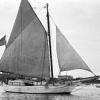 MRJG got a reaction from Dansweeney in Bluenose by MRJG - Model Shipways
Today I started on my first ship build "The Bluenose I", I recieved the kit on September 10 2015. It is the kit from Model-Expo the 1/64 scale MS2030. I am excited to get started... I started with putting the keel together, there are three pieces that make up the keel with this kit that needs to be assembled and set over night for the glue to cure, then putting a bearding line and a rabbit line that needs trimming/cutting.. as of now the keel is sitting glued together till tomorrow, I'll try to keep up with photos as I build her.
I would appreciate any and all comments as I keep up with building, so please give me all helpful tips and comments.
-
 MRJG reacted to DBorgens in Bluenose by MRJG - Model Shipways
Looking good, you are making much faster progress than I did. You're blessed to have a wife who will help your hobby in such a good way. Seems they often know exactly what we need when we don't have a clue. Keep up the good work and enjoy the ride.
Dave B
-
MRJG reacted to hamilton in Bluenose by MRJG - Model Shipways
Your build's looking great so far - I have to say I laughed when I saw the clip clamps - I just made a bunch of these on the weekend in the lead up to planking my Yacht America. Looking forward to seeing how your BN comes together
hamilton
-
 MRJG got a reaction from hamilton in Bluenose by MRJG - Model Shipways
Today I would like to show you what Nirvana used aid him on His "18th century Long Boat" for his planking and where I used to help me.
These are paper clips/binders. What you do is take one and separate the silver finger levers and then add them to the other clip. I found they work really nice!
-
 MRJG got a reaction from Omega1234 in Bluenose by MRJG - Model Shipways
and also I have been using weldbond glue in a rather large bottle that seemed to hinder my progress...
The nozzle on the top was a too big and I always kept getting more on the project than I needed. So my wife had went out and purchased a small bottle with a longer thinner nozzle. I tell you what it sure help make the glue process allot better and less of a mess. here is a pic of the bottle with glue added to it
She was watching for few minutes and replied " you need something better than that big bottle "
then she disappeared for about an hour then came in with this bottle!
-
 MRJG got a reaction from mtaylor in 18th Century Longboat by Nirvana - FINISHED - Model Shipways - 1:48
Thx for the info. I'll Try to start soon, I'll probably be doing the long boat as I do my Bluenose. Thumbs up on your "Long boat" looking Good!
-
 MRJG got a reaction from Canute in 18th Century Longboat by Nirvana - FINISHED - Model Shipways - 1:48
Thx for the info. I'll Try to start soon, I'll probably be doing the long boat as I do my Bluenose. Thumbs up on your "Long boat" looking Good!
-
MRJG got a reaction from Canute in 18th Century Longboat by Nirvana - FINISHED - Model Shipways - 1:48
I'm planning on starting my long boat also, My wife received my kit last week while I was In Robotics School!
-
MRJG got a reaction from Canute in 18th Century Longboat by Nirvana - FINISHED - Model Shipways - 1:48
Hey Nirvana why did you use poly wipe on, I'm just curious as I am still learning? Thx John
-
 MRJG got a reaction from CaptainSteve in 18th Century Longboat by Nirvana - FINISHED - Model Shipways - 1:48
Thx for the info. I'll Try to start soon, I'll probably be doing the long boat as I do my Bluenose. Thumbs up on your "Long boat" looking Good!
-
MRJG reacted to Dan Vadas in 18th Century Longboat by Dan Vadas - FINISHED - 1:100 scale - BOTTLE - using most of Chuck's Practicum
Thanks Daniel, David, Russell and Greg.
Trust me Russell, this wasn't "manufactured". I'd have finished the whole thing a couple of days ago except for the accident .
We're only on the other side of the world, not on Mars Greg .
Well, so far so good. I've managed to get the jib stay back on and tightened. Also the forestay. The tip of the mast was a real bugger to get back on after doing the other two lines. It took some rather ingenious (if I say so myself ) special tools to help me do it.
From the top, a Q-Tip on a BBQ skewer used for cleaning off glue. A sliver of Scalpel blade super-glued to a skewer for trimming excess line. A piece of bent brass tubing on a handle used for applying glue. A pair of extra-long tweezers made from scrap wood :
Raising the forestay. Another tool I made was a piece of square wood with a "U" filed into the end, used as a push-stick. This holds the mast in position while I pull back on the fishing line attached to the stay. The hair clip holds the line while the glue dries :
I used the Q-tip to hold the top of the mast in position while the glue dried on the repair. The Blue-tack holds the push-stick in place :
And .... I also managed to get the Truck back onto the top of the mast :
Danny
-
MRJG reacted to Nirvana in 18th Century Longboat by Nirvana - FINISHED - Model Shipways - 1:48
Thanks for the head up!
-
MRJG reacted to Chuck in 18th Century Longboat by Nirvana - FINISHED - Model Shipways - 1:48
Nope....no good.....your piece is not oriented properly with the grain. That is why they break...rotate so the part of the stem that sticks up and always breaks is going along with the grain....rather than across it. This is super important and you should always keep teh grain direction in mind when posiitioning your templates.
-
MRJG reacted to Dansweeney in Bluenose by MRJG - Model Shipways
We are working on the same kit. Same start time. I'll try and post where I'm at and photos.
Dan
-
MRJG got a reaction from Omega1234 in Bluenose by MRJG - Model Shipways
As this is my first wood ship model, I was always building "Plastic Model Kits".
So far wooden ship building is more challenging, also seems to help me relax, and having to think more in advance too.
I work alot and while at work I find my self thinking about the ship constantly thinking what needs to be done next. what steps should I take to do the tasks needed to be done.
Today I have givin up on plastic kits and now prefer the wood ships instead. Now Im constantly looking on the internet for the next ship after the Bluenose to build so I can work and learn my up to scratch building.
-
 MRJG got a reaction from eclipsefire in Bluenose by MRJG - Model Shipways
As this is my first wood ship model, I was always building "Plastic Model Kits".
So far wooden ship building is more challenging, also seems to help me relax, and having to think more in advance too.
I work alot and while at work I find my self thinking about the ship constantly thinking what needs to be done next. what steps should I take to do the tasks needed to be done.
Today I have givin up on plastic kits and now prefer the wood ships instead. Now Im constantly looking on the internet for the next ship after the Bluenose to build so I can work and learn my up to scratch building.
-
 MRJG got a reaction from prutser in Bluenose by MRJG - Model Shipways
As this is my first wood ship model, I was always building "Plastic Model Kits".
So far wooden ship building is more challenging, also seems to help me relax, and having to think more in advance too.
I work alot and while at work I find my self thinking about the ship constantly thinking what needs to be done next. what steps should I take to do the tasks needed to be done.
Today I have givin up on plastic kits and now prefer the wood ships instead. Now Im constantly looking on the internet for the next ship after the Bluenose to build so I can work and learn my up to scratch building.
-
 MRJG got a reaction from GuntherMT in Bluenose by MRJG - Model Shipways
Well I'm hopefully finished with fairing the bulkheads sides and deck. I did have to do a little shimming here and there and sanding too! thanks for the helpful tips from freinds on the forums here.
Now I think I am ready to do some Planking.
This is my first wood ship model, and I learned a Valuable lesson here! Dont forget to make sure and double sure, while installing bulkheads and also any future framing to the Keel that you are square to the keel and level for the decking! so as to you wont have to shim and sand deck areas ETC... aslo critical to make everything else to install easier! It is pretty much the back bone to your ship, if its not right then everything else isnt going to be either!
-
MRJG got a reaction from mtaylor in HMS Vulture 1776 by Dan Vadas - FINISHED - 1:48 scale - 16-gun Swan-class sloop from TFFM plans
Congrats, I do tip my hat towards you! and continue to keep up my efforts to have a beautiful build such as yours. All i need to do is keep learning and some day I will be a pro as yourself!
Cogratulations from your pal John
-
 MRJG got a reaction from Jack12477 in HMS Vulture 1776 by Dan Vadas - FINISHED - 1:48 scale - 16-gun Swan-class sloop from TFFM plans
Congrats, I do tip my hat towards you! and continue to keep up my efforts to have a beautiful build such as yours. All i need to do is keep learning and some day I will be a pro as yourself!
Cogratulations from your pal John
-
 MRJG got a reaction from GLakie in HMS Vulture 1776 by Dan Vadas - FINISHED - 1:48 scale - 16-gun Swan-class sloop from TFFM plans
Congrats, I do tip my hat towards you! and continue to keep up my efforts to have a beautiful build such as yours. All i need to do is keep learning and some day I will be a pro as yourself!
Cogratulations from your pal John
-
MRJG reacted to Dan Vadas in HMS Vulture 1776 by Dan Vadas - FINISHED - 1:48 scale - 16-gun Swan-class sloop from TFFM plans
How did you know that Mark??? EDIT - ah, I just found the post that Grant put up earlier. Thanks Mark and Grant
Yep, Vulture took out the Members Choice trophy, their equivalent to "Best in Show" at the Canberra Model Shipwright's Society Show last weekend. She also came 2nd in People's Choice.
I'm pretty chuffed :
I'm taking it to the Mid North Coast Maritime Museum at Port Macquarie later on today after I mount the Binnacle.
Danny
-
MRJG reacted to Dan Vadas in HMS Vulture 1776 by Dan Vadas - FINISHED - 1:48 scale - 16-gun Swan-class sloop from TFFM plans
HMS Vulture Build Log Resurrection
Following the Crash of MSW in February 2013 I’ve attempted to re-create as much of my former Build log as I can. The following is a very truncated version of the original. It doesn’t contain any of the comments posted by others, as they were unrecoverable. My apologies for that.
I've also left out the MISTAKES I made during the construction in the "Resurrection" section. Some of them can be found in this Topic : How I Fix Boo-Boos and Oopsies
The original Build Log was started on June 11 2011. Actual work on the model commenced on Wednesday August 17 2011.
The Build Log was terminated on February 14 2013 (the day the Server crashed), and Re-building it started the day MSW came back on-line.
_____________________________________________________________________
Following is an Index to "Points of Interest". you can Click on the Links to jump straight to the First Post that starts a particular Section.
Links to other Sites in the following pages, e.g. Tool Suppliers, look like this : Sherline . You can jump straight to their Webpage by Clicking on them. Note : I have no affiliation with any of the Suppliers I have posted Links to - just a happy customer.
To return to the Index Click on the "HMS Vulture" Link in the Signature in one of my Posts, or use the "Back" Arrow of your Browser. There are no Signatures under my posts in the Reconstruction phase to save page room.
The Index will be updated as work progresses.
____________________________________________________________________________________________________________________________
Index to Points of Interest
Page 1
HMS Vulture - some History of the ship + Links to Build Logs of other Swan Class Ships on MSW
Research and Materials + Links to Suppliers
How the Model will be built
Tools
Preparations
Clamps and Planking Pins
Laying the Keel
Lower Apron
Stem and Fore Deadwood
Aft Deadwood
Sternpost
Rising Wood
Cutting Rabbets and Fitting the Mounting Nuts
Cutting, Shaping and Fitting Transoms
Cutting the Bowsprit Seat
Fashion Pieces
Bollard Timbers
Timberheads and Bowsprit Chock
Forward Cant Frames and Hawse Timbers
Forward Cant Frames
Aft Cant Frames
Side Counter Timbers and Timbers on the Side Counter
Aft Cant Fairing
Knee of the Head Construction
Aft Square Frames
Frame Bend
Shifted Toptimber
Fixed Blocks
Page 2
Frames all Fitted
Toptimber Aligning and External Fairing
Treenailing Frames
Keelson
Pump Recesses
Stemson
Fillings
Harpins
Ribbands
Limber Strakes
Floorhead Thickstuff and Treenails
Mast Steps
Aft Crutch and Lower Breasthook
Limber Boards
Lower Well and Shot Locker
Chain Pump Inlets
Pump Tubes
Chain Pump Sprocket
Lower Deck Clamps
Footwaling
Internal Treenailing
Aft Platform
Aft Platform Carlings and Ledges
Aft Platform Bulkheads and Spirit Room Hatch
Lower Deck Beams
Fore Platform and Bulkheads
Lower Deck Hook
Block Room and Tar Room Bulkheads
Magazine Bulkheads and Mizzen Boxing
Lightroom
Page 3
Finishing the Magazine
Aft Platform Rooms
Upper Deck Clamps and Ceiling
Lower Deck Beam Carling Mortices
Lodging and Hanging Knees
Pillars in the Hold
Opposed Knees, Beam Arms and Iron Knees
Lower Deck Beams, Carlings and Ledges
Chain Pump Inlets and Tubes Fitted
Sleepers
Lower Deck Waterways and Spirketting
Riding Bitts - stage 1
Upper Deck Beams
Lower Deck Planking
Hooked Planks
Lower Deck Treenailing
Hatch Coamings and Companions
Lower Deck Breasthook
Forward Room Bulkheads
Upper Deck Pillars and Beam Set
Forward Rooms Bulkheads and Scuttles
Forward Bulkheads Finishing
Riding Bitts and Sail Room
Wing Transom Knees
Bread Room Bulkhead and Pillars
Aft Bulkheads
Pantry
Upper Well
Upper Deck Framing Finished
Upper Deck Ledges
Page 4
Upper Deck Waterways
Mast Wedges
Main Mast Partners
Aft Beam Arms, Carlings and Ledges
Mizzen and Foremast Partners
Main Topsail Sheet Bitts part 1
Upper Deck Hatch Coamings
Capstan Step
Upper Deck Planking
Top and Butt (Anchor Stock) Deck Planking
Upper Deck Treenailng
Counter Timbers
String in the Waist
Quarterdeck Clamp and Transom
Ebony Wales and "Dummy" Treenails
"Black" Strake
Topside Planking
Port Stops and Sweep Ports
Spirketting,Quckwork and Inside Sweep Ports Trimming
Treenailing Spirketting and Quickwork
Upper Deck Companions
Helm Port
Lower Counter Planking
Garboard Strake
Lower Hull Planking
Top and Butt Planking
Tricky Plank
Hull Planking Continues
Hull Planking Finished
Starboard Sheer Strake
Page 5
Scuppers
Main Topsail Sheet Bitts
Main Jeer Bitts
Forecastle Deck Beams
Hawse Holes Finishing
Fore Topsail Sheet Bitts
Bucklers
Upper Deck Breasthook
Bowsprit Partner, Hanging and Lodging Knees
Manger
Riding Bitts
Galley Stove 1
Galley Stove 2
END OF BUILD LOG RECONSTRUCTION
Chain Pump Cisterns
Pump Chain
Pump Brakes
Rhodings
Forward Stanchions, Cistern Hood and Pump Dale
Capstans
Rudder
Main Piece
Bearding
Pintles
Spectacle Plate
Bands
Gudgeons
Rudder Shipped
Rudder Coat
Forward Athwartships Aft Cabin Bulkhead
Bulkhead Doors
Aft Athwartships Aft Cabin Bulkhead
Longitudinal Aft Cabin Bulkhead
Upper Counter Planking
Forecastle Bulkhead
Forecastle Bulkhead Lights
Making Stern Light Frames
Stern Lights Completing
Rudder Head Trunk
Great Cabin Lockers
Completing Great Cabin
Rudder Head Partners
Transom Iron Knees
Guns
Brackets
Barrels
Capsquares
Drilling the Bolt Holes
Axletrees
Carriage Assembly Jig
Trucks
Bed
Quoins
Hardware
Breech Rigging
Side Tackles
Forecastle and Quarterdeck Carlings
Forecastle Knees
Catheads
Catheads Fitted
Cathead Caps
Steam Grating Coamings
Steam Grating
Galley Cowl
Cowl Baffle
Breast Beams
Forecastle Half-Door and Light
Quarterdeck Hanging Knees
Cast Knee
Quarterdeck Lodging Knees
Beam Bracket
Quarterdeck Hatch Coamings
Capstan Step
Forecastle and Quarterdeck Waterways
Forecastle and Quarterdeck Planking
Forecastle and Quarterdeck Treenailing
Bulwark Spirketting
Gun Rigging Re-do
Gangboard Knees
Planksheers in the Waist
Hances
Making Timberheads
Timberhead Jig
Forecastle Planksheers
Forecastle Timberheads
Quarterdeck Timberheads
Gangways and Gangboards
Entry Steps to the Waist
Gallows Crosspiece
Preparing Tuck Molding and Waist Rails
Quarter Badge
Quarter Badge Stools and Munions
Upper Finishing
Lower Finishing
Carving the Finishing and Glazing Lights
Pilasters
Quarter Badge Crown
Chesstrees
Channels
Sheer Rails
Standards
Drift Rails
Main Studding Sail Boom Irons
Fenders
Entry Steps
Swivel Gun Mounts
Fore Jeer Bitts
Belfry
Forecastle Railing and Spar Rack
Companion Top
Ship's Wheel
Quarterdeck Ladderway
Ladderway Railings
Quarterdeck Breastwork
Fixed Gangway Newel Posts and Railings
Taffarel
Taffarel Capping Rail
Ensign Staff Block and Clamp
Quarter Pieces
Roughtree Rail
Brake Pumps Fitted
Steering Rigging
This INDEX has grown too large, so I will start a 2nd one. It can be accessed by clicking the link below.
Link to Index Part 2
-
MRJG reacted to DBorgens in Bluenose by MRJG - Model Shipways
Your progress looks good, nice work on the stern blocks. With the stem and stern pieces in place, be careful when you fair the bulkheads so you do not damage these pieces. If they are high, simply sand them down to fair with the rest of the deck. If they are low, glue e a thin strip on top and sand it down. This is one reason I like working with wood.
Dave B
-
MRJG reacted to Nirvana in Bluenose by MRJG - Model Shipways
Dave,
As I follow this build log, I thank you for this input as next one is the Bluenose.