
HOLIDAY DONATION DRIVE - SUPPORT MSW - DO YOUR PART TO KEEP THIS GREAT FORUM GOING! (Only 51 donations so far out of 49,000 members - C'mon guys!)
×


Cathead
-
Posts
3,494 -
Joined
-
Last visited
Content Type
Profiles
Forums
Gallery
Events
Everything posted by Cathead
-
 Ken, I find that the story-telling aspect of model railroading is very appealing to the historian and writer in me. Obviously every model can tell a story, but there's something particularly rich in designing and implementing an entire setting, beyond just a stand-alone item. I'm really enjoying how this town is coming together and I look forward to expanding the layout, probably early next year. And thanks to Keith and all the other supporters!
 -
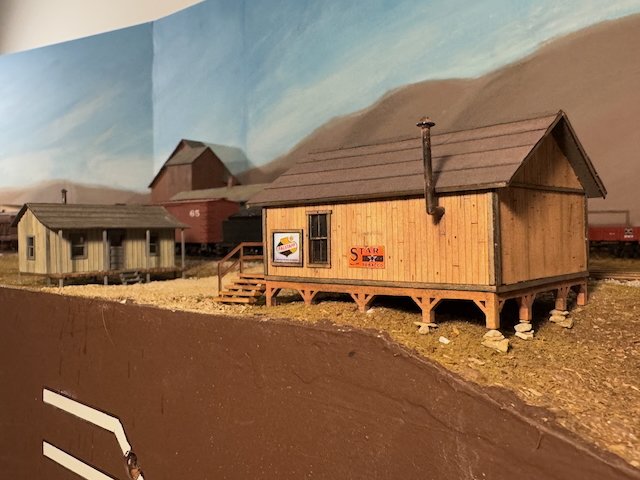
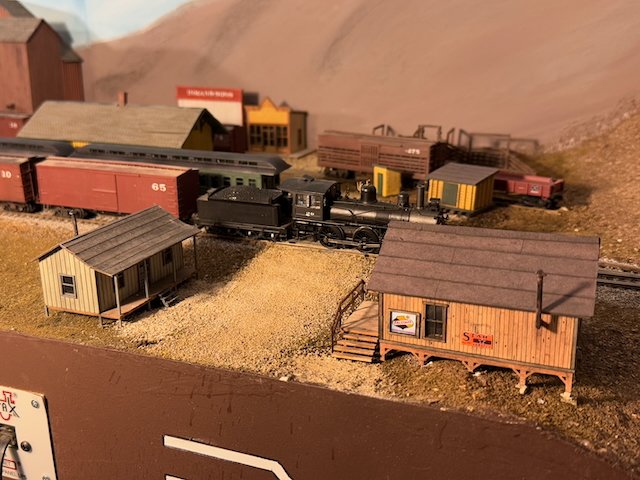
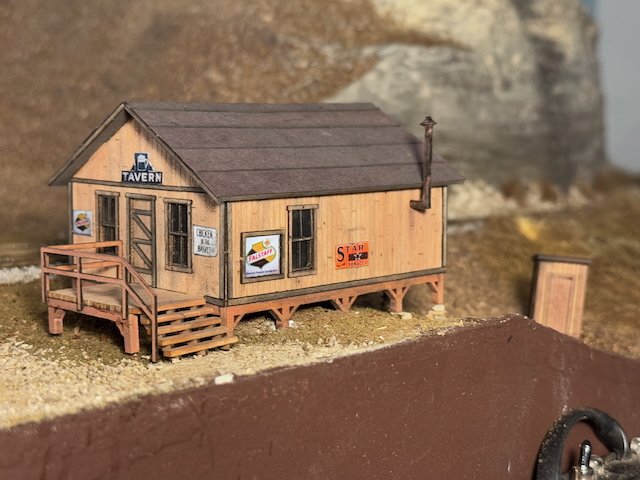
Another building for you. This is the other "wrong side of the tracks" structure, where the land starts sloping down toward the river and incomes and property values are lower. Intended as a general tavern / store kind of place. You can see the kit's version here: https://www.blairline.com/samsroadhouse/ No photos of construction, because it's a pretty straightforward laser-cut kit and I didn't do anything particularly unique to it. Just some basic weathering. I didn't use the kit's corrugated metal roofing (see link above), preferring tar paper. Although metal roofing was in use by 1900, my sense is it was far from ubiquitous. I don't have any other buildings I intended to use metal roofing on, and it'd look strange for the only building with such a new-fangled idea to be one of the rougher settings. I also didn't want a super-rusty look as even in the rougher part of town, I want Rocheport to have a well-kept appearance, and I wanted this to look like a relatively recent construction, not a 50-year-old wreck. Notice the outhouse downhill in the back, that was part of the kit. Also part of the kit was a sheet of possible signs. I chose a couple brands that really were produced in St. Louis during this era, Falstaff beer and Star tobacco. The manufacturer's version has this building plastered with signs, but I think that's overkill clutter and like how just a few add some flair while letting the building breathe overall. I intentionally chose this one and its partner across the street because they're up on posts, as is common for river-adjacent structures in this region. I used small pieces of crushed limestone to build up support pillars for the wooden posts. This is also pretty common around here in older buildings. Close eyes will notice in the first photo that I need to stick a couple rocks under the front porch posts. I like how this sticks out over the slope that starts descending down to the river. No paint on this one, it's all pastel weathering. I really wanted this to have a raw-wood look to it. The lower supports are intentionally more reddish to hint that maybe they were built from local Eastern Red Cedar, which is highly rot resistant and very common around here. I've built all of my full-scale outbuildings from it, and it would have been quite easy for someone to harvest in 1900, too. I think the raw wood goes well with the subtle grey of the sharecropper house, and contrasts with the brighter colors of the depot area. And here's a broader view, showing how this frames the street leading from the river landing into town past the east side of the depot. That's the last building for this district; other than trees, other vegetation, and some fencing, that's pretty much how this is intended to look. Thanks for following along!
- 230 replies
-
- 14
-

-
I agree with you on the satisfaction from the craftsmanship of building the boats yourself. Nice job!
-
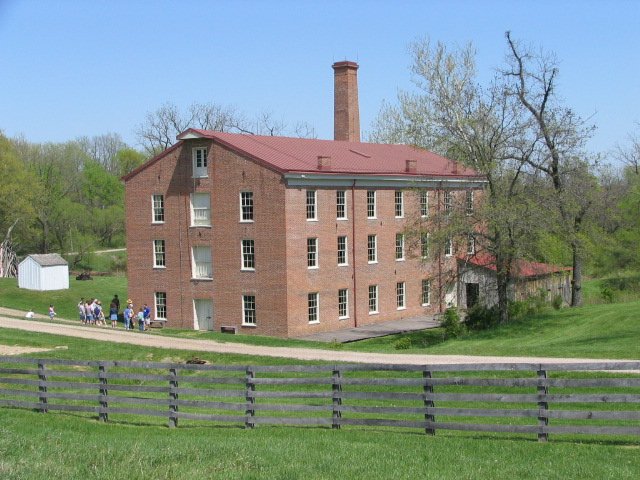
Lovely photo! That girder, and those doors, especially look like equipment access to me, the way they've lined up vertically with a hoist-support beam above. This was how machinery was hoisted up and into various floors in many buildings. Here's a classic older example from Missouri, at Watkins Woolen Mill State Park (from the park's photo gallery, though I've been there many times). Look at the vertical line of access doors, overhung by a roof extension that housed support beams for whatever pulley system was used to hoist machinery to all the mill's different floors. As discussed earlier, the commentariat convinced me that my elevator's doors weren't equipment access given the way they're not lined up and don't have any hoist housing above them. But the style of access door shown above is super-common in mills and similar industrial buildings and it's worth recognizing. So glad to have you following along!
-
Thanks for joining us! Better late than later. I do much enjoy all the different complex directions model railroading takes one, mentally and artistically. Ship building does too, just in a different way.
-
I would break my keyboard ordering a Vanguard-quality Beagle so fast. Would love to build one but am put off by the quality of the kits available and am not really up for scratchbuilding. And would have broader appeal than many warship kits.
-
Wefalck, you would especially love the book I mentioned earlier, then. Great job, Keith, you nailed the look of that side wall.
-
The biggest problem spot is near the depot. They're north of the tracks to the west/left of the depot, but south of the tracks to the east/right of the depot. Review the photos above. So I'd have telegraph lines running through town, behind the main line as viewed from the aisle, but then they'd stop all of the sudden by the depot (or cross over in one of the busiest areas for people to reach in). I just think it'd look strange to have a telegraph line ending right in the middle of town near the depot. Plus, even run along the backside of the main line, they'd still interfere with people reaching back into that siding that runs along the grain elevator and behind the depot. Plus, I'm thinking longer-term about the plans to extend the layout in either direction. As a standalone diorama it might be fine to have the telegraph lines just in Rocheport, but when the tracks extend west and east beyond this scene, it'd be bizarre to have no further telegraph lines other than those in Rocheport. And I'd have to then extend the lines in front of the tracks in either direction, doubling down on them getting in the way. It's a fun discussion, but for now the core point is that even if I did decide I wanted to string them (never say never), it's virtually the last thing I would do and there are so many other ways to spend my time on this and future scenes that it's just a very easy thing to set aside and not deal with.
-
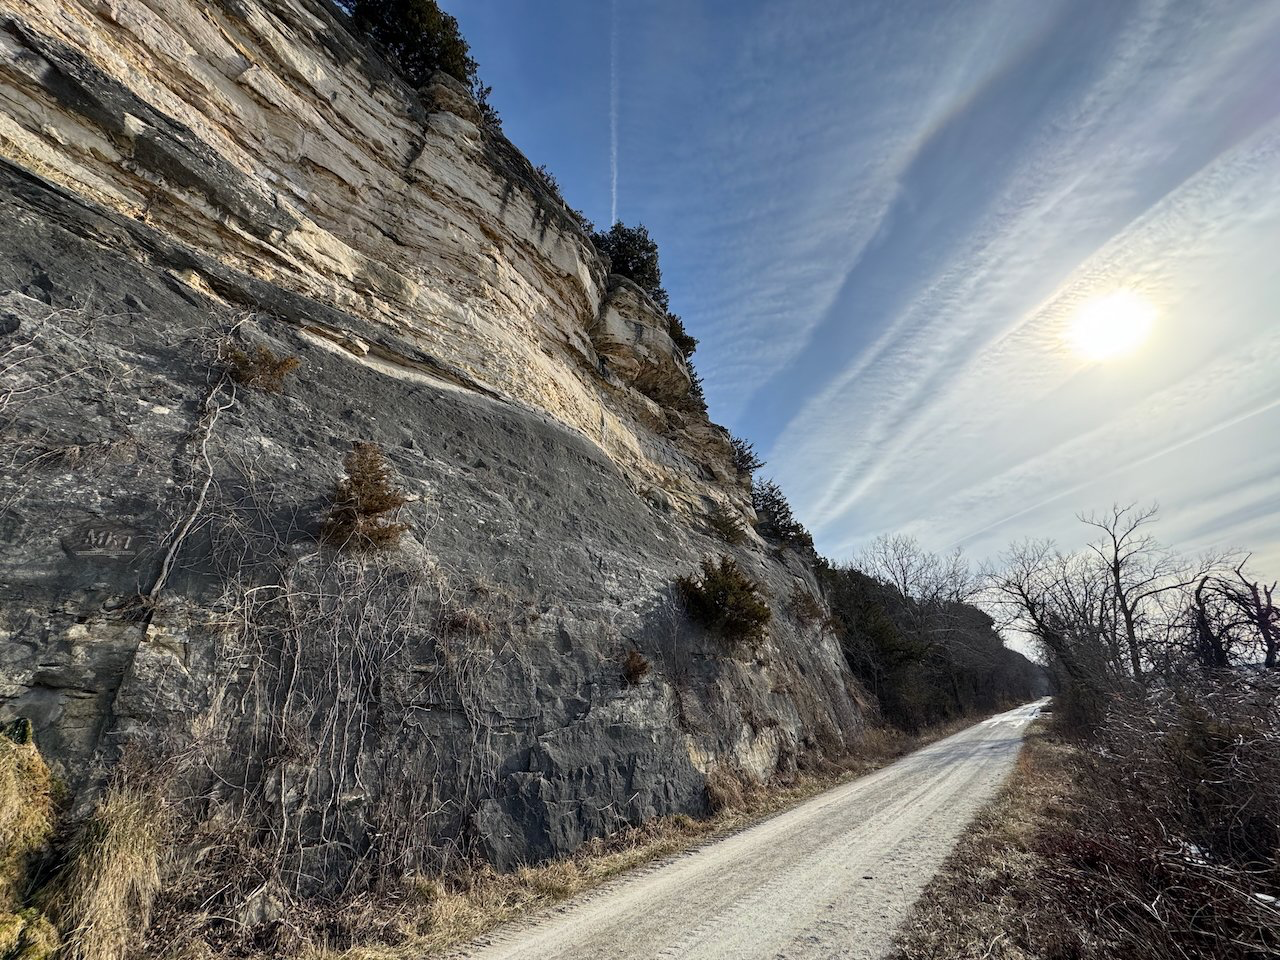
Yes, those are the ones I agreed you could see on the north side of the tracks in town. But the problem is, they cross over to the south (river) side at either end of town and stay there along the river in either direction. So if I ran those north-side lines through town, what do I do with them at either end of town? It'd look ridiculous to just truncate them, but if they cross over they immediately get in the way and beg to be damaged by errant elbows. See if this map/diagram helps. Remember that the aisle is in the river, so anything on the south (front) side of the tracks is directly in the way. And I can't just keep them on the north side because there's not enough room between the bluffs and the tracks either to the west and east; the rock faces are right up against the track. Remember, this is what it looks like for long stretches of the mainline along the river: The telegraph poles/lines (now gone) would have been on the far right of this photo, along the riverbank, where they'd be in the way of a god-like hand reaching in from the river! Does that help?

-
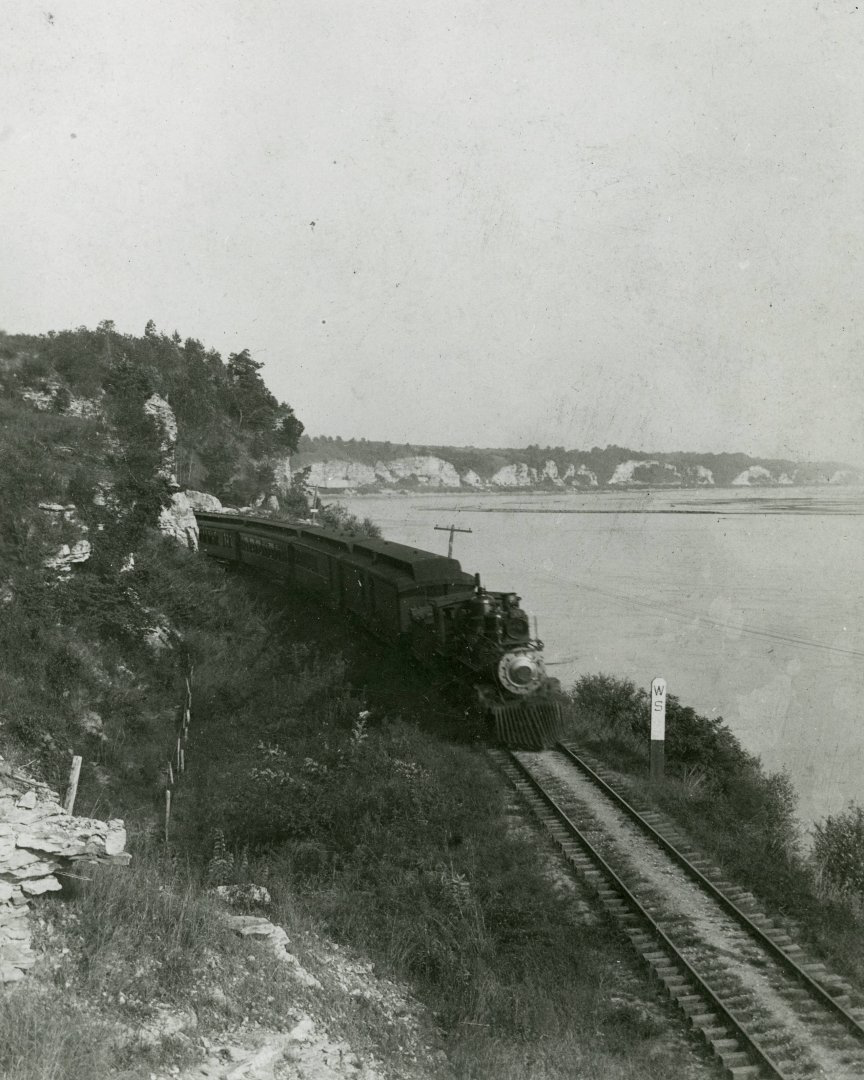
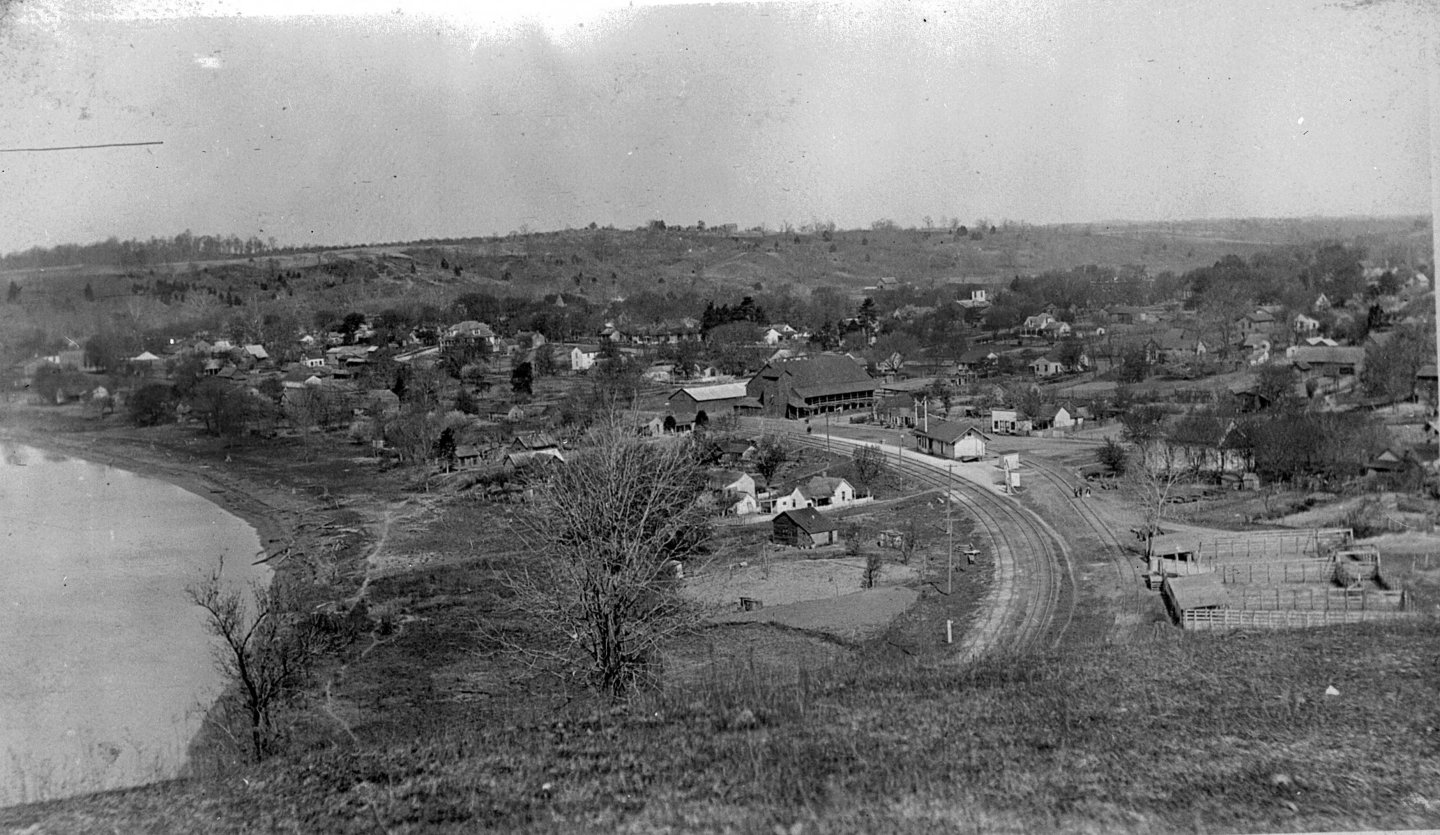
Great question, Keith. There were indeed telegraph lines along the right of way. In the photo from the west (marked up above) you can see them dimly on the north side of the tracks. But most of the time, they were on the south (river) side of the tracks, as you can see in the view from the east posted earlier (the curve near the depot), and this photo from along the river just west of Rocheport. So they must have crossed over once somewhere near the tunnel, then back over again somewhere before the depot. But having them mostly on the river side, especially along the narrow corridors between river and bluff, is a problem for me. This makes sense for the railroad, as there wasn't really room along the bluff side of the tracks, where the rock faces almost literally overhung the rails. But if I added these accurately, they'd be on the aisle side of the tracks, making access to the right of way rather difficult, because anyone reaching in (to uncouple cars or even clean the rails) will find the telegraph lines in the way, and all but guarantee a damaging interaction sooner or later. If this were just a diorama, I would definitely add them. But as an operating layout, my instinct is not to, because I think they'd be in the way. Regardless, they'd be just about the last thing I would add, as they'd also get in the way of any other scenery work, so I don't have to worry about it for now. They get filed away in "maybe someday final detailing". Again, great question, and a good example of how an operating model railroad forces somewhat different thinking and decision making than a static display model.
-
Here's another way to answer Keith's question about remaining structures. Most of what I need to add is on the west side of town, shown below. Circled are three distinct ice houses and the Spanish-style barn that I'll be scratchbuilding. I won't be adding the large brick mill along the river because there isn't room (you can think of it as being in the aisle). Otherwise I want to represent the general sense of that main street crossing the tracks behind the circled barn, so will use a variety of storefronts and nicer houses to do that, as well as adding a smaller farmhouse and possibly a second barn to capture the general sense of smaller farms on the outskirts of town. But I don't feel the need to exactly recreate every structure, so I'll be using reasonable kits for most of those. My philosophy on scenes like this is that, rather than try to recreate everything perfectly, it's better to choose a few distinct signature structures (depot and elevator on the east side, ice houses and Spanish barn on the west side) and let those scream "Rocheport" while the rest capture the feel of the place. And since I'm compressing a half-mile-long town into less than ten feet of layout space, this is a sensible way to do it since it's by no means a complete re-creation anyway. Hope that makes sense!

-
Thanks! I do think they turned out well, too. Approximately 8-10, not including little things like outhouses. Rocheport's a busy place. Loosely speaking, the upcoming list includes: 2-3 upscale business-district-type storefronts 1 nice town house 1 smaller/rougher house 1-2 barns 2 other "rougher" business buildings 2 small ice houses Most of these are will be laser-cut kits, which saves a lot of work. I'm happy to scratchbuild when I need a distinctive structure but many of these are quite well represented by existing products. The ice houses and one of the barns will definitely be scratchbuilt because they represent specific structures I can see in photos that no kit can adequately simulate.
-
OK, here's a fun little mini-building project. A few years ago, the official newsletter of the Katy Railroad Historical Society had a modeler's article on building a simple railroad coal shed. These were used by the Katy to store coal for use in stoves/furnaces within small railroad buildings like depots, offices, or workshops. Like most railroads, there were official designs for exactly how to build these, so the article shared blueprints and an example of a model built in 1:48 scale (larger than my 1:87 scale). These would be located along a spur, where a gondola of coal would be spotted. Coal would then be shoveled into the hatch in the back, filling the shed. When coal was needed, a worker could open the front door and shovel it out. This had upper and lower halves for obvious reasons. I decided that one of these would be the perfect addition to my version of Rocheport, since the depot has a stove. A coal shed isn't clearly visible in the photos I have, but I decided I don't care. It's another place to spot a car, adding operational interest, and it nicely fills in an empty zone near the depot, a place you can see several sheds (just not a coal shed like this one). Here are the four walls laid out, using scribed siding and extra strips for the outside bracing. Figure for scale. Assembling the walls with a magnetic jig: Walls, roof, and floor assemblies, with the thick beams the whole structure rests on. These are stained cherry, scraps left over from my NRG capstan and other projects: Painted in the proper corporate yellow/green scheme (same as depot), assembled, and weathered, with tarpaper roof (front and back views): While I was at it, I built a small outhouse to go nearby as these depots didn't have indoor plumbing in this era: And here are the final two buildings on the article photo: Here they are installed on the layout. I'm pretty amused at the genius of placing the outhouse right across the tracks from the stockyard: I like how these extend the "railroad property" zone a bit to the east (right) with their coloring. And here's the classic historical photo showing a few sheds east of the depot; I'm just shifting their exact location and purpose to suit my needs, as most model railroaders do: This was a fun couple nights of work and fills in another small spot on the layout. I've been doing some scenery work, too, but am not ready to share it. This, at least, shows you that I've been doing something! Thanks for following along.


- 230 replies
-
- 11
-
-
Yeah, that plank bending line was meant as tongue-in-cheek. As was the editor comment.
-
No going to lie, I initially read that as "spittoon" and did a double-take. Spit-take, even.
-
Anyone interested in shantyboats should find a copy of Harlan Hubbard's classic book "Shantyboat", which recounts how he and his wife built a shantyboat and spent years working their way down the Ohio and Mississippi Rivers. Full of humor, close observation of river life, and just plain good writing. More than a little Engel/Billy in that book, in terms of the creative/iconoclastic thinking both employed. As a professional editor, I feel attacked! Great looking hull, and as always a startling perspective on your tiny work size. I guess we now know why this one is called "billy". I hope you didn't have too much trouble with all the plank bending, that's usually what trips people up on hulls.
-
I laughed out loud at the thought of Engel sitting up there in his pilot house on a tractor's springy seat.
-
Yeah, I have to agree that other Keith has it. If such a design really did make a meaningful increase in efficiency, I'd think other vessels would have adopted it at some point. American riverboat design was an absolute ferment of evolutionary creativity (few regulations, no "official" dockyards, no corporate staidness) and overall the designs evolved rapidly toward convergence on best practices. My guess is he just wanted to maximize his cabin/deck space on this small vessel, and doing that gave him the equivalent of an RV's "over the cab" loft. But it's question worth asking, and certainly one can never rule out the idea of a creative iconoclast coming up with something new!
-
Vexillology clearly has the right root word. Personally I commend manufacturers like Vanguard for caring about getting little details right. It shows attention and care for their work, and helps justify the appropriate price they charge. Would much rather have that approach than the slapdash cutrate version we see from various other sources that shall go unnamed. An incorrect flag may not "ruin" a model for casual viewers any more than upside down deadeyes, but it makes the model less than it could be. If an individual modeler makes something their way, fine. I see that as different from a manufacturer providing incorrect materials when they could get it right. So again, well done to Vanguard for making a sensible choice and explaining it.
-
Great work on this interesting and challenging project so far! As you saw in my project, I also enjoyed using woods I'd collected as well.
- 20 replies
-
- 4
-

-
-
- NRG Capstan
- NRG
- (and 1 more)
-
To be fair, those are the people who are retired and now have time to pursue extra hobbies. It's certainly possible younger generations will have different interests, but it's also reasonable to assume that people can develop new interests once they have more time on their hands.
-
I don't know about "setting you straight", it's a coin flip who's "right". To me, center-stair seems both more logical and more suited to the photo, but you've every right to follow your own instincts and build it the way you're most comfortable with. For what it's worth, in my head, two 6'x10' rooms work nicely if you think of one as a cozy sleeping cabin and the other as a sort of pantry/storeroom. Plenty of room for a bed (and small WC?) in one and lots of shelving/cabinetry in the other. And you still have a larger main room under the pilot house to act as a combination living room, dining room, workshop, etc. Also, even the staircase isn't entirely wasted space because 1/3-1/2 of it also makes a great "broom closet". I've been in lots of houses where the under-stair area has been turned into a useful cupboard of one kind or another.
-
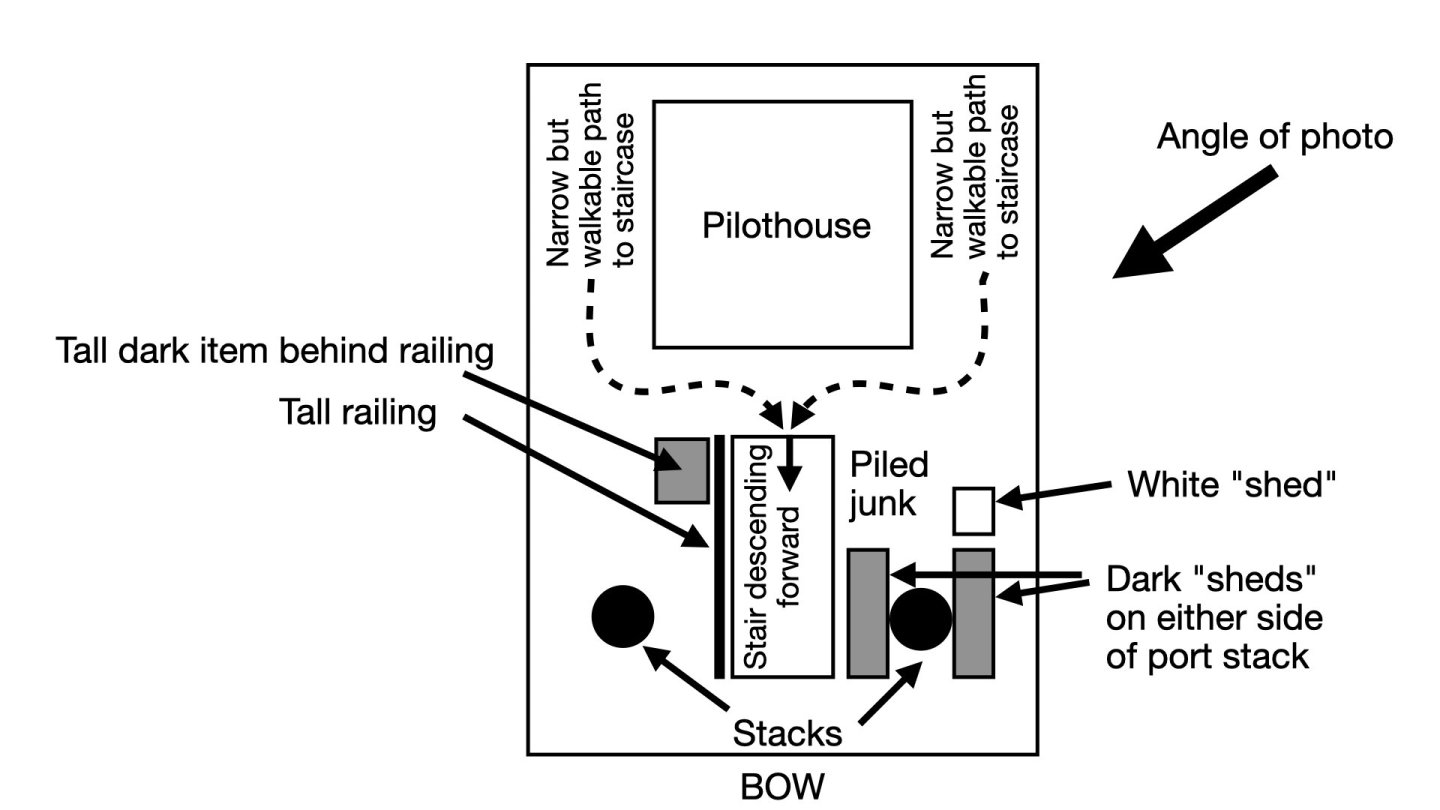
Keith, that's roughly what I had in mind, but I'm a little confused by your labels. If that staircase ascends sternward (from main deck forward to boiler deck aft, just in front of the pilothouse), what does "door below" mean? There'd be no door up on the boiler deck, where that label is, and any door down on the main deck would be at the forward end, opposite from your label. I also don't understand what you mean by "cuts out so much of the deck structure below the pilothouse" because the whole thing is well forward of the pilothouse, which would be plenty well supported on uncut beams aft of the staircase. Again, lots of steamboats had staircases rising up into the boiler deck at various places without any structural integrity problems. As for the junk, it looks to me like it's on either side of the proposed stairwell opening. That railing certainly runs in front of the right-hand "junk", as I can see it on crossing that item on the blown-up image posted earlier. That also implies that that railing runs fore-aft, 90º off what it would be if it was protecting a right-descending staircase as in your other proposal. The other stuff looks like it could be piled in the narrow space between the port side of the stairwell opening and whatever those little sheds are. As for the stacks, my eye says they both lean outward at about the same angle. In an earlier discussion, I believe we decided that they were entirely decorative, explaining why they weren't straight. Also, based on the trend of the left-hand stack, it appears it comes down to the boiler deck at least 6-8 feet after of the forward end of that deck, since you can see 3-4 feet of "shack" forward of the left stack, then another 3-4 feet of deck forward of that shack's wall. So the right-hand stack would be placed well aft of your proposed starboard-descending staircase, meaning that both stacks have equal support (or lack therefore) because they don't interact with either staircase, which also fits why (to me) they both lean outward at similar angles. I don't mean to be telling you what to do, but this is what I see. Here's a drawing to illustrate how my mind reconstructs that image, right or wrong.
-
I have to admit, I also saw that railing and thought "center-mounted stairway forward of the pilot house". Why do you say it's "plugged with junk"? I don't see anything directly blocking that, only structures off to either side. And what do you mean by "below the PH"? What I, and I think others, are seeing is a staircase FORWARD of the pilot house, probably descending in a forward direction though it could be either. I don't see why its central location is a big deal, it wouldn't violate structural integrity any more than a regular home staircase does, especially in this vessel's cockamamie design. He could easily have that framed solidly. If anything, it mimics the forward central staircase that many steamboats had, ascending just in front of the main chimneys, and I could see him copying that design. I can't argue against your starboard idea, but I'd love to understand your thought process on rejecting the central idea.
-
I agree, it's easy to envision how the right location would work, giving them room to expand and add more collections, while drawing in more visitors and school groups. Just hope they can make something work. That article I linked was the first I'd heard of the Kansas options, and there's some promising ideas in there. Leavenworth could potentially be a great site, keeping it near the original discovery location but giving them more flexibility.


