
HOLIDAY DONATION DRIVE - SUPPORT MSW - DO YOUR PART TO KEEP THIS GREAT FORUM GOING! (Only 51 donations so far out of 49,000 members - C'mon guys!)
×


Cathead
-
Posts
3,494 -
Joined
-
Last visited
Content Type
Profiles
Forums
Gallery
Events
Everything posted by Cathead
-
 The Arabia museum has been in limbo for some time. Their lease with Kansas City is ending, and the city wants the building/location for other purposes. To be fair, the museum isn't the best use of that space or location and I can understand why the city wants to change. It's also not the best location for the museum, especially as it has no room to grow. But the museum hasn't been able to reach any kind of future deal for another location in KC. They've made lots of noises about other locations like Jefferson City, St. Charles, or even out of state, but nothing substantive has ever come out of those rumors. Honestly, from the outside, it's all seemed kind of ham-handed, like there's no one really in charge making clear decisions. And this has been going on for years, so it's not like they've been thrown a curveball. My impression as an outsider is that things aren't being run that well and they're kind of floundering. It honestly reminds of some stadium-hunts that certain pro teams do. This is a good recent article that sums things up: https://www.kshb.com/news/local-news/manager-explains-why-arabia-steamboat-museum-will-close-its-location-in-the-city-market
 -
In old-time steamboats this purpose was served by a single jackstaff mounted right at the bow, on the center line, primarily used for navigation. Not sure if that term is applied to these with their similar purpose but different mounting. Gorgeous work. I know exactly what you mean about the prototype, I'm a wood-and-iron person myself too, but you've done a lovely job of bringing this to life. I'm always tempted in the background to try my hand at one of these but it never quite makes it to the top of the list, so it's especially rewarding to follow someone else taking it on!
-
Oh, I know and appreciate it. Didn't mean to imply you hadn't or that I didn't know who you were. I meant that comment more for the general audience, and maybe a reminder if you didn't happen to remember that detail (I forget plenty of details from other peoples' builds, no matter how good).
-
Nicely done! And I agree with your reasoning on the carriage coloring. It makes sense to choose a style (realistic or artistic) and follow that consistently; both are attractive and reasonable but it's best to follow one path consistently.
-
My impression (could be wrong) was that riverboats by this era were required to have some kind of warning noisemaker, though of course that may not have stopped this eccentric fellow. Though I have a hard time imagining he made this journey without being inspected at some point by authorities, even in that era. Maybe he's got something mounted on the starboard or forward wall of the pilothouse where we can't see it. Although anyone who could cobble this thing together and take it downriver needed to get a grip. Everything's looking great, Keith!
-
Just to keep this dead horse alive a little longer, this YouTube video has some really nice footage of the Millersburg Ferry in operation.
- 457 replies
-
- 4
-

-

-
- sternwheeler
- Hard Coal Navy
- (and 1 more)
-
Having been on it many times, I can confirm that it operates as one unit. It is more or less in two parts (the car deck and then the hull with engines, wheel, pilot house, etc) but they're functionally one whole. I can't remember exactly how they're joined, though my leaning is that they're actually physically joined and not just lashed, but regardless the "power" unit isn't really set up to operate on its own. The last time I rode this was in 2003, with my first ride probably in the early 1980s.
- 457 replies
-
- 5
-
-
- sternwheeler
- Hard Coal Navy
- (and 1 more)
-
It was pretty common for sternwheeler outhouses to directly overhang the wheel for exactly the reason you state: it's the best place to dispose of waste and the wheel spray helps somewhat. There are also (possibly apocryphal) tales of uncomfortable situations when a lady went to use the facilities while crew were doing some form of repair to the wheel below. Not pleasant for anyone involved. If you look at my Bertrand build you'll see an example of the direct overhang style. As always, your work is looking fantastic!
-
Late to this side theme because I've been away, but that looks like the Millersburg PA ferry that ran (and still operates) across the Susquehanna. I rode it many times growing up and it's still a going concern: https://www.visitcumberlandvalley.com/listing/the-millersburg-ferry/1818/ My memory is that it's a gas engine with some kind of chain drive to the wheels. It's a fascinating ride, the river is extremely wide there but also very shallow, most of the time you could walk across it without getting your head wet. Most of the crossing you can see the bottom of the river just a few feet below the ferry deck. It's a cobbled-together contraption out of a whimsical nightmare, and there are actually two different ferries, both similar but each their own.
-
Ken, there were some brick and stone buildings in Rocheport but they were in the core business district set a few blocks back from the tracks, so not visible on the layout. If you go back and look at photos of the general setting I posted early in this log, you'll see that pretty much everything within a couple blocks of the tracks wad wood. And yes, MK&T buildings will share the same palette but the only other one in this town is a small shed I haven't built yey.
-
Richard, There was certainly smoke staining on the tunnel and I included that in the weathering, though gently since this layout is set shortly after the tunnel's opening. As for buildings, there's no evidence of that in contemporary photos, and I'd say it's a non-issue in a rural small town like Rocheport. No major industry, buildings not crammed together like a big city, only so much train traffic on a single mainline, relatively small 1900s engines, many houses still heating with wood, etc.
-
Ken, no figures in the tavern for now. It's too obscure and figures are expensive. I'd rather feature them where they're more visible. I left the roof detachable so I can change my mind someday. As for the differing colors, that actually raises a point I left out but can address: thinking about the color palette for different parts of this scene. While buildings in this era could certainly be colorful, I wanted to think about how to compose the scene in a way that would influence viewers. For example, I already talked about three subtle "zones" of town; the prosperous west side (no buildings yet built), the workmanlike depot area (most buildings now built), and the lower-income southeast side down along the floodplain on the "far side" of the tracks (one building now built). Another part of that is choosing colors. If you look carefully, you'll see that the buildings in the depot area all share a compatible reddish-yellowish-grey palette. This was quite deliberate as it ties them all together in a district. I didn't want, say, a bright blue building clashing with other buildings there and standing out. Since the depot was set as the railroad's yellow/green scheme, this also sets the non-railroad buildings subtly apart from the depot while still not clashing with it. Inman & Sons stands out a little, but not in a clashing way that it would if it were, say, light blue. My intention is that all the "far side" buildings will be an even more muted dull white/grey/raw wood palette, to emphasize their lower-income status and again to help that district subtly stand apart (and emphasize the transition between it and the depot area). Whereas the prosperous west-side district will have brighter colors (clean white farm houses, redder barns, brighter-colored storefronts, probably some nice blue). So you have this visual transition all the way across town in both design and color palette of structures that helps subtly tell a visual story about the economics of even a small town. Just to be clear, as I reread that sentence, I don't mean that in a political way, just in a "that's how it really was" way and I think it makes the scene more interesting by dividing it up into mini-scenes that both the viewer's eye, and the trains, pass through even in this little diorama. The final point is that, since this is set in late fall / early winter, too many bright colors would contrast with the general muted end-of-season color palette. So I'm making all sorts of behind the scenes decisions to help the entire scene "feel" right, not just look right.
-
I bet you're right. I was just rereading a history of the Ozarks earlier this evening, and in a passage on steamboating along Ozark rivers, the author notes that later gasoline-powered riverboats along the Osage River were still built with fake chimneys just for appearances. I honestly didn't think the 1938 date through when I noticed those wonky stacks. Funny you say this as I'm typing during a commercial break late in World Series Game 5.
-
This is just a hilariously quirky prototype. So many oddball details to see, as befitting a homemade steamboat. This thing honestly looks like an AI-generated image derived from prompts written by someone who had never actually seen a riverboat. "Uh...draw me a boat with two paddle wheels and a big boxy shape and a room with big windows at the top and two smokestacks and, uh...let's start with that" I love how even the chimneys are charismatically off-kilter. I think this thing is the singularity for your quirky steamboat obsession!
-
Keith, your models are a ray of sunshine for us all!
- 457 replies
-
- 4
-
-
-
- sternwheeler
- Hard Coal Navy
- (and 1 more)
-
This looks like a great project. I'm a big fan of Amundsen as an explorer and leader, and will enjoy watching this story take shape.
- 44 replies
-
- 1
-
-
- Northwest passage
- Norway.
- (and 2 more)
-
Absolutely spectacular job on that load. Wouldn't change a thing. Looks so good. In fact, I'm going to show these photos to a bunch of people and tell them to "get a load of this!" (American slang from my youth for those who might not get it, meaning "take a look at this"). I would look to see another photo of the fleet with an item for scale, you know, like a pinhead or something. This has been so fun and rewarding to follow and I thoroughly enjoy the niche you've carved out for yourself in these workboats.
- 457 replies
-
- 4
-

-
-
-
- sternwheeler
- Hard Coal Navy
- (and 1 more)
-
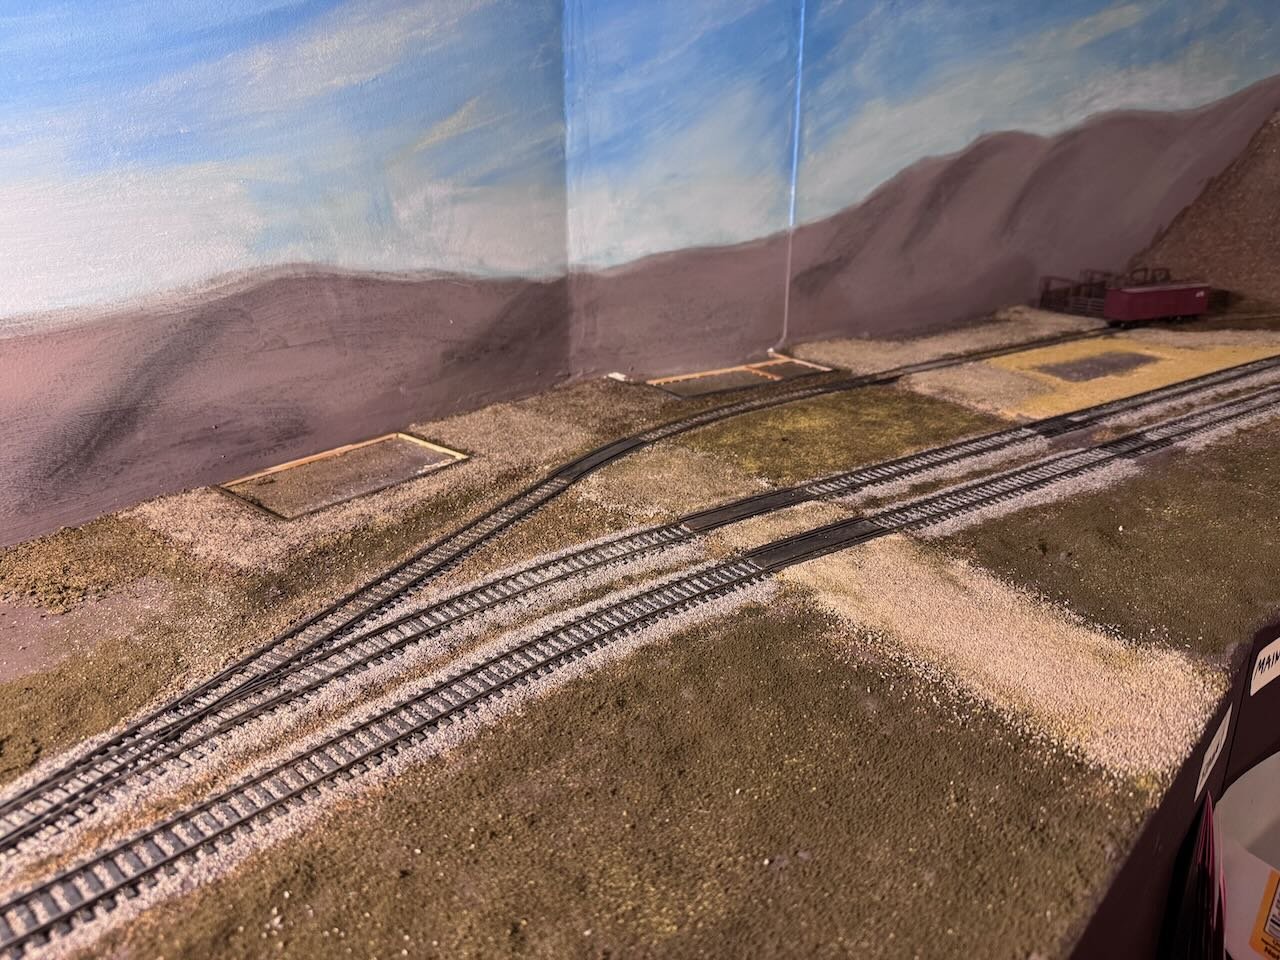
I also solved a long-standing scenic issue. I really haven't been satisfied with the color of the dirt/gravel roads in town, but hadn't found a solution. I want them to have the same grey/tan color as the surrounding bedrock, but still look like fine material. Railroad ballast is roughly the right color, but too coarse and uniform. I've played with other purchased scenic ground covers but none are the right color or stand out enough from the surrounding terrain. I finally hit on the solution, literally, by accident. I had collected some chunks of limestone from along the real right of way, intending to crush them for coarse rock debris at the base of the bluffs along the right of way. But as I was hand-crushing these samples, I realized that the limestone was actually powdering quite nicely in addition to forming coarser rubble. So I made a point of finely crushing some of this material, then sieving it out to separate the rubble from the powder. The latter was perfect for spreading as extra-fine road material and also had just about the right color (of course!). Here's what the new road surfaces look like. The right grey/tan shade, similar to but distinct from the railroad ballast, and finer in texture. Also stands out from the surrounding land without being too bright. A few more shots at different angles: I'm definitely pleased with this and it's infinitely renewable with just some healthy exercise effort. You might notice two more foundations in the shot above; I built them to match their intended buildings, glued them down, and then worked scenery material up to blend them in. This gives me somewhere to set buildings without having to be super-careful about working wet scenery material right up against carefully built wooden buildings. Here's a closeup of the elevator's new foundation. I'll do most of the rest of the buildings this way too. Doing this lets me move forward on some scenery work I'd been holding off on, until I got foundations properly in place. Finally, here's a fun update showing the arrival of a late birthday present. Although I'm obviously focused on 1900, this line was operational into the mid-1980s, when trains were very different. I'm also a fan of the MKT's late-era yellow and green paint scheme, and as a geologist would very much enjoy running modern(ish) coal trains one day. So a late birthday present was an MKT SD40-2, which the railroad specifically purchased for unit coal train service. These never actually operated through Rocheport, because (a) the railroad didn't haul unit coal on this line and (b) the track wasn't up to standard for these large 6-axle locomotives. But I'm indulging myself in some alternate history so that, down the road when more mainline is completed, I can watch MKT coal trains roll through here. Given that the Union Pacific tracks on the other side of the river still host unit coal trains to this day, I feel quite justified in this little departure from reality. It's also pretty fun to be able to see 80 years of railroad history nose-to-nose! And as this unit is also sound-equipped, it adds quite the different tone to the layout to hear a loud diesel blast and engine rumble in contrast to the shrill whistle and gentler puffing of the steamers. I should acknowledge the Katy Railroad Historical Society here, which worked with the manufacturer to produce a special limited run of Katy-specific diesels for members to purchase, including this one. It's a fun twist, and all of these hobbies at their heart are supposed to be fun. I hope you had fun reading these updates, and thank you for your patience with my intermittent updates.


- 230 replies
-
- 16
-

-
-
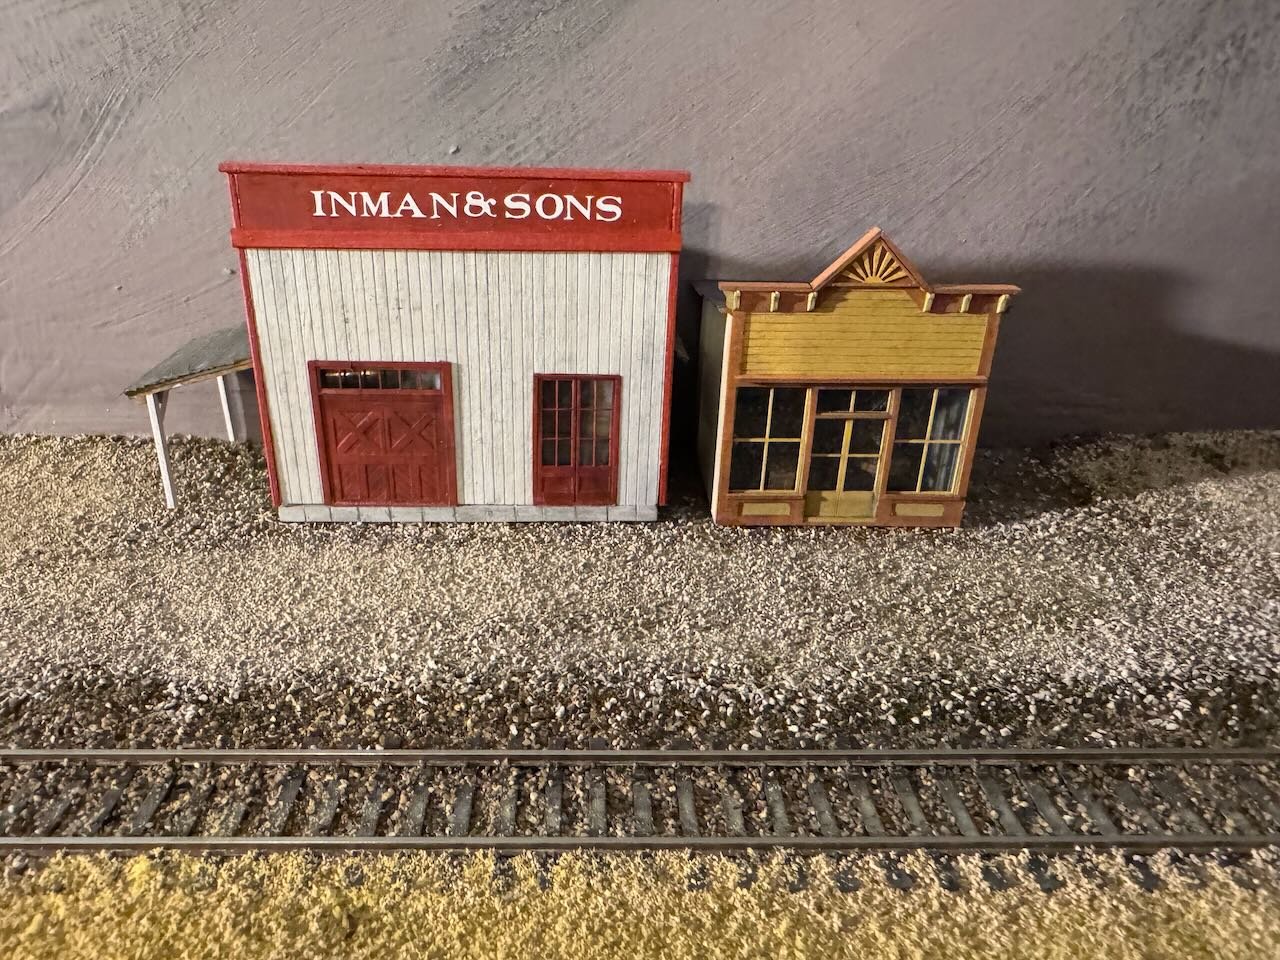
OK, it's been over a month since I updated this, past time to share the small bit of progress made. This will be two posts; the first one covering the latest building. This one is a small laser-cut kit from Berkshire Valley models, which I modified to fit my scene. It's meant to go against the backdrop next to the scratchbuilt Inman & Sons, but the kit is deeper than the space I have, so I needed to chop some length off the kit version. Below, you see the original roof & floor with the walls shortened to the length I needed. Assembling the walls and floor after airbrushing: The fancy false front, built up of thin layers of laser-cut wood, pre-airbrushed to different shades. And one of the side walls with light weathering. I wanted a basic interior for this one, even though it's a backdrop building, because the front windows are so large. Since this sits right behind the depot, my vision is that this is a basic trackside eatery/bar serving passengers, train crews, etc. So for the interior I mocked up a few tables and a bar. These aren't painted yet in the photo below. And here are a couple shots of the finished building, with strong light so you can see into the interior. I did just enough for the shapes to be visible and hint at their purpose, I don't intend to light this internally or otherwise go overboard. This is roughly where it goes, behind the depot. This will also get its own base, and there will be a planked sidewalk running in front of both buildings, since we're still in the muddy-street era of American small-town architecture. You can see examples of these in the historic photos. In later years this would be considered a diner, but that word hadn't come into routine use in 1900. Instead, this would probably have been considered a tavern, and that's what I'm going to go with. I don't have a reference for a real name in this case, so I'm trying to decide whether to go with the generic Rocheport Tavern, or come up with something more poetic or creative. In the following post I'll cover a scenic development.


- 230 replies
-
- 13
-
-
I actually think that's an American-ism, not an Anglo-Saxon-ism. As an American geologist, I'd never heard of the formation you're talking about and had to look it up. According to Wikipedia it's a somewhat obscure British formation (https://en.wikipedia.org/wiki/Culm_Measures) and so not something we learn about unless we get a tipoff! But since "culm" supposedly derives from a Welsh word for coal, it's quite believable that it took on a new but related meaning over in the US, like so many other words. For the naturalists out there, like me, it also refers to the hollow stem of a grass or sedge, like bamboo or wheat (think straw). I'm certainly pleased to see the culmination of this build!
- 457 replies
-
- 4
-
-
- sternwheeler
- Hard Coal Navy
- (and 1 more)
-
Keith, what is it with you and choosing subjects with mystery objects on their roofs? First the Susquehanna vessel with its not-boat white tank thing, now this? Can't you choose something straightforward and sensible and stop torturing readers who like figuring things out?
-
We still heat primarily with wood, along with solar hot water & electric panels, and a passive-solar house design. And now do a fair amount of our cooking with wood, too, after completing our outdoor kitchen project. We're far from hippies but very much living the dream in our own way. Back on topic, overall I suspect the ease of wood won the day for a long time. You could also argue the same dynamics for various other fuel transitions, such as that from sail to coal/oil. Yes, coal/oil is far superior overall, but suddenly navies and merchant fleets went from a universal free fuel to one that had to be extracted, hauled, stockpiled, and protected globally. Even the concept of an EV transition faces the same challenge: gas is functionally as ubiquitous as wood was to a 19th century steamboat, whereas charging stations are still lacking across much of the country in the same way that early fuel depots were.
-
Great writeup, Keith, I'm also curious about that. As I think I posted much earlier in this thread, the kind of softwoods highly available in the PNW are terrible fuel in comparison to coal, or even the hardwood oak/hickory/maple forests we Midwesterners are used to. Obviously better than nothing but I sure agree that it would make sense to switch to coal fast once available, as railroads widely did. The primary reason I can think of otherwise is simply that wood was available anywhere for refueling, whereas using coal would still require the establishment of specific coaling stations (assuming there was no tender system). For a vessel roaming a very large inland waterway that was still fairly remote, I wonder if the ease of refueling anywhere trumped the fuel efficiency of geographically limited coal supplies? The same was true for both steamboats and railroads; the switch to coal made sense but did require the establishment of a whole separate system for transporting and restocking fuel in depots from extractive point sources, whereas wood could be acquired locally just about anywhere, at least in the eastern half of the country. Fun question.
-
I can actually top my own story, as long as we're swapping river tales. A-10s based out of Missouri's Whiteman Air Force Base have a habit of using the Missouri River corridor for training runs at times, and they like to line up on river traffic. My wife's colleagues in research vessels have been buzzed on clear target runs before (though not her personally), and we also personally had it happen a few years ago during a paddle race on the river. It's absolutely hair-raising to have one of those things appear out of nowhere and go screaming overhead, especially in a non-airshow setting where it feels more real.
-
My wife used to be a researcher on the Missouri River, and one time her research boat got buzzed by a helicopter warning them to get off the river because a loose barge was coming their way. Somehow the normal channels of communication hadn't worked and they hadn't gotten the news through radio from their own agency, and the helicopter was searching the river for other traffic to warn (think fishermen or paddlers).