HOLIDAY DONATION DRIVE - SUPPORT MSW - DO YOUR PART TO KEEP THIS GREAT FORUM GOING! (Only 51 donations so far out of 49,000 members - C'mon guys!)
×


Cathead
-
Posts
3,494 -
Joined
-
Last visited
Content Type
Profiles
Forums
Gallery
Events
Everything posted by Cathead
-
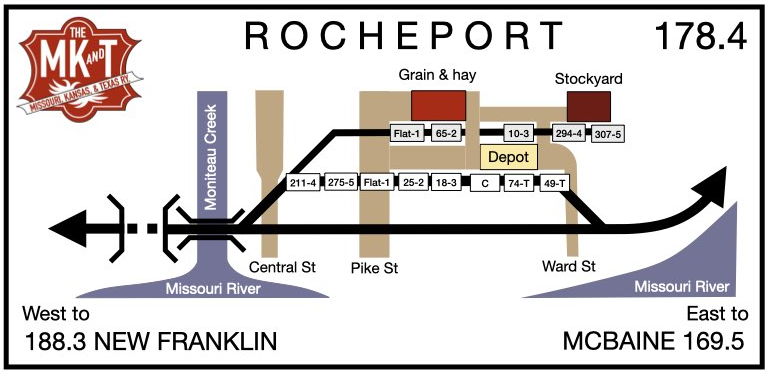
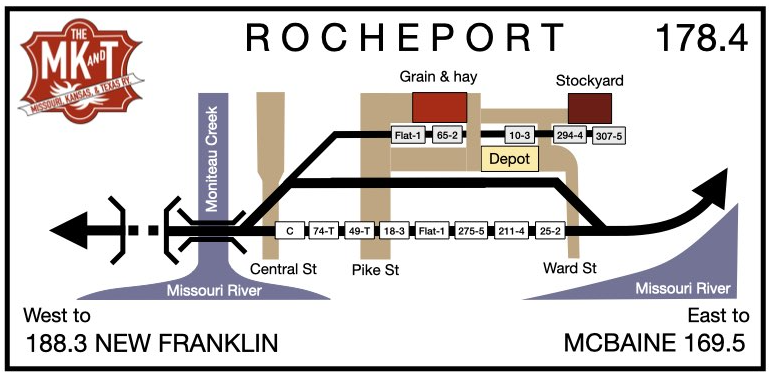
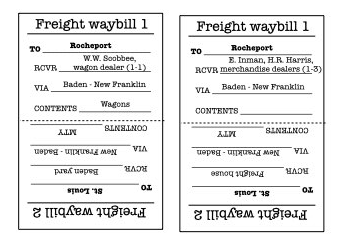
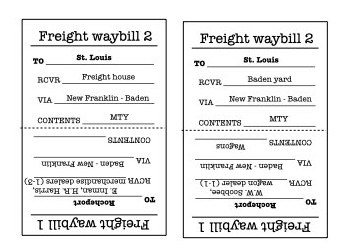
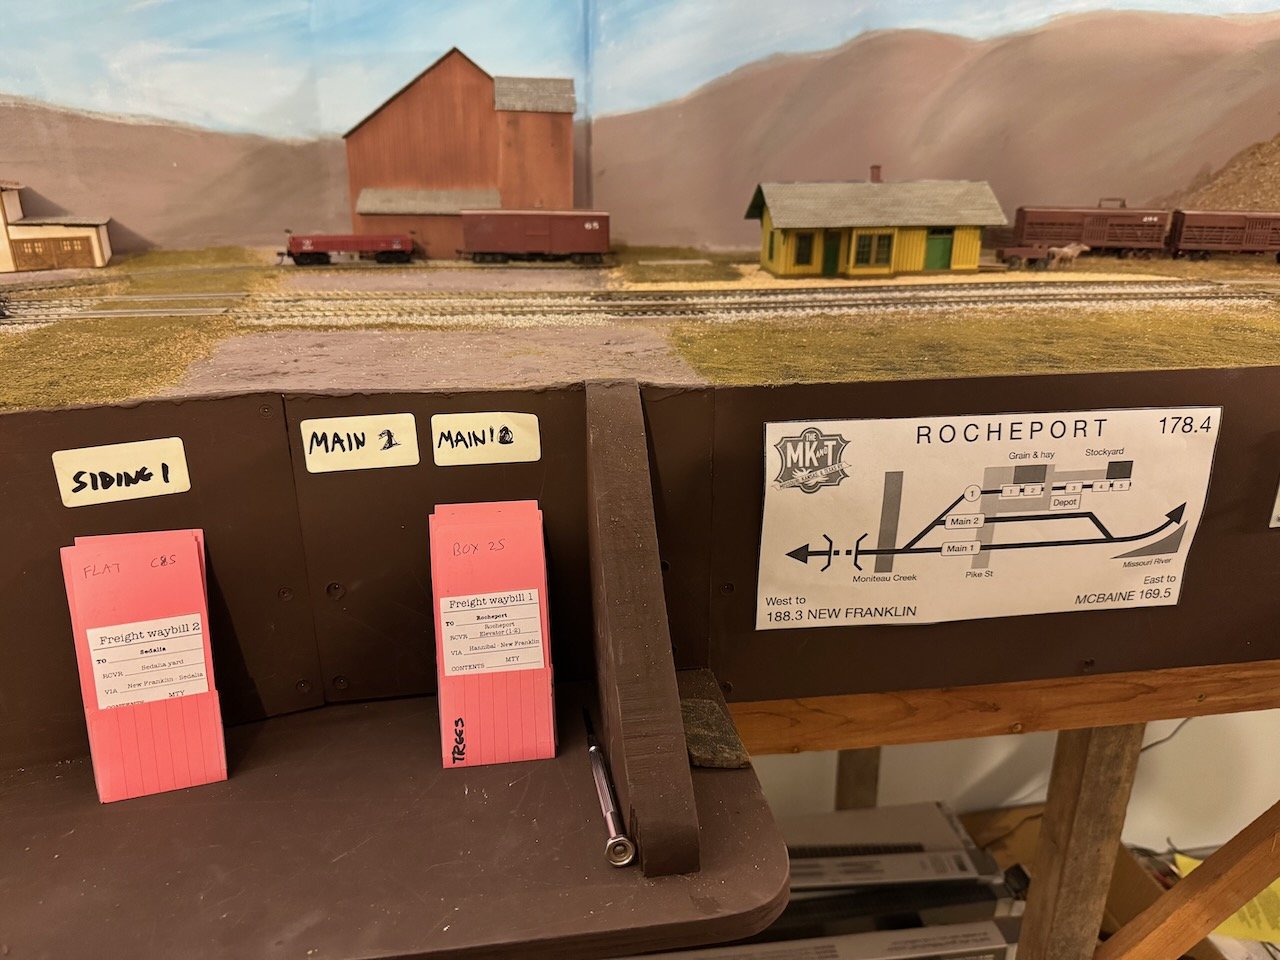
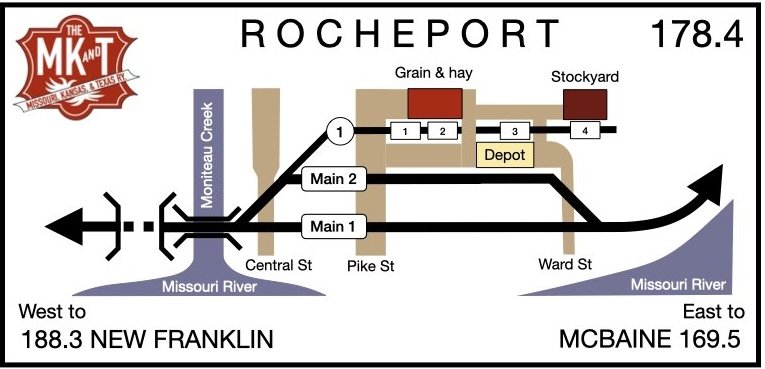
 OK, last week I promised a different explanation of how that operating session worked, so here's a graphical approach. We start with the Rocheport track diagram. There's one siding (1) with five places for freight cars to be set out for loading or unloading. [1] is a team track used for unloading anything from coal to wagons to lumber. [2] serves the grain elevator. [3] is the depot's freight house. [4] and [5] serve the stockyard. How do we know where to set out cars? Here are two examples of waybills. There's one per freight car, and they slide into a pocket on the car card so that you can only see the top half (we'll get to the bottom half later). The first one tells us we have a car headed to Rocheport, on consignment to a wagon dealer named W.W. Scobbee (a real Rocheport dealer at the time). See that "1-1" after the receiver's name? That tells us the car needs to be delivered to Rocheport's siding (1), spot [1], as shown on the diagram above. That's because this dealer doesn't have his own trackside warehouse, just receives individual shipments now and then. So this needs to go to the team track, where this fellow can pick up his new wagon. The second one tells us that this car has shipments for two different general merchandise dealers (again, real Rocheport businesses), and this one goes to spot [3] at the depot, which handles crated items like these (hand tools, canned groceries, clothes, whatever). Both cards also tell us that the cars came from St. Louis' Baden Yard, brought to nearby Franklin yard by a through freight, where they were sorted onto the local freight that brought them to Rocheport for final delivery. So what happens when it's time to pick up these cars? Between operating sessions, we flip the waybills over in their car card pockets. Notice how the first ones had a big 1 in the upper right corner? That tells us this waybill brings the car onto the layout to its destination. When we flip these over, we get a 2, which tells us that now we're in the second part of this car's movement, sending it back off-layout to some other destination. For example, if we'd loaded an empty boxcar with grain at the elevator, it might be destined for a mill in Chicago or St. Louis. In the cards above, both cars delivered a product on their first run, so they're now empty (MTY) and are being sent back. The merchandise boxcar at the depot goes back to an MK&T freight house in St. Louis, and the empty flatcar goes back to a yard in St. Louis until needed for some other job. In both cases, the local freight takes these back to nearby Franklin yard, where an eastbound through freight will pick them up and take them to St. Louis. So each waybill creates a realistic set of shipping/movement directions for each car on the layout, lasting for two operating sessions. Now let's summarize how this worked in practice. Thinking back to the photo essay in an earlier post, here's how we started. The diagram below shows each car with its number and location or destination. Grey cars are being picked up, white ones are arriving on the local freight currently sitting on the main line. So 65-2 is car #65 currently in spot [2], while 25-2 is car #25 that needs to be placed at spot [2]. 74-T and 49-T are through cars going to a different town; here they're just in the way! Notice that the arriving cars are all out of order; sometimes the Franklin Yard operator should deal with that, but today it's our problem. So the first order of business is to re-sort these cars into the proper order for delivery. Right now they're in order 3,1,5,4,2 but we need to end up with 1,2,3,4,5 on the siding. Below, we've taken the caboose and the two through cars and stuck them up on the passing siding as out of the way as we can get them, since we don't need them here. Then our locomotive does various sorting to get these in delivery order on the passing siding. Notice something odd? Why are they in order 4,5,1,2,3? Well, that's another fun operating quirk. Local railroad rules (e.g. mine) say you can't pull past the tunnel when switching here. So there's only room for the locomotive to pull three cars at a time past that left-hand switch just to the right of the bridge. So we placed the 4,5 cars first, so we can pull them past the switch, shove them into the far end of the siding first, then place 1,2,3 behind them. Just another part of the puzzle that makes operating interesting. So now all we have to do is pull all the departing (grey) cars from the siding, in two pulses because of the length limit, and stick them on the main line. Then we're free to deliver 4,5 and then 1,2,3 into the siding. Then we just stick 74, 49, and the caboose back on the end of our outbound cars, and our train is ready to depart for the next town. I hope that made sense. Please ask questions if not. This is a fairly simplistic version of operations; it can be made far more complex if desired. For example, a real railroad would do everything it could to avoid carrying empty cars. So instead of sending empty cars all the way back to St. Louis, it would be looking for a chance to send them somewhere closer to be re-loaded with something else. There are ways to simulate this more complex approach and I might implement those later, but for now this simple approach still makes for interesting railroading. The beauty of this approach is that it's highly flexible and customizable. I can create as many waybills as I want, setting up different car movements for different reasons, and keep swapping them out. I could have a given car need to stay in Rocheport for several days, getting in the way! Not all sites have to have a car picked up or dropped off every day. And I could even swap out one waybill for another between sessions. And all this is for just one town; if the layout expands, the same situation happens in other places, and once you add a larger yard like Franklin, a lot more sorting happens when you're actually dealing with all cars passing over the railroad, not just ones for a little dinky town like this. I realize this may seem esoteric to non-railroad-buffs. But think of it as a combination of historical re-enactment and mental/logic puzzle. Not only do you get to step back in time and experience live railroading in a given era, but you get a really fun mental challenge if you're the puzzle-solving type. My wife, who's a mild railfan, actually really enjoys these little operating sessions because she's a data scientist who gets easily drawn into logical puzzle solving. The railroad experience is just a bonus. Thanks for reading (or skimming?) all that. Soonish I'll have more actual modeling to show, as I'm working on various buildings.
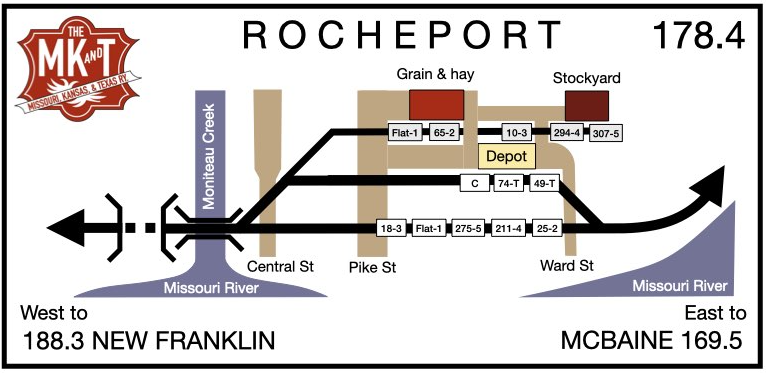


- 230 replies
-
- 11
-

-

-

-
As it turns out, I've worked as an editor for many years and have written freelance for various outlets, so writing this wasn't overly burdensome! It's still a good feeling to contribute to the historical record.
-
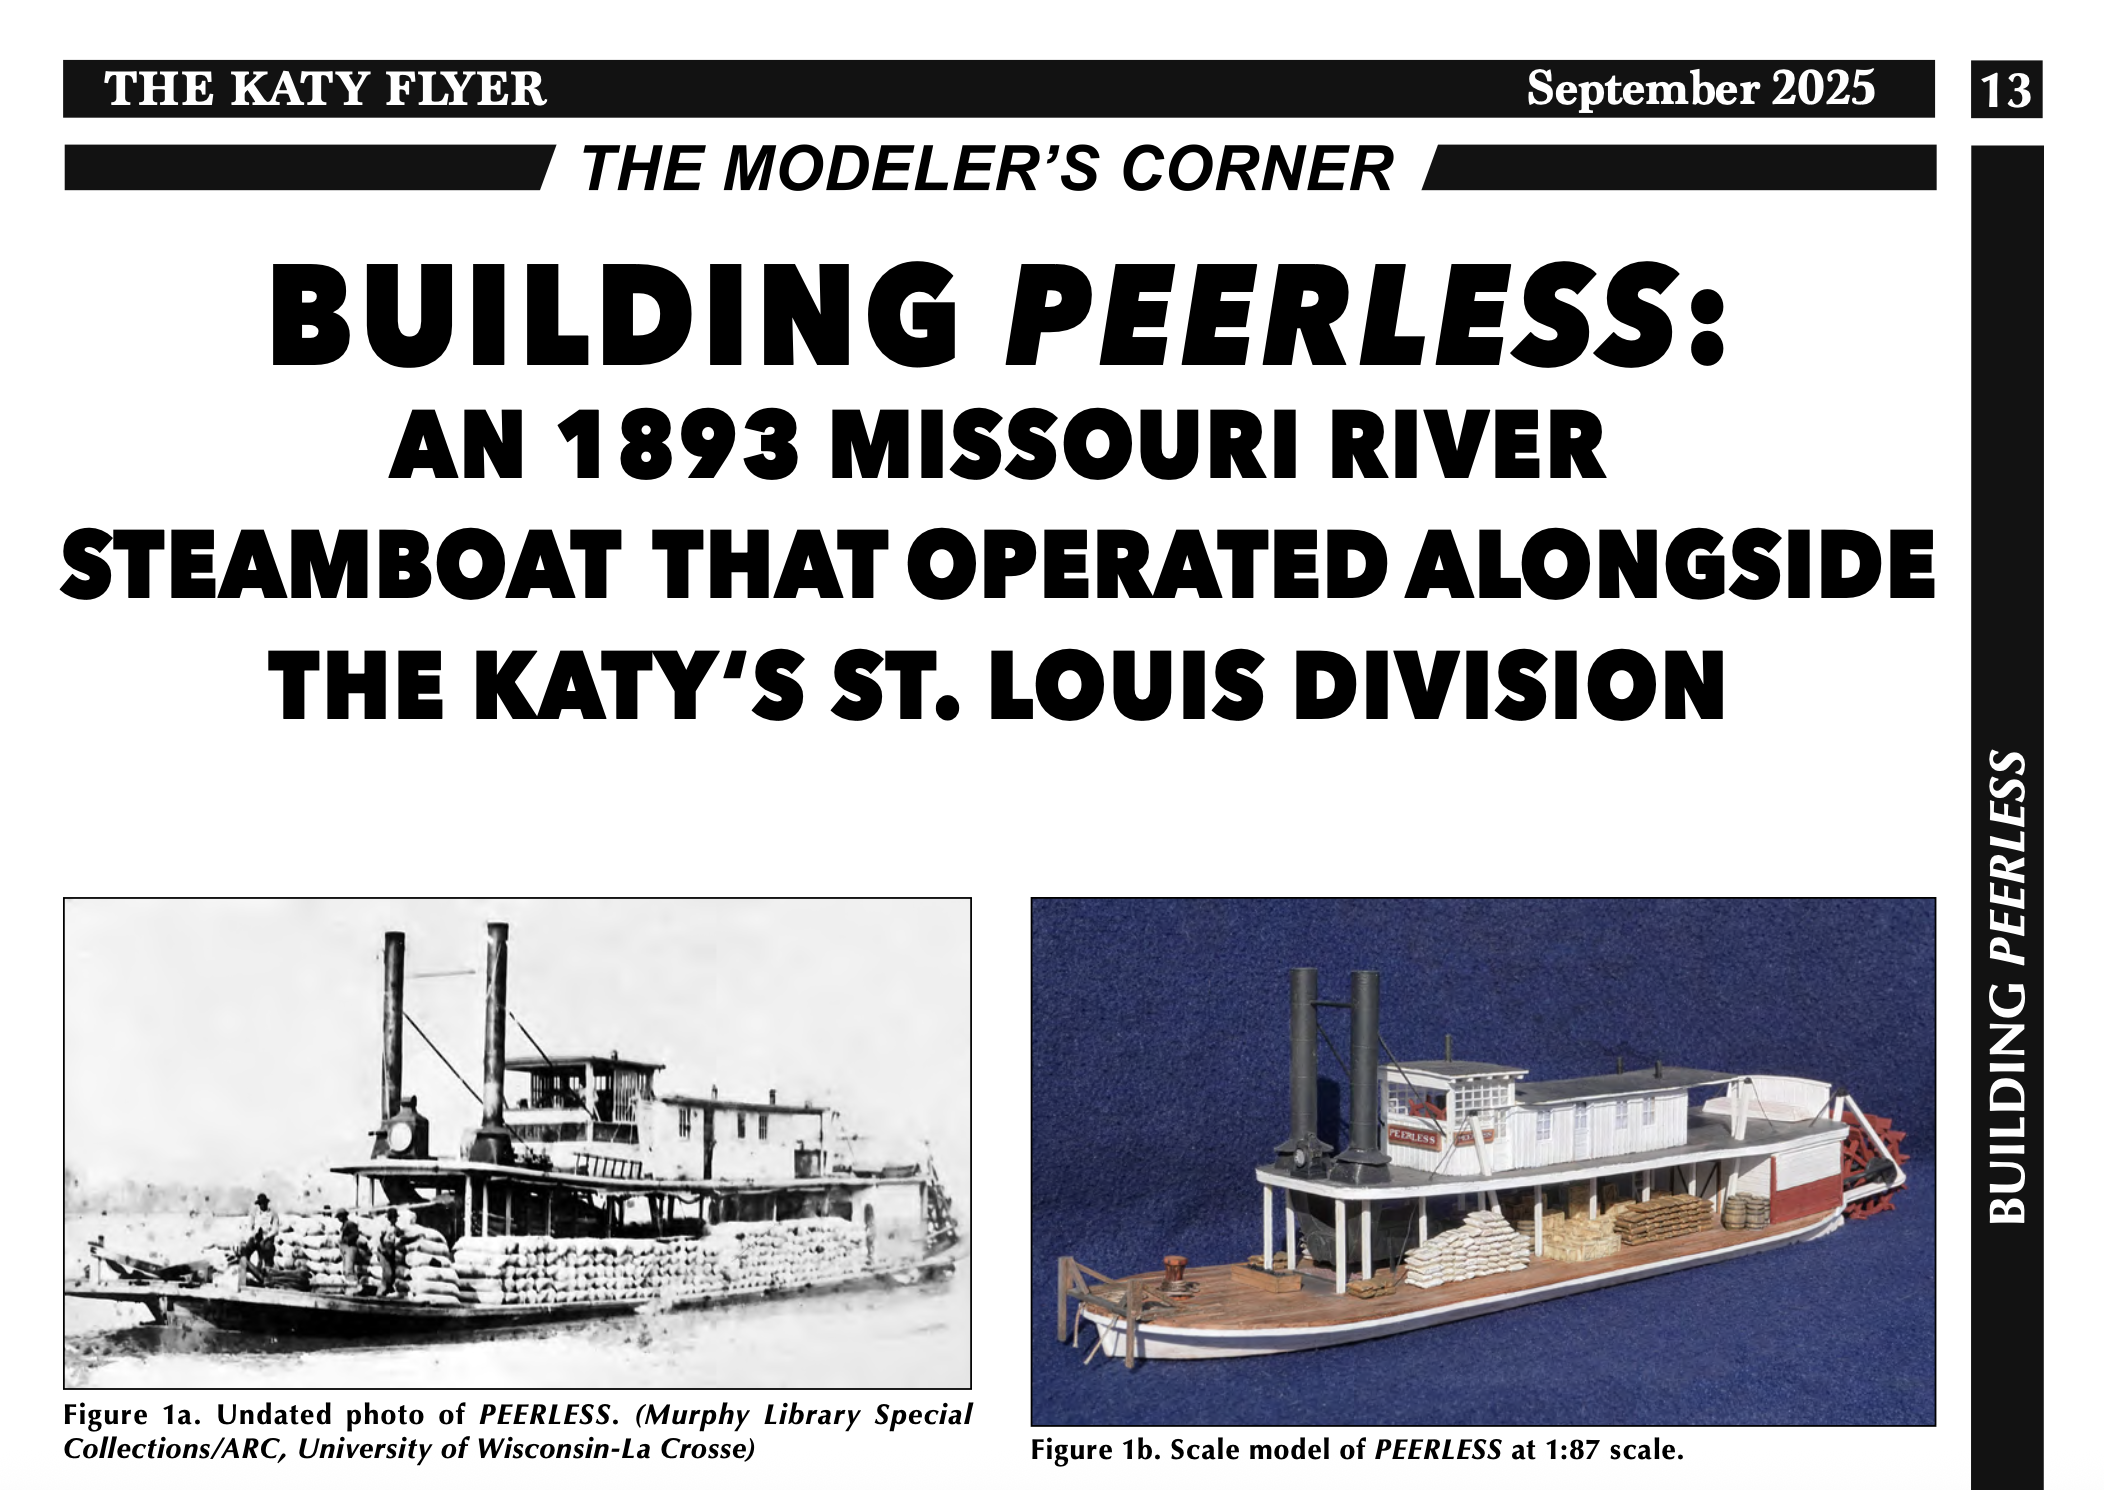
Fun news! I'm a member of the Katy Railroad Historical Society, which publishes a quarterly newsletter covering the railroad's history and various modeling projects related to it. The September 2025 issue publishes an article I wrote about the Peerless modeling project and its connection to the railroad. The newsletter is print-only, but they graciously sent me a PDF copy of the article with permission to distribute to people I know who aren't KRHS members (specifically including MSW members). If you're interested in reading the article, send me a private message through MSW with your email address, and I'll send you the PDF. Here's a screenshot of the first page to whet your appetite. Also cross-posting this on my build log for the Peerless. To send a private message on MSW, click a user's name to go to their profile, then look for the "message" button to the right of their username on the banner of that profile page.

- 230 replies
-
- 10
-
-
-
Fun news! I'm a member of the Katy Railroad Historical Society, which publishes a quarterly newsletter covering the railroad's history and various modeling projects related to it. The September 2025 issue publishes an article I wrote about the Peerless modeling project and its connection to the railroad. The newsletter is print-only, but they graciously sent me a PDF copy of the article with permission to distribute to people I know who aren't KRHS members (specifically including MSW members). If you're interested in reading the article, send me a private message through MSW with your email address, and I'll send you the PDF. Here's a screenshot of the first page to whet your appetite. Also cross-posting this on my build log for the MK&T model railroad layout. To send a private message on MSW, click a user's name to go to their profile, then look for the "message" button to the right of their username on the banner of that profile page.
-
I dunno, man, ol' George seems unimpressed. Maybe you should hold him up so he can get a better look. Seriously, that's awesome. As Paul said, the color really jumped out as perfect to me. And it provides just the right touch of diversity in the overall consistent color palette.
- 457 replies
-
- 6
-
-
-
- sternwheeler
- Hard Coal Navy
- (and 1 more)
-
Keith, thanks and you're welcome! Rik, I think I might draw up a conceptual diagram of the operating session described above, to help people see in map view how things got moved around. Hopefully o over the weekend. It definitely is a very new way of thinking if you're not in this world and I want to at least convey the intellectual challenge and stimulation it creates.
-
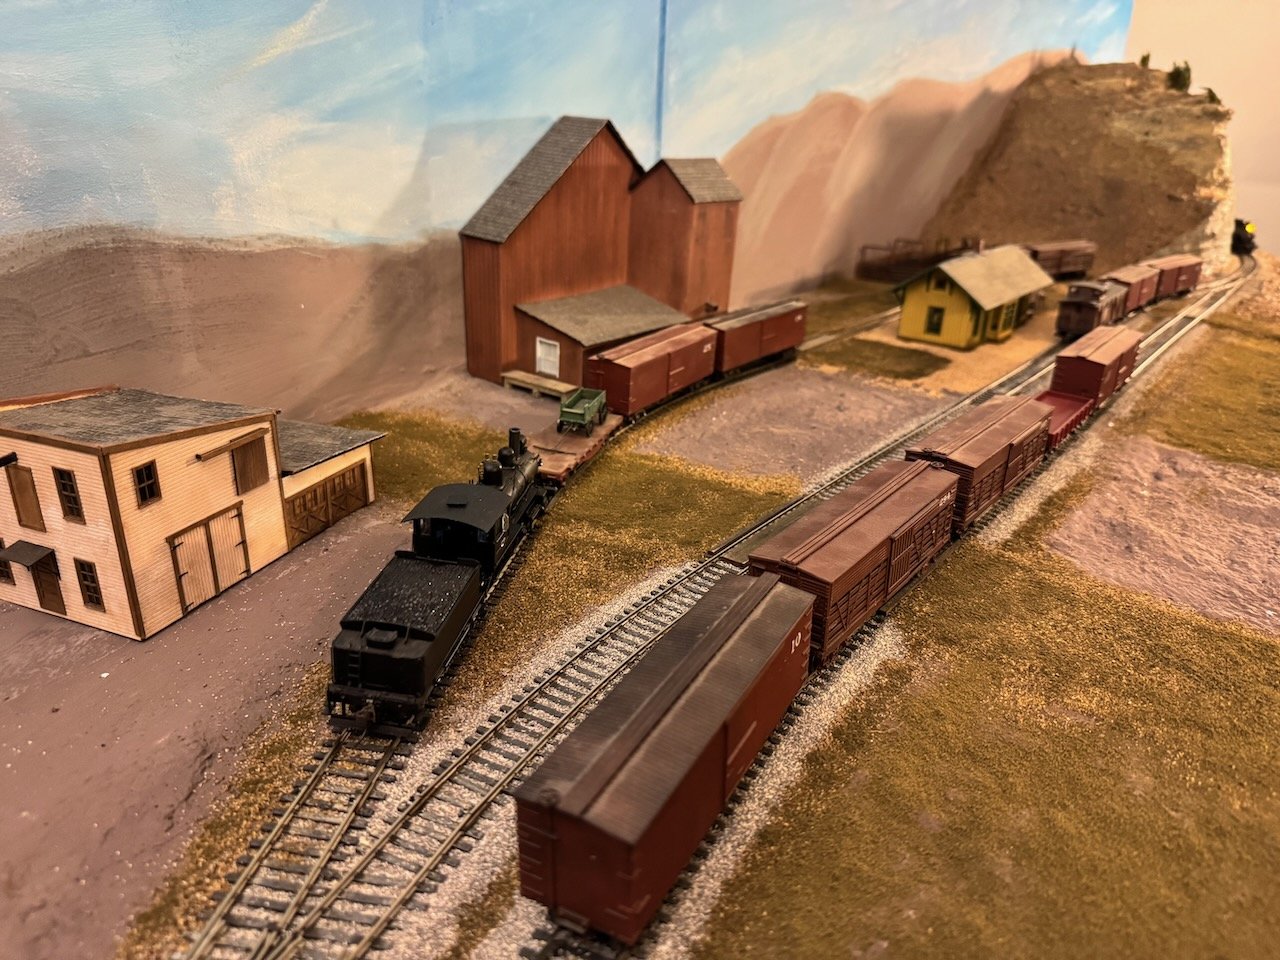
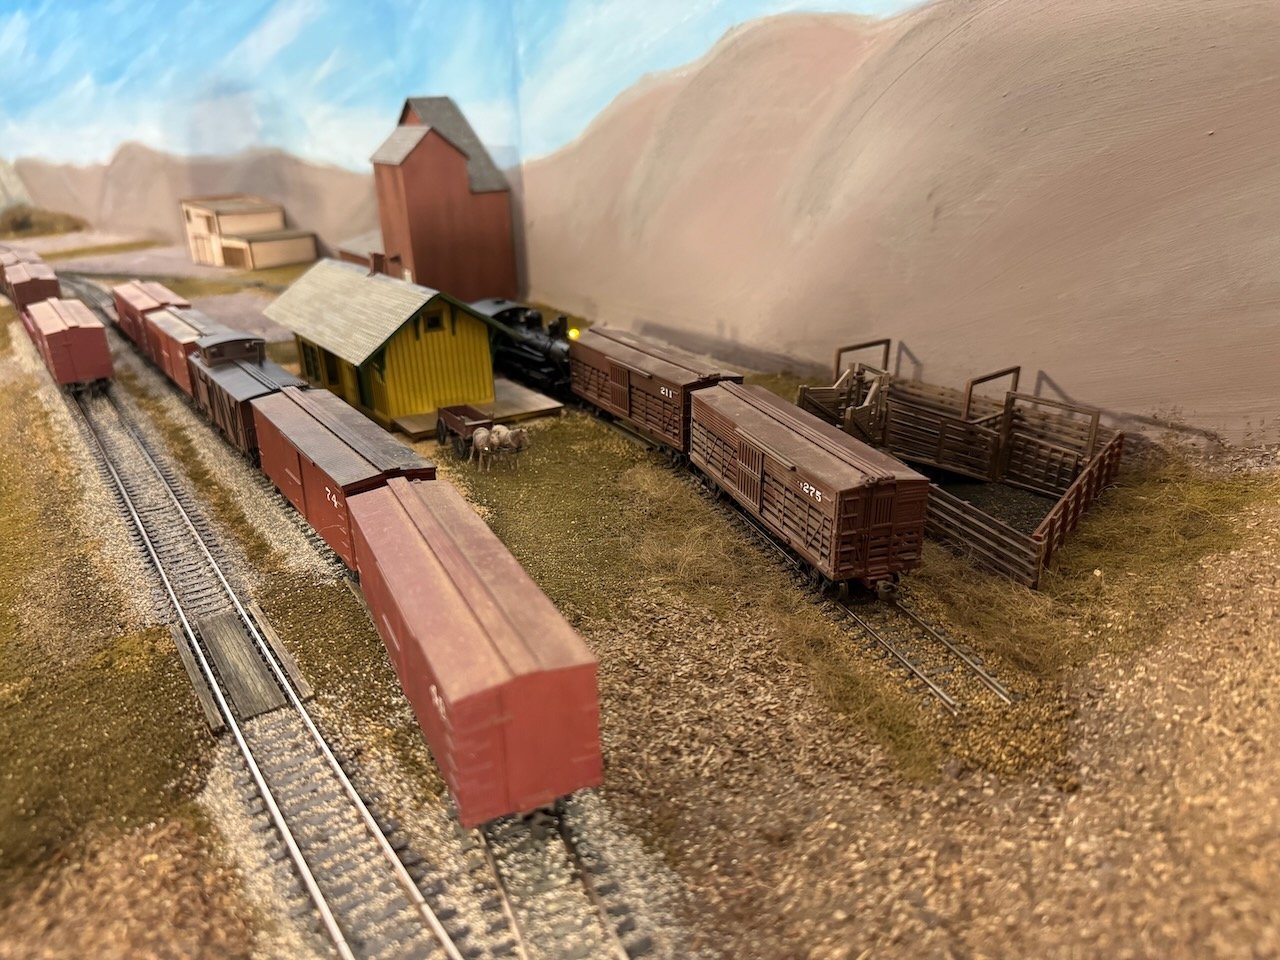
OK, let's get to work. Our locomotive is going to start by sorting all the inbound cars into the right order for shoving into this siding. In some cases this pre-sorting might have been done in the yard to make the road crew's life easier, but that didn't seem to happen today, so they're all jumbled up (more busy work in the real world, more fun work for us). Below, we're using the near end of the siding as an extra place to stash a car while we sort things out. Keeping an eye on our MK&T timetable, we know we have to clear the main line for an express passenger train soon. So everything gets shoved out of the way while this passes through. One change I made from the real Rocheport is to designate the track nearest the depot as the passing siding, and have the main line be the track away from the depot (on the real thing the main line was in front of the depot). The actual reason for this is complicated and has to do with how best to arrange turnouts in this condensed scene, but there is real-world precedent for having a depot on a passing track. In my case, I can argue it makes sense because only slower locals stop at Rocheport so this lets faster expresses barrel right through on the outside track. Once all the inbound cars were sorted, we pulled all the outbound cars and started spotting inbound cars. Here the locomotive is shoving two empty stock cars toward the stockyards. Cars 74 and 49 in the foreground are going to a different town than Rocheport, so will just be left out of the way with the caboose until we're done. And another angle on that move, shoving the stock cars into the siding. And the final placement. With those cars shoved into the far end of the siding, we can place the other three cars at the western end. Here the locomotive is shoving in a boxcar of small freight for the depot, an empty boxcar for the grain elevator, and a flatcar with a new wagon for one of the local implement dealers. You may recall from an earlier post that all the businesses listed on my waybills are real ones found in the railroad's business directory, adding to the sense of realism. With all the inbound cars spotted, it's time to reassemble our train. Five outbound cars and two more to take to another town before returning west to Franklin. Let's grab that caboose and those two cars and stick them back on the end of our newly pulled five cars. Tacking the caboose and two final cars onto the rest. Our train is reassembled, but we can't leave yet, as there's a local passenger train due. We were smart enough to reassemble our train on the main this time, so the local can pull into the passing siding in front of the depot. Another view of this meet, with the short local at the depot and the longer freight ready to depart eastbound. Our freight heads east along the river bluffs... and our passenger local heads west toward Franklin. And that's what a simple one-town operating session looks like. The intellectual puzzle of sorting and spotting cars is quite fun, and it can be kept fresh time after time by simply altering the waybills for each card. Maybe next time there's a boxcar of apples to ship out instead of a wagon-loaded flatcar arriving. Maybe there aren't any livestock shipments. Maybe a boxcar has to stay at the elevator, meaning we have to move it out of the way, do our work, then put it back. So many iterations even in a small town. As the layout expands, operations get even more complex. As towns are added, trains have more places to actually go, and more work to do in those places. It gets more practical to run passenger and freight trains through, actually going places instead of just moving back and forth on a glorified diorama. Add in the larger yard at Franklin and suddenly you have a whole separate job dealing with all the long-distance freights as they stop to drop off and pick up local-destination cars. And so on. Long-term the full layout I have planned will keep 4-6 people happily busy for several hours. As it is, Mrs. Cathead and I (or any other friend) can run a fun little operating session in half an hour or so, a quick break from life to travel back in time to 1900, when steam whistles still echoed off the bluffs here. I hope you followed along on all that, and that it gave you a sense of what makes model railroading distinct from many other hobbies. Feel free to ask further questions, whether you're a model railroader with specific curiosity about something esoteric, or someone who wonders something more general about all this. Thanks so much for reading! There's still a lot of scenery and building to do, but this project is now at the actively fun stage.


- 230 replies
-
- 13
-
-
-
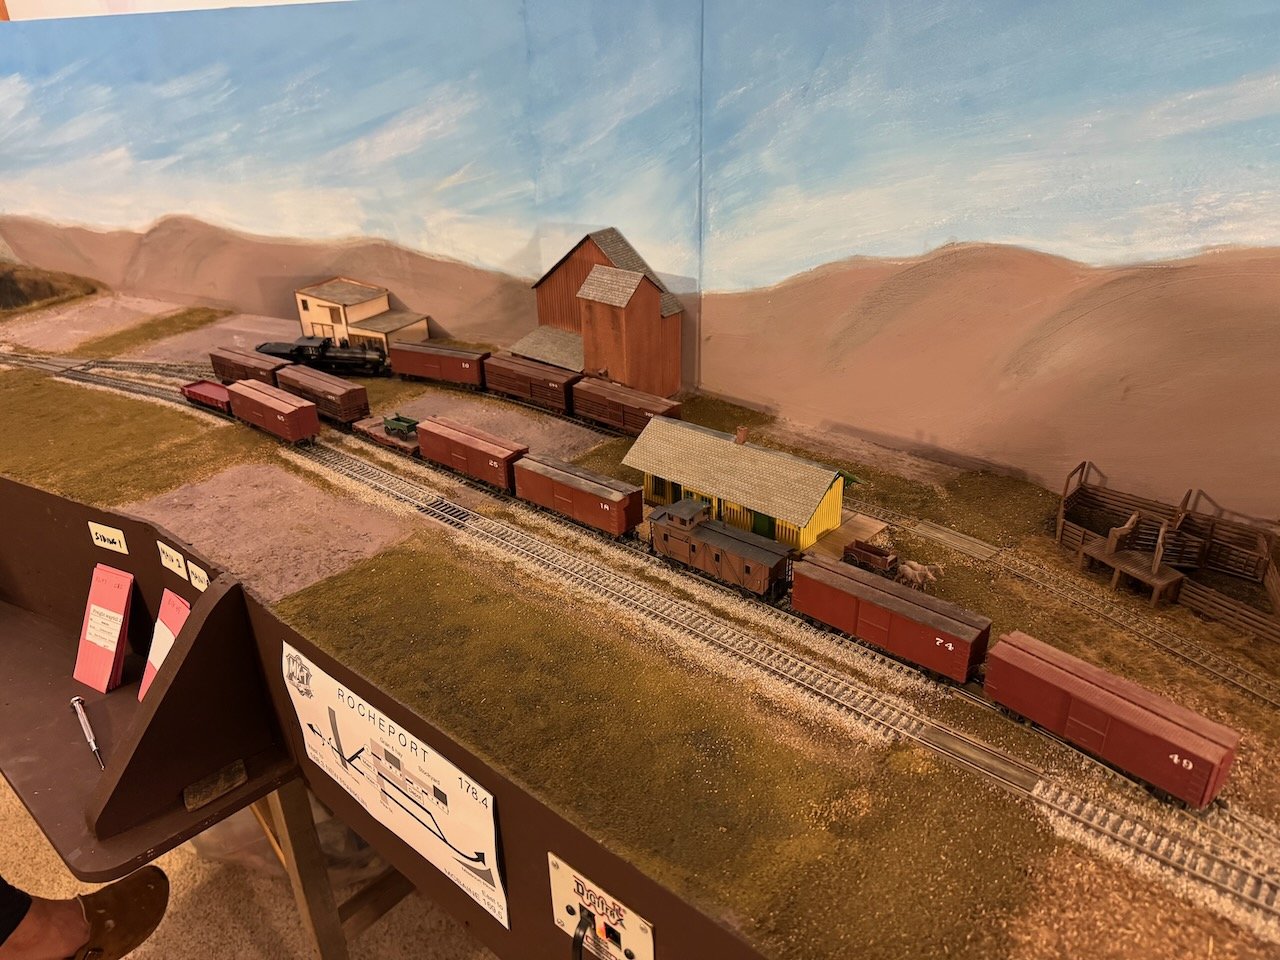
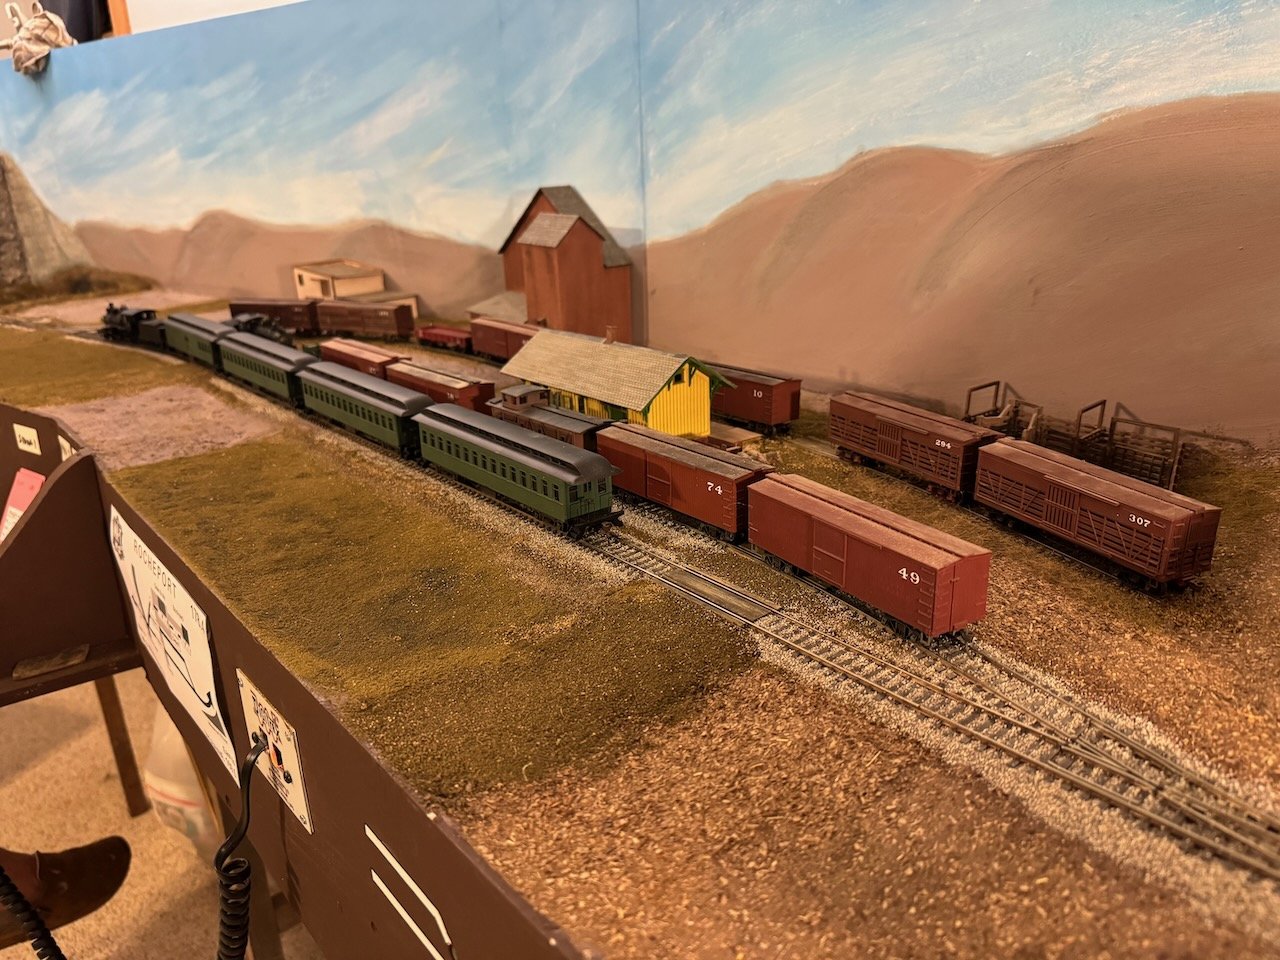
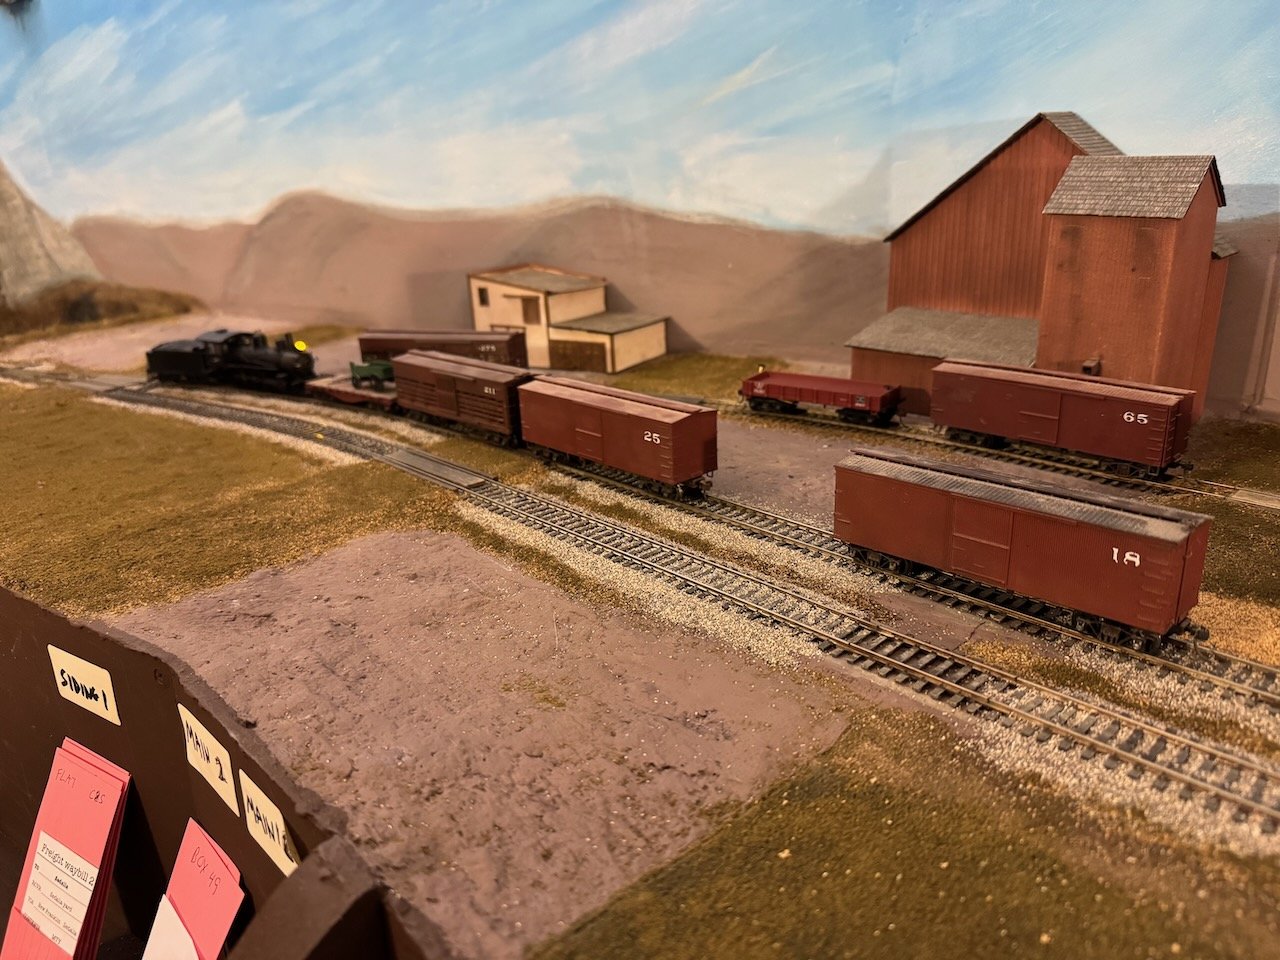
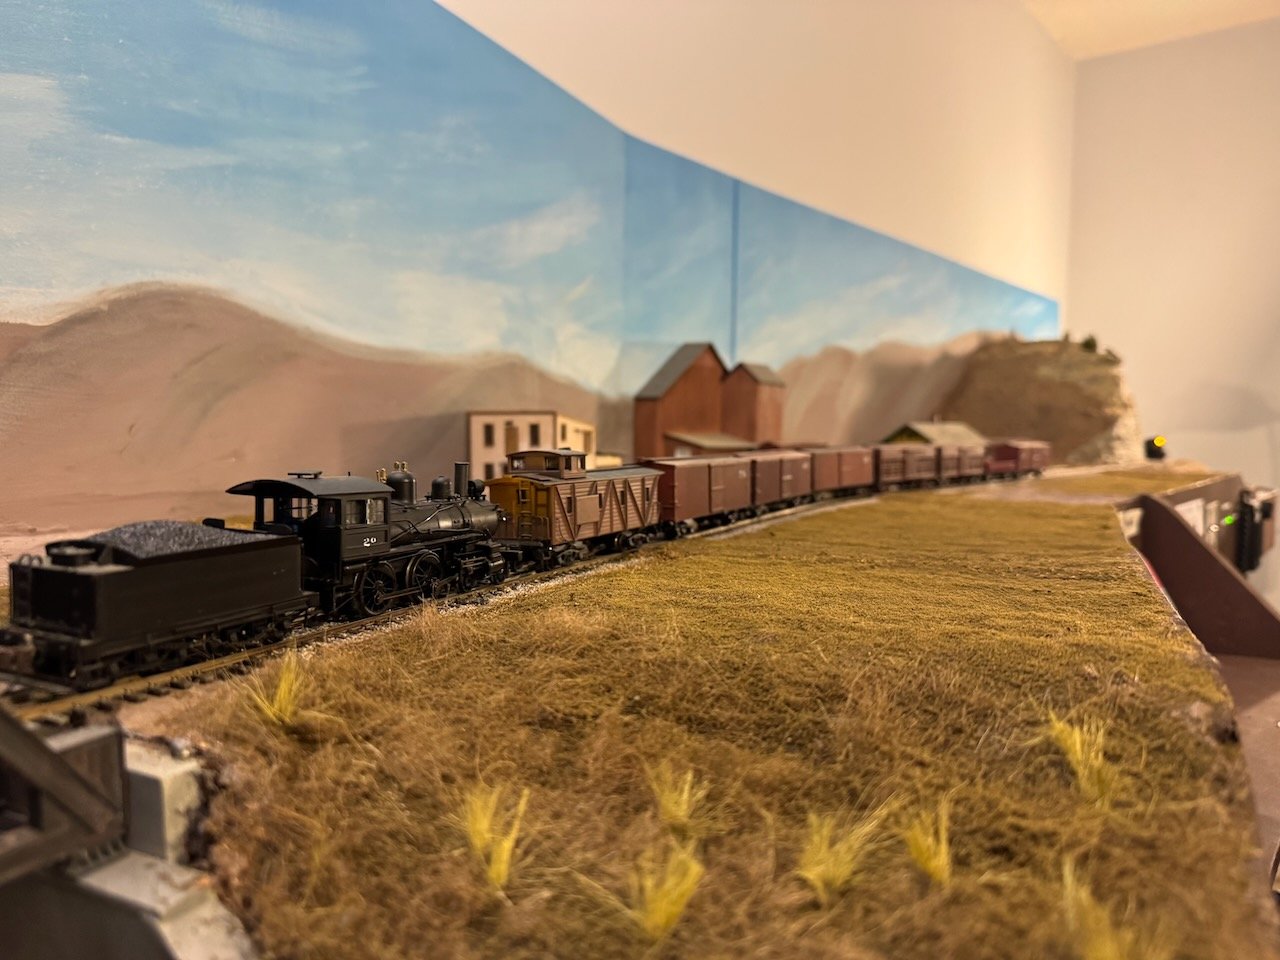
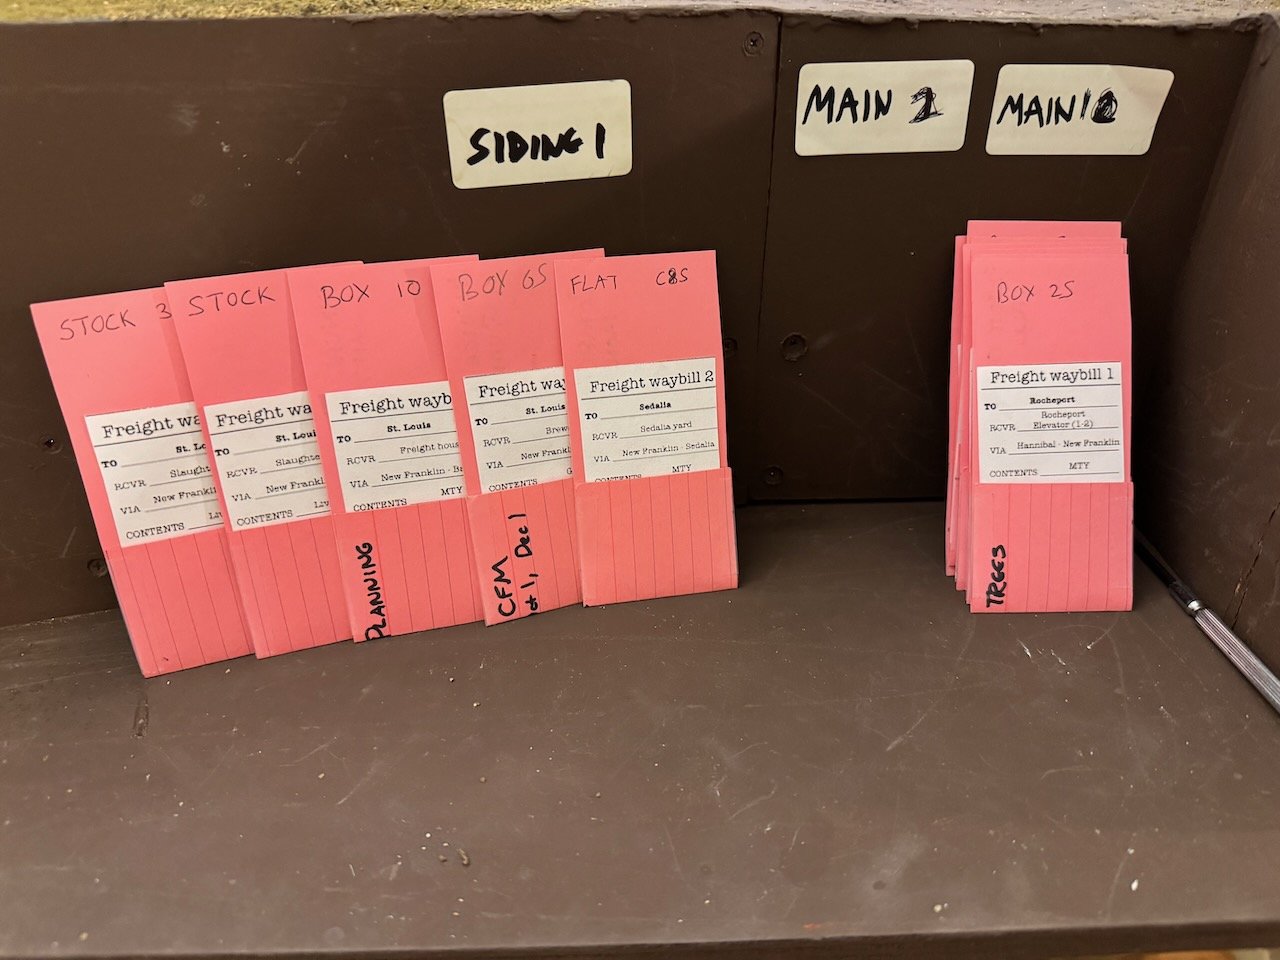
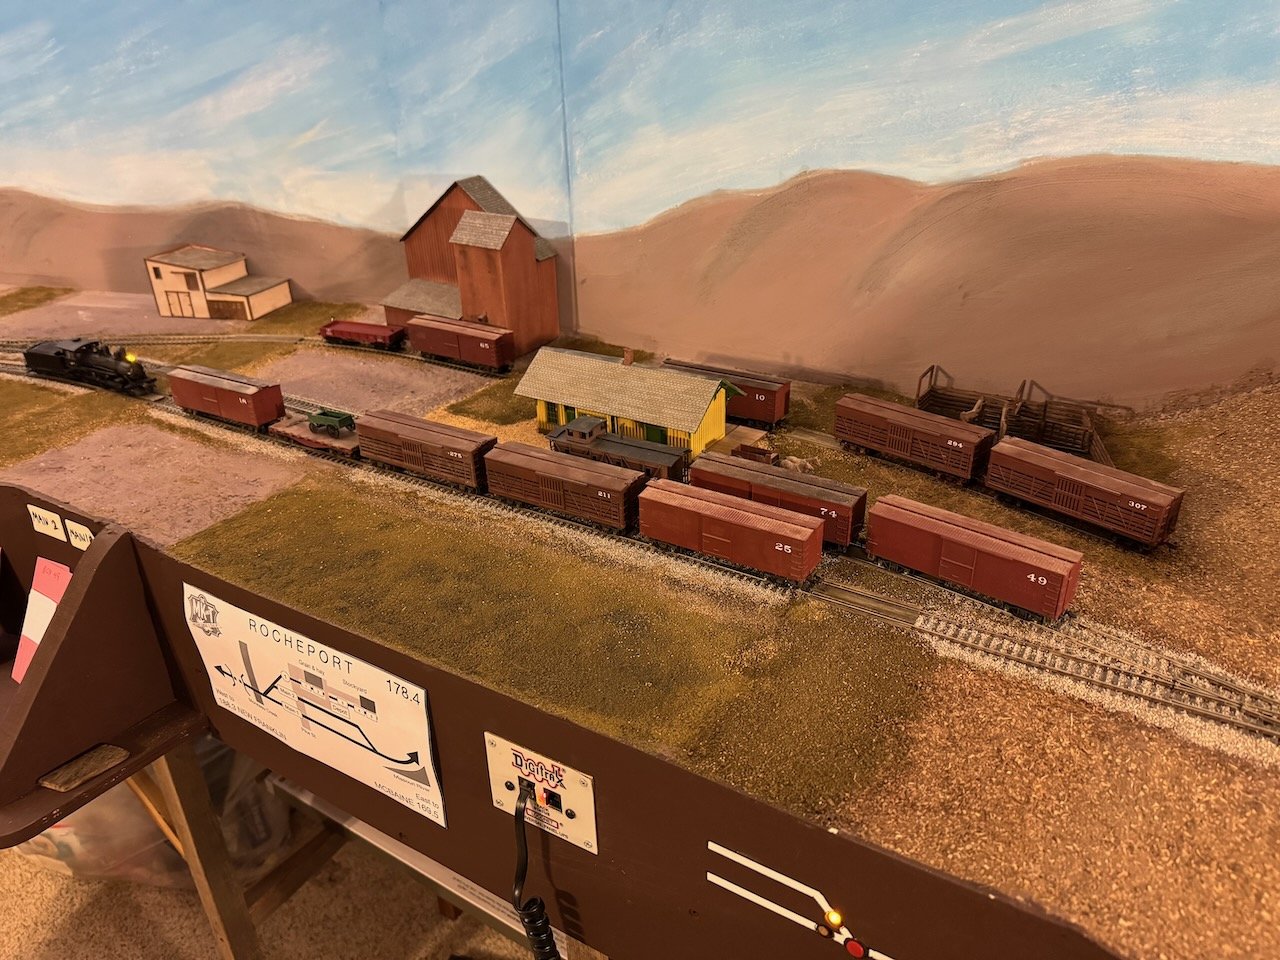
OK, so things have progressed enough that over the last month or so I've run a few test operating sessions in Rocheport. I put a lot of thought into designing the track plan and the operating scheme for this layout, and the early results are that it's paid off as things are really working as I want them to. I could go really deep into the weeds of all sorts of planning details but that's not of primary interest to most of you right now. What I'm going to do here is an illustrated walk-through of a single local freight coming into Rocheport, doing all the switching necessary, and then heading on. This is the basic concept of an operating session, bringing an actual train into town and doing real railroad work in a way that's reasonably similar to how a real railroad would do it. I can't post video so you'll have to make do with the images below, which I took in sequence while Mrs. Cathead and I ran this session together. You'll have to imagine the sound-equipped locomotives as they huff and puff and whistle their way through the work. Also, keep in mind that scenery is nowhere near done and I have a lot of buildings left to complete, so town looks rather emptier than it should. Leading off, an eastbound seven-car local freight arrives through through the tunnel from the yard at Franklin, where its cars were previously dropped off by through freights that don't bother stopping at dinky little towns like Rocheport: Already in town are five cars waiting to be picked up: an empty gondola that had delivered coal to a local dealer, a boxcar loaded with grain from the elevator, a boxcar behind the depot that both dropped off and picked up small shipments (the UPS truck of the 1900s), and two stock cars loaded with livestock from local farms and ready to be sent to processors in St. Louis: Our locomotive starts to break down its train and sort cars for delivery. It's easy to just pick up all the outbound cars and take them back to the yard, but how do we know where each inbound car goes? The answer in this scheme is the car card and waybill system, very common in model railroading. What's presented here is a rough version I mocked up for testing purposes; I'll make better ones later when I'm satisfied. The pink slips are car cards, each of which represents a physical car on the layout. The waybills are little printed slips of paper that slide into a pocket on the car card, with information on where the car originated, what it's carrying, and where it needs to go. Back in Franklin, the yard engine would have switched all these cars onto the same track based on their final destination printed on these cards, and here in Rocheport, other printed lines tell us which cars are destined for Rocheport (vs other towns down the line) and which exact destination they go to. I also drew up a railroad schematic for Rocheport, which shows operators where each track is, what its official name/number is, where different car destinations are, and other relevant geographic features. Using the waybills and this map, you can figure out where any car is or where it needs to go. The numbers in the corners are the actual railroad mileposts. If you go back a few photos, you'll see this hanging on the fascia where it's easy for operators to consult. There's a little shelf hung from the fascia right in the center of town, where operators can sort and read the car cards and waybills as they do their work. This "desk" is a key featuring in making operations functional. Here you can see how it's laid out. Right now each track just has a cheap label, in front of which the car cards are stacked based on which track the cars are on. Soon those will be converted into little sorting boxes that will better hold the cards separate. With that explanation out of the way, we'll follow our freight as it switches this surprisingly complex little town. But I'll do that in the next post.

- 230 replies
-
- 12
-
-
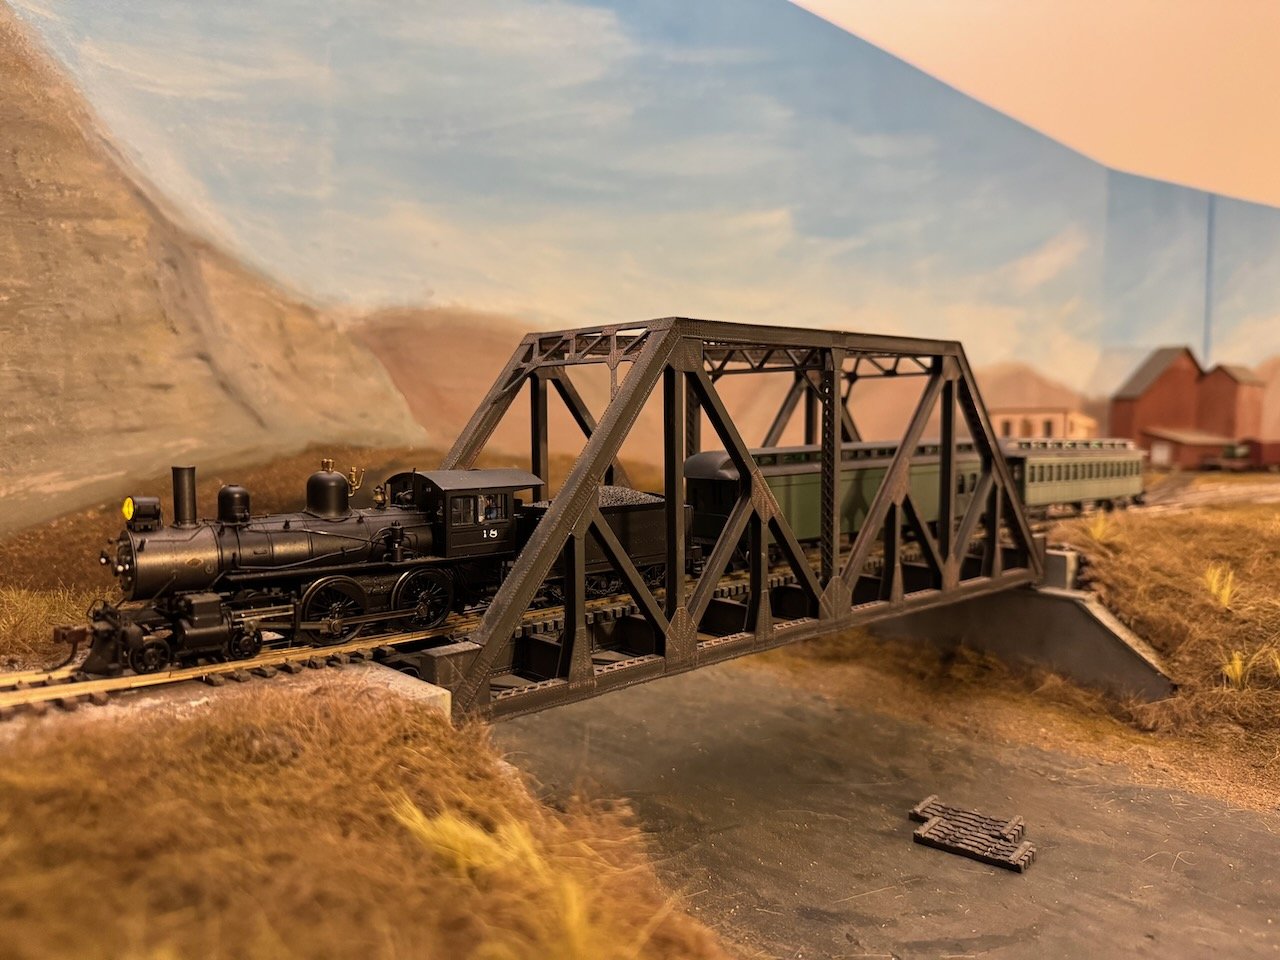
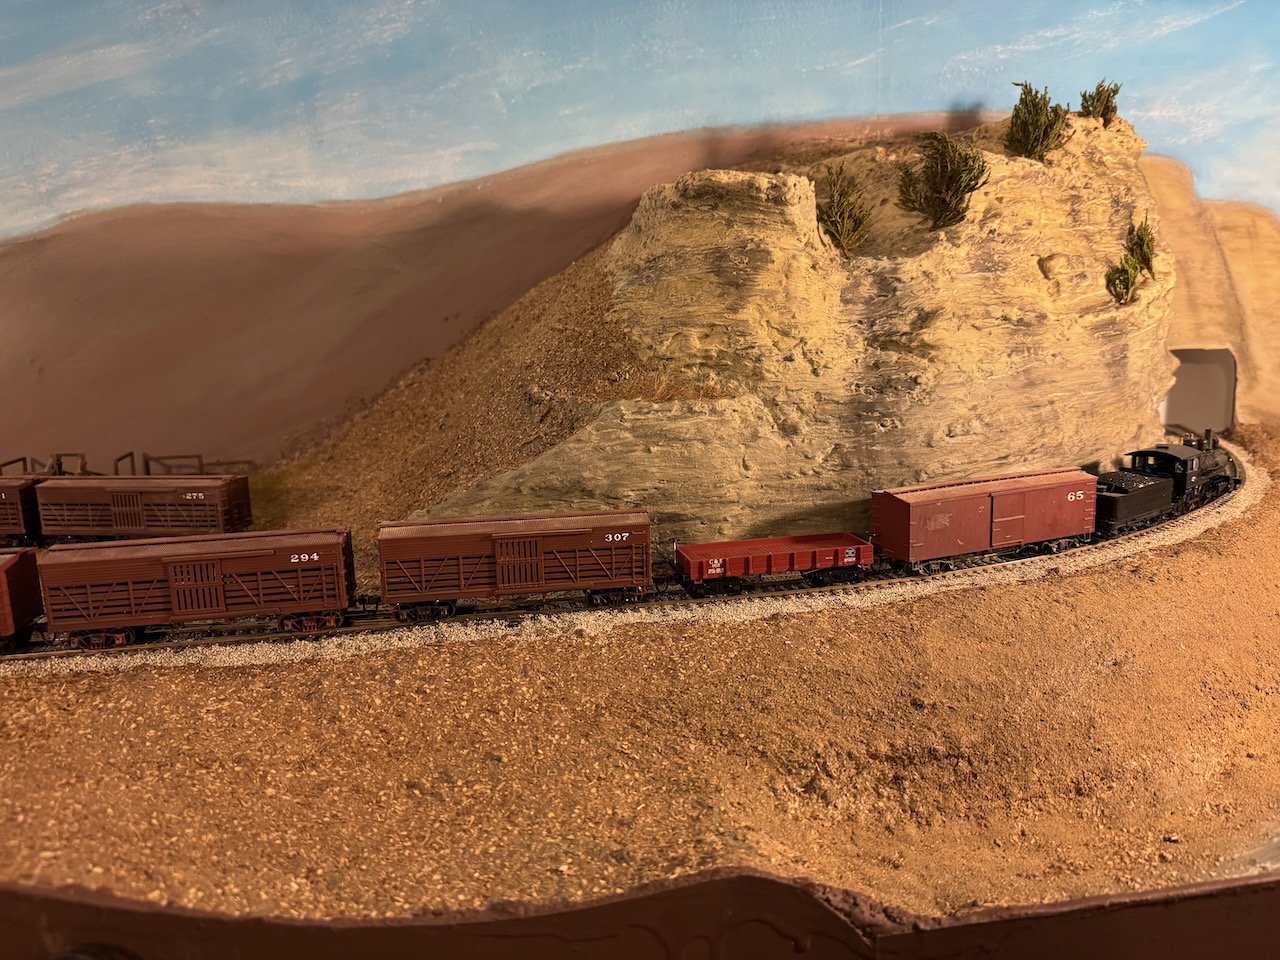
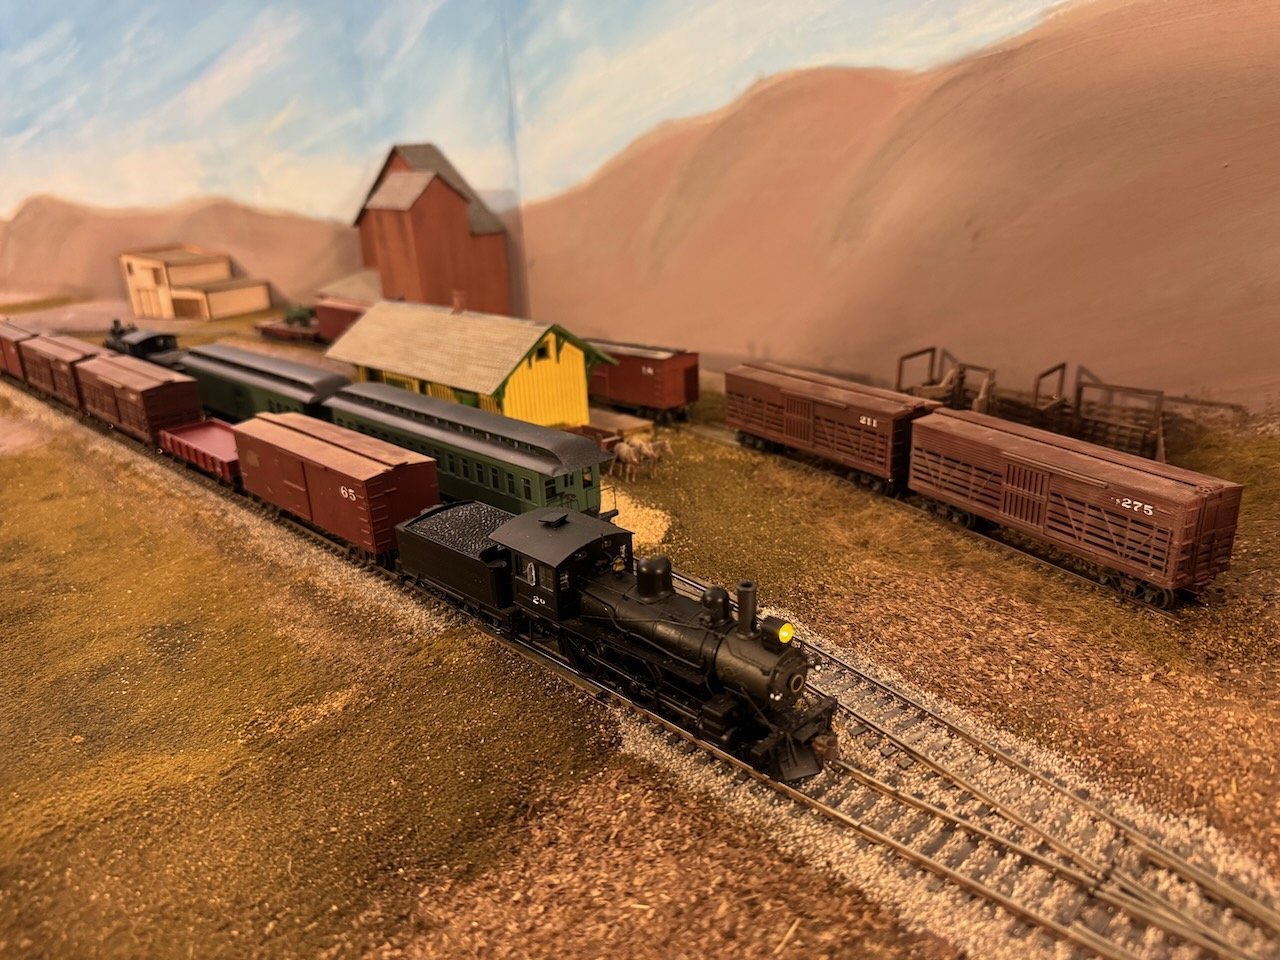
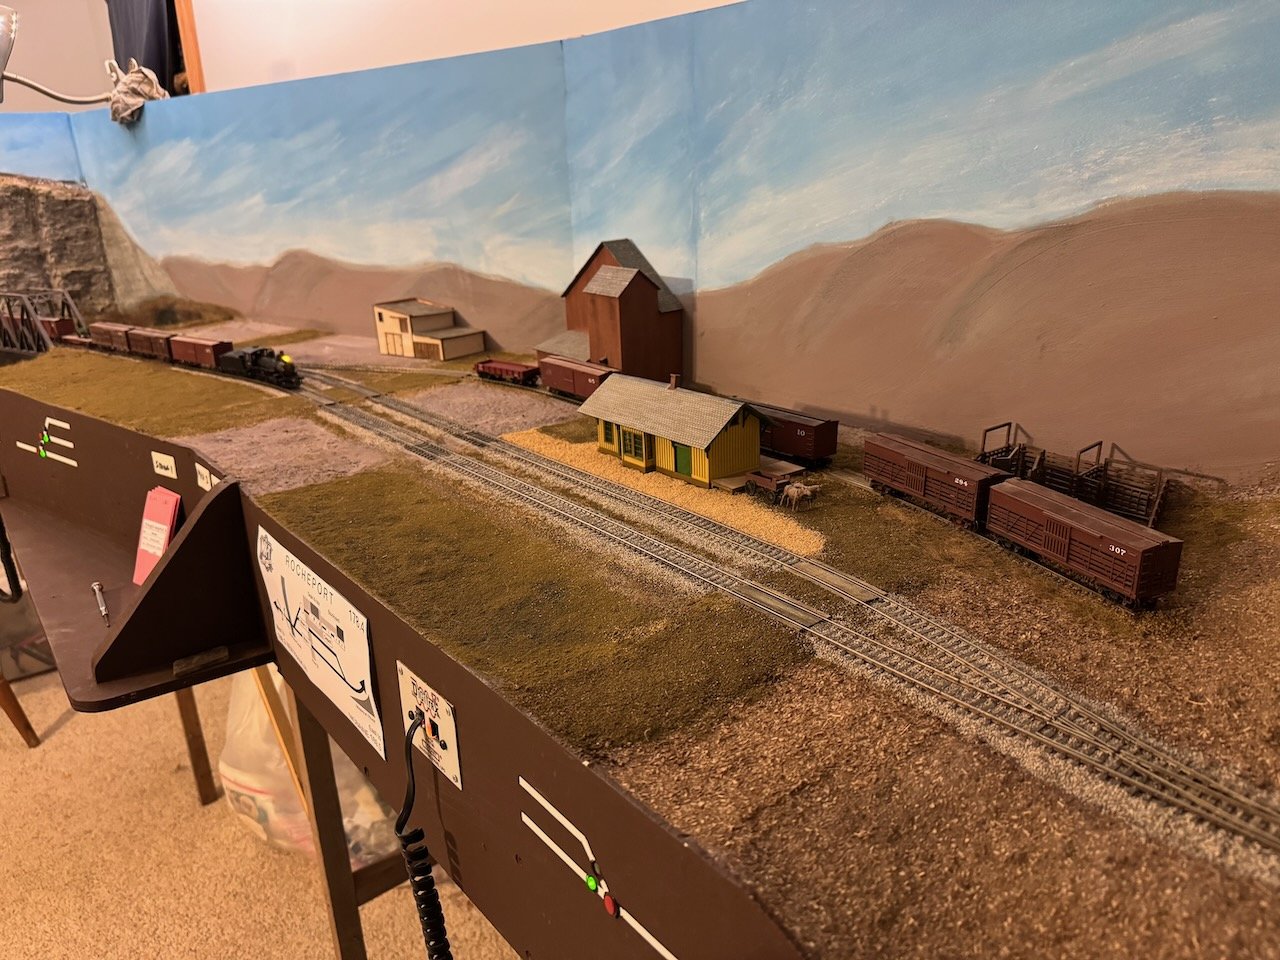
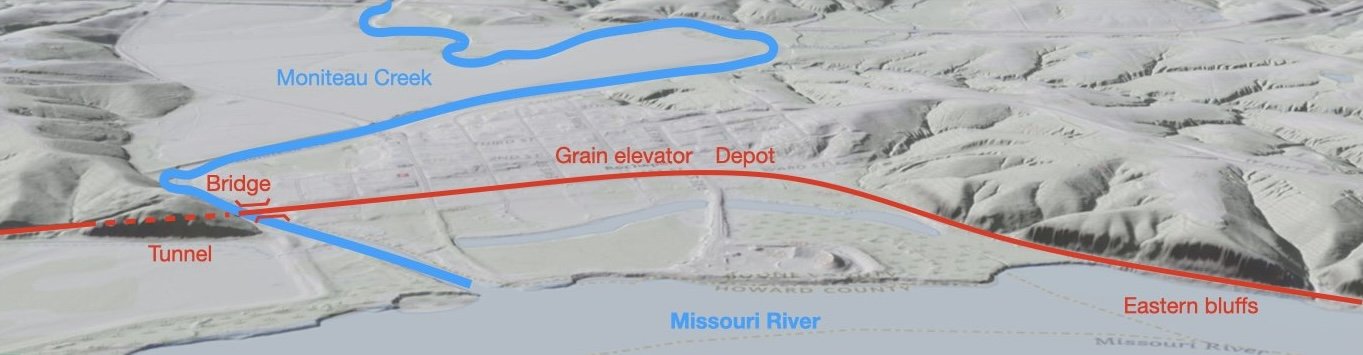
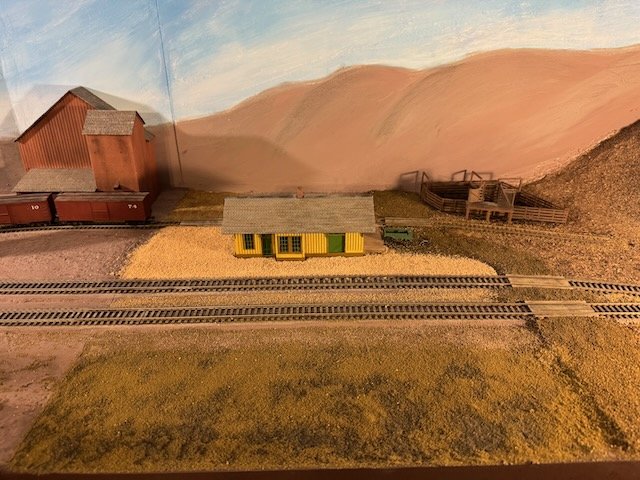
OK, this is going to be a long post (or maybe series of posts). It's finally time to talk about what makes this project something other than just a big scenic diorama: active railroad operations. The trick here is to make this interest for the model railroad folks, and intelligible to the non-railroad folks, without boring or overwhelming either population. Here goes. A core idea in model railroading is not just that you're creating a realistic static scene or model, but in addition, setting up a stage on which actual railroad operations can be conducted. In other words, you're not just recreating a look or an object, but recreating a full set of actions and operations that bring the feel of railroading back to life. There are decades of writing, theory, discussion, practice, debate, and experience in this realm and I'm not going to conduct a seminar here. But I do want to try and express how this idea and goal plays out in the design and implementation of this Rocheport module, and by extent to the rest of the planned layout if it expands. First, a reminder that Rocheport was a real place along the 1900-era MK&T. I'm reposting this image from earlier in the log, showing the route of the mainline. Coming from the west, it passes through the line's only tunnel, crosses the Moniteau Creek bridge, runs through town, encounters the depot and grain elevator toward the east end of town, then curves out of town to the east along some major bluffs hard up against the big river. What we're doing is recreating a version of how the MK&T might have operated its trains through and in this town. A reminder that the railroad's primary yard in this region was 10 miles west at Franklin, and a series of smaller towns with minor industries/customers stretched east from here along the river. And here's a contemporary view from the east side of town, showing the dual-track passing siding in front of the depot, and the single spur track behind the depot that serves all the town's possible freight customers, from the grain elevator to the depot itself to the stockyards to any other customer that might want a carload of something delivered or picked up (such as an apple shipper). MK&T traffic through town in this era would have consisted of (1) three passengers trains each way (some stopping, others expresses that didn't stop), (2) a certain number of through freights between St. Louis and points west and south (these also wouldn't have stopped), (3) livestock trains hauling local cattle and hogs to slaughterhouses in St. Louis, and (4) a local freight operating out of the yard in Franklin (10 miles west) whose job it is to switch small towns along the line like Rocheport. In a larger layout, I'd be focusing on recreating all this traffic when it really has somewhere to go (and the Franklin yard to interact with). Right now, with just Rocheport, the focus is on the single local freight arriving in town to pick up and drop off cars, then proceed on its way, while staying out of the way of any other passenger trains or through freights that might be scheduled to pass through while it's here. Yeah, that's long enough, this is going to be multiple posts. This one sets the stage, and in the next one I'll try and show what actually operating the town looks like.

- 230 replies
-
- 10
-
-
Welcome to a thoroughly enjoyable scale to work in!
- 457 replies
-
- 3
-
-
-
- sternwheeler
- Hard Coal Navy
- (and 1 more)
-
Worst Planking Job Ever
Cathead replied to rhephner's topic in Building, Framing, Planking and plating a ships hull and deck
Yes, much better. Well done on taking the time to learn how to tackle this difficult skill. -
As a geologist, I'm always excited to see someone take an interest in the Beagle. Hope you have fun with this one! Greg's advice has been good so far. One thing I'd add, is that while planking with thin veneer can be easier because the thin pieces bend more easily, it's also less forgiving, because you can't fill and sand mistakes as easily. Since it seems that you're still working on learning how to plank tightly curving areas (we all had to learn this at some point!), there's an argument to step back before you try the final layer and do some more practice planking runs. This is why some folks advise re-doing the first layer for results like yours, because it helps you learn to do it "right" before diving into the display layer. You could consider getting the NRG's hull-planking tutorial kit, or you could simply mock up a version of Beagle's bow by cutting out rough hull forms to match the bulkheads from the kit and setting up a "fake" Beagle bow to practice a few strakes on.
-
So it looks like I screwed up that last post. There was supposed to be a historic photo in there, and that last photo wasn't supposed to be there. Please go reread it now so you can actually see the old photo that shows the lighter-colored ground cover around the depot, the small fields across the tracks, and so on.
-
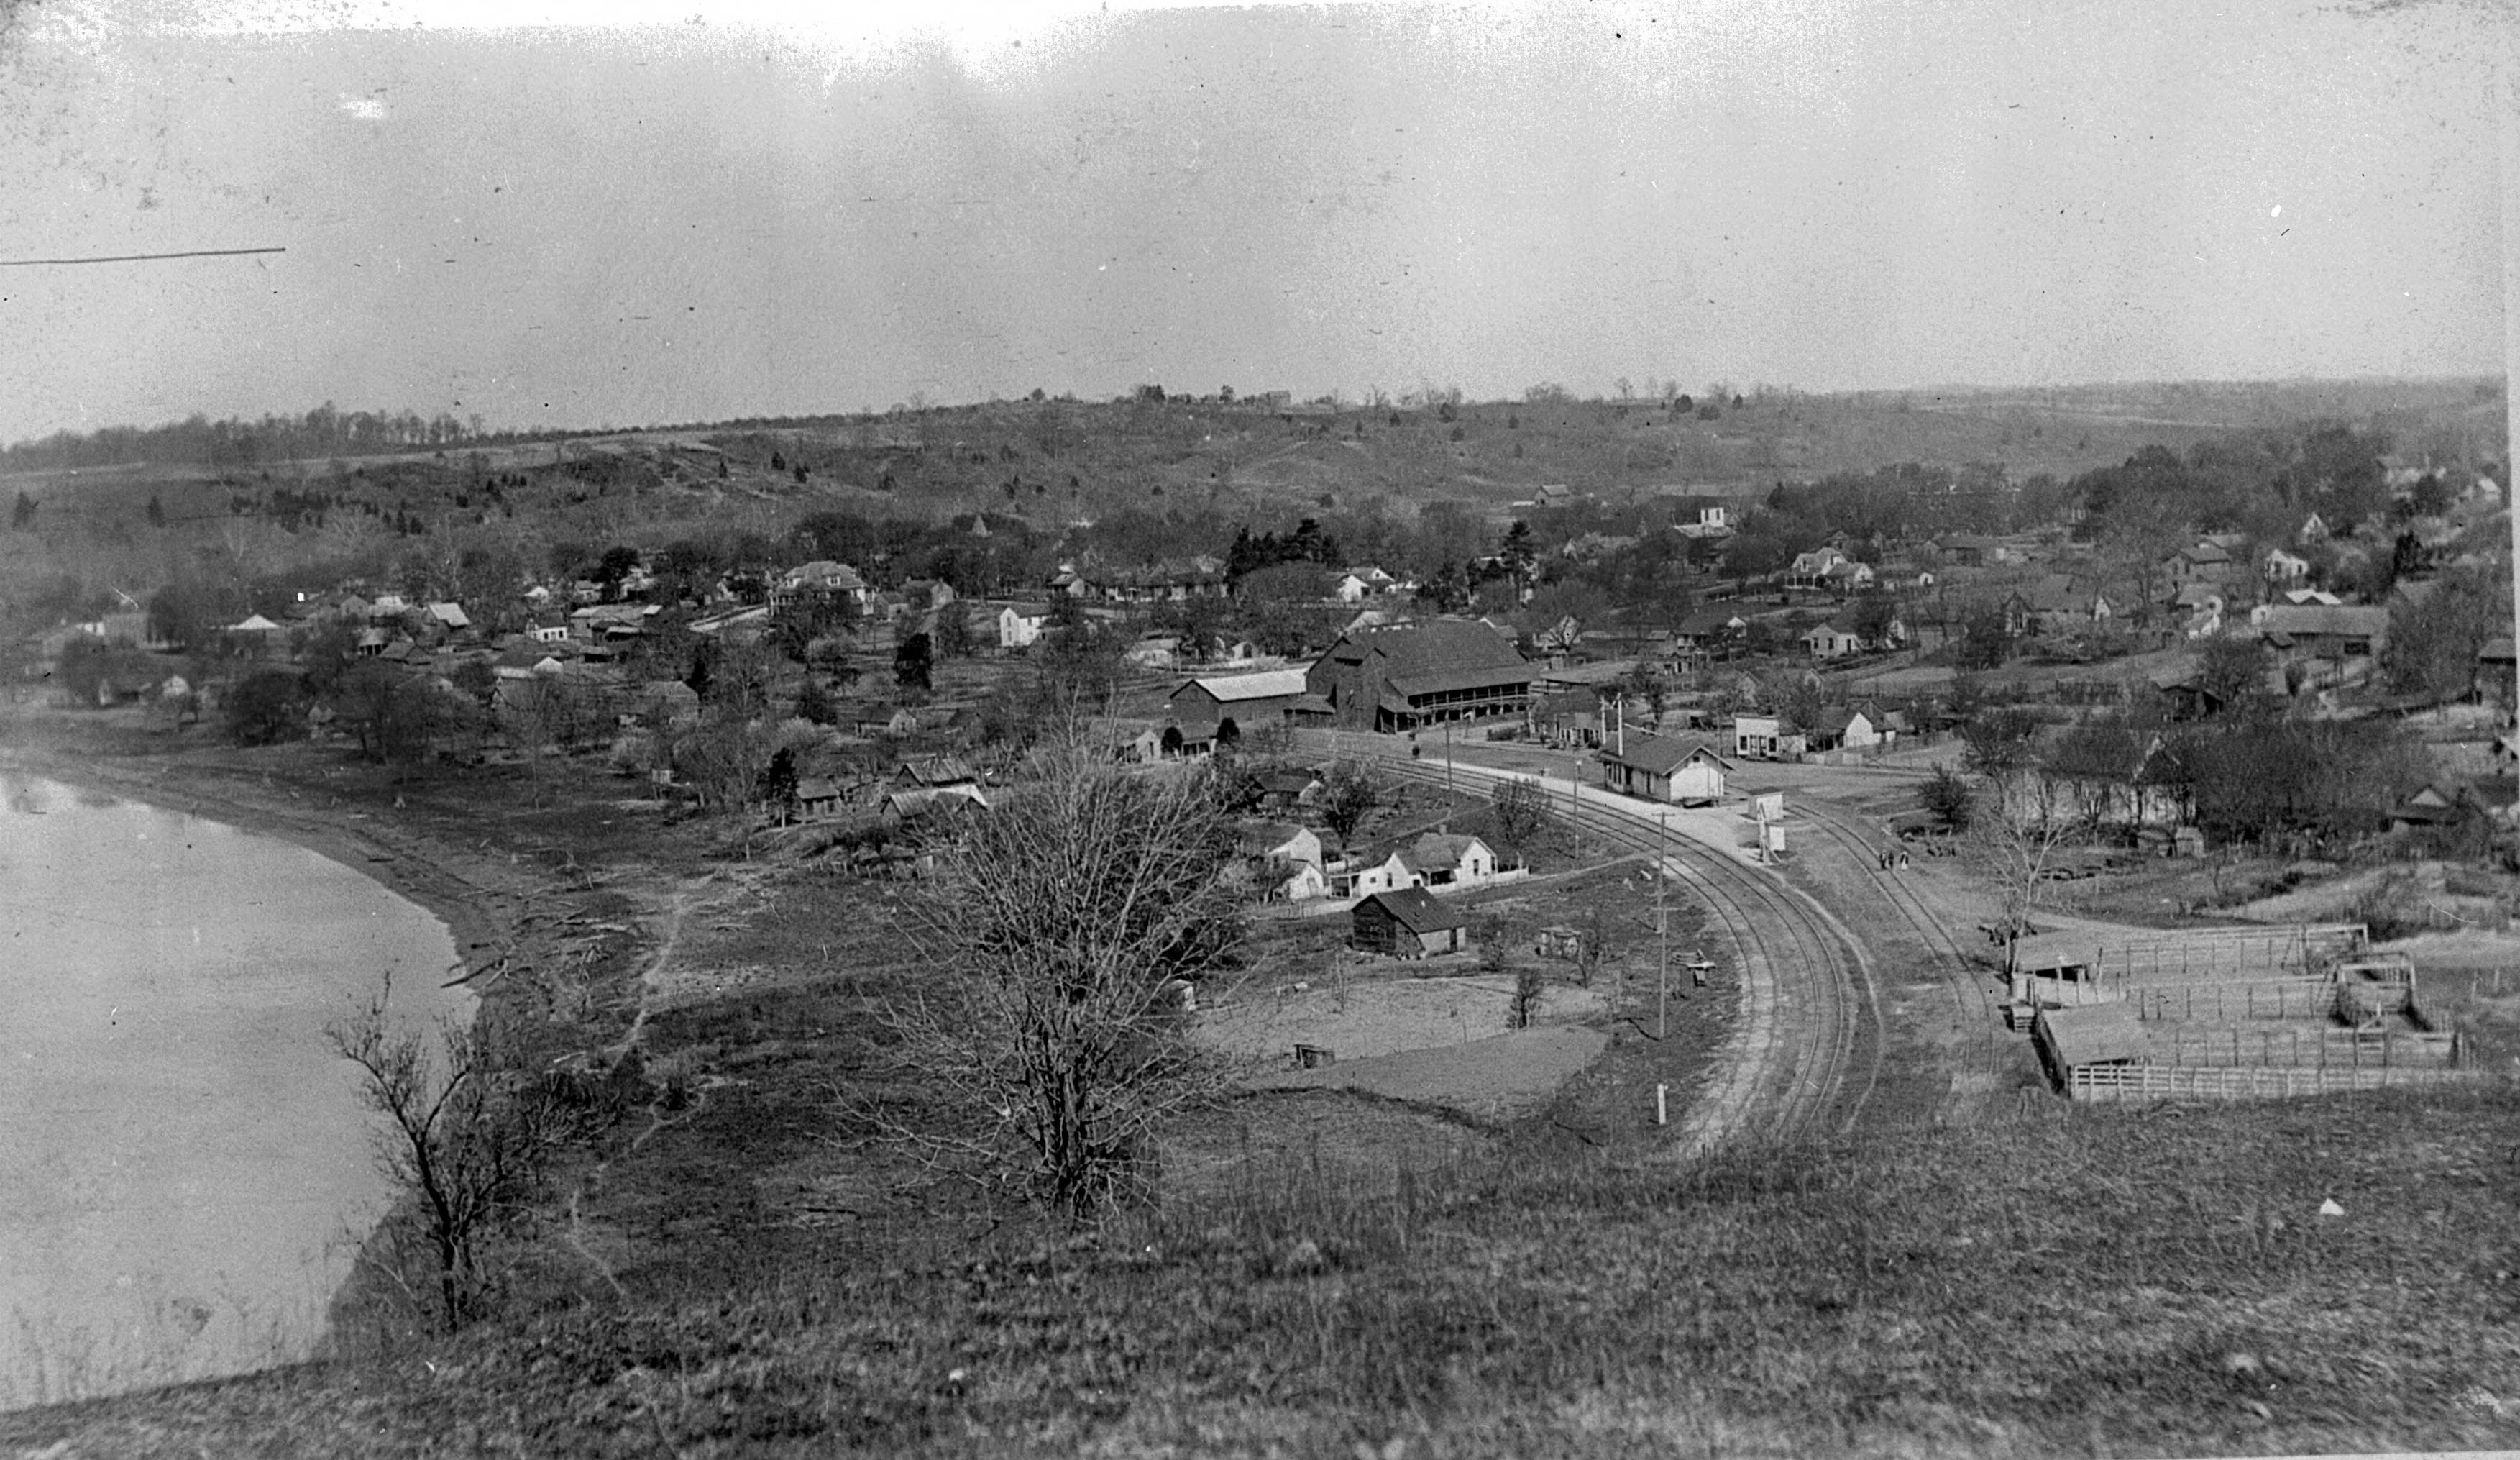
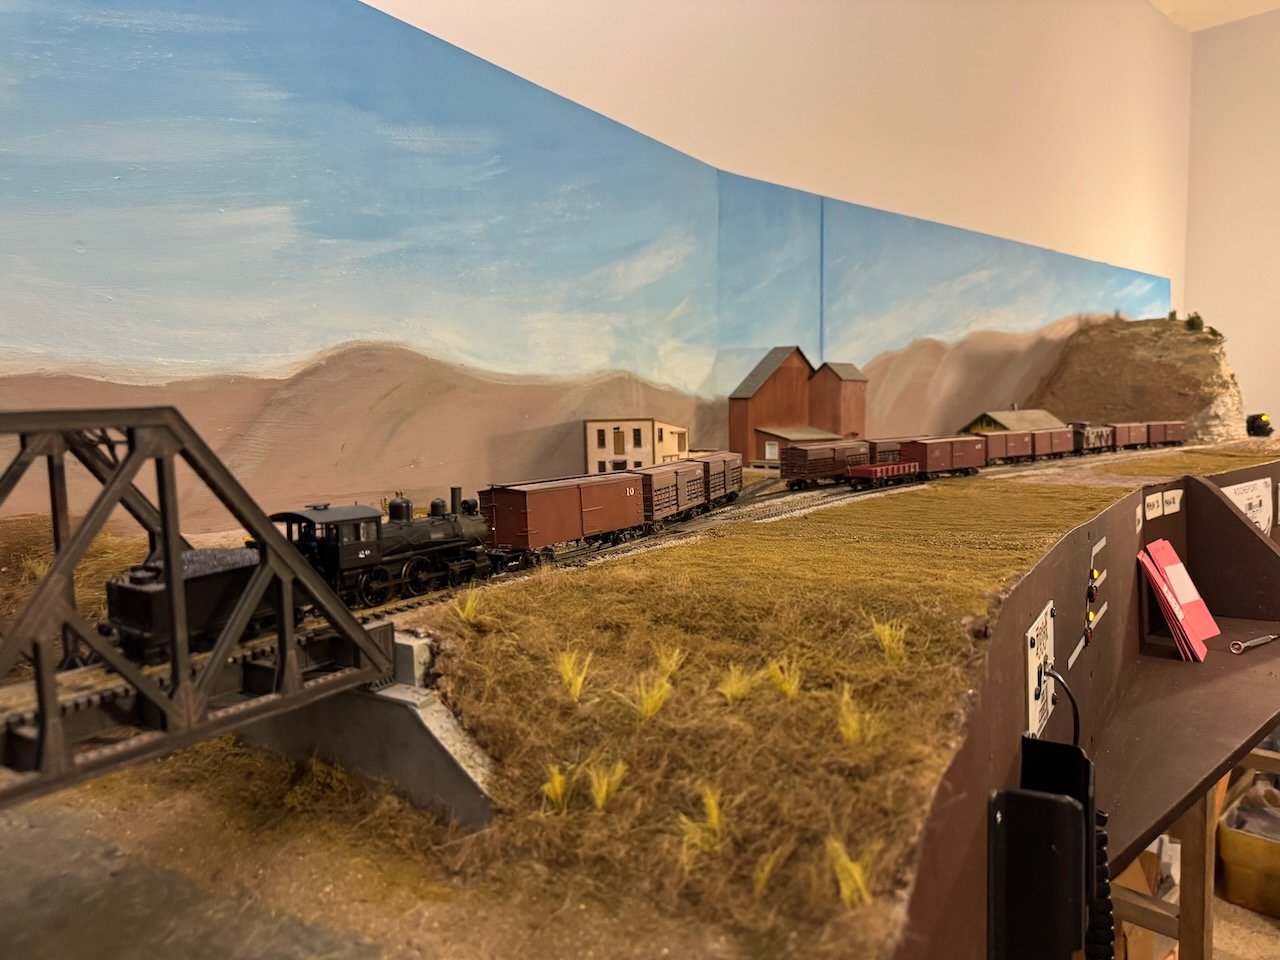
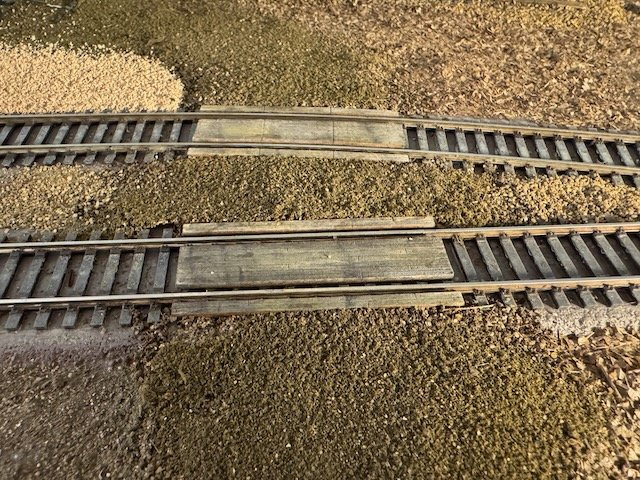
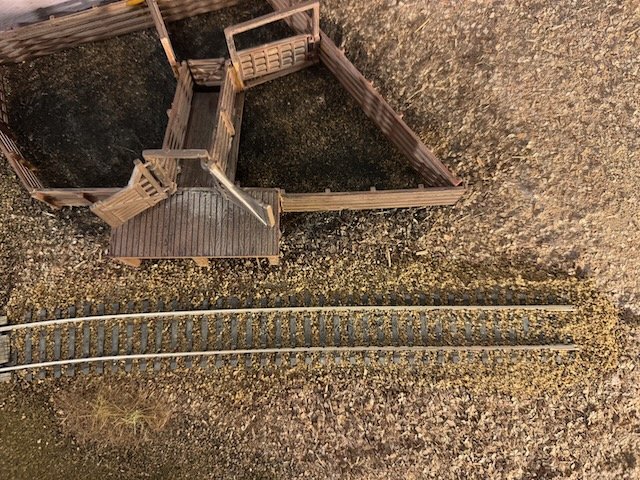
Apologies for ghosting this log. Summer has continued to push us hard, with relatively little persona time. I do have two updates to write up, the shorter of which I'll do here, the longer of which I'll need more time for. I've moved forward with a bit more scenery work, mostly laying down base layers in the eastern part of town. Here's the current status: This is trying to replicate the pattern clearly seen in historic photos, of the depot area having a much lighter layer of ground cover (some form of sand/gravel) than the rest of the area. The foreground area will become a rough farm field; much of the area south of the tracks was functionally in the river's floodplain and had small farm plots on it. You can also see that I've filled in the road east of the depot and added a rough version of the stock pens along the spur behind the depot. Here's a photo of this area in the early 1900s. A couple closeups: here are some of the grade crossings, laser-cut wood castings that I weathered. And here's the stockyard part of the spur. Both the road and the spur's ballast are finished with sand from my local stream, sifted to a grain size I want. The stockyard is a cheap plastic modular kit; down the road I'll want to rebuild this from scratch using wood, but I had this sitting around, and adapted it to fill the space for now. At some point I'll use an airbrush to do some weathering on it. This all continues to look like Montana until I get more vegetation on it, but that's down the road yet. But at least I'm slowly moving forward with filling in the blank surfaces with something at least resembling scenery. Thanks for sticking with me on this! Look for a longer post at some point on my first test runs of an operating scheme for this town.

- 230 replies
-
- 15
-
-
Yes, nicely done. The slight angle there adds a lot of distinctive visual interest and you captured it well.
-
I should have added that the hogging problem was exacerbated by most riverboat hulls being built quite lightly, very different from your typical maritime wooden hull. A classic ocean-going hull was built super-strong, of heavy oak with very dense framing and lots of cross-bracing. These hulls were essentially rigid and didn't need additional trussing beyond the hull itself. But that's because they were deep-water vessels. Classic North American riverboats operated on shallow rivers and in an economic context that required them to be cheaply built, including that fact that their service lives were far shorter than that of a typical maritime vessel. So their framing was much farther apart and built of smaller timbers, their hull sheathing was light and thin, and they couldn't afford much cross-bracing without making the draft too deep. Plus, their hulls had to be flexible because they were highly prone to hitting bottom, where a rigid hull would break. So all of this meant the hulls were lightweight and needed the extra trussing of hog chain systems to keep them in line. Keith's vessel is operating on a reservoir but clearly derives its lines and design from classic North American riverboat design, with a shallow blocky hull made of wood that would require trussing to remain stable.
- 457 replies
-
- 7
-
-
-
- sternwheeler
- Hard Coal Navy
- (and 1 more)
-
Yes, in square(ish) hulled riverboats, hogging is defined by the bow and stern sagging relative to the center. That's why it became called hogging, because it resembled the arched back of a hog in an era when everyone knew what a hog looked like. It's less an issue of hull shape than of uneven loading on the hull. This was accentuated in traditional sternwheelers by having the heavy wheel hanging off the far end of the stern while the boilers and engines were up near the forward end. So these vessels needed a robust set of hog chains (actually iron rods despite the name) running longitudinally. In sidewheelers it became especially necessary to use transverse hog chains because the heavy sidewheels hanging off the side would otherwise crack the hull down the middle. Hog chains were an absolutely necessary and extremely distinctive feature of standard North American riverboats until steel hulls came along. In a perfectly rectangular and evenly loaded barge, you wouldn't need hog chains, but weight wasn't distributed evenly in powered riverboats. Early railroad cars had the opposite situation, supported at the ends (by the trucks) and peak loading in the center. But the engineering solution was pretty much the same, because either way trusses help distribute loading across a span. Keith's vessel is smaller than traditional riverboats, and also has a lighter wheel given newer metal technology, while the machinery is more amidships than on a "typical" vessel, but presumably the principle remains. Any wooden hull is subject to hogging and the weight distribution on his vessel is still uneven. And I agree that his photo shows a basic version of a longitudinal hog chain.
- 457 replies
-
- 7
-
-
-
- sternwheeler
- Hard Coal Navy
- (and 1 more)
-
The city is interested in keeping the Arabia museum, just not at the current site. Also, next time you plan a trip to KC, let me know, because I can think of a ton of interesting things in the city and area for people to do! But all this would take over CaptainMac's thread too much so I'm not going to dive into it. And yes, their other vessel is a much earlier one (think 1830s) and would be amazing, but they need space first.
-
Nice collection of books! If you're considering a trip to see the Arabia, don't wait too long, as its future is uncertain at the moment. The museum's lease in Kansas City runs out sometime next year and it's unclear what will happen next. The city seems to want that space for other uses (it's honestly not the best long-term use of that particular real estate), the museum wants a larger space so they can pursue another excavation, and several other cities have expressed interest. But it's all very much up in the air, at least in terms of what's been said publicly. It seems likely the museum will move, whether to a different location in KC or to an other setting, and that means a significant period where its collections won't be visitable. Given your interests and collection, another book you'd very much enjoy is an old Time Life book called The Rivermen, all about the history of the Missouri River. It's a classy volume in the tradition of how such books used to be made before the internet dumbed everything down, and I bet you can find a copy online or even through interlibrary loan.
-
What a great set of news and photos to catch up on a Friday evening!
- 457 replies
-
- 4
-
-
-
- sternwheeler
- Hard Coal Navy
- (and 1 more)
-
You forgot the third, a certain degree of certifiable insanity. If I tried this all I'd end up with was a bunch of pennies with stuff glued to them such that they wouldn't even go through a bank's counting machine!
- 457 replies
-
- 6
-

-
- sternwheeler
- Hard Coal Navy
- (and 1 more)
-
Turn "Live" Off on an iPhone Camera
Cathead replied to palmerit's topic in Photographing your work. How to do this.
If you're exporting photos directly from the phone, it's easy to turn the live status on/off within the Photos app. There's a menu on the upper left of any live photo that lets you flip between live/loop/bounce/off, etc. Then it will export as a jpeg rather than video. It can be done within the computer version of the Photos app, too, but it's more complicated; you have to hit Edit (like you're going to crop or color balance it) and there's a menu in there to change the live photo setting. Once you set it to off, it exports like a normal photo. Neither of these deals with the problem that you can't choose which frame of the video to export. Ironically, since in actual videos you can. The real answer is to just pay attention and turn the live feature off when taking model photos, just like you would adjust any other setting (like flash on/off). Personally I can't understand why people leave the live photo feature on all the time. It takes up a huge amount of space storing all your photos as short video clips. I turn it on for very specific needs when having motion actually helps enhance the effect (like a waterfall). But to each their own.- 1 reply
-
- 4
-
-
Thanks for sharing this sad news with us. My condolences to all who knew him. I concur with Kurt, please post any updates about installation at the museum for those of us in the region who might be able to come.