HOLIDAY DONATION DRIVE - SUPPORT MSW - DO YOUR PART TO KEEP THIS GREAT FORUM GOING! (Only 51 donations so far out of 49,000 members - C'mon guys!)
×


Cathead
-
Posts
3,494 -
Joined
-
Last visited
Content Type
Profiles
Forums
Gallery
Events
Everything posted by Cathead
-
 Great to see more progress! That tarp is going to look perfect. I saw a fun river vessel (for me) along the Missouri this weekend that I thought might interest you and others. Let me know if this feels like a distraction instead and I'll remove the post. This is the USGS vessel Gasconade, pushing a buoy tender barge used for maintaining navigational markers along the commercial nav channel. It's carrying both red and green marker buoys and a crane up front for setting them in place. It was heading upriver from its home port in St. Louis, presumably toward a work site. According to the Coast Guard, she covers the lower river from St Louis all the way to Sioux City, Iowa, so who knows how far she was headed toward her work site.
.jpeg.c491c776a864292354c9cb540736871f.jpeg)
-
My understanding is that these dredges were digging up material deposited behind the power-generation reservoirs built on the Susquehanna. So they're hardly dredging up pristine riverbed, they're digging into thick deposits of sediments that were already laid down behind the dams. And the dams had (and have) a far larger impact on the river's ecosystem by completely altering its flow regime as well as flooding miles of river valley. And most material stirred up by the dredge likely would have settled back down again before flowing over the dams. So I can't imagine that the dredging itself is a meaningful environmental issue compared with (a) the dams themselves and (b) the upstream pollution that resulted in this much coal washing down from the mines in the mountains in the first place. If anything this is slightly ameliorating the environmental impact by salvaging a bit more of that wasted coal from the river instead just burying it in reservoir sediment or washing it out into Chesapeake Bay.
- 457 replies
-
- 3
-

-
- sternwheeler
- Hard Coal Navy
- (and 1 more)
-
Speaking of dredging, I'm coming up dry in my barrel of superlatives, having used them all up on your logs over time. So, you know, good job and all that! Models after my own heart.
- 457 replies
-
- 3
-

-
-
- sternwheeler
- Hard Coal Navy
- (and 1 more)
-
I just love how a well-planked deck draws a model together.
-
I'm going to have to order a replacement WOW button soon, mine is wearing out.
- 457 replies
-
- 5
-
-

-
- sternwheeler
- Hard Coal Navy
- (and 1 more)
-
Yikes! Dodgy instructions are the bane of way too many kits.
-
LOL, Glen, that meme is everywhere but rarely have I seen it used so perfectly.
-
Well, pretty much every modern river towboat has a grill/smoker out on deck somewhere, so maybe these guys were just foodies ahead of their time.
- 457 replies
-
- 4
-
-
- sternwheeler
- Hard Coal Navy
- (and 1 more)
-
For the life of me I can't NOT see that as the bow of a small upturned boat with the stem and keel arcing over the top. The strongest argument I can think of for it NOT being that is that it looks rather deep, more like a maritime boat, especially when it can't be all that long. It would seem far more likely that this vessel would use a simple shallow squared-off jonboat. Otherwise could it be some kind of stern-facing vent hood? But there isn't much room under it for any sort of equipment that would need such a large vent, and I can't even think of what that would be. Presumably they didn't have a restaurant-grade commercial fryer in there...
- 457 replies
-
- 3
-
-
-
- sternwheeler
- Hard Coal Navy
- (and 1 more)
-
I'd say that these aren't just any figures, but figures of arguably two of the most beloved naval literature characters of all time. They're edging over into collector's items, not just obscure details of a given model. If they were just generic crew figures you wouldn't see this level of interest. But lots of people enjoy collectibles (baseball cards, action figures, *ahem* models) that recreate something beloved, and these certainly fit that niche. Personally I'm not in a position to take on a Surprise model, but I'd absolutely buy these on their own, paint them lovingly, and develop a little cabin diorama to display them in. I wouldn't do that for just any figurine.
-
That's pretty much where that phrase comes from, right? The fact that railroad lines so often divided communities and helped create distinctly different districts based on income, class, race, etc.? Certainly I'm using that as a subtle visual cue here.
-
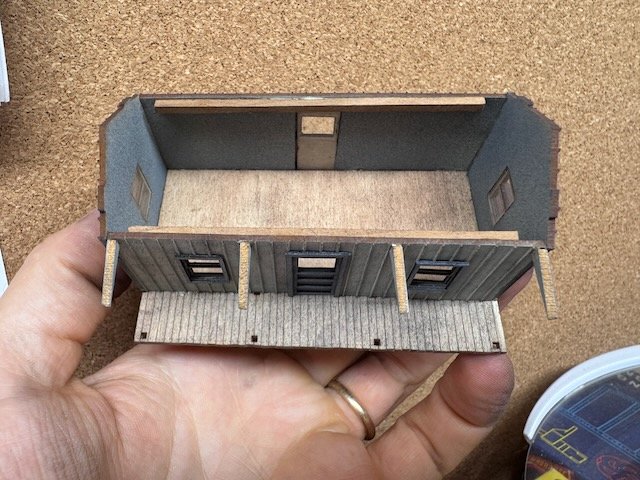
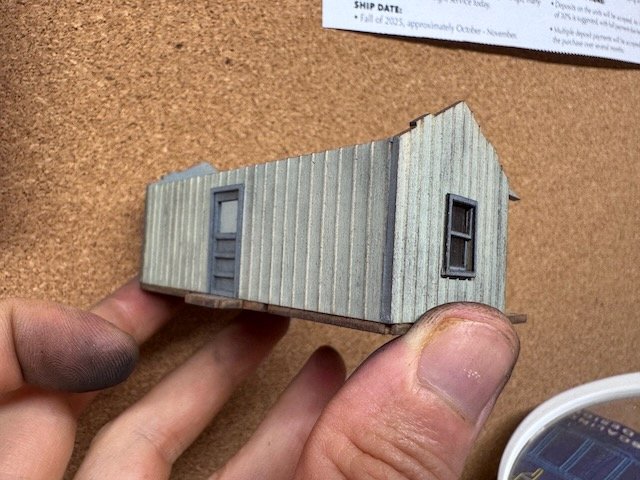
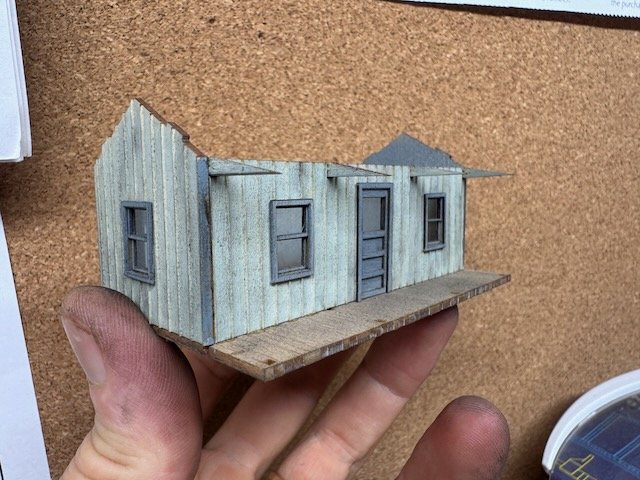
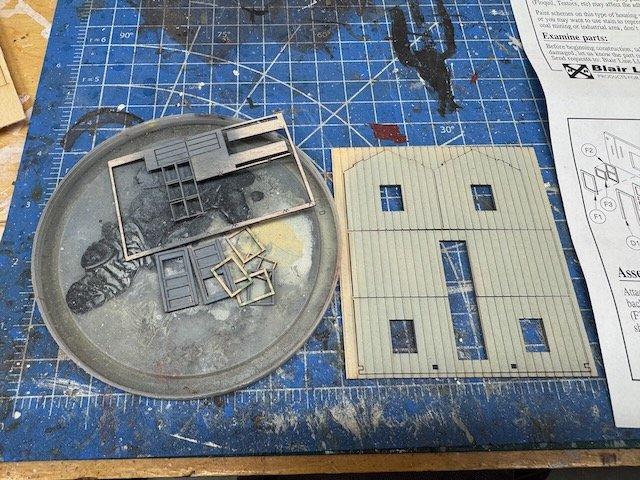
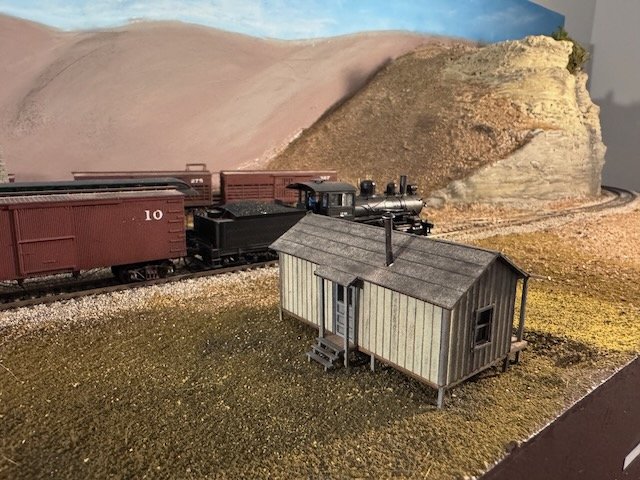
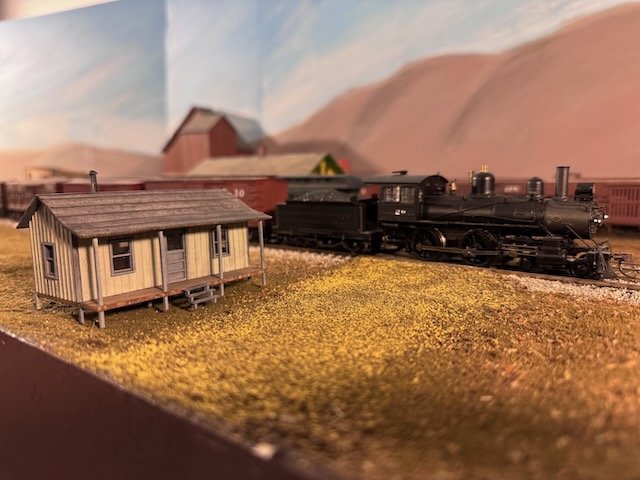
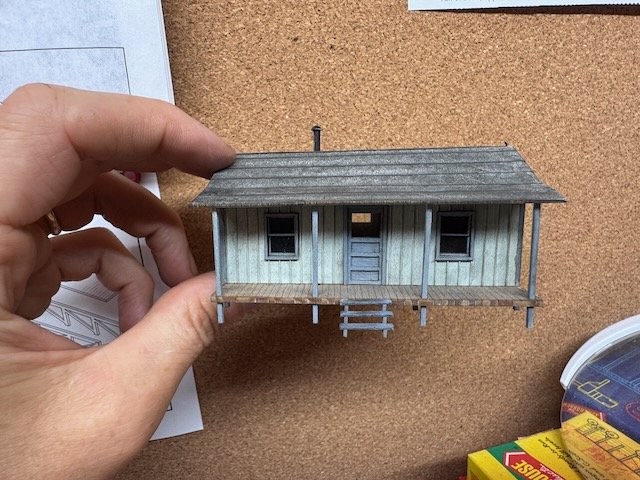
And one more building done this weekend. This one was a laser-cut kit, so went a lot more quickly. Basic airbrushed coloration, again just a low-key color scheme. Assembling walls with windows, doors, and roof braces. Already weathered the walls the same way as the last building, using pastels and small brush. Wood porch, same thing. The kit's wood is quite thin, so I added some braces to keep it from warping. Basic tarpaper roofing, colored with pastels. Finished building, with posts and chimney installed. No need for a foundation on this one! And here it is in its rough intended location. As discussed earlier, this part of town is meant to be a somewhat poorer district down along the river, which is a short distance from the fascia here. It's hard to see in the photos, but the scenery slopes down gently from the tracks toward the river. There will be a small general store type building across the road from this, also up on posts due to the location. Using this style building helps differentiate from the higher ground districts across the tracks, and implies the nearby presence of the river. As much as I like scratchbuilding, I do enjoy a well-designed kit where someone's put careful thought into all the dimensions and fit and so on, so I can focus on the artistic side. If you're wondering, here's the kit: https://www.blairline.com/cohouse/ Blair Line is a small Missouri-based manufacturer and I'm happy to support them. Thanks for reading!


- 230 replies
-
- 13
-
-
Man, it's so good to have you and this build back. I missed you both. This is especially well timed since we somewhat recently spent a weekend up along the Mississippi River, renting a small riverside cabin and just watching traffic go by on both the river and the adjacent busy rail line. Good times. I'll note that many towboats I've seen on the Mississippi have a smoker and/or gas grill on deck somewhere. Every detail you've added looks marvelous.
-
Great question, I had actually given this some thought; guess I should have discussed that! I decided not to list a specific business for two reasons. Laziness. I just didn't want to hand-letter "Furniture makers" or some such in an even smaller font unless I really had to! Especially for a background/backdrop building. Leading to the next point. Flexibility. Even though in my head it might be a furniture maker, why not leave it a bit more open in practice? Maybe it's a cooper's shop instead? Since, as you say, there's precedent for just the owner's name, I decided that worked fine in this case. You can argue that in a small town like this, everyone knows everyone and their business. And this isn't so much a walk-up business like a grocer or clothes shop, so they're not as concerned with drawing casual passersby. Essentially versions of your B2B point. In the railroad's business directory, virtually every business was simply listed by owner's name, not any further clarification other than the general category. For example, under "general merchandise", they just listed J.B. Challis, H.R. Harris, etc. rather than something like "H.R. Harris, dry goods" or "J.B. Challis, grocer". Finally, defining it too specifically doesn't alter operations; you don't need to know exactly what that business is to accept that crates of goods are arriving at the depot for it. It's the depot operators need to recognize, not this little background structure. I will likely be putting more details on buildings that are more day-to-day public retail (bank, grocers, etc.). Later, I could also change my mind and make a separate sign saying "Furniture makers" or the like, and hang it over the door. You two are on top of things! It actually does have a foundation, I just didn't photograph it. My goal is to install the foundation permanently on the layout to allow scenic material to overlap up to it, while the building stays removable. Same plan for most of my other structures. This lets me integrate scenery in without risking staining the building. I was planning on presenting that when I did the scenic install work, which I haven't done yet. But since you asked, here it is with its foundation loosely held in place. Most of this will be hidden by overlapping scenery and by a partial wooden walkway. The overhang is just a storage area where I'll pile stacks of lumber, barrels of nails, etc., so it'll just have a gravel base. Thanks for the attention to detail and thoughtful questions!

-
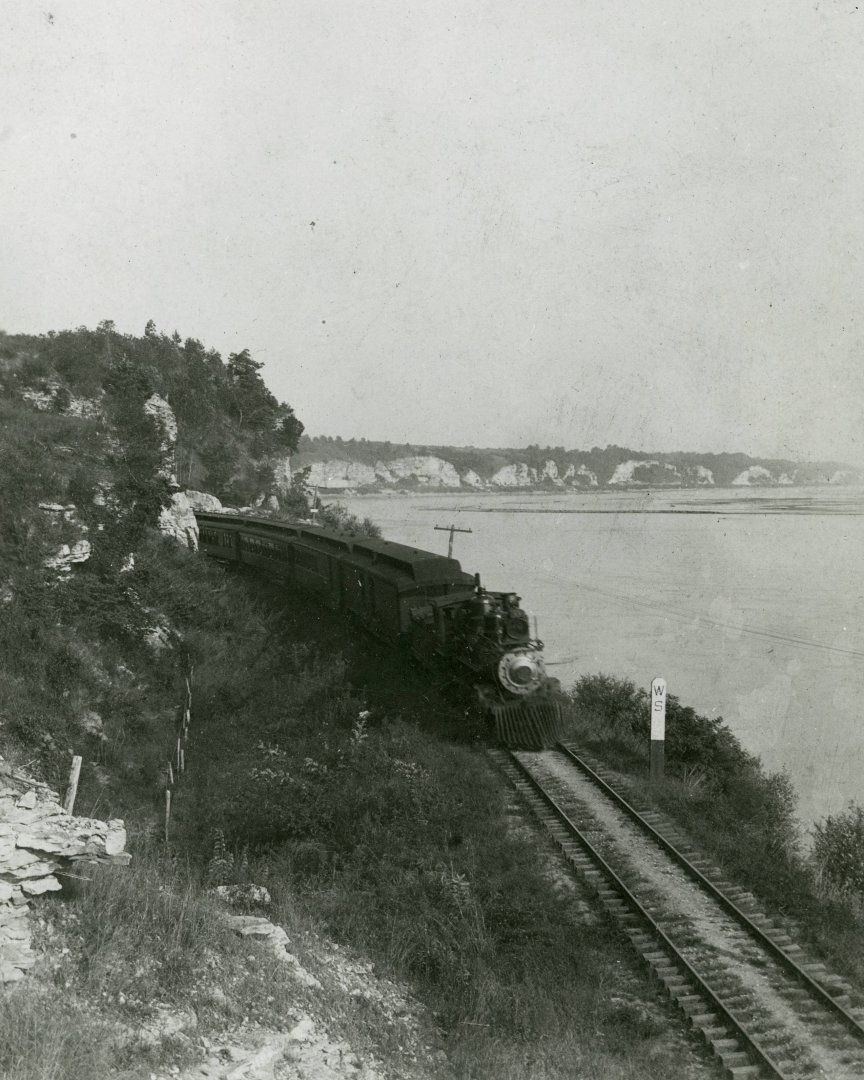
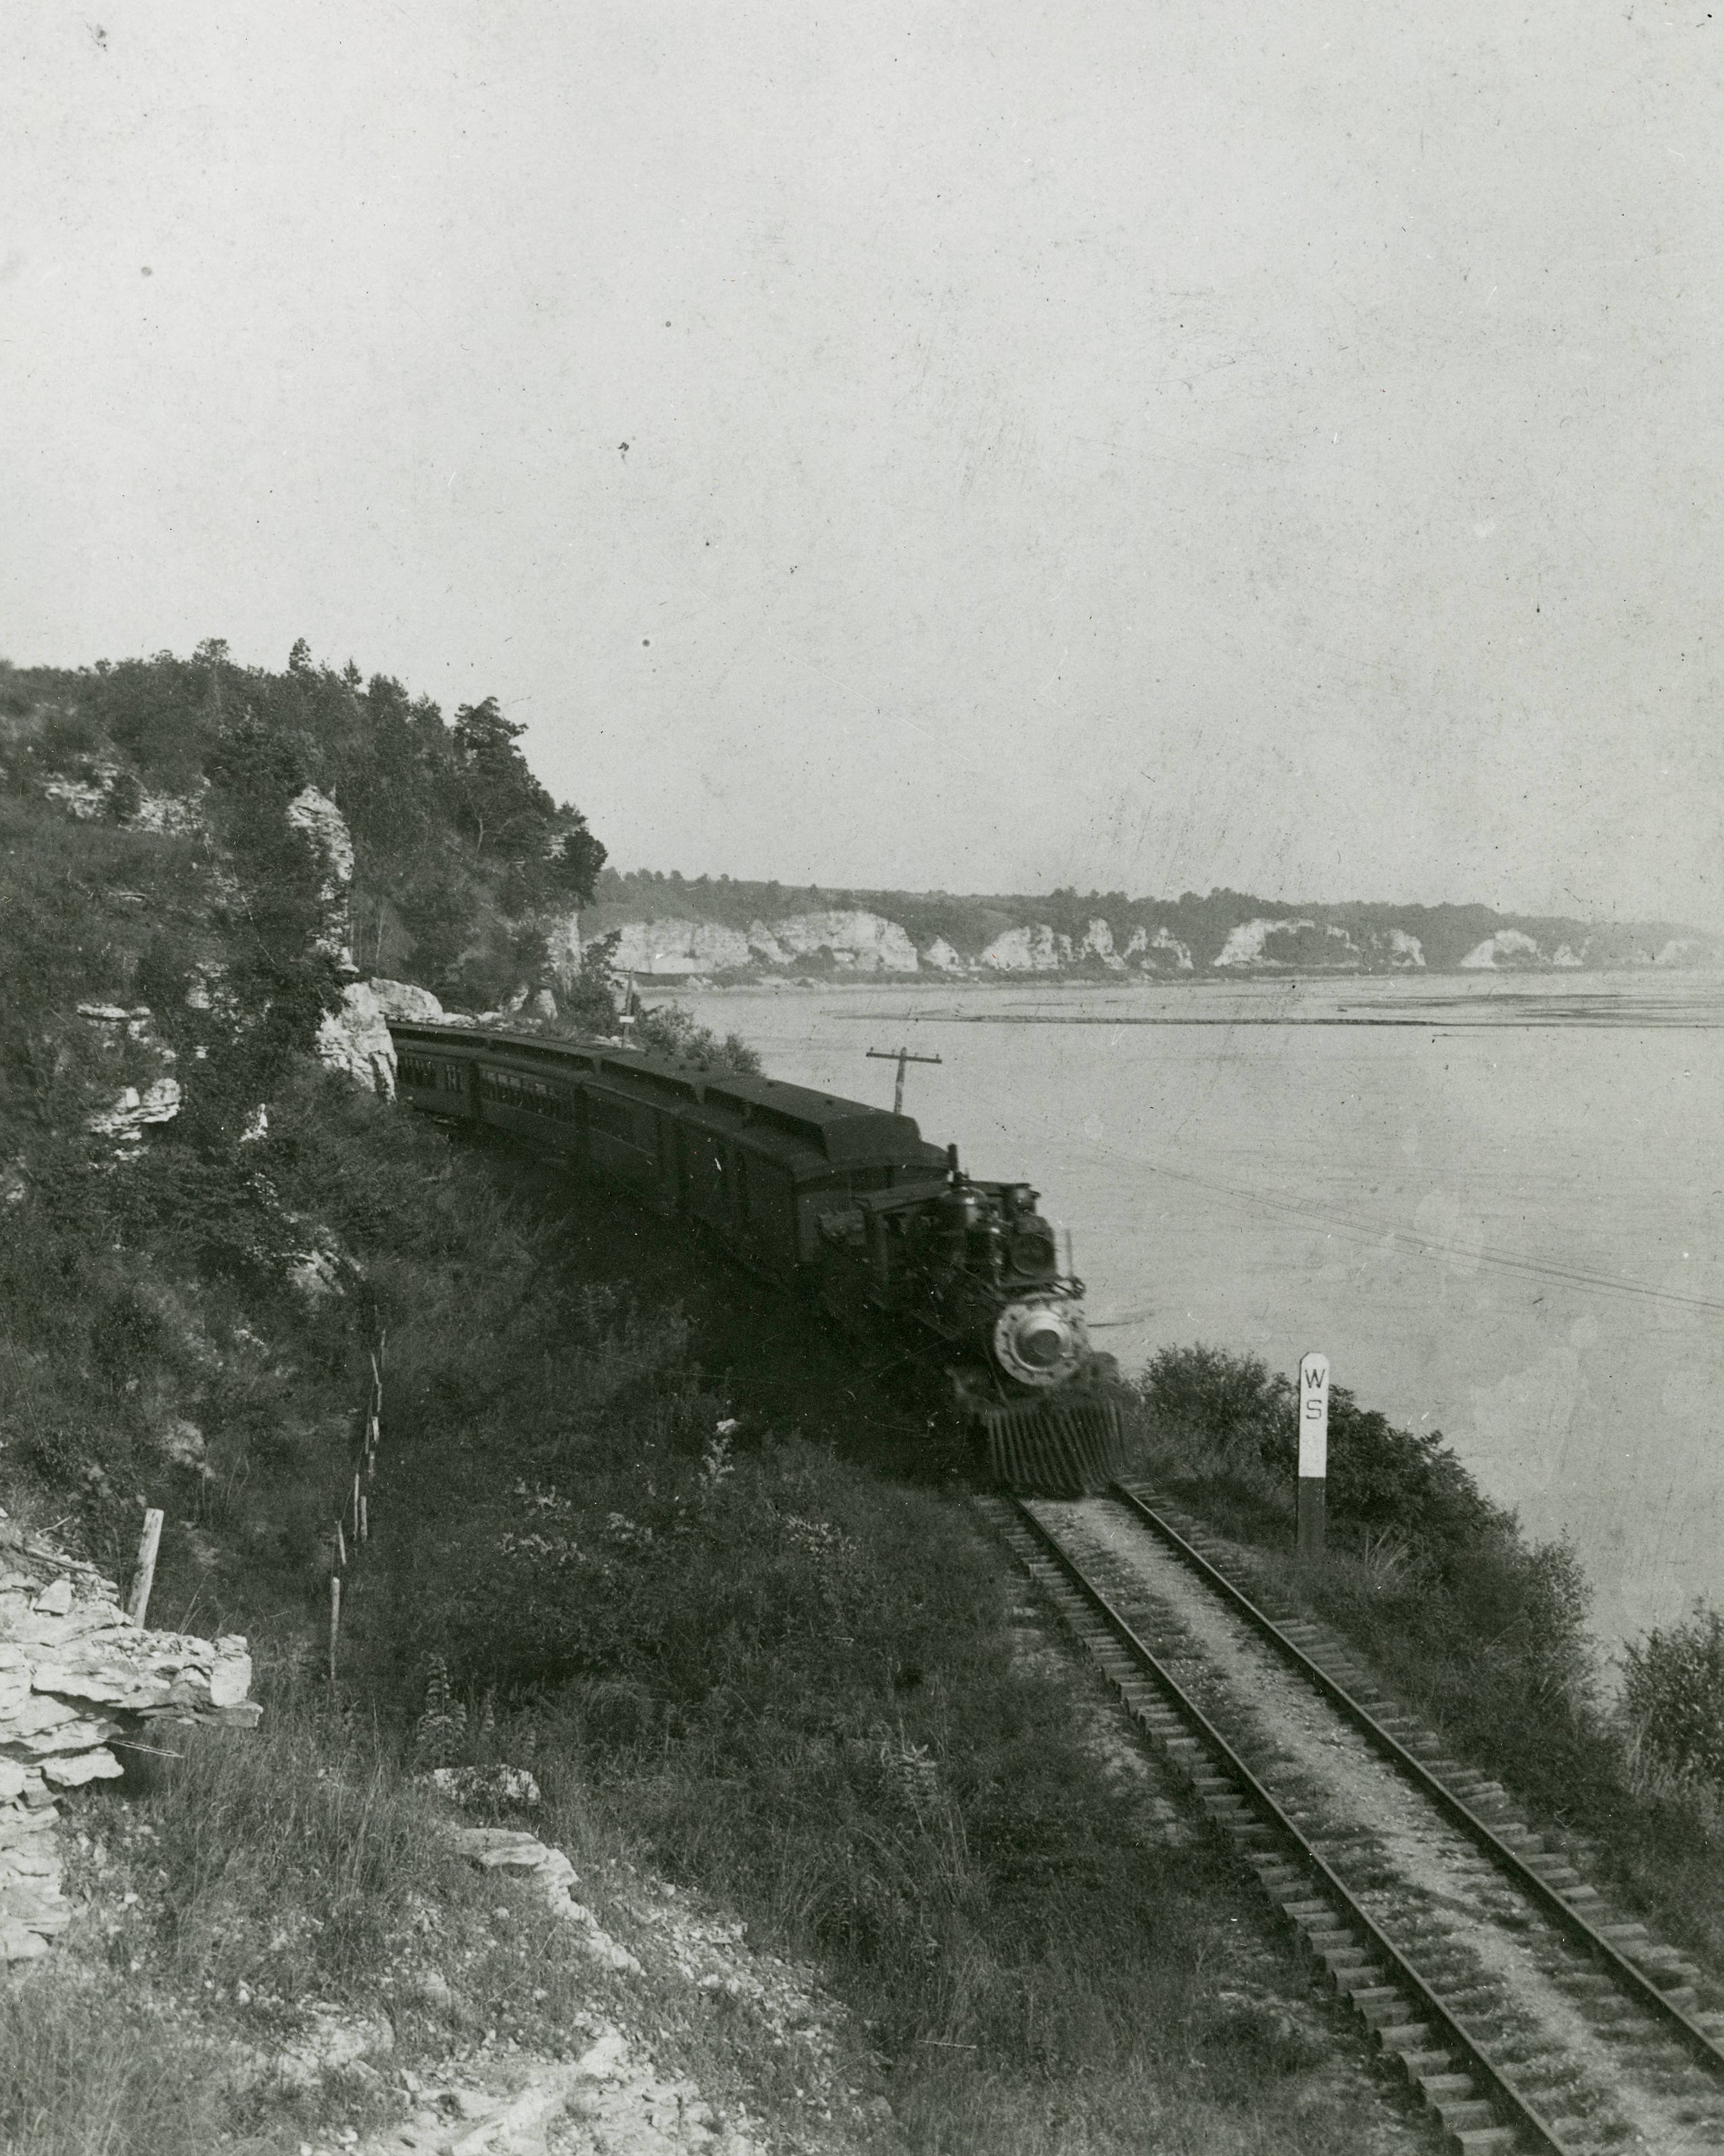
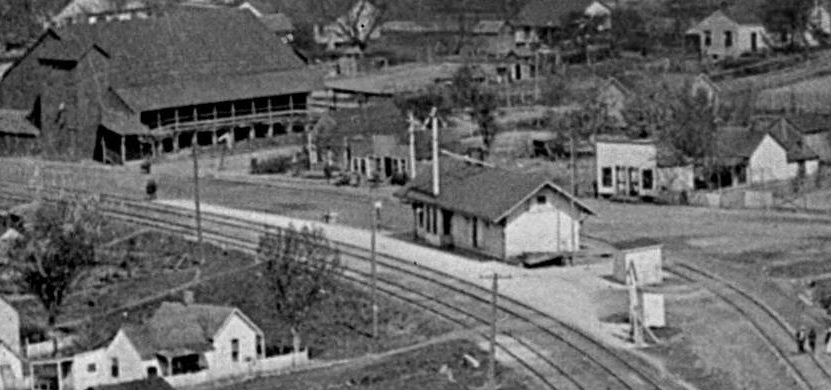
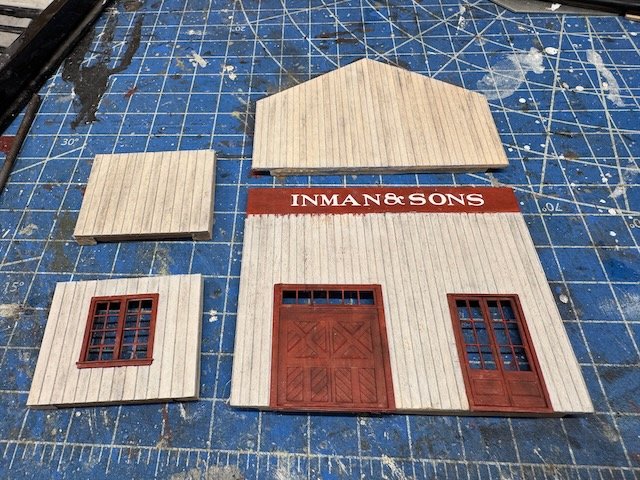
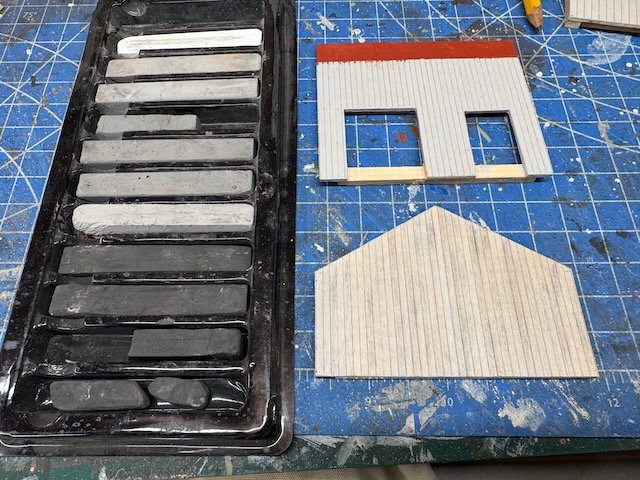
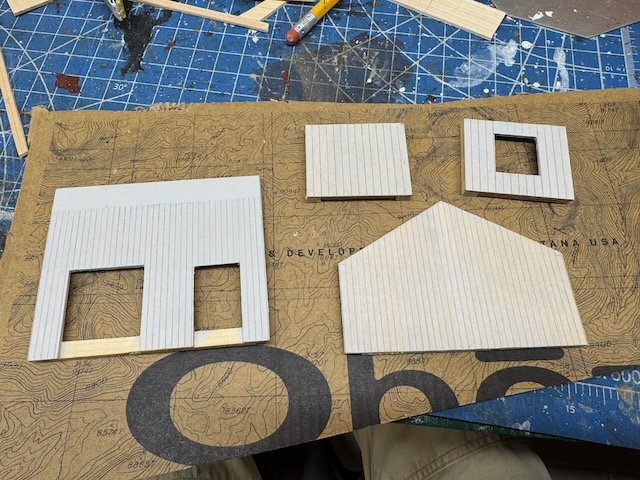
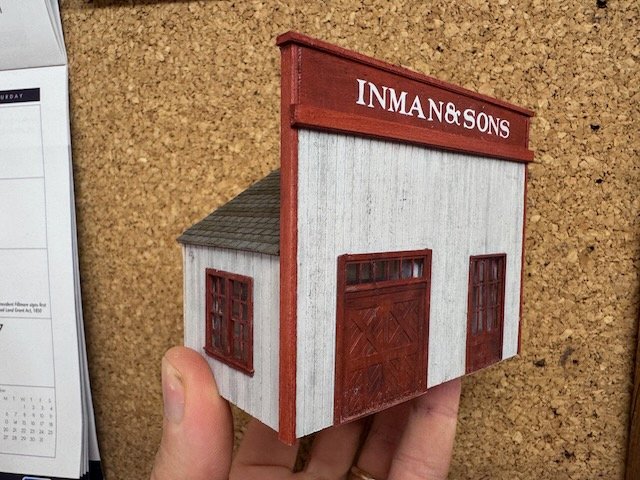
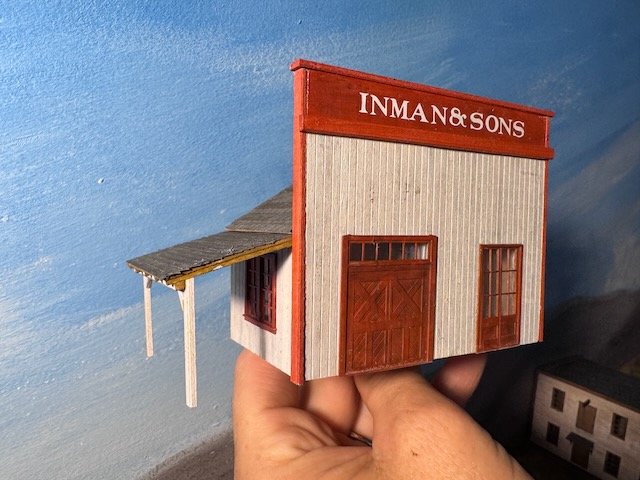
Time to go back to some actual traditional model building! I need lots of buildings to fill out the town, which will be a mix of scratchbuilt and kit-built. First up is a simple scratchbuilt background building. I zoomed into the depot area In the historical photo below (from the State Historical Society of Missouri). See that row of small false-front buildings across the street from the depot? Those fall right on the line of my backdrop, so I need to make a few shallow-depth buildings to fill in that space and convey the feel of that district. I'm not worried about reproducing them exactly, I just want to capture the right feel. I have a distinct visual theme in mind for Rocheport. This was a prosperous time, overall, with the railroad having recently come through. So I want my buildings looking reasonably well-kept and in some cases fairly new. I'm not going for the decay-gothic look so common in model railroads. I want this to feel like an old but prosperous town. That being said, there are different districts. The core business district off to the west should look especially prosperous, while these smaller buildings near the depot should be a bit rougher, and the riverfront area across the tracks (foreground) should be noticeably poorer if still not run-down. Keep all that in mind as I describe this and future buildings. First I drew up a basic design and cut out the constituent walls from the scribed wood sheets I had on hand for just this purpose. These were given several light coats of grey primer, both to seal the wood somewhat and to simulate a coat of paint. Back wall at lower right is after one coat, front wall at lower left is after two coats. The primer color is almost exactly what I wanted (a faded grey-white) so I didn't bother with actual paint. Plus, this maintains a hint of wood grain that I like. Next I did some gentle weathering of the walls using pastels applied with a thin brush. Working plank by plank, I subtly varied the colors help the planking stand out. In the photo below, the front wall at top hasn't been pasteled yet, while the back wall at bottom has. I then painted the door and window fittings I dug out of my scrap back, and lettered the top of the false front using dry transfers. It's really hard to line up individual dry transfer letters perfectly, and if I could do it over again I'd use a little more space on either side of the ampersand. But the slight unevenness also brings to mind a small business's hand-painted lettering, which does fit the setting. You can't easily tell here, but I gently distressed some of the wood to give a hint of peeling paint. Not too much, just enough for subtle visual effect in person. Time to assemble the building. I used my magnetic square jig for this, which both holds walls square and uses strong magnets to lock pieces in place while glue dries. I haven't mentioned it yet, but all the walls have interior bracing to make sure they don't warp. I did this early on, prior to priming. Overhead view of the assembled walls and interior framing. I don't intend to show the interior of this so made no effort at detailing. This is a background structure that will be partly hidden behind the depot. And the assembled walls from the most common viewing angle. Notice the slight bleeding of red paint into the planking, which I don't care about because a piece of trim is about to be installed there. Time for the roof. I braced thin sheets of wood cut to size, then applied pre-made trips of paper shingles. Several manufacturers make versions of these. They're slow and fiddly to apply but I love the results. These also get some light pastel weathering to vary their appearance. Rear view. This goes up against the backdrop. Front view. Not quite done, I wanted to add a lean-to overhang on the left side for added visual interest. This was pretty straightforward and I didn't photograph the process. I forgot to add earlier, the name comes from that railroad business directory I wrote about a while back. Inman was a real merchandise business in Rocheport with ties to the railroad. I made it Inman & Sons so the name would stretch more across the false front, and decided this is probably a small furniture maker or other such manufacturer, who might be getting small loads of hardware and supplies (nails, hinges, paint, glass, that sort of thing), which is why being located right behind the depot makes sense since that's where small loads like that would be delivered. This kind of business isn't big enough to have its own dedicated slot on a freight spur. It just gets crates from the depot. And here's the final structure loosely in place on the layout. It and its future companions will help line the street behind the depot nicely, obscuring the backdrop transition and bringing a sense of busy-ness to the depot district. Go back and refer to the opening photo to remind yourself what this is representing. So that was a fun little project. The building going next to it is a laser-cut kit, so that'll provide a fun comparison in methods and results. Thanks for reading, and hope you enjoyed this return to actual model-building!


- 230 replies
-
- 14
-
-
Great backstory! Had no idea you had a connection to this vessel's home region.
-
Washington State does have a variety of coal deposits, especially in parts of western WA, and coal is a LOT more energy-dense than wood, and a lot of vessels had converted over to coal by the late 1800s (just like railroads). Also, a lot of the dominant trees in the Pacific NW aren't as energy-dense as Midwestern/Eastern hardwoods, making coal even more attractive as a fuel. But I'm not particularly familiar with the maritime history of that area so I really can't say what fuels were used when. The lack of smoke may just be photographs being staged/taken when the vessel isn't working hard. Coal-burning locomotives don't put out plumes of black smoke all the time, either, just mostly when they're trying to build up steam pressure (like starting a heavy train or going up a grade). A locomotive cruising along doesn't actually put out all that much heavy smoke, and the same would be true for a vessel like this.
-
Interesting that it doesn't include the frame around the paddle wheel. Looks like the builder hasn't been active on MSW in a few years, and I don't see a build log on their profile. Wonder what photos/resources they used? Would be well worth sending a private message to see if you can establish contact.
-
Best place for gravity feed. Maybe pilot liked a regular mixer for his whiskey? No argument it's an unusual placement, whatever it is. Go back and scroll through the very first post in my Peerless log. She's barely recognizable as the same vessel: Boiler deck superstructure either extends all the way to stern or stops before the engine room front wall Main deck railings vary from none to extensive Boiler deck railings vary from none to all the way around Engineroom has either between a row of diamond-shaped windows or no windows Tow knee configuration changes Front of the boiler deck varies between square and round corners And it's not just two different versions, all these changes seem to happen on a spectrum as people kept messing with her configuration. To my eyes the wheel and stack in your two photos seem the same, and those seem some of the less likely features to be altered. Just my two cents.
-
That was my first thought, too. Given that it's a saltwater vessel, kinda makes sense to have a source of drinking water given that this seems to have made long runs (e.g. not a harbor tug). Just to play devil's advocate, if you go back and look at the image collection in my Peerless build, that vessel went through some rather extraordinary revisions in her appearance over just ten years (including multiple configurations of railings and superstructure). Changes to things like railings, splashwall, masts, and even the cladding/windows of the engineroom, etc. wouldn't faze me. Your comment on the boiler stack distance to the pilot house is certainly something that would be harder to change, but I'm not immediately convinced it IS different? The difference in foreshortening between the two photos makes that, and the overall length, hard to judge but to my eye they look pretty similar. I'm not insisting that it IS the same boat, but most of the differences in those two photos strike me as more aesthetic rather than structural and in line with what Peerless went through in even shorter service life. Bare minimum that second photo is a good reference for how things might have been from that stern angle, since if these aren't the same boat they're built along very similar lines. You have an extraordinary knack for finding charismatic work boats; each project is unique yet all seem to follow a similar vibe that makes this series of projects flow together wonderfully. It's a real joy to follow and I'm thoroughly looking forward to this one.
-
With respect, this is a somewhat combative and unhelpful response. Please read the link Chris provided, as this community gets a lot of questions just like yours, unfortunately from people who are convinced they have something of great value just because it's old and/or has a family history. The folks here are extremely knowledgeable, and if they tell you something at odds with your hopes, it might be well to keep an open mind. Of course we don't know what you're dealing with when you haven't provided any photos or clear information about your specific model. The link you posted is to what is, sadly, a laughably inaccurate toy-like "model" that bears the same resemblance to a real, scale model ship as a child's toy does to a scale model aircraft. Such items can be quite attractive and can have significant personal appeal/value if they have a family history, but they are no more "scale models" than a Black Forest nutcracker bought from a tourist shop is an accurate scale representation of an 18th century German hunter or a valuable work of art. I'm going to assume you mean halyards, the lines used to raise and lower sails? These are different from the braces, used to control the angle of the yards (spars) from which the sails are hung, and other rigging. The Etsy links you shared show models that have wildly simplified rigging that bears little resemblance to anything a real square-rigged ship would have had, essentially the equivalent of an armor model with a dowel poking out of the turret labelled "boomstick". The Etsy model appears to have a primitive form of braces (run from the tip of the yards), whereas halyards would primarily run parallel to the mast. You can absolutely restore this model to look nice, and give your friend some piece of mind that a model associated with fond memories of her granddad can be displayed happily. What you can't do is turn it into a "scale" model in any meaningful way. If those Etsy photos are comparable to what you have, I'd suggest using those as a guide to restore the basic rigging to something similar, using whatever model rope source you like. Honestly, thread from a craft store would be just as effective and more budget-friendly. Rather than trying to do it to a non-existent scale, I suggest measuring the existing rigging or other parts, then simply purchasing the closest size you can find. The goal should be to restore the model to its prior appearance, not to make it "accurate". If sizes in metric are throwing you off, there are various online calculators that can help you with that. Again, if you post photos, dimensions, and other specific information, and keep an open mind, people here will be very happy to guide you with suggestions on how best to repair/restore your model.
-
This actually has a connection to Rocheport. Readers will good memories may recall that the huge warehouse behind the grain elevator was a massive hay barn used for feeding livestock being shipped on the Katy.
-
To add to what Ken said (thanks!), some model railroads will operate with two-person crews per train, to better simulate the engine crew / conductor dynamic. One person actually operates the locomotive, the other handles the paperwork and is in charge. This has several advantages: it lets more people take part if you have a lot of interested operators, it's more realistic in terms of recreating the teamwork necessary to actually operate a train, and it divides up the work as one operator juggling a throttle and paperwork and timetable and uncoupling and turnout operation and everything can actually be too much for one person (just like on the real thing). The whole blocking question is fun because it's a good example of how different model railroaders approach the hobby. In some cases people intentionally change things to make the work "harder" because, as a hobby, it's more interesting that way. So an unblocked train arriving in Rocheport would be an annoyance on the real thing, whereas on the model layout it's potentially a perk if the operator enjoys switching puzzles. Track plans are another example. In real-life Rocheport, as elsewhere on the Katy in this era, almost all sidings were double-ended (a turnout at each end) to make switching easier. But I took out the east-end turnout on my layout to make that a long one-ended siding, because that's more interesting to operate from a model perspective. If both ends had turnouts the work in Rocheport would be over too fast! It also saved some space that I wanted for more scenery.
-
I agree, the paint really begins to transform the look toward something finished. Nicely done.
-
Rik, great questions. Just to clarify, the waybills I'm using here aren't exactly what a real railroad used, they're simplified and adapted to a model railroad context. And while I designed this exact version, it's heavily drawing on a system developed long ago for model railroading by very smart people. What these model waybills do is allow a modeler to simulate the way a real railroad generated paperwork to direct how business was generated and moved over the railroad, whether or not "waybill" was used. And every railroad did things their own way. There are model railroaders who really strive for accuracy and duplicate the exact paperwork forms their prototypes used. I'm not quite at that level! But doing it this way gives you a more realistic feel than "let's put that car over there today". That being said, you are correct that good people were very important in this system! My understanding is that in this era, there would be a station agent at each depot whose general job was to deal with all the railroad's business, from generating business (e.g. "selling" transportation services to local businesses) to handling paperwork and orders to selling passenger tickets. Obviously with some staff in larger towns. By the 1900 era of this layout, the Katy had telegraph wires run along its route, so that facilitated communication. I honestly don't know how it worked pre-telegraph, other than slowly! In the layout-contemporary photo below, you can see a telegraph pole and wires on the river bank side of the tracks. Most railroads were organized into "divisions" covering a certain distance (often roughly 100 miles in this era), and each division had its own central office, railroad crews, maintenance crews, etc. My understanding, though I'm not an expert in this, is that local station agents reported up to divisional offices, which handled the central paperwork to generate traffic on the railroad. So if I'm correct, the Rocheport station agent would submit reports and requests for shipments (or empty cars) up to the division office (in Franklin), where that information would be collated with all the other comparable info coming from all the other stops in the division. Basically the division office would develop a daily sense of all the traffic needed and being generated on their division, decided what they could handle on their own (e.g. are there empty cars within the division they can draw on) and then communicate with higher authority to coordinate additional traffic to and from the division. That's why there's a yard associated with the division office in Franklin, because that's where cars are picked up and dropped off from farther locations to be sorted and then delivered locally (or collected into blocks of outbound cars). Think of the division and its yard as a regional postal service center that sorts packages for local delivery or outward shipment, and station agents and their depots as local small-town post offices. Especially in the pre-truck era. Beyond that my knowledge fades and I can only logically assume that there's a central office for the whole railroad that helps coordinate shipments, billing, etc. There are some other model railroaders in this thread and they may be able to correct or confirm what I've said here. My knowledge has been primarily gained in a model railroad context, which tends to emphasize on-the-ground operations and not necessarily the full hierarchy of how that information is handled. In other words, model railroaders tend to focus on the role of engineers and conductors actually operating the trains, who are given a set of paperwork orders telling them what to do, which is what my waybills are. In the same way that model shipbuilders tend to focus on the construction and daily operations of a given ship, but less on the infrastructure and logistics it took to maintain a dockyard or coordinate naval movements throughout an entire service Those aspects might well be interesting, but they're not essential to the model itself. In the same way, a waybill system like mine is essential to recreating reasonably realistic railroad movements in a local context, but aren't necessarily built on a complete reconstruction of the railroad's business structure. It's just understood that the business orders came from somewhere and our job is to enact those orders on a day-to-day basis on the ground. Lastly, there are all sorts of levels of complexity in how model railroaders implement operations. What I'm doing here is a sort of middle ground. At the simplest level, some people eschew paperwork altogether and just use colored stickers or pins on the cars to make movements solely a simple visual puzzle, or they don't care for switching much at all and just run trains as a railfan. At the other end, there are computer programs that let you generate and track car movements layout wide, more like what a central office would do, and print out all sorts of customized instructions just like a central office presumably would. And again there are folks who duplicate all the real paperwork a real railroad used, including all sorts of extra details I'm not even beginning to address here. Just like in model shipbuilding, there are lots of rabbit holes to go down or lots of ways to keep things simple, as preference dictates. Hope that long brain dump helped, and I hope other readers will correct anything I've mis-stated.