


Cathead
-
Posts
3,351 -
Joined
-
Last visited
Reputation Activity
-

 Cathead reacted to mtaylor in Licorne 1755 by mtaylor - 3/16" scale - French Frigate - from Hahn plans - Version 2.0 - TERMINATED
Thanks for the "likes" and commentary...
Making progress. The beams are in for the lower deck. There's probably another couple that I'll need to put in once I figure out the shape at the bow and stern. The bow, not so much, but the stern looks different on the drawing than it does looking into the hull. i think it's not at deck level... just has me scratching my head as I know the beams are all at the right height.
Anyway, I'm checking fore and main mast locations and then I'll be dropping a bit of string down the centerline to double check and pin down where I'll need the mizzen mast step, the three hatches, and the bowsprit step. I'm also plotting out the walls and cabins but won't get to far into that until the deck is planked. Which... I'm hoping to get started on this week as soon as I can get the planks cut. The actual next step with the waterways. The wood has been selected (cherry) and the appropriate sized pieces selected.
Here's pictures. Feel free to point out any stupidity or errors on my part.
-
Cathead reacted to ggrieco in Heroine 1838 by ggrieco - FINISHED - Scale 1:24 - Western River Steamboat as she appeared before hitting a snag in the Red River
Thanks Patrick, albert, Keith and Pat,
Keith, I look forward to seeing the sternwheeler!
This week I was finally able to get around to the top of the paddle box. It's starting to look like a sidewheeler.
I was able to cut all the pieces for the arches in about 2 hours with the mill. I don't know how long it would have taken by hand. I milled some of the segments double. These will be used on the planked side. It saves a little time and adds a little strength.
Trying to keep everything square. The notches in the cross pieces are for a thin plank that will be used to support the ends of the lateral planking.
Port side.
Starboard side.
-
Cathead reacted to rcmdrvr in King of the Mississippi by rcmdrvr - FINISHED - Artensania Latina
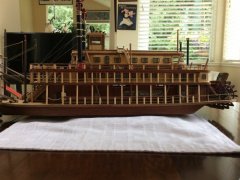
This is how she stands now. Next steps will be the second deck.
-
Cathead reacted to rcmdrvr in King of the Mississippi by rcmdrvr - FINISHED - Artensania Latina
Installed the paddlewheel and the drive arms.
-
Cathead reacted to rcmdrvr in King of the Mississippi by rcmdrvr - FINISHED - Artensania Latina
Next I went to work the posts and rails. Each post had to be individually cut and then carefully sanded to achieve a tight fit. Overall I was pleased with the posts and railings.
-
Cathead reacted to rcmdrvr in King of the Mississippi by rcmdrvr - FINISHED - Artensania Latina
Went to work on the stair cases. Not too happy with the results. The steps were easy to put around the post but the stair railings twisted. If I had to do it again, I think I would have fashioned my own railings. I would have used better would that could have been stained rather than painted.
-
Cathead reacted to rcmdrvr in King of the Mississippi by rcmdrvr - FINISHED - Artensania Latina
Started work on the paddlewheel. I airbrushed the red and hand brushed the dark grey. Next step will be to install the wooden paddles.
-
Cathead reacted to kurtvd19 in Chaperon 1894 by Mike Dowling - FINISHED - Model Shipways - Sternwheeler Steamer
Mike:
Looking good.
The deck is glued down tight so there is no worry about warping at this point.
I airbrush, but this works with brush too. Wet the wood - dampen the wood is more accurate - let it dry and you will see that it has fuzzed up. Sand lightly to knock off the fuzz and dampen it again. Re-sand and then paint. There might still be a bit of fuzz, but much less. A very light final sanding will give a smooth surface. I use a very worn sponge sanding pad (by 3M) for this.
Another way to avoid the soaking in of the paint and fuzzing of the basswood is to apply Shellac to the wood - the Shellac seals the wood. A very light sanding and then paint.
Kurt
-
Cathead reacted to Mike Dowling in Chaperon 1894 by Mike Dowling - FINISHED - Model Shipways - Sternwheeler Steamer
Time for a winge!! I reckon that Model Shipways get their basswood from the same place as Constructo !! Both are horrible, very prone to denting and as absorbent as blotting paper. It just loves to soak up anything like water including paint and then warp in a variety of directions. I suppose if one wants to be precision accurate then mechanical engineering with metal is the answer and this sort of thing is the punishment that those of us who work with wood must put up with.
Right, enough of the rant. I have now put the first deck on the hull which proved to be a lot more difficult than I anticipated. To be honest apart from the above I am not sure why it was so awkward but I had the devils own job lining up the four parts required. Anyway, they are now on, very firmly glued (!!!) and the sort of 'dog tooth' joint between the sections filled and re-scored for the imitation planking. To be perfectly honest I would have preferred to plank the deck as I have with others but I am trying to follow the destructions!
I don't have an airbrush so I am intending to hand paint the deck with iron oxide coloured paint as suggested but which I have to say is very orange. My main problem is that if I water down the paint it will make the basswood far too soggy and raise the grain far too much. If I use it too thick it will fill in the laser cut plank markings. I have tested on a piece of scrap and the coverage is good and I found if I sanded it afterwards very, very gently that the wood doesn't show too much through and if anything leaves a sort of weathered effect.
Any hints or opinions as how to progress gratefully received.
Anyway, a couple of photos of the deck.
-
Cathead reacted to heksanol in 18th Century Longboat by heksanol - FINISHED - Model Shipways - 1:48
Another day, a little bit done
Cut out a template for the rear and front boards and glued on the planks that I assembled before hand. I added a black line to one edge of the planks via a permanent ink marker to simulate caulking:
After the template dried I cut off the excess wood:
I tried a dry fit of the rear board and front board, but discovered that the scale of the diagrams to the actual model was off. Uh oh. Will have to modify the board to fit on my own.
So, after some modifying, got the boards to fit. Not the same as the plans, but still adequate.
-
Cathead reacted to Panama Port in Mississippi by Panama Port - OcCre - 1:80
I hate wallpaper!! I won't do it for the admiral and can't believe I did it for this model. As usual the reasons became very obvious very quickly. The first one went on quite well. I thought I might be able to do this then disaster struck. Paper stuck and I tore it to shreds trying to get it off.
Can you see it?
$30 Printer/Copier and a little creativity solved the problem.
-
 Cathead got a reaction from Keith Simmons in Chaperon 1894 by Mike Dowling - FINISHED - Model Shipways - Sternwheeler Steamer
Hey, Mike, welcome back. I'm so glad to see a new log for this kit, as an American riverboat aficionado. I'll be very interested in following along and learning more about what the kit is like, as from afar it seems to be one of the few reasonably accurate steamboat kits out there.
-
Cathead reacted to heksanol in 18th Century Longboat by heksanol - FINISHED - Model Shipways - 1:48
Greetings
Had some time again to work on the model.
I finished with the rail, and made the middle joining piece.
I added the planks at the bottom, as well as staining the planks and the rail with oak colour. I am pleased with the colour results.
Finally, I added the lower rails, as well as staining them oak. Hopefully later I can take some pictures with sunlight.
-
Cathead reacted to Mike Dowling in Chaperon 1894 by Mike Dowling - FINISHED - Model Shipways - Sternwheeler Steamer
And here are a couple of shots of the boiler. A wee bit more paint and the steam lines to go on but otherwise done. Matt black really doesn't photograph well and I can't believe something so boring to look at could have taken so long to put together!
-
Cathead reacted to heksanol in 18th Century Longboat by heksanol - FINISHED - Model Shipways - 1:48
Greetings.
Had some time to make some progress.
Painted the rest of the hull in white, as well as fit the stern post:
I applied a coat of gloss varnish for protection while working further on the ship. Will make it matt again later.
I started with the cap rail:
After some sanding down:
I am still going to fine tune the cap rail, as well as add the joining piece.
The cap rail am going to stain with an "oak" colour.
Until next time!
-
 Cathead got a reaction from Canute in Heroine 1838 by ggrieco - FINISHED - Scale 1:24 - Western River Steamboat as she appeared before hitting a snag in the Red River
Idle? More like idol! Can't wait to see how you handle the chimneys, the geometry of fitting those through multiple decks is a challenge.
-
 Cathead got a reaction from muzzleloader in To help kit developers and kit builders alike-What would you like to see developed for the hobby.
People aren't being unreasonable, they're doing exactly what they were asked to do by the topic, sharing what they'd like to see. Most of us don't know anything about the business side of kit development (which is why I tried to ask about it earlier), so how do you expect respondents to magically produce only practical answers?
Look, no one understands businesses they aren't engaged in. Among other things, I'm a vegetable farmer, and farmers market customers always want their produce organic, perfect, and cheap. Well, you can't have all three. Organic and perfect, it won't be cheap. Organic and cheap, it's going to have bug damage. Perfect and cheap, it ain't going to be chemical-free. But people who have never grown a vegetable in their life, or even people who have a home garden, have no mental structure for evaluating the actual business of vegetable production.
So there's no need to get huffy about modellers saying what they'd "like" to see, especially when that's what was asked for. If we can get a nice explanation from the developers of what actually goes into the business model of kit development, maybe then we can give more "realistic" answers. Until then, just take the feedback here at face value as a narrow sampling of a limited community of dedicated modellers and get what value you can from it.
-
Cathead got a reaction from Canute in Whats the chemical for "chemically blackening"?
I posted a short forum a while back about a similar product from BlueJacket, it has some responses, advice, and my own followup experience with the product.
http://modelshipworld.com/index.php/topic/12757-experience-with-bluejacket-metal-toners/
-
Cathead got a reaction from Keith Simmons in Heroine 1838 by ggrieco - FINISHED - Scale 1:24 - Western River Steamboat as she appeared before hitting a snag in the Red River
Sorry, Glenn, I don't have any special insight. Any idea of Heroine used heat guards around the chimneys? You make a good point about consistently keeping it simple, rather than extrapolating beyond current knowledge.
Part of my questions was when/how you're going to run the chimneys through the boiler deck. Will you make a separate assembly leading up to that deck, for ease of installation soon, then drop the rest of the chimneys in on top later on? Or will you make it all one assembly that you'll run through the boiler deck framing, and plank around later on?
-
Cathead got a reaction from Keith Simmons in Heroine 1838 by ggrieco - FINISHED - Scale 1:24 - Western River Steamboat as she appeared before hitting a snag in the Red River
Those windows...I'll need to wipe the drool from my keyboard.
What's your plan for running the chimneys through the boiler deck?
-
 Cathead got a reaction from Omega1234 in Heroine 1838 by ggrieco - FINISHED - Scale 1:24 - Western River Steamboat as she appeared before hitting a snag in the Red River
Idle? More like idol! Can't wait to see how you handle the chimneys, the geometry of fitting those through multiple decks is a challenge.
-
 Cathead got a reaction from mattsayers148 in USRC Ranger 1819 by Cathead – FINISHED – Corel – Scale 1:64
Roger, thanks. I think I have enough information to move ahead with something that will be better than the original, if not entirely prototypical. I'm going to try to mimic the Louisiana drawing above, in part. Hopefully I'll show some progress this weekend.
I very much appreciate your willingness to advise amateur projects like mine.
-
 Cathead got a reaction from FriedClams in USRC Ranger 1819 by Cathead – FINISHED – Corel – Scale 1:64
Roger, I'll look forward to your photo. After a bit more research, your explanation matches my new mental impression of how the transom is supposed to be; the filler blocks represent the lower/horizontal portion of the horn timbers, while the solid "transom" piece represents the upright framing that connects at an angle, just in a cheap and confusing way. The kit does have the stern extending out beyond the rudder post, which passes up between the filler blocks as it should, leaving the transom extending to the stern past the rudder, so I think that part is right (you can see this slot in the photo below).
Here's a quick mockup of what I think the transom framing should look like. Just imagine the lower portion of this assembly mortising into the lower horn timbers extending away from the camera, into where the filler blocks are instead:
This would then be planked over fore and after, I assume, with the aft planking extending in a gently rounded curve just a bit beyond the hull planking and the low bulwarks.
I looked at a plan for a similar William Doughty vessel, and it showed a gently rounded transom extending just beyond the hull.
The above is crude, and not glued into place or anything, just me test-fitting pieces and drawings to see if it feels right. What do you think?
-
 Cathead got a reaction from Blighty in USRC Ranger 1819 by Cathead – FINISHED – Corel – Scale 1:64
Stage 3 - preparation of frames for first planking
Fairing the frames is pretty self-explanatory. I added thicker filler blocks at the bow and stern than those provided in the kit.
The real challenge in this stage (and the next one) is deciding what to do about the transom. The instructions provide unclear, and conflicting, information about the transom's relationship to the planking. Just look at the images below:
Upper left shows the first planking lining the outside of the transom. Upper right shows the second planking butting up against the inside of the transom, incompatible with the previous image. Lower left shows the planking butting up against the transom, too.
The written directions don't help. The first plank (along the edge of the deck) is to be installed "terminating against the transoms", clearly contradicting the photo upper left. However, in Stage 4, they say of the first planking, "these are glued under the transom", implying that the photo upper left is what's intended.
Adding to all this, the transom supplied in the kit appears way too wide (photo bottom right). Not only is it cut asymmetrically, it sticks out on either side well beyond the width of the hull, making it impossible to extend the planking along its side. Matt.s.s appeared to get around this problem by doing both; butting the first plank up against the transom while wrapping the rest around the outside.
I'm honestly not sure what's accurate here; should the transom extend beyond the hull's width at all, or be fully contained within the planking? My instinct is to terminate all the planking against the transom, which makes life much easier.
Stage 3 involves laying the first strake along the edge of the deck, so here it is. The edges pulled away from the bow a bit; I thought I had it clamped tightly enough when I left it, but now there's this annoying gap with stretched glue solidified in it. I'm trying to decide whether to attempt to re-do this or just not worry about it and allow the planking to flow from here, as this is just the first layer and I can fill and sand to my heart's desire before laying the final planking.
Either way, it's on to Stage 4, planking the rest of the hull.
-
Cathead got a reaction from FriedClams in USRC Ranger 1819 by Cathead – FINISHED – Corel – Scale 1:64
Stage 2 - Deck
Now the deck needs to be fitted to the frames. I don't agree with the way the instructions approach this step, and will suggest an alternative. The plans show the theoretical location of each frame where it meets the deck (top of photo below).
The instructions want you to glue a series of short walnut laths onto the deck's underside, on either side of where the frames will go, to provide a nice secure slot. This is sensible. However, the instructions tell you to do this by taping these laths to the plans, spreading glue on them, then carefully placing the deck over them and weighing it down. I though this approach sounded overly complicated and sure to create problems, so I used a different approach.
As faintly shown in the photo above, I laid the deck over the plans and traced the outline of each frame's ideal position onto the deck. I then fit the deck onto the frames and compared theory with reality, adjusting my pencil lines where needed (a few didn't quite match up). If I'd done it the plans' way, I would have been very annoyed to discover my plans not quite fitting the walnut slots.
Instead, I glued laths onto the deck individually, so I could position each one properly instead of relying on the decking sitting on them all perfectly. I did all the aft-side laths first; when they dried I test-fitted the deck again, held it on with a few rubber bands, and added the fore-side laths so they'd be snug against the actual frames (photo below). This worked beautifully for creating nice tight slots for the frames that fitted the actual model, not the ideal plan version which didn't quite match the cut parts.
Alternatively, I could see an argument for gluing the laths onto the deck before gluing the frames to the keel, then using the pre-slotted deck to ensure that each frame is exactly where it's supposed to be. But if you glue in the frames first, don't pre-glue the laths on the deck without checking as described above. The kit isn't engineered well enough to take that gamble.
When I was happy with the slots, I moved on to attaching the deck. The instructions suggest wetting the surface of the plywood, then spreading glue on the frames and bending/gluing the whole thing at once. I was suspicious of this, so wet the deck (using a toothbrush and water dish) and fit it first without glue, rubber-banding it down and letting it dry into the proper camber. Honestly, I didn't need to do this, the deck bent really nicely with a light surface wetting, but it didn't hurt either.
Once it was dry and I was happy with the fit, I removed the deck, spread thin glue along all the frames, then re-wet and refit the deck. I wrapped rubber bands around the structure at every frame to ensure that the deck bent properly and fully through the camber. I'm pleased with the final result. The structure is strong and ready for the next step.
Next up: fairing and filler blocks.