HOLIDAY DONATION DRIVE - SUPPORT MSW - DO YOUR PART TO KEEP THIS GREAT FORUM GOING! (Only 13 donations so far - C'mon guys!)
×


UpstateNY
-
Posts
466 -
Joined
-
Last visited
Content Type
Profiles
Forums
Gallery
Events
Everything posted by UpstateNY
-
 Just gorgeous work. Congratulations and I hope you have a wonderful place picked out to display your fleet! Cheers, Nigel.
- 153 replies
-
- 1
-

-
- royal caroline
- panart
- (and 1 more)
-
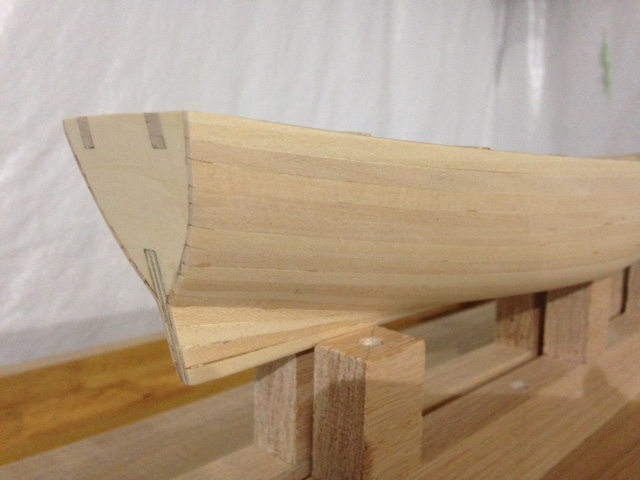
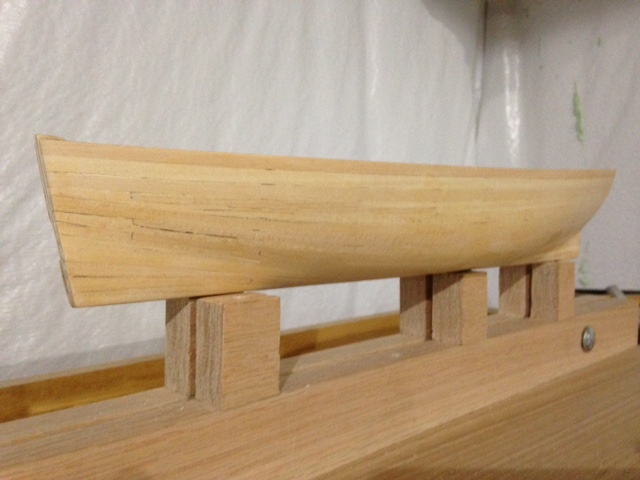
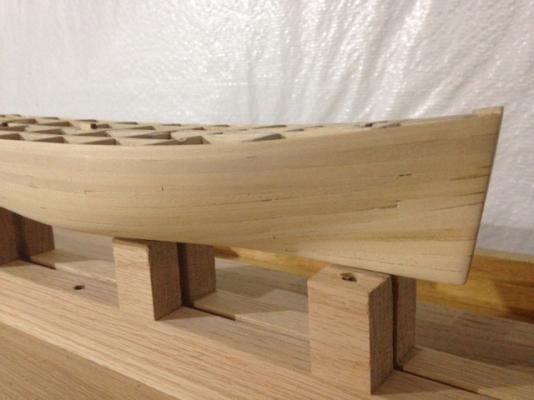
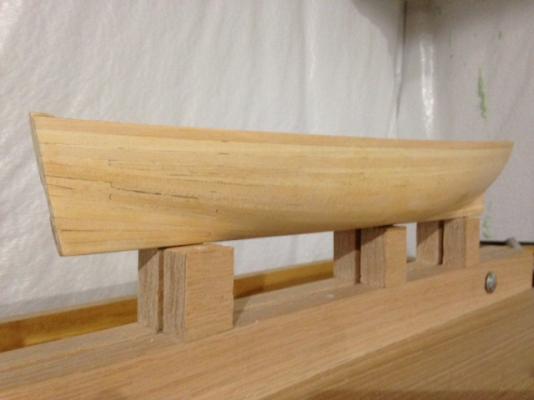
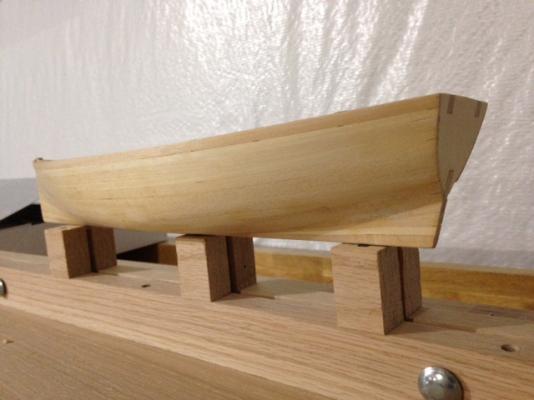
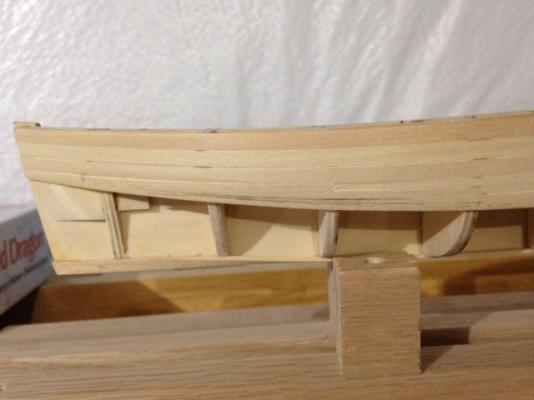
Thank you Augie and Theo for the kind comments. We actually dodged most of the storm up here, only got about 6 inches. Hope everyone further east in New England is doing OK. So, a small milestone as the first planking is now complete and the hull sanded. Elbow grease was applied per Augie’s recommendation so things are a bit dusty in the basement right now! There is still some work to even up the bow and stern so the second planking will flow cleanly into the walnut false keel. Next step is to decide the hull and deck planking pattern. I will be using 4in long planks so perhaps a 3 or 4 shift pattern? Model is pretty small so a 5 shift pattern may not show enough repeats to make sense. I am also thinking about getting a draw plate as some treenails would be fun to do. As usual, thanks for reading. Nigel.


- 270 replies
-
- 7
-
-
- red dragon
- artesania latina
- (and 1 more)
-
Hi Augie, I've finally managed to get up to date on your build log...took a while to say the least. The time was well spent as your build is amazing and I learnt a lot. Really like the way this kit allows you to add so much detail and the pumps above are just the latest example of your great work. Now I have to go and look up what a "jeer bitt" is and what it does! Cheers, Nigel.
- 2,191 replies
-
- 1
-
-
- confederacy
- Model Shipways
- (and 1 more)
-
Hi Janet, Agree 100% with John as your build is amazing. I am looking forward to an update when you have time. Nigel.
-
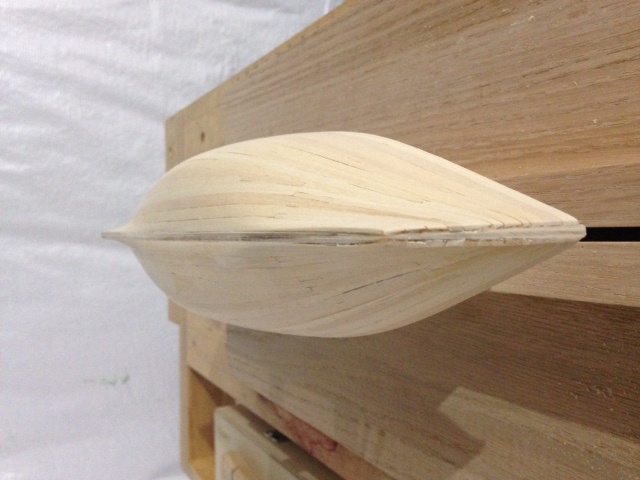
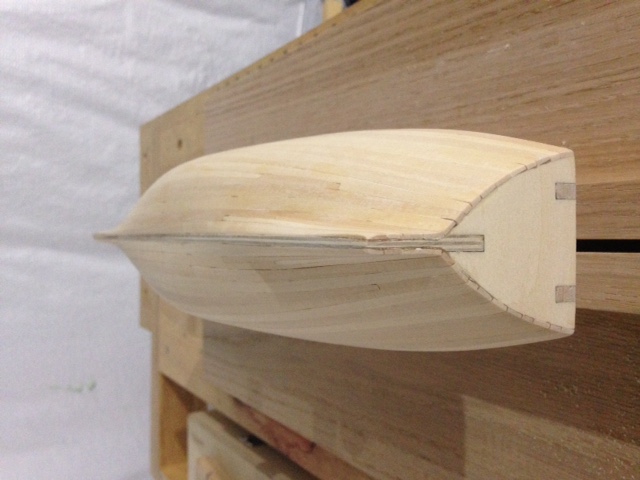
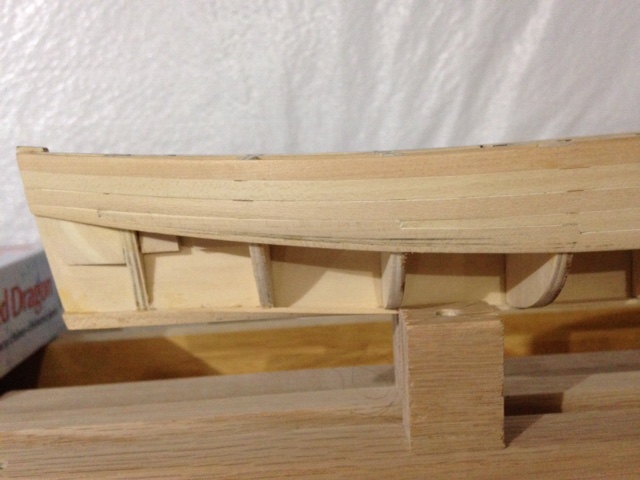
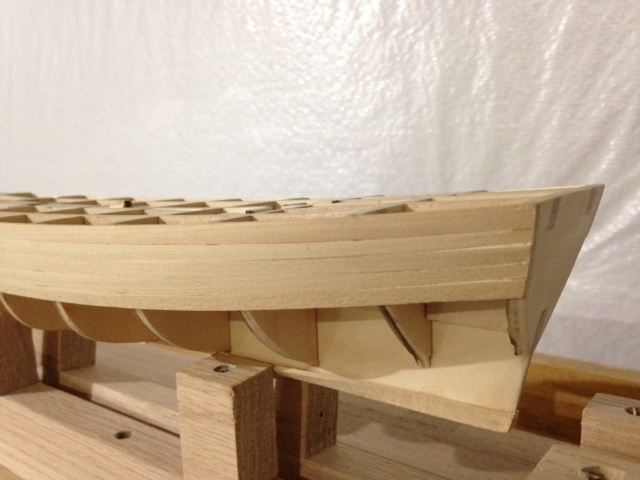
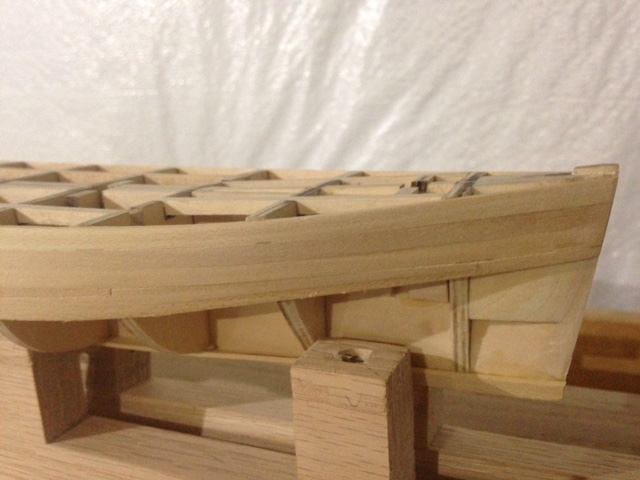
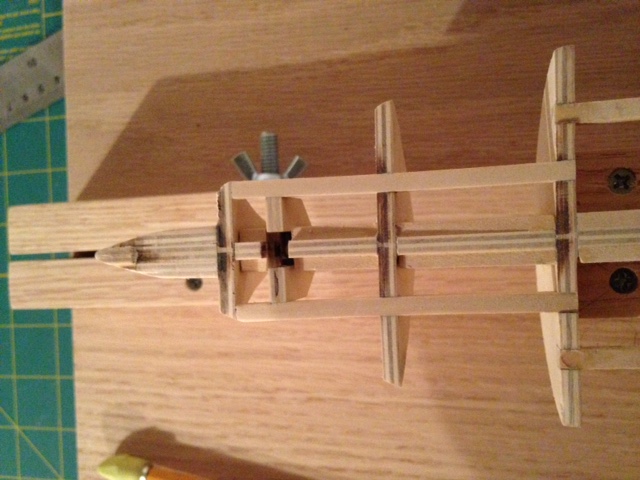
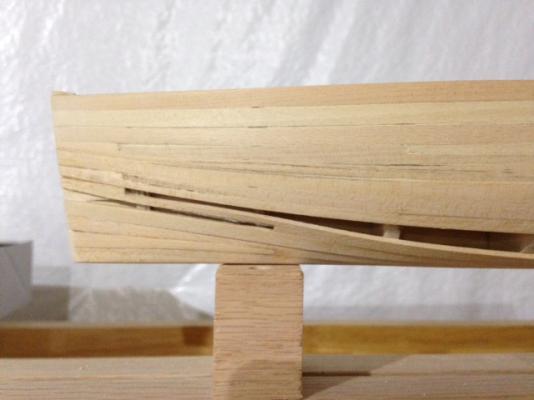
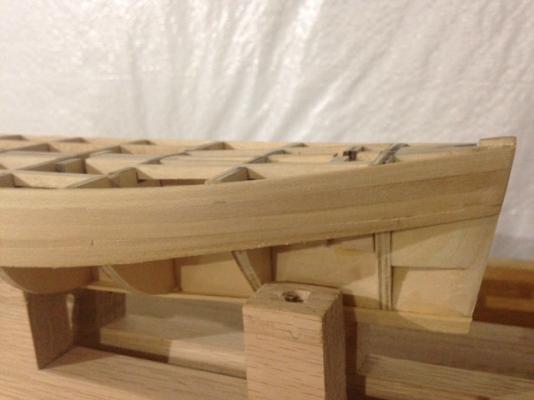
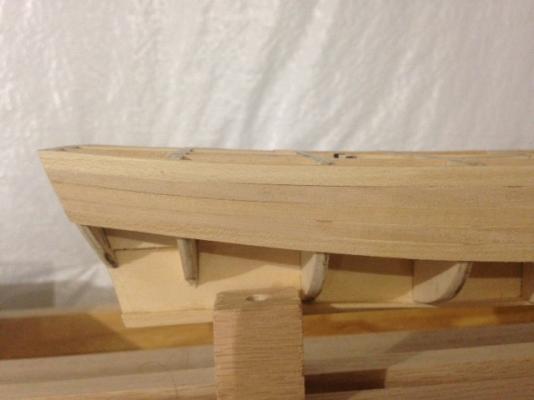
So planking continues on the Dragon. It took me ages to work out how the planks needed to run and then work in the drop planks, but I finally managed to get the port side closed up. I broke a couple of planks along the way as I had to notch one plank from both above and below. As Brian suggested, I start to thin down the final planks to avoid a very thin final plank to close the hull. The final few shots show the hull after sanding. You can see a few places, especially on the bow, where some gaps opened up as I sanded so seems I need to chamfer the planks more carefully next time. Overall I am pretty happy with how the port side turned out as the hull lines seem to run smoothly from bow to stern so I am hoping I am in decent shape for the final planking. Thumbnails below. Now, it’s back to the basement to close up the starboard side! Just hope I have enough wood left to complete the job after my breakages. Will be close! Thanks for reading and of course for the replies and likes which are much appreciated. Cheers, Nigel.


- 270 replies
-
- 15
-
-
- red dragon
- artesania latina
- (and 1 more)
-
Sweep ports look great to me...your build is looking really good!
- 831 replies
-
- 1
-
-
- Armed Virginia Sloop
- Model Shipways
- (and 1 more)
-
Hi Brian, I did measure each frame to determine the number of planks needed when I worked out where the drop planks would be. I think the chamfering I did to fit each plank also narrowed them slightly leading to this potential problem. At least I found this early enough to adjust and as you say, reducing the width of the final 2-3 planks should avoid the need for a very thin final plank. I will also look at using the planking fan method for the second layer. Hi Simon, Jury is still out on need for any filler over here, but fingers crossed it won't be needed! Looking forward to seeing your progress! Cheers, Nigel.
-
Thanks Augie and Brian. Appreciate the inputs. Got a couple more planks on the Dragon tonight and yep..another drop plank was needed. It went on more easily than the first one fortunately. Right now I'm going with what the hull is telling me it needs like you both suggest. I also did some checks and seems I need to watch the plank widths from now on to avoid needing a very thin final plank to close the hull up. Cheers, Nigel.
-
Thanks for dropping by Brian. If my planking turns out as well as yours in the end, I'll be very happy! The planking certainly does take a lot of time. I am hoping the time spent on the first layer will then let the second layer go smoothly. Can't be much sanding given how thin the walnut is for the second layer! Cheers, Nigel.
-
Catching up on your log Brian. I like your planking pattern choices very much and the finish looks great. Like the method you used to do the ports as well and they look really good. Looking forward to seeing the starboard side! Nigel.
- 831 replies
-
- 1
-
-
- Armed Virginia Sloop
- Model Shipways
- (and 1 more)
-
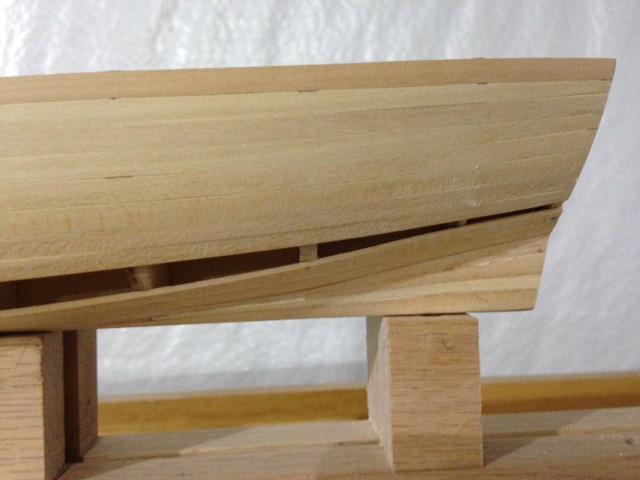
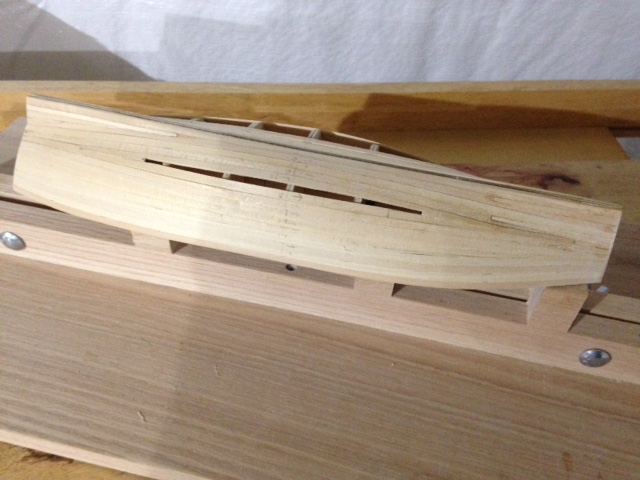
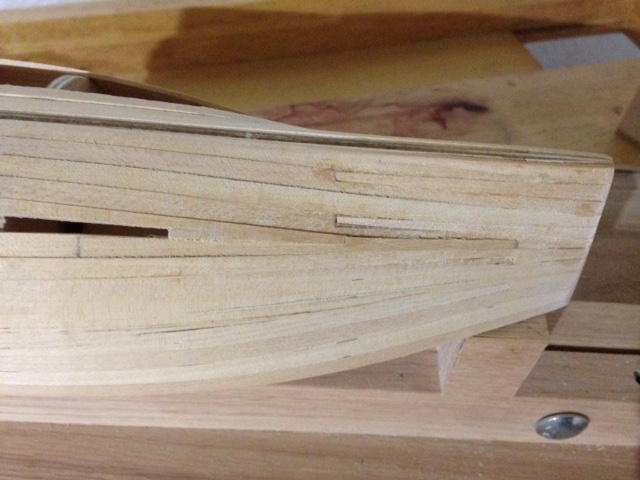
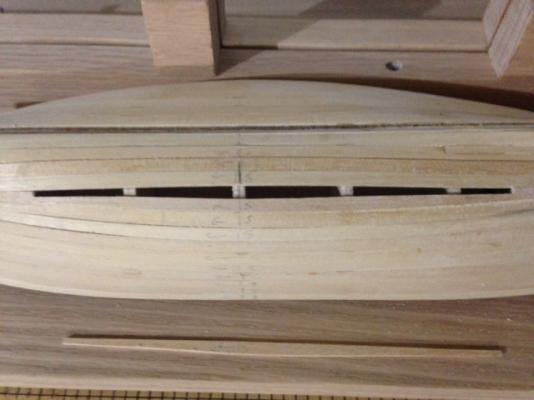
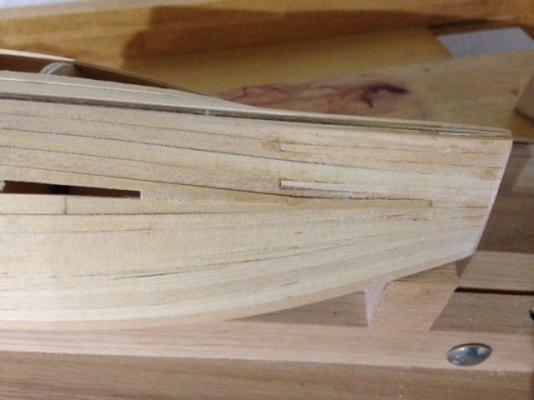
So, I started the first planking this week. Garboards are on as well as the first 5 rows starting from the deck level on each side. Progress is a bit slow as each plank has to be sanded and chamfered individually as the planking how-to's warned! It is taking me about an hour to fit each plank right now so it's a good thing I am not in a hurry! I did need a drop strake on the bow to move from five to four rows and I expect I will need at least one more drop strake before the bow is done. To get the drop strake to fit smoothly, I had to put in a joint between 3rd and 4th frames on both sides as otherwise the planks tended to split. The hull shape seems to be running smoothly, but I am wondering if I made a fairing error or possibly should have put the drop strake on row 3 rather than 4. Inputs would be welcome so I understand this properly. Fortunately, by shaping the planks, I’ve been able to avoid using any steelers at the stern so far. Hull will need a fair amount of sanding to fully smooth things out, but I'm pretty happy with the results so far. Thumbnails below. Thanks for reading. Nigel.

- 270 replies
-
- 11
-
-
- red dragon
- artesania latina
- (and 1 more)
-
Great progress Simon...also like the planking jig!
-
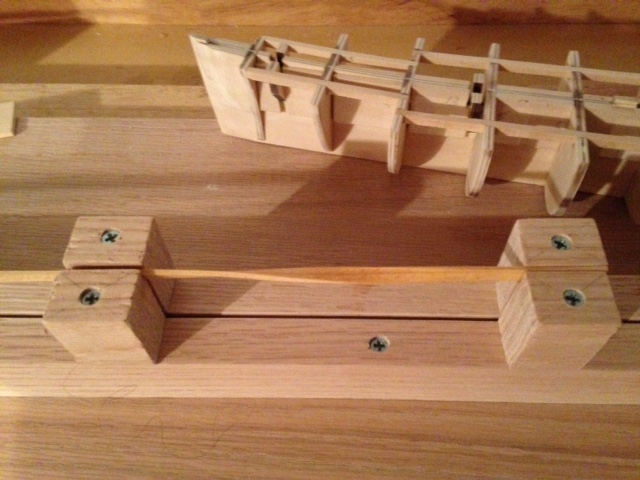
Hi Augie and Carmelo, Thanks for stopping by. Would appreciate any tips or thoughts you have...just don't expect fast progress as I need to learn the skills I need to perhaps do a more advanced model in the future. Finding it really relaxing after work to spend even just an hour on the model. Augie, The how-to articles posted on this site are extremely helpful and my thanks to the authors and moderators for posting. I'm rather enjoying reading through them, even though my current build won't need all of the info. Carmelo, The build clamp I made myself using off the wood at Lowes (a large do-it-yourself chain for those outside the US). It will need some mods this weekend as I made the clamps too wide to allow the model to be held inverted with the deck supports now in place Live and learn! Thanks, Nigel.
-
Hi Simon, Color choice looks good to me. As for the lighter areas, my 2 cents is to use the area that will be covered by the cabin as a test area and do a further fine sand and then a light second stain to see if you can even it out a bit. I'd probably use a rag to apply the stain and then wipe off the excess quickly to do the restain in stages. Perhaps someone else has a better idea. As you say, most will be covered in the end and the deck already looks very nice. Nigel.
-
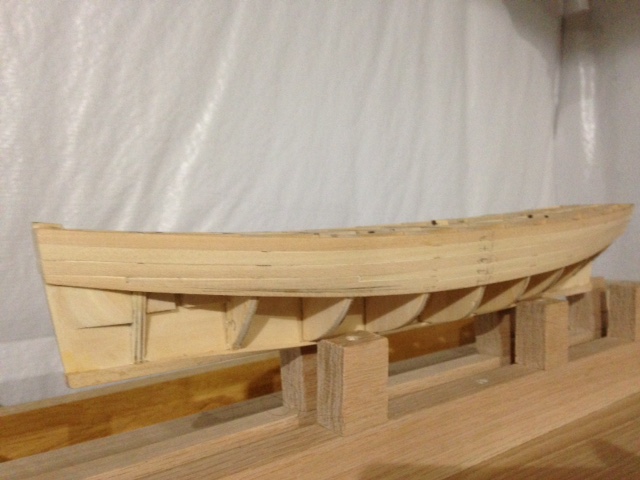
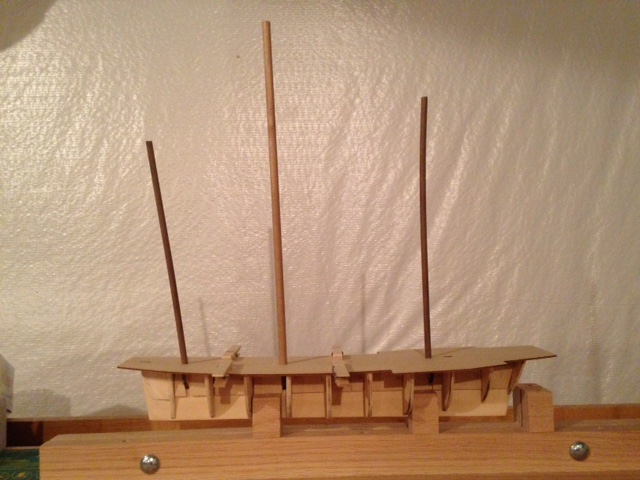
No worries Simon..stop by any time! There has been a little progress on the build. Keel and frames are now sanded down and test planks seem to follow the hull smoothly. I’ve dry fitted the deck to check the fit to the top of the frames and took the chance to also dry fit the masts. I wanted to make sure I can hit the mask angles required from the plans, the foremast is angled forward quite noticeably on this model. Dowels are a bit warped and will need straightening. I am now starting to work on the planking and did some tests to try and make the garboard plank by soaking a plank and then clamping it past the needed angle. When the pressure was released after a few hours, the plank relaxed back to give a decent 90 degree bend that actually followed the hull line reasonably well. There seems to be very little room to rabbet this plank into the false keel as some articles recommend, so I will probably just gently sand this plank to chamfer it so it butts up tightly against the keel. Thumbnails below. Thanks for reading. Nigel.


- 270 replies
-
- 7
-
-
- red dragon
- artesania latina
- (and 1 more)
-
Looks really good! I'll follow along if you don't mind as we are building the same model. Thanks, Nigel.
-
Hi Simon, Thanks for stopping by, but sorry there is no guru building this Red Dragon!!! Kit is a nice starter kit, I think. For tips, check out the framing and planking articles posted on this site as well as the logs of the expert builders here. These articles, and the pictures in the logs, really helped me finally understand why my models from many years ago didn't work out. Main reason was I always brought the first plank next to the false keel (garboard strake?) too far up the bow. This meant I ended up with many very thin planks at the bow especially. Perhaps I can now avoid at least some of my planking sins of the past! Thanks, Nigel.
- 270 replies
-
- 1
-
-
- red dragon
- artesania latina
- (and 1 more)
-
Hi Simon, Glad you found a good solution for your deck nails. Understand the strike comment...I was thinking some steady pressure to gently recess them would do the trick. Not sure what you are doing w your planking, but I've read some builders leave the holding nails slightly high so they can easily remove them after the glue dries and then then add their treenails. Wonderful pictures of the actual ship just posted by Tarbrush. Will you paint your hull to match? Finally, my build log is up, but I need more approved posts before I can add the link to a signature! I'll be posting another update soon, but am still (very!) slowly sanding the frames and false keel to get the bearding lines right. Thanks, Nigel.
- 35 replies
-
- 1
-
-
- Constructo
- Gjoa
- (and 1 more)
-
Hi Simon, Wow...you are really building fast! Deck looks good and I'd expect a light sanding to remove any glue and so help the stain to take evenly. I plan to do some test areas to see how the stain takes on my build. Hopefully you countersinked the remaining nails OK with a small punch...for very small nails I've filed down a large nail to blunt it down and so create a very fine punch. Of course, this feedback is a bit late now given your deck is now planked! Putting some adhesive on the treenail should work great but I've not done this myself and so I'll learn from you here. How do you plan to make your treenails? I am thinking of ordering the Byrnes draw plate to make mine. I've seen it mentioned on other build logs as a good way to make treenails of differing scales. Link below in case it is useful. Thanks, Nigel. http://www.byrnesmodelmachines.com/drawplate1.html
- 35 replies
-
- 1
-
-
- Constructo
- Gjoa
- (and 1 more)
-
Hi Simon, You are making fast progress as I am still sanding my frames down! The balsa blocks should work well for adding gluing more gluing area. By decorative nails, do you mean treenails? I'll be interested in your choice here as I am thinking about how to treenail my hull and deck as well. Also I doubt the soft balsa will properly hold any nails you need while the glue dries. Hopefully a light sanding will level the center planks before you apply any finish. If you've not does so already, perhaps countersinking any remaining nails below the deck line would help. Keep going and enjoy! Nigel.
- 35 replies
-
- 1
-
-
- Constructo
- Gjoa
- (and 1 more)
-
Hi Simon, Like you I am new round here and I guess I get to welcome you to MSW! Looks like you have picked a great first build! Will check in every now again and see how you are doing. Welcome again! Nigel. PS You got me beat for cold! Only -17C here right now !
- 35 replies
-
- 1
-
-
- Constructo
- Gjoa
- (and 1 more)
-
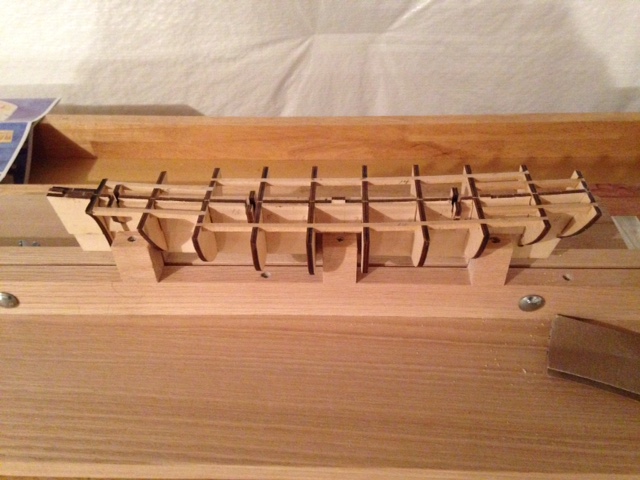
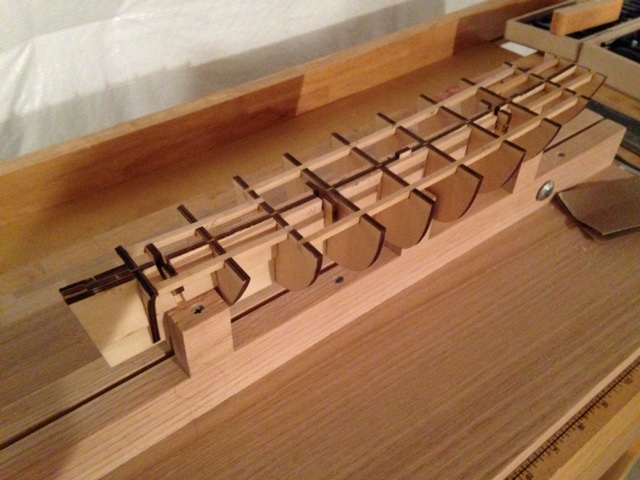
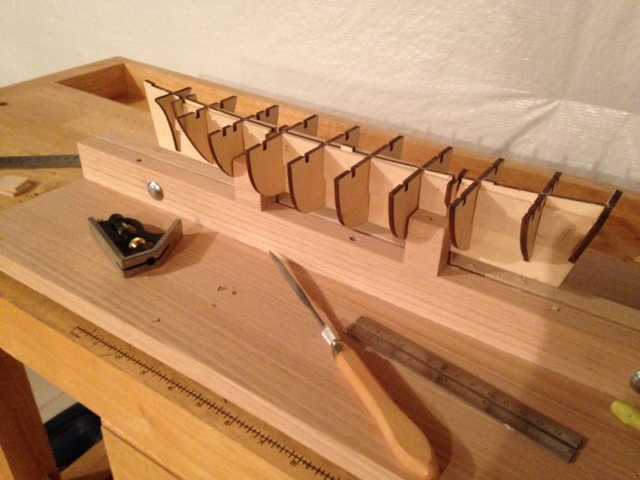
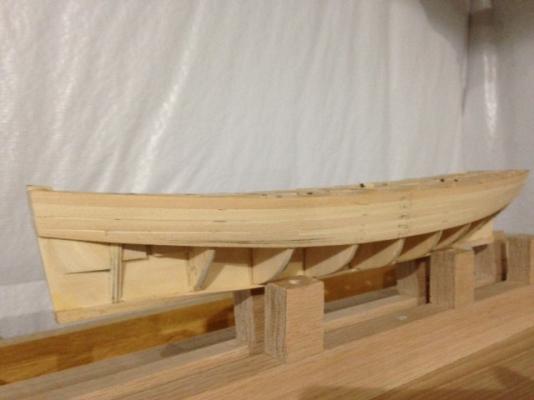
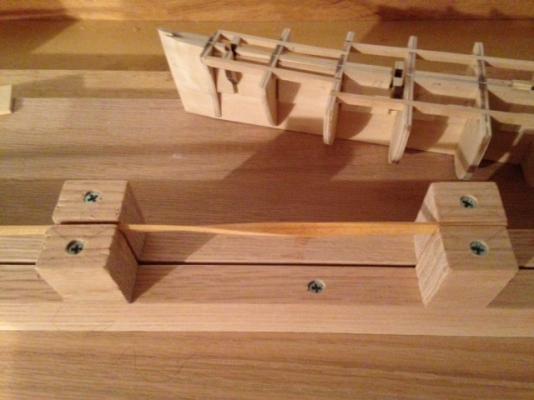
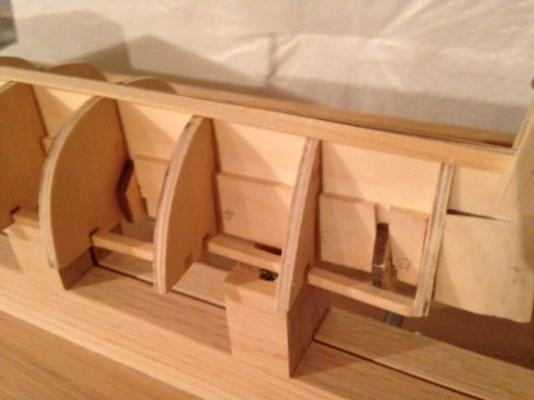
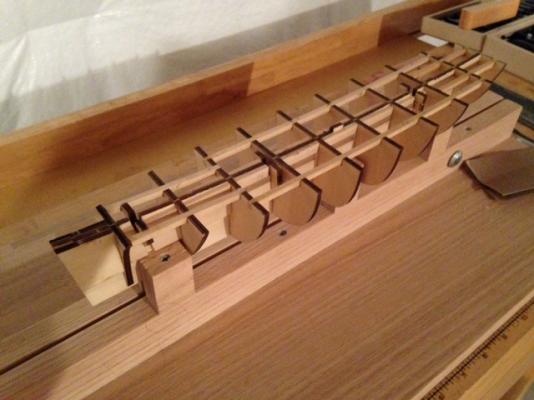
Hi All, Quick update. Keel, frames and deck supports are now glued and things seem pretty straight. Photos below. Now reading up on hull and deck planking from the articles posted in the Ship Model Framing and Planking section. Great list of articles...just wish I’d seen these 20 years ago! So after some reading, next step will be to gently sand the frames to shape before starting the planking fun. Thanks, Nigel.

- 270 replies
-
- 7
-
-
- red dragon
- artesania latina
- (and 1 more)
-
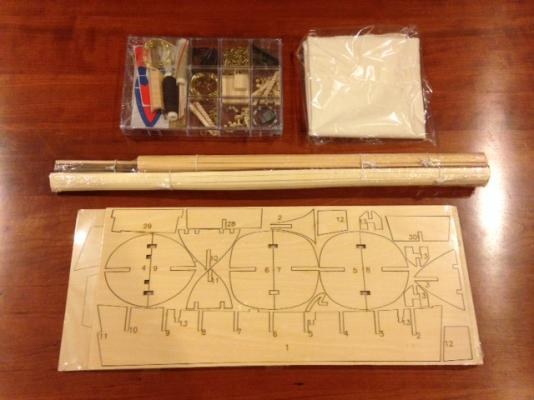
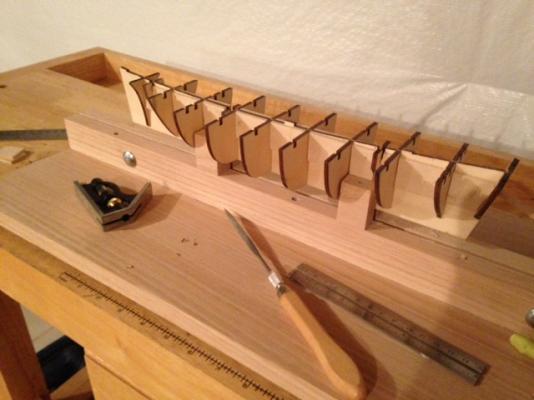
Hello All, This is my first build log as I am returning to this hobby after many years as I was lucky enough to be given the Red Dragon as a Christmas gift. I am looking forward to building this model and will certainly appreciate any and all comments along the way! Thanks again for all the kind welcome notes after my first post last week. Opening the box was actually a pleasant surprise as I found a neat, shrink wrapped package containing all the items, including a plastic box with all the fittings. Very different to the box mayhem that I remember from over 20 years ago when all the components were mostly left to freely roam around the box. The instructions were disappointing, being nothing more than a basic listing of the build order complementing a nicely printed, but detail-limited plan sheet. On the plus side, there was a nice set of photos of the model at different build stages. Even though the box was unopened, I still did the inventory that many of you mention doing in your logs and happily I found nothing missing. The laser cut parts seemed accurately done when I checked what I could against the plans, but keel and frames seemed rather thin. Fitting quality overall was OK. On to the build! After making a build stand, the first step was to check the false keel against a straight edge and surprise (!) there was some warping. Fortunately, soaking the keel and gently clamping it for a couple of days seemed to correct the problem. The frames were pretty straight and quite symmetrical, perhaps a nice benefit of the laser cutting. As the keel was so thin, I glued bracing strips along each side to reinforce it and also increase the frame gluing areas. After cutting the frame slots in these strips, I spent a few hours sanding out the slots until the frames fit snugly. A dry fit showed things to be lining up well as far as I could see in both vertical and horizontal directions, so the next step is to glue them together. Attached a few photos. Thanks for reading. Nigel.


- 270 replies
-
- 8
-
-
- red dragon
- artesania latina
- (and 1 more)