HOLIDAY DONATION DRIVE - SUPPORT MSW - DO YOUR PART TO KEEP THIS GREAT FORUM GOING! (Only 13 donations so far - C'mon guys!)
×


UpstateNY
-
Posts
466 -
Joined
-
Last visited
Content Type
Profiles
Forums
Gallery
Events
Everything posted by UpstateNY
-
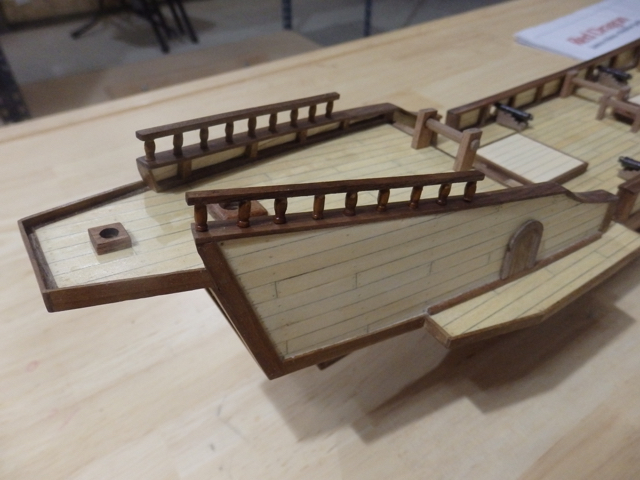
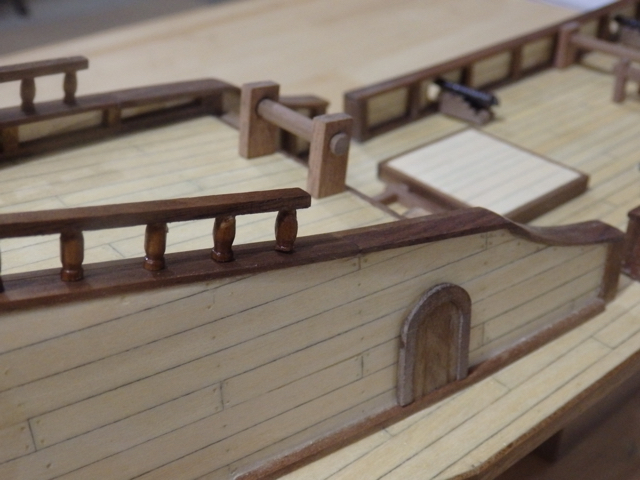
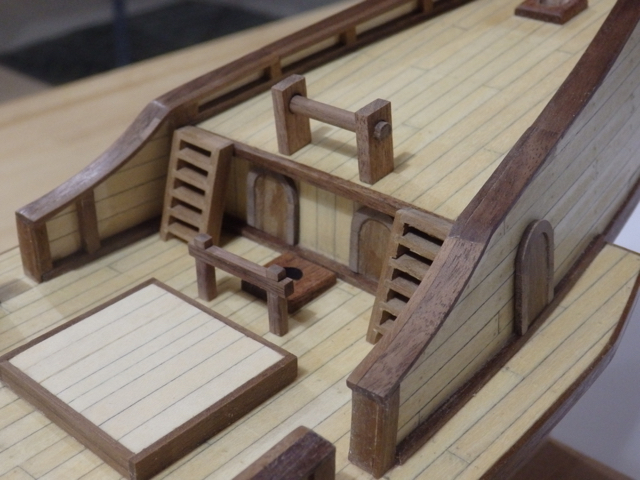
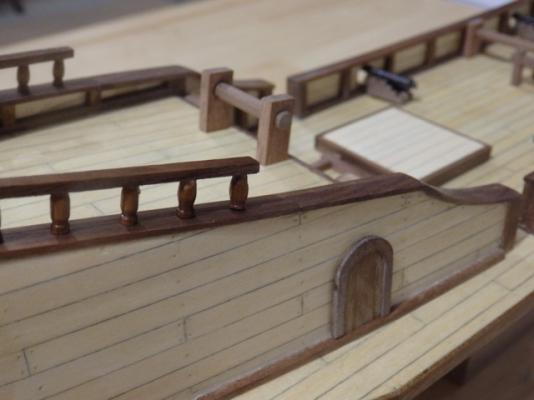
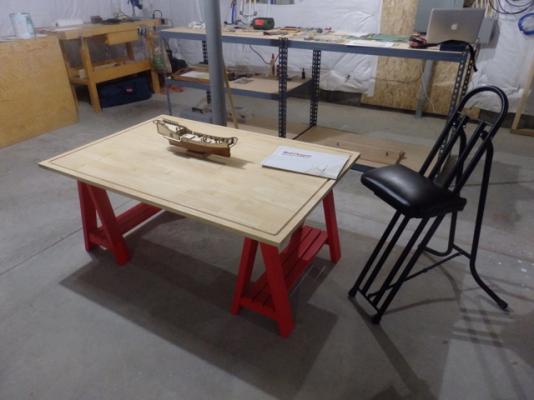
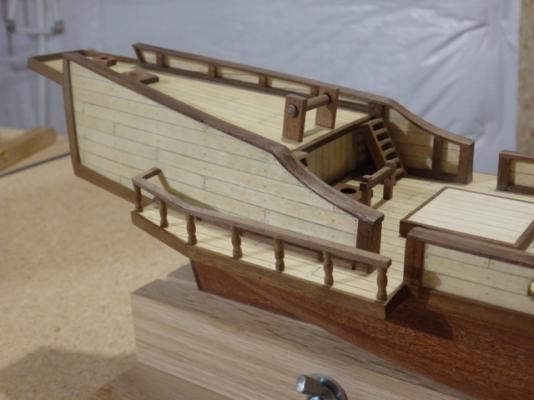
 HI All, Been making some progress on turning railings as I realized for the poop deck railings, I didn’t need as much height as for the entrance railings. This allowed me to cut off some of the bases so I could repurpose some of my earlier attempts. I then just cherry picked those pieces that matched reasonably well for height and shape. Railing was as usual slightly edge bent using heat to follow the poop bulwark’s curve. After gluing up, using the end of my ruler as a square to keep things as vertical as possible, I then finished the rails with a couple of coats of WOP. Hopefully my test fit shows the completed railings pass at least the famous “looks OK from a galloping horse" test! Macro shot shows I need to even up a base or two. Macro images are just plain tough...show up everything! Oh well...if at first you don't succeed...! Final shot shows my new ‘rigging table”…which is my captain’s old play table which she has now completely outgrown. Height is about 20 in and is ~50in long by 33in wide so my little Dragon looks rather lost on it! It also works great as a plan table. The black chair is my old astronomy observing chair and is infinitely adjustable for height as the seat grips the back rails using a plastic friction bar. Needs a foot rest at the highest settings (~36in so at least I do!) but again will work well for rigging w/o bending over or standing up for ever. I’ve not seen anyone mention these chairs before so figured I’d post in case it interests someone. They aren’t cheap, but I find mine sturdy and comfortable. Link below for those not into astronomy. Not done any checks for price so look around before you take the plunge if you like it. https://www.astronomics.com/astronomy-viewing-chairs_c457.aspx Thanks for reading and of course to those that hit the like button and made the kind comments. Support here on MSW is just great for us newbies! Cheers, Nigel.
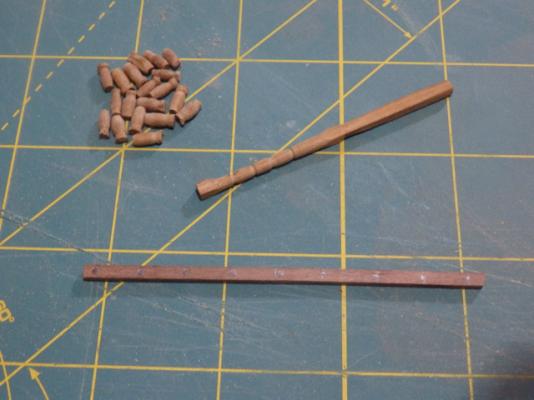
- 270 replies
-
- 5
-

-
- red dragon
- artesania latina
- (and 1 more)
-
Hi Ed, Robb and Ken, Thanks for stopping by and I appreciate the very kind compliments. Really glad I found MSW with all the great support out there to help new builders like myself. The Red Dragon is proving to be a really fun build and adding the extra details here and there is an extra challenge I am really enjoying. Robb, Glad to know you like this area. I am pretty new up here still, but love it as well. I hope you have another great visit again this year. Cheers, Nigel.
-
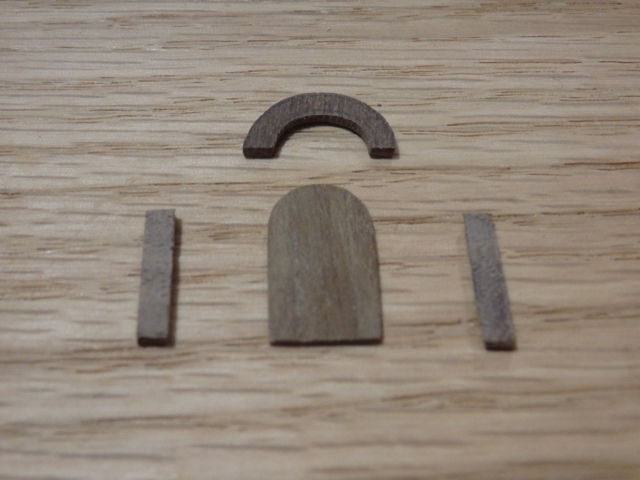
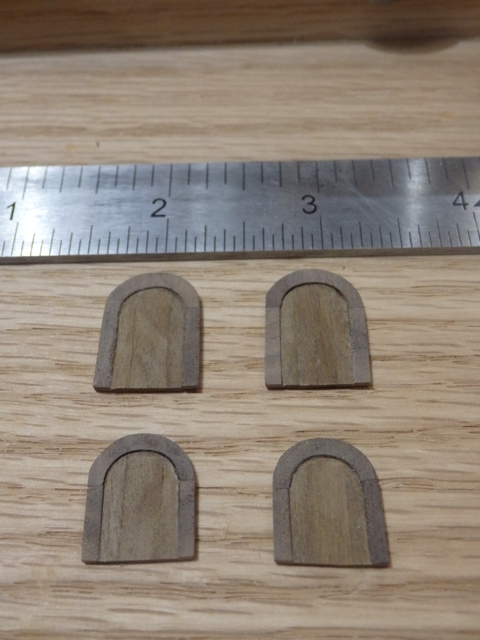
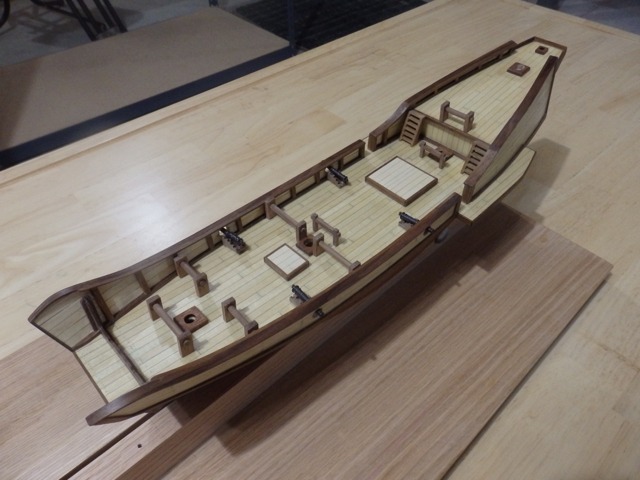
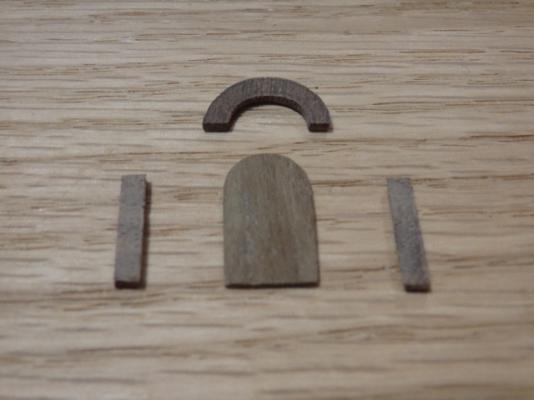
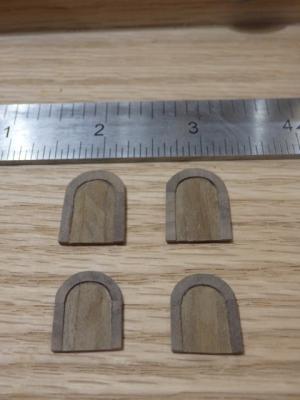
Hi All, Another small step forward as I’ve completed the four cabin doors other than adding the brass hardware as I am still waiting for the blackening solution to show up. The doors were assembled from some 5mm walnut strips glued together and then cut to shape. The kit did not provide any door frames so I made these from some slightly thicker walnut sheet to try and provide some extra detail. Each door was used as a template for its arch which was then roughly cut out from the walnut sheet before slowly filing it to fit. The doors by the mizzen mast are slightly shorter than the outer doors so they clear the poop deck edge trim. Their bottom edges were also sanded to follow the deck curve. Thumbnails below and thanks for reading. Cheers, Nigel.
- 270 replies
-
- 5
-
-
- red dragon
- artesania latina
- (and 1 more)
-
She is really coming along...still amazed at the detail level possible at 1/400th scale! I have a hard time at 1/60th holding onto things without dropping them every 2 minutes! Deck color is also just looking better and better as the color contrasts build up as you add all the other deck items. Cheers, Nigel.
-
Hi Augie, Fabulous work as always! Enjoy your vacation...being off grid in Alaska sounds wonderful! Good luck with the fishing! Cheers, Nigel.
- 2,191 replies
-
- 4
-
-
- confederacy
- Model Shipways
- (and 1 more)
-
Hi Jesse, Build looks great and if you don't mind I'll also follow along. There still seems to be some room at the back! Most importantly, I am very glad to hear you are feeling better...long may it continue! Cheers, Nigel.
- 1,306 replies
-
- 5
-
-
- syren
- model shipways
- (and 1 more)
-
Hi Captain Steve, I see lots of careful, patient work going on here.....those blocks look very nicely shaped to me. Great work! I see in other logs that it is rather easy to break off the tops of the frames, especially as they thin during fairing. Have you considered making some temporary braces (perhaps basswood?) to run across the deck to support the frames during fairing and then planking so it is easier to turn the hull over as needed. Strips of metal glued to the inside of the frames may work as well...just a thought! Cheers, Nigel.
-
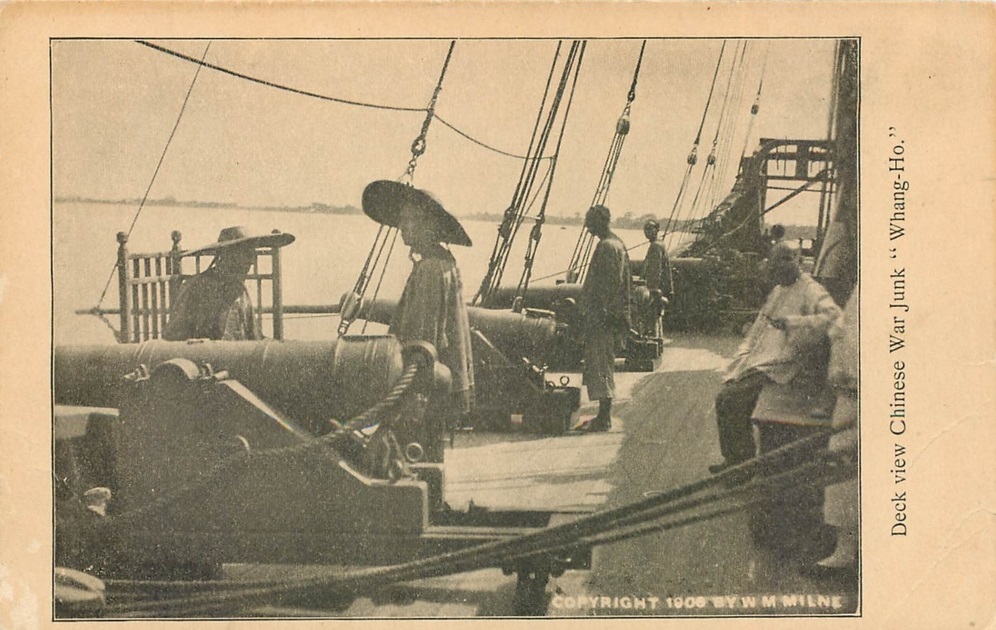
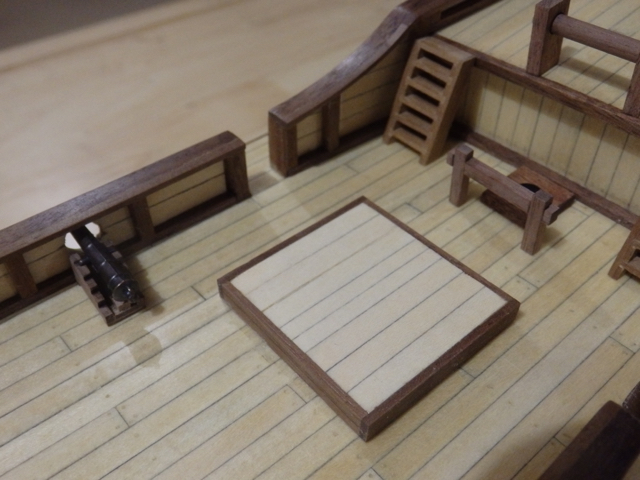
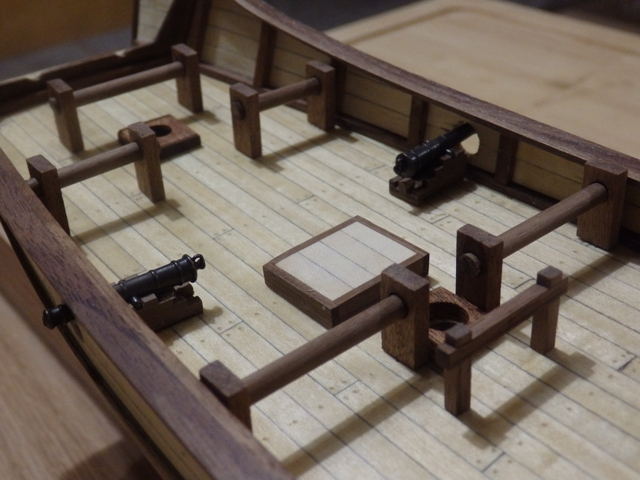
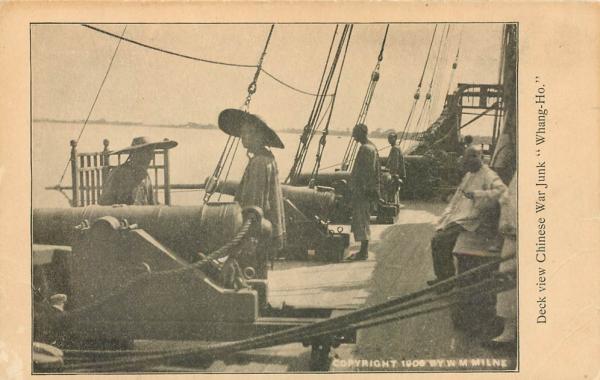
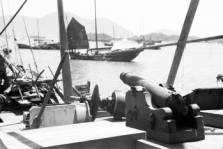
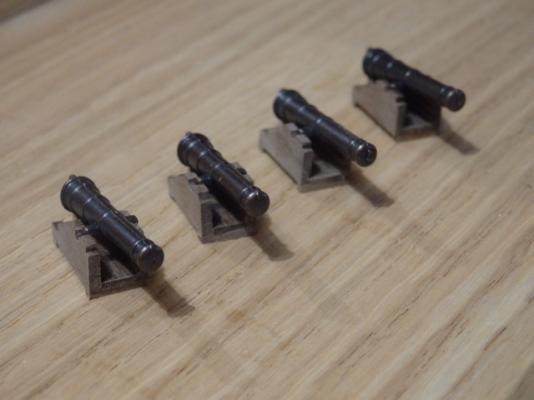
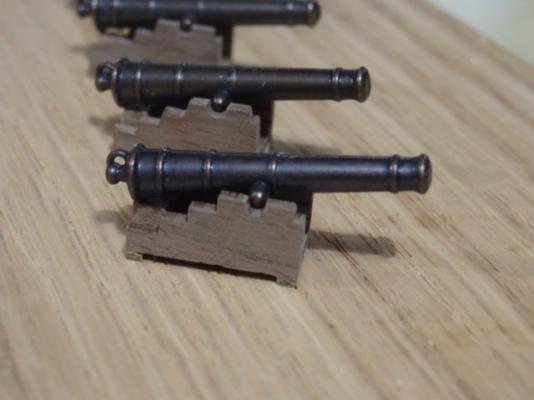
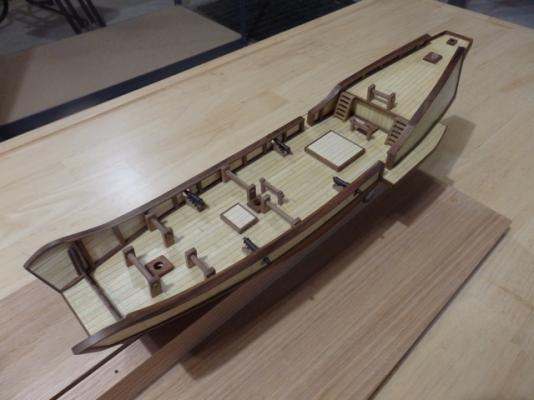
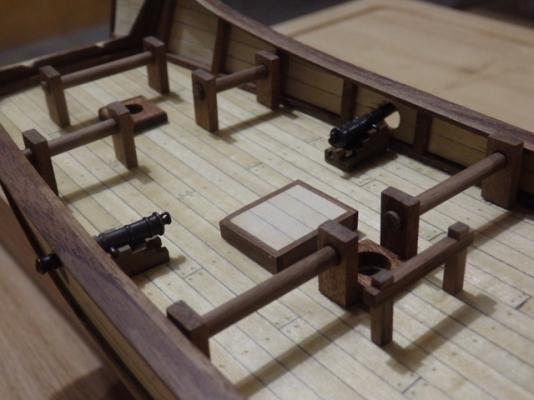
Hi Nigel, Thank you for stopping by and for the kind words. Appreciate them very much. Hi Augie, Yes, they fit, but only just! I may need to open up the ports a bit more or.... Hi Captain Steve, Thanks for the great thought. Most interesting images I've found to date are below. One looks pretty similar to what the kit provides and I used this as the reference to add the small footing blocks (which of course raised the cannons...) The other has some nice curves to it. Neither have wheels. Rather than open up the ports to center the cannons, I'll try to scratch out a prototype and see how it works. . Cheers, Nigel.
- 270 replies
-
- 2
-
-
- red dragon
- artesania latina
- (and 1 more)
-
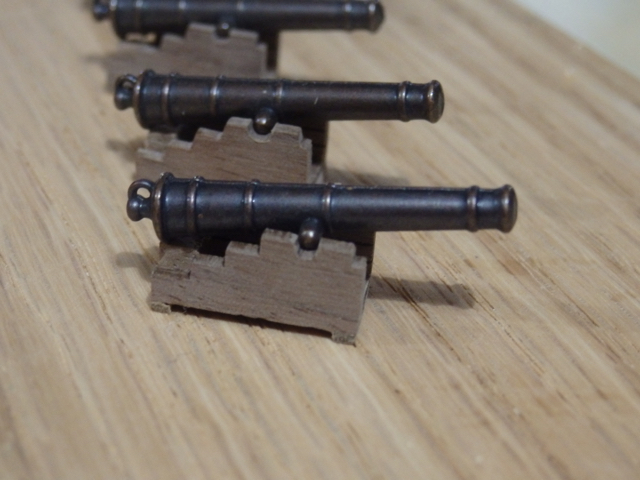
Hi All, To provide a little break from turning the multitude of posts I need for all the railings (rather slow going right now ), I decided to assemble the cannons. The macro shots are very unforgiving, but at normal viewing distances, they don't look so bad. I am thinking about trying to drill out the mouths and perhaps try to smooth out the cast lines to clean them up a bit. Chuck has replacements if I mess up as I certainly doubt I can turn my own right now! Casey’s brass blackening solution is also now on its way so I can add the brass hardware to the carriages and the other details like the windlass bars to the other deck furniture. Thumbnails below as usual and thanks for reading. Slowly, but surely she is taking shape . Cheers, Nigel.

- 270 replies
-
- 5
-
-
- red dragon
- artesania latina
- (and 1 more)
-
Thanks for the access Chuck! I have many happy hours of plan reading in front of me! Thanks for the welcome Pete! Cheers, Nigel.
-
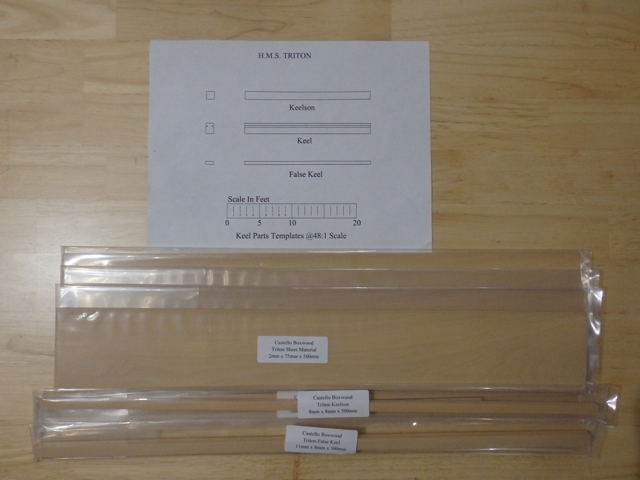
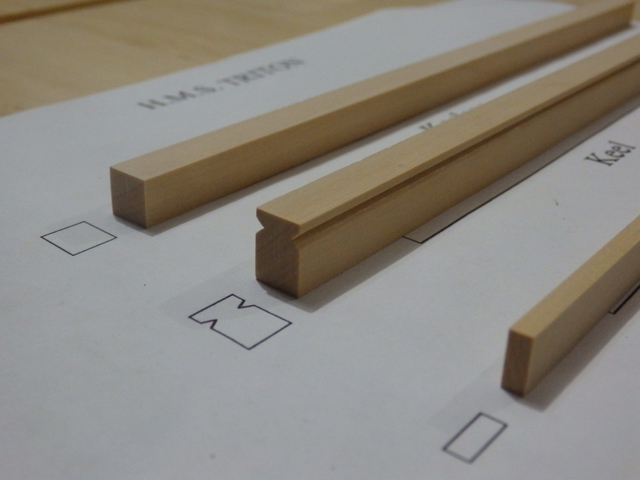
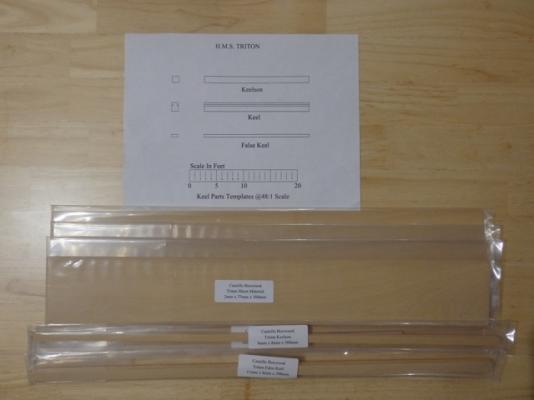
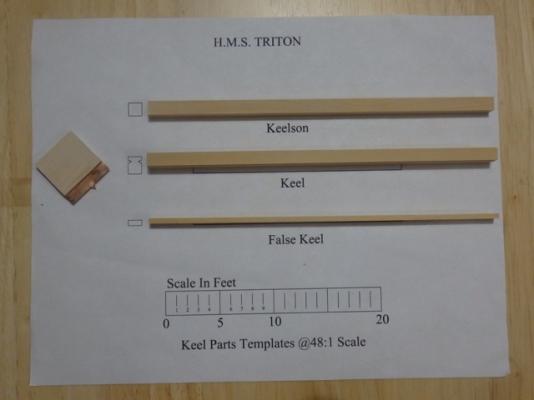
Hi All, I’ve decided to try and build the Triton cross section after seeing all your great builds. I love seeing all the exposed framing details and so just have to try this build myself. I am also hoping making this cross section will help me do a better job on the Confederacy which will be my next full build. I am using boxwood for the main structural components and my thanks to Jason at Crown Timberyard for the gorgeous boxwood he just milled for me. I plan to use swiss pear for all the planking, holly for the decking and perhaps walnut for all the deck furniture. I hope these choices will make for a nice paint with wood look once finished. My keel, false keel and keelson images are below. I’ve made them much longer than the plans call for as I want to follow Raymond’s lead (see link below to his beautiful build) and add the main mast and yards with their standing rigging. This will allow me to gain some much needed rigging skills as I also plan to fully rig my Confederacy. You can also see the small copper tool I made to shape the notch in the keel after I started the slot using a small wood saw. Hope some of you can follow along and help keep me out of too much trouble! Just don’t expect a fast build please! Moderators, may I have access to the rest of the plans please? Cheers, Nigel. Link to Raymond's rigged cross section: http://modelshipworld.com/index.php/topic/5545-hms-triton-148-scale-cross-section-complete)

-
Hi Popeye, If those chains are only an inch long, then goodness knows how small some of the other parts are! Hope you have your microscope at the ready! She is looking good and I really like how the deck color came out. Cheers, Nigel.
-
HI Brian, Cannons look great and seem to fit really well. Hope things are calming down for you at work now. Cheers, Nigel.
- 831 replies
-
- 1
-
-
- Armed Virginia Sloop
- Model Shipways
- (and 1 more)
-
Hi Ken, Been enjoying following all your beautiful work. Amazingly fast as well. It is only just over two months since you started and you are already stepping the masts! Cheers, Nigel.
- 440 replies
-
- 2
-
-
- niagara
- model shipways
- (and 1 more)
-
Great rescue job on the wheels Augie. It is also wonderful to see those important smaller details starting to go in like the belaying pins, speaking tube and all those eyebolts! I like the black color on the pins...they stand out really well against the red bulwarks. Your third photo also helps to show how long this lady is...she's a truly beautiful build. Cheers, Nigel.
- 2,191 replies
-
- 3
-
-
- confederacy
- Model Shipways
- (and 1 more)
-
Simply fabulous work. How you manage to make all this look so clean and precise is just amazing. Congratulations on finishing the rigging. Cheers! Nigel.
- 1,477 replies
-
- 3
-
-
- essex
- model shipways
- (and 1 more)
-
Really enjoying your build Popeye. Great stuff and amazing attention to detail with all your care in matching the paint colors. This level of kit is certainly in a completely different league than the old Airifx kits I remember. Detail level is really impressive. Cheers, Nigel.
-
Hi Janet, Sorry to hear about the glaucoma, but glad to know things are improving with treatment. Looking forward to hearing that all is OK soon. I agree that this kit does allow extra details to be added as your build and also Vivian's show so well. Thanks for the kind words on my turned posts. Trying to file down some brass rod right now to make a more durable, and hopefully much sharper, template. Cheers, Nigel.
-
Thanks for the advice Augie. Appreciate it. I managed to find some 0.014in thick brass tube at the hardware store. Hopefully it will be thin enough to easily cut and file to make the template, but still stiff enough that it will work to shape the posts. Cheers, Nigel.
- 270 replies
-
- 1
-
-
- red dragon
- artesania latina
- (and 1 more)
-
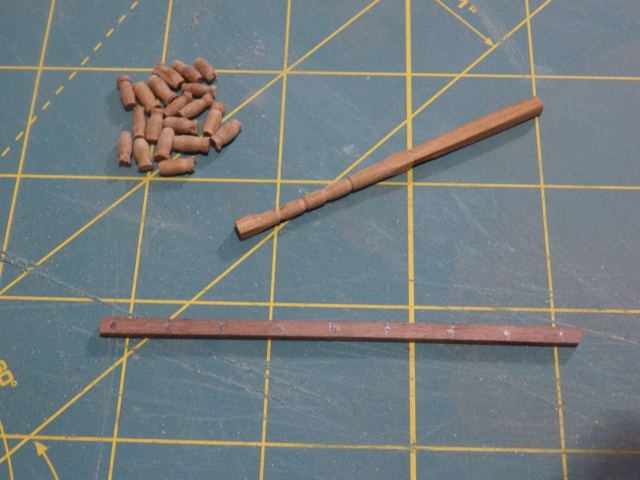
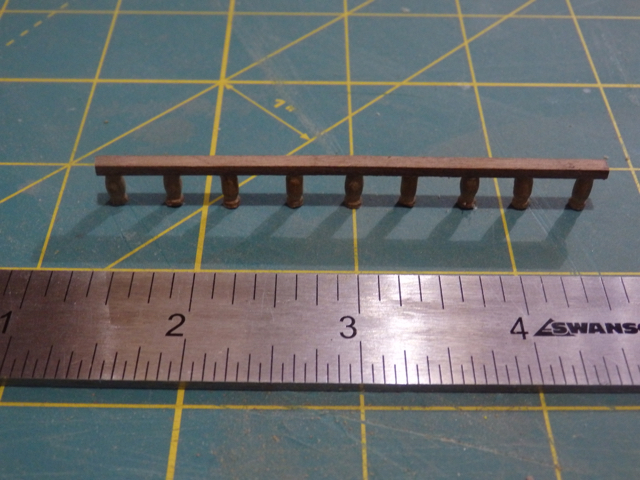
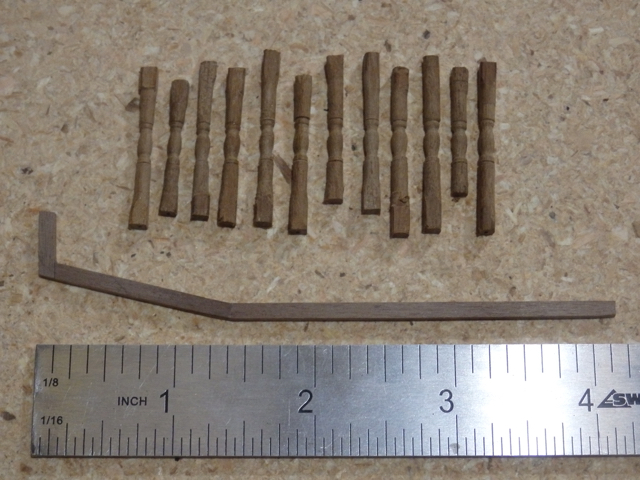
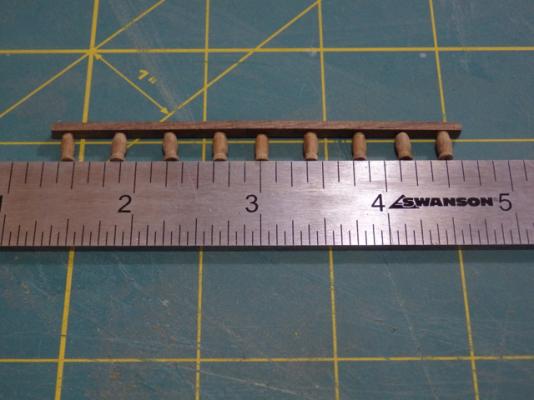
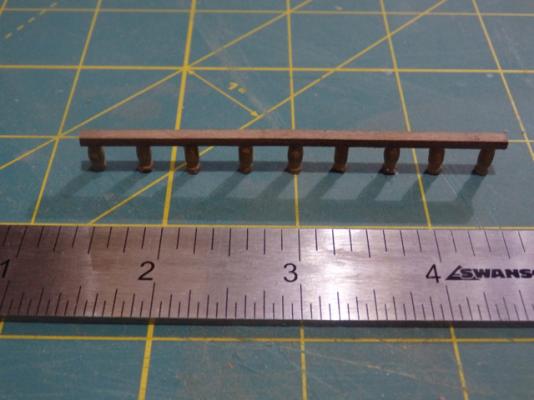
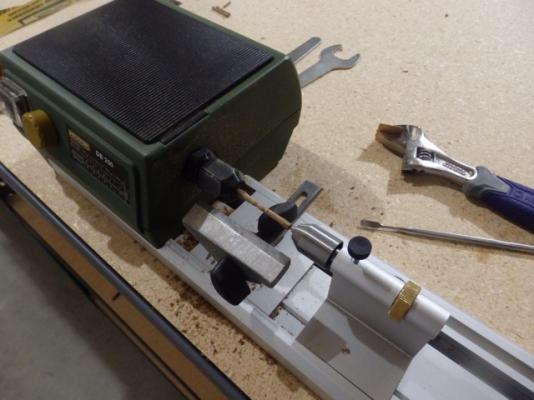
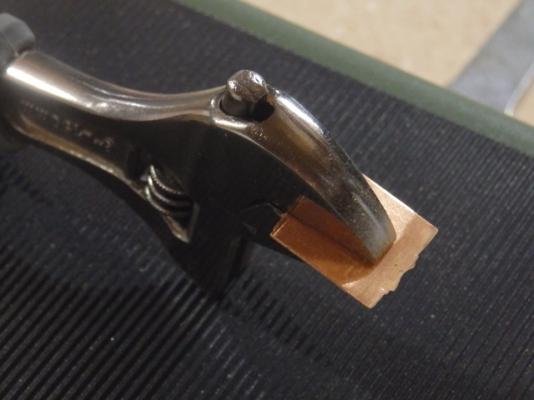
Hi All, Next up on the deck furniture is to make the various railing and posts. AL provides some simple square stock to make these, but I figured it would be fun to try turning the posts using my new lathe. It would at least give me some practice before I have to try tapering my masts. I made a template for the posts from some copper sheet, following the method Janos posted in post #159 in KeithW’s great Royal William log. Probably should have found some brass or steel as the copper didn’t seem to hold much of an edge. I then used the template to shape each post after turning down the 3mm walnut strip. Janos's post: http://modelshipworld.com/index.php/topic/7195-hms-royal-william-by-keithw-euromodel-172/page-8 After a bunch of practice runs, I made up one of the starboard railings using the more presentable posts. Seems the technique will work with more practice. I am also thinking I need to add more posts as the gaps look a bit wide. Thumbnails below. Cheers, Nigel.


- 270 replies
-
- 5
-
-
- red dragon
- artesania latina
- (and 1 more)
-
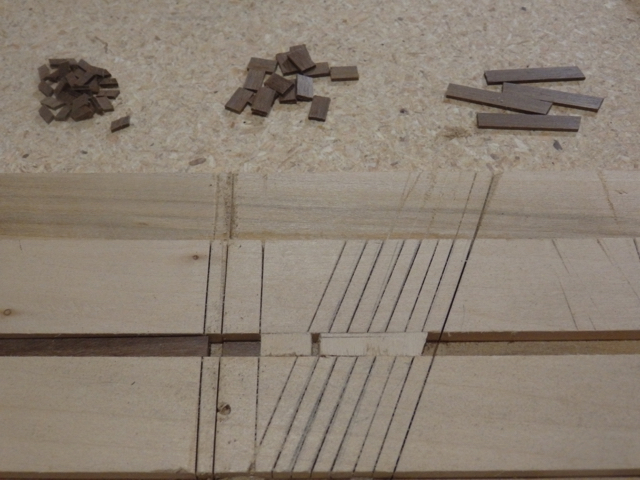
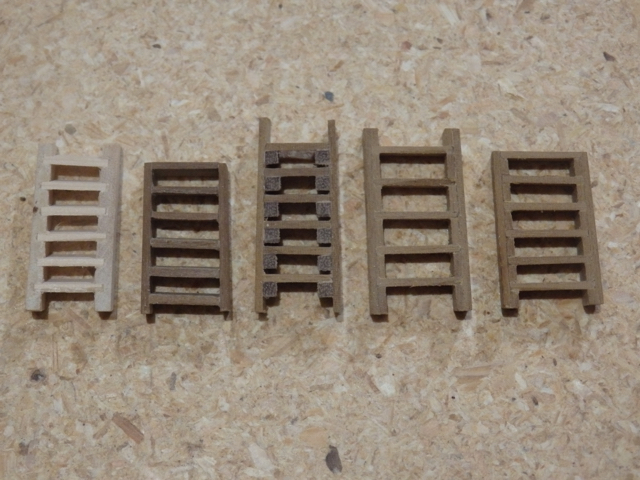
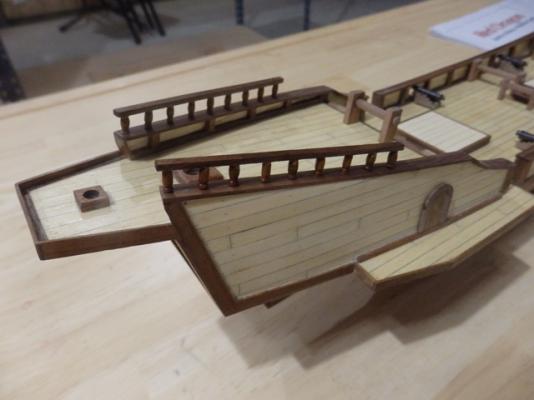
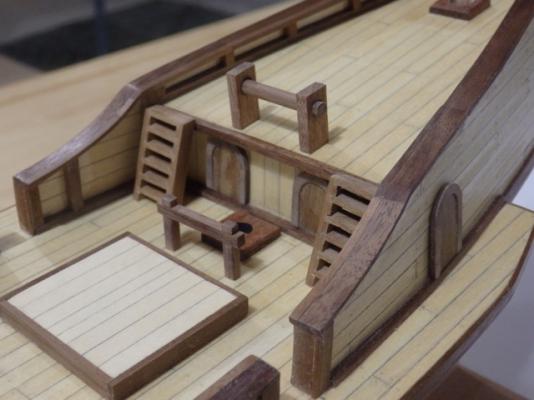
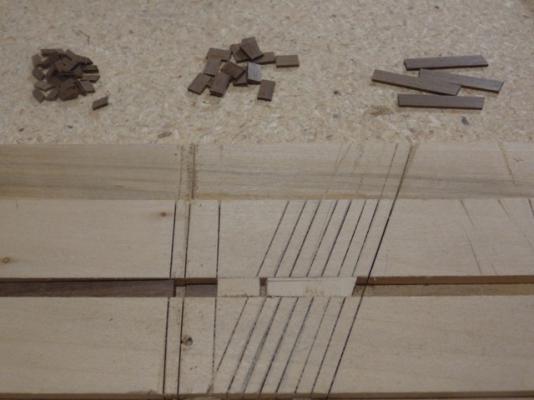
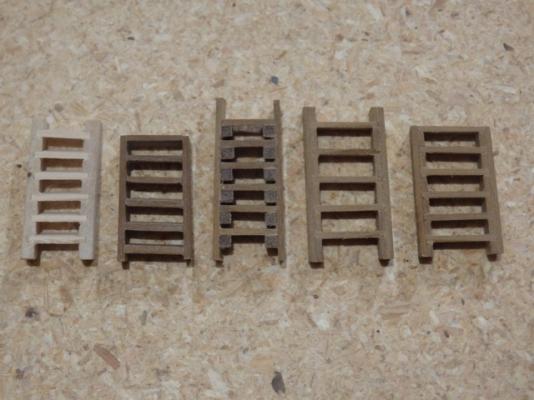
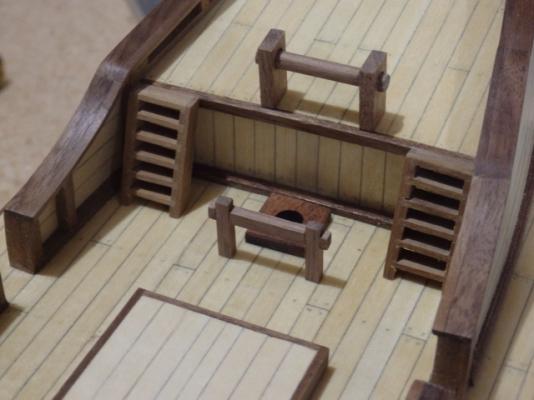
Hi All, Past week or so has been spent learning how to make acceptable ladders. Without a mill or table saw to keep things 100% true, this proved a very challenging given my current woodworking skills. I tried several jigs and methods and in the end I used the basswood jig shown below to cut small tread support structures and then the treads to keep everything consistent. 3mm supports seemed to be correct for the Dragon's 1:60 scale to hold a decent tread separation. I tried 5mm, but these only allowed 5 treads for the completed ladder so the scale looked wrong. The support structures were then glued on to the side rails using a dummy tread to separate the supports consistently on the side rail and hold the needed right angle between the support and the tread. Final adjustments were done by eye as the two sides of the ladder were assembled. Thumbnails are below showing the jig with the individual pieces cut, my various learning attempts and the final version to the far right. Kit ladders are to the far left showing the problems I had with their misaligned pre-cut slots. Final picture is from my test fit of the pair of ladders against the poop deck. Overall I am pretty happy with the way these look now...they are at least better than I could manage using the kit ladders. . Macro shots show I still have to tweak the port ladder to fully correct for the deck curvature. As always, thanks for reading and for all the kind comments and likes. Cheers, Nigel.
- 270 replies
-
- 6
-
-
- red dragon
- artesania latina
- (and 1 more)
-
Hi Popeye, I'll follow along as well if you don't mind. I think it is almost 40 years since I last built a plastic kit. Looks like things have moved on a very long way in terms of the detail that is either molded in or can be added. Cheers, Nigel.
-
Hi Captain Steve, Been enjoying following along from the back row and your Connie is looking great! I have a feeling every hour spent getting the shape of these blocks absolutely right will save endless trouble down the road! Cheers, Nigel.
-
Mary Rose 1545 by tarbrush - Scale 1:72
UpstateNY replied to tarbrush's topic in - Build logs for subjects built 1501 - 1750
Hi John, Just adding my best wishes for your full and speedy recovery. Cheers, Nigel. -
Hi.. Very nice work on those ports. Certainly looks tricky. A couple of small thoughts just in case they help. Think about using a sanding block as you smooth the port cuts out so their edges stay sharp. I learned in another blog that the port edges will round off if you try to do it using just the sandpaper. The other thing in my AL kit was the final planking strips were paper thin. I was worried I would sand right through them so I only used 320 to 400 grit paper for all the final layer sanding. Hope the above helps...she is looking good! Cheers, Nigel.