


bryanc
-
Posts
218 -
Joined
-
Last visited
Content Type
Profiles
Forums
Gallery
Events
Posts posted by bryanc
-
-
Proxxon DB250 with three jaw chuck
No longer required as I have gone to the dark side (plastic kits!), in excellent working order, complete in the box it came in with manual etc. The 3 jaw chuck was purchased later (about £30.00) and makes life so much easier. One of the two chuck keys was lost early on, but anything will serve, I used a small screwdriver.
I haven't actually costed the postal price, as I'm lazy (it'll be about a tenner - in the UK) and hoping the purchaser might want to pick it up (UK - SK17 6DU).
On Amazon currently it costs £136.00 and the chuck £41.00. Both yours for £90.00 plus postage
How can you not want it!
Bryan
-
I completely forgot to mention I have done another video presentation of this model, c/w the sounds of crashing waves, seagulls and ominous wood creaks. My children say there should be a piratical voice going "Arghhhh", but I don't think they are taking this seriously enough ;-)
The video is here
- mtaylor, Elijah and thibaultron
-
 3
3
-
Just to show I’ve not completely dropped off the radar I’m tentatively showing what I’ve been up to whilst desperately searching for a new large scale cross-section kit; the Mantua French Carronade - here
I've established there are no further large scale "cross section" or "diorama" kits currently available, or if there are I can't find any. Which really only leaves the "scratch build" option. I'm prepared to have a go, but am concerned one really needs to expensively tool up for such an enterprise, which isn't easily done.
As an introduction I am tentatively looking at NRGs "Battle Station" - yes, yet another battle station, but scratch built, and which should be a more gentle introduction to scratch building. Plus there are a few build logs of it on here, including the excellent NRG Battlestation by Doc Blake here
-
For Christmas my children bought me two of the Mantua “Battle Station” carronade kits (both the French and English versions thereof). They are to a scale of 1:17, so more than fulfil my desire for large scale kits. However it’s difficult to take them as serious “kits”, so I won’t be doing any build logs, I didn’t take any photos whilst constructing the first (here presented, the French one), but think I might do whilst doing the English one, just in case.
However it is worth pointing out that the kits are extremely well produced with the parts as good as any I have come across in any ship kit. Even the manual is well presented, although one gets the feeling it’s not taking itself too seriously as some required dimensions are not listed and one has to make several “best guesses”.
I think the fact the very first item one builds, the decking, gives the user the (completely wrong) impression this kit is not going to be too demanding. The deck comes complete as one piece, with planking joints and treenails already etched into the surface. In a sneering way I found this completely off-putting, but as the kit developed, I quickly realised it wasn’t a complete walk in the park, but some elements were in fact a tad demanding. There is some scope for bashing, but I limited myself to two additional cannon "tools" ; the wormer and rammer. The "sponger" was part of the kit. I should also point out the original cannon was a superb brass one - of considerable weight! However I demand realism (to a point), so the brass had to be rendered gunmetal.
The finished model is actually quite pleasing, and well worth a place amongst the more finished, more self-important, model ships previously built.
- Tigersteve, thibaultron, mtaylor and 2 others
-
5
-
Videos
I should just mention I did a couple of videos, primarily to show the wonderful flickering lantern light! Sadly it fails miserably to do so, obviously flickering lantern light is best viewed in the dark, but videoing in such lighting conditions is near impossible, at least with the primitive kit I've got. They do give a vague impression though.
However I've gone on to post them both on YouTube. They are quiet novel, and even quite atmospheric, but do note they are not intended to show my modelling prowess, which would be very difficult to do!
You can view them following the links below.
Thanks
-
Finished!
Well this last post took infinitely longer to appear than intended, but to be honest I’ve deliberately dawdled over the last couple of weeks, partly because I’ve enjoyed the build so much and was reluctant to admit closure, but mostly because I have no new kit to move onto! Well, that’s not strictly true, I have the Occre Santisima Trinidad Cross Section waiting in the wings, but I fear it will be waiting for some time, as I’ve little or no enthusiasm for beginning another tiny scale kit (1:90!) after the pleasures of working with a wonderful 1:23 scale. It’s the greater detail I so love as I’ve said before. And it’s adding, and embellishing, that detail that has made this build so enjoyable – frustrating at times of course, but that’s part of the enjoyment!
But finding another, similar kit is proving near impossible, and believe me I’ve scoured the Internet! One option is a scratch build, but I genuinely doubt I have the skill set required, at least not yet, and anyway haven’t a clue where to start; finding plans, working out the methodology etc. etc.!
But, onto the build details of this one;
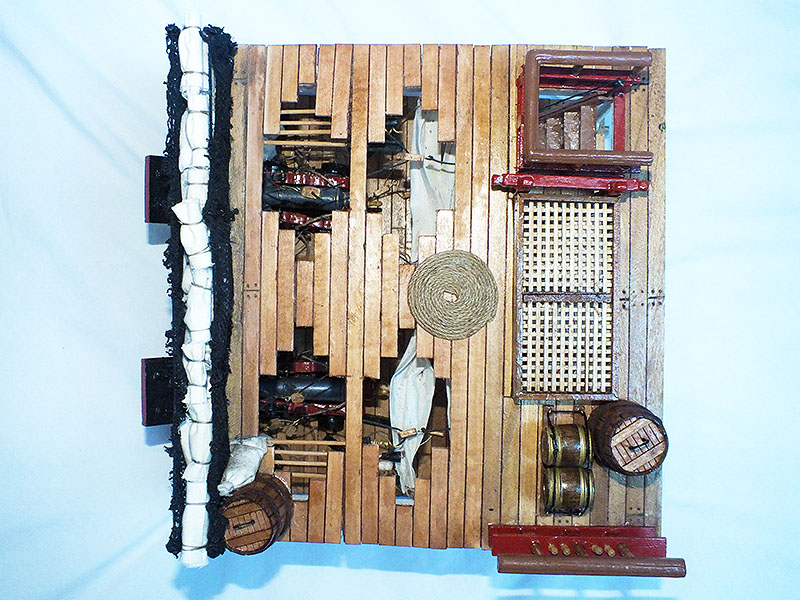
First to explain the “cutway” view mentioned cryptically earlier on. The original kit design is simply to leave the upper deck planking incomplete, so the lower deck is completely visible; fair enough, when the majority of the painstaking detail of the kit is on that lower deck. However I wasn’t comfortable with it, it just strikes me as unreal, so I’ve compromised, and laid the upper deck planking in a way that left “cutout” views of the deck below. (Note this is not an original idea, an Ian Lawrence – ianlawrencemodels.com, did the same thing).
Another reason for doing this was my coup de grace; a “real” flickering lantern illuminating the lower deck! To disguise the installation of this required more timbers above it than the plans allowed for. I had the idea of doing this almost as soon as I saw the kit, it’s almost begging for it. The completed model now even has a push switch, hidden beneath the upper deck grating! Again I knew I wanted all this, but was clueless on how to achieve it, and do have to acknowledge the invaluable help offered to me by Jennifer Smith of jsminiatures.co.uk who provided me with exactly what was required.
I’m hoping to be able to post some videos showing this in all its flickering glory – it’s really impressive – but I’m not sure if the forum can facilitate this. I’ll find a way if not. I have however posted some photos which give an idea.
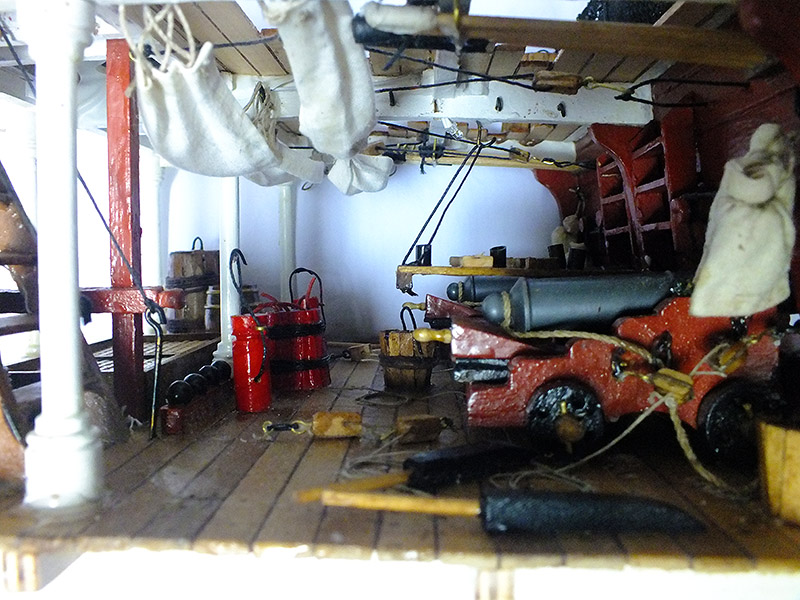
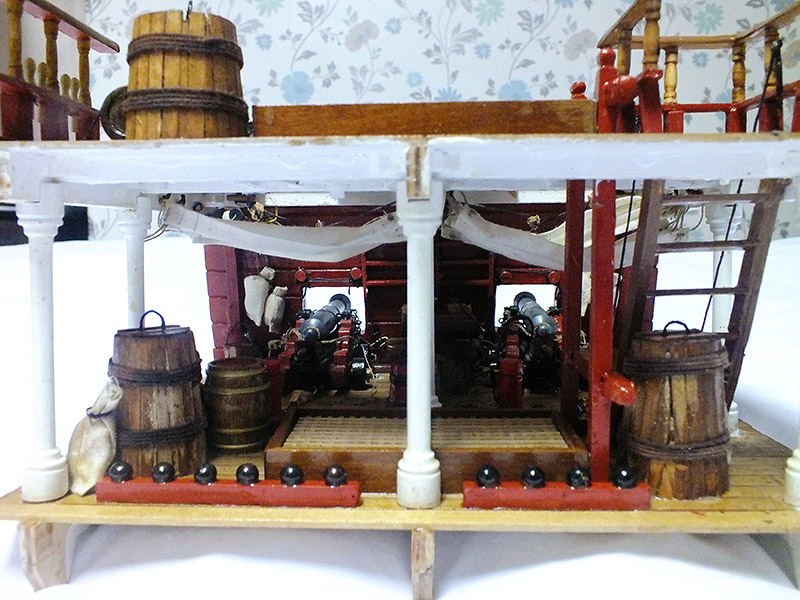
The cannon were already assembled and rigged, it was just a matter of fitting them in place, awkward, but that’s to be expected. Then all the deck furnishings, barrels, sacks etc. (Those barrels and buckets! Assembled stave by stave, they took weeks in themselves). The table fell out during one tricky fitting operation, and I took the opportunity of embellishing it further before replacing it. It now has plates on it (square of course) and little mugs!
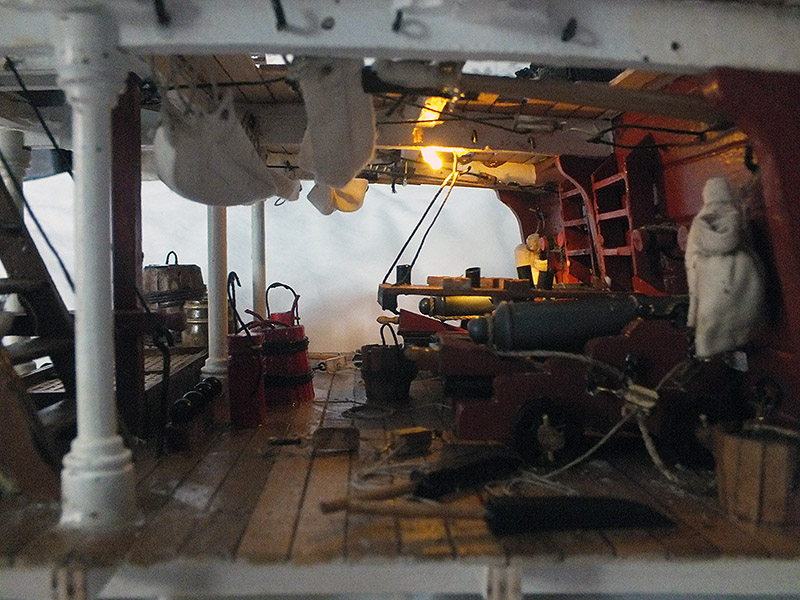
I think the last thing I worked on was the rolled up hammocks placed inside the netting on the upper deck. Only a few hammocks were catered for in the plans, but I decided to fill the entire length of the deck netting with them, as would have been the case in reality. The netting incidentally proved very tricky, and I’m afraid it does look a little tatty in places. It ended up being made of muslin cloth after I spoilt the original supplied netting, and I’m not sure the muslin was the right material.
But there she is; imperfect, and a tad tatty in places but in an odd way, all the more authentic looking for all that.
Bryan
-
Hi Bryan
Rig the cannon up outside, then juts move it into position and hook it up. My method,
1. Put cannon in position desired, I staggered mine
2 Measure Canon rope ends that go around end of cannon ( no idea what is called yet and make sure they are same length. Add the hooks to the ends
3. take out cannon
4, Make up tackle and put pulleys and ropes on cannon Put it back and place in final position
5. I glued it into place PVA on wheels
6 Hook ropes over hull hooks with tweezers
7 Hook loose tackle onto hooks , and pull tight,
8 glue tackle rope ends to floor in desired position ( no coil on rope)
9 repeat other side,
9. Make up fake coils and place in postilion on rope.
10 Done.
Thanks paul, I had already done most of what you suggest, apart from the fake coils. Now that is one to remember!
-
Thanks guys.
Praise indeed Paul re. the ladder, considering it was your work I pinched the idea from! Again the larger scale make things like the ladder that bit easier, but I am pleased with it.
I take your point(s) guys regarding the hammocks. Some ideas to bear in mind for other projects. I might just get away with it (hammocks not fouling the tools too much) but we'll see. Currently struggling rigging the cannon - especially on the "inside"!
Thanks again.
(BTW has anyone come across any similar large scale kits? I'm really loath to move back down to a much higher (lower?) scale again! There's a 1:90 waiting in the wings which I'm frankly not relishing. I may have to investigate building from scratch, but fear I'm just not skilled enough).
-
Nice job Bryan

Those hammocks are definitely a bit of a pain, mostly because of the folded edges making them stiff

The reason the plans and booklet differ is the plans are from the original kits, when they did an update they added the booklet but did not change the plans to reflect the changes they made, but it all works out in the end as you have found

Thanks Bob, yes those hammocks really did cause some grief, but it was worth it, they add a lot. Sadly I now realise why the outer set of hammocks were folded; I assume they will foul the cannon tools when they are fitted. I should have realised. If I can get away with it I'll leave them, but I suspect they will have to be folded.
I didn't realise that's why there were the few discrepancies between the plans and the manual. That would explain it. As you say though, they could all be worked around.
-
Wow, it's so realistic. It gives me the feeling I remember when I walked through HMS Victory.
Thanks Keith, now that really is the best compliment anyone could make! I'm envious you have had the opportunity to walk through the Victory for real, something I hope to do one day!
-
I just thought I'd better do a quick update as things are nearing completion! This is likely to be the penultimate post on this build log.
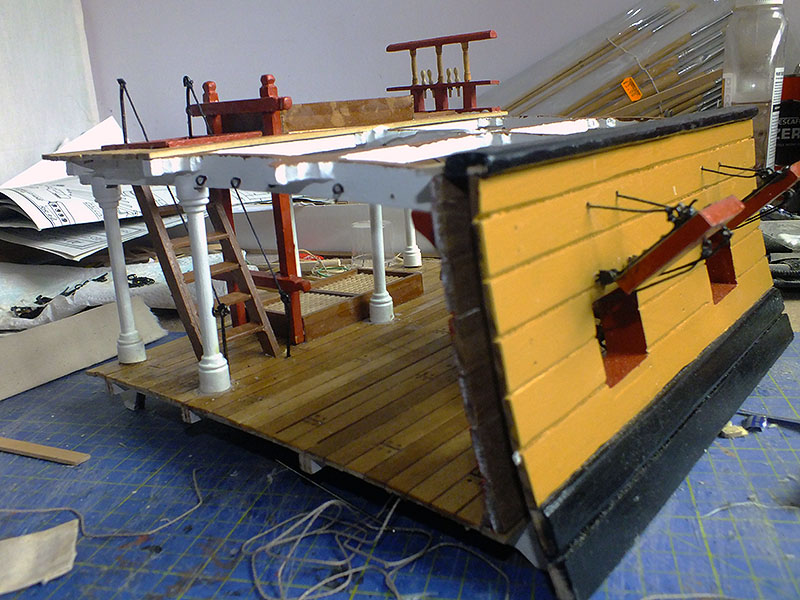
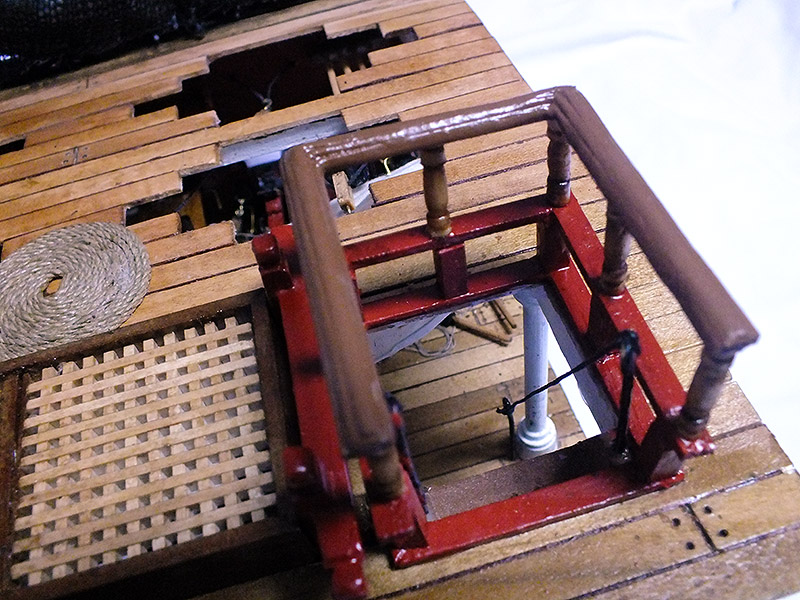
Added the stairwell and stanchions to suit (all bashed as they don't appear on the original build). I think I've made them a tad too large a scale, and, as mentioned before, in retrospect I would have positioned them on the opposite side of the model, and conceivably facing down the length of the build, but they serve the intended purpose well; adding a little more interest.
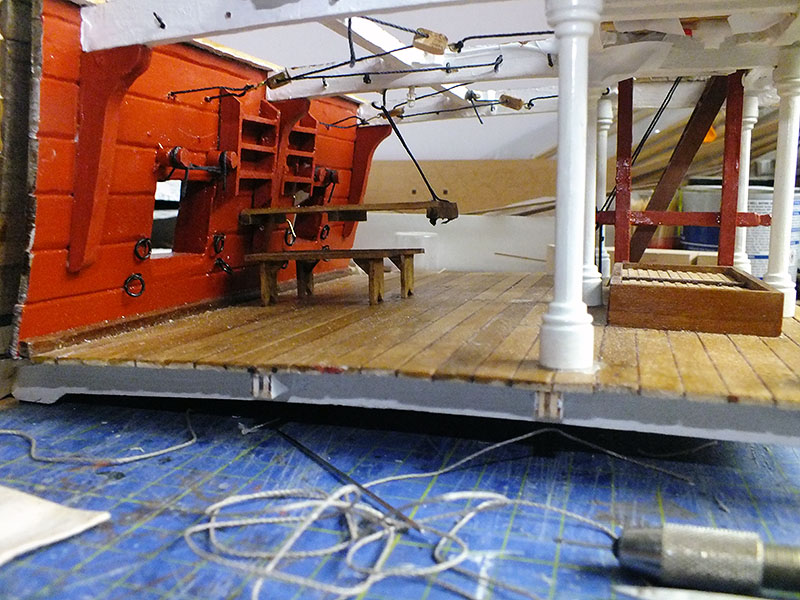
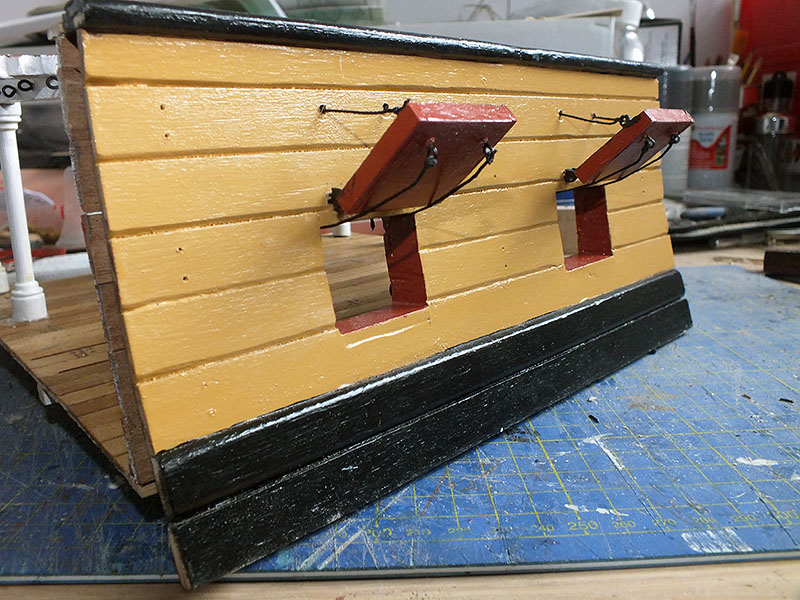
New from last time are the fittings on the inner hull; table and benches, porthole lid inner rigging, and shelving etc. The latter did have additional fittings (to stop things falling off as the ship hit heavy swells), but they looked ungainly so they went.
The last additions are the hammocks and the shot racks (there is an additional rack still to be added). The hammocks were really awkward to assemble - talk about sticky fingers - and in my case extreme sniffles as I was obliged to use superglue! In the original plan, its intended two hammocks were to be left "open" whilst two tied up. I decided they looked best all hanging loose.

Yet to do; fit the cannon, already built and rigged, fabricate and position all the cannon "tools", and fabricate all the barrels and sundry deck fittings (which are probably going to tax me as much as anything has!). Finally decide exactly what I'm going to do with the upper deck planking. For reasons I'll explain later, I tend to think I'll create a sort of "cutaway view". Not the best solution perhaps, but one forced on me! (Sorry to be so cryptic, all will be explained).
One thing has become obvious; what a pleasure it is to work with a kit which is complete with good instructions - OK so the plans contradict the manual sometimes, but that's still infinitely better than no instructions at all, as with my last build.
Bryan
- Mumin, cobra1951, GrandpaPhil and 6 others
-
9
-
Another update as things are proceeding apace, and without any major trauma (there I go tempting providence again!).
I’m relatively pleased the fitting of the gun port lids didn’t cause the usual head banging on table that they usually do. Probably because of the larger scale involved, things proceeded relatively calmly and according to plan. I’m admittedly beginning to regret my decision regarding the ladder, but only because I elected to place it on the wrong side. As it is whichever way it faces it’s going to (theoretically) foul the brace. But that’s only a minor detail really.
I also shouldn’t have used the thicker black thread for the port lid rigging, and I don’t really know why I did. I even had to fashion new pulley blocks to accommodate it! I think I perhaps wanted to make sure it could be seen easily, given the trouble it took to do it!
The cannon are complete but not yet in place as there are lots of small “incidentals” to create and put in place. The table and benches are now under construction, and of course sooner or later I'm going to have to decide just what I do regarding the upper deck planking. Obviously the plan proper is for only a few more planks than I have already completed, to "reveal" the deck beneath. But in reality of course it would be completely planked over. I can sense a compromise approaching...
Bryan
-
Hate when that happens......the boat gods need to be fed once in awhile too
Yes your right, a sacrifice has to be made to those gods once in awhile. There's no chance I can get under my freezer so the gods have possessed them!
I'm only reassured others make the same occasional blunders as me :-)
-
Good job.
Yes I had 2 full hull planks left, That explains it. I assume you also used one of the planks for the lining of the gun ports which would account for the other piece
The gun ports have three bits. The fat wood, a ply cover and for some strange reason, a pre marked external cover (not listed or shown anywhere).
Take your time with the all the accessories and use the plans as there are in mote detail than the book. ONly advice is to review the book as some bits use pre shaped as the plans assume you make it all.
Also the keys for the cannon are tiny and hard to see,
Thanks Paul, and yes, you're about right in your working out of my lack of planking. Your advice is welcome as ever.
Regarding the cannon keys, I'm afraid I had a laughable but very unfortunate accident; I was about to blacken all the brass parts and after soaking them in thinner to clean them, as I was rinsing them and lifting the shallow plastic bowl I was using to contain them, clipped it on the edge of the sink and all the brass bits went all over my kitchen floor! Cannonballs rolling everywhere! I've retrieved most of the parts; sadly a lot of the cannon balls have gone, and there was no chance of me ever finding the tiny keys. I'm afraid the cannon hinge fittings have had to be bodged.
The language was creative though!
-
Looking great! I think I used more of the 3x3 on the inside than said in the manual and also had a lot of wood left over.
do you mean the thickness of the gunports? Because that's not unrealistic as they where as thick as the hull of the ship. But a lot of people think that they look too thick (and thats no biggie as one should do as one feels is pleasant to the eye). Not being critical, just a note... ;-)
No! Obviously the gun-ports are as thick as the hull, I mean the lids / covers. I've never seen any that fit the gun-ports like a plug, and were as thick as the hull itself, as the manual and instructions suggest. Not that they might not exist, I've just never come across them.
-
Nice rescue on the outer hull. Strange that you ran out of wood there as I had almost two complete planks left over from each of mine.
One, the topmost inner hull one, I "totalled" when notching it, I accidentally inverted the notching, useless for anything! Quite where the rest went I don't know.
-
Hy Bryan
Very very nice work. Looks terrific. Your doing a great Job.
As Bob mentioned the cannon blocks are just a bit to big in thickness. Be aware that the booklet mentions a part no for it that is 'precut ply that needs gluing together to get the width' but not marked on the parts, whilst the plans show you cutting some 10x10 walnut diagonally. They supply both so it works either way.
Also be aware of the interior planking at the external near the top and internal near gun port. Plans show solid wood, instructions show 3x3 stacked. One again both work.
The gin port openings are not supposed to line up exactly they have s small slope on the top and bottom to allow for closing of the ports with he curvature of the hull You will see this when you build the port lid fittings. If you leave it thick as per the plans it will close into position with the slope.
Yes it is a fun kit.
Thanks Paul, a very useful insight. I think I've got the cannon about right, I kept to the 10 x 10 walnut for the "axles" but have fashioned a more sensible sized "wedge" (not shown yet). I've already decided the port lid fittings are unrealistic as shown, and will use only the one thickness of lid. It won't be as good as yours, but will do - I hope!
Yes, I am enjoying the kit! Thanks again.
-
I thought it about time I did a further update before all the detailed bits start being added.
The build has not gone as easily as it may appear. I had tempted providence earlier! As you can see from the dry built cannon, there isn’t a great deal of room between the barrel and the bottom of the gun-port. It wasn’t that bad, but it would have niggled me, besides the two gun-ports weren’t exactly in line. So out came the heavy file, and that’s where my troubles started! Making both ports look in line and about the same size didn’t prove as easy as I had anticipated, but eventually I had it looking something like.
I then continued planking the outer and inner hull, and ran out of material. One plank short! After much cursing and head scratching I worked out a solution. I removed, very carefully, the bottom most outer hull plank. It became the missing one at the top. To fill the gap at the bottom I fashioned a second “rubbing strake” from the remains of the laser cut wood and put that in position under the original kit provided one. It didn’t look out of place and arguably could have been there anyway!
(Good though the material provided in the kit is, there's not an overabundance of it. I had admittedly spoilt a little of the the 15 x 3 I ran out of, but not much at all. Another case in point is the numerous pieces that make up the hatch covers. When I'd completed both hatches I had one piece left over! Hardly generous enough to cover breakages etc.!)
All throughout the build I have been tortured about whether to paint the hull or not, or just inside or both. I first decided to paint the inside white, to match the beams, but on completion it didn’t look quite right. Nothing ventured I went the whole hog and painted it with the good old red ochre. This then persuaded me to paint the outer hull “Victory yellow” to contrast the black of the strakes. A coat of satin varnish completed it.

I’ve taken a leaf out of paulv1958’s build, and decided to add a ladder to one side of the hatchway down from the upper deck, so have left a gap for it. It will hopefully add more interest to the upper deck (I’ll be borrowing heavily from his methodology in crafting said ladder as well)!
Now to complete the half constructed cannon, and add all the various fastenings to the hull. I’ll have a think about just how much decking to put in place on the upper deck once all those fiddly things are in place.
Bryan
-
Looks great Bryan
nice tidy build so far. As for the tree nails they look good and as you say they need to be seen to give a better planking effect. If you build the canons don't follow the sizes for the wedge assembly part, if you do the cannons will only have a downward trajectory.

Mr Pucko tipped me off about it when i was doing mine, I showed what i did in my log,
Thanks Bob, I've dry built one just to see how it presents itself to the gun-port (I simply put a bit of waste in position to simulate the wedge). It looks a tad low, but nothing the file can't cure. I very much take your point (and Mr. Puckos') regarding the wedge assembly, thanks.
-
Just a small update; nothing outrageous has occurred, nothing remarkable, just a good solid, very pleasurable build so far. Unremarkable because everything has gone according to plan and has progressed so well. Well, perhaps that in itself is remarkable; I simply cannot fault the build, the instructions or the materials. And now I know I’ve set myself up for a fall, but I’m just paying credit where it’s due. Hats off to Panart - thus far!
Of course there are a couple of errors there, hard to spot from the photos, but one gun-port is less wide than the other, I can't think how it happened, but my mistake, plain and simple. I’m also very aware the inside hull planking is not going to line up with the outside (where the bottom of the gun-port is concerned). The manual seemed to suggest they should I think. Neither of these issues is insurmountable, and my file will be put to energetic use very shortly.
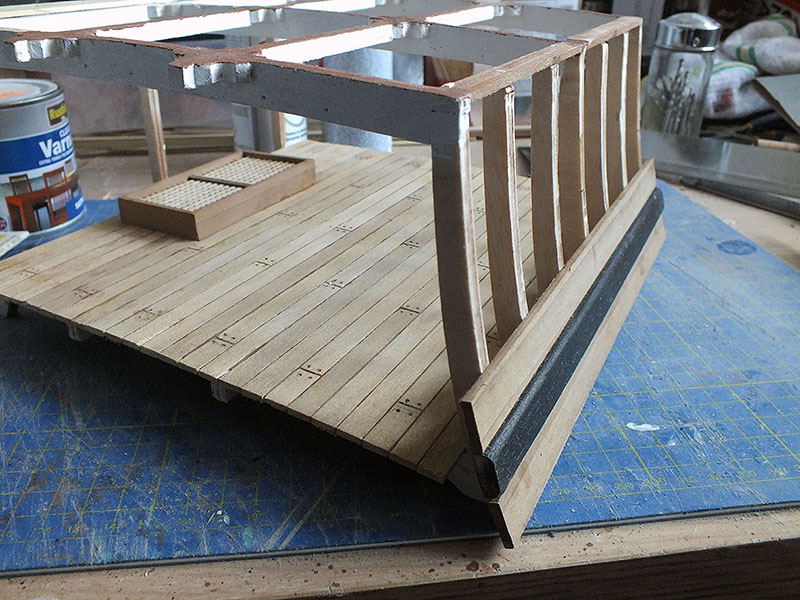
The deck planking went OK, I did use the provided walnut “caulking”, and yes, the glue went everywhere, but I’m not displeased with the end result. I originally started using toothpicks to make “proper” tree-nailing, however it didn’t go as well as it has previously, and I ended up following the instructions provided and partially cutting through the planks width-ways to represent decking “ends”, and boring small holes and penciling them in to serve as tree-nails. They look fine. It brings to mind the endless discussions about how visible tree-nailing would be. I happily admit that even at this large scale realistically the tree-nailing would hardly be visible, and you can certainly see mine, but I’m OK with it. Why go to the trouble of doing tree-nailing that you can’t see?
I painted the finishing lower deck with a light wash of very watered down walnut wood stain, and when dry it was given a light coating of satin varnish. I am very pleased with the result.

The hull planking went well, lovely material to work with and easy to handle. I elected to chamfer the lower edges of these planks, and I think the end result justifies the risk taking. Because of the chamfering, I didn’t use any caulking between the planks, not really worth it as it would not be visible.
Right, now to tackle those gun-ports, and maybe build one of the cannon to prove the fit…
Bryan
-
Great work so far. No big issue with painting I went white for the Victory Colors and under painted the roof / flooring to match. Only the rear third is covered later and thats broken up with the gratings and additional beam work.
The next choice is going edge to edge including cross beam width or just to edge of floor joists. There is enough wood for both options including hull Its a personal matter of choice. I went full width. Gives you a bit more space to place items later.
Paul
Good thinking Paul re. the edge to edge including beam. I had already decided to without really thinking why, it just seemed the right way. I hope your right about the quantity of wood, I've already started cutting to size and its disappearing at a staggering rate!
Bryan
-
-
Nice work Bryan. Being new to ship modeling at first I didn't see the value of small cross section models like this, but after hanging out a bit on the site I began to realize how interesting it is to focus on a particular part of interior of the hull to see how it was constructed, outfitted and used.
The interest for me Mike is the far greater detail afforded by the larger scale. Of course that creates its own problems, but its all good fun and interesting.
-
...and off we go!
The laser cut ply main frames seem solid and well-formed and cut. I sanded down all the laser-cut edges before continuing (something I do as a matter of course these days). The frames fitted together without issue, and I’m praying this is going to be the trend! The cross beams followed and they fitted easily, arguably too easily. In a perfect world the fit would have been tighter.
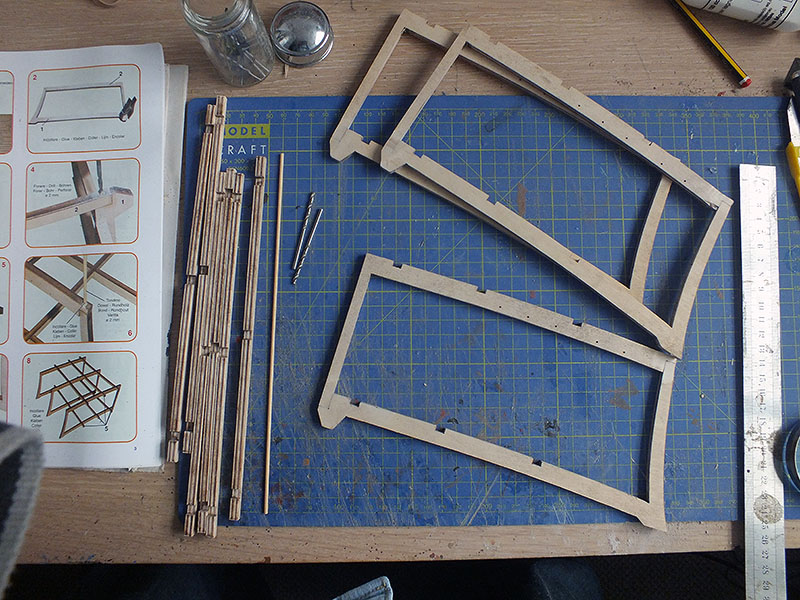
I dry fitted the whole assembly to give some stability before gluing the individual cross beams in position one at a time (as in waiting until it was dry before moving on). I ensured things were true and square by using a set square fastened to the frame at each gluing. I was well pleased with the finished assembly, it’s sound and true and remarkably stable.
Although I wondered whether it was a little over the top at the time, this stability is due in no small part to the doweling. The original main frames each has a dowel reinforcing each opposite corner, and the main uprights I also reinforced at the joint with the same dowels.
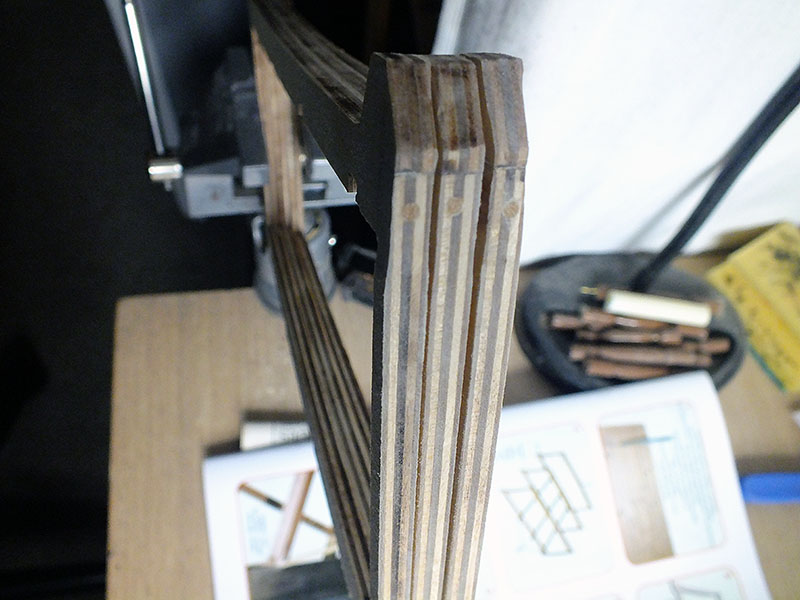
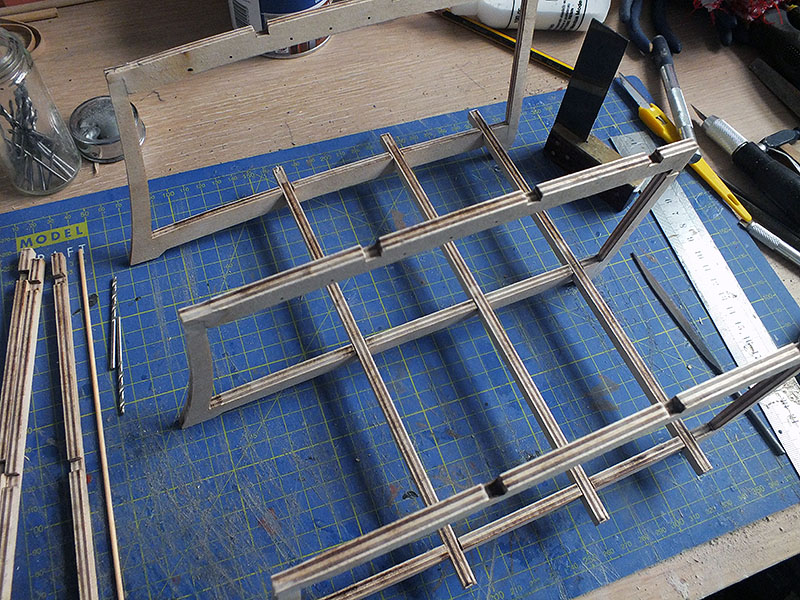
The laser cut curved supports along the front were tricky to fit, mainly because they were a tad small. I managed it because they were also doweled at the top joint, and I confess I positioned the dowels before actually applying glue. These supports are true and in line, which is quite an achievement!
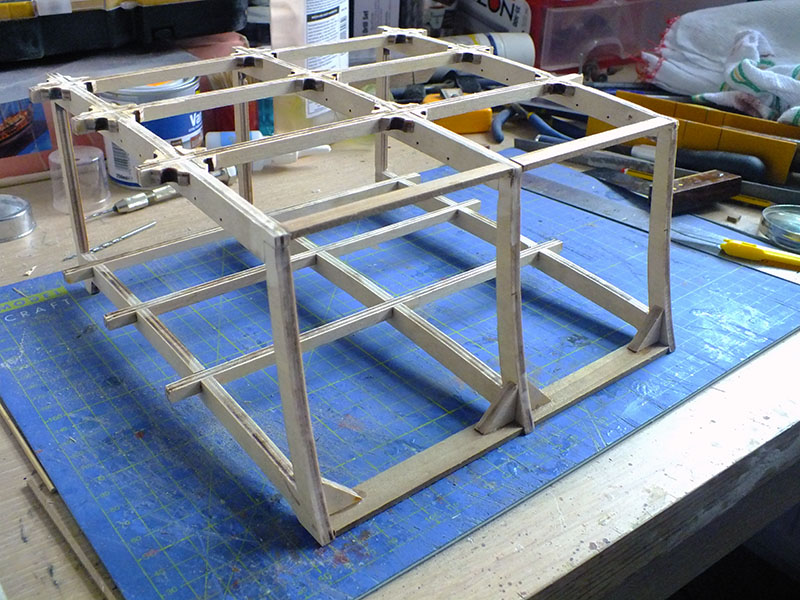
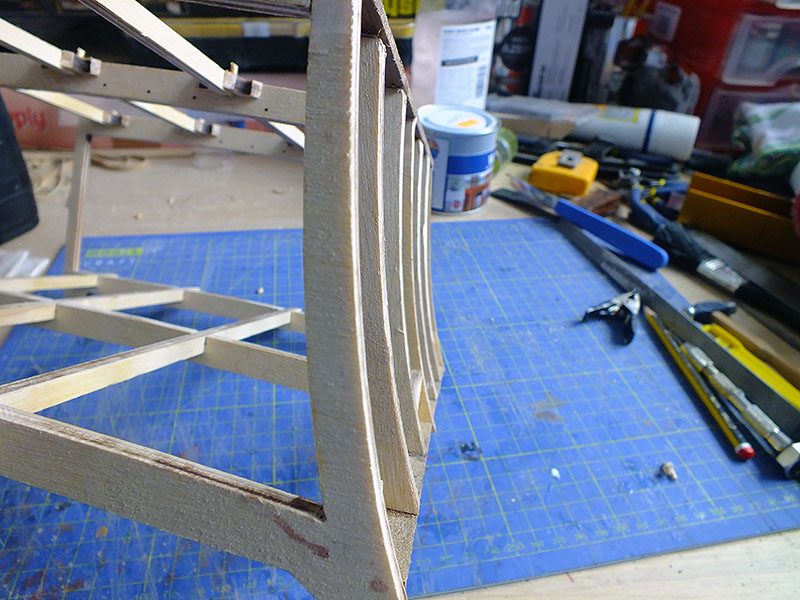
I then cut and fitted the grating supports towards the rear and at that stage had to pause and consider whether to paint or not. Whilst staining the wood like Cobr@ eventually elected to do, my every instinct was to paint it. Not necessarily like the Victory, although I have a natural bent to do so, but simply because that was the style in the day in a lot of cases (painted white, to maximise light). So the top deck support beams were painted white as will the pillar supports when they are assembled. When the time comes I am going to see what staining the rest of the wood looks like, but will paint it walnut if I don’t like the appearance.
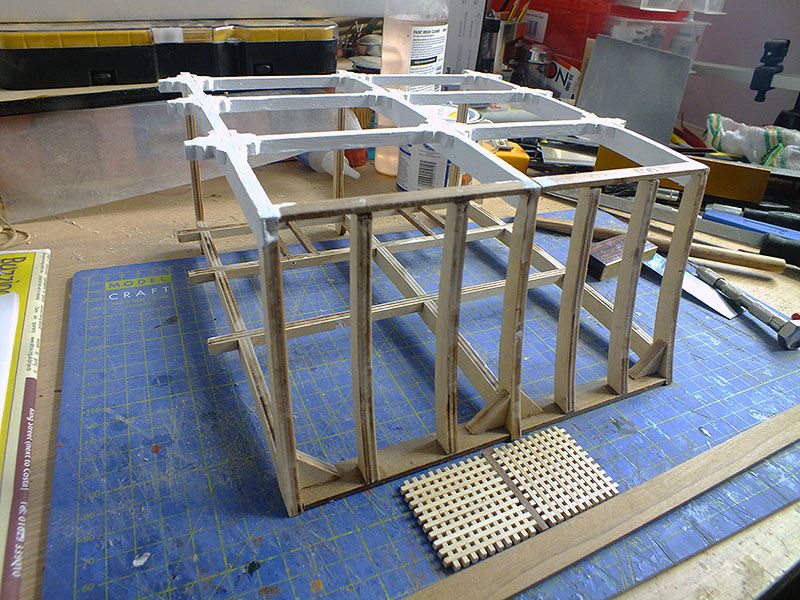
I also foolishly painted the upper sides of the deck supports, which was not only unnecessary, but a mistake. Half of them will be visible on completion (which in reality they wouldn’t be, something I will have to give some thought to) and it’s not logical for them to be white. The upper side of the beams will therefore be sanded down very shortly, and stained or painted walnut. I’ll leave the decision on the colour scheme of the hull until later, although I do have a yen to see it painted the familiar yellow and black!
Bryan
Proxxon DB250 with three jaw chuck
in Modeling tools and Workshop Equipment
Posted
Well... not really when you're building a tank!