


Per
-
Posts
77 -
Joined
-
Last visited
Content Type
Profiles
Forums
Gallery
Events
Posts posted by Per
-
-
It is a companion port for the helmsman handling the whipstaff.
On the Vasa: http://www.wikiwand.com/en/Whipstaff
Per
-
Hi Harley,
You could try "Ordnance Instructions for the United States Navy, 1866" at Project Gutenberg:
http://www.gutenberg.org/files/19058/19058-h/19058-h.htm#Page_A_46
P. 46 onwards should give you all the information you need. On p. 55 you will find instructions how to house lower-deck guns in different weather.
Per
- mtaylor and thibaultron
-
 2
2
-
I use a micro attachment for the home vac, a flexible hose with a soft brush at the nozzle end, that works for both models and computers.
For really tight corners canned air and an artists brush. Canned air can be got from any camera shop.
Per
-
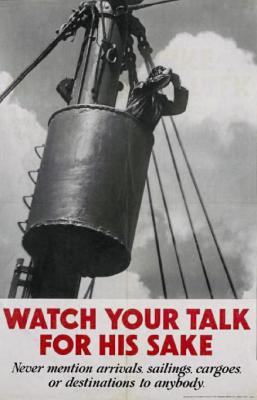
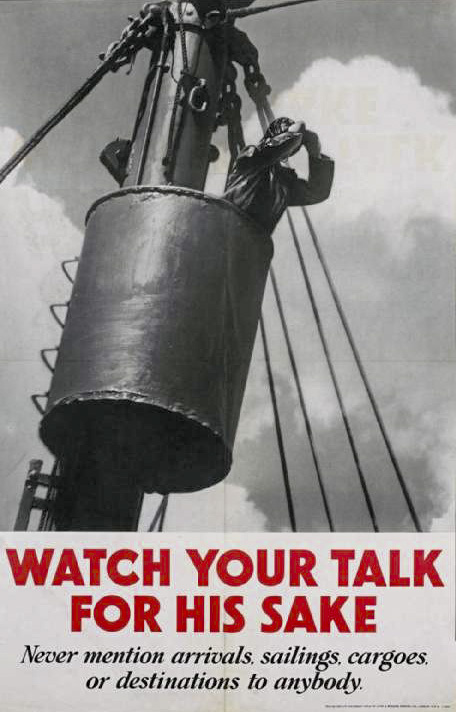
I also found this British wartime propaganda poster. It clearly shows a ladder bolted to the mast and, once you got that far, rungs bolted to the outside of the barrel.
Per
-
I found this - Ogden's 1927 whaling cigarette cards:
http://www.coolantarctica.com/Antarctica%20fact%20file/wildlife/whales/whaling_cards.htm
Kester's bad weather barrel as well as a more minimalistic southern type.
Per
-
-
-
Now this is what I call a lathe! Ok, not quite up to date and perhaps a tad overpriced, but boy would I want one!
Per
-
-
The website for the replica schooner Lynx, http://www.privateerlynx.com/# , has some good photos of their swivel guns in the photo gallery.
Per
-
-
I am looking for an old roll top desk or two for the same purpose.
That would make the workshop look very shipshape and Bristol fashion.
Per
-
I think Thanasis got the answer, I found this description in a Tasmanian newspaper, the Deloraine and Westbury Advertiser, May 13, 1911:
A NIGHT LIFEBUOY.If, as often happens, a person should fall overboard when it is dark, the ordinary lifebuoy is not much use unless the vessel happens to be provided with a searchlight.The item we illustrate is intended specifically as a night buoy, lt consists of two hollow metal globes which are so buoyant that when in the water a man's weight will not sink them. The vertical tube contains a composition of calcium and phosphorous which ignites on coming into contact with water.In the case of "man overboard" one of these buoys is thrown towards him, and as the composition instantly lights up, there is a definite guide for him to make for, provided he can swim, till such time as he is rescued.

-
Ilhan,
I found a couple of good photos here:
http://www.flickr.com/photos/withloveforjin/7008102377/in/photostream/
and one photo here:
http://zuluboat.blogspot.se/2009_02_01_archive.html
Hopefully a member close to San Diego could do better.
Interesting. It is the first steam windlass i have seen with upright steam engines. Perhaps because of tight space on the forecastle?
Per
-
Mine are called Dovo, a German make. Got them from an embroidery shop and they were not cheap.
What I like is that they, like me, are left-handed so I actually see what I am cutting. And the cutting edges are micro-serrated, keeping the thread from sliding when you cut.
Per
-
Just saw this video and thought it might be of interest:
I have no connection to Stewart-MacDonald other than having spent a lot of money on them. I'm just a sucker for both tools and musical instruments...
Per
-
I didn't understand your commment "there is really very little steel to remove afterwards to get the right shape". Is that a good or a bad thing? What is the implication?
Tony
Forming the end of the graver (about 60 degrees) with a bench grinder gives it a sort of hollow shape. All you have to do is hone it so the tip and edges are flat, leaving the hollow in the middle. Bill Smith:
Because of the curved surface caused by the bench grinder, the graver will rest on its point and its heel and neither the right and left corners of the square will be touching the stone. So, tilt the top of the graver slightly to the right until the point, heel and right corner of the square touch the stone. Now, make long strokes with pressure. (This is quite important. Two short strokes which total the length of one long stroke will roll the graver twice as much as the single long stroke.) Eight or fewer such strokes (usually five) should bring up the two right hand edges of the diamond face. Now, with the face flat against the stone, tilt the top of the graver slightly to the left until the left corner of the graver touches the stone. Make long strokes with pressure. Again, eight or fewer strokes should bring up the other two edges of the diamond face.
I like your Tanzania story. Amazing what a skilled workman can do with just hand tools.
In the early seventies, my Nikon camera died on me one time in Laos. The town watchmaker spent the night filing up a new gearwheel from brass sheet and fitted it to the camera motor drive.
Per
-
what do you use to keep the graver dead sharp?
Tony
I use a diamond lap (Eze-Lap?) and finish off with a hard arkansas stone. If you use a bench grinder like Bill Smith suggests in the Sherline article, there is really very little steel to remove afterwards to get the right shape. You can also search for "Scary sharp", there are many MSW members here that recommend that method for getting a sharp edge.
A bit off topic, but a great many years ago I watched a jobbing brass turner in Clerkenwell turn up a large telescope lens mount from a brass casting, completely by hand. The handle on his turning tool must have been two foot long. He jammed it into the armpit and leaned on it to get the depth of cut he wanted and the brass chips were flying. Next thing, he turned the inside threads with a chasing tool, finishing off the job by heating the machined casting, still rotating, with a spirit lamp and wiped on shellac. The whole thing can't have taken more than two minutes. But please don't try that at home!

Per
-
Here is one of the gravers i use on my Unimat 3 and my Boley watchmakers lathe. I pressed a bushing into the handle to hold a 1/8” HSS square toolbit.
I use handles bushed for 1/8” and 1/4” round and square toolbits on the Unimat, on the Boley mostly 1/16”.
The handle is about 80 mm long, enough to hold comfortably in the hand. The long handles you see on turning chisels are to make it easier to apply leverage for a heavier cut, something you don’t want to do when turning with gravers on a small lathe, a dead sharp graver using fine cuts is the way to go.
Start using a speed of around 200rpm, you’ll soon get the feel for the best speed for what you are doing.
Oh, and never plunge the graver tip into a cut, that is a surefire way of losing both the graver tip and whatever you’re turning. Angle the graver up (or down) and cut with one of the front edges.
Per
-
Paul,
As davyboy says, it can't hurt to contact Aberdeen Maritime Museum as they do have the builder's model. I don't know how accurate it is, since it was made for the owners' approval before building the real ship. Possibly changes were made before building:
http://www.aberdeenships.com/related.asp?searchFor=thermopylae&index=13563&shipid=99403
Per
-
OK I want to go to THIS party !!!!
I was to one of these parties when the firm I worked for celebrated a jubilee fifteen years ago and rented the museum for the evening. They had a lot of 17th century food on the menu, oodles of different herrings and salted meat. The beer went down easily after that.

But my best memory of the ship is as a kid when my school class were actually allowed on board to tread the decks. Definitely not allowed anymore, unless you are a visiting head of state (Obama was the latest last summer). Only wish I had better sense and a better camera as a kid. Just a few bleached-out instamatics remain of that visit of a lifetime in the 1960s...
Per
-
PRIMING WIRES:
"Two and a half the diameter of the bore of the piece in length from the back of the eye to the point and two tenths of an inch in diameter.
To be made of drawn wires.
The end which forms the eye to be welded to the others
The point with four squares
[The last statements make little sense as written ...]
I suppose what they mean is that the point was square in section, like an old-fashioned ice pick. Makes sense if they use it to pierce the cartridge.
Per
-
I just had a look at the Ordnance Instructions for the United States Navy, 1866:
http://www.gutenberg.org/files/19058/19058-h/19058-h.htm
Where all the things needed to service and fire the guns are listed. The gunner certainly had a lot of stuff in his inventory.
Per
-
ALUMINIUM CANS - Cut strips from a flattened-out can to the scale size of flags for your ship. Using transfers or by painting, add your flag design to both sides of the aluminium flags. Remember to reverse the design on one side.
Crumple the aluminium piece slightly to produce a natural-looking flag that will appear to be permanently flapping in the breeze.
(This idea comes from a fellow USS Constitution builder here on MSW - the eminent modeller12)
Aluminium cut straight from a can is very hard. Annealing the sheet, heating it until a piece of wood leaves a brown streak when drawn across it, leaves aluminium that is soft and pliable and can be easily formed.

12 pounder carronade carriage
in Discussion for a Ship's Deck Furniture, Guns, boats and other Fittings
Posted · Edited by Per
Bruce,
I found an old engraving of a 12-pounder carronade on a 4-wheel carriage on Wikimedia:
Just search there for "Carronade 12 pounder.jpg". Unfortunately it seems dated to 1913, but the construction seems reasonable.
Per