HOLIDAY DONATION DRIVE - SUPPORT MSW - DO YOUR PART TO KEEP THIS GREAT FORUM GOING! (Only 20 donations so far - C'mon guys!)
×


EKE
-
Posts
231 -
Joined
-
Last visited
Content Type
Profiles
Forums
Gallery
Events
Everything posted by EKE
-
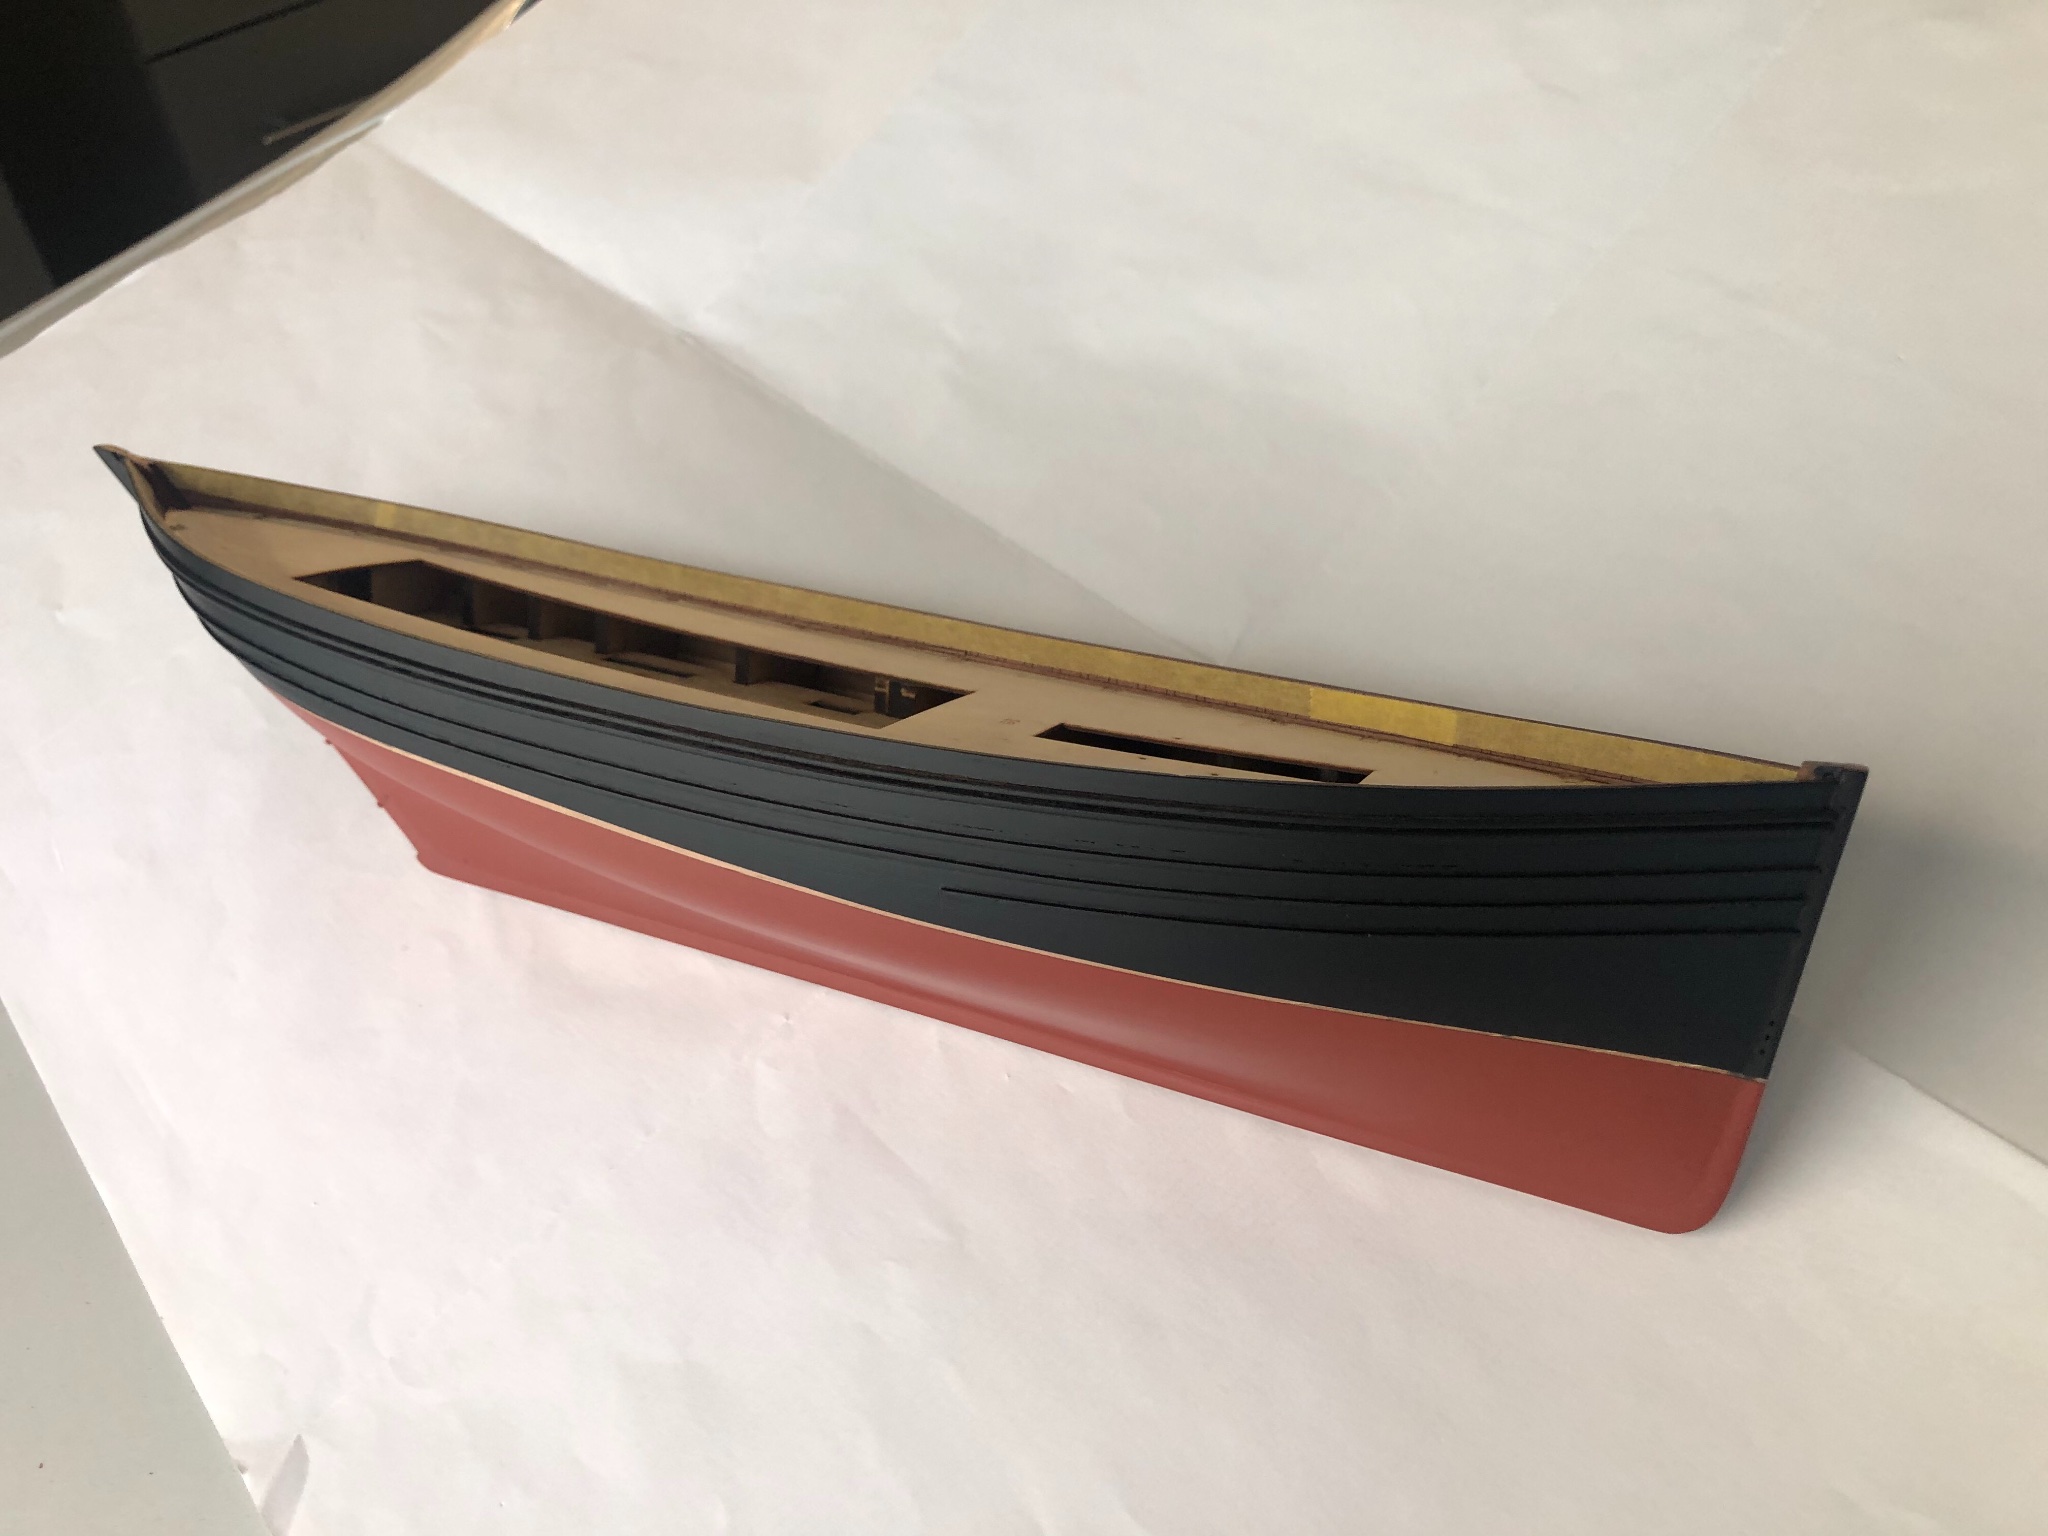
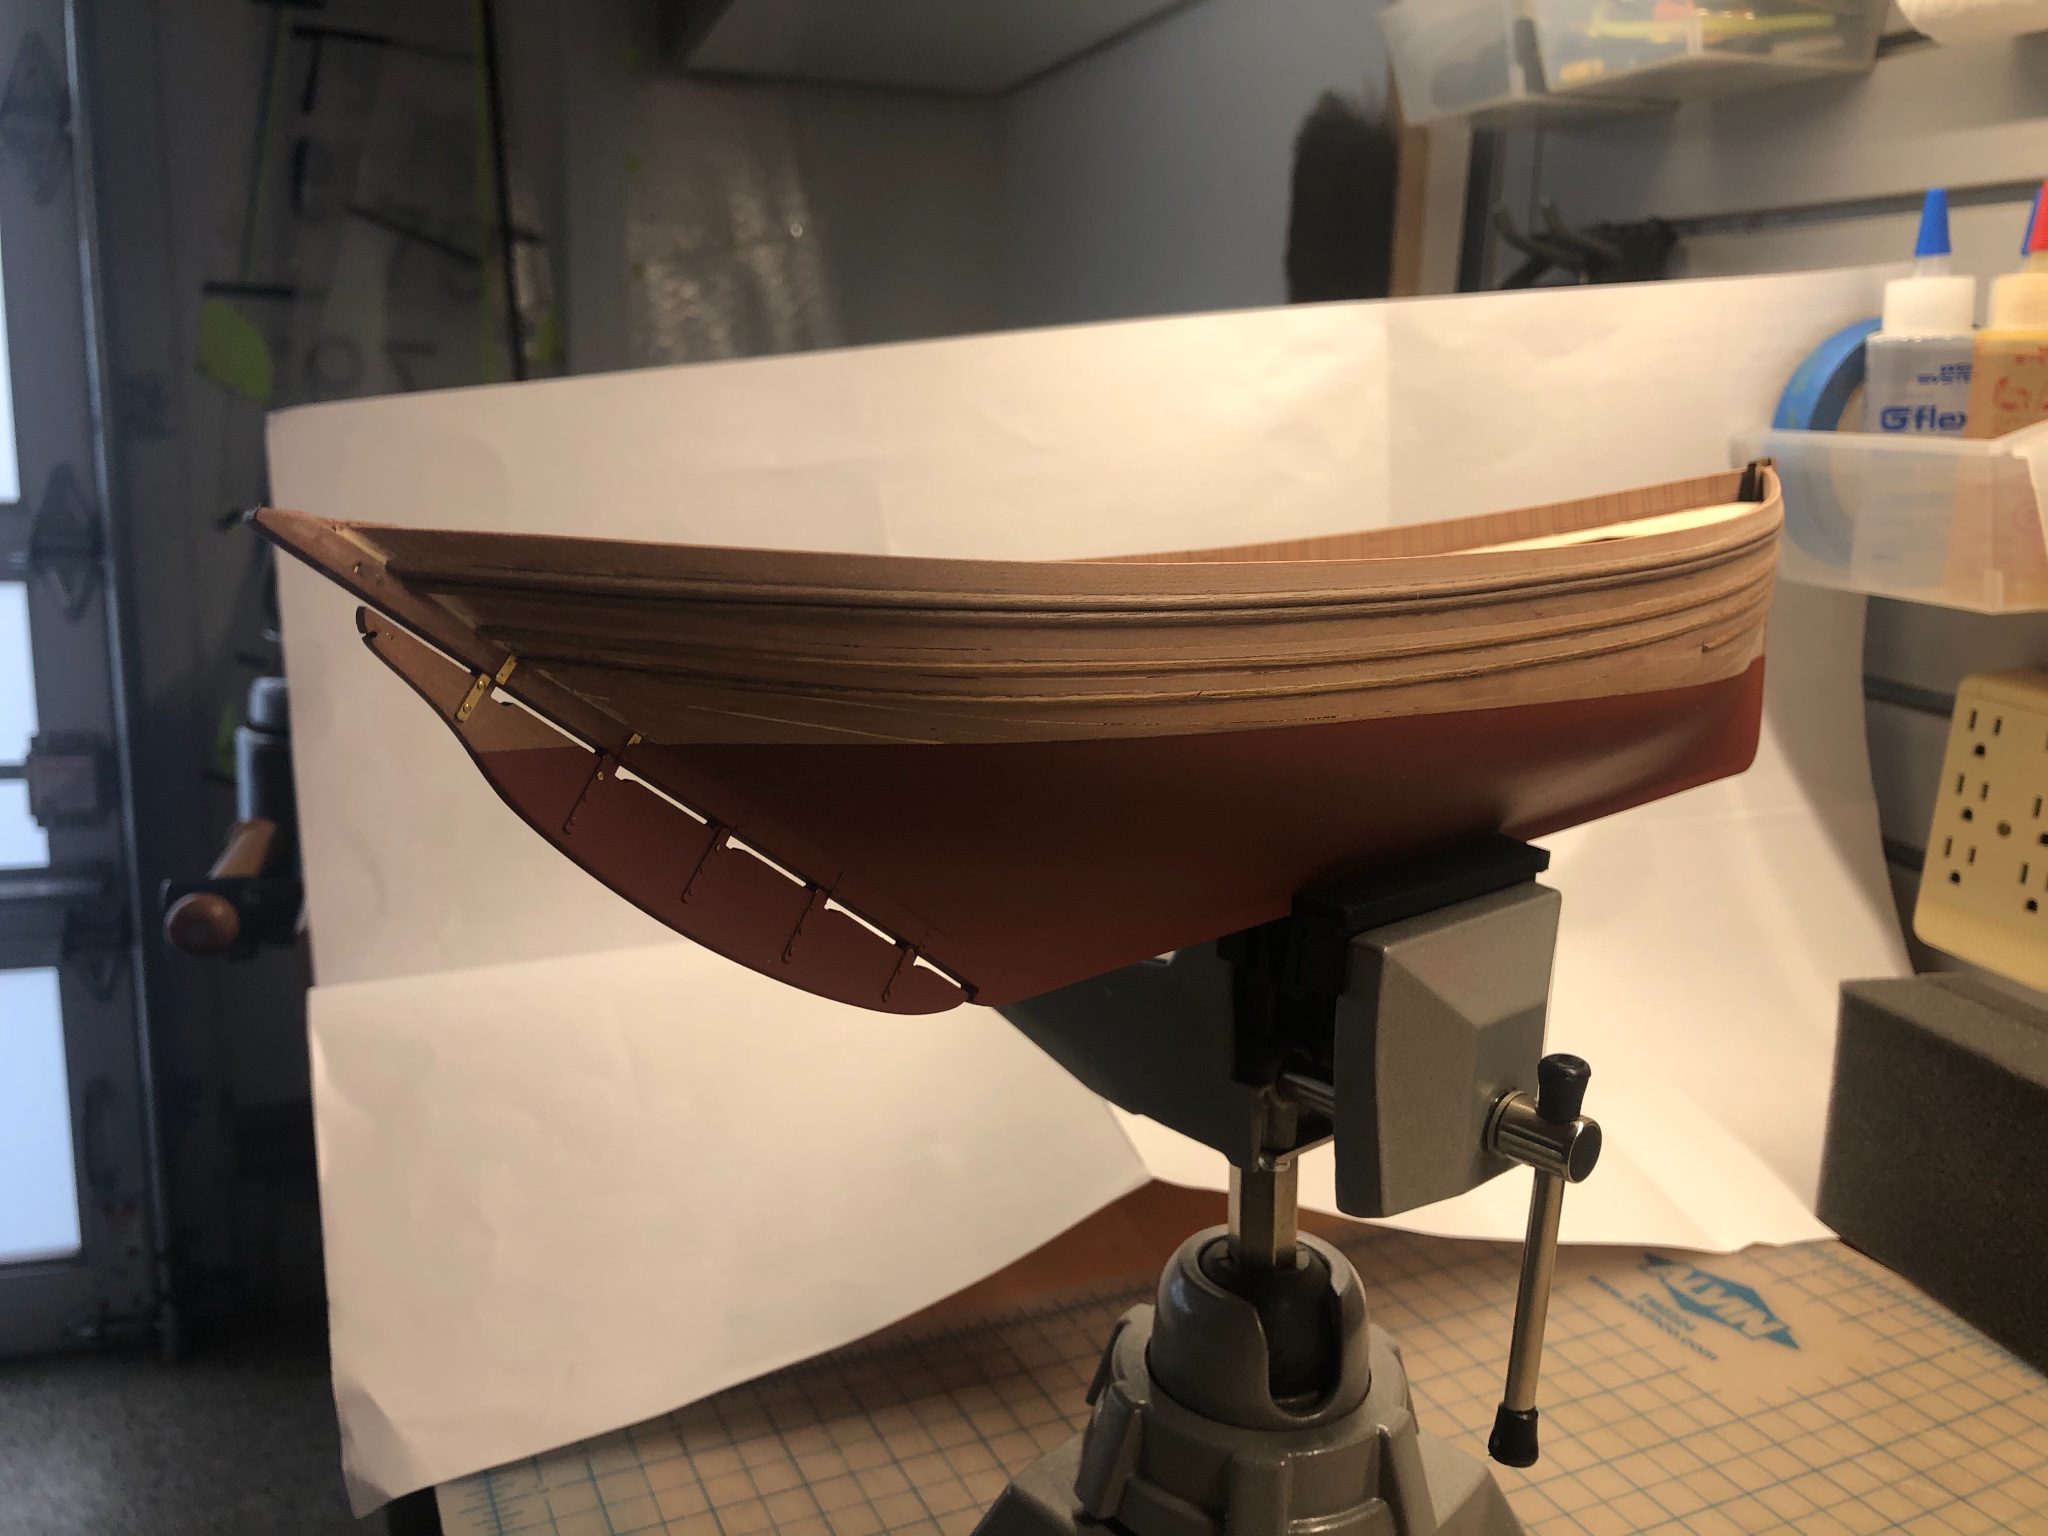
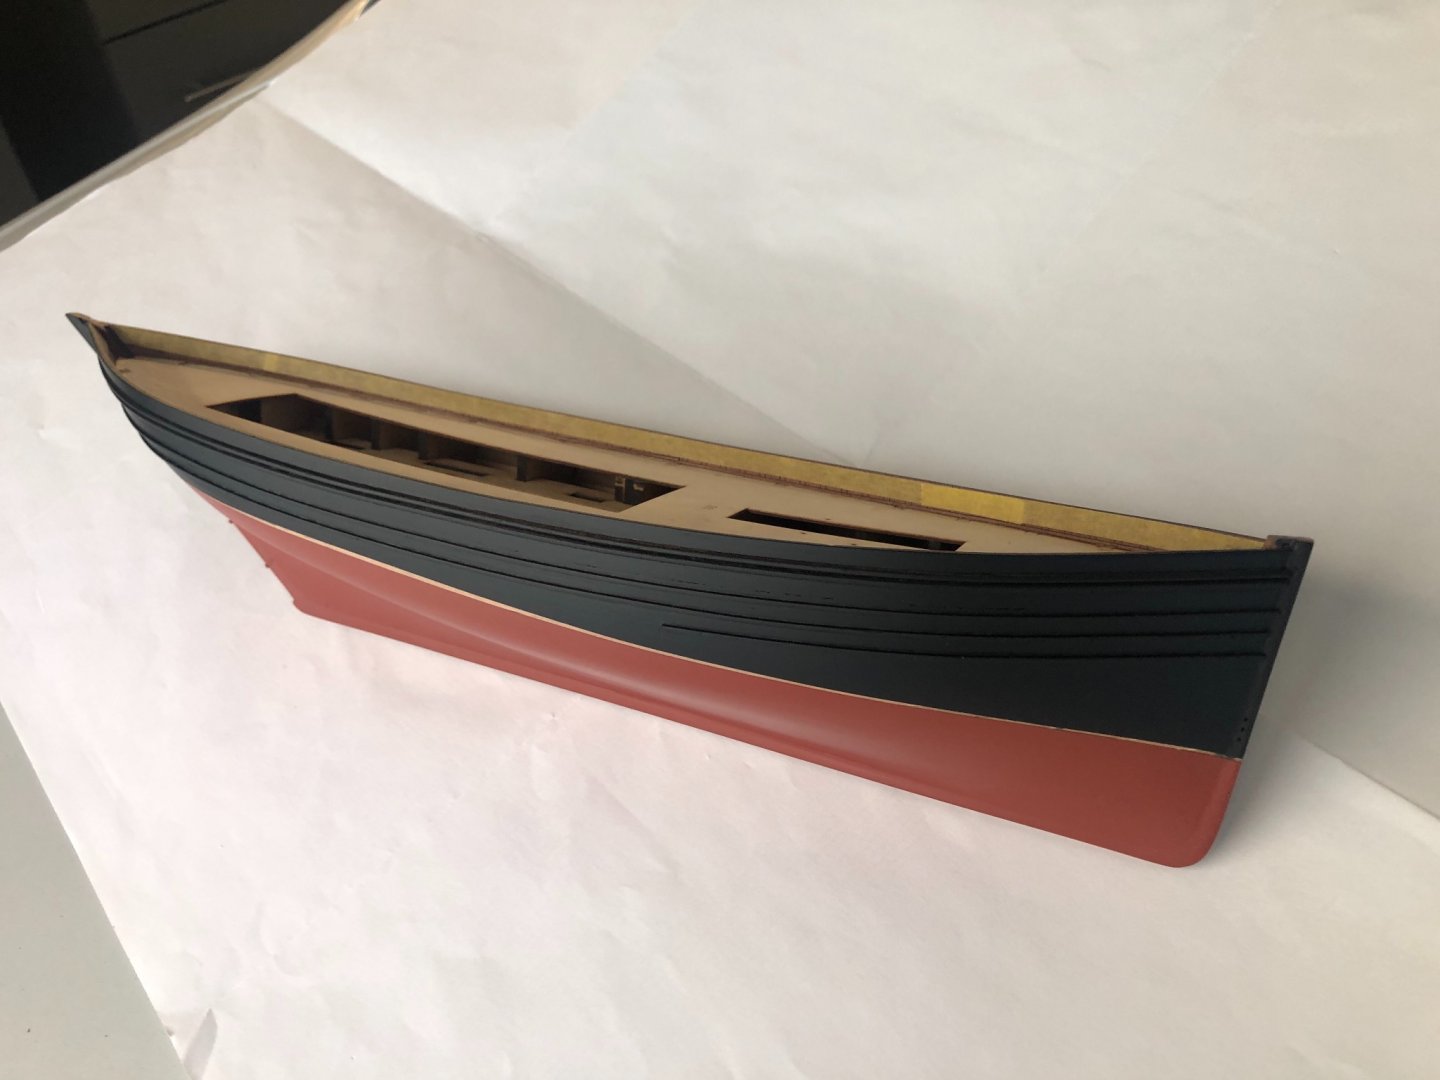
 I’ve completed the topsides paint, and damn if she’s not starting to look like a proper Zulu! I spent a crazy amount of time with tiny sanding sticks, cleaning up around the strakes to remove glue crust. It was worth it though, as I think it came out pretty clean. I carefully masked the deck area, bulwarks, and bottom, and sprayed two coats of the Chaos Black aerosol that James recommended. Great paint, excellent coverage. And Jim, you were absolutely right, the finish is just what I was looking for, a lovely satin. Just right for a working boat. I brought the black close to the waterline, but not quite to it, as you can see. I wasn't super careful with the mask line for the black, as as I'll be painting over it. The edges will be covered by the boot stripe. Next task is to mask off the boot stripe, and spray it satin white. That’s all for now. She’s coming along!
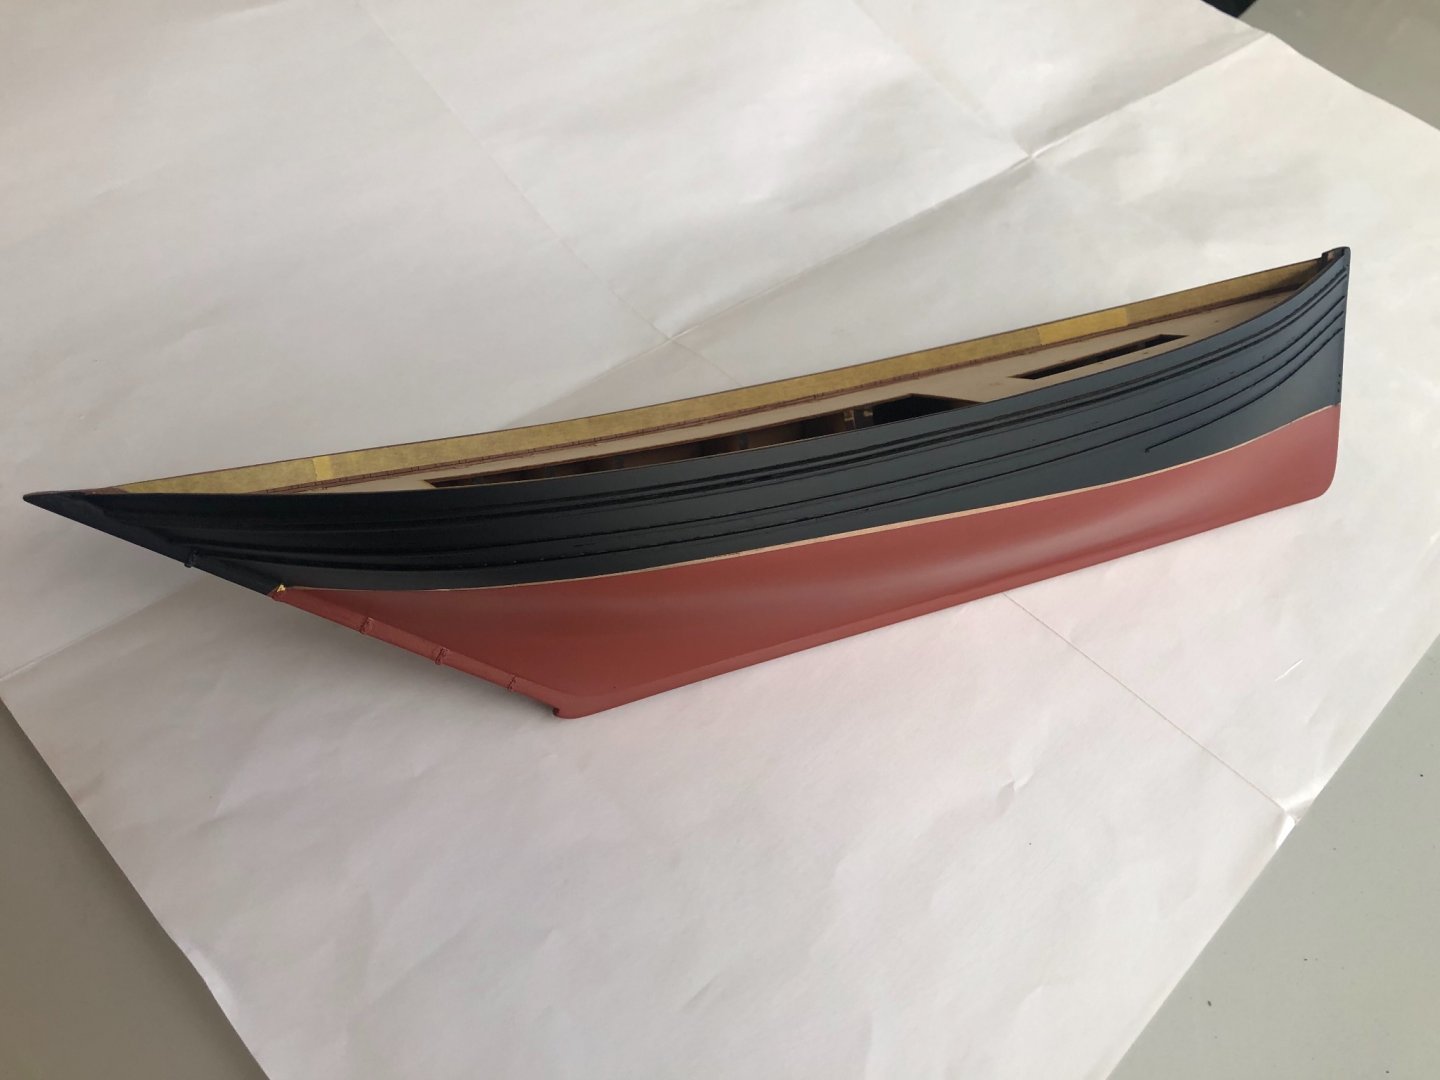

- 222 replies
-
- 11
-

-
- First Build
- Lady Isabella
- (and 2 more)
-
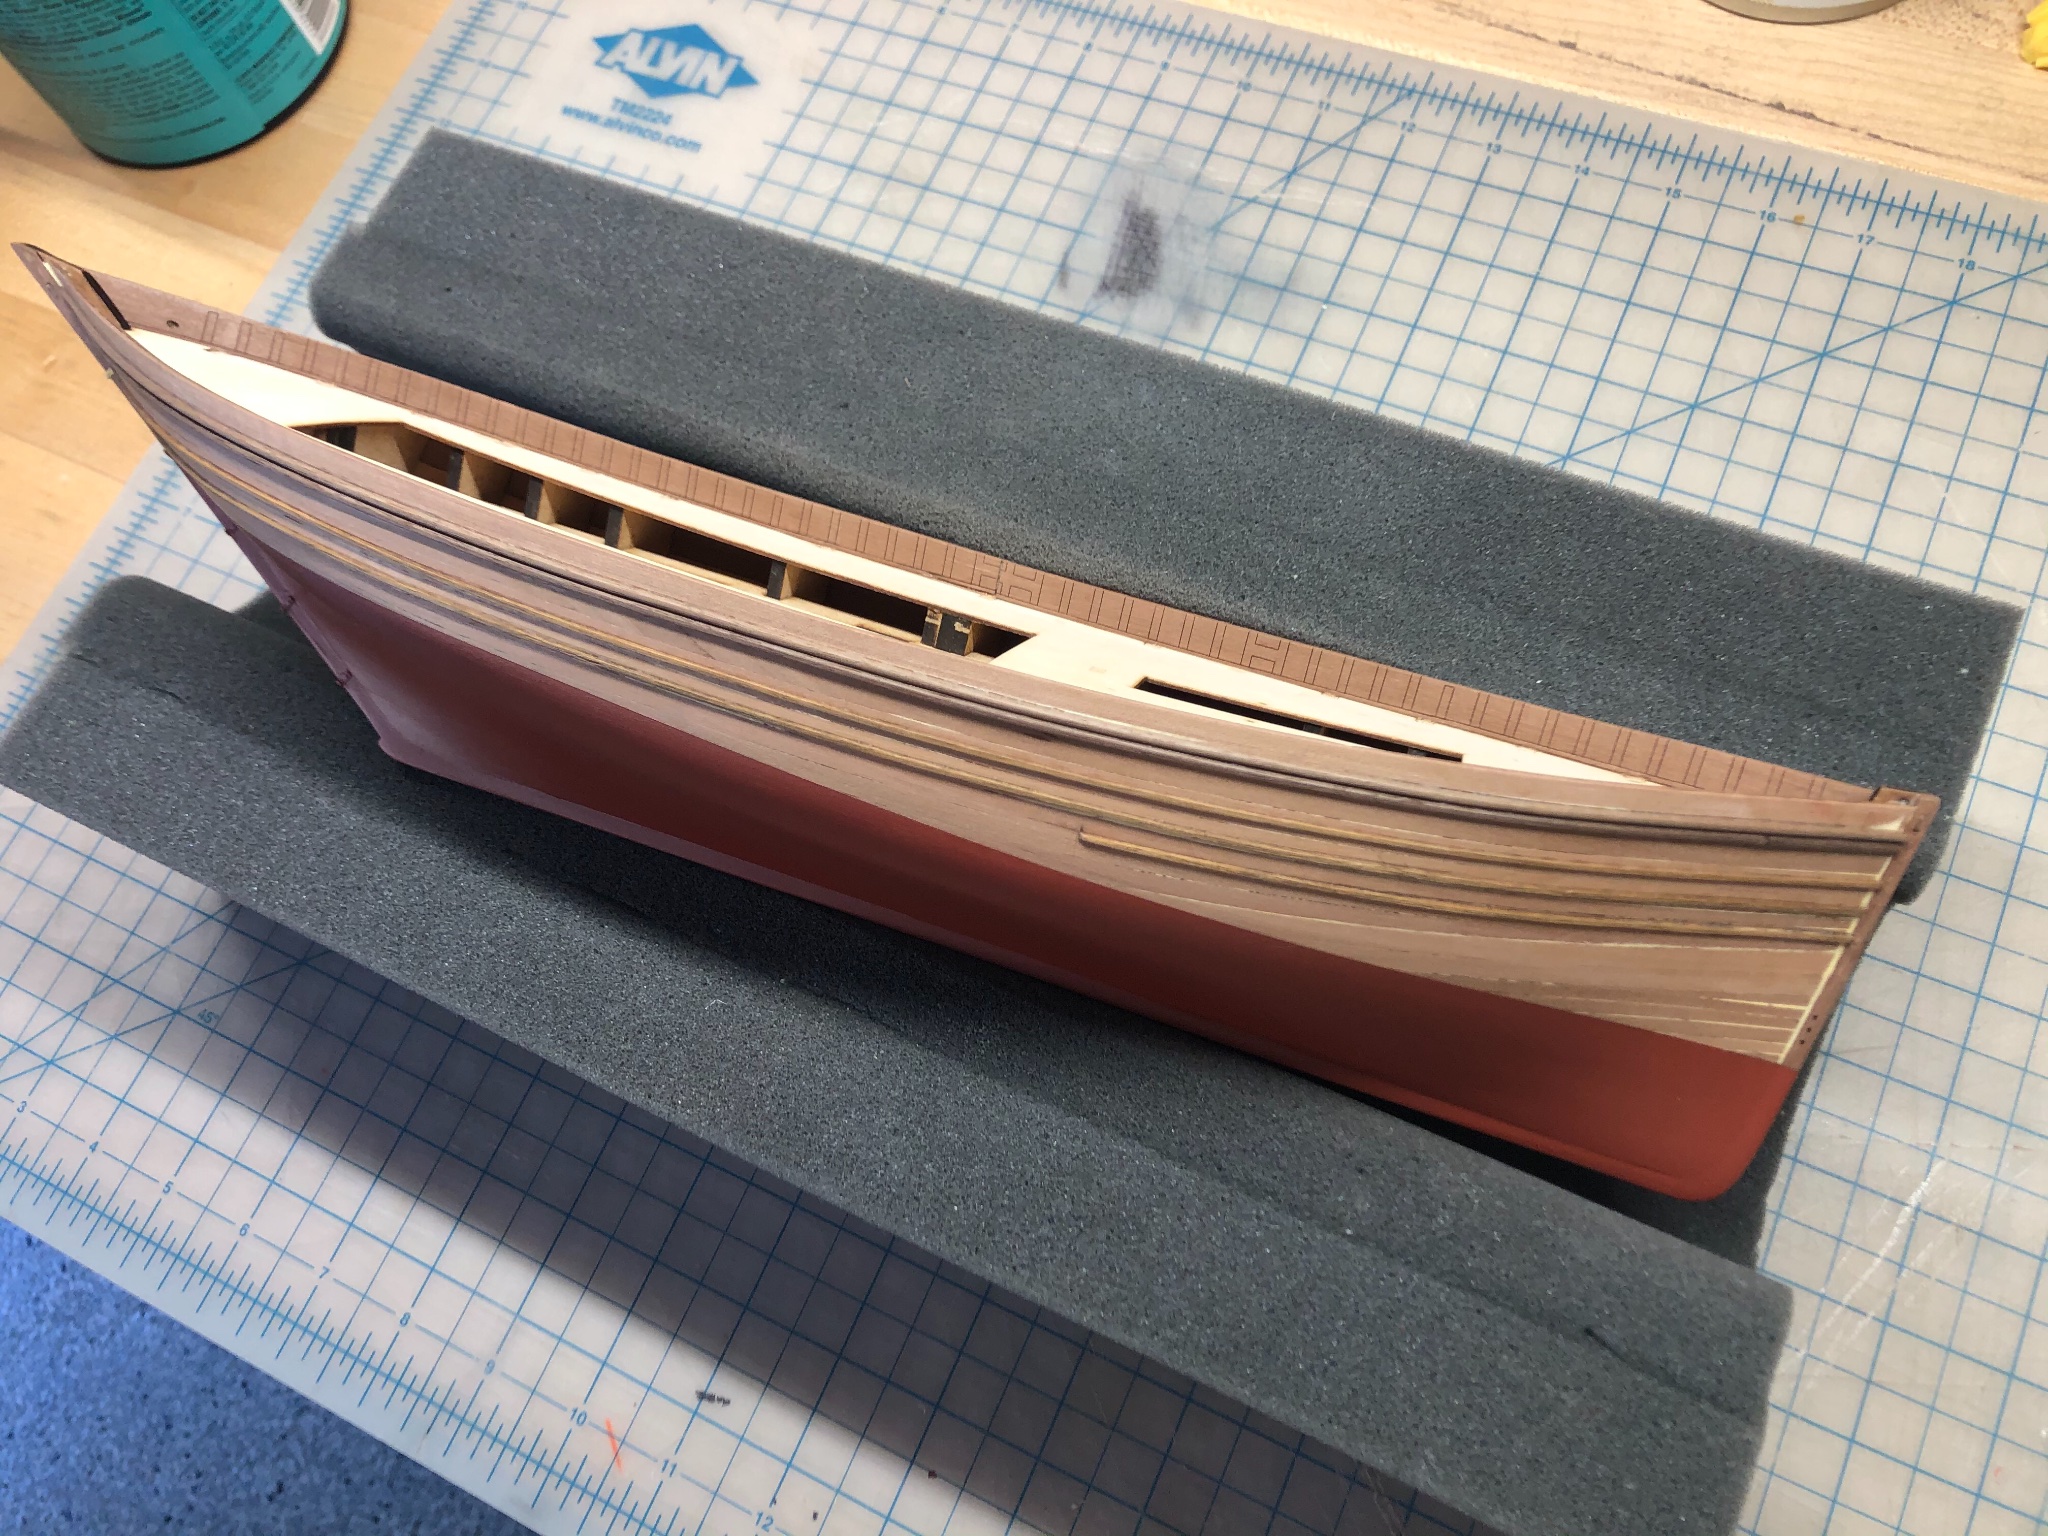
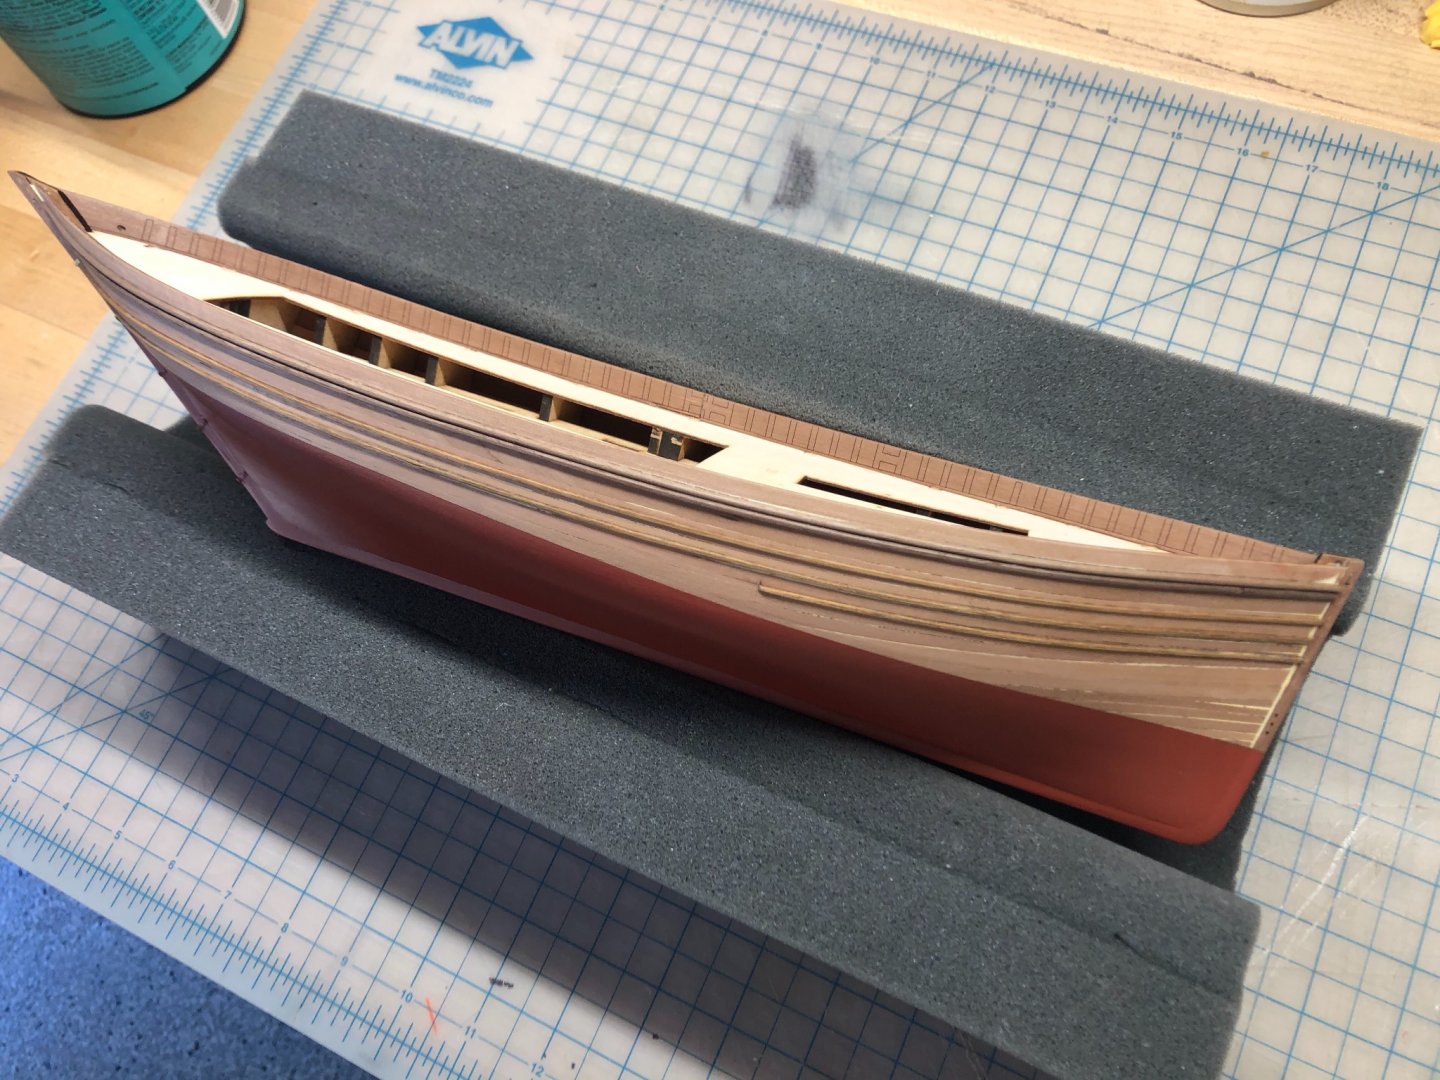
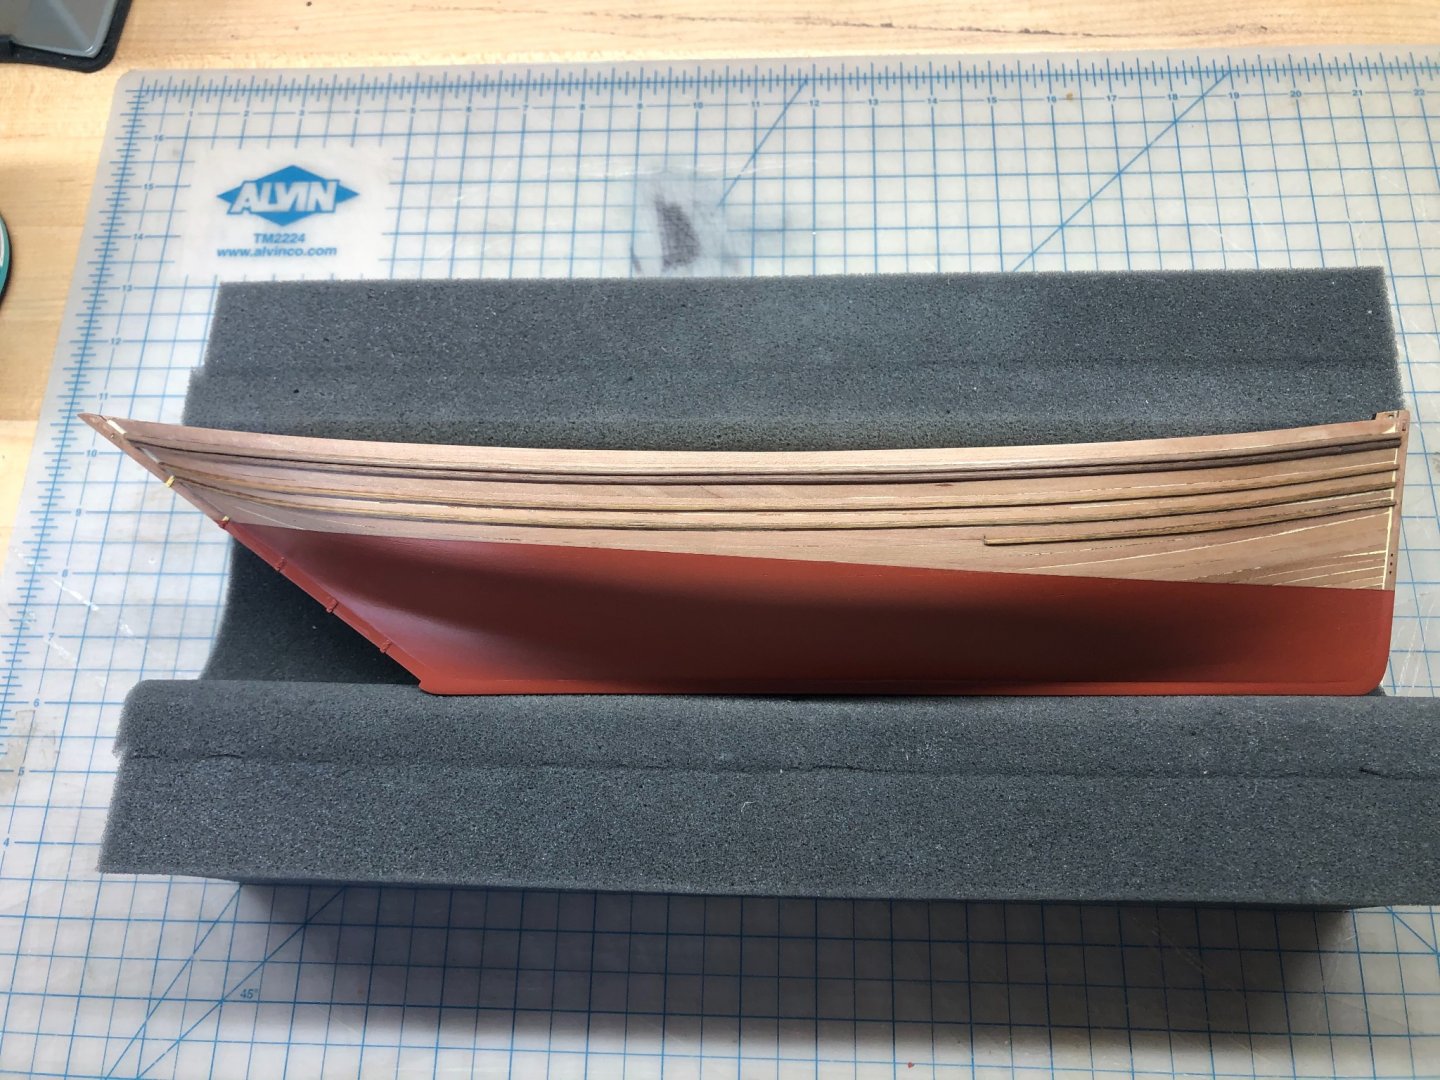
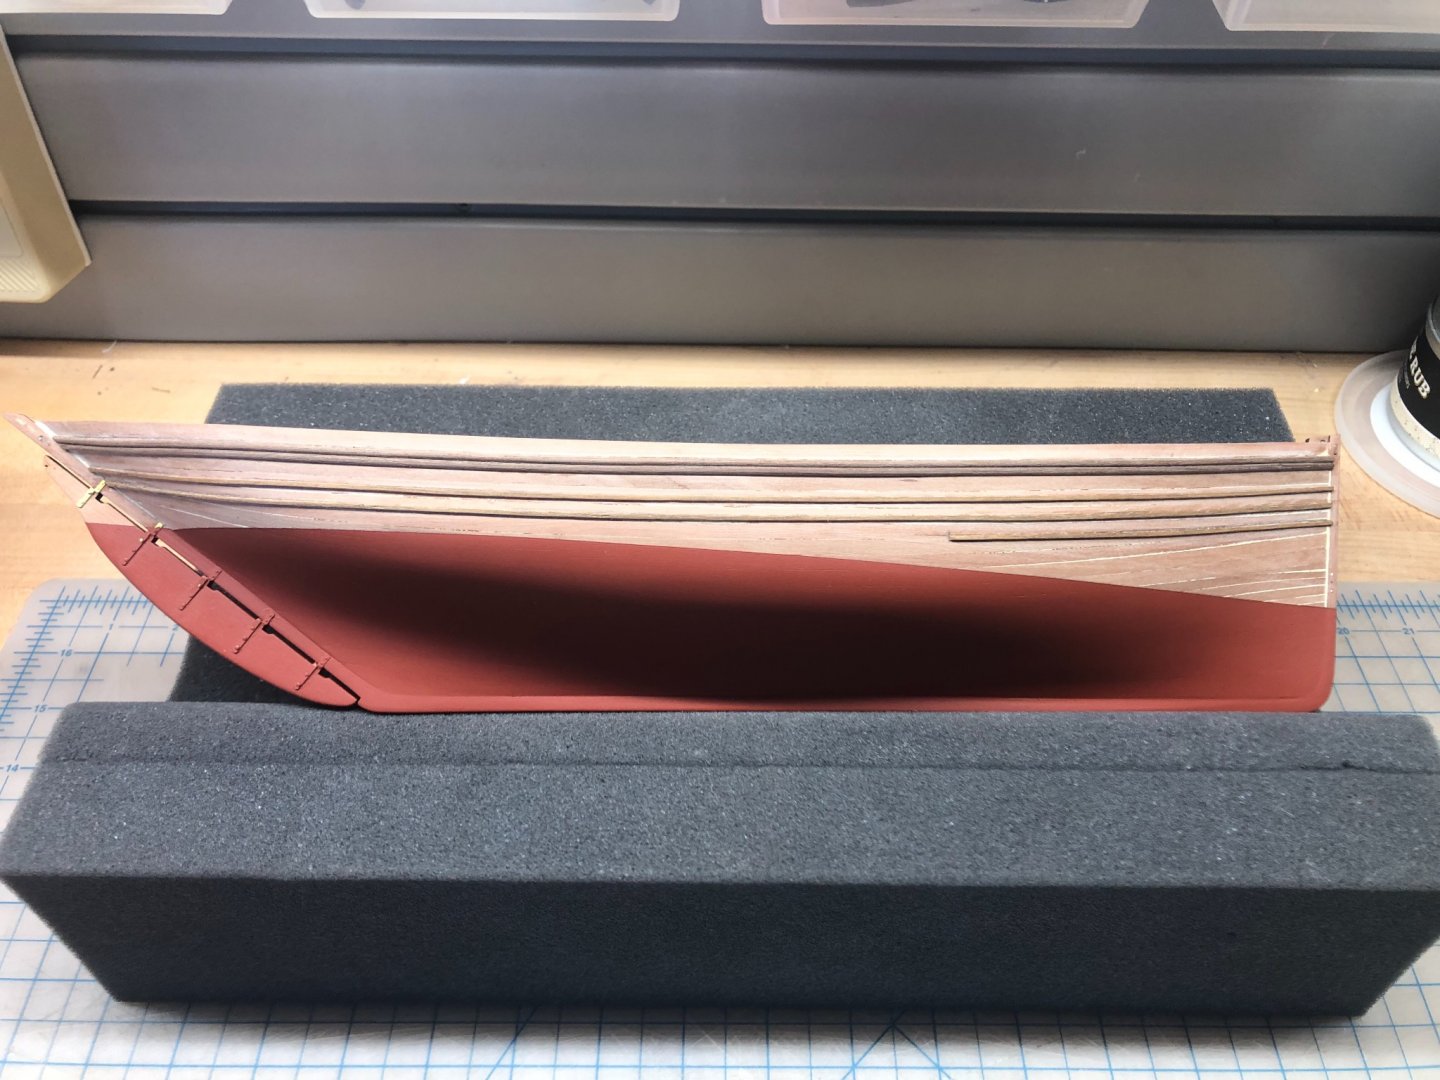
So I went ahead and used the Minwax varnish. I thought it had the nicest color of the three choices on the pearwood. I also tested it over the red oxide, and it seemed to be a nice matte/satin finish. So I dove in, and brushed on a coat of Minwax on the inside of the bulwarks, and the entire exterior of the hull, bare wood and painted bottom. Results below. I think the Minwax poly varnish is great so far. It comes out of the can a milky white, but dries crystal clear. As it dries, it seems to self-level and smooth out, so that the finished surface shows almost no brush marks. Very nice. And the finish is has a slight touch of satin sheen, subtle but noticeable. I think it’s perfect for model boats. And the cleanup is super easy, as it’s water based. Great stuff, if you ask me. It seems to dry to a very hard, durable finish, as far as I can tell. I’ll be adding a few more coats after the paint is complete. On to masking and painting the black topsides.
- 222 replies
-
- 4
-
-
- First Build
- Lady Isabella
- (and 2 more)
-
Jim, have you been using oil-based poly varnish?
-
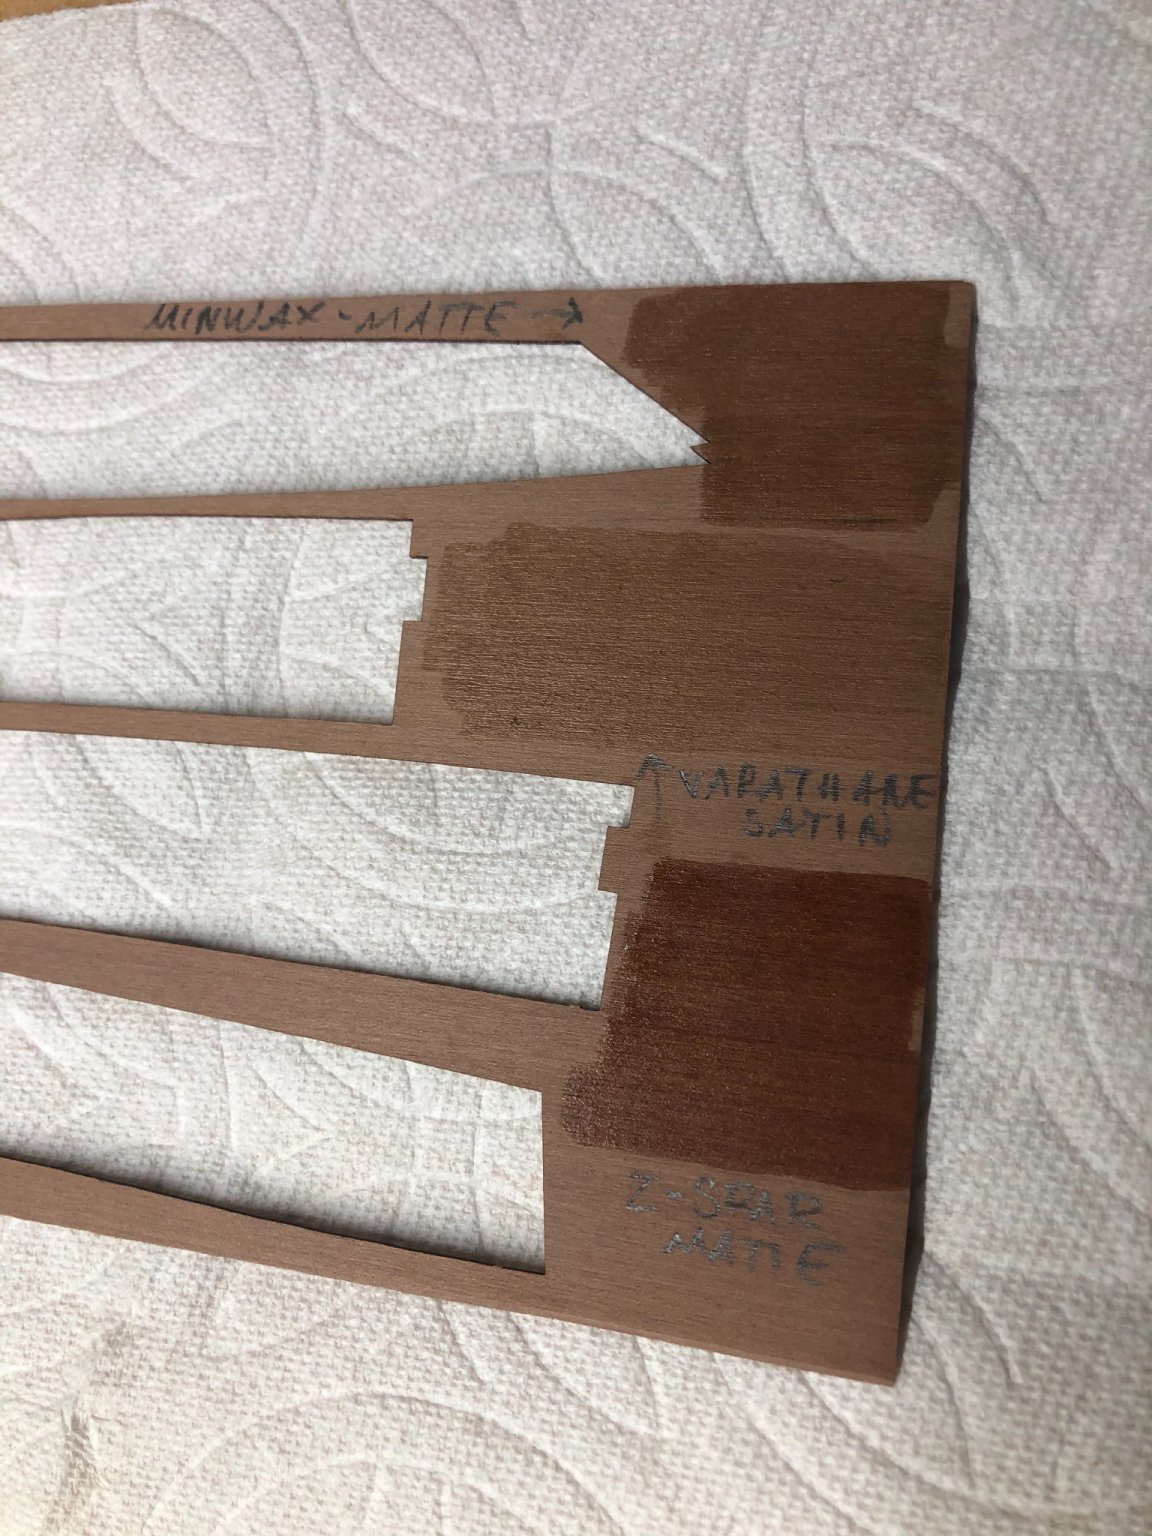
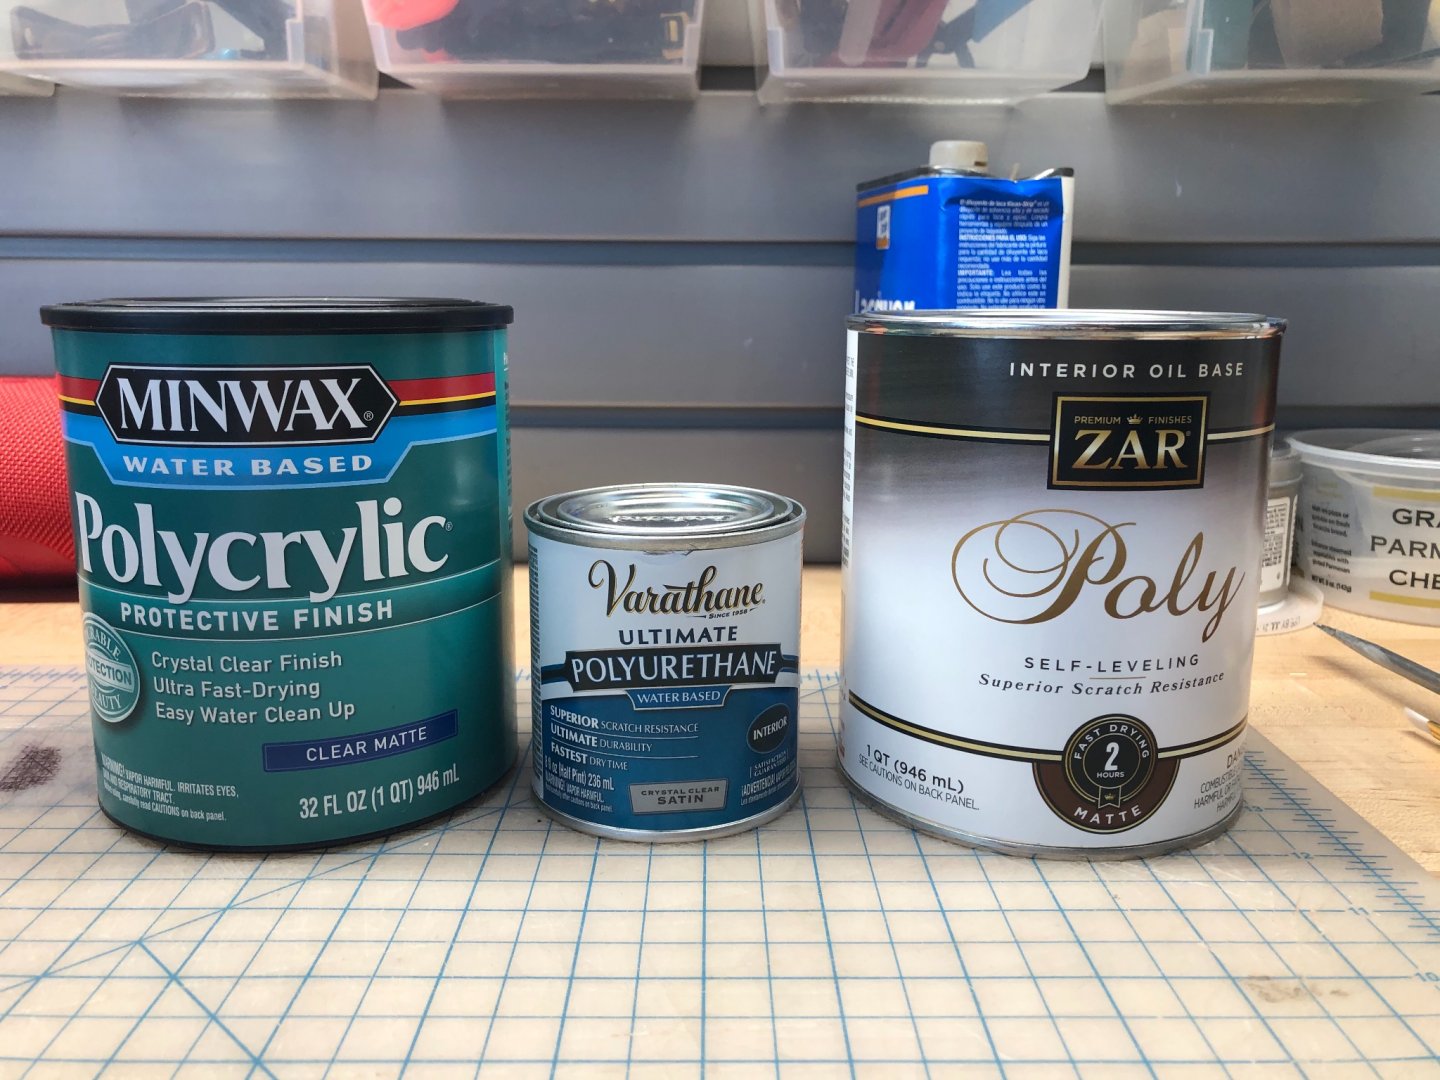
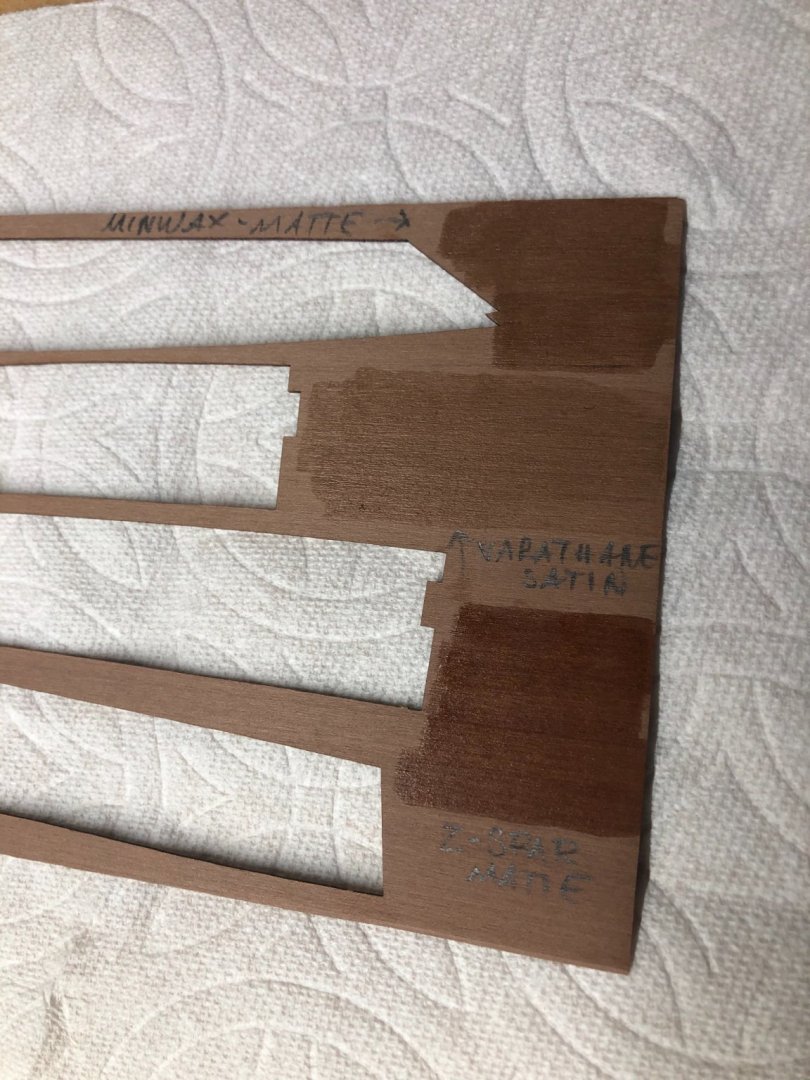
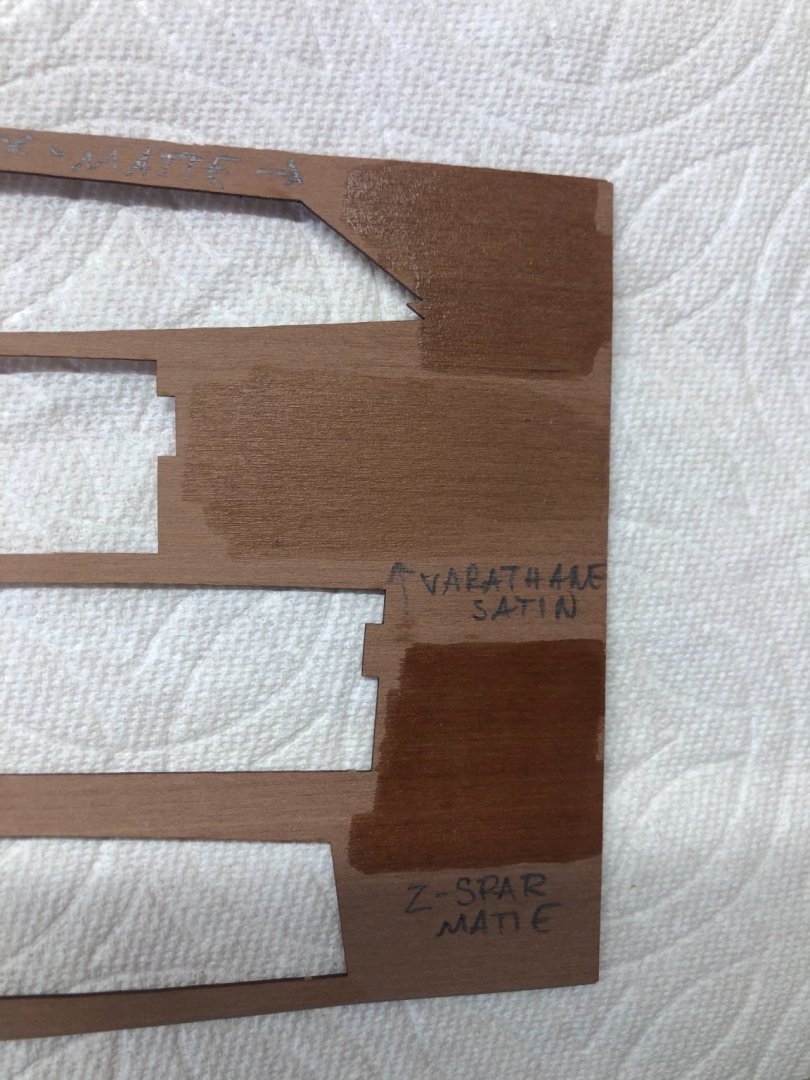
I’ve been testing three “poly” varnishes: 1. Minwax “Polycrylic” water-based, matte finish 2. Varathane Polyurethane, water-based, satin finish 3. Zar “Poly”, oil based, satin finish I took a scrap piece of pearwood and tested them, two coats each. Test shown below. Top to bottom: Minwax, Varathane, Zar. A couple of observations: the water-based products seem to change the color of the wood the least. The Zar oil-based product results in a much richer, darker color. Also, the Varathane “satin” finish is really no shinier than the matte products. All three seem to be very easy to use, lay down beautifully with a good brush, and are easy to clean up. I’d be interested in advice on which one to use. I plan to coat the topsides of the hull with a coat of varnish before painting, and then the insides of the bulwarks and the deck will be varnished. Thoughts?
- 222 replies
-
- 3
-
-
- First Build
- Lady Isabella
- (and 2 more)
-
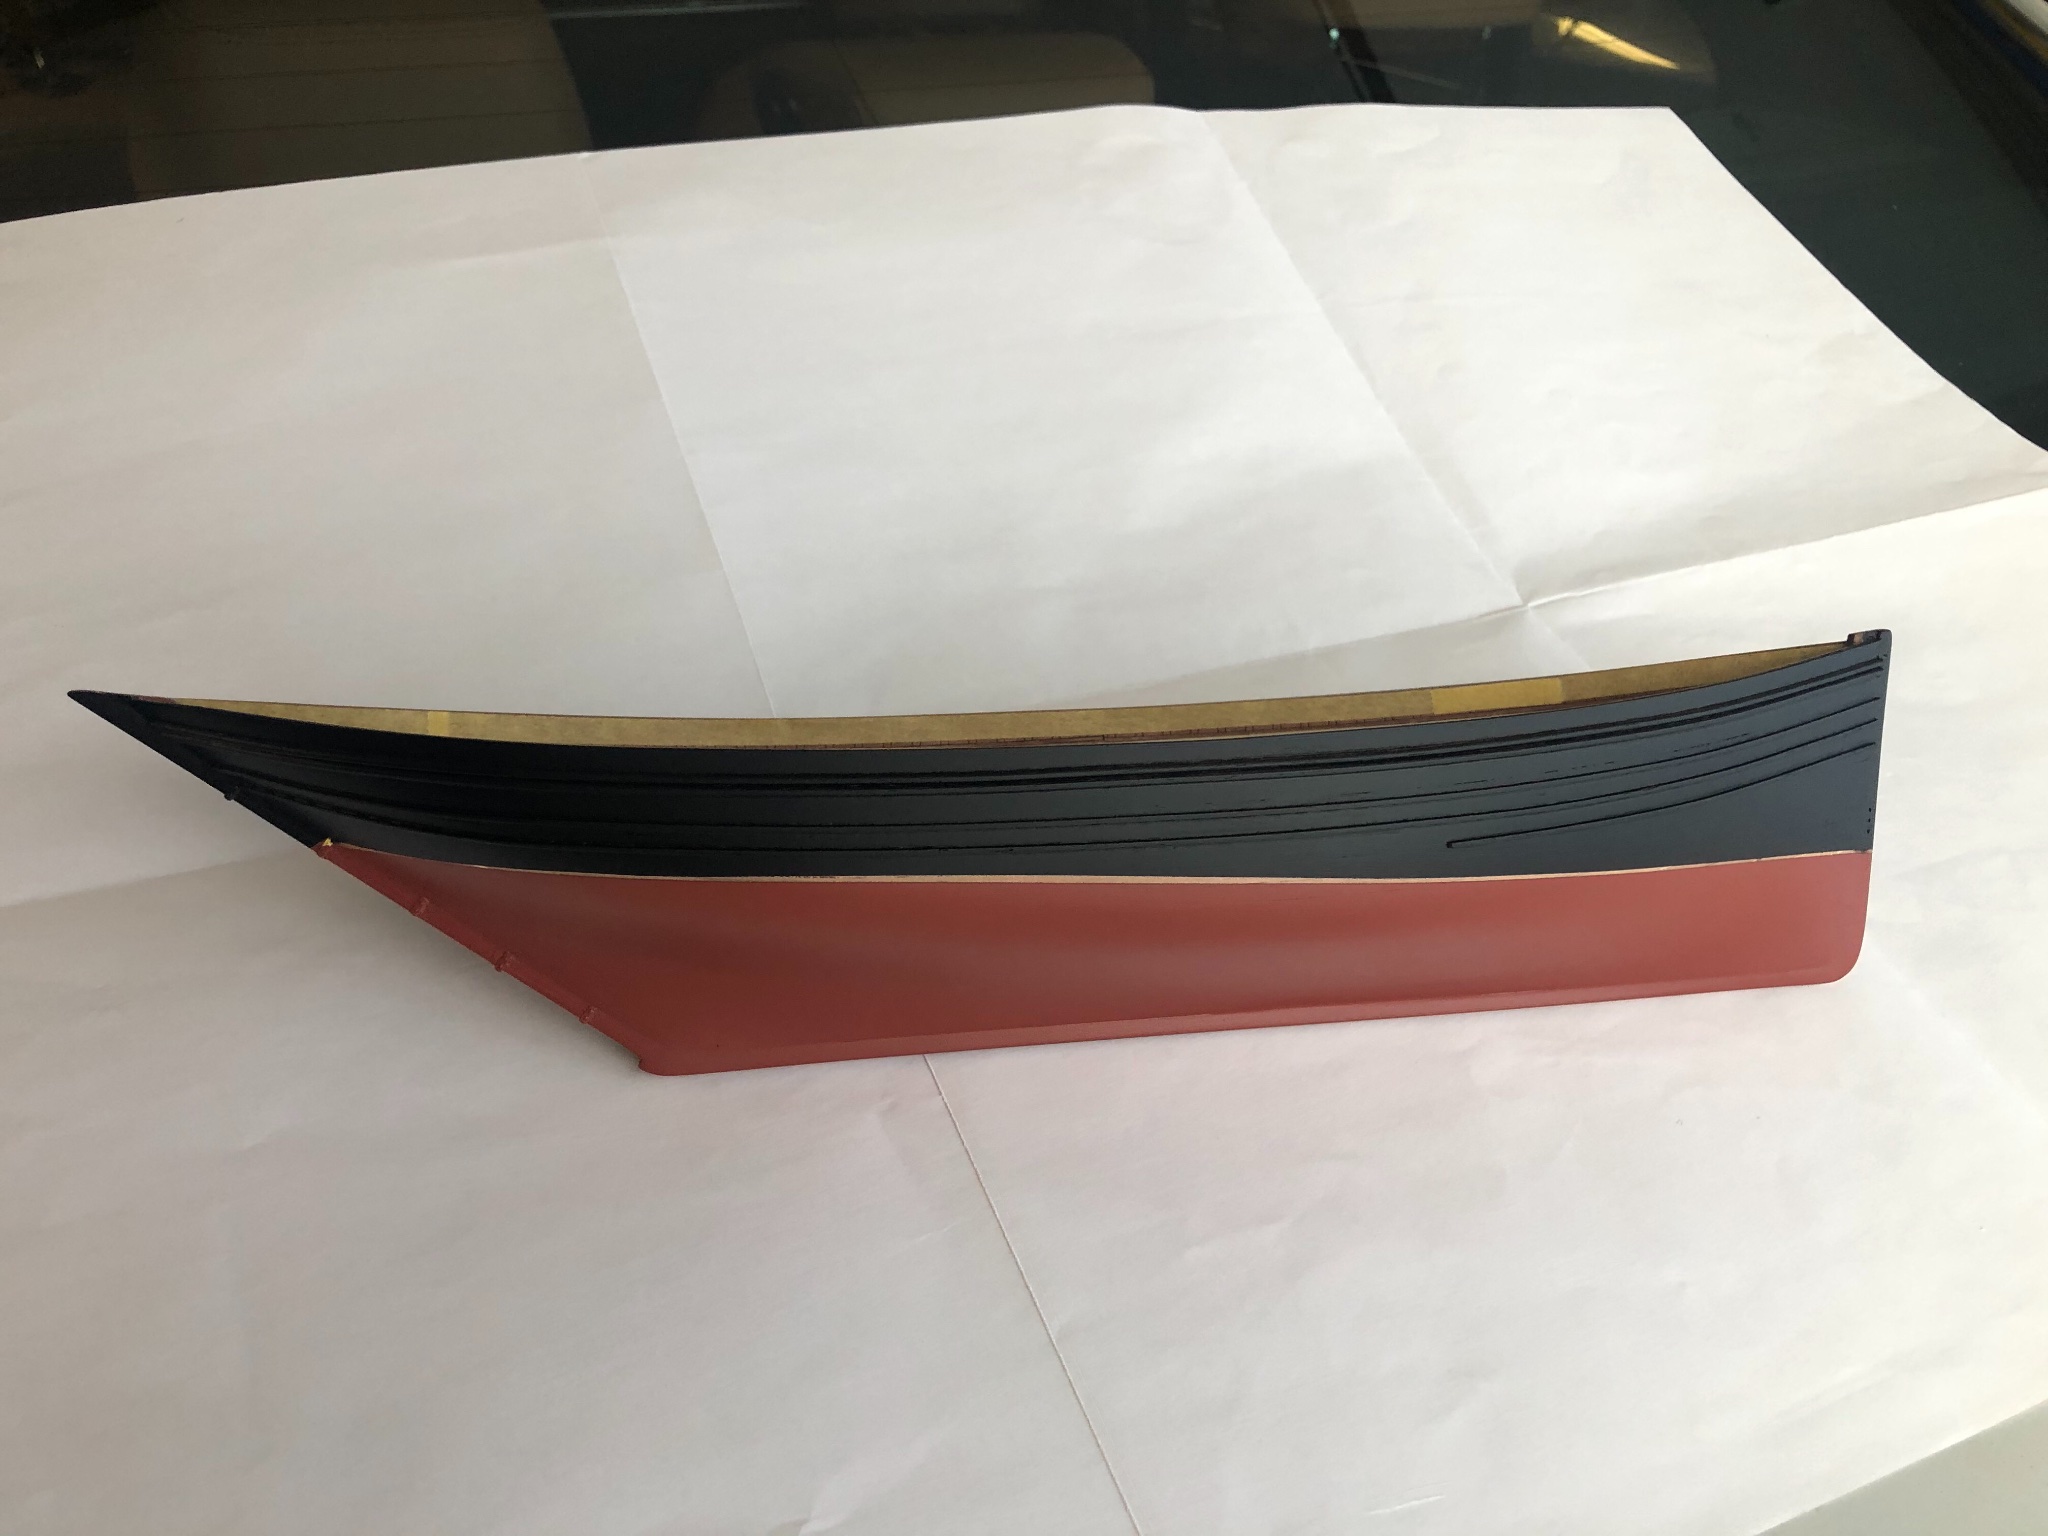
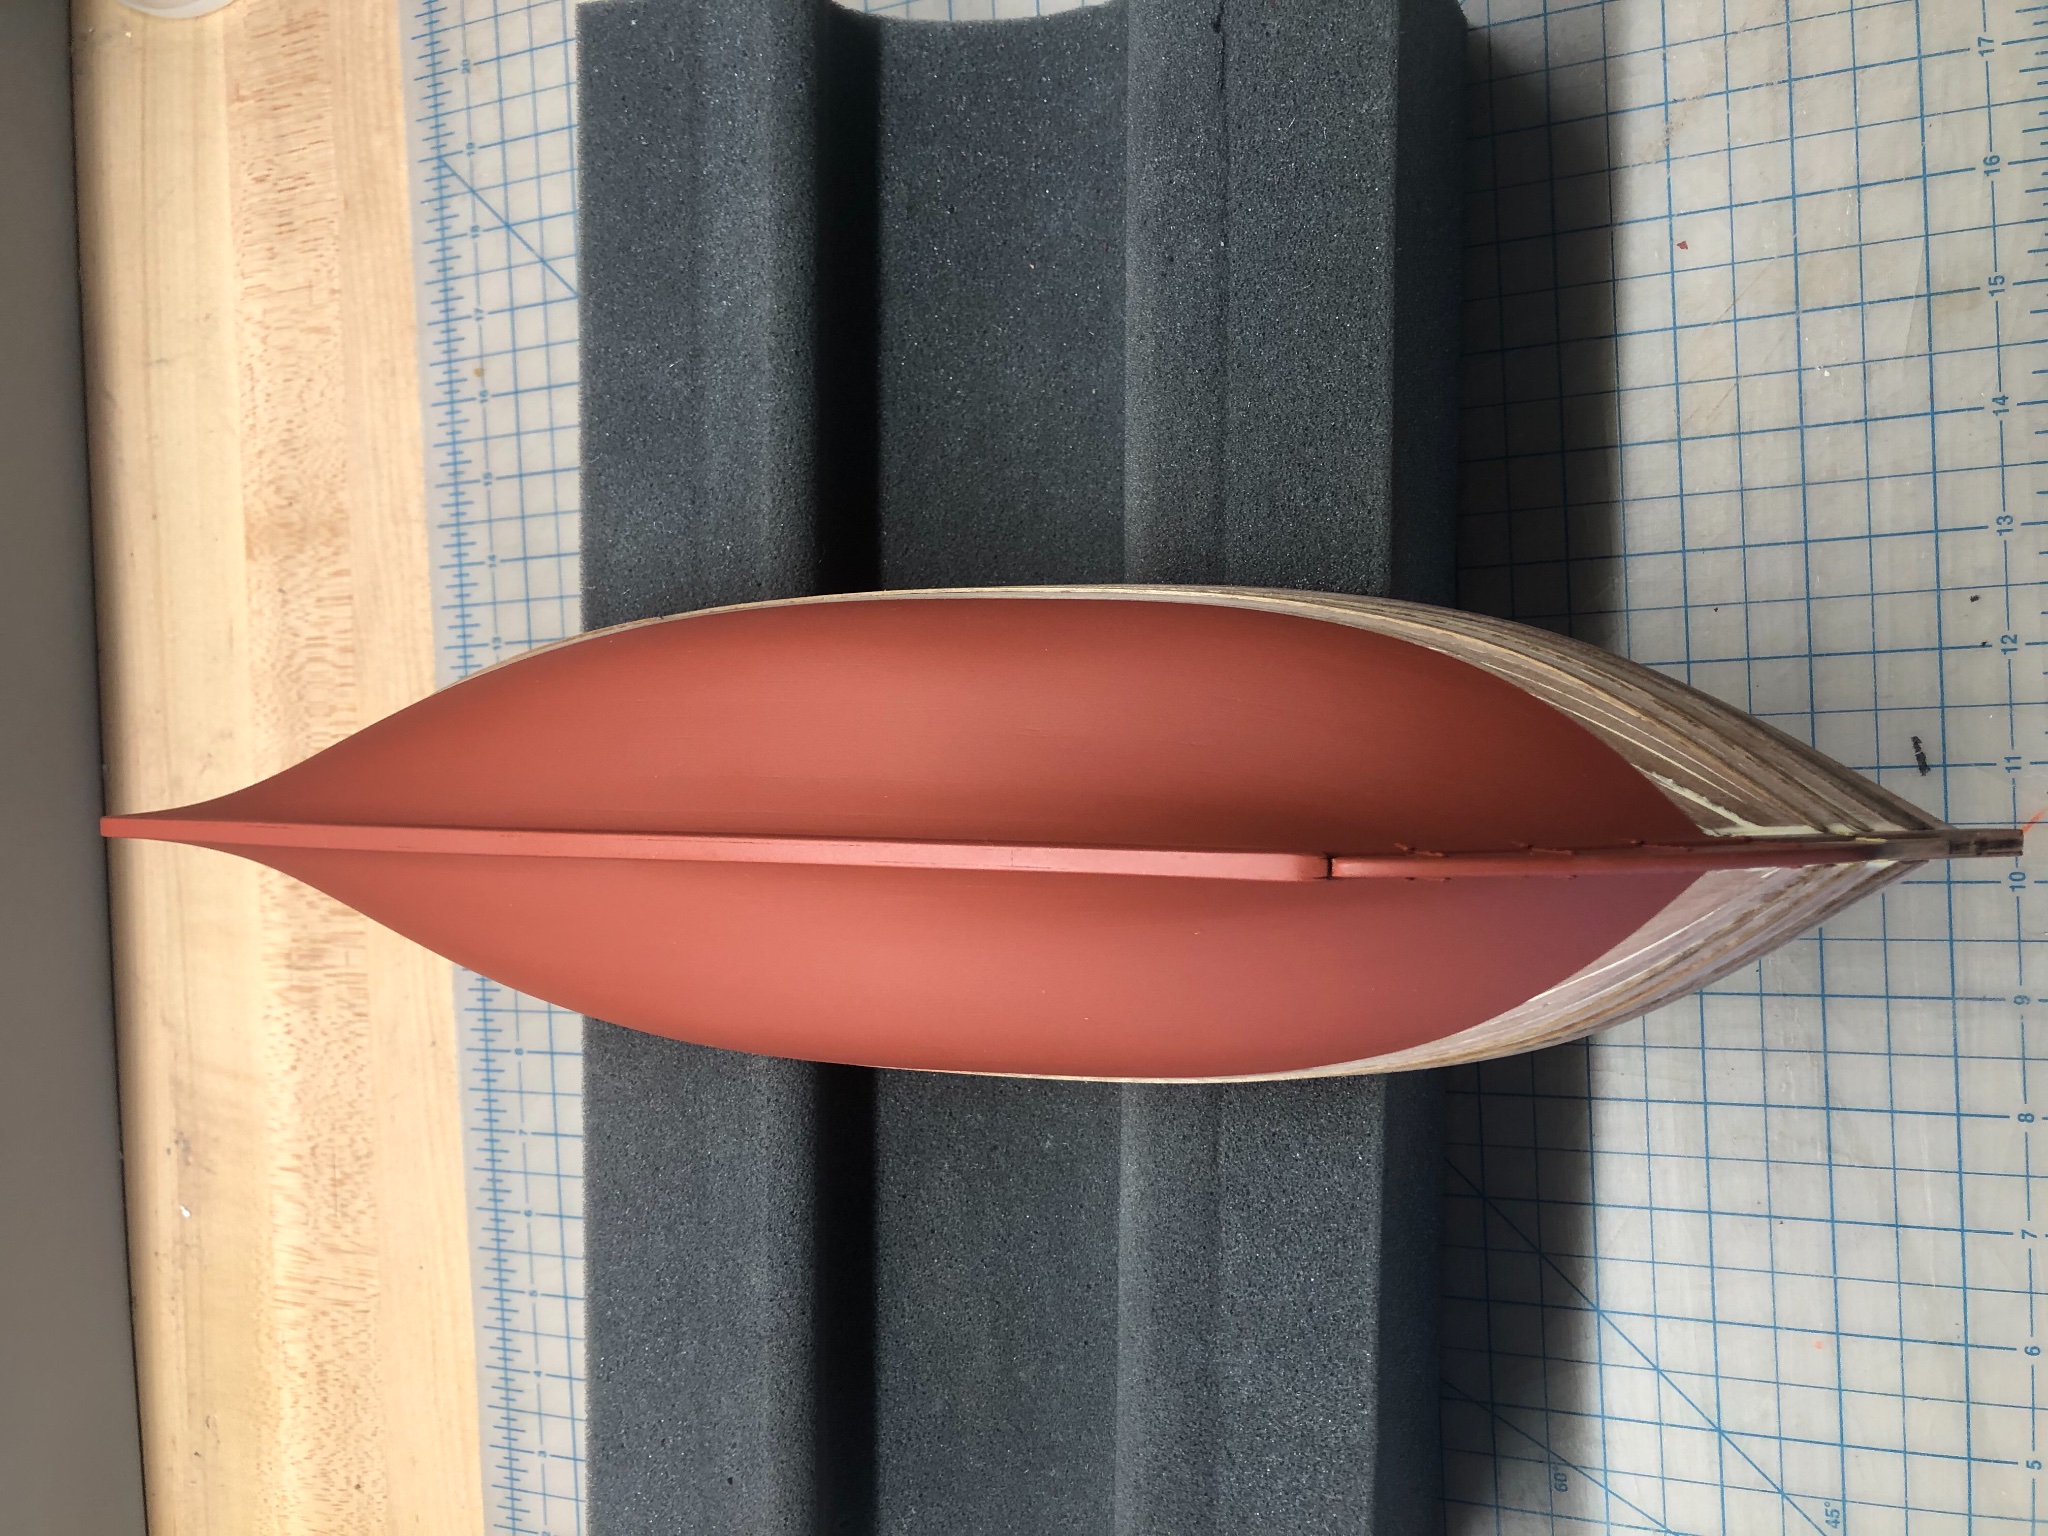
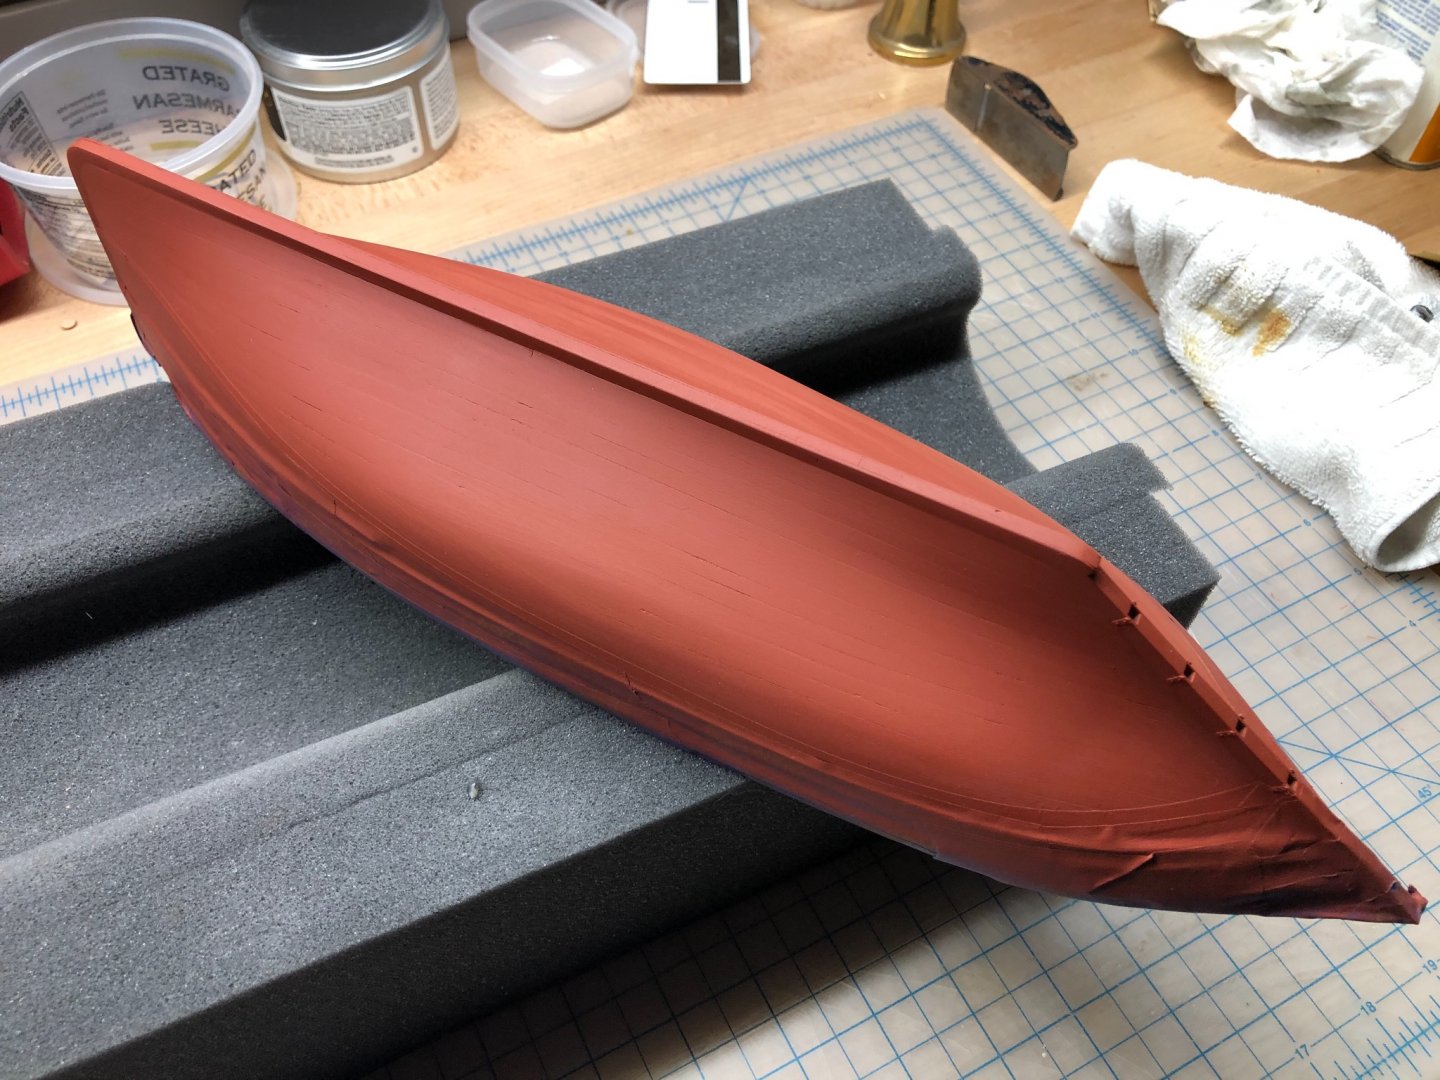
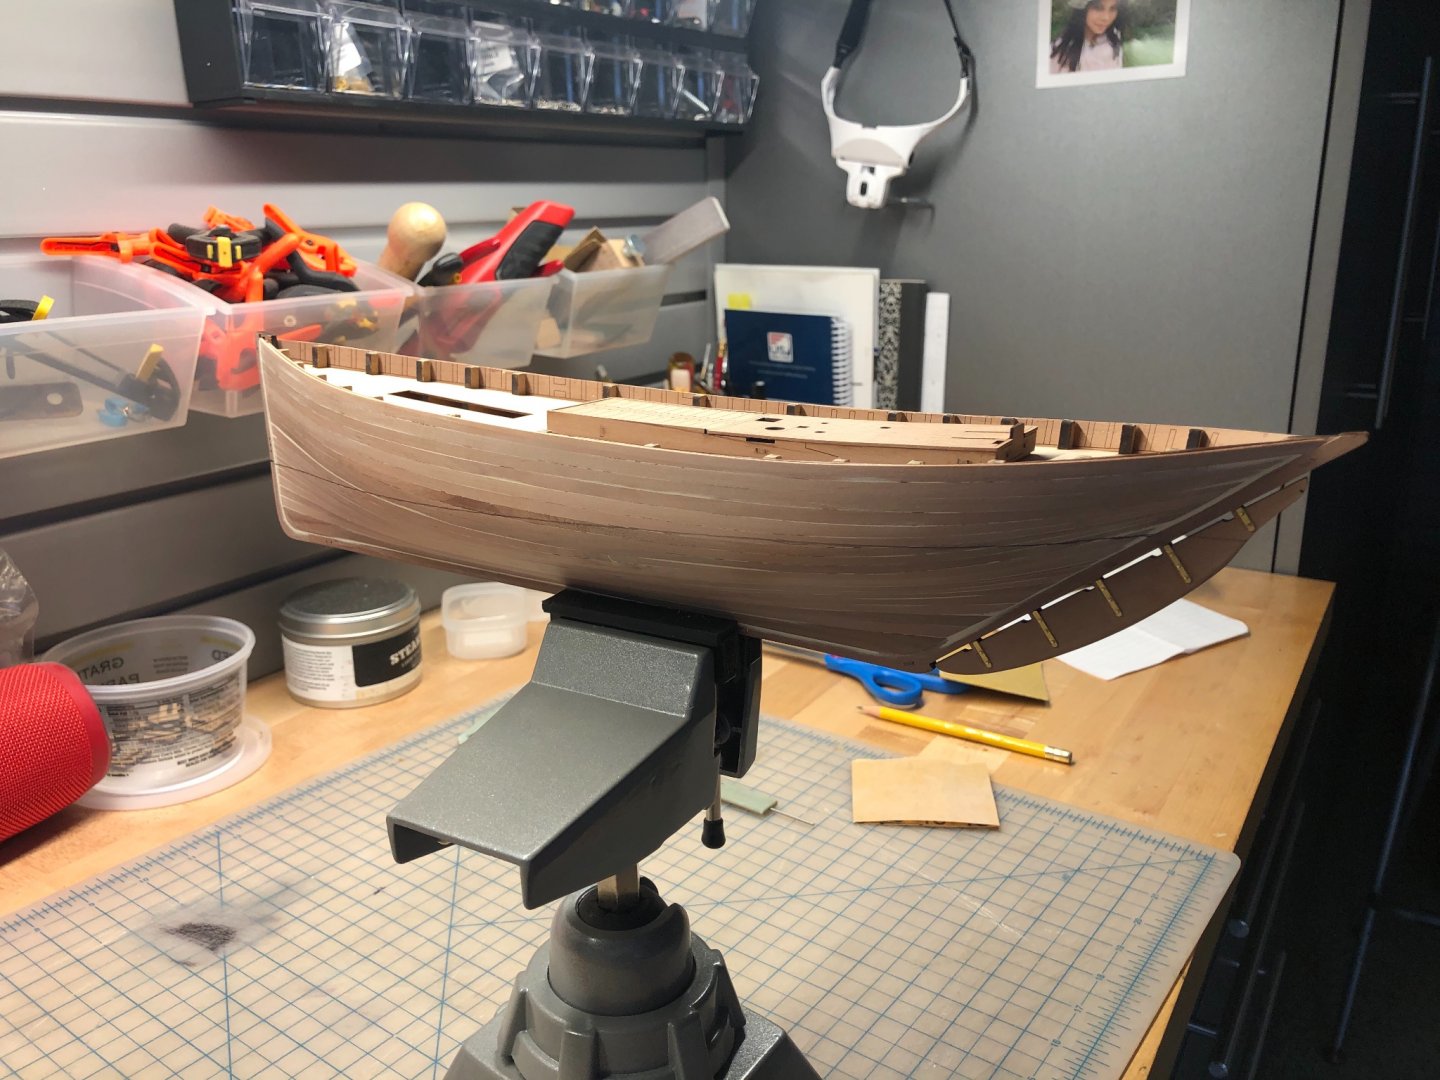
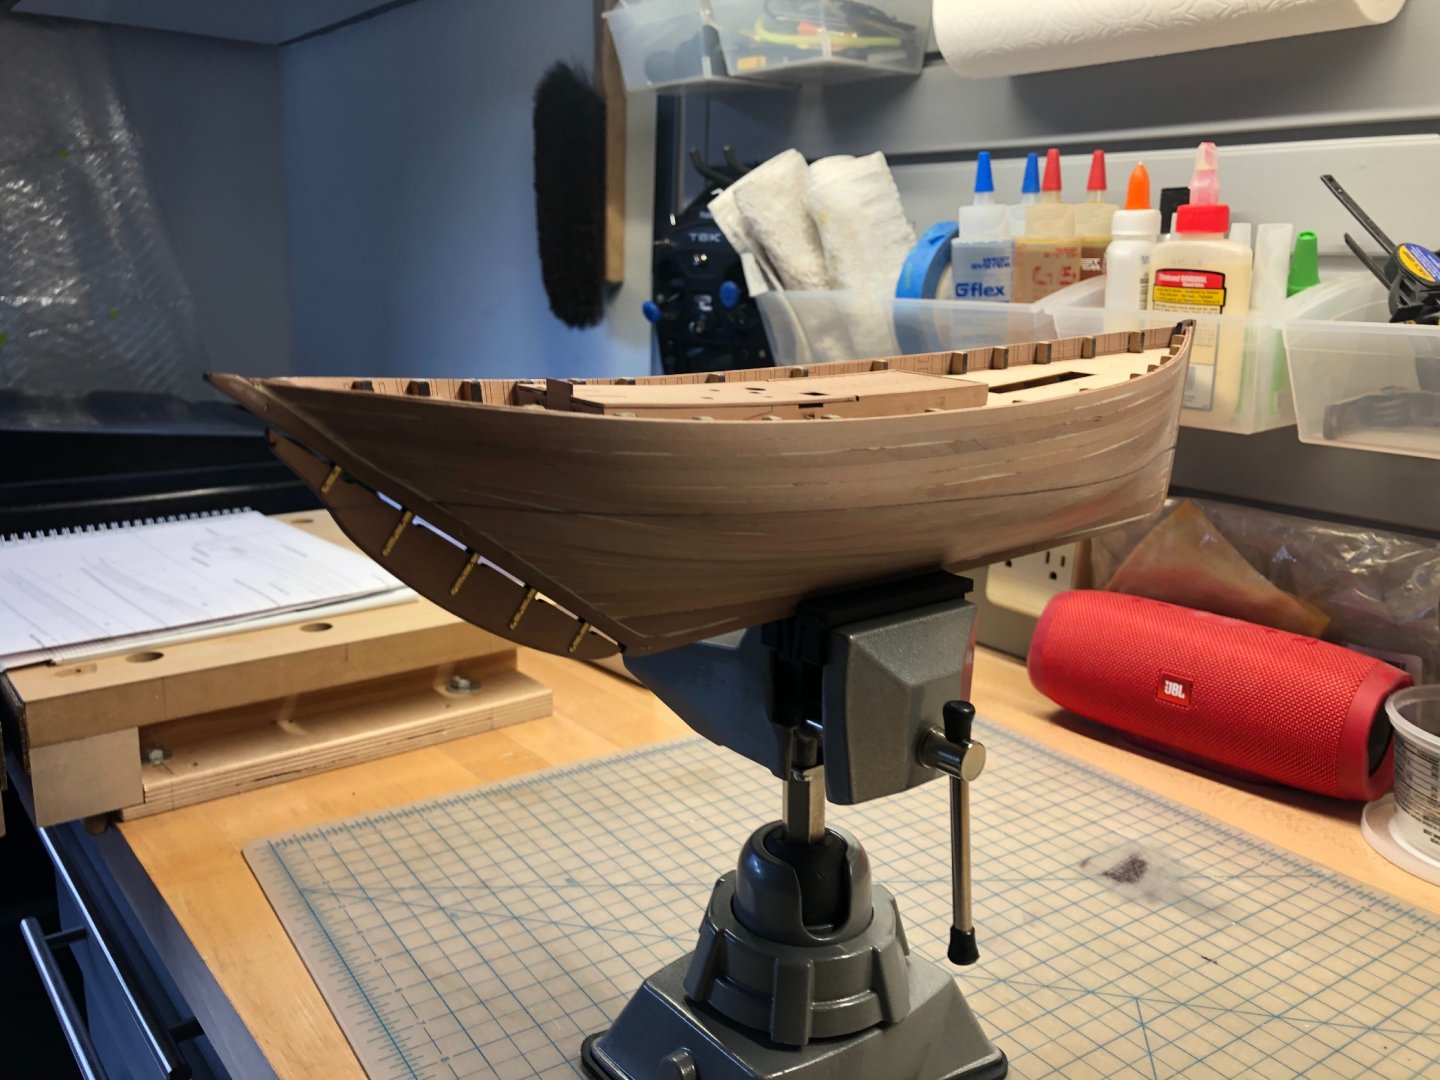
I finished the red oxide bottom paint. Just pulled off the masking and the tape line. Looks pretty good! Four coats of paint, with a bit of light filling in between. This came out about the way I was hoping. Smooth, fair finish with a slight hit of the planking ghosting through. Next up are black topsides, and then the white boot stripe. Then she’ll be looking like a proper ship. Off to prepare a feast for my family. I have much for which to be thankful. Happy Thanksgiving to all!


- 222 replies
-
- 12
-
-
- First Build
- Lady Isabella
- (and 2 more)
-
By the way, I went on the Rit Dye website, and they make different dyes for natural fibers and for synthetics. I'm wondering if there is a different product that would dye the stitching.
- 261 replies
-
- 3
-
-
- muirneag
- vanguard models
- (and 2 more)
-
After you do the 268 reefing ties, you could get a fine point Xylene technical marker in a dark brown color, and color the stitching. It would be a pain, but it's achievable. All it would take would be a magnifier, and lot of time and patience. I have to say that your build log is really helping me map out my Zulu process. It's like looking into the future, so that I can anticipate the issues I'll be dealing with a month down the line. Bless you, BE!
- 261 replies
-
- 3
-
-
- muirneag
- vanguard models
- (and 2 more)
-
This looks fantastic, Tim! Well done. I'm jealous, certainly. I've been relegated to a short workbench in our garage for the last few years. But there was a time when I had a small lean-to shed off the back of an accessory garage on our last property. It was small, but cozy and perfect. There's something nice about a separate space to use as a craft retreat. Enjoy! -EKE
-
She looks wonderful, Richard! I love the way these boats look with the black topsides. I’ll be doing my Zulu in the same way. Terrific detail on the fish hold hatch boards! I wish I had seen your log sooner, as I might have given that a try. Thanks for all the inspiration. I have a Flirt kit as well, so I’ll be following along on that one too. EKE
- 49 replies
-
- 1
-
-
- Lady Eleanor
- Vanguard Models
- (and 1 more)
-
Richard, Thanks for the thoughtful reply. It seems to me that is an interesting question for model ship builders: how for do you go in to smooth and perfect finishes? My personal inclination is to keep sanding, and to smooth out the surface as perfectly as I can. I love sanding, it’s meditative and I like the results. It probably comes from spending hours as a kid painting model cars, or sanding the bottoms of full-size racing sailboats. But models of vintage ships are different indeed. There, seeing the wood grain on certain parts, seeing the joints between elements, the planking lines ghosting slightly through the finish often looks to me more “real” than perfect smoothness. I suppose it depends on which parts we’re considering. I think the best modelers I’ve had the privilege of observing on this site have really excellent discretion between elements which would look best smoothly finished and those which need some “grit”. By the way, Richard, I just discovered your build log for the Vanguard Fifie. I don’t know how I had missed it. You finished her out with a look very similar to the one I plan for my Zulu. I’ll be studying it closely. Thanks for the inspiration!
- 222 replies
-
- 3
-
-
- First Build
- Lady Isabella
- (and 2 more)
-
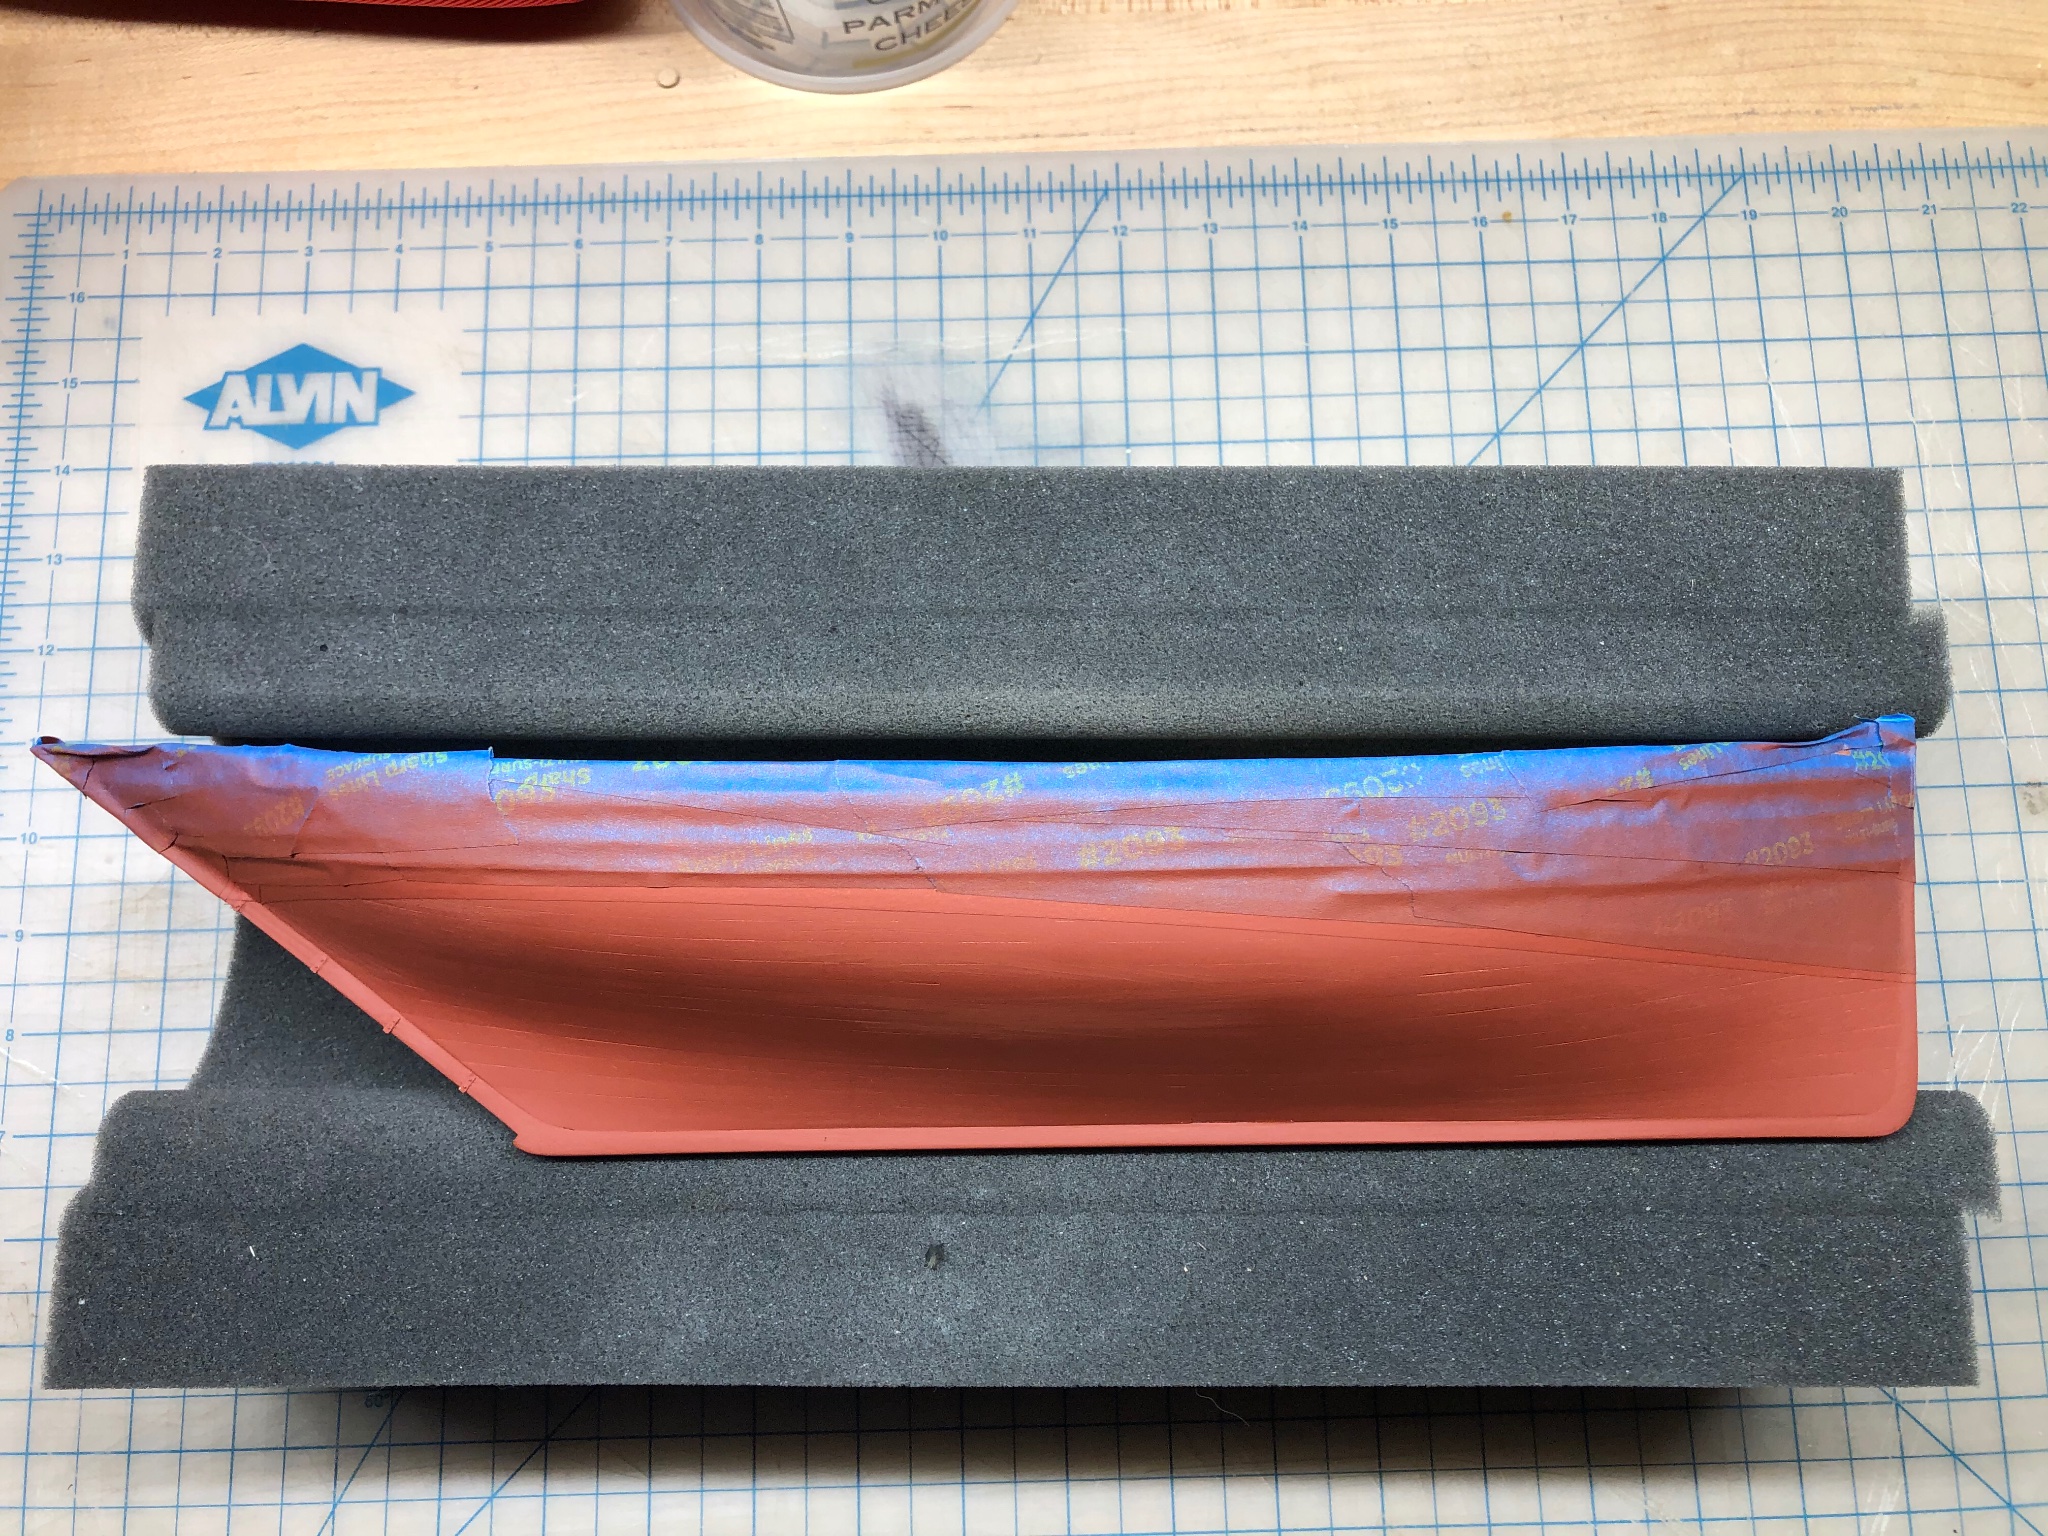
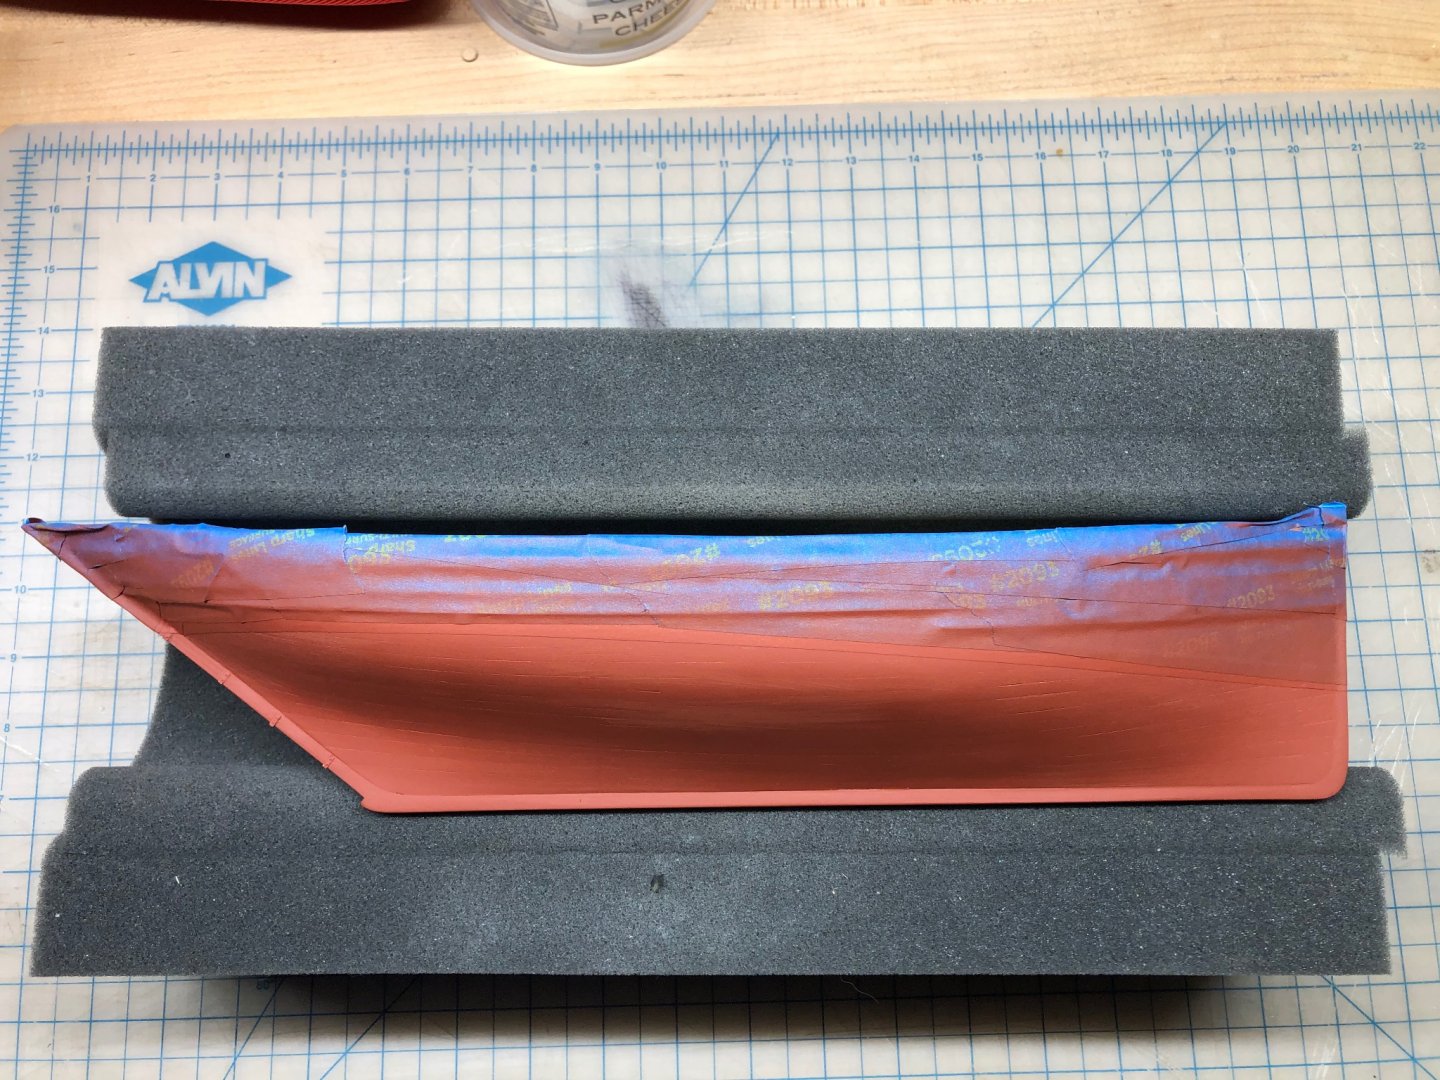
Been super busy with work this week, trying to keep clients with high expectations happy. But I am moving forward on the Zulu, as time allows. I masked off on the waterline, and put down a first coat of red oxide bottom paint. The hull looks pretty fair! It’s going to end up nice, I think. There are a few areas which need some additional filling, but that looks to be minor. My opinion is that I want to fill all of the major gaps where there are cracks between planks, but I’m not too worried about seeing a bit of the planking broadcasting through the paint, as I think it adds character and realism to the finish. I’d certainly be interested it all of your opinions on that. Here’s a few photos of the hull after the first light coat. I expect to build up three or four coats at least, as necessary. By the way, I used 6mm Tamiya masking tape to mask the waterline. The stuff is fantastic. Flexible as required to lay down difficult curves, and just sticky enough to burnish right down on the surface very reliably. Great product.

- 222 replies
-
- 7
-
-
- First Build
- Lady Isabella
- (and 2 more)
-
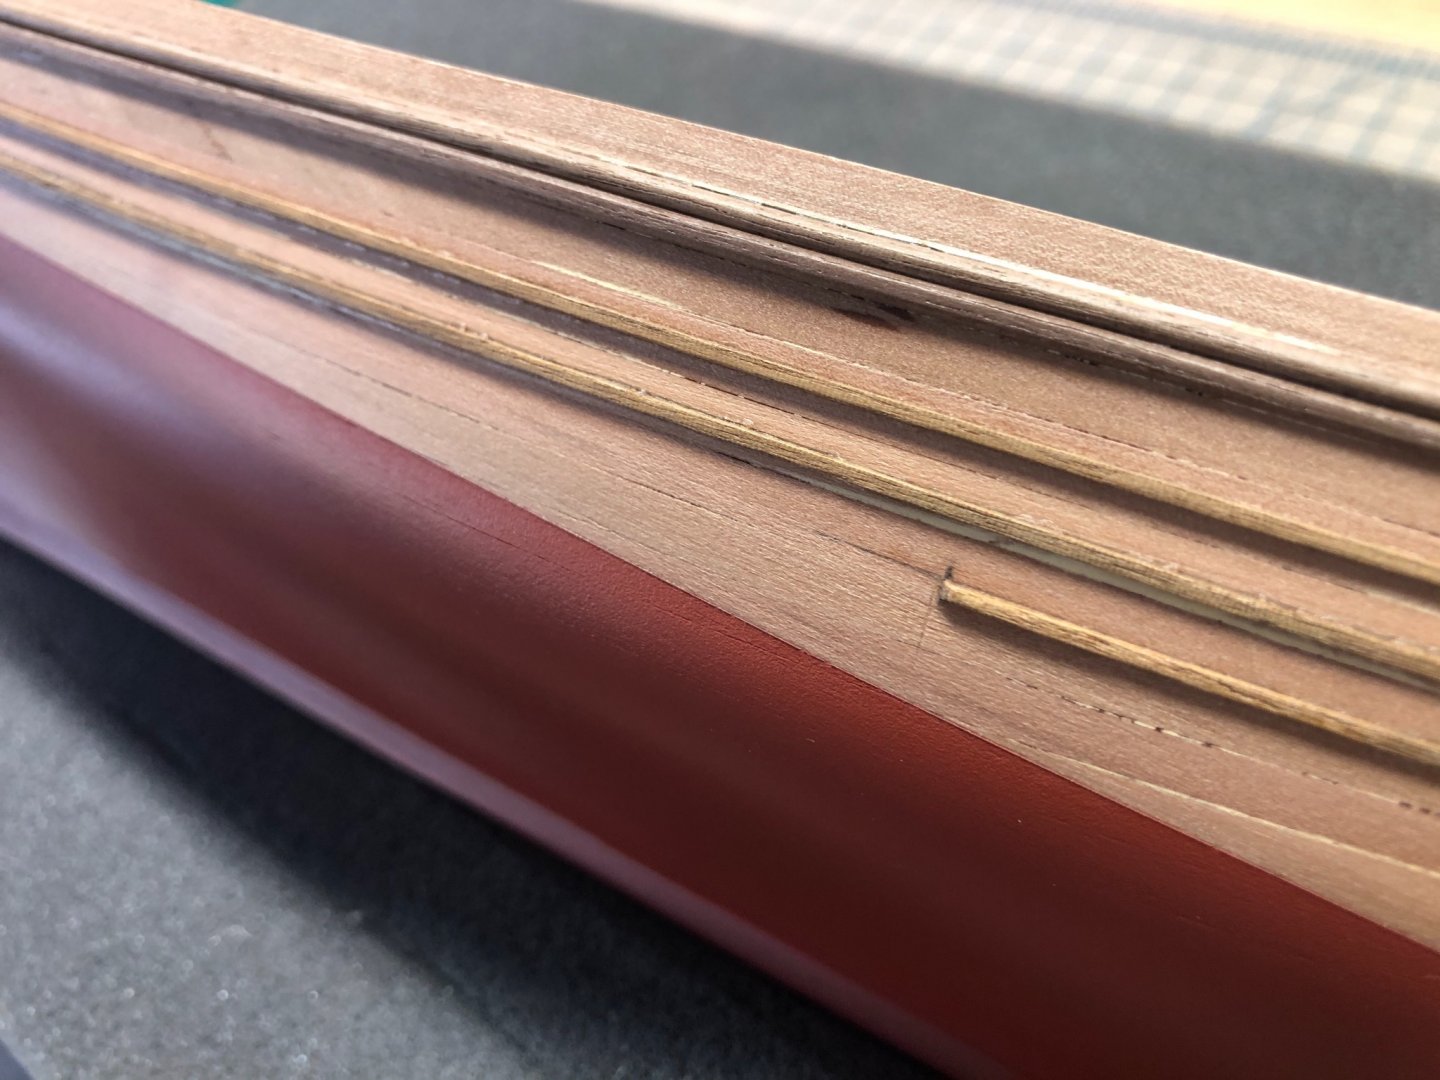
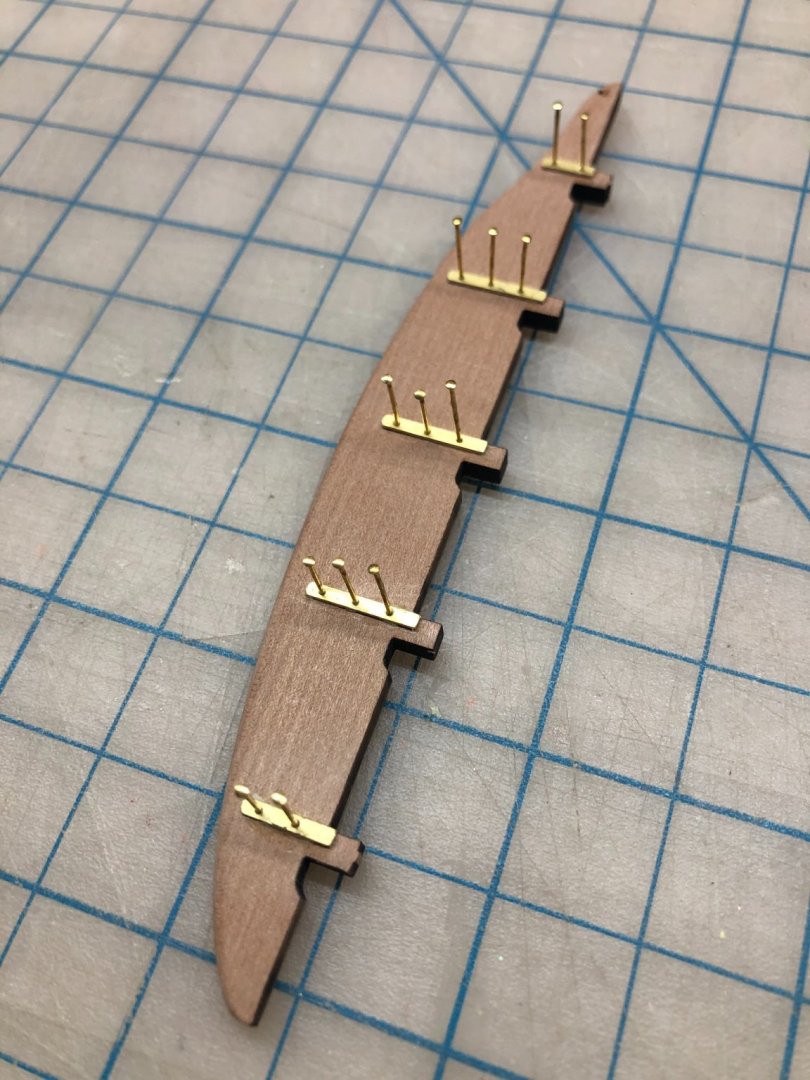
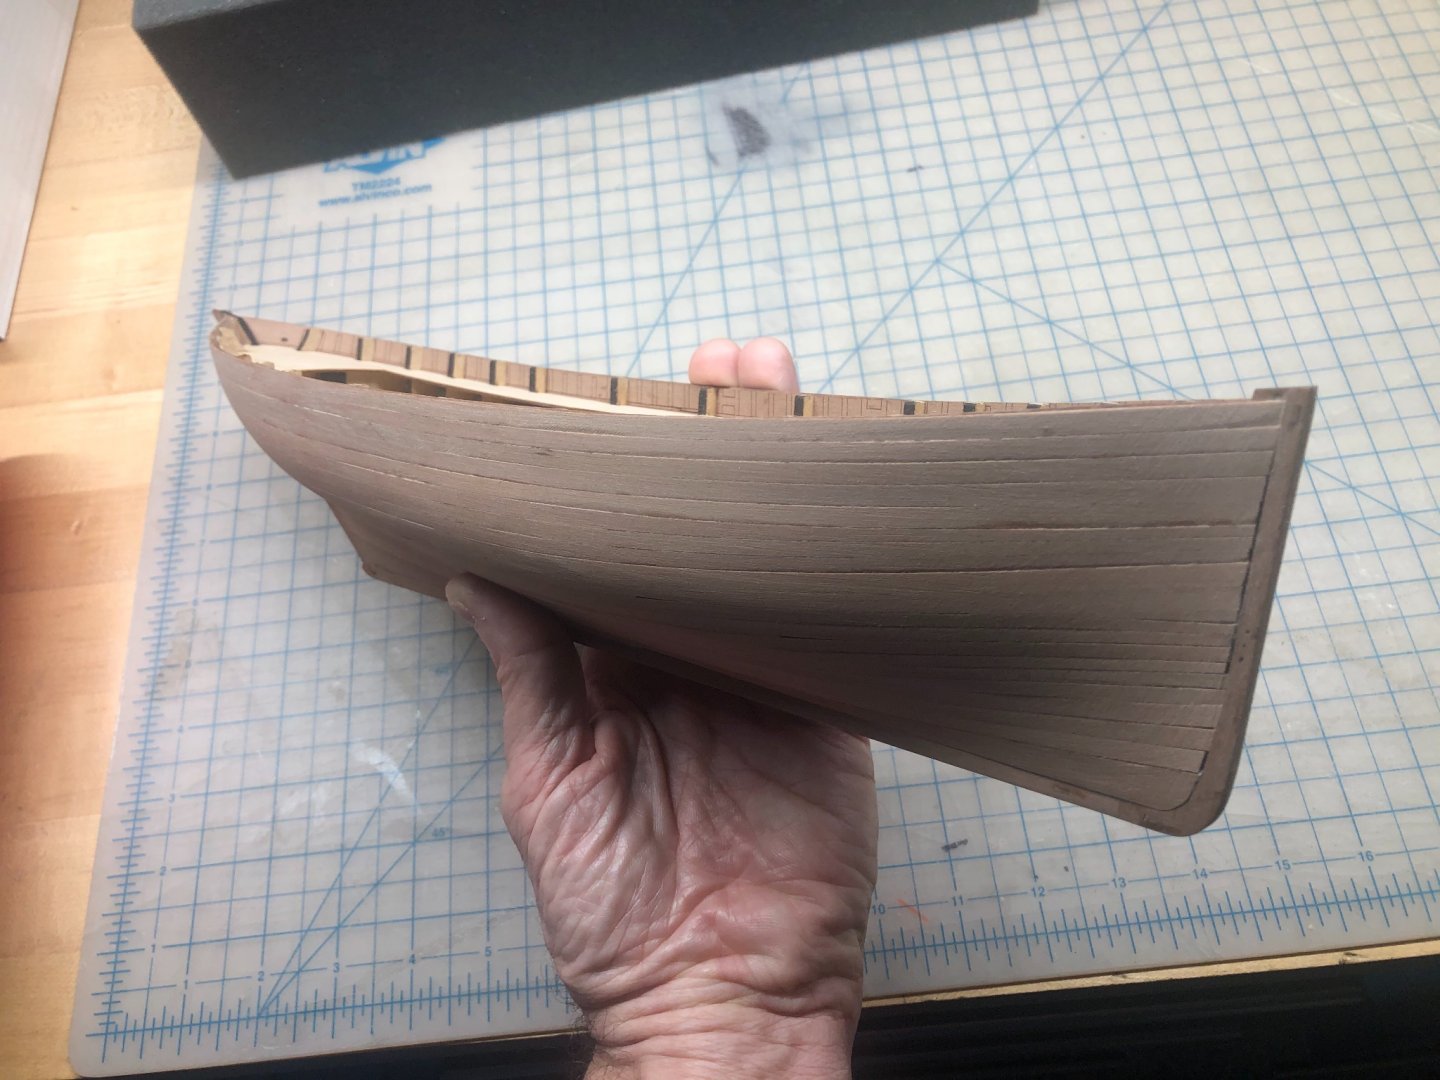
I finished the rubbing strakes. I spent a good amount of time measuring off the plans and marking the lines out carefully on the hull. I think they came out rather well... nice and fair. By the way, the 1mm square stock for the lower strakes is very small and brittle. If you are working with this material, be very careful. I broke one of them while trimming it to size. I had to very carefully glue it back together with CA, and then sand it down to proper dimensions. The kit is supplied with just enough stock to do the strakes, and no extra pieces. Respectfully offered: I’d recommend to Chris that he include at least one extra spare piece in future kits, as I think it’s inevitable that some builders will break these. Next, I’m ready to start masking and painting the hull...

- 222 replies
-
- 6
-
-
- First Build
- Lady Isabella
- (and 2 more)
-
I just added the top rubbing strake, which is a double, half-round bead in walnut. It really accentuates the swoop of the shear. I’m thinking that I may paint the bulwark above this strake a different color, maybe a green-black. We’ll see.

- 222 replies
-
- 3
-
-
- First Build
- Lady Isabella
- (and 2 more)
-
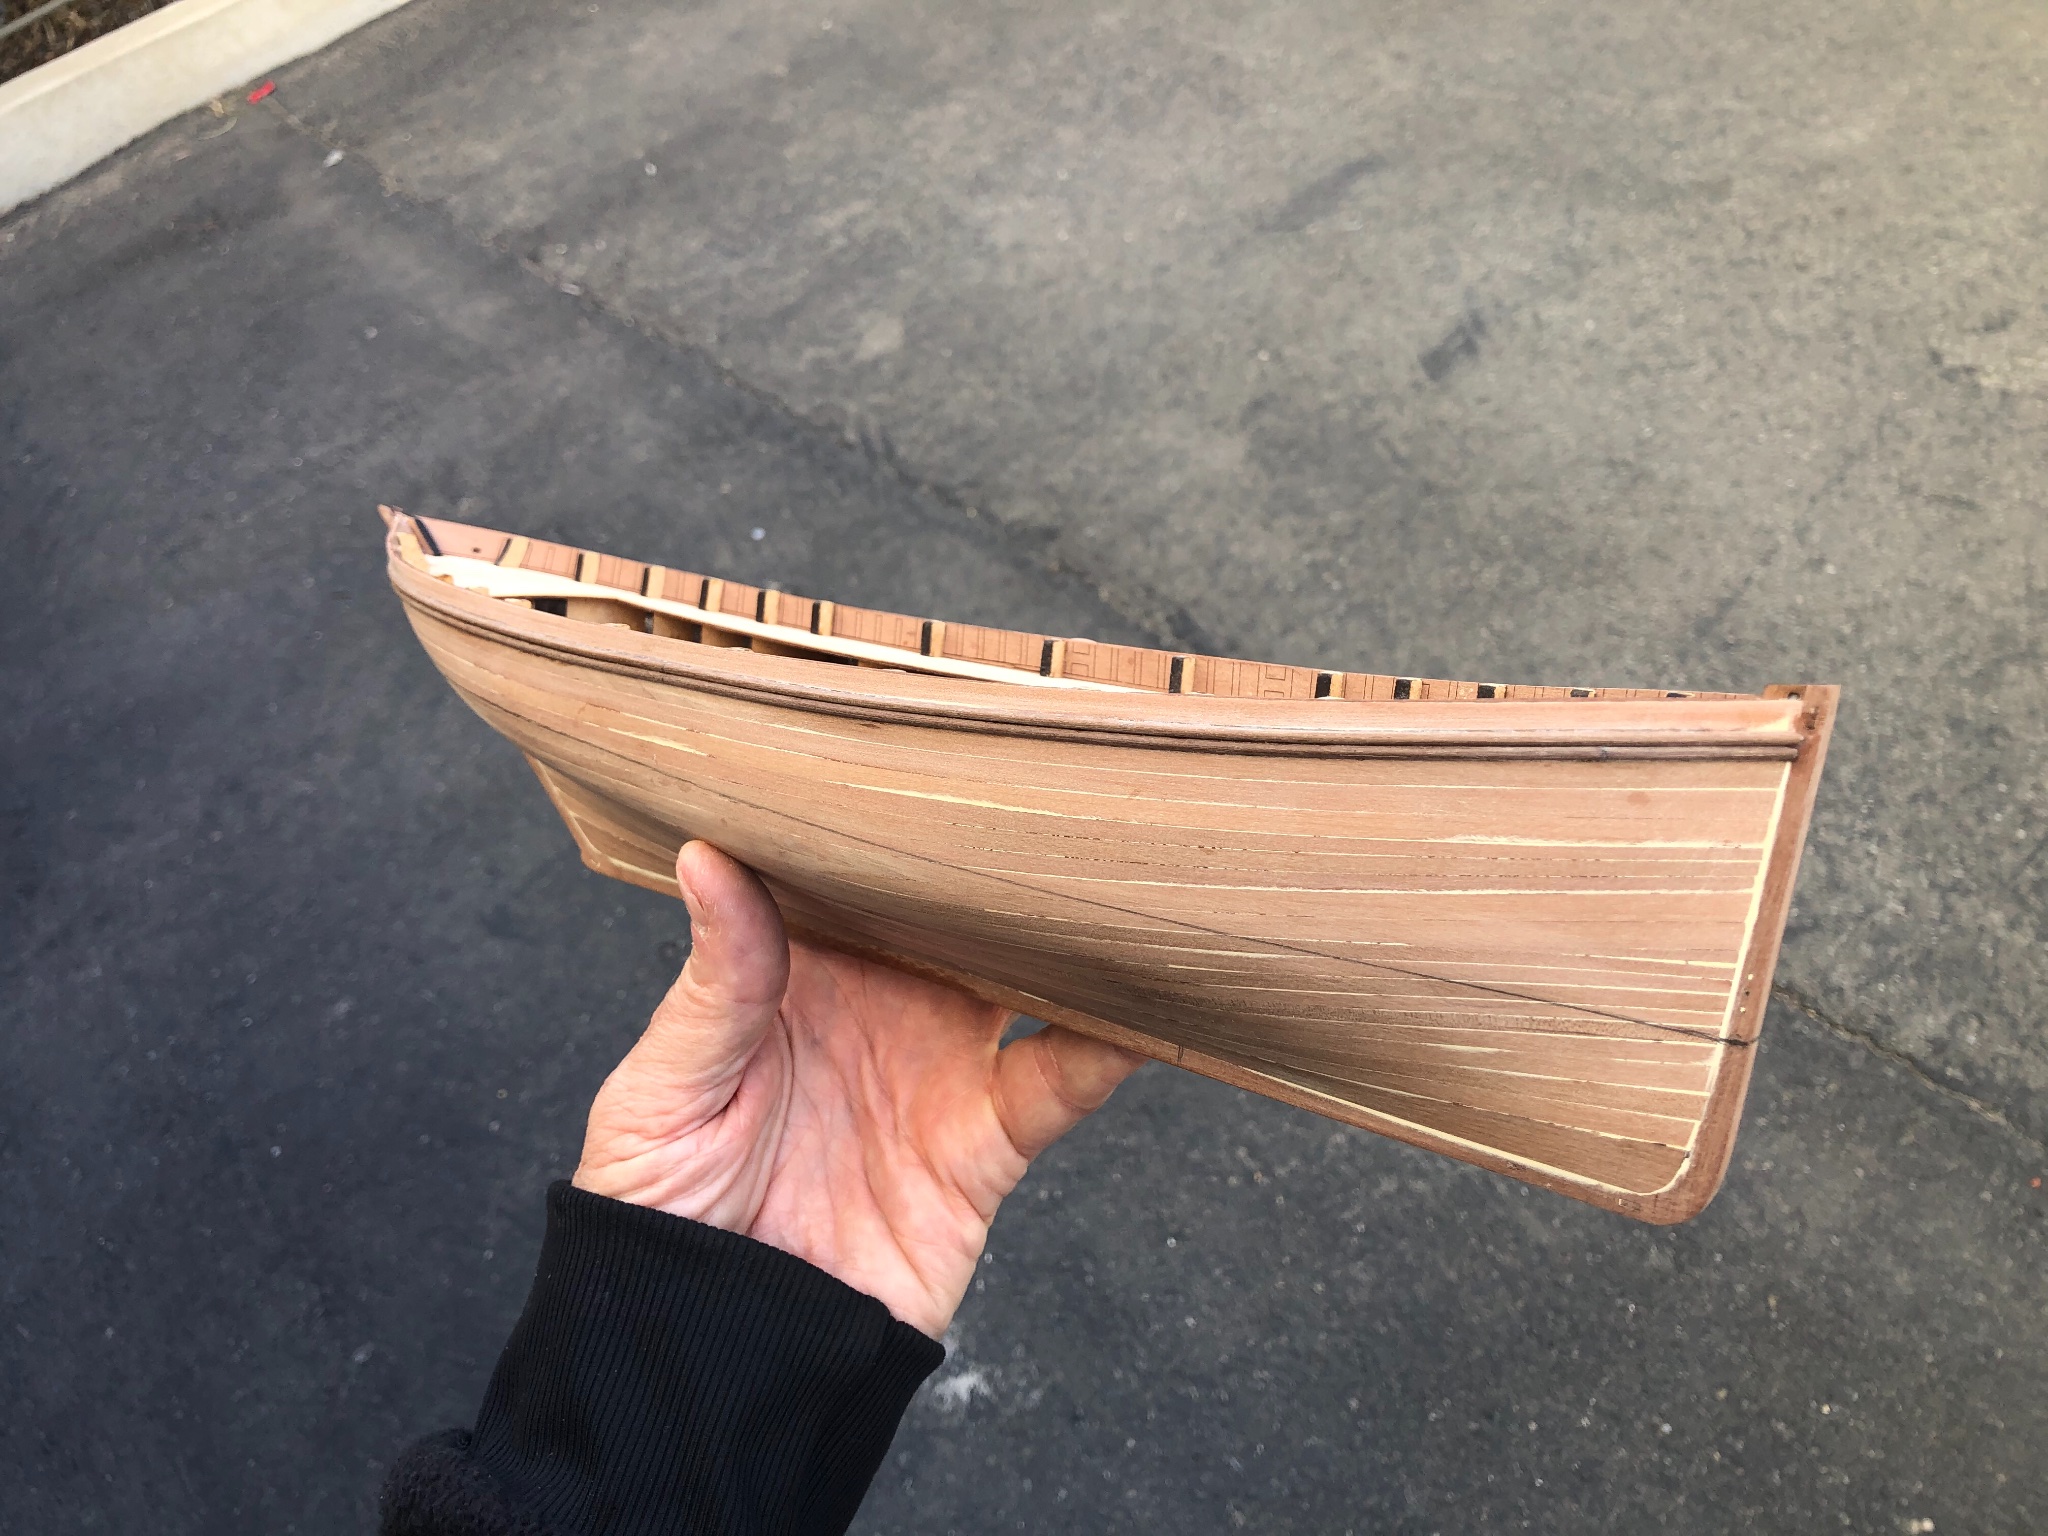
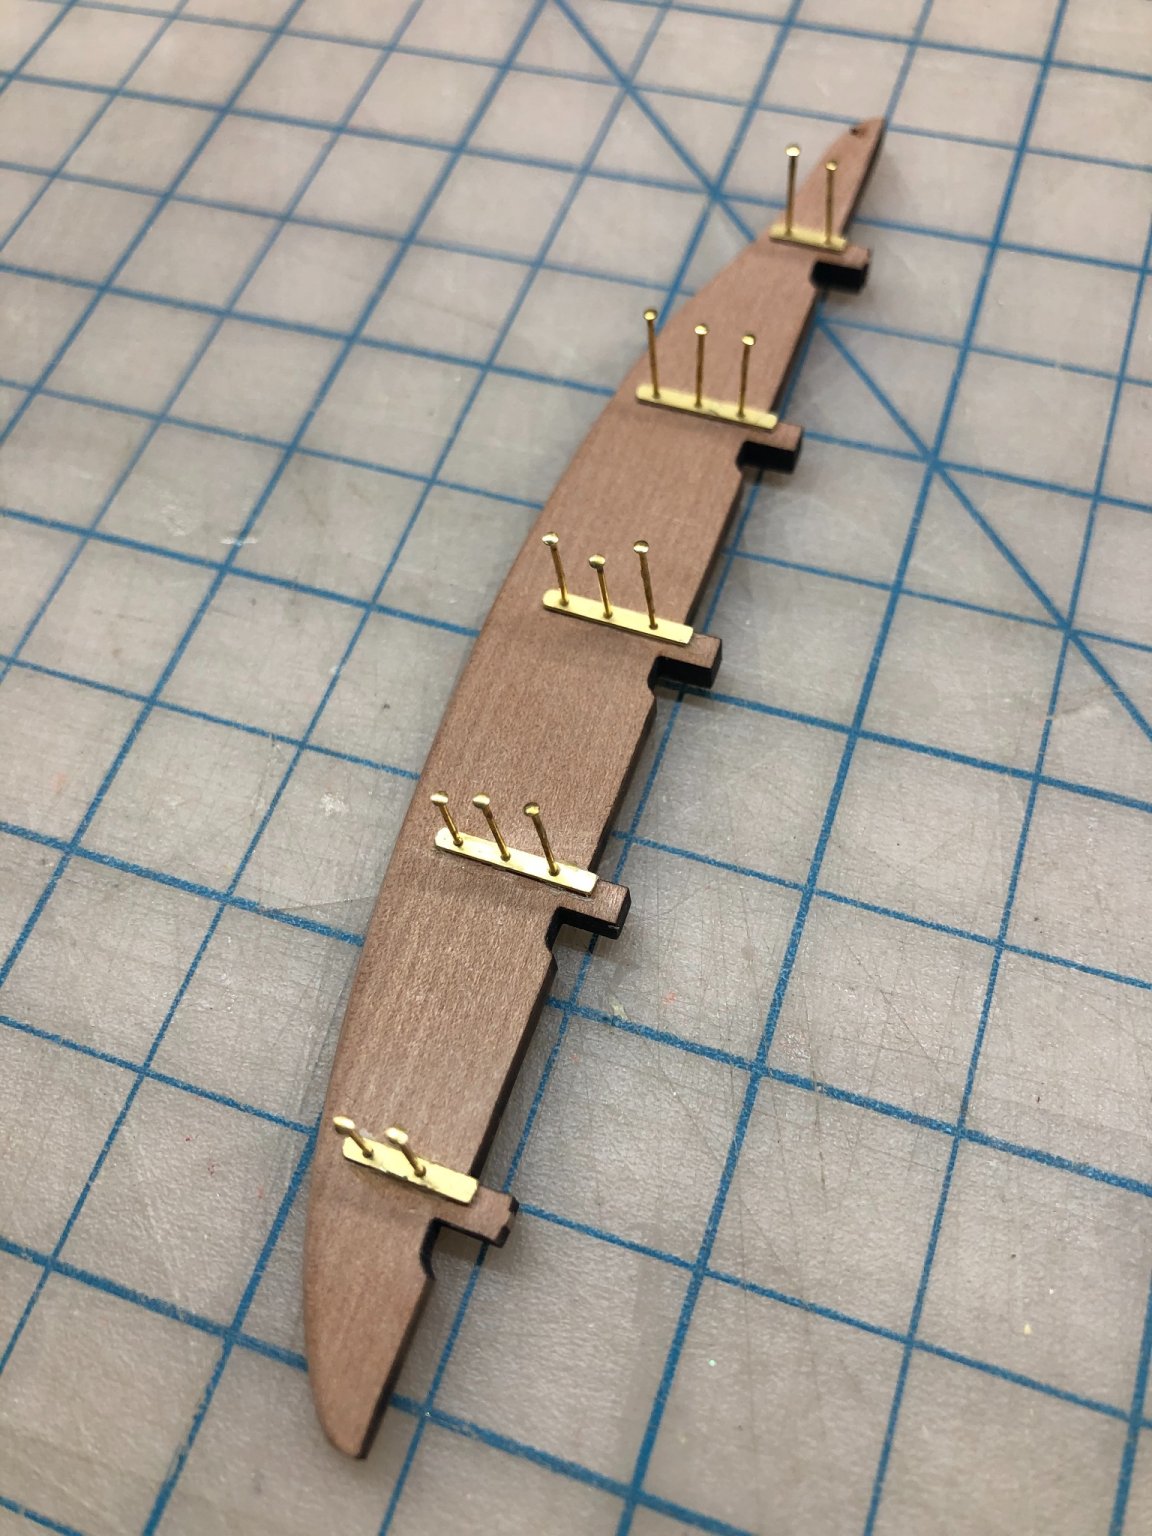
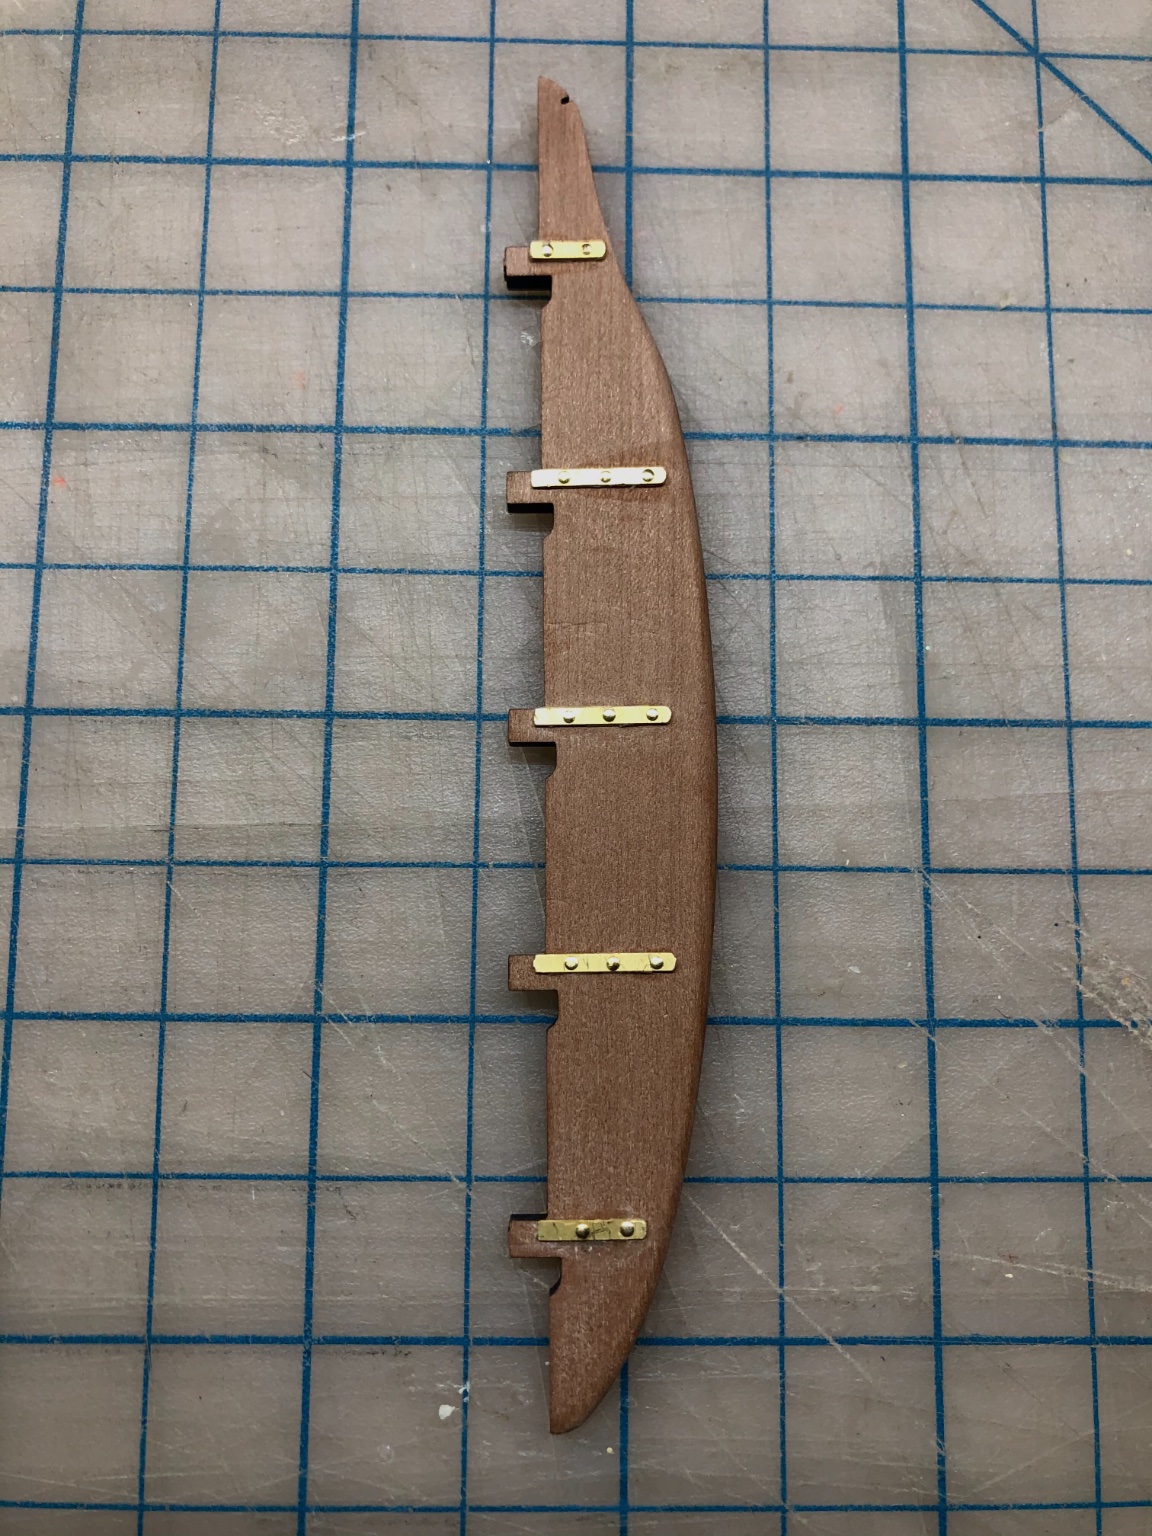
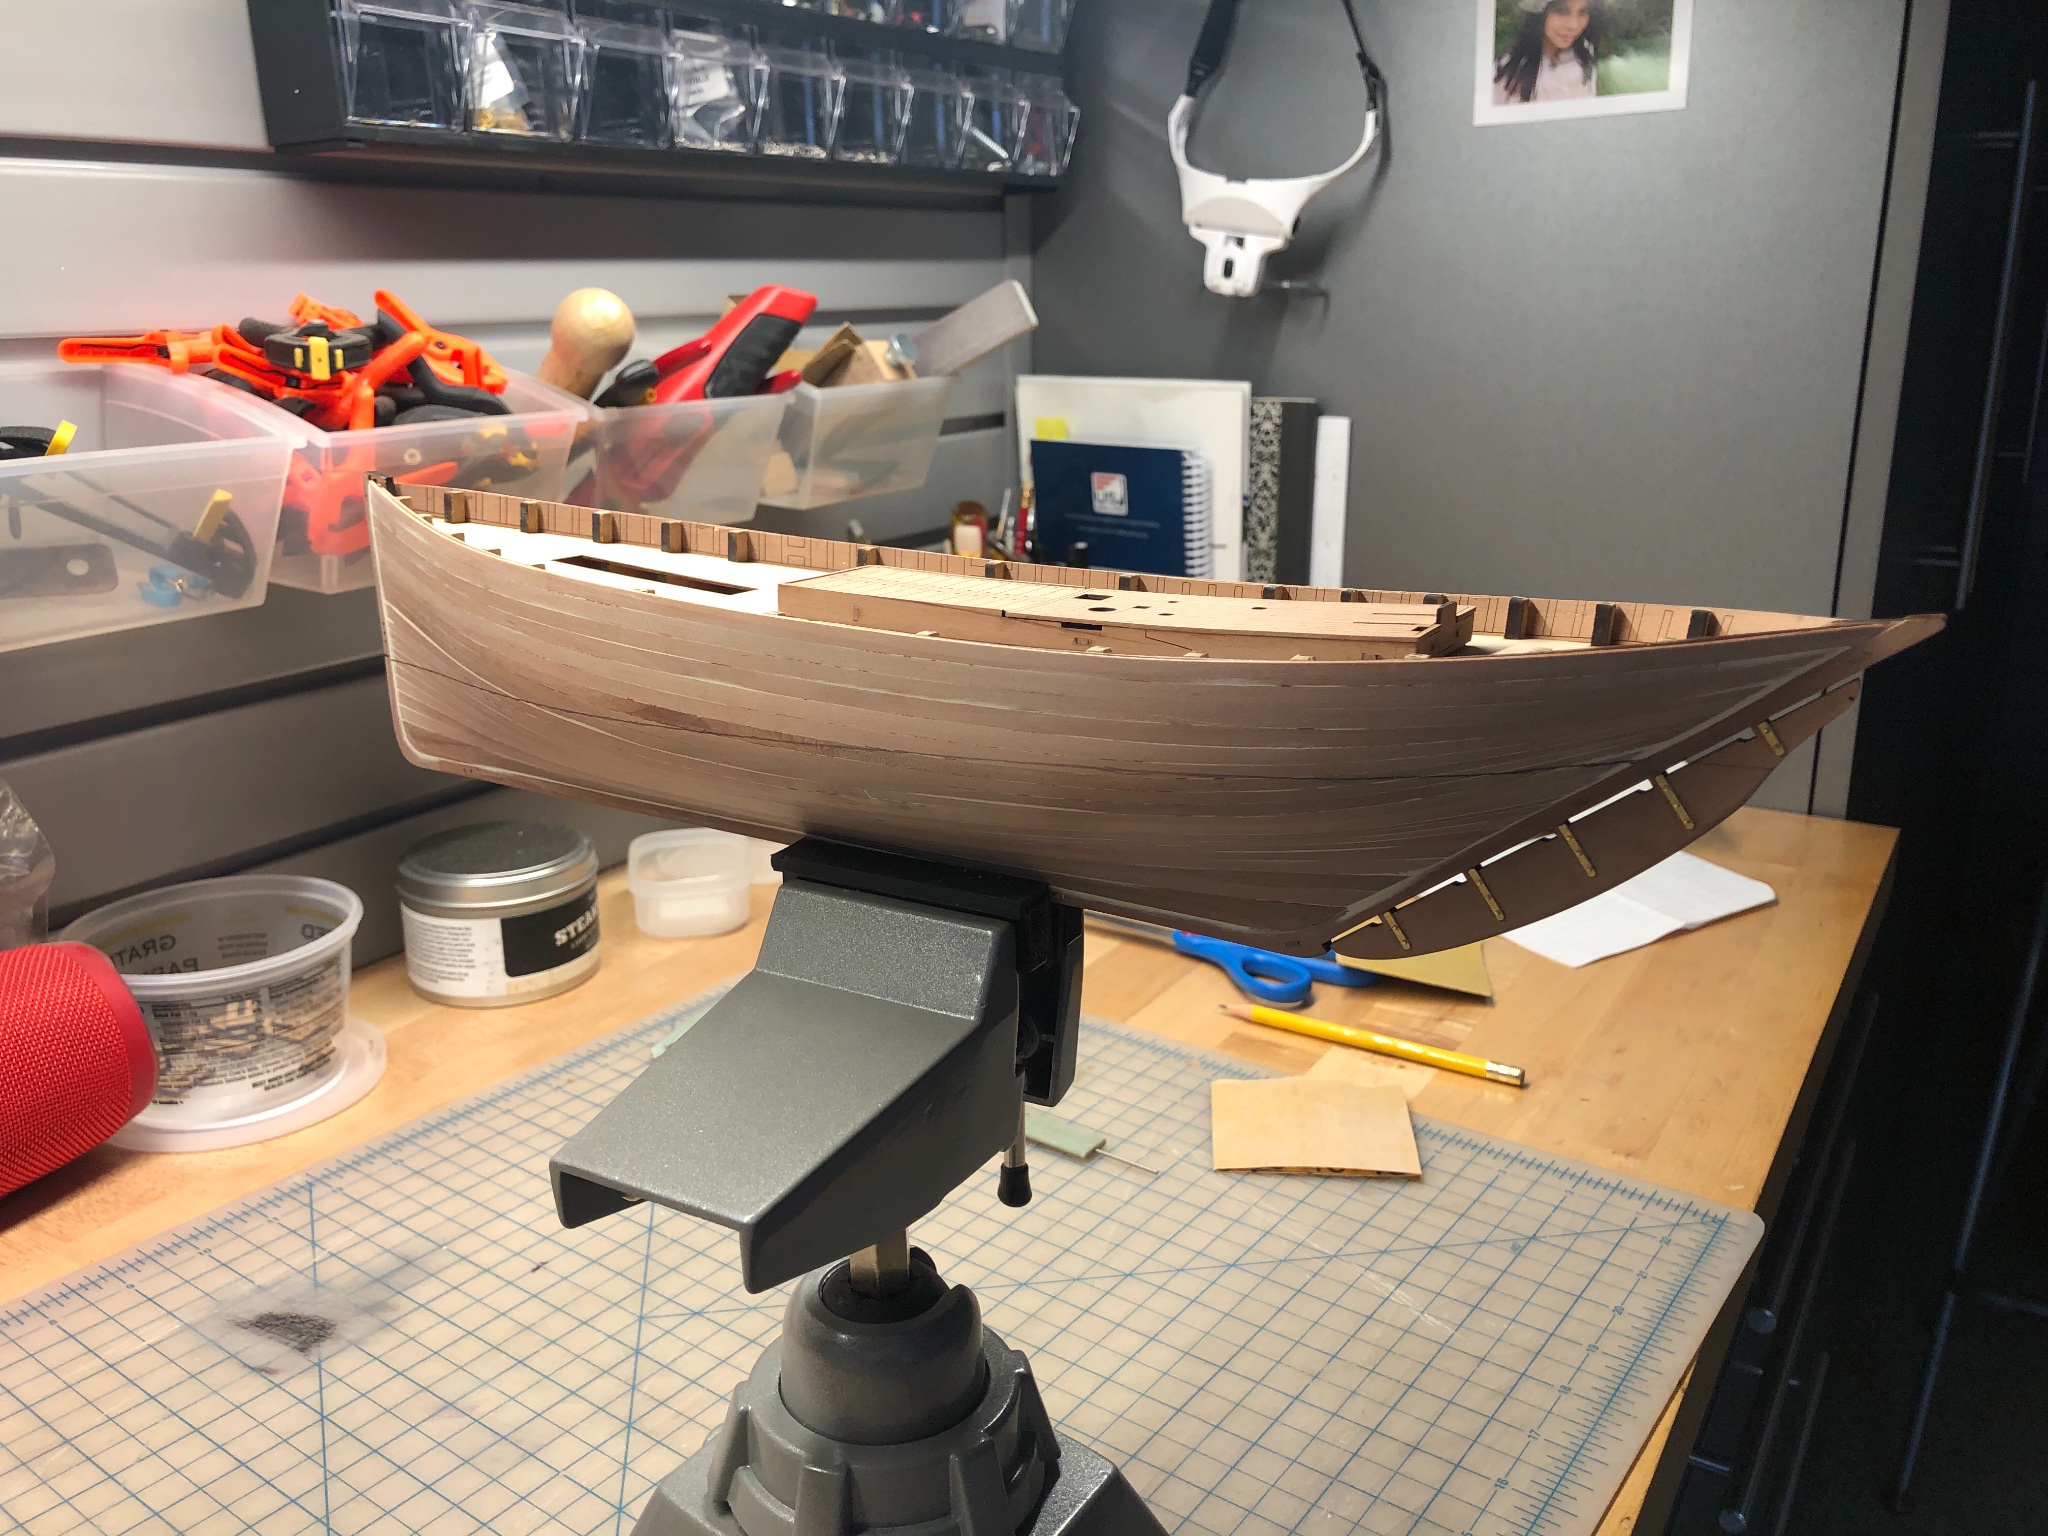
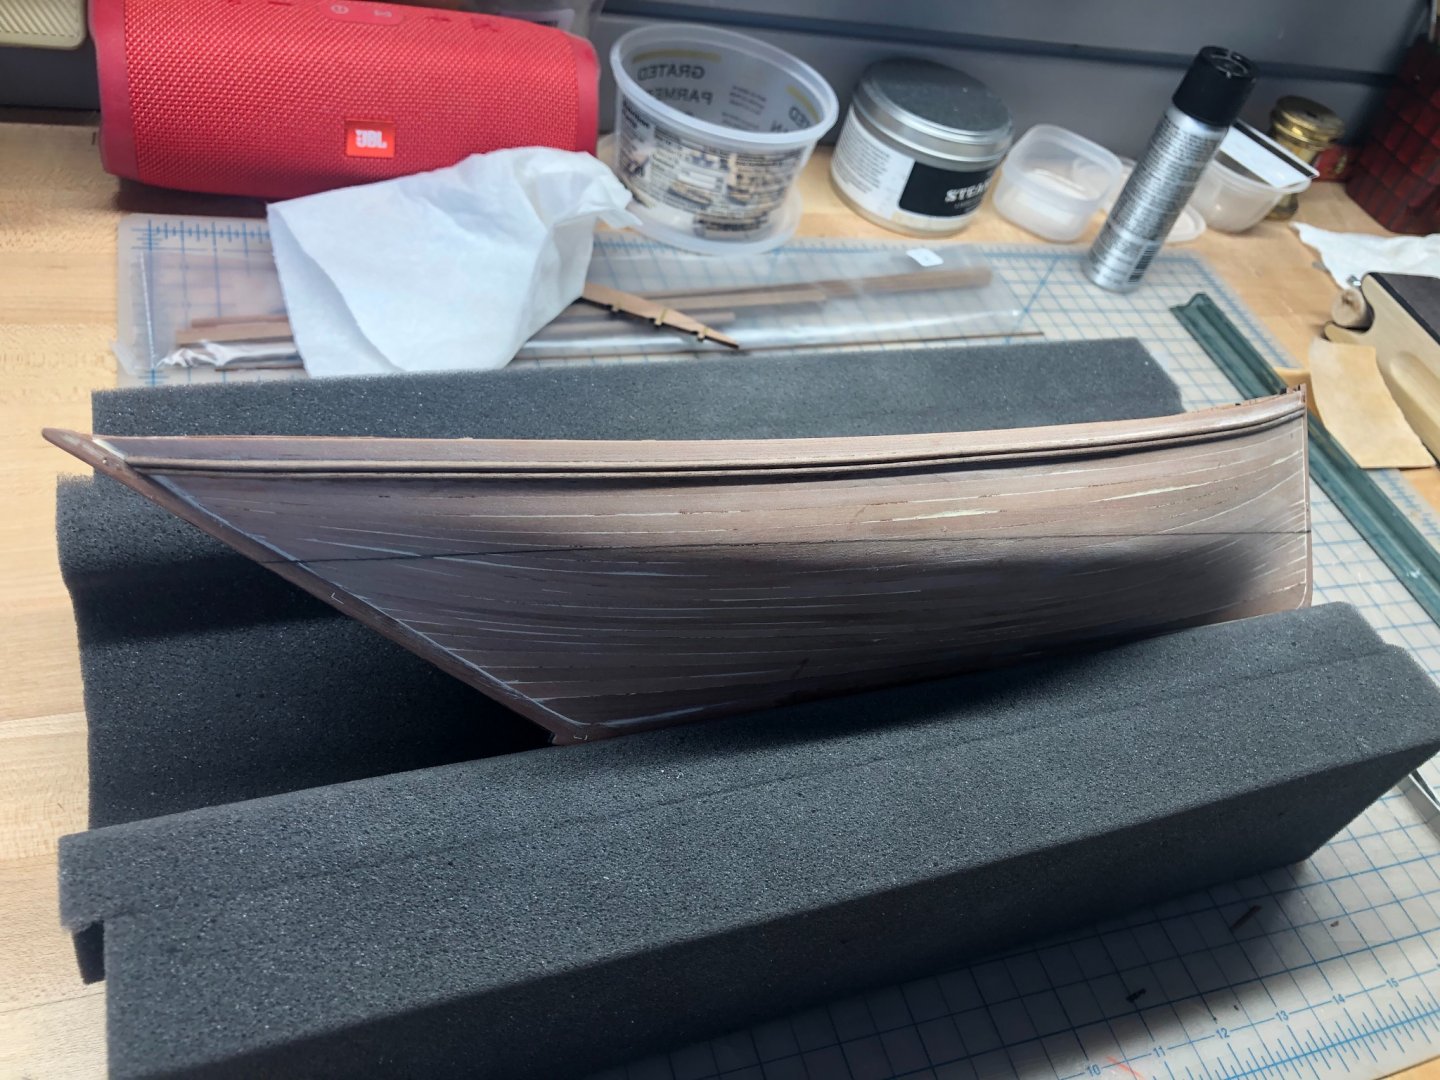
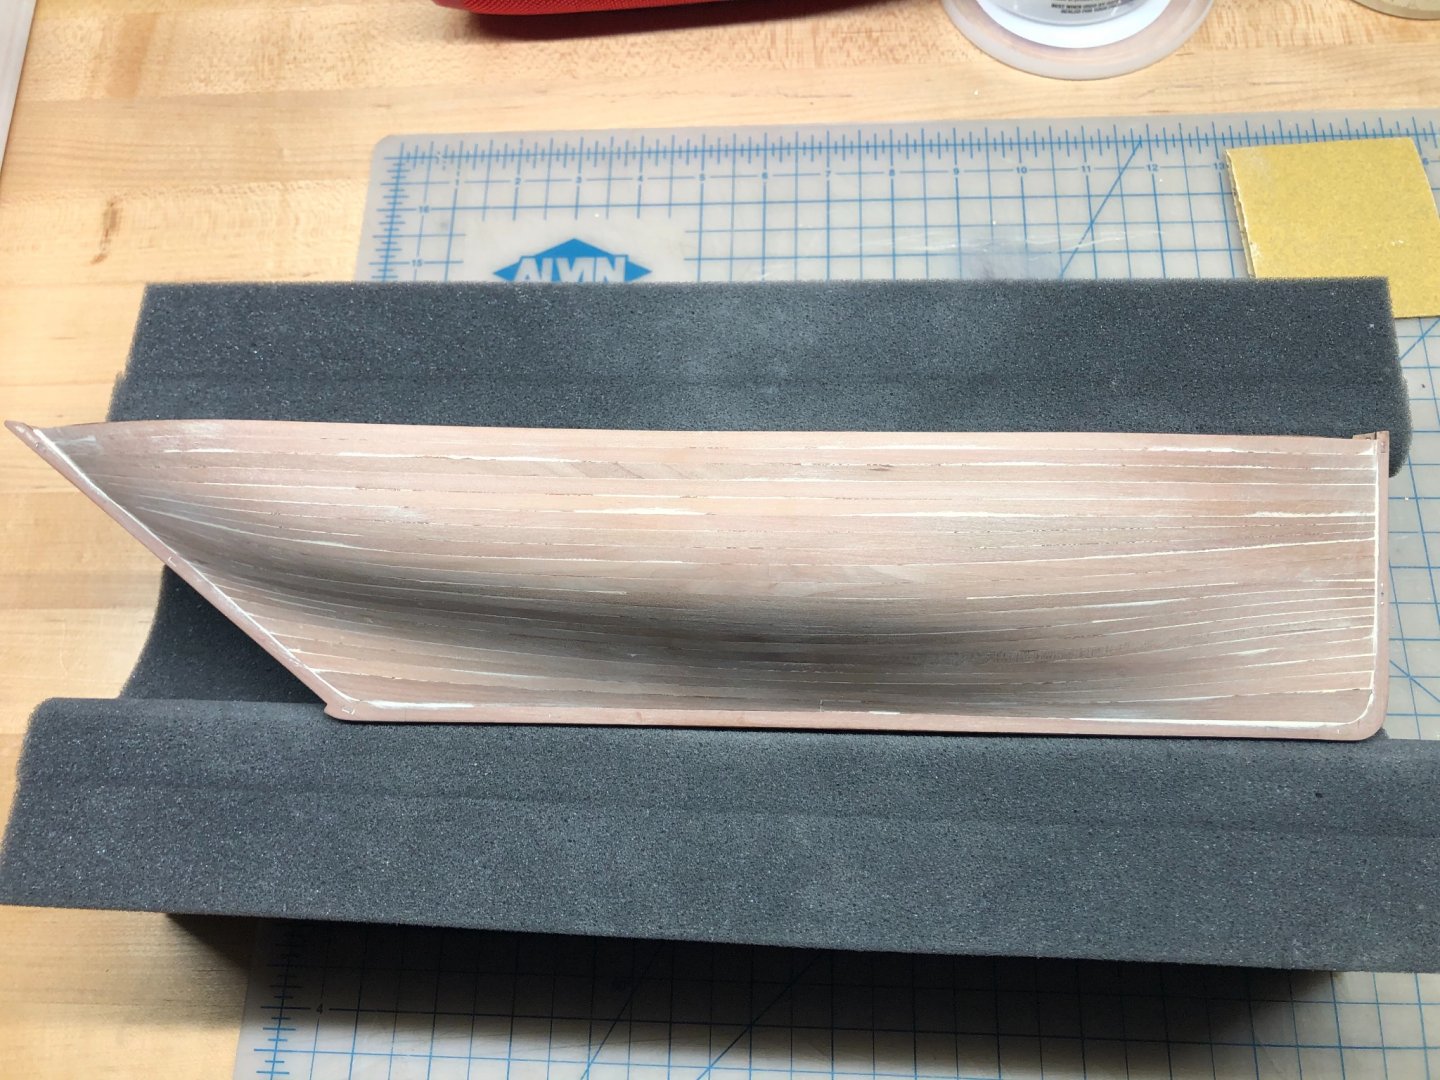
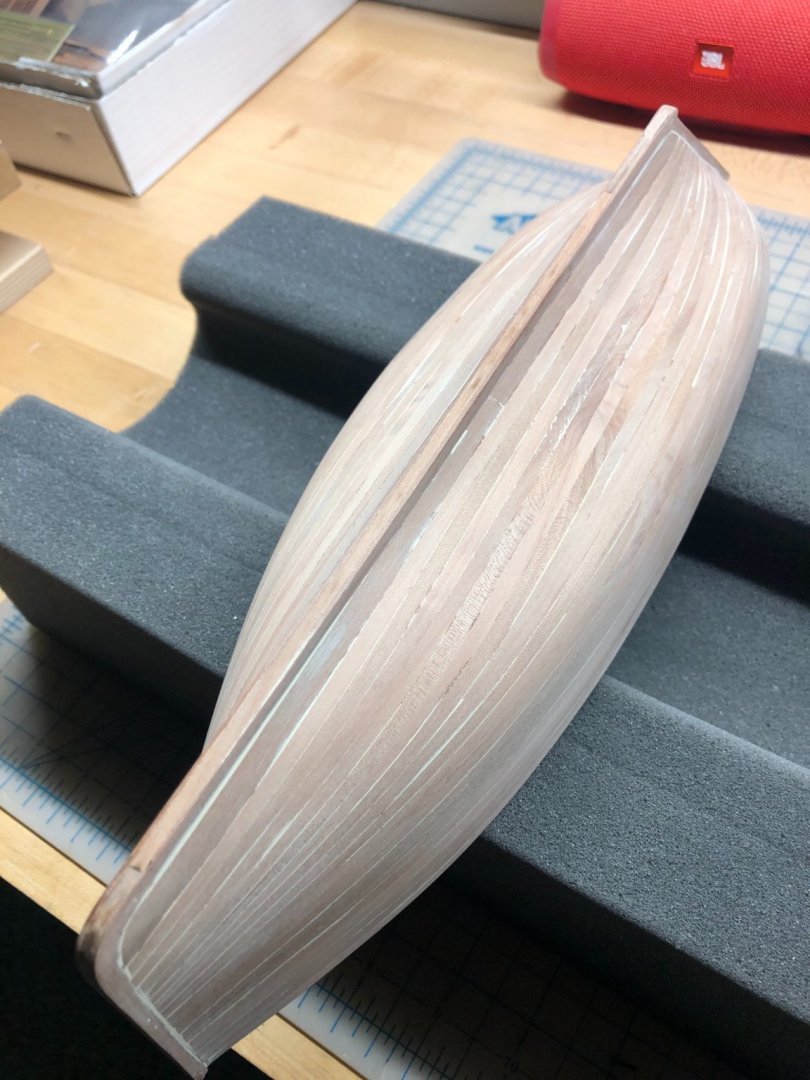
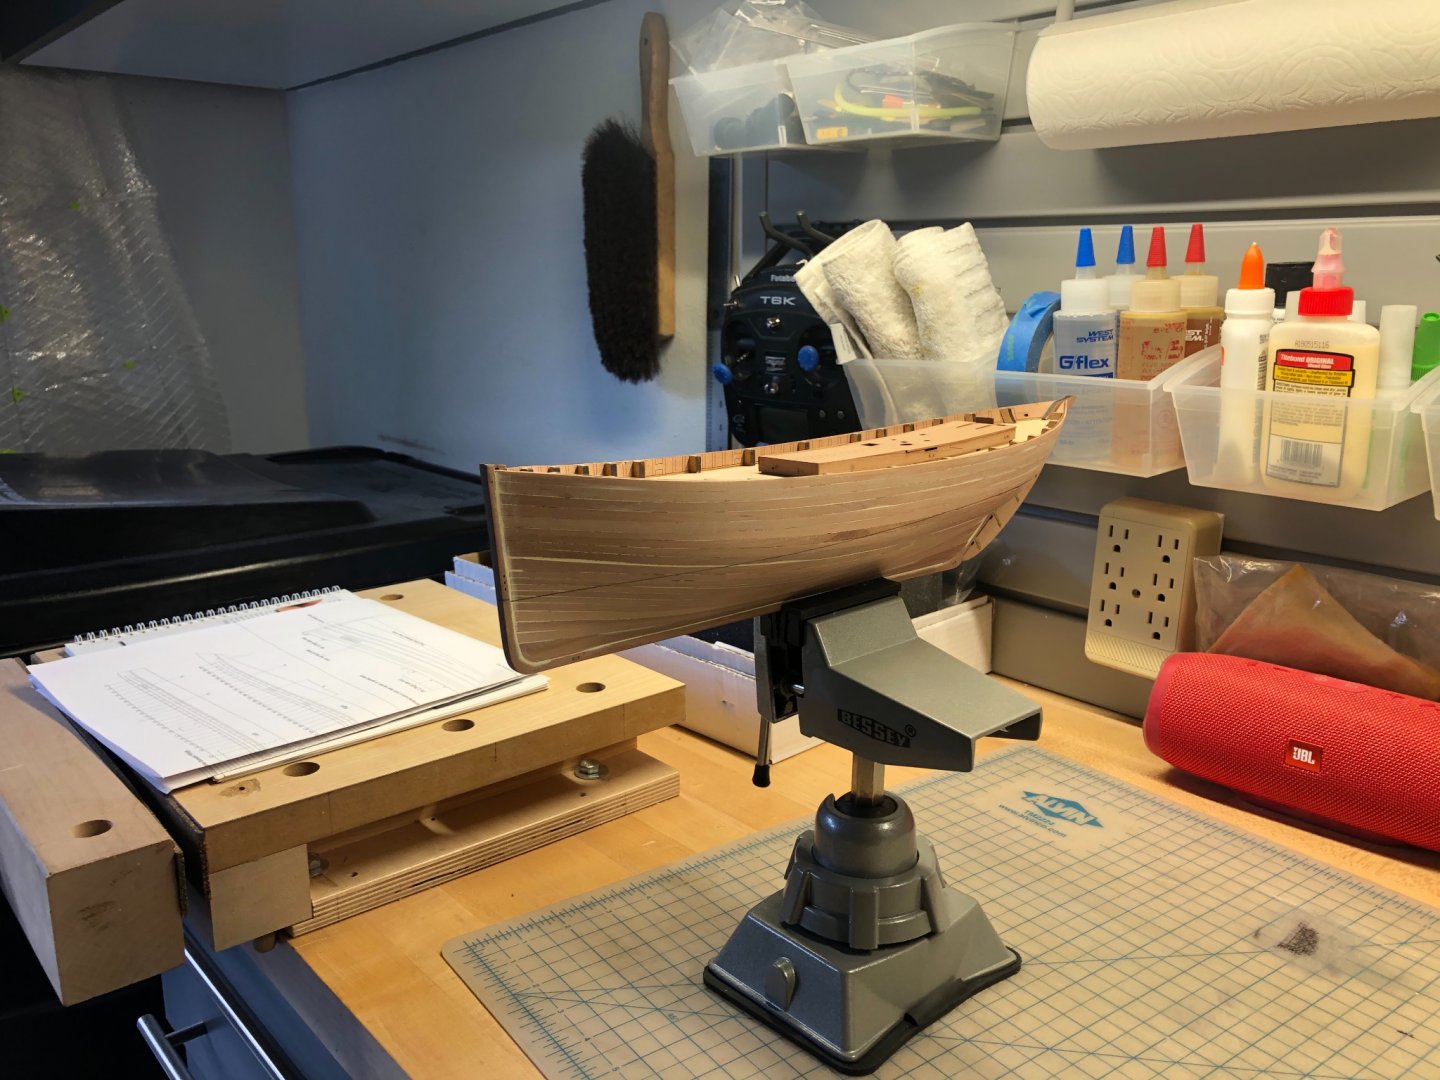
I made a bit of progress this weekend. I filled and sanded the hull. Since I am painting the entire hull surface, I went in pretty heavy with the wood filler, so that I’d end up with as smooth a surface as possible. Started with 80 grit for initial pass, then 120, 220, and finally 320 grit paper. Smooth as a baby’s butt. Next, I built the rudder. I gave it good sanding, and then attached the straps for the pintels. This was a bit fiddly, as the straps are tiny, and need to be placed carefully. Fortunately, Chris has taken care of us, because the holes for the pins are pre-drilled, so it's hard to make a mistake here. I trimmed them from the PE sheet, and filed them smooth, then I glued them to the rudder, pinning them temporarily with brass pins. Then, when the glue had set, I removed the pins, cut them to a short length, and hammered them gently into place. The pins need to be shortened because they come in from both sides of the rudder, so they can’t be more than half the rudder thickness. Then I marked out the waterline on the hull and rudder, to get ready to paint the bottom. I set the boat up on the acrylic cradle provided in the kit, and then marked the WL point on the stem and stern post per the drawings. Then I used my Model Shipways WL tool to mark out the WL. If you look closely, you can just see the pencil line for the waterline in these photos. Slow and steady. She’s starting to look like a proper little ship.

- 222 replies
-
- 6
-
-
- First Build
- Lady Isabella
- (and 2 more)
-
That lamp is fantastic. You must be feeling pretty good about it.
- 261 replies
-
- 4
-
-
- muirneag
- vanguard models
- (and 2 more)
-
I’m quite proficient at spending other people’s money. That’s essentially what I do for a living.
- 222 replies
-
- 3
-
-
- First Build
- Lady Isabella
- (and 2 more)
-
Beautiful, BE! For what it's worth, I like the look of the stem plate unpainted. It gives a crisp and detailed look to the stem profile. I'd leave it as is. -E
- 261 replies
-
- 2
-
-
- muirneag
- vanguard models
- (and 2 more)
-
I bet Micro-Mark could ship to the UK... don't you think? It would probably cost more to ship than the sales price for the cradle, but if you bought some more stuff, it could make sense. Micro-Mark has a bunch of terrific product, so it shouldn't be hard to find lots of things to buy.
-
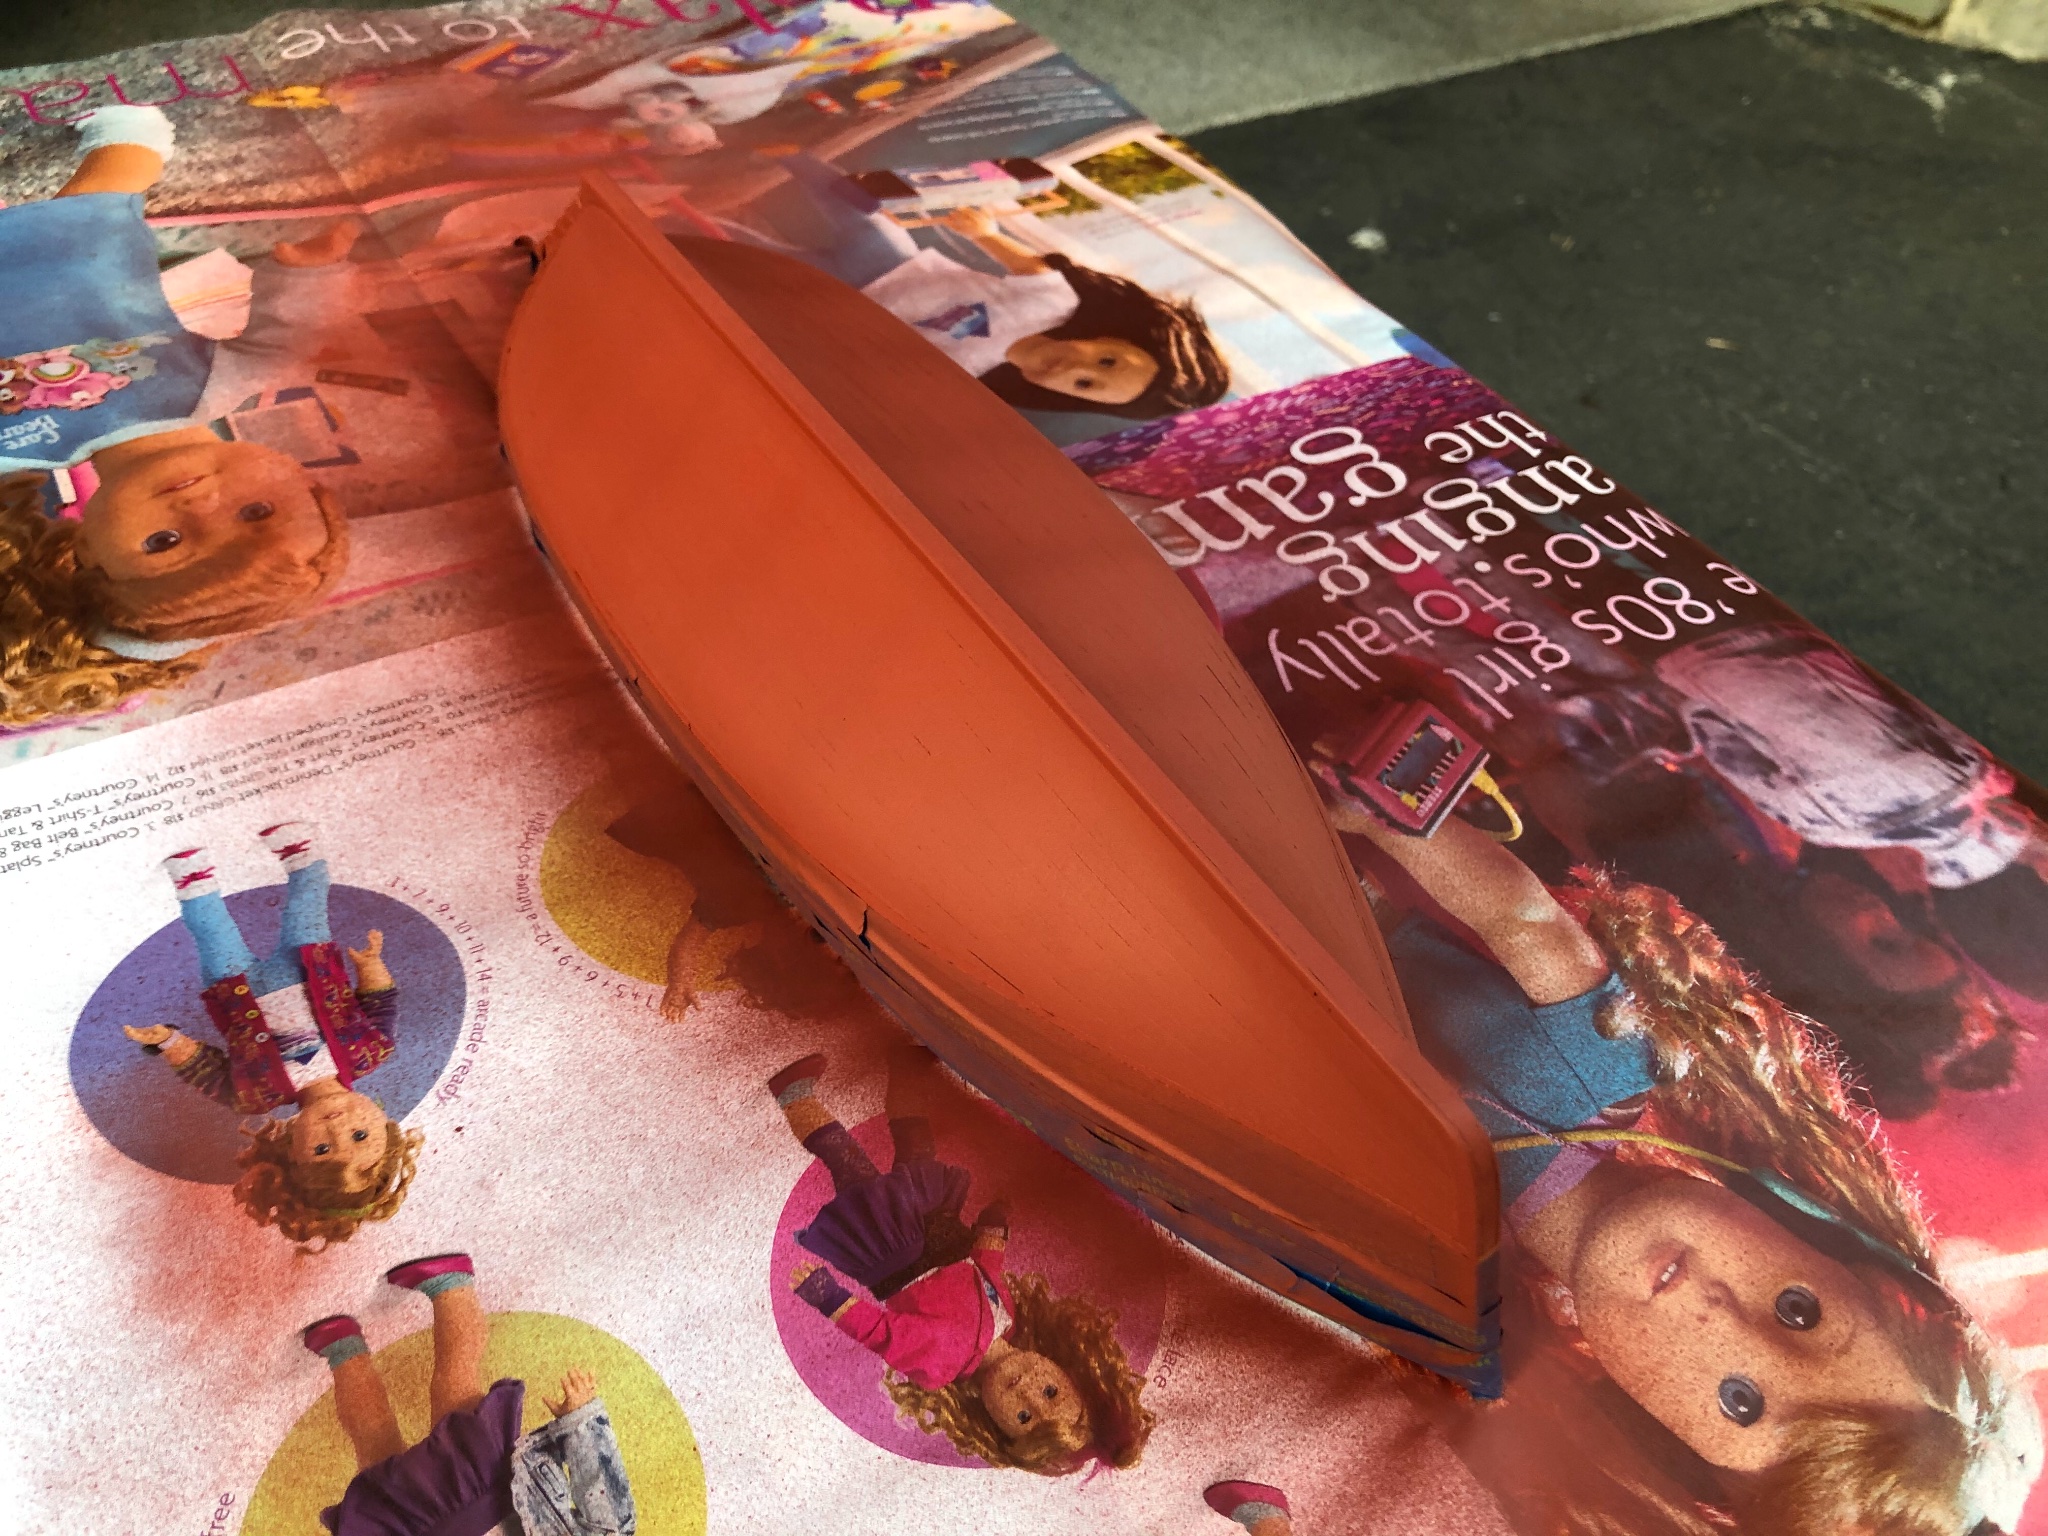
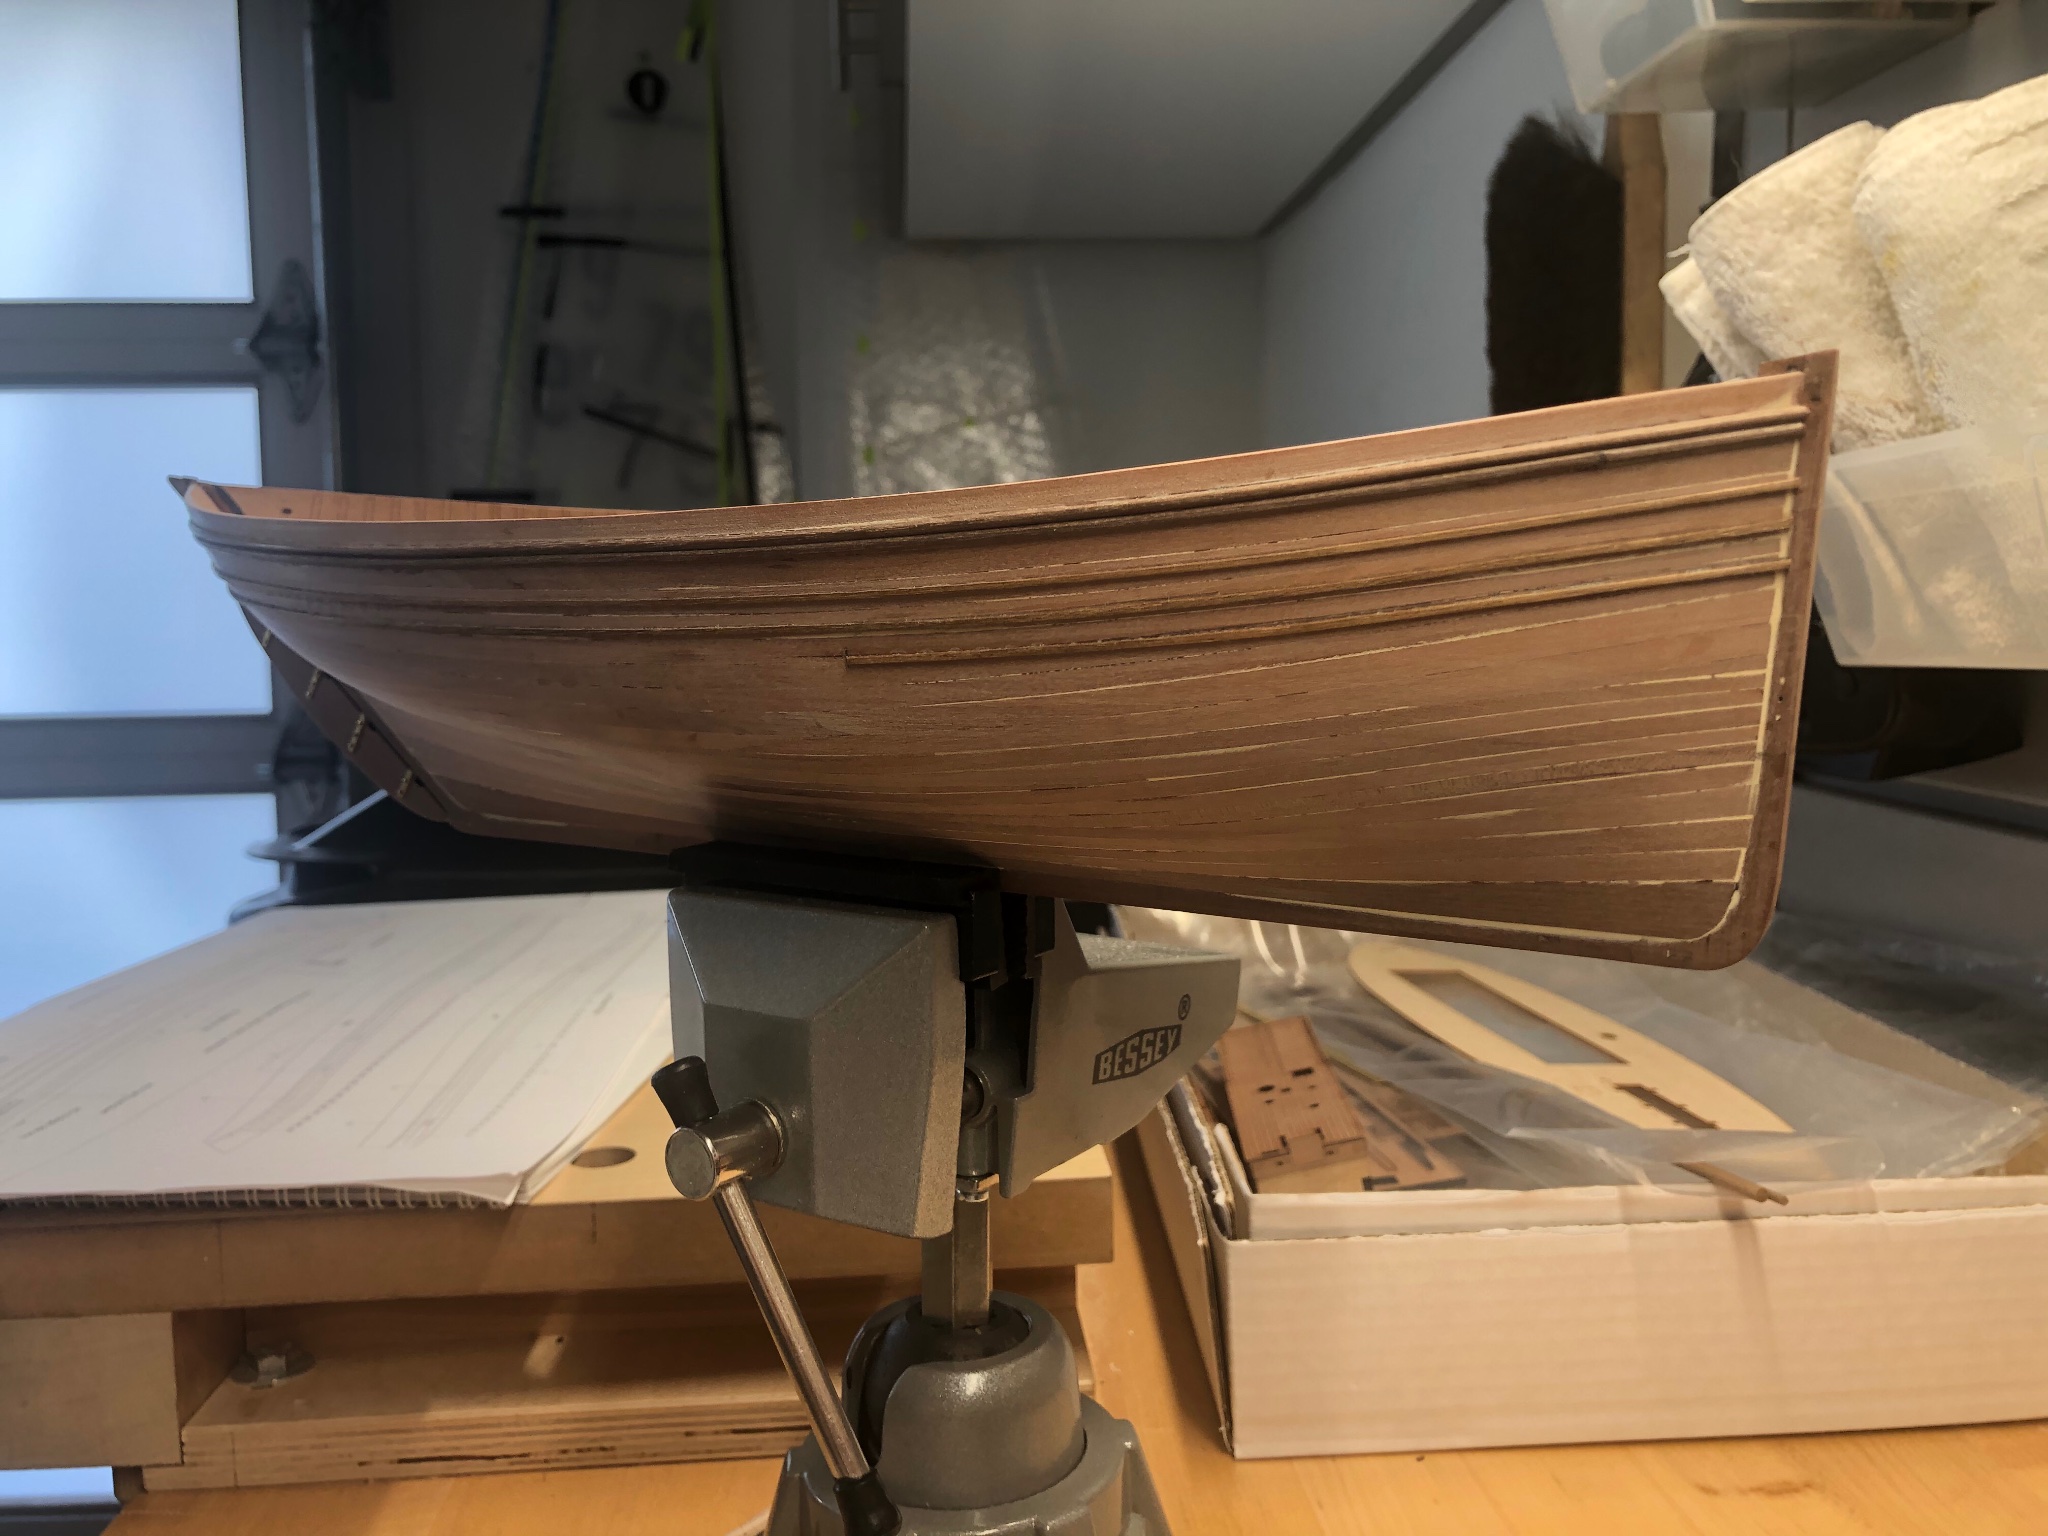
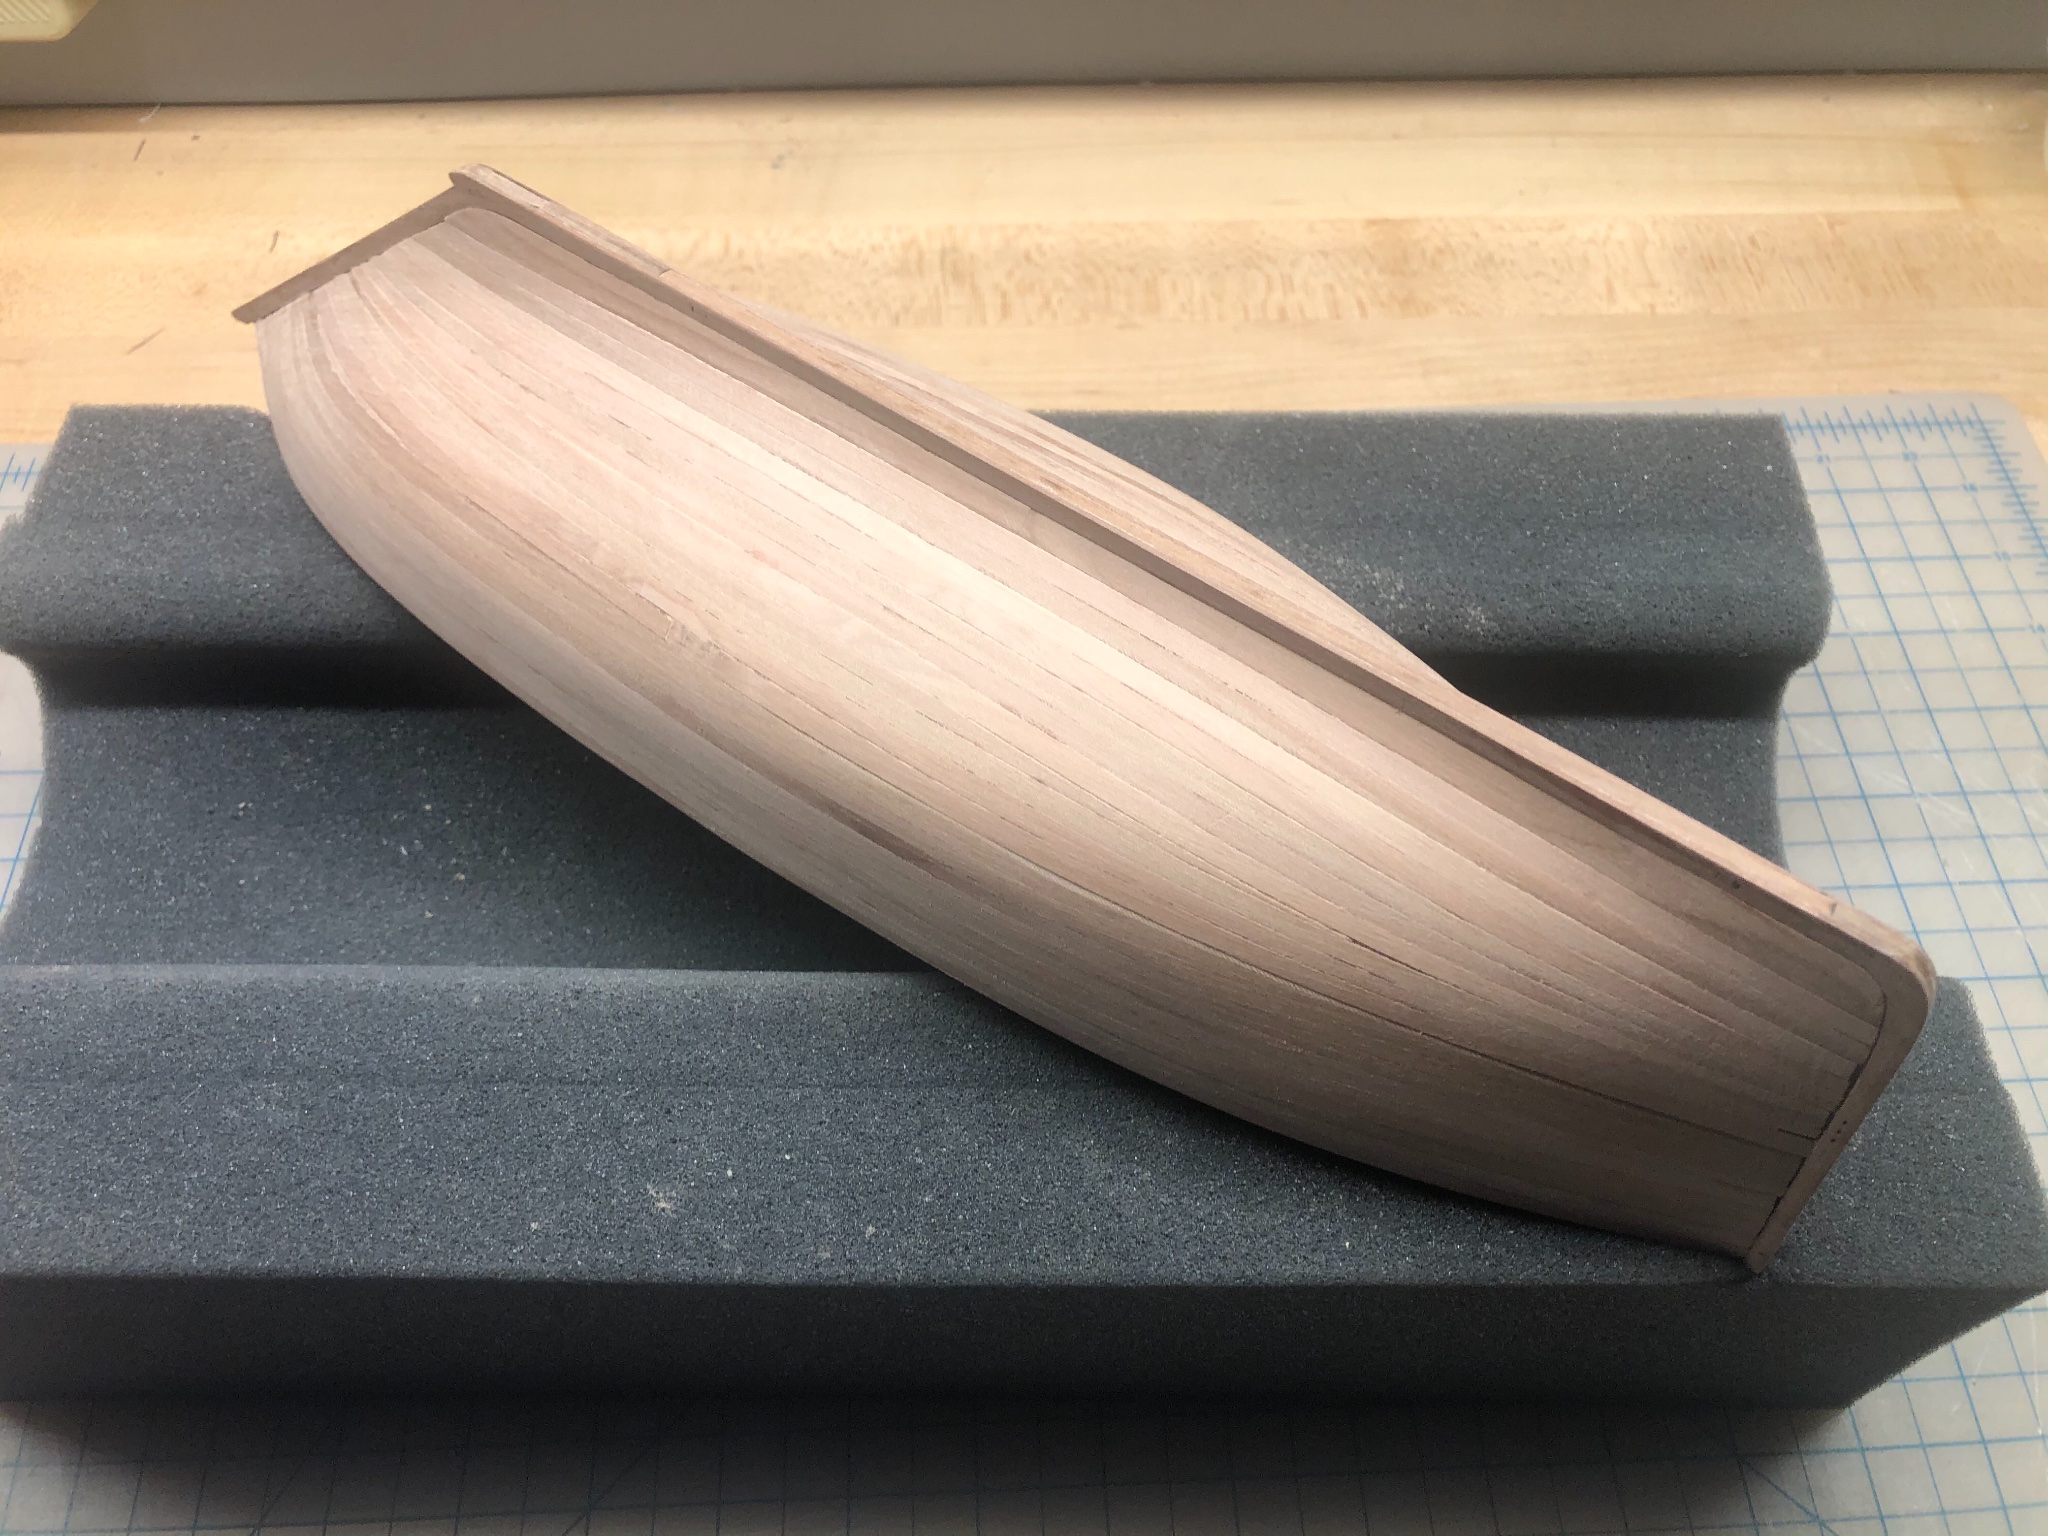
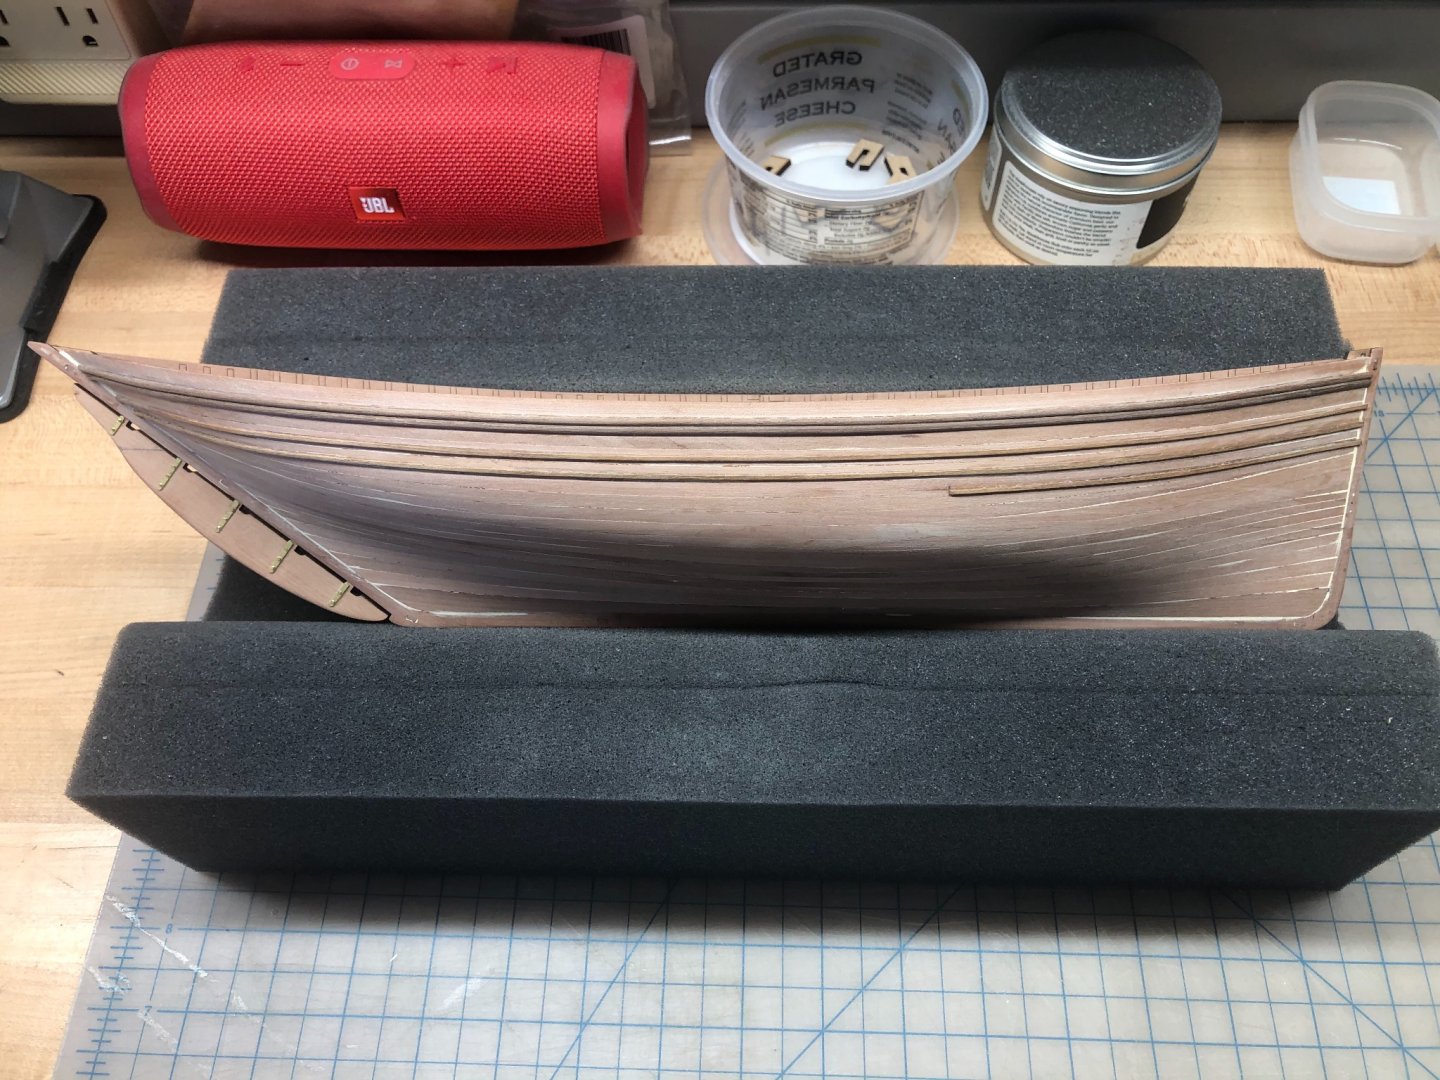
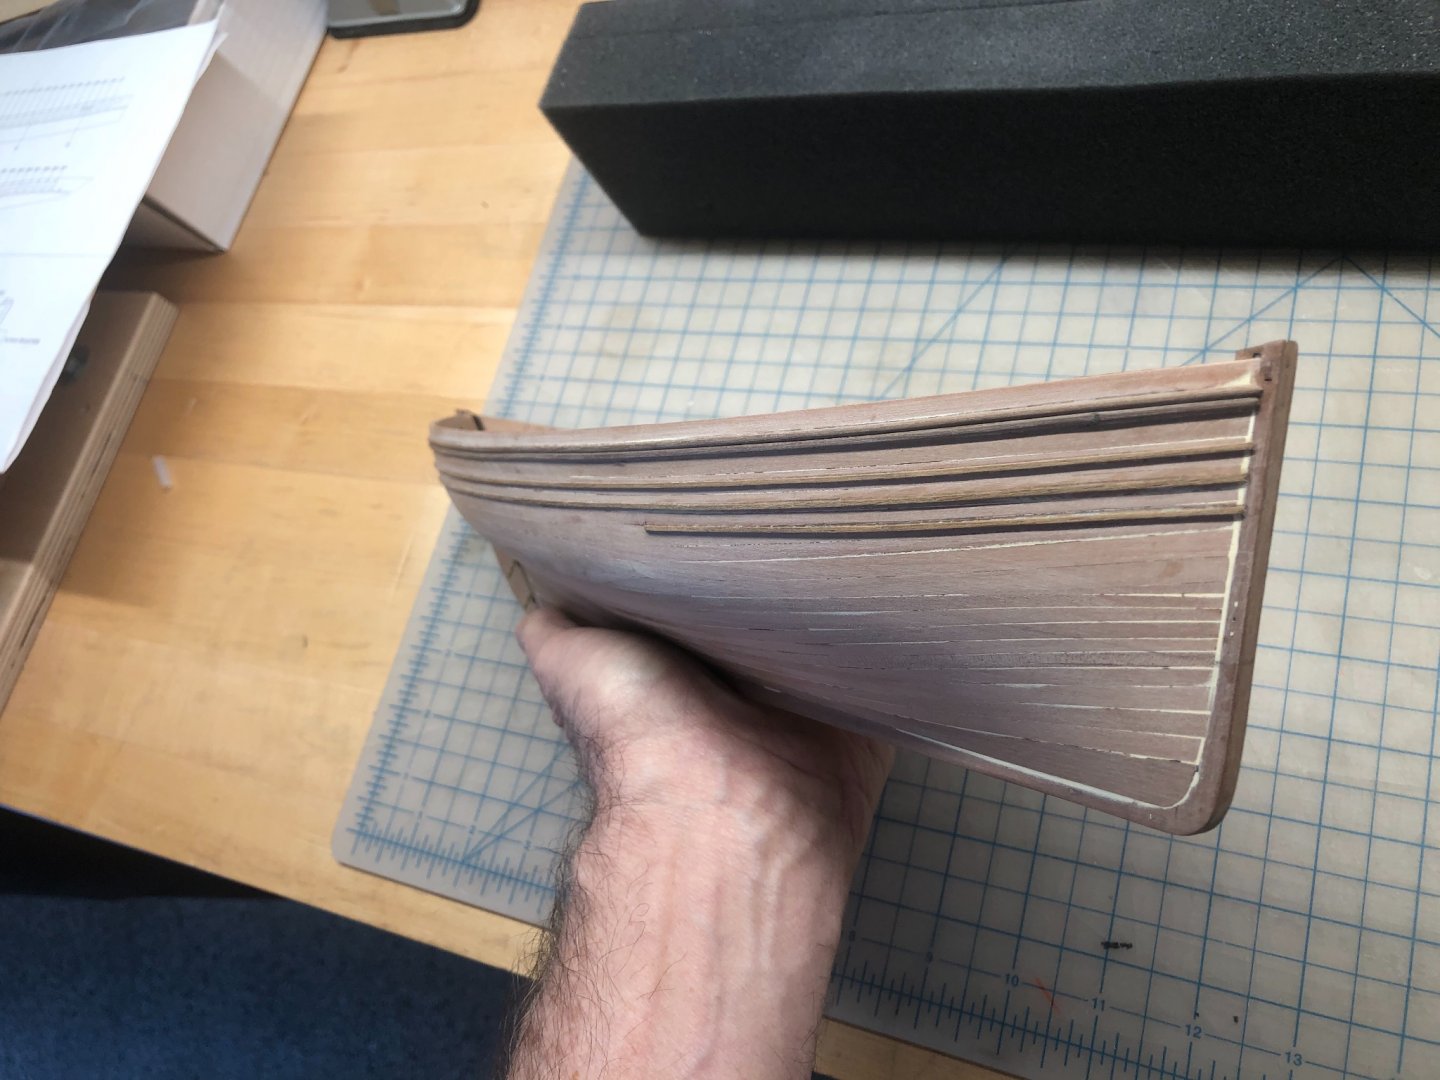
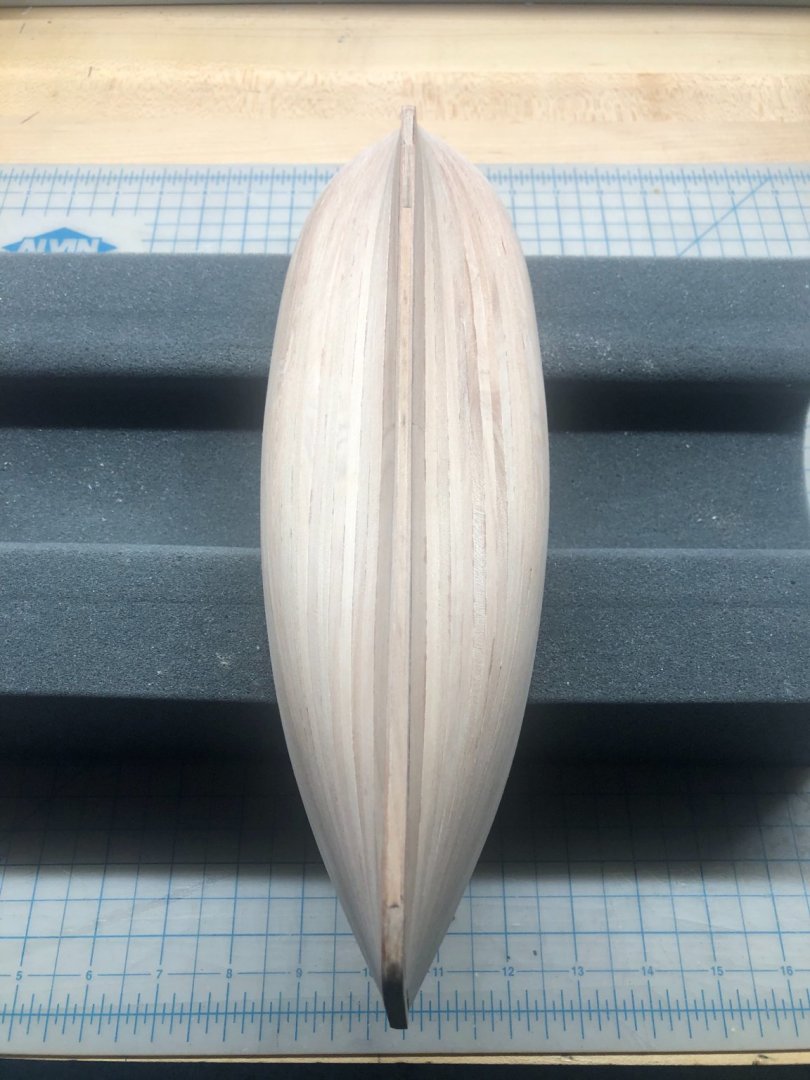
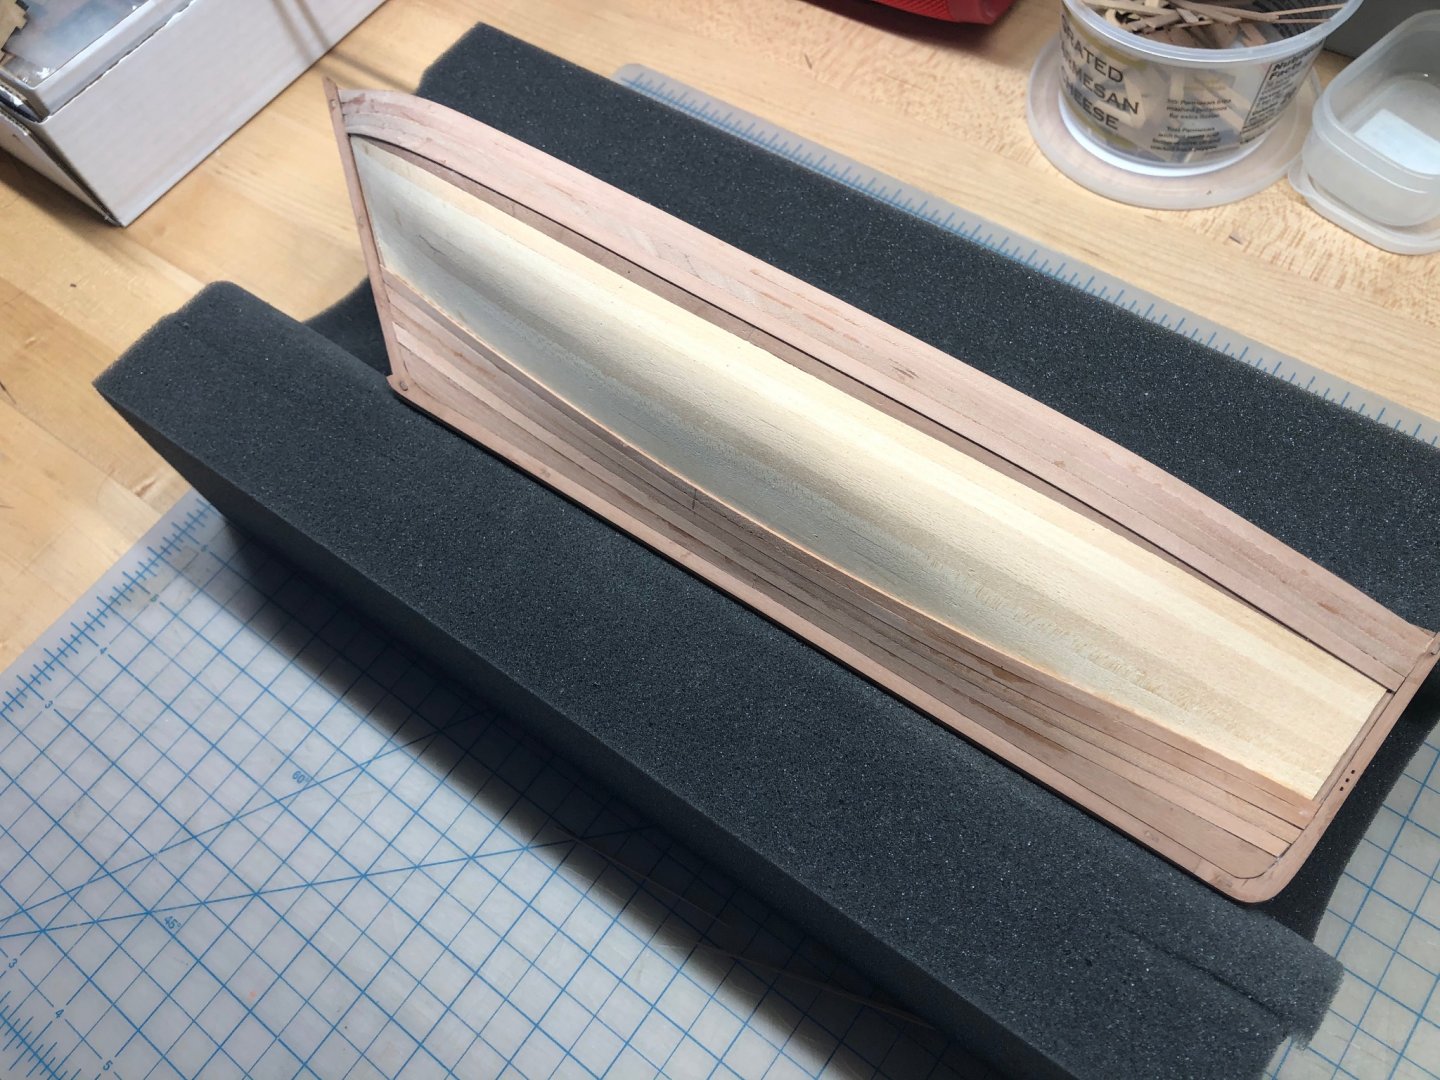
Finished the second planking this weekend. I think it came out pretty well, and should sand out nicely. I will need to do a bit of light filling with wood filler, especially at the stern post and stem, where there are some gaps at the ends of the planks. But overall, I’m pleased with the results. Here’s a few photos after an initial light sanding with 80 grit paper. Filling and more sanding to follow. Again, I am reminded how lovely the lines of this Zulu are, particularly in the stern. I’ve always been smitten with double-enders, and this one is so unique and pretty. Next steps... building the rudder, installing the rubbing strakes, and finishing and painting the hull.

- 222 replies
-
- 6
-
-
- First Build
- Lady Isabella
- (and 2 more)
-
BE, this is coming along so well! Your attention to all of the detail is inspiring. The details on the rudder seem just spot-on to me. Thank you for sharingI You mentioned “Chuck’s fiber versions” of the gudgeons and pintles. Would you please explain for this newbie? -Erik
- 261 replies
-
- 2
-
-
- muirneag
- vanguard models
- (and 2 more)
-
Thanks so much, Jim! I appreciate the tip. I found the Chaos Black paint on Amazon, so I’ll order some and give it a try.
-
While I finish up the planking, I need to make some decisions about painting the hull, and I’m hoping to solicit some advice. My plan is to fill and sand the hull surface, mark the waterline, and to paint up to the waterline with a matte red oxide spray to simulate the bottom paint. All good there. But I want to paint the hull above the waterline black, in conformance with nearly all of the photos I’ve seen of Zulus. My first thought was to simply use a matte black acrylic paint like the Vallejo acrylics I have. But looking at vintage photos, it looks to me that the topsides paint on the Zulus was most often glossy, or at least a satin finish. I’m having trouble locating a good satin black paint to use. Can anyone recommend one? I suppose another option would be to use the Vallejo black, and then topcoat it with a satin sealer of some kind, to give it a bit of sheen. I’d love to hear any advice you all may have on how to proceed. My plan is to do the bottom and topsides as described, and then to paint the white boot stripe last. Another question, this one for James... in your build log, you mentioned after painting that you coated the entire hull with a matte clear varnish. Do you recommend putting the varnish over the painted surfaces, including the red bottom paint, or just the bare wood surfaces? Thanks to all for any advice! -E

- 222 replies
-
- 1
-
-
- First Build
- Lady Isabella
- (and 2 more)
-
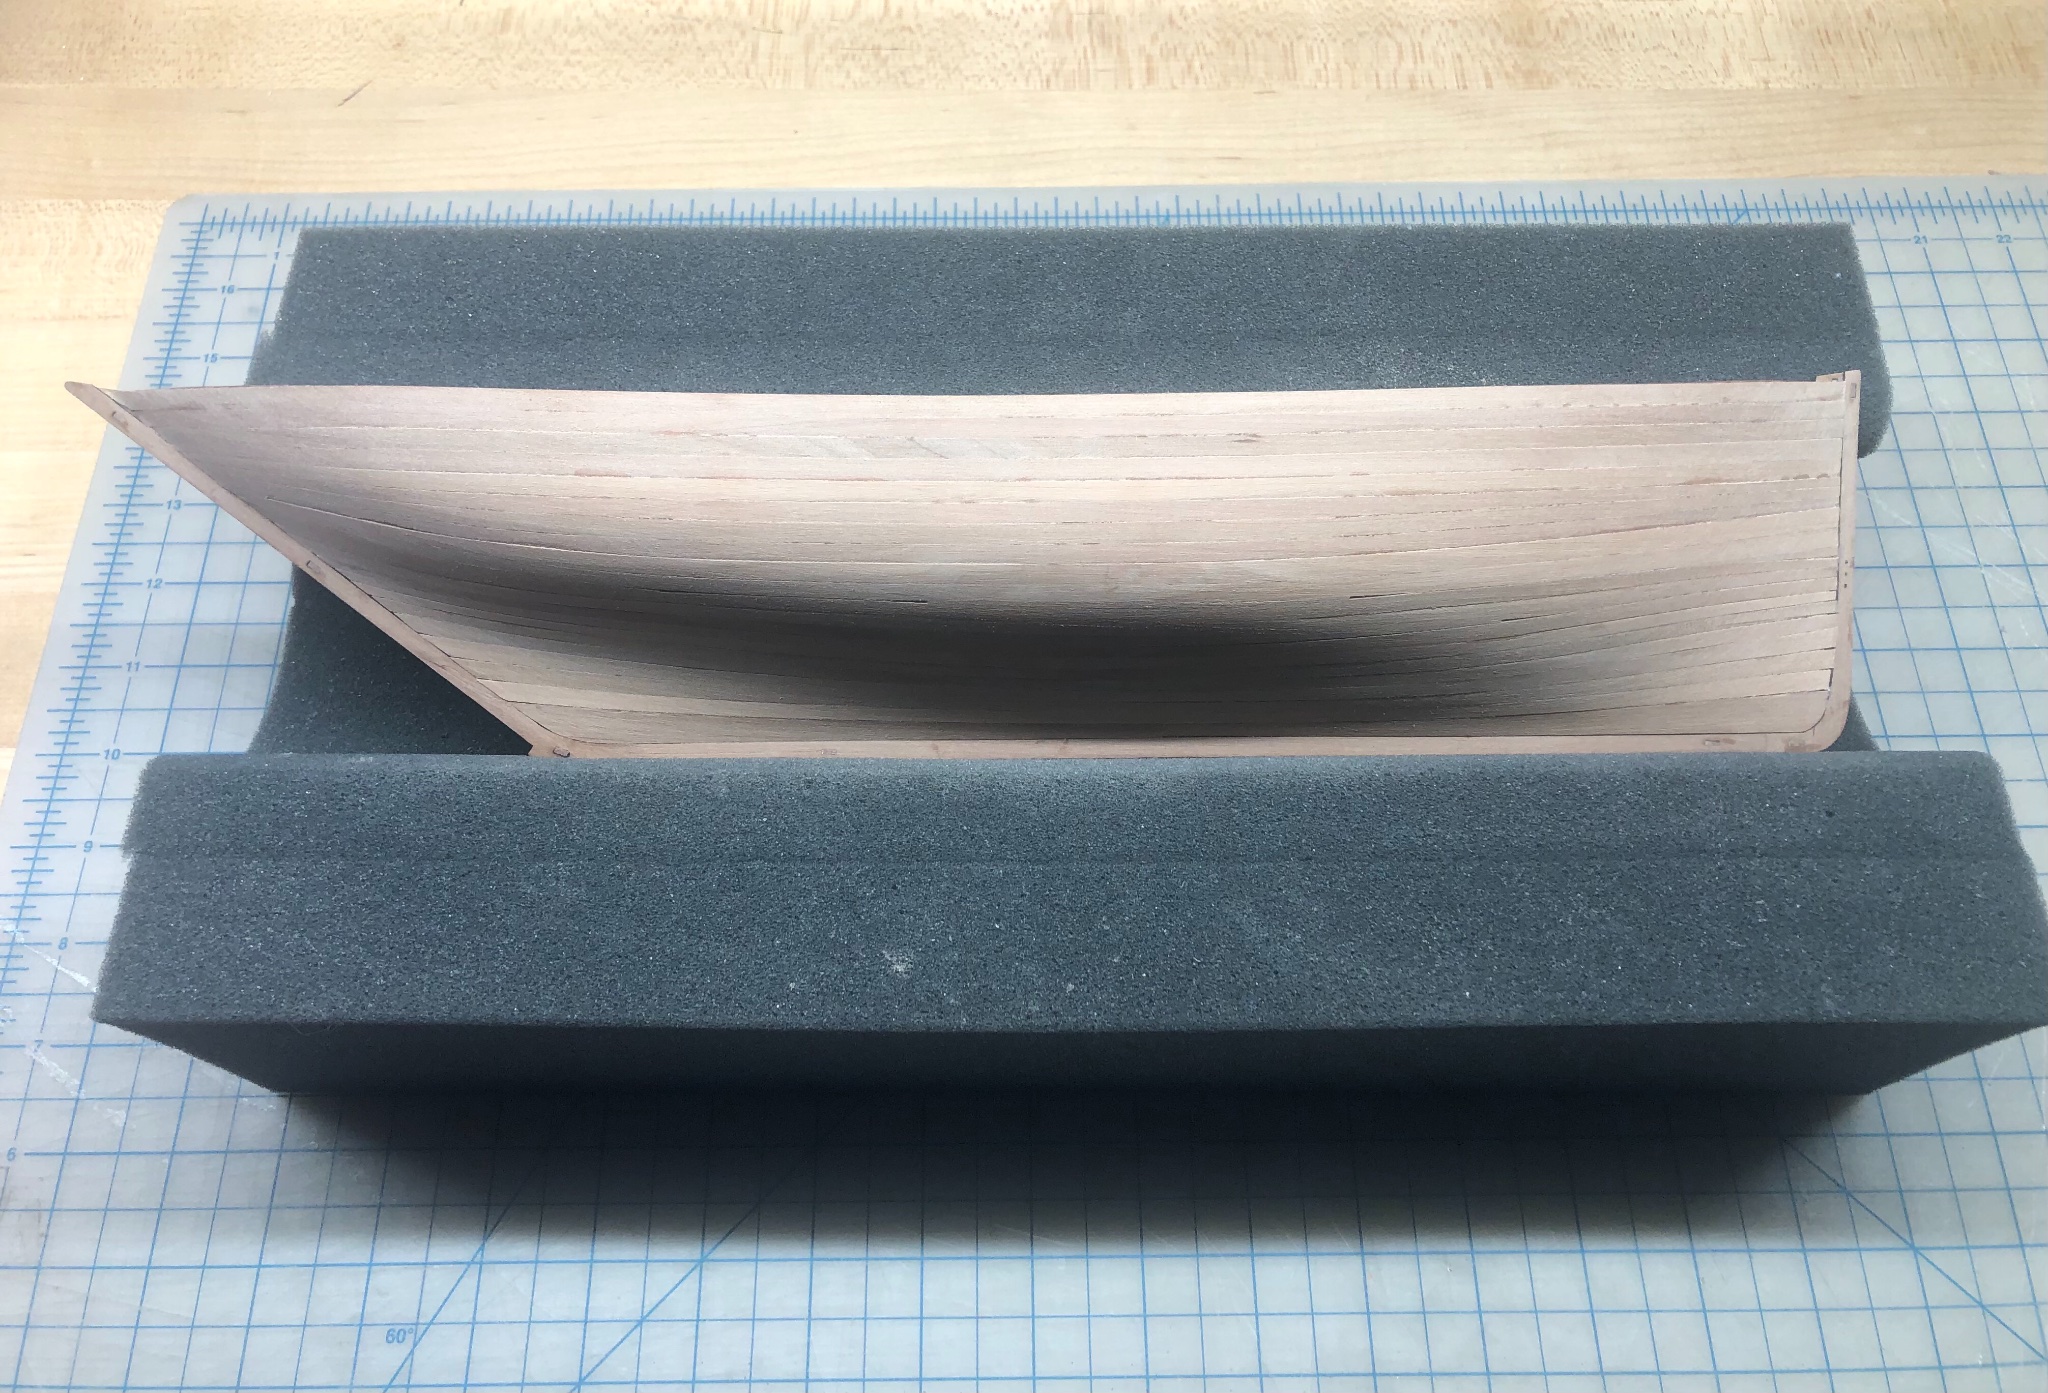
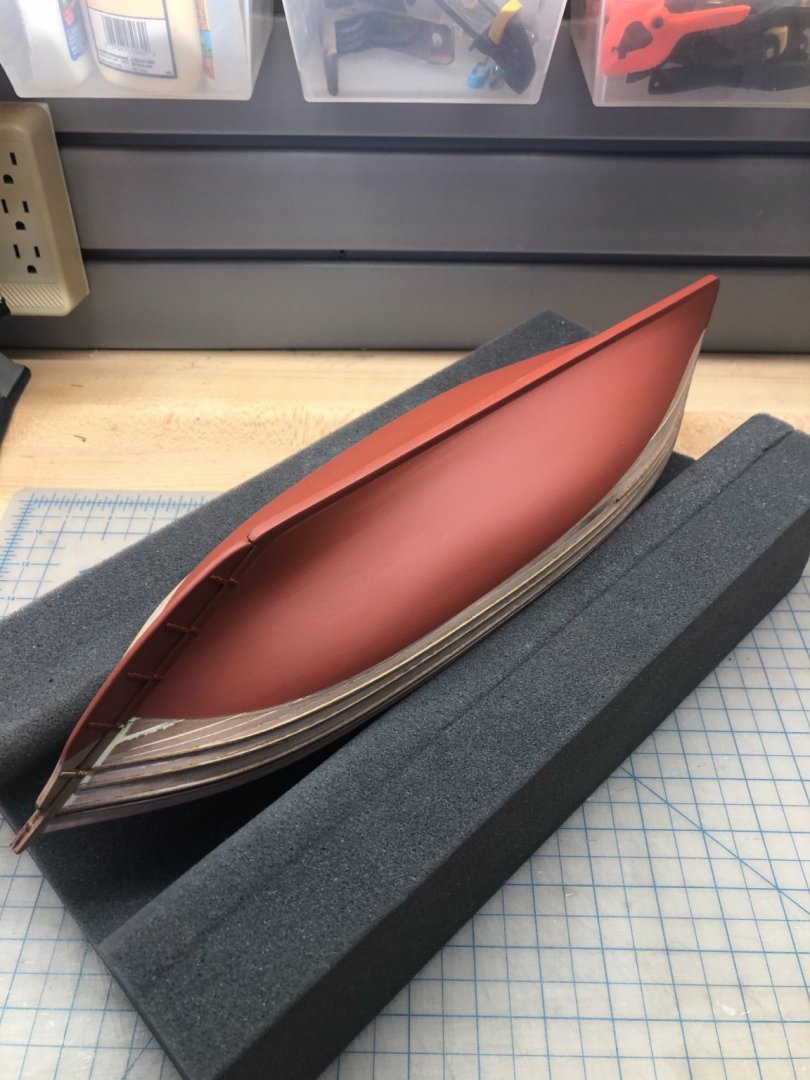
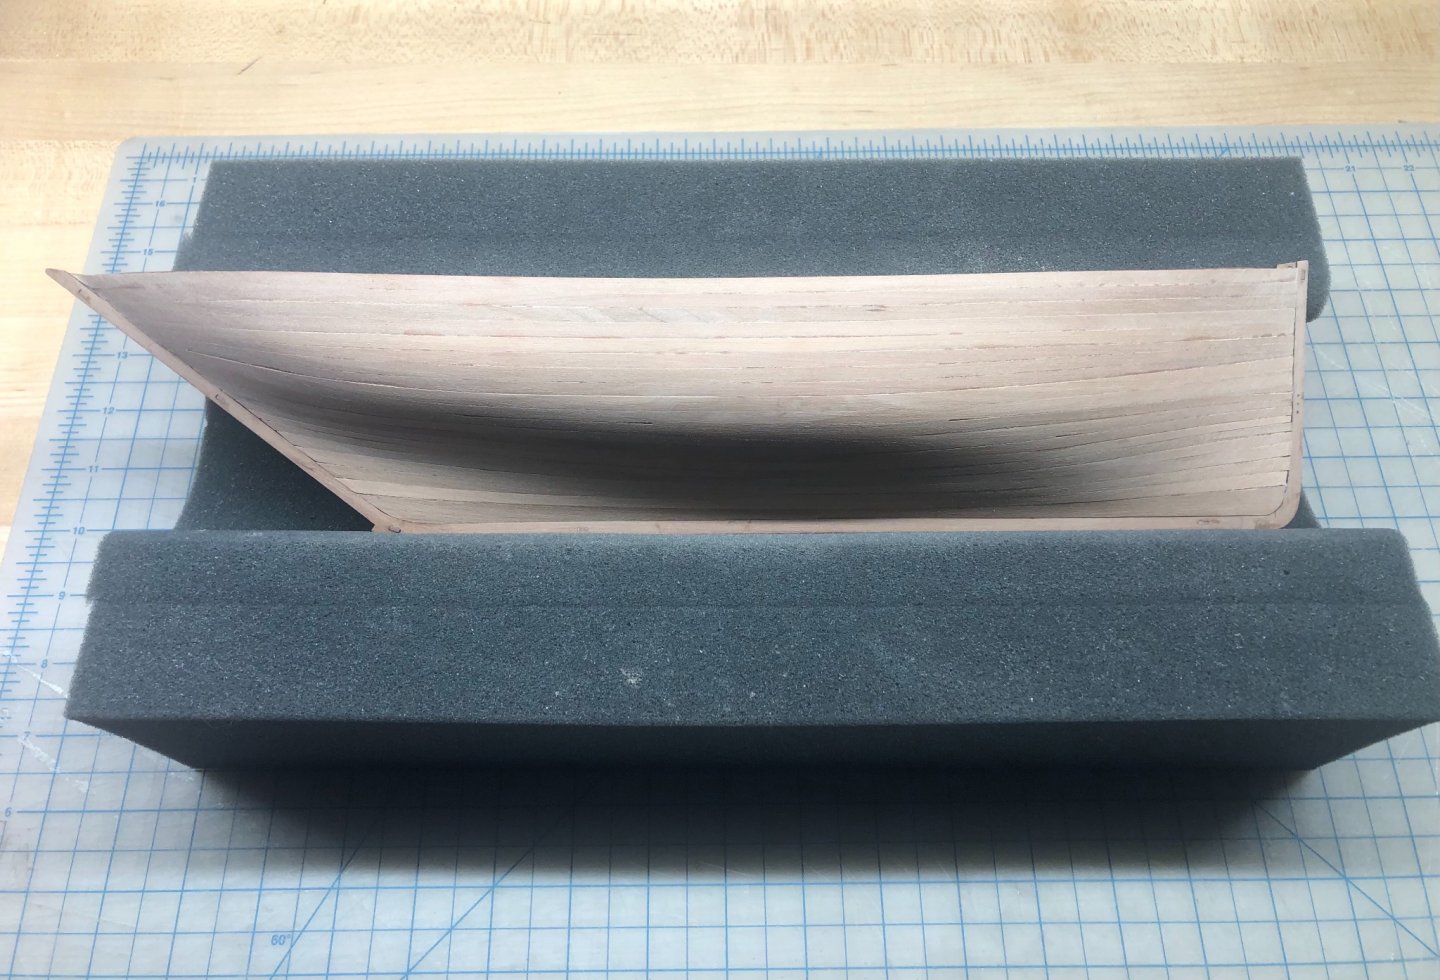
By the way, I bought this really great foam hull cradle from Micro-Mark, and I really like it. It’s made of a nice quality foam that’s firm, but pliable. And it’s cut into two different sized cradles, which fit one-inside-the-other, for different sized hulls. It’s turned out to be a great thing for doing tasks like the second planking, when I have had to press a plank down quite firmly to hold it in position while the CA dries. With this foam cradling the hull, I am not worried that I’m going to crush or damage anything. I really recommend it. Here’s the link: https://www.micromark.com/Triple-Duty-Foam-Cradle-for-Models-and-Ships
- 222 replies
-
- 4
-
-
- First Build
- Lady Isabella
- (and 2 more)
-
Thanks, Jim. I have to say that I am really enjoying this. I work hard at my profession, and the days are hectic and sometimes stressful, so when I can get a few minutes out in my shop to work, it’s a pleasure. It’s therapeutic.
- 222 replies
-
- 2
-
-
- First Build
- Lady Isabella
- (and 2 more)
-
Thanks so much Bradley!