HOLIDAY DONATION DRIVE - SUPPORT MSW - DO YOUR PART TO KEEP THIS GREAT FORUM GOING! (Only 20 donations so far - C'mon guys!)
×


EKE
-
Posts
231 -
Joined
-
Last visited
Content Type
Profiles
Forums
Gallery
Events
Everything posted by EKE
-
 Terrible news Bob. So sorry to hear about your friend. I’m praying for everyone who’s hurting because of the fires.
 -
Greetings! Long time lurker coming out of the bushes!
EKE replied to EKE's topic in New member Introductions
Thanks very much, Per. The boat is a Dragonflite 95, which is one of the hottest one-Design RC racing classes in the world right now. It’s a kit boat and a strict one design. The boat is well designed and engineered, and the kit is about $425 US. Including radio. An amazing value. They are selling thousands of them worldwide. I sailed in the US National Championships last year in Charleston, and there was a full house of 50 skippers participating in the three day event. Here’s a link to the Class Owners Association: Dragonflite 95 USA And here’s where you can purchase a boat: Dragon Sailing -
Thank you very much for the kind words and encouragement, Ryland. Between you and me, I am having such a good time with this, the end product will simply be a bonus. The journey is the thing.
- 222 replies
-
- 2
-

-
- First Build
- Lady Isabella
- (and 2 more)
-
Greetings! Long time lurker coming out of the bushes!
EKE replied to EKE's topic in New member Introductions
By the way, I thought some of you might like to see my boat. This is "Robin Lee", my Yankee Dolphin, built in 1968, on mooring at Catalina Island here in Southern California. Designed by Olin Stephens in 1959.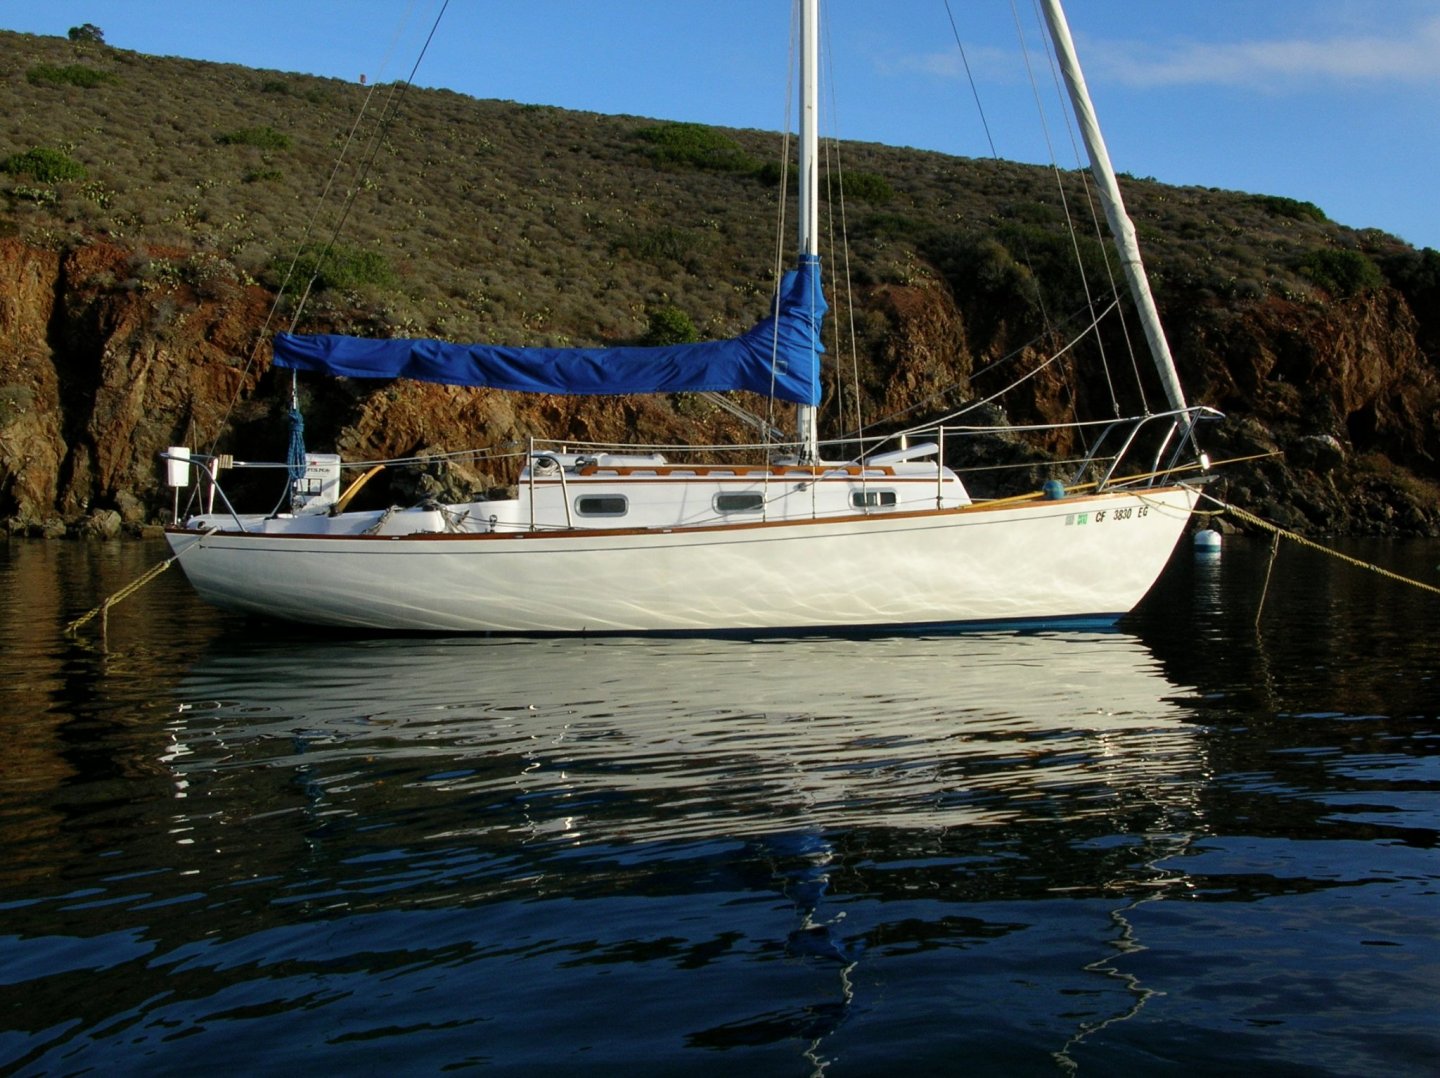
-
Greetings! Long time lurker coming out of the bushes!
EKE replied to EKE's topic in New member Introductions
Thanks for the warm welcome, all! Glad to be here. -EKE -
They fit perfectly, like a glove. Not a bit of trimming necessary, except a tiny bit at the bow for length. I find that kind of thing really amazing, actually. As an architect, I’m always a bit stunned when some custom assembly we’ve designed, made in a shop across the country, shows up on the job site, and fits perfectly. I know it’s not, but it feels miraculous. Chris did a marvelous job developing these curved shapes in CAD.
- 222 replies
-
- 5
-
-
- First Build
- Lady Isabella
- (and 2 more)
-
Well, it’s easy to fly through the build when you are actually further down the road, and are just posting up photos you’ve taken long before. I am actually making slow and very deliberate progress. I’m a “measure twice, cut once” guy. Once this log catches up with me, here in the future, things will slow way down and I’ll be pestering you all with lots and lots of questions.
- 222 replies
-
- 2
-
-
- First Build
- Lady Isabella
- (and 2 more)
-
Greetings! Long time lurker coming out of the bushes!
EKE posted a topic in New member Introductions
Greetings, Friends. My name is Erik Evens. Pleased to meet you all. I’ve actually been a member here since 2015, if you can believe it. I’m an architect here in Los Angeles, where I’m one of the owners of a 40 person firm designing elaborate custom homes for people with high expectations. My specialty is traditional and classical architecture, and in addition to designing homes for discriminating clients, I teach architecture for the Institute of Classical Architecture and Art. But sailing is a passion, and has been since I was a wee lad. Grew up racing sailboats, sailed a bunch of Transpacs, and logged a lot of miles in fast boats. I have a very pretty S&S designed Dolphin 24 birthed here in Marina del Rey. I’ve been charmed and fascinated by ship models ever since my first time visiting the model room of the New York Yacht Club In NYC many years ago. Spent my youth doing a lot of plastic modeling, and flew RC planes for a while (stressful!). So I’ve always wanted to take the leap and build models of beautiful vintage ships. Finally committed and bought a kit, the “Lady Isabella” from Vanguard, which I am building now. I’ve started a log here, so look it up and if you can, I’d appreciate the guidance... sorely needed! My other hobby passion is radio controlled sailboat racing. I’ve been deep into this since the mid 1990’s. See below, my DF 95 beating to windward in the 2019 National Championships in Charleston, SC. Great fun! Glad to be out of the closet here, and hoping to learn a lot from all of you smart folks. —Erik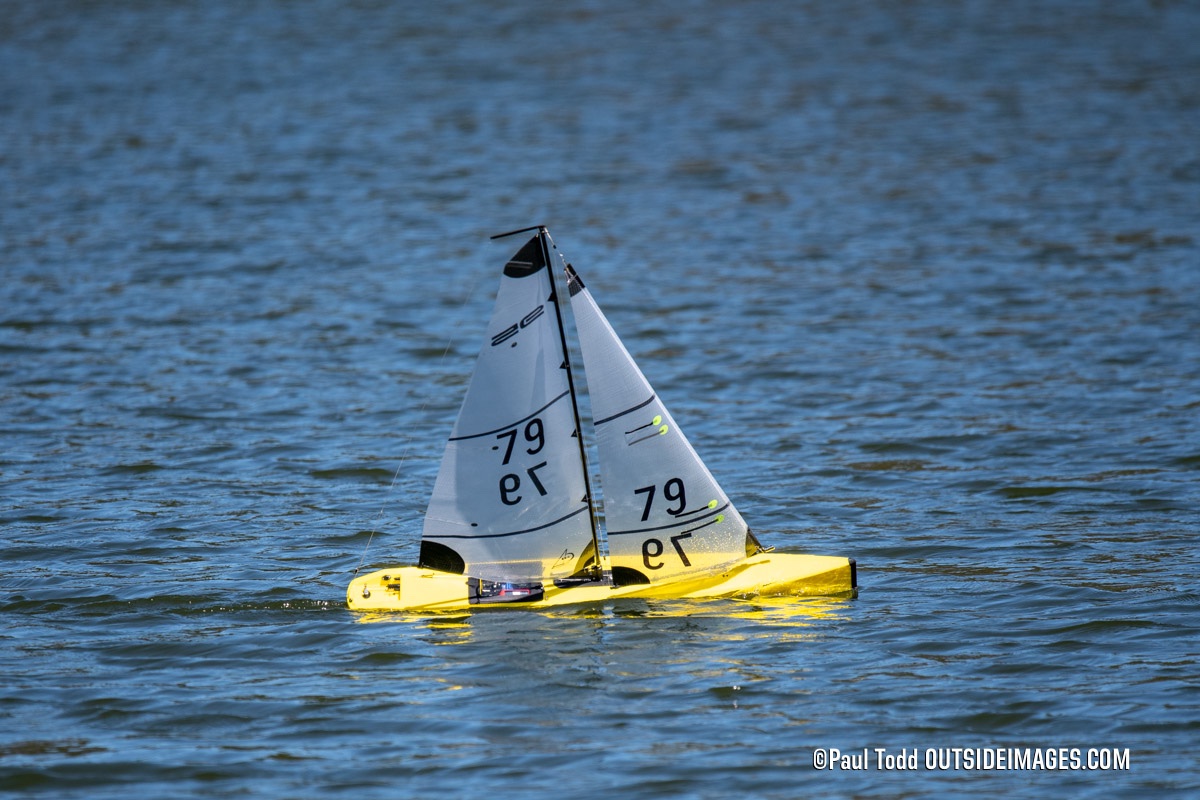
-
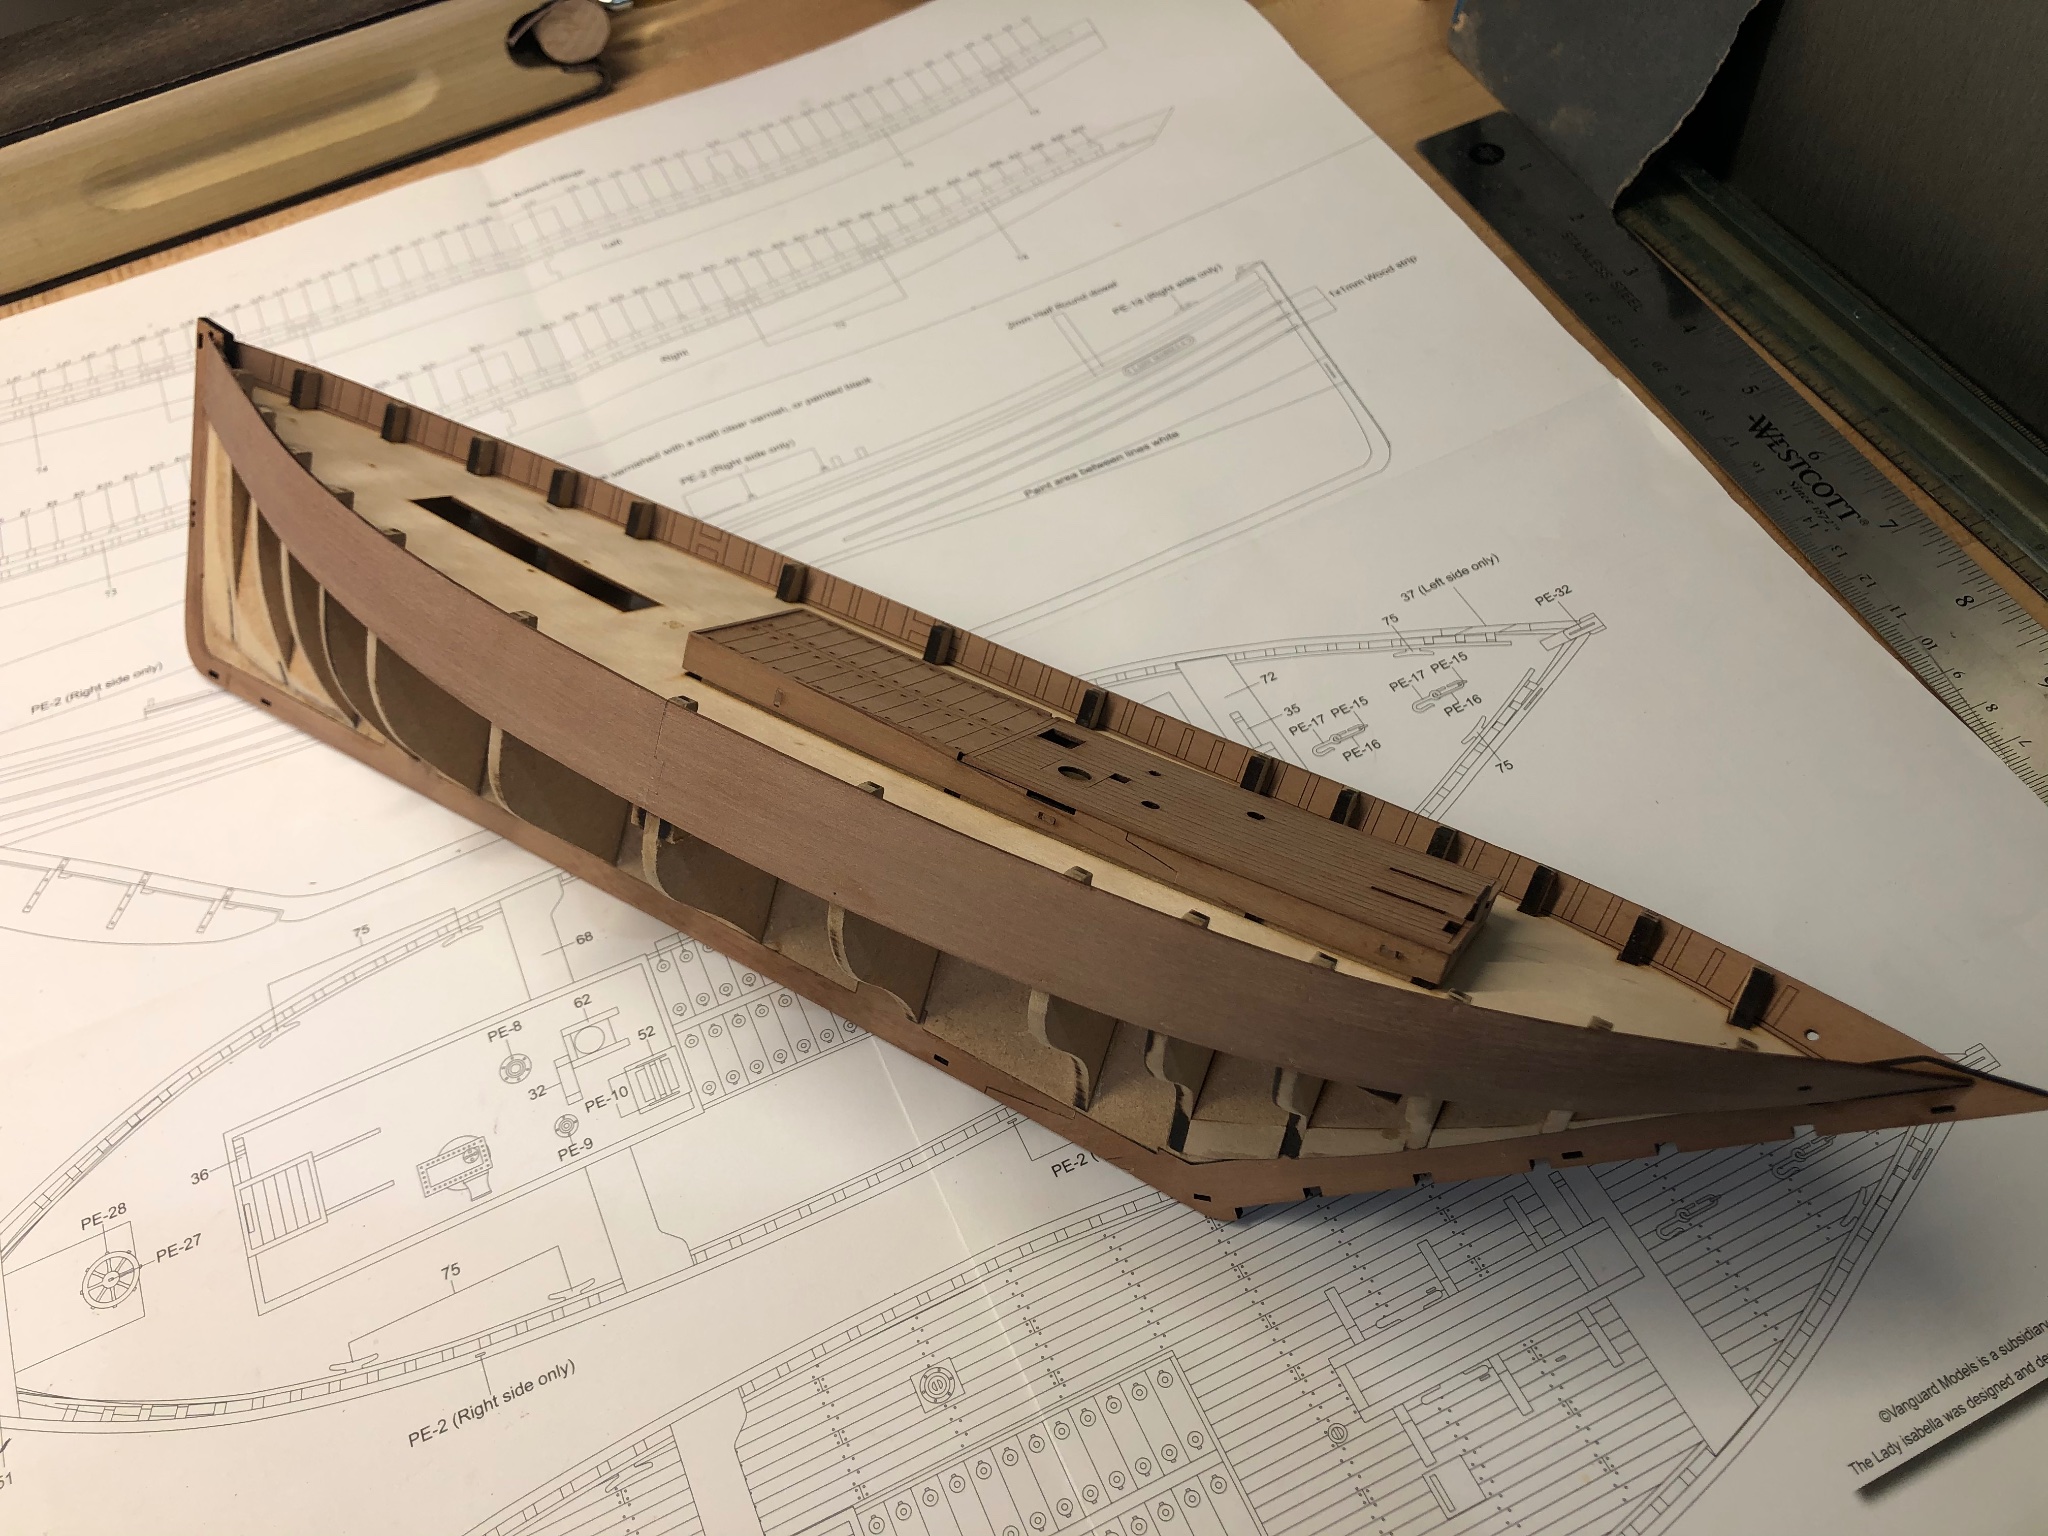
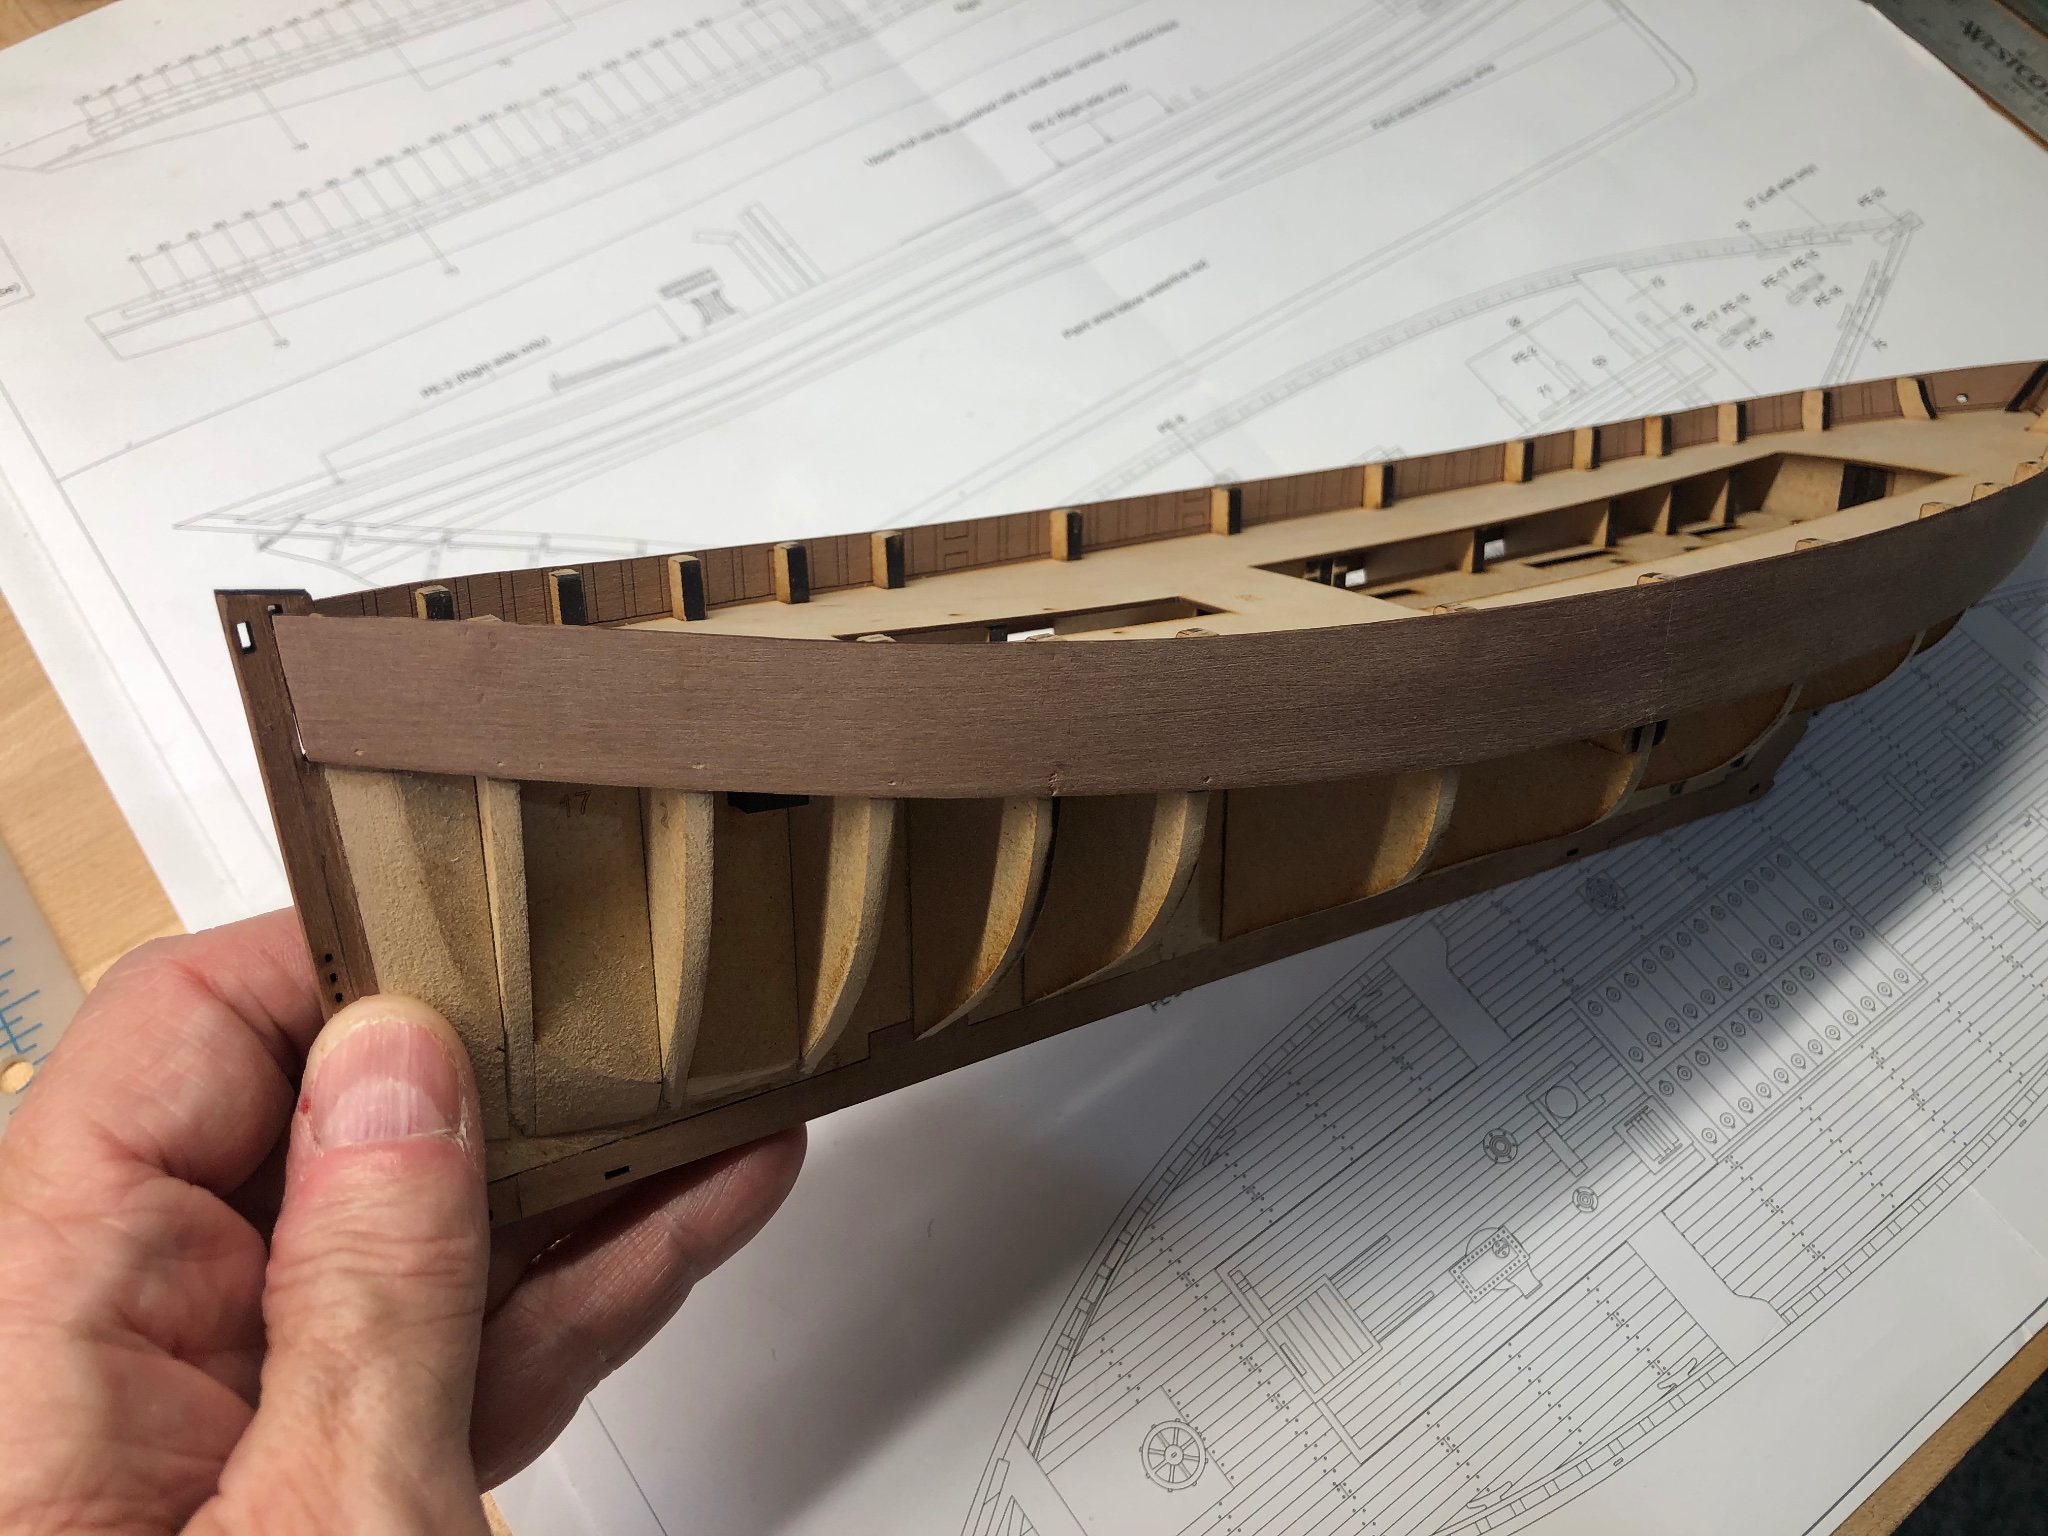
Here’s the bulwarks installed. I’ve slotted the deckhouse in place... not glued. You can really start to see the shape of the hull now. I have to say that I’m a sucker for a swoopy shear. And the shear of this boat is just that. Very pretty!


- 222 replies
-
- 7
-
-
- First Build
- Lady Isabella
- (and 2 more)
-
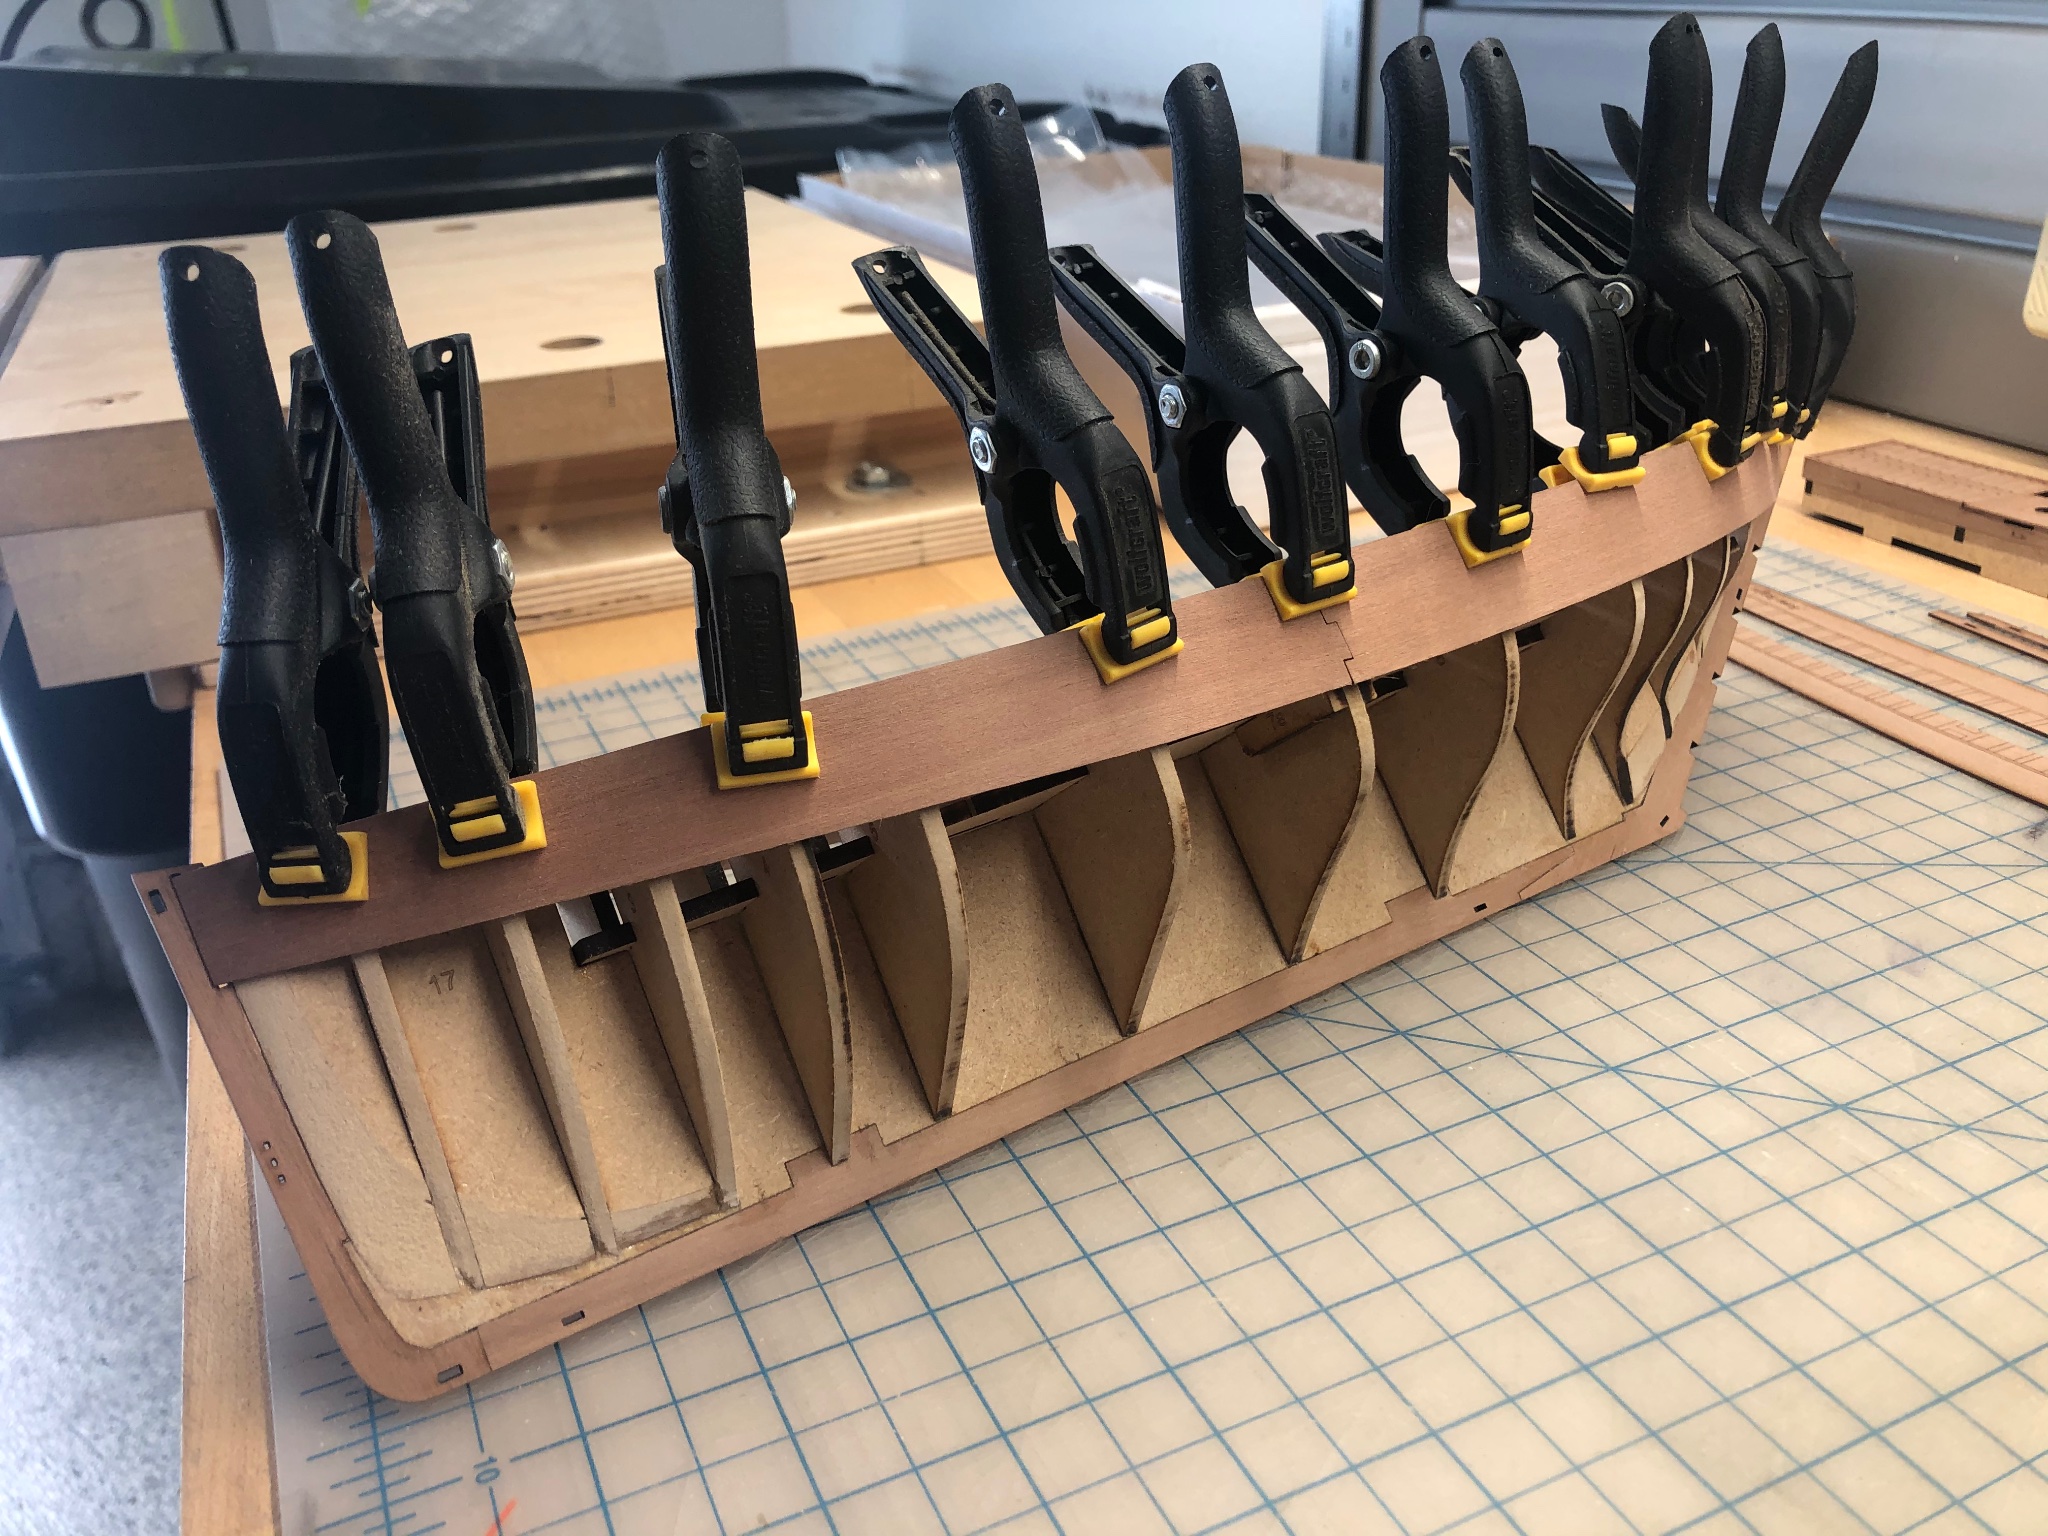
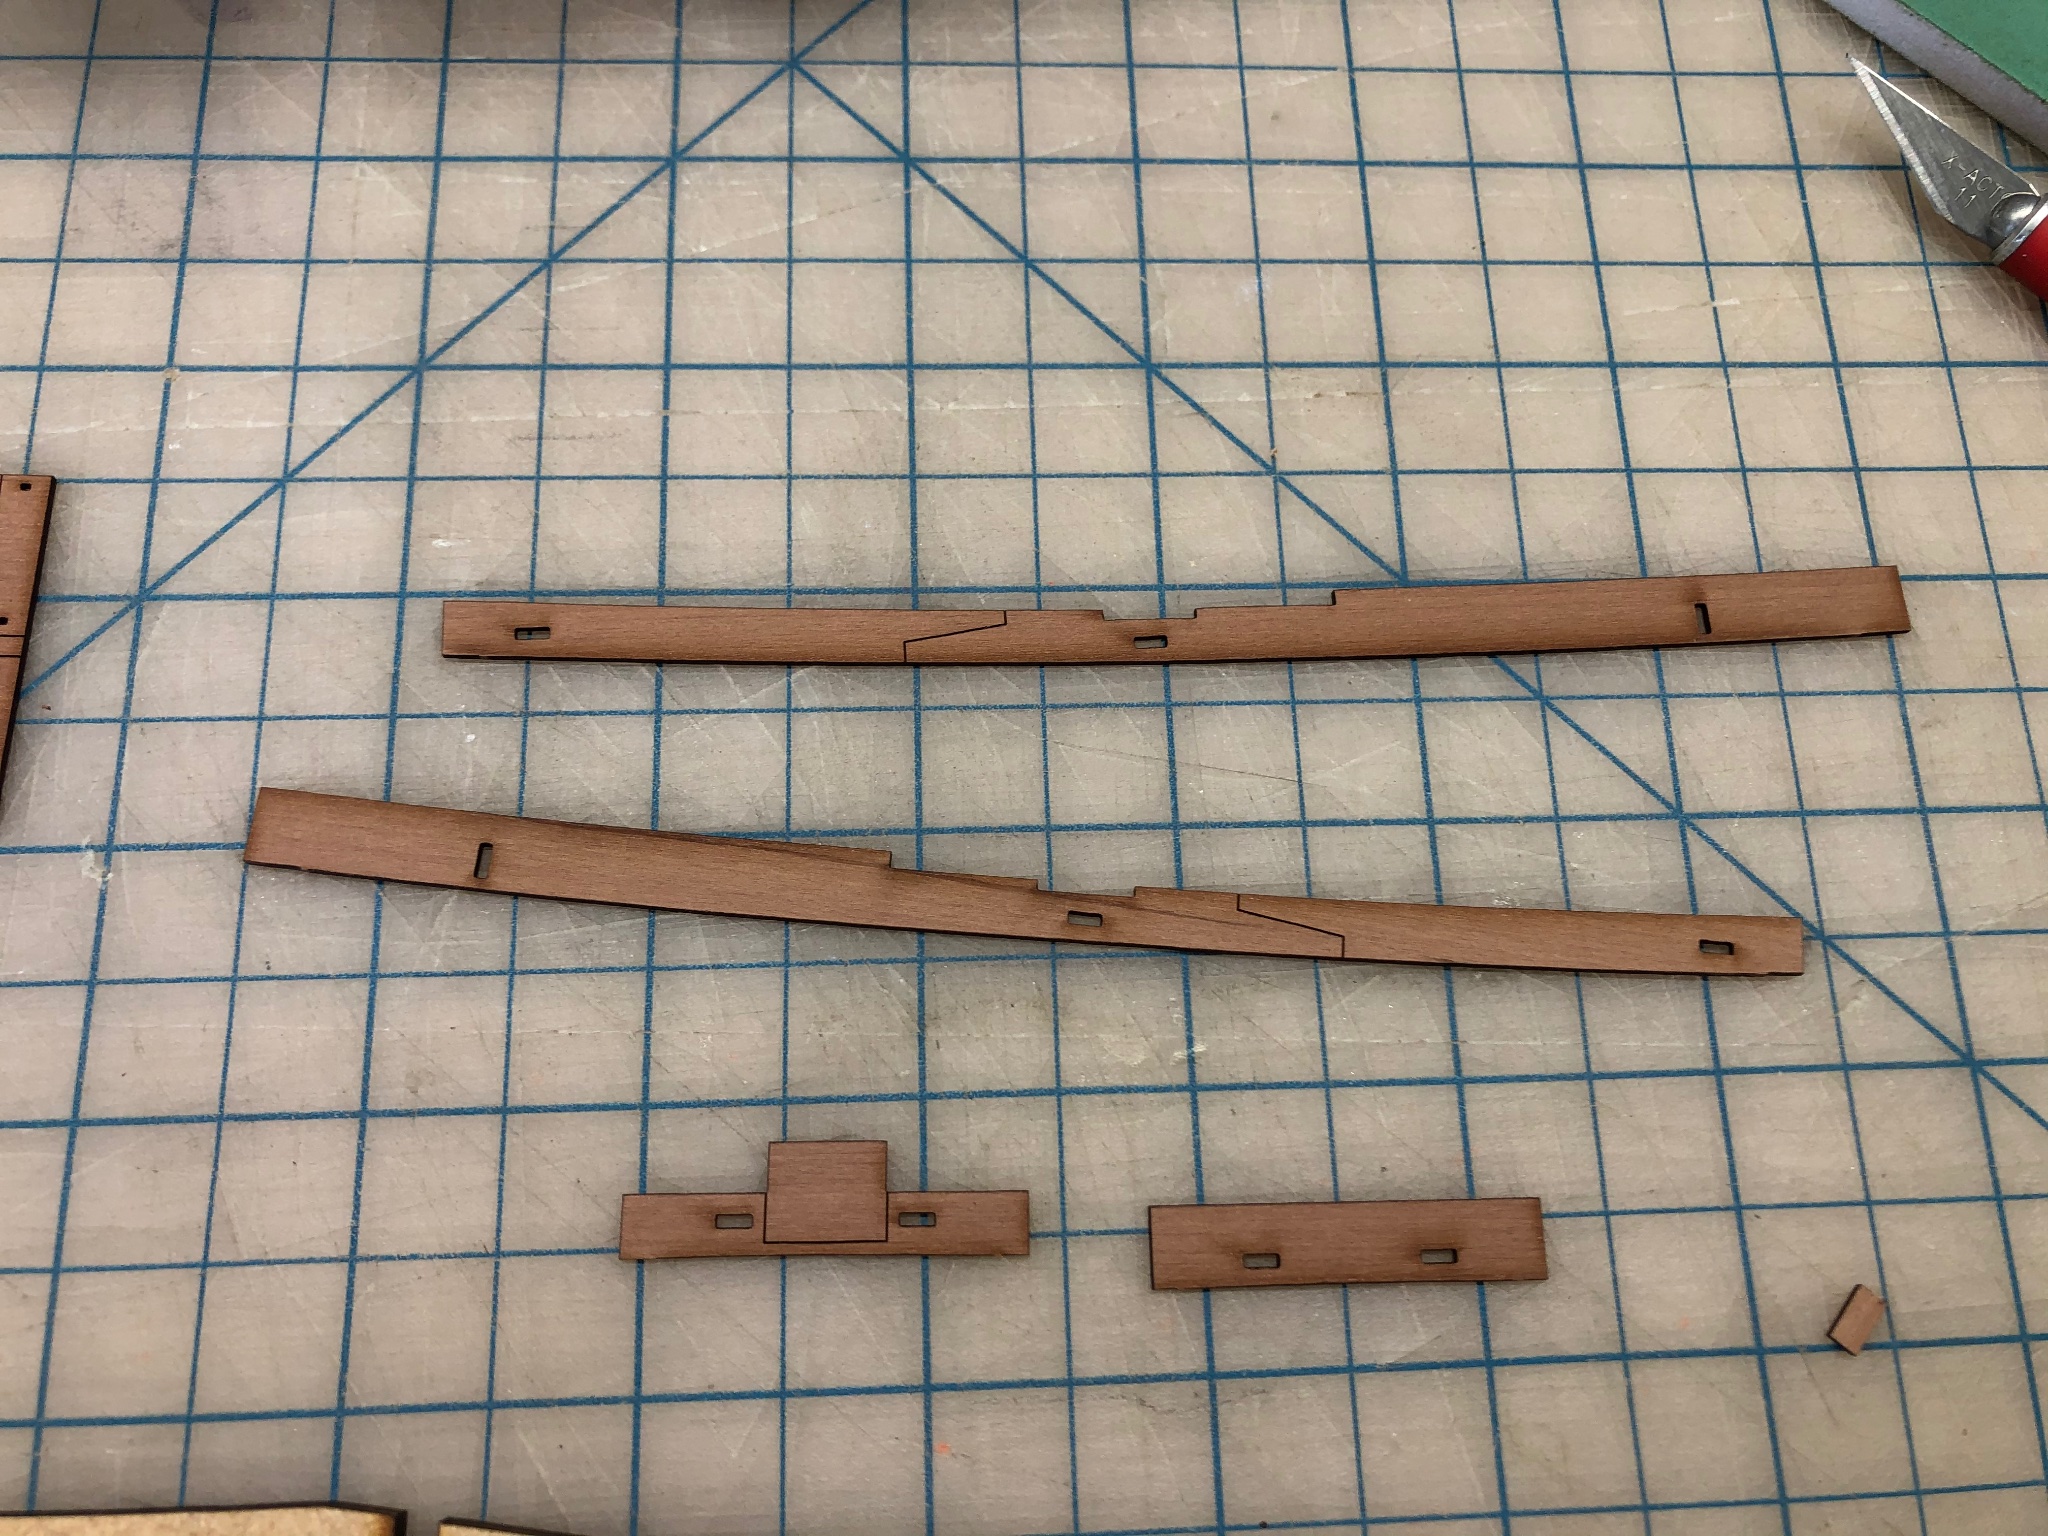
Next up were the bulwarks. These pieces are laser cut from pearwood, two parts each side with a tabbed splice amidships. They are fully developed shapes, and are bent around the top of the bulkheads at the shear. I soaked them in hot water for about a half hour, and then clamped them in place without gluing to allow them to bend to shape. I let them dry for a few hours, and then glued them into position. They fit perfectly.
- 222 replies
-
- 5
-
-
- First Build
- Lady Isabella
- (and 2 more)
-
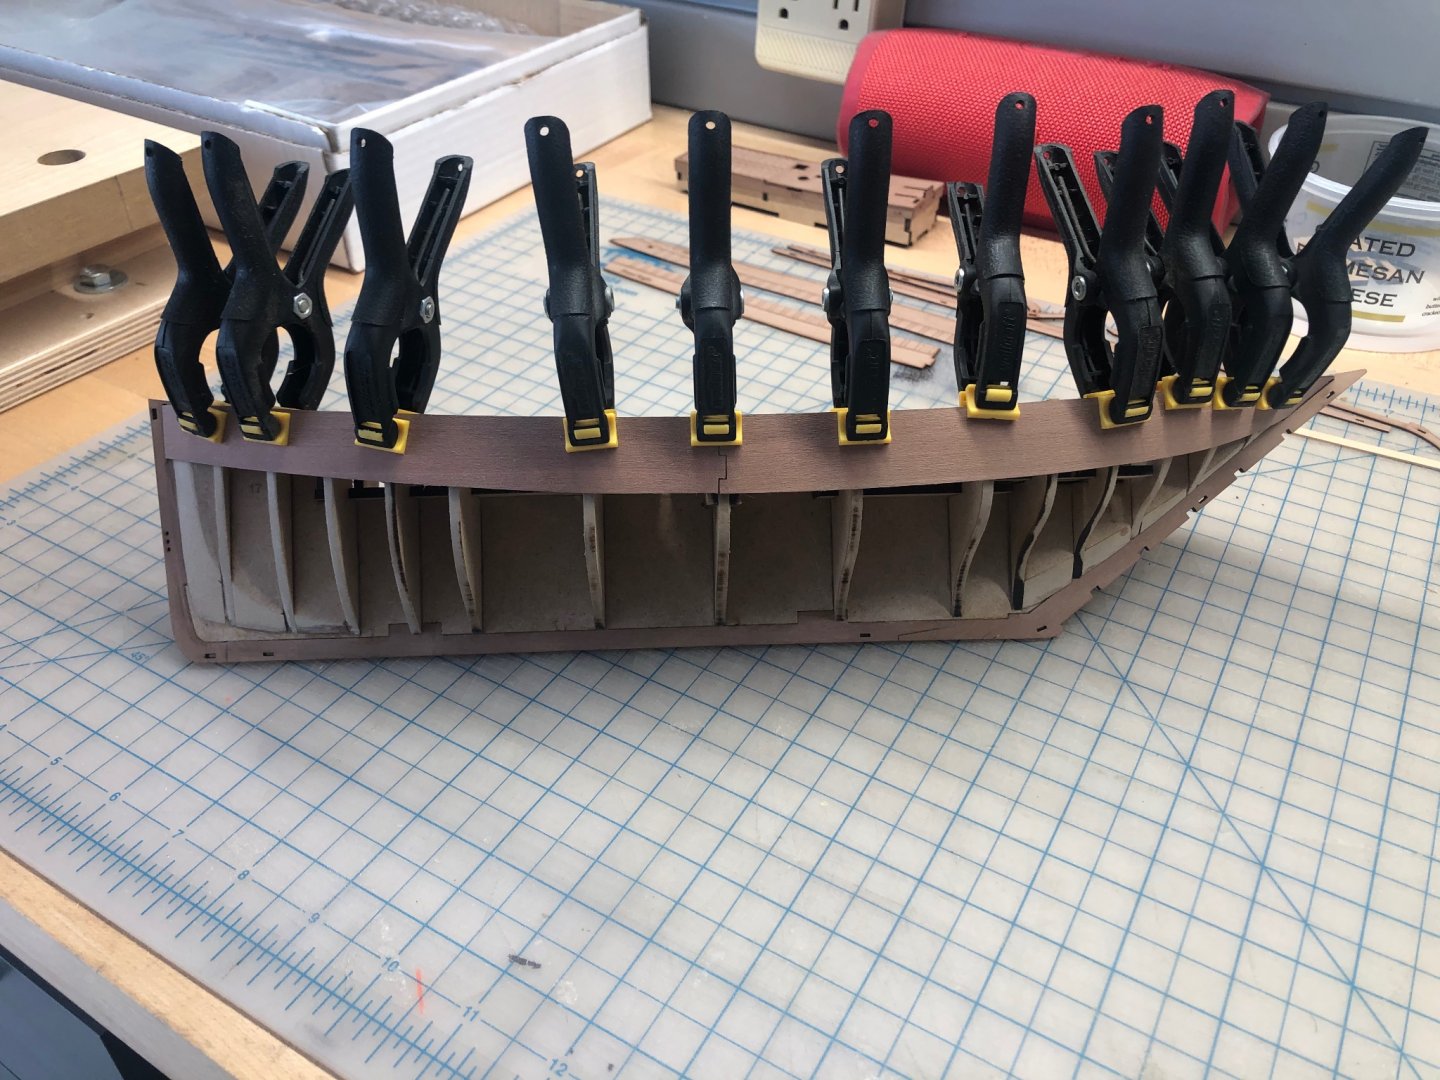
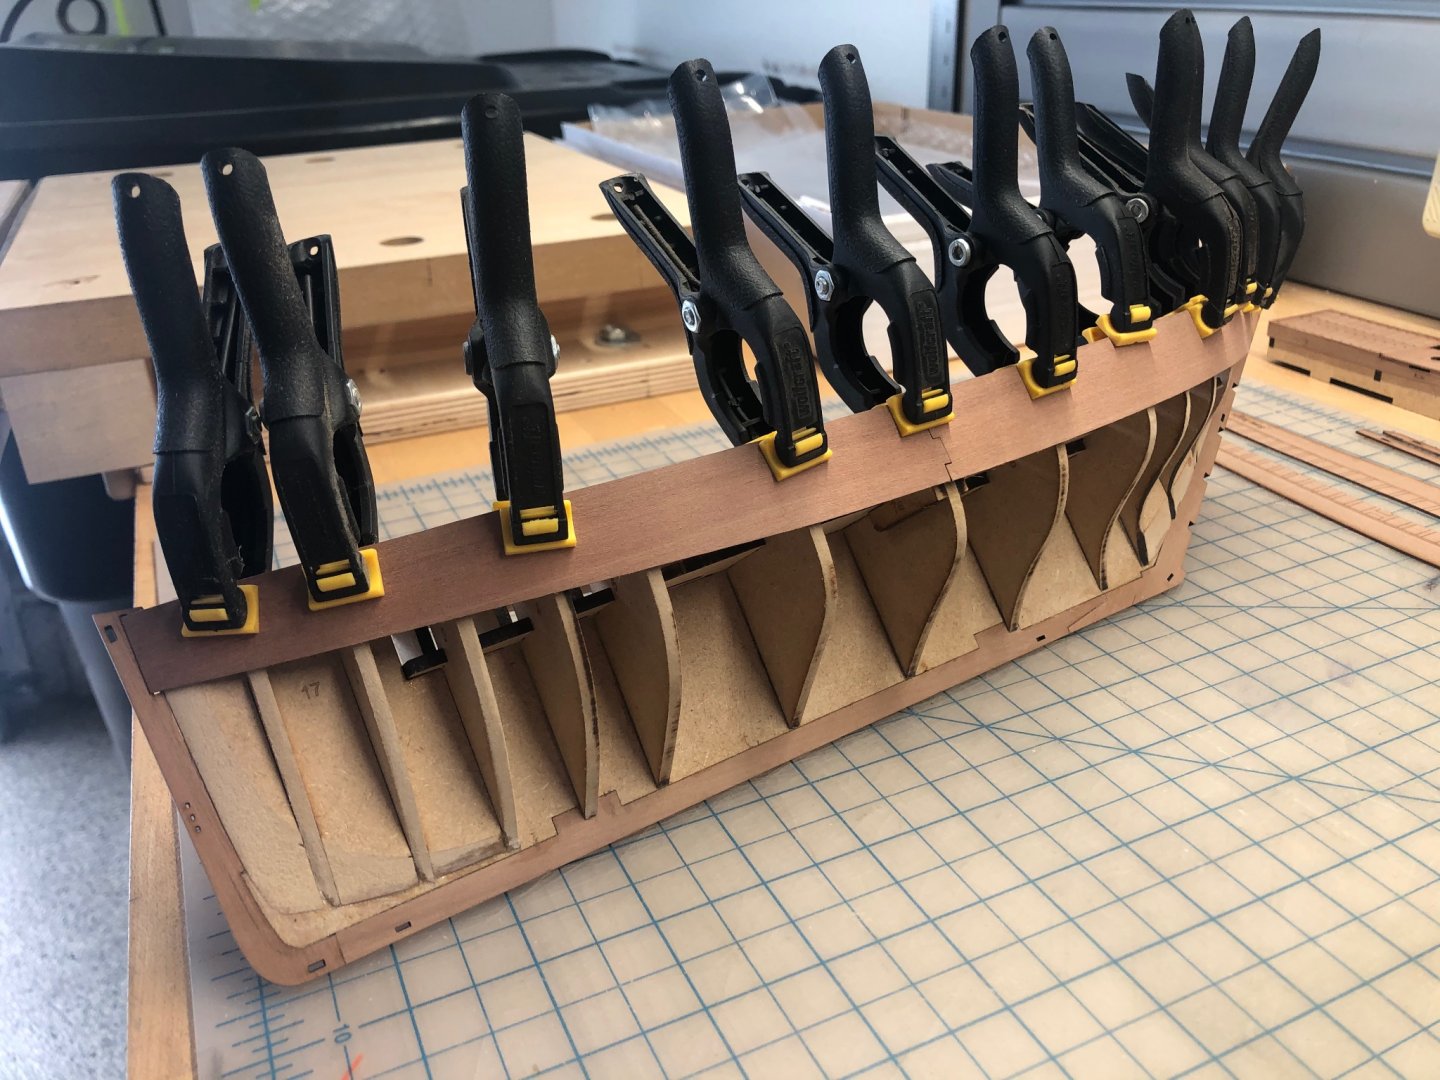
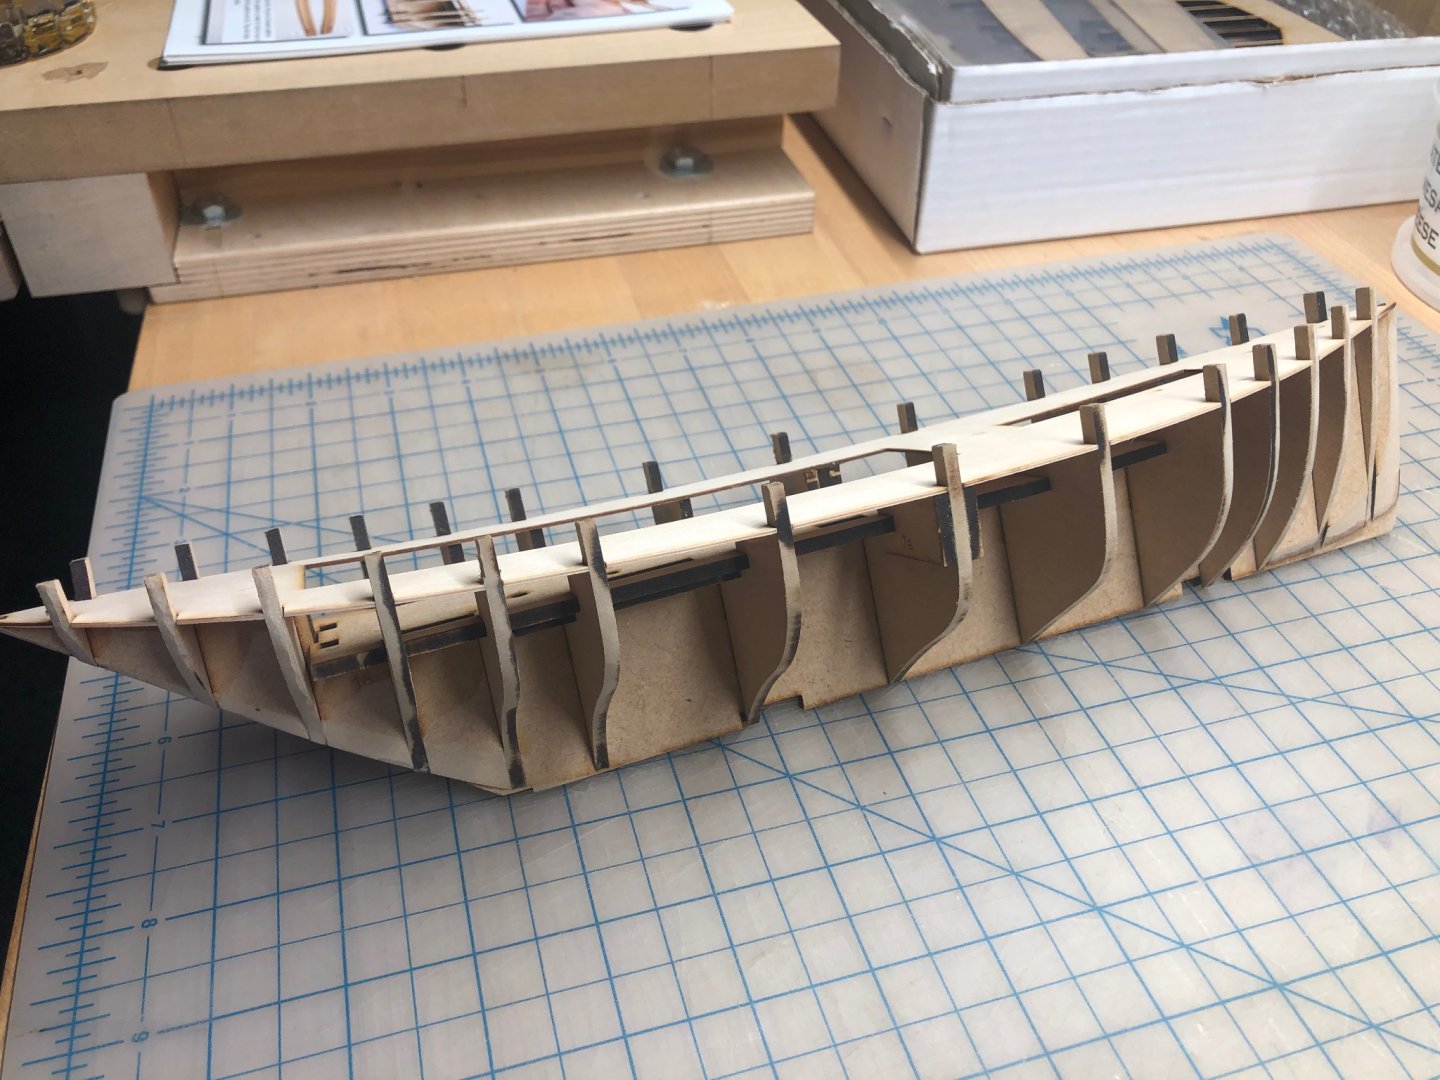
After the fairing was complete, I added the pearwood keel, stem and rudder post pieces. These parts are very precisely cut, and fit perfectly. Chris has provided a few clever laser-cut clamps which ensure that these pieces remain plumb and true while the glue sets. You can see those clamps in this photo. Yet another instance where Chris has gone above and beyond the expected to give the builder the best chance to succeed. The notches in the rudder post will accept the tabs on the rudder itself.
- 222 replies
-
- 7
-
-
- First Build
- Lady Isabella
- (and 2 more)
-
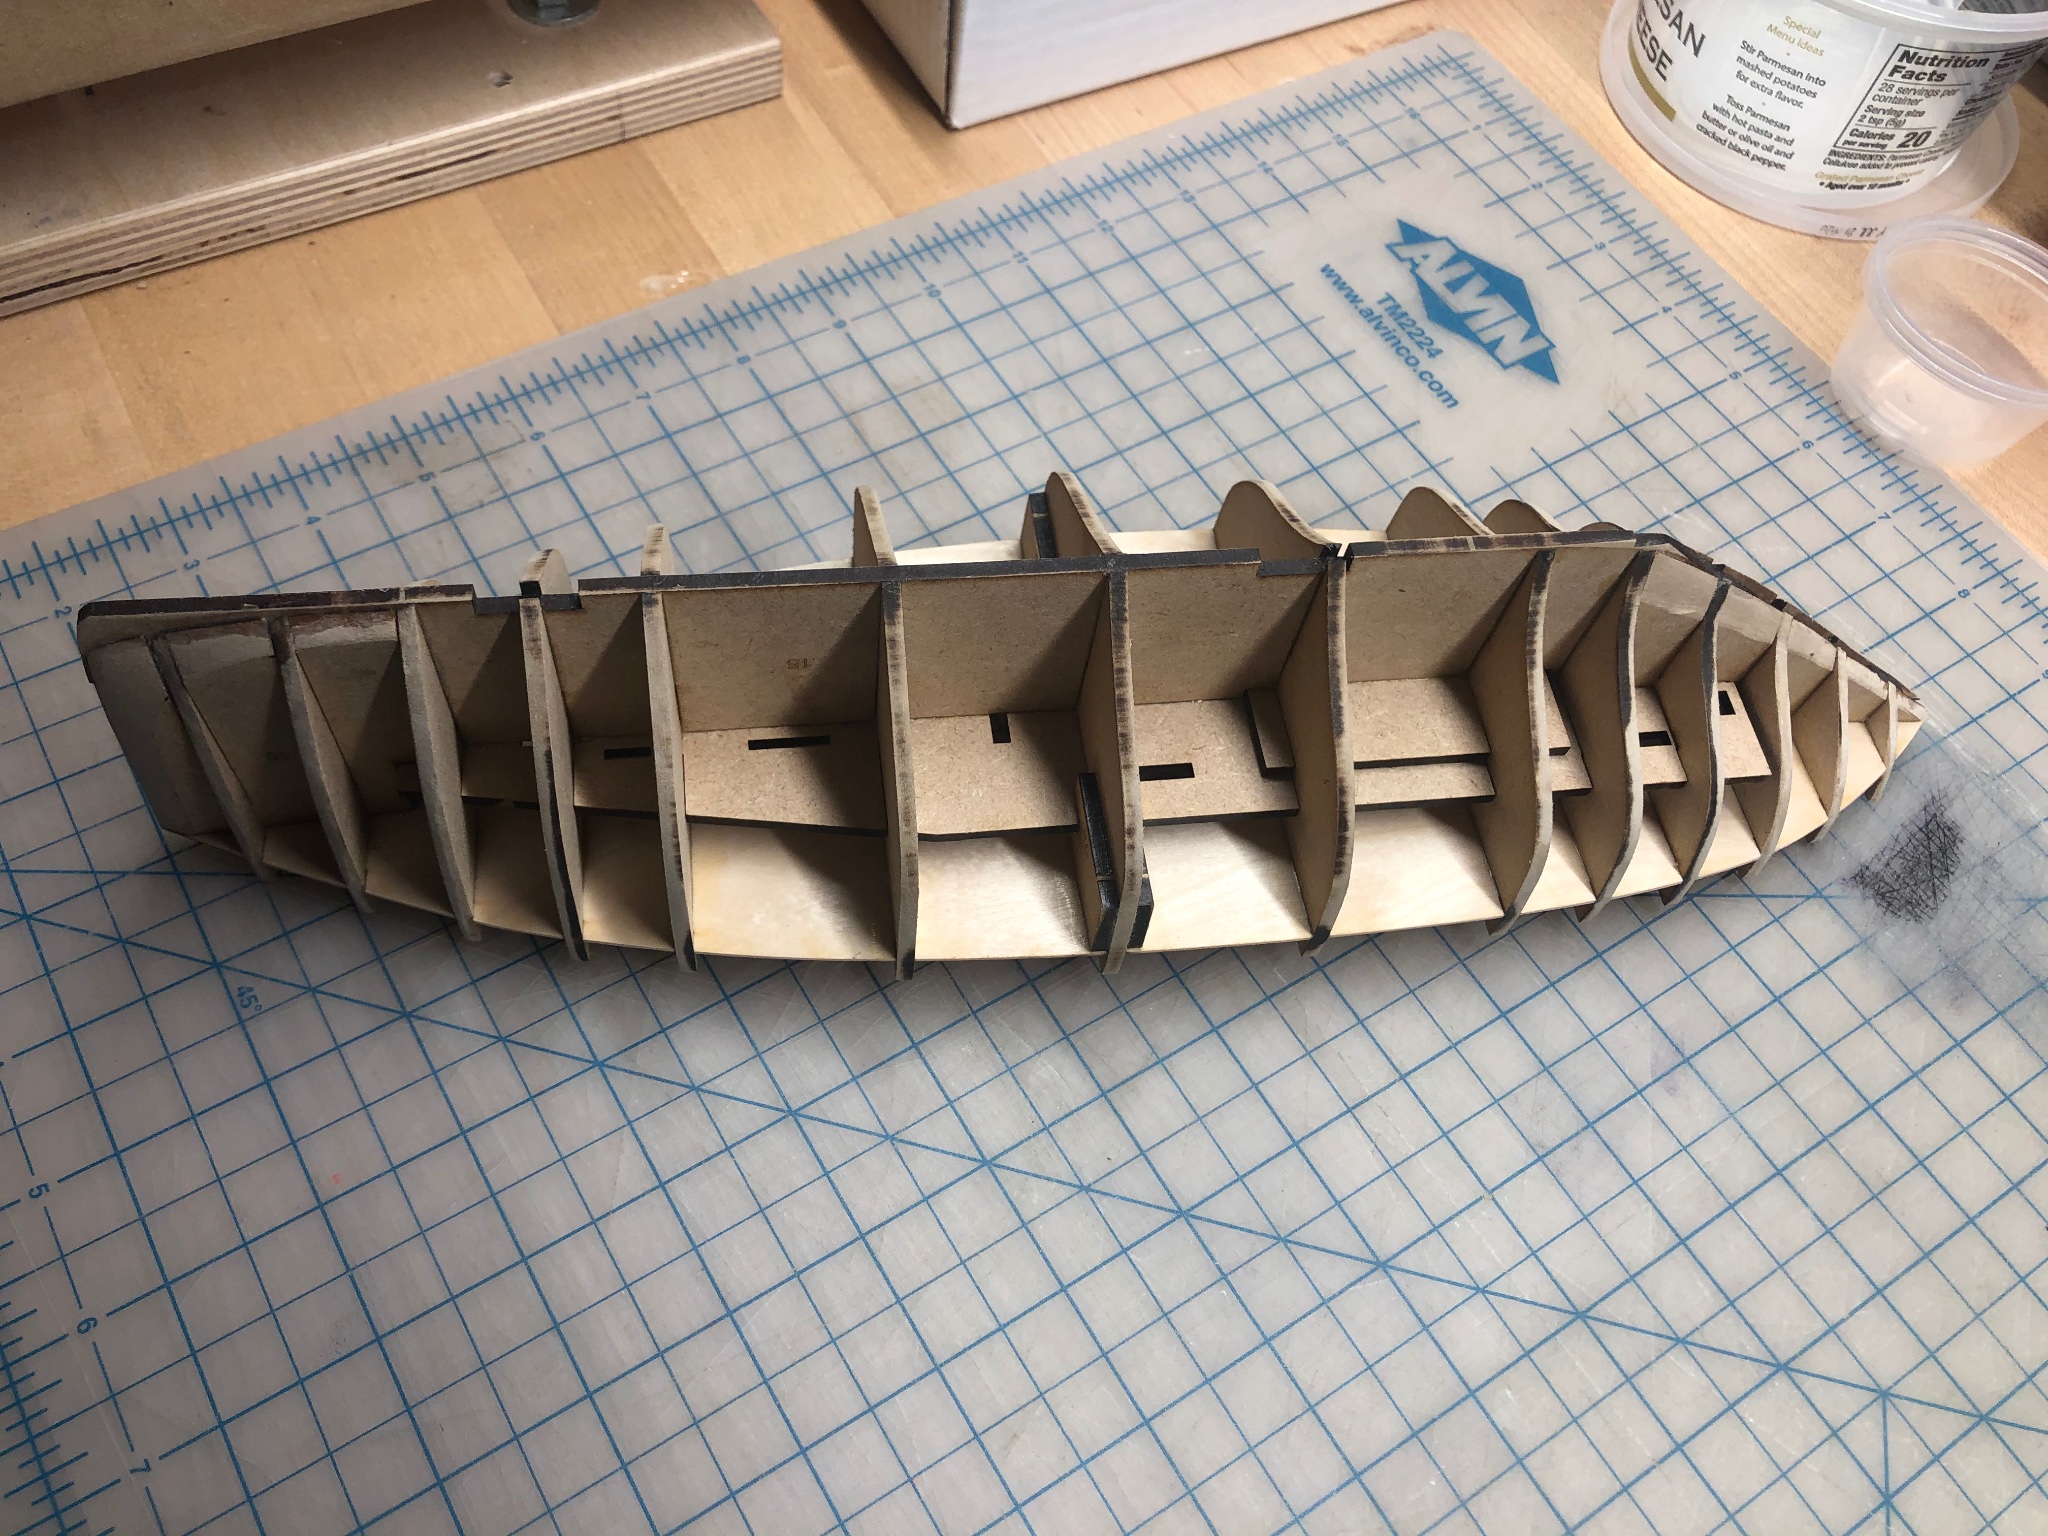
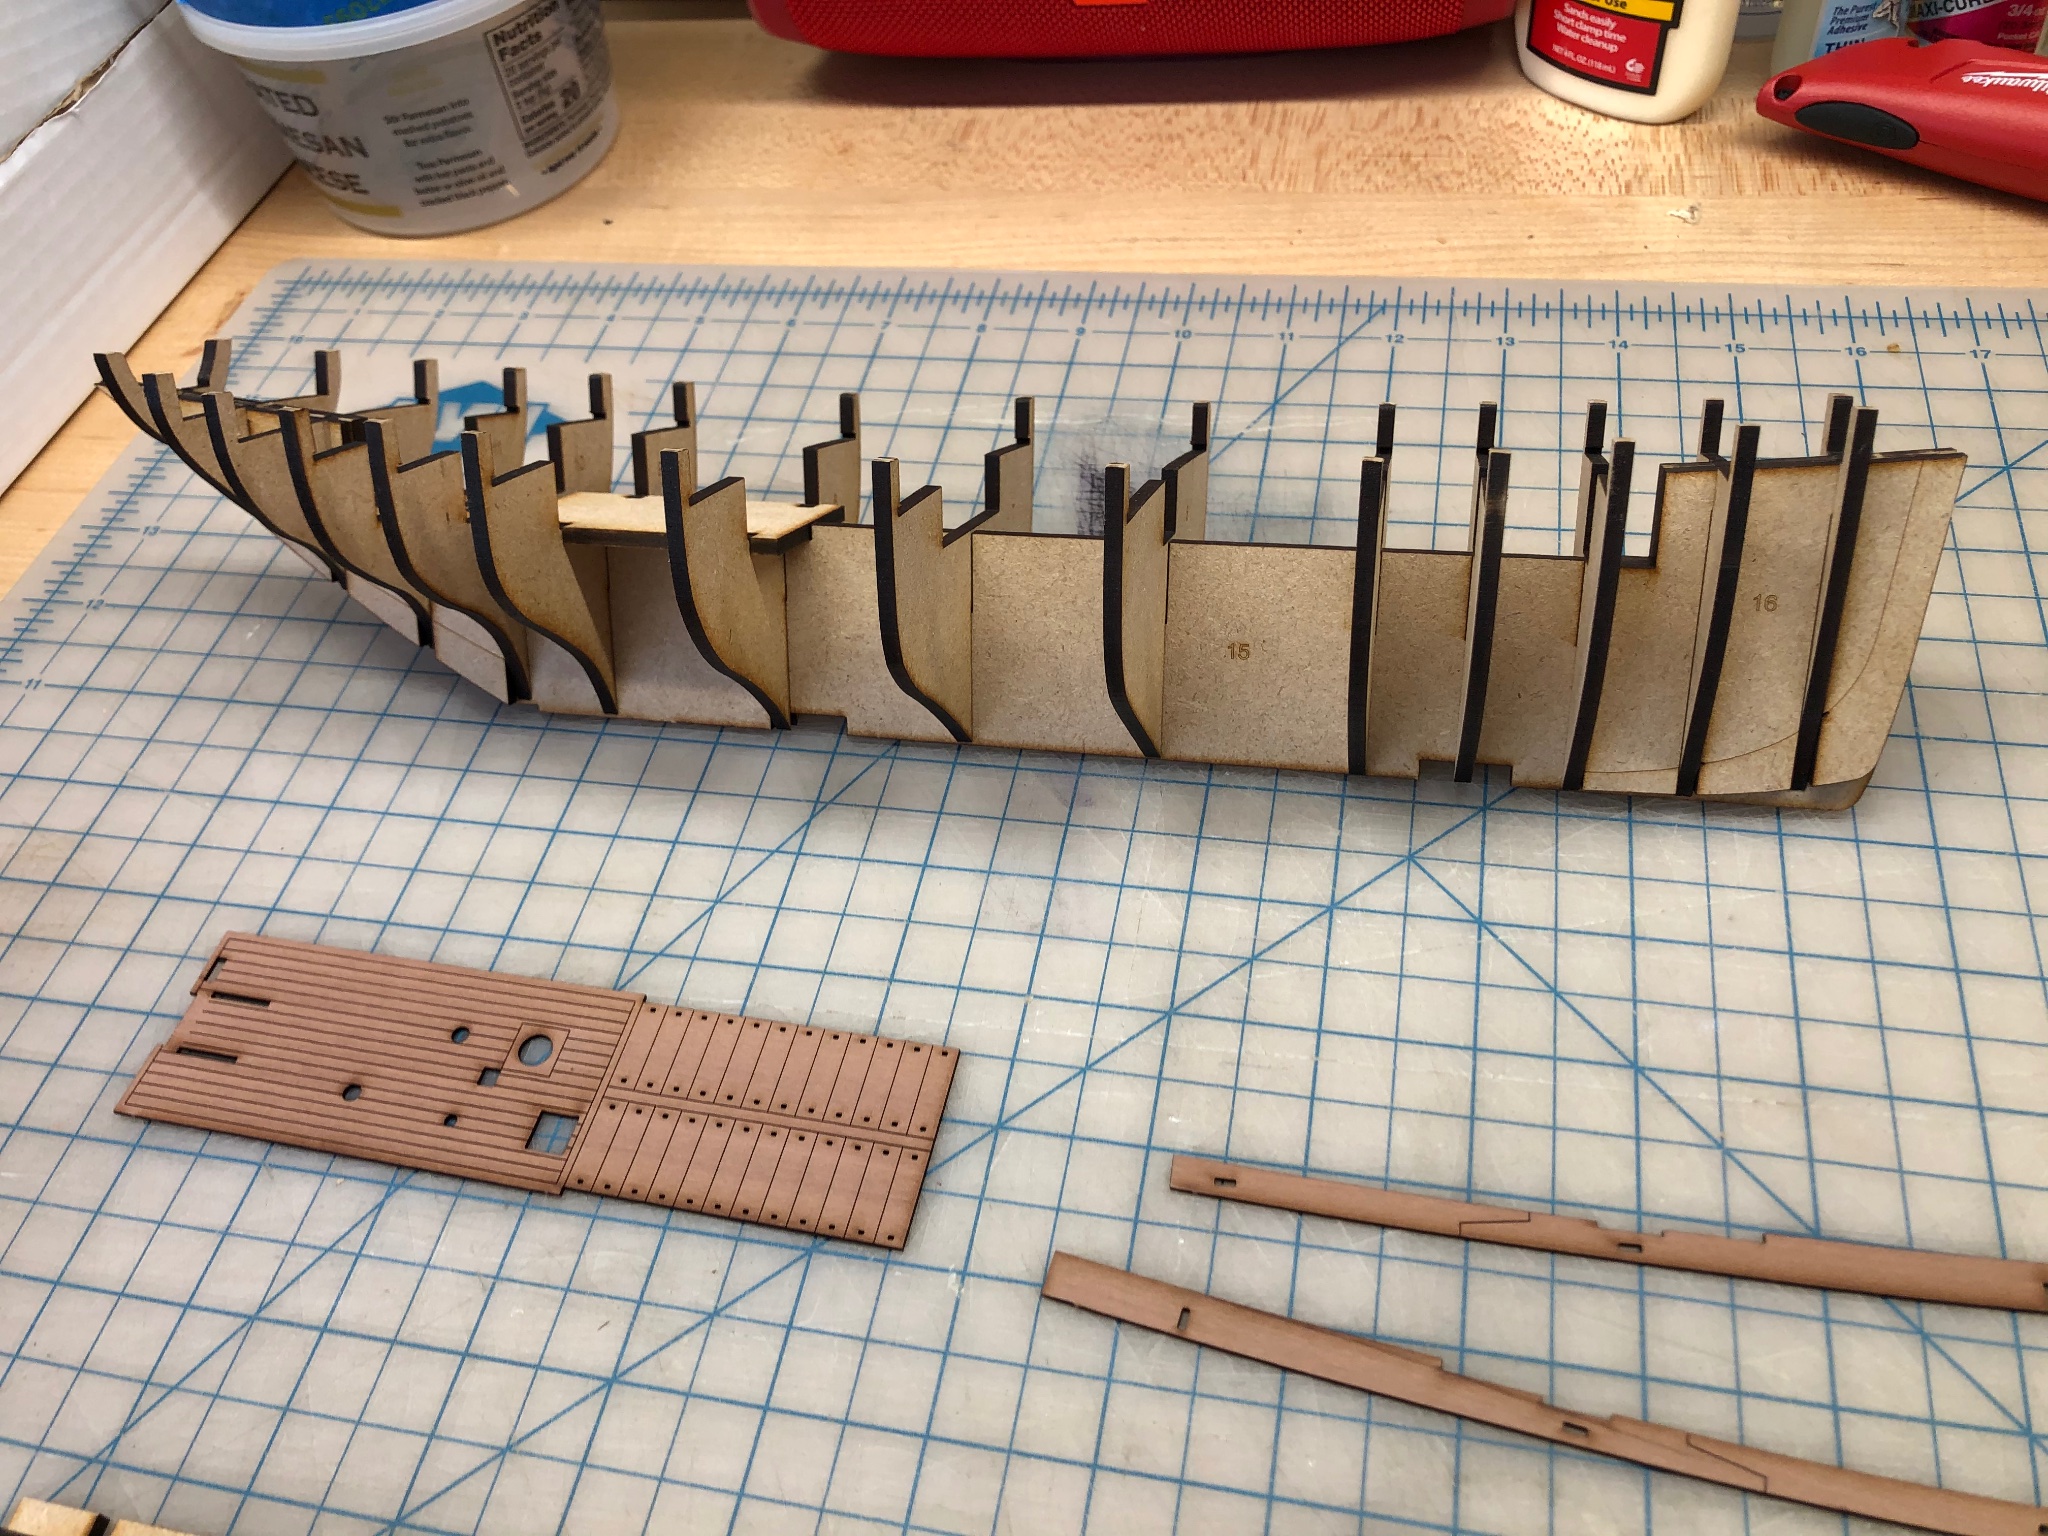
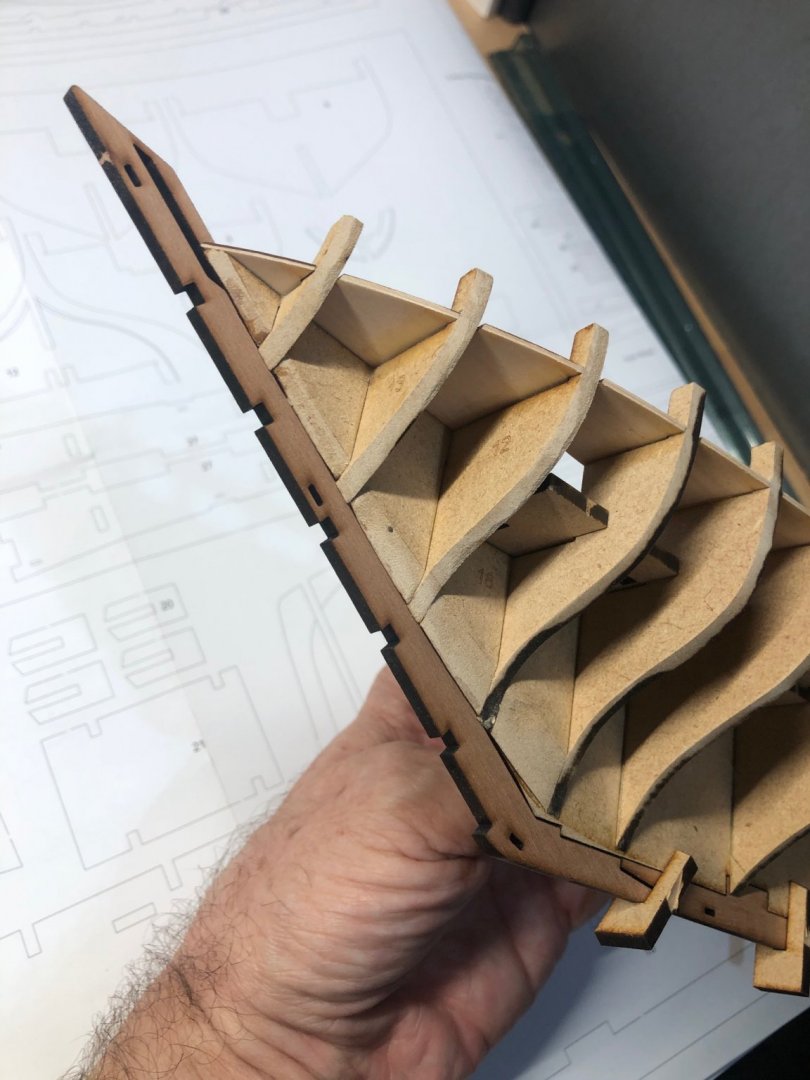
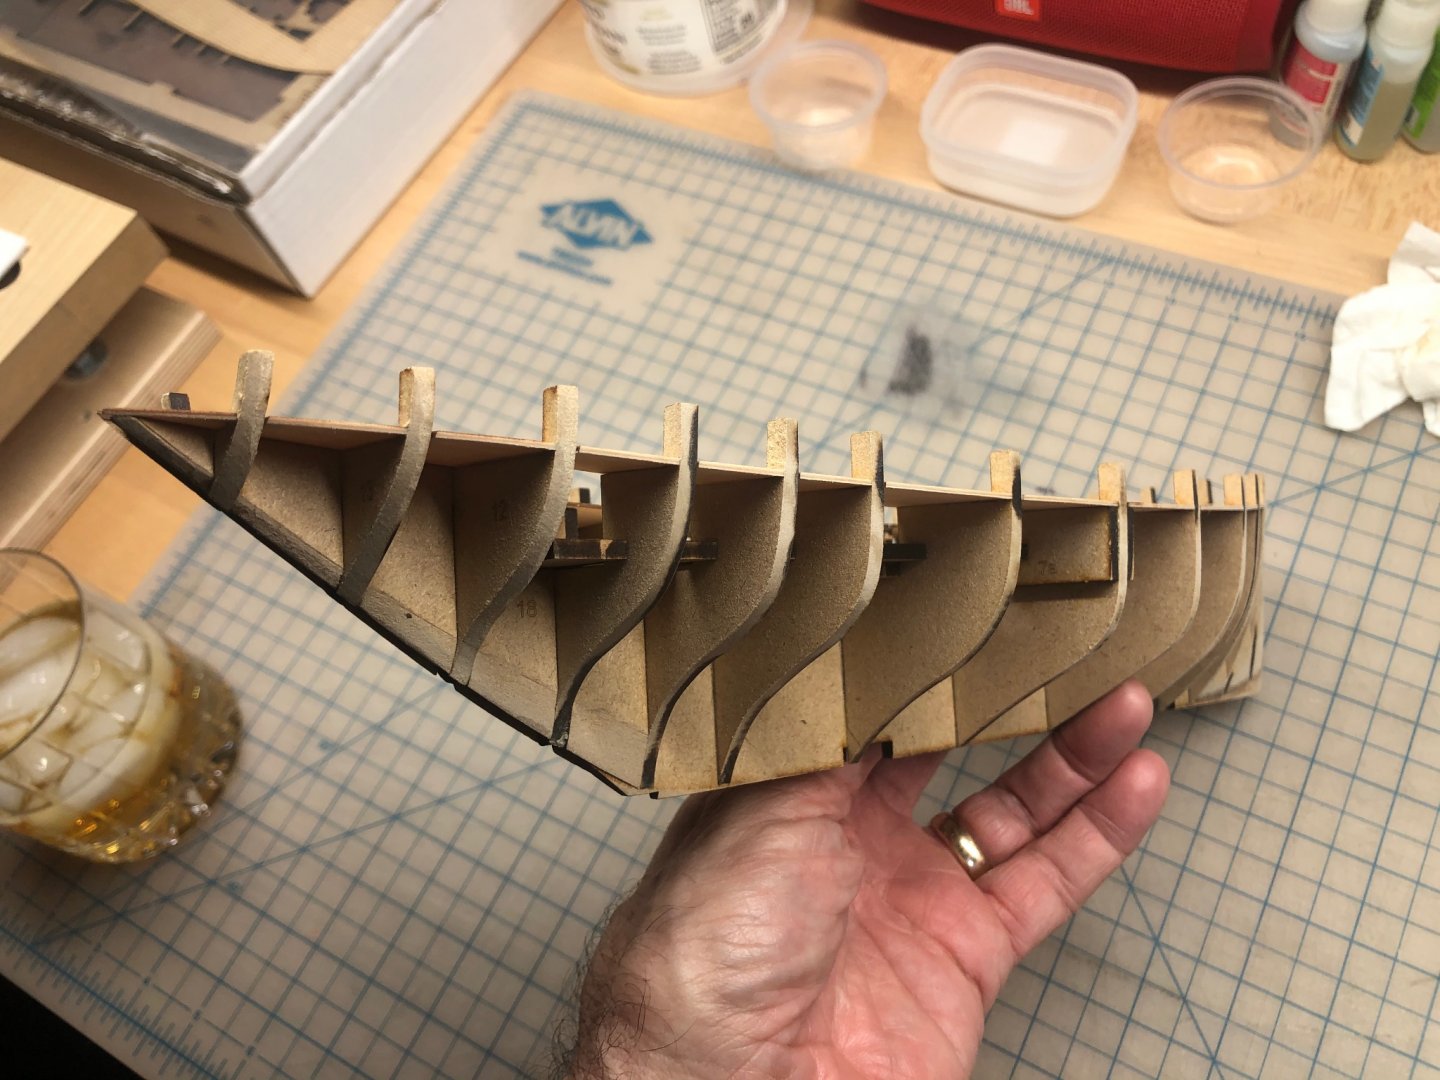
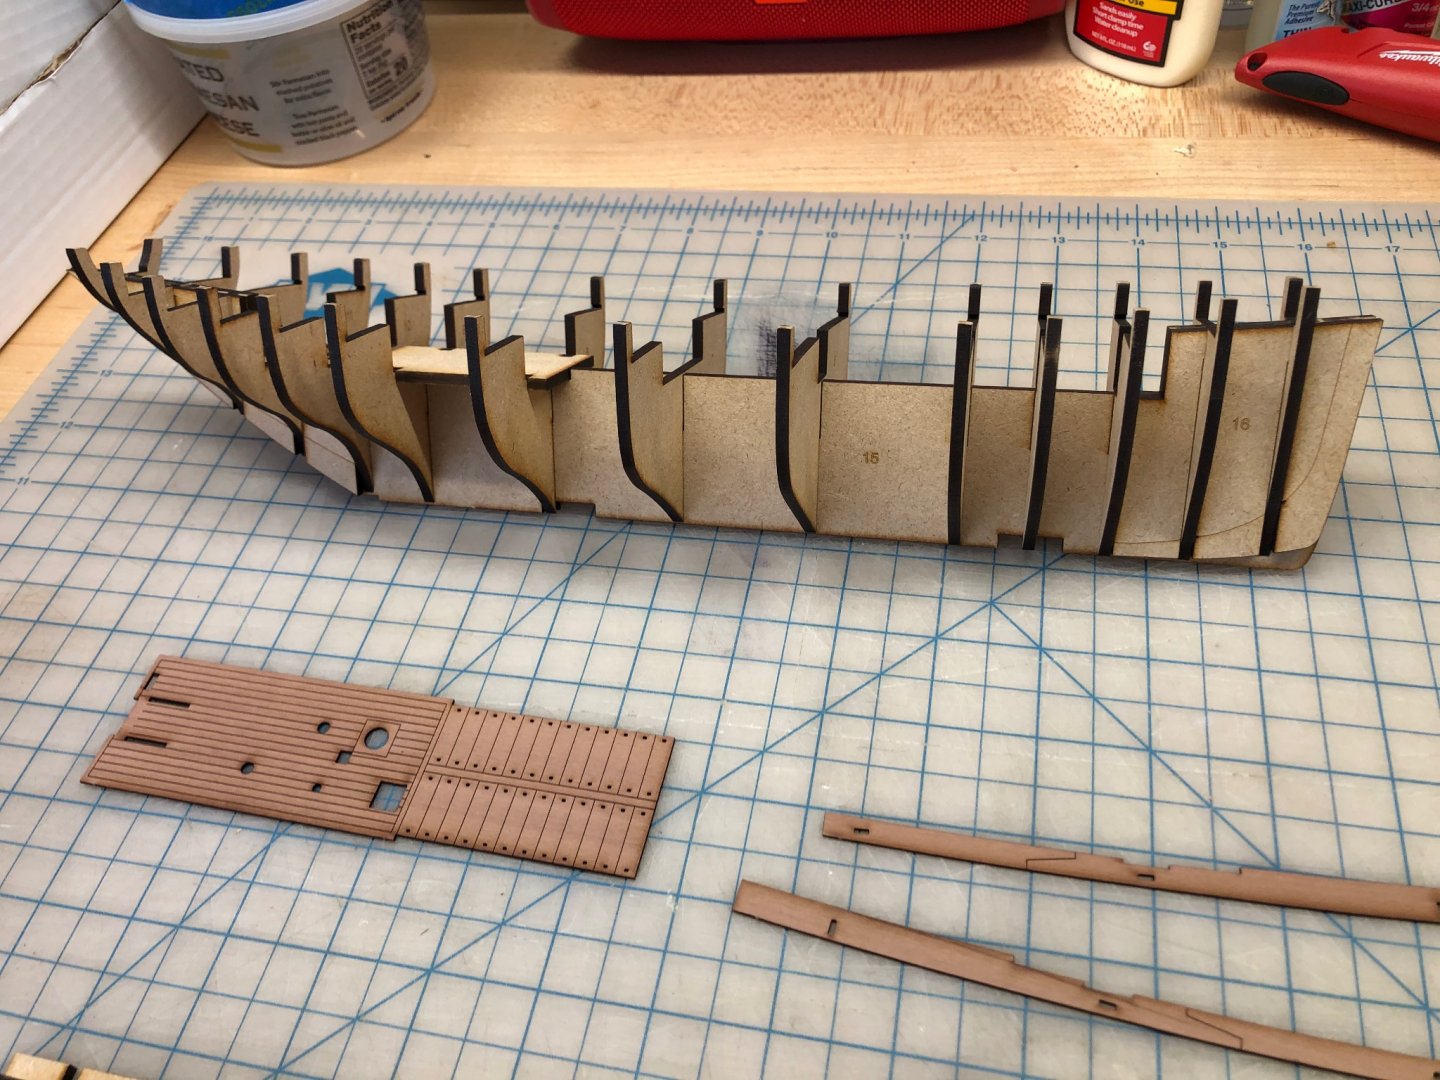
Once the frame was dry, I spent some time fairing the bulkheads. This didn’t take too long, since I had already beveled the bulkheads to the bevel lines etched into them. At Jim’s suggestion, this pre-beveling was done with a Dremel tool. The MDF cuts away very easily, like butter, so if you use a power tool, don’t set it to high RPM, as you can get ahead of yourself very quickly. Once everything was assembled, I faired the bulkheads with a small sanding block and 120 grit paper. Here’s a few shots during the process. I have to say, the lines of this hull are really pretty. I’m particularly smitten with the stern. So unusual, and so lovely. Can’t wait to see it planked.
- 222 replies
-
- 6
-
-
- First Build
- Lady Isabella
- (and 2 more)
-
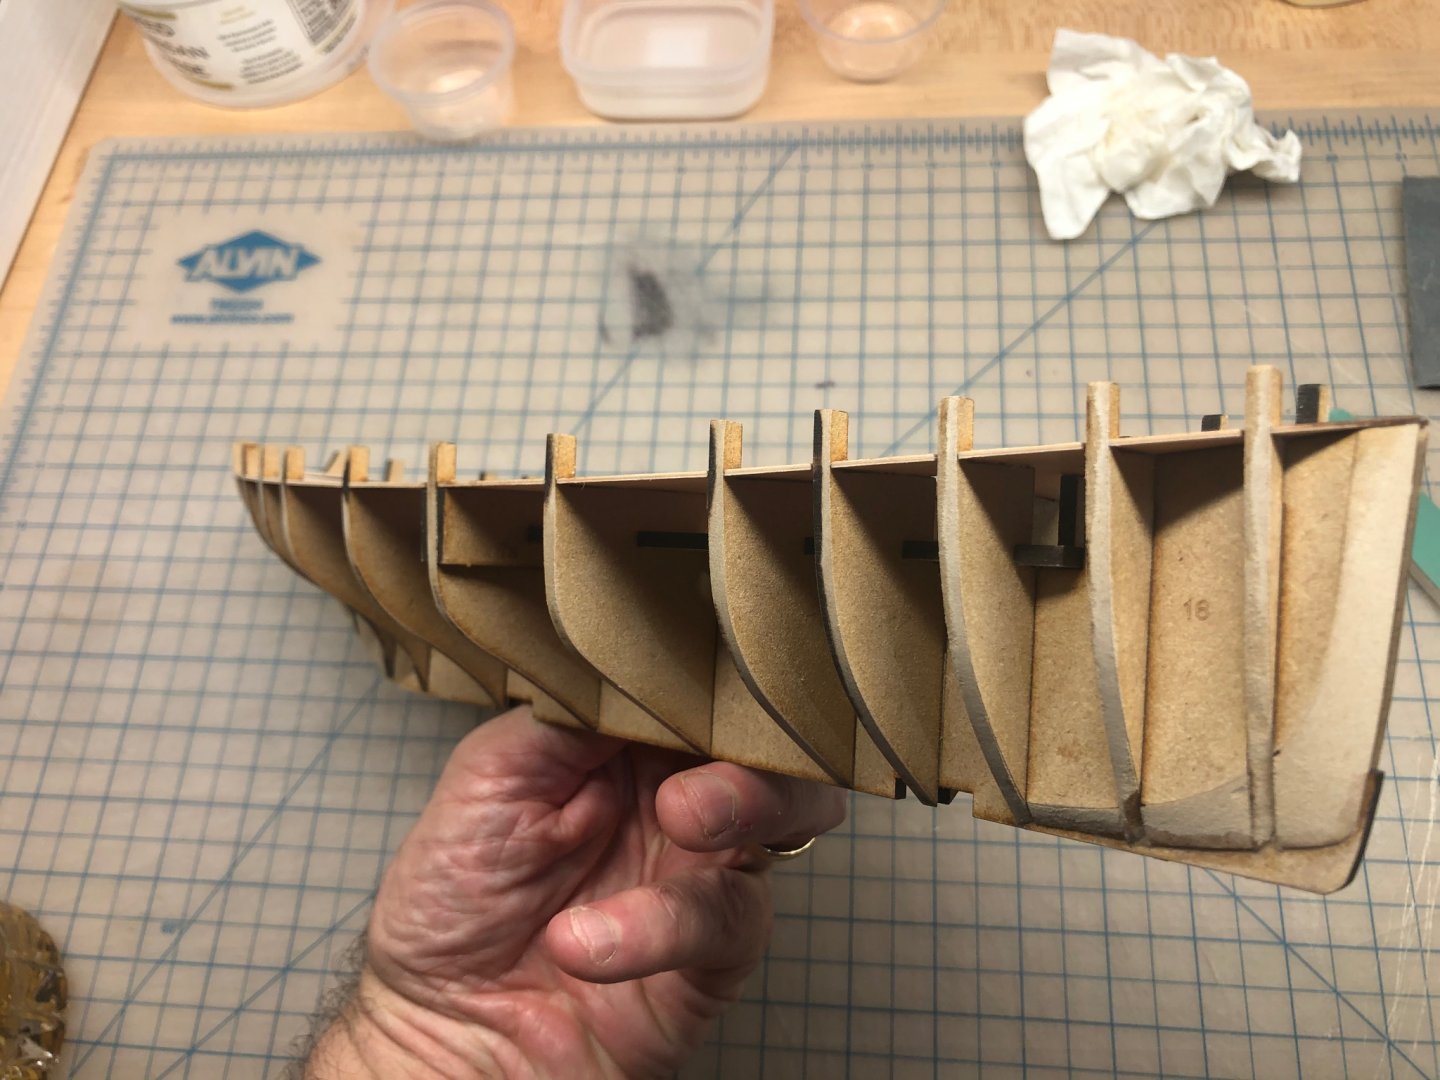
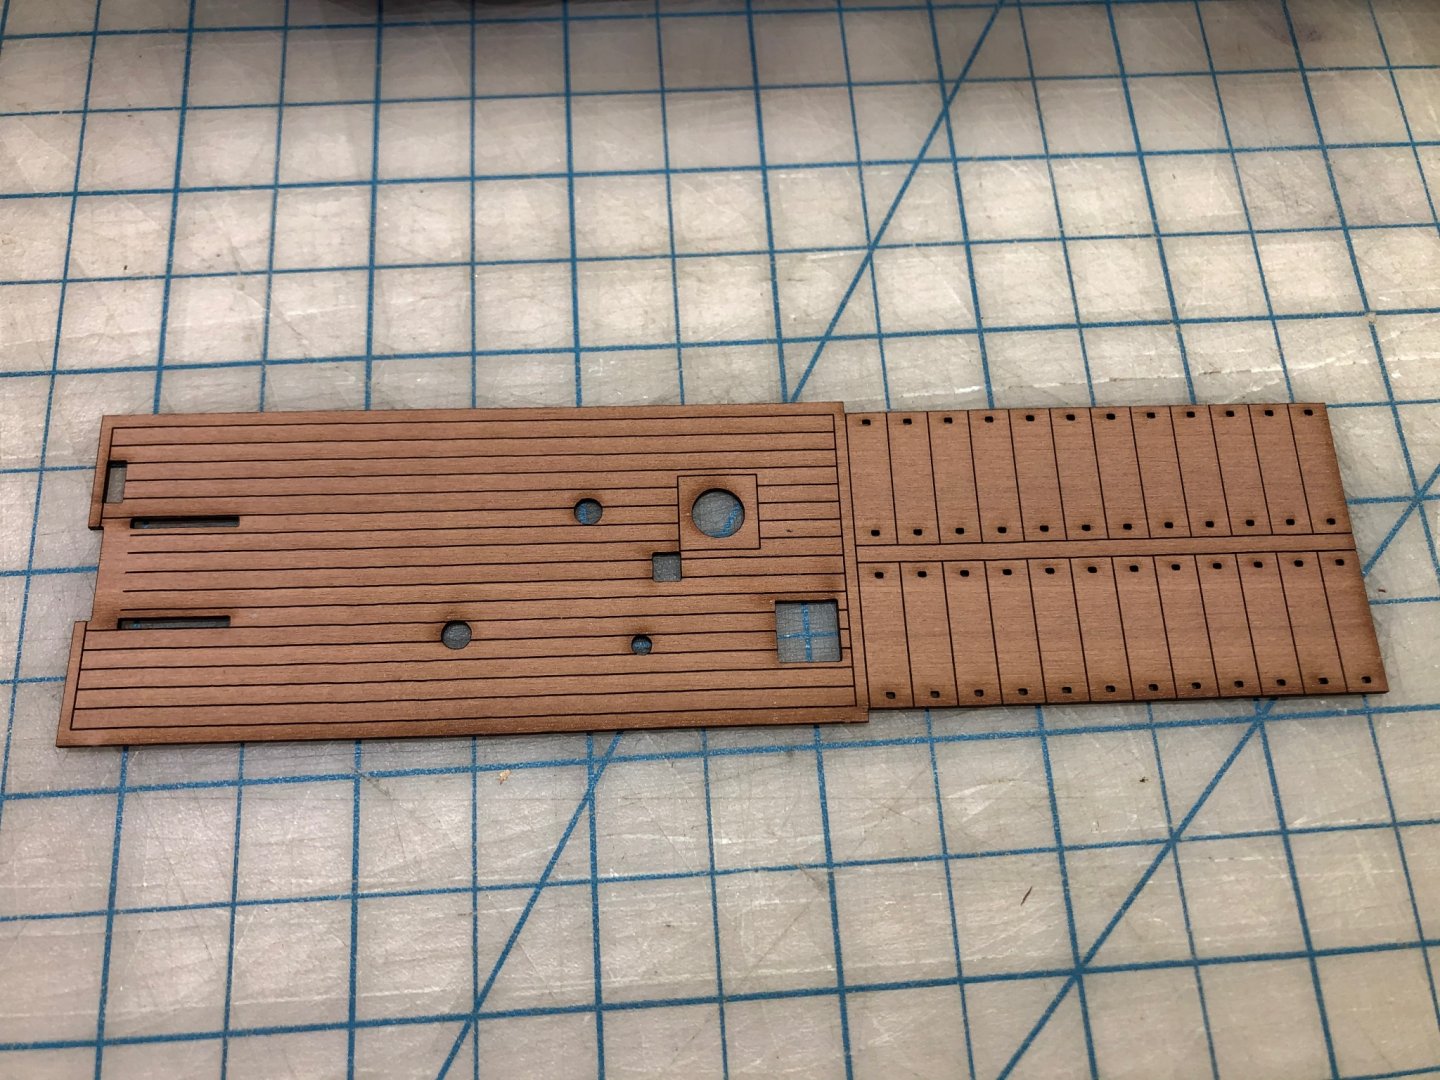
Here is the framework a little further along, all glued together. I used Titebond wood glue to assemble the frame. It seemed to give me plenty of time to get everything properly in place before it set up. You can see the false floors installed in the center of the hull. I’ve also installed the light plywood false deck, which slides into small slots in the bulkheads. This plywood piece is very flexible, and it needs to be, since you need to bend and warp it to get it into place. Once it finds its home, it just snaps into position. This piece is very accurately shaped, and it fits with no modification necessary. I have to say that’s kind of amazing to me. 😊 I clamped the center of the deck down to the bulkheads amidships, to make sure that it was seated properly, and would take on its proper curve, and I let everything dry for a while.


- 222 replies
-
- 6
-
-
- First Build
- Lady Isabella
- (and 2 more)
-
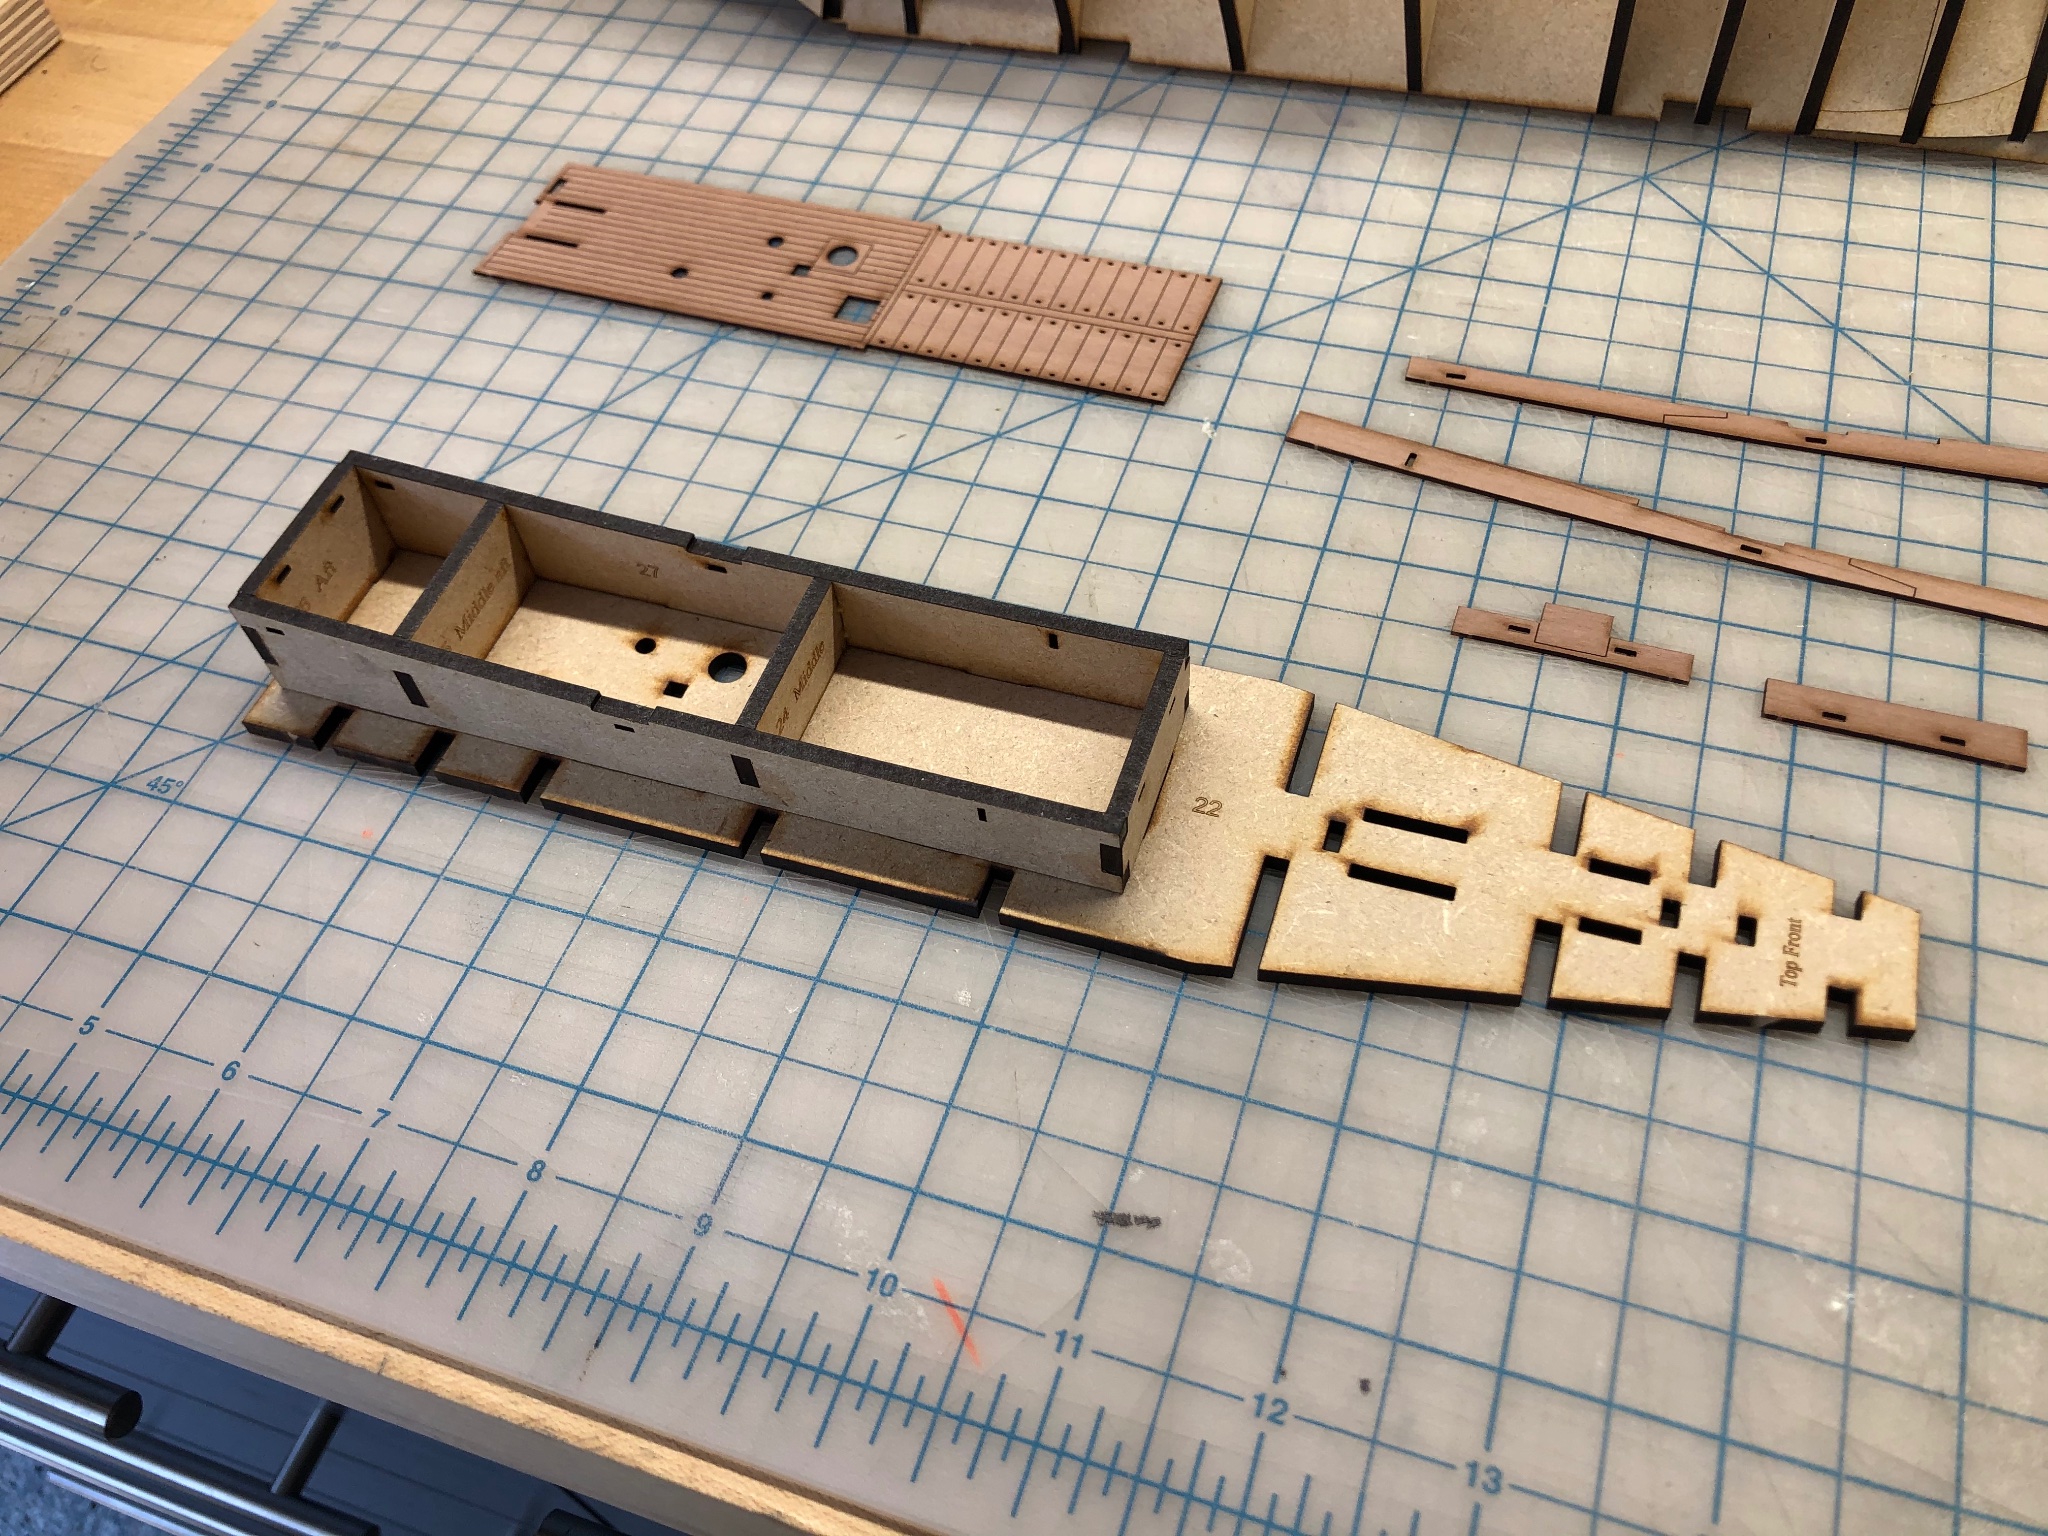
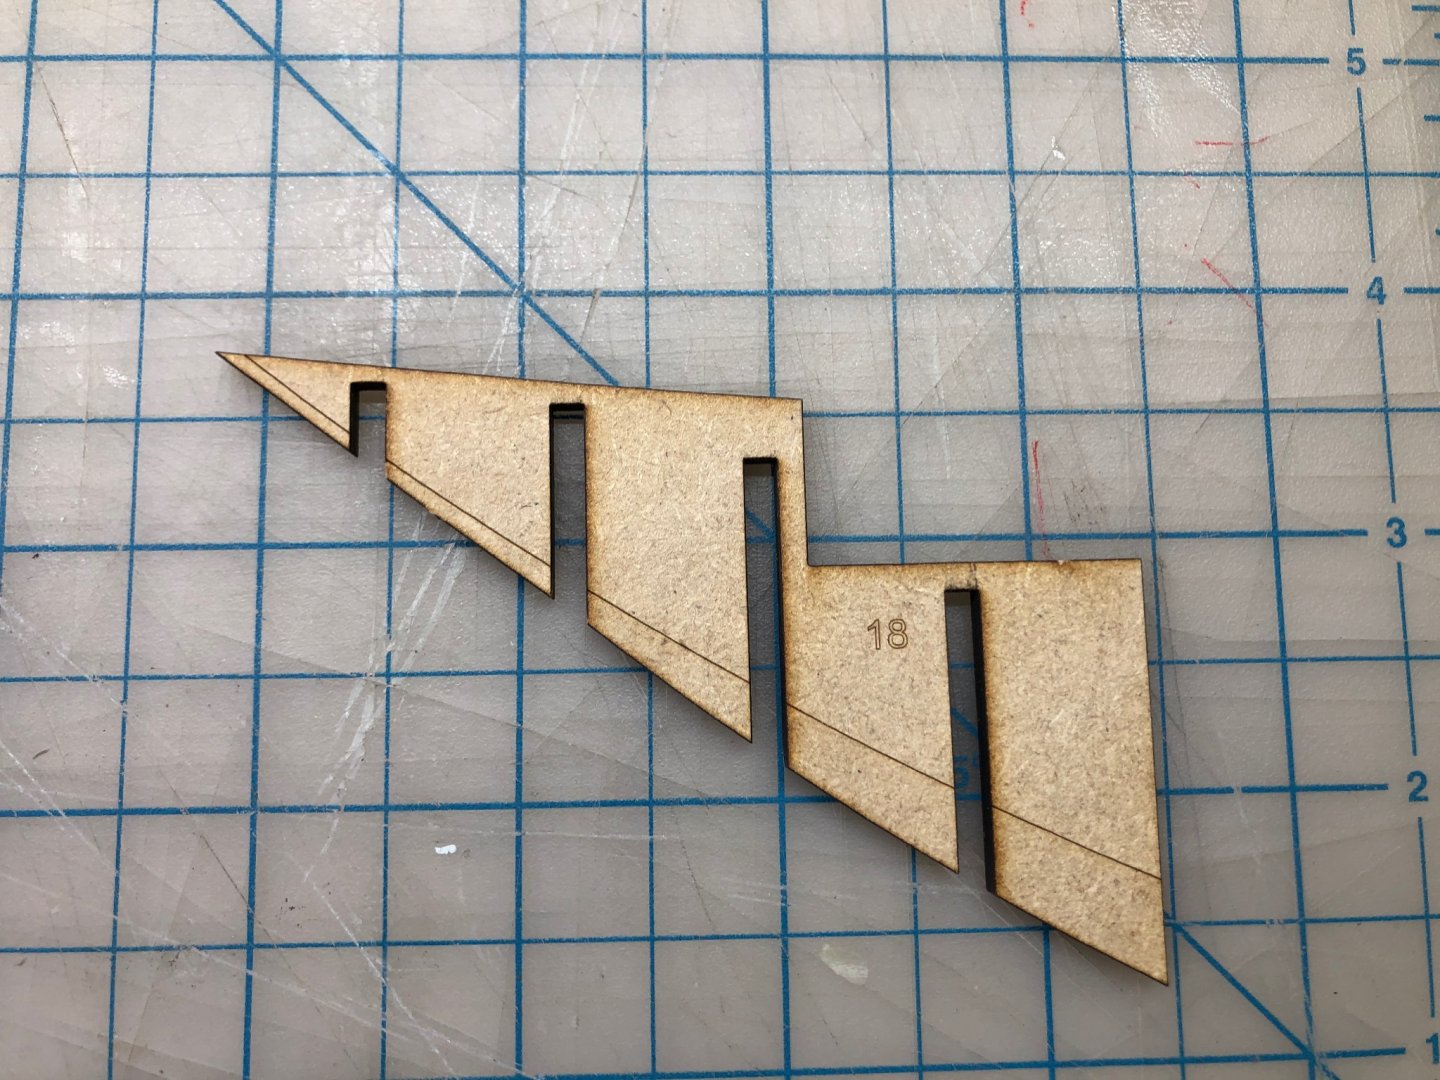
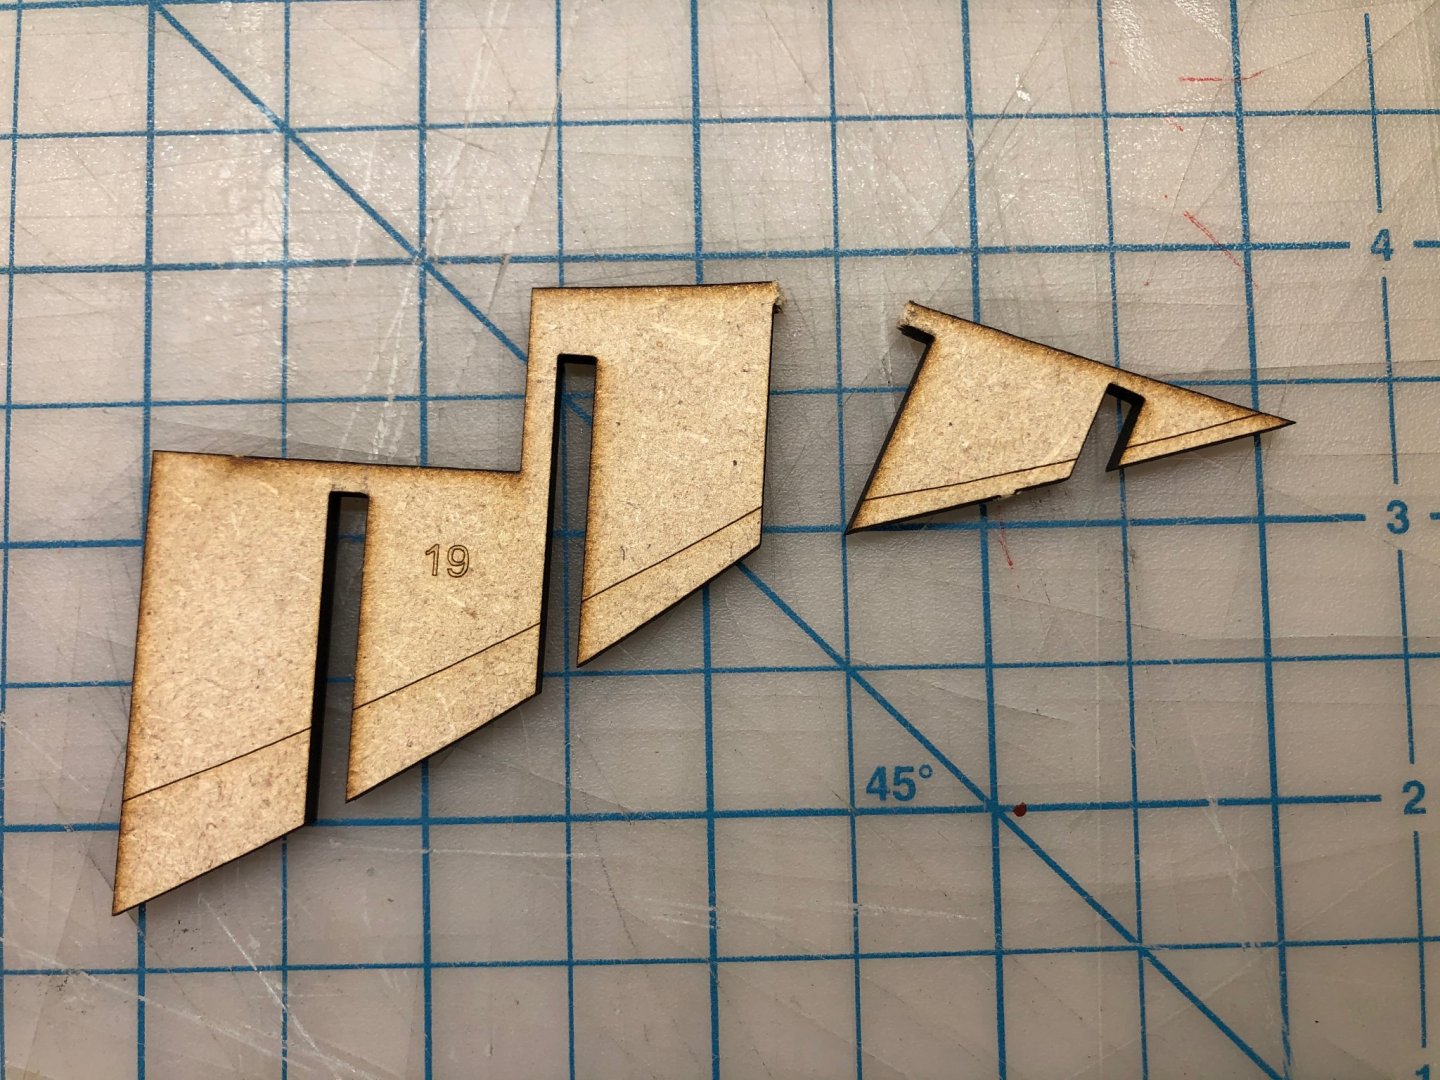
At the bow and stern there are pairs of filling patterns which slot into place, sandwiching the keel. They provide extra thickness at the pointy ends of this double ender. Shown below are the aft patterns. Be very careful of these pieces as you are slotting them together. They are very slim in certain places, and the MDF material is not as strong as plywood. When taking the frame apart after my test fit, I broke the aft port pattern where the MDF is extremely thin. This turned out to not be a big problem, as the two pieces of the broken part each can be slotted independently and glued into place, so I was able to save the situation. But beware and be gentile with these parts. Also note in the photo the beveling lines which are etched into these parts. All of the filling patterns, and the fore and aft bulkheads have these bevel lines, and allow you to pre-bevel them before assembly.
- 222 replies
-
- 3
-
-
- First Build
- Lady Isabella
- (and 2 more)
-
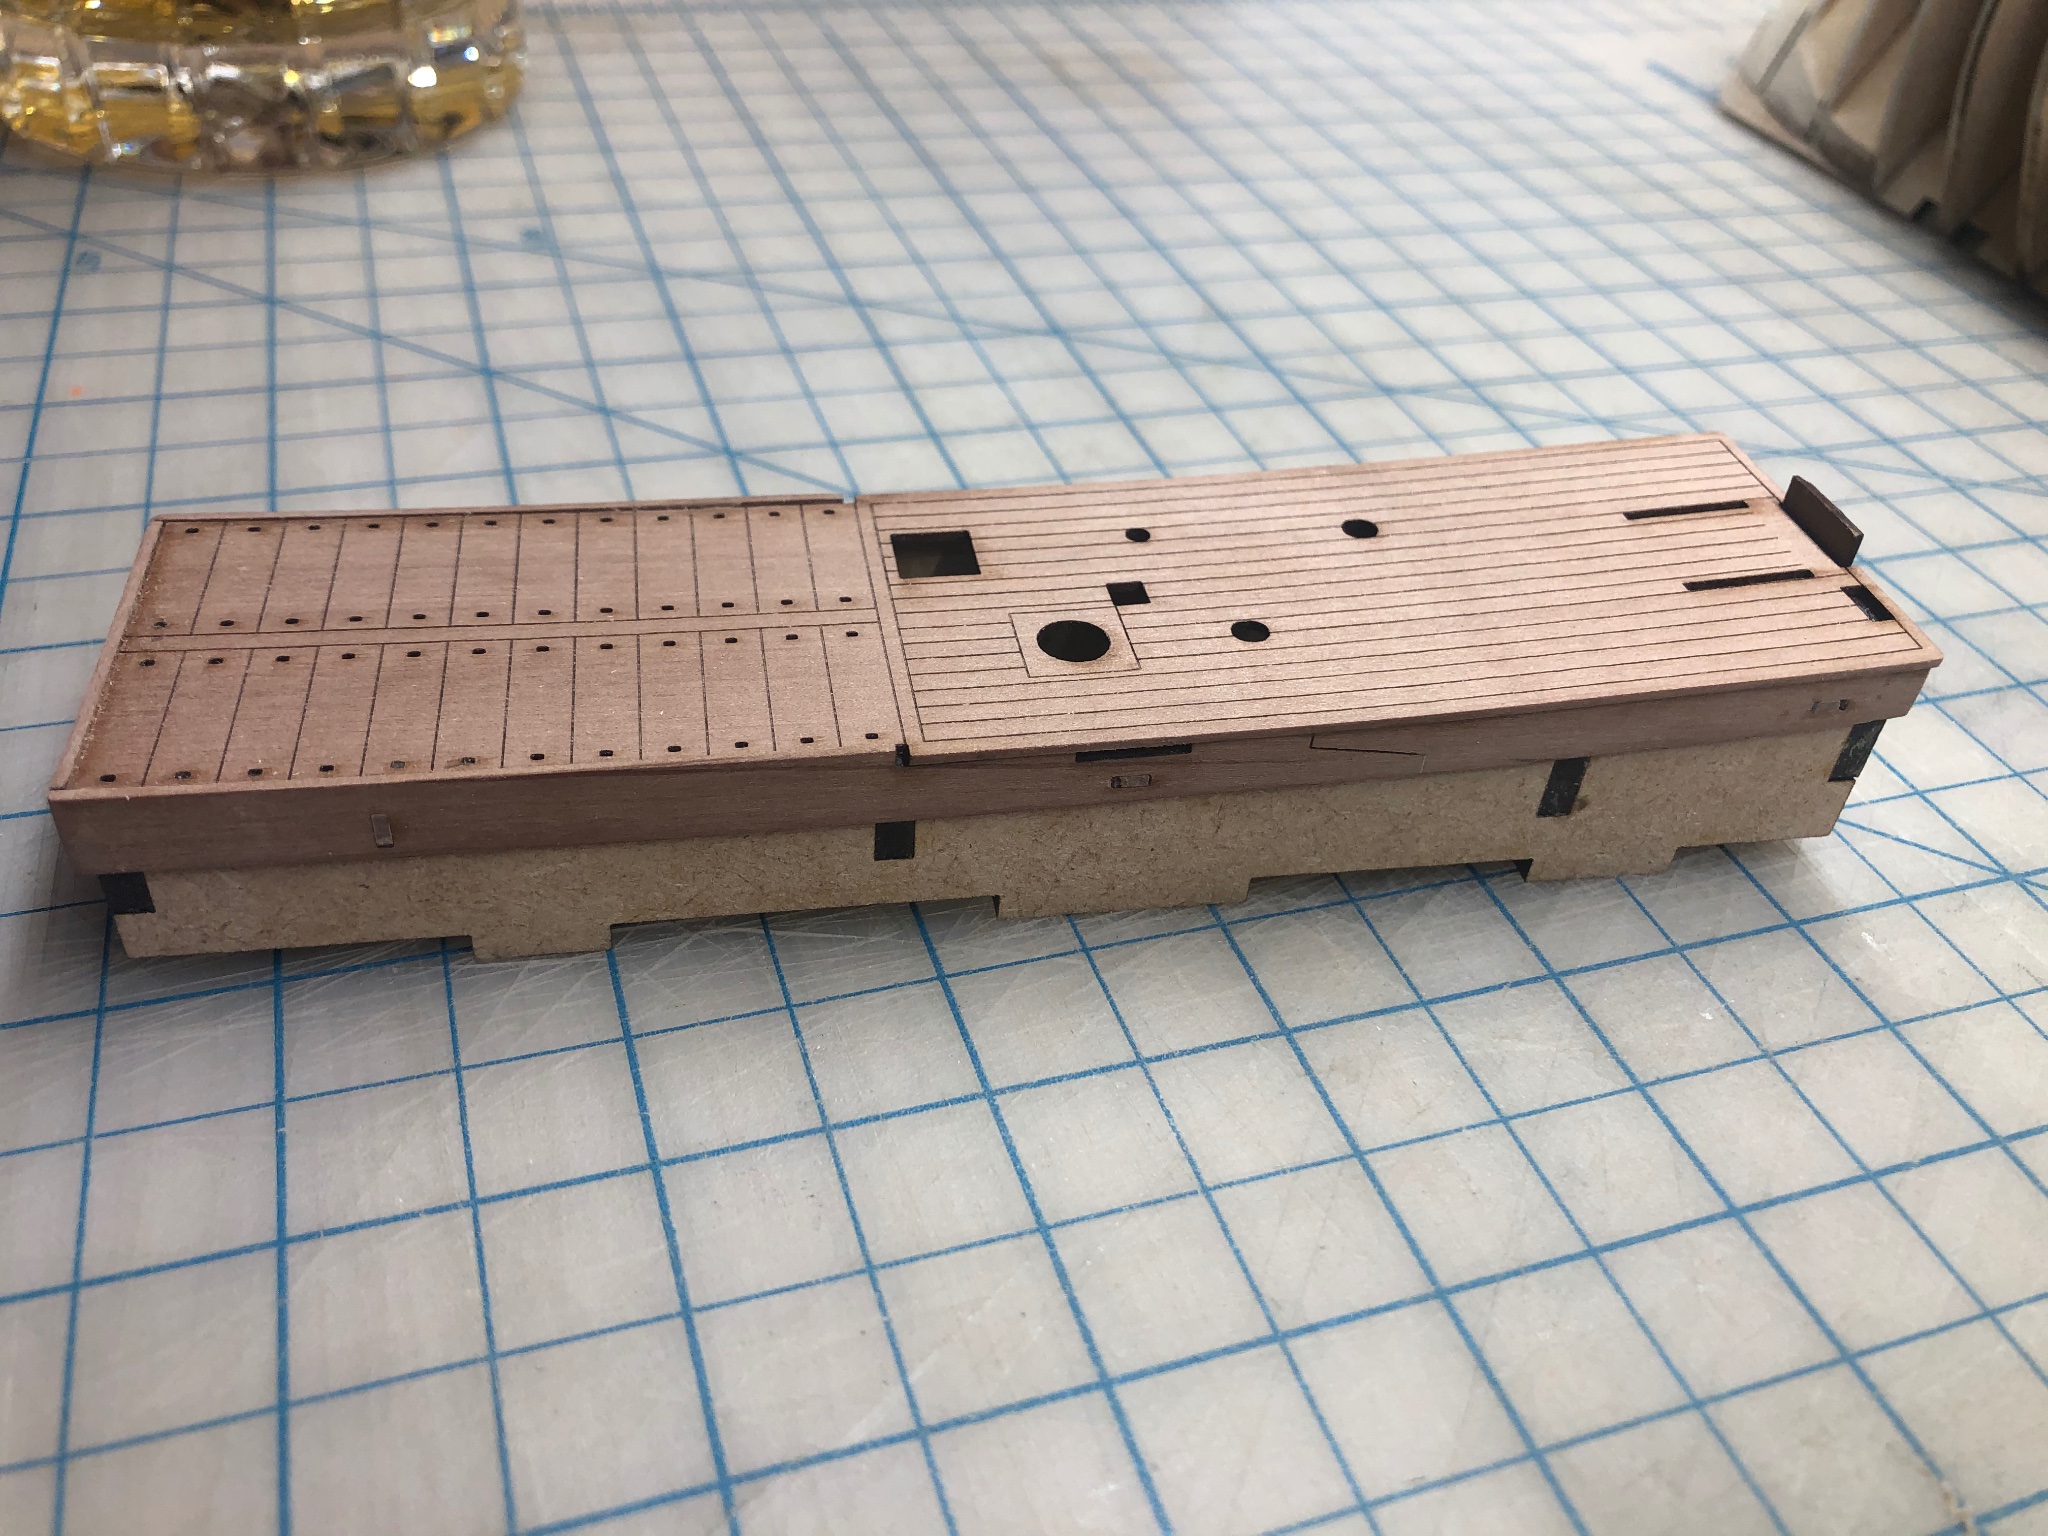
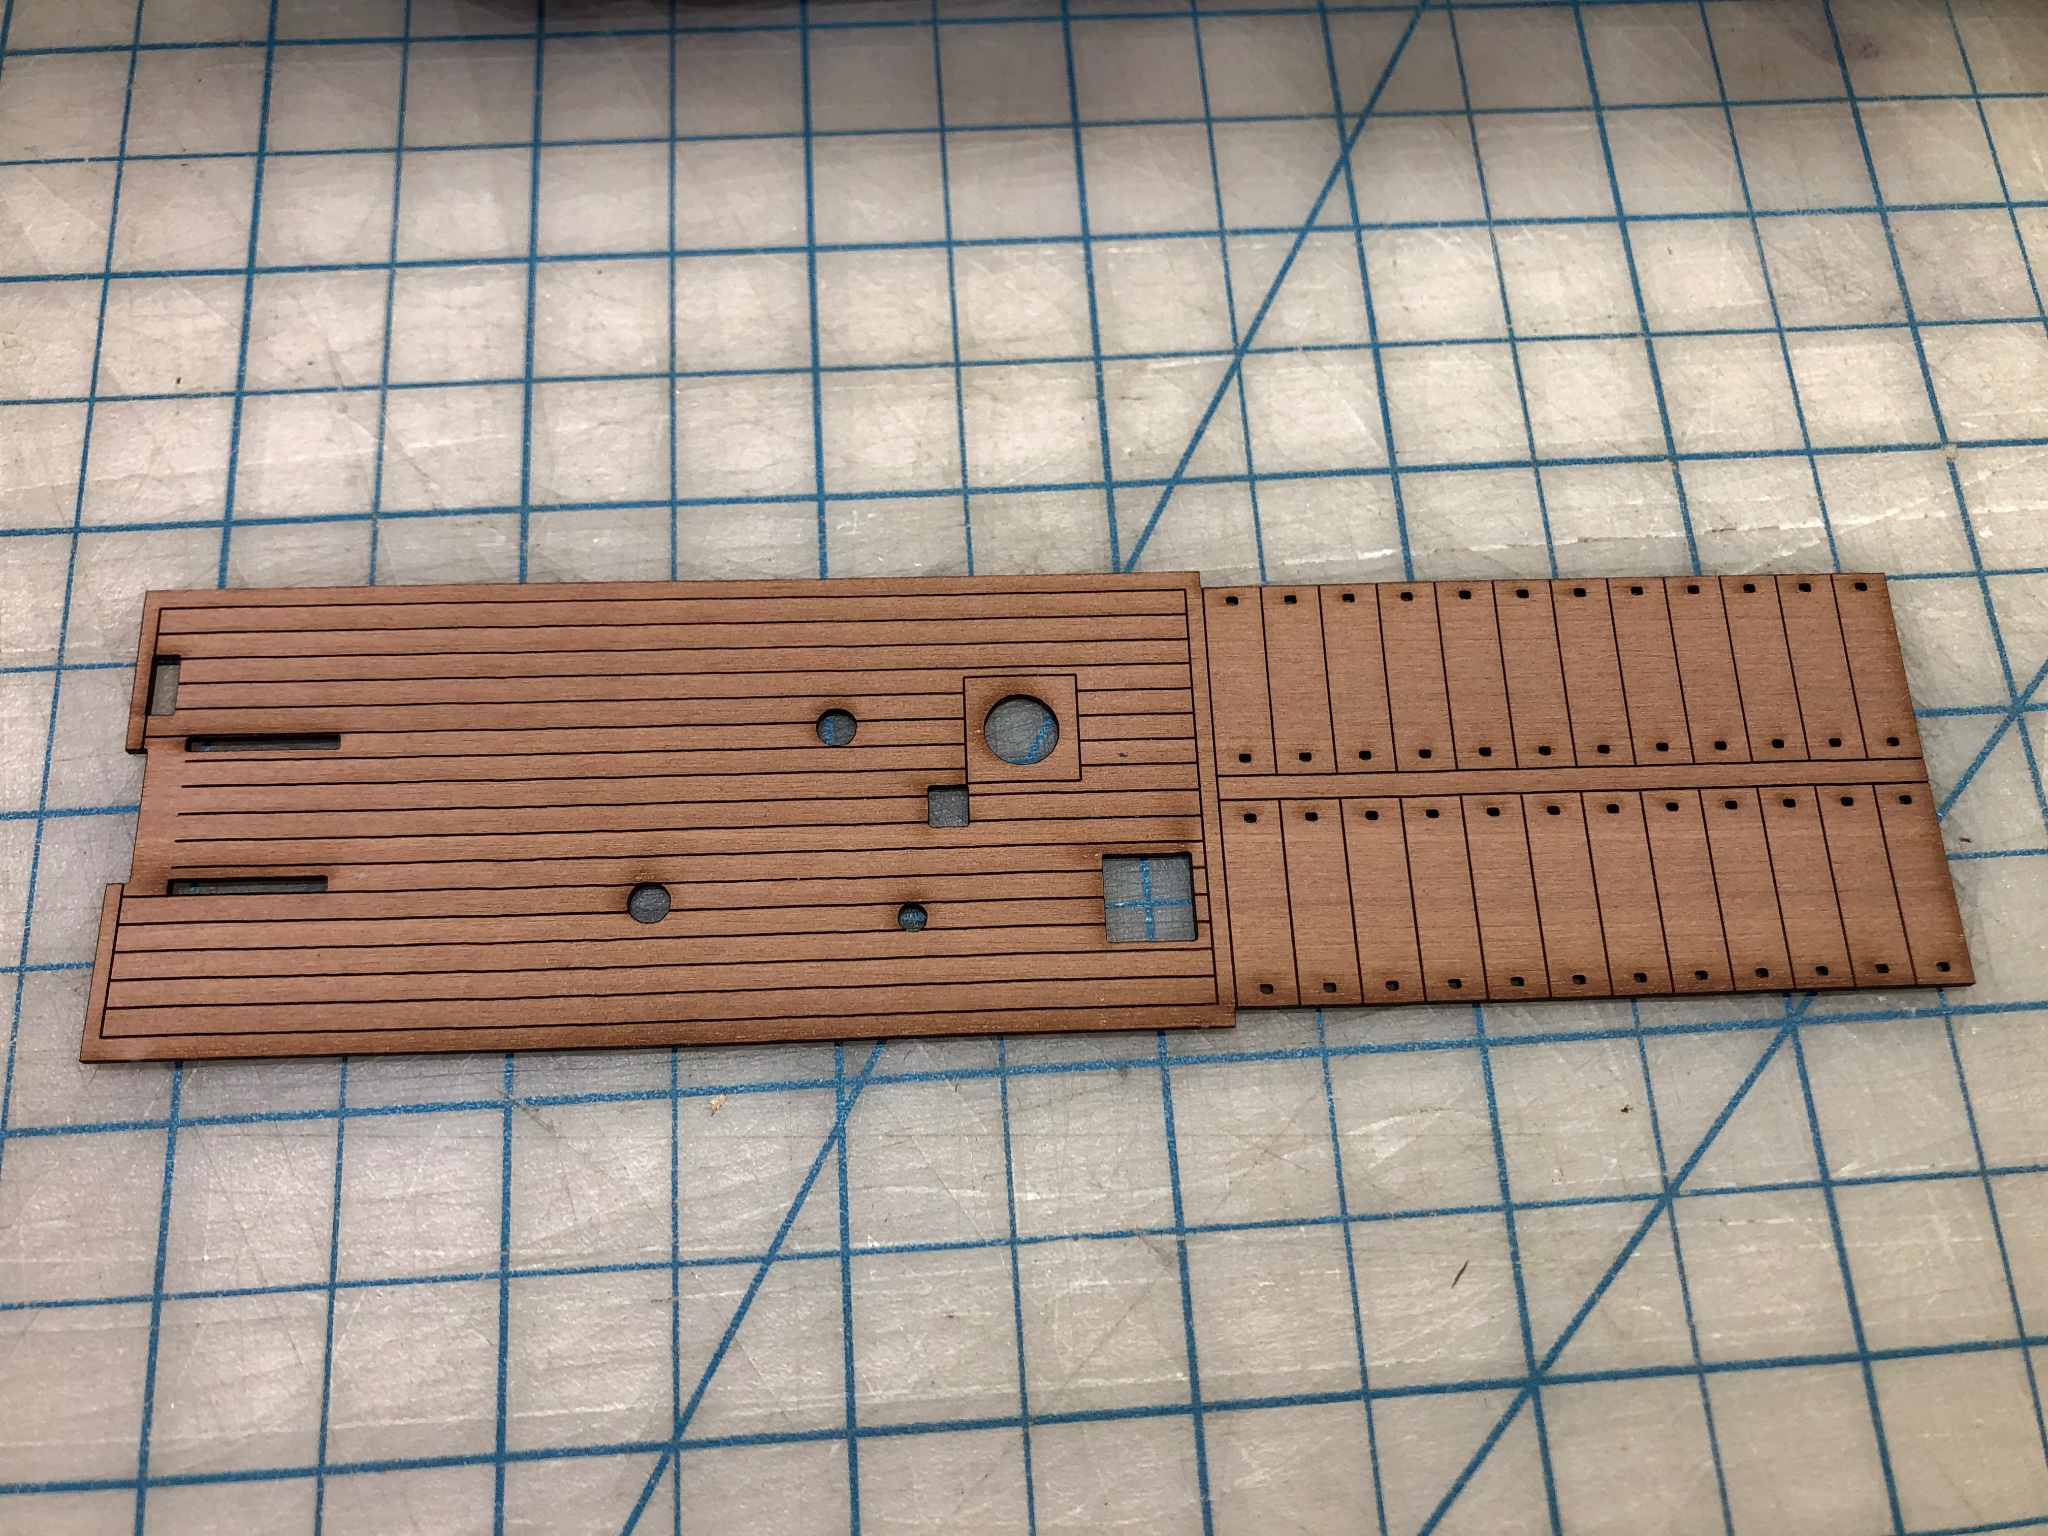
The MDF deckhouse is faced with very pretty veneer pieces of pear wood. They are laser etched with beautiful detail, including splice joints, deck boarding, main hatch companionway, and fish locker hatches. All really lovely. These pieces laminate to the outside faces of the structure. I used a couple of clamps on the top piece, since there is a camber to the top of the house and you want the veneer piece to follow that curve. Everything goes together quite easily.


- 222 replies
-
- 5
-
-
- First Build
- Lady Isabella
- (and 2 more)
-
Before proceeding with the hull structure, I built the deckhouse. There are six MDF parts which glue together to create the structure. They tab together, and the whole structure will tab into the upper false floor. You can use the false floor as a form to make sure the deckhouse parts are square as the glue sets. Just make sure you don’t glue the deckhouse structure to the deck. Dry fit only. Everything fits beautifully together. No ambiguity.

- 222 replies
-
- 6
-
-
- First Build
- Lady Isabella
- (and 2 more)
-
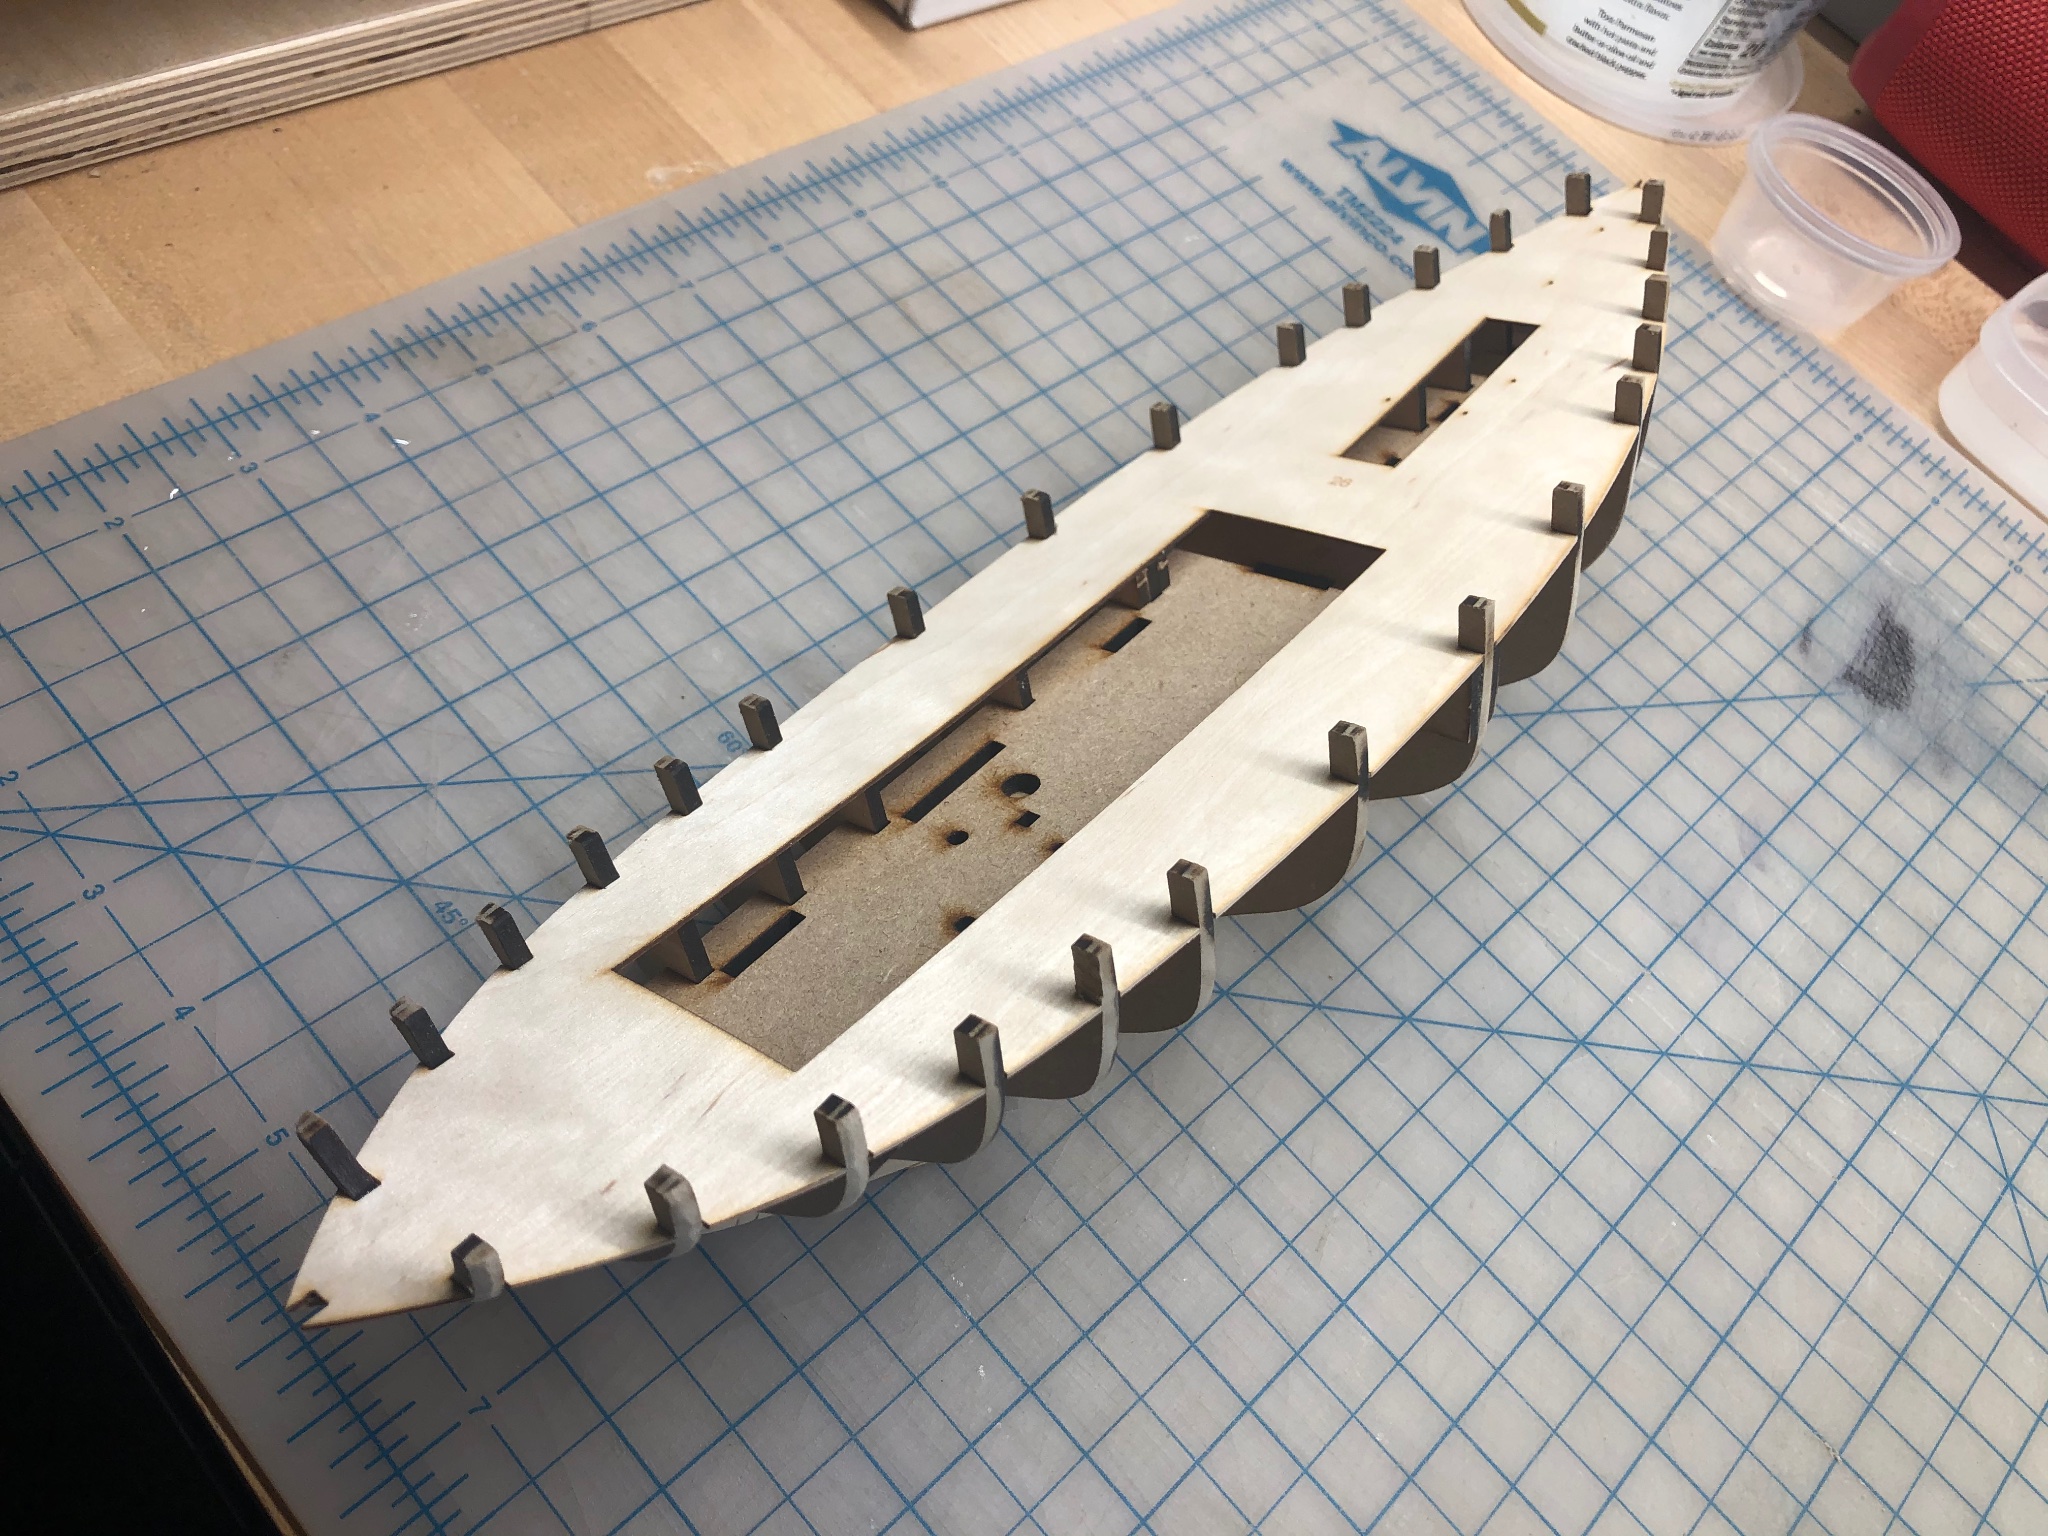
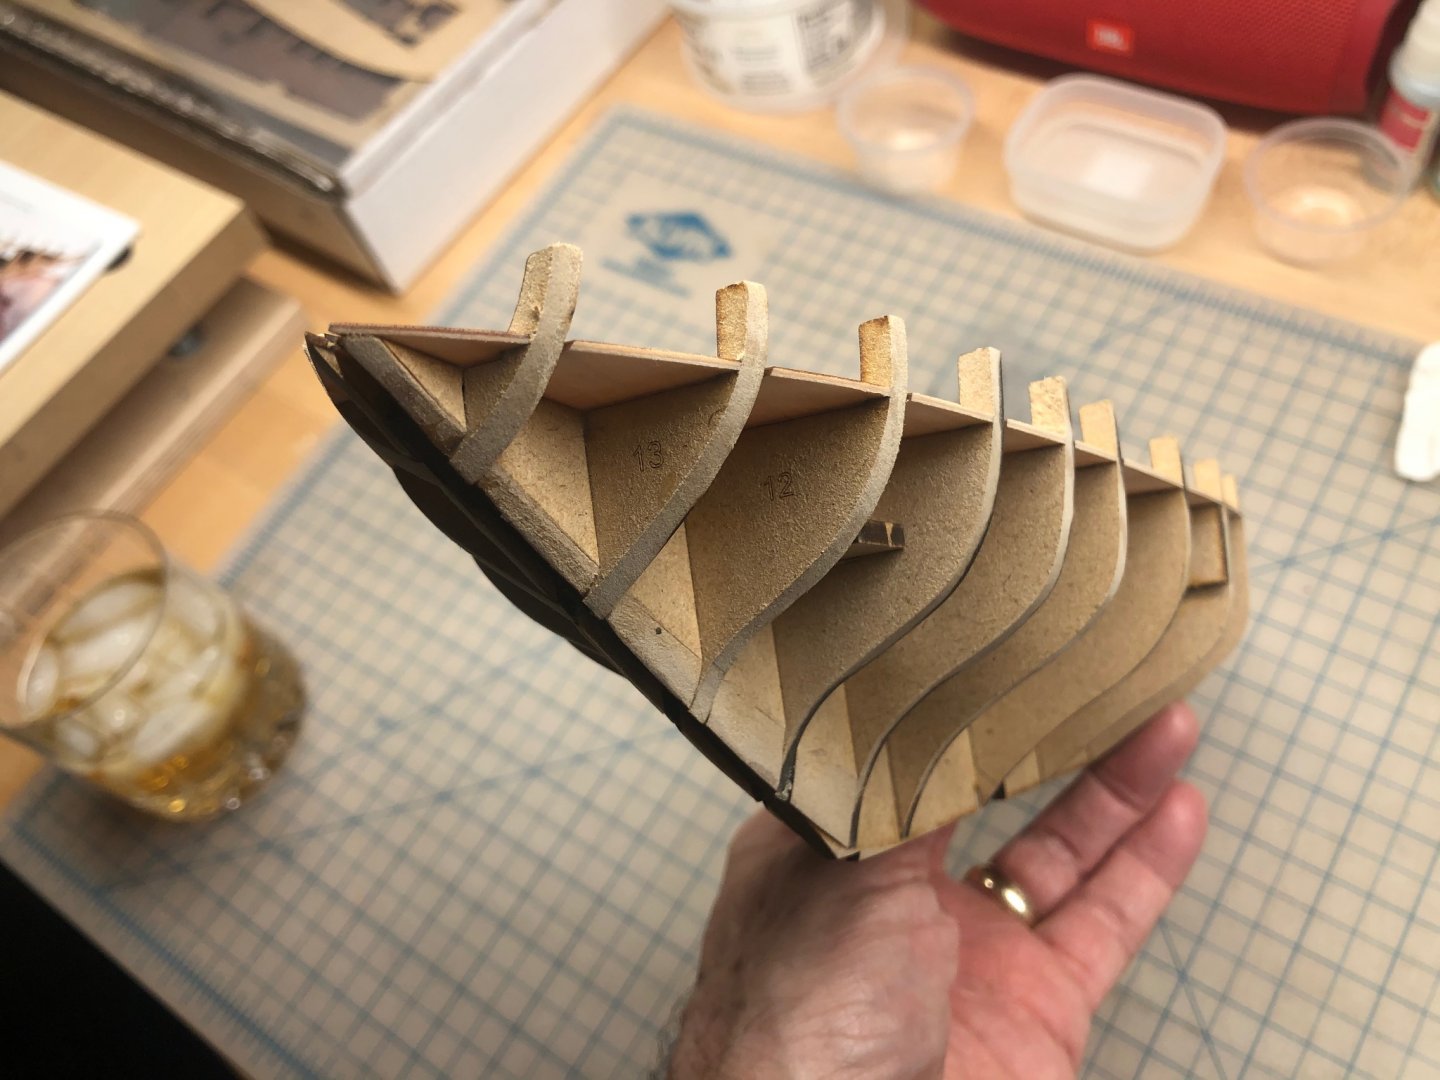
Here’s a test fit of all of the bulkhead framework. Everything is very precisely cut, and fits quite snugly, with no ambiguity about how it seats together. Very well engineered. There are two false floors (one of which is shown in place here), which slot in horizontally, and give the structure great inherent rigidity. Also seen in this photo are some of the pieces for the deckhouse.
- 222 replies
-
- 6
-
-
- First Build
- Lady Isabella
- (and 2 more)
-
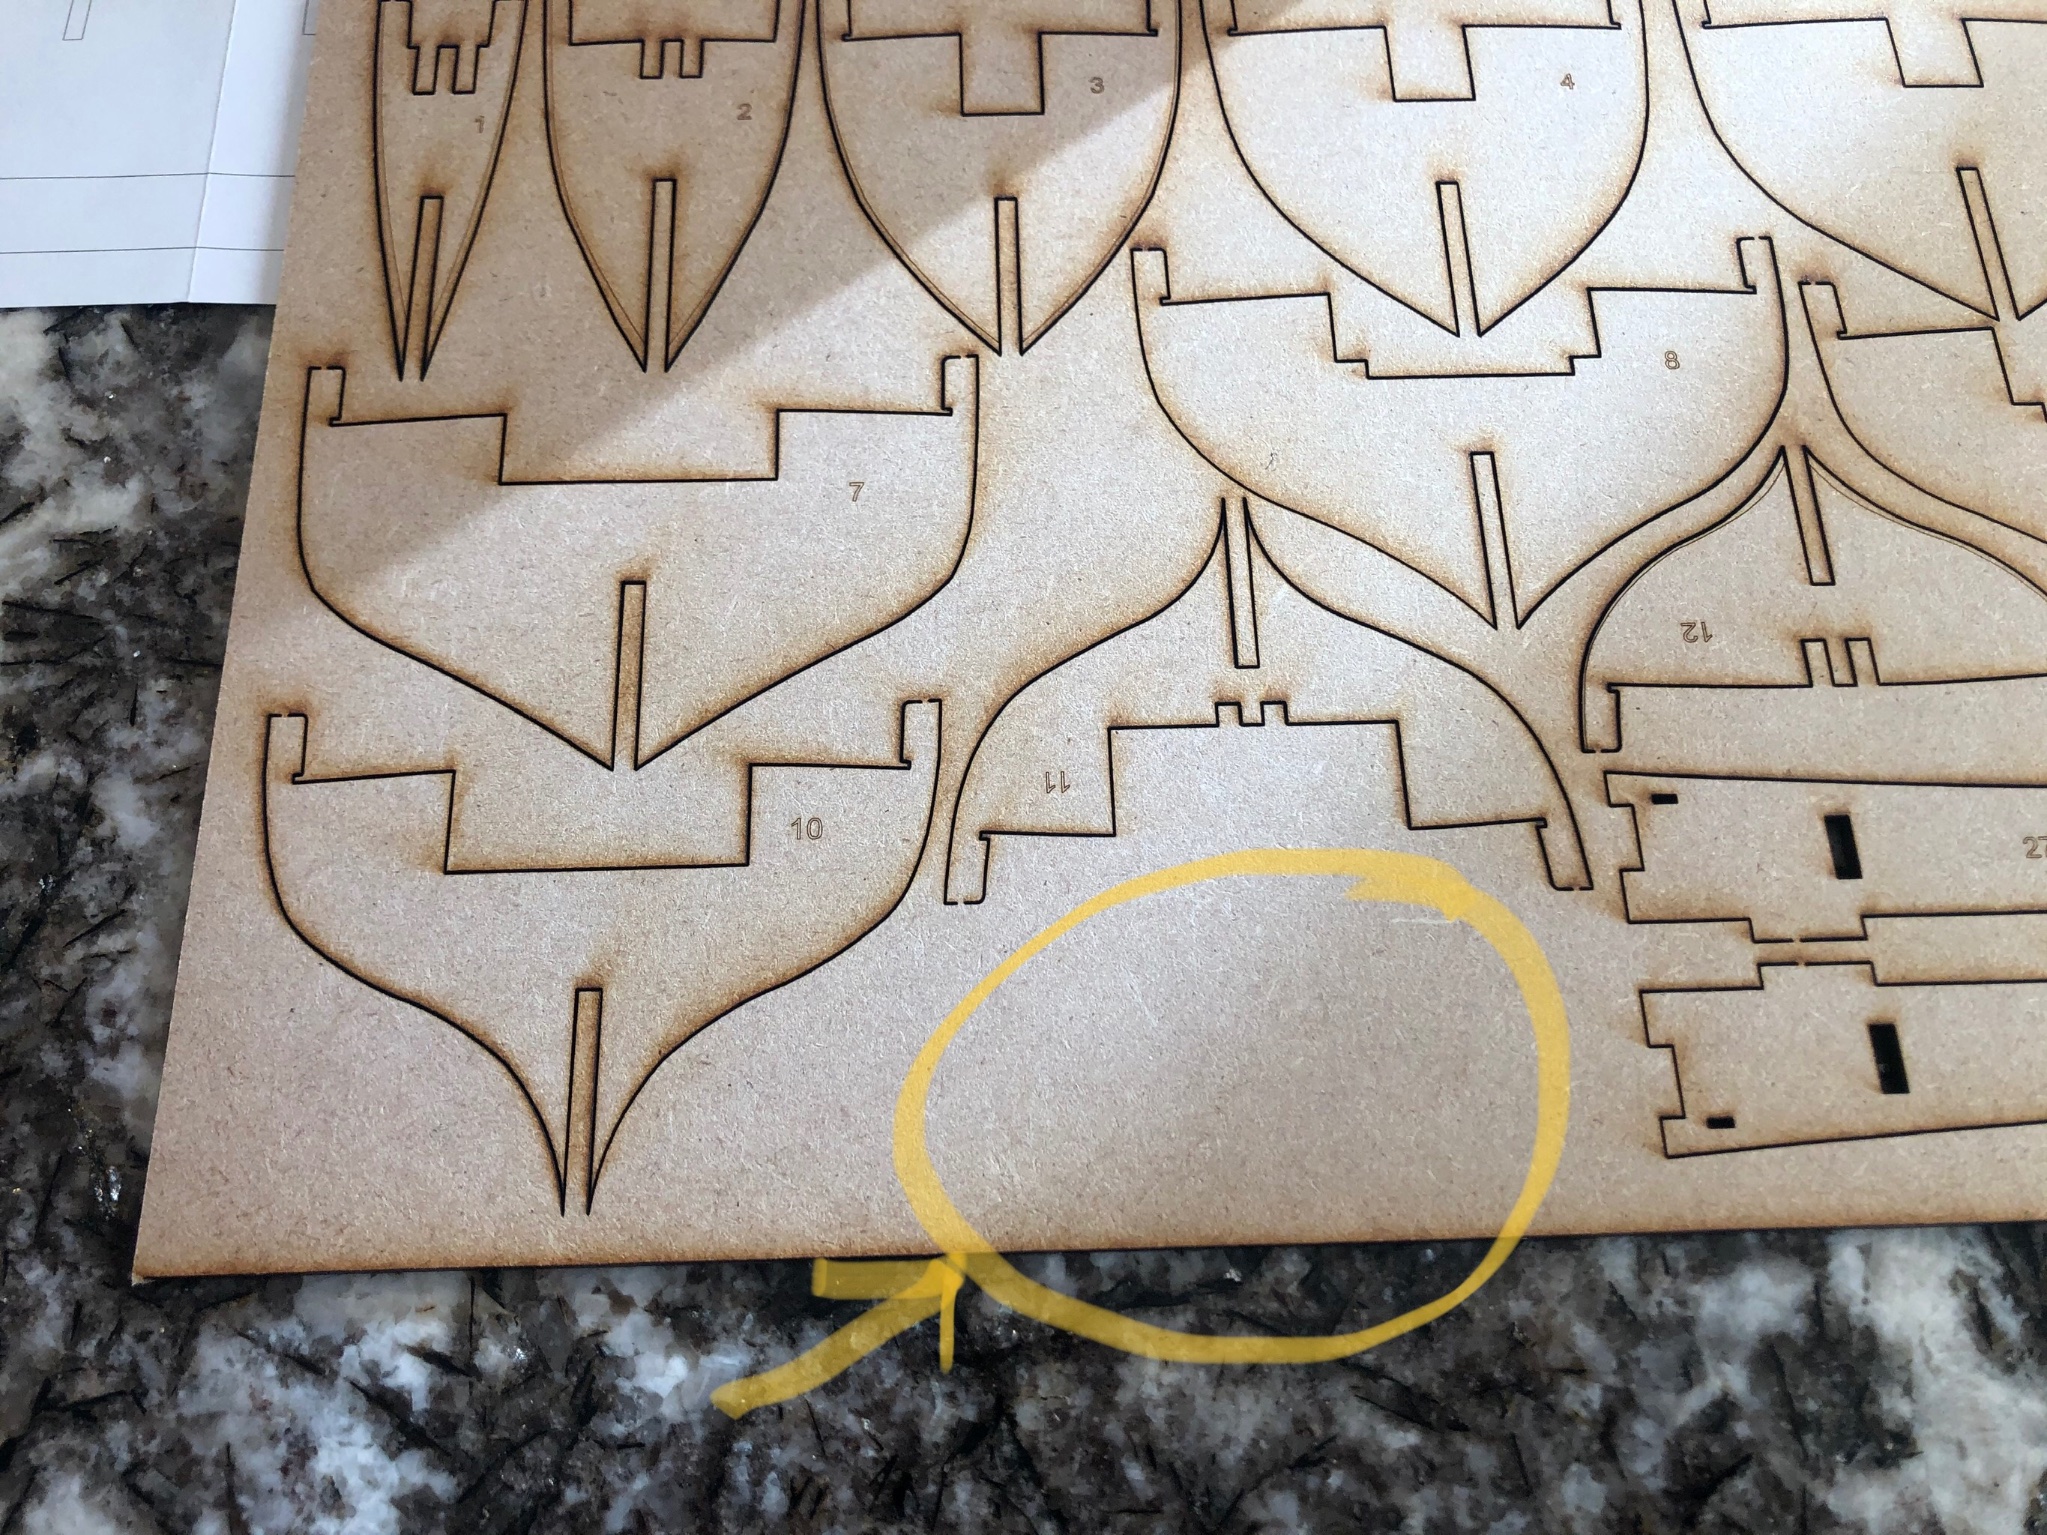
Another item to note: when I was checking the MDF sheets against the plans, I found that the three parts for the deck winch were not cut into the sheet where they were shown in the drawings. See the photo below, where the location of where the parts should be is identified. I contacted Chris, and he quickly acknowledged that I was correct, and he sent me the winch parts in the mail. Outstanding customer support! I’m sure that he’ll be updating the cut file to add the parts onto the sheet in the future, but if you are building the Zulu, I recommend you double check.

- 222 replies
-
- 5
-
-
- First Build
- Lady Isabella
- (and 2 more)
-
Chris has provided full size drawings showing the layout of all the laser-cut parts. When corresponding with him before I started, Chris recommended that I check all of the parts sheets against the drawings, to confirm that they were all there, and that the numbers matched. Good idea! There were in fact a couple of minor discrepancies between the way the parts were numbered and how they appeared on the control drawings. Chris had warned me of a few errors, which I’m sure he’ll be rectifying in future editions of the kit. So my advice is to go through the parts sheets, compare them to the drawings, and take note of any discrepancies.
- 222 replies
-
- 2
-
-
- First Build
- Lady Isabella
- (and 2 more)
-
Let me start off by saying that this kit is beautifully conceived, engineered and packaged. It has been put together with such care. James has shown abundant photos of all of the contents of the kit, so I won’t soak up bandwidth here with more of the same. But the materials seem just top-notch, and all of the laser cutting and photo etching seems fine, precise and accurate. Special praise is due for the beautiful, detailed and thorough construction manual which is provided. For a first-time builder such as me, it’s much appreciated and a real confidence-builder. Bravo to Chris and James for putting the beginner in a great position to succeed.
- 222 replies
-
- 6
-
-
- First Build
- Lady Isabella
- (and 2 more)
-
Thanks, gentlemen. I’m having a splendid time so far!
- 222 replies
-
- 1
-
-
- First Build
- Lady Isabella
- (and 2 more)
-
I’ve been encouraged to start a log for my build of this beautiful kit, the “Lady Isabella” by Chris Watton and Vanguard Models. This is my first ever wooden ship model. So I’m thirsty for knowledge and eager for thoughtful input. I’ve been a life-long architectural and plastic kit modeler, and wood worker, so I’m fairly handy with my hands, but I need to learn so much about best practices in this discipline. I’ll be posting up a few photos soon as I have the time over the weekend, and I’ll catch you all up to where I am in the process. Many thanks to my new and helpful friends, Chris Watton and James Hatch who have been very encouraging and patient with all of my newbie questions. I am having the most fun with this build. Looking forward to sharing a bit of my joy with you all. -Erik

- 222 replies
-
- 7
-
-
- First Build
- Lady Isabella
- (and 2 more)
-
Thanks James! That makes sense. And thanks for the welcome. I've lurked here for quite a while, but I finally decided to take the leap when I read this log and learned about Chris' beautiful kits. Chris has been super-helpful in answering pesky email questions from this novice. And yes, one of the things that sold me on Chris and Vanguard was when I downloaded the PDF of the manual for the Zulu. Certainly one of the finest manuals I have ever seen in the hobby industry. Bravo! I'm having the best time building this model, and will probably post up some images when complete. After doing some research on the Zulu type, I've decided to paint the hull freeboard black above the boot stripe, since it looks like the ubiquitous paint scheme. And... I have an HMS Flirt kit waiting when the Zulu is done. I'm afraid I've been hooked...thanks Chris and James! -Erik
- 100 replies
-
- 3
-
-
- zulu
- vanguard models
- (and 2 more)
-
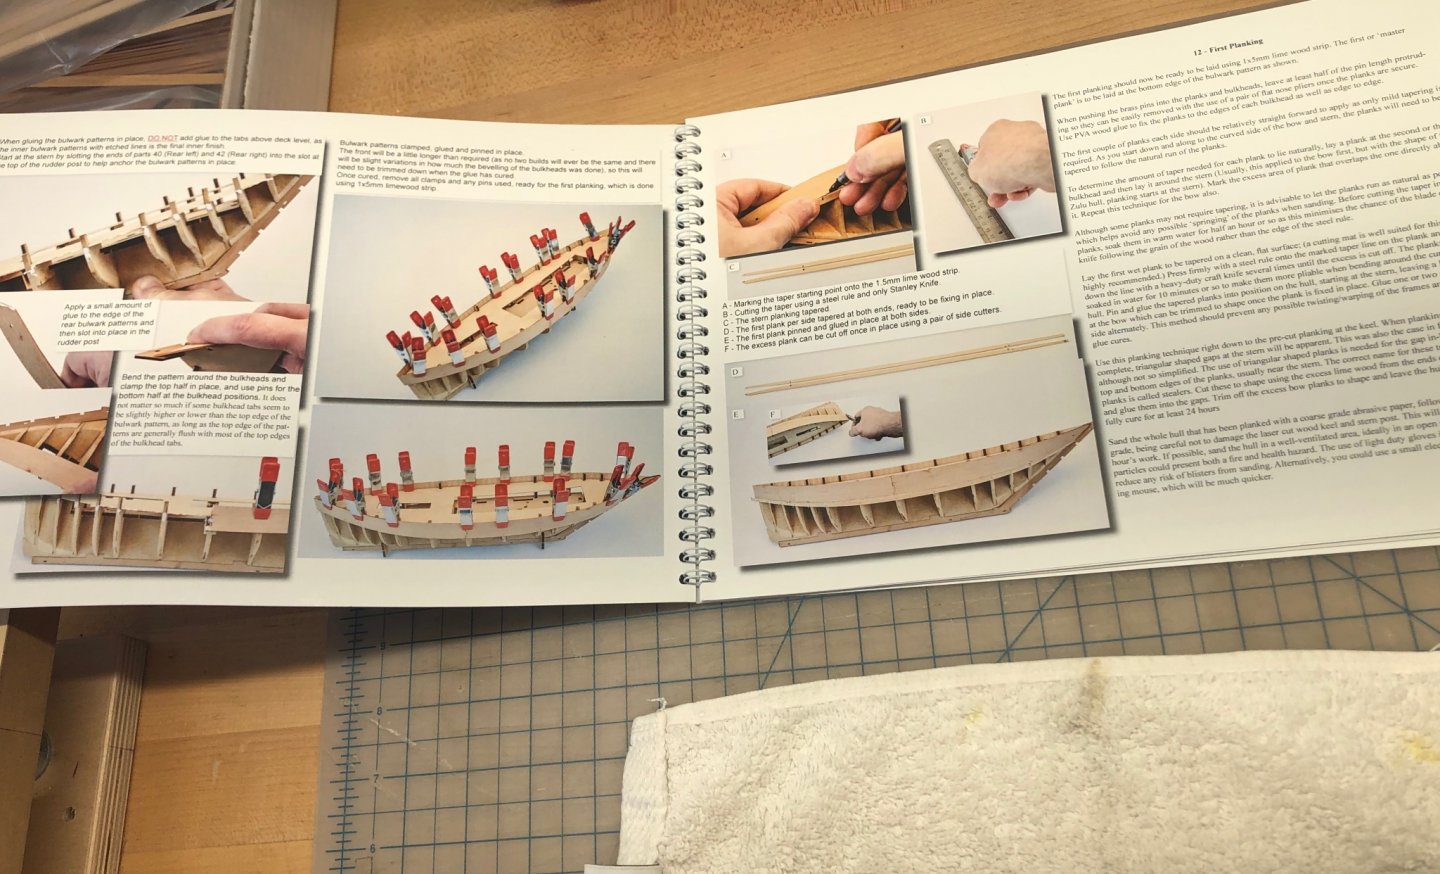
Hi James. Thanks so much for sharing your process so thoroughly. I’ve learned so much. I’m building this kit right now, and I have just finished the first planking. i am wondering if you might share a bit about your process for the second planking, particularly how you are laying down the planks using CA gel. Are you simply ‘buttering’ the back of the entire plank with gel, and holding it in place with your fingers until the gel kicks off? Or are you using something to hold it in place? Tape? Are you using an accelerator? Are you gluing the entire plank in one go, or are you gluing parts of it in stages? Thanks again for your wonderful build logs! They are a terrific resource for folks like me who are figuring out how to do this... Grateful. -Erik
- 100 replies
-
- 3
-
-
- zulu
- vanguard models
- (and 2 more)