gak1965
-
Posts
727 -
Joined
-
Last visited
Content Type
Profiles
Forums
Gallery
Events
Everything posted by gak1965
-
 Looking spectacular Vlad! An amazing achievement! Regards, George
 -
To be sure 😀. Right now all the work on Discovery involves turning drawings of one kind into drawings of another kind, and I like the idea of splitting my hobby time into tactile work (Kearsarge) and more intellectual work (Discovery - e.g. where should I put the top of the bulkhead given the need to put in a waterway, have the planksheer come to the right place, etc., etc.). I've often found that I would be in a place during a build where something would need time to dry or set, and that is a great time to do other things. No doubt it will slow both ships, and it may not work at all, but that's okay - I'll adapt as needed. There is another factor here, which is that I need a scroll saw to cut out the pieces for Discovery in an efficient way (My coping saw isn't going to cut it - well it could, but it would take forever). The Admiral and my (adult) children have made it clear that such a purchase prior to Christmas and my birthday, which is shortly after, would yield, ah, extremely negative results in the home department, so even in the best circumstances sawdust on Discovery was going to be waiting until 1Q24. Regards, George
-
And kick-off. This model is built rather differently than the POB models that Model Shipways sells, in the sense that the 21 bulkheads are in 42 (rather than 21) pieces, one port and one starboard piece, each of which has a tab that fits into either the top or bottom half of a slot on the main keel. It is also different in the sense that it appears that I am going to add the keel after the hull is planked (in prior kits, I'd cut a rabbet into the bottom of the hull, and then added the keel and bulkheads, before planking. Here is everything dry fitted on the port side: and all of the bulkheads cut out and aligned, port and starboard, fore and aft (the sections with the holes are for a reveal). There are also 21 2 x 1/2 x 1/16 strips of wood that I cut out that are going to 'lock' the frames in place. Observations so far. The laser cutting is generally pretty good. I had no trouble with the main false keel, and 3.5 of the four sheets of frames. At one end of one sheet, the cutting hadn't gone as far as it should, and even though I was careful cutting the parts out and used a fresh blade, I wound up with broken tips on two of the frames. They broke by having the two outer layers of ply break off, so I just repaired them by cutting out a section of ply of about the right shape, gluing them to the stub of ply and then trimming it down. It added about 20 minutes of work, but no big deal. One other thing I've noticed is that the tabs on at least some of the bulkheads are a little too long, and they protrude in a way that would prevent the opposite side from attaching securely to the false keel. Again, no big deal, I'll sand them down a little bit before I start attaching them. Regards, George
-
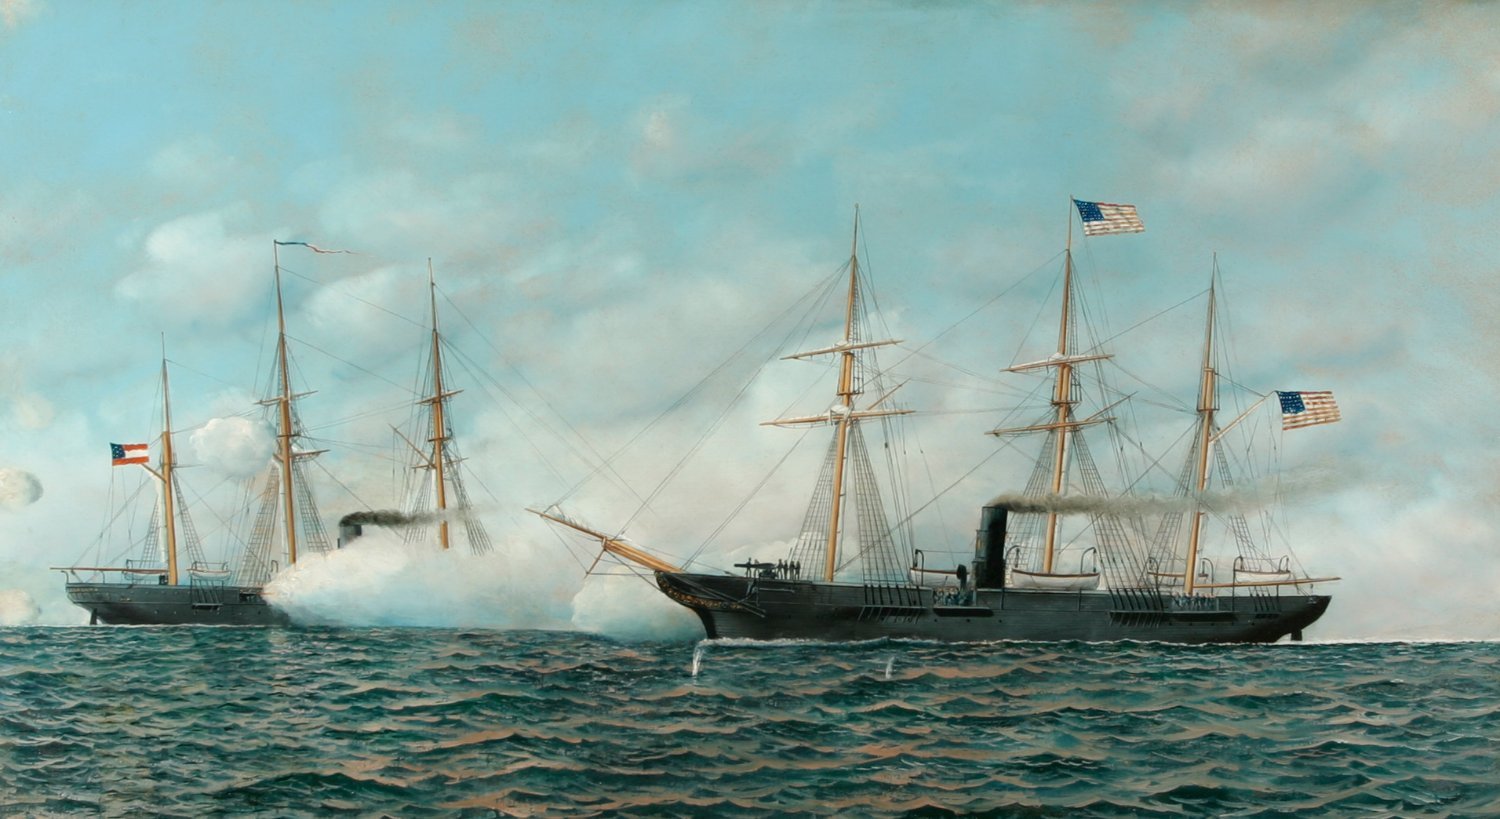
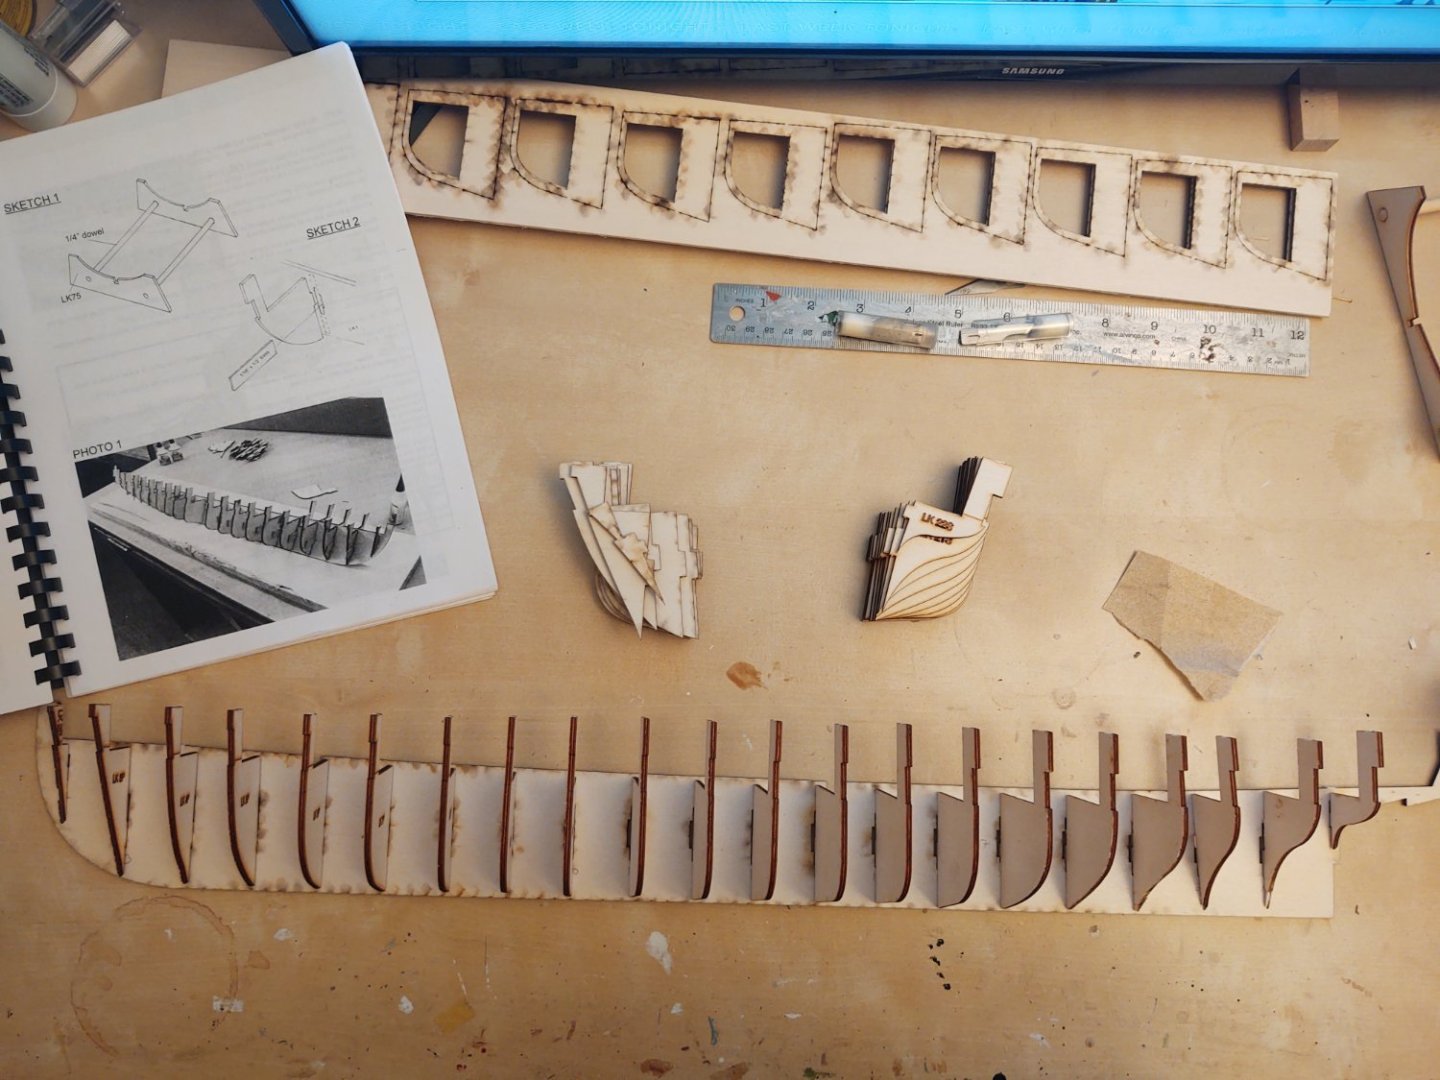
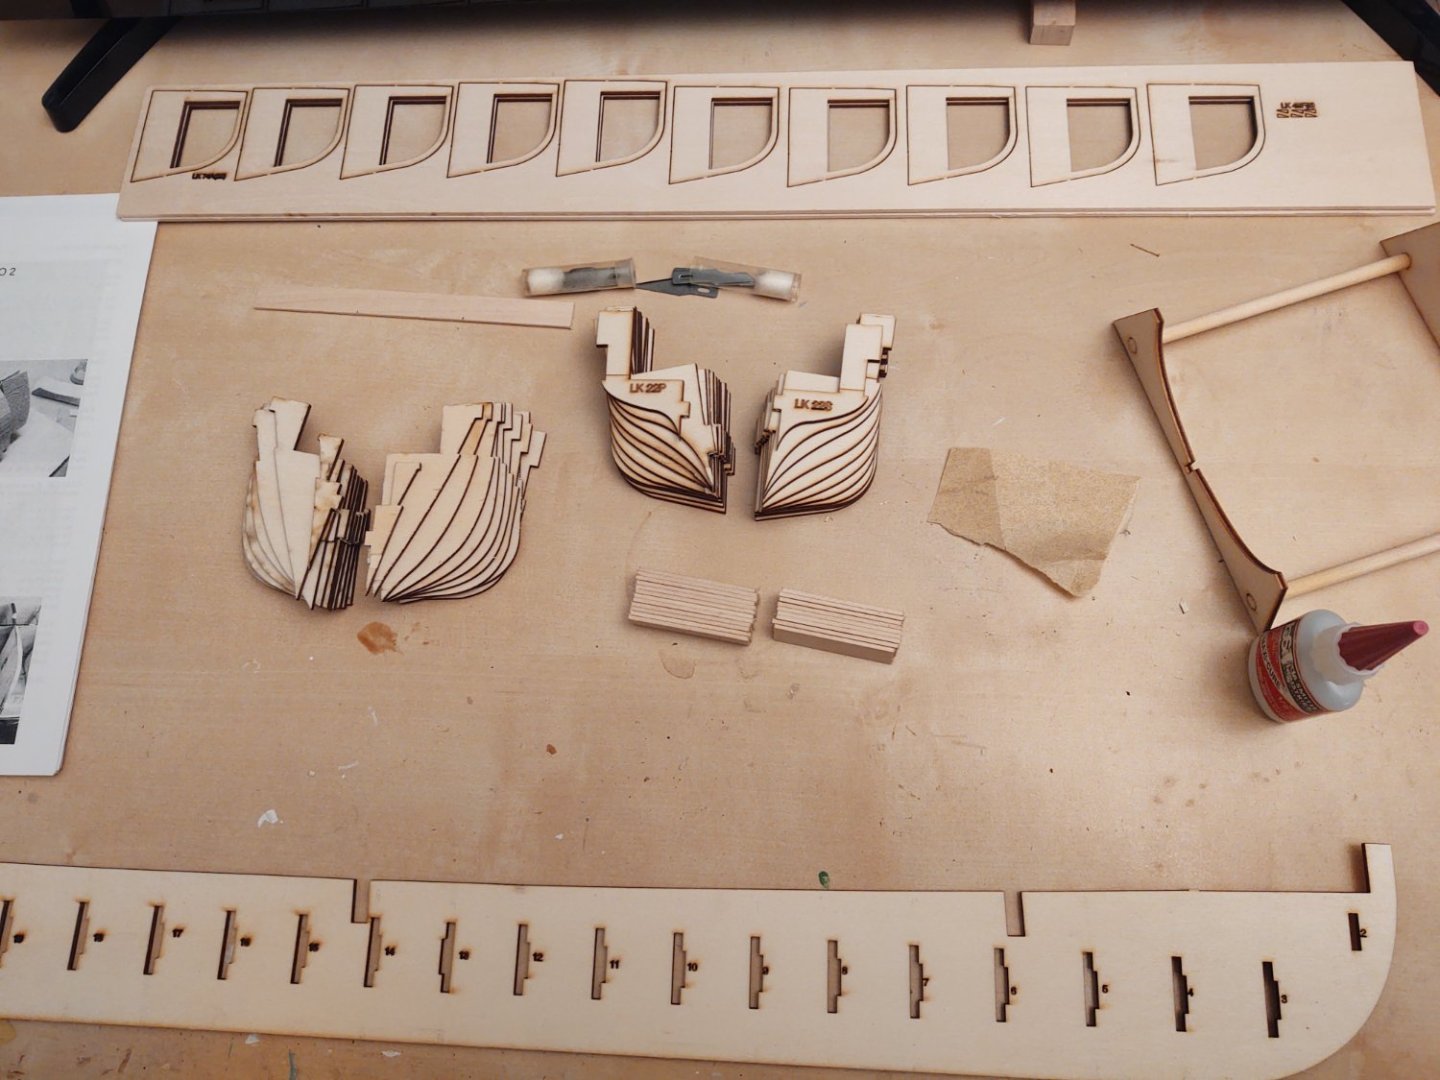
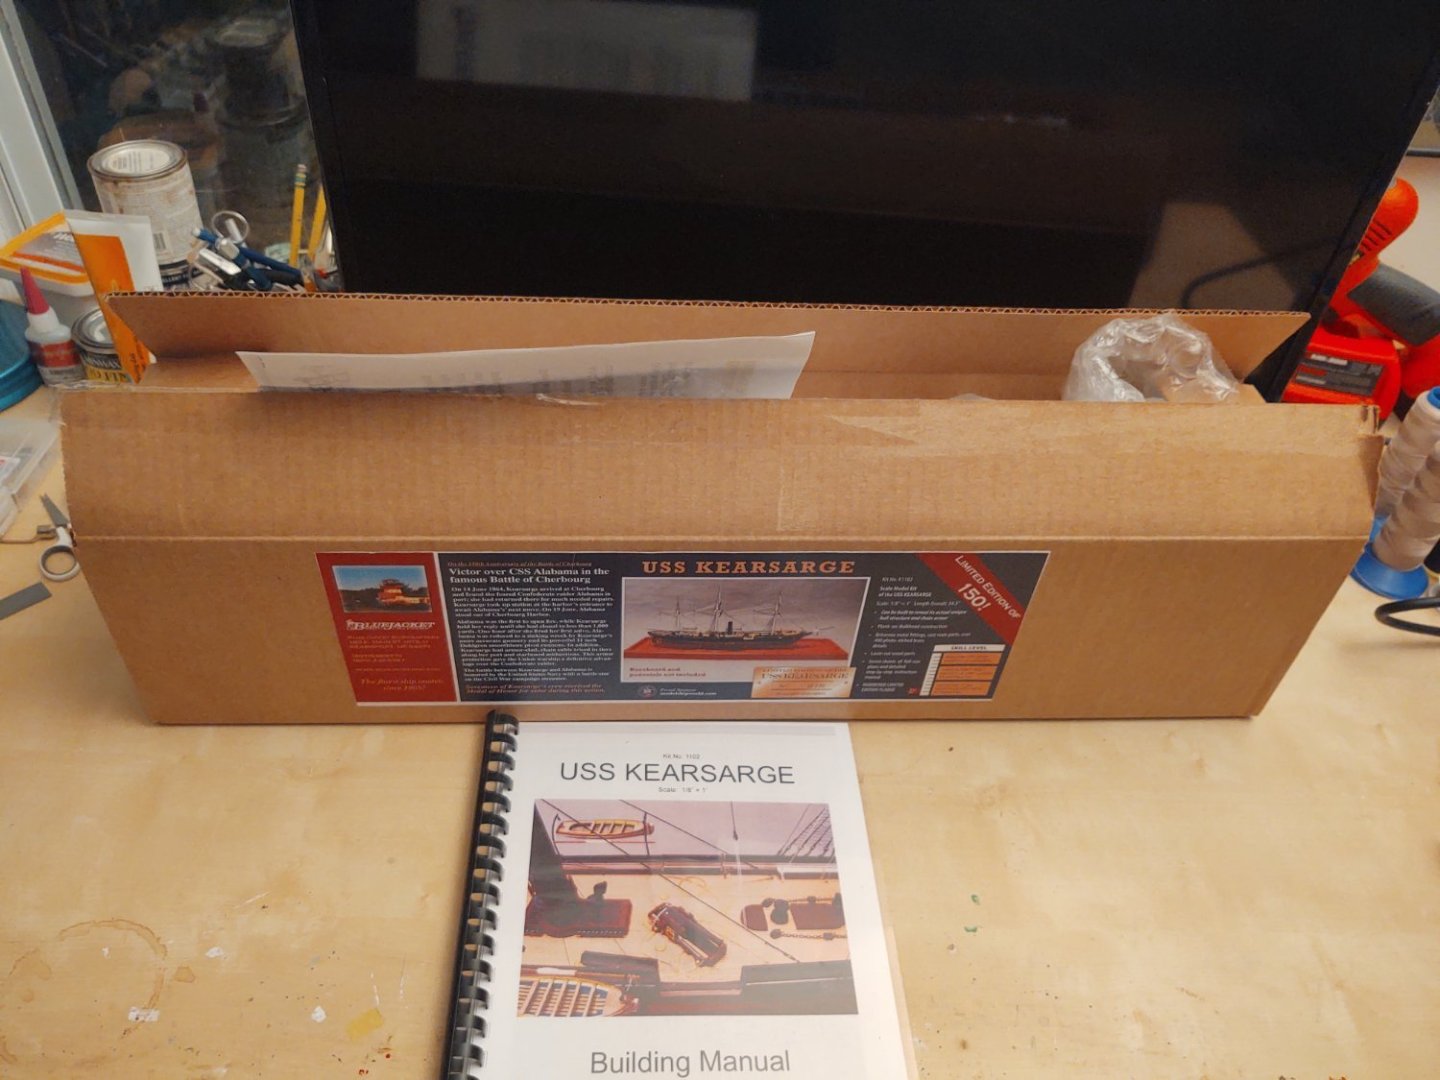
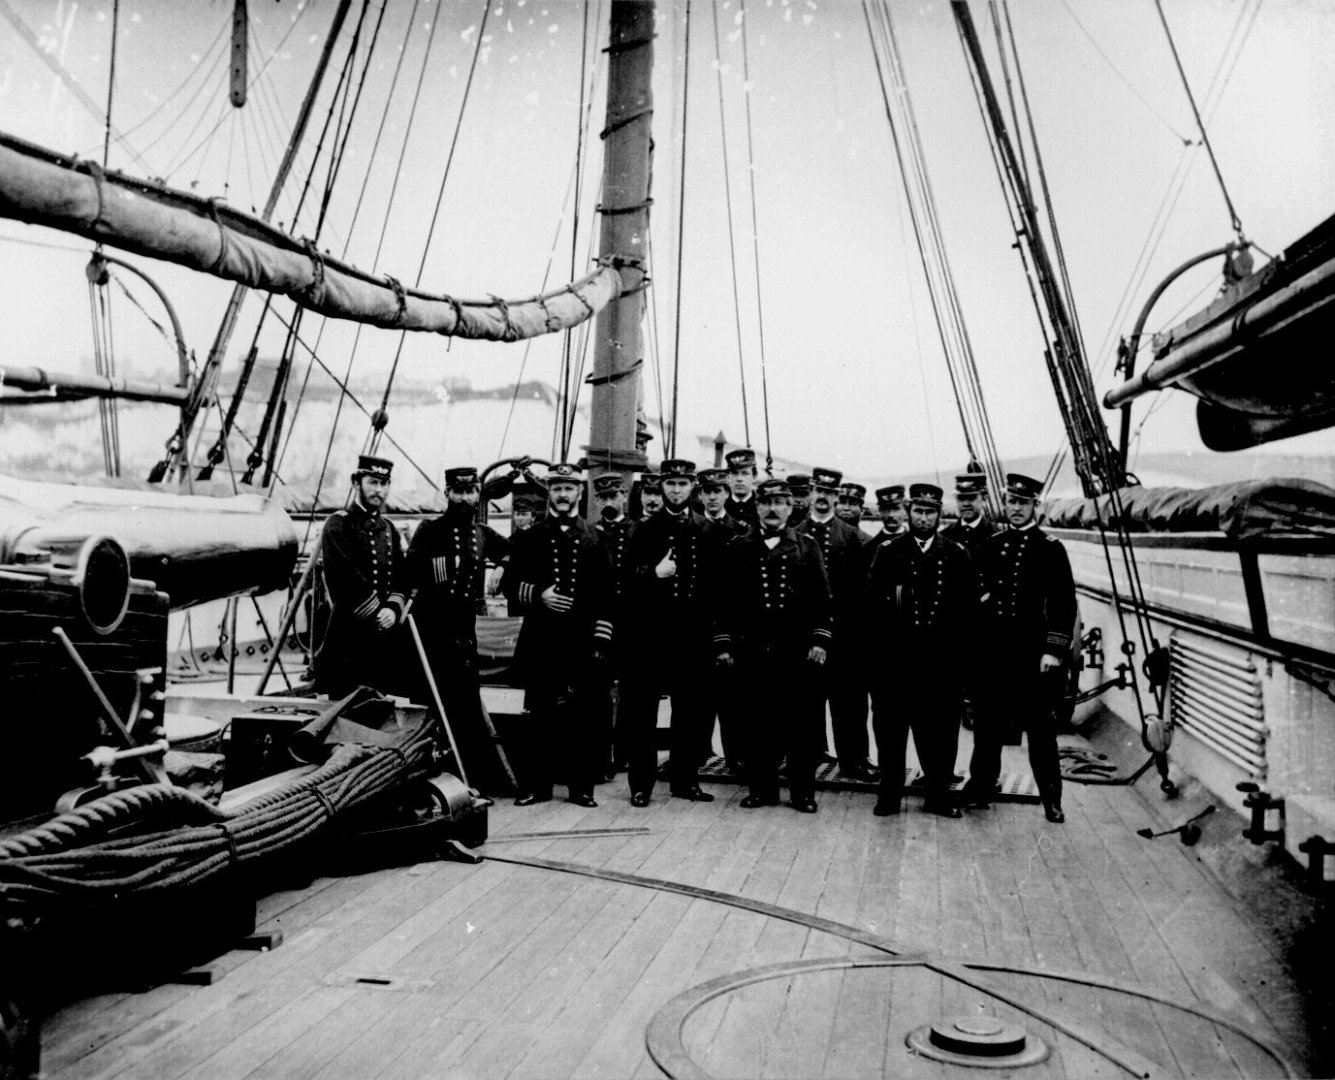
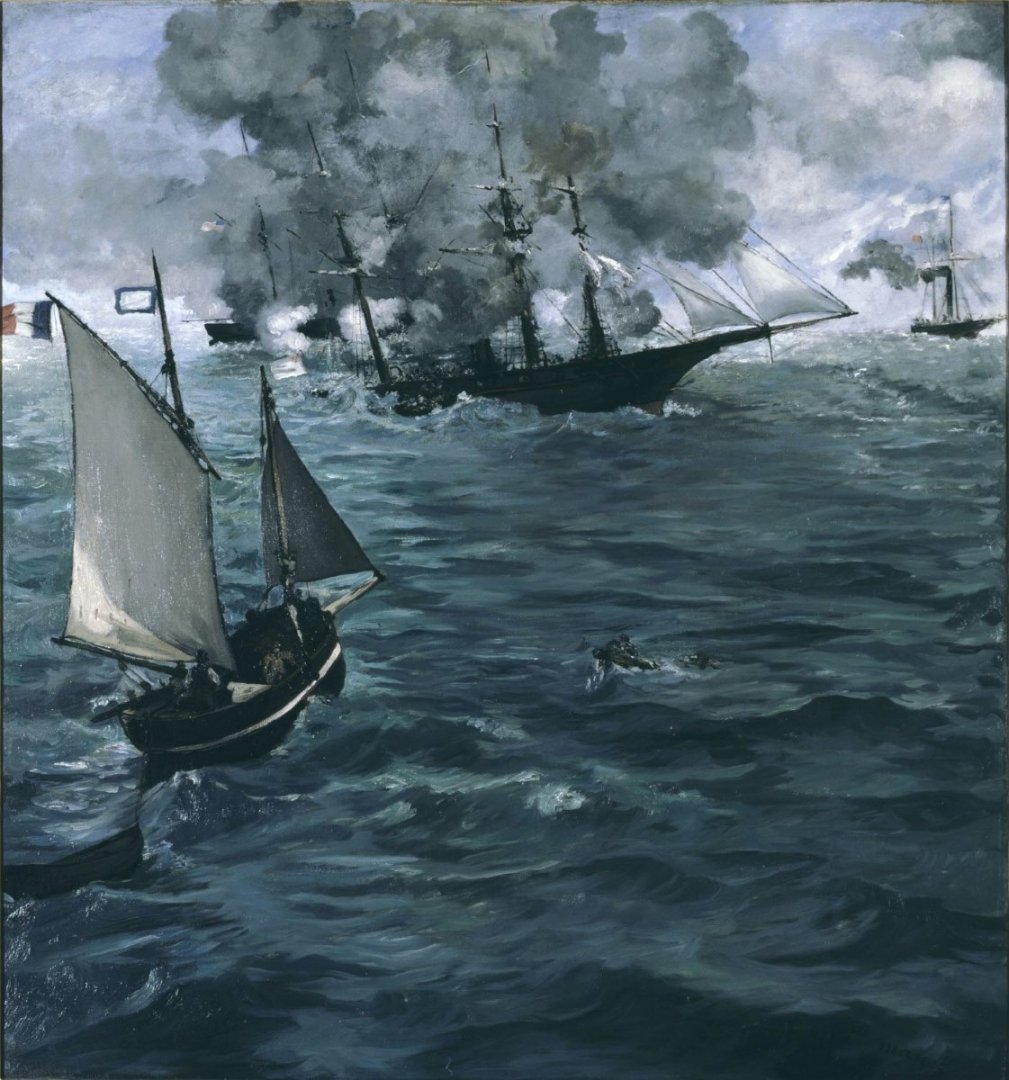
I'm currently building out the plans and parts for a scratch POB version of RRS Discovery. That is probably at least a month away from making any kind of sawdust, and I wanted to have another project where something other than electrons and paper was created, so I've decided to do the Bluejacket USS Kearsarge. This is my first Bluejacket kit, although I've used many of their parts/supplies in the past. There are other logs, and I won't reiterate what you can find on the Bluejacket website. Suffice it to say that she is a Mohican class steam sloop-of-war, built in 1861 by the Portsmouth Navy Yard in Kittery, ME, and commissioned in January 1862. <aside>If you look up Mohican class on Wikipedia or Google you will initially find the article on the Mohican herself, the Kearsarge and the Oneida (which sank with the loss of 125 in Japan. So far, my far from significant research has turned up 6 of them, two from 1859 (Mohican and Iroquois) and 4 from 1861 (Kearsarge, Oneida, Tuscarora, and Wachusett)</aside> Kearsarge is best known for sinking the Confederate commerce raider CSS Alabama. This particular battle caught the world's (and certainly the art world's) attention. I have read that only the battle between the Monitor and the Merrimack/Viriginia yielded more naval art in this period than the Kearsarge/Alabama fight. I will leave it to the psychologists as to why (larger than life personalities? the appearance of a chivalrous duel? Good artists nearby?), but there is a lot of such art out there. The default one is this one by Manet (image is public domain). It has been pointed out by people with more artistic skill than I that Manet changes the focus to the French ship coming to rescue survivors and that Kearsarge is barely visible. Manet: This is another one by Antonio Jacobsen and shows the Kearsarge nicely, with what appears to be a pretty rational rig. Just one more photo, this one of the ship's officers: I love this photo for what it says about life on board a navy vessel. This was apparently taken after the victory against the Alabama. At this point, this is probably the most famous ship in the Union Navy, Captain Winslow (3rd from left in the front row) is a national hero but you'll see that he is still wearing the old insignia for a Captain (3 3/4-inch stripes), while his junior officers (who presumably are newer at this than he is) are wearing the up to date version using more, narrower stripes (in the 1864 version of the regs, Captain Winslow would wear six stripes in two groups of 3, of the same width as the two LCDRs on his right). Bottom line was that he was on duty and had better things to do than replace his dress coat - not like anyone on the ship was going to be unaware of who he is! So, let's get the initial requirement out of the way. Here is the mandatory photo of the kit on my clean work table (not for long!). As to why this kit, well, it links a couple of areas of my interest. First, it is a Civil War era kit, and I've been fascinated by the history of that period for decades. Second, Kearsarge is, in some ways like Discovery, a transitional ship, powered both by steam and sails, and those transitional vessels have started to attract my interest of late. This project is going to be rather different in many ways from the kits of built recently (three Model Shipways kits, the Pride of Baltimore II, Niagara, and Flying Fish). This is much more 'mixed media' than those in the sense that there are wood parts, Britannia fittings, wood and metal strip, cast resin, styrene, and photo etched brass (a LOT of photo etched brass) so it will no doubt require developing some new skills. I am going to bring some techniques from those other ships though. For example, rather than paint the hull copper or using the individual copper plates, I am going to copper the bottom more or less as I did the Flying Fish using copper tape, and hopefully I'll be able to learn from my myriad mistakes on all the prior models to make this one go smoother. Regards, George

-
Well, a final entry from me in this log. Here she is in her new home: Regards, George
- 602 replies
-
- 10
-

-
- Flying Fish
- Model Shipways
- (and 2 more)
-
Well, the first change, thankfully before any sawdust is created. At the end of the day as I started printing out sections of the plans, and given some of the uncertainty around length, I've decided to switch to 1:72. It should still be easier than working in 1:96 as with the Flying Fish while coming in just over 3 feet stem to spanker (the actual length appears to be about 220 feet - exact measure once I print out the plan. However, I now have the exact amount to shrink them by and will hopefully get it done this weekend. @Vladimir_Wairoa helpfully shared the bulkhead count on his wonderful Glory of the Seas which is also at 1:72, given the relative sizes of the two ships I don't think I will need any additional bulkheads than are already on the drawings that I have. He also pointed out that I needed to make sure that they didn't interfere with cutting a mast slot, which I hadn't considered, but which it turns out is not a problem. So here are the stations at 1:72. The ship is about 5.5 inches wide at this scale. I've removed much of the yellow so I can print it more effectively and have a ruler (badly placed) for scale. The false keel will be about 3 to 4 inches tall depending on whether we are talking at the stem or the stern. I think that 1.5 inch slots in the false keel will work for all but the first and last bulkhead. The foc'sle is interesting. At least today it is closed off (unlike say the Flying Fish where it was open at the main deck (if you go to this YouTube video you can see what that access is via doors. Thus, although I was tempted to make it solid, I'm going to need to cut out an opening as you see in the MSW Flying Fish because even though it's closed, the fore stays appear to anchor inside it. And, if it turns out that it was open in Scott's day, I guess it will be a lot easier to have it open from the start rather than trying to open it out. I was thinking of using birch ply for the false keel and the bulkheads. There is a place nearby that sells what appears to be decent 1/4 inch 3 ply American birch in sizes of 24" x 48". I think that two of those should be enough for the bulkheads, and single piece keel and false keel. Finally, on Saturday morning I am going to annual Montgomery County Maryland Urban wood sale: https://montgomeryparks.org/events/montgomery-parks-urban-wood-sale/. They sell wood that comes from trees that the county had to remove from various places. I figure it is a good place to look for something that I can turn into a nice baseboard or perhaps some simple furniture (we need some place to display some items). Anyway they apparently have walnut, cedar, pine, poplar, oak, beech, cherry, cypress, and ash, some kiln, and some air dried. We shall see, I've never been before, but a nice 3/4 inch oak or cherry board in the 3/4 inch to 1 inch range, suitably prepared would work for Discovery and Kearsarge. Regards, George
-
Welcome. Just remember the essential fact of anything worth doing. The first step in building a great ship model is to... build a less great ship model. Even the most amazing builders you will see did less amazing work while they learned, and that less amazing work is what allowed them to make the amazing work. Plus, only they will realize it is less amazing work - to everyone else it's awesome. Regards, George
-
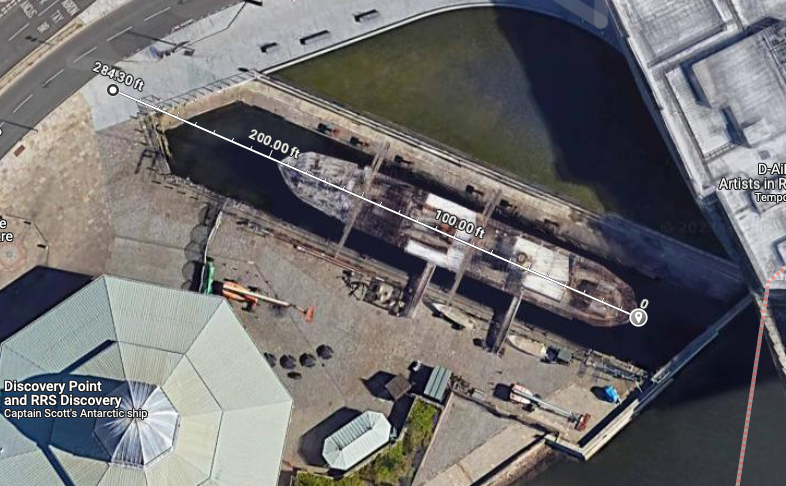
Well, next step was to try to validate what scale the plans would be once they were actually printed out. The ones from the NMM are really huge (24917 × 9042 pixels for the sheer drawing, for example). Printed at 300 dpi that would yield a drawing 83 by 30 inches. The nominal scale on the drawings is 1/4 inch = 1 foot or 1:48, so a 200 ft long ship at 1:48 would generate be 50 inches on the plans, that seems consistent for a 3 view diagram with borders. When I print a piece of the plan (what a pain that turned out to be) at 50% scaling, I wound up with a half beam at station 7 (the widest point on the ship) of almost exactly 2 inches, or an 8 inch full beam at 100% diagram scale. At 1:48 that's 32 feet with an extreme beam of 33 feet (I was using the lower view rather than the slices so I don't think it's significant). So, it looks like at 100% it will print to 1:48, and I can get a printer to reduce it to 66.6667% and get 1:64. My original plan, BTW, was to use the length overall to make sure that the scale was good. I know the LBP (172') and I wrote the Discovery Point museum asking about the overall length. Unfortunately, they wrote back to tell me that the overall length (spanker boom to tip of the jibboom) was 284 feet! Accounting for the additional length on deck, that would seem to imply a 90 foot bowsprit/jibboom. That seemed wrong to me (maybe they swapped a digit?). Discovery's bowsprit and jibboom are pretty compact, and it fits comfortably in its slip. I went to Google maps and measured 284 feet from the aft bulwarks and it runs out of the slip, over the pedestrian areas and almost to the A85 road. Anyway, I sent them another note asking if they really meant that long, so we'll see. Don't get me wrong, they have been incredibly helpful, but when your 1:64 project goes from 41 inches to 53 inches, you start to worry! Regards, George
-
And I seem to recall there is a large aluminum smelting operation in Iceland due to a combination of hydro and geothermal
-
Good pics of the boat davits as well!
-
Nice looking figurehead. It's got the grace of a real fish.
-
Bruce, The Discovery is in the Lloyd's Register starting in the 1901-1902 (R.F. Scott, RN listed as master). They appear to have plans for the replacement ship Discovery II from 1926, but no plans for the original. It does provide some details on the engine and it's manufacturer, which are quite interesting. A very interesting resource, thanks for the tip! George
-
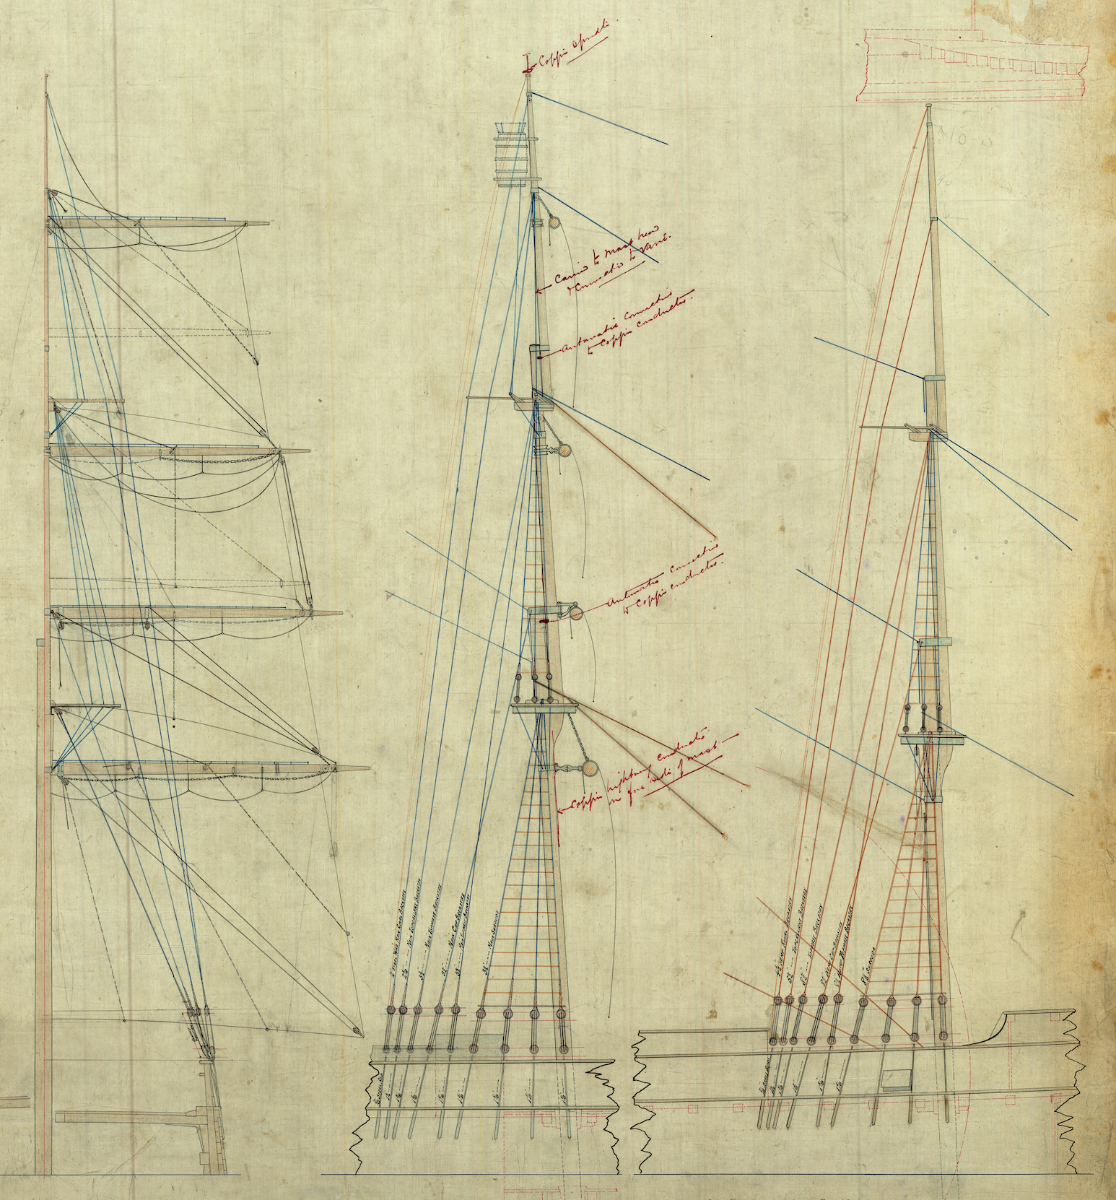
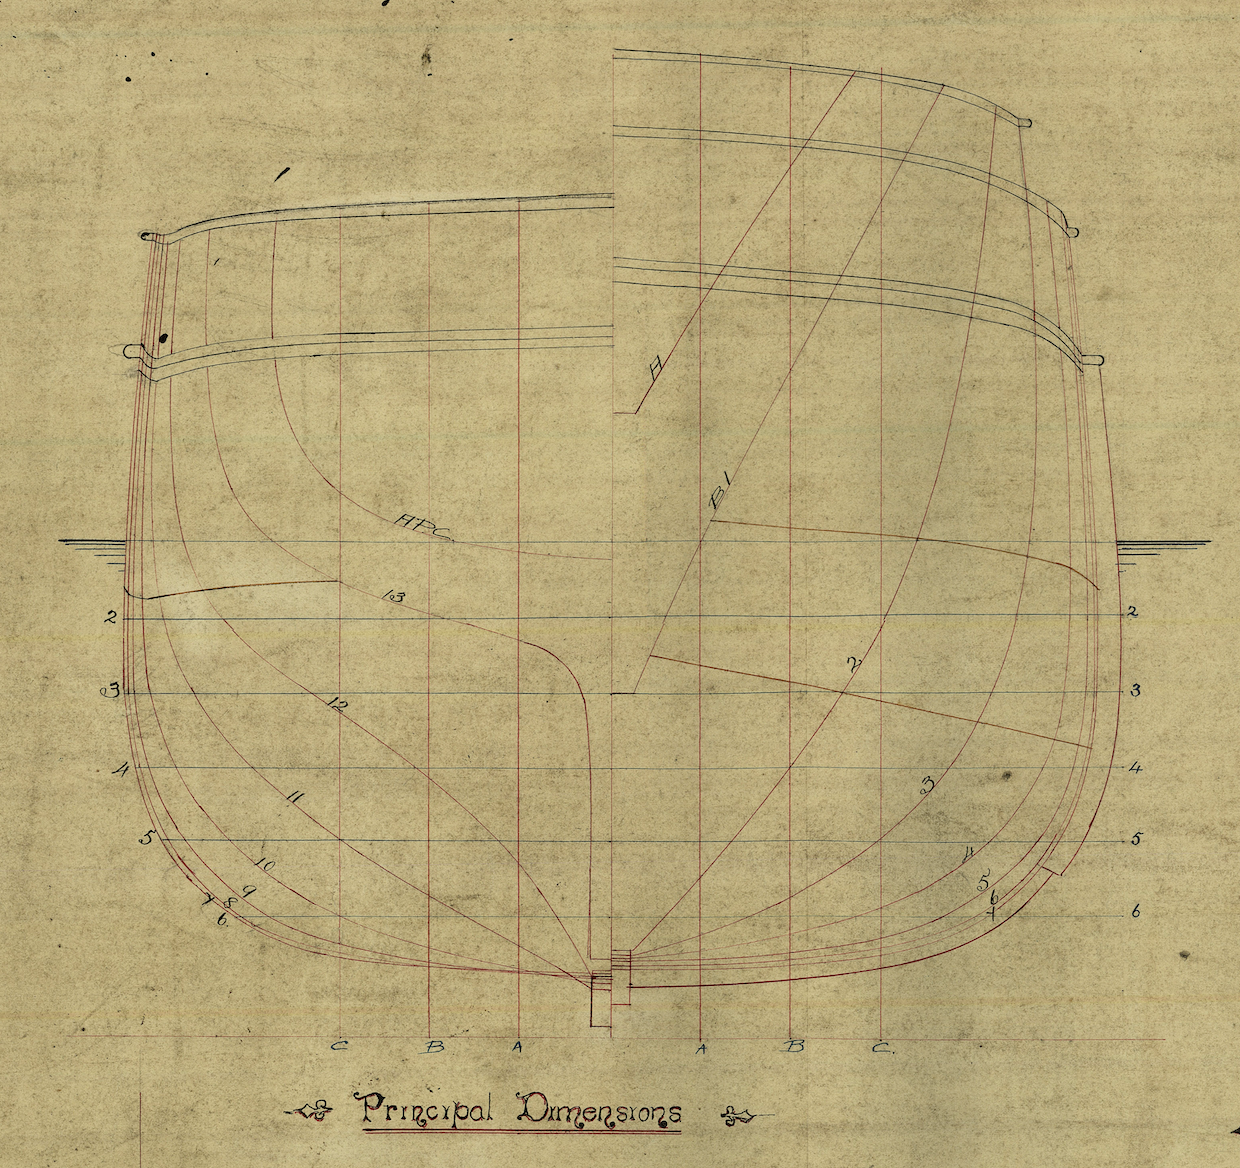
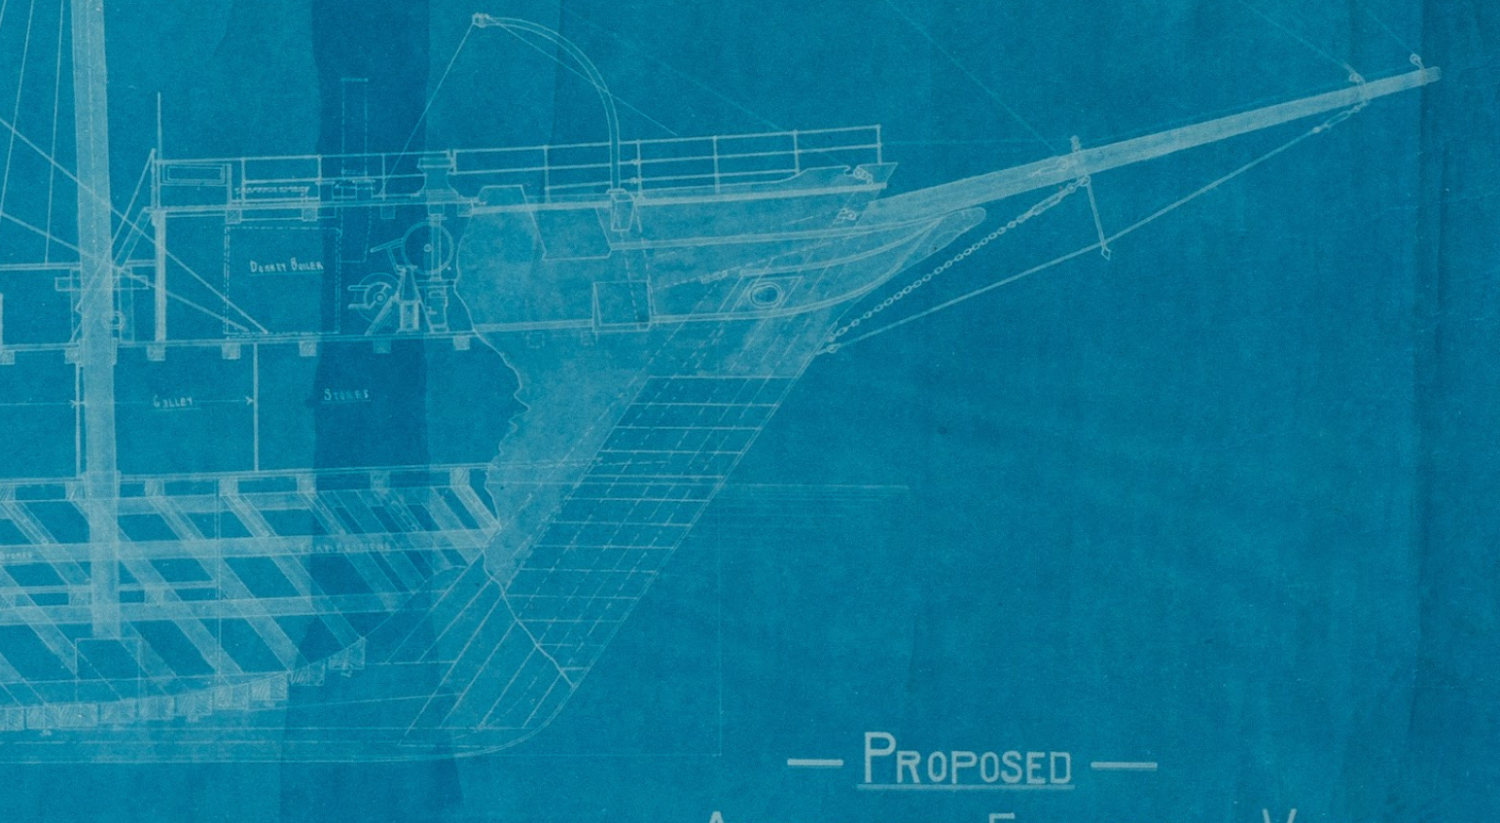
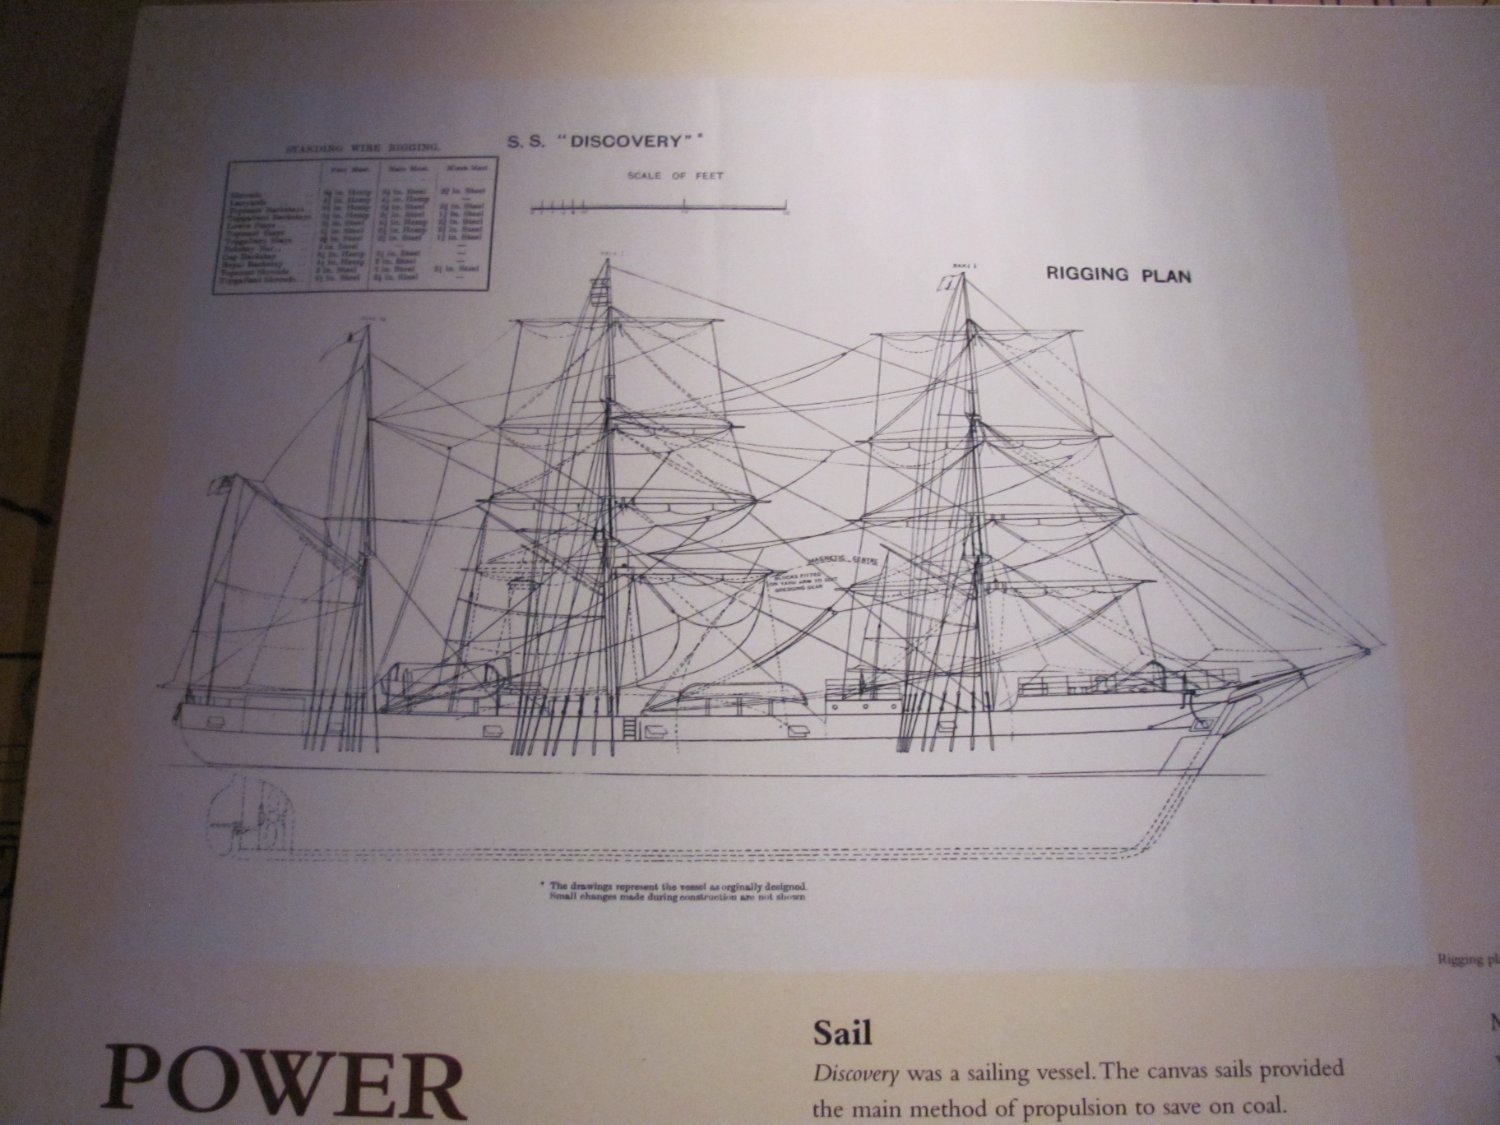
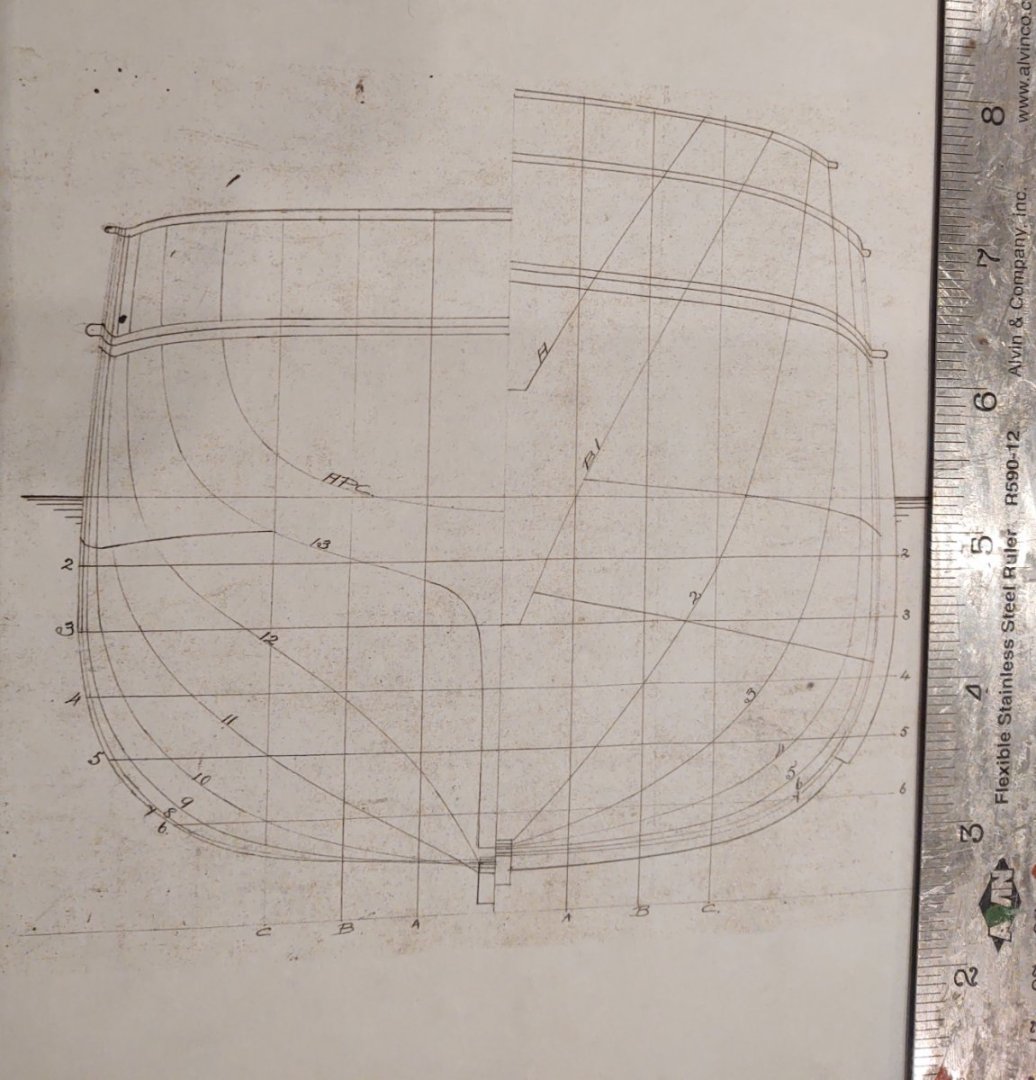
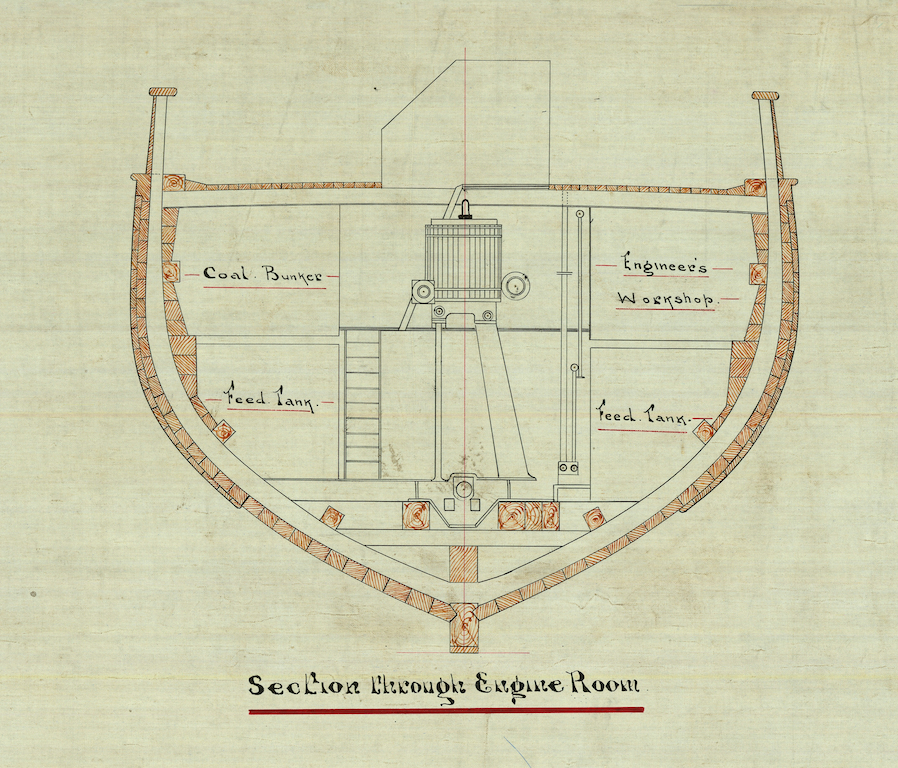
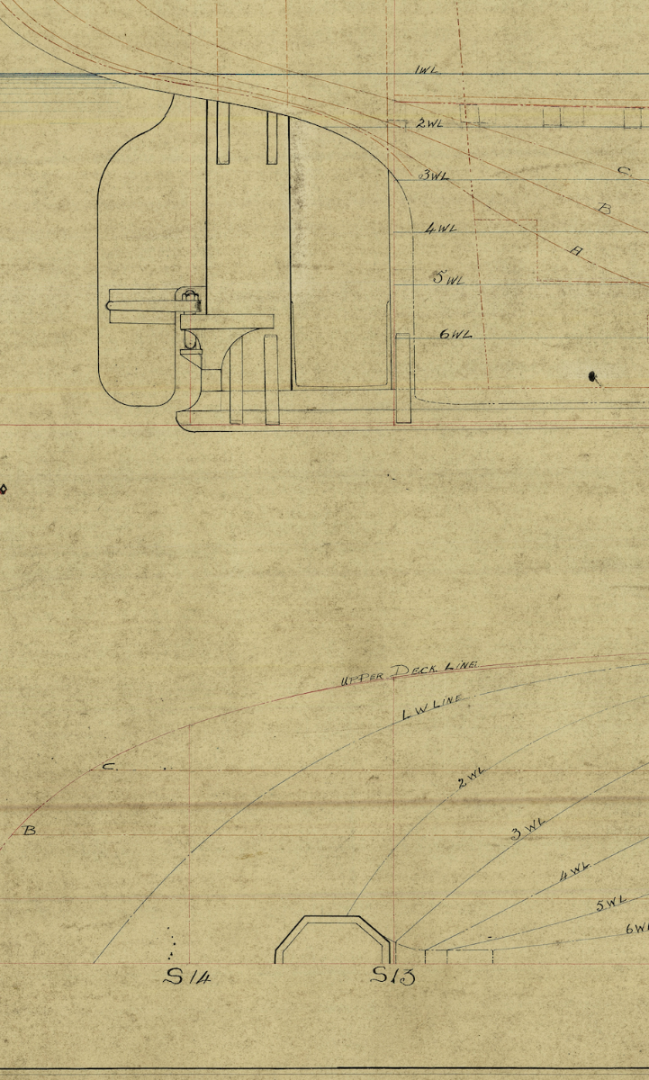
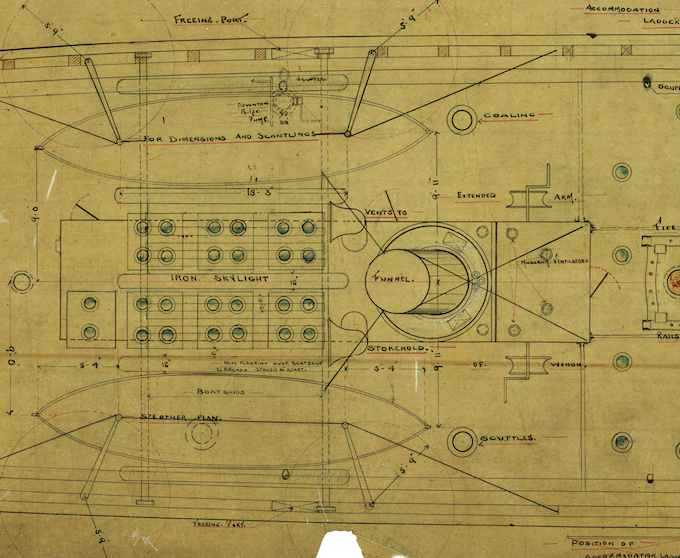
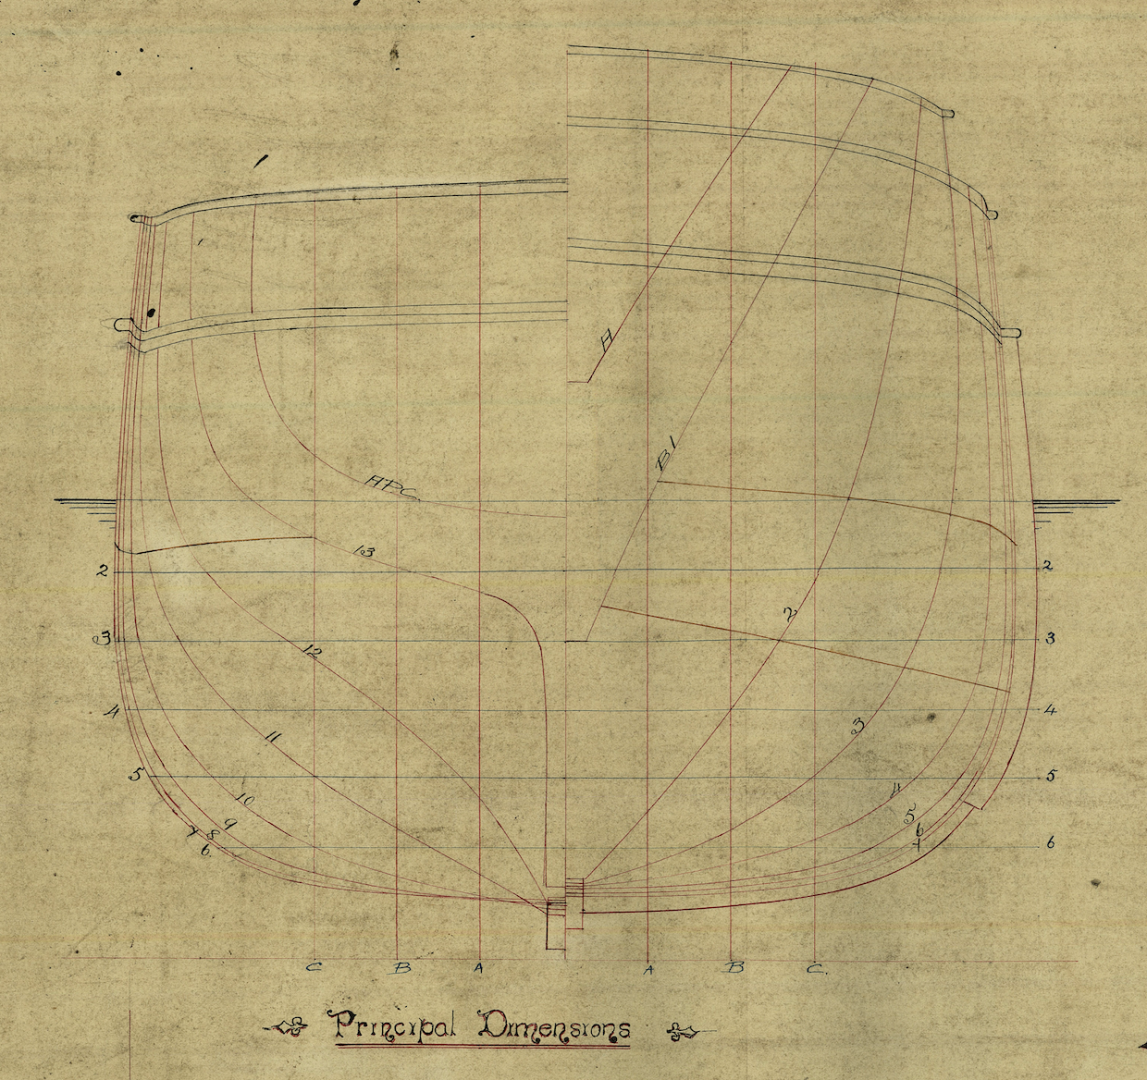
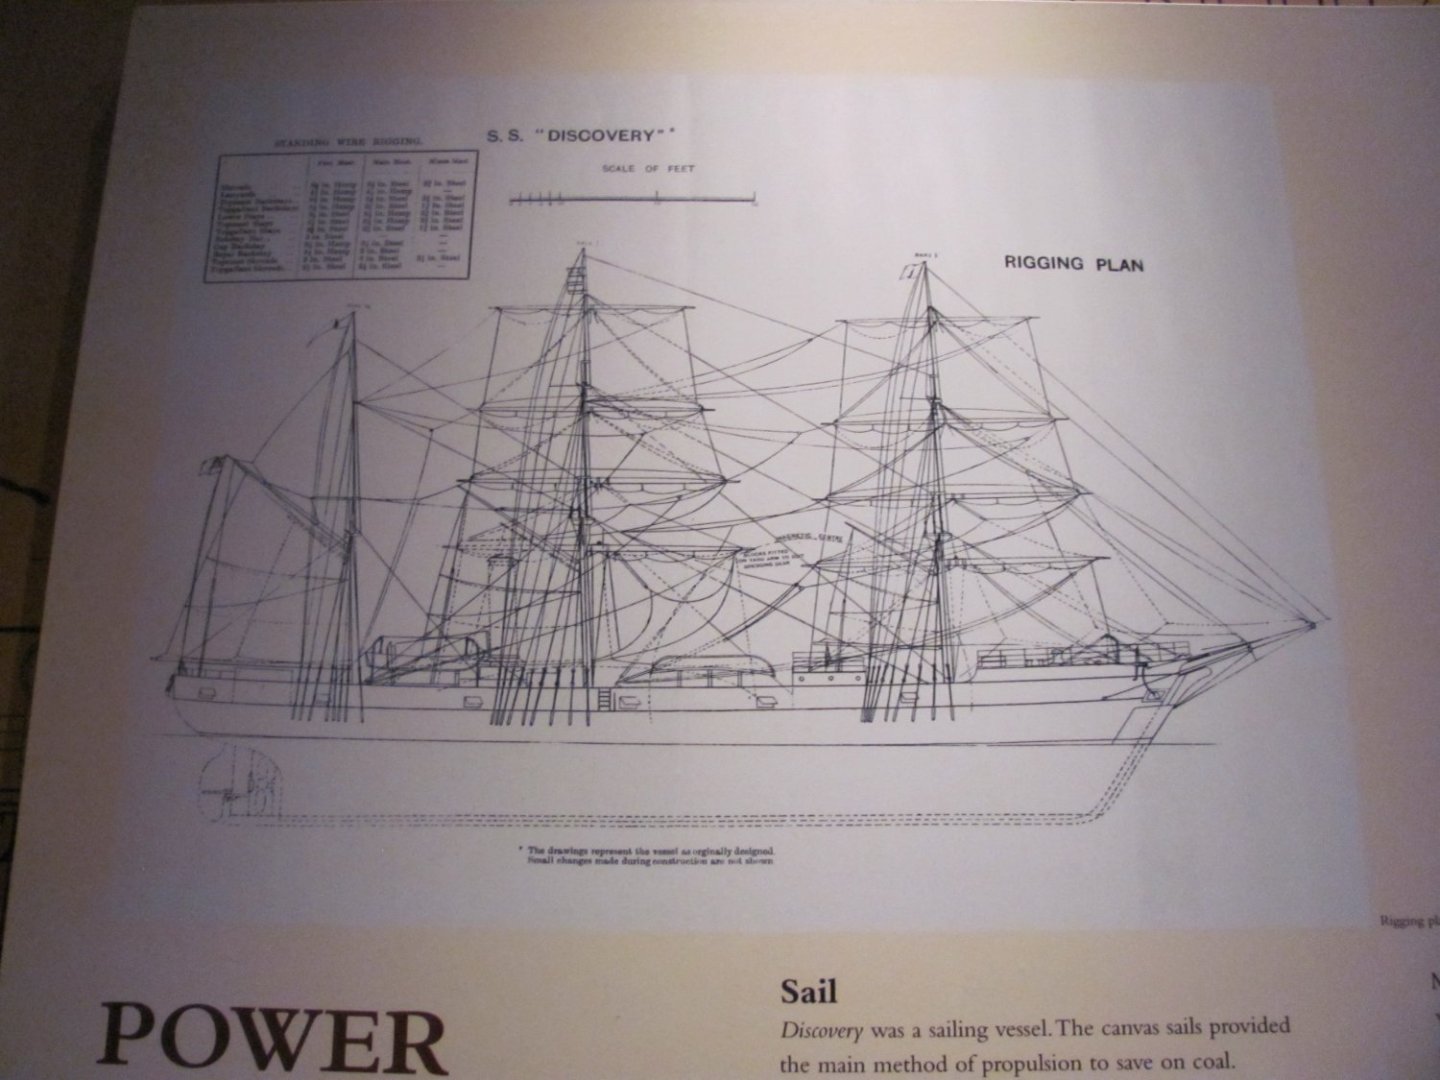
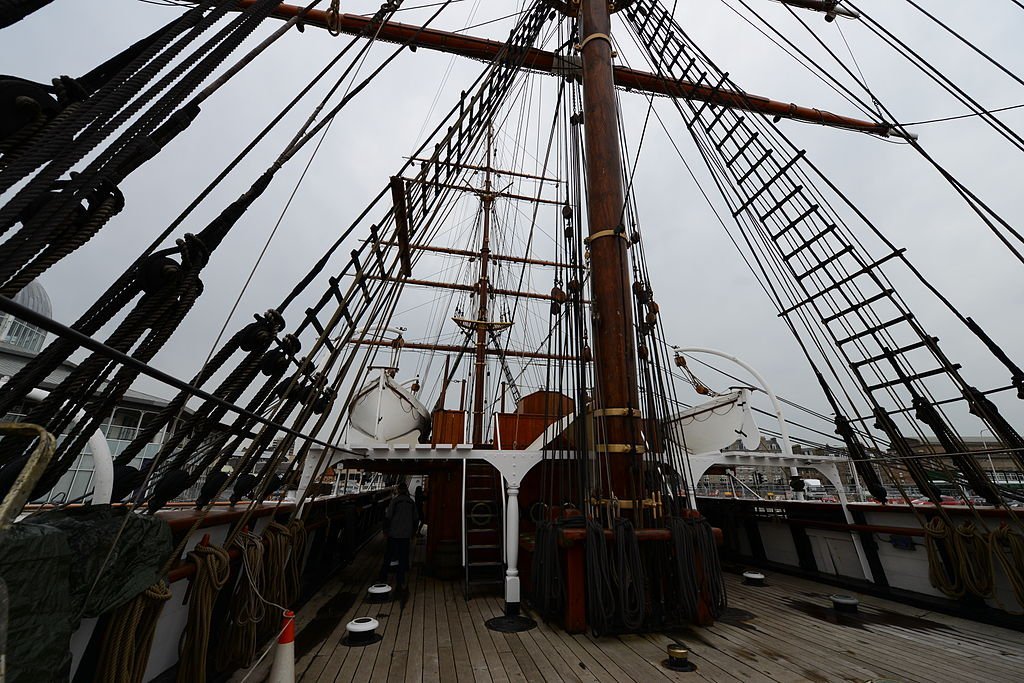
I have plans for RRS Discovery from a number of sources. The Discovery Point Museum in Dundee (where the ship is docked) sent me a few, along with some photos, and I ordered some of the large collection of plans for the RRS Discovery that the National Maritime Museum (NMM) has in Greenwich. I ordered 6 from the NMM, primarily because I had to pay for the scanning charges, which run £70 for the first document and £50 for the following ones. The docs I ordered were: Lines Main/Lower Decks/Hold Hold/Sections Sections Mast and mountings Profile, Upper, Forecastle & Bridge Decks It turns out that I probably didn't need docs 2,3, or 4, but that was only known in hindsight. Just to give you bit of an overview of what the plans are like, and something about the ship (while keeping to my obligations under the NMM license) here are some details, but not the complete drawings (and at lower resolution). So, looking at part of the sheer plan you will see that the ship has a bit of a drag: I will need to plot some more stations to make the hull flow better, but that shouldn't be a problem. If you wanted to do a full plank on frame, the section sheets have really great construction details, although the content of 3 and 4 are quite similar. The ship has three layers of wood in much of the hull, an inner layer on the inside of the frames, and up to two additional layers on the outside of the frame. Here is an example section through the engine room. The ship has a 450 hp triple expansion steam engine mounted vertically. You can see the three layers of wood in this as well. Again from the sheer diagram. The hardest thing to build on the hull is likely to be where the prop was located. If you look at the bottom of the image, you will see an octagonal structure - this was so that the prop could be raised into the ship for easy repair. My original thought was to cut the center keel for the POB ship to include the mount for the rudder, but I'm less sure now. I may add the rudder mount after I've cut the octagon in the planked ship, or maybe I will add the octagon prior to planking. Not sure at the moment, still thinking that through. The detail of the weather deck plans is excellent. Here is an excerpt over the engine rooms. A number of interesting features here, including the coaling scuttles. You can see (on the right hand side) 4 of the myriad mushroom vents that were used to provide light and ventilation to the lower decks. They were used because of the concern that portholes would compromise the structural integrity of the ship. Here is a photo of them (Link: https://commons.wikimedia.org/wiki/File:Deck_(336716710).jpg) The ship's rig was designed to support an expedition far from home. This shows the fore and main mast, but if you look, although they look different, they were intentionally designed to use the same size masts and yards (i.e. the main and fore course yards were the same, etc.) so that they could carry fewer types of spares in a location where there were no trees to build new ones. The difference in heights is driven by where they are stepped, not because they are different sizes. This was an antarctic vessel, so it has plates on the bow to help break the ice (this is a closeup of a plan that Discovery Point kindly sent me). And they sent a rigging plan (which I am going to ask them to take a closer photo of). The sheet with the masts has most of the standing rigging, and the data on the routing of the lifts, sheets, clews, and buntlines, but not the braces, which are shown here. More important is the size and type of lines in the upper left corner, which will be very helpful when it comes time to build yards and rig. The key thing is that the lines are a mix of steel and hemp. I have yet to find something that is an obvious belaying plan, nor are there any pinrails shown on the plans, although they are visible on photos. I will ping Discovery cove and look at some of the photos at the Scott Polar Research Institute to make up my mind, but I suspect like a lot of contemporary ships they just had pinrails throughout the ship. Link: https://commons.wikimedia.org/wiki/File:RRS_Discovery_Dundee_Main_mast_rigging.JPG A couple of other observations from this photo. Note that the ratlines are slats, so, no knots. Not so yea, as I need to figure out how they are mounted. Again, email to Discovery Point. ALso, note that it looks like they use bar fairleads rather than trucks, which I find much easier. So, that is where we currently stand. Next step is to get a full sized (i.e. at 1:64) printed someplace with a big printer, and then figure out where the boundaries on the centerpiece and the keel. Take the lines and cut out patterns for the bulkheads on paper, and then eventually get to the point where I can buy some wood and think about cutting it out. Regards, George


-
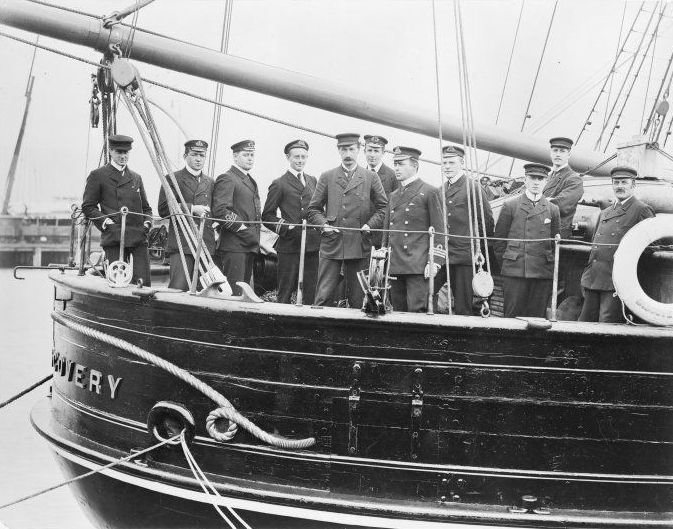
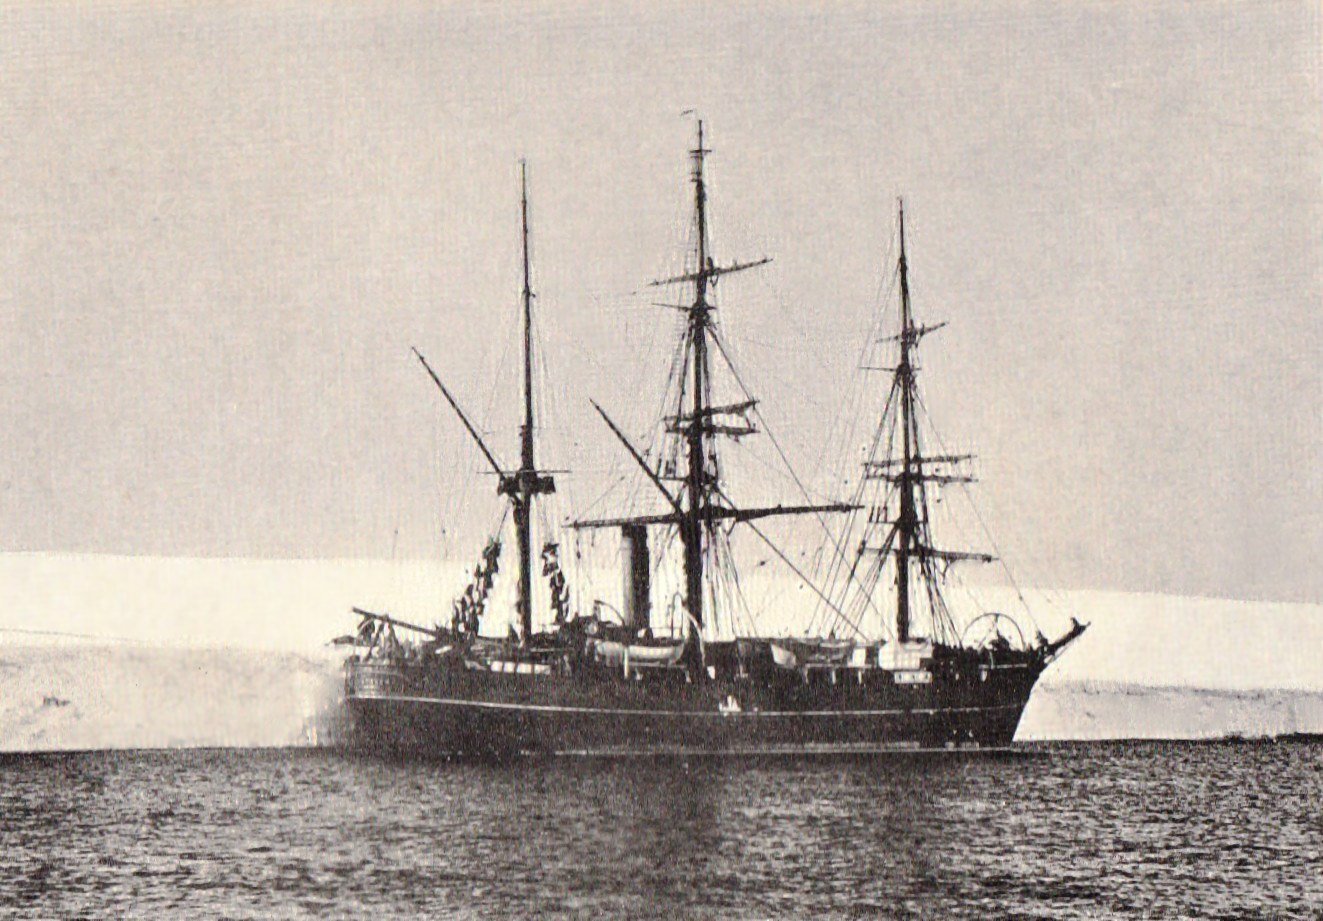
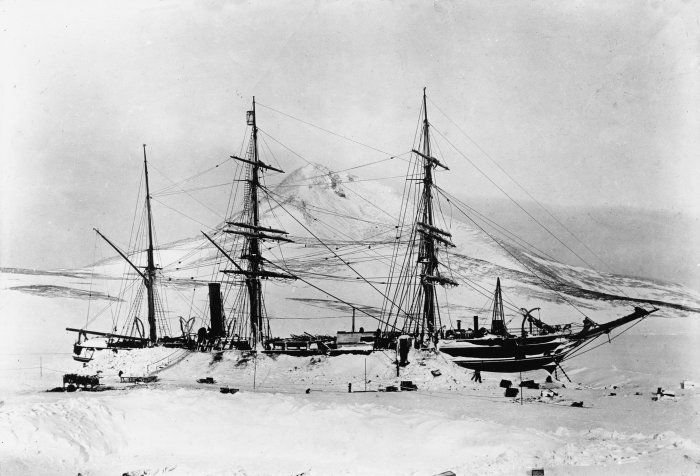
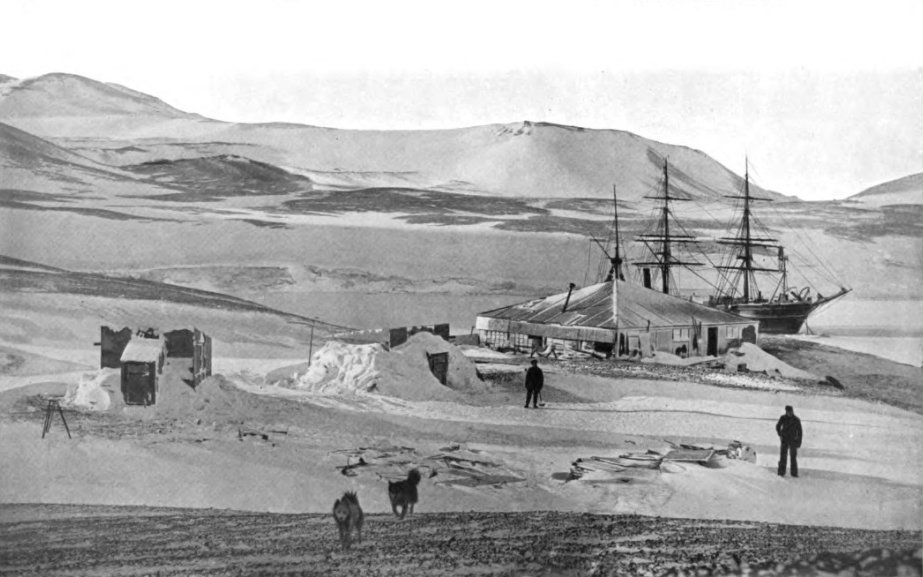
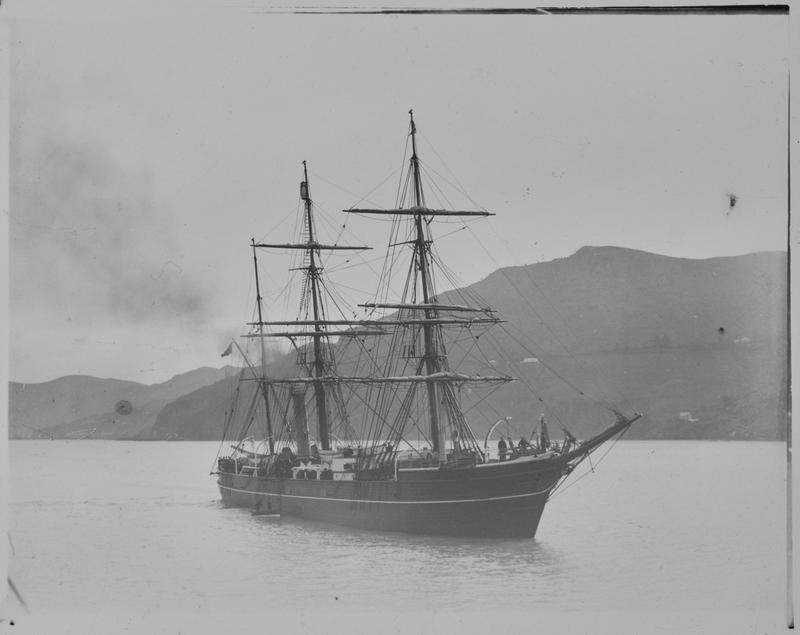
Hello. This is the start of what will become a build log for a scratch version of the RRS Discovery, a Royal Research Ship built in 1901 to support what was officially called the British National Antarctic Expedition, but which eventually became known as the Discovery Expedition of 1901-1904 after the ship. I'll go into more information about the expedition later, but suffice it for now to say that it was led by Commander Robert Falcon Scott and included such other polar explorers as Ernest Shackleton (of Endurance fame) and Reginald Skelton, who was her Chief Engineer. Although on an official government expedition, and her officers were on loan from the Royal Navy, the ship itself was not a RN vessel, as such, she used the Blue Ensign rather than the Red Ensign. One might ask why build the Discovery. Well, for a start, I think that Discovery has been more than a bit overshadowed by the Endurance, and rather unfairly at that. To date, I am only aware of an uncommon Airfix kit of her. Unlike Endurance, she came home, was used for exploration in other areas, and still remains to this day, in Dundee, where she was built. I find her an interesting subject because she is a transitional ship, a steam vessel but with a full Barque rig, and was fitted out as a floating research lab, designed to conduct science in a hostile environment far away from any help; the epitome of exploration. The ship is the namesake of many other vessels doing difficult things in difficult places, including several other Royal Research Ships: Discovery II (1929), Discovery (1962) and Discovery (2013). Space Shuttle orbiter OV-103 Discovery is named after her, and several other ships with similar names, and the ship Discovery-1 from 2001: A Space Odyssey was also named after her, as Arthur C. Clarke used to eat his lunch on her while she was in London. As I indicated, the ship is still in existence in Dundee. This is a wonderful, but imperfect reference, as she has been modified a number of times. Her rig is rather different now (5 vs 4 yards on the square rigged masts, for example, and my goal is to make her as she appeared in 1901 on her way to Antarctica for the first time. I should also point out that this log is starting with the development of a Plank-on-Bulkhead design that I can implement. My suspicion is that I won't really be making sawdust until some time in the new year. With all that out of the way, let's have a look at the ship (photo source link here: https://commons.wikimedia.org/wiki/Category:Discovery_(ship,_1901)#/media/File:Stern_of_the_Discovery_-_geograph.org.uk_-_1805082.jpg) As you can see, she is a Barque rigged steamship. The hull is relatively straight sided above the planksheer, and we have three masts, two square rigged, with a fore and aft mizzen. To give some scale her dimensions are: Length between perpendiculars: 172 feet Beam (extreme): 33 feet I expect that when the spanker boom, bowsprit and jibboom are accounted for, she'll be 200-210 feet long, or about 39 inches with a hull 6 inches wide. Here are a few photos of the ship during the expedition. For those that aren't aware, the ship spent several years bound in ice, so many of the photos show her in that condition. (Source link: https://commons.wikimedia.org/wiki/Category:Discovery_(ship,_1901)#/media/File:The_ship_Discovery,_Antarctica,_1901.jpg) Source link: https://commons.wikimedia.org/wiki/Category:Discovery_(ship,_1901)#/media/File:The_ship_Discovery,_Antarctica,_1901.jpg Discovery by the ice. Link: https://commons.wikimedia.org/wiki/File:Discovery_alongside_Barrier.jpg The ship's officers including Scott (center, 3 stripes on sleeve). Source link: https://commons.wikimedia.org/wiki/File:ATLNZ_11715.jpeg And here are is a photo from the New Zealand Maritime Museum Hui Te Ananui a Tanaroa. (New Zealand Maritime Museum Hui Te Ananui a Tangaroa, [https://collection.maritimemuseum.co.nz/objects/51662/lantern-slide-rrs-discovery-1901-barque-rigged-auxiliary-steamship (accessed on 2023-11-21], ) Hopefully, this will whet your appetite for the ship. On my next post I'll describe the plans that I have been able to obtain so far. Regards, George
.jpeg.11e756da1340b47bbc5545f4e0cff2bd.jpeg)
-
Starting to go off topic here, but that person also appears to have a video of @mbp521 (aka Brian's) USS Cairo model, and I'm guessing others (I haven't dug into it - life's too short, but the Cairo popped up in the 'you might like' after the video).
- 602 replies
-
- 1
-
-
- Flying Fish
- Model Shipways
- (and 2 more)
-
Well, answering the second question first, I can only speak for myself when I say I wish I had some of his old models to remember him by. The only one that survived the years and the moves was a 3" tower with a checkered flag that was part of an old HO scale Aurora slot car set from the mid '60s. It's part of a very small set of physical things I have to remember him by (the rest are some photos and the light from the top of his taxicab). As to the first question, I'm not a materials scientist, but my read is that most plastics are going to take the bulk of their damage from UV via creation of free radicals, and how deep it goes will be driven by a number of factors associated with the mobility of the radicals in the specific material. I would presume any paint would provide an ablative surface that would protect the underlying plastic against UV derived free radicals, and might (depending on properties) be more or less resistant to UV and/or more or less likely to spread the radicals than the underlying plastic itself. Wishy-washy I know, but hard to see how paint wouldn't at least help a little and probably help a lot. My $0.02. Regards, George
- 602 replies
-
- 2
-

-
-
- Flying Fish
- Model Shipways
- (and 2 more)
-
Thanks Vlad and John! John, I think most of the pictures in that video are of @MikeR's scratch Flying Fish, but there does appear to be one at the end of the fish before I had crossed the yards. Regards, George
-
Looking great! Can't wait to see the finished product!
-
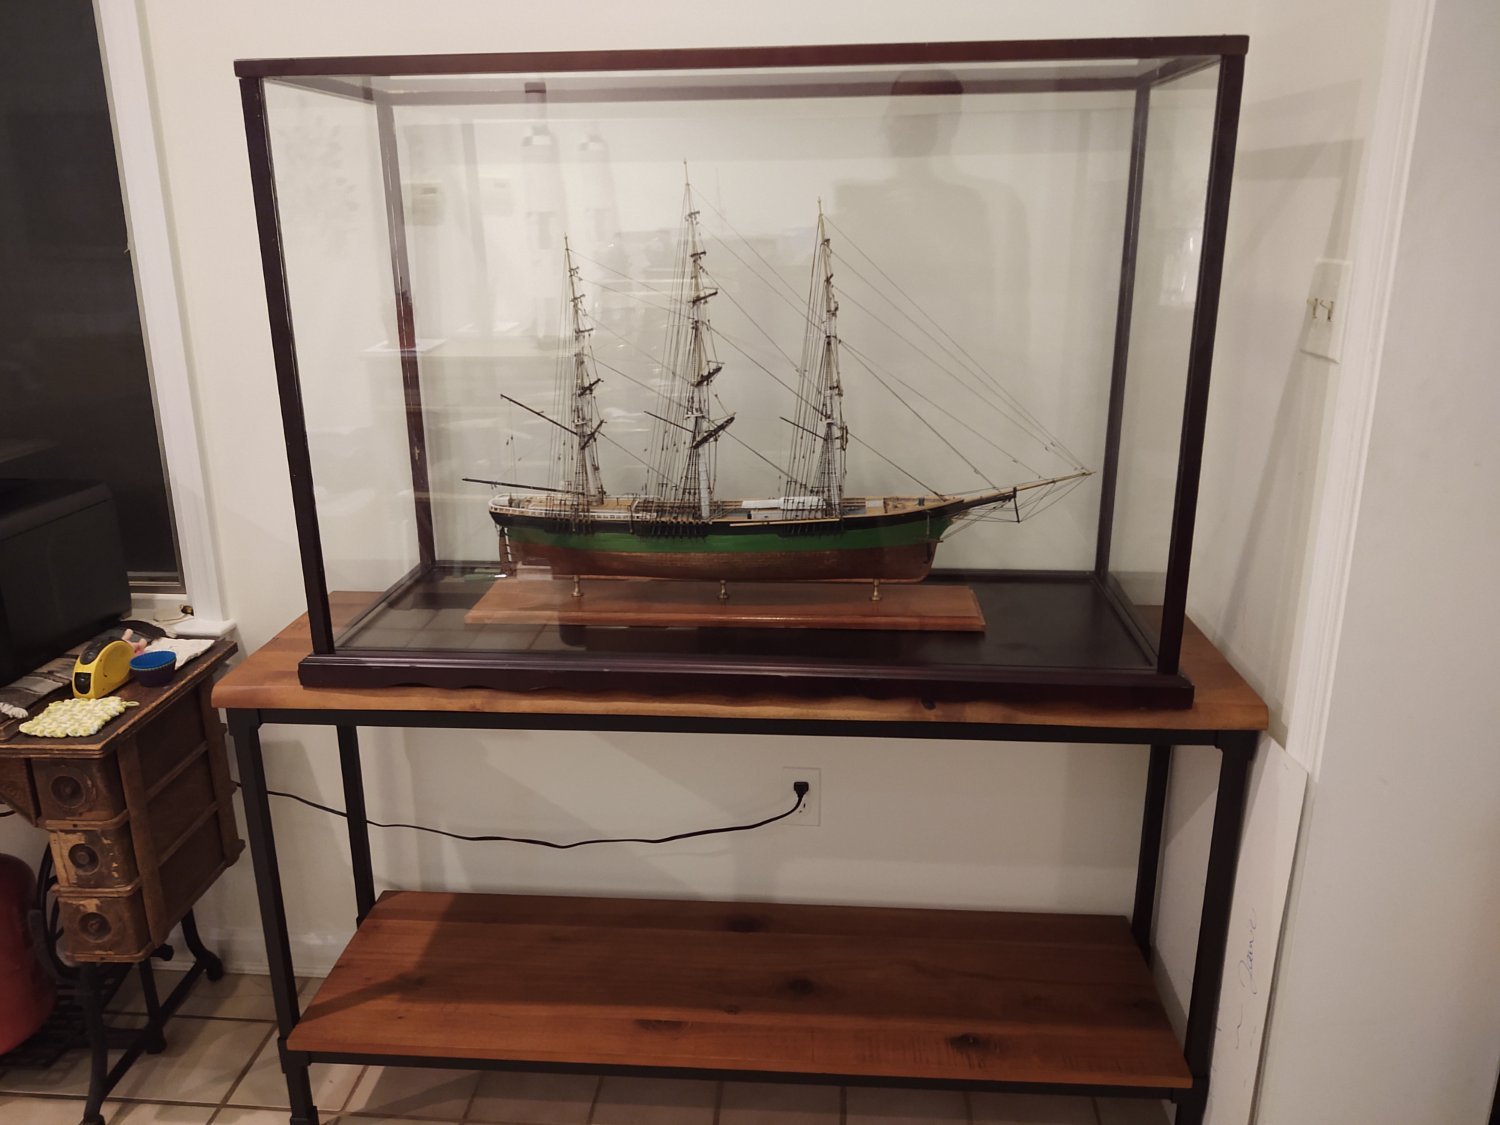
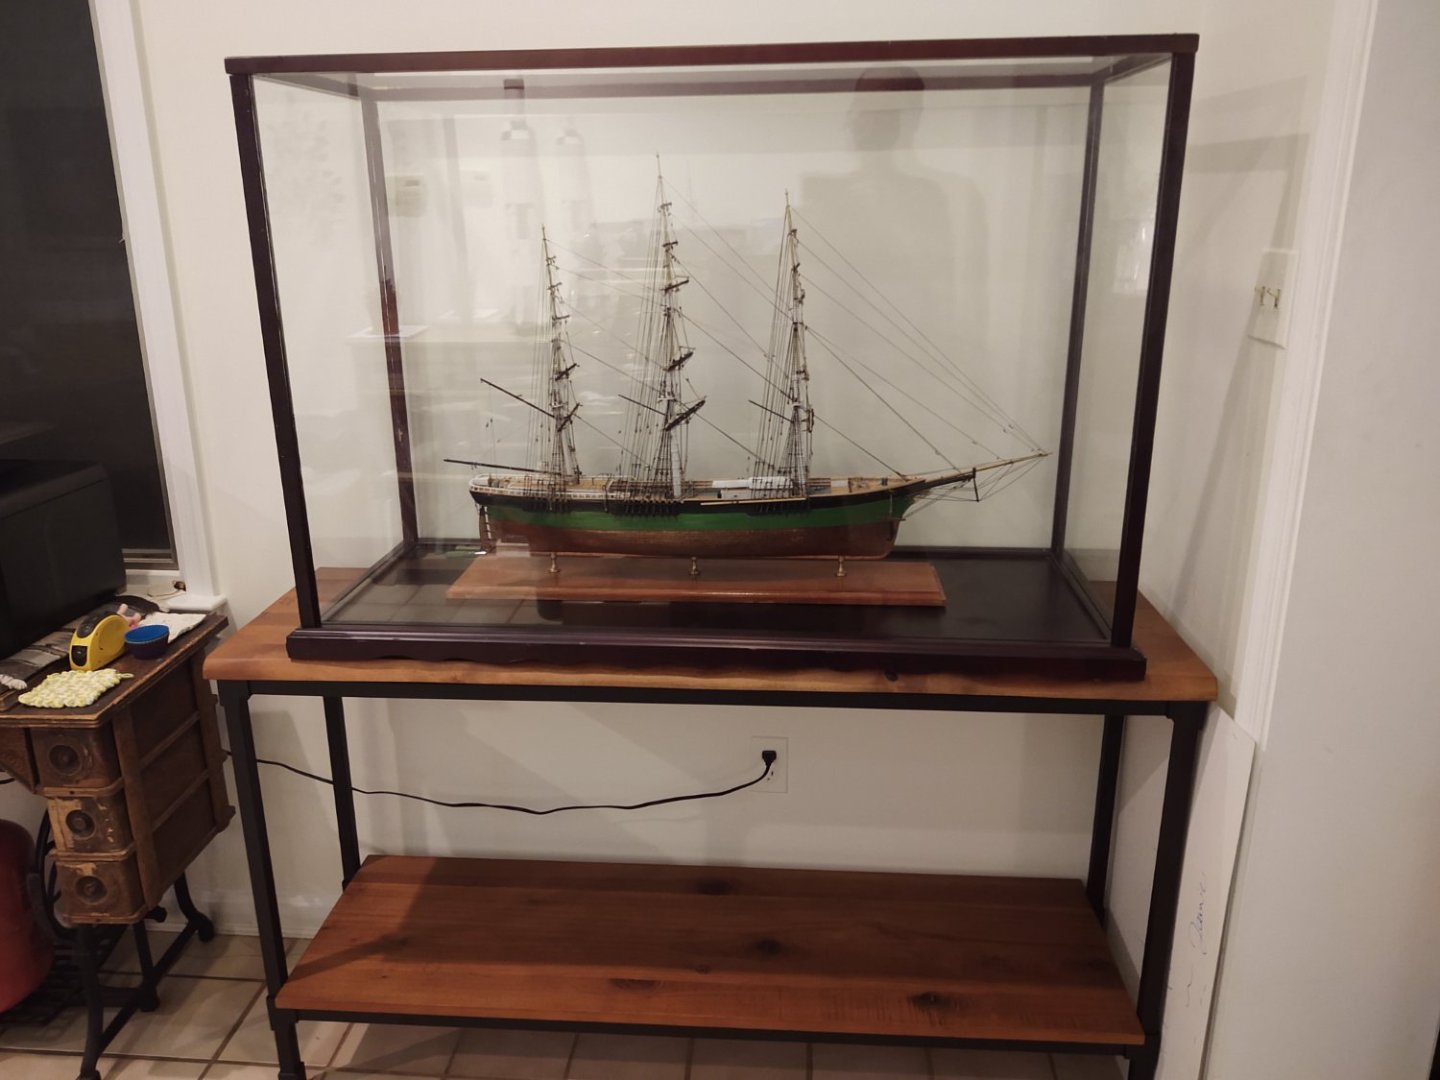
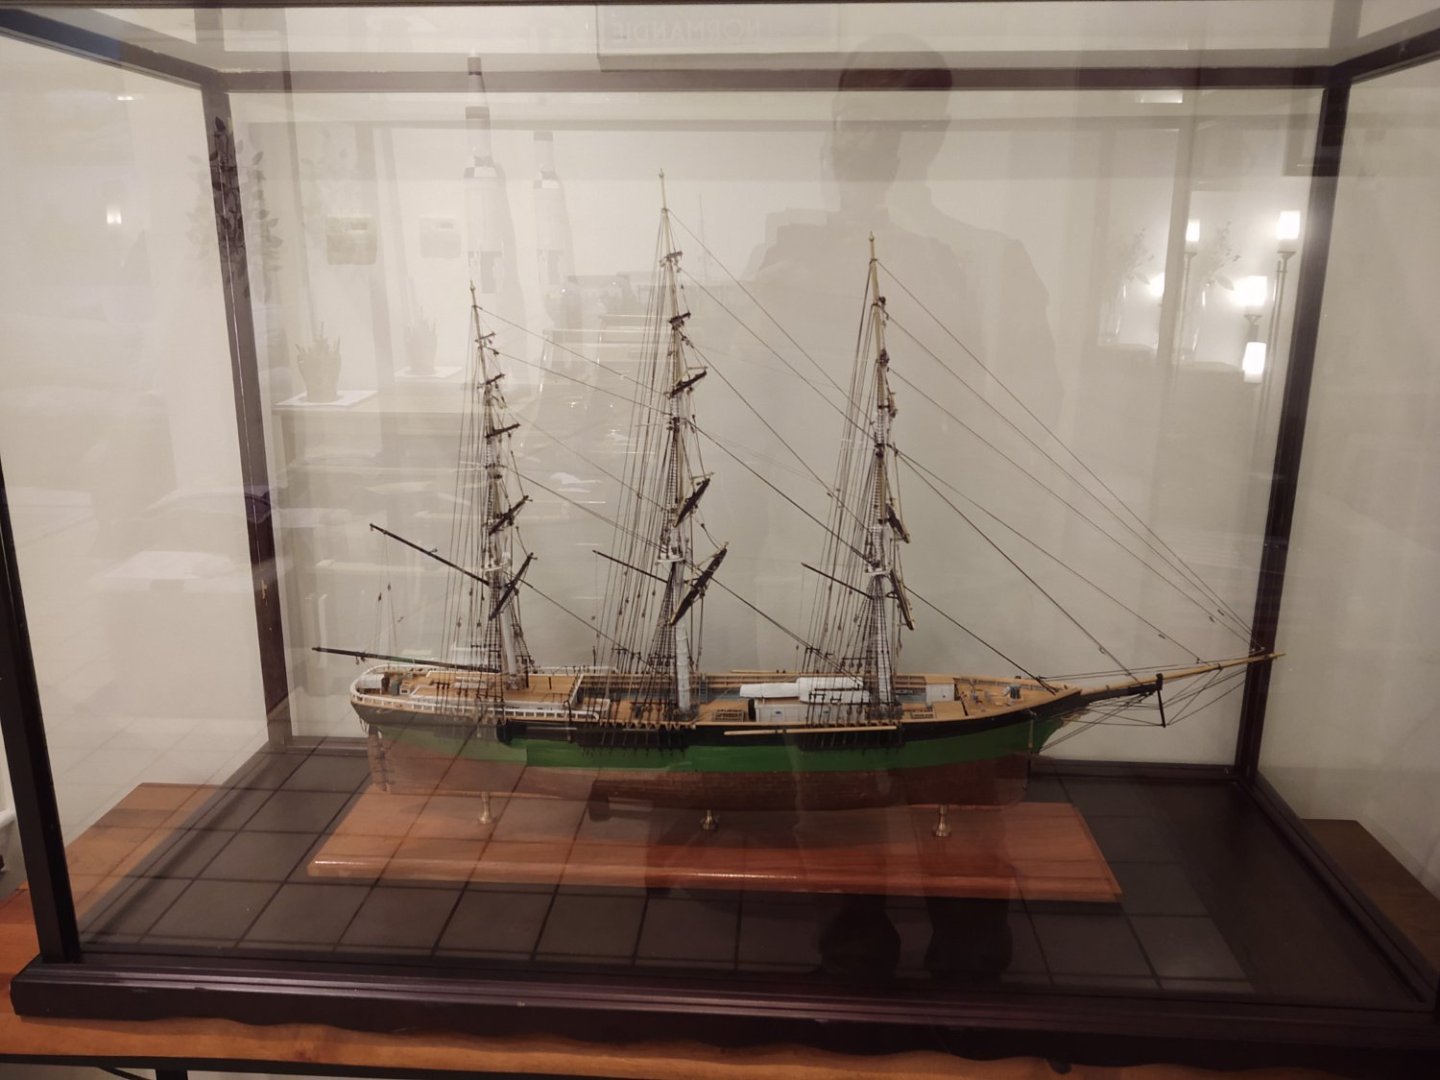
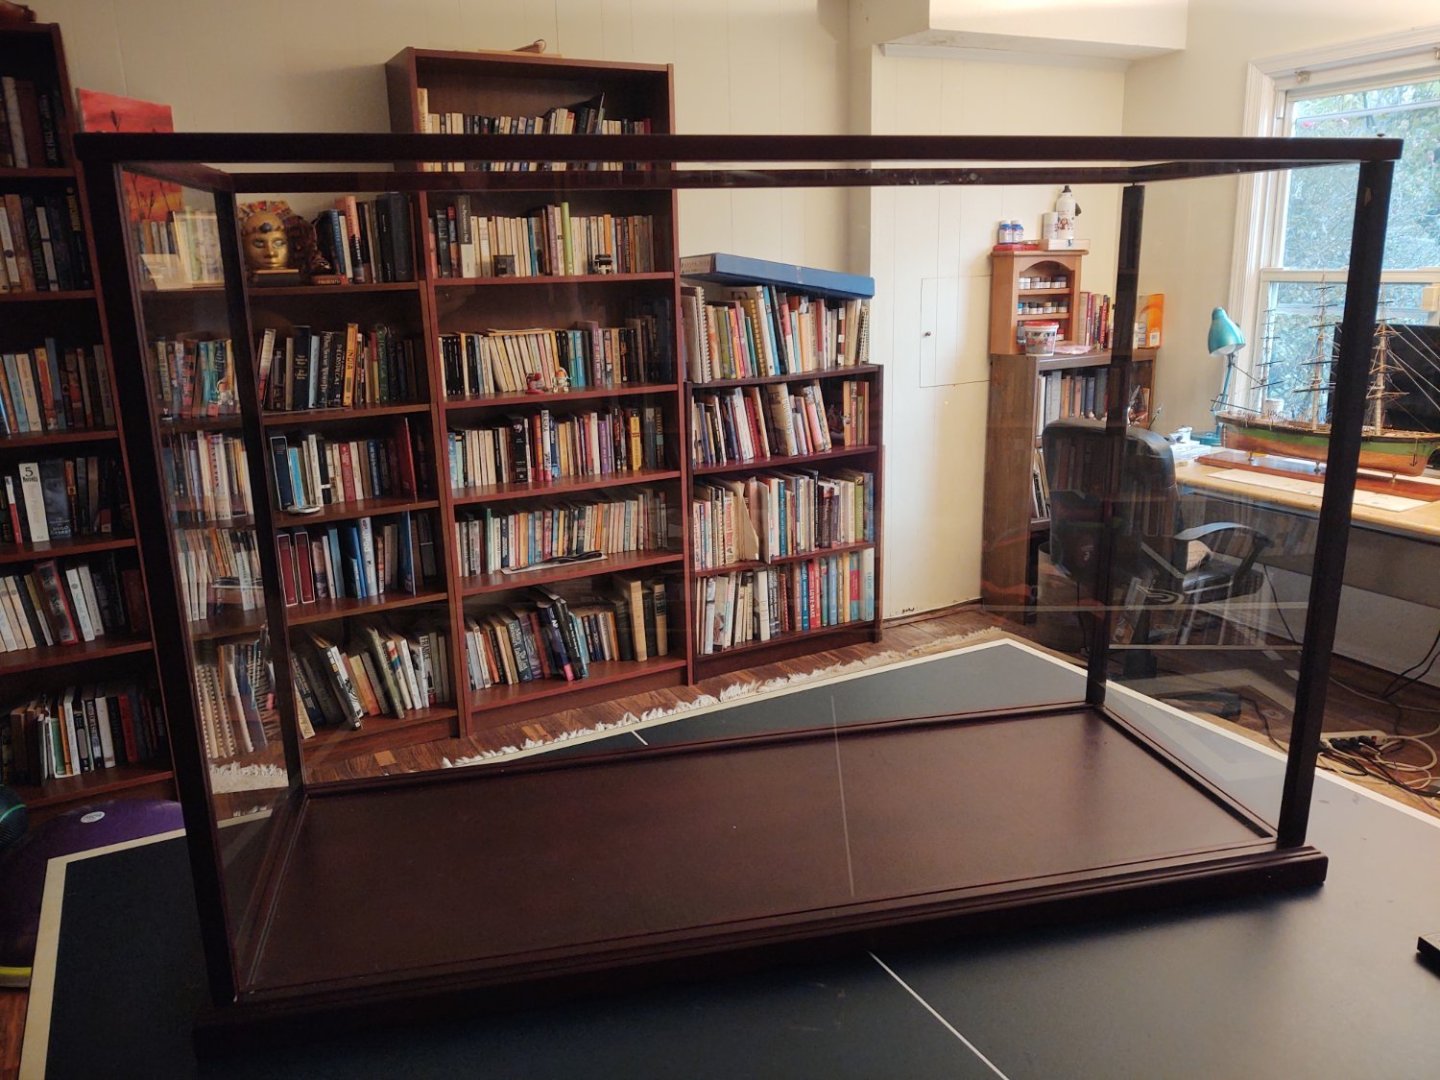
I haven't had a chance to take good photos yet. It's been a busy work week, and I was hoping to take some nice ones today (it's a holiday for my company), but it's dim and rainy. I did get the case ready. This was a case my dad bought for the Revell Constitution, so another 1:96 ship, but for some reason he ordered one 36 inches tall. I have it now, because when they moved to an apartment, he kept the ship but not the case. Anyways, I cut 7 inches off the bars and took the glass to the local hardware store and got it cut down to 29 inches. He didn't use anything to hold the glass in, the bars have screws to hold them in place, but when I reassembled it, I used some silicone to attach the rear and side glass panes to the bars. I don't intend to do so to the front panel, I will slide it in place after the model is placed. The front panel (which is in the back in this picture) isn't in place yet, among other reasons, because it broke as I was taking it out of the car at the hardware store (sigh). That said, 4 of the 5 panels survived 18 months in my garage, and the recutting, which is probably close to miraculous. I may get a piece of plexiglass for the front panel (although, paradoxically it appears to cost more than glass). Then we need to figure out where it is going. Our ping pong table is not a good long term location. Regards, George
- 602 replies
-
- 4
-
-
- Flying Fish
- Model Shipways
- (and 2 more)
-
Thanks Scott! FWIW, as I mentioned earlier in this log, I have a weak spot for old Revell sailing ships because my grandfather built the Cutty Sark and was working on the Constitution when he died. A restoration of one of his ships (which were, alas destroyed and/or lost over the intervening 55 years) would be great; I wish you the best in completing the restoration of the Thermopylae your mom built. Regards, George
-
Thanks Rob! I followed your log on Glory and used many of your techniques, which was a great help. Regards, George
-
Thanks! I'm watching your Gorch Fock restoration. I wish you the best on that project. Regards, George
- 602 replies
-
- 1
-
-
- Flying Fish
- Model Shipways
- (and 2 more)
-
Thanks Eric! I like the time lapse too - when (if) I finish another I think I'm going to use it again as well. Regards, George
- 602 replies
-
- 1
-
-
- Flying Fish
- Model Shipways
- (and 2 more)
-
Thanks Rob, I am following your build of Stefano. You are way braver than I doing those sails! Regards, George