HOLIDAY DONATION DRIVE - SUPPORT MSW - DO YOUR PART TO KEEP THIS GREAT FORUM GOING!
×


gak1965
-
Posts
715 -
Joined
-
Last visited
Content Type
Profiles
Forums
Gallery
Events
Everything posted by gak1965
-
 And looking at the diagrams in the link, the cross deck catapult is just aft of the forward elevator. What year is the Trumpeter kit meant to represent? The ship went into the Puget Sound Naval Shipyard in the summer of '43. Maybe it's late war.
- 154 replies
-
- 2
-

-
- Enterprise
- Trumpeter
- (and 1 more)
-
Yorktown and Enterprise had cross deck catapults on the hanger deck. Basically sent an aircraft out the hanger doors. The photos in Warships after Washington seem to imply that they are flying through the hanger on the way out. Some photos here: https://www.thedrive.com/the-war-zone/11821/the-crazy-aircraft-carrier-hangar-catapults-of-world-war-ii. They were apparently removed during the war, and not added past the first batches of Essexes
- 154 replies
-
- 3
-

-
-
- Enterprise
- Trumpeter
- (and 1 more)
-
Makes sense. I've heard of people putting metal rods in the thicker sections of the masts.
- 89 replies
-
- 2
-
-
- Cutty Sark
- Revell
- (and 2 more)
-
Hi Vitus, Good to see you are making progress. It's quite possible it's just an artifact of the angles, but is the Royal mast bent aft compared to the rest of the mizzen mast (too much tension on the backstays, maybe)? Referring back to @Snug Harbor Johnny's comment above. I think it'll be easier to keep everything lined up if you do the fore and backstays as pairs as you go up the mast, which will help keeping the flexible masts where you want. Regards, GAK
- 89 replies
-
- 2
-
-
-
- Cutty Sark
- Revell
- (and 2 more)
-
Nice. Two things I learned for when you put the tops on. Drill any holes you need in the lower mast now, and maybe open the lubbers hole a bit more than is on the plans/laser cut pieces. As is, the lubbers hole is pretty crowded. George
-
I obviously went without the bands, but who really knows. Regardless @Jared, good luck however you choose to proceed. I've made some choices that I'm sure lots would disagree with, probably the biggest to paint the hull green after an apparent desire by McKay to paint her that color that he did not do. But, it's a variation that I liked and if I give it to someone that objects, it's fixable with a couple of hours of painting, so... Regards, George
-
Thanks Bruma, Rob, and Jared! Brief update. I've built the two iron blocks, attached them, and painted the main yards. Now to add all of the items that go on after the body of the yards are complete. They include (clockwise from 3:00 o'clock): stirrups (way too long at the moment, will be trimmed so that the foot ropes are about 1/2 inch (4 scale feet below the top of the yard), blocks for the buntlines (attach to the jackstay, so stopped with thread), double blocks for clew lines and some of the sheets ("iron" stropped), and single blocks for the working ends of the sheets and also the clew on the skysail. I think that will be enough. I'm not putting in the reefing tackle and the blocks for the live lifts on the main course are already mounted on the mast. Similarly, the halyards for the top 4 masts either use blocks already on the mast or a sheave, so nothing more to do there. Next are attaching the stirrups, foot ropes, and all the blocks that I've stropped, and installing the trucks that are used as fairleads. I'm going to also take a quick check to make sure that I don't need to mount some blocks for the braces (although it looks like they mostly attach to various stays and shrouds) and put the hardware for the topping lifts and outhauls on the Spencers. As always, thanks for looking in! George
- 602 replies
-
- 5
-
-
- Flying Fish
- Model Shipways
- (and 2 more)
-
Vitus, this seems really odd to me. Again, working off American ships, but this has been true of other ships I've built. If you look at the lines that go from the mast to the deadeyes you get (fore to aft) lower mast shrouds - start near the top of the lower mast (between the top and the mast cap), go through the lubbers hole, anchor on the deadeyes Top mast back stays - start near the top of the topmast (between the crosstrees and the mast cap), anchor on the deadeyes. Topgallant back stays - start just above where the topgallant lifts anchor on the mast, anchor on the deadeyes. Royal back stays - start just above where the royal lifts anchor on the mast, anchor on the deadeyes. Sky backstays (where relevant) start just above where the sky lifts anchor on the mast, anchor on the deadeyes. On the Flying Fish that is (mizzen per side) 4 shrouds, 2 topmast backstays, 1 topgallant, 1 royal, 1 skysail backstay. Looking at the instructions (and your photo) it looks like you have (per side) two backstays on the lower (that run up to the top), one attached to the topgallant but just above the course mast cap, and then 1 each where I would expect for the topgallant and royal. Am I seeing that right? That just doesn't make sense to me. I defer to the Cutty Sark experts out there ( @Bruma or others), but the she have backstays on the lower mast? And the stay that is running to the lower mast cap - that seems in the wrong place to me. Physics says you want it at the end so that you have the longest possible lever arm. Where it is, you aren't getting much assistance that isn't already in the shrouds. Not casting aspersions on your work @VitusBering, you are doing great and relying on the directions but it reads wrong to me. Regards, George
- 89 replies
-
- 1
-
-
- Cutty Sark
- Revell
- (and 2 more)
-
Concur with Bruma here, the backstays should be outboard of the spreaders. I will also say that the backstays at the top seem odd to me as well. I've looked mostly at American clippers, but in 'G' it seems to me that you should have two pairs of backstays per side wrapped around the course mast, definitely not on the iron connecting the course and top masts
- 89 replies
-
- 3
-
-
- Cutty Sark
- Revell
- (and 2 more)
-
Ah yes. The Saturn V from Estes was (at least back in the 70's) a single stage cluster design using 3 C engines that I think was also set up for a single D engine later. As a boy I made some of the multistage variants. They flew so high I lost a couple of them when they flew out of the range of realistic recovery. Never did the clusters as it felt like the odds of actually igniting all 3 engines at the same time seemed low, since I'd think that the first thing that would happen is that once the first engine lit off it would promptly pull the ignitors out of the other engines (they were all wired together).
-
Unless a I've forgotten my physics (possible) plenty of specific impulse, not enough thrust....
-
Thanks Rob. No footropes or stirrups either. I finished the eyebolts and wood parrels yesterday, maybe I can make the iron blocks and paint tonight and get the regular blocks and footropes this week. We'll see I'm sure you are aware of this, but one thing I realized installing all the eyebolts is that I have to remember to move one set on each of the mizzen yards to the forward side of the mast. These are the bolts that make up part of the band where the yardarm begins, and they are used to attach the brace pendants. On the fore and main, the braves run aft, on the mizzen forward. On the Niagara I just tied them onto the yardarm, but there are irons, hence eyebolts, hence I need to orient them correctly. Regards George
-
Neighbor had the steep driveway. A couple of 2 by 4s, some lag bolts, a piece of rope, a bit of scrap plywood, and the wheels from a broken wagon were turned into a "go cart". Fortunately we lived in a cul de sac, so as we flew out of the driveway there weren't a lot of '70s cars with their crap brakes to run us over. That's the thing that was really different for my kids; vs me; even in the suburbs there is just so much more traffic and the drivers are always in such a hurry. That and there just wasn't the same number of kids their age to help provide safety in numbers. I think it was because I grew up in a new neighborhood, where everyone was a family with young kids, whereas we've always bought older homes, and the neighborhood was a mix of empty nesters to people without children and everything in between. There were 18 kids on my block growing up in the mid 60s through the early '80s, all but one in a 6 year birth year range; there were 10 on the block with my kids covering a 17 year range. Not the same. The heck of it is that we always misunderstand the risks, don't we? When the DC sniper hit in 2002, our kids were 2 and 4. After a day or two they were crawling up the walls and we figured we had to do something, so we took them to this playground in our neighborhood behind the Silver Spring YMCA on the logic that this was not well known, required you to take an obscure route on a bunch of residential streets, and we couldn't be afraid of everything. The chance of the snipers being in there was astronomically small. Well, it worked for the kids for the two weeks or so it took to catch them. I almost had a heart attack afterwards though, because they had been using the YMCAs in Silver Spring and Bethesda as bases, those guys had been within 100 meters of the playground multiple times. At the end of the day it was fine, it was the correct decision on statistics, but you really never know do you. George
-
Gosh, a Big Wheel, although ours were from the '70s and the one in the photo has the "safer" hand break designed to intentionally create a spin. Between the three of us, we wore a long hole in the contact patch of the front wheel (like maybe 3 inches long) and still rode it. My guess is we'd be arrested if we had let our kids play with them. Lord knows my collection of scars implies I did childhood right by your impeccable definition 😀 George
-
Sails look great! I hadn't thought about how the split topsail would create a situation where you have stuns'l booms on the course and upper topsail only (so skipping a yard) but that makes complete sense seeing it. What is that device in the background of a bunch of your pics (the one with the 4 meters)? An old school power supply or an amp of some kind? Great work, looks like you will be able to put 'FINISHED' into the title soon! George
- 399 replies
-
- 2
-
-
- cutty sark
- revell
- (and 2 more)
-
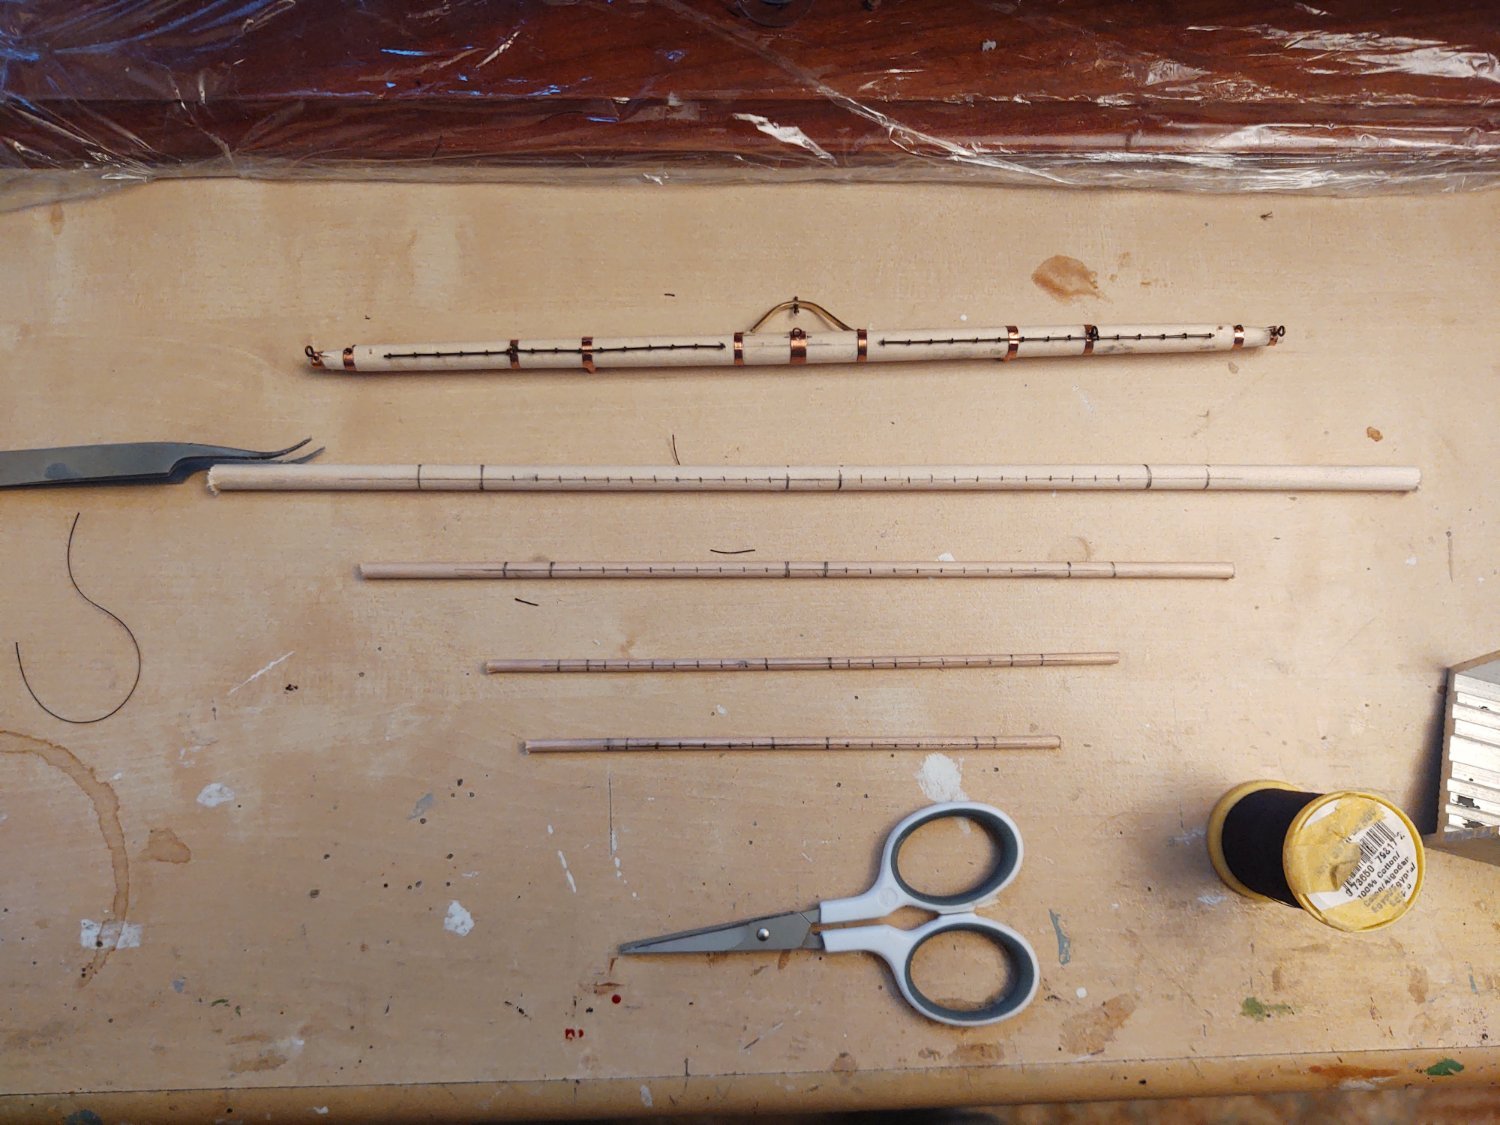
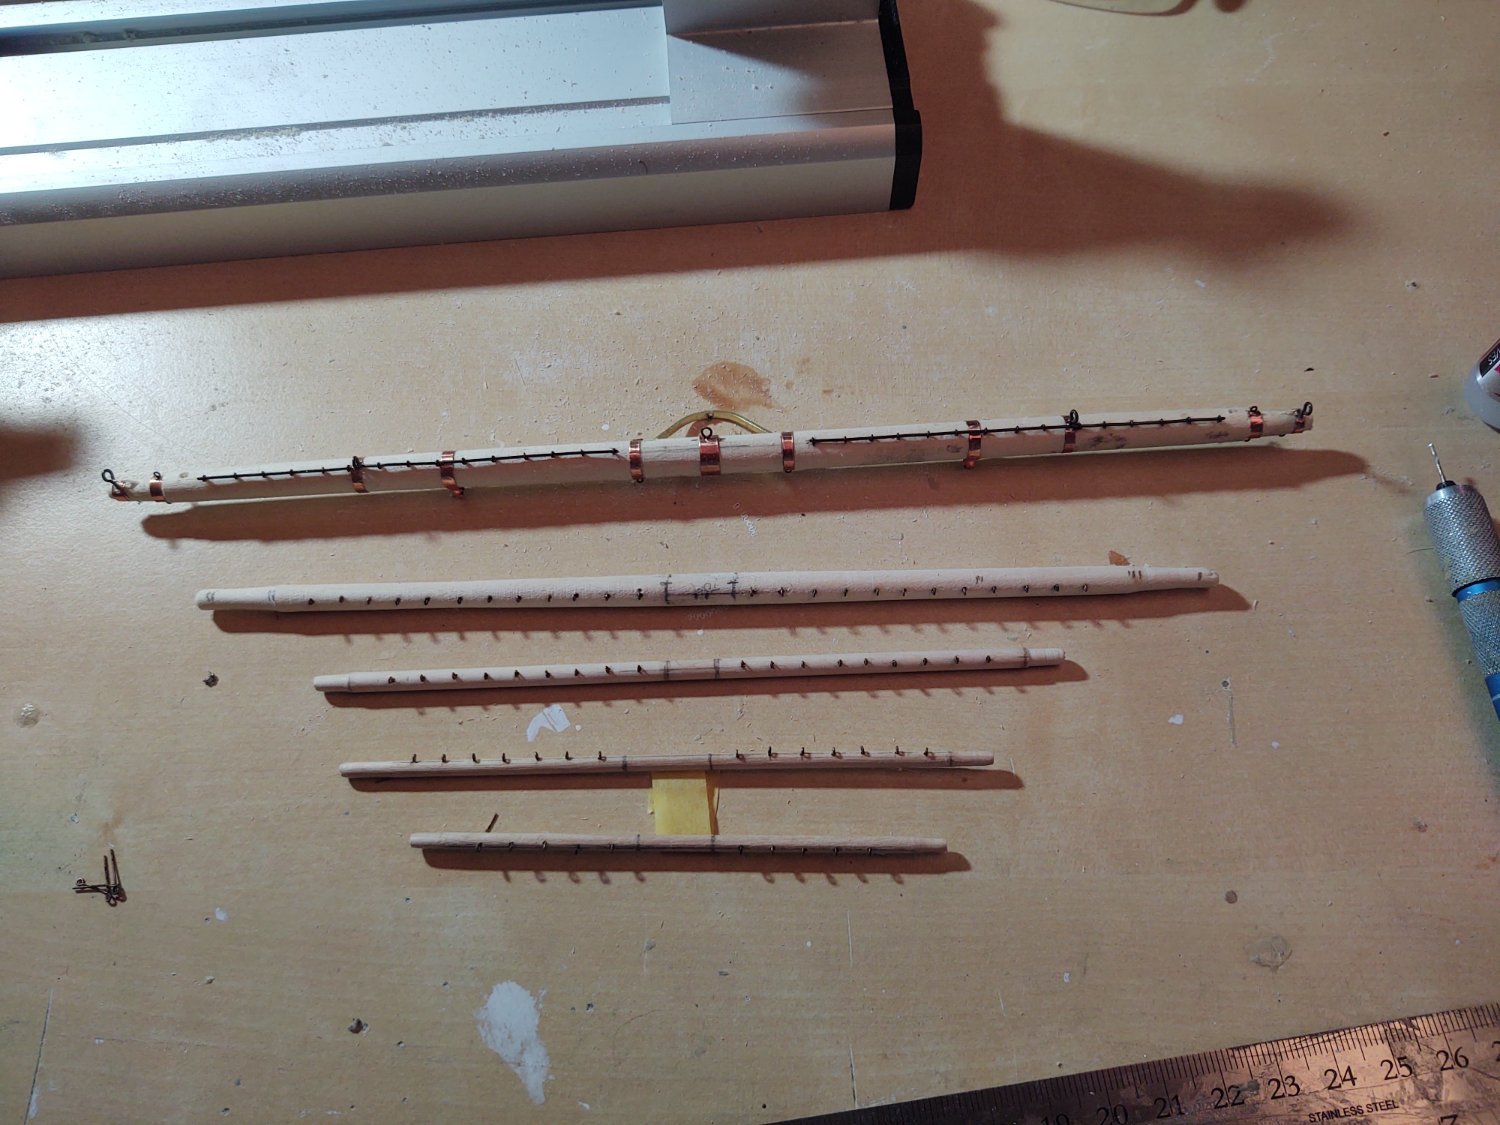
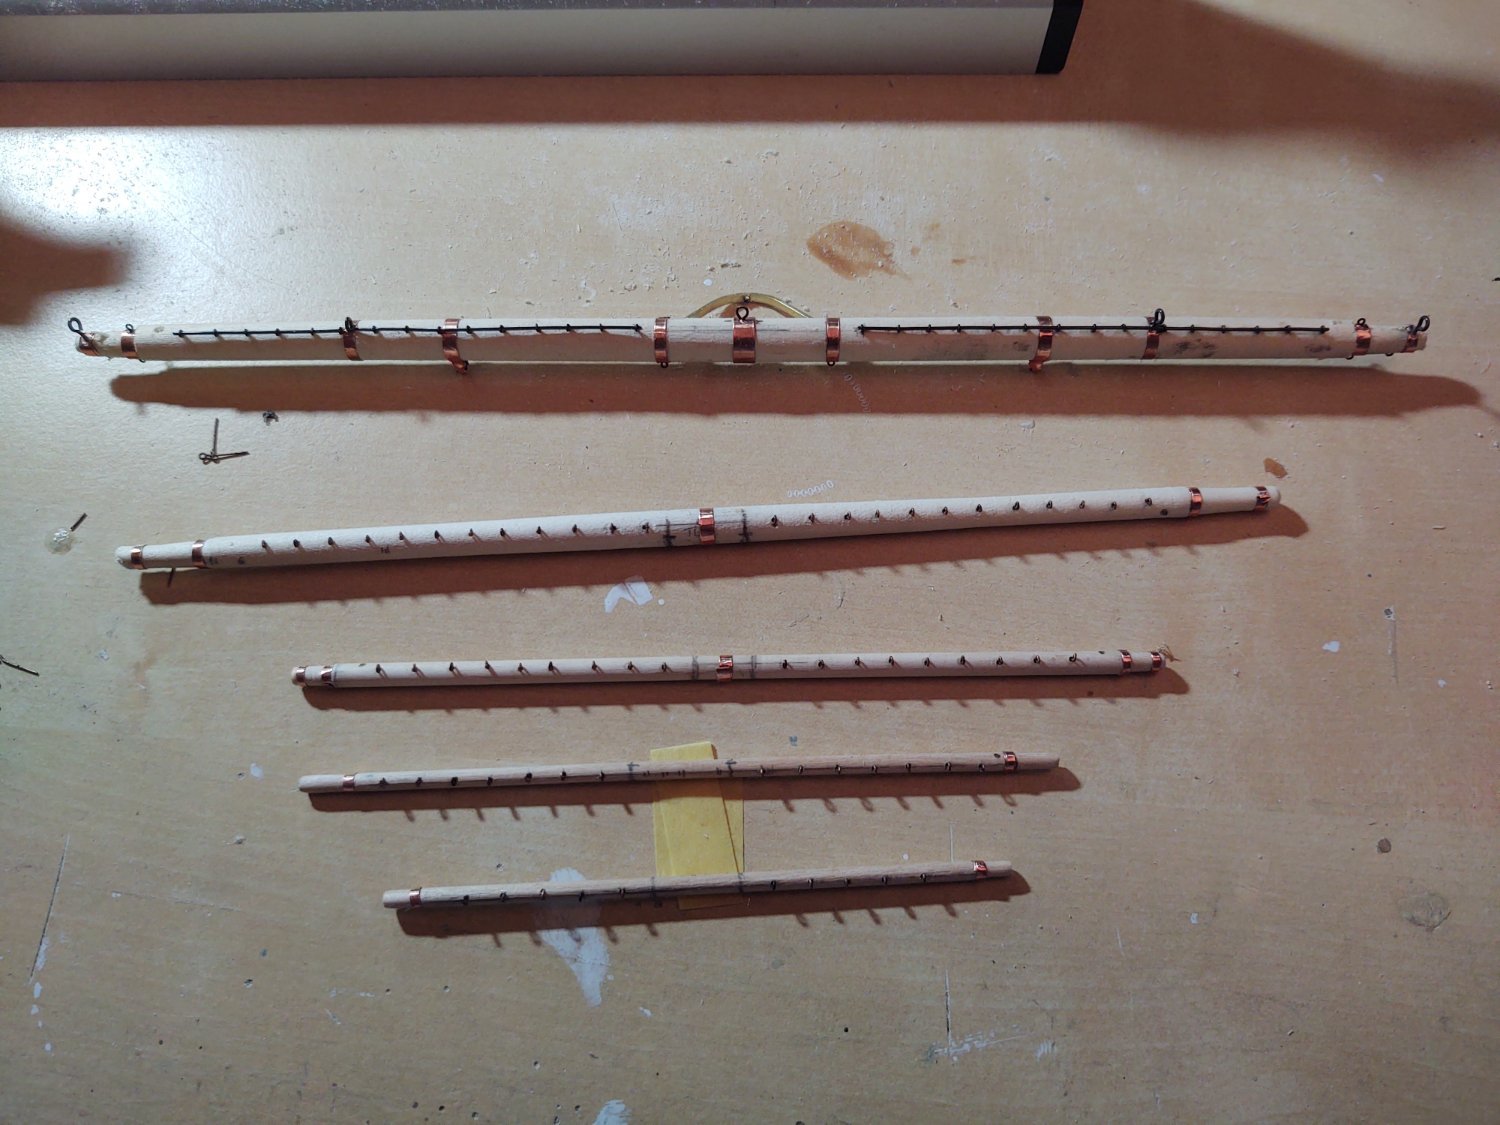
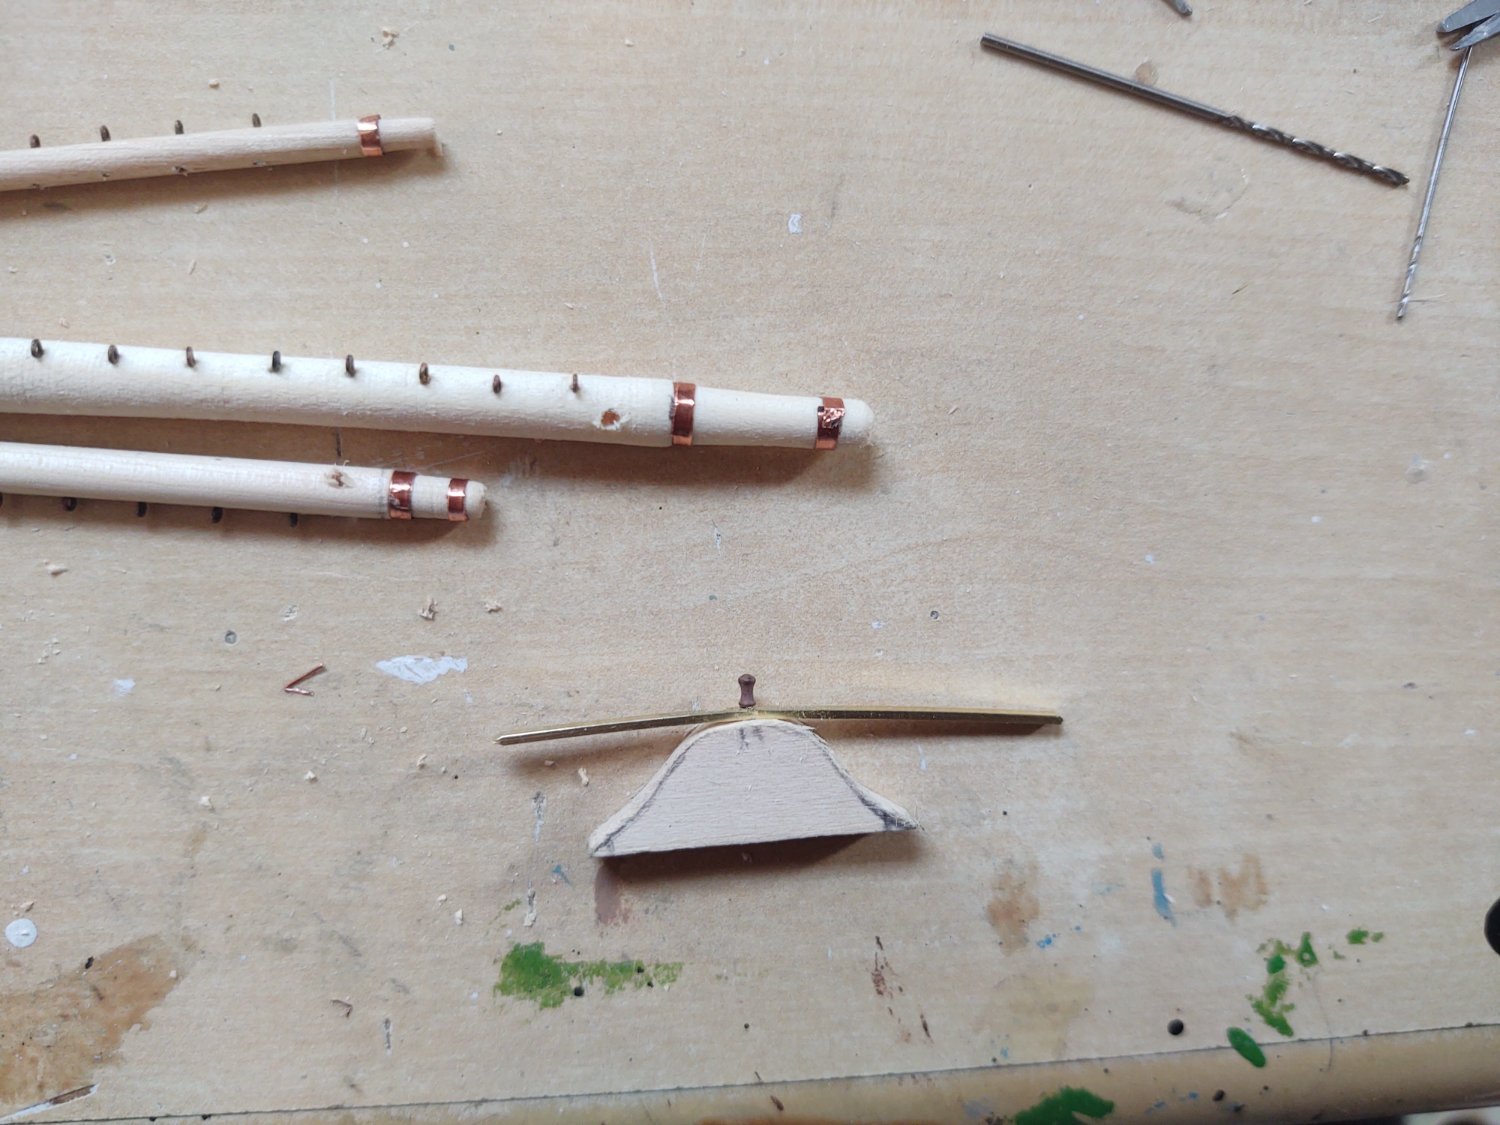
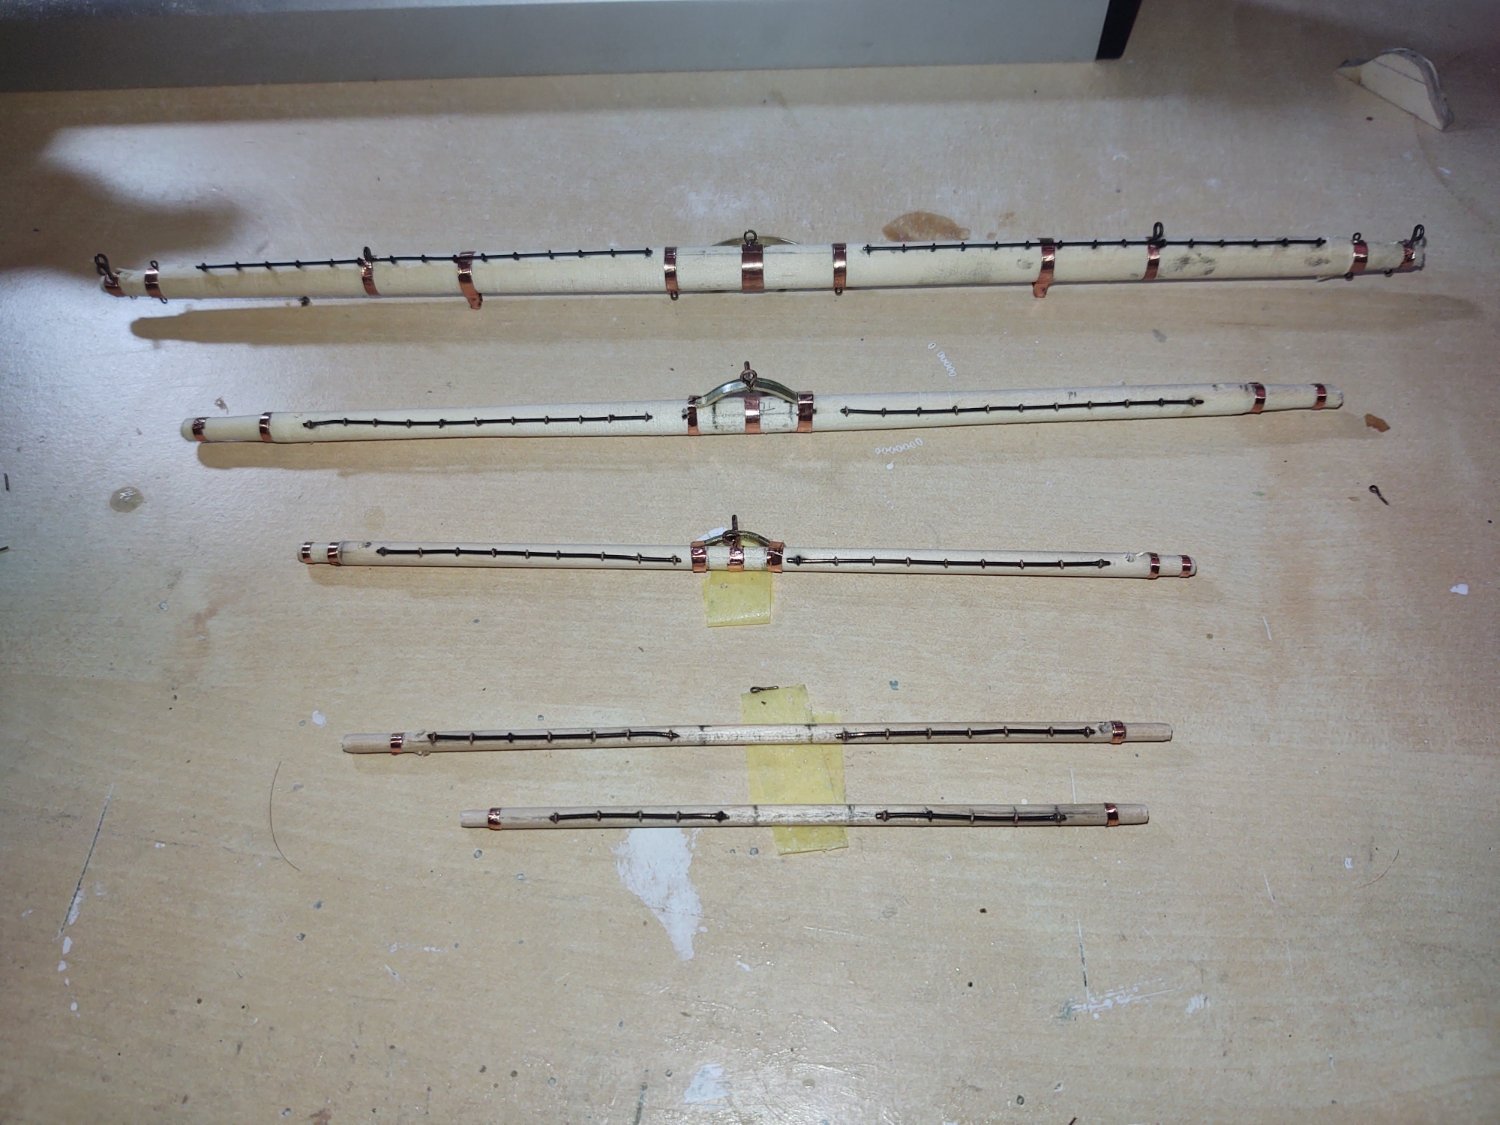
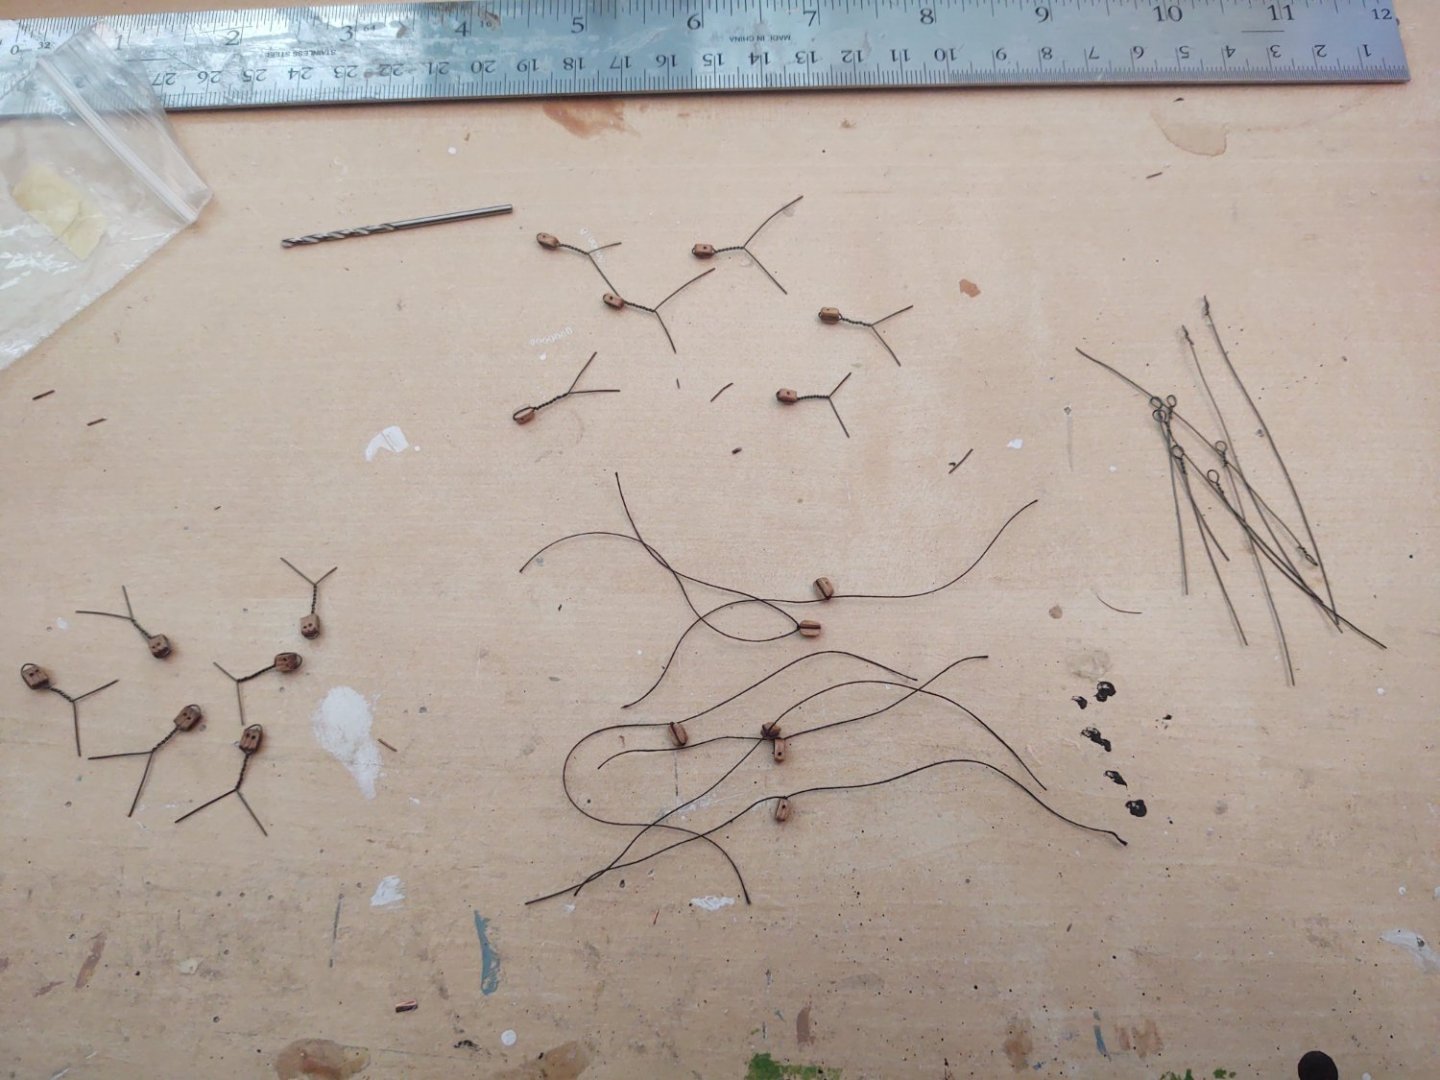
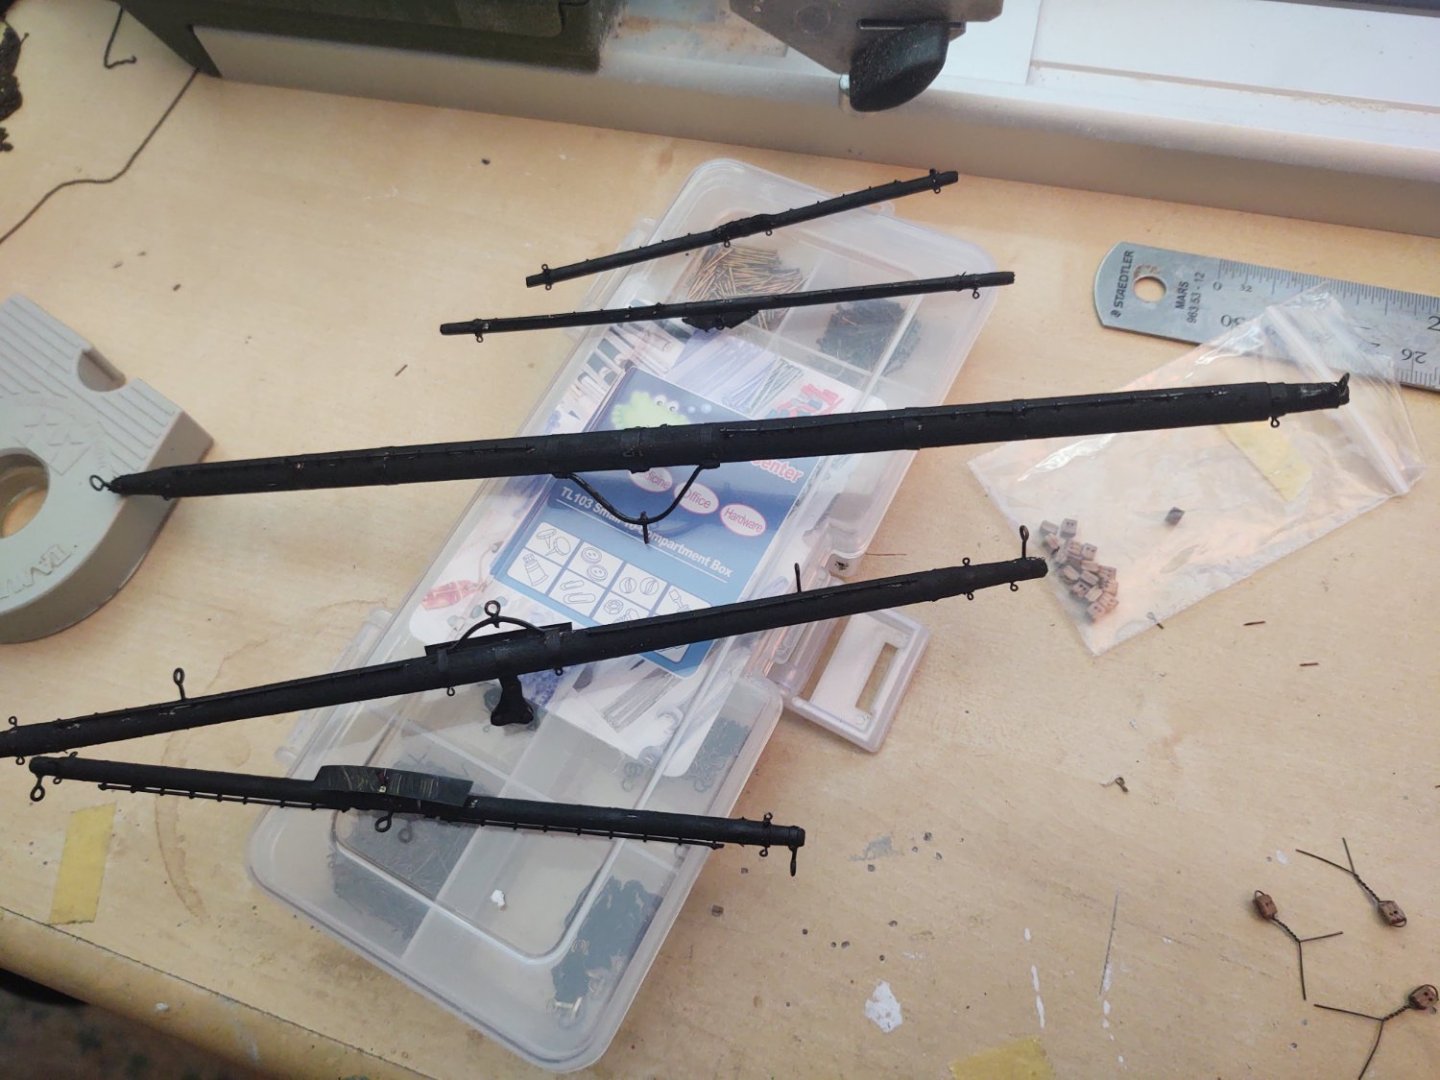
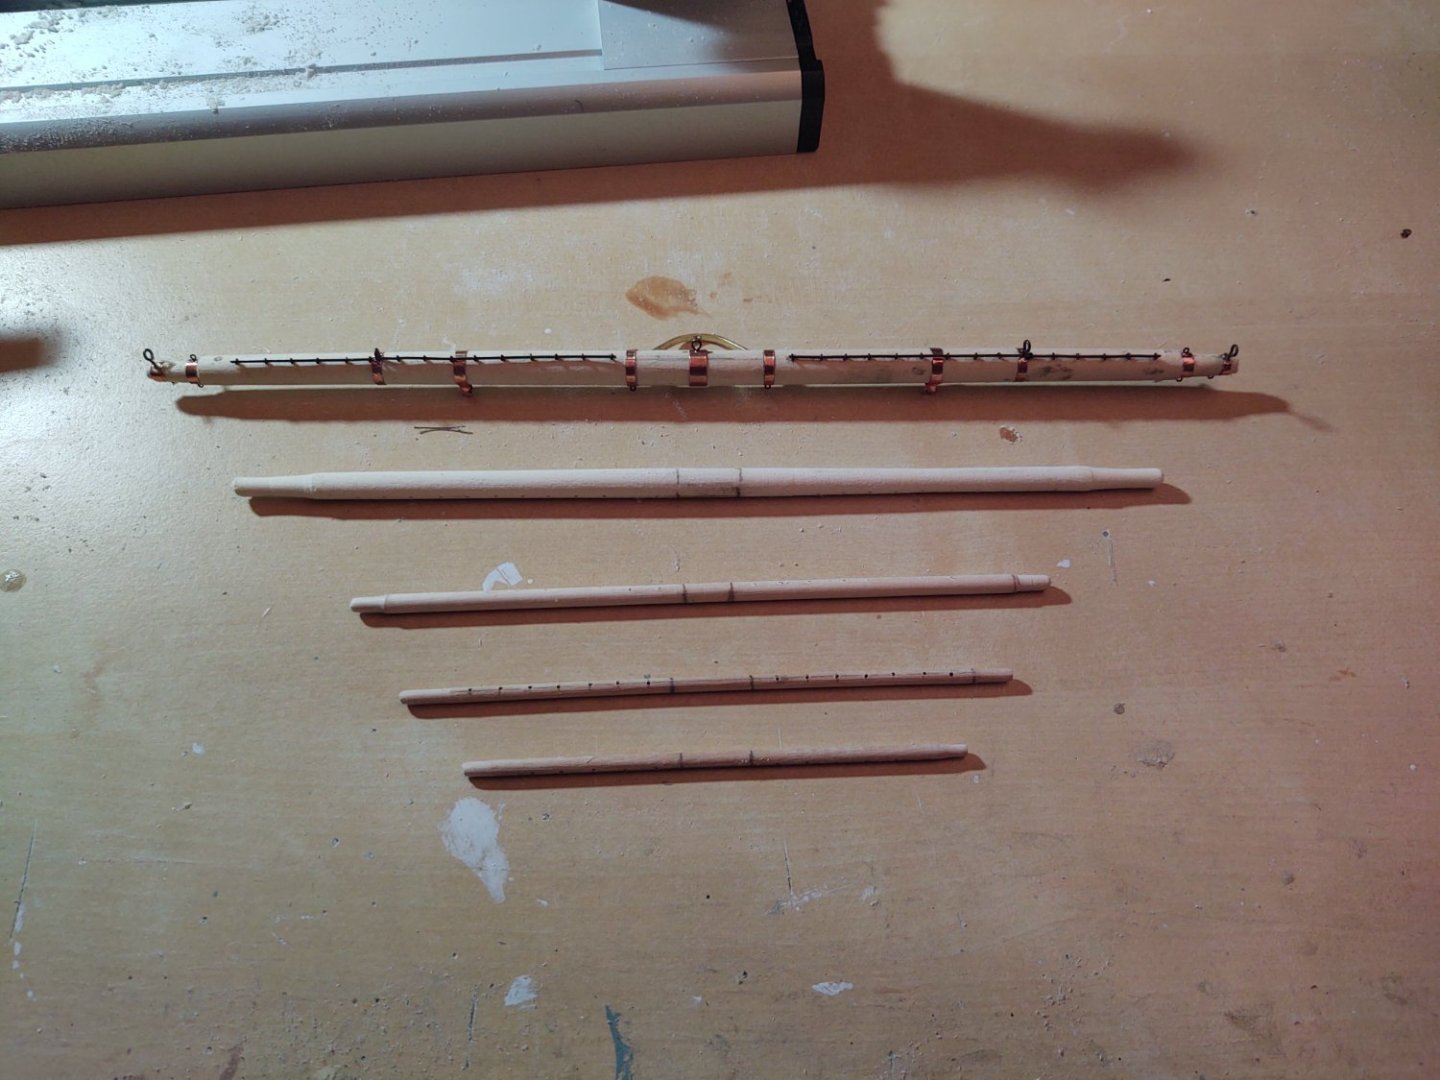
Well, it's been a couple of weeks, so I thought it was time for an update. A little early, but Happy Father's Day to all, and thanks for the well wishes on progress. I mentioned in my last post that I was off to Chicago for the ASCO Annual Meeting, so, I've had more like 9 days rather than 16, but progress is still a bit slow as I find yard making a slow task. However, I've taken a bunch of pics that show the progress of the main yards, including the previously made main course, which I accidentally made with the fore yards. So first, we have a photo of the four dowels that will be the top, topgallant, royal, and sky yards. I've drawn in the locations of the trusses (center) and the yardarms on either side, and then marked where I need to drill the holes for the jackstay eyebolts. Extra wood so they have someplace to attach when I put them in my mini wood lathe. Second photo. Holes drilled and lathed down to shape, with the extra wood cut off. Next step is to put in all of the eyebolts. Photo 4, I've made most of the bands on the yards out of the Venture tape I used to make the copper plating, just cut down to the proper size. Next, I need to make the trusses that connect three of the yards to the masts and are the halyard attachment point on the top yard. I made a former out of a block of wood. I use 1/32 by 1/16 brass strip that I've cut a hole in to make the truss. The hole is the diameter of a belaying pin, so I use that to place the brass onto a forming model I made from a chunk of wood. I bend it with the end of a pair of heavy wire cutters, and then cut the ends to length, and bend them to form the attachment points. If the truss is going to connect the yard to the mast, I take the belaying pin out, remove the 'ball' top, and reinsert it in the other direction, and CA glue it in place. That pin will eventually be mounted in a hole in the mast to allow me to sturdily set the yard in place. It won't allow me to change the orientation (straight on or nothing), but it's very solid, which I appreciate. Finally, the last steps up to where I am now. CA glue the trusses in place, and the wrap with trimmed copper tape. Slide steel wire in the jackstay eyebolts as the jackstay itself. I still need to add a bunch of eyebolts as mounting points for various lines, make and add 2 iron blocks for the course and top yards that handle the top and topgallant sheets, and add the stuns'l irons to the top and topgallant, add the wood parrels to royal and sky, and of course paint them all black, but progress. The jackstays are not perfectly straight, even using my drill press I find that the bit tends to wander a bit, especially on the smaller yards, but once they are painted, it really isn't very noticeable. In any case, thanks for looking in! Regards, George


- 602 replies
-
- 6
-
-
- Flying Fish
- Model Shipways
- (and 2 more)
-
Absolutely concur. The davits are going on the Fish very near the end. The only thing that may go after are the lower stuns'l booms . The holes are drilled (on the Fish they mount on the outside of the hull amidst the chains) but they are getting rigged at the last moment. I'm even tempted to rig them as if the boats are away on a task as the Britannia boats are really bad (the ones on the deck house are upside down and I added some detail to make it look better on the outside).
- 89 replies
-
- 1
-
-
- Cutty Sark
- Revell
- (and 2 more)
-
One other thought is to get a set of Britannia davits from Bluejacket or Model Expo. It looks like BlueJacket has several sizes, and they make 1:96 ships that use them (e.g. Red Jacket), and they will sell definitely you a couple pair even if they aren't in the catalog. I don't see them in the model expo catalog, but my Flying Fish has 4, so they must make them, and I imagine that if you call or email they will sell you some. Britannia fittings are also somewhat soft so you will need to use some care, but they will do better than soft plastic. I'm not in love with the model expo ones generally, as I find they have a lot of flash and sometimes casting defects such that I've replaced a subset of them on my Fish with either Bluejacket or scratch replacements, but I'm not planning on doing that with the davits at the moment. George
- 89 replies
-
- 2
-
-
- Cutty Sark
- Revell
- (and 2 more)
-
The 2017 instructions don't make a lot of sense to me. It looks like they are trying to set up the boats to be lifted out of their cradles, but the rig for that looks all wrong to my eyes. Something I have done to flimsy wood parts is add some wire or brass in unobtrusive locations (like underneath spreaders). Can you take a bit of brass or steel wire, CA glue it to the hidden side of the davit and paint the whole thing? I'm not sure exactly how big these are, but maybe that would work enough to keep things steady. Could you set the spacing between the blocks with the line in place and then paint it with dilute glue while hanging down? It would presumably stiffen the tackle and you could attach it on the other davit without worrying that it will go slack. Never tried it, it's just an idea. George
- 89 replies
-
- 2
-
-
- Cutty Sark
- Revell
- (and 2 more)
-
Can't say for WWII. However, if you go here: https://www.dailypress.com/2019/10/29/the-aircraft-carrier-john-f-kennedy-to-float-in-dry-dock-12-at-newport-news-shipbuilding/ and go to the third picture, you will see that on modern ships at least, the shafts are painted.
- 154 replies
-
- 3
-
-
- Enterprise
- Trumpeter
- (and 1 more)
-
Wow. Six capstans. Is the helm in that aftermost house on the poop? Given the skylights I assume there are some kind of cabins in the after 1/3 of the ship whose overheads make up the poop deck? She must have been a bear to unload with only two hatches, both in the waist. Regards, George K
-
Saratoga and Lexington were repurposed battlecruiser hulls. Under the Washington Naval Treaty, they could be either scrapped or turned into aircraft carriers. Yorktown and Enterprise were designed as carriers from the ground up, and was based on the US Navy's first such clean sheet design, USS Ranger, although both were much bigger than Ranger. Wasp was a smaller ship, more like Ranger because of the available limits under the Washington and London Naval Treaties. After the treaty system was concluded, the Navy built Hornet to the Yorktown specification. George K
- 154 replies
-
- 4
-
-
-
- Enterprise
- Trumpeter
- (and 1 more)