HOLIDAY DONATION DRIVE - SUPPORT MSW - DO YOUR PART TO KEEP THIS GREAT FORUM GOING!
×


mikiek
-
Posts
2,276 -
Joined
-
Last visited
Content Type
Profiles
Forums
Gallery
Events
Everything posted by mikiek
-
 Started laying some stealers last nite. Pix will be forthcoming. Doing the deadwood first is the right approach. Darrell - I wish they could have found a balance between the sapelli first layer (2mm thick) and the walnut outer layer (0,5mm thick). The sapelli is a bear to bend although I'm finding it's better when totally saturated with water (read - soak overnite). And you are right, with what I am doing now I will either learn how to do it or how not to do it for the 2nd layer.
- 136 replies
-
- 1
-

-
- enterprise
- constructo
- (and 1 more)
-
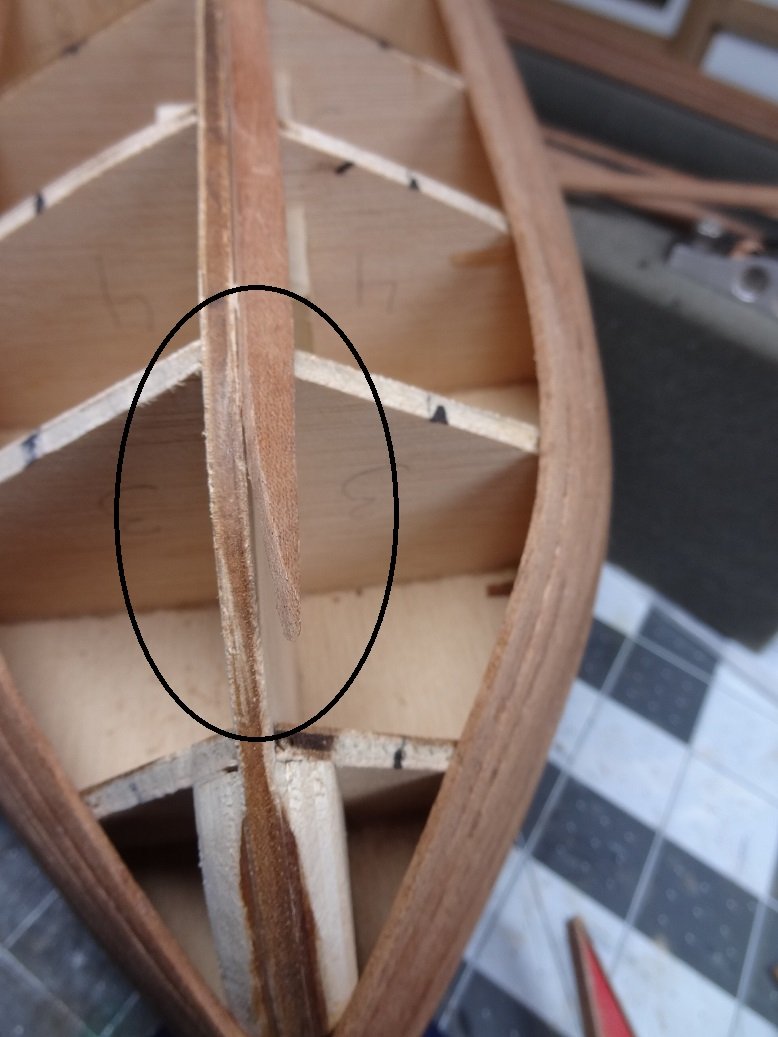
I'm still contemplating these planks. Something doesn't seem right. I was going to work from the lower planks upwards. Now I'm thinking top down. Sheesh Edit: Got that backwards. I've been looking at the boat upside down for too long. Was going to go top down to first get that plank correctly into the joint. Now I think bottom up may work better. I can go ahead and do the stealers to cover the deadwood first. Turn 1 plank into 2 at the stern.
- 136 replies
-
- 3
-
-
- enterprise
- constructo
- (and 1 more)
-
Looks fantastic Darrell - I like that you did the 2 "rope rails" on your hammock units. I only did 1 and now I see 2 would have been the better choice. I hate running out of stuff. That's why I probably have enough Syren materials on hand to do 2 more builds. A whole tackle box full of every size & color. If I get down to 3 packages of anything it's time to reorder. Yes, I am a hoarder and proud of it.
- 648 replies
-
- 1
-
-
- niagara
- model shipways
- (and 1 more)
-
The accepted belief is shiny models look strange. Maybe on the real thing but at our scale it's overpowering. I think your black is fine. I mixed a custom black that is even flatter and more non-reflective then yours. I've found that sometimes you need a few coats even though it doesn't look like it. Paint is paint and all paint jobs look better after the 2nd or 3rd coat, black included. Whether you do that now or wait until later is debatable. I guarantee you will ding the hull more than once, requiring one last paint job when everything else is finished.
-
Tom - I'll differ with Darrel on my experience. I started with blackening - BlueJacket products. I found I was always finding spots that lost the coating. Once installed all you can do is hit them with a paint brush. So my reasoning ended up being (and still is) forget blackening and paint. It seems much more durable. There are a lot of good "metal" colors out there - you don't have to use black. There are some VERY fine detail paint brushes that can be used for touchups. Some so fine you can literally count the hairs. Those have worked well for me. FYI - this topic tends to be discussed a lot. There is the blacken camp and the paint camp. They don't agree on much.
-
You know I had a thought on that. Fortunately most of it is rectangular strips of some form. I was thinking maybe a paper cutter, you know one of those guillotine types that just chops. It might take some work to line up the cut but it would be perfectly smooth from end to end.
- 190 replies
-
- 1
-
-
- pinnace
- model shipways
- (and 1 more)
-
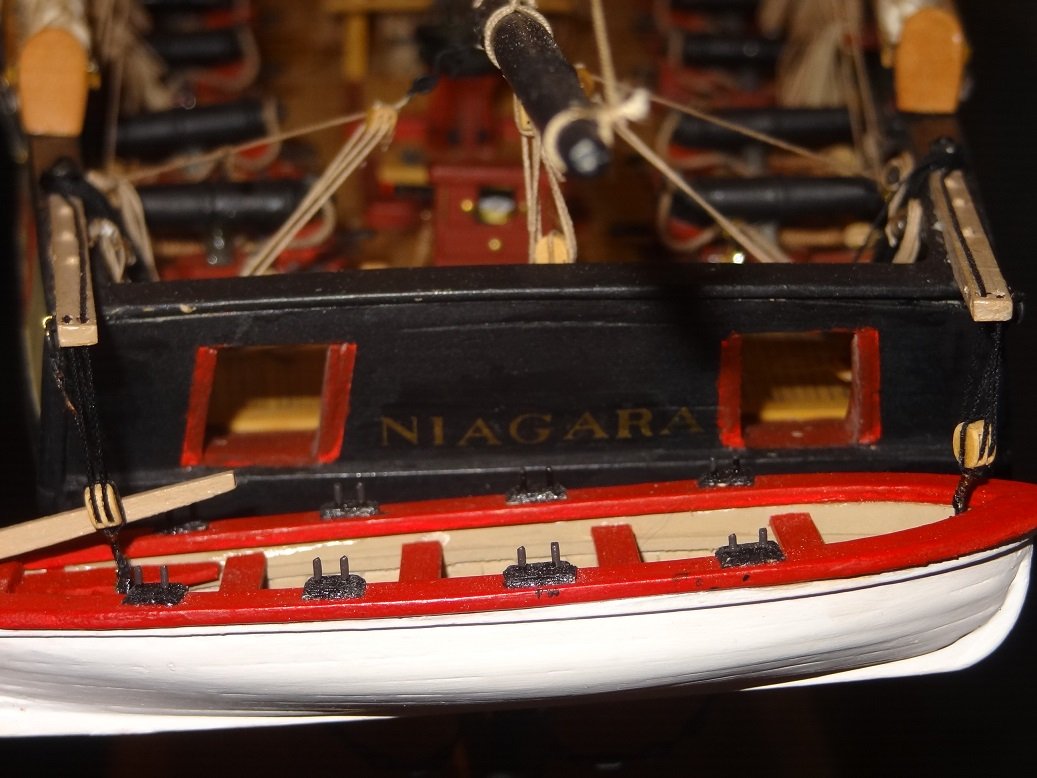
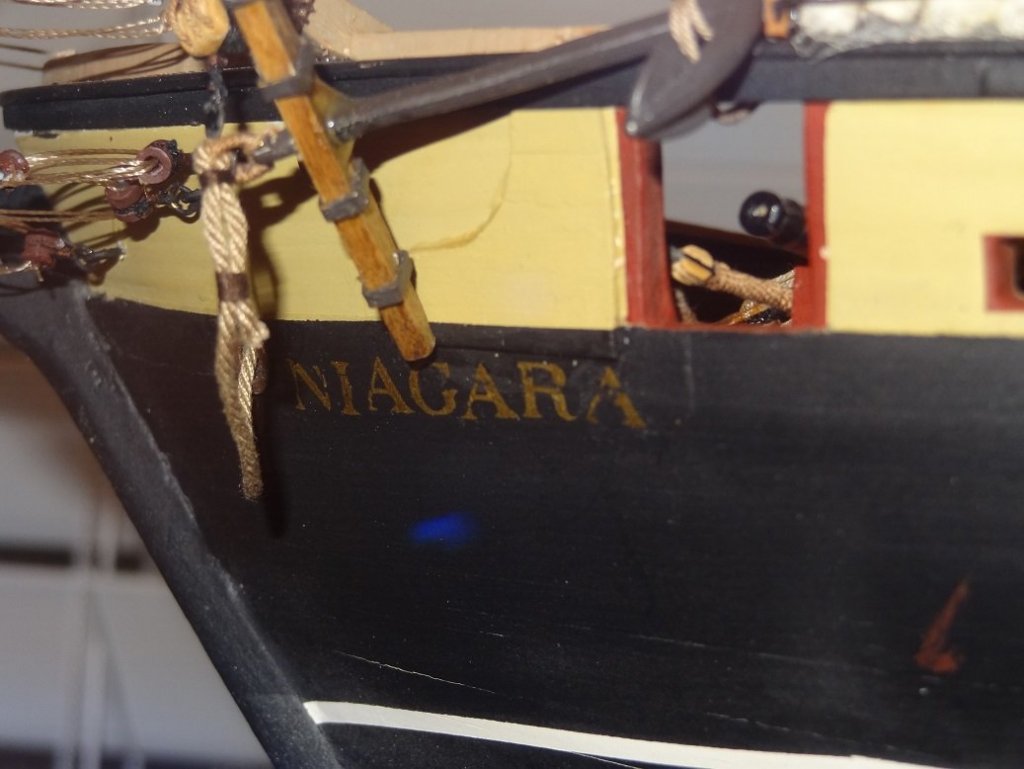
I had some dry application decals from Amazon. Coincidentally, almost the exact font and size on the current boat. They were a little difficult to apply - I found out how much rough woodgrain I actually left on the hull. The decals prefer smooth surfaces. But a lot of burnishing got it done. I was pretty pleased with the outcome. The trick is finding a way to get a nice straight line to lay them on. Masking tape worked OK. Then you have to cut the letters out of the sheet right at the bottom of the letters. Then hold the letters in place while you burnish the back. Do some practice tries first. And don't do those spelling out Niagara or else you'll run out of A's. Voice of experience.

- 648 replies
-
- 3
-
-
- niagara
- model shipways
- (and 1 more)
-
I can relate Darrell. I was just a bit surprised at how I scrutinized yesterday. Reliving a few of those build moments. Especially the guns. We've both put in our pound of flesh for these boats. I hope you enjoys yours as much as I do mine.
- 843 replies
-
- 1
-
-
- niagara
- model shipways
- (and 2 more)
-
Thanks for the feedback Steve. My kits Nuestra Senora and Royal Caroline have a ton of that kind of artwork that is supposed to be applied. Sounds like you have a good approach for doing it. If I can only remember when it comes time
- 190 replies
-
- 1
-
-
- pinnace
- model shipways
- (and 1 more)
-
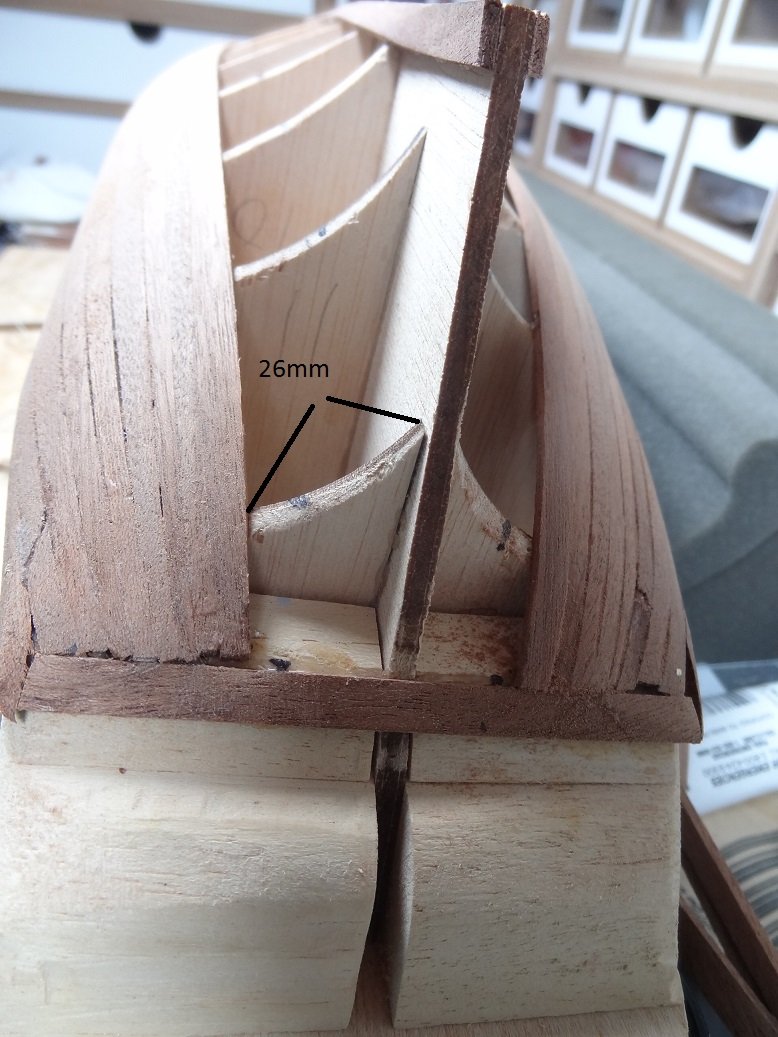
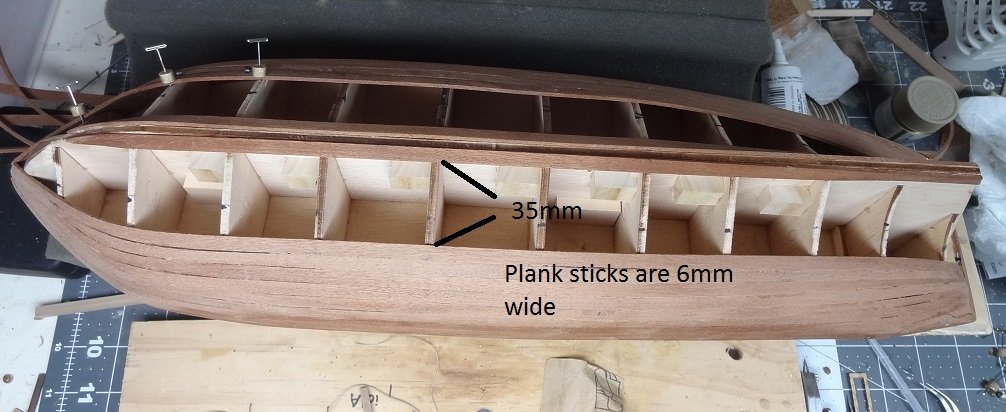
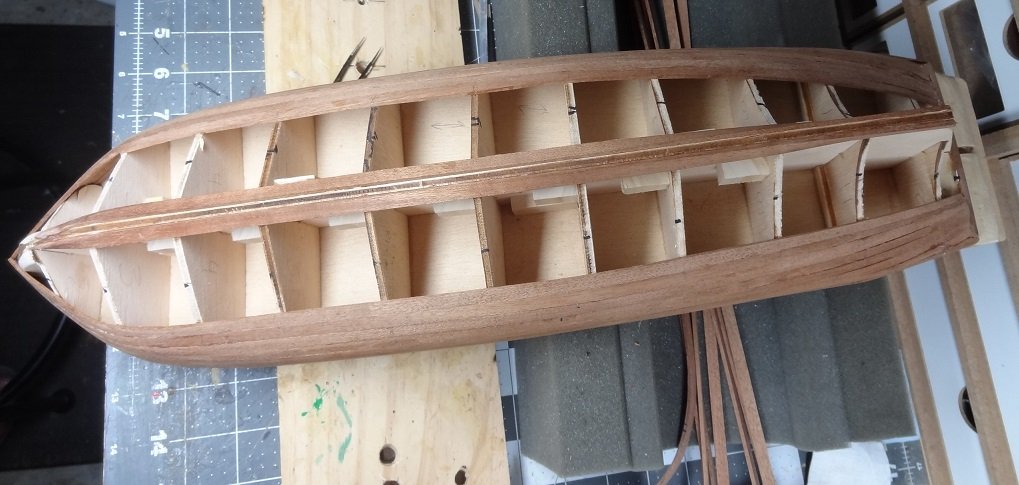
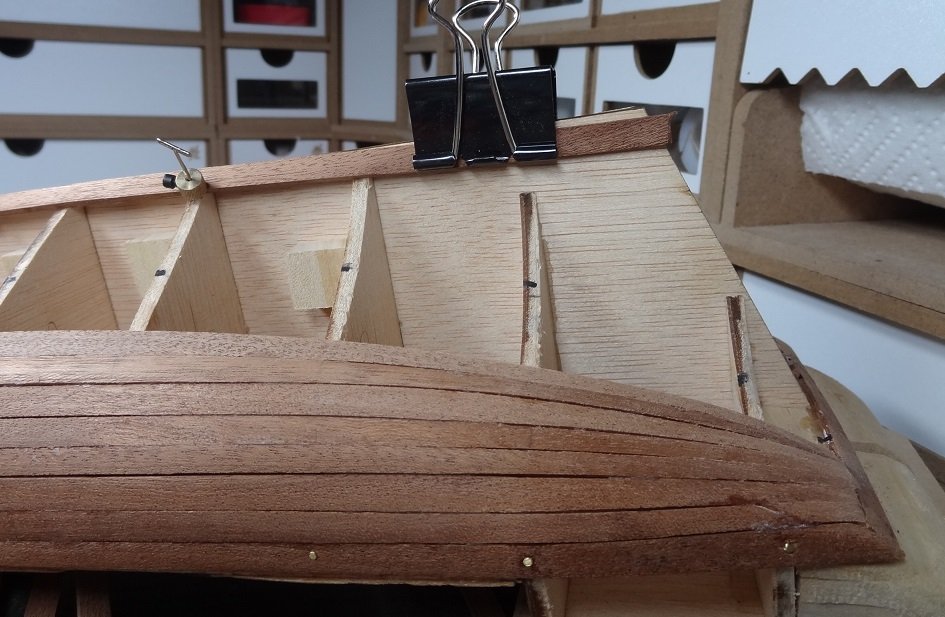
I'm getting closer to finishing layer one. It's time to reassess my planking pattern. I started with 3 bands, finished band A, started B and then went for the garboard which is in C. My plan now is to consider the remaining open space as 1 band. Of course this calls for some recalculation. Most of the space over the frames would be typical planking. This is easy enough to handle. The space between the planks is 35mm. That measurement is consistent for 8 of the frames. The sticks I am using are 6mm. So it will take 6 sticks (tapered slightly) to cover that area. Using the dividers, this will be a piece of cake. There is also a much wider area towards the stern - a lot of deadwood that must be covered. And there is another consideration. As planks are laid over the aftmost frame they must be tapered so that the edge of one lays right at the joint of the frame and the deadwood (hope that made sense). As you can see the area to cover on the last frame is 26mm. So with a 6mm wide plank it will take 5 sticks (tapered of course) to cover that frame. Once again the dividers should help with this. The pic below kinda shows how this should be. Bare in mind what is drawn over the pic is not scale. It is just to show the general idea of what has to happen. So with 6 sticks to cover mid ship minus 5 sticks to cover that frame, that leaves 1 stick to cover all that deawood. NOT!!! There's definitely going to be a stealer or two back there. I think it would be impossible to cover all that deawood with one stick and a few stealers. They just won't fit together. So I think using a stealer to cover part of that 26mm will help, and should allow me to cover the area with 4 sticks plus a stealer instead of 5 sticks. That will give me 2 sticks for the deadwood area. The more I think about it maybe 2 stealers in the 26mm area. And I could end up with 3 sticks and a couple more stealers in the deadwood area. This is going to get interesting The tangled webs we weave... Hope that makes sense. If anyone has some suggestions here I am all ears.


- 136 replies
-
- 5
-
-
- enterprise
- constructo
- (and 1 more)
-
Hey Jim - congrats on your Syren completion! Happy gawking!
- 843 replies
-
- 1
-
-
- niagara
- model shipways
- (and 2 more)
-
I hope this doesn't sound big headed. I was in the dining room today - that's where Niagara is docked now. Couldn't help but wander over and pull up a chair and just gawk for a while. A good 10-15 minutes. Sometimes I amaze myself How in the world did I do all that? I'm glad I can still have an interest and be proud of past projects....That may be tougher to say when I have no more room for them
- 843 replies
-
- 5
-
-
- niagara
- model shipways
- (and 2 more)
-
Steve - I always wondered about those friezes. I have some similar ones for a few of the kits on my shelf. How did that paper hold up when wetted by glue and also your finish? Any wrinkles or shrinking?
- 190 replies
-
- 1
-
-
- pinnace
- model shipways
- (and 1 more)
-
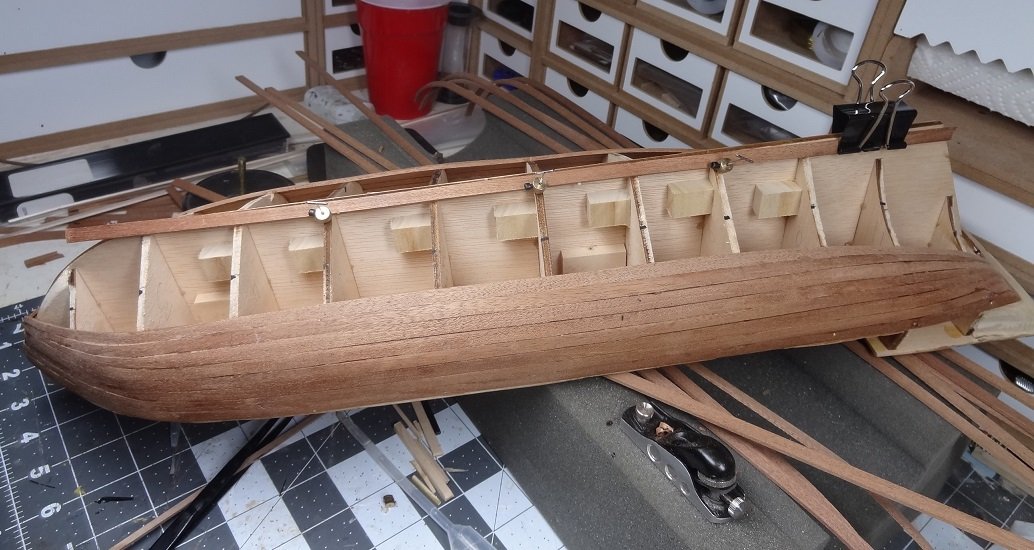
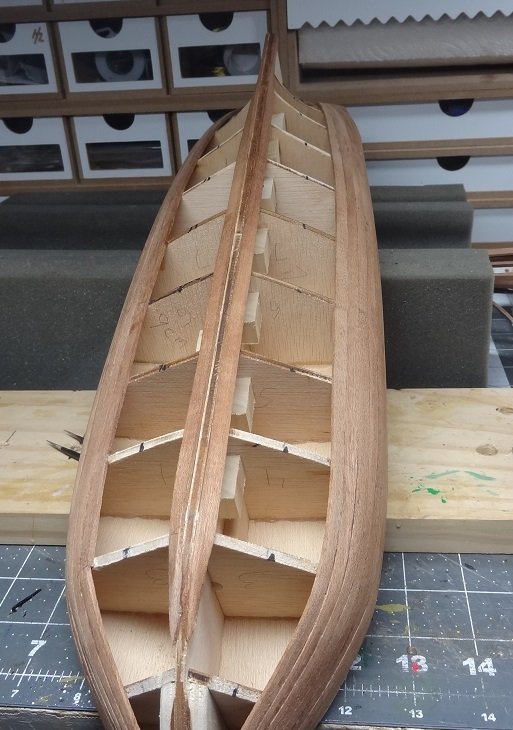
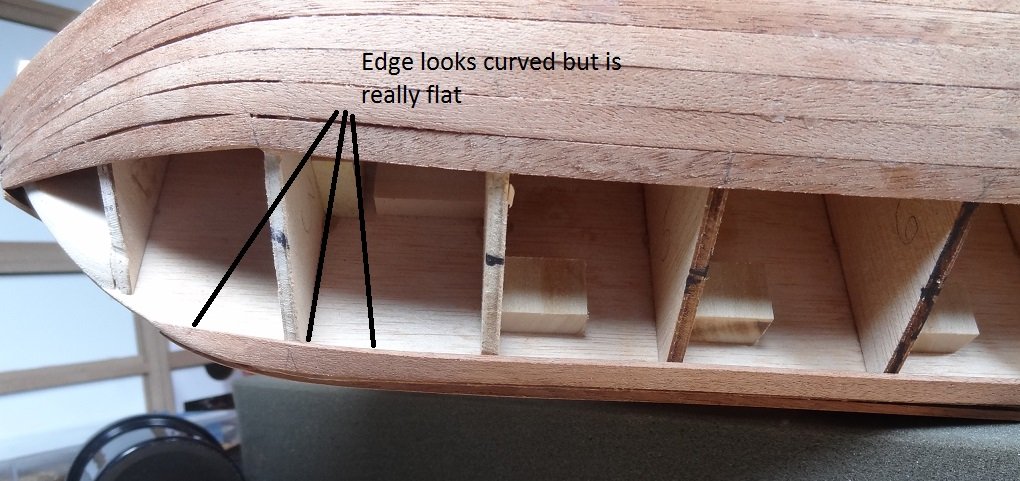
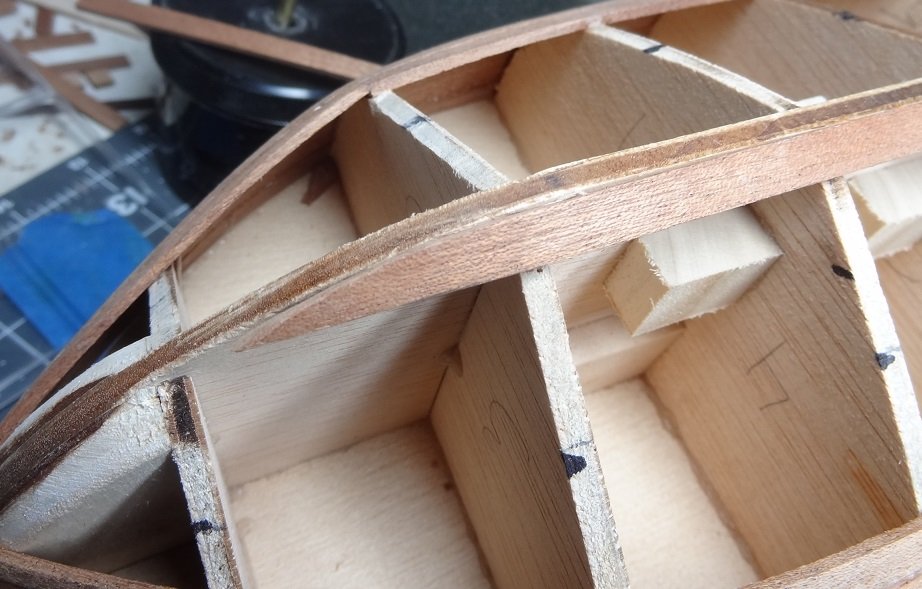
Second verse, same as the first. The other garboard is done. It's funny how a little bend or twist can trick your eyes. Here the leading edge appears to curve upwards. However laying another stick edge to edge shows the GB upper edge to be as flat as it can be, just like it should be. The next stick fits like a glove. You can see bottom strake at frame 2 is a repair job. The sapelli broke as I was bending it. Too dang thick! I kinda lost track of planks and bands. The GB is in band C. The sticks you see coming down are bands A and a few of B. I think I'm going to recalculate it all to make 1 band from the remaining space. The dividers will make that a simple effort. I'll post a few pix & notes on how I do that. Stay tuned.
- 136 replies
-
- 5
-
-
- enterprise
- constructo
- (and 1 more)
-
Here's one for ya Darrell. The name? I thought about that real early on and then proceeded to forget about it. Do it before you hang a boat off the stern.
- 648 replies
-
- 2
-
-
- niagara
- model shipways
- (and 1 more)
-
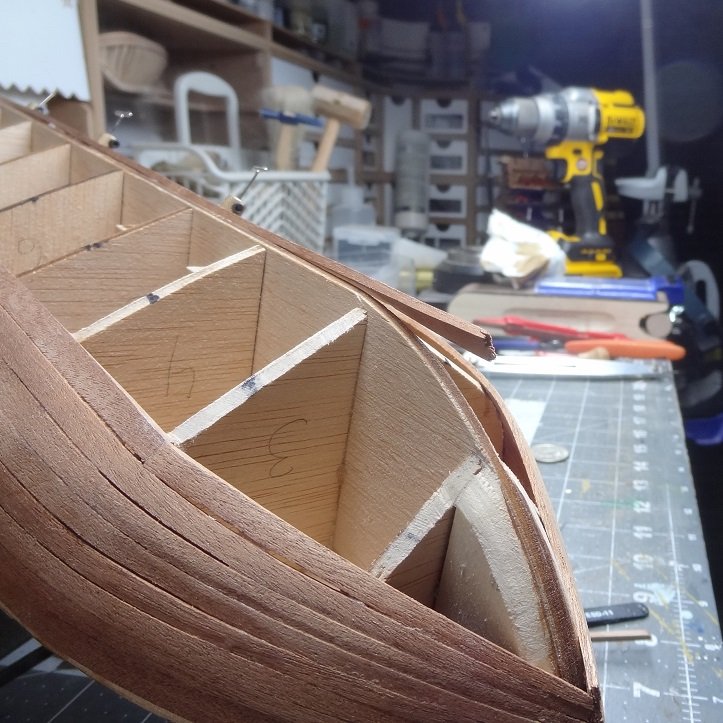
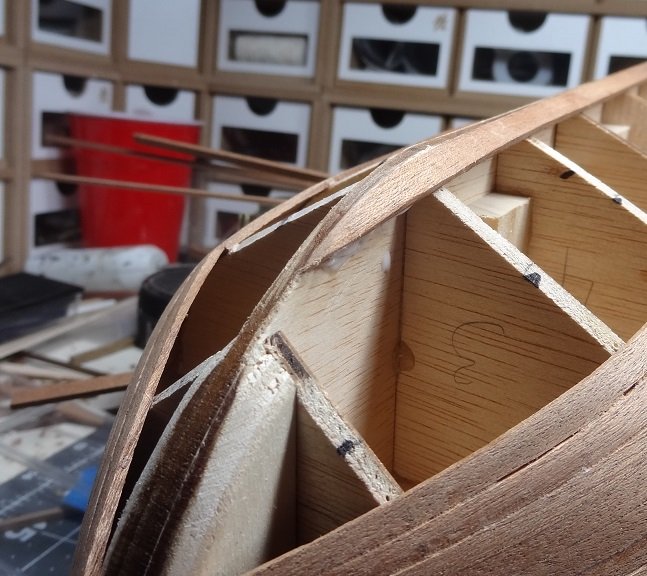
Darrell - I suppose I could have cheated and glued the false keel on before doing the garboard. I could have cut a rabbet into that. I think the potential problem with the kit method is getting the bottom edge of the garboard flush to the false keel. You have to lay the GB leaving a slot at the bottom to fit the false keel into. Of course a lot of the nastiness there will be covered by the second layer of planks. I'll have to check to see if that layer requires a GB also. I'm hoping it's just a "skin" for the first layer. Did I say I don't like double planking?
- 136 replies
-
- 3
-
-
- enterprise
- constructo
- (and 1 more)
-
OK Sam - glad to have you along with us. Was about to ask if you have built Enterprise. But I see in progress might be more accurate. I'll have a look at your log.
- 136 replies
-
- 1
-
-
- enterprise
- constructo
- (and 1 more)
-
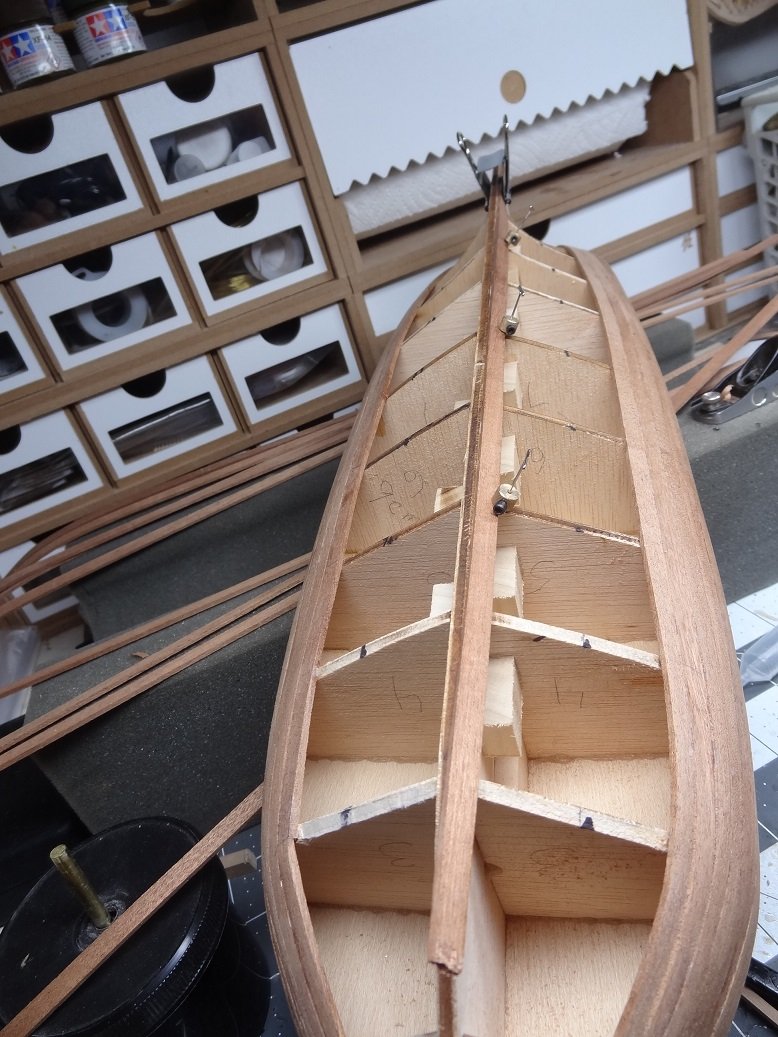
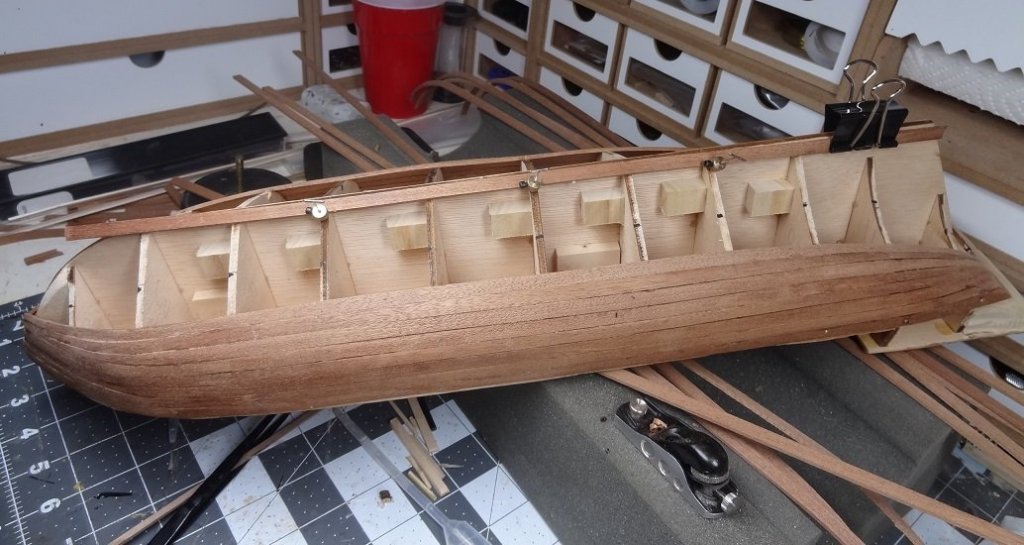
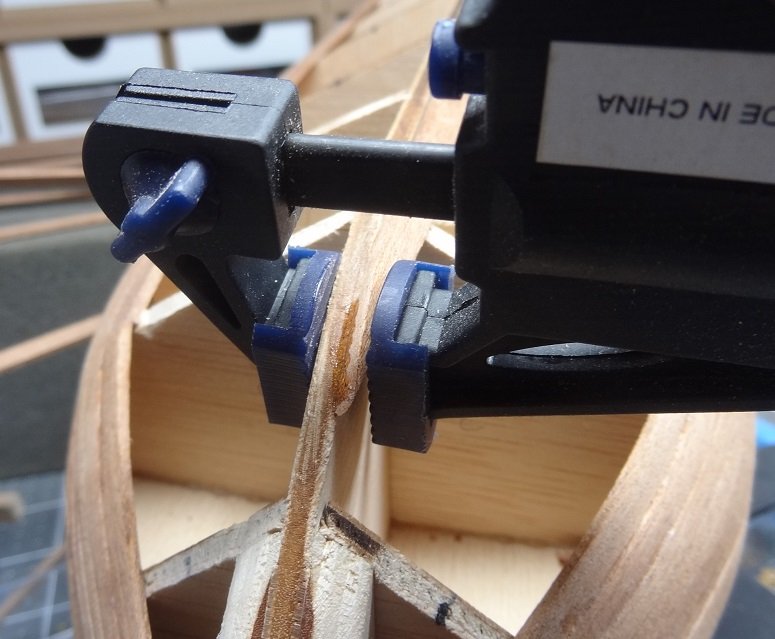
I've been preaching garboards to some folks here and realized it's about time to take care of mine. This would be interesting as there is no rabbet to slide a stick into. Instead the idea seems to be gluing one down along the edge of the keel. Then another keel strip is glued on to the first and I assume it will partially cover the garboard stick. Kinda cheesy, but I have seen other kits do something similar. There is still a ton of twist required to get the stick to lay in place. Not easy with these thick sapelli planks. Soaking them did help somewhat. Although laying the board is different than with a rabbet, the result should be the same. You want to lay a board and keep the upper edge as flat as possible so that the next stick has a solid place to lay. The bottom edge of the GB is parallel with the keel amid ship but as the keel transitions to the stem it begins to run upwards. I will be carving the GB lower edge to match this curve so that this edge can be glued to the keel. And now with the GB leading edge shaped and glued. Now if I can just duplicate this on the other side


- 136 replies
-
- 6
-
-
- enterprise
- constructo
- (and 1 more)
-
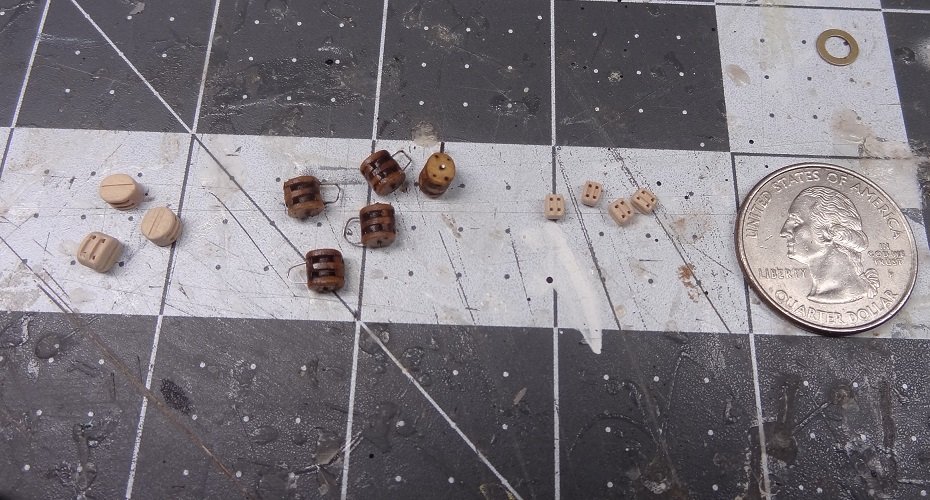
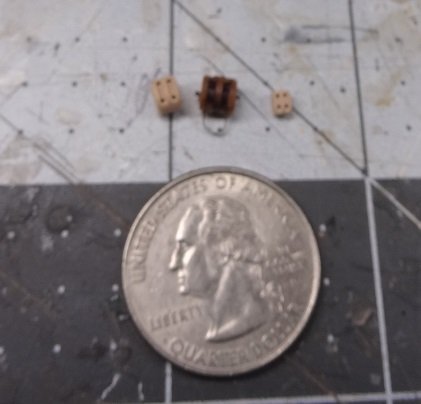
Somewhere out there in MSW Land I had commented about the new strapped blocks available from Syren. Contrary to the 'ready to rope' idea behind the original blocks, these have to be built. The blocks come as layers - outside, sheave, outside for a single - and the layers need to be glued together, sanded and most likely stained. If you are familiar with the Syren deadeye construction, this is the same idea. They come in a few sizes, but not as many choices as the originals. The 3/16" blocks are the smallest. I told a few folks I would check them out. I have mixed feelings on these guys. I think the biggest problem is just that. They are pretty big. Syren's page on these blocks says it might be best to use them in a few choice locations where they are obvious and would stand out. Not a bad idea - however in the 3/16" scale of a lot kits these things are just too big. I'm thinking a 1/4" build might be more practical. Secondly, these blocks do take time to make, maybe a total of a minute per block. When you have a hundred or more blocks in your build this is some serious time. Back to the Syren statement - use sparingly at strategic locations. Part of the assembly process is putting the blocks into a block tumbler to smooth down the edges. Other than home made the Model Expo tumbler is the only one I have found. I do own one and have found it to be problematic at best. Even when it works, it has a tendancy to beat the poop out of whatever you put in it. My experience with the deadeyes was out of 10 dropped into the tumbler only about 7 would come out unscathed. The others were usually broken. Not that this is a bad thing but the blocks will most likely need to be stained. There is a lot of laser char on the parts and some of it is impossible to sand off. Stain could darken up the wood to somewhat match the char. The pix below show the blocks stained with Minwax Golden Oak. The blocks do look very nice. Can't argue with that. left to right - 3/16" ready to rope; 3/16" internal strapped, 1/8" ready to rope I think I will be sticking with the ready to rope blocks. The majority of the kits I have are 3/16" (1:64) and I don't think these blocks fit the scale. I'm guessing the 3/16" block is about as small as you could manufacture given the detail required. Rest assured I am not out to sink the product or Syren. I use tons of Syren products in my builds and will continue to do so. They may work well for some of you and I suggest buying a package or two and checking them out for yourself.
- 136 replies
-
- 4
-
-
- enterprise
- constructo
- (and 1 more)
-
To keep extra paint I use Tamiya bottles. I happen to use their paint so I have accumulated the empties. However MegaHobby sells empty Tamiya bottles. It's the tops on the Tamiya bottles that keeps the paint good. A much better seal than the cardboard "gaskets" found in most bottles. All of my mixtures - some over 2 years old now - are still usable. I highly recommend the bottles. The "yellow" can be had by starting with a biege - Tamiya calls theirs Buff - and then adding yellow and white, rather than starting with yellow and then adding Buff. Instead of a French's Mustard color you get a Dijon Mustard color.
- 648 replies
-
- 3
-
-
- niagara
- model shipways
- (and 1 more)
-
re: the paint - my lesson learned, you either: 1. Mix your paint drop by drop,counting the drops and writing the recipe down so you can make it again OR 2. You make more of the color than you could possibly need for the project and store the rest somewhere
- 648 replies
-
- 2
-
-
- niagara
- model shipways
- (and 1 more)
-
The bracing is where the look is really transformed. She's a fine one Darrell - yours and I think the kit in general. Think back to when you opened that box - the raw white basswood, plywood sheets and the rest. Think of all that has happened between then and now (big & small). Niagara will be a marker for a little chunk of your life.
- 648 replies
-
- 3
-
-
- niagara
- model shipways
- (and 1 more)
-
Nice work Ron. Usually pictures will bring out every little error in the paint job. Yours came out pretty good.
-
Hello Elijah - dude you are starting to sound like an engineer. They call that laminating, a lot of people do it. Welcome aboard. Auger - yours looks great. Every time I'm in a online store looking at kits, this one always catches my eye. Very attractive. I think I just like the 2 masted boats - brigs, schooners, etc. Thanks for checking out the log and welcome. I will try to carry a good pace with this build.
- 136 replies
-
- 2
-
-
- enterprise
- constructo
- (and 1 more)