mikiek
-
Posts
2,276 -
Joined
-
Last visited
Content Type
Profiles
Forums
Gallery
Events
Everything posted by mikiek
-
 Hard to say Steve. And I'm wondering if you are commenting on my griping in the Enterprise build log? Trajta is a single layer. I'll just say it one more time - I REALLY don't like the whole double plank thing. What a waste of time & materials! Some will say it will help get the second layer right. Here's a novel idea - why not get the first layer right? I will now step off my soapbox........
- 204 replies
-
- 1
-

-
- trajta
- marisstella
- (and 1 more)
-
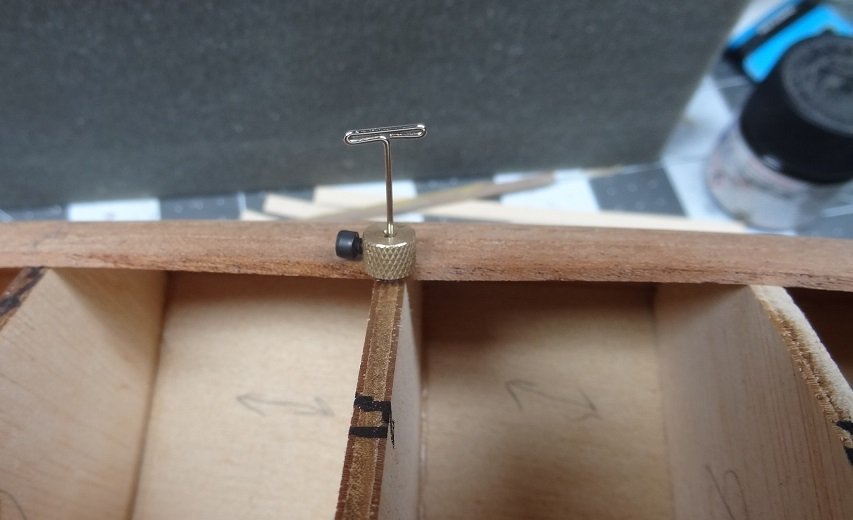
I 'd send a photo but mine is all black and you can't see much. I was drawing a blank with that notch. Doesn't seem to serve much purpose as the crosstrees don't even extend out from under the platform. However a closer look made me think - the aft crosstree runs almost the full width of the platform. If you have made notches or holes in your platform for the deadeyes and placed those according to the plan, the aft crosstree terminates right at one of the holes on both edges. All I can figure is the notch in the crosstree is to provide clearance for the deadeye wire coming thru the hole. Pretty pointless really. It doesn't look like I made the notch. Knowing my own laziness, I probably shortened the crosstree enough (just a hair) so that the ends do not interfere with the deadeye. My best guess...
-
Still laying the sticks. I had 2 break today as I was "forcing" them down on the frames. I HATE double planking! What a waste of time & effort. I could be almost done. And now I'll go back and lay some more
- 136 replies
-
- 4
-
-
- enterprise
- constructo
- (and 1 more)
-
Tom - can you point us to what plan page and the inset number or name.
-
Hi Don - thanks for checking in. Strong and heavy. I wish they had balanced the sticks better. The first layer is really thick. The second layer (walnut) is close to a veneer. I hope it won't be a different set of problems.
- 136 replies
-
- 2
-
-
- enterprise
- constructo
- (and 1 more)
-
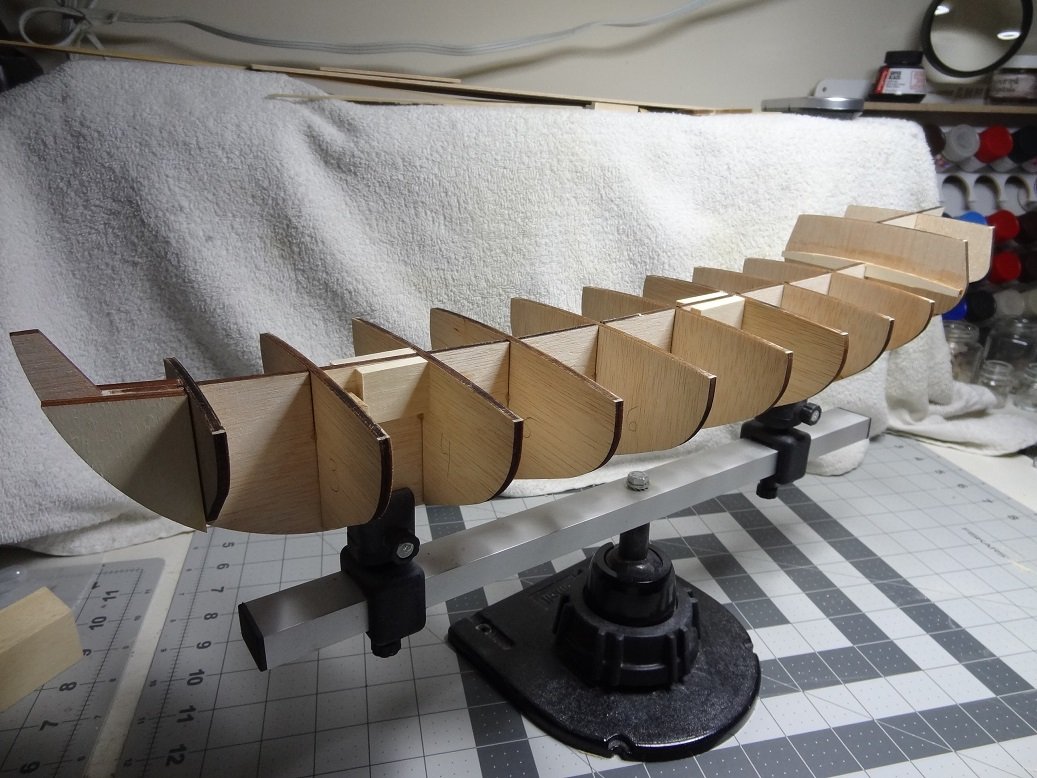
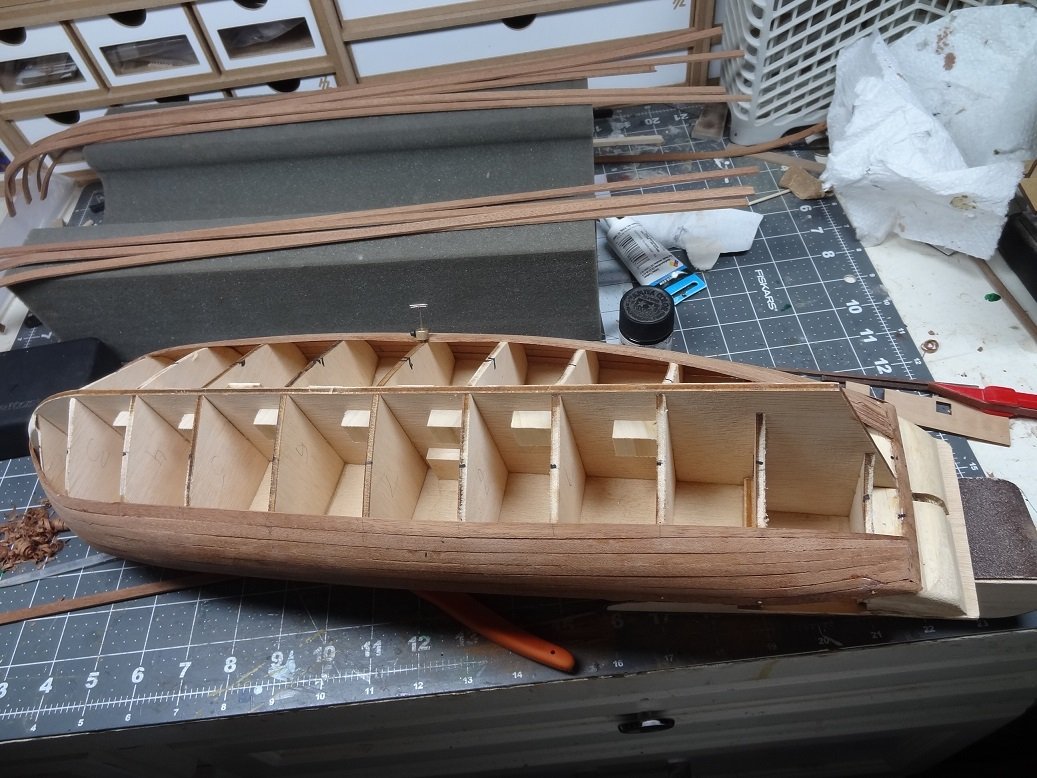
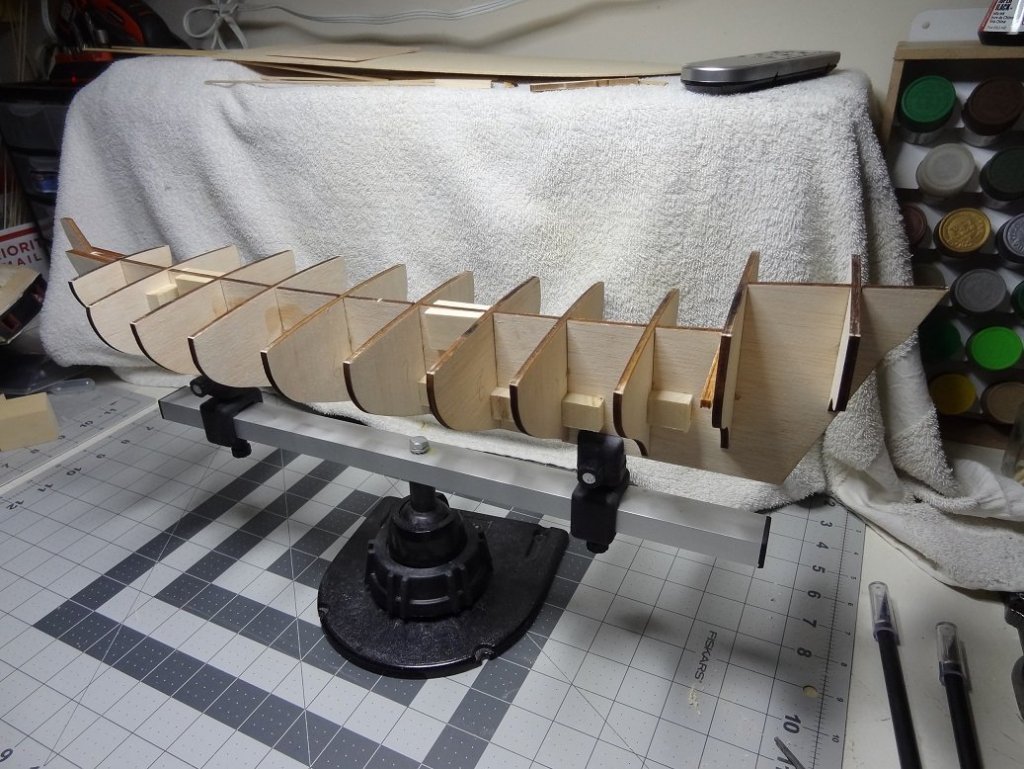
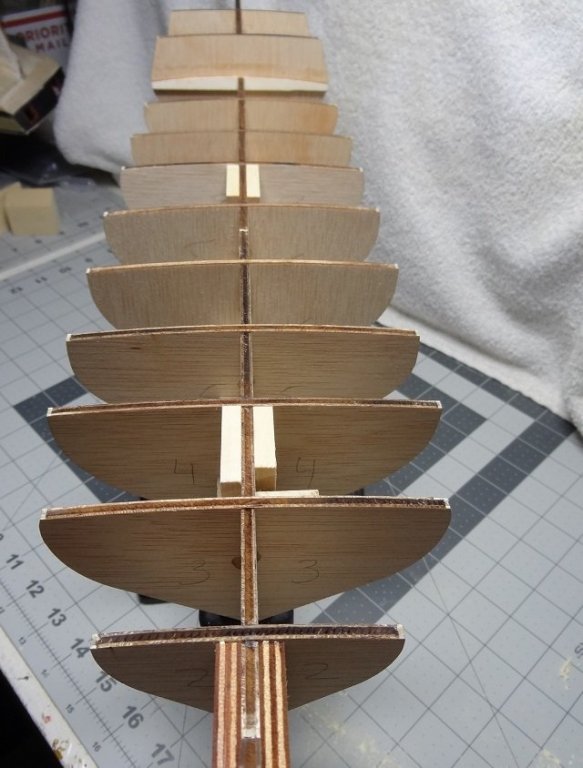
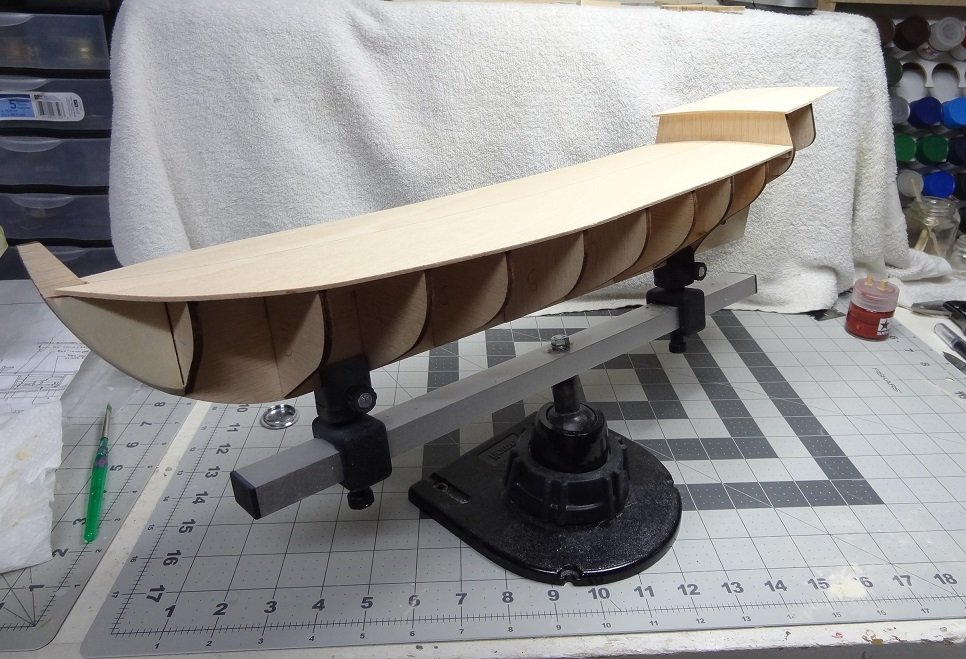
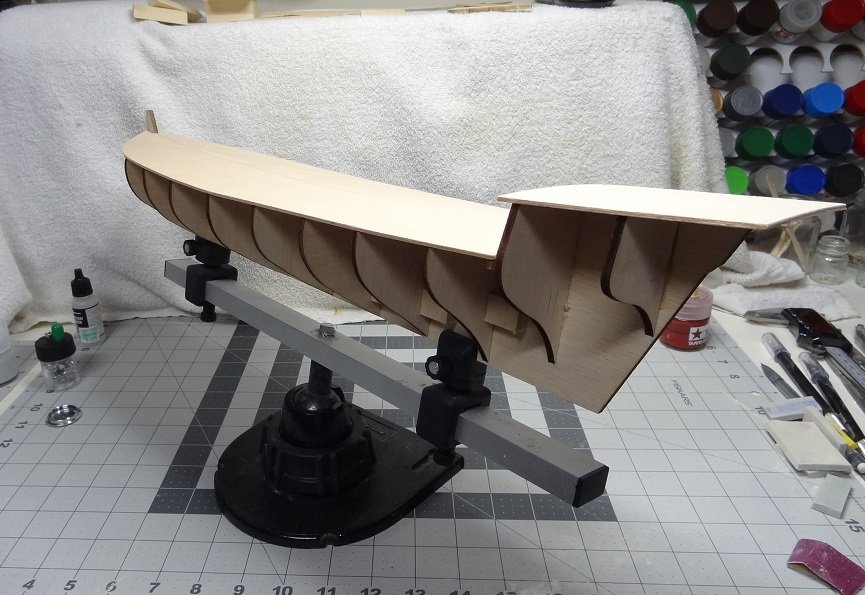
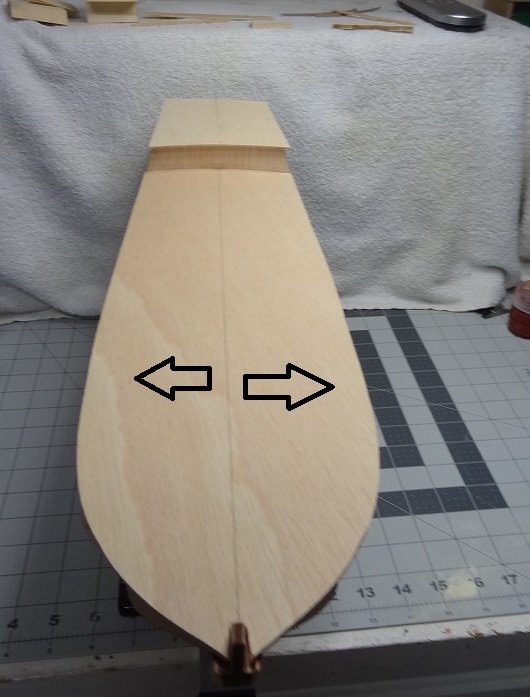
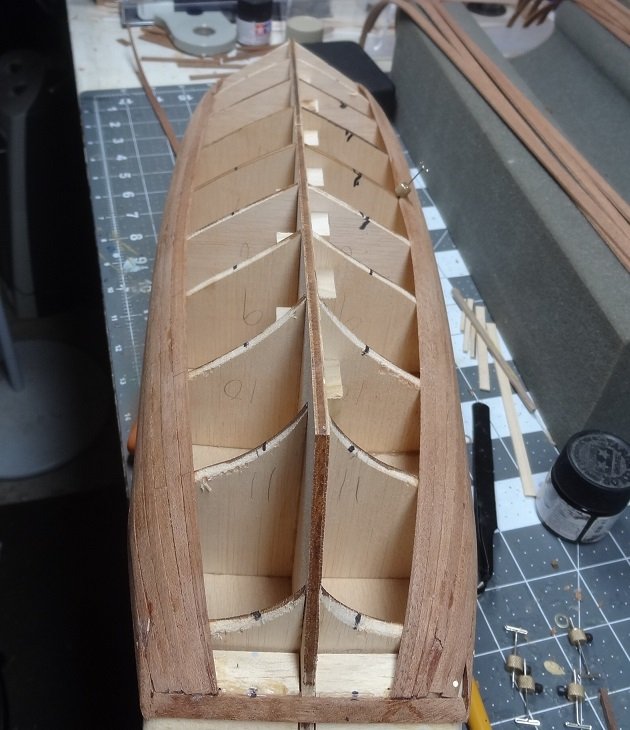
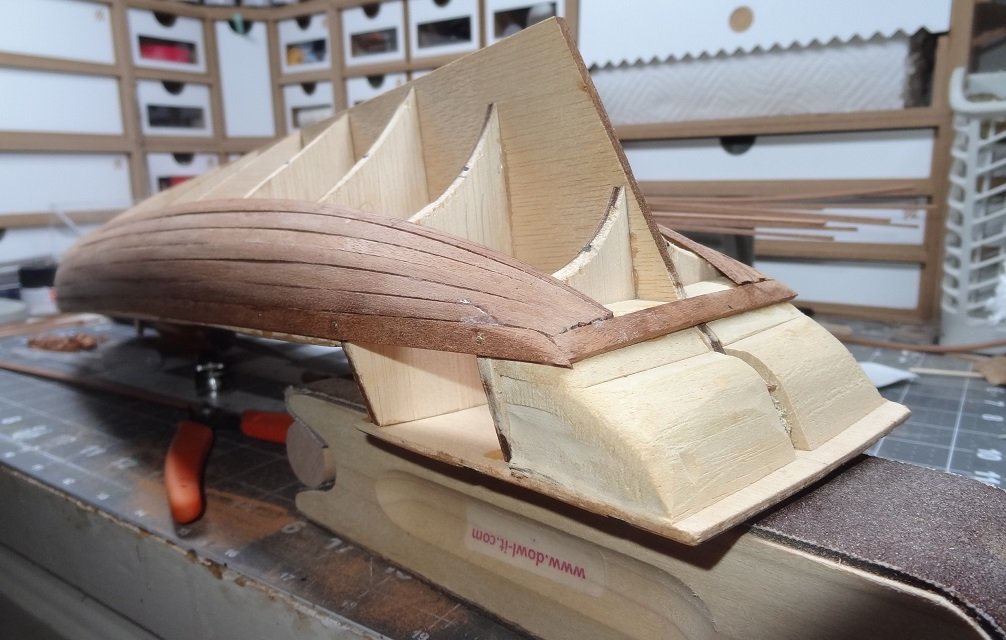
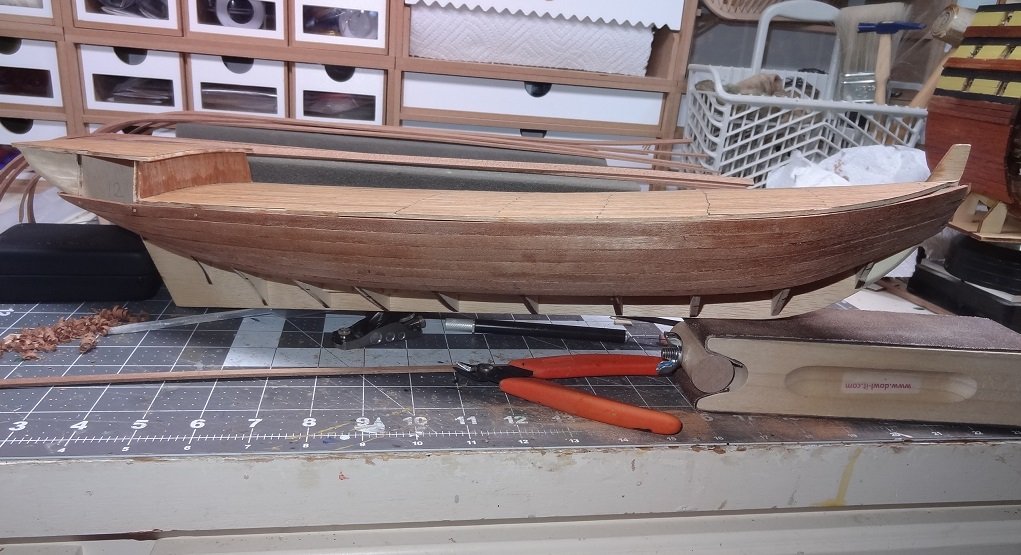
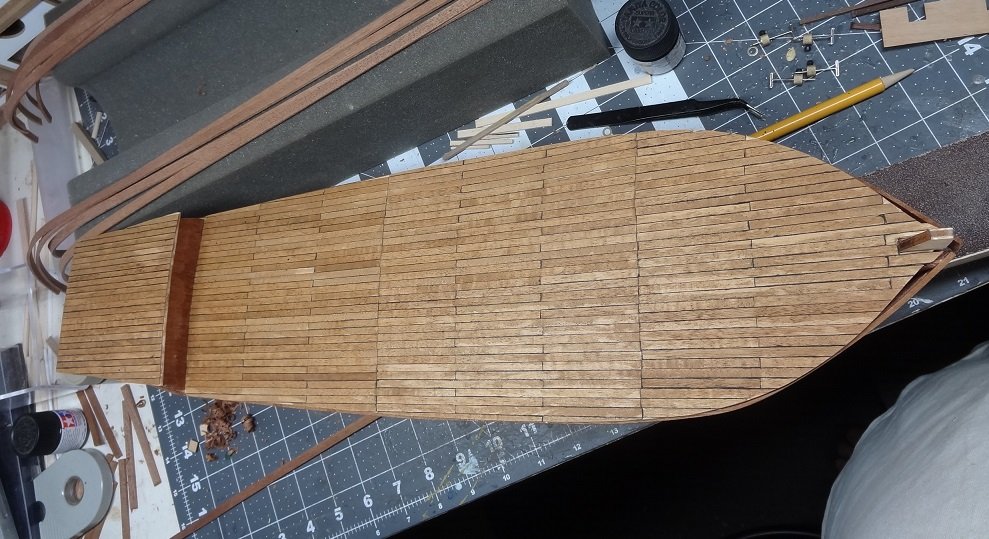
I've never been crazy about 30-40 photos of the kit parts so I will spare you and me from that effort. I'll just say so far everything looks to be in order. Bulkhead frames to keel was the first order of business. Everything popped out from the laser sheets OK. The fit was a little on the loose side. Not bad, but I decided it could use a little help. I cut brace blocks from a 1"x1" and used them kind of like a square. After positioning the block to get a frame at 90 degrees, the block was glued to the frame and keel. This is something I usually do anyway. It got rid of all the slop very well. Next was the deck substrate, one of the first big frustrations. The frames have a lot of slope from the centerline to the bulwark. Of course the plywood base for the deck did not. Getting that glued well was a struggle. The slope was obvious right away so I figured the best plan would be to glue down one side then the other. Got the first side down without incident - tacked with CA then white glue at the joints. I let that set overnight. Things looked good the next morning so I was ready to work the other side. I put down some CA on the top edge of the frames and tried to bend the plywood down from the centerline to make contact. Not enough fingers . Just to mess with me a little more, the base popped up and off several of the frames on the first side And I still didn't have the second side glued down yet There really is no clamp that I am aware of to use in situations like this, so I did a lot of manual holding down of the edge. Finally got that side down except for two frames - I decided I should shim those rather than distort the base getting it to glue down. So back to the first side for some repairs. Holding the base down on that side caused one on the other side to pop. And so it went. Close to two hours of holding pieces together. The deck was planked next. I followed the plank pattern from the plans. Don't care for it that much. I also screwed up and stopped all the butts at one spot near the bow. I guess the brain was parked somewhere else. I've already passed on a brief description of the hull planking debacle. More of a bluff bow than my previous build and I fought with it. The double planked hull had some overly thick sticks that had a mind of their own. Enterprise wound up gathering dust & bugs waiting for me to try again. A few weeks back, armed with some better bending techniques, I was able to get a few sticks in place. Did a few more and decided that it was possible. So that pretty much brings me up to now. I'm continuing with the same sticks - a long soak in hot water, edge bending in a jig I made, then lateral bending with the electric style plank bender. It still isn't easy to lay a strake but it's manageable. As usual, I am using the proportional dividers to help taper the sticks and as usual they are providing me with a pretty accurate pattern. To shave off the material I am using a thumb planer. This is a miniature version of the hand planers used in wood working. I have found this tool to be very useful. One caveat - I tried a couple of the $5 versions first. I quickly decided this was one of those times where I was going to have to spend some $$ and get something on the higher end. In the end the Veritas planer has proven to be worth every penny. As I mentioned the sticks are extremely thick. Holding them down while the glue sets was getting old. Couldn't find any clamp that really helped beyond the second or third strake so I thought I would try these. Did not like them at first but a retry a few days later showed them to be helpful. I would recommend them if you don't have a problem with stabbing things in your bulkhead frames. I think I have hosed up the filler blocks at the stern. The instructions & plans were very vague. Several other logs show the blocks shaped more squarely. I rounded the back end. I imagine this can be overcome. So there you have it for the moment. Thanks for reading!


- 136 replies
-
- 10
-
-
- enterprise
- constructo
- (and 1 more)
-
No, that wasn't a typo. The scale is 1:51 - says so right on the box. How they figured that I'll never know. Welcome to my build! Hope you'll stay along for the ride. The name Enterprise has had several incarnations as a boat, some better documented than others. This one had a fairly productive history as well as a refit or two. So how accurate is this kit? Don't know and I'm not going to worry about it. When I am browsing kits on websites, I have always found Enterprise to be an attractive build just as it is shown. So that's where I'm headed. I see several other boat kits that are similar in appearance - Independence, Lexington, just to name a few. I imagine I'll be researching as the project progresses, but just for knowledge's sake. I have no plans to alter the design, save for maybe ropes, blocks from Syren. I started this project quite some time back - I believe over a year ago and towards the end of my Niagara build. Enterprise has a rounder bow than does Niagara and that did me in. This is a double plank hull and the first sticks - sapelli I think - were IMO way too thick. Extremely hard to bend - and they did need bending, both laterally and edgewise. I got frustrated and Enterprise ended up back on a shelf. I tried several times to get up some interest to start again but it didn't happen. Fortunately I did take a few photos back then so I can start this log close to the beginning. So after a couple of recent projects completed I pulled her down again. This time (with a few more tricks up my sleeve) I was able to get planks shaped to fit the frame. So I have decided to continue on. The beginning of this log will be memories of what happened quite some time back so I can't provide too many details. Nothing really earth shattering anyways. So I will go update my signature and get on with the show. Thanks for reading!
- 136 replies
-
- 3
-
-
- enterprise
- constructo
- (and 1 more)
-
Ahh the good ole days.......
-
That's what I meant about not knowing Bluenose. Heck they should have given you a plastic hull and saved you a lot of trouble
-
I agree with you on the tackles. I have my own feelings about coils, but if you want to go in that direction I believe Darrell showed how to do them.
-
Don't know a thing about Bluenose, but if I was building a square rigger I would leave wood grain and small gaps. Looks like another primer coat would fill it and your hull will still look like wood planks rather than a show car. Whether or not Bluenose is supposed to look like that, I'll leave to you.
-
Welcome back Don. As has been said, nice job on the blocks. I am also still really liking your deck. That wood stands out but at the same time doesn't dominate the overall look. Great choice.
-
Wow Per. That's good to know, but a bad thing. Brian you might check into either Vallejo or Tamiya. Both are a step above the average stuff. As I mentioned I use Vallejo primer & airbrush additives. For paint, you can't go wrong with Tamiya. Vallejo can be had on Amazon. Megahobby always has a good selection of Tamiya in stock.
-
I believe that's what I used also Tom. The .35 for sure for the breech. The .18 definitely too much for 3/16" scale and even with the .12 you may find that you will have to drill out some of the holes in the blocks. For threading your lanyards thru the holes, dip the end in some CA to harden it and keep it from fraying. One more decision I would make at this point is what are you going to do with the excess rope in your tackles? Don't know if you were planning on tackles for that ring at the rear. I decided not to. If you do, that particular tackle was usually shared between multiple gun crews. In theory the tackle is only needed for the first load. For subsequent loadings, the recoil of the gun firing would back it up into loading position. The only time it might be needed again would be after a misfire, where the gun didn't recoil. IMO they made it way too crowded on the deck. I can't imagine them being left there.
-
Can't speak specifically for the ME brand but most primers can and should be thinned for an airbrush. Same for most acrylic paints. Keep an eye on the blobs. Out where you're at low humidity can start the mist drying before it gets to the surface. Vallejo (probably others) makes a retarder for this problem. It works well. Only problem, if I recall is there are no instructions giving mixing ratios. If you have ever seen the small Tamiya paint bottles, I use them for mixing. Mix paint/thinner to fill bottle about half way and for that I add 10-15 drops of retarder. Just go with lite coats, and several of them. If the blobs happen, you may need to sand them off after you correct the mixture.
-
I had to cut squares out after the fact. Those nippers and a little filing works well. Hhmmmm Victory, Victory or Victory. I may have to think on that for a while If that is your direction you might do some digging and see what the differences are. Maybe a build with the best from each. I imagine after completing one you won't want to do another.
- 648 replies
-
- 2
-
-
- niagara
- model shipways
- (and 1 more)
-
Darrell - the best luck I've had cutting any brand of grate is with something like some sprue nippers. The grates from ME were weird and I quickly replaced them with the ones from Syren. I will say I had problems with some of those, but Chuck stood behind his stuff and sent me some replacements.
- 648 replies
-
- 2
-
-
- niagara
- model shipways
- (and 1 more)
-
No problem Tom - whatever works best. I had fun for 3-4 strakes & the garboard, but after that I just wanted to be done. The blocks should be doubles at the bulwark and singles at the gun. The .008 in those blocks looked kinda wimpy to me although it is the accepted size for the Niagara scale. I was also frapping the excess and the .008 wound around really looked too thin. Plus the .008 doesn't show the rope strands as well as the .012. People that see what I did either love it or hate it. But I am the only one I was trying to please and I like it. I'm working a build with a slightly larger scale than Niagara and I think those blocks may fit well. I know they would add a lot. Downside is making each one of them.
-
Hey Darrell - it's never too late and thank you. I was about to open a new kit - either Victory Granado or ME Confederacy - and I still may. But I have had Constructo Enterprise just started but collecting dust for months. Maybe a year. It's a double plank (still don't get that) and the first layer was something like sapelli and REALLY thick. Bending them was so frustrating I gave up. For the moment I am back at it and making progress and I would love to finish it. They say it's not terribly accurate, but I still find it a very nice looking build. After doing the sail on Trajta and the restoration project I am ready to try sails on a square rigger. Enterprise should not be too bad - only 2 masts, several fore/aft sails. Can't wait to see where you're headed after Niagara.
-
Tom - black & dark brown ropes are supposed to simulate tarred rope. It's used mostly for your standing rigging. It's nasty stuff - sticky, smelly, rubs off on anything. I don't think it would have been used for gun tackles. But that one is your call. The bottom of the cheeks on your masts are supposed to be sanded - kind of tapered - so it blends into the mast. If you decide you want to speed up your planking, this works well for me and no waiting over night. With the basswood, I don't even bother bending first. Lay your strake in place and put a small pencil mark at each spot on the stick where it is touching a frame. You're going to be gluing the strake to between 1 to 4 frames at a time. Start amidship (the easiest area) and run some white glue along the top edge of your new strake. This edge will be contacting the bottom edge of the previous stick and will eventually dry. DO NOT put white glue on the edge above the pencil marks. Go for 4 frames on this step. Let that stick sit a couple of minutes to let the glue begin to set. Now put a dot of medium CA on the frames right beneath the previous strake. Quickly take your new stick, line up the marks and lay it on the frames, pushing it upwards to contact the previous stick and also push downwards at the frames. The CA dries quickly and acts as your nail, hold the stick in place until the white glue can dry. You should be able to easily do the next 2-3 frames on either side of that - same process. After that it will likely get to doing 1 frame per step as you are getting to the areas where the stick needs to bend or twist. So do that, manually bending or twisting as required. Again the CA (if applied lightly) should hold the stick to the frame. Use any type of clamp if you want but make sure the entire spot of the strake is contacting the frame. A couple of notes. I'm using Titebond moulding & trim white glue. It's a lot thicker then the regular stuff so it does not run or drip and it set quicker as well. The reason for not applying white glue above the pencil marks - I have a tendency to slide the strake up under the previous one. Sometimes when I do this the white glue would get on the frame and mix with the CA which can render the CA useless so the stick doesn't stick. Your blocks look good. I don't know if you saw them at the Syren site, but Chuck is offering blocks (you have to assemble them) with metal parts for pins & straps and a working sheave. They look real nice. Haven't used them before but I ordered some and let everyone know how it goes. Chuck recommends putting them in strategic places, not a total replacement. Rambling again FWIW.......
-
Don - you played a big part in this. The rewrite of the instructions in the nick of time. Advice & support when I needed it. My hat is off to you and I pass on a big thank you. It's good to hear from you again.
- 204 replies
-
- 1
-
-
- trajta
- marisstella
- (and 1 more)
-
Steve - it seems like you are taking this kit to a whole new level. I'd have to say this is the best Pinnace build I can remember. Your care for the details is really obvious.
- 190 replies
-
- 1
-
-
- pinnace
- model shipways
- (and 1 more)
-
Hi Brian - I'm about at a point where I am going to have to make a move on displays. I'm thinking at a minimum some shelves on an office wall but some built-ins would be preferred. I've got so many kits on the shelf (ordered more today) and I think it's about to be a problem. At the moment this one is on loan to my Dad at his apartment - uncased. I had given him Niagara with the case I had made, but he thought it was all too big so I took it back. He wants a square rigged build so my next may be to fulfill that wish. Once again thanks for coming along for the ride.
-
Zoran - I believe YOU should be proud of the product(s) you are turning out. I find it very refreshing to have a choice of kits like yours. Something quite out of the ordinary and different than another Victory or Constitution. The simplicity of certain parts of Trajta allowed me to step into some new areas like the sail. This was my first try at that. Techniques learned from that will be applicable for future builds. And of course your guidance adds a lot of value to the overall experience. Thank you sir! I do have Cog on the shelf. I think I will tackle a square rigger next but Cog will be coming up soon.
- 204 replies
-
- 1
-
-
- trajta
- marisstella
- (and 1 more)