HOLIDAY DONATION DRIVE - SUPPORT MSW - DO YOUR PART TO KEEP THIS GREAT FORUM GOING! (Only 13 donations so far - C'mon guys!)
×


mikiek
-
Posts
2,276 -
Joined
-
Last visited
Content Type
Profiles
Forums
Gallery
Events
Everything posted by mikiek
-
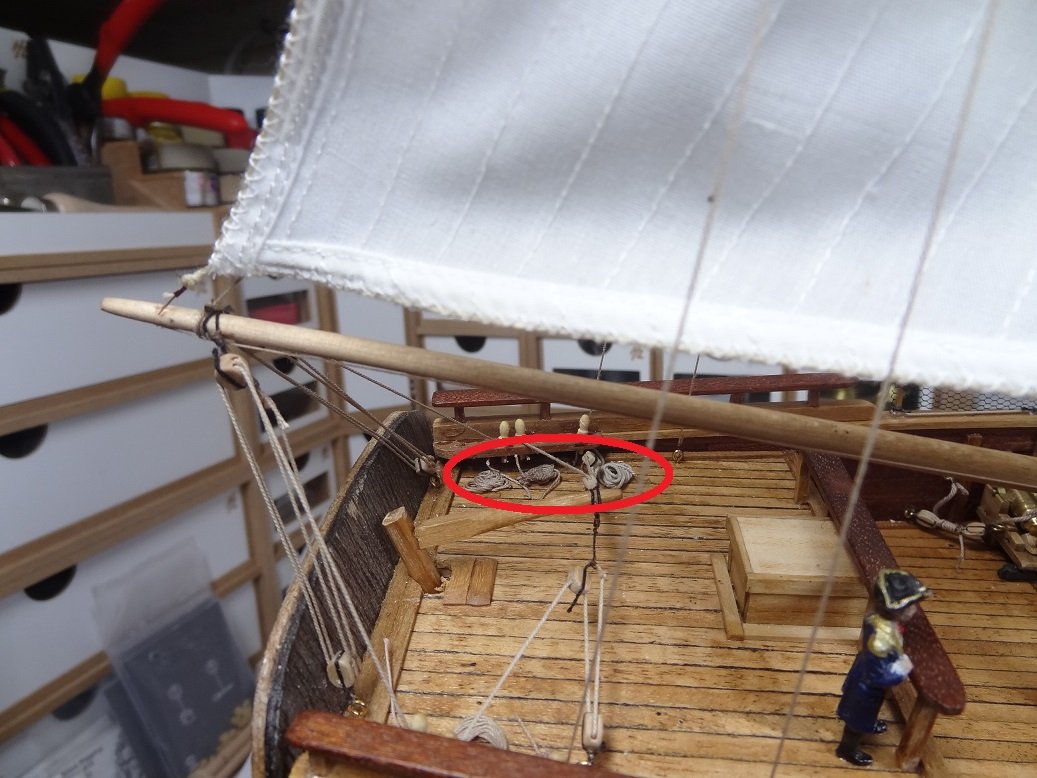
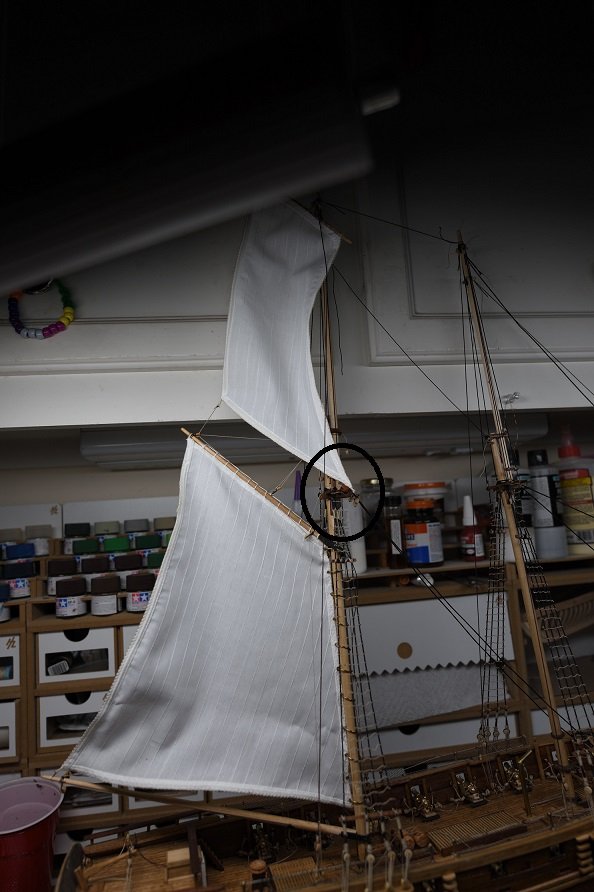
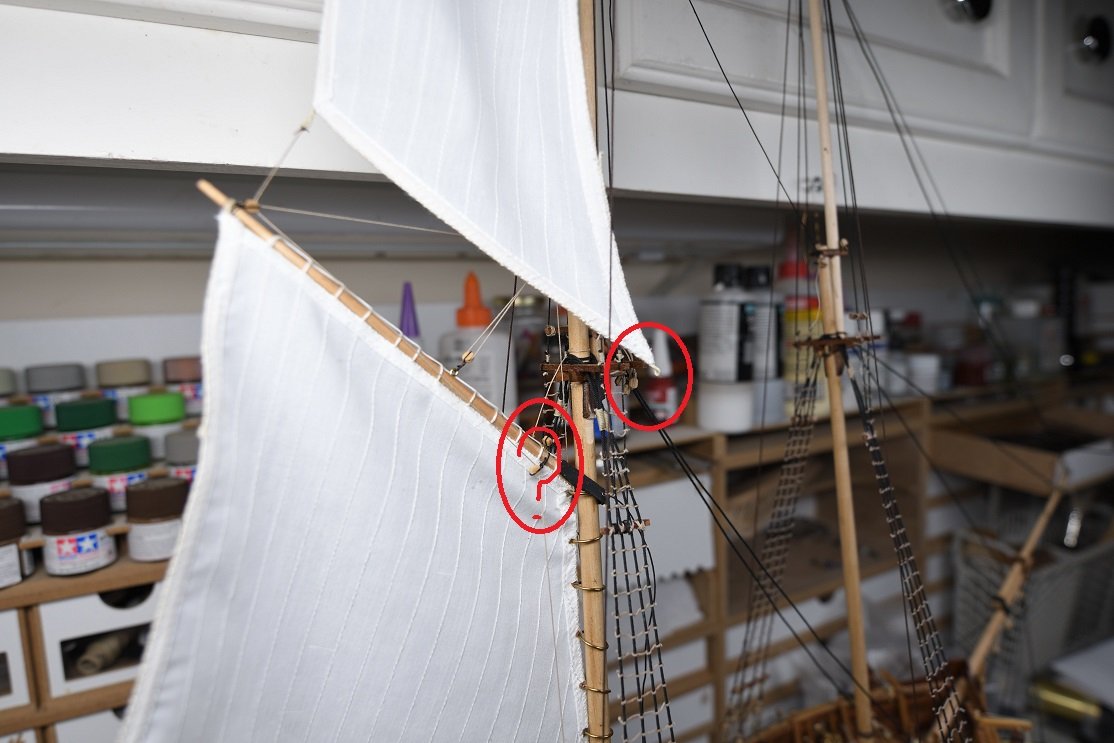
This is Enterprise 1799. The rope pointed out in the diagram. If I read it correctly it would be siezed to the yard then run down the front side of the sail to the corner then under and back up the back side to the block? Or maybe under the sail into that block at the foot and then back up? Seems like a rope running down the front of a sail could keep it from filling properly. Hope someone can set me straight....

-
 Maybe my first real stumper. The rope pointed out in the pic - hope the pic will scroll . I I read it correctly it would be siezed to the yard then run down the front of the sail to the corner then under and back up the back side to the block? Seems like a rope running down the front of a sail could keep it from filling properly. These dang instructions don't give you the names for the running rigging ropes. I will probably post this in the rigging forum too.
- 136 replies
-
- 2
-

-
- enterprise
- constructo
- (and 1 more)
-
Hello Rowboat - regarding the gun tackles - the technique is called frapping. It is not something recently made up, they actually did that back in the day. The other option is to coil the excess rope on the deck - a look I don't really care for. There's lots of ways to do it. The easiest is to use some sort of third hand tool - something that can hold a few alligator clips. Assuming you already have two blocks laced up, clip blocks in two alligator clips, get them the distance you want, take in the slack rope. At the block where the free end of the rope comes out, stretch the rope to the other block and tie a half hitch right at the block. You can put a dot of CA on the hitch to hold it. Then start winding the rope towards the other block. You might check my Niagara build log for details. I may have posted pix there. I don't remember for sure, but I think I bought the sail upgrade kit for this model. I remember dreading having to hem all the sails and then being quite surprised that the hem was already there. If the hem is not in your sails you will want to add one. My Trajta build has some notes on that as those sails did need a hem and I did them all by hand. I'm not sure if it is possible with square rigged sails, but the lateen sails for my Arrow build I just double folded the edges and glued with CA. The I ironed the heck out them to smooth it out. Be careful, a hot iron can scorch the material. Good luck...
- 136 replies
-
- 2
-
-
- enterprise
- constructo
- (and 1 more)
-
I have a few logs that are finished - maybe 2-3 years ago - and it looks like some of the posts from other members are missing. I was reviewing my Gundeck Section log (see link in signature) and there are quite a few posts that I made, thanking someone for a compliment or comment but I don't see the other guys post. My Arrow log appears to have the same problem. Also, from the Activity menu option > Activity that I Started is missing a lot of threads including several build logs. As I don't actively review those threads I can't say exactly when this might have happened. I first noticed yesterday.
-
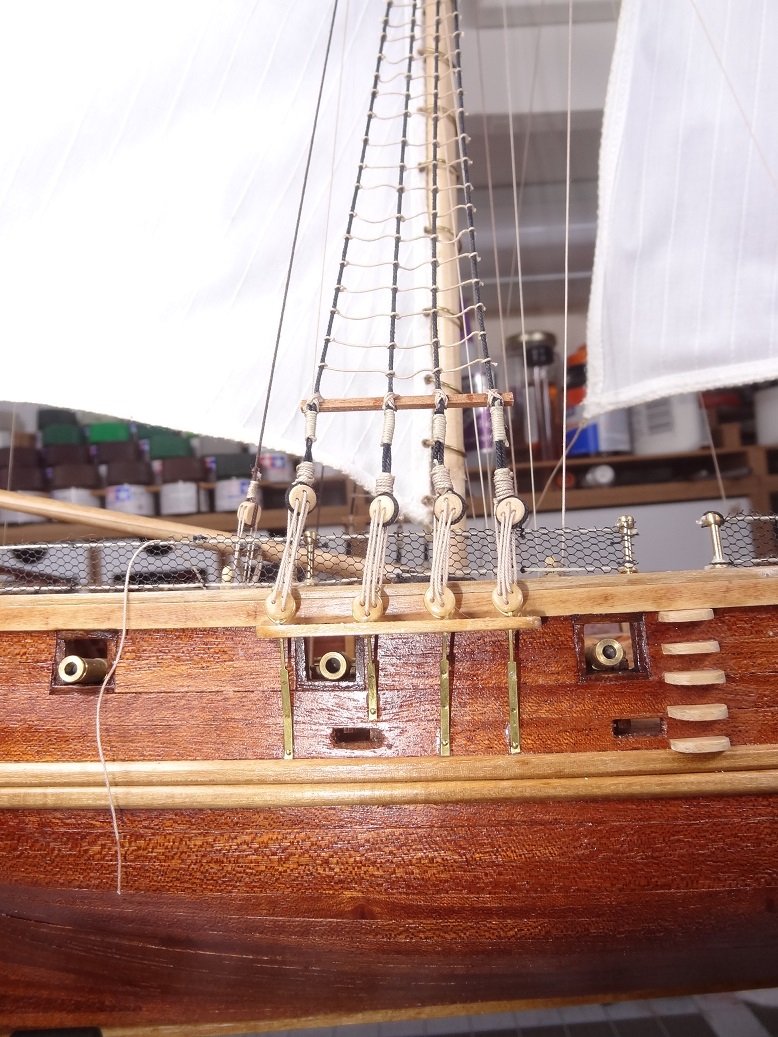
Have still been trying to do some tidying up before putting in the fore mainsail. And I have come to one conclusion when doing rigging with sails. OK actually several. As I was bringing rig ropes down to the pins I glued some of the pins in place. VERY bad move!! Suggestion - take some time when making your pin rails. The holes for the pins should not be oversized. The holes need to allow the skinniest tip of the pin to fit in easily but should show some resistance when the fat part of the pin is inserted. If you do that you should not have to glue any of the pins in place. The reason here is pretty simple - I have had the need to constantly adjust the tension of the running rigging as more is added. Big fat hands push against ropes already in place - and those will loosen. You need the ability to adjust the ropes all the way to the end of the build. I'm sure the more experienced of you are just going DUHH. Another gotcha I just concluded tonite. The coils that hang on the pins are separate from the ropes that are actually pinned. As usual, I wanted to finish out sections as I worked on them so after I pinned a rope I would add the coil over the pin. IMO this is a terrible idea. The coils are only fluff, they serve no purpose for the build. And if you need to tighten/loosen a pinned rope you have to take the coil off to access the pin. I'm thinking those coils should be almost the last thing you do in the build. With those alligator forceps I mentioned earlier, adding the coils later is not too big of a task. I did actually start to hang the fore mainsail tonite. That immediately pointed out several blocks that I did not install when making the mast. I did get them in tonite but with all the rig & sails in the way it was a real bear.
- 136 replies
-
- 2
-
-
- enterprise
- constructo
- (and 1 more)
-
Geez no posts since April. With this stay at home thing I am completely losing track of time. Don't know what day it is most of the time. Or maybe that's old age setting in. I have slowly been fastening up all the rigging loose ends. Still got the fore mainsail to hang but it was a very good idea not to do that until all the other running rig was pinned and coiled. It would have been awful trying to reach in around that sail. Speaking of reaching in, I came across a tool I had never seen before, although apparently it is very common at the ear doctor. They are called alligator forceps. I won't even try to describe them. Just Goggle. If you are like me, the second I saw them I knew they could be very useful. They come in various sizes, I'm finding the longer ones are the most useful. They have helped with rigging quite a bit for reaching thru rigging and across deck to grab something on the far side. The beauty of them is the jaw is just at the tip so you are able to open them up without having to spread the other end 3-4". I'm really struggling with getting rope coils to hang over the pins. The rope just isn't heavy enough so that it hangs naturally - pulled down by gravity. I have tried putting Elmers at the loop end and then holding it bent until it dries. The idea being one end of the coil is angled slightly. That end goes over the pin and lays on the pinrail and then angles downward at the edge of the rail. This sort of works but still doesn't look natural. Sad thing is almost all the coils are in place and I'm liking the look less and less. Would hate to have to redo them all - would be a big waste of rope. If I do I may make a mock up pinrail to hang the ropes and get them shaped before they are installed. I think they do need some glue on them so that they will hold their shape over time. Matter of fact I may head out and give that a go now. No new pix. The last ones I posted are pretty much what she still looks like. Later.....
- 136 replies
-
- 2
-
-
- enterprise
- constructo
- (and 1 more)
-
The jig for the guns is extremely helpful. Can be painful too. I lost a lot of sleep fretting over the size of ropes, blocks, etc. I thought the size ropes speced in the plans looked a little wimpy. Almost every nite rebuilding the jig with various combinations of pieces. Took me almost a month to decide. Whatever you do with the breech ropes just remember those were big, heavy ropes. However they were hanging they would have drooped anywhere they could. This is another place where using some lacquer or Elmers to help the ropes hold shape will add a lot to the final look. The eye notices stuff like that.
-
If you think back 75 years ago and farther, modelers didn't have all the brass strips & sheets we have today. They took wire and beat the heck out it - just like you. That is a very good skill to have some knowledge of and experience with. I guarantee ya it won't be the last time you have to do that. As for the holes, using a center punch (or even a nail in this case) to start the depression for the hole really helps. Stay with it.
-
Exciting isn't it? I remember the thrill of seeing the first guns permanently on board. I have 2 suggestions for consideration. Complete the breech rope - hooks, eyebolts and all - off ship. It'll be a lot easier to seize the ends (read save you lots of time) and all you have to do to install is stick the eyebolt in the hole in the bulwark. The 2nd thought is debatable but I think your breech ropes should be a little longer. Remember guys had to ram long sticks down the barrel. When the end of the barrel is just a few inches inboard, it would have been pretty tough to get the tools in the barrel.
-
I'm proud of ya man! Just saw the gallery pix. Can you give me some pointers on taking photos? 😃 I thought they were of a real boat at first.
- 648 replies
-
- 1
-
-
- niagara
- model shipways
- (and 1 more)
-
Yo Darrell - man I thought you had finished Niagara already. Well it's good to see you are making progress. The ships boats look fantastic. Love the clinker style hull. I painted mine inside & out but I like your staining much better. Stay with it.
- 648 replies
-
- 3
-
-
- niagara
- model shipways
- (and 1 more)
-
Solder is funny stuff. Make sure the 2 surfaces you are trying to solder are touching. It's damned near impossible to fill in a gap. Even a tiny one. Are you using an iron or a torch?
-
This may already be in your playbook but get your deck completely finished before you start stepping masts or hanging yards on them. You start losing elbowroom exponentially as you start that phase so be sure you are happy with the guns, furniture, etc first. One other suggestion, and this comes after my build has been sitting in a display case for 2 years. The footropes now look worse than anything else on the build. I guess maybe they have shrunk slightly in places and don't have the consistent shape that they once did. Some of the stirrups also don't extend straight downwards any more. They are totally enclosed in the case so whatever happened was something natural. Back then I used some acrylic lacquer on them in an effort to stiffen them up after I shaped them. I remember doing maybe 2 applications, painting the lacquer on with a brush. Guess I should have done a few more applications. My point is you could do some of that now while the yards are easily accessible. If you have something like the 3rd hand tool, clip a yard in that then use additional alligator clips at strategic spots like the end of the stirrups to keep them straight and hanging down while you apply. I think if I had it to do over again, I would experiment with some watered down Elmers and see how that works.
-
Something I learned on Niagara and it's true for all builds - the bigger it gets the easier it is to break something off. You might try putting 2 finishing nails in a board and wrapping your wire around those. Use some long nose pliers to keep a tight hold on the wire. Then pull tight as you wrap it. Copper wire is malleable and can be shaped so after you make the loop try some light hammering to flatten out the wire a little bit.
-
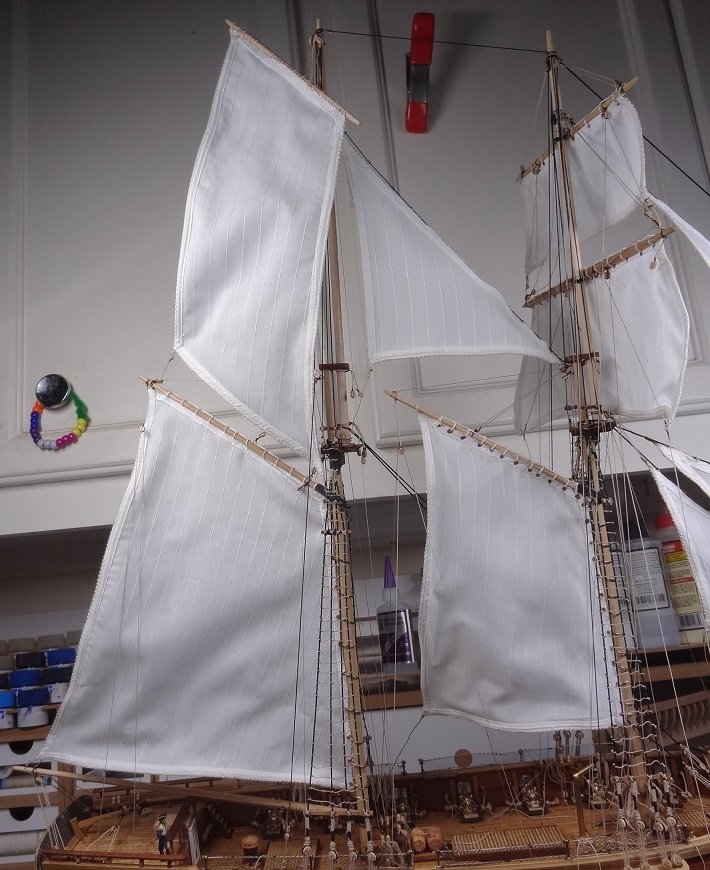
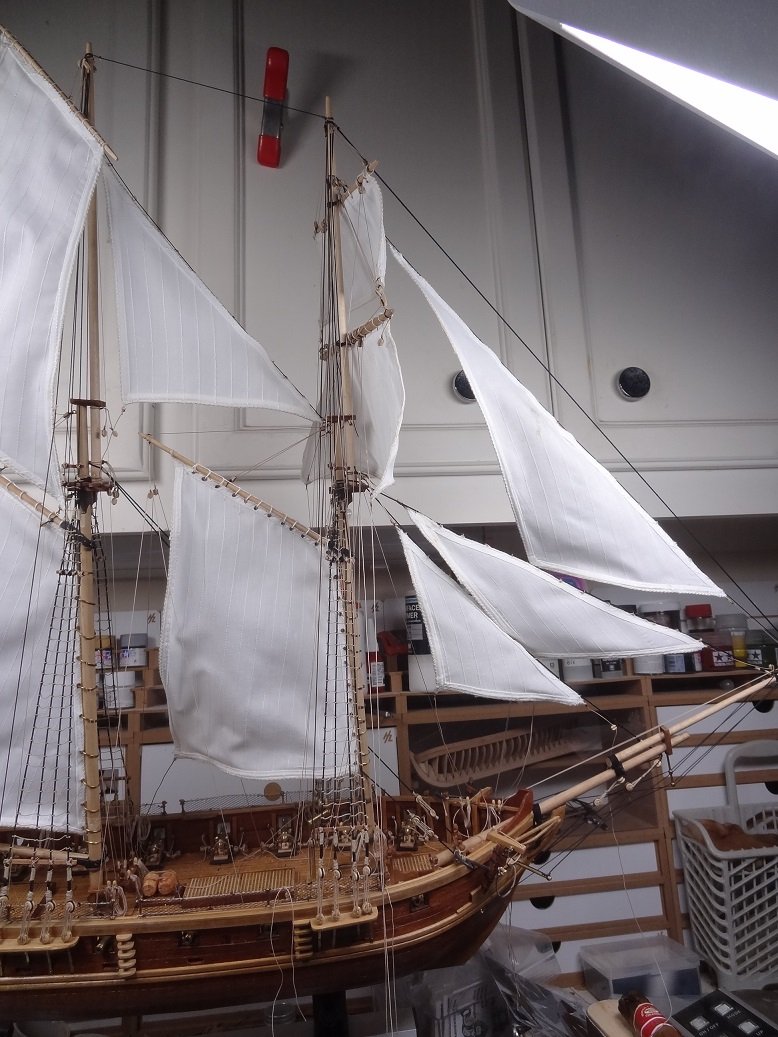
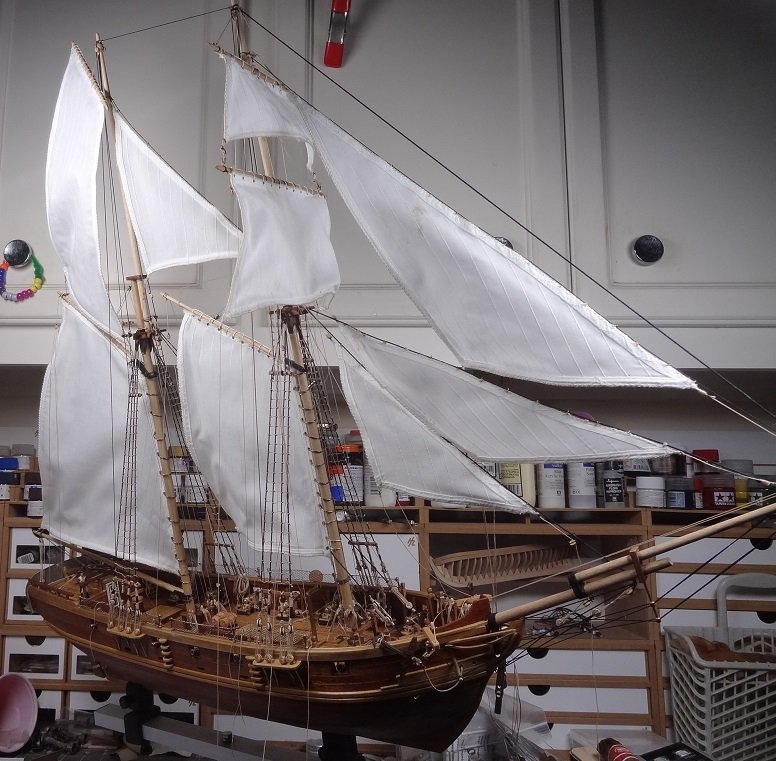
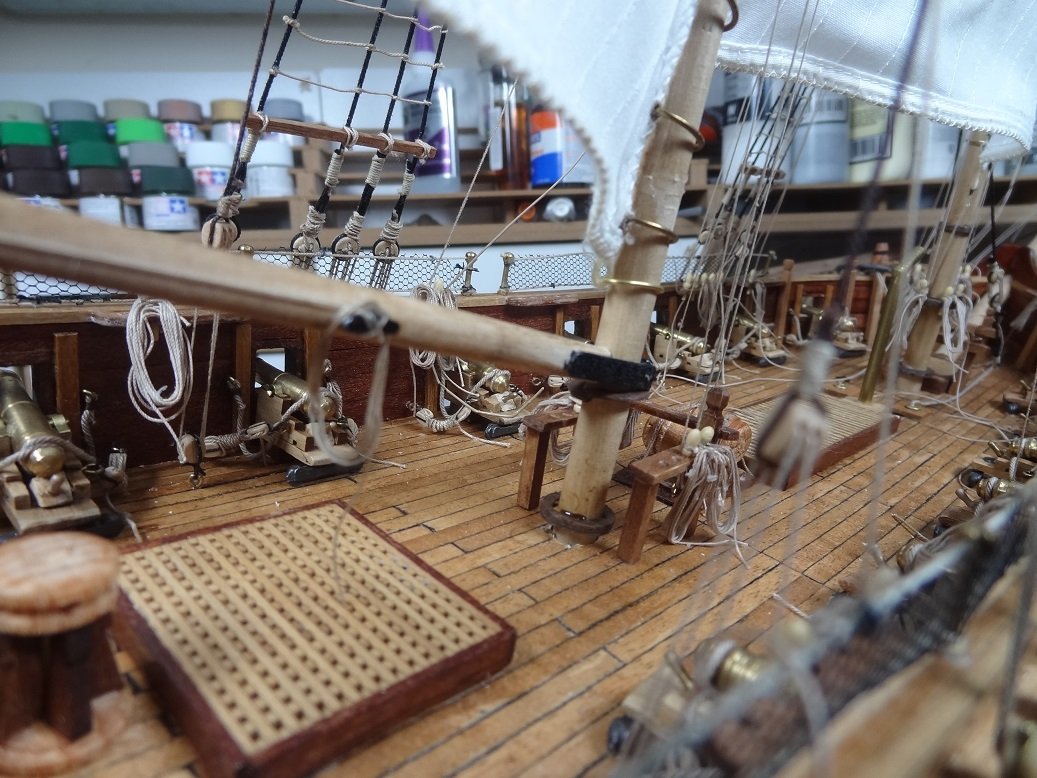
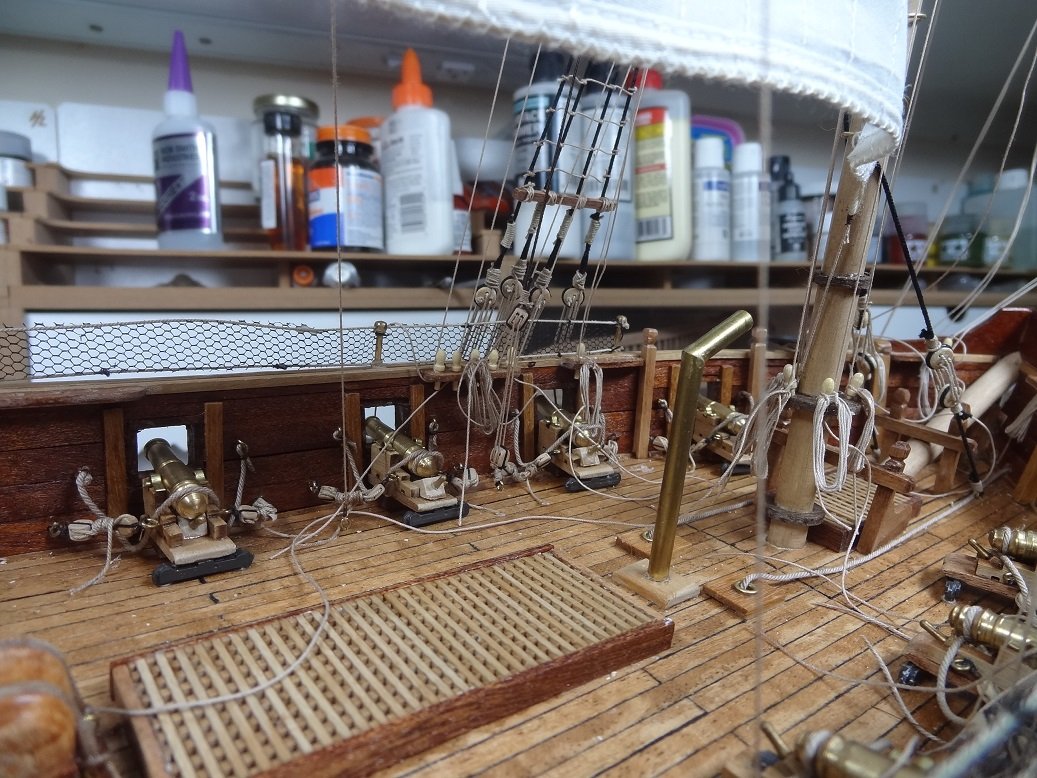
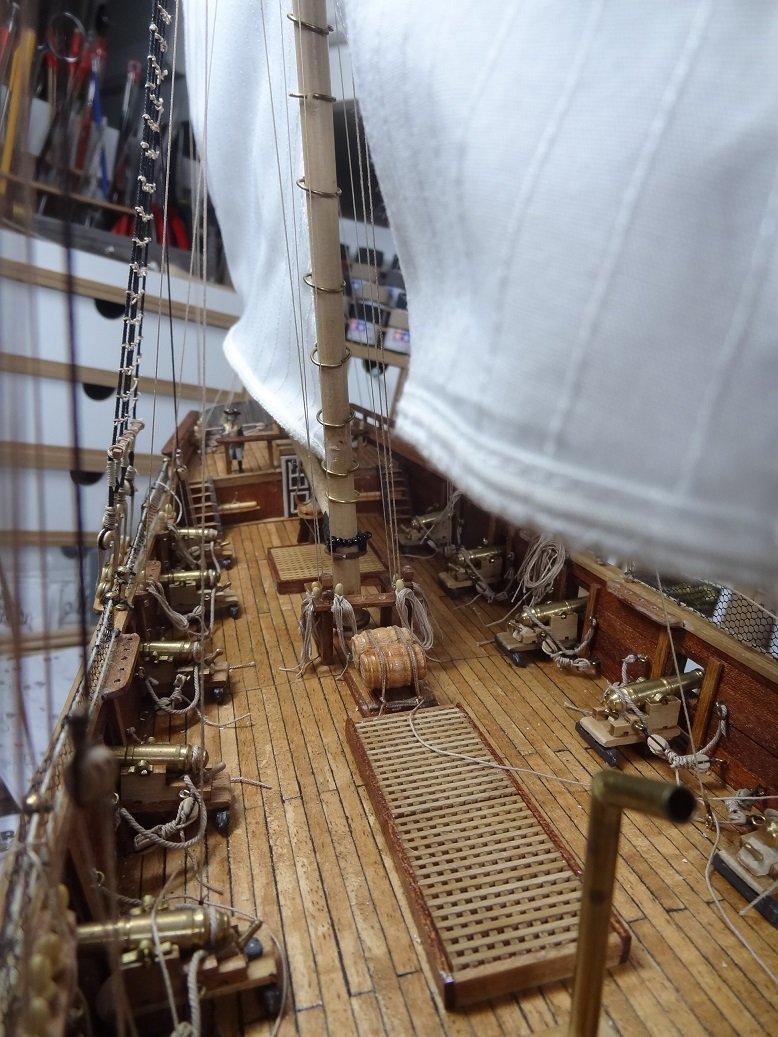
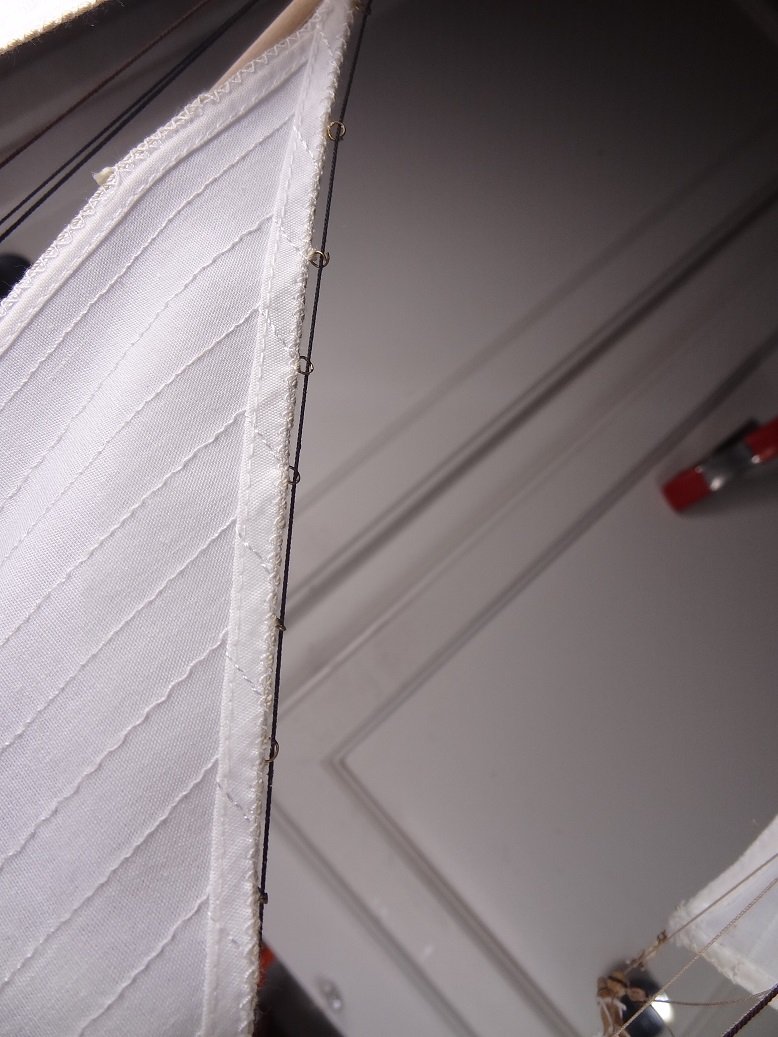
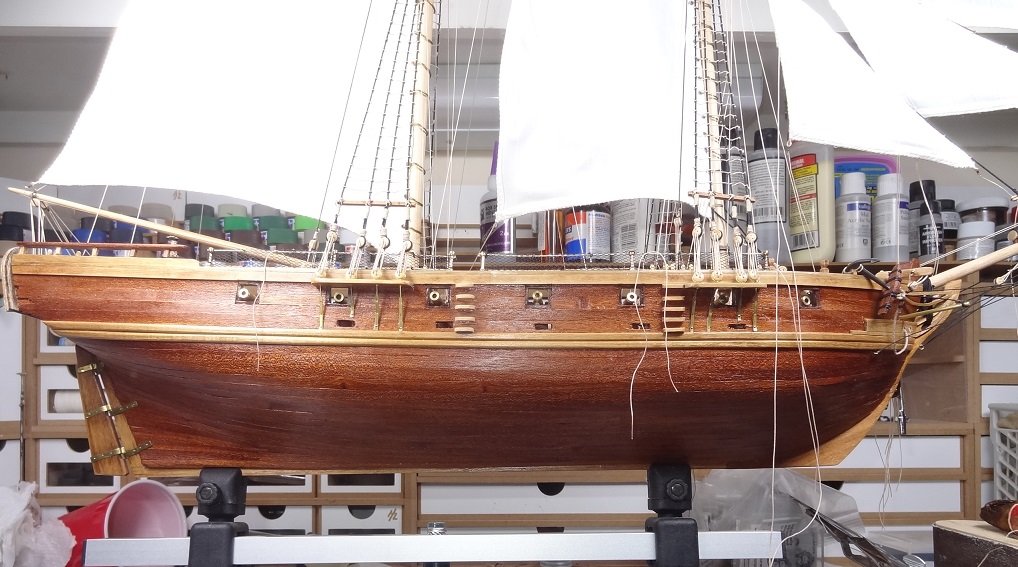
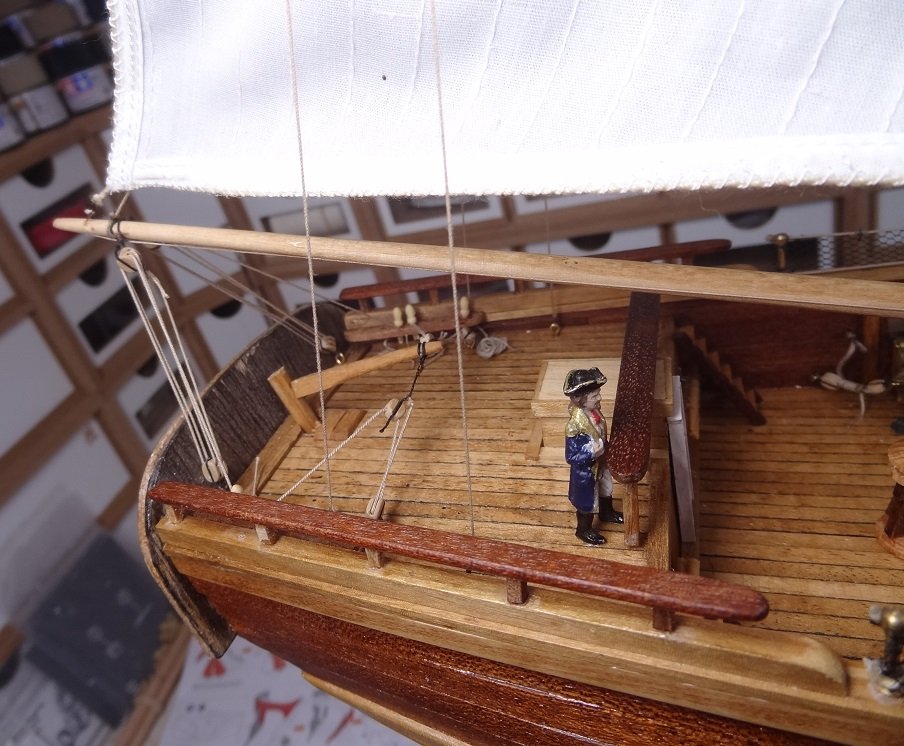
Have been caught in one of those Catch 22 situations. I'm down to the last sail but I wanted to shoot some pix before I put it in. Been trying for almost 3 weeks to get some shots but everything came out really crappy. So tonite I went back to the point & shoot and below is the results. Still pretty crappy. Anyway, here's the story. I had to disagree with the manual on installing the sails. Don't know what common wisdom has to say, but the instructions wanted me to start with the lower sails and work up. This didn't make a lot of sense to me as all the ropes from the sails go down and many fasten to the pin rails on the masts. If the lower sails were there - with all their ropes installed - it would have made the upper sails a real bitch to do. Trying to take all those ropes down, working in between the lower ropes and sails. It made no sense to me. So I started at the tops and worked down. The main mast is all fore/aft sails so those went fairly easy. The fore mast has both fore/aft & square rigged. I am left with the main sail to do there. I'm planning on completing all sail rigging beforehand while there is still room to reach in. You may see from the pix a lot of loose ropes and rope ends still around. I did not glue any of the masts in place, so I decided to leave all the seizings loose until the very end so that I could adjust the masts & spars and tighten/loosen ropes as needed to keep everything straight. I like this approach and it paid off as masts & yards moved around quite a bit while putting up the sails. As I have mentioned before, there is a minimal amount of paint on this build. While the color of materials do not give a realistic representation of a sailing ship, I found them to be very attractive so I'm going with not much more that lacquer on most surfaces. So here's a few - well more than a few - pix of Enterprise before I put in the last sail. I hate coiled up rope on the deck. Just looks too contrived for my taste. I worked on making neat piles of extra rope instead. Looks better in person. These brass rings were a bitch to put into the sail and then close them around the stays. So I opened them up, stuffed them thru a small hole in the sail leaving the open ends pointing up. Then I put a dot of CA on the rings to hold them in place on the sail edge. It was then very easy to put each ring over the stay and close it up. Now I can get on with finishing this thing up.........
- 136 replies
-
- 7
-
-
- enterprise
- constructo
- (and 1 more)
-
Your deadeyes will be fine when you get that strip glued to the channel edge. Don't do that until you get the deadeye straps fastened to the hull. fyi - I used Syrens deadeyes and have to say those may be the one product from them that I don't care for. You have to assemble them which was not too difficult, but you are then supposed to put them in a block sander to rough up and wear down the edges a little. Many of them broke in that process. On the flip side, all the holes are perfectly drilled and each piece is very consistent.
-
Hello Elijah - it is an interesting game, but I have found (just as I always knew) the internet can bring out the worst in some people. Hiding behind their monitor with no accountability. No wonder it sometimes seems like the whole world is headed south. As to your problem, sometimes you do need to walk away for a while. I have confidence that you will work things out. Thanks for checking in.
- 136 replies
-
- 2
-
-
- enterprise
- constructo
- (and 1 more)
-
Hello Tom - it's been a long time since I checked in with you. Wow - moving the shipyard, I can't imagine. What a headache. Glad it seems to be working out and falling into place. Will try to keep closer tabs with you and your Niagara.
-
Geez - can't believe it's been this long since a post. For those following I apologize. On a side note - don't know how many of you play online computer games. I allowed myself to get sucked into one called Naval Action. First online game I have ever played. I was attracted from several angles. The fact that it related to ships we build didn't help. But I went way overboard in my involvement. Many things got pushed back in my priority line including finishing this build. It was almost an addiction that I could not resist. People and things that should have been first in my life got relegated to lesser importance. Again, I went way overboard in my involvement. Finally realizing this mess I am attempting to put the games aside and get back to business. And while this build doesn't take #1 in priorities I am returning focus to it as my "passtime". So much for the personal note. Looking at the last post, I was surprised. Coulda sworn i had some more recent pix. And I recall that was my last endeavor, working on some real images of the build instead of "boaties" from a cell phone. Will recheck my photo folders to see if there is something more current. If not will produce some soon. The build progresses. Most of the sails are hung and I have learned some tricks along the way. Hope to pass them on soon. Hang in there guys, Enterprise will be completed. Honestly it may be sooner than I think. Although there are a few more sails to hang, that's about the last of it.
- 136 replies
-
- 4
-
-
- enterprise
- constructo
- (and 1 more)
-
Instructions Stink, Can't Find a Sample Picture
mikiek replied to mikiek's topic in Masting, rigging and sails
Fantastic information! Thanks JFC! - was wondering how a tack would be handled regardless of whether the sail tack was run thru some tackle or just straight down to the deck. Kinda clumsy either way. Your pix were great! Spelled it all out perfectly. -
This should be easy. Working USS Enterprise 1797 and beginning to put in some sails. My first time with gaff rigged. There is a top gaff sail above the main - its 4 sided not 3 sided. Most of it is in place except what I believe is called the tack. The lowermost corner. I can't see from the instructions or plans how this is supposed to be rigged. The rigging plan just shows the sail foot running to the mast and then it disappears. I would expect some sort of tackle and eventually a downhaul of some sort but thats just a guess..
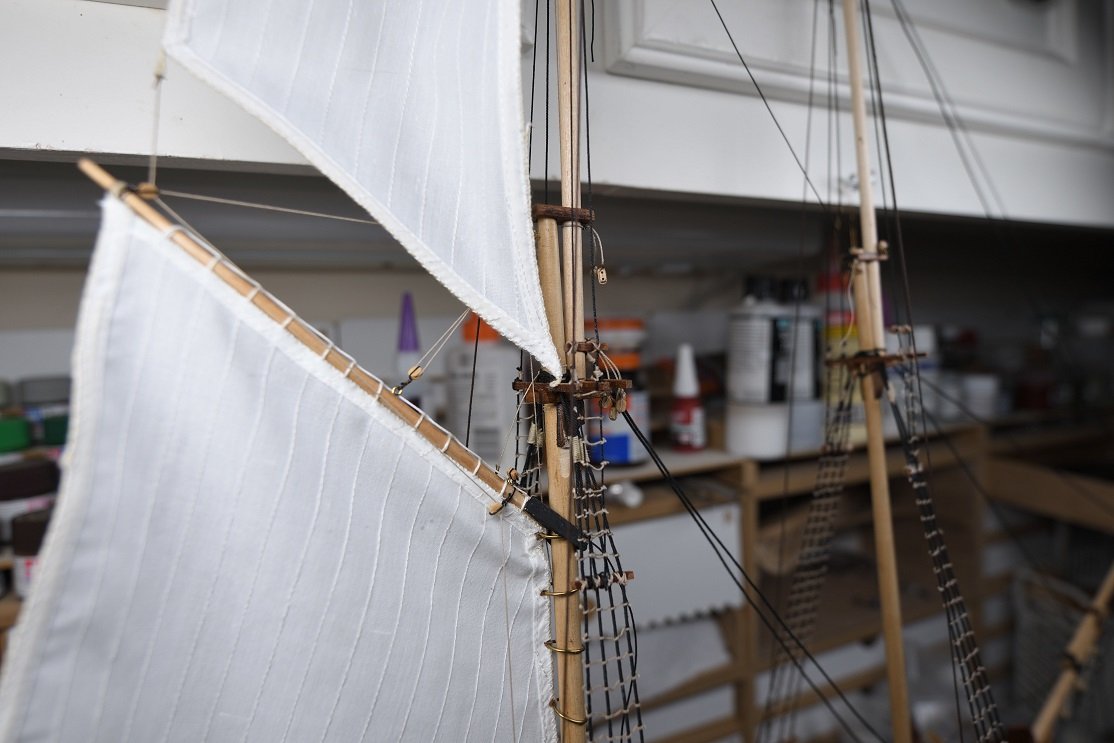
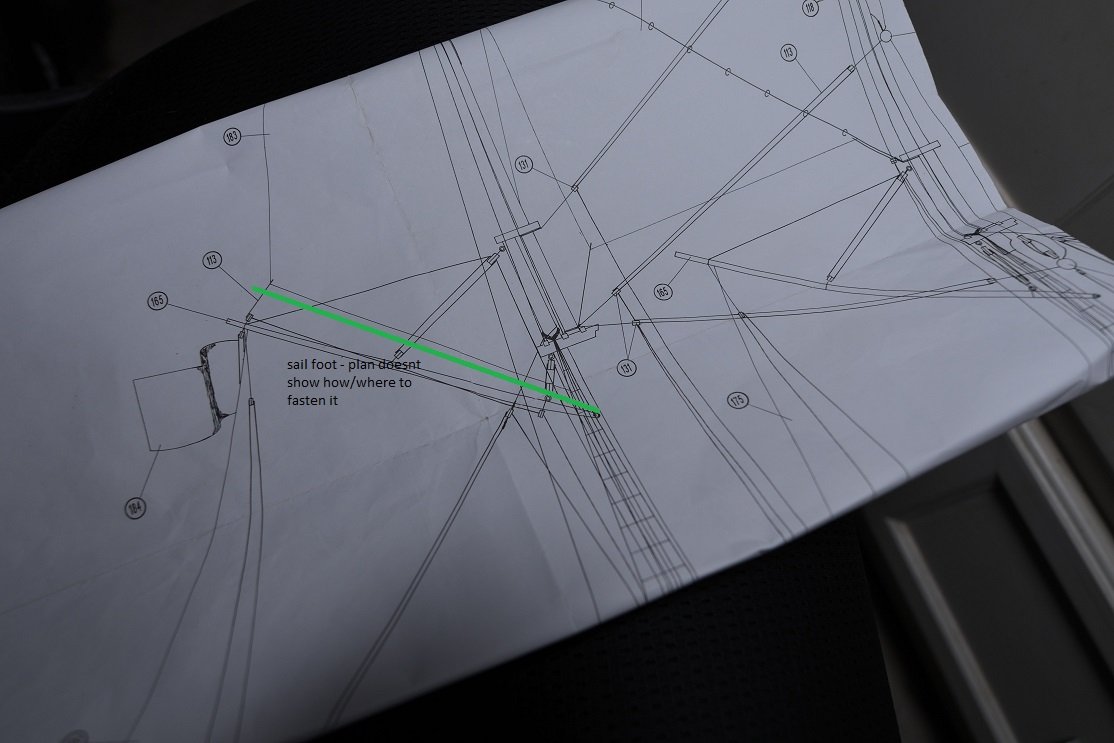
-
If you havent already completed - spray sizing works well. Iron afterwards and while the sail is still hot you can add some shape the usually keeps when the sail cools off. I am finding that running wire inside the hems from one corner to another is a great way to shape your sails - from the barely a breeze look to the 20 knots look.
-
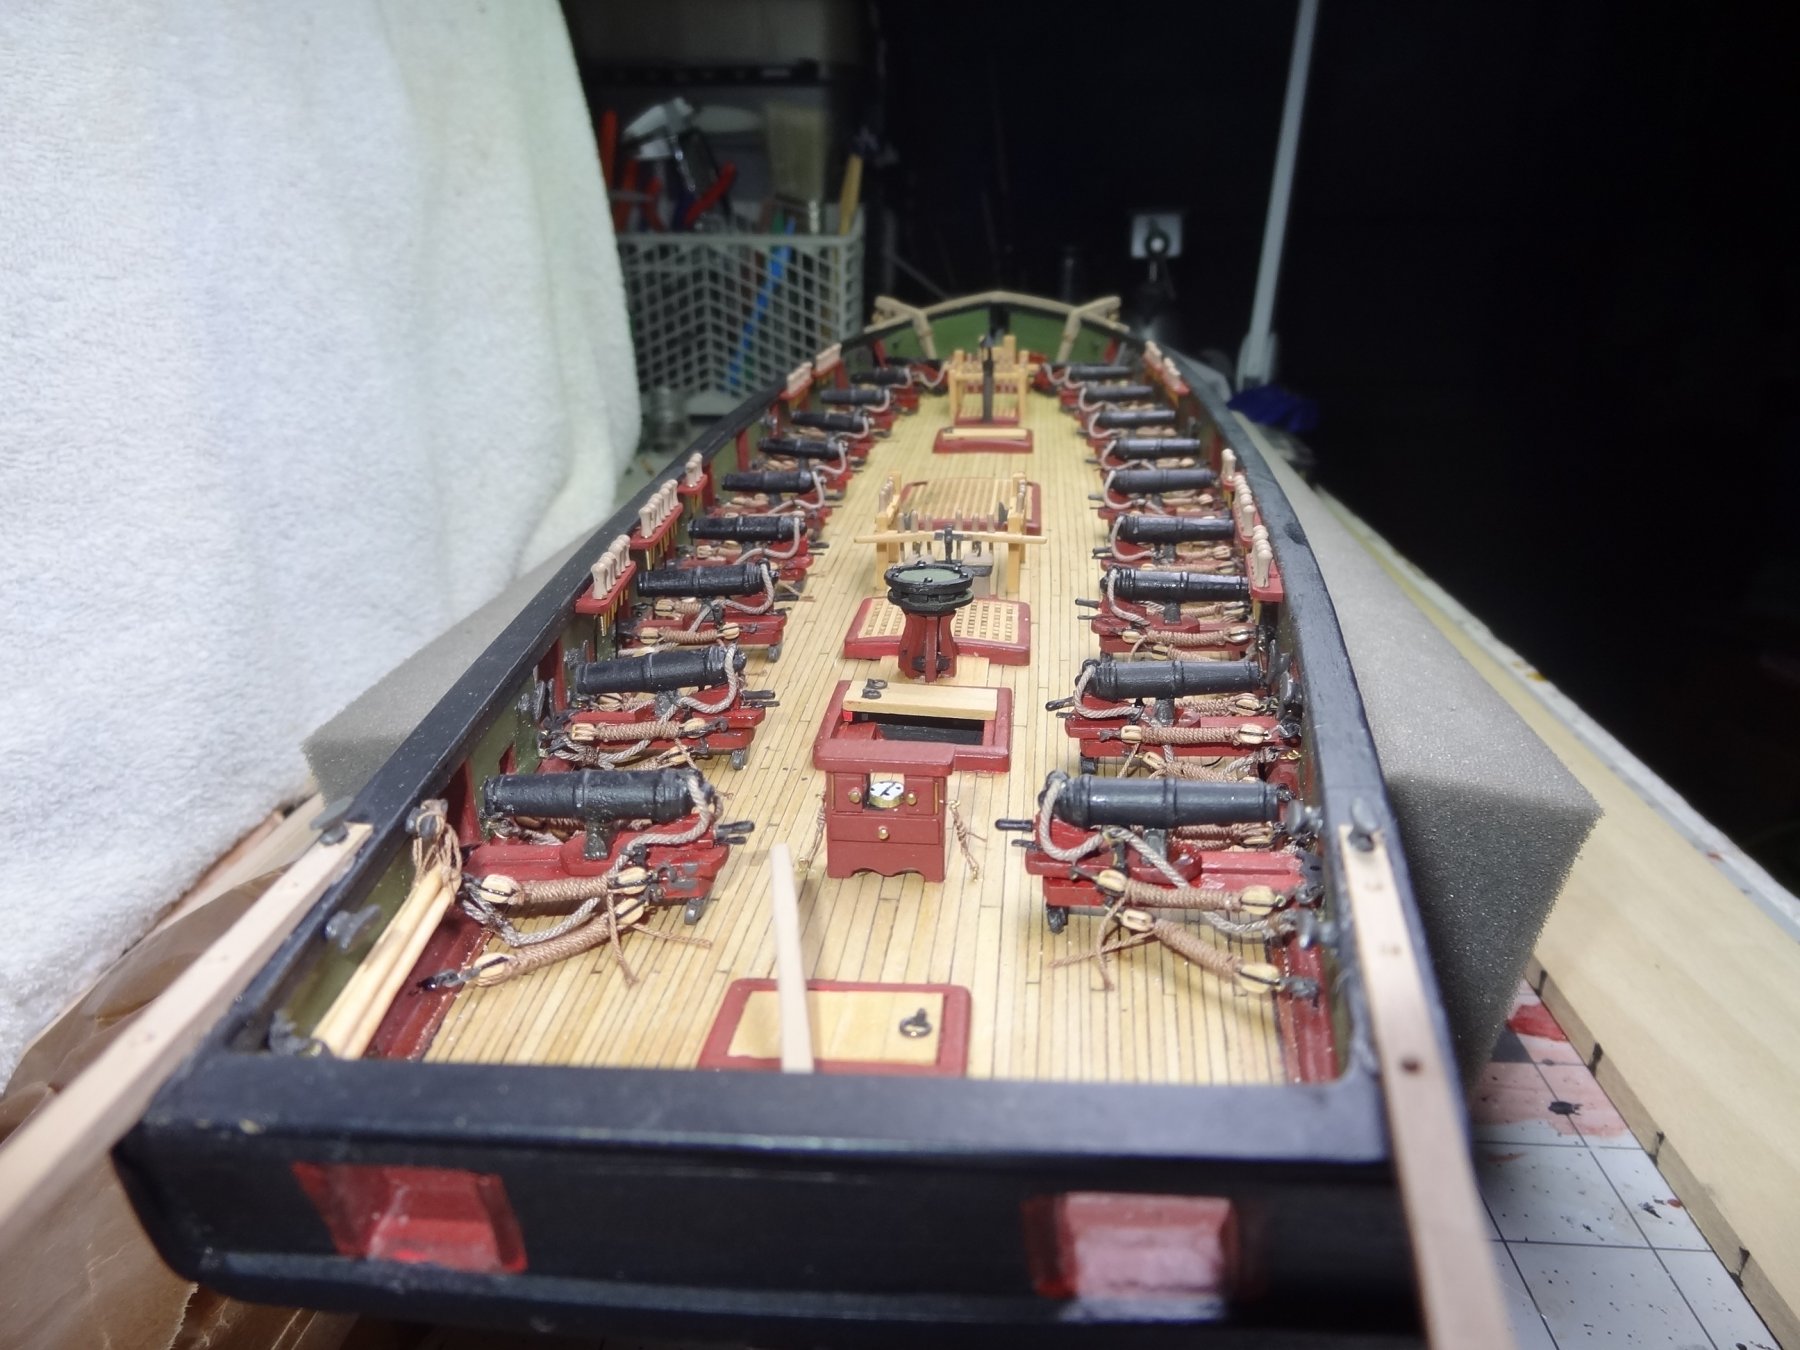
Gary - I was blessed to have the guidance of a builder who convinced me to go with a historical representation rather than a copy of todays version. Of course that required learning a lot about the history of the build and the times. While there were no plans and it is debatable what boats were actually dredged up in the several "restoration" efforts, given the need for an urgent completion, one can only surmise that only what was absolutely necessary was included in the build. I can't find the exact quote, but it is recorded that the head of the project told a builder that excellence was not required. Good, was good enough. Everyone knew that win or lose, the boat would fight one fight only, so there was no point in "extras". Joel and I took the approach that other than a capstan none of the other deck furniture was required. As quoted in an article he wrote - "Commodore Perry would have to read by candle light." The grate placements were completely a guess on my part. The positions of 2 of them were just to make easy the trick that I did adding stairs leading to the 2nd deck. You can see that here - post #167 MESSIS - thanks! It was fun working thru that side project.
-
Tom - you should be very proud of your progress so far. And nothing wrong with smelling up the place with good food as long as you can keep the crew at a distance.....
-
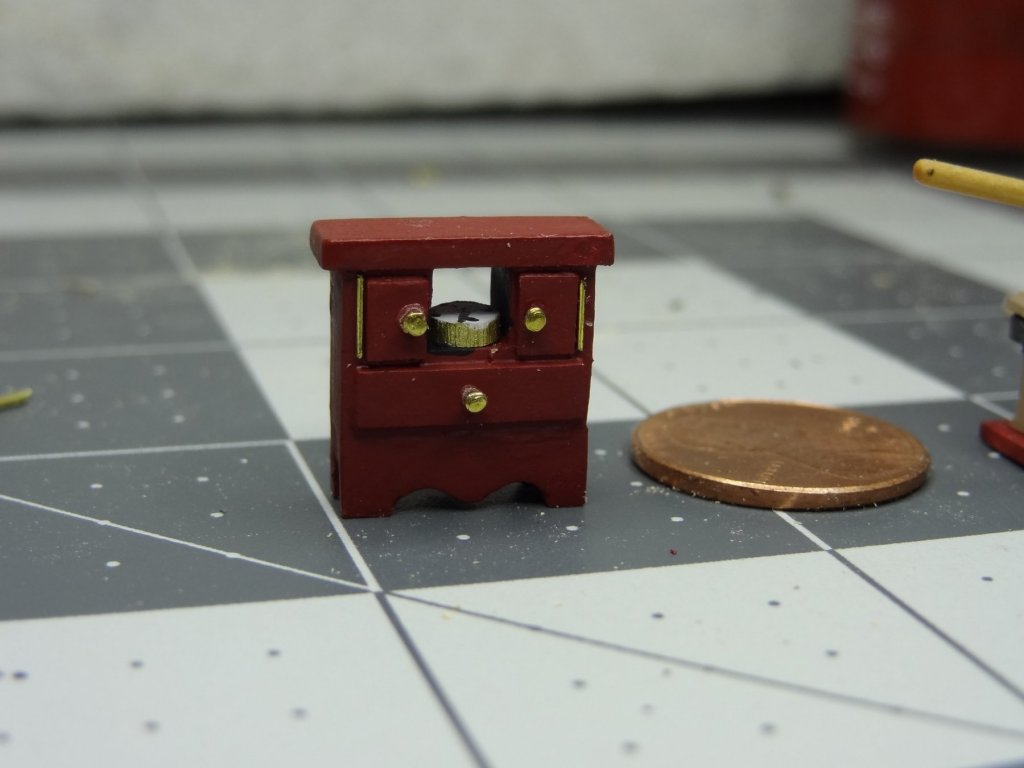
Tom - re: your compass - in those days a compass (or several) were usually mounted into a cabinet called a binnacle. The binnacle was set in front of the wheel/tiller. There were several typical requirements: 1. all cabinet hardware to be made of brass or copper - iron could confuse a compass 2. there should be a place to set candles next to the compass - for night vision 3. the cabinet had to be able to completely enclose the candles else they might be seen from a distance. If you Google binnacle there is not much on binnacles before about 1850 and the styles changed radically after that. Here is a pic of what I did - it was fun to build - just like miniature furniture Of course you could just put a satellite disk up in the main top 😉 Whether Niagara had any of these features is debatable. Remember they were in a race to complete before the Brits completed their build. No frills. What you had to have and nothing more. A compass on the ocean would have been mandatory. On a big lake, eh.