DONATION DRIVE - SUPPORT MSW - DO YOUR PART TO KEEP THIS GREAT FORUM GOING! (91 donations so far out of 49,000 members - C'mon guys!)
×


mikiek
-
Posts
2,276 -
Joined
-
Last visited
Content Type
Profiles
Forums
Gallery
Events
Everything posted by mikiek
-
 Sounds a little intimidating already Sam. You're talking with a guy that can turn a square stick round on the lathe but that's about it. Can't speak for anyone else but never worry about posts in my threads. If it can help me or someone else it is welcome here. Whether it's one line or one thousand. Just curious how you figured out the trucks were 0.02 off?
- 136 replies
-
- 3
-

-
- enterprise
- constructo
- (and 1 more)
-
Sam - I am open to any and all ideas. My lathe sits unused on a shelf the cover gathering lots of dust. Bought the thing and have hardly any idea how to use it. Sad but true.
- 136 replies
-
- 2
-
-
- enterprise
- constructo
- (and 1 more)
-
I'll have to play a little but Lou. I would think it would be easy to get them out of scale. I also need to find what size dowels I can come up with. I can just take slices off of that. Not sure I want to try to make some from scratch. I have also considered some sort of chock - triangular shaped - under the front wheels that I could run the carriage up. Either alternative has to be done in moderation or else I run the risk of having to elevate the back end of the carriage as well.
- 136 replies
-
- 1
-
-
- enterprise
- constructo
- (and 1 more)
-
Leave it to Chuck to think of everything. The hole in the barrel was off center. Had no idea why, but the barrel is on the higher side. I'm gonna fool with the axles next. I really don't want to have to make new trucks for 14 guns. Just sanding the char off without flattening an edge was a lot of work. I think those would probably show up as being off scale pretty quick.
- 136 replies
-
- 2
-
-
- enterprise
- constructo
- (and 1 more)
-
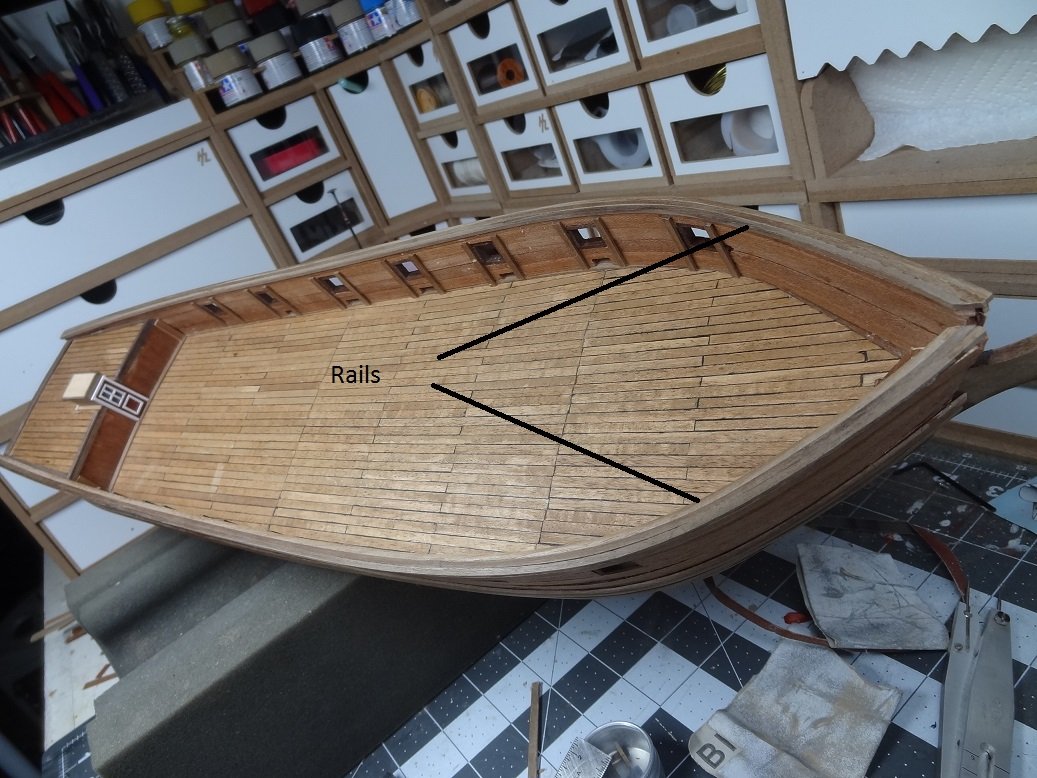
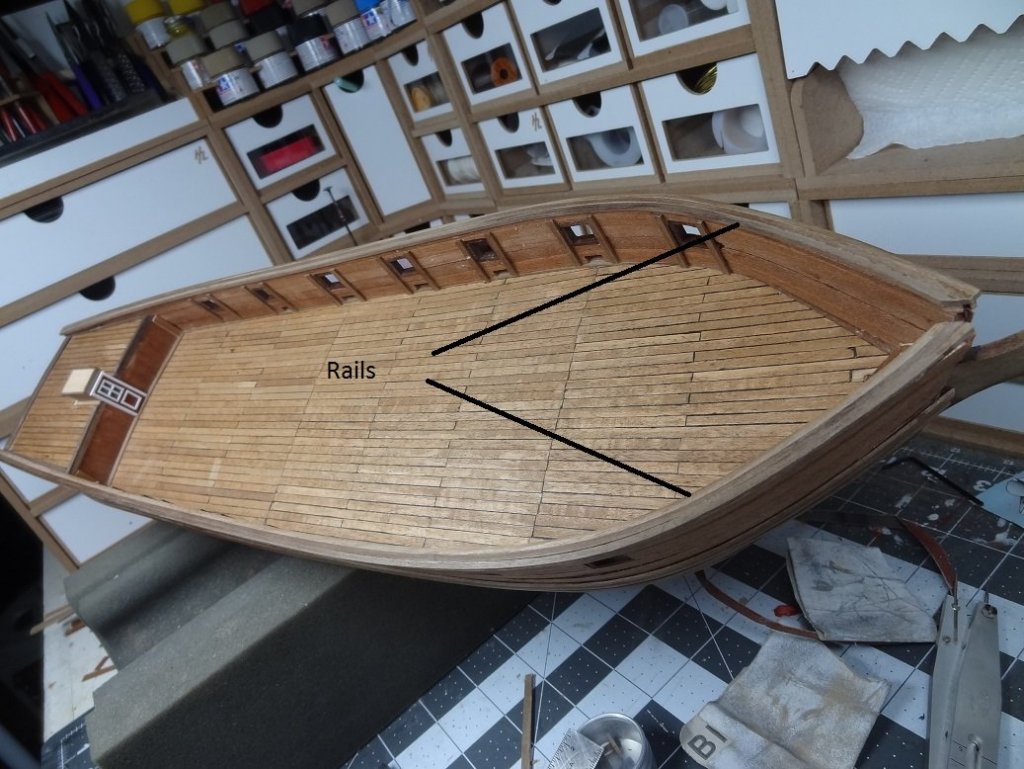
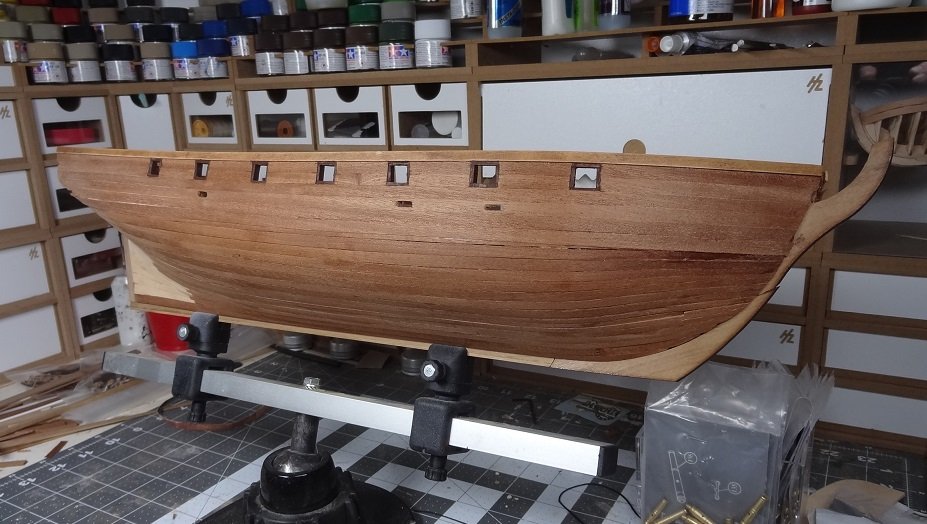
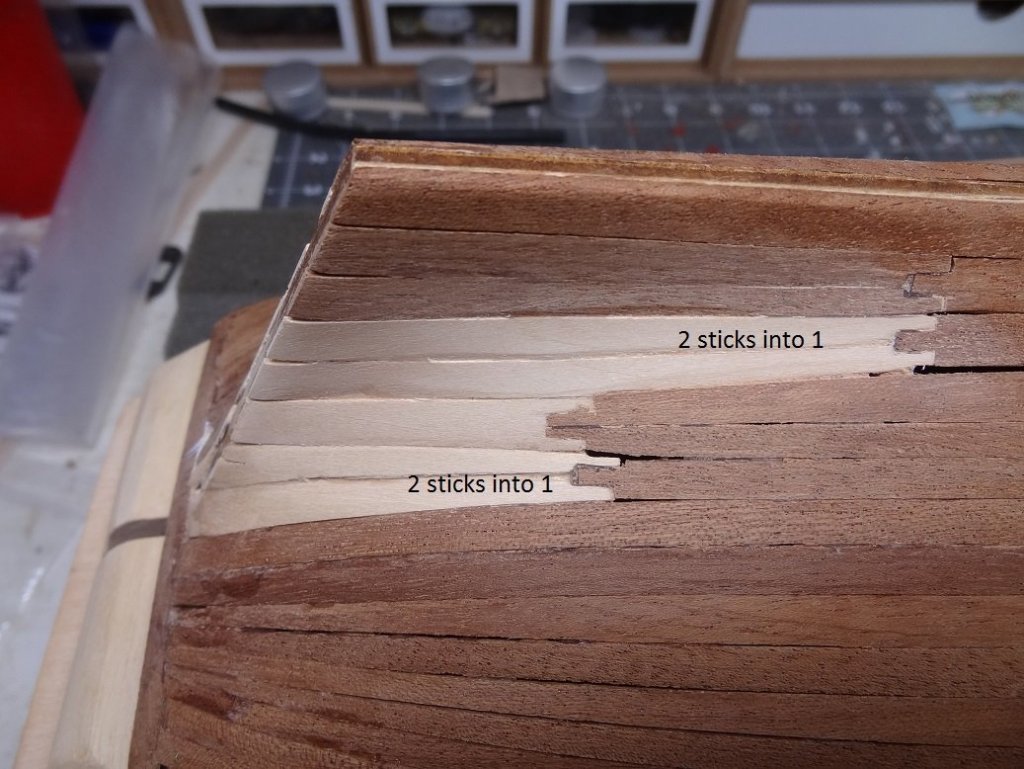
A few samples of tasks being done: Top gallant rails. Planking - garboard & first stealer. Two sticks turn into one. Can you see the joint? Added wales. Constructo had a nice touch here. I've always just glued one or more sticks to the side for a wale. Manual says to sand down (round) the two upper corners. If you don't overdo it this looks really nice. Will do this always in the future. Strake symetry is fair. Not sure what I will fill those gaps with? Can't wait to get some finish on this guy.


- 136 replies
-
- 2
-
-
- enterprise
- constructo
- (and 1 more)
-
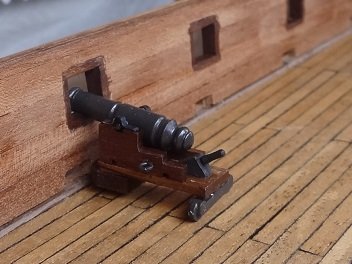
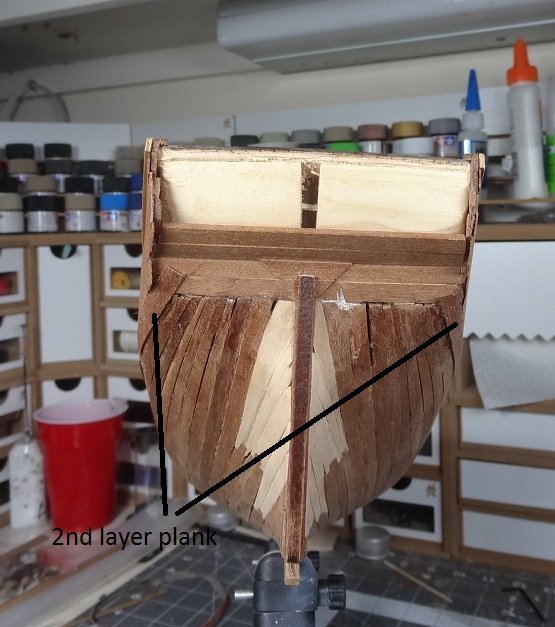
Hi guys - thanks for stopping by. I have yet to do any looking to see what might have been on Constructo's mind regarding the guns. I have a book on schooners of the period and another on general naval armaments. I'm hoping one of those might shed some light. If there is any valid justification for the kit guns I will go with those. However, personal preference would lead me towards Syren's. As you alluded to Sam, I believe the carriage needs to be raised somehow. It doesn't fit in the port with a level barrel. Slightly larger trucks? Drop the axles a bit? And in that photo the quion was not really coming into play. All this and planking too. What more could one ask for? Honestly, I am finding this to be a very enjoyable part of the build. The 2nd layer planks are going down nicely, a few at a time. And there is a lot of deck work to be done. I really like being able to switch between tasks.
- 136 replies
-
- 4
-
-
- enterprise
- constructo
- (and 1 more)
-
I'm glad to hear Jason has things rolling again. It seemed like things were kinda rocky for a while. He does offer a good product and has always been very helpful when I have needed assistance. Even in the U.S. Cornwall can't be beat on many products. I get all my European kits thru them. The turnaround is fantastic - store to door is usually 4-5 days. Some kits are literally hundreds less than anyone over here.
-
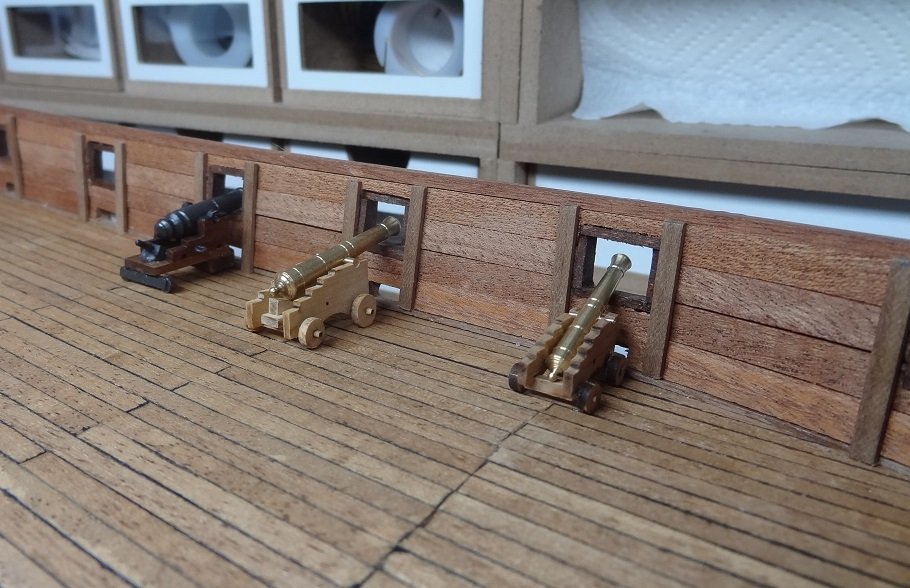
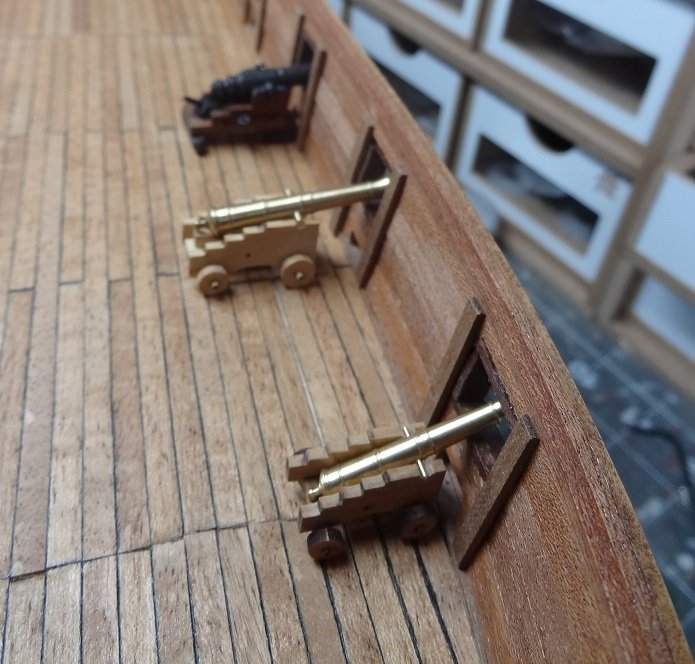
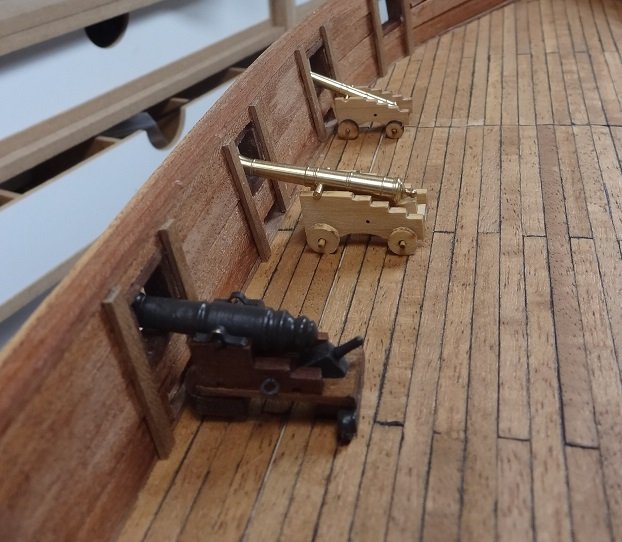
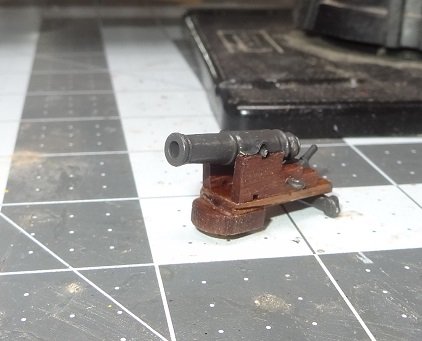
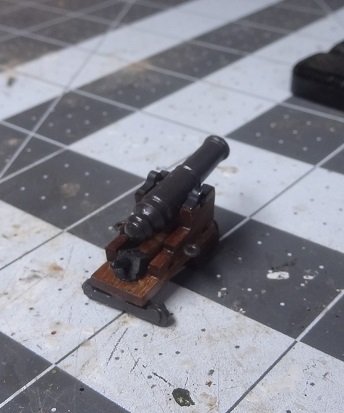
The Syren guns arrived. It turns out I had the right barrel size just the wrong carriage size. Funny what a difference 1/32" can make. So the line up is the kit gun, the larger Syren gun (still not the biggest available) and the small Syren gun (just for comparison-not really in the running). The kit gun is big & beefy but still a little strange looking. The larger Syren gun is more traditional - not sure whether I would paint, stain or leave it as is. I don't mind big & beefy. With all the delicate detail we put into our builds, IMO big guns with big tackles are an offset to that. I'm leaning towards the Syren gun, but I would like to know why Constructo decided to produce the carriage that they did. I think I will try to research the style of the kit gun. Maybe it was something specific to smaller boats? Would like to know if it is supposed to be a carronade or long gun.

- 136 replies
-
- 2
-
-
- enterprise
- constructo
- (and 1 more)
-
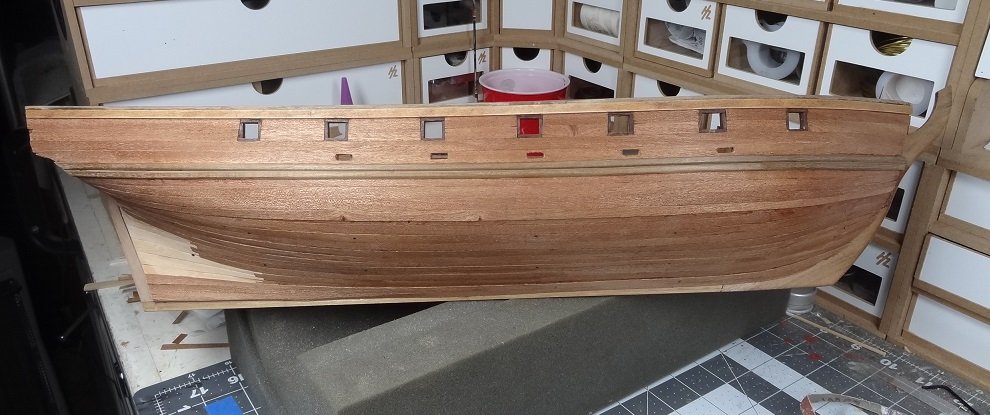
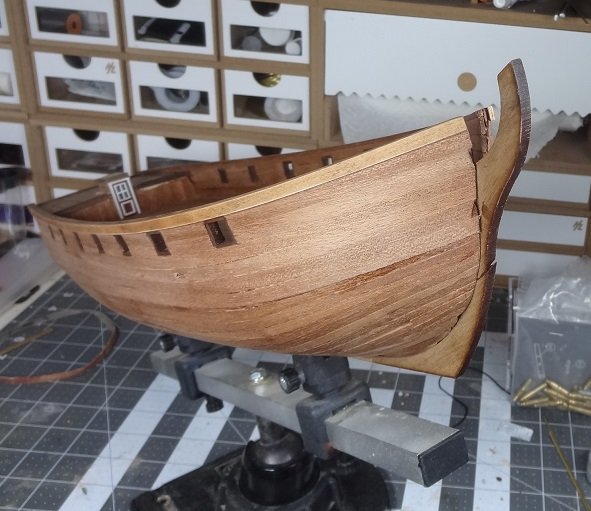
I'm still debating what guns to use. The kit supplied version has a rather odd looking carriage. The barrel also looks more like a carronade. I went ahead and finished one out just to get an idea how they look. I'm not crazy about them but still could use them. You might notice they seem a little low in the port. I had to glue a shim under the front end just to get the barrel level. With the barrels completely elevated they do fit but that looks pretty strange. Note to future builders - consider lowering the ports a bit or make them slightly larger. There will be some fit issues. Another debate is whether to leave the barrels brass or paint them. I think brass is probably historically incorrect, but they are shown in the kit pix that way and I have to say it doesn't look all that bad. My alternative would be to use Syren's barrels & carriages. I had a few on hand but they looked a little small. I ordered some of the larger sizes but I'm too lazy to go to the mailbox and get them today. Maybe later.

- 136 replies
-
- 2
-
-
- enterprise
- constructo
- (and 1 more)
-
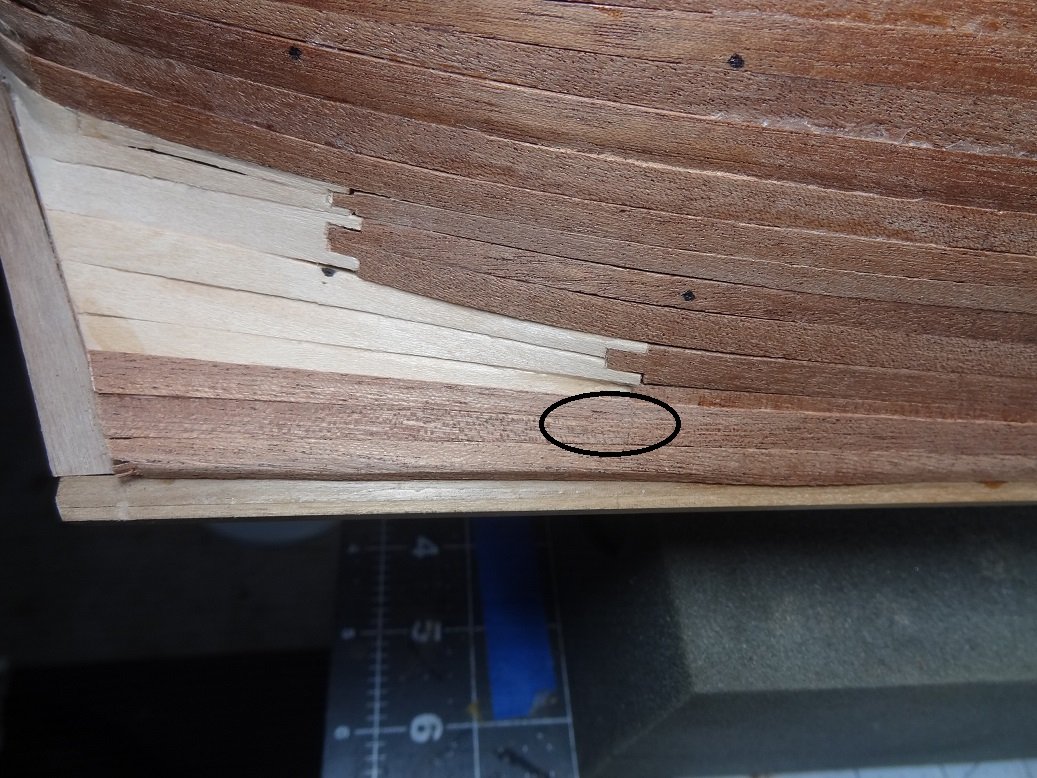
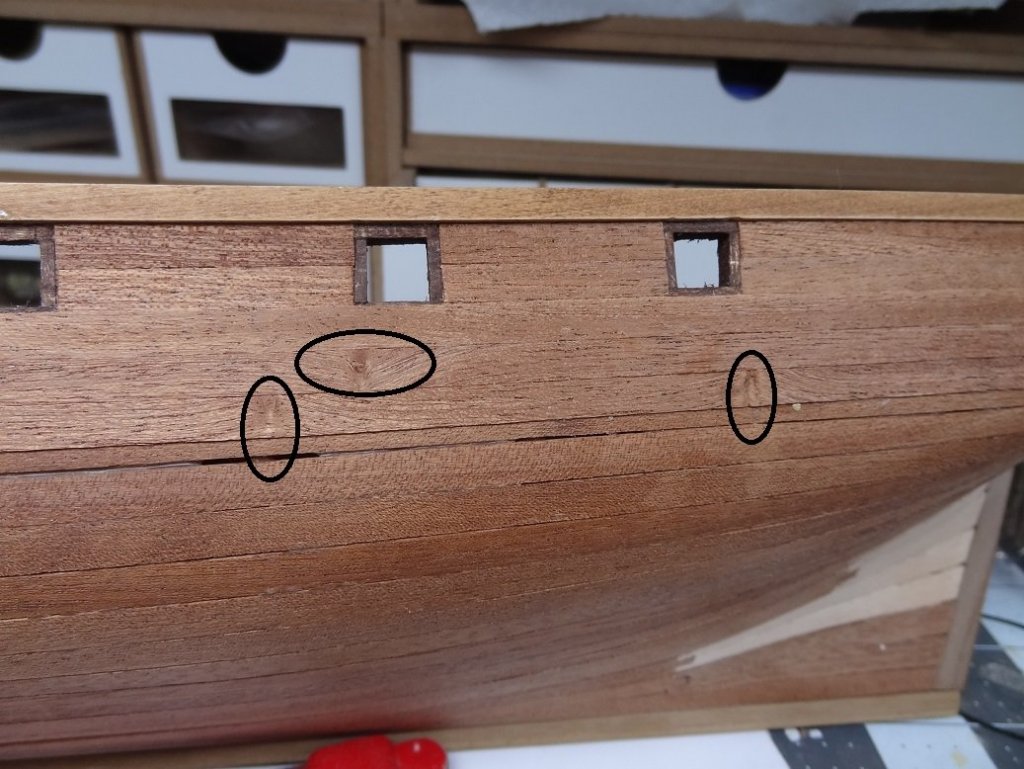
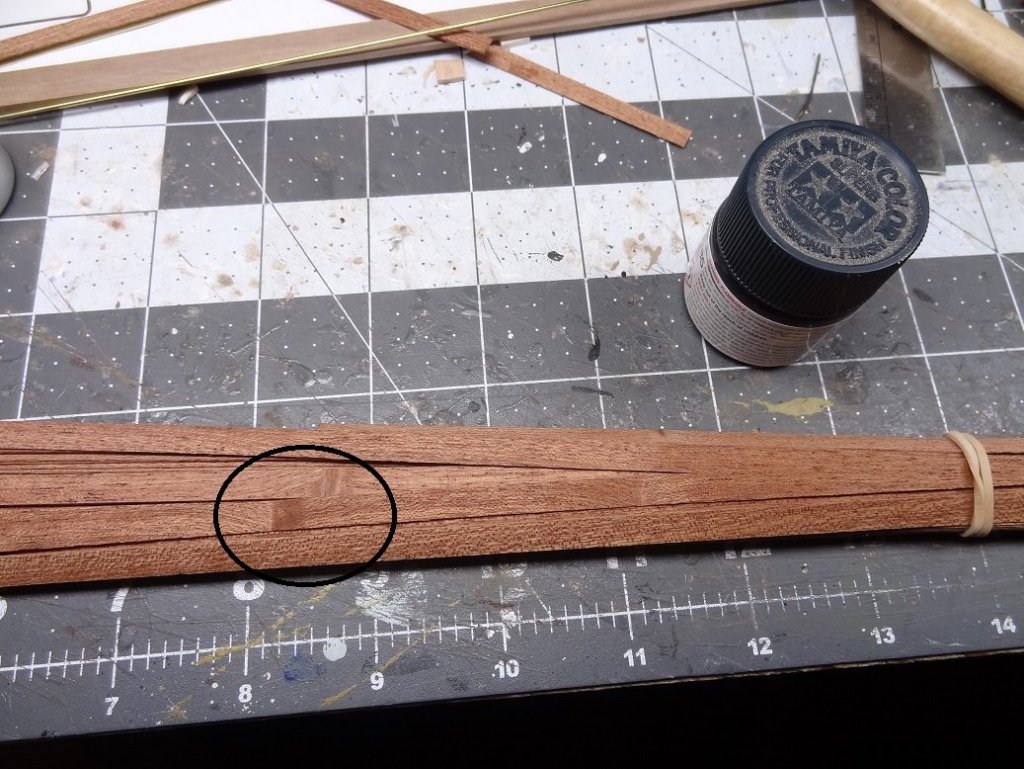
I have finished "catching up" with the ports and planking. My problem was with the 0,5mm sticks used for 2nd planking I'm concerned about tapering the ends consistently for both sides. I don't know that my dividers will help and I want to keep the symmetry at the bow and stern. What I am expecting to have to do is shape the stick for one side, then "trace" it out on another stick for the other side. I don't know the wisdom in doing this but that's the plan for now. And not a moment too soon. The 2nd planks laid so far have no shaping and you can see in the pix that the 1st layer does. Hope I'm not too late. Now I will have to come up with a width and count for the plank bands. Not to beat a dead horse, but I'm still questioning the need for the 2nd layer. So far, I guess it looks a little better although I suspect when I have to start shaping them that will change. Then they will have to bend edgewise a little and I imagine quite a few will break while doing that. I'm having a problem with the 0,5 sticks in the kit. Looks like they were cut from a piece with a knot in the grain. Not only does it look a little funky but the sticks are VERY weak at that point - several have broken. I'd say maybe 25%-30% of the sticks are affected. Too many to just toss them. I'm trying to place them so the knots are laid at some place on the hull that doesn't curve much. EDIT: If you are like me you sand those planks a lot as you are laying them. Strake by strake sometimes. RESIST! I have already sanded the 0,5 sticks down to 0,25 and I've barely started. The problem is you need the edge of the previous strake to butt the next strake up against. 0,25 doesn't give you much of an edge.

- 136 replies
-
- 2
-
-
- enterprise
- constructo
- (and 1 more)
-
The hull is another thing that will get beat to death before you finish the build. Plan on painting it one last time near the end. It looks good. I like that you left the wood showing thru.
-
And I completely forgot to mention the Cheerful kit. I knew that was there, have looked at it many times. What I didn't know was all the mini kits available for the various structures on that boat. There's even a cedar version of the build now. I even went as far as adding all that (plus the boat kit) into a cart. "Just to see how much it all would cost".
- 136 replies
-
- 4
-
-
- enterprise
- constructo
- (and 1 more)
-
Ya know how one thing leads to another, and another? Bingo! Been working the other ports - getting them cut & lined. I've been having this feeling in the back of my mind about the guns. The ports are cut pretty high above the deck, maybe that explains the funky kit carriages. Already decided I don't care for what comes with the kit - what else is new? Ordered some from Chuck but they are proving to be too small, so now I've ordered the larger sizes. Of course I finally luck out and get on the site when the Royal Barge kit is available. So there's another couple hundred in addition to the gun order. Will he ever learn ?
- 136 replies
-
- 4
-
-
- enterprise
- constructo
- (and 1 more)
-
I know the accepted rule is to do matching planks - one for starboard one for port. Needless to say I don't follow that one very often. This will be different. I'm not sure if I will still be able to use the dividers to help shape the strake ends. That's a shame because it gave me consistency from side to side. I think now I will have to just wing it to get a strake for one side and then copy that for the other side. Otherwise the symmetry is going to be way out of whack. I had already started the 2nd layer on starboard where I had finished the ports. Looks like I need to stop that and do the ports on the port side, then catch up with the planking. This could have turned into a real mess otherwise.
- 136 replies
-
- 2
-
-
- enterprise
- constructo
- (and 1 more)
-
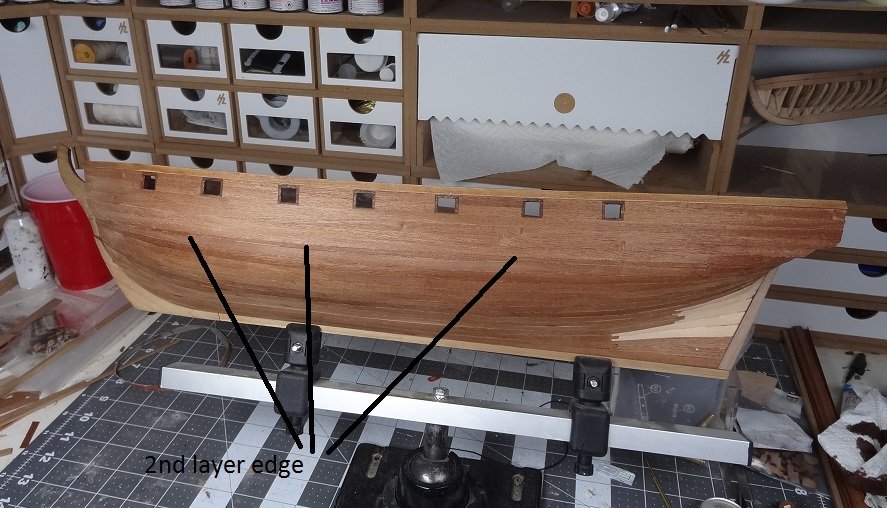
OK, so you've seen the ports. now I started with a little bit of the 2nd planking just to get a feel for it. Another bad surprise. The 2nd layer sticks are 5mm wide not 6mm. So none of the shaping done on the the 1st layer carries over. And I am still going to have to figure out how to taper them down at the ends. On the bright side they do seem a little stiffer than I would have expected. The ends can be sanded without them splintering. I guess it's gonna be another case of draw & plank the bands, tapering the sticks to fit within. It'll all have to be done with one width of stick. This may well be the last time I double plank anything. It's such a waste of time to repeat everything.
- 136 replies
-
- 2
-
-
- enterprise
- constructo
- (and 1 more)
-
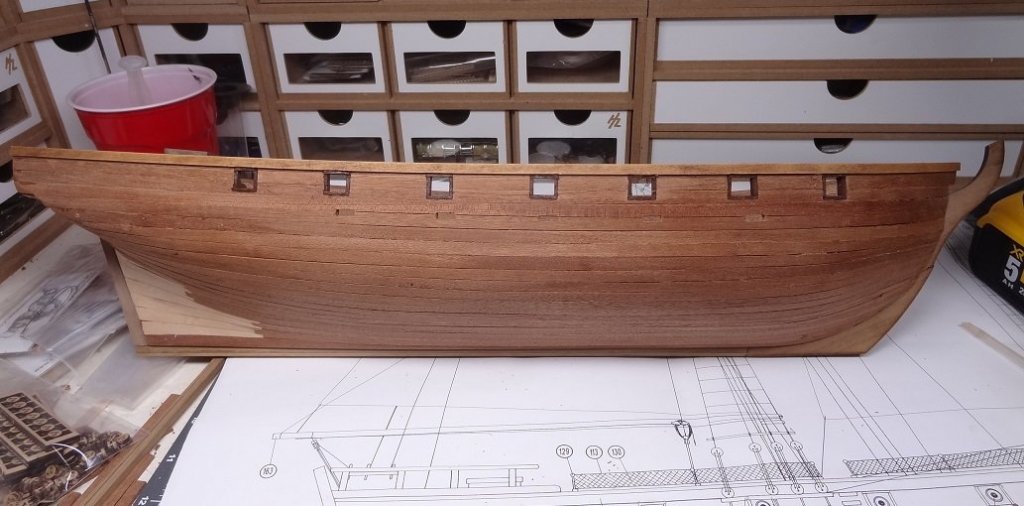
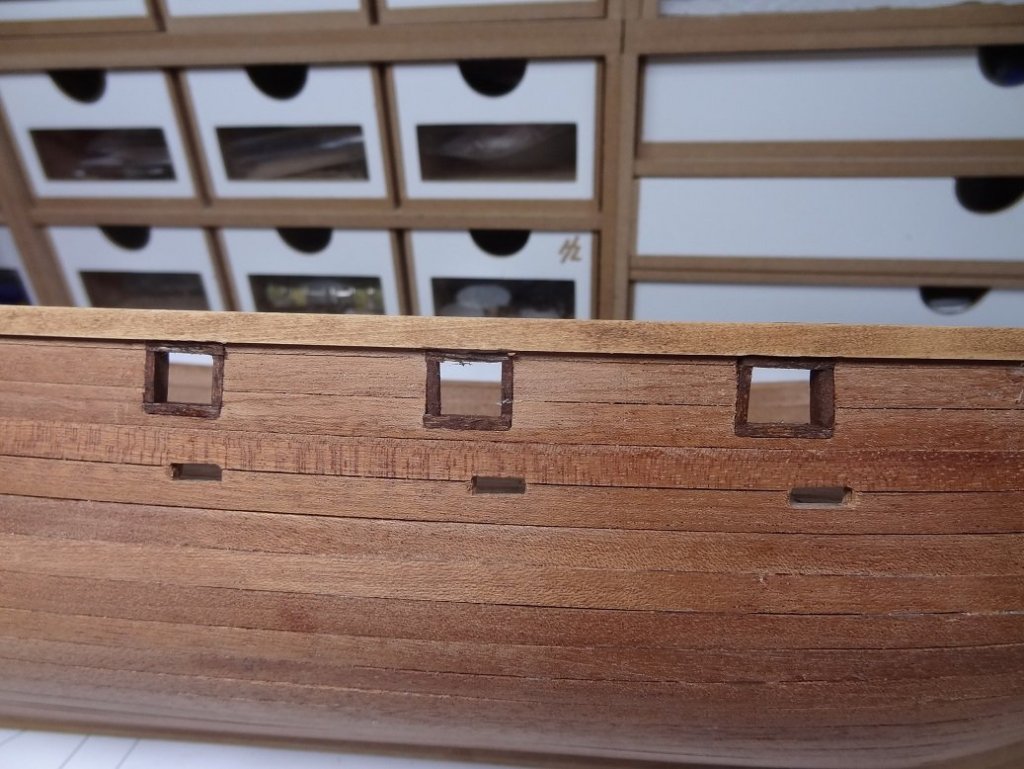
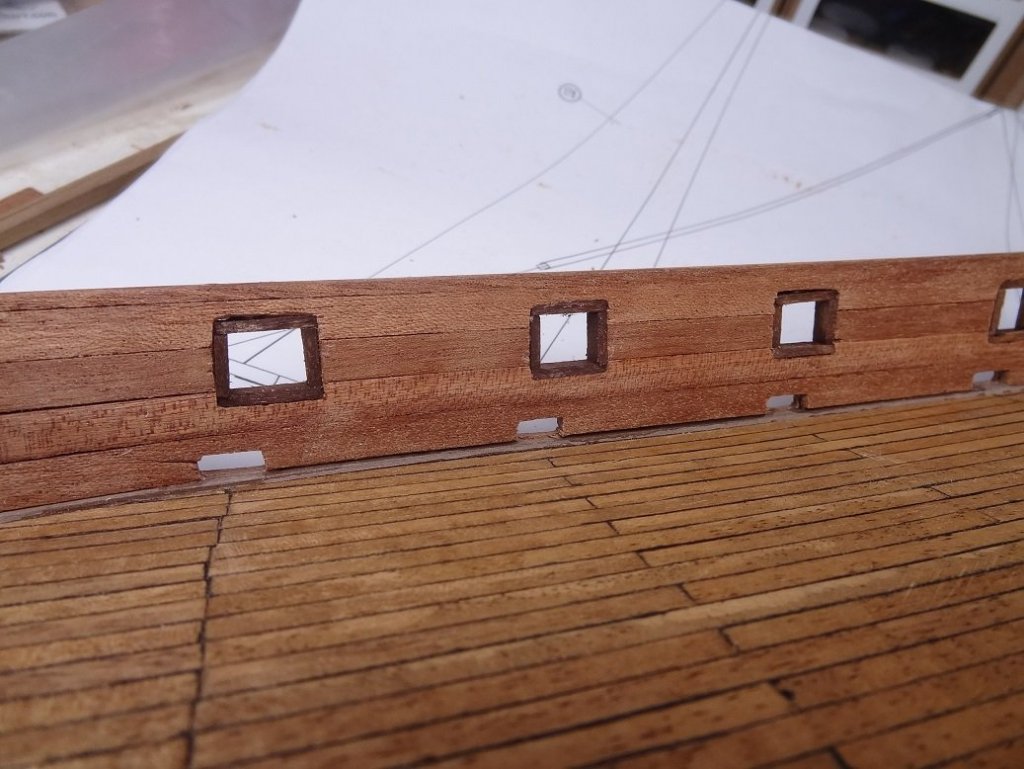
While the planking debate rages, work goes on. It's not that bad really, and I suppose there is a plan to be followed. I'm going to do the ports first as any planking should butt up against that. Same story for the wales. I think that's all so then would come the 2nd planks. Other items that wind up on top of the hull surface will be done last. Starboard ports are done: I couldn't find the correct stick for the port liners so I used basswood instead. Was thinking of going with a lite color (basswood or boxwood) for some contrast, but didn't care for either next to the sapelli. So I broke out & tried most of my stains. IMO boxwood doesn't stain well - it doesn't absorb much. That left basswood and as I realized a darker color would be the best choice I ended up with English Chestnut. Honestly, I probably coulda/shoulda just painted the pieces dark brown. It would have given me a more consistent coverage. It's all hindsight now. I do like the dark contrast to the reddish sapelli.
- 136 replies
-
- 5
-
-
- enterprise
- constructo
- (and 1 more)
-
What dark splashes are you referring to?
-
Congrats Ron - one big task getting close to complete. Just my opinion, but don't get too wrapped up in your finishing. Wood is wood and there's grain, knots, warppage, gaps, etc. That's the beauty. It's not a show car.
-
Hey Cap'n - you may have found the same rasps as I recently got. Very small but not quite micro sized. They're great for removing material in tight places. Would recommend to everyone. I'm doing a few tests on port liners and various stains. I'm leaning towards something pretty dark. I'll post some pix when I have decided.
- 136 replies
-
- 2
-
-
- enterprise
- constructo
- (and 1 more)
-
Regarding the 2nd planking my thought process keeps going from one extreme to the other. At first I thought it would be best to do the entire 2nd planking before doing anything else. Since items like pintles, channels, etc. go on top of the hull there's no chance to plank after installing any of that. In an effort to stay busy, I began the gun ports and liners. In this area it seems like the stuff should go on first and then the planks because the planks will have to be cut to size. Making things more interesting, I'm seeing that a lot of the 6mm x 0,5mm sticks are wider than the 6mm x 2mm sticks from the first layer. ERrrrrrrrrgh! While cutting the openings for the ports I began to look at the kit supplied guns and carriages. The latter looking like a very strange morphism between a carronade sled and cannon carriage. Not sure if those are legitimate or not. Quite unattractive to say the least. So replacements from Syren are on the way. I'll be going with the standard carriage. Here's hoping they're tall enough, those ports are rather high in the bulwarks. I will say having to drill out the port openings and file them to size brings an appreciation for the laser cut alternative.
- 136 replies
-
- 1
-
-
- enterprise
- constructo
- (and 1 more)
-
Those ribs were a bear, even with the sandwich style approach. I could not get anything to bend that sharp at the keel. Of course one option is to make each rib from several pieces, letting the ends butt into the keel. Another thing to think about is how much stuff are you going to put in the boat? If you are going to make floor boards then the ribs don't really have to extend all the way to the keel. The floor boards will cover that part up. Then you have the thwarts, benches and rail which will cover even more. You can hold your nose while you make them and go with a sheet of styrene cut into proper sized strips. The sheets come in many thicknesses, bend great, they cut & file nicely and they take paint well. Some people just don't want a non-wood product on their build. I used styrene and have no regrets. There's some pix somewhere in the first 1/3 of my log. Rigging came out well. On that 3 way block thing - were those on every yard or just the course? That's a cool looking piece wired into your hull sheaves.
- 648 replies
-
- 2
-
-
- niagara
- model shipways
- (and 1 more)
-
Interesting idea grxjax. I think the biggest concern is that I was using 7mm wide sticks for the stealers in the first layer, effectively allowing me to cover a 14mm wide space. These 2nd layer sticks are only 6mm wide so I don't think copying the pattern is going to work unless I find a way to wedge in a 3rd stick.
-
I suspect I already know the answer to this but I'll ask anyway. Working on Constructo Enterprise. 1st hull plank layer was done using 2mmx6mm sticks. There were quite a few stealers at the stern in the deadwood area. I used 2mmx7mm for most of those. It's all done and came out OK, now it's time for the 2nd layer. I'm supposed to use 0,5mmx6mm sticks for those. Ridiculously thin for any kind of planking. What I'm wondering is what to do for tapering & shaping? With the first sticks I could whittle down the ends with a knife or even better my thumb planer. None of that is possible with a 0,5 stick. All I can think of is laying a stick down flat and trying to cut with a straight edge. Anyone one of you got better ideas? Also on the stealers, I was using the 2mmx7mm sticks to squeak out a little extra width. They were about full width at one end and tapered down to about 1/2 width at the other end, where they joined up with a 2mmx6mm. So essentially I was making 2 sticks fit into 1 stick. This is going to be made even more difficult given the fact that I don't have any 7mm sticks for the 2nd layer. Only the 6's. So I may need to try a 3 into one.
-
I guess there's a reason we always say read thru the manual before starting. I'm working on the stem & stern post, the logical next steps in the build. But after that the manual would have you adding wales, rudder with pintles & gudgeons, etc. Lot's of stuff on the hull. One big problem, I only have the first planking on the hull. NOWHERE does it mention the second one. So I suppose right after the stem & stern post I should look into doing the second layer. What an oversight!!! That's inexcusable!!! Guess I'll have to come up with a plan for that. I'm still shaking my head over that one.........
- 136 replies
-
- 2
-
-
- enterprise
- constructo
- (and 1 more)
-
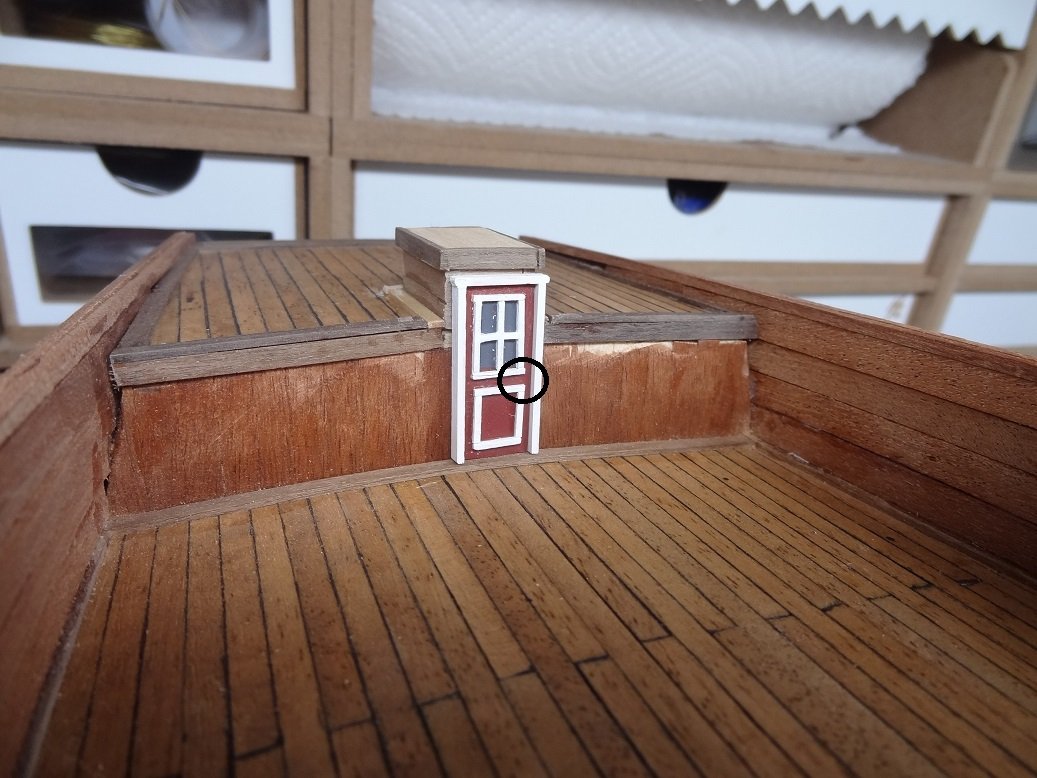
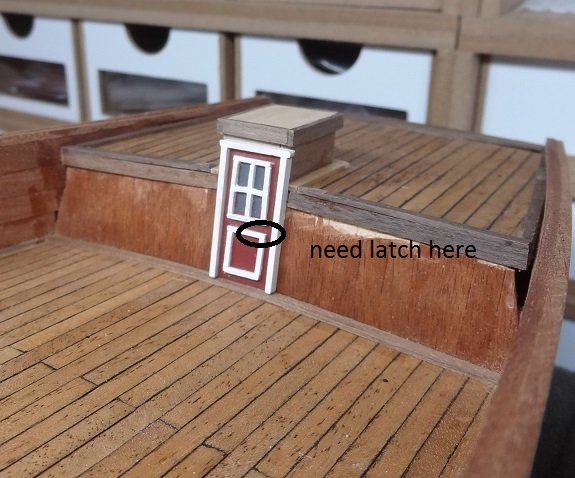
Well, if I'm asking for help, I suppose it would be useful to be able to see what I am talking about. Door is not glued in yet.

- 136 replies
-
- 3
-
-
- enterprise
- constructo
- (and 1 more)