mikiek
-
Posts
2,276 -
Joined
-
Last visited
Content Type
Profiles
Forums
Gallery
Events
Everything posted by mikiek
-
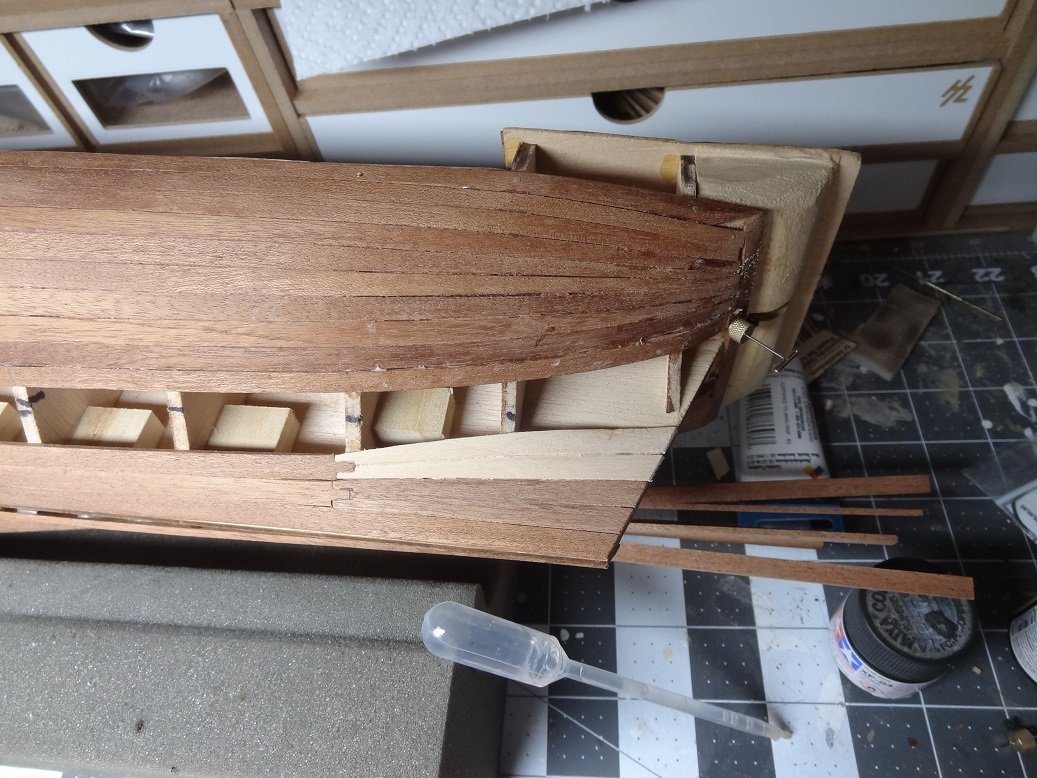
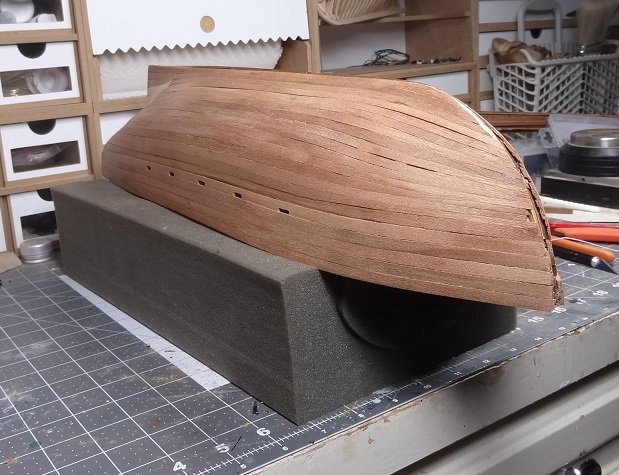
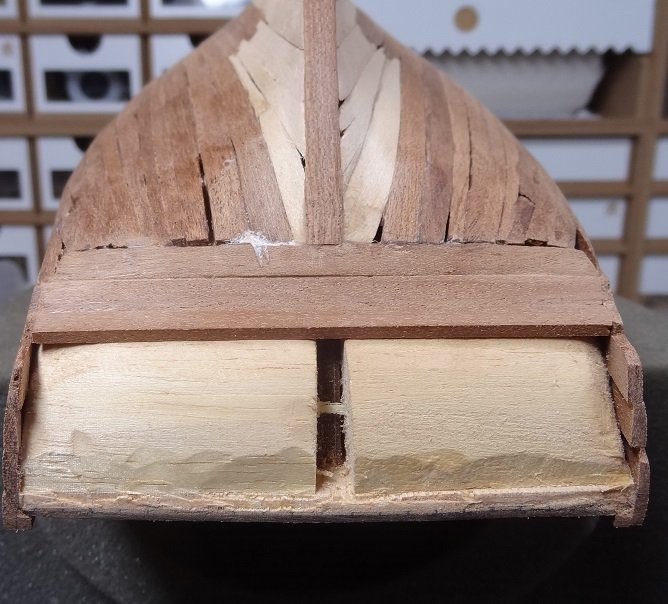
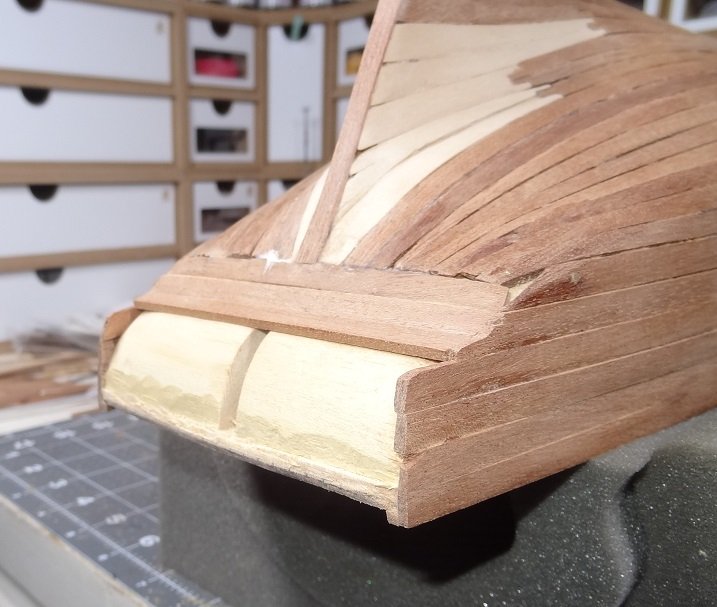
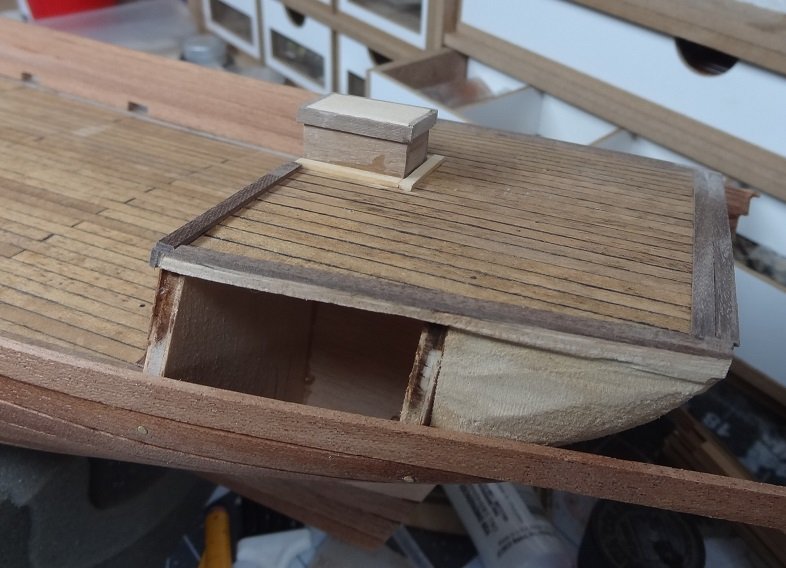
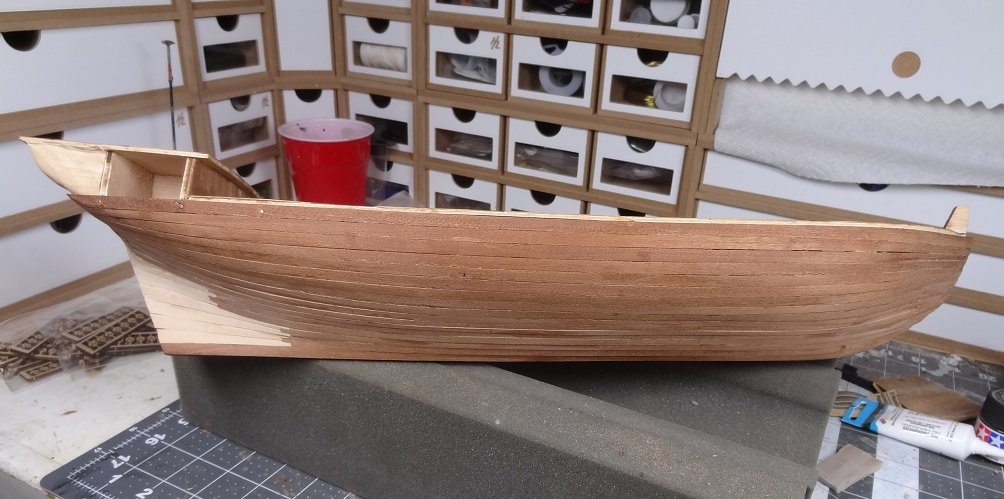
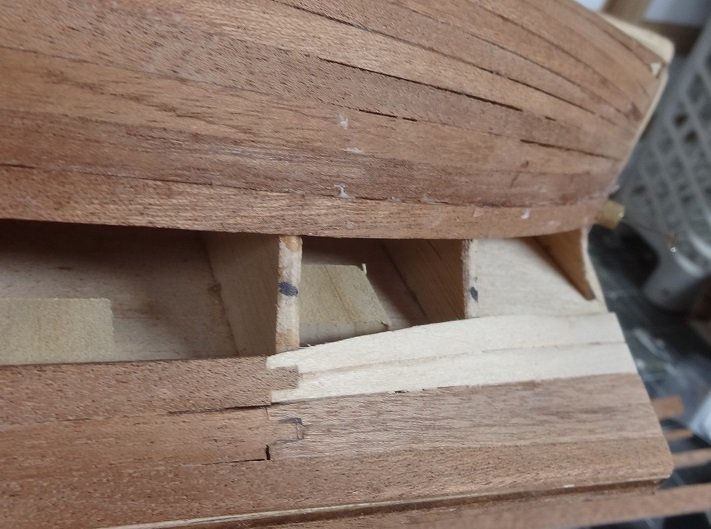
 Both bulwarks are complete now. I've been sanding off & on for a few days. I realized with the 2 layer process the 1st layer must be smooth but really does not require filler. I am still concerned about having only 6mm sticks (if you can call them that) for the 2nd layer. What I did for the 1st layer at the stern cannot be copied because most of that was with 7mm sticks. You know if I don't hose this up, Enterprise could be a gorgeous build. In my eye, there's something about the schooner hull - short, fat, rounded - that really get's my attention. This hull seems to do the same: And then there's the stern. I really messed up the filler blocks,but the more I see of them and the instructions the more I realize they are almost useless in this build. As you can see I rounded mine off, where the instructions show 2 flat sides. At the end of the day, it doesn't matter because it's all recessed. The big stern plate thing doesn't even come into contact with the blocks. It just rests on the ends of the hull strakes. I did do my first replacement (bash) of a part. The pewter door to the lower deck left a lot to be desired. So I made one from scratch. It looks decent enough (I forgot to snap a photo) but I need to add a door latch. It's too small to do anything in brass, so I was thinking the card stock trick although that would be pretty small as well. I just need a sort of rectangular piece at the most maybe 1/3" long and 1/8" wide painted black. I guess maybe I could try it with a piece of wood? You guys have any ideas?
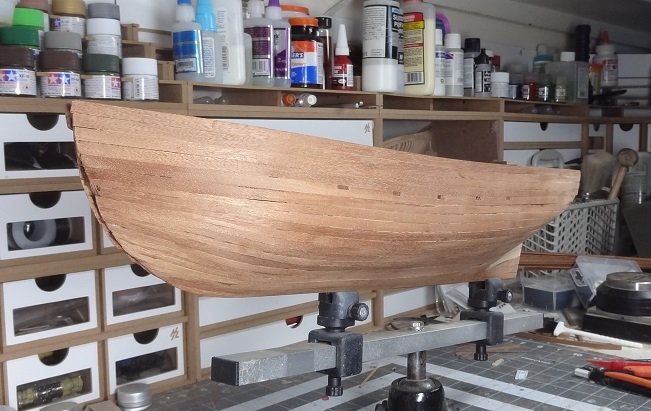


- 136 replies
-
- 3
-

-
- enterprise
- constructo
- (and 1 more)
-
That's kind of you to say Steve. Thanks.
-
So Tom - are those residential structures turned into rentals? Nice abode for that painting to show up in. There's a lot to Google for John Harvey. Looks like he did quite a few similar pieces. He seemed to like the galleons, and I would say that's what is in yours. Sounds like he did a few artist renderings of real subjects, but also a lot of made up scenes too. In scanning around I did not see your exact picture - there's 3 boats there. Another piece looks almost identical to yours but only 2 boats. That's what 2 minutes turned up.
-
That place is almost as bad as Lowes. There's always something you didn't know you needed
-
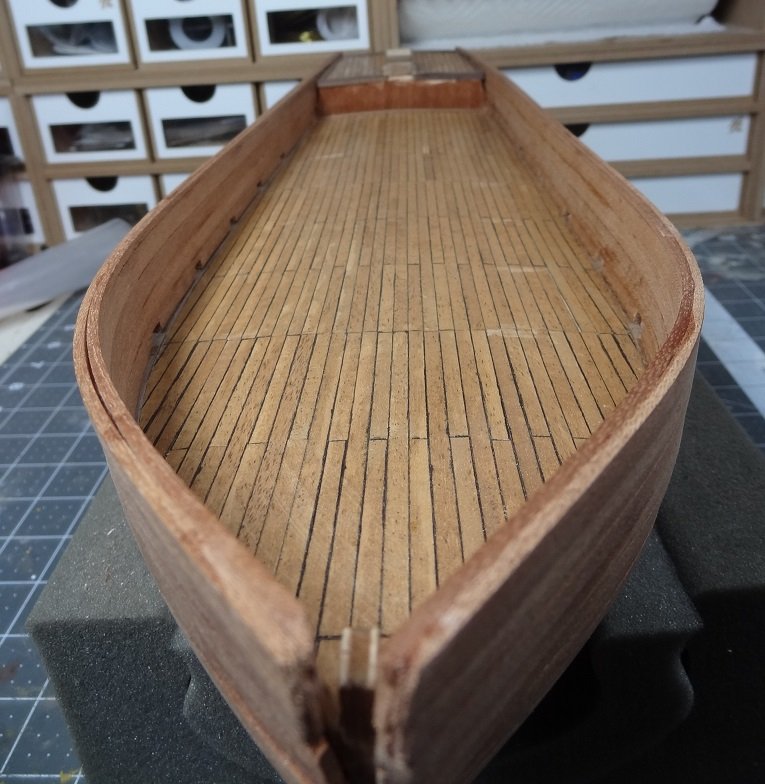
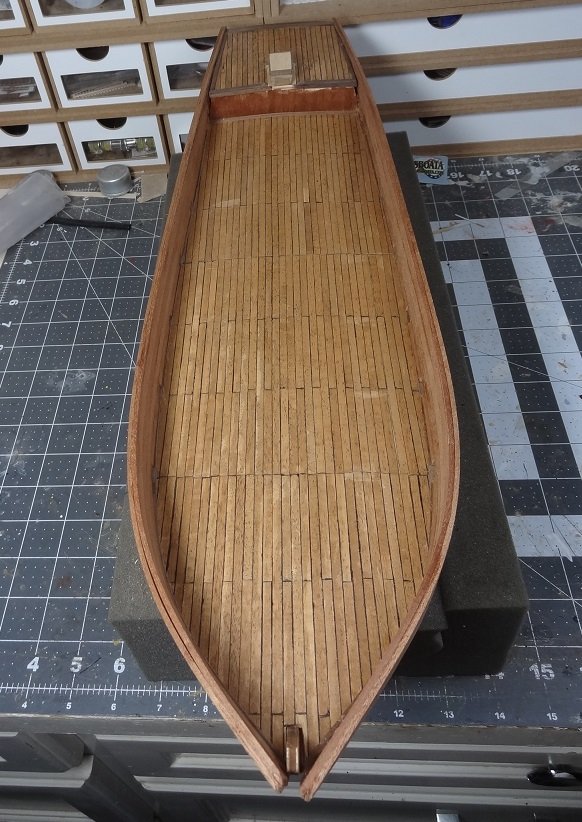
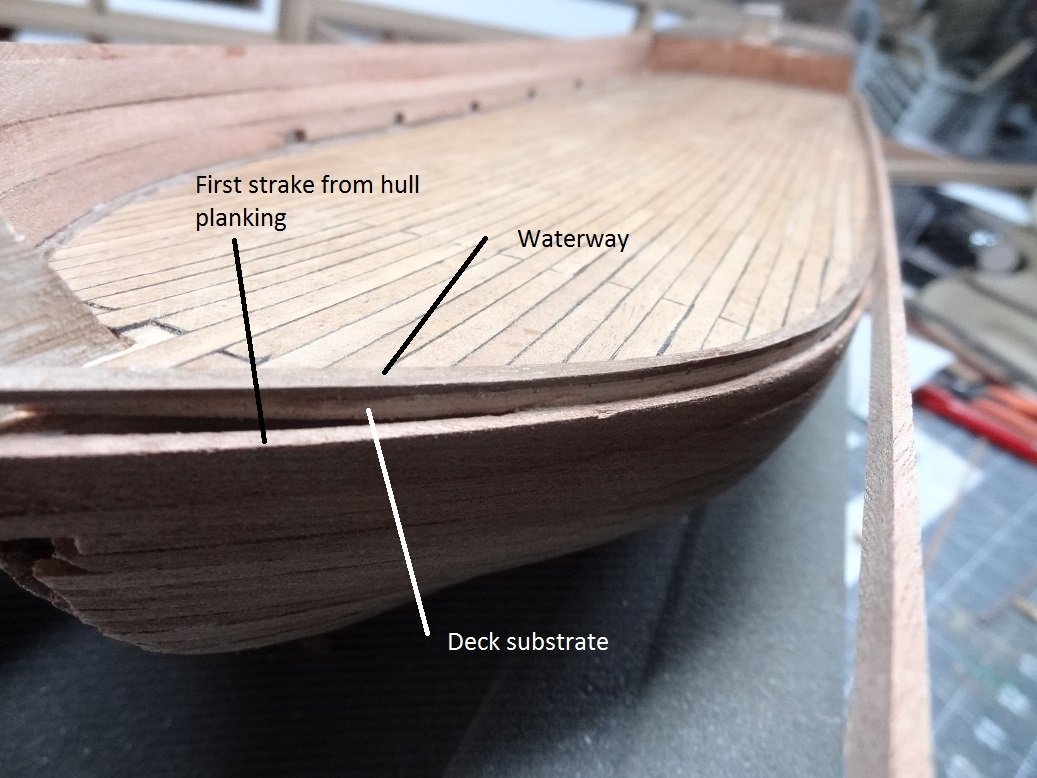
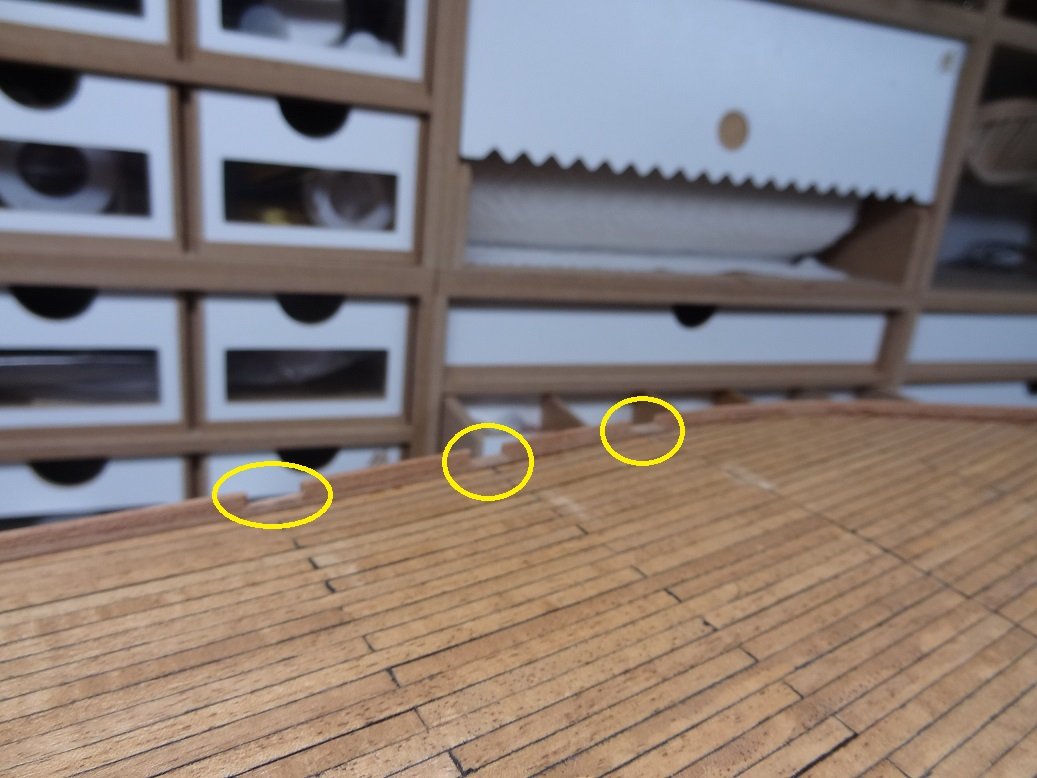
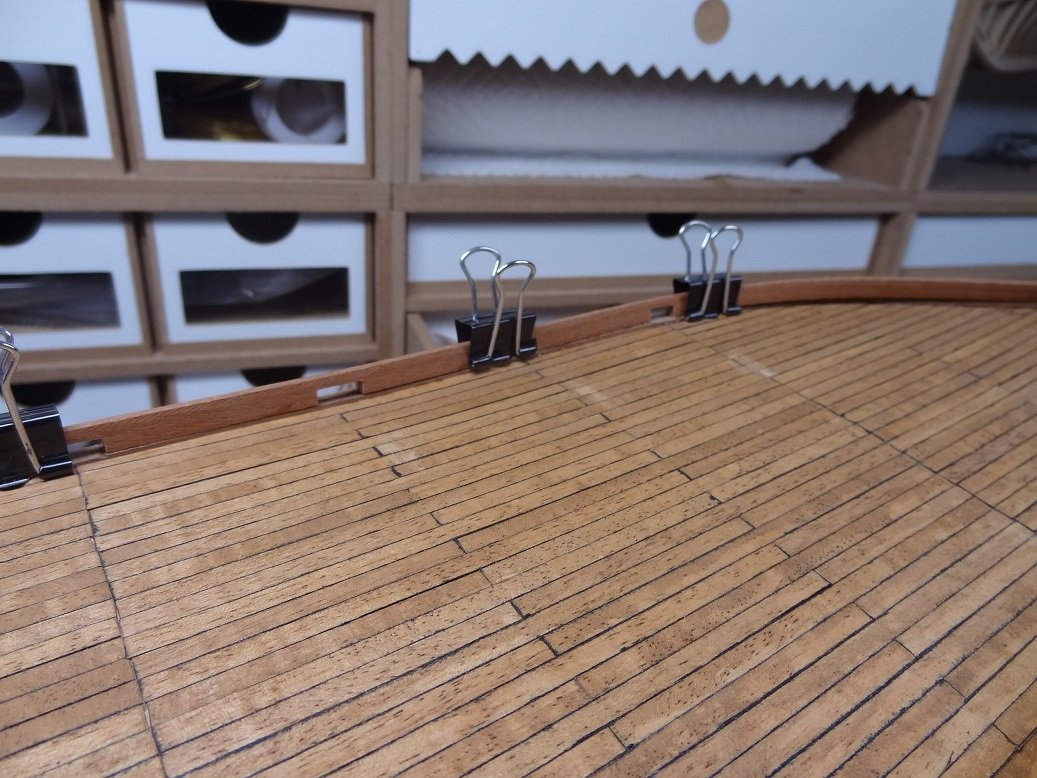
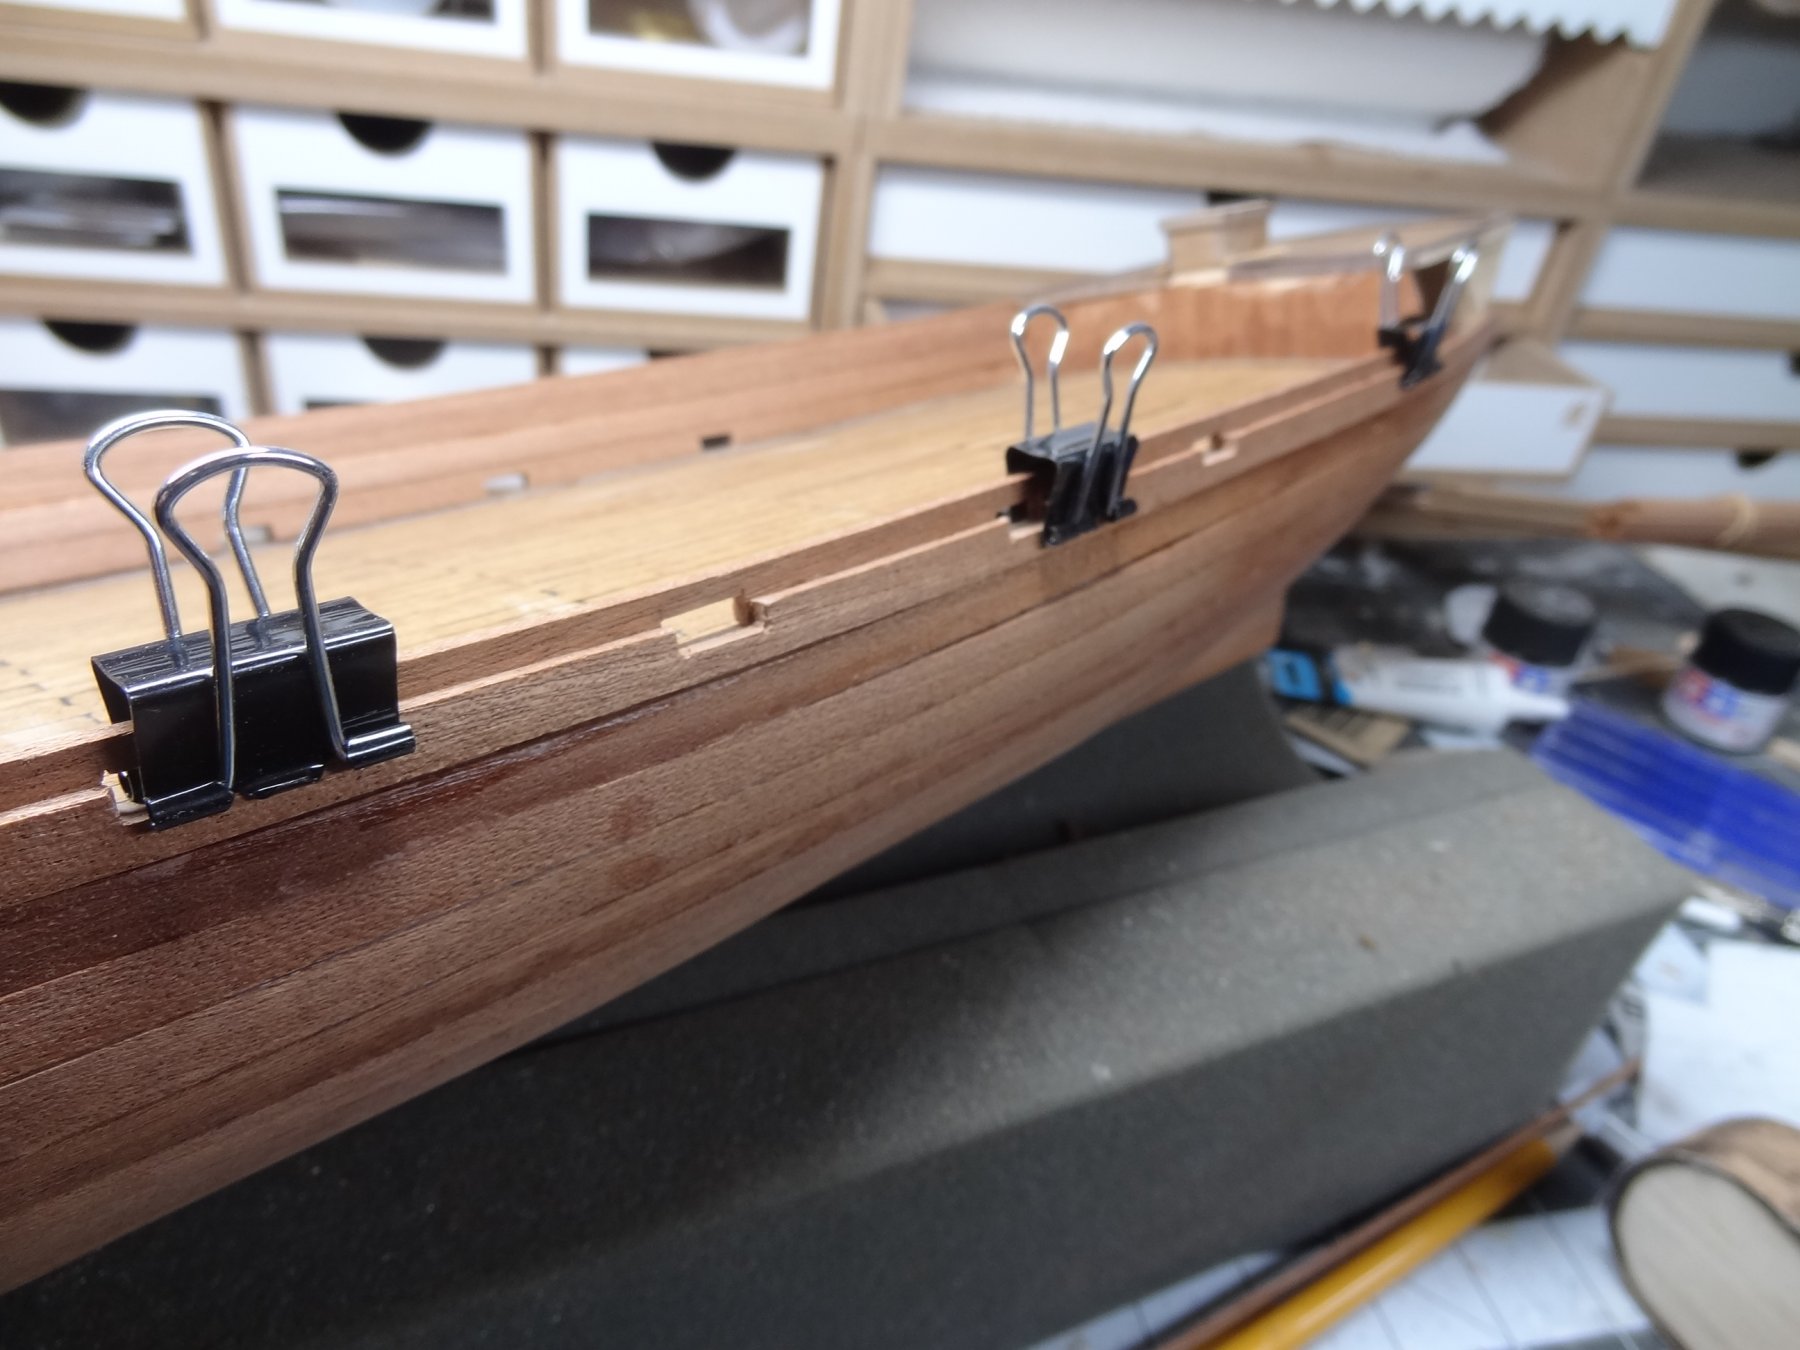
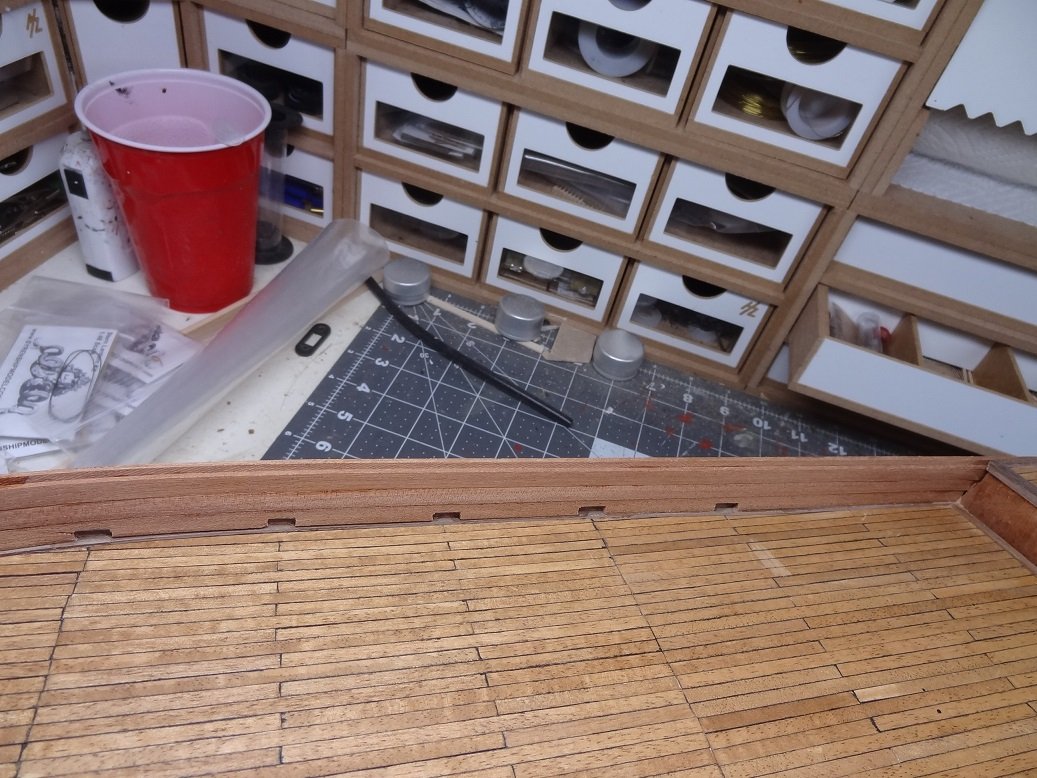
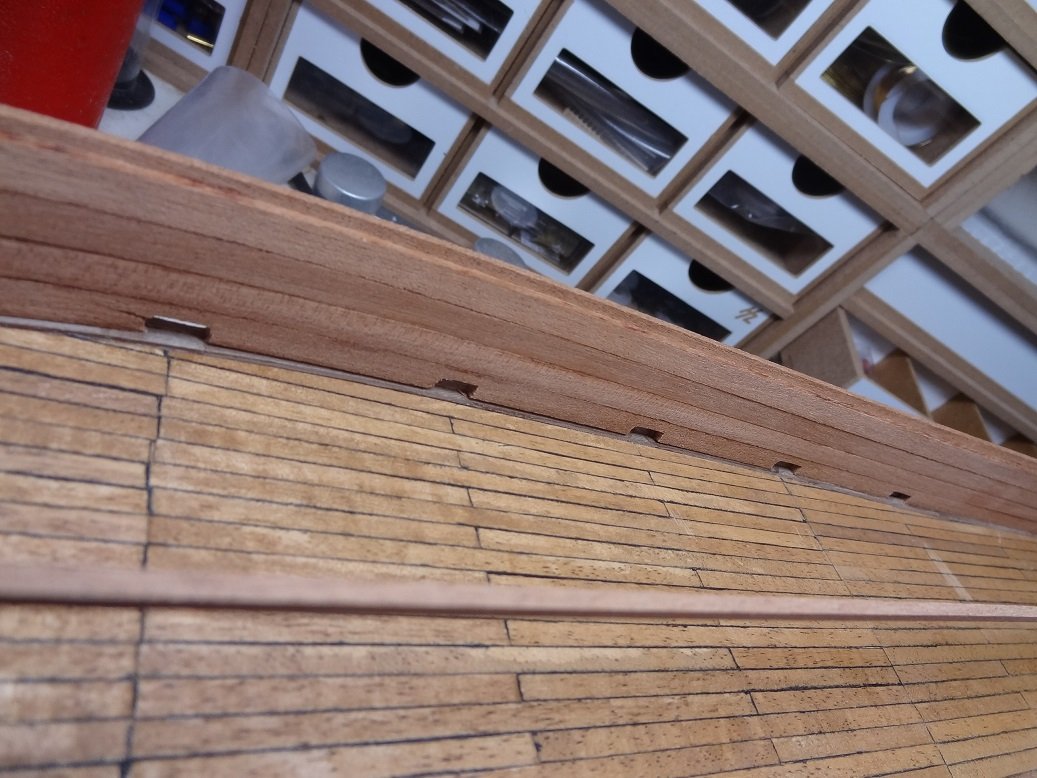
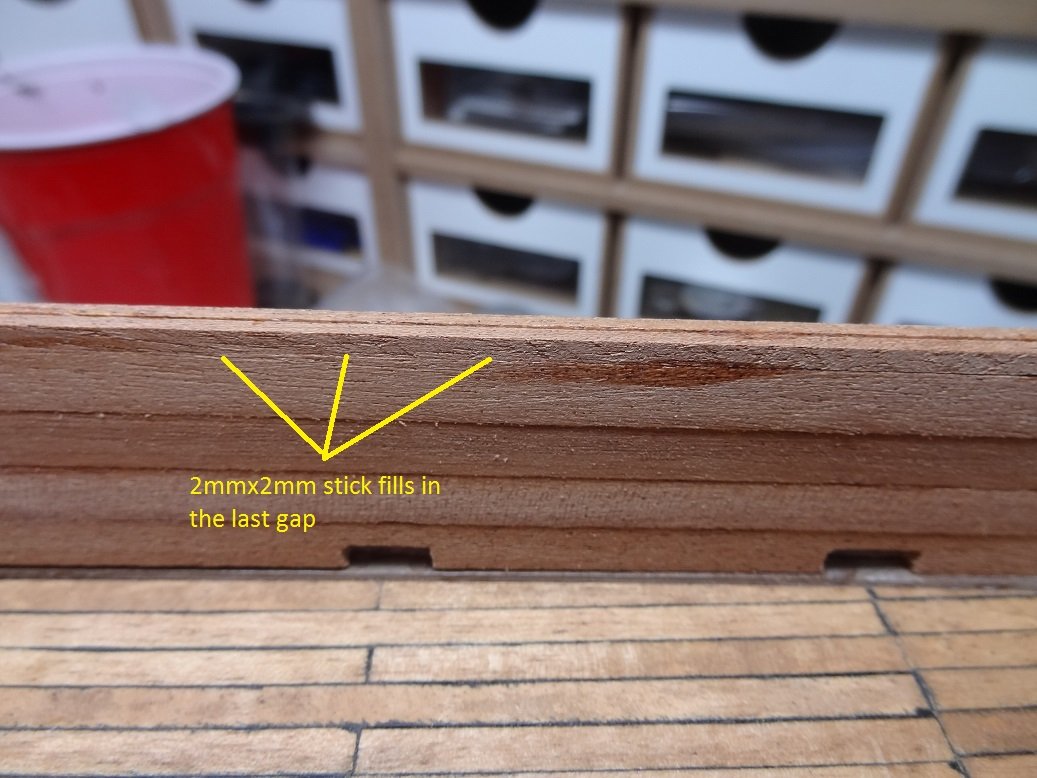
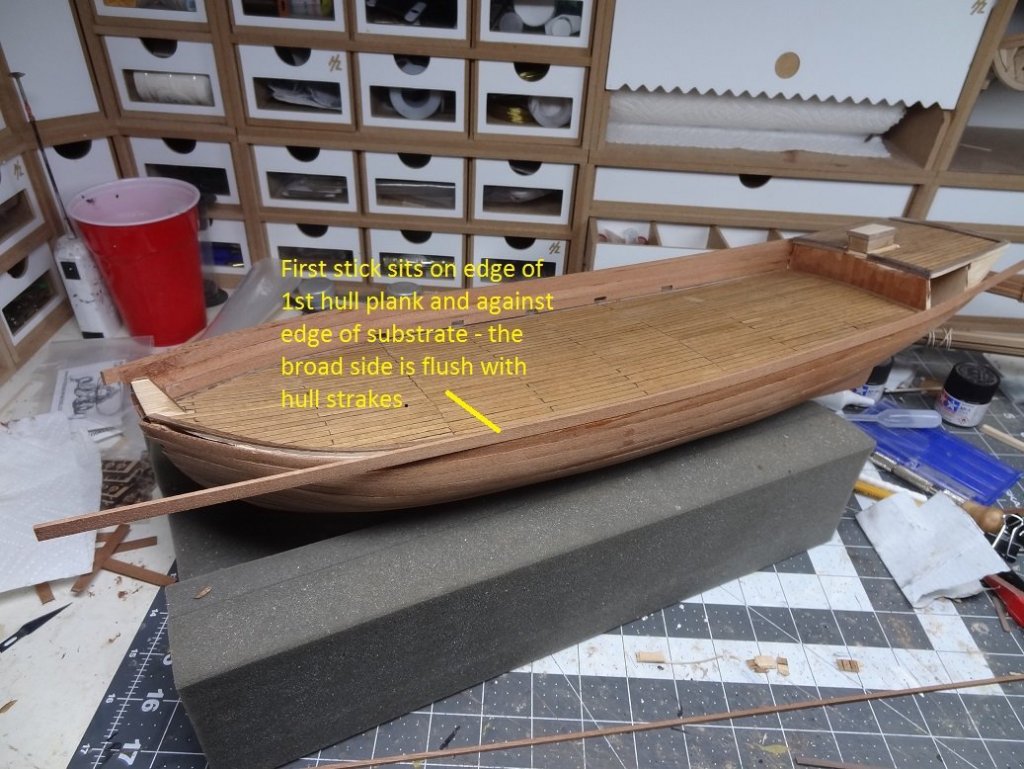
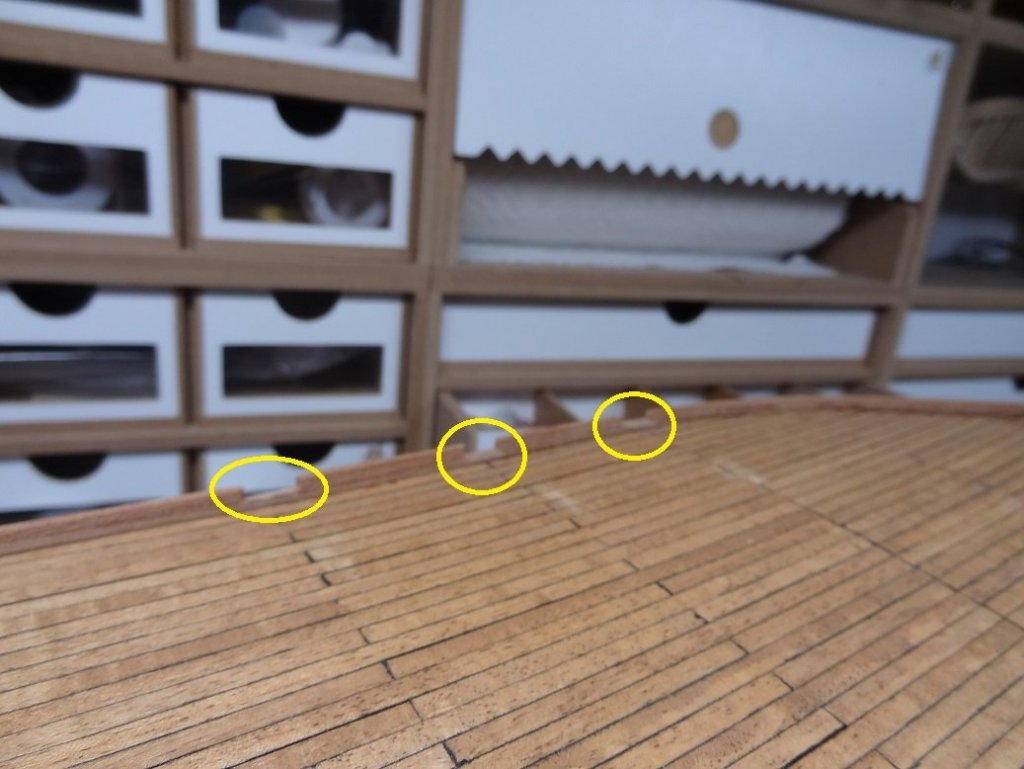
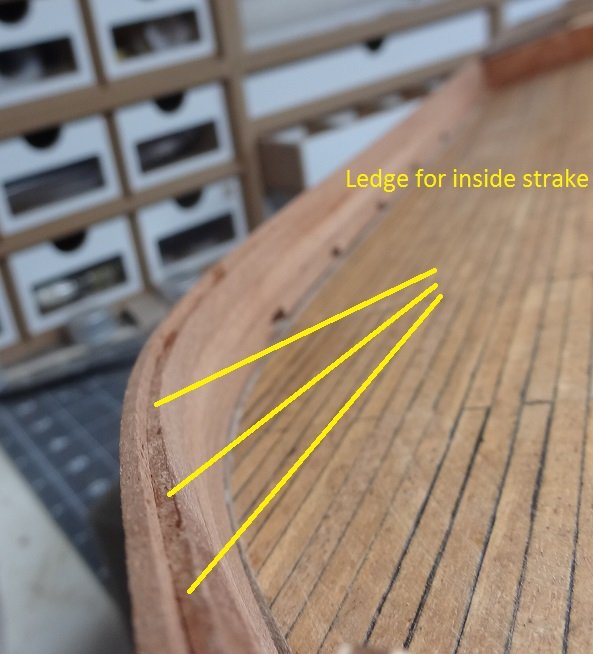
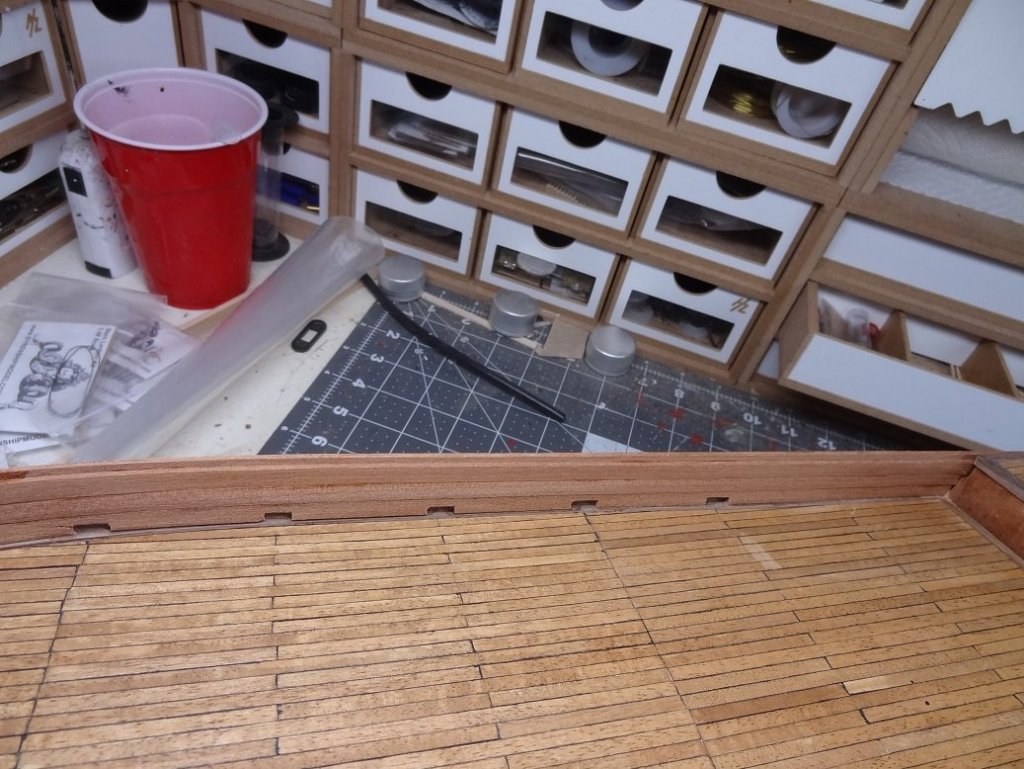
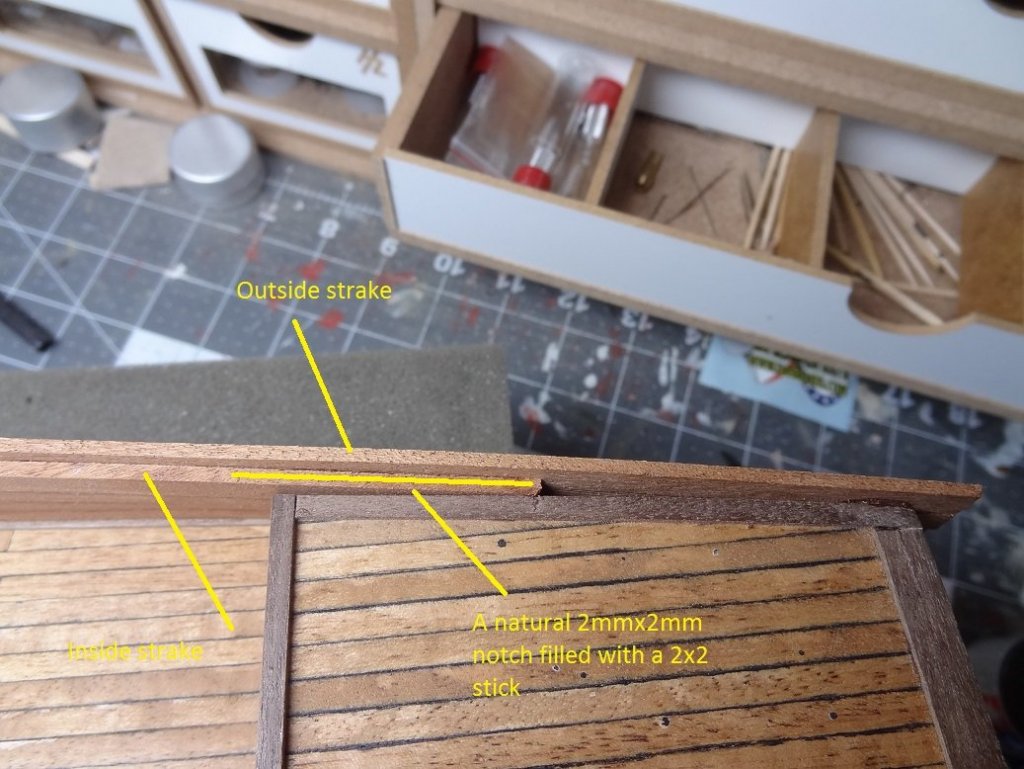
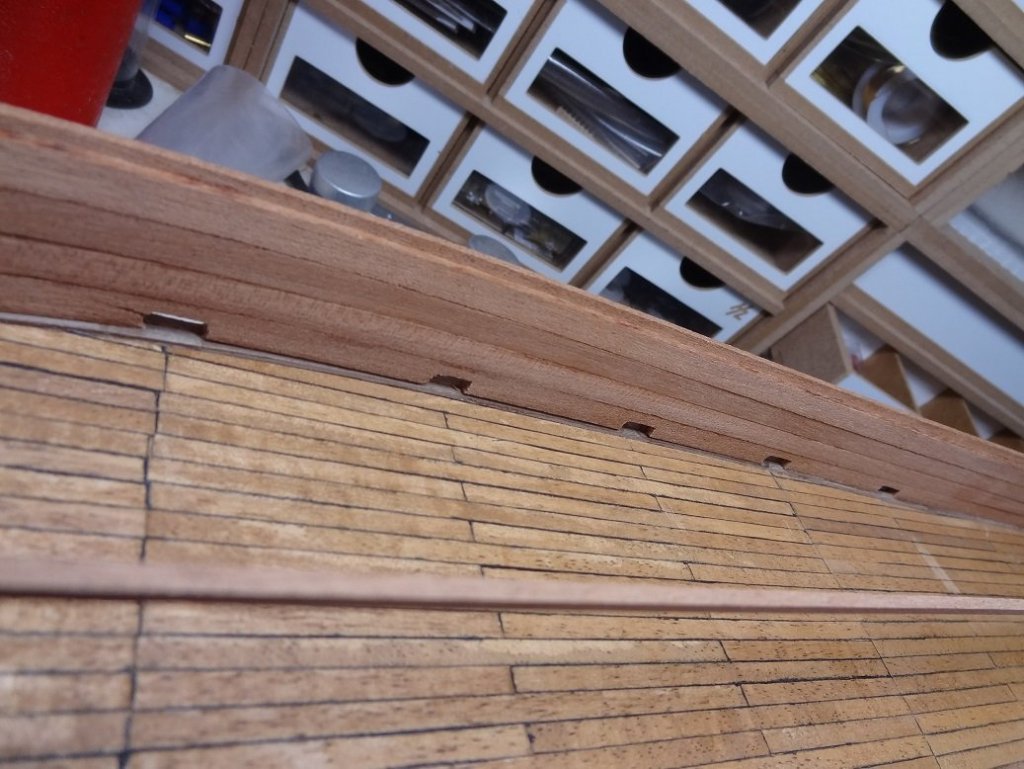
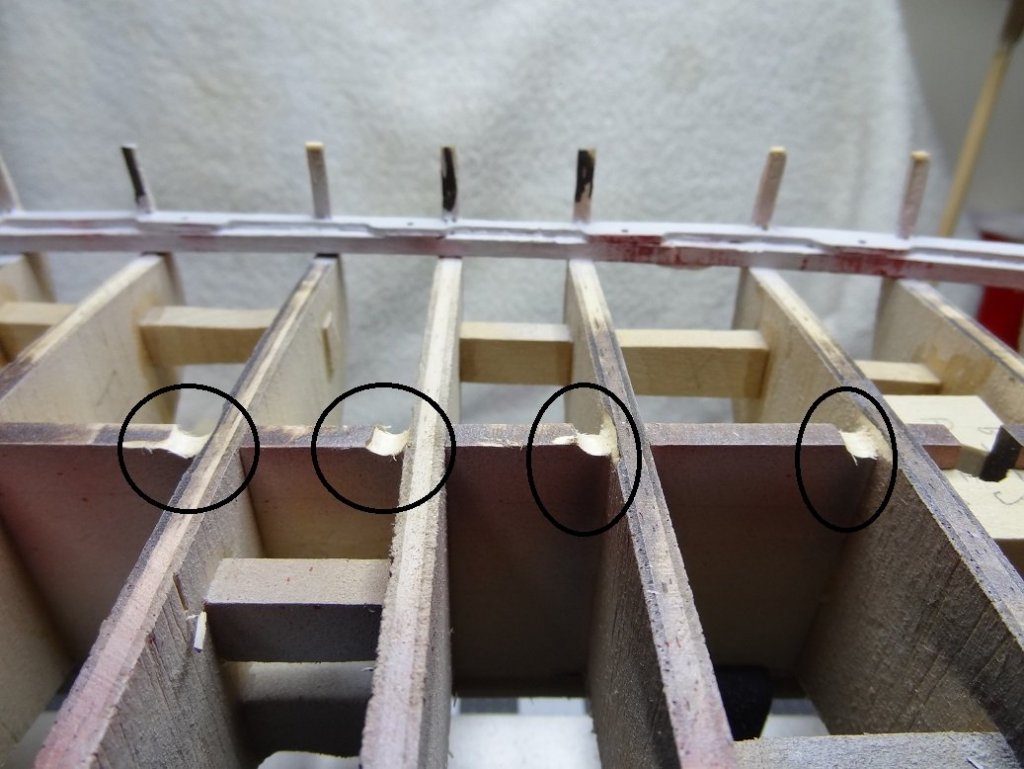
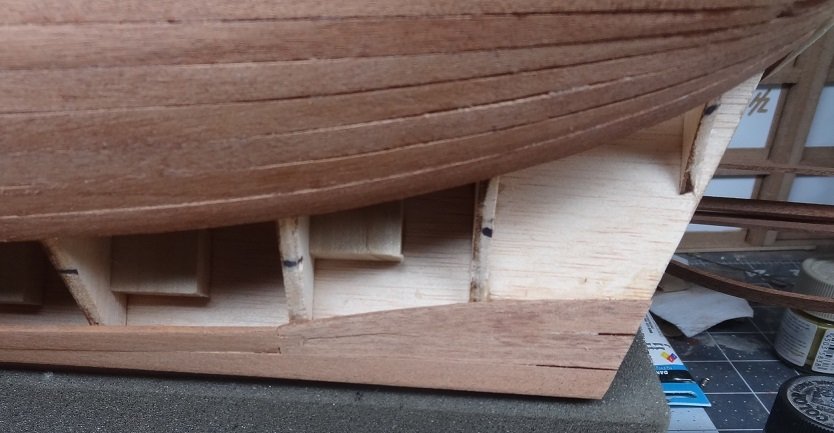
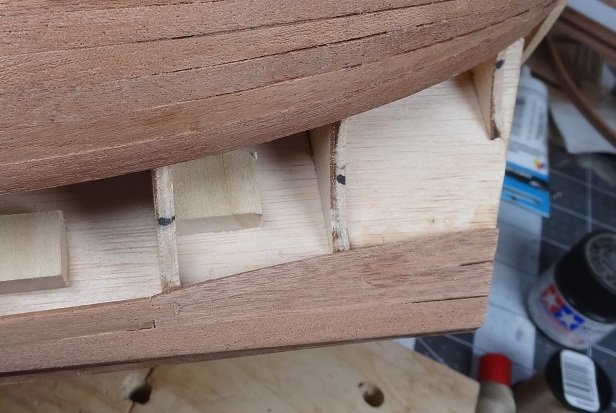
The bulwarks are the next big feature. I don't know if all Constructo kits do them this way, but for Enterprise the method was different than any bulwark I have assembled. Look back a few posts and you will notice there are no timberheads extending out from the hull frames. They also did not do the thing where they give you a laser cut strip of plywood that is the entire bulkhead. The method here is a lot simpler and seems to work OK. Had I been in one of those head down, stay focused and keep working moods I probably could have done it all in about 90 minutes. What they do is glue a stick edge to edge on top of the upper most hull strake. Going back to hull planking for a sec, the instructions were fairly adamant about the first strake being positioned slightly below the deck substrate. Now I see why. There will be an inner and outer "wall" of sticks making up the bulwark. The first stick glued will be for the outer wall. It is placed edge to edge with the first hull strake and it sort of leans against - and is glued to - the deck edge. So the placement of that first hull strake is important as you should be able to see in the pic it leaves a notch or groove in which you place the first bulwark strake. How deep that groove is will determine how much of the first strake extends above the deck and that is very important at the end of all this. The strakes are 6mm wide, and you want to end up with 2mm of the stick running above the deck. And that first strake requires you to cut some scuppers. The next strake is an inner one. It is laid edge on with the waterway and rests against the outer strake we just put down. You have to cut matching scupper notches for that as well. So here's the first inner strake. Same strake from the outside. You should be able to see the groove on the outside where the next outer strake will be placed. And so it goes. In that groove you lay the next outer strake. This leaves a groove on the inside for the next inside strake. The offset between the last inner or outer strake makes the groove for the next stick. Other than cutting the scupper notches, no shaping or tapering of the stick was required. Very simple and I must say very sturdy as well. The biggest challenge was what to do at the stern - the instructions seem to completely gloss over that. If I ran both the inner and outer strakes all the way to the transom it added a lot of material at the edge of the poop deck. So I ended up cutting the inner sticks about 3" before the transom. Another vagueness with the instructions was in describing how to end the bulwarks. It said 4 inner strakes and a 2mmx2mm cap. I think I got lucky here. I believe what they meant was 4 inner sticks, then the next outer stick. Magically this leaves the groove on the inner side which perfectly accepts a 2x2 to fill the groove and make it all flush. And there you have it. I'm still finishing one side and I'll post some completed pix when it's done. The thing I don't like about this method is someone (read you) will have to position and cut the gunports by hand. The instructions say make an outline in the bulwark by drilling holes. Then cut and file/sand them square. I'm still thinking on how to make certain they end up square. But square to what? Stay tuned.


- 136 replies
-
- 5
-
-
- enterprise
- constructo
- (and 1 more)
-
By design the deck planks should lay on top of the hull frame pieces. So with your sheet, it is now 1/16" higher than it should be - as you noted. It makes sense that the guns didn't fit, there's not a lot of extra room. They were probably 1/16" to high. If I understand, you raised the ceilings of the gun ports? If yes, that fixes the gun fit problem. However the deck planks are still 1/16" higher than they should be. I don't know if that puts them higher than the top of the waterway or not. If it does this may be a problem. Have you decided what kind of edge you will put around the deck planks? Nibs? Faux Nibs? No nibs? The higher deck might have an effect there. Also, the deck planking at the stern, the ones that run side to side instead of bow to stern. Those need to join the deck smoothly. You may need some sort of transition there. Just stuff to consider. Oh, just thought of something else. Another tough one to describe. You will likely need to move back the holes that go through the deck for the masts. The masts sit angled. The plans show holes in the deck based on the deck being at a certain height. If the deck is raised, the mast hole will move back. A little trig would tell you how much but I suck at math. Compared to the location on the deck layout plan, any deck toys in close proximity to the mast may need to move also. I'm thinking the pin rails that surround the masts for sure. There may be other items. I have a grate right at the backside of the foremast that would have had to be moved, but I may have placed that one there by a WAG. Just be aware. Things may need to be placed relative to the mast hole rather than relative to the front/rear of the deck. Hope that makes sense. Not to worry, none of this is insurmountable! It will be a good exercise.
-
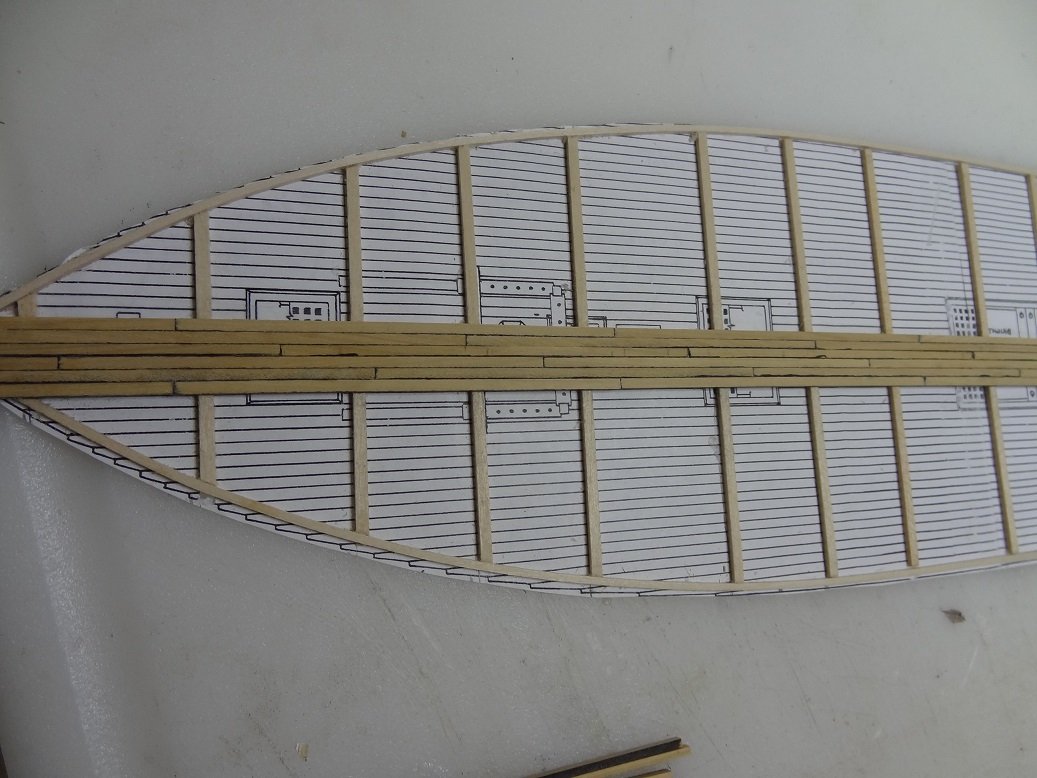
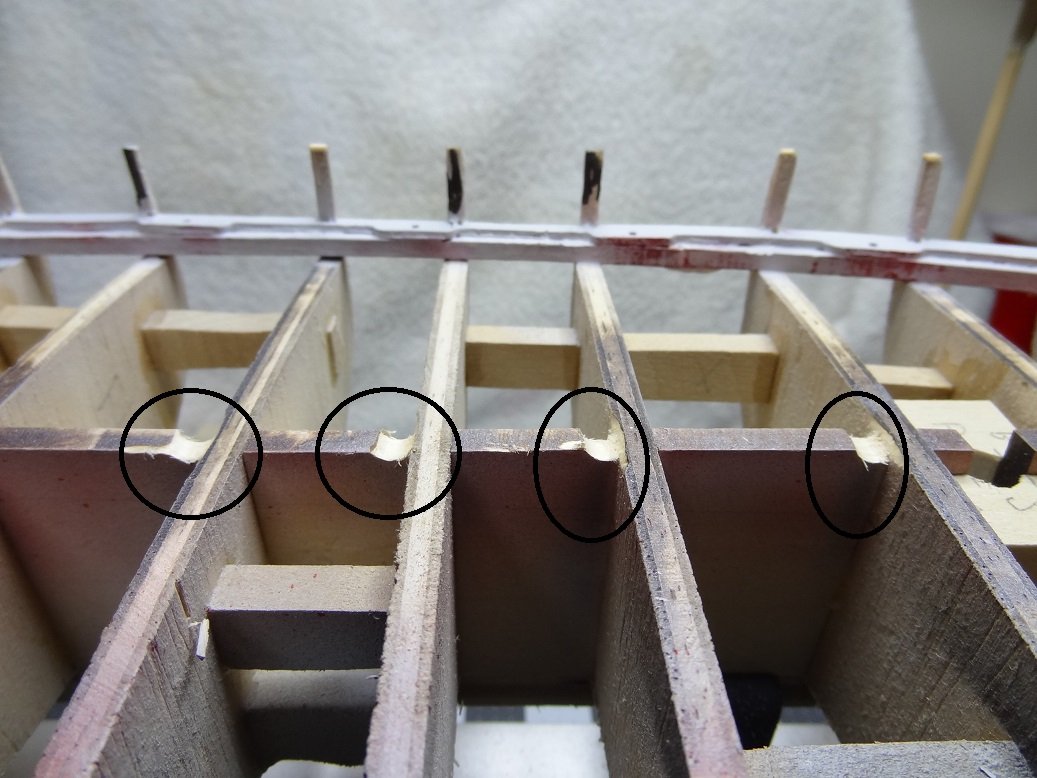
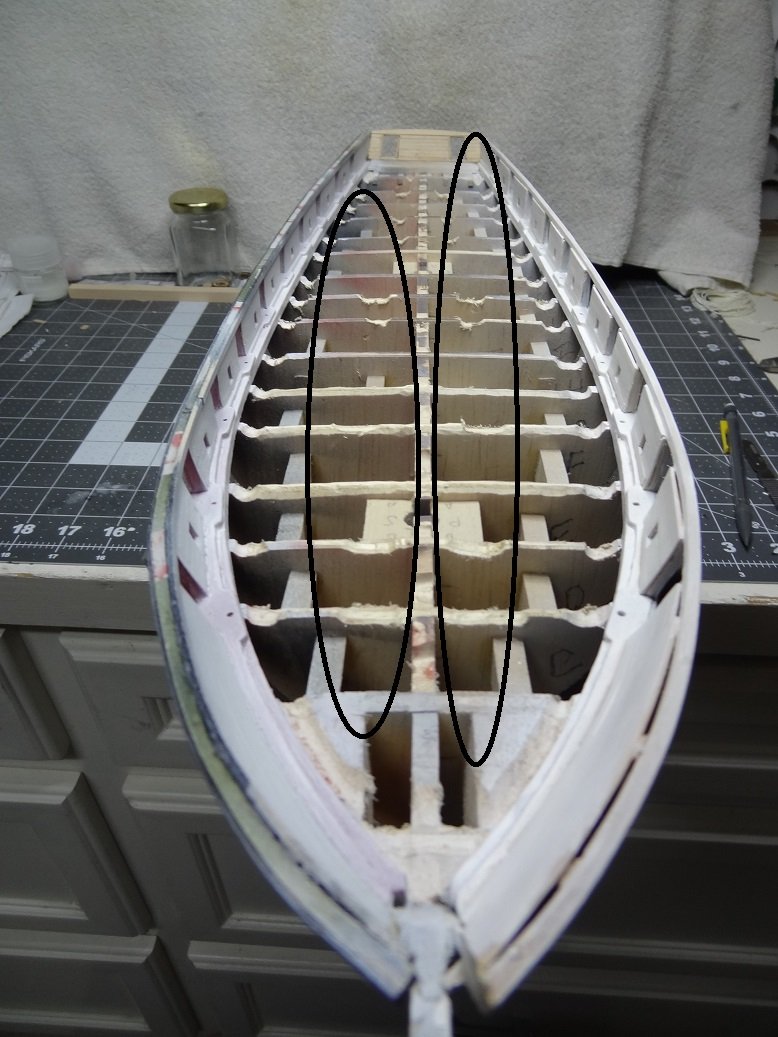
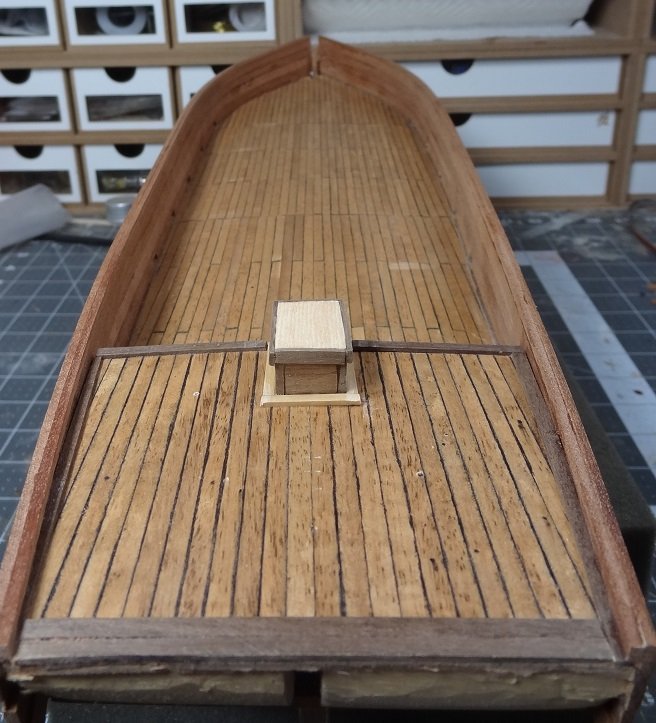
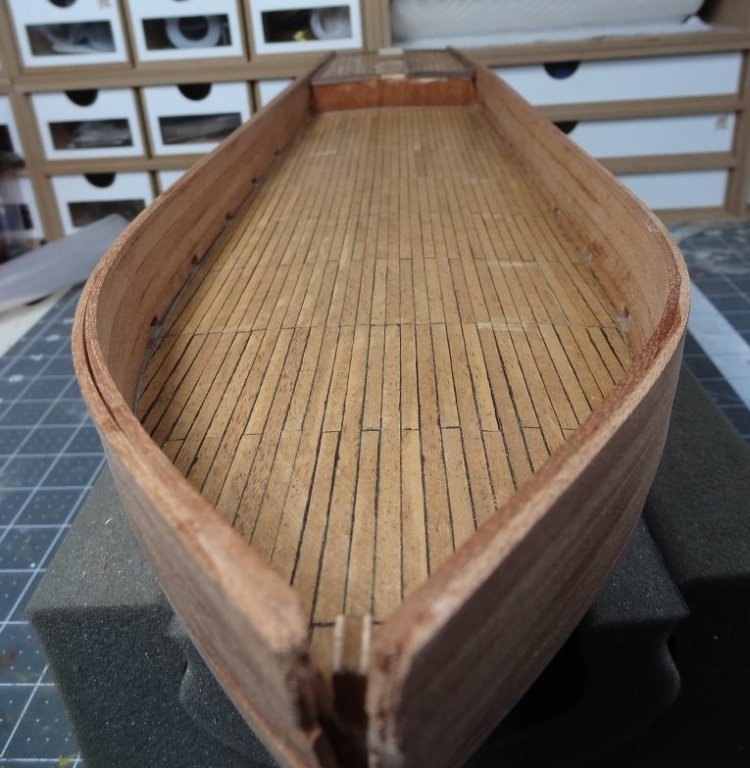
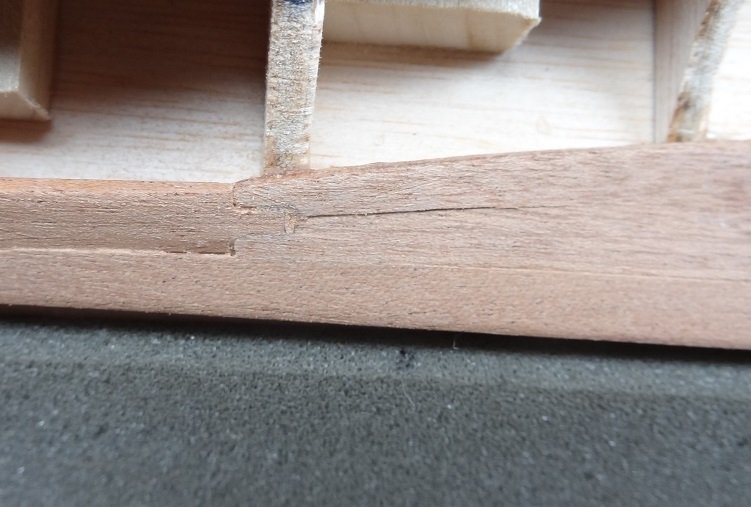
Ron - what did you glue the deck planks to? I made a frame but some use an entire sheet of wood. You have to glue it on top of something. Whatever that something is will elevate the planks slightly higher that if you glued them straight to the frames inside the hull. You will need to compensate for the elevation or eliminate it. Otherwise the deck planks will be almost level with the waterway and you don't want that. Pardon me for posting pix in your thread but they are worth the 1000 words right now. Here's the frame with a few planks glued. I think I used 1/16x1/16 sticks for the frame so in my case the planks are elevated 1/16" higher than they should be. BTW - regarding furniture I framed out places where they would go. When the deck is complete you've got planks glued to frame (the deck frame) and all that drops in on top of the hull frame. Therein lies the problem. The deck planks will be sitting 1/16" higher than designed. So in my case I Dremmeled out grooves in the top of the hull frames deep enough so the deck frames did not rest on the hull frames. The actual deck planks did. Man there's just not a good way to explain that. Thought this was all I would need at first. But there ended up being a lot more. There were gouges all over those frame pieces. You would have the same problem if you used a sheet of wood instead of a frame but I'm not sure how you would compensate for that. Once again, I am not slamming your decking method. In fact I endorse it when the boat design allows it. You just have to think ahead some.
-
Ron - you could always use a hair dryer after you placed the wet wood. Not to shape or bend, just to hurry up the drying. I did the deck like you. For the first build it was a good step. You will need to consider the underside of your decking. Anything that protrudes under the deck you will have to notch out in your frame's top edge. I'm not describing it well, but take a look in my log where I had to prep the frames to receive the deck structure. I just got after it with a Dremmel, but it was ugly when I finished. Maybe your deck surface will be different. You might show us a pic of the deck underside. Also keep in mind not all ship designs allow you to drop in a completed deck. Niagara gets wider as you go from keel to hand rails. A lot of bigger ships are widest at the 2nd or 3rd deck and begin to get narrower on the main deck. The bizarre term for this is tumblehome. I don't mean to worry you. It's a perfectly good, perfectly valid way to do a deck. There are just a few different considerations you should be aware of. Planking is coming along just fine.
-
Not sure what brand you are after. I use strictly Tamiya - bought from MegaHobby. They carry the full line, are rarely out and shipping is pretty quick. The only problem is the color chart. It has the usual problems from viewing on a monitor. They also carry the clear paints which are great to use when you are masking a surface and don't want the paint to wick under the tape. Just paint the clear over the edge of the tape first. Speaking of masking tape, Tamiya's is one of the best. It comes in several very thin sizes for modelling. Tamiya's paints are always thicker than need be so you will want to thin it. While you can use water, alcohol works better - 91%. Even better use their thinner. It supposed to be an alcohol based acrylic paint. The one thing they don't make (except aerosol) is primer. I use Valejo there.
-
Brian - the biggest problem with mixing colors (voice of experience here) is you have to do one of two things. 1. Count every frikin drop of each color you mix and write it down. Because if you need some more to paint the same build you need the same color. OR 2. Mix way more than you need and store the rest. Storing can be a problem. A lot of the mixing bottles have crappy lids that leak air. Tamiya paint bottles store really well. If you use the paint (which I do) then save the bottles. Otherwise you can buy empties. The lids are the difference.
-
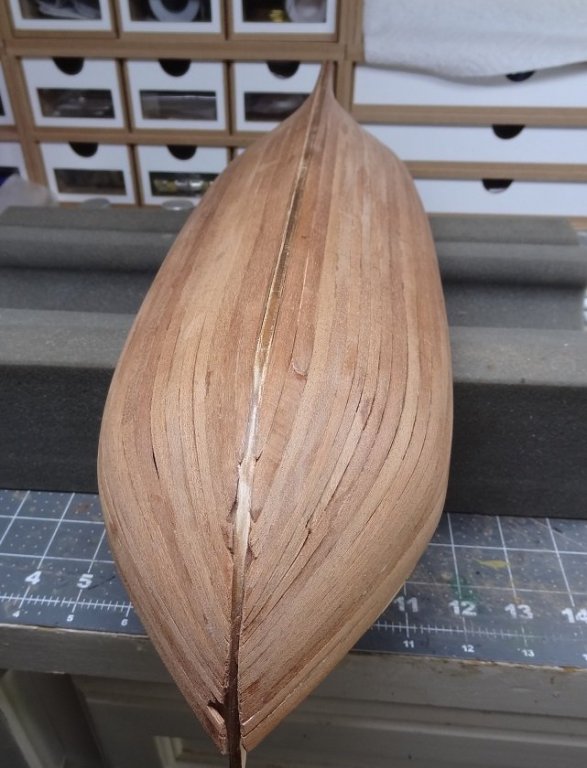
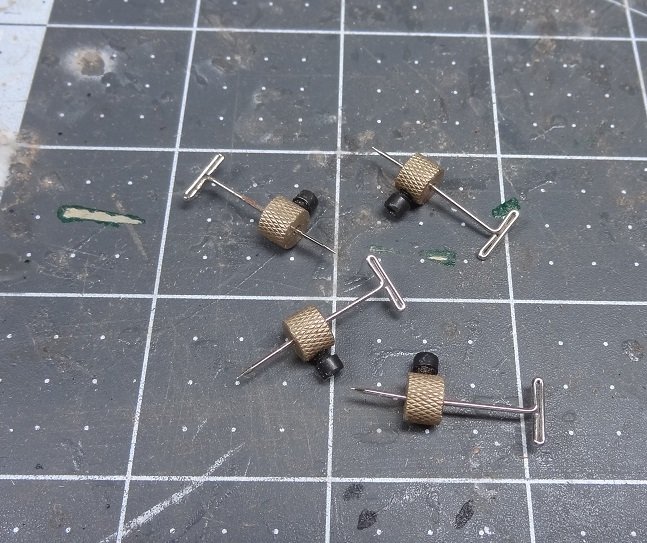
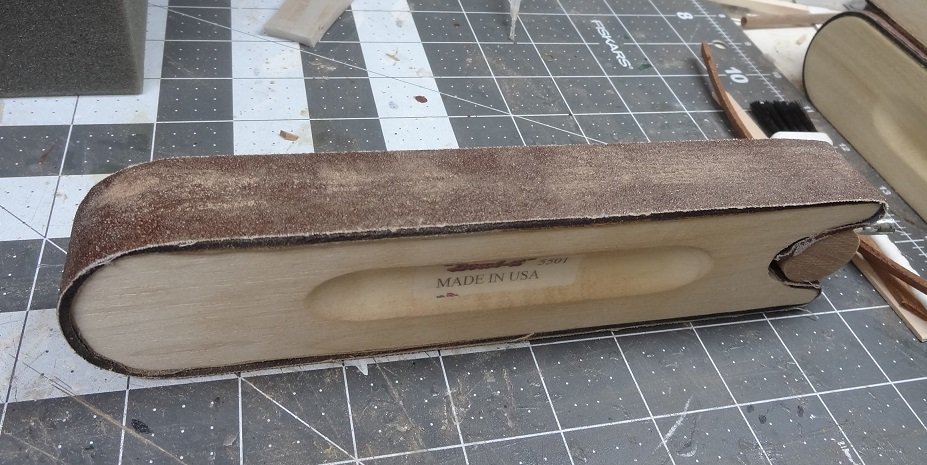
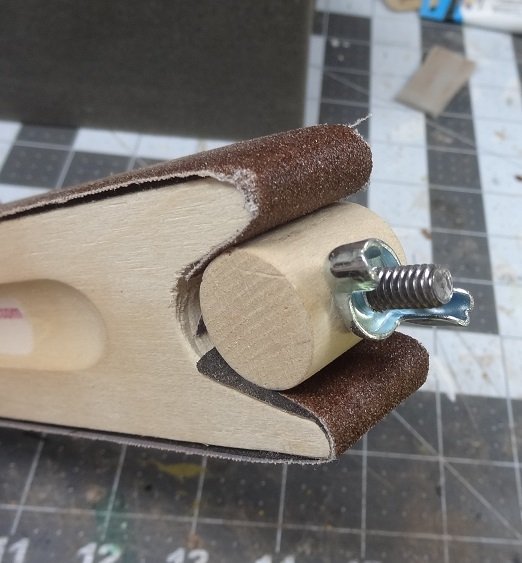
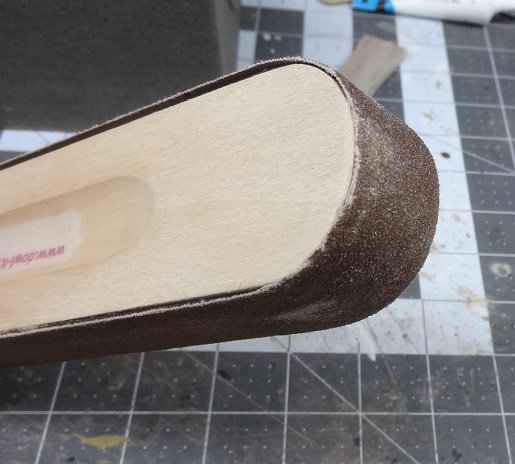
Today & yesterday was a mad rush to finish the hull. Just getting tired of it I guess. Ready to move on. And of course that opens the door to complacency. One of those "I coulda done it better if..." situations. At the end of the day, it's all going to be covered up right? I think the looks of the lime wood I had to use for wider planks (stealers) really steals from the aesthetics. It's all going to be covered right? There were quite a few sticks that cracked on me. I hit them with some runny CA and used them anyway. It's all going to be covered right? I haven't read the instructions far enough to know what will be done with the bow & stern. I imagine a stem will be added, probably a stern post. So as you will see those areas are still in need of some trimming. I have a big concern regarding the second layer. The sticks are 6mm wide, just like the first layer. As I have griped about in the past, they are pretty thin. I used 7mm sticks for the stealers (10mm would have been better). So I have nothing but 6mm sticks for the entire hull, stealers and all. If it was some other wood than the sapelli I could cut my own. I began using 2 new tools during the planking process. I don't want to sound like I discovered them - I didn't. I was just in need of a solution and these worked out pretty well. The first are those straight pin "clamps". After an initial struggle they turned out to be a real help as I tend to bend sticks around the frames, sometimes more than they want to go so something needs to hold them down while the glue sets. I had no problems sticking them into the frames - a complaint I hear about them some times. They were easy to insert and stay in place well. And they seem to be the only thing to hold a stick down in the middle of a frame. The second thing is your basic sanding block. I know for many a piece of 2x4 is good enough, but I never liked that. Never cared for the clamp on type readily available at the hardware store. This one is kind of a hybrid of the two. It's pretty big - I like that because it has some weight to it. For my size hand, it's very comfortable to hold. It has a good long flat surface as well as a few curved ones. It holds the paper very well. It even has some foam mounted to the block to keep the paper from sliding around. The one downside is it works best with their proprietary paper strips. While this could be a problem, I have found the supplied paper to be very long lasting. I'm still using the original strip and it's been maybe 5 weeks. I liked them so much I bought 2 more so I came have one for each of the grits I use. They came from MicroMark. I would recommend them but as always, your mileage may vary.

- 136 replies
-
- 6
-
-
- enterprise
- constructo
- (and 1 more)
-
jeez dude - can't you just find a premixed color that's ready to go?
-
Sorry to hear about the move Tom. There's nothing worse - with or without a shop. You're not moving out from that cold weather are you?
-
"If the rake seems off compared to the plan it is only because the plan is not hung level on wall. " I never thought of that excuse before
-
It's cool when me & Per post side by side. You get 2 T37 Avitars.
-
Hey Darrell - in the last photo there is a small rectangle - vertically about in the middle, horizontally to the far right - in the yellow band and it runs somewhat diagonally. What is that?
- 648 replies
-
- 1
-
-
- niagara
- model shipways
- (and 1 more)
-
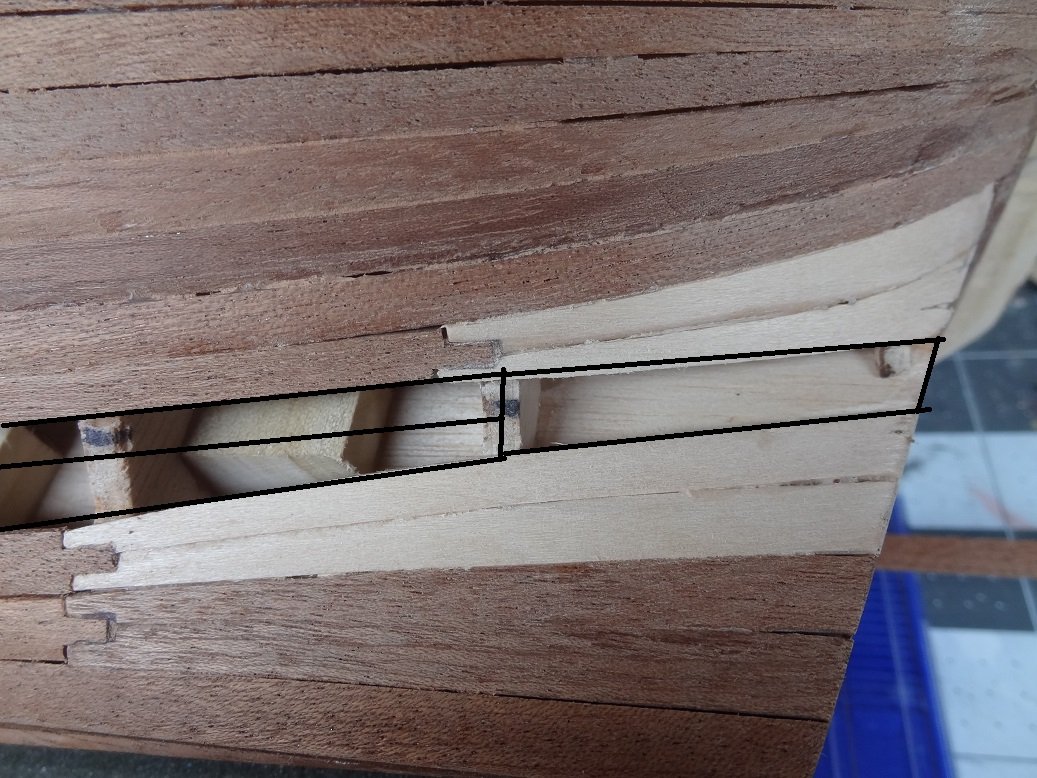
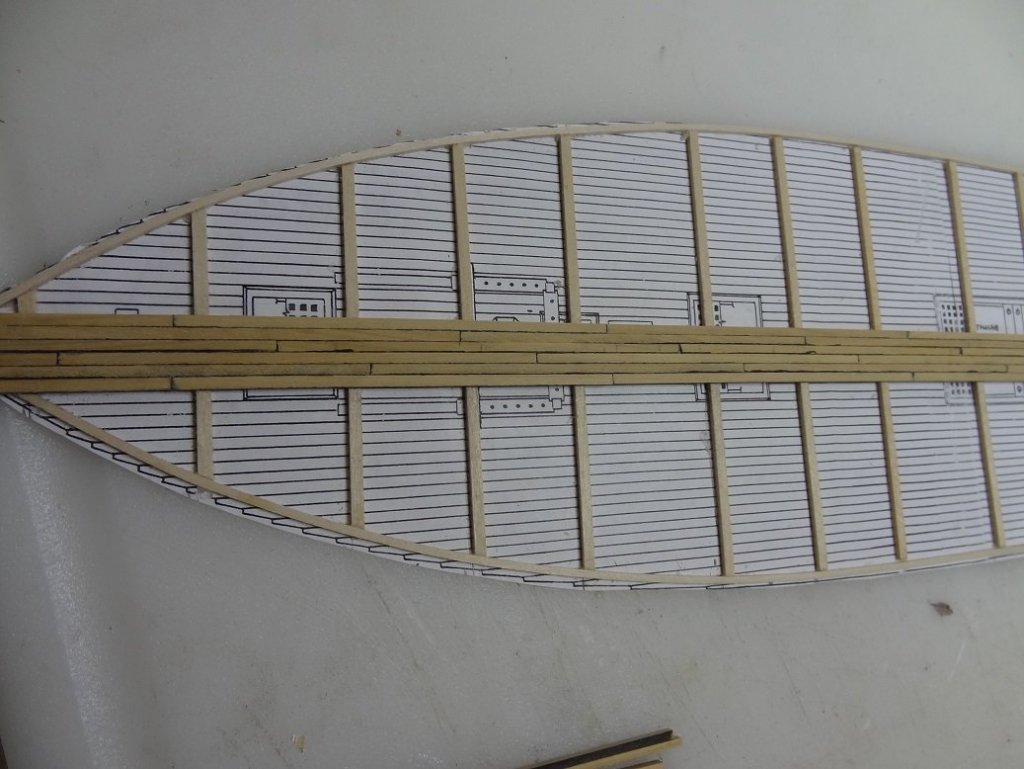
Getting closer. It took another 1 into 2 combination to get things in order. Now it looks like I will need a 2 into 1 to finish. I suppose I could just run 2 more strakes and narrow them a lot at the stern. More thinking to do.

- 136 replies
-
- 5
-
-
- enterprise
- constructo
- (and 1 more)
-
That would be minutes. A quick spray all over and you won't get near full coverage and that's fine. 15 minutes do it again. Lather, rinse, repeat. Start at one side, spray to the other and stop. Don't spray back & forth - you end up with build up on each end. RH right now varies 50%-60%. When an arctic front pushes thru maybe 30%-40%. Summertime try 80%-85%. The only thing you worry about then is if your sweat drips on it. I just brought the humidity thing up because a few months back it was cold & dry and I was trying to paint (aerosol can). Paint hit the surface and shriveled up and sure enough dried looking like an orange peel. Even funnier because it was orange paint. All you can do is wait for it to dry and sand it off. Spray cans usually have a warning about low temps & humidity. Like Per says, just do it. Use a few obscure parts, if it orange peels on you you will now know why and what to do.
-
That would be degrees. WHen paint or surfaces get cool you may start to experience the orange peel effect. This can be mitigated somewhat by the golden rule - spray extremely lite coats. BTW - if using acrylic, and youdo the lite coat thing you only need to wait 15-20 minutes between coats. Just remember it will look like crap until the 4-5 coat. By then everything should be covered. But keep going lite even after that.
-
Don't paint if it gets below 60. Did you order some of that retarder medium? I think that's the only problem you may have. The paint begins to dry in mid air and is a relatively hard ball of paint by the time it hits the surface. When it's real bad you can see the balls bounce off. If you don't have the retarder try moving the brush a little closer to the surface - less time in the air so less time to dry out. Almost all acrylic paint in bottles needs to be thinned for airbrush use. Plan for 8-10 VERY light coats. The first 2 or 3 will not even completely cover the surface. I find this terribly hard to do. It's a real exercise in self control. I assume you will be priming first? Everything described above applies to that also. A lot of times primer needs to be thinned drastically. Apply then sand with very fine grit abrasive. If the coat feels rough sand some more. Keep the brush clean. Don't let it sit with paint in it for very long.
-
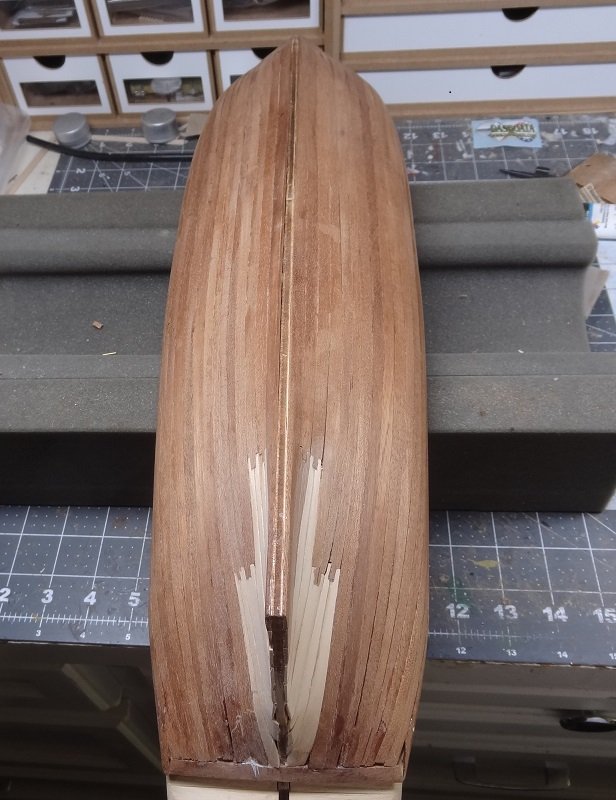
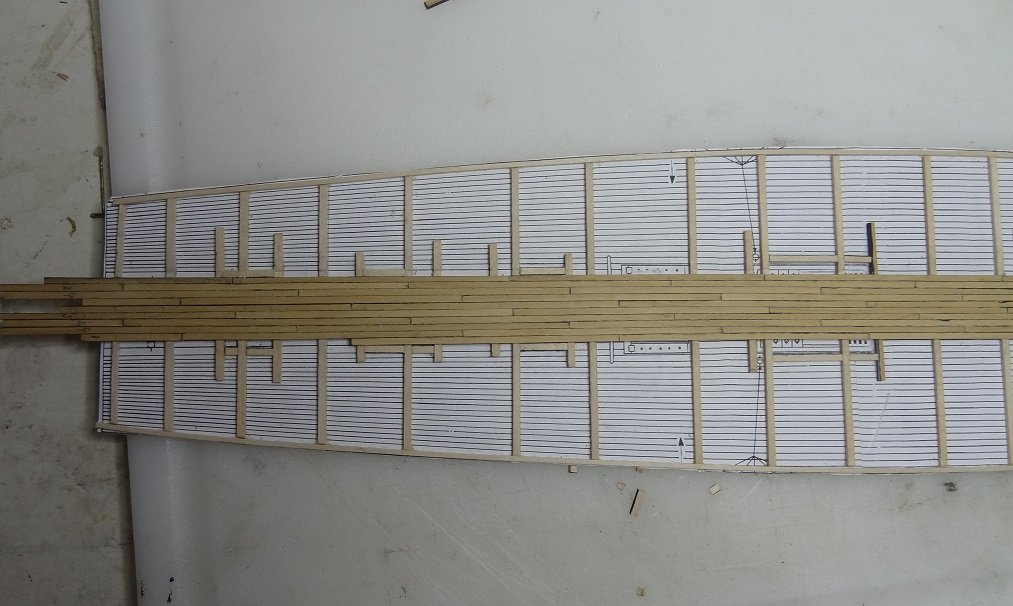
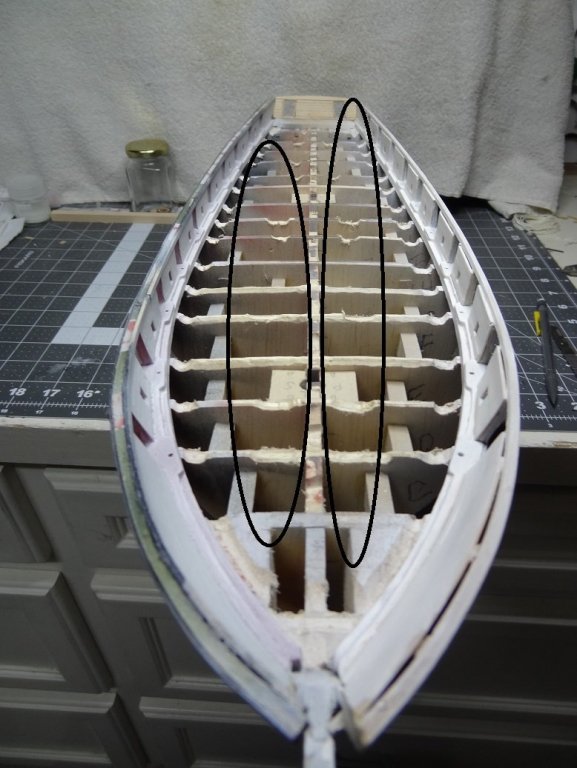
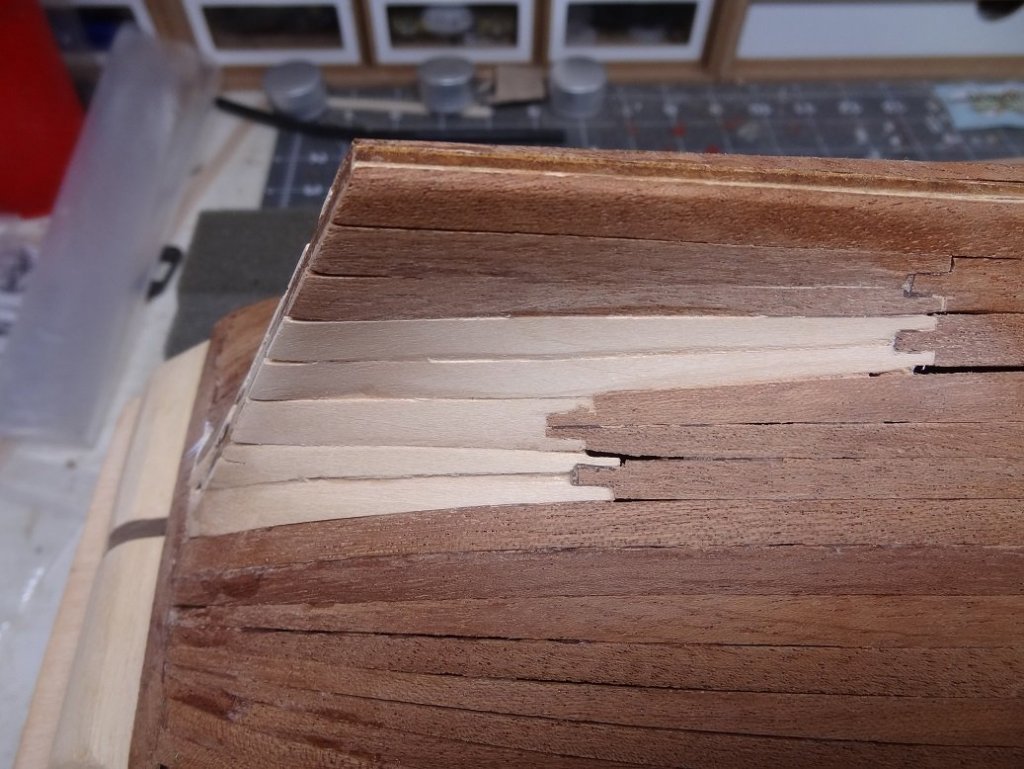
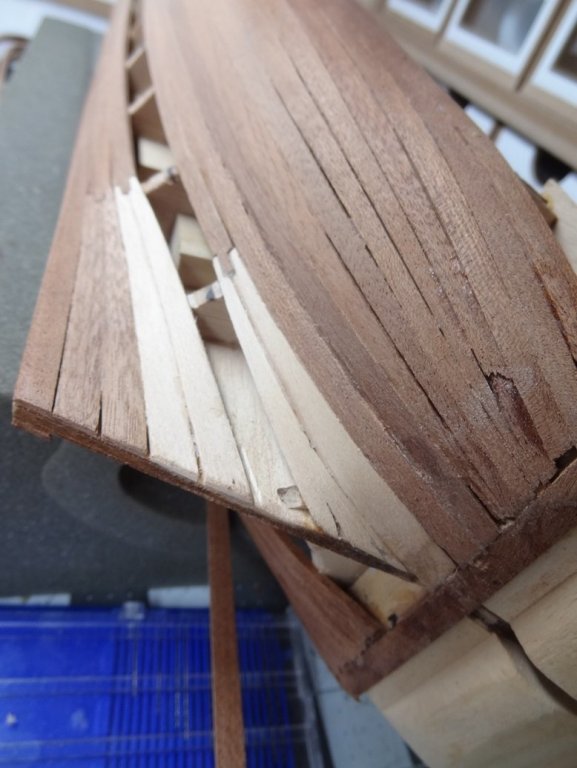
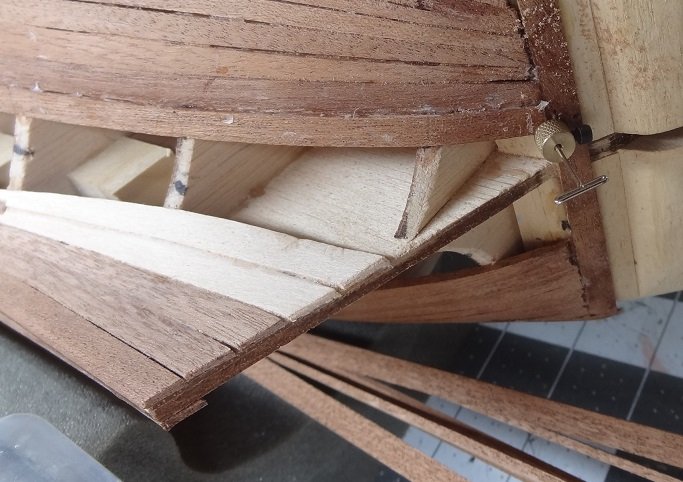
Thanks to all for the likes - I appreciate your interest in this project. As always feel free to jump in with any sort of comments you may have. No egos here, so if you see something you're not crazy about let me know. We can discuss out back Seriously all your opinions are welcome here. I finished the second set of stealers. As I mentioned I had to use lime wood rather than sapelli. I still haven't found that 7mm stick I was using at first. As the pix will show I need one more stealer to even out the spacing between the top strakes and the bottom. That doesn't sound like a big deal except that there is only room for 4 more strakes total and there is still a lot of frame to cover from the top down. With that in mind I am doing alternate strakes to finish out - one strake for the top band then one strake (plus stealer) for the bottom band. It's going to be very close. I suppose all this is happening due to the elevated deck at the stern. Frames & transom are farther from the keel than other builds I have done? I believe there was only a single stealer per side on my Niagara build, but it has no rear deck. Unfortunately there is no plank plan so I don't know how the "experts" at Constructo would have done it. All in all I think they're coming out OK. Probably even OK if this had been the only planking layer.

- 136 replies
-
- 5
-
-
- enterprise
- constructo
- (and 1 more)
-
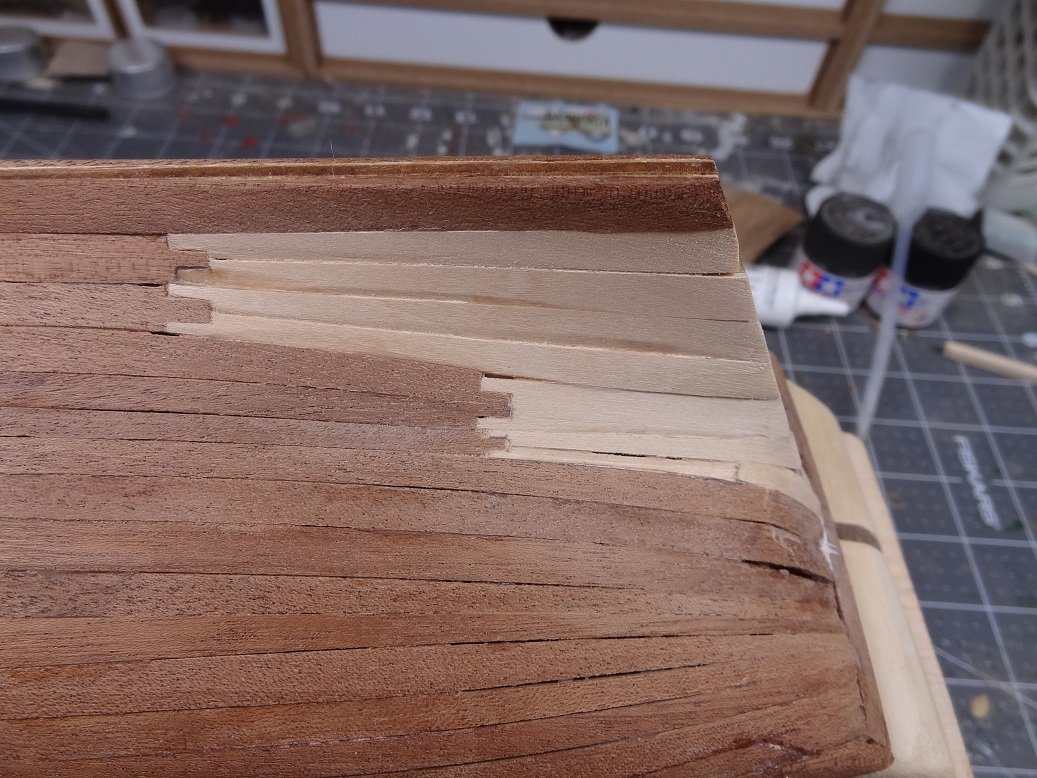
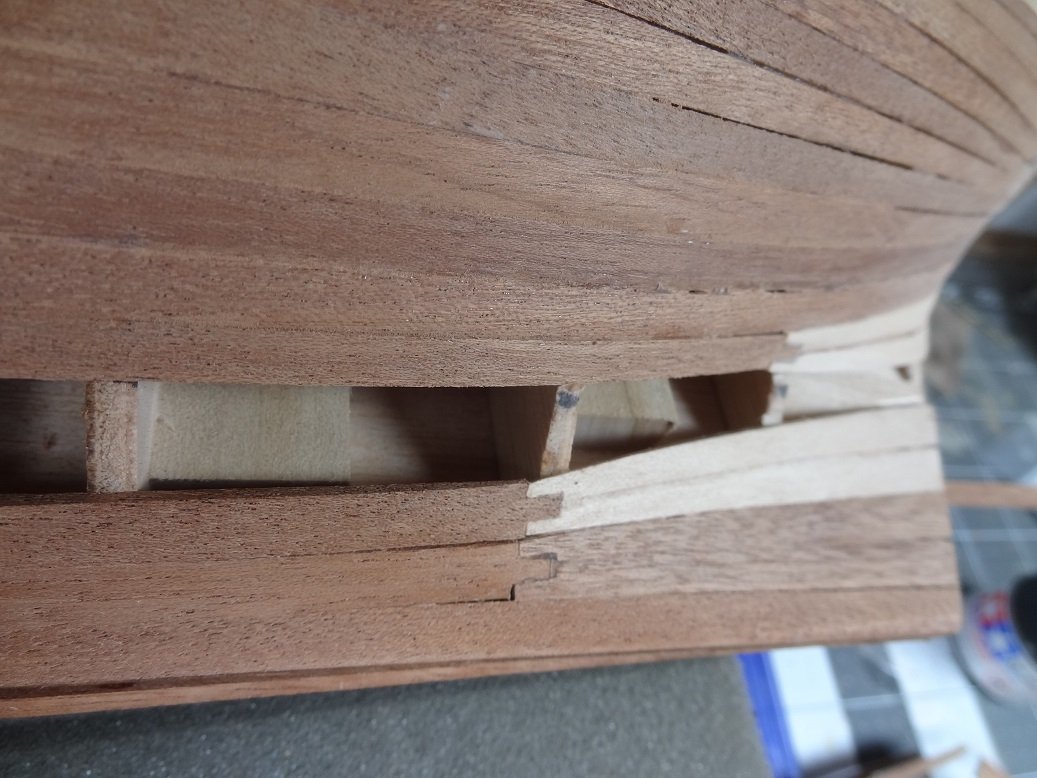
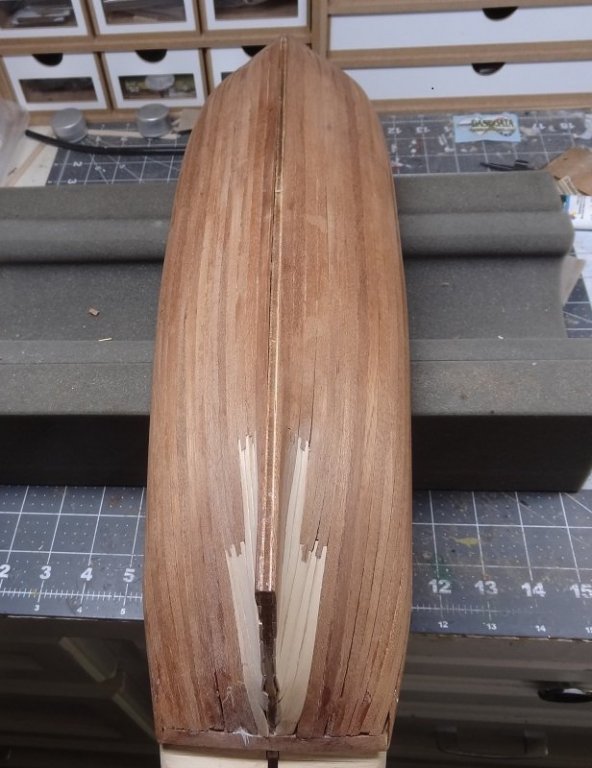
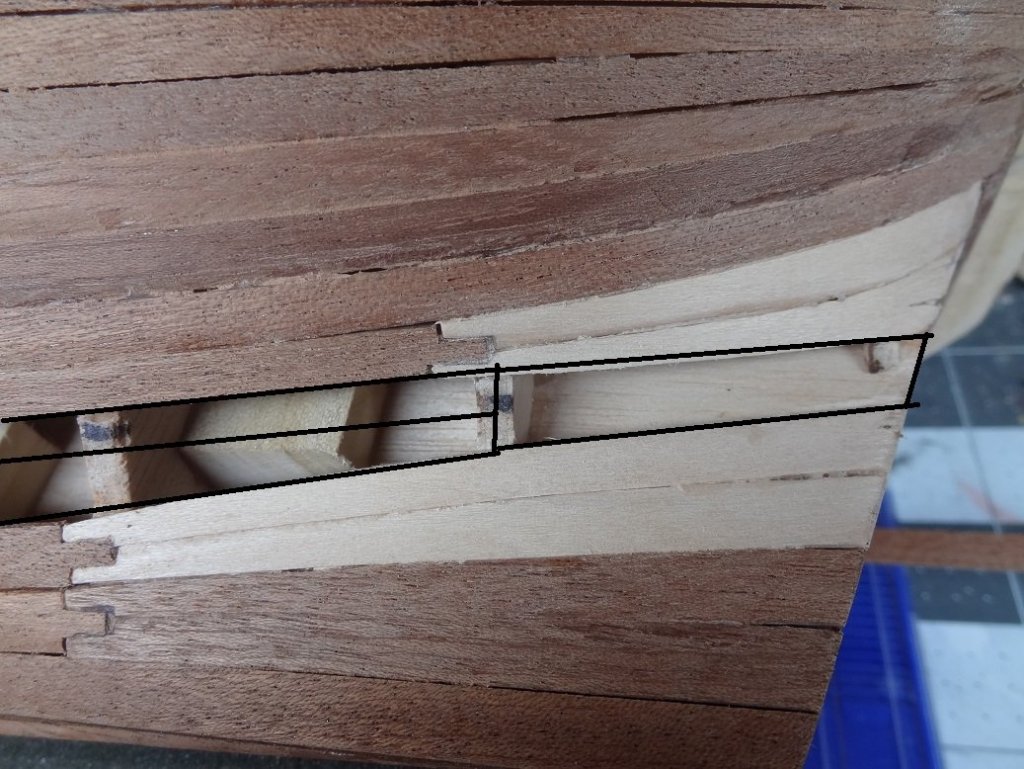
First two stealers came off pretty good. Regular planks are 6mm wide stealer plank was 7mm. So about 14mm at the sternpost narrowing down to 6mm at the 2nd frame where it meets the normal strake. Pix may show a little more clearly. As you can see I narrowed that gap some but not enough. It's going to take a second set of stealers, probably very close to the size & shape of the first. One huge problem, I can't find that 7mm stick - anywhere. That happened to be the only one I had. I found a 10mm stick in the kit - I could have shaved that down. But I imagine it has another purpose. I checked another kit I'm building, there were some 7mm sticks there but limewood. Who cares I guess? It's all going to be hidden anyway. So I'm shaping the next 2 from that. Laying those down on the deadwood it appears that I may even need 1 more after that. The could get problematic because doing some math: Space for 6 total strakes amid ship. 2 strakes used to fit the stealers leaves 4. One more stealer with a strake leaves 3 and I needed 4 to cover the last frame and hit that frame/deadwood joint. That doesn't work out. So now we're talking about a stealer up in the frame area. That was the one good thing with the 10mm stick. Two of those as stealers closed up that space perfectly. Everything would have fallen ito place.
- 136 replies
-
- 4
-
-
- enterprise
- constructo
- (and 1 more)
-
I believe you are correct Sam. It looked like walnut under the dim lighting, but it is a little redder and grainier than walnut. I stand corrected. And yes, sapelli has some shortcomings, but it's final look isn't one of them. With a good finish it is very attractive.
- 136 replies
-
- 2
-
-
- enterprise
- constructo
- (and 1 more)
-
What is the humidity running these days?
-
I'll go back and check Sam. I could have sworn it was. The box does sit in a rather dim area in the shop. I could be mistaken. Whatever it is it is thin.
- 136 replies
-
- 2
-
-
- enterprise
- constructo
- (and 1 more)