HOLIDAY DONATION DRIVE - SUPPORT MSW - DO YOUR PART TO KEEP THIS GREAT FORUM GOING! (Only 24 donations out of 49,000 members far - C'mon guys!)
×


mikiek
-
Posts
2,276 -
Joined
-
Last visited
Content Type
Profiles
Forums
Gallery
Events
Everything posted by mikiek
-
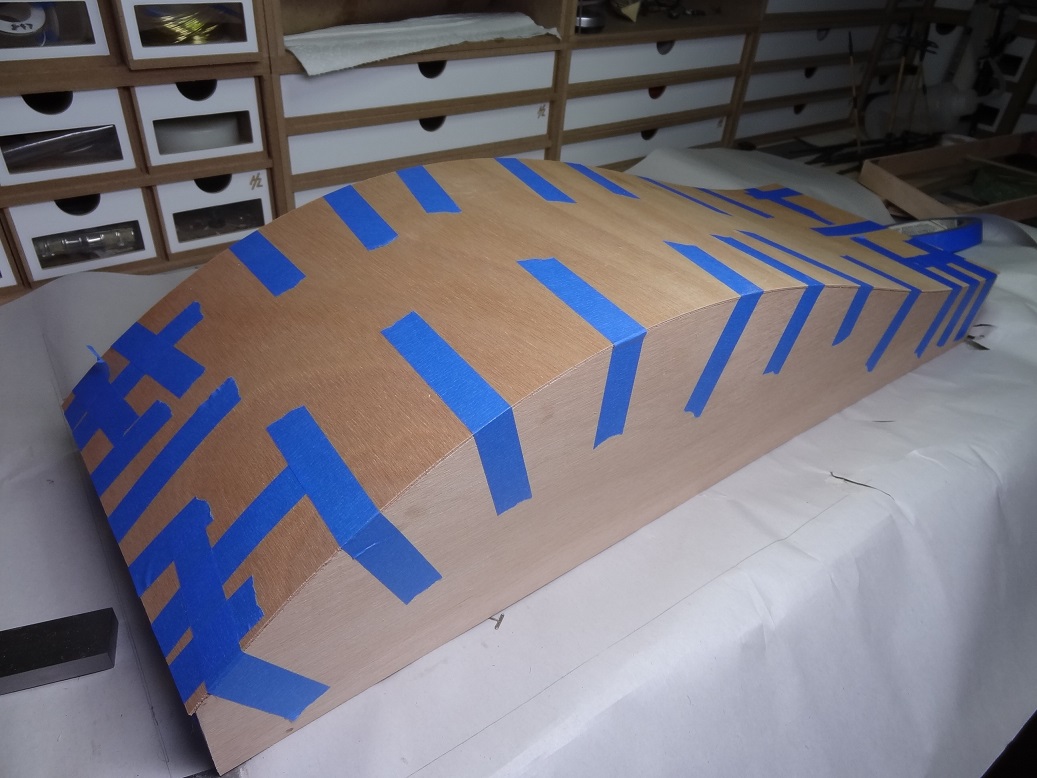
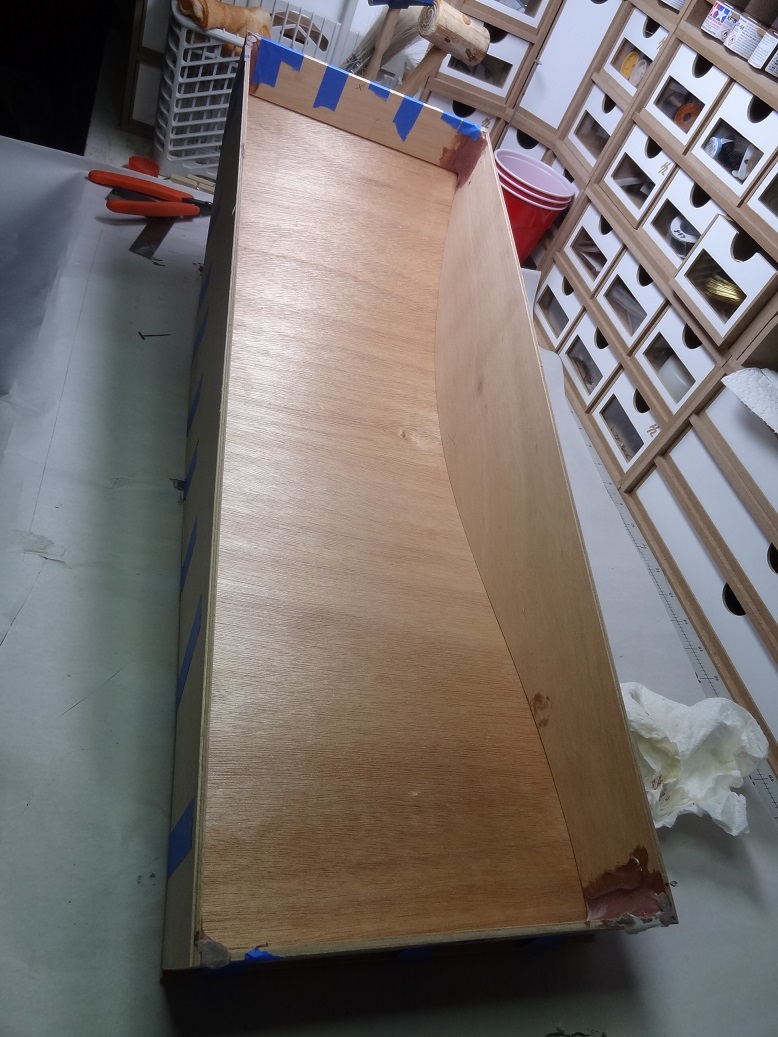
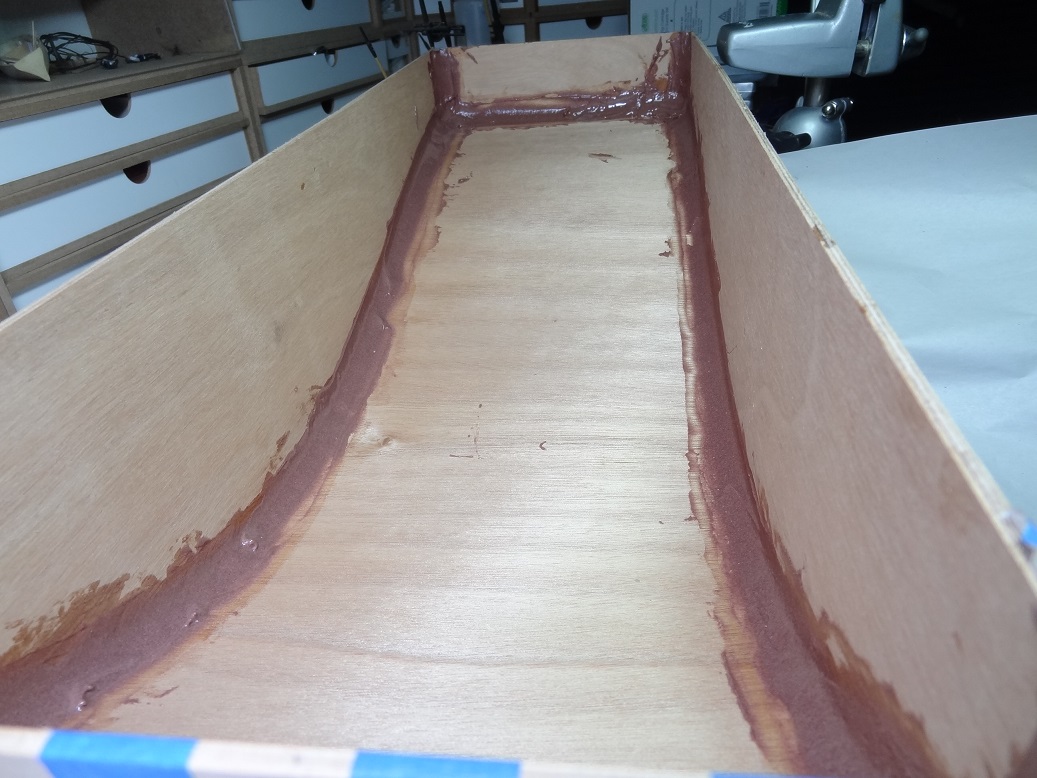
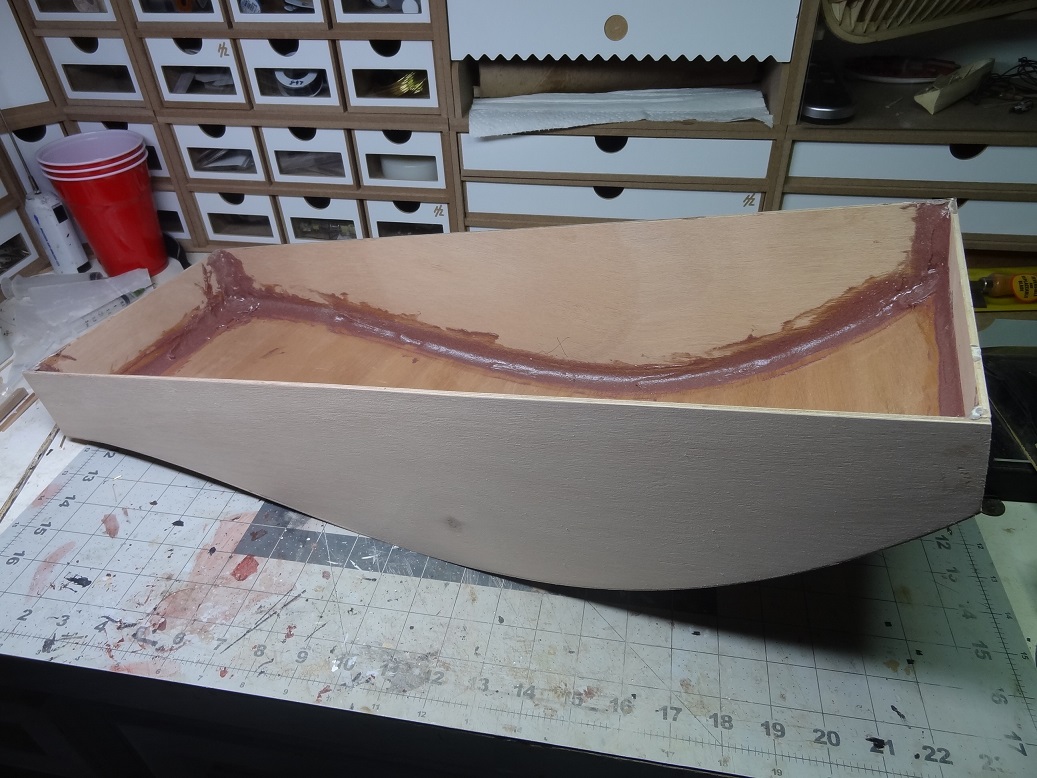
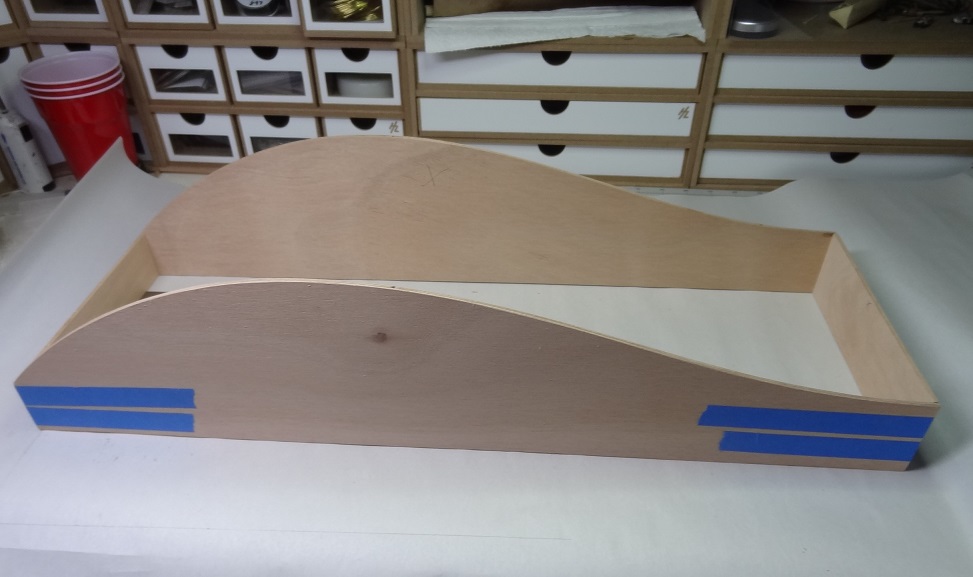
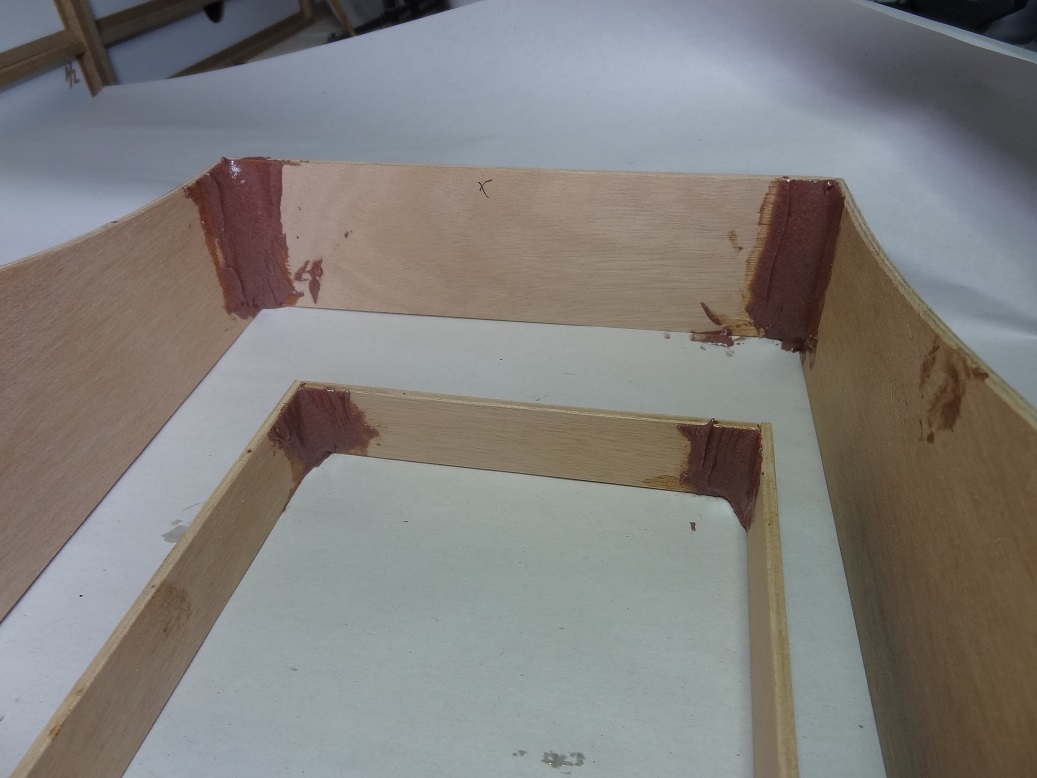
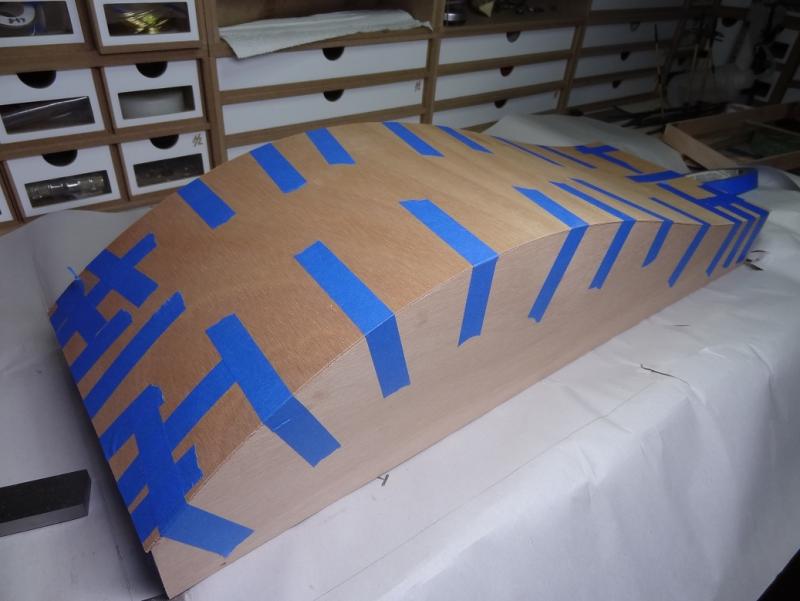
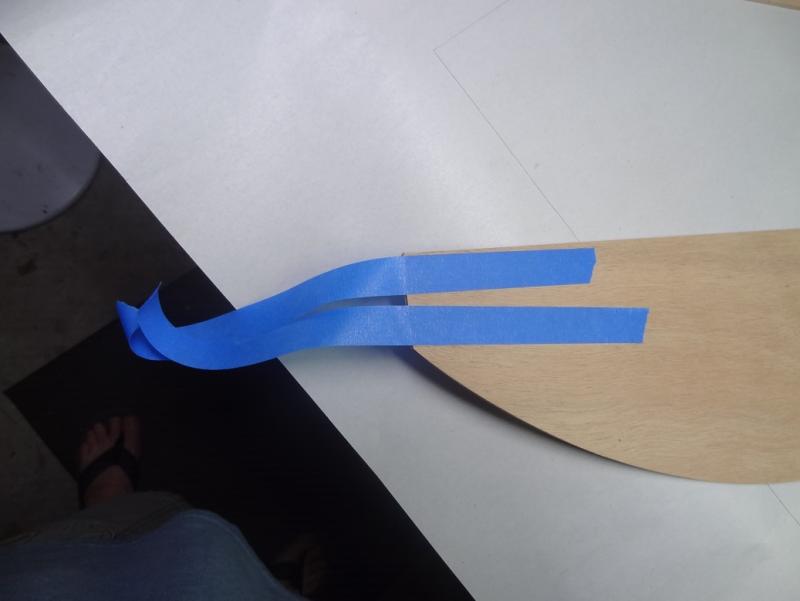
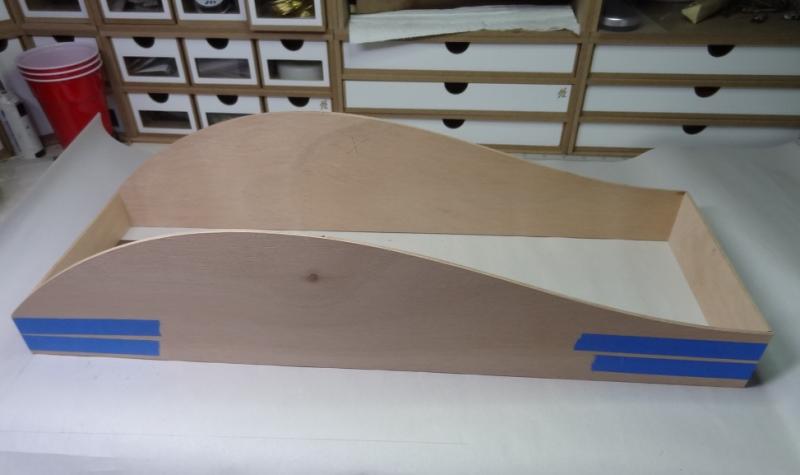
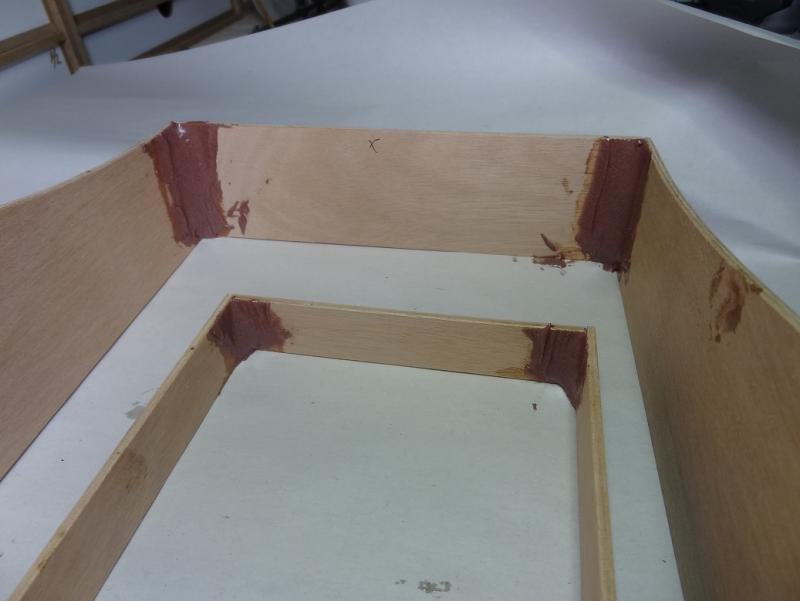
 Outer hull was completed today. Taped on the bottom last night but didn't feel like doing the gluing. This one was a little tricky. But first here's a pic of a joint from the first nights work. Epoxy is hard as a rock and you can see it didn't run or sag. Remember this joint was vertical when I applied the epoxy. Here's the hull with the bottom taped Gonna have to lay a fillet all the way around. Adding a piece to the lower cabin. I suspect this tug was designed more recently than the sailboats. I can see how the instructions have matured a bit. One thing they are doing is while a big epoxy job is the main step the instructions will say something like while your at it and have the epoxy out go ahead and glue these unrelated parts. I believe that's going to speed up this build. I promised I wouldn't repeat all the epoxy steps again. It was mostly the same - clear coat and then the thick stuff. The difference this time was the amount of epoxy required. As you may know epoxy doesn't harden or set from being exposed to air. The hardening is a reaction between the resin and hardener. A lot of heat is generated during the reaction. In fact a cupful of the mixture will get almost too hot to hold. Heat is part of the hardening process. If you want to help your mixture set a little faster you can hold it next to an incandescent light bulb for about 30 secs. The more you mix up in a small container the more heat is generated and the faster it will begin to set. For this gluing I mixed the largest batch I have ever used - 2 of them in fact. In these little plastic bathroom cups. The way to "beat the heat" is to get the mixture out of the container and on to the surface quickly. The heat then radiates out and is not contained by the cup and the hardening is slowed down. So I was slopping stuff everywhere and then went back to smooth it out and make the fillet. The result. Did that this morning and by this evening the epoxy was set enough so I could take off the tape. CAREFULLY! You can see here the tape (3m blue masking) pulled off some of the grain. Sanded down all the edges. Looks like the next few steps are building the cabin structure.
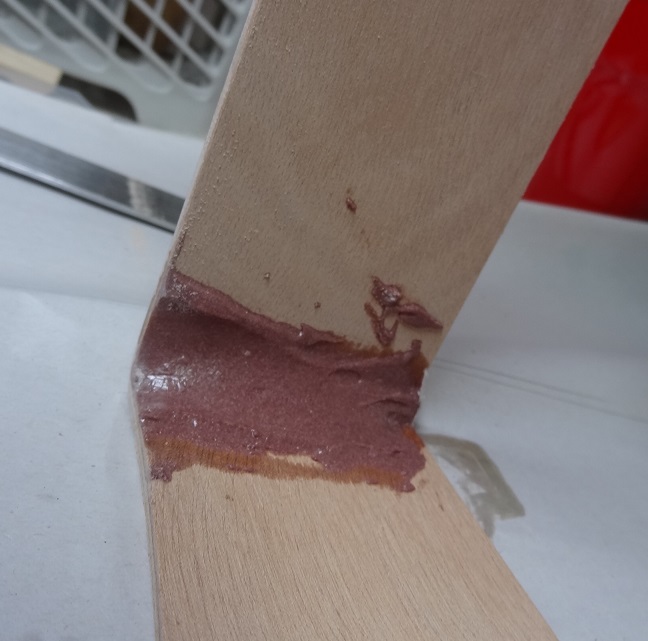


- 96 replies
-
- 6
-

-
- tugboat
- Tippecanoe Boats
- (and 2 more)
-
I hear you on the workload Bill. I'm sneaking this tug in after just completing one build and before starting another. The RC is a nice diversion, particularly building one. One other cool thing - I can get the tug build wet
- 96 replies
-
- 4
-
-
- tugboat
- Tippecanoe Boats
- (and 2 more)
-
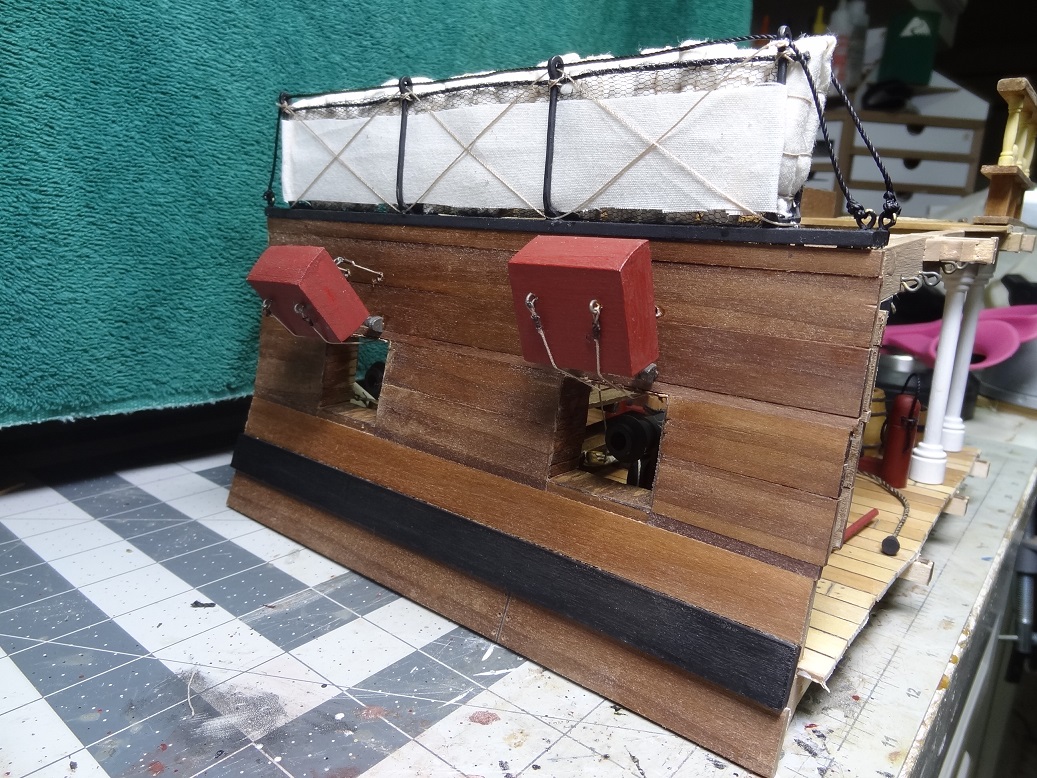
Tonight I came to the conclusion that I am making this hammock thing too complicated. I know what I want to do with the hammock setup and I know that would come in contact with the shrouds. Ya know what? WHO CARES? On a real ship it would be 20 lashes for something like that, but hey, I'm the captain of this rig and the shrouds will never wear out a hammock canvas on a boat that doesn't go anywhere. So there!
- 843 replies
-
- 2
-
-
- niagara
- model shipways
- (and 2 more)
-
Per - that would be so cool to go up there. I chatted with Will regarding the T37 quite a few times. He is always helpful and thorough. I will be talking with him again soon. I have my eye on that T50 trimaran but I need more information from him. Bill - as Per says, if you get the right thickness it doesn't sag. Interestingly with the T37 sailboat build there were a couple of places inside the hull that needed epoxy and you apply it so that it does sag down to an adjoining surface. The epoxy was mixed a little thinner for that. I checked the hull this morning and all the epoxy is right where I left it last night. Will has made 2 Youtube videos on the T37 build - almost 10 hours of instruction. There are great instructions on mixing and applying the epoxy. That's where I picked up most of my knowledge. He's a real wizard with the stuff.
- 96 replies
-
- 3
-
-
- tugboat
- Tippecanoe Boats
- (and 2 more)
-
Thanks Don. It was a fun build. I love that big scale. Even my fat fingers can handle it.
-
Thanks Carl. That's one of the reasons for the log. It's a pretty simple design but all the epoxy work is quite different than what most of us usually do. I've learned a lot of new do's and dont's regarding epoxy. When I start my next model ship It could come in handy. Grant welcome aboard! Rescue was a big reason for me doing this build as well. I went out this morning to check the hull. The epoxy is not quite cured completely but it's already solid as a rock.
- 96 replies
-
- 3
-
-
- tugboat
- Tippecanoe Boats
- (and 2 more)
-
Wow - small world Per! My hull number is 2815. There is a club in town but they seem to be mostly retired and sail during the week. I'm the only T37 owner among them. Also I live out in the sticks on a big lake and can walk one street over and drop her in the lake. So it's kinda tough to get motivated to drive in to town. This tug construction seems to follow along the same principles as the T37 so I'm hoping to knock it out fairly quick. I've had my eye on the Tippiecanoe trimaran But I'm already running out of space for the fleet, various rigs, etc. But it would be cool to watch the thing up on only one hull just screaming down the winward run. I'm glad you stopped in.
- 96 replies
-
- 3
-
-
- tugboat
- Tippecanoe Boats
- (and 2 more)
-
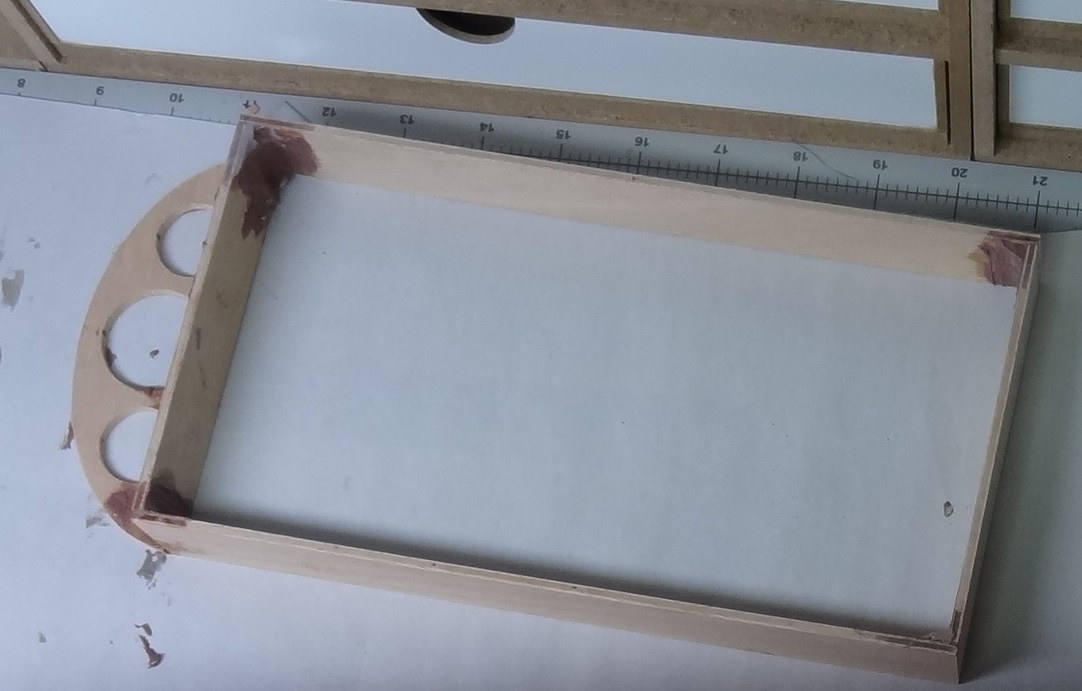
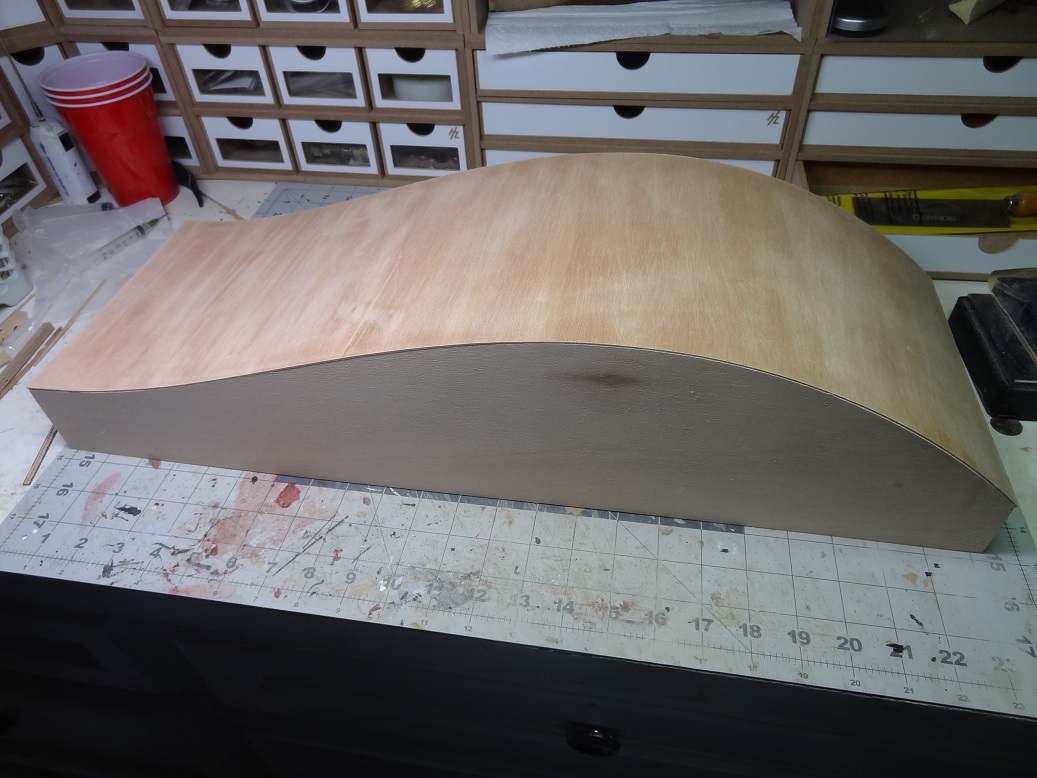
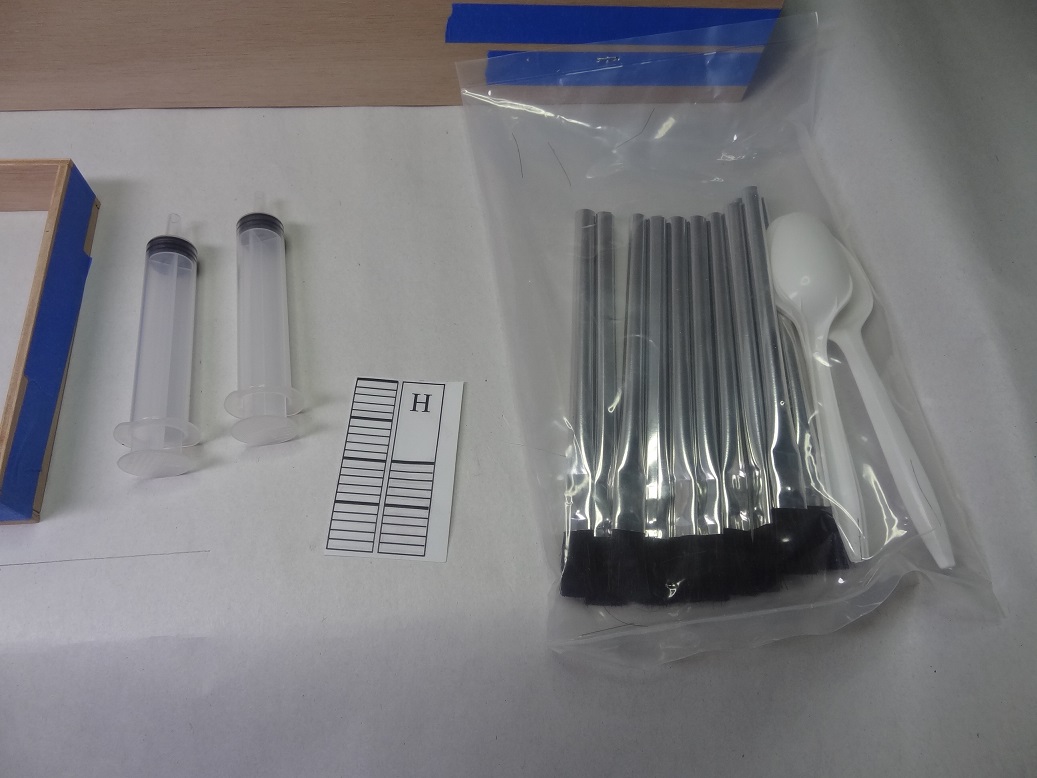
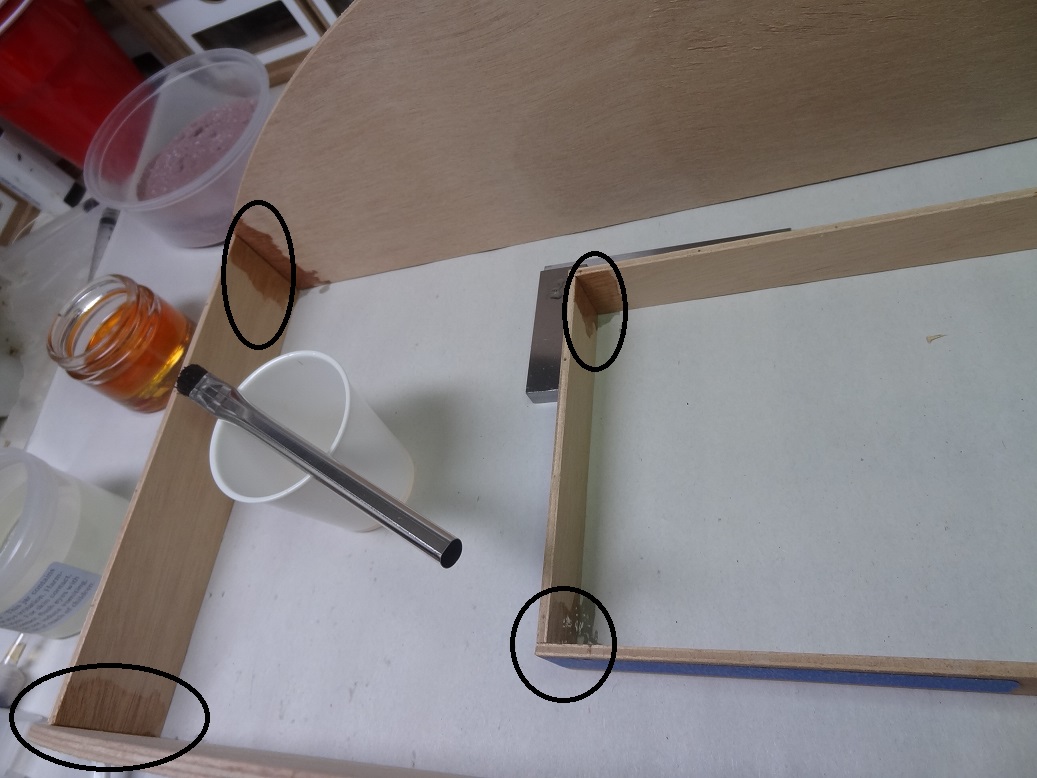
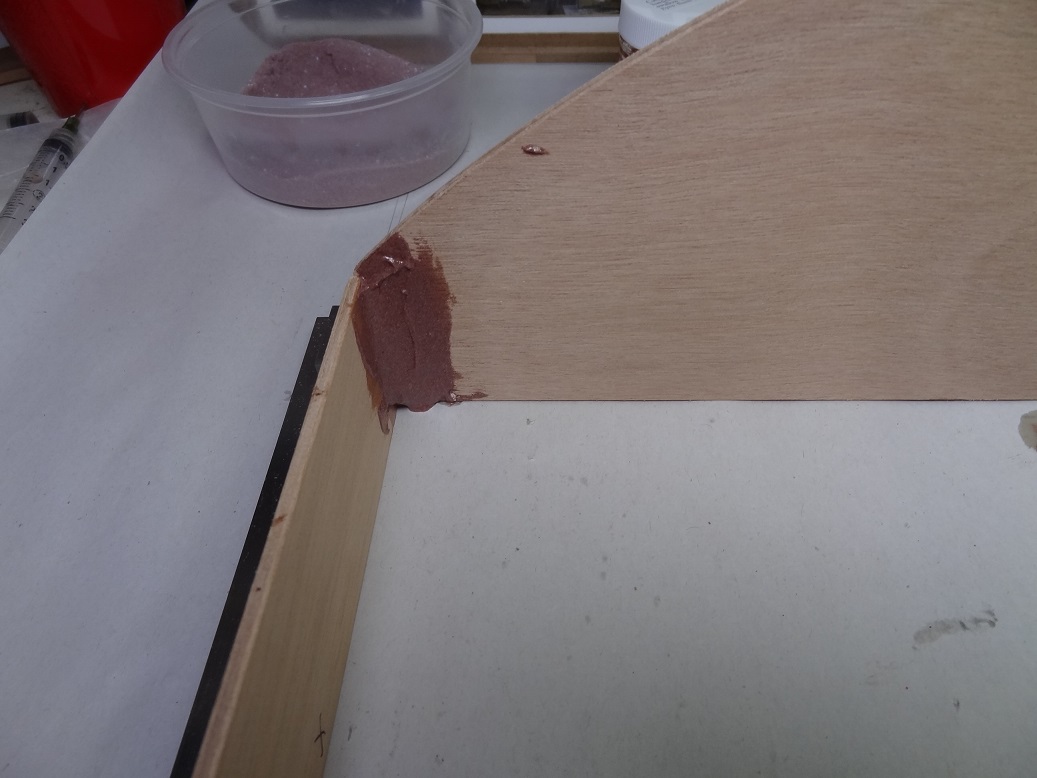
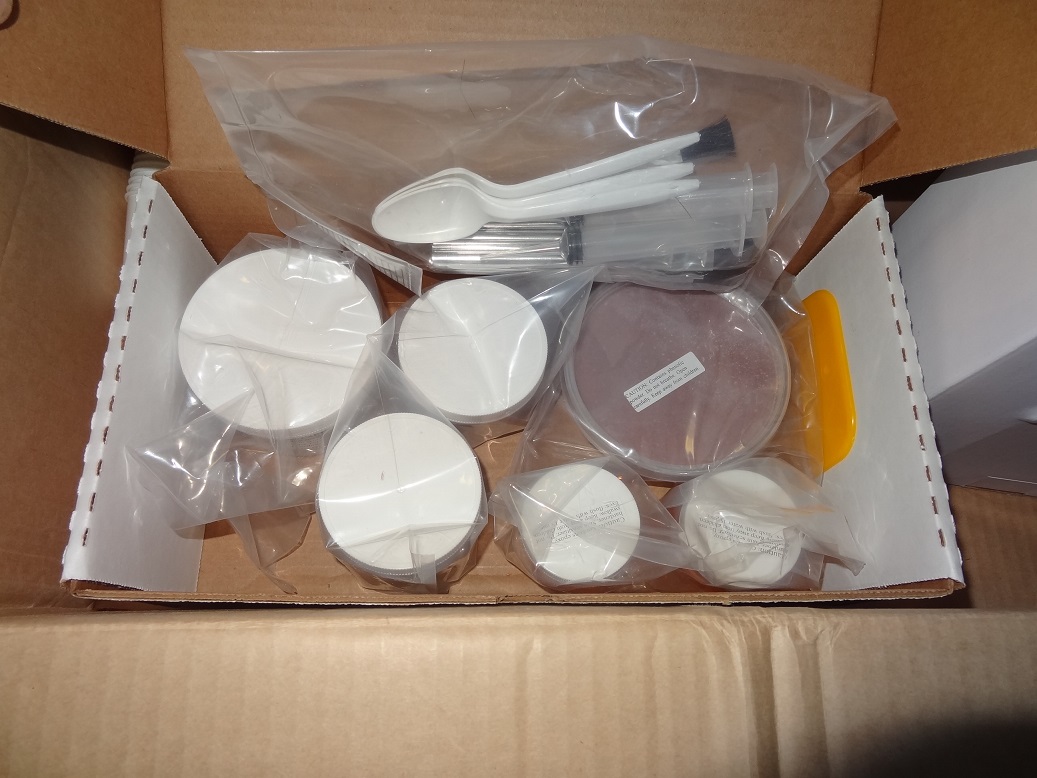
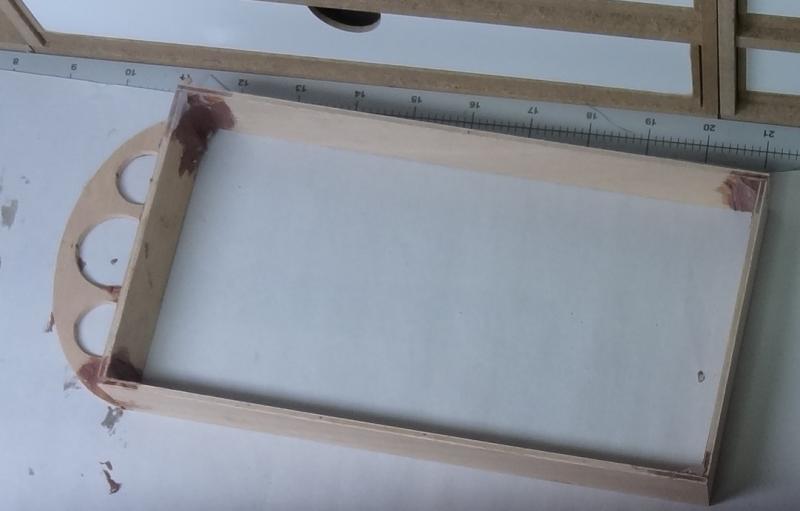
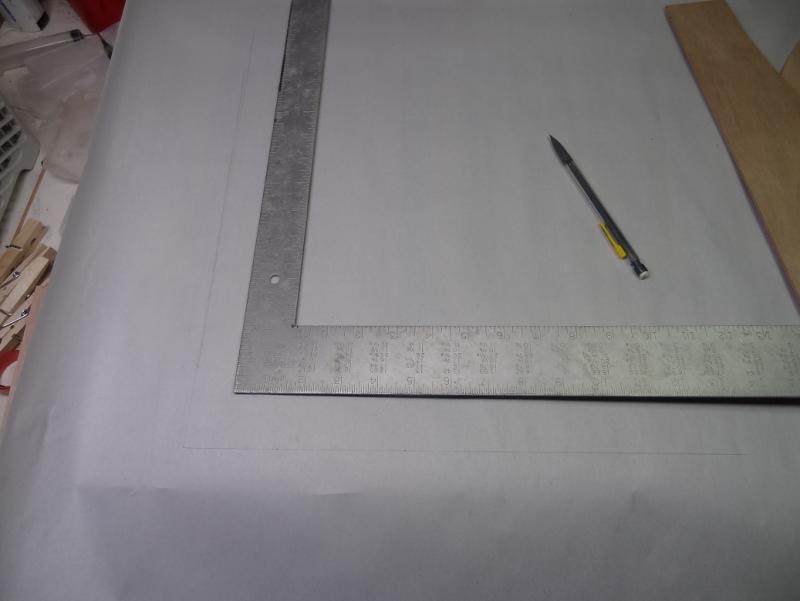
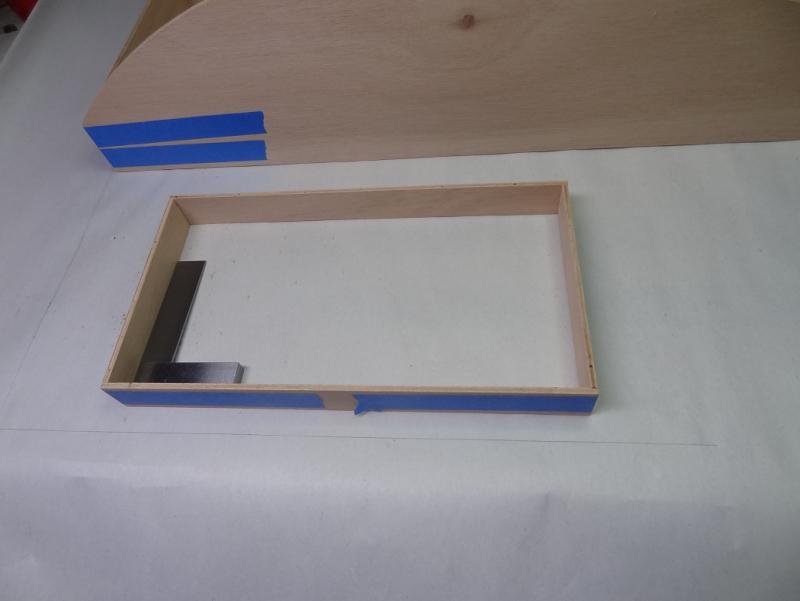
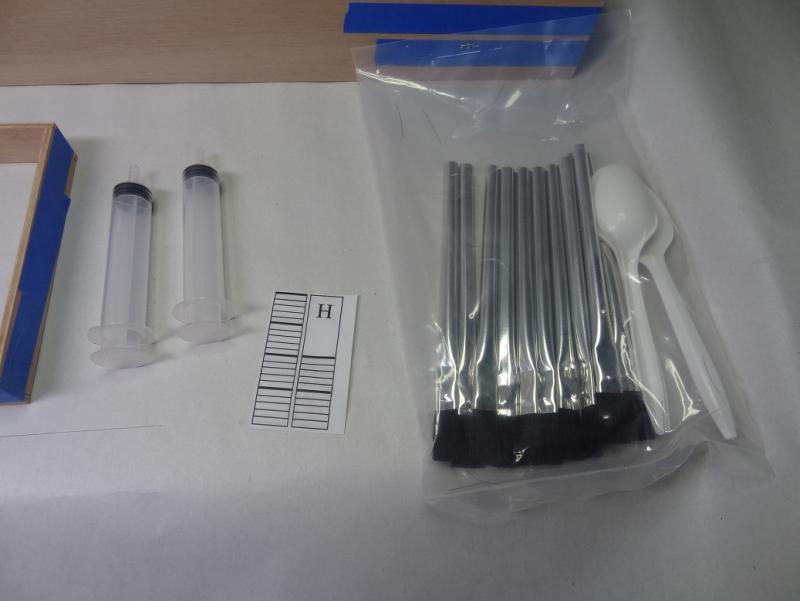
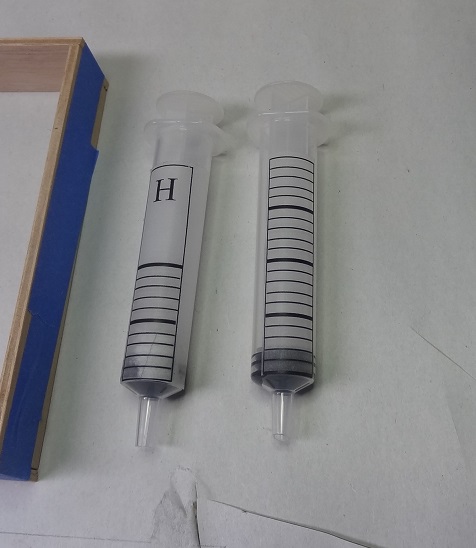
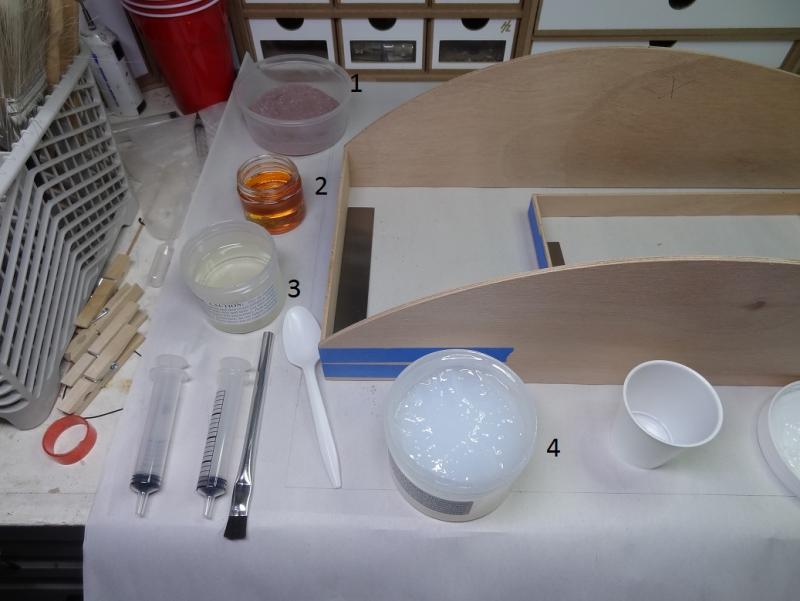
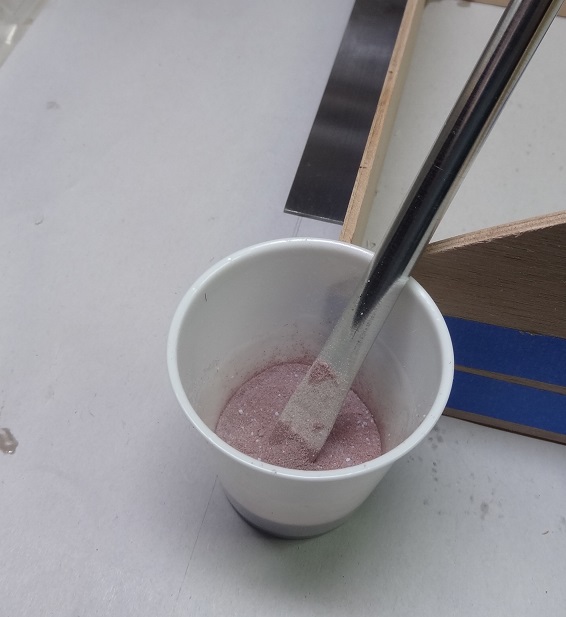
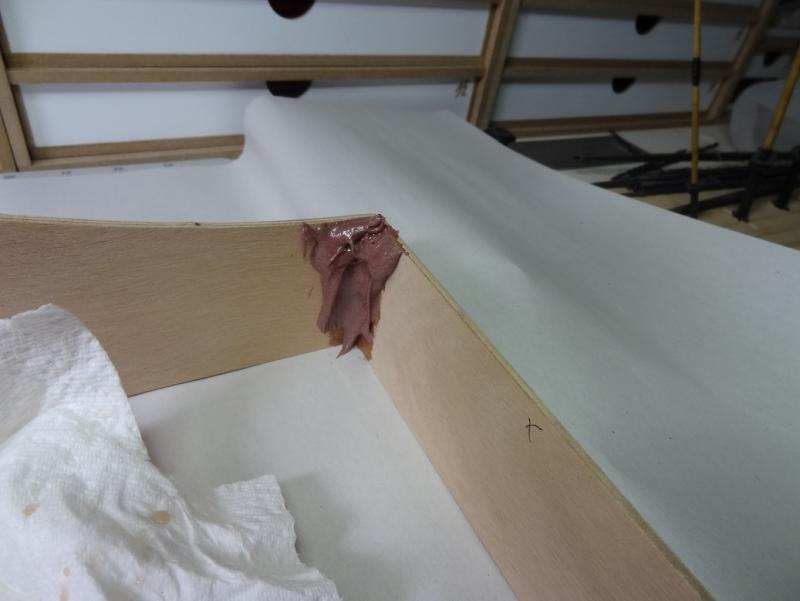
I got a decent start on the build this evening. Epoxied the hull and lower cabin parts. Gotta wait for the to dry now. This was the first 4 steps of the instructions. What I like about them is you first get a good explanation of what you are about to do and then an explanation of how to do it. Here are the parts - laser cut. A little sanding required. For some reason this wood really smells good when you're sanding. They even supplied some work paper the instructions saying to put plastic under the paper if you are working on the dining room table. I'm fortunate to have a work bench I guess. I still used the paper. The idea here was to draw a square corner for a guide. I ended up using machinist squares instead. The parts are taped together on the outside Now comes the fun part. Gluing all this together. Will is very serious with his epoxy - he has a system. Even down to supplying measuring decals for the syringes. So here's the materials - 1 Phenol powder used for thickening; 2 Hardener; 3 Resin; 4 Pre-thickened resin I will be using a thickened epoxy in a bit but before that you mix a small amount of regular resin and hardener together and paint that on the joints. This mixture is the consistency of syrup. The idea here is that the thickened epoxy will not bond well to the wood grain so you do a quick "wash" with the thin stuff. That gets into the wood better and the thick stuff will bond with the thin stuff. Pretty smart . This wash is called clear coating. One thing I learned epoxying the sailboat is to wear gloves. The epoxy is not caustic but it is really difficult to wipe off if you get it on your hands. Then everything you touch leaves fingerprints. Now I'm mixing up a thickened epoxy. I'm going to be applying it to the joints (which are standing vertical) and we don't want the epoxy to start sagging while it dries. This is the thickening powder The common description in the instructions is creamy but not drippy. The test is to pull up a brush full and hold it for 30 seconds. If it sags at all add more powder. Slather on a good helping to each joint. Then using a plastic spoon (also included) smooth out the epoxy to make a thick fillet. The final result I promise I won't get this detailed again. A lot of the gluing steps are the same as this - clear coat then thick stuff. I just found it kind of interesting and thought I would share - all the theory behind what you do. Especially since the only expoying I have done is dabbing the 15 minute stuff here and there. Will actually made a 24' sailboat from plywood and epoxy and did a trans-atlantic voyage in it so you know it's sturdy. Later...


- 96 replies
-
- 6
-
-
- tugboat
- Tippecanoe Boats
- (and 2 more)
-
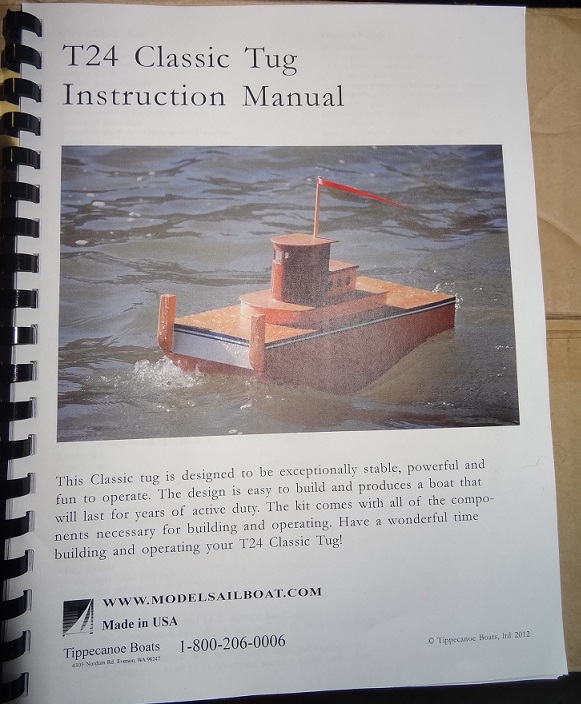
Per thank you. The kit is 1:23. The footprint is 10"x9" and 7" tall. Many thanks Joel. As always your input is appreciated.
-
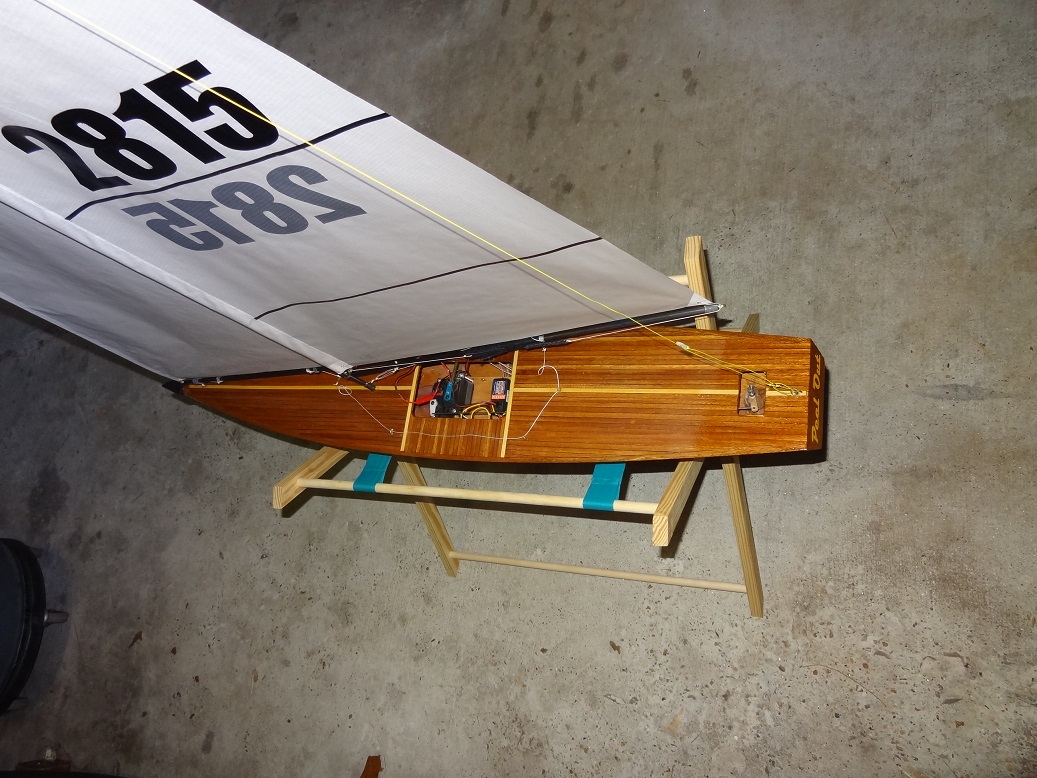
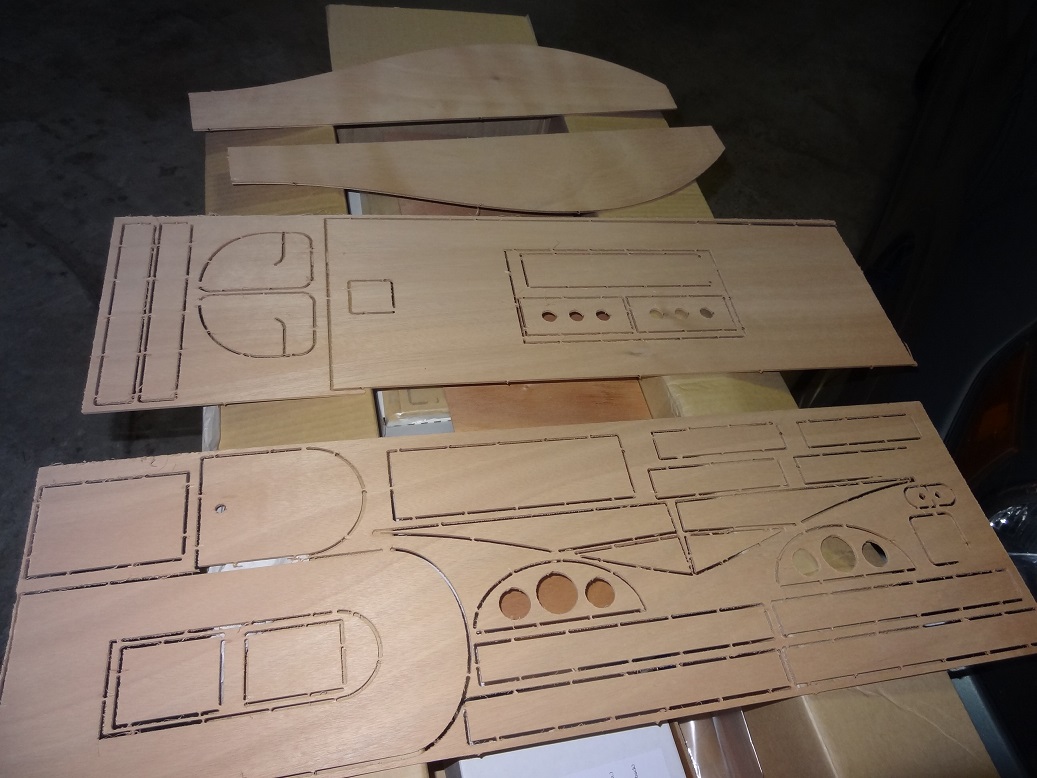
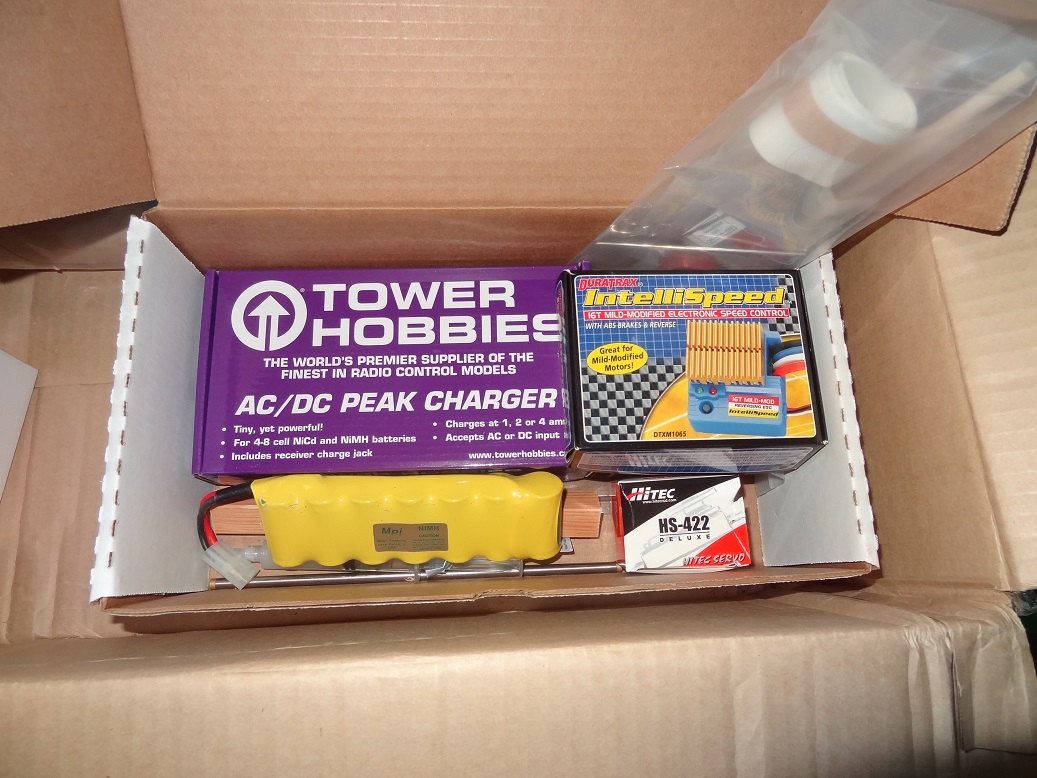
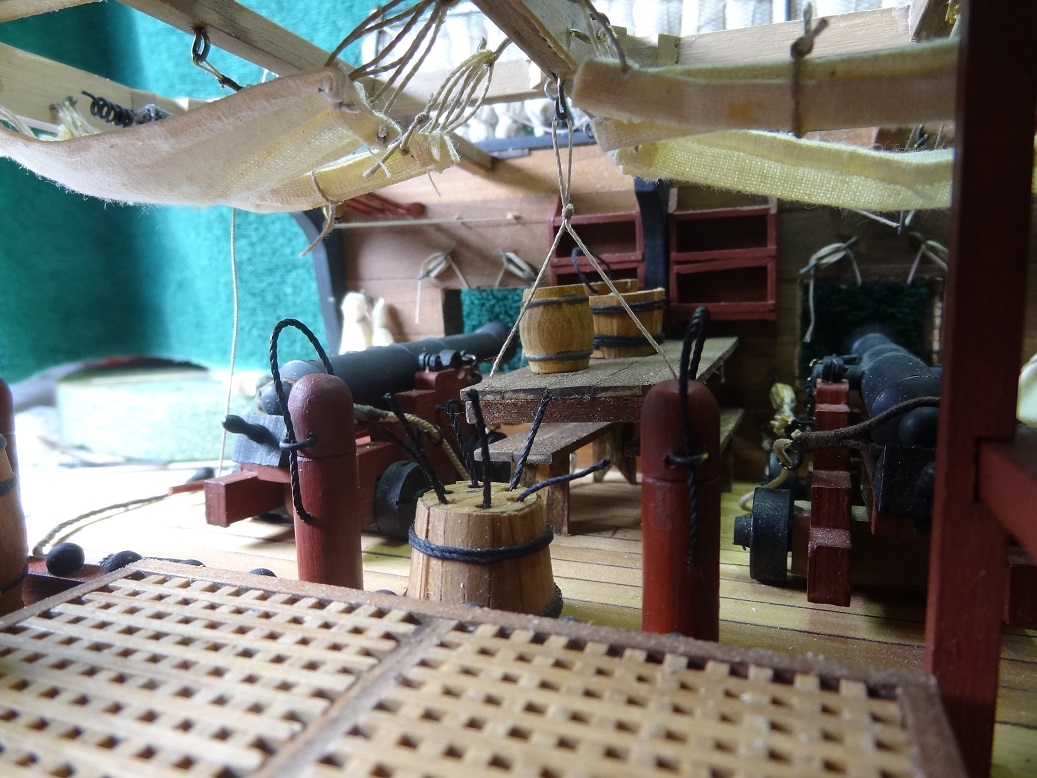
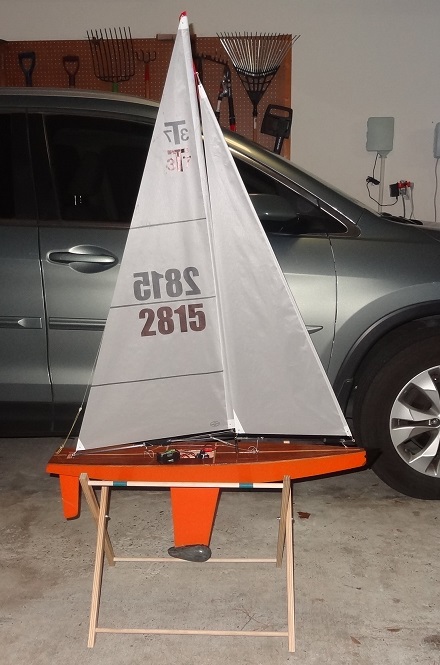
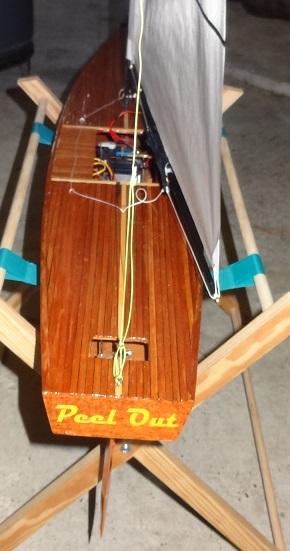
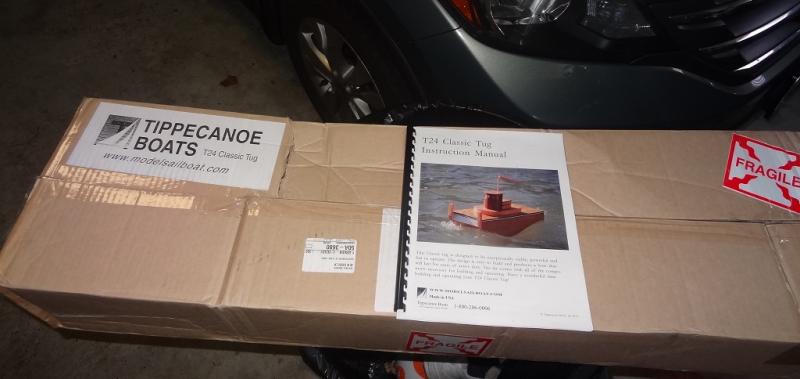
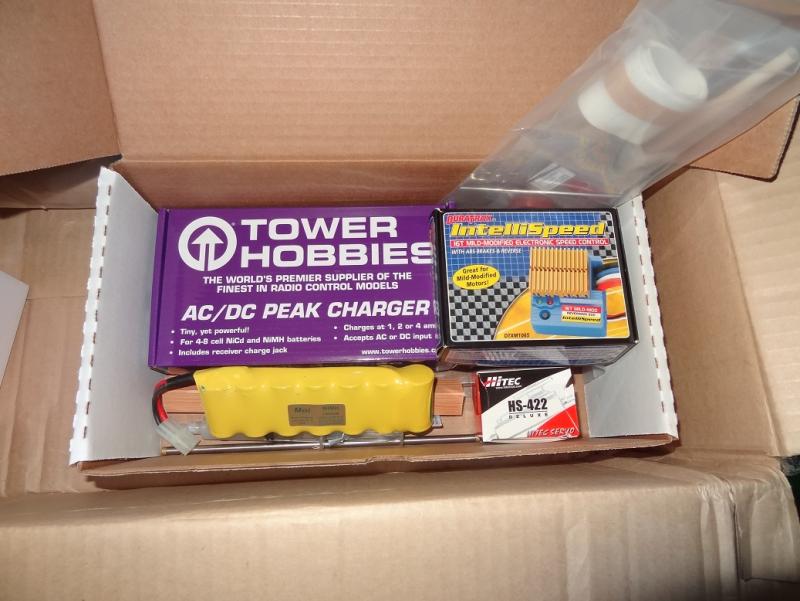
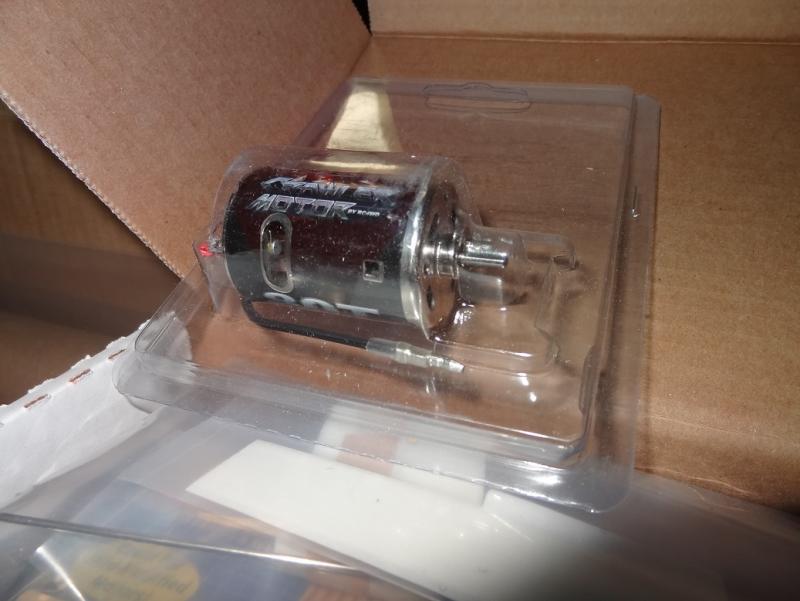
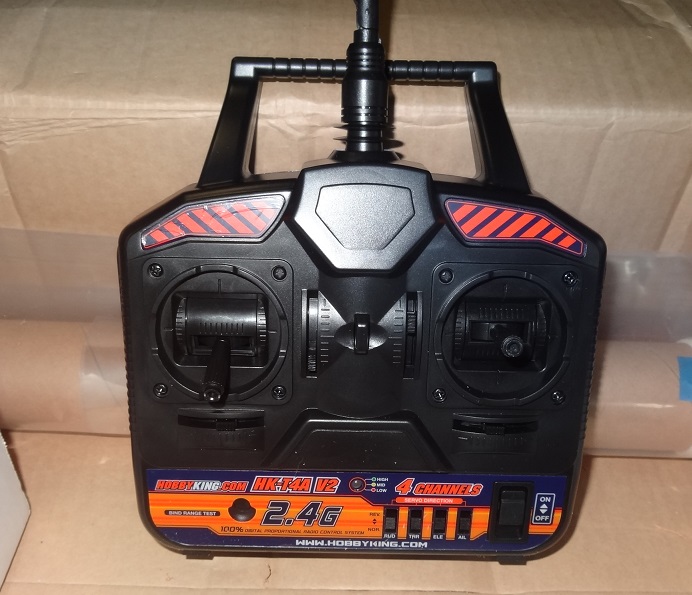
I posted a question on the Questions forum and everyone seemed OK with me doing a log for an RC tugboat. So here goes. The kit is made by Tippiecanoe Boats out of Washington state. The owner, Will Lesh, designed all the models for sale there. They focus primarily on RC sailboats. Will is a good guy and almost always available by phone for questions. You can't beat that. I have already built one of their RC sailboat kits. I had the itch for one and it seems like you can either buy one RTR (ready to run) or build one. Given what we do here, building one seemed the natural choice. I did not do a log for the sailboat but here are a few quick pix. Yes it's really that big - 37" in length and a little over 5' tall. Does the decking look vaguely familiar? Both the sailboat and tug kits are made from top quality materials. Deck & hull parts are marine grade ply with a mahogany veneer. Marine epoxy is used to fasten all parts. Instructions are extremely detailed. It comes with everything needed to complete the model except paint & varnish. That includes the electronics, epoxy and additives. The tug is not a rendition of an actual boat, rather just a generic model. The looks are pretty basic. So why in the world would I want to build this kit after building highly detailed models? Mostly because I need it. I live on a big lake. Several places where I sail the RC are open water. If something were to go wrong with the sailboat, it would be a long swim to get it back. The water is pretty cold right now - even in Texas. The tug has a rescue arm - a big hook that can snag a disabled boat and haul it back to shore. Also, people race the sailboats. That's usually several floating markers out on the water that the boats sail around. The tug can be used to drop the markers. Lastly, I'm sure it will be fun just motoring around Normally I wouldn't post pix of the kit - we've all seen them right? I'm guessing not too many have seen this one so here are a few. Very detailed instructions including 3 pages on how to use the epoxy. More on that in a sec. Some of the plywood parts The electronics. This kit even included a battery pack & charger in addition to the servos. The epoxy kit. This stuff is way different than the 15 minute stuff we use. Mixing the resin & hardener produces something about the viscosity of molasses - it's self leveling. In fact it is used to "clear coat" the wood in some areas. If you want it thicker (and you will for some applications) you add a thickening powder to the mixture. Needless to say I learned a heck of a lot about the correct way to use epoxy while building the sailboat. The motor RC controller. So there it is. I plan to begin the hull this evening. If I'm lucky this will take about 6 weeks to build. The epoxy slows down the process somewhat. It's not CA - it takes overnight to dry so there is some wait time involved. Thanks for reading!


- 96 replies
-
- 9
-
-
- tugboat
- Tippecanoe Boats
- (and 2 more)
-
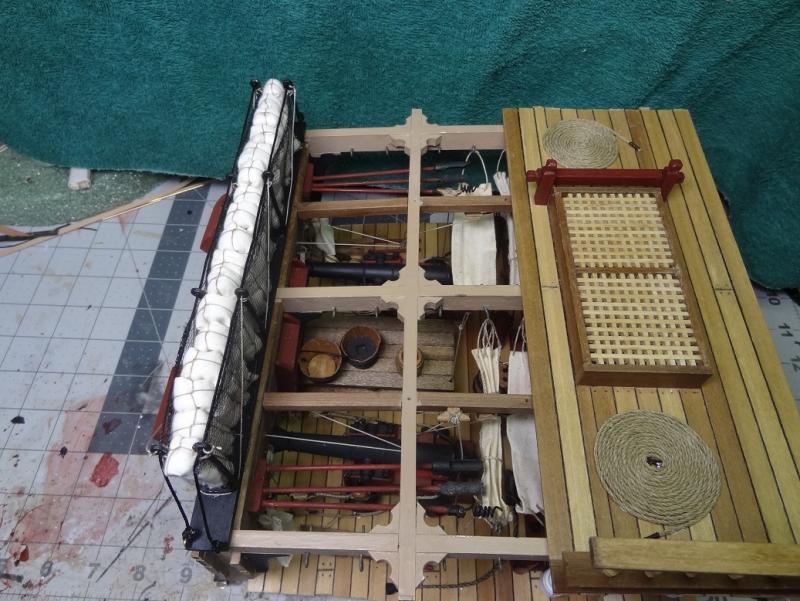
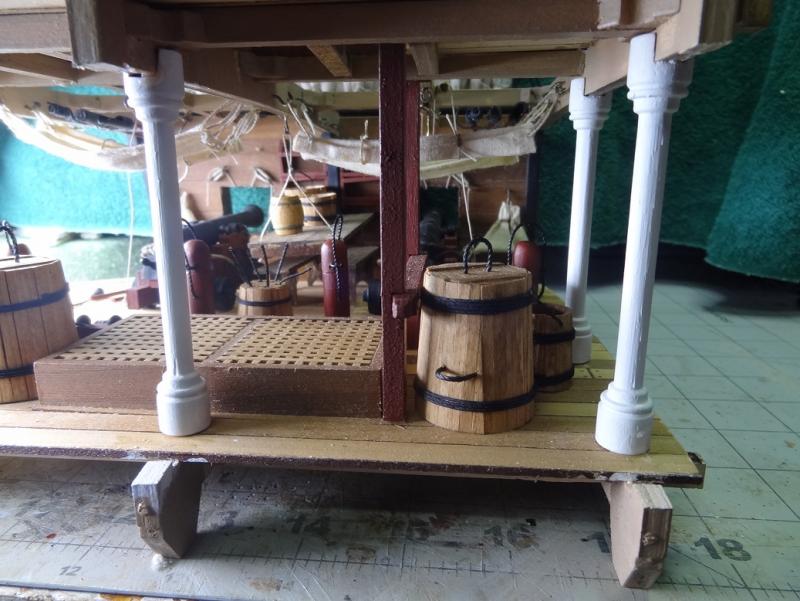
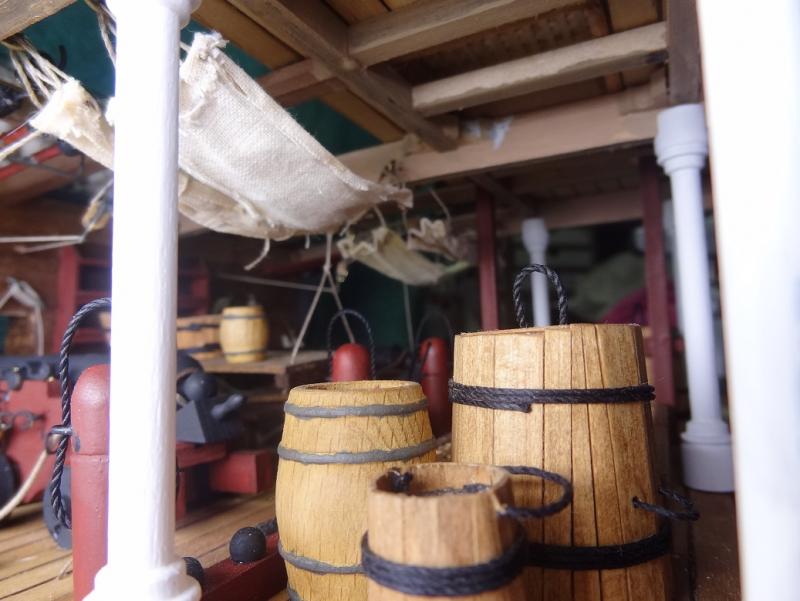
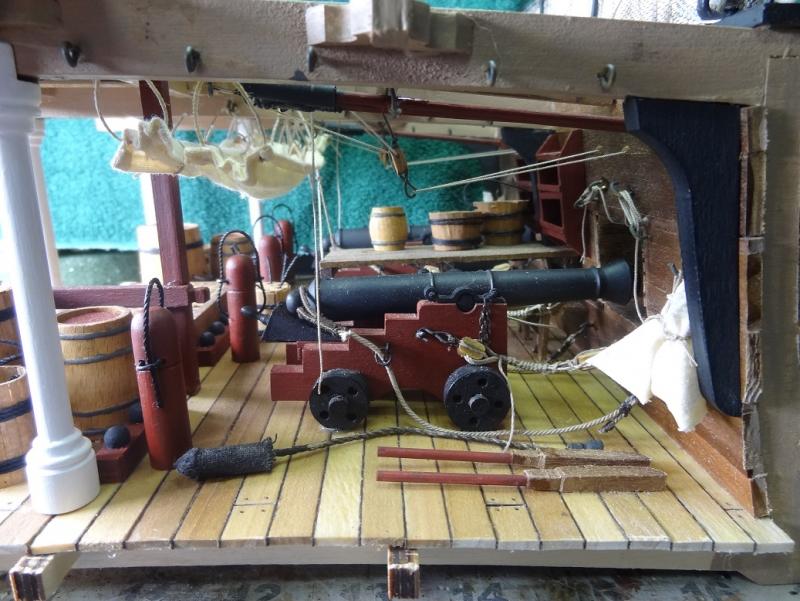
I'm calling this one done! It has been a fun build, working at 1/2" scale is very cool. Wish I could build a ship in that scale. The kit wasn't without problems though. Obviously, being foreign made there is a language problem with the plans and instructions. Also the plans and instructions did not agree on some structures. I've also noticed the sizing is off in places - a handrail that's almost as tall as a person; there's over 6' of headroom on the gundeck. Those things aside, I'm glad I did this kit and would recommend it to others. Now to figure out how to change the log title to Finished A big thank you to everyone that has followed and helped out along the way! Here's some final pix.


- 143 replies
-
- 10
-
-
I suppose the obvious solution is to make it small enough so it does fit. No one except my scale figurines will know if my 6' hammock is really 4'
- 843 replies
-
- 2
-
-
- niagara
- model shipways
- (and 2 more)
-
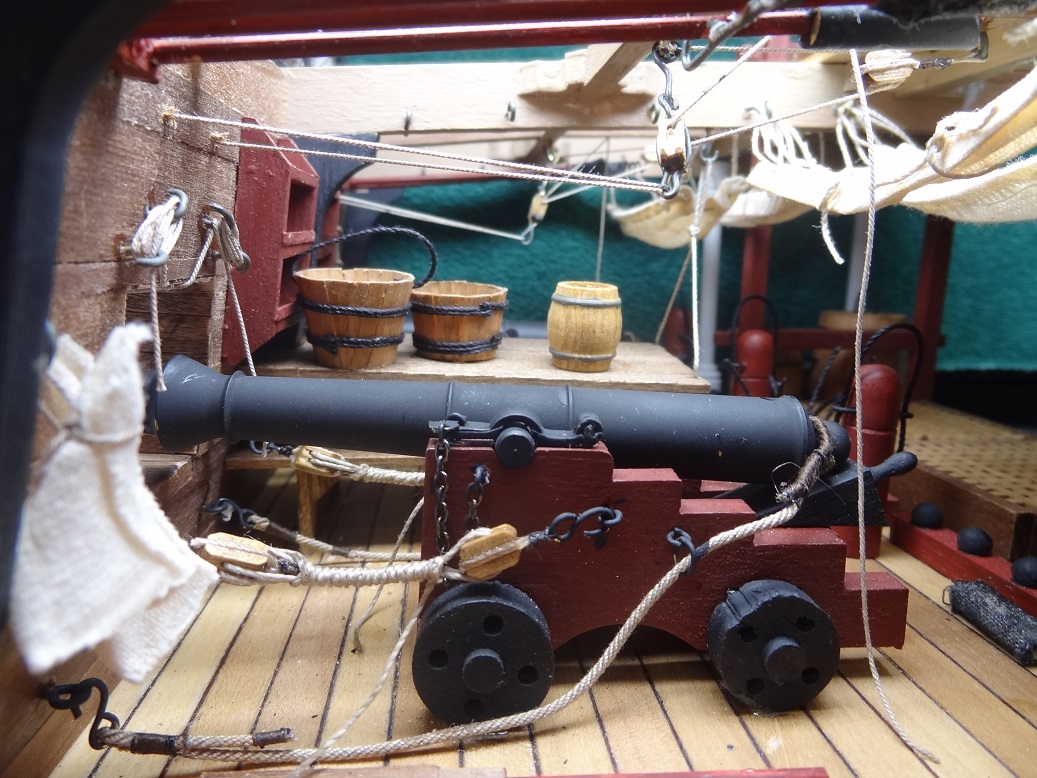
I never put the prototype on the handrail. It wouldn't fit either. At the channels, as best I can measure, from the outer edge of the handrail straight up to where the shrouds pass over the edge is less than 1/4". It just don't fit. One more reason to turn it into an admiralty build
- 843 replies
-
- 2
-
-
- niagara
- model shipways
- (and 2 more)
-
Hey Brian - I replied to your PM a few days ago.
-
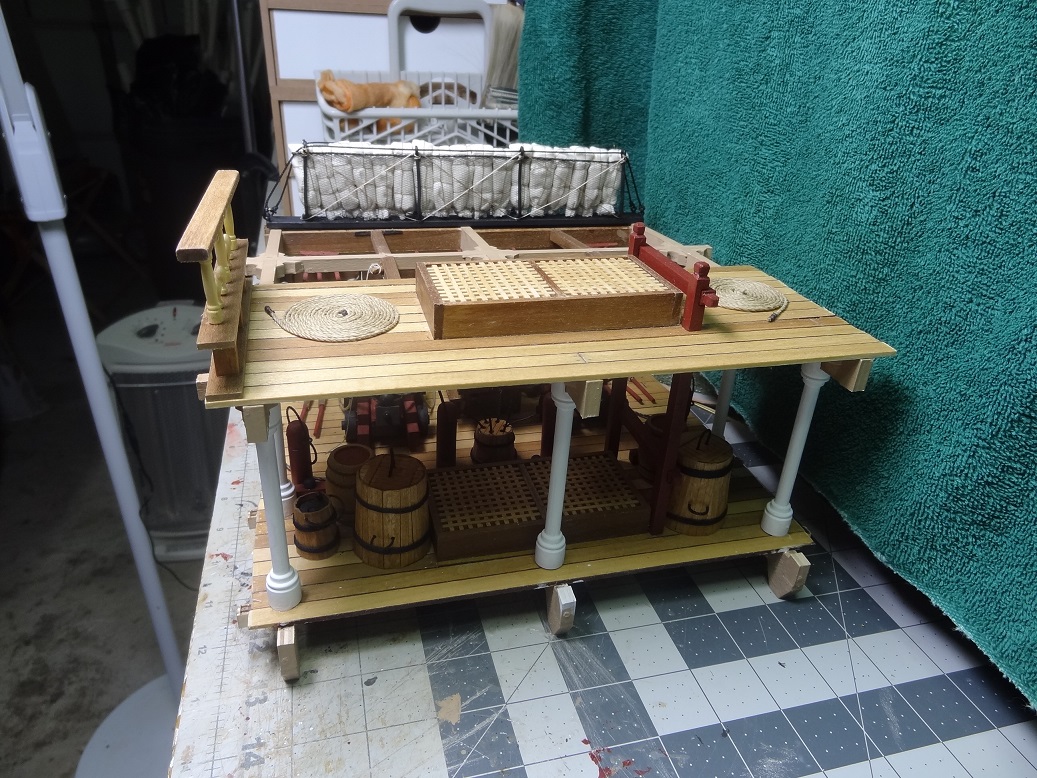
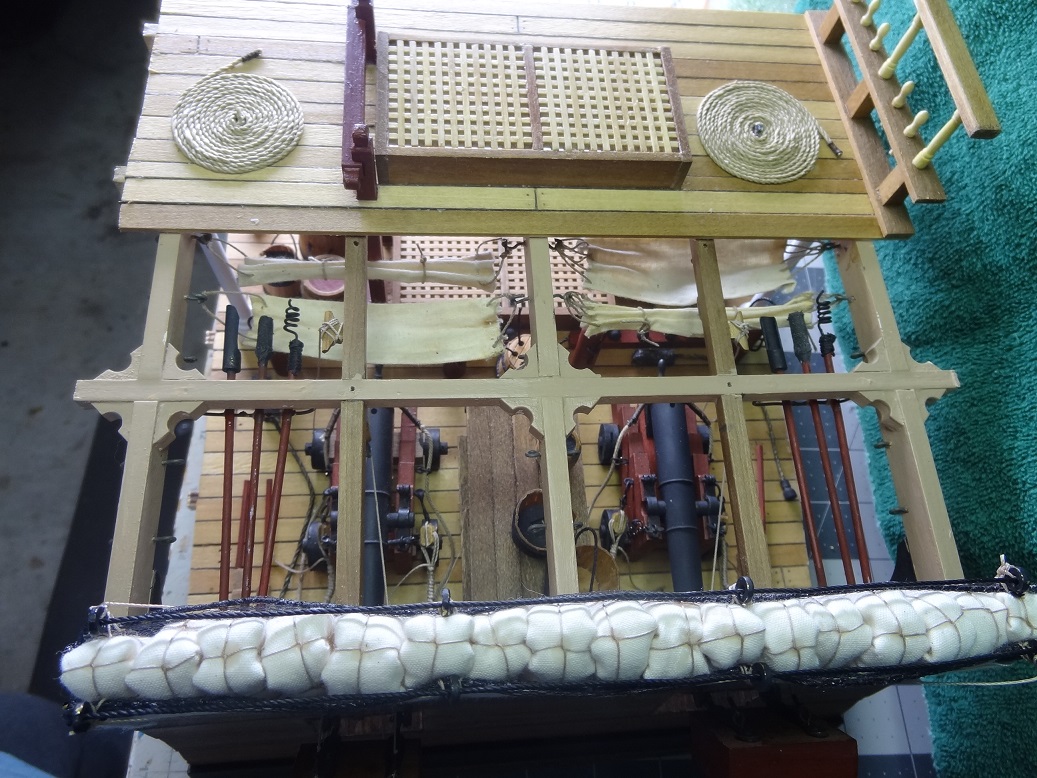
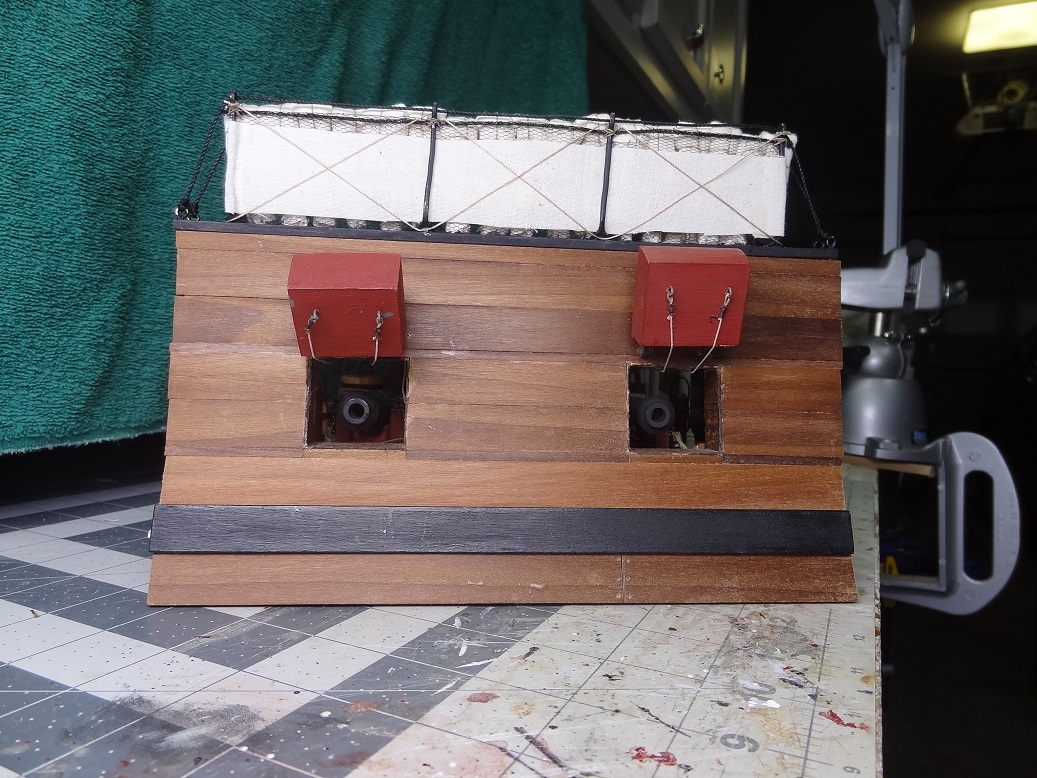
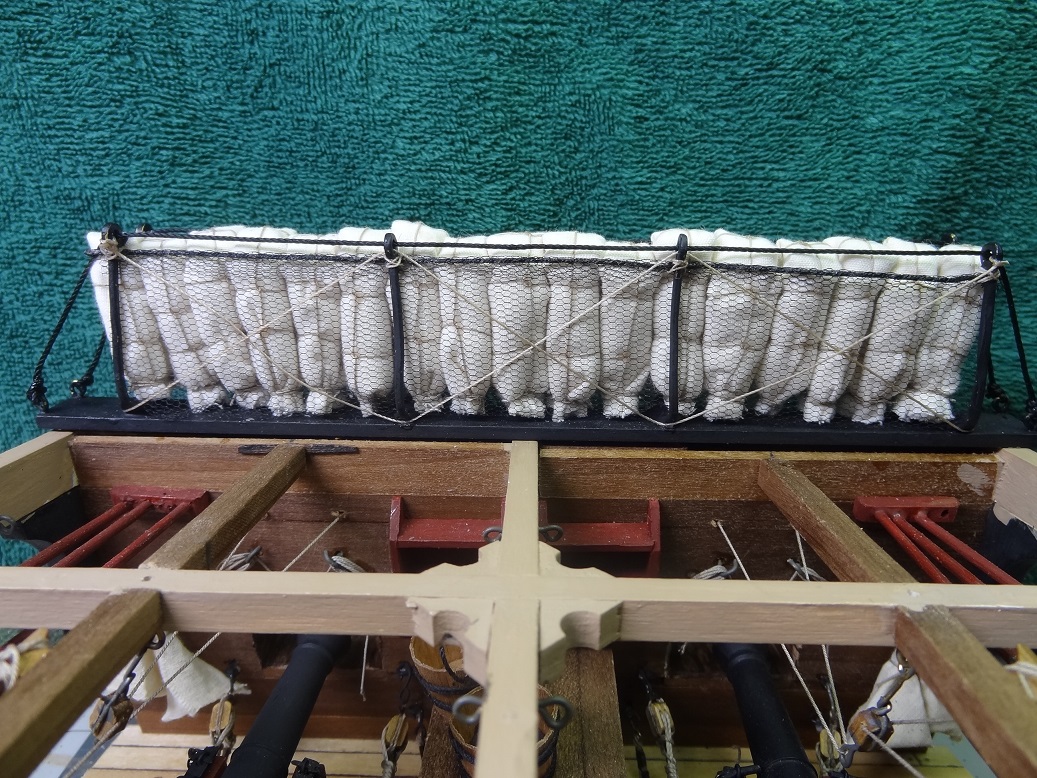
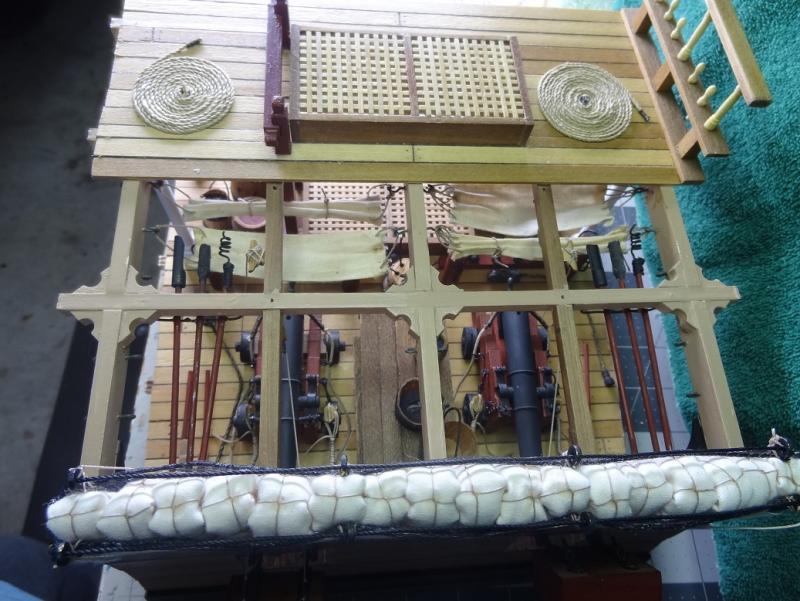
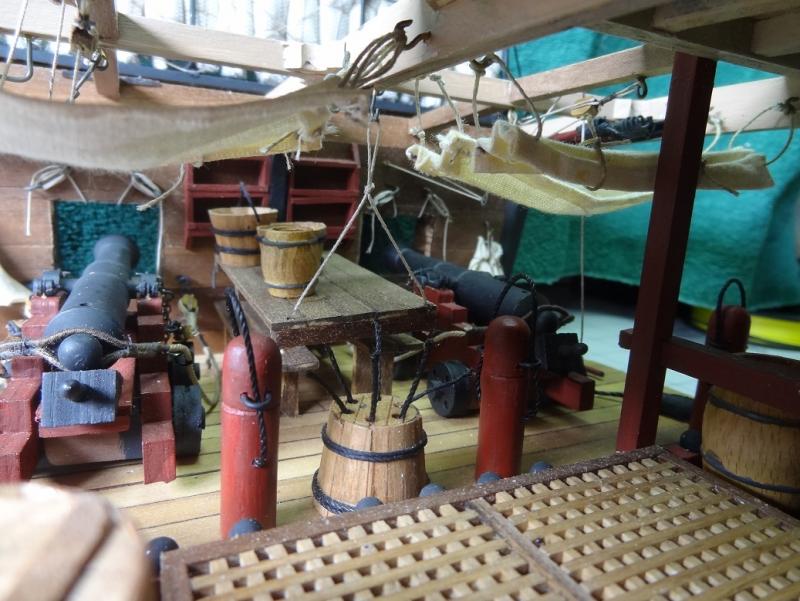
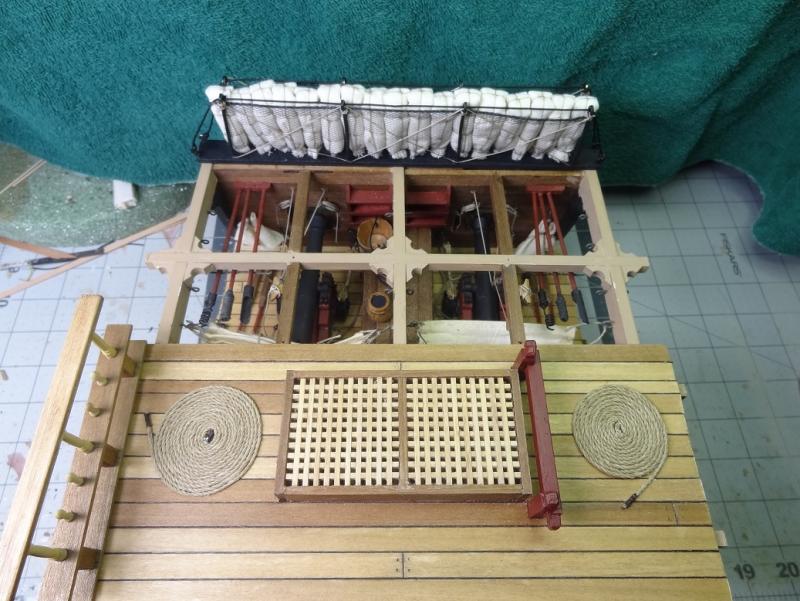
This ain't getting any easier. I'm seeing why the plans for the hammocks & rail are what they are. I made a stanchion with the measurements called out by the plans. Then I started to work on a hammock - 6'x3'. That scales to a little over 1" long and about 1/2" wide. I rolled that up and even put the 7 lashings on it (it's kinda cute). Then I folded it in half and put it inside the stanchion. The folded hammock is almost 1/4" taller than the stanchion. It looked pretty good. I took that and set it on the hand rail of the build. Big problem. The shrouds do not leave enough room. I don't have all the shrouds rigged but there are a few and there is not near enough room under the shrouds for hammocks - at least they way I was doing them. The stanchions all by themselves clear the shrouds just by a hair. The plans call for a strip of "canvas" to be laid inside the stanchions. A long edge fastens to the top of the inner stanchion post, runs down the post, across, back up the other post and then over the inner stanchion and is fastened. Completely enclosing the hammock area. NOTHING extends higher than the stanchion. Now I know why. Just to muddy things up some more - there was a site member that posted a bunch of Niagara pix here. Have a look at how the the whole assembly is done there - some good pix about half way down the set of pix. Not sure if that's just a modern rendition or not. What that looks like is a canvas that goes down one stanchion post, across and up the other post and stops there. Then there's another canvas laid down on top of the stanchions and fastened (maybe snapped in this case) on the sides. Sounds like I'm whining again so I'll stop my rant. Would appreciate any ideas. The obvious one is to do like the plans but I don't think it would be very realistic. From what I can tell, the pic on the front of the kit box didn't follow the plans, but it's too small to see what they did. No big surprise there. I think I need a new build....Arrow? Trajta? Maybe Cazador?
- 843 replies
-
- 2
-
-
- niagara
- model shipways
- (and 2 more)
-
I hoped a little research would clear things up for me. NOT. I've seen tall stanchions, short stanchions, square stanchions, U shaped stanchions, stanchions that hang out over the rail, hammocks stacked vertical, hammocks stacked diagonal, folded, not folded, with netting, without netting - Enough! Sheesh! Sorry, I guess I needed to whine a little bit Nothing left to do now but pick a few of the attributes I just mentioned and go with it.
- 843 replies
-
- 3
-
-
- niagara
- model shipways
- (and 2 more)
-
I'll look around for some pix Joel. If done diagonally are the hammocks still doubled over? Seems like it might make more sense to roll them but NOT fold them in half. Given everything I've described I'm beginning to wonder if I just make the entire run covered over with the canvas and not show any hammocks.
- 843 replies
-
- 2
-
-
- niagara
- model shipways
- (and 2 more)
-
Bummer! I ran into a few snags this evening. I remade one of the stanchions using a beefier piece of wire. Went to check the measurements and both the new one and the others that I made yesterday are too big. And if I follow the plans, the stanchions should be only about 1/4" tall. That leads to another problem or at least a big question. Bare with me. The hammock inset on the plans is at 3/8" = 1' . Twice the actual scale of 3/16" = 1'. The plans show the stanchions as 1/2" tall, so at actual scale they would be 1/4" tall. If you scale that up to life size I believe that means the stanchions would be about 16" tall. Now take a 6' hammock, fold it in half to get 3' and that is what the stanchions are supposed to hold. I think it would look pretty goofy even if covered by canvas. I've already decided to change the stanchion height to about 3/8". Given that there will be a thin wood rail (probably a 3/32"x3/32" stick) at the top of the stanchions and at least 1 rail under that (the plans show 2) I need the extra length and it doesn't look funny on the actual boat. But I don't think the hammocks will look right standing vertical. So horizontal? End to end or stacked? Could also lay them diagonally semi stacked?
- 843 replies
-
- 2
-
-
- niagara
- model shipways
- (and 2 more)
-
Wondering about some of these pix. The canvas almost looks like it is draped over some hoops or something. The shape is too perfect. Also assuming any hammocks underneath would lay horizontal? The whole thing looks rather modernized.
- 843 replies
-
- 2
-
-
- niagara
- model shipways
- (and 2 more)