HOLIDAY DONATION DRIVE - SUPPORT MSW - DO YOUR PART TO KEEP THIS GREAT FORUM GOING! (Only 20 donations so far - C'mon guys!)
×


mikiek
-
Posts
2,276 -
Joined
-
Last visited
Content Type
Profiles
Forums
Gallery
Events
Everything posted by mikiek
-
 Mike - it kinda looks like the seat back would make it difficult to add a cap rail at all. Particularly if there is to be some overhang on the inside. Does the rail pass behind the seat back?
- 129 replies
-
- 1
-

-
- finished
- model shipways
- (and 1 more)
-
Joel - I will revisit that idea next build. I tried it once and seem to remember that I didn't get the darkness I wanted.
-
re: using alcohol to dissolve PVA type glue. Please be smarter than me. Take a minute to assess the items around where you will be applying the alcohol! It is almost inevitable that it will run/drip beyond where you will be applying it. Case in point, I was applying alcohol to the bulwark plank to remove it. This plank sits on the outer edge of the deck. When I applied the alcohol to the plank, some ran on to the deck. Not a big problem in theory, however I used a Magic Marker on the deck plank edges to simulate caulking. You can probably see where this is going... The alcohol liquefied the marker ink which in turn soaked into and saturated the adjacent planks leaving some black spotting on the deck. It appears that I may be able to sand this out - I got lucky again.
-
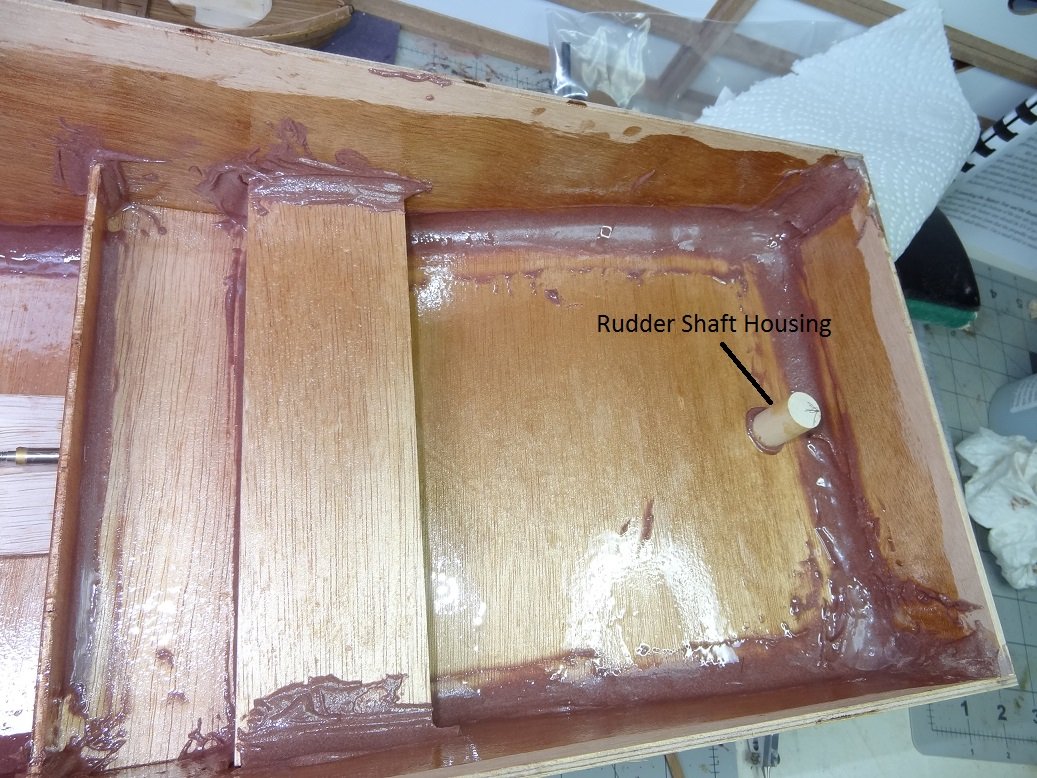
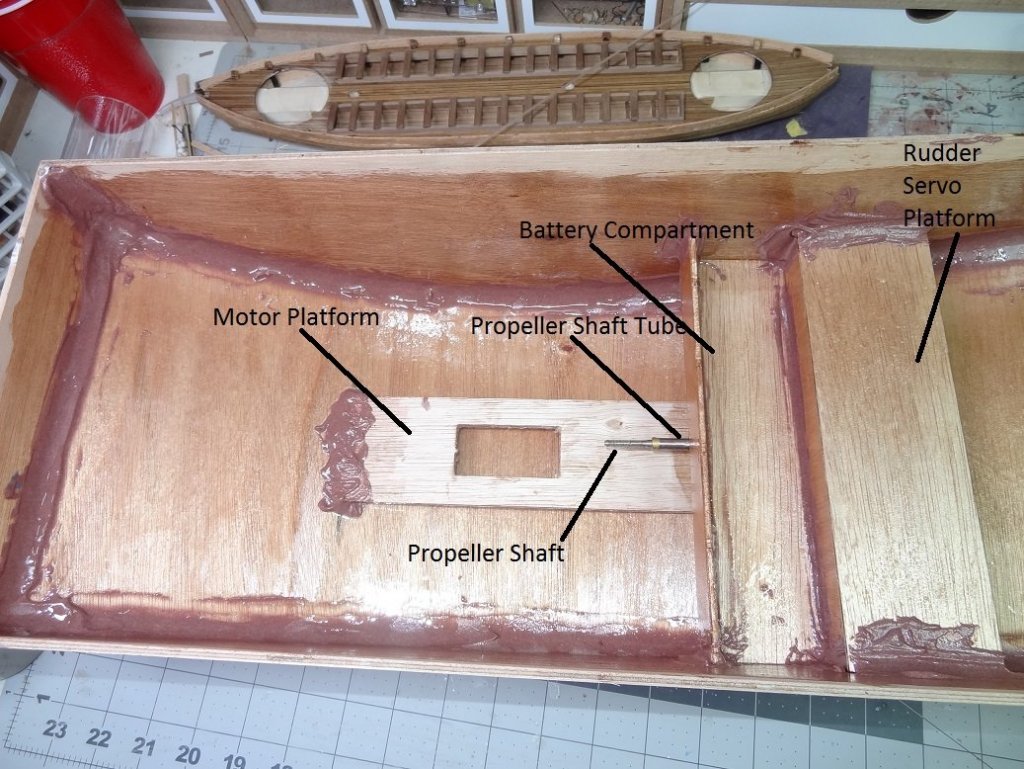
A lot of epoxy action this evening. I had several components ready to go inside the hull so I decided to glue them all at once. In addition, the instructions said to clear coat the entire inner hull. The hull plywood is fairly thin so the clear coat will beef it up some. It was the usual routine (clear coat, thick stuff) except for the amount of epoxy I was mixing up. That's where it gets tricky. Epoxy doesn't set by air exposure. It's a chemical reaction that does it and a fair amount of heat is released during that reaction. Heat speeds up the curing. In fact if you want epoxy to set quicker you can hold the mixture container next to a incandescent light bulb for 30-40 seconds and it will thicken (cure) noticeably. So the problem is when the 2 parts are mixed in a small container, heat generates in the confined area and the epoxy hardens much quicker. In the intro to epoxy at the beginning of the instructions Will states the way to beat the problem is to (obviously) get the mixture out of the container and on to a surface quickly. The heat can dissipate into the air that way. Then you can work the epoxy wherever you need it. So tonight I was more concerned with speed than with neatness. I actually walked thru my entire process 3 times so there would be no issues during the live run. The parts I glued are not terribly interesting, but the good thing is I can start installing the electronics next. Here's what it looks like, please excuse Arrow in the pic.

- 96 replies
-
- 5
-
-
- tugboat
- Tippecanoe Boats
- (and 2 more)
-
Looks just like the real thing. Nice touch!
-
Per - the motor is from RC4WD. It's labeled Crawler Motor 80T. Now you know as much about it as I do. It is pretty heavy for it's size and metal parts from my workbench are sticking to the motor exterior. It must have one heck of a magnet. Twin screws? I guess you could. It would take some redesign of how the propeller shaft tube exits the hull. This design has it running thru a thick keel which is epoxied to the hull. The hole in the hull is covered by the keel. Not sure if you might need additional batteries or not. The battery pack is big, sort of like 6 C cells shrink wrapped together. I imagine it adds ballast in addition to power. Of course someone knowledgeable in RC could probably figure something out. But that's not me
- 96 replies
-
- 3
-
-
- tugboat
- Tippecanoe Boats
- (and 2 more)
-
Well I am getting good practice with the alcohol. When I glued the bulwark planks on the first time I left some overhang at the bow. Somewhere along the way I must have cut off the overage. Then I removed the planks - the first time - then glued them back correctly. I finished the pintles and gudgeons for the stern and rudder and was dry fitting those. It became obvious that with the rudder in place there was not much room for the platform in between the bulwark planks. The bulwarks did not extend past the stern far enough. So out comes the ole 90% again. Tear the bulwarks off again. Wasn't so lucky this time, I did get one side off intact but the other side got shredded in a few places. Since there are no replacements I guess I'll have to use some boxwood strips this time. But first I'll have to darken them up to match the walnut. Definitely working on the tug tonight!
-
Agreed. Mine is 90% also. Not 90 Proof Like most things you just have to be careful where it gets applied. I have it in one of those lab squeeze bottles. I thought I could pinpoint exactly where I wanted it to go. Not so. It ran everywhere. Hope I didn't unglue something else
-
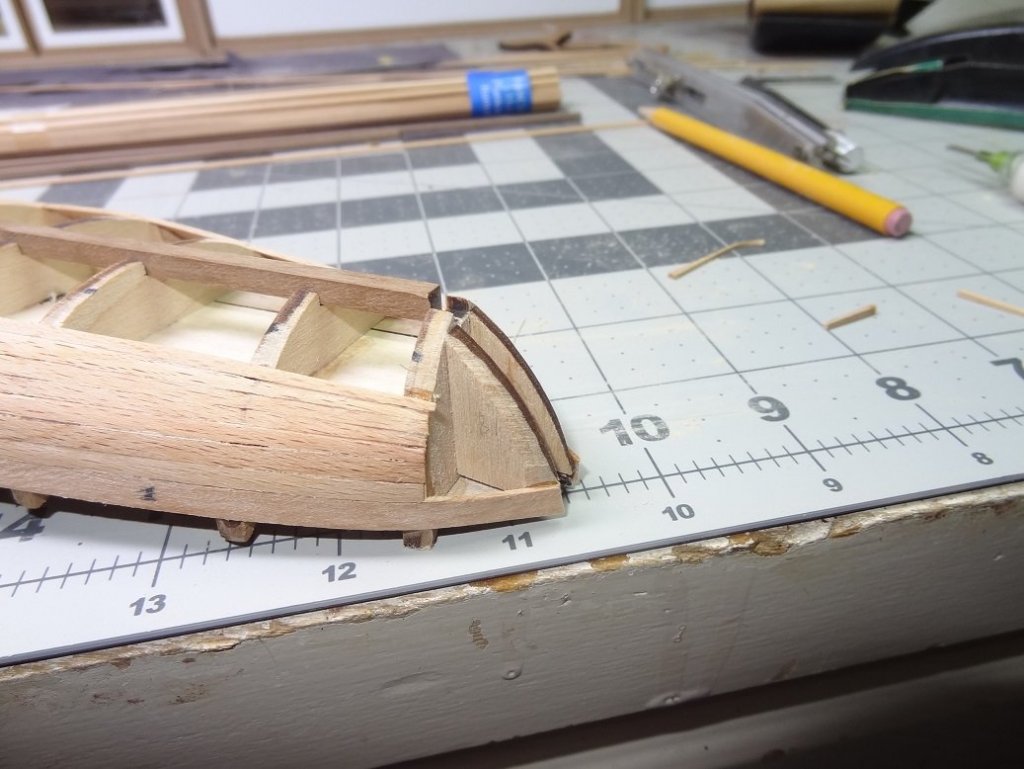
If my knee bent in the opposite direction I'd be kicking my butt right now. Working the deck, I began construction on the stern platform. There is a 2nd bulwark plank that is glued on over the 1st. These extend out from the stern and form the support for the platform. Got them in place - glued well - and moved on to the grate that fits in the middle of the platform. It's not a square grate! The aft end is convex, the sides are concave. To get those shapes I thought I might sand them. Grates do not like this. Made a mess of the first one. Fortunately this is one thing Amati supplied extras for. Adding insult to injury - I began dry fitting the parts only to realize that I had extended the bulwark planks off the bow instead of the stern. And - yup you guessed it - there aren't any more. I did have the foresight (or just plain dumb luck) to use PVA on these planks so I soaked them in alcohol which did loosen up the glue. Never done that before, but I read it here somewhere. I was able to salvage the 2 planks and reverse them. Maybe I need to work on the tug for a little while
-
Elijah - one thing I would suggest to anyone that is serious about model building. Have extra materials on hand. For us that means wood, brass, rope to name just a few.
-
Talk about getting diverted I'm back on planking again. Since I have not installed the stern post & stem I have been leaving all the strakes extra long so that I'll have enough wood to fit them nicely to the stem/stern. This is becoming a problem as the strakes get closer to the garboard (my number one concern) the ends are starting to collide. So, what the heck, I'll go ahead and glue the stern post and stem in place. In fitting those, I realized I would have to make pintles and gudgeons for the rudder. Easier to make them before gluing the stern post. I'm out of nails except for some very thin ones - no idea where they are from. If I hammer them about half just crumble up. More than a few one syllable words have been voiced. The first set I made ended up extending out too far so I ended up with almost a 1/4" gap between the rudder and stern post which looks odd. Of course I used up all the brass strip from the kit. Again, they don't supply much extra. I have some slightly thicker brass strips I'm using but drilling them out with a pin vise is painfully slow. Maybe time to break out the flex shaft. Thanks for letting me bend your ear
-
I know what you're talking about! I use some high end sewing scissors. They're made for sticking under a stitch and snipping - there's a name for them but I don't remember. Very sharp.
- 648 replies
-
- 2
-
-
- niagara
- model shipways
- (and 1 more)
-
Do I hear some kit bashing in that statement?
-
Was thinking of your rigging these last couple of days. I received the Lauck Street practicums and tutorials and dove straight into the rigging chapter. Probably not much help to you now, but I like how it is presented - block by block, spar by spar. He does something called a figure 8 seizing - I had never heard of. You fold a line over making a loop at each end. Then you seize in the middle which leaves you a loop at each end that you can pull tight - one loop around a block the other loop around a spar. Sounds useful.
- 648 replies
-
- 2
-
-
- niagara
- model shipways
- (and 1 more)
-
Thanks Darrell. I'm still up in the air over that. I made the decision to just follow the instructions and they have the stem & stern after planking. I can see your point. The downside is somehow I managed to break several plank ends right where they extend over the first frame at the bow. I'm going to have to cut those planks somewhere and add some shorties to replace so that they reach to the stem again. Had I installed the stem they probably would not have broken. Sadly the kit doesn't provide enough of these hull planks to cut out the whole strake. In noticing that I also realized that I did not break the strakes up into individual planks - something I like to do. Just one of those moments I guess.
-
I won't argue with you there. I'm a boxwood bigot Is boxwood easy to come by where you live?
- 120 replies
-
- 2
-
-
- mercury
- victory models
- (and 1 more)
-
I'm sure it would look better with filler blocks. Unfortunately I have about 2/3 covered with the 2nd planking now. There's a slight bend right where the plank goes over the first and last frame but I think most people would not see it. Sanding has smoothed it out some.
-
Filler for Natural Wood?
mikiek replied to mikiek's topic in Building, Framing, Planking and plating a ships hull and deck
Good advice. That is what has had me concerned all along. I have yet to find any type of filler - commercial or handmade - that takes stain like the wood it is filling. -
OK the keel is on. Last nite I built some pieces for inside the hull. A platform for the motor, a battery tray and the rudder. Nothing really sexy enough for pix. Besides it was a pretty messy epoxy job and I don't need that on my camera. Anyways all that set and is ready to be glued into the hull so I'll do a few pix then.
- 96 replies
-
- 4
-
-
- tugboat
- Tippecanoe Boats
- (and 2 more)
-
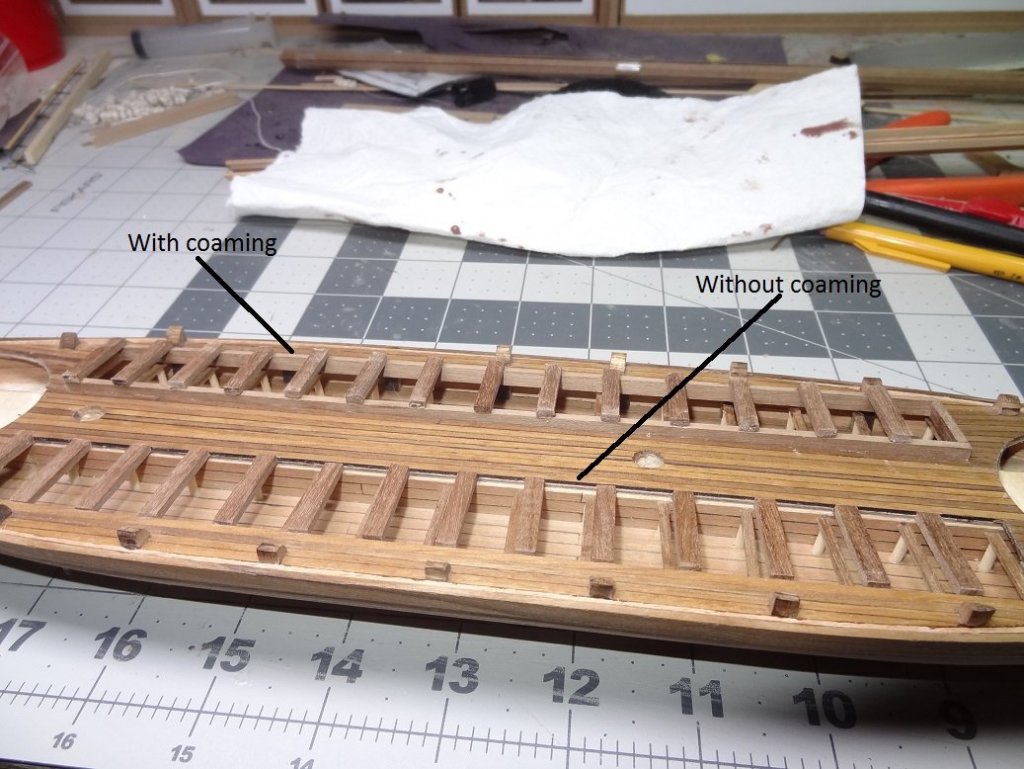
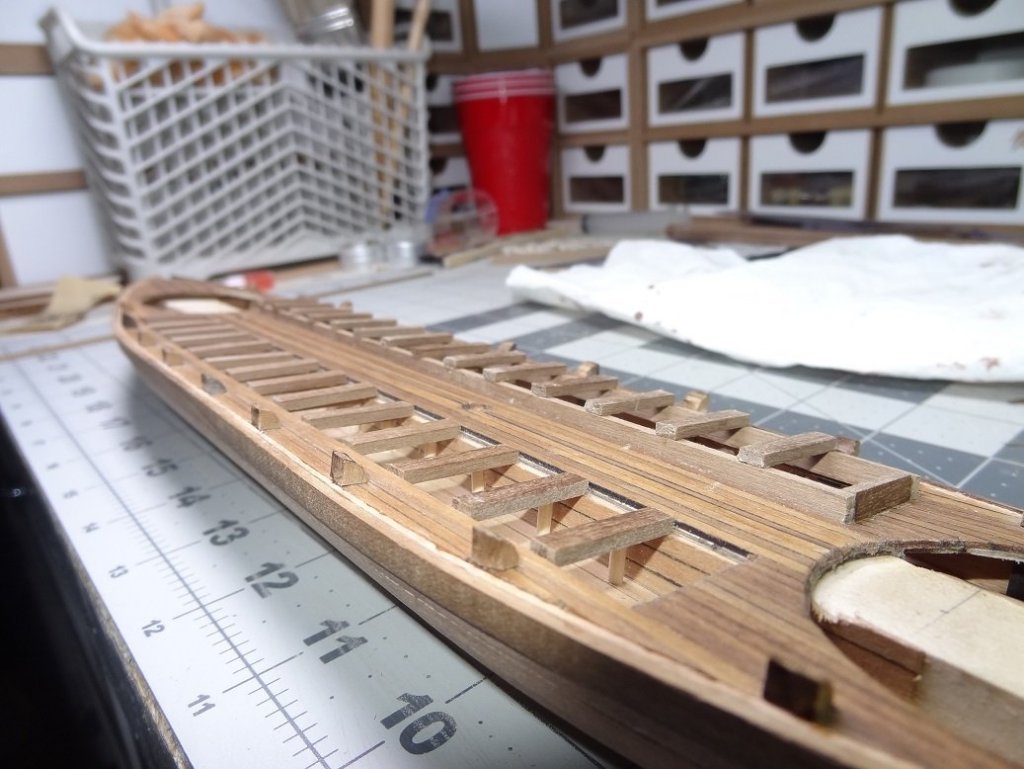
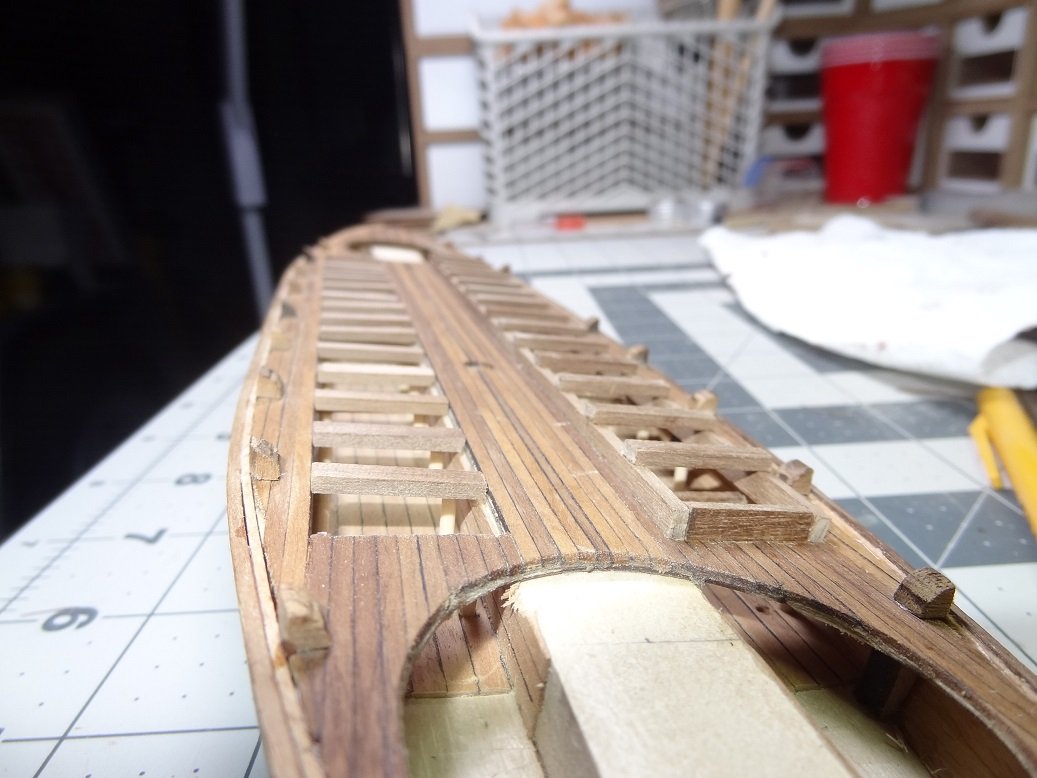
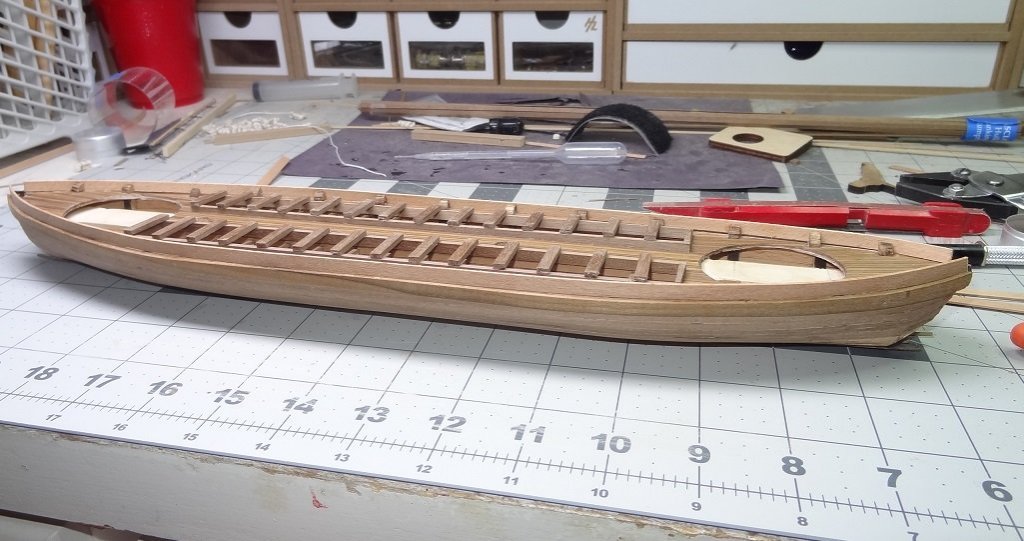
I've finished both bench coamings and I must say they add to the look a lot. It also gave me a chance to realign the benches on both sides so that looks better as well. I've been complaining a lot about knocking the frame tips off the upper deck as I plank. So much so that I gave up gluing them back on - until now. I decided to add the bulwarks which are supported by the frame tips. So I glued them back on, then faired them for the bulwark which is a single 1mm x 5mm plank laid above the sheer strake. So this was essentially like laying another plank. This feature also adds to the look and the deck is starting to take shape. There are 2 layers for the bulwarks. The first runs from the bow, down the deck and ends at the stern. The second is going to be a bear. It starts out the same at the bow but you don't glue it to the last frame tips at the stern. Instead you let them extend past the stern and they will be the support for a stern platform behind the rudder. It was pointed out early on in this log that the existence of such a platform was debatable. When they pulled up what is believed to be the Allen, that part of the boat was gone so no one can say for sure if the Lake Champlain galleys had this structure. Some of the galleys used on the eastern seaboard did have the platform and I imagine this is where Amati got the idea. At any rate, the instructions are quite vague on building the platform. There are a few pre-cut parts but it appears that some must be made. There is a grate right in the middle of it all. The plans are no help as all they show is the finished structure. I'm gonna have to think on this one a while.


-
Looking good Mike. Very precise. Even in a photo which will usually bring out all evils.
- 129 replies
-
- 2
-
-
- finished
- model shipways
- (and 1 more)
-
Filler for Natural Wood?
mikiek replied to mikiek's topic in Building, Framing, Planking and plating a ships hull and deck
Sounds like the voice of experience.... -
Mark - I've been thinking that all along. I was pretty happy with the first layer, not sure what the wood is but it could have been stained darker. The one big problem is the sticks for the first planking were not long enough to run from stem to stern. I had to start them at the first frame and stop them at the last frame.
-
Planking continues. I'm still finding those 0.5mm sticks hard to work with. I decided to take a break from that and do some deck work. Discovered a pretty glaring oversight. The Italian instructions show a pic of this, no idea whether it's mentioned in the text. The English instructions don't mention it. Regarding the bench seating, I had wedged each bench into place right behind and above the preceding footrail. WRONG! There is a coaming of sorts that is supposed to go around the entire rowing section and the benches are supposed to go on top of that. This raises the benches up some which I suppose would have been a good for the oarsmen. The way I had done it, I was always laughing thinking a guy would have his boots on the butt of the guy behind him. Not any more. It just looks better too. Fortunately I was able to salvage the benches, sand off the glue and reuse them. A good thing - there is not a lot of extra walnut in this kit.