DONATION DRIVE - SUPPORT MSW - DO YOUR PART TO KEEP THIS GREAT FORUM GOING!
×


mikiek
-
Posts
2,276 -
Joined
-
Last visited
Content Type
Profiles
Forums
Gallery
Events
Everything posted by mikiek
-
 Allen - I am contacting Abe Books about one of the sets they have posted. Will let you know.
 -
Is the top of that top strip where it is supposed to be? If yes then you probably should add a filler strip. The question becomes do you put the filler under the top strip or notch the top strip around the port and make the filler the new top strip. I seem to remember Niagara having some inconsistencies regarding the port placement. I think I added an additional 3/32x3/32 strip on top.
-
Allen - that limited edition set would look great in anyone's library. I can almost smell the leather covers. I think I was getting the hardbound version confused. It appears to be 2 volumes. Abe Books in the UK has several - hardbound and limited editions.
-
Pretty soon all you're left with is the bow or the stern
-
Cornwall has most of the European kits for a lot less than anyone here. Even with freight I usually save $100. And the freight gets here within 2-3 days of the order. I have several of the Victory kits including Granada. Looks like you and I have the same taste in boats.
-
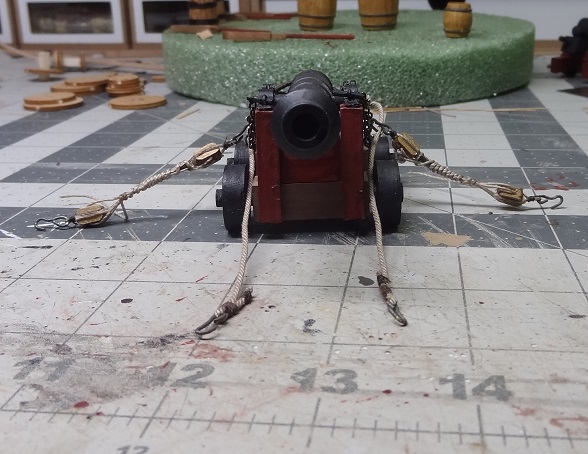
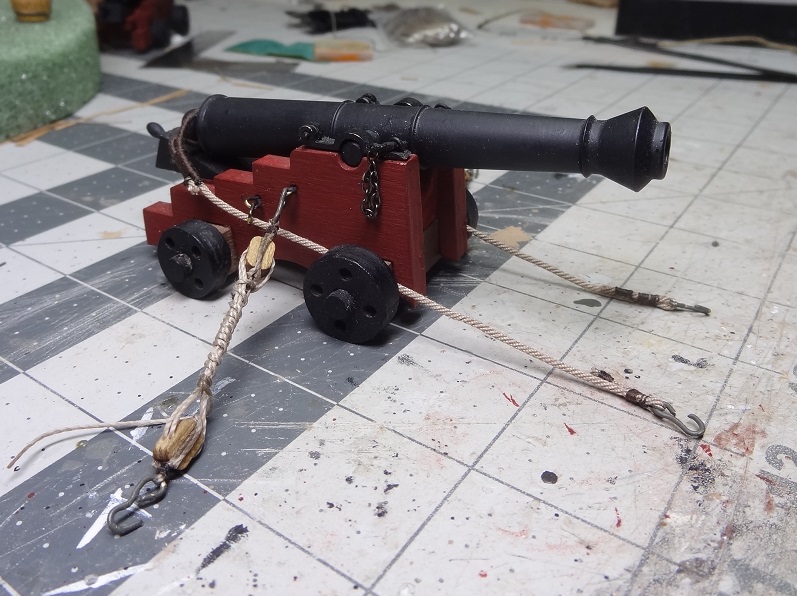
I have come across some reading in Lavery's Ship of the Line V2 that describes the cannon ignition. Sounds like a long gun on a basic truck would take off like a freight train. While the tackles and even the wheel sizes were intended to help slow down, the breech rope is what really did it. He also claims the recoil distance was more substantial than what I had expected. A 24 pounder had a breech tackle 34' long and could recoil up to 17'. A 6 pounder had a 23' breech line and could recoil about 10' . Ample room to get the tools into the barrel without having to hang out a port window.
-
That's what I am confused about there appears to be more than one "edition' One appears to be a single book that covers the entire date range. The other claims to be a limited edition set (2 volumes). Does anyone have any knowledge on what's what?
-
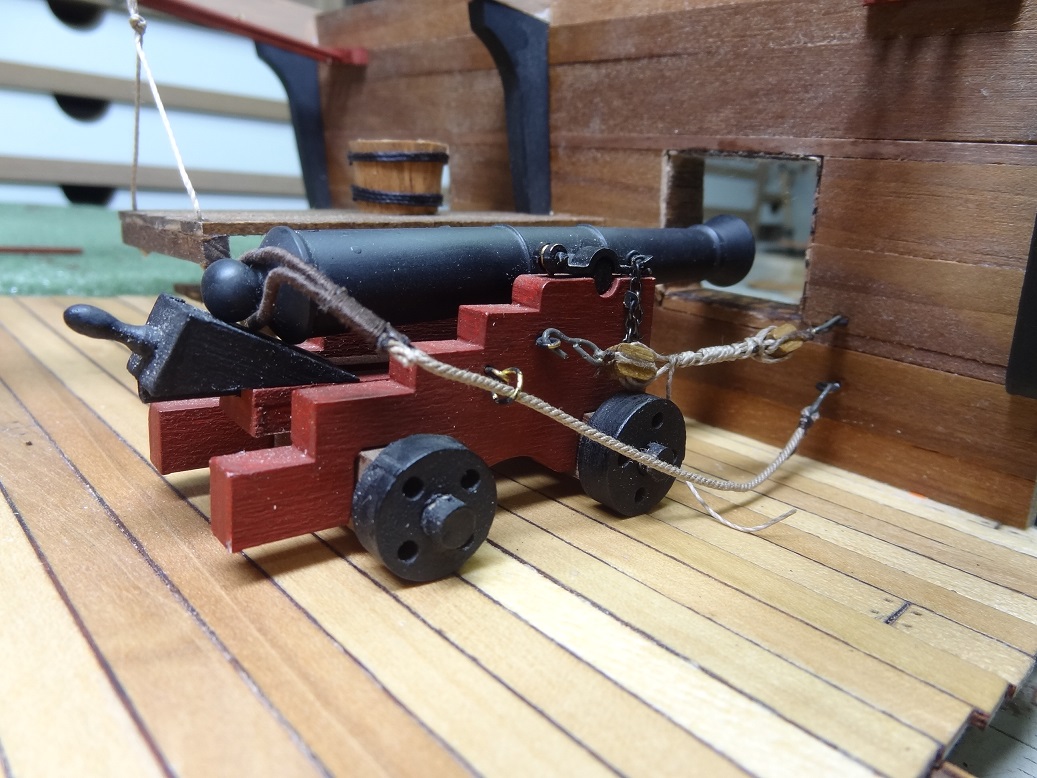
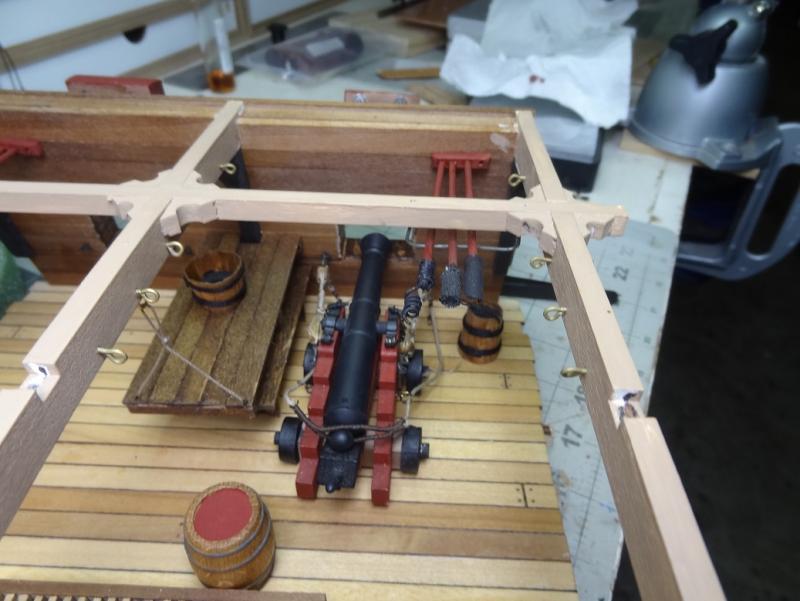
The gun station (cross section) I am working on is from Panart who also seems to be Mantua. It's a generic rig, all the tools and equiment for a couple of guns but it's not any particular ship.
-
Thanks Don and happy holidays to you. It has been a good addition to the work bench. BAck when I was doing the all the gun rigging, the shadows were wreaking havoc on my eyes and my temper. Seeing things that weren't there and not seeing things that were there. Adding the second light was a great move. No place for shadows any more.
- 843 replies
-
- 2
-

-
- niagara
- model shipways
- (and 2 more)
-
Make what? A Rattlesnake kit? The RS kit I have is by Model Shipways. Same company that made our Niagaras. I've opened the box a few times, it looks simpler than Niagara.
-
singidunam - I went back and looked at their site - this is what I have. 288 LEDs. The rheostat is a good feature. The head has good reach and swivels around to almost any position. And it doens't get hot. When you think about it, your eyes are your most used tool. Protect them and do what's good for them. Having the 2 light setup has virtually eliminated eye strain for me. At the time I was fortunate to have some cash to throw at it. It was worth it. Good luck....
- 843 replies
-
- 2
-
-
- niagara
- model shipways
- (and 2 more)
-
Thanks Mark - Good to hear it's more than page after page of technical stats in tables. I have seen a few online that claim to be a 2 volume set "special edition". I'll keep my eyes open. Maybe a late Christmas gift to me.
-
singidunum - I have 2. The first one is one of those with a circular flourescent tube and a magnifier in the middle. These can be found most anywhere online or the big box hardware stores. I does a decent job but the shadows - when my hands are in between the light and the object of interest - were killing me. No fault of the light, any single source is going to do that. So the second light is purely LED. Don't remember how many but it was a lot. The manufacturer is Dazor. U.S. made, excellent stuff but pretty expensive. I got turned on by the customer service - the guy went over and above to make measurements of height, reach, cord length. It is very similar to a dental light which is something you should Google. There are plenty of knock offs out there as well and I imagine some of those could be pretty decent. I now have a light to my right and to my left - both shining to a spot in front of me. Shadows are gone! Hope that helps....
- 843 replies
-
- 2
-
-
- niagara
- model shipways
- (and 2 more)
-
For any that have read the book. Is it just a collection of specs & tables? Is there any interesting verbiage to go with the numbers?
-
Don - everytime I come to your log I do so with some intrepidation . All your pics - they're really making me want to pull out Trajta and get started
- 653 replies
-
- 4
-
-
- trabakul
- marisstella
- (and 1 more)
-
Thanks Mark - That's kind of how I imagined it although I had nothing to base it on. I do recall the Vasa video showing the quion come flying out as the gun hit the limit of breech line. That's quite a bit of momentum. On this gun deck build, I've decided to place one gun what would be about 2' back from the inner hull with a little slack in the breech line - ready for loading. At the moment I'm planning to have the other one hauled out ready to fire. This has been a really interesting thread. It's funny how one small detail in a build can bring on a good conversation. I've learned from this one.
-
Yup - either you're rigging a ship or about to have a hanging party All your effort - both the work and the documentation - will make it easier for anyone rigging Niagara.
- 648 replies
-
- 3
-
-
- niagara
- model shipways
- (and 1 more)
-
I'm feeling like a broken record Darrell - your work looks great. Wondering - rope not included, what rigging parts did you get from Syren? I had a few things to order and thought I would include whatever else was needed.
- 648 replies
-
- 2
-
-
- niagara
- model shipways
- (and 1 more)
-
Sirius - we had some good discussions on red paint in my Niagara build log. The kit showed a fire engine red which was much too gaudy for my taste. Also mentioned was the fact of the difficulty getting that bright red pigment. A lot of colors were made locally and included all sorts of items - clay, berries, etc. So I see the Chili Red as more authentic and a lot easier on the eyes.
-
Jud - your point is well taken. And I was asking for that reason. Sure the tackles could help slow down the gun but there would be some extreme wear & tear on them as well. Of course, if the breech rope was the only thing stopping a carriage it would not take long for an eyebolt to tear out of the hull.
-
For live fire, try this: or google vasa cannon. Joel - That's a lot more like what I was expecting. That carriage slamming backwards an almost lifting up when it hit the end of the breech rope. Great video.
-
Joe - thank you. I'm finding it interesting that each item added really brings more life to the build. I'm looking forward to adding the hanging hammocks. Should really give it it a 'lived in' look. Sirius - I call it Chili Red - as in the food not the pepper. It's a mix - both colors are Tamiya acrylic. About 5 parts Flat Red to 1 part Hull Red.
-
That's a help Mark - and I was mis-reading Russ's post. I think I know the answer to my next question but to be sure. Say the bore length is 8' . 3 x 8 = 24'. Would the breech line be 24' - from eyebolt in hull, around the rear of the gun, to the hull eyebolt on the other side? Or would total length be 48' - 24' on each side? One last one. I have my gun loaded and ready. Guys use the outhaul to get the barrel out the port. Are the outhaul ropes left taught in the blocks or do they get loosened up before firing?
-
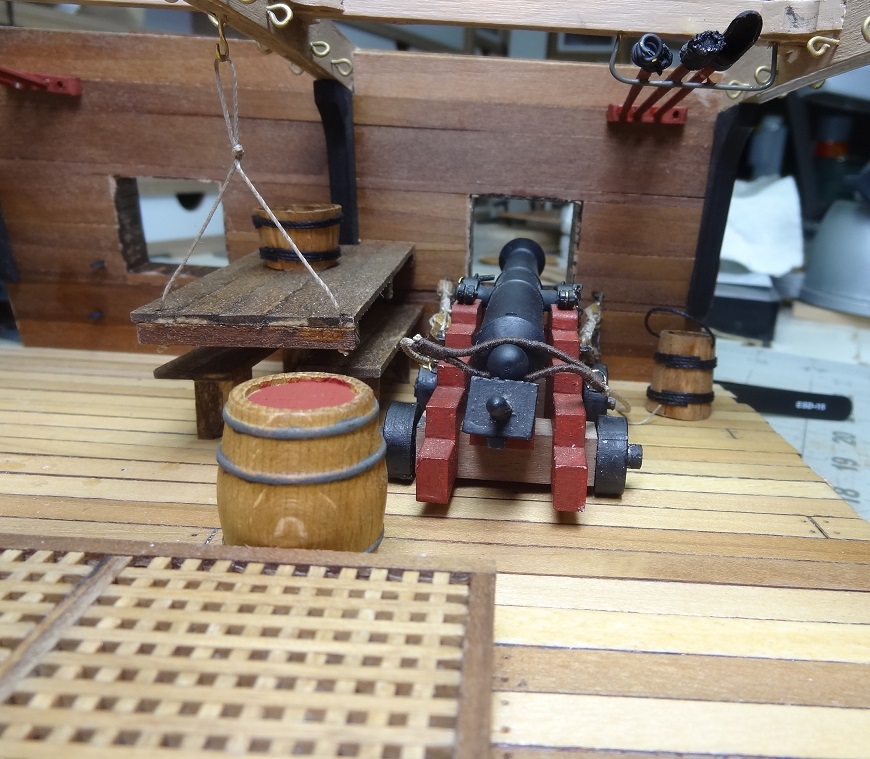
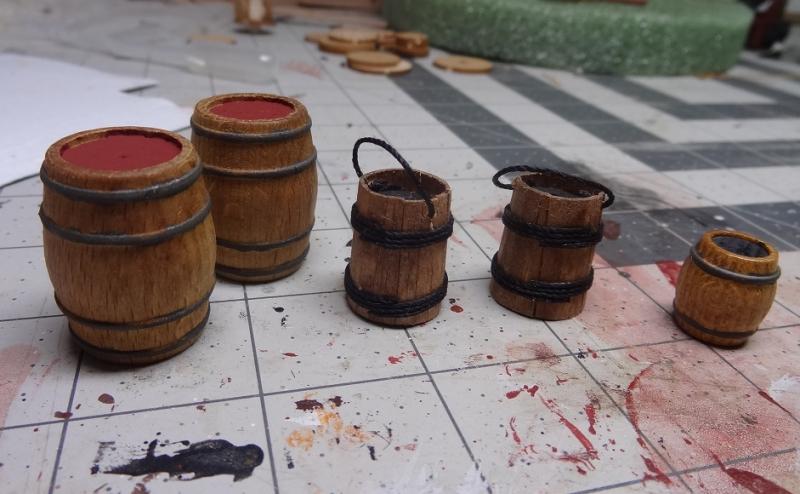
Slow but steady progress on this guy. I've completed most of the gun tools, some of the buckets and the rigging for a gun. There is supposed to be another tool - looks like some sort of tamper. In the instructions it almost looks like it's brass, but I can find no metal parts like it. There are 2 wood parts that could be them, but I would hate to use the pieces and then find out they are supposed to be something else. I'm going to wait until I get further along and see what parts are left. My intention is to take this build to the office when it is complete - a little dangerous I know, but if everything is glued down I'm hoping I'll be OK. It's a little harder to walk out with an entire build that just a cannon. The breech rope looks more like twine so I subbed some rope from Syren - 0.035" .It's slightly thinner but I think the look makes up for it. May still go back and replace the line in the blocks as well. Yes the block line will be frapped. Planning to glue the guns to the deck in the loading position. A question maybe some of you would know - the hammock rail seems to be at an odd height. It is supposed to be on the upper deck and start at foot level and go up to maybe waist high. In other words the hammock setup is the only thing keeping one from falling overboard. I thought the hammock rail was usually mounted on the handrail which would be mounted on a bulwark.


-
The gun station I was referring to is one of those "cross section" kits. Just a couple of guns on a gun deck and all the stuff that goes along with that. The kit is by Panart/Mantua and I believe they are Italian. It's a cool build because the scale is so big - lot's of details that you could never build at 1:64. The gun barrel is longer than my pointer finger. I do have a Rattlesnake kit as well. But it is the one from Model Expo. Have not started this one yet. It will be interesting as I had Crown Timberyard replace the entire basswood stock of wood with boxwood. Not sure when I will get to it. I have a few other kits I would rather do.