mikiek
-
Posts
2,276 -
Joined
-
Last visited
Content Type
Profiles
Forums
Gallery
Events
Everything posted by mikiek
-
 And since I kept the garage doors closed, not a single skeeter bite. They have been tearing me up lately.
- 843 replies
-
- 3
-

-
- niagara
- model shipways
- (and 2 more)
-
Styrofoam garage door insulation arrived Tues. Installed Weds. Today picked up and installed 14000BTU portable AC unit in garage. WOW! 'nuff said.....
- 843 replies
-
- 2
-
-
- niagara
- model shipways
- (and 2 more)
-
Thank you Elijah - I hope it will help. Dividers have many uses. Planking is just one.
- 843 replies
-
- 2
-
-
- niagara
- model shipways
- (and 2 more)
-
Thank you again Joel. You have played a big part in my progress.
- 843 replies
-
- 3
-
-
- niagara
- model shipways
- (and 2 more)
-
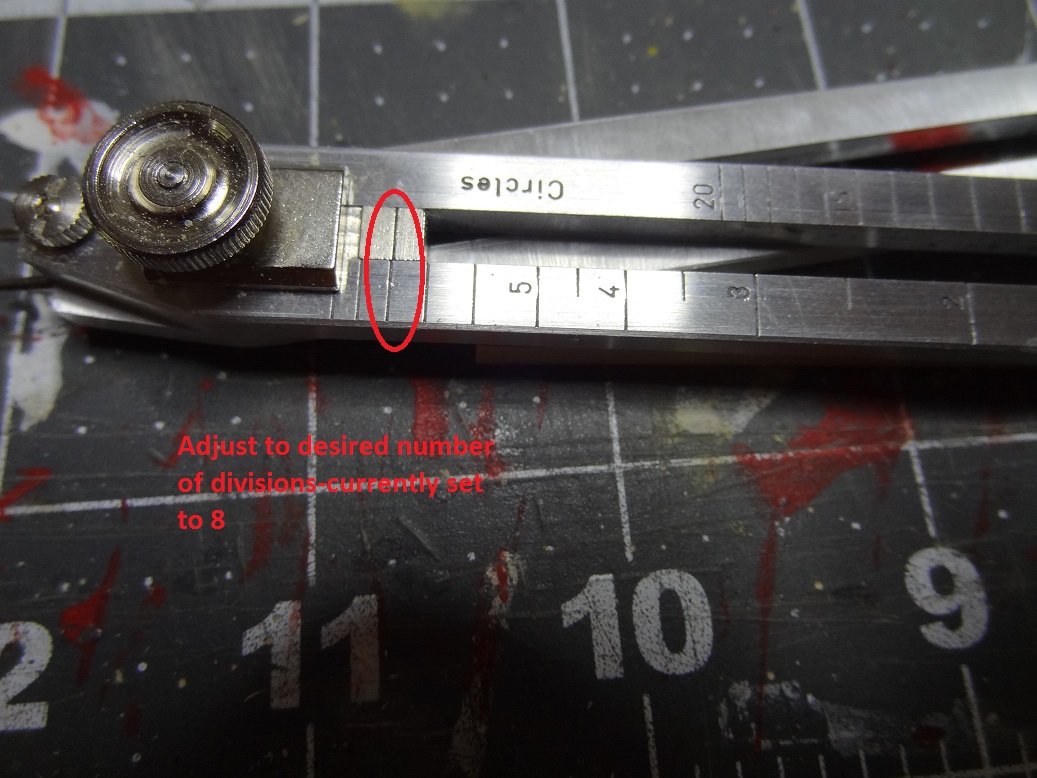
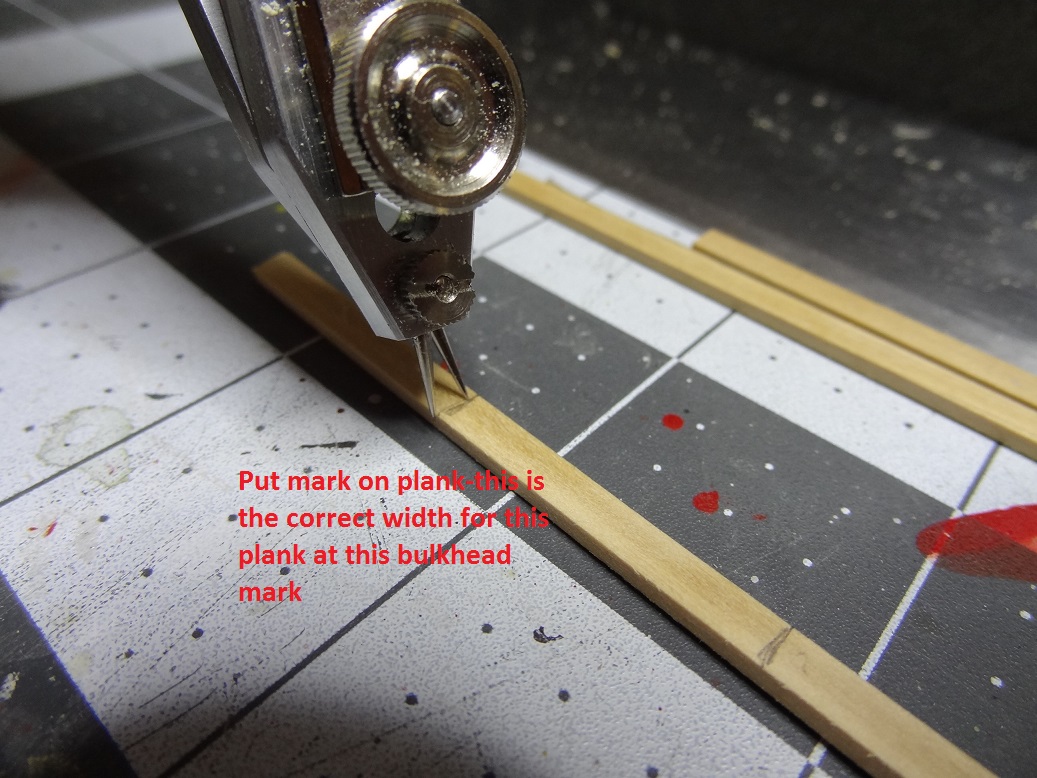
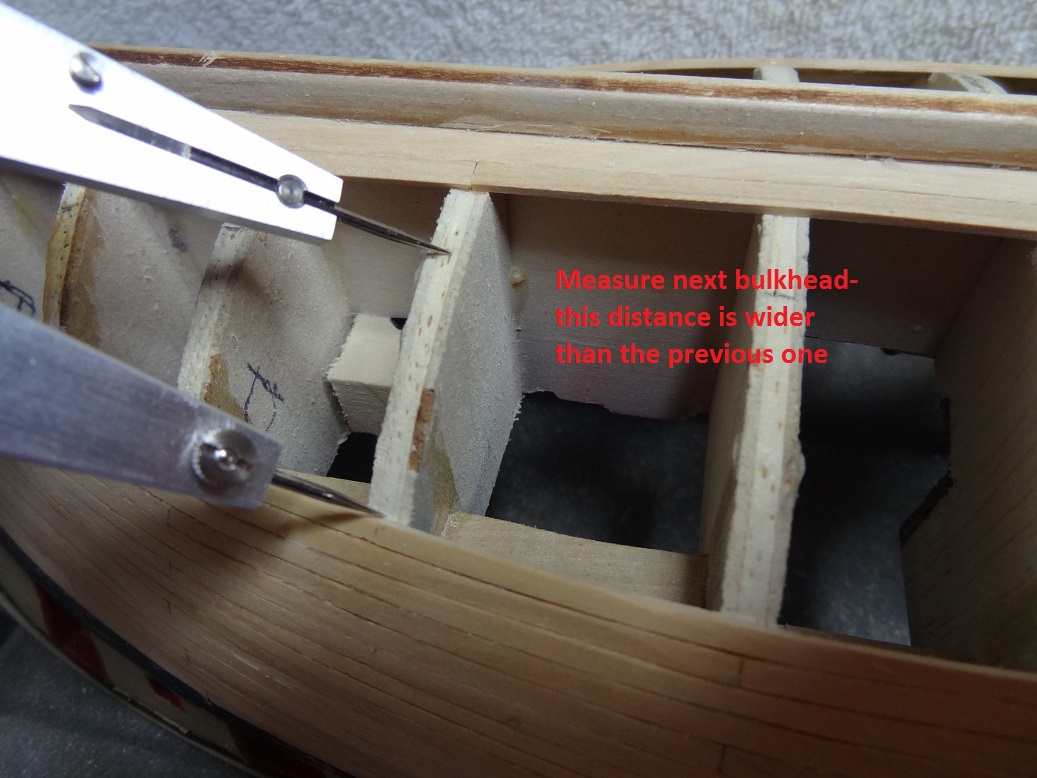
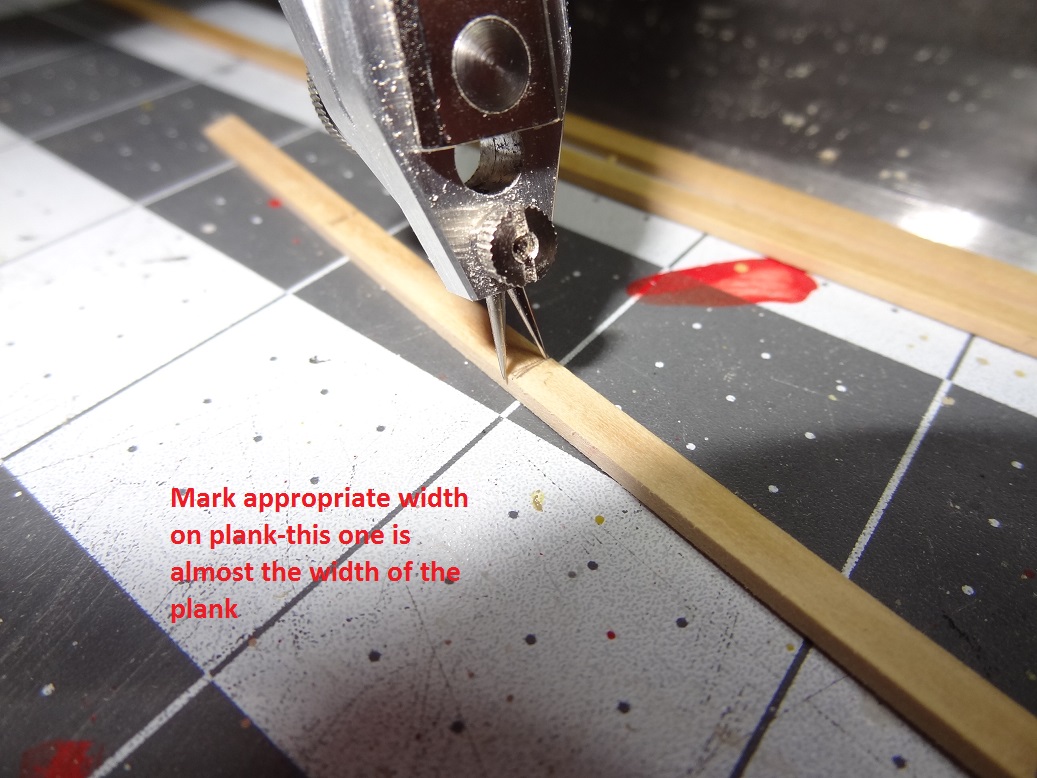
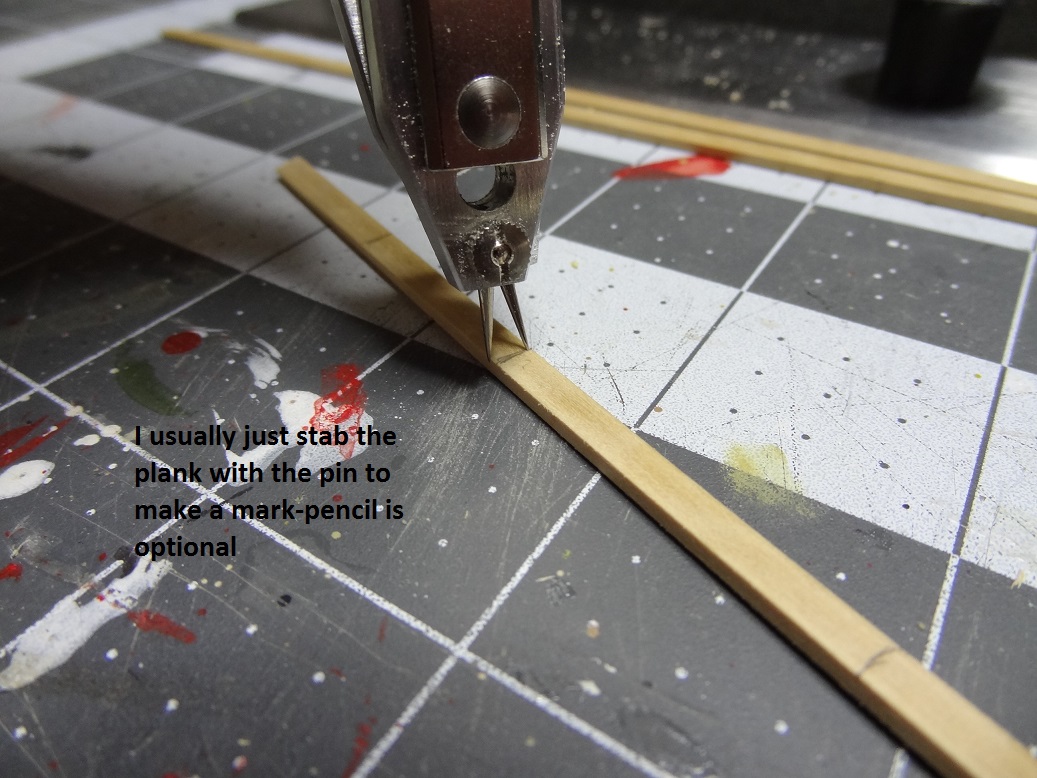
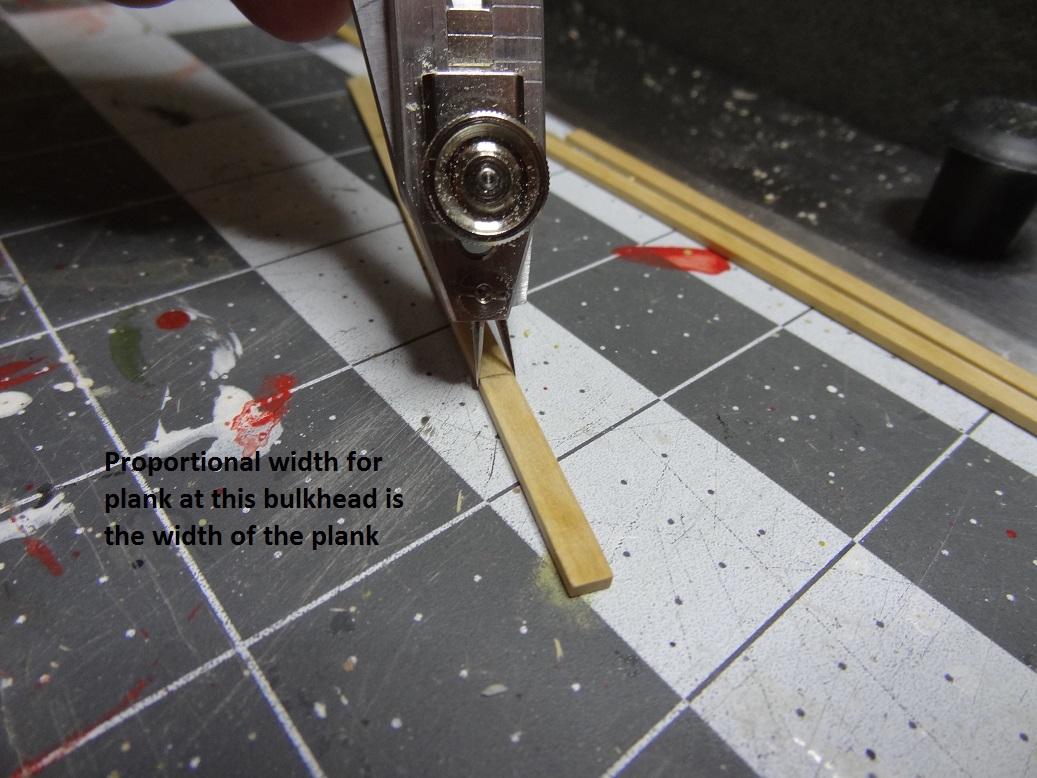
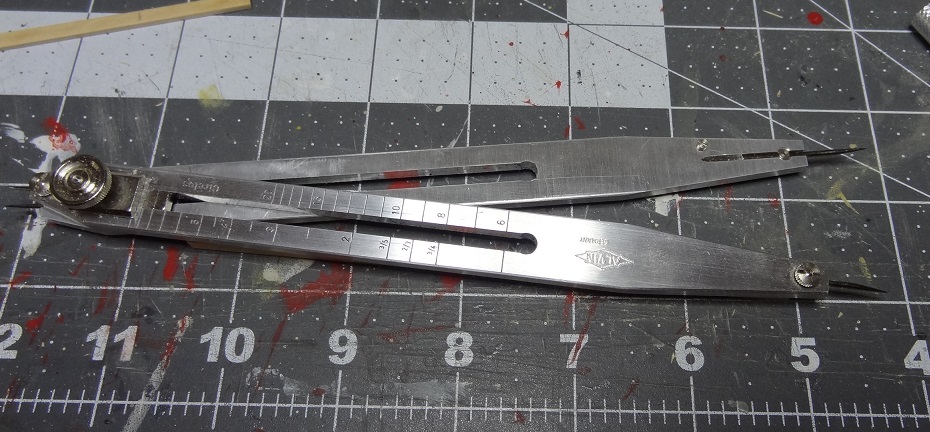
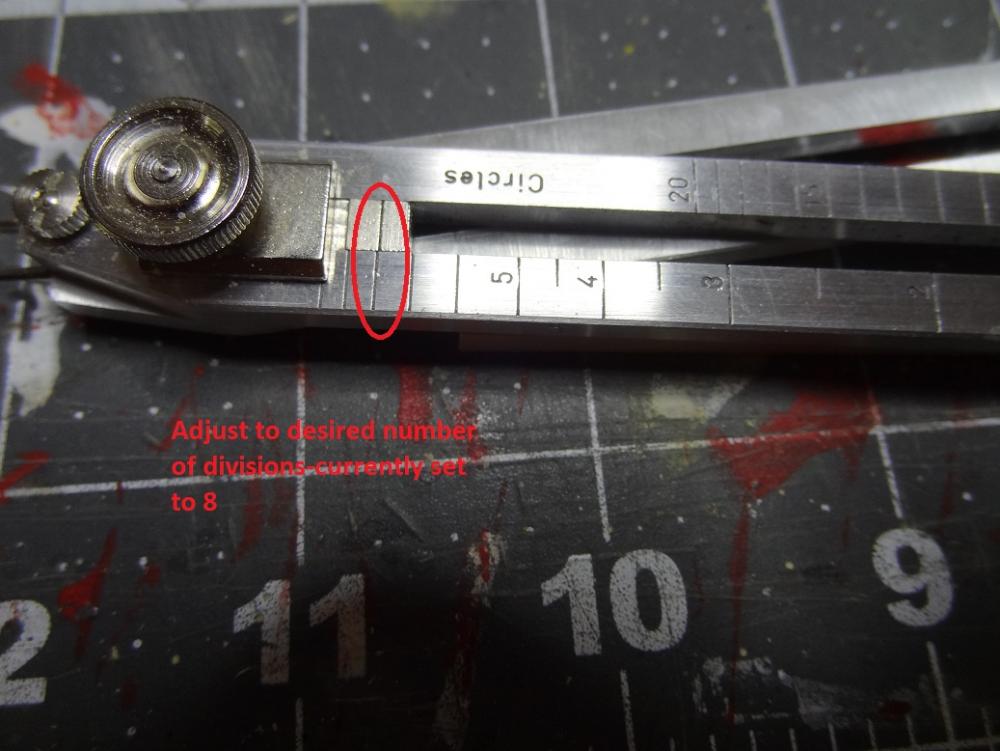
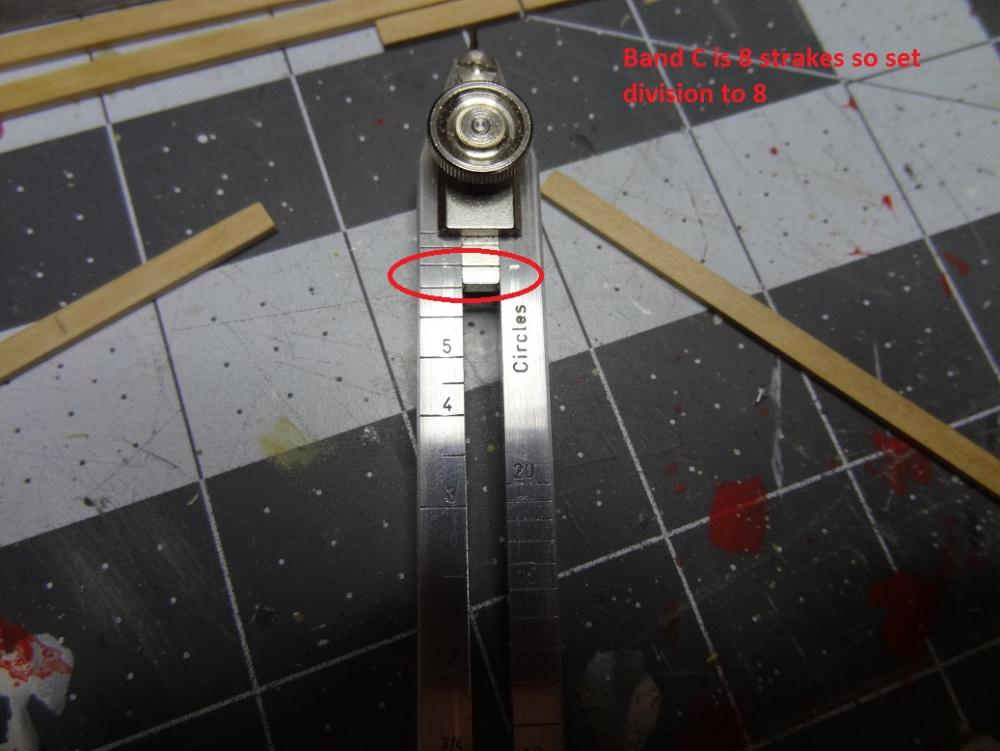
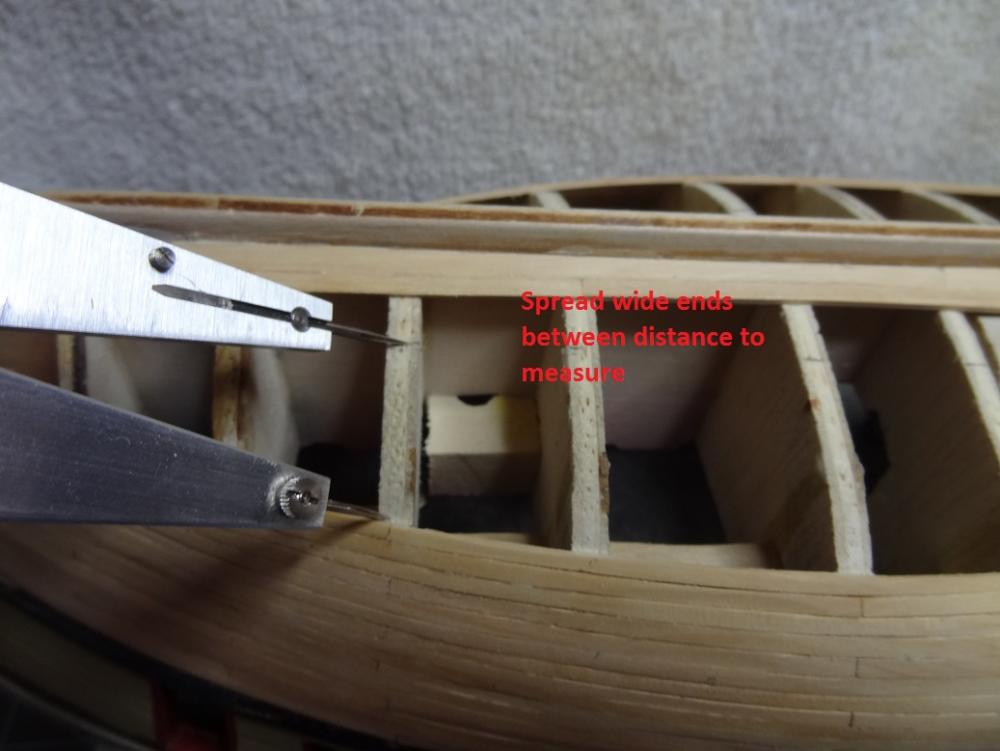
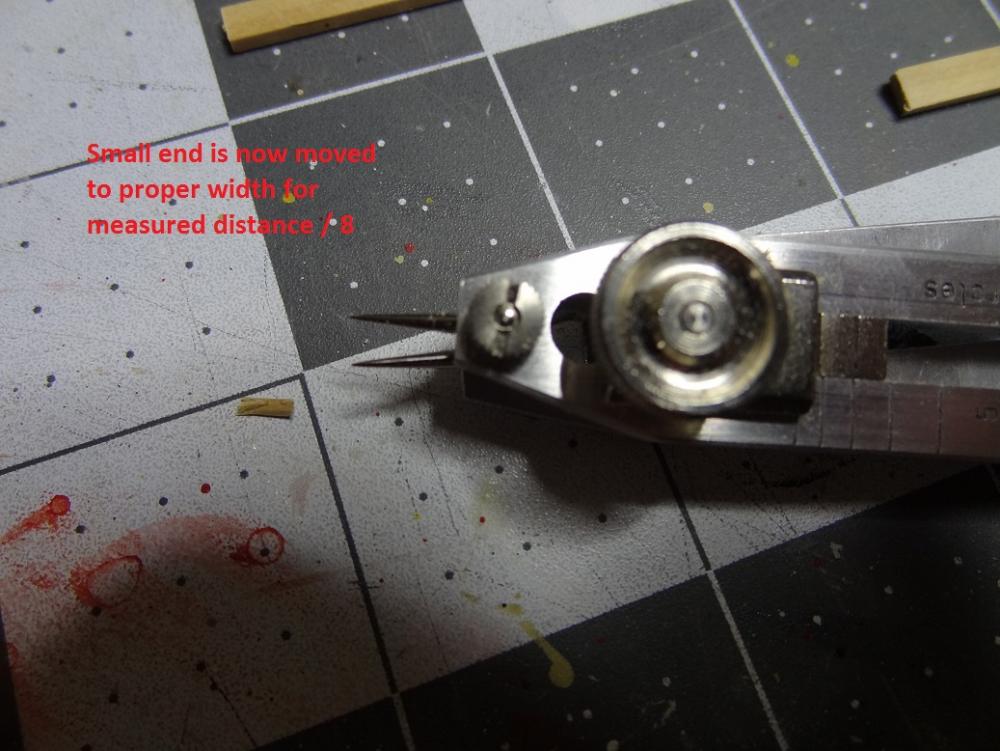
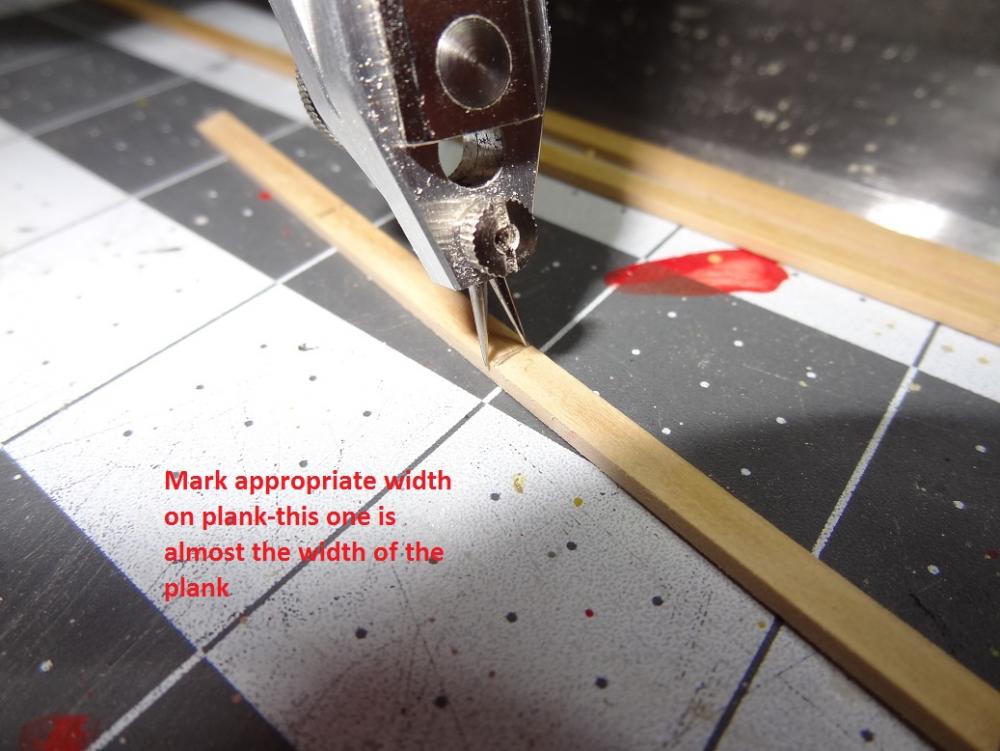
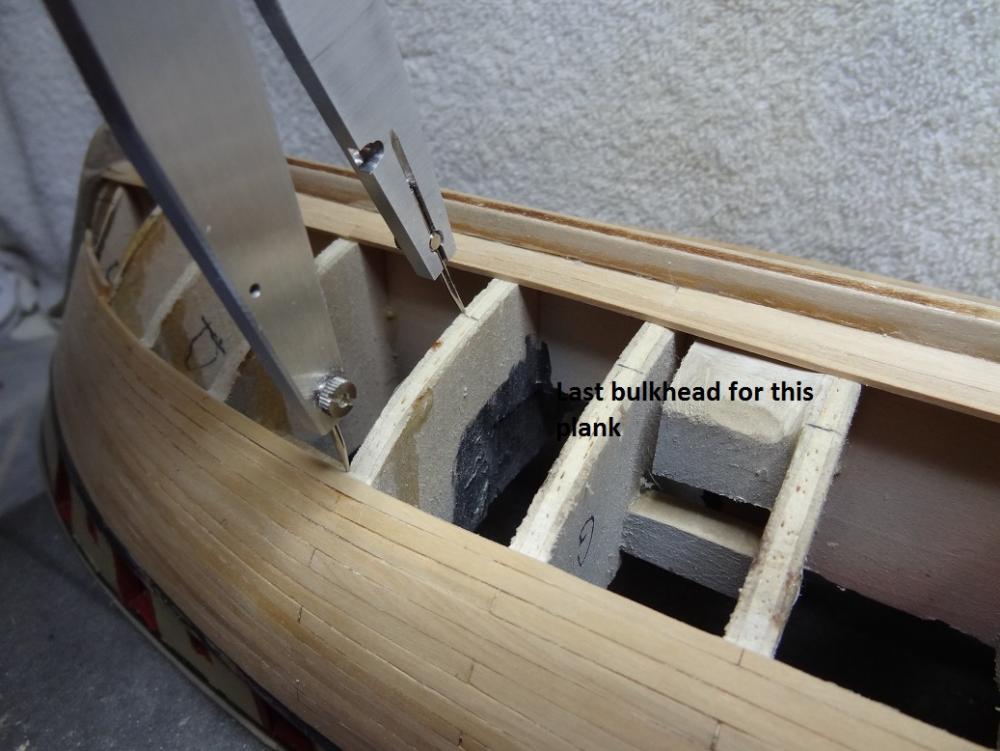
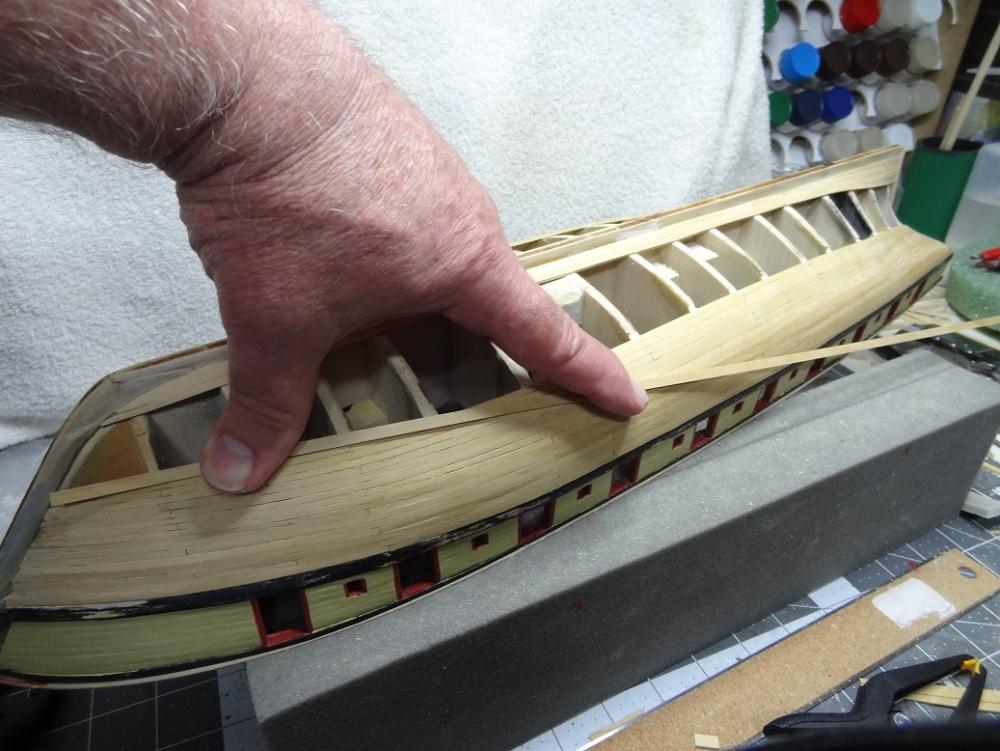
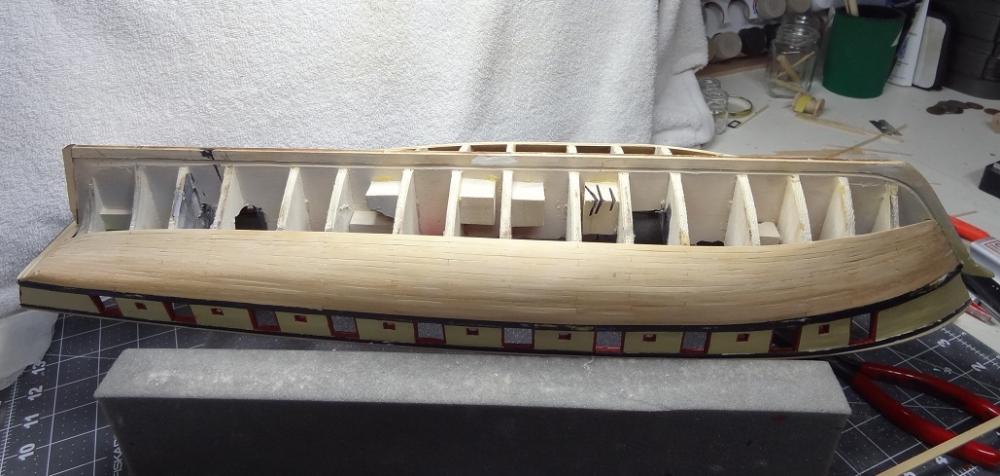
Hi everyone - I have mentioned proportional dividers several times lately. Frankly they are something I just recently found out about. But I have quickly come to see their value, particularly with hull planking. I have had several PMs asking about the dividers so I thought I would do a quick demo for those that haven't had the opportunity to use them. They can be purchased online at Amazon or any art supply or architect supply site. Prices range from $12 to over $800 - the difference being materials and precision. The one I have was around $75. I am using the dividers to help me determine the width of planks as I lay them to the hull. As you know the width will vary from one end to the other. One note: I do not lay a single long strip for a strake. Instead the strip is cut into usually 5 pieces and each piece laid individually. So on with the show.... I go thru this routine for each strake. You have to decrease the divisions for each strake as after the first strake is laid there will be 7 left. The nice thing about dividing for each strake - even if you screw one up (too narrow or too wide) when you do the next measurement it will automatically correct itself. So it is just about impossible for the the last strake in the band to miss the band mark. The only way to mess up is to not get your bands marked accurately. For full disclosure, the measuring method I am using is how to divide a straight line into equal parts. Of course the bulkhead edges are not straight. There are methods for using the dividers for circles and curved surfaces - just a little more math involved. However, I have found that for this application, at least on the Niagara hull, the straight line method is sufficient and incredibly easy. It takes less than a minute to measure and mark a strake at each bulkhead. Hope maybe this will help someone......


- 843 replies
-
- 9
-
-
- niagara
- model shipways
- (and 2 more)
-
Thank you Joel. Things have progressed since the day I first opened the kit box back in October. Yes, hard to believe it's been 7 months. I feel like I'm at a point where I can spot when something is not right. Coming up with solutions is where I am still heavily dependent on everyone here at MSW. It has been a pleasant journey.
- 843 replies
-
- 2
-
-
- niagara
- model shipways
- (and 2 more)
-
Wow Antony - Cudos to you for your effort! And thanks for the link. It will help immensely and my daughter will love reading it. The kit looks like it will give her a taste of the main tasks we do in a larger build - just not too much of it. Now you have me thinking about getting her to do a build log.
-
Just to close this out - we went with the Mini Mamoli's. Black Queen and Flying Fish. Kits arrived today. Reasonably simple, but there is some planking and rigging called for. Daughter was SO excited. Should be fun!
-
Well a little bit of positive news. I filed the heck out of the area around the dip and the next strake will now lay where it is supposed to - with a little help. Not sure if I consider that a fix or just postponing the agony a little longer. I will file this strake at the same places. Probably the rest of the strakes as well. One nice note - I have been filing with a cheap MM flat mini file. It takes forever to raise any sawdust from wood. I completely forgot I had some of the best riffler files made, sitting in a drawer of the toolbox. So out come the Corradi's - set of 8. All shapes and sizes. What a difference!! They go thru the boxwood like a knife thru butter. All the filing mentioned above would have taken 30 minutes with that cheap flat file. Did it in about 5 minutes with the rifflers. There's one kind of like a curved rat-tail that is fantastic at getting into the concave curved surfaces at the stern. They won't be headed back to the toolbox any time soon.
- 843 replies
-
- 2
-
-
- niagara
- model shipways
- (and 2 more)
-
I think Larry had the same dip but it's a couple of bulkheads closer to mid-ship. He may have had to edge bend a little. Mine, being a little closer to the bow, I'm having to edge bend and do the normal bending for the bow. You are right about the pics and my build does the same. At some angles the problem is plain as day, at others it looks perfect. This is why I fell in love with the proportional dividers. It easily does exactly what you describe. As a matter of fact I am using them after every strake. 'Here's the remaining space (edge of last strake to band mark) and I have 5 strakes to go'. The dividers then show me how wide each of the 5 should be for each bulkhead. Lay that strake. Do the dividers again changing the setting to 4 strakes. The only way to hose it up is not getting your band marks right. Unfortunately for me, the dividers did not arrive until after I was finished with Band A and was a couple of strakes into Band B. And I knew my Band A was off at the bow.
- 843 replies
-
- 2
-
-
- niagara
- model shipways
- (and 2 more)
-
Brian - I have debated adding a correction plank. My gut tells me it is overkill for what I need to fill. I didn't include a pic of the plank I was spiling for that spot but I am adding maybe 1/16" in width to about 1 1/2" of a 5" plank In other words, it ain't much. This really didn't come to a head until I switched from 1/8"x1/16" strips to 5/32"x1/16". The wider strips don't want to edge bend very much. If I stayed with the 1/8" strips I could probably keep going. What I can't say is with either a correction plank or a spiled plank, will 1 fix it or am I going to have to do another one 4 or 5 strakes further on? Elijah - I have started a spiled plank for that spot. One edge is nicely shaped to fit edge on with the last strake but I am indecisive as to exactly how/where to add the additional width for the correction. If I don't get it right, I will just move the problem to a different spot on the hull!
- 843 replies
-
- 2
-
-
- niagara
- model shipways
- (and 2 more)
-
I'll check out logs, but here is what I am seeing A strip laid in the problem area - it sure wants to go off in a different direction. I can't help but wonder what kind of grief this is going to give me after a few more strakes.


- 843 replies
-
- 3
-
-
- niagara
- model shipways
- (and 2 more)
-
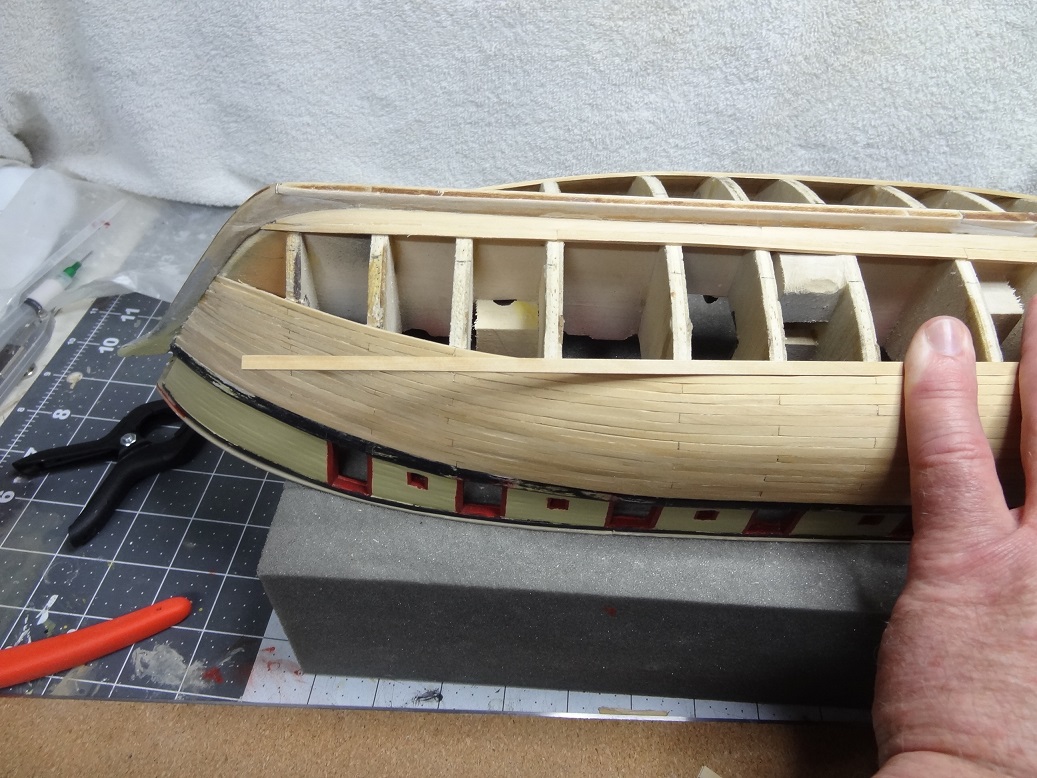
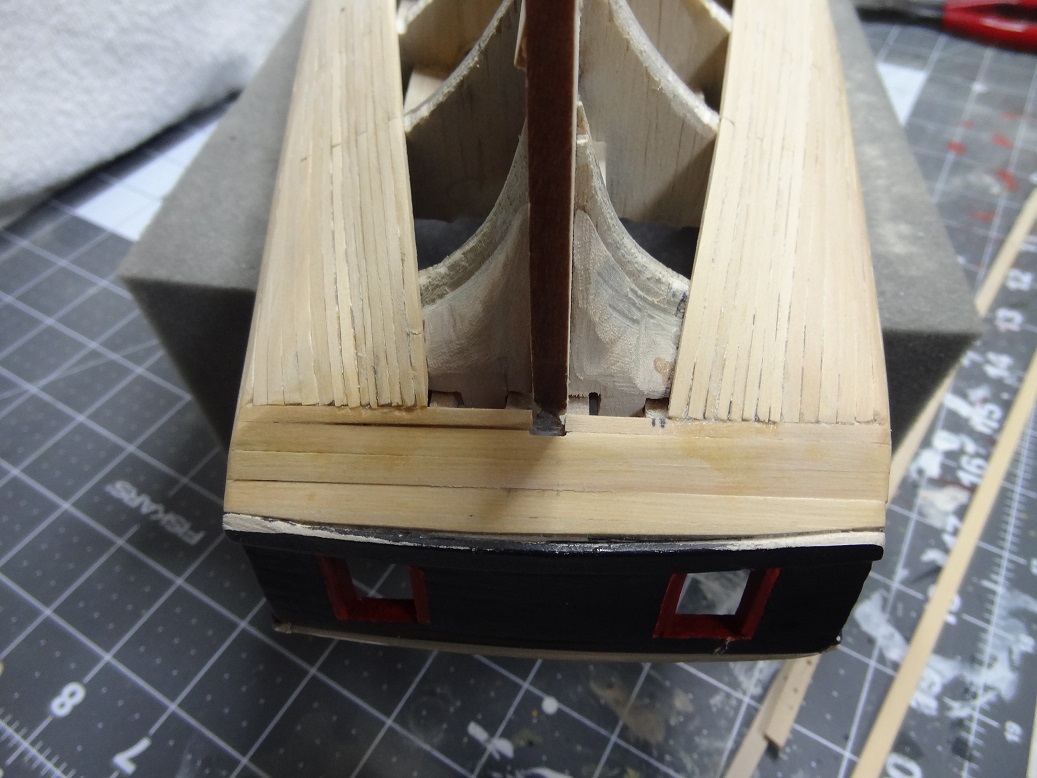
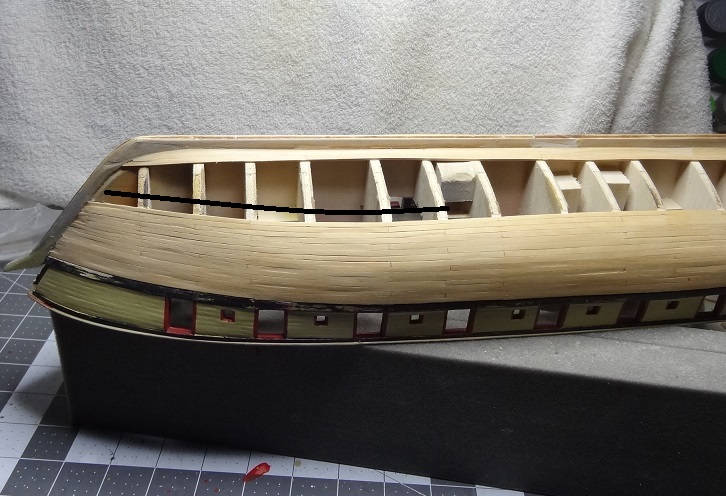
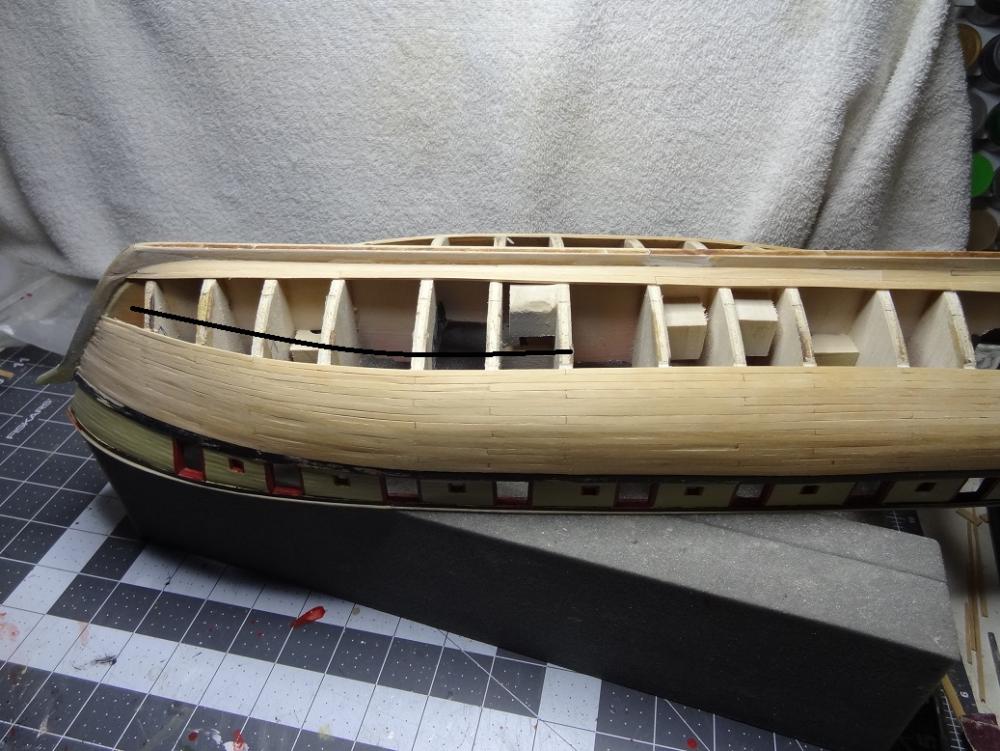
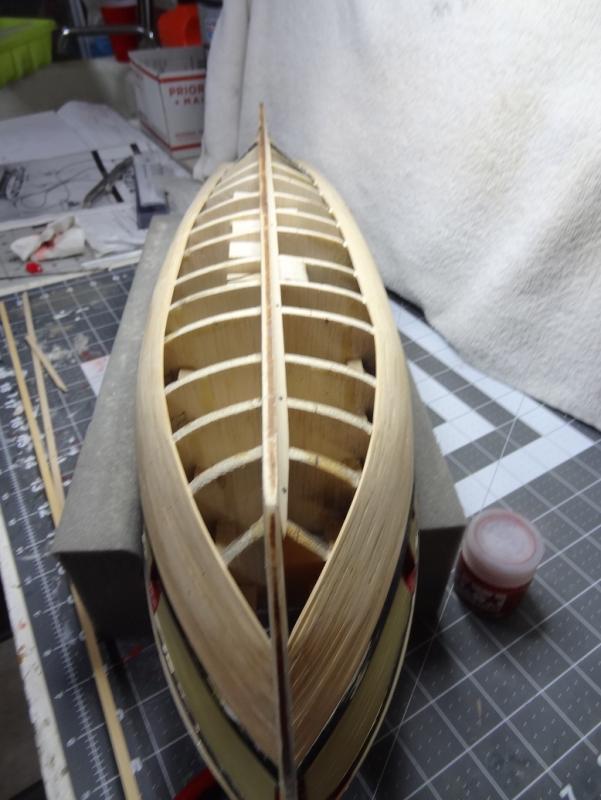
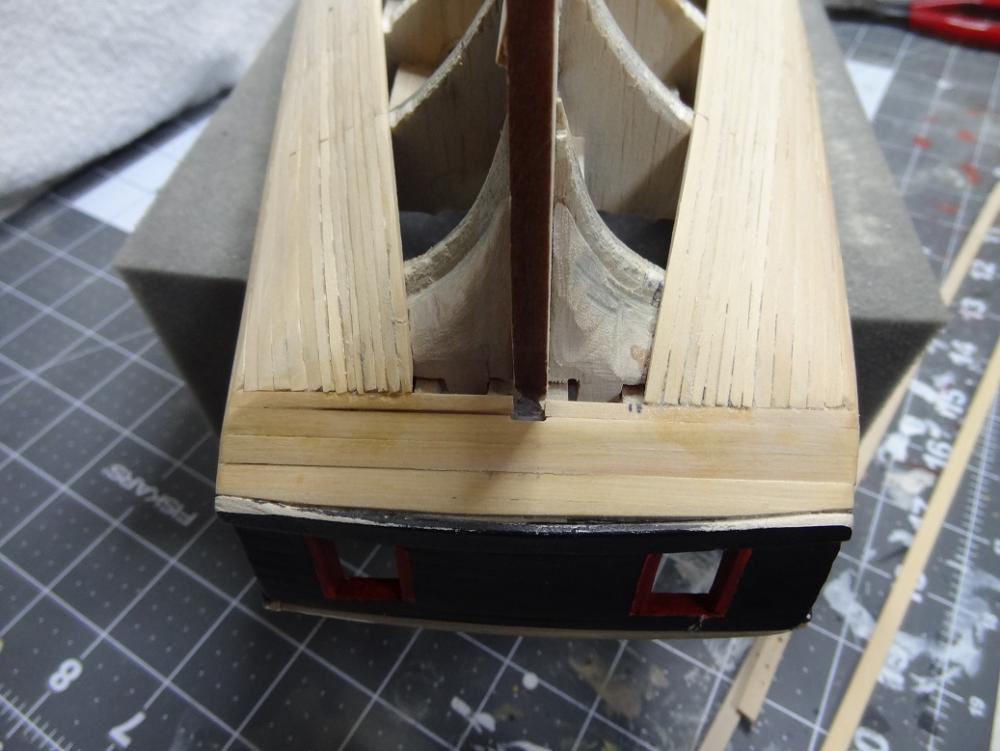
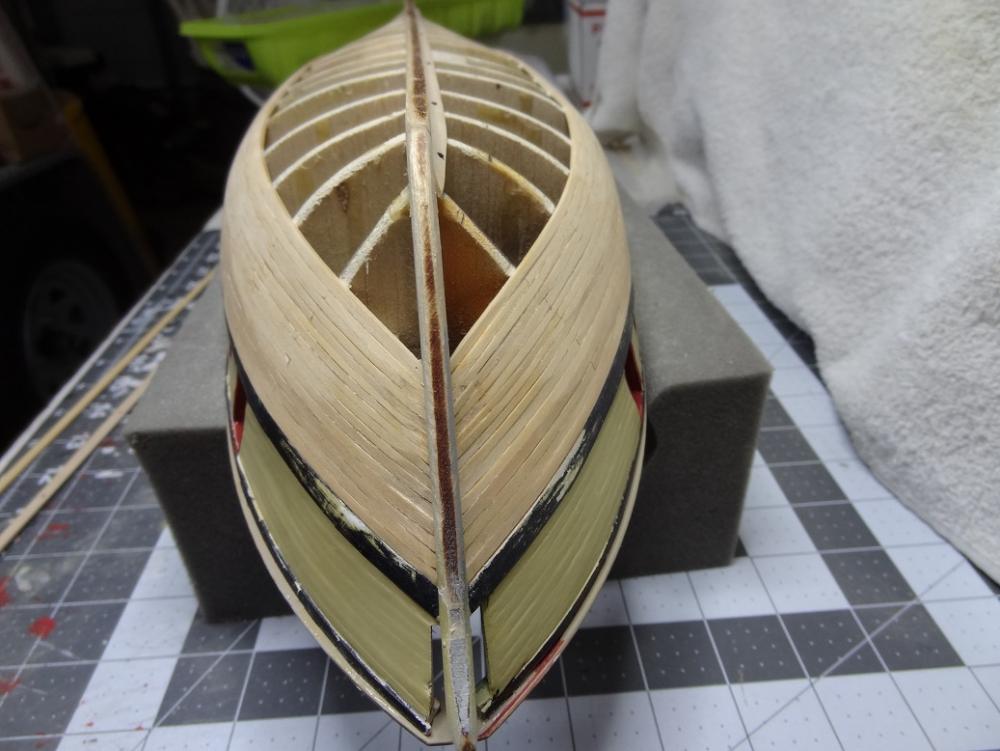
You know I think that's what most of the write ups I found were trying to tell me. But until I get to a place where I actually use the rabbet - placing the garboard - it's another one of those hard to visualize tasks. At any rate the garboard (with stealer) is laid on both sides. The strake above it, also with a stealer, is also in place. They look OK but I think there is a bit of waviness on the upper edge of the second strake at the stern. With all the twisting and turning I think it was inevitable. I've been doing quite a bit of forcing strakes to lay where they really don't want to go. Speaking of that, the strakes in Band B are taking a dip right about where the bow curvature transitions into the mid ship area. I was edge bending for Band B to get the strakes flush at that point, but Band C & D are calling for a wider strip - 5/32"x1/16" - and those don't want to edge bend very much. I've begun spiling a piece of 1/16" sheet. The edge that will contact the previous strake is shaped well and fits nicely. However, I am debating how to cut the other edge. This particular plank will run from bulkhead C to G, with the apex of the dip being at bulkhead F. I'm considering adding to the width of the plank around that point, maybe 1/32" to 1/16" to remove the dip for subsequent strakes. Is that a valid strategy or am I just denying the inevitability that all planks in that area may have to be spiled?
- 843 replies
-
- 2
-
-
- niagara
- model shipways
- (and 2 more)
-
That may be the clearest most succinct description of how to cut a rabbet I have come across. So the cut or groove of the rabbet is the same from bow to stern, wide enough to accept the garboard. But the angle of that groove changes to follow the twist of the garboard. Almost horizontal amidship rotating 90 degrees (to vertical) at the stern. Unfortunately, I have already butchered this one pretty bad. It's going to work but the garboard edge doesn't always sit squarely in the rabbet. I may have the perfect Dremel bit to use next time. I'll give it a try on some scrap wood.
- 843 replies
-
- 2
-
-
- niagara
- model shipways
- (and 2 more)
-
Get the smallest can you can find. It doesn't take much. Were you planning on staining or painting? I ask because if you are painting you may not need the sealer. You will want primer. But then you've got the decision of what type of paint? Some primers do better with certain types of paint. Also primer comes in several colors. You'll want a white primer for lite colors, gray for medium or dark colors. The primer will seal the wood. Several coats, sanding in between.
- 701 replies
-
- 2
-
-
- phantom
- model shipways
- (and 1 more)
-
OK Joel - I can see the plans telling me that. The thing I am finding a little odd is there are several bulkheads where the garboard is laying neither vertical or horizontal. Thinking bulkhead A is the bow and bulkhead Q is the stern these would be C,D,E and L,M,N. One edge of the garboard is in the rabbet, the corner of the other edge is on these bulkheads. At these points, It doesn't appear that there is much surface to apply glue. Some serious edge beveling might help but I don't know if that is appropriate there. And if I do, then the next strake to be laid is not going to edge up to the garboard very well.
- 843 replies
-
- 2
-
-
- niagara
- model shipways
- (and 2 more)
-
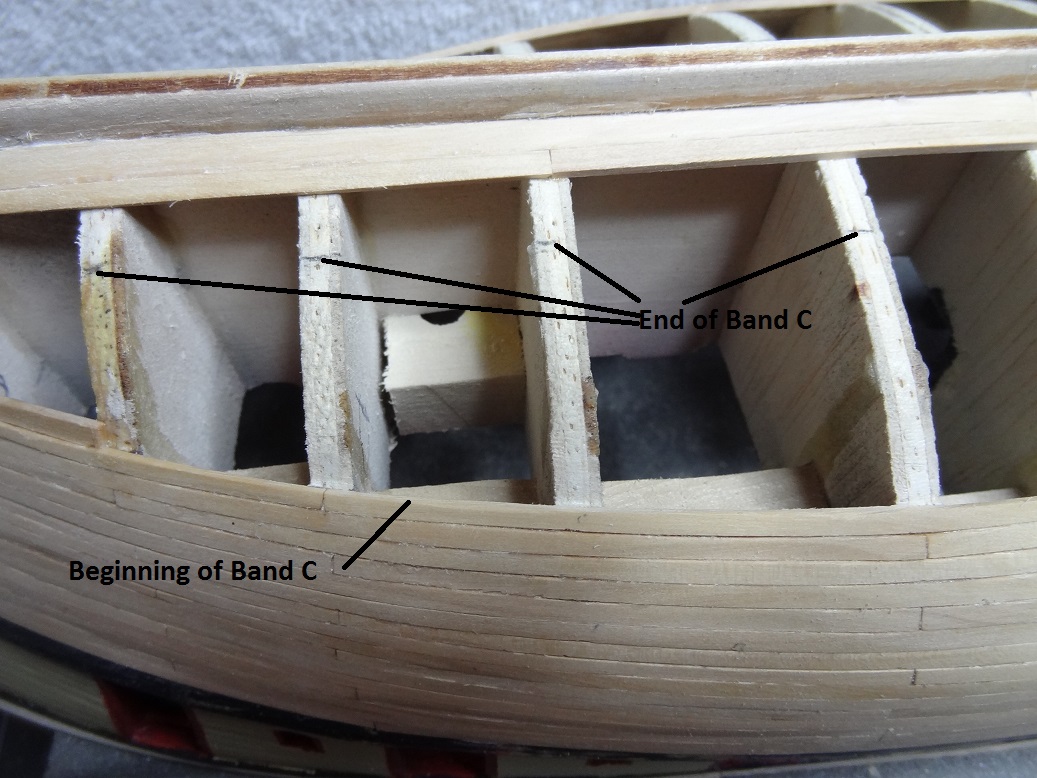
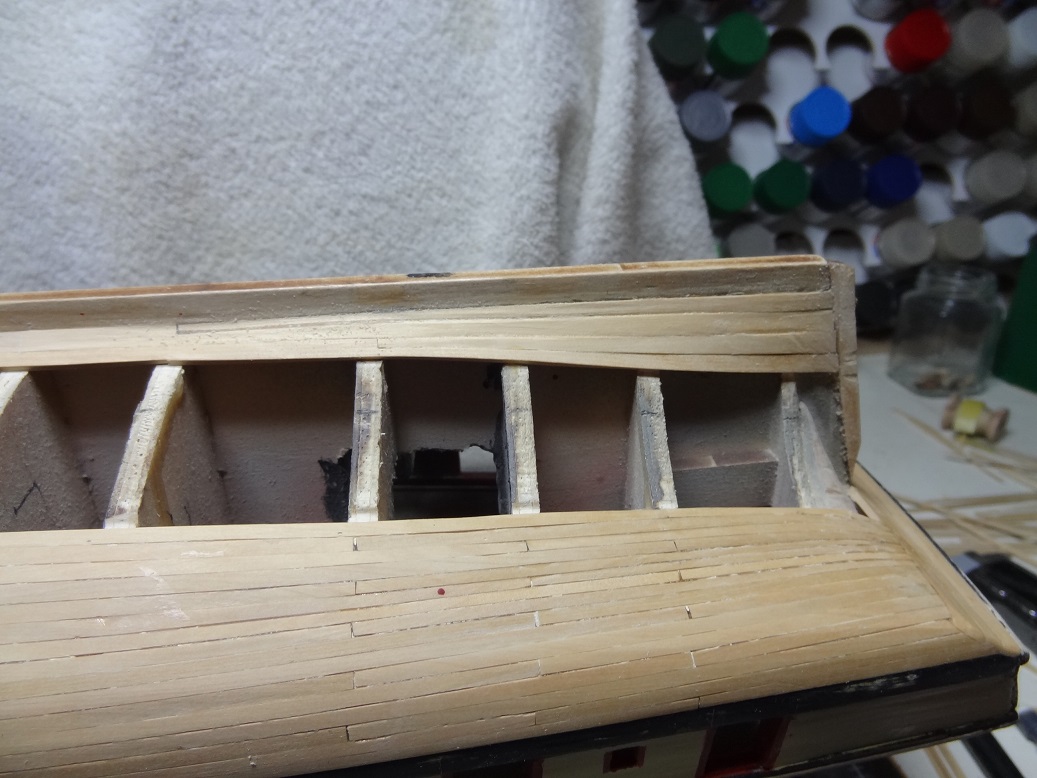
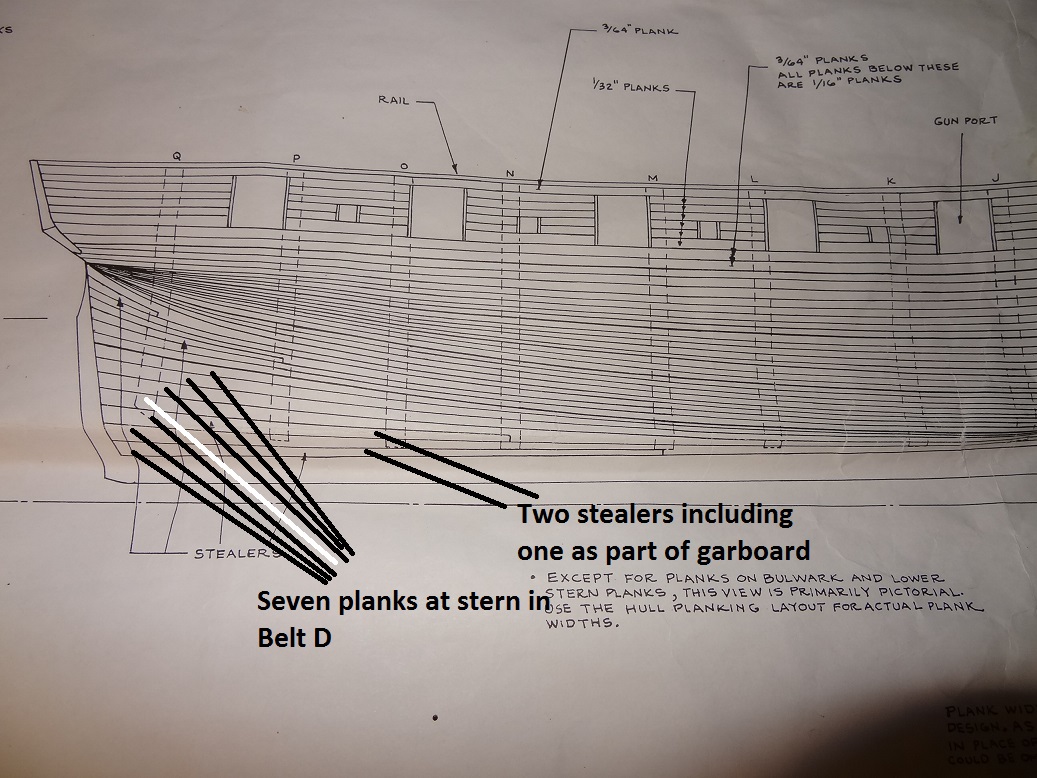
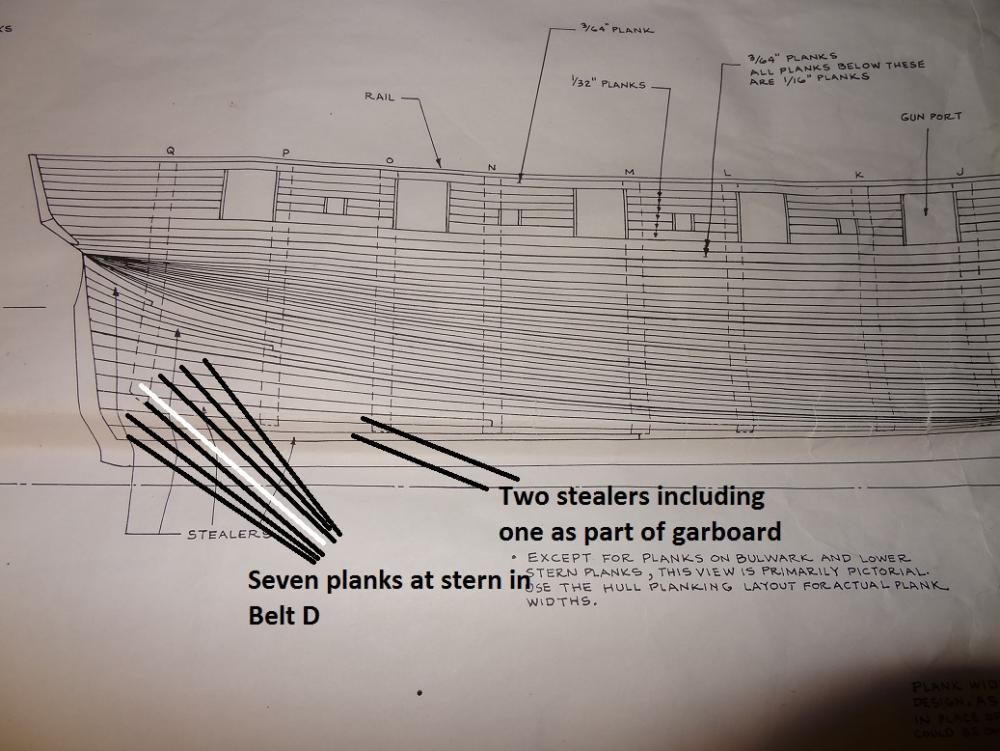
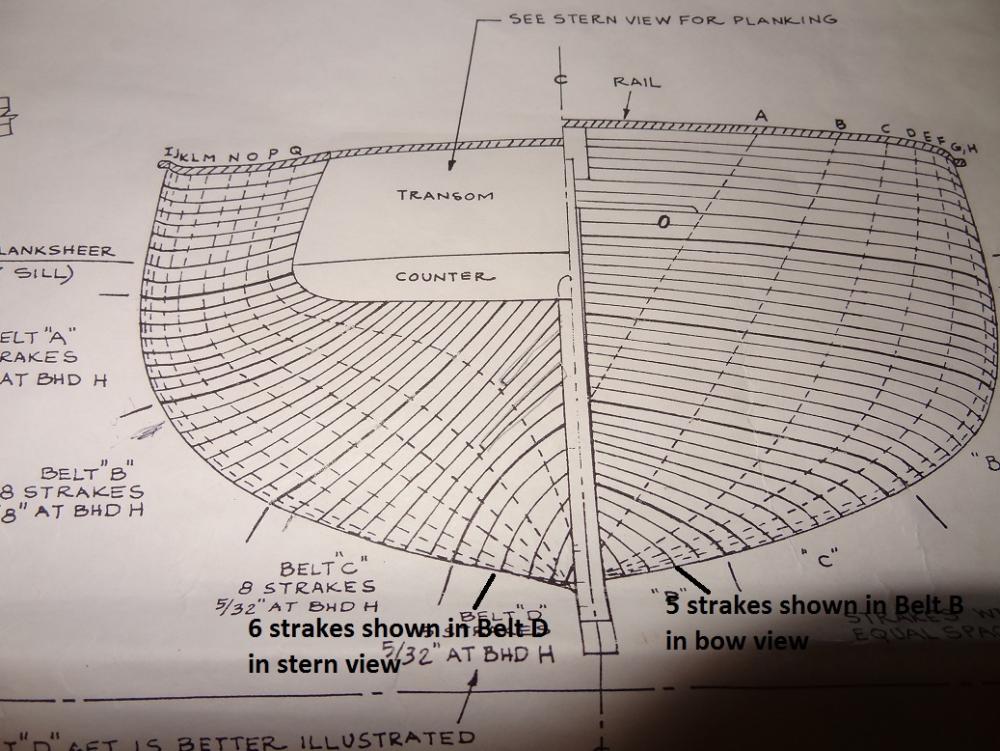
On further review of the plans here is what I have determined: 1. The plans are a bit confusing until I think about it some. On the plank layout the bow side shows 5 planks in Belt D. The stern side shows 6 planks. For this belt you also have to use the plank profile and that shows 7 planks at the stern. So 2 of the 7 are stealers so that knocks it down to 5 actual planks. This is what is called for in the plan. The garboard doesn't run all the way to the bow - it stops at bulkhead B. This is why there are fewer planks in this view. 2. The plank layout is attempting to show a 3D shape in 2D. This is why the shape of Band C looks so crazy (wide,skinny,wide,skinny). I believe in reality, and after measuring, remeasuring and remeasuring, it is fat in the middle, skinny on each end. 3. As best I can tell, the garboard is just another plank. Same width as the other planks in Belt D. You do have to look at the plank profile though, as a stealer is called for under the garboard at the stern. From the research I have done, I have not seen this arrangement before. Also in my research, the special shaping, wider planks, jigs, tapering and other baloney is not required for this build. It has a curved front end so that it will fit into the rabbet, but not much else. I do plan on putting a twist in the strip before mounting it - similar to what I did for the planks running over the stern. On another note, I have been stocking up on timber from Crown Timberyard - all shapes & sizes. Plans call for 5/32"x1/16" strips for the last 2 bands. This is one size strip I didn't have. However I do have several 1/16"x3" sheets so I used the Byrnes to rip a bunch of 5/32" strips. I am just so impressed with the accuracy of that saw. All the strips were spot on from one end to the other. Have not decided whether to continue on with hull planking or take a break and work on something else for a while Belt B completed:
- 843 replies
-
- 2
-
-
- niagara
- model shipways
- (and 2 more)
-
The stuff is pretty cheap at any hardware or home improvement store.
- 701 replies
-
- 2
-
-
- phantom
- model shipways
- (and 1 more)
-
I'll post some pix this evening but I wanted to get these questions out there. Band B is finished!!! With the help from the dividers, the last strake in the band (I'm working downwards from the wale) landed right on my bulkhead marks. So that had me feeling pretty good. No spiling or extra filler pieces required so far. I do see some waviness on the exposed edge of the last strake so I guess that needs to be smoothed out. Here's my concern. I went ahead and marked the end of Band C. On the plans, C seems to have some craziness to the shape, however my marks make C look pretty much like B - fat in the middle, skinny on the ends. The plans also show 2 stealers in this band, but I thought stealers were for when the band width exceeds the sum of the plank widths. I'm not sure that's going to happen. The other odd thing is on the plans, Band D (the last/lower band) is really fat in the middle. The marks I made for the end of Band C (which is the beginning of Band D) would make Band D almost the same width from bow to stern. Add to that, I am having a tough time reading the plans as they relate to the garboard. Looking at the planking layout, the bottom most plank in Band D is really fat in the middle. However, it appears that there could be another plank underneath. The bow view has something right at the keel but I can't tell if it is supposed to be a plank (the garboard) or it is just a poor print job. Researching garboards, I've seen them in all shapes & sizes. All I can figure is that different hulls are going to have different requirements. But at the end of the day, isn't the goal to have a nice flat surface to lay the next plank on? Early on in the planking, I made 2 test garboards and pinned them into place. There was a lot of wrestling to get them in place but the only shaping I did was to round them at the bow so they would fit in the rabbet. If I lay another plank edge on to the garboard it seems to lay nicely, again with almost no shaping. Any Niagara builders out there that have gotten past this step I would appreciate hearing from you. I can post a pic of the plans if that helps. I hope all that made sense.....
- 843 replies
-
- 2
-
-
- niagara
- model shipways
- (and 2 more)
-
Brian I think you have made me aware of my problem. I was just pressing my guide (a 3" metal angle) on the plank. Of course trying to keep anything on top of something as skinny as a plank is problematic. Often times the guide edge was not perfectly flat on the plank so the edge was at something other than a 90 degree angle to the plank. So getting the entire guide to the same elevation as the strip (1/16" in my case) should fix several problems. Putting something with some tack under the guide and the plank should make it even better. Brilliant!! re: the Mini Mamoli's, I did find a US site that still has a good selection at decent prices. I picked up 2 kits. Historicships.com has them. However you can't get to the page directly from their home page. If you Google 'mini mamoli' the results do have a link to their page. I called them yesterday and they did verify the kits are still in stock.
- 843 replies
-
- 3
-
-
- niagara
- model shipways
- (and 2 more)
-
You know that's one of the great things with this hobby. If you get tired of doing something or need to step back and regroup, there's usually some other completely different task you can move to for a while.
- 701 replies
-
- 3
-
-
- phantom
- model shipways
- (and 1 more)
-
Yes, my Niagara is the Model Shipways kit. Didn't buy it from ME. Got a better price elsewhere. Sadly, they don't seem to have any Mamoli kits. Since Mamoli shut down it's getting harder to find them.
- 843 replies
-
- 2
-
-
- niagara
- model shipways
- (and 2 more)
-
A little off topic but interesting. There was another - Constitution vs Victory. In terms of seamanship I don't know how accurate the video is, but I find it fascinating watching sails set and reefed, the luffing and tacking. It's a part of all battles that I don't think we often realize. It's not all just firing cannons at each other. Would be curious to know if there are others, perhaps not as detailed graphically, but show the movement of ships through some of the major battles.
-
Wow John - you had it worse than us. Hope you've got everything back in order. We're on the crest of a hill so I don't worry about flooding. Bought what I guess is a medium size generator back during the hurricane. It won't run the whole house but I can keep the fridge, deep freeze, fans, etc. going. Of course that brings on "extension cord hell". Got a feeling we haven't seen the last of the foul weather.....
- 843 replies
-
- 4
-
-
- niagara
- model shipways
- (and 2 more)
-
Brian - I did get a dehumidifier today. Guess I should have researched more. Yes, it did start filling the bucket almost immediately. It also exhausts 105 degree air. Reading the fine print - this is normal behavior. Go figure, low humidity makes it seem cooler. OK I get that. What does 105 degree air blowing into your room do????? It will be returned tomorrow. Good tip on the AC vent. I'm not sure if this idea will work or not. It's a big area even though my workbench is at one end of it. I don't plan on leaving it running all the time. Just turn it on 30 minutes before I start work and shut it off when I'm done. If I can keep temps in the mid 80's while I work I think that will be good enough. As for the planking tool - proportional dividers are used by architects, artists, (modelers), etc. Typical use is to transfer measurements between drawings and the like and can be used to change the scale as well. It looks a little like a compass (the circle drawing one). You can get plastic ones on Amazon for $10-15. Better ones go for $50+ . It has given me some confidence when shaping planks. Even if I screw one up, after it is glued I can remeasure the distance to the end of the band and it will tell me how wide the remaining planks need to be. So I can adjust as I go. I see in your signature you have a few mini Mamoli's. Where did you get your kits? Been considering one for my 10 year old but they are not that easy to find.
- 843 replies
-
- 4
-
-
- niagara
- model shipways
- (and 2 more)