mikiek
-
Posts
2,276 -
Joined
-
Last visited
Content Type
Profiles
Forums
Gallery
Events
Everything posted by mikiek
-
 One thing I forgot to ask last nite regarding the transom. The underside of the horn timbers will be planked. I believe they are called counter planks? These planks run 90 degrees to the keel. They will also intersect with the first few hull strakes. How is that supposed to happen? Do the hull planks butt into the counter planks or vice versa? It seems either way, the result will be an ugly joint.
- 843 replies
-
- 3
-

-
- niagara
- model shipways
- (and 2 more)
-
I have faith that this young man will do what he needs to do. Whatever it takes. While doing my first build ( I haven't got to rigging yet), I am guessing that sanding/filing has taken at least 50% of my effort
- 701 replies
-
- 3
-
-
- phantom
- model shipways
- (and 1 more)
-
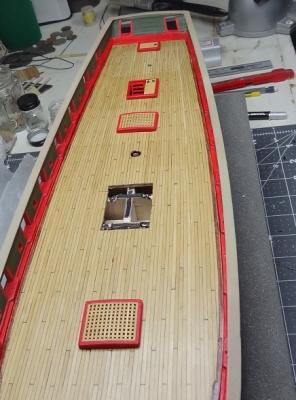
The hull planking process has officially started. I have taken a rather lax approach to the band method. Rather than trying to mark off everything before beginning, I am going to plank band A - not worrying about the others until I get there. Band A is rather easy, 3/4" wide at each bulkhead (8 - 3/32" planks) so no real plank shaping to speak of. This is a real blessing as I am able to get the rest of my process down without that complication. I've done some bending at the bow and it looks like there will be some twisting involved towards the transom starting at the 4th strake. I am also using cut planks butted together rather than a single strip for the entire strake. This has worked out very well as it is easy to make a small correction without having to tear off a whole strip. I am finding I did a reasonable job when I originally faired the bulkheads, but when it gets down to laying planks there is some fine tuning to do. Lesson there - don't kill yourself trying for a perfect fairing right after gluing the frame together. You are going to have to clean it up down the road anyway. Also, the small planks make fairing easier (at least for me) as I only have to straighten out an area big enough for the next plank. So I fair both the bulkhead and the edge of the previous strake. So far I am ending up with a nice smooth surface to lay the next plank. We'll see what happens at strake 4. The other step I have been doing is to bevel the top inner edge of each plank. I was doing that with the bulwark planks. It seems to help the plank be flush with both the previous strake and the bulkhead surface, as those two surfaces are not perpendicular to each other. Band B will be a little more challenging - narrowest at the bow, not quite as narrow at the stern. Band C looks like the crazy one. I'll post some pix when I finish Band A Thanks for reading!
- 843 replies
-
- 3
-
-
- niagara
- model shipways
- (and 2 more)
-
I had a miserable time with this site's edit features using IE. I now use FireFox here and all the editing works like normal. I don't like that solution but it is what it is.
-
I'll bet the second coat smooths things out. Red seems to show brush strokes worse than other colors - at least for me. The second and third coats really made a difference.
-
I Like your red. Have same ordered and will probably redo my red as well. I have not seen Chuck's plans - do you build the on the bulwarks (on the hull) or do you build the deck outside the hull and then glue it to the bulwarks? I did the rails as the very last task for the bulwark sides. Figured it might give me a slight bit more room to move around and they wouldn't get beat up.
-
That is gorgeous wood Don! The kit just gets more impressive. Thanks for the update.
- 653 replies
-
- 5
-
-
- trabakul
- marisstella
- (and 1 more)
-
My resupply of Syren grates arrived yesterday along with a couple extra jigs. Chuck even sent me a couple extra grates to replace the ones I busted up the first night. Everything is working well. A few pieces needed sanding but most dropped right in. I got the extra jigs so I can be making more than one grate at a time. I'm glad everything is resolved, they look good and add a nice level of detail. And cudos to Chuck for standing behind his product and making things right!
-
I like that color! Now you have me thinking about repainting the red on Niagara. I get some realism and it's a more pleasing color to my eye.
-
The pigments to make bright red were not easy to come by. At least compared to others.
-
Will let you know if I find something. I'm thinking precision placement may not be too important.
-
Hey Scott - have you drilled the holes in the chock rail yet? I can't seem to find the spacing measurements anywhere in the plans. I see the rail on some of the plan pages but it's hard to gauge from that where they should be placed.
-
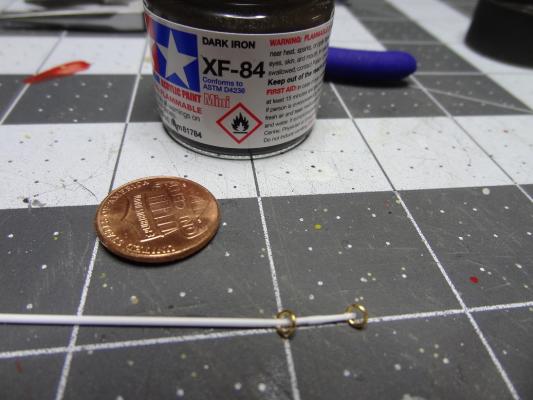
Mike thanks - I was trying to find the Tamiya version.
-
Had a suggestion for red oxide - described as a brick or barn red. Probably, a more accurate color for the period.
-
Thank you Scott. It was an enjoyable effort. I found some red oxides that seem to be popular with German tanks. Oddly, Tamiya doesn't make one or at least they don't call it that. Anyway, I am already too invested in the fire engine red at this point. For all you Niagara builders - I came across the chock rails last night. Painted and ready to go, but stuffed away in a drawer. I know it needs some holes drilled for rigging but I cannot find the actual spacing measurements in the plans. The plans and instructions have a pic with some holes but the angle of the view makes it hard to guess exactly where they are. Does anyone have these? Does it really matter if they are exact?
- 843 replies
-
- 2
-
-
- niagara
- model shipways
- (and 2 more)
-
Bob - I have the Veritas Mini Plane already. This turned out to be a non-issue for me. Rounding the edges was a better option.
-
Are you trying to round off the edges? If yes, Goole - block tumbler - or search this site
- 701 replies
-
- 2
-
-
- phantom
- model shipways
- (and 1 more)
-
Basswood is kind of famous for that. Even with the grain sometimes. I think some of it can be due to how well it is cut - or how poorly. Especially the thinner pieces. I've given up on it for most of the build. Of course the response to that is - thousands of people have done thousands of gorgeous builds with basswood. So what is my problem?
-
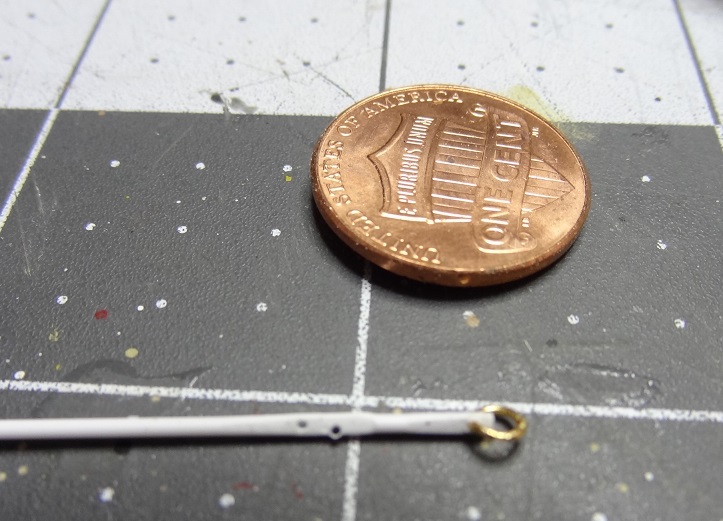
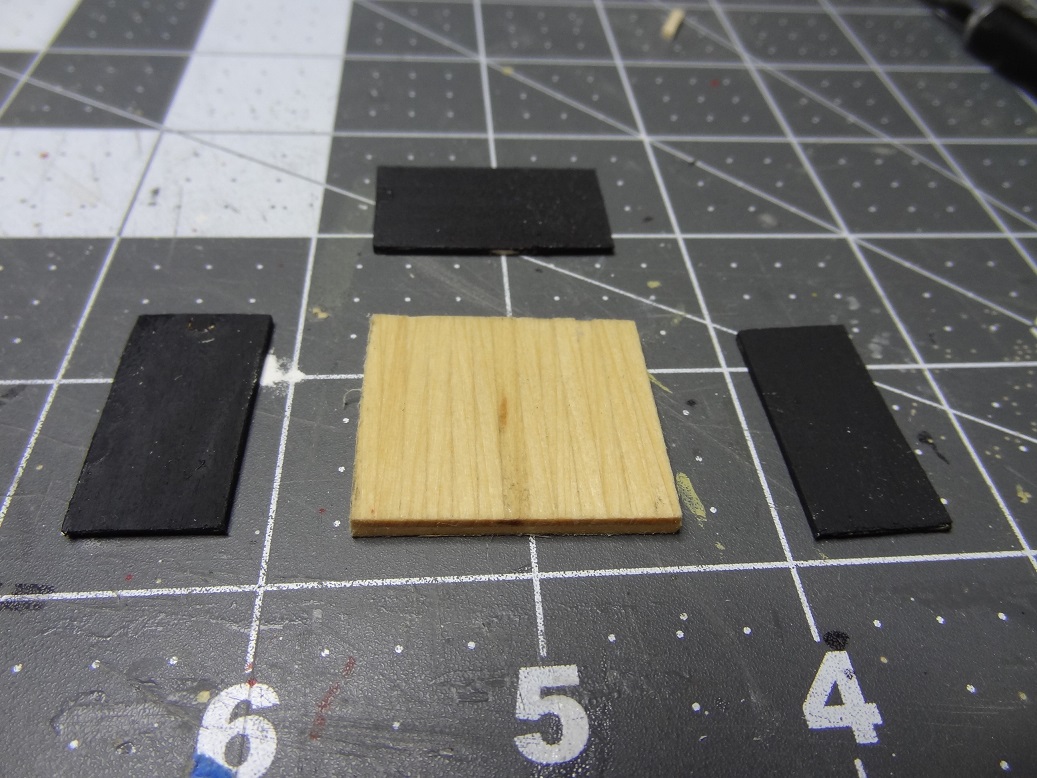
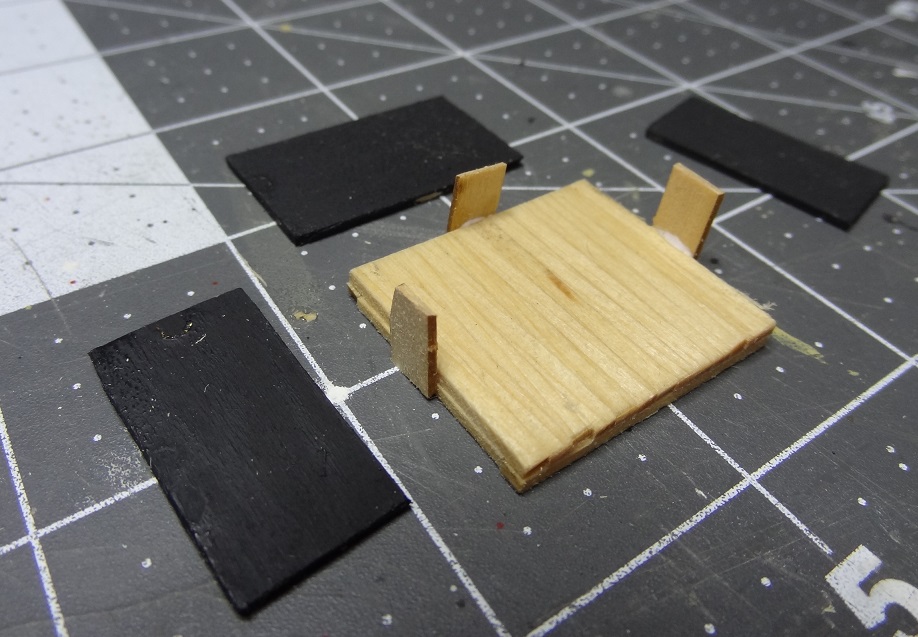
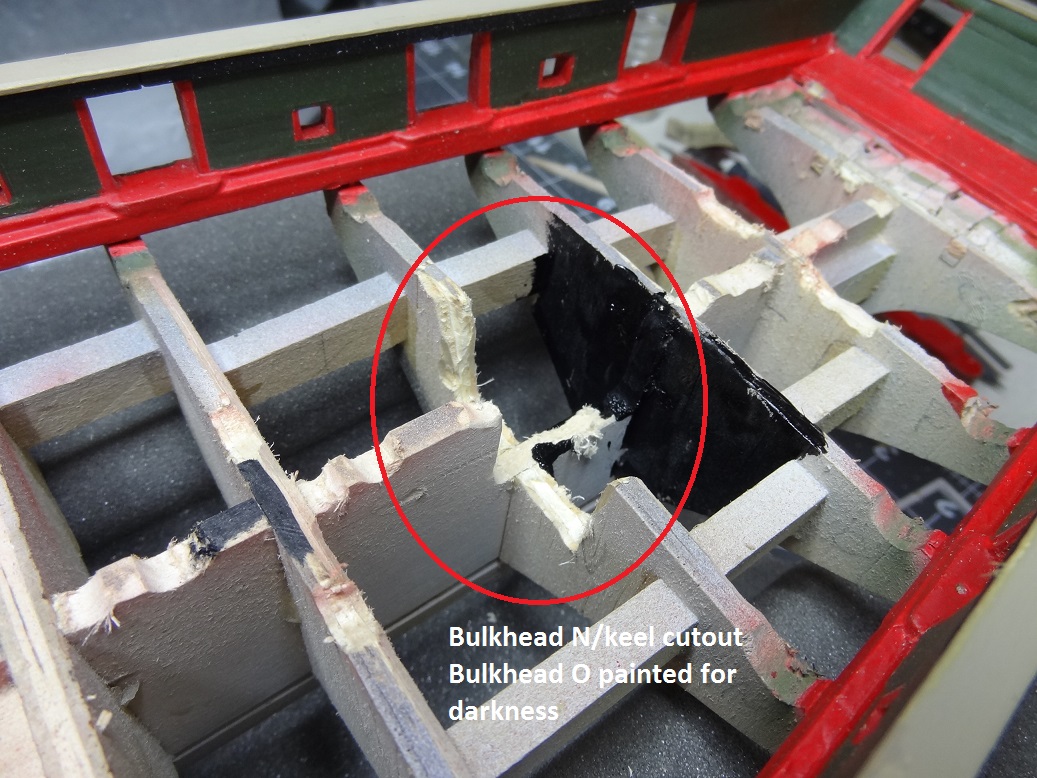
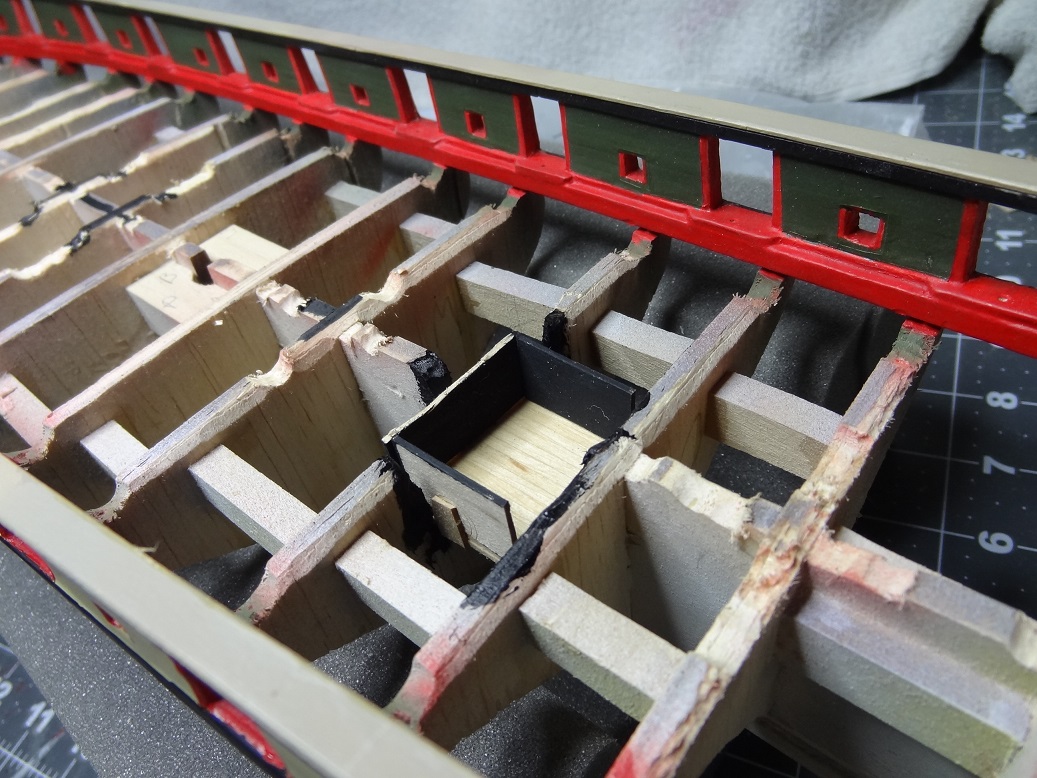
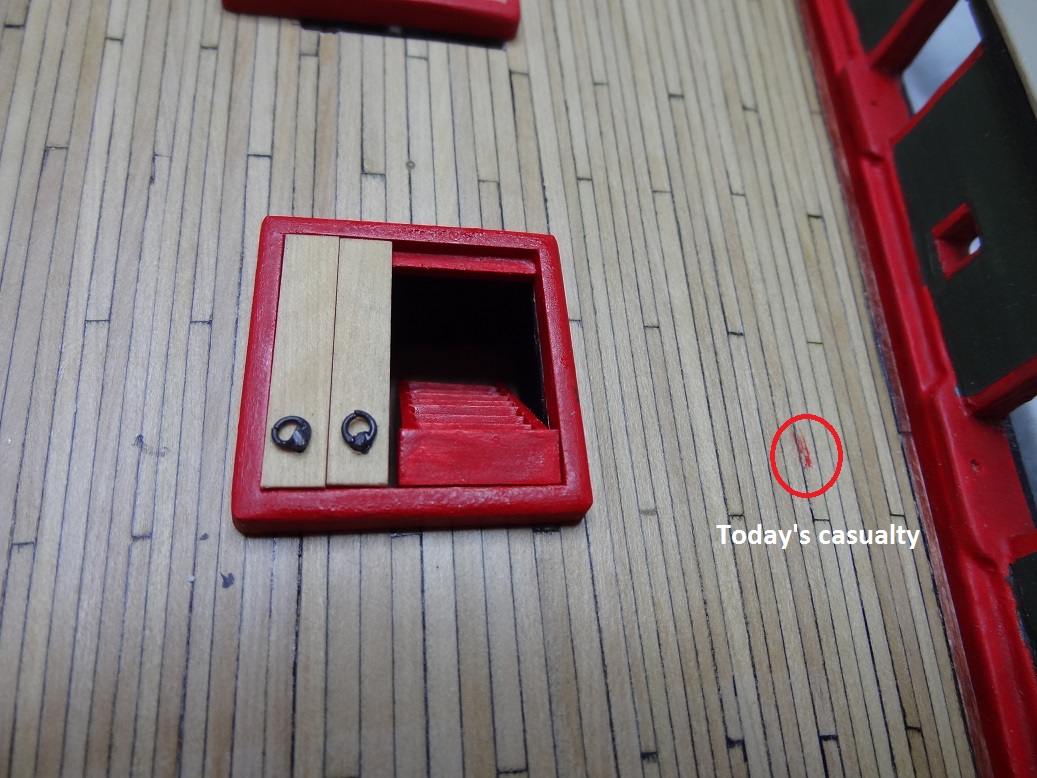
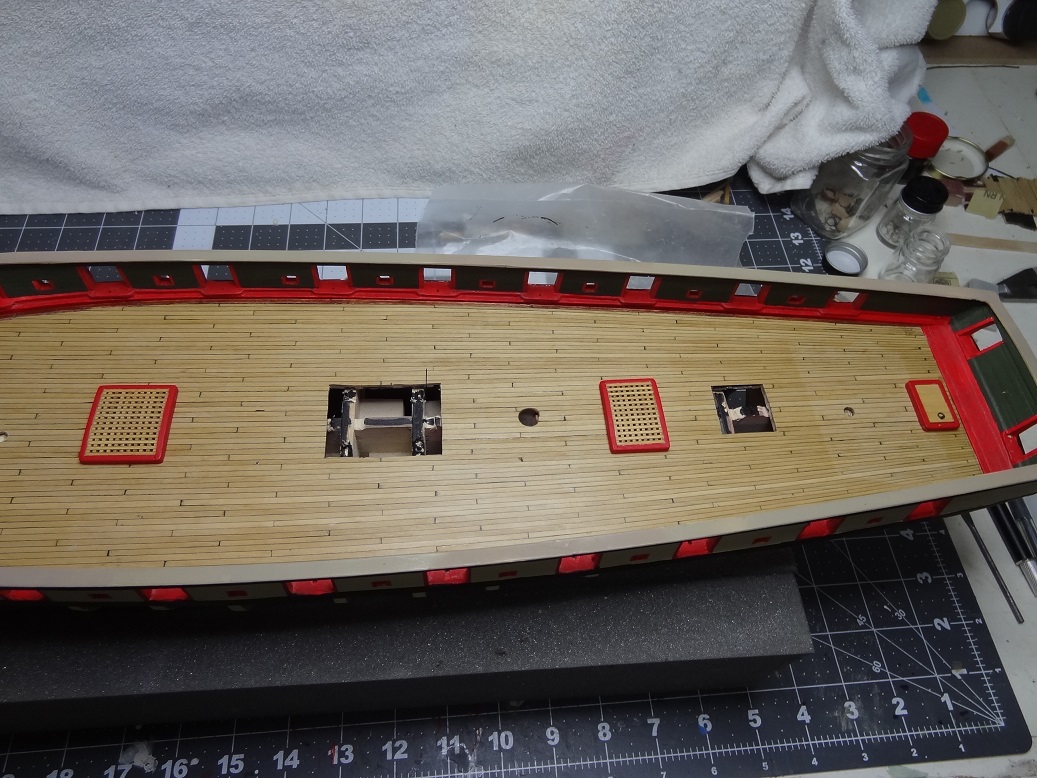
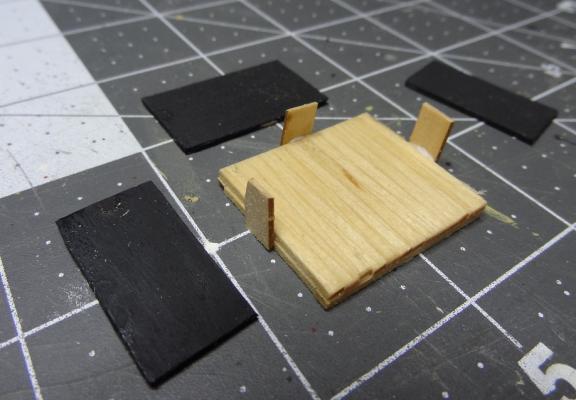
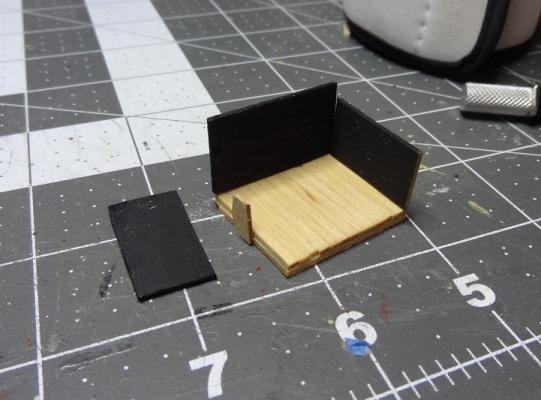
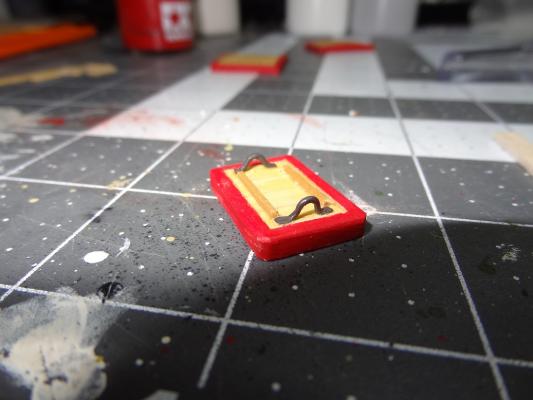
OK - I will add a binnacle to my list of deck items. Definitely not making a captains skylight. As for today - SUCCESS!! I think the kid nailed it today. The ladderway hatch came out..., well take a look. First off, the ringbolt from yesterday - used a few more today. How do you drill a <1mm rod with a #75 bit? I was using the brass rings from the kit and #75 was as small as I could go and still make a big enough hole. But getting that hole started proved challenging. Ended up with a styrene rod and squeezed the drilling spot to flatten it out a little. Much easier! After inserting the ring you can squeeze it back into shape. Please excuse the focus, but you get the idea. I'm using this color paint a lot lately instead of blackening. I like the looks. Back to the problem at hand - a ladder going down to the lower deck thru a hatch opening (ladderway). First problem, bulkhead N goes right across the opening. As does the keel. Solution - remove. Next - the ladder has to end up on a deck. Problem - there is no lower deck on this build. Solution - make one. Problem - when you look into the ladderway hatch you can see other bulkheads. Solution - darken the entire area where the ladder lands. Gives a whole new definition to the term false deck! My Evil Black strikes again. It is sooo black. The rest is sort of a repeat of the grate/frames. I elected to go with solid planks as a covering. This helps hide the "below decks". Keep in mind none of this has been glued yet so alignment is a little off. How about that for a rookie? I'm pumped! I think this was a nice addition and my first real "bash". For those that have followed this log for a while, you may know I have been threatening to glue down my deck for some time now, and trying to do whatever is necessary first. As someone who has yet to plank a hull to those that have - would there be any benefit to planking the hull before installing the deck?


- 843 replies
-
- 4
-
-
- niagara
- model shipways
- (and 2 more)
-
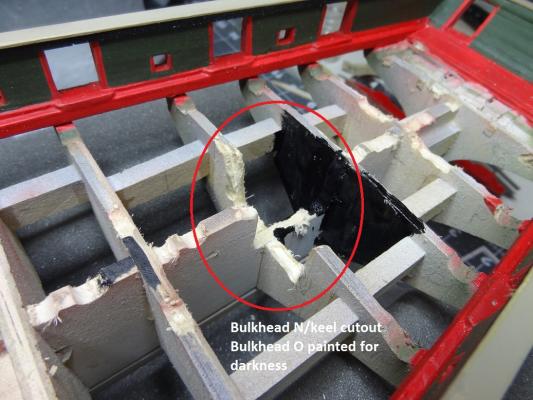
Ouch! You're a braver man than I. Not sure I could "loan out" a model. On display somewhere, yes, but I would want to be there the whole time. No one touches it but me. Even then I hear horror stories about transporting models to and from shows, displays, etc. Actually the top was the same one as before , just flipped. Only problem was it was glued to the frame and didn't want to come off at first. I'll probably end up gluing it again. That is the type of part that I WILL end up losing. Besides, there is nothing to see underneath. Last nite, I did get the Dremel with a grinder bit and took out a piece of the keel and bulkhead directly under the ladderway opening. Even without a frame, the ladder looks quite good there. I think it will be a nice touch. I just need to decide how to integrate the ladder into the frame. As has been suggested, I will likely put a few planks in the frame, probably at one side or the other. Then the ladder will take up the rest of the opening. I happened to glance at the plans and realized that the ladder has to end up at the aft side of the hatch. Having a climber exiting to an alley is not practical and exiting towards the bow would put them face to face with the capstan. Joel - in your Niagara article you mentioned placing a binnacle rather than the captains skylight. Is that what you ended up with? If yes, did you make one? I will have to do something at that spot as I did drill a hole in the deck there in anticipation of cutting the footprint for the skylight. I have seen several model web sites that sell scale binnacles, however it's difficult to see what they look like. So far I am really pleased with how the deck pieces turned out. Thanks to everyone for their ideas and support!!!
- 843 replies
-
- 3
-
-
- niagara
- model shipways
- (and 2 more)
-
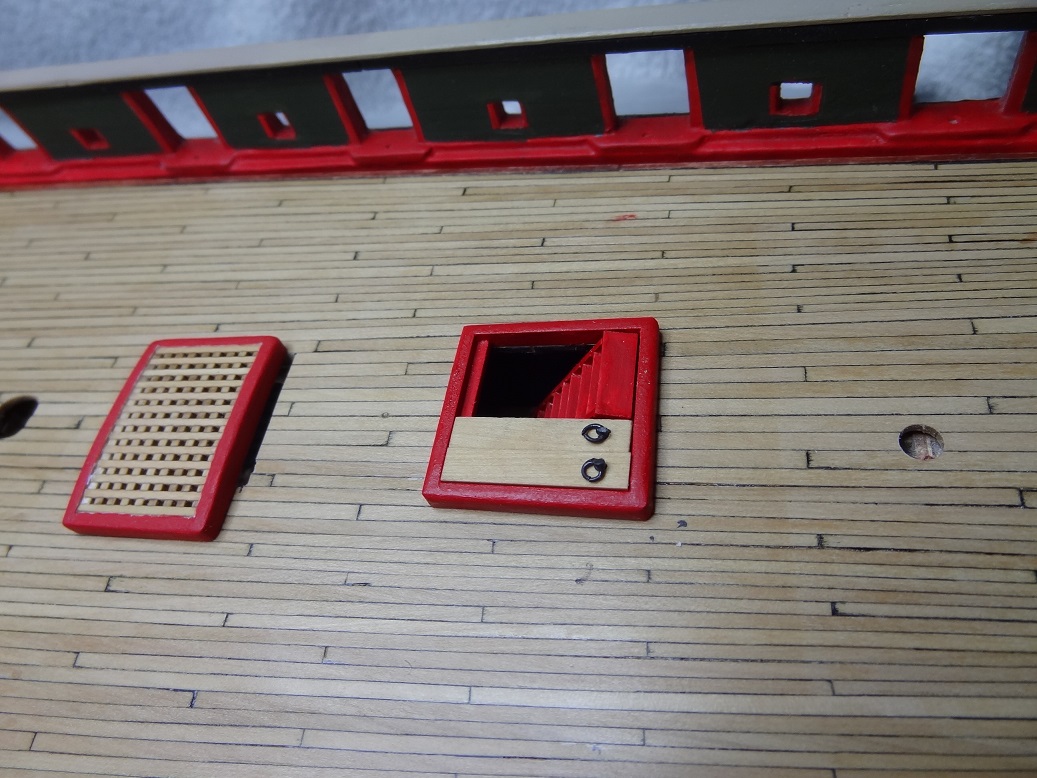
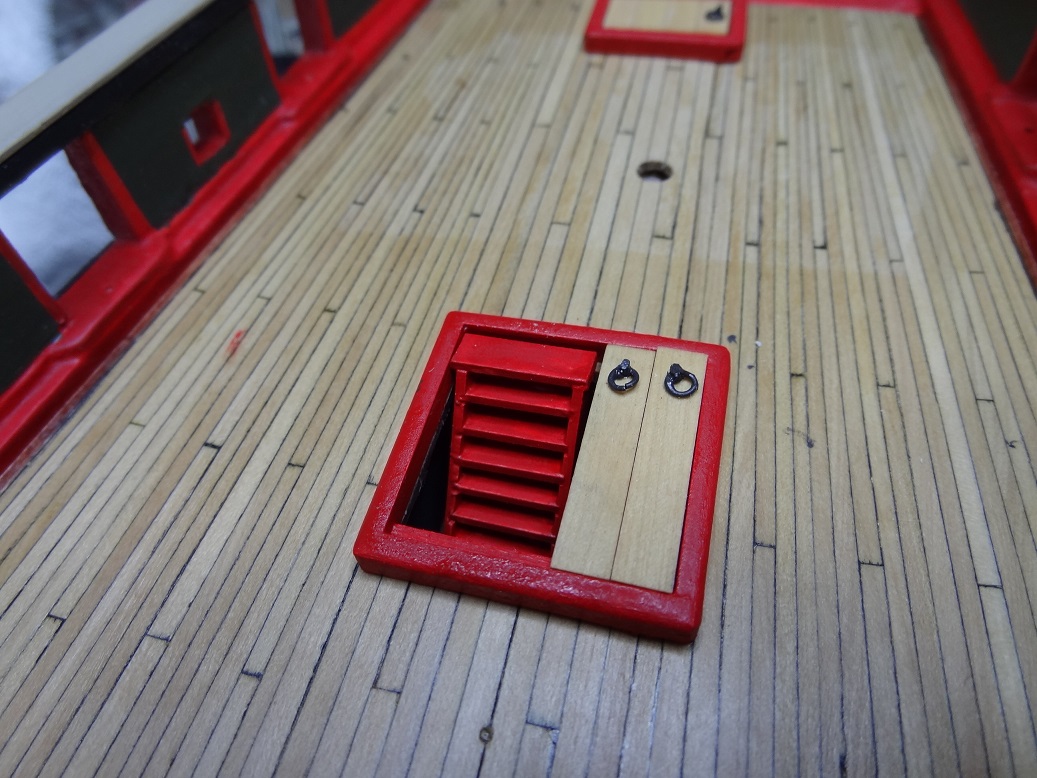
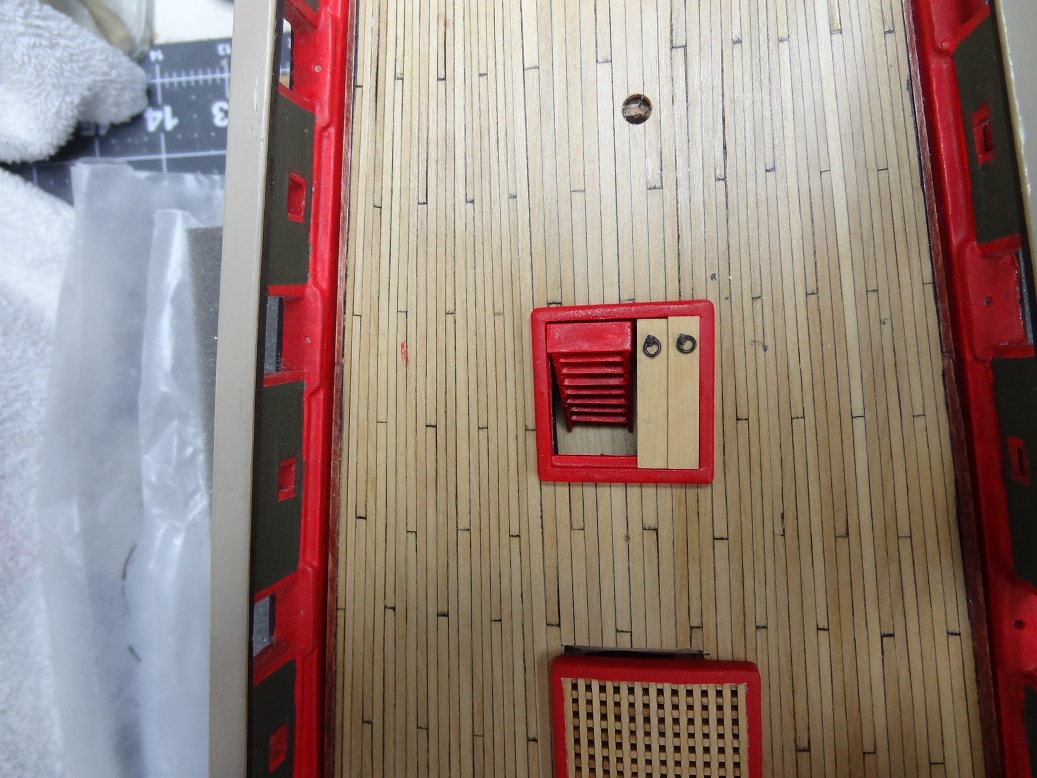
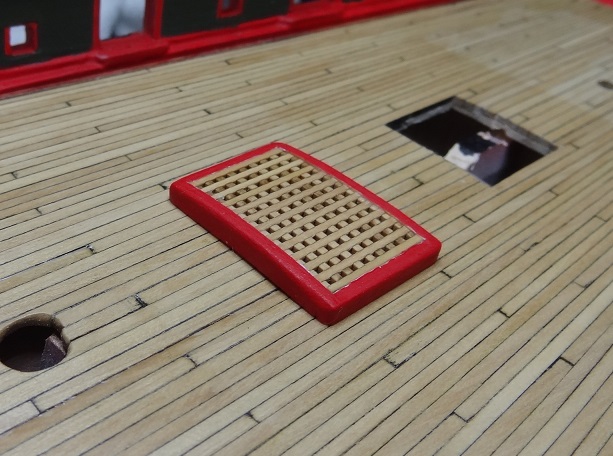
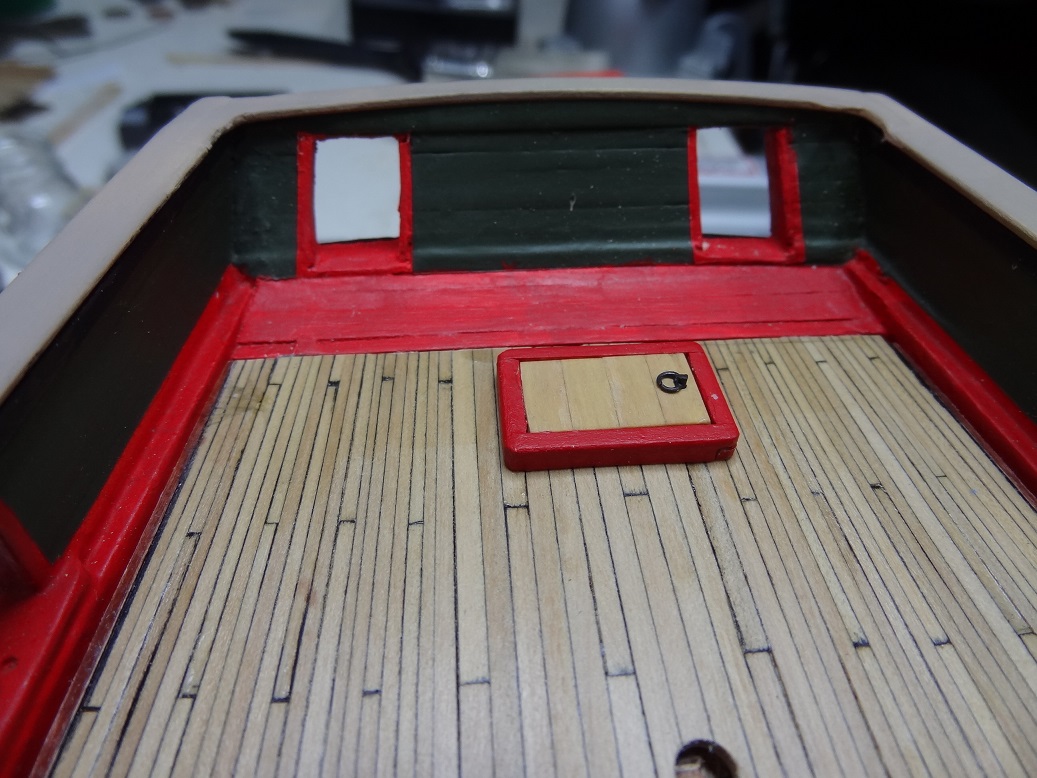
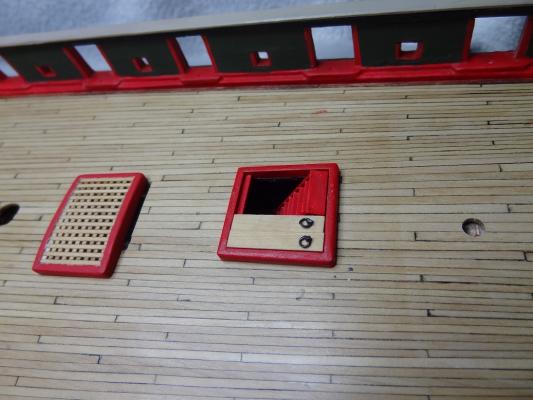
Boy, we have to get our ideas and our production coordinated Making the handles was interesting. I have read "back in the day" if you didn't have brass strip you just smack some wire with a hammer and flatten it out - voila, strip. Did sort of the same with those handles where they are fixed to the plank top. I tried repeatedly to put some sort of rivet looking thing on the flat part to make it look like it is bolted down. That flat area is just too small and my rivet maker wasn't cooperating. Among other things, I painted the grating frames today. The red doesn't look near as annoying as it does elsewhere. I finished the grates with a Natural stain. No added color, it just gives some depth to the color of the boxwood. Same as the deck. Kept thinking about the rear hatch. Why is that called a Lazeret hatch? What is a Lazeret hatch? " A lazaretto /ˌlæzəˈrɛtoʊ/ or lazaret (from Italian: lazzaretto [laddzaˈretto]) is a quarantine station for maritime travellers. Lazarets can be ships permanently at anchor, isolated islands, or mainland buildings. " Need more? " The name derives from the biblical story of "Lazarus". On the old square-rigged sailing ships it was located in the bow of the ship. The original purpose was to store the bodies of important passengers or crew who had died on the voyage, (lesser seamen would be buried at sea). It was a large locker obviously, and was situated at the bow in order that the stench of rotting flesh was blown away from the vessel rather than across the decks. (The wind cannot come from the front of the ship whilst sailing.) All that remains from these origins is that it is still generally the largest locker on a boat, and it's still known as the "Lazarette". A lazarette is usually a storage locker used for gear or equipment a sailor or boatswain would use around the decks on a sailing vessel. " It turns out that it is rather common to have a solid top rather than a grate here. Thus the term scuttle. So being as how I love rework, I give you the Lazeret hatch complete with scuttle and ringbolt. I don't know why, but for some reason I have been having the urge to bust into one of my other kits. Not for the purpose of shelving Niagara - not a chance. But the thought of working on some different wood is appealing. I need to watch myself. No room for 2 hulls on the workbench. I also made a ladder for the ladderway hatch. Will try to tackle that tomorrow. Not a huge task but I am contemplating cutting out a chunk of bulkhead and keel that run under this opening. The whole thing would look kind of goofy if I don't. Will also have to come up with a way to simulate a dark hole so the ladder just disappears into the dark. Should be interesting.


- 843 replies
-
- 3
-
-
- niagara
- model shipways
- (and 2 more)
-
Went back to your Niagara paper and see that you did call for the red paint on the frames. Ah well, I guess that's what it will be.
- 843 replies
-
- 2
-
-
- niagara
- model shipways
- (and 2 more)