mikiek
-
Posts
2,276 -
Joined
-
Last visited
Content Type
Profiles
Forums
Gallery
Events
Everything posted by mikiek
-
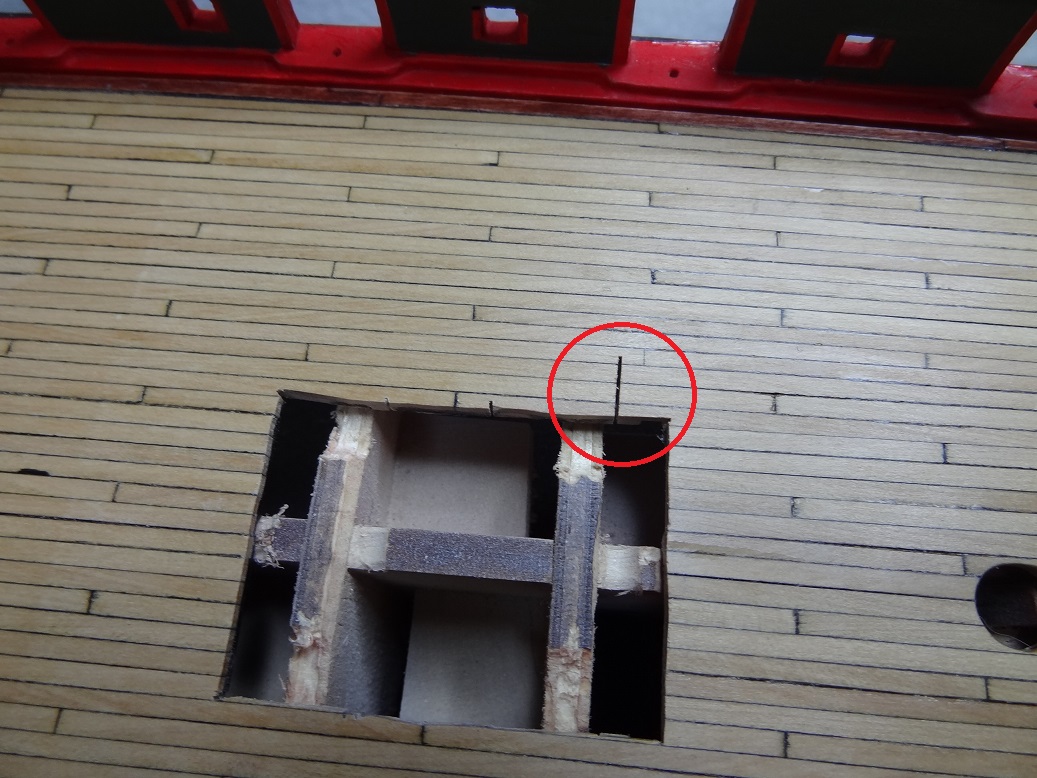
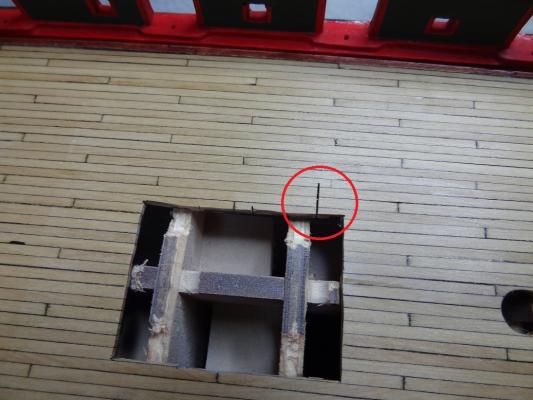
 I would like to add a ladder to the companionway. However, there is the matter of the bulkhead that crosses thru and the keel. Was thinking of taking a chunk out of each at that point. Not hard to do since my deck is still not installed on top. I'm trying to think of how to make that spot under the companionway dark so the ladder goes down into darkness. You know it seems like an open hole in the deck is a safety issue. Maybe that's why the coamings are painted red? I suppose I have the same issue with the grates. If you look into them you will see the keel and bulkhead frame pieces underneath. How do people handle that?
 -
That does Mark. Thanks. What I am beginning to hear (or finally get thru this thick noggin) is as little deck structure as possible on a warship. To your knowledge, the grates were just set inside the coaming? Were they fastened there somehow? Regarding the companionway - the top of the ladder just comes to the coaming? Angle of the ladder - still have to climb with hands and feet or less steep, more like a stair? Ladder width? If you can't tell, I'm at that point in my build. Joel pretty much convinced me to replace deck structures with grates. The splinter thing makes perfect sense. On a side note, in review of the reading I have been doing, 18th and 19th century naval warfare has to be some of the most brutal combat in man's history.
-
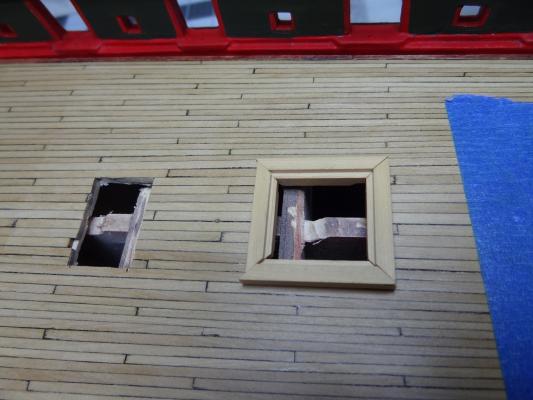
Most of our builds have at least a few grates to cover openings in the deck. The landlubber in me got to wondering about them in real life. Are they a permanent fixture? That seems a little limiting. If they are permanent what happened during inclement weather or rough seas? Battening the hatches? How would you get large items below deck? If not permanent, were they pulled off sometimes? Did they slide? Sometimes replaced with a cover of some type? What about other deck openings, companionways for instance. There are some theories that 18th/19th century warships did not have elaborate structures over them - or any at all. So what would that look like? A framed opening with a ladder ? Just wonderin'
-
Jaggy - is that the Golden Oak again on the bulwark exterior? I can't get over how nice that looks. Richard - I couldn't agree more with you on the boxwood. I switched midstream on my Niagara. Looks better and works better. Oddly, I had just made a comment to that effect in my log, before jumping over here.
-
You know I did learn one thing while doing the framing for the holes. When I admire some of the truly exceptional builds here and elsewhere, I marvel at how some features - deck structures for instance - look so precise they almost look like injection mold plastic or something. Even the coloration doesn't look like most. My first attempt at the frames was done with basswood. It came out OK but like typical basswood there were flakes & feathers, the edges didn't look sharp and the color was a flat whiteish/yellow. The second try was with boxwood. Low and behold the pieces had that injection mold look - crisp edges, exceptionally smooth finish and a deep rich color. Just shows what a good piece of wood can do for you....
- 843 replies
-
- 4
-

-
- niagara
- model shipways
- (and 2 more)
-
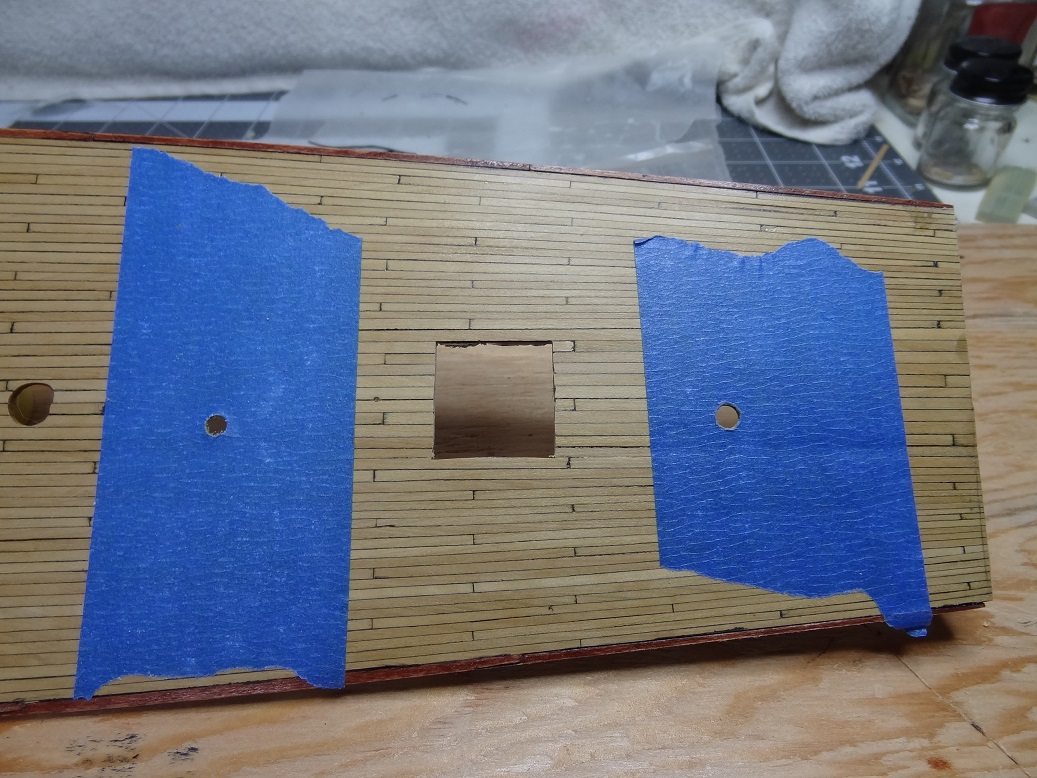
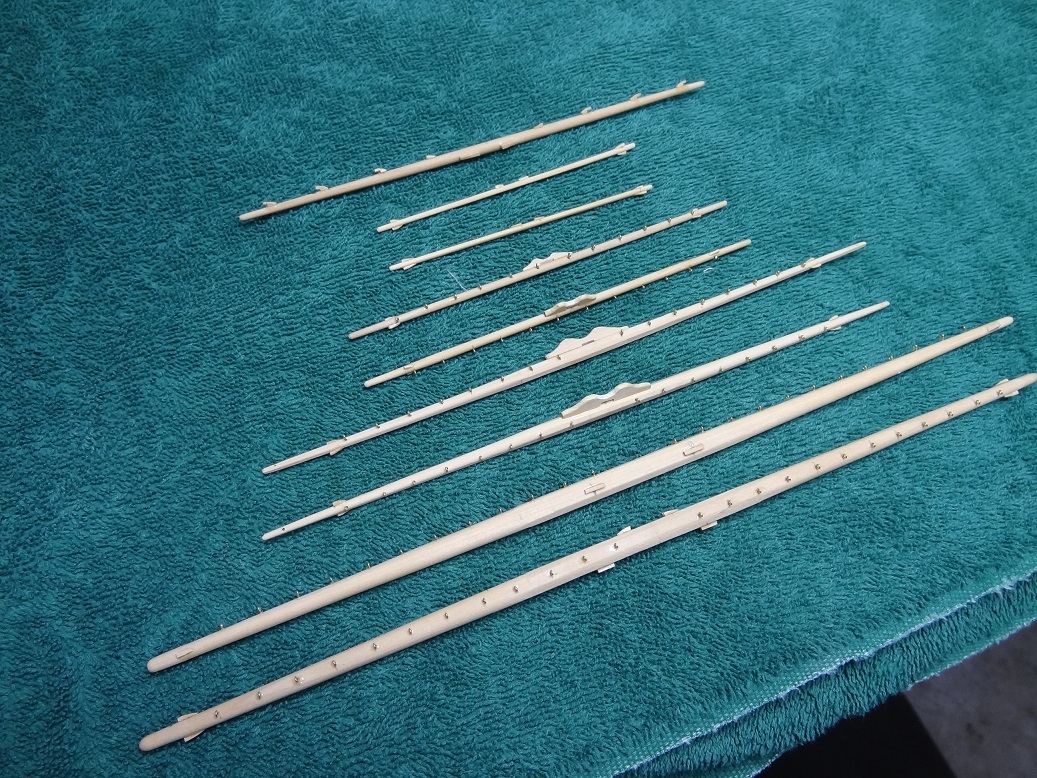
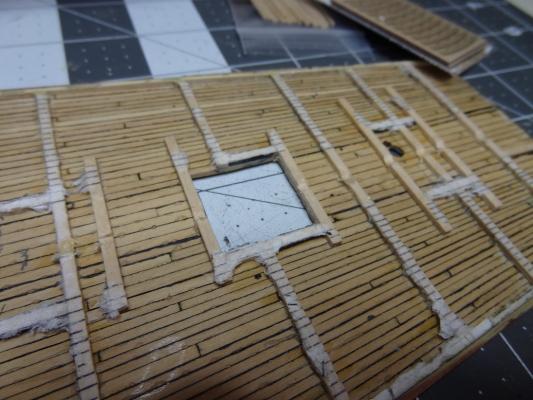
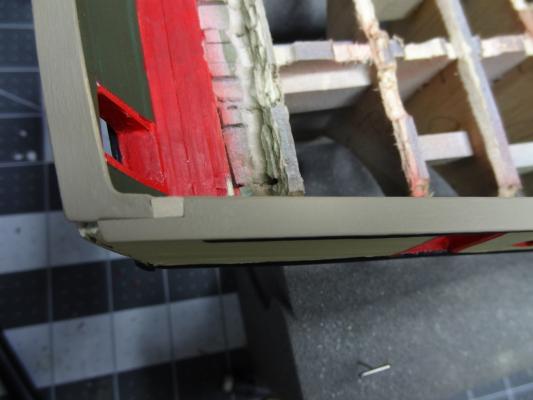
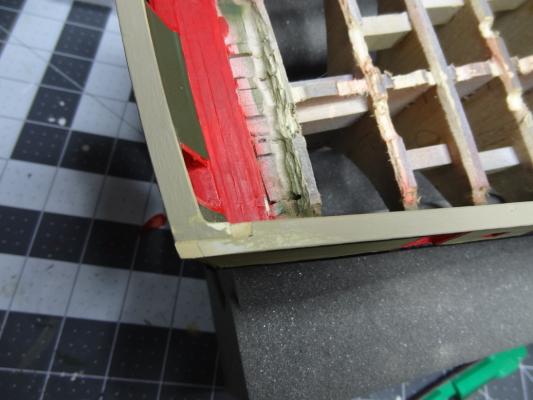
It is done..... Weapon of choice.... The framing I added under the deck seems to be working out well. I just cut out the structure footprints based on those. I imagine they also gave the deck planks support during the cutting. Only 1 casualty. You're supposed to be awake when you play with power tools Then I experimented with the structure base/coaming. This started out as a 1/4" square strip. Cut notches in appropriate places. Mitered the edges. Fairly labor intensive. Yeah, I know they're crooked - they're not glued. Then I realized I was framing the companionway (which will be different than all the others) so I haven't bothered to square it up yet. The 1/4" looked too big so I did the same with a 3/16" - shown below. May still be to big. I am now toying around with a 1/8" square with a 3/16"x3/32" strip glued to it to keep it flush to the edge of the hole. I'll notch that for the grating. Dang, vacation is over. The week flew by. I could get used to that life. Come on retirement......


- 843 replies
-
- 3
-
-
- niagara
- model shipways
- (and 2 more)
-
"I am now seven week in to this project. I've worked almost every weeknight for an hour or two, and many hours each weekend. I do not know if my pace is fast or slow, but I'm enjoying it." Then your pace is just right.
-
Not sure how you handled it. Days away from the boat! Carry on young man..........
- 701 replies
-
- 2
-
-
- phantom
- model shipways
- (and 1 more)
-
Pardon my French but this was one of the scariest damn things I have done in some time. 'Nuff said. You'll excuse me now, I have to go check my shorts......

- 843 replies
-
- 2
-
-
- niagara
- model shipways
- (and 2 more)
-
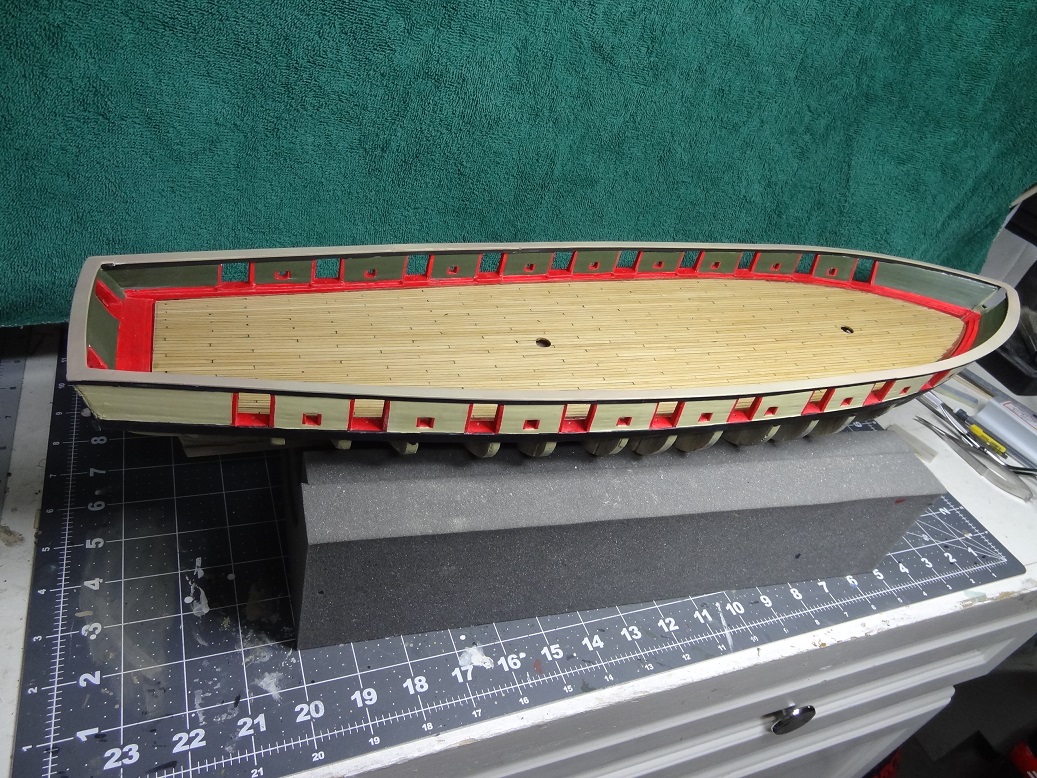
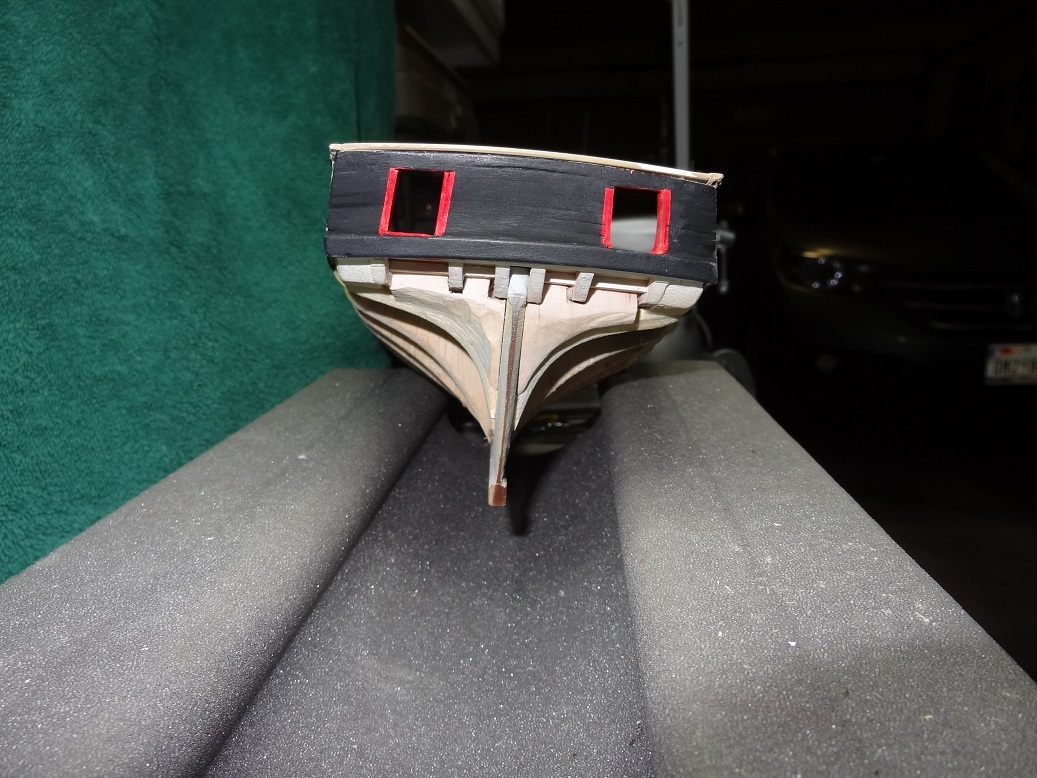
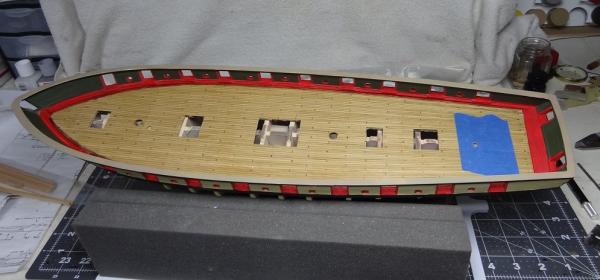
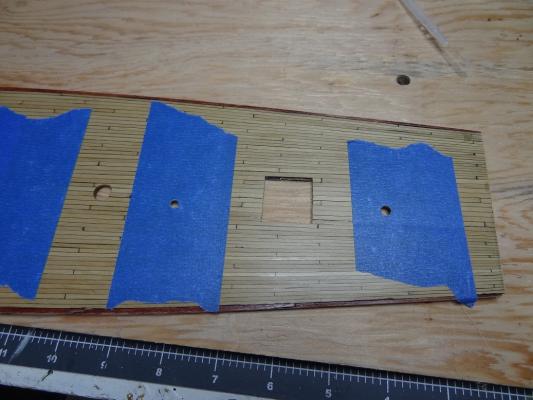
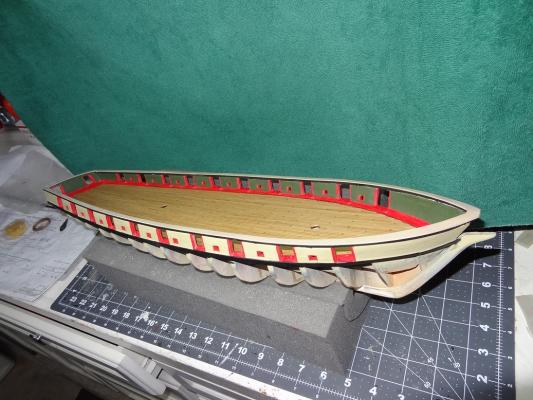
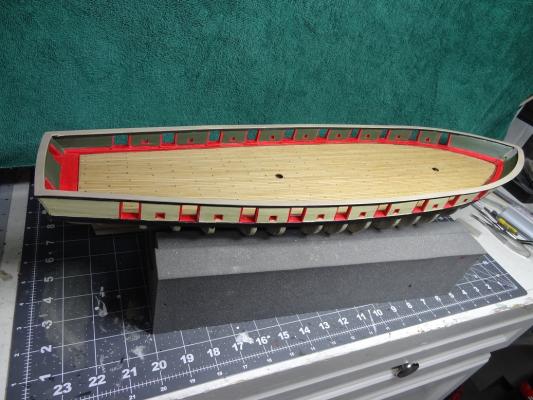
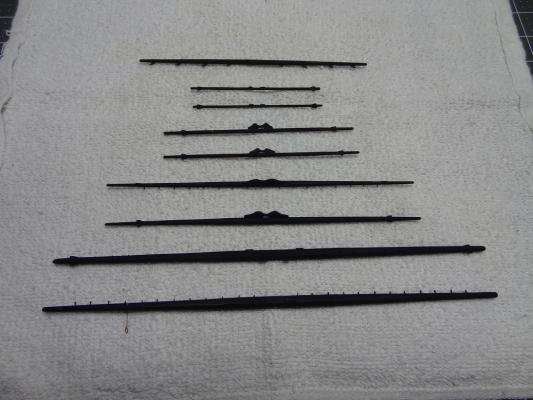
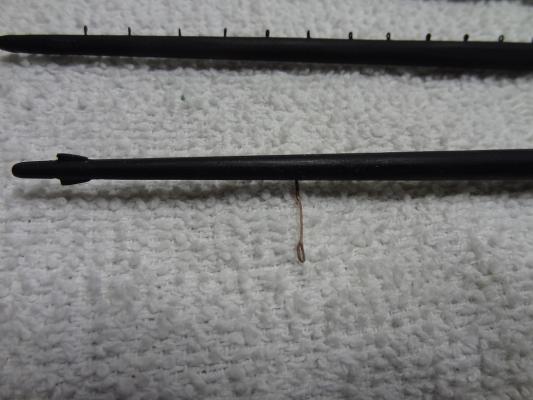
It's tomorrow right? Man, I have been on a painting extravaganza. It has been time (for some time) to wrap this up. Bulwarks with some colors not others. Changing colors midstream. Masking and remasking. Terrible raised paint edges from the masking. And then - oh yes - BORDER WARS!!!!. To backtrack a little - at Joel's suggestion I mixed a complete replacement for the yellow - I call it Dijon Yellow. Very nice but since it was lighter than the original I elected to re-prime. Keep in mind I had all the ports, gunwales, etc. masked off. So first paint over the tape edges, prime, then several coats of Dijon. Removed the tape. The paint left an obvious raised edge against the tape. Finally ended up sanding those down which pretty much destroyed the red around the ports. So one more good coat of Dijon - sprayed over everything. Figured on re-painting the ports afterwards. Time to mask around the ports - AGAIN. I have been having a miserable time with paint wicking under the tape. Even when painting over the edges. This time rather than colored paint I used a Flat Clear paint. I don't know why that would behave differently, but the results were outstanding!!! I have not had a single instance of wicking since then, and believe me I went thru a lot of masking. Lesson learned - I will always have that on hand from now on. In the middle of all that, I finished up the nibbing strake around the deck. It's about time to fasten in, but I want to cut out the spots for the structures, or more likely that grating that will replace the structures. In the pix below, the deck is sitting on the bulwarks but not glued. If you haven't read Joel's Niagara write up yet (links in previous post) you should. In it he theorizes the colors used on the MS kit (and on the replica today) may not be correct. He's suggesting all black on the outside. While I want a little more color variation than that in my build, I have to admit it's pretty cool looking. You will notice I finally have the railing installed. Those parts have been sitting around forever. The starboard pieces painted, the port parts untouched. The bulwarks were starting to look so nice and the area where the rail sits on was looking so lousy, I repainted the black strip (more masking) and then glued down the rail. This was the first time I have ever used pins. You can't just start gluing the pieces down you have to see how they all fit, especially at the transom. Good thing, as something was hosed. The port side pieces laid out perfectly, the starboard side didn't reach the transom rail. It was off by a good 1/4". No idea how I managed that. So now I have to make some filler pieces. Of course this was after the pieces had been painted, so now there was some sanding, filling and repainting to do. The scarph joints needed the same so there were numerous places to repaint. Since I had air brushed originally I wanted to do that again so more masking first! So finally done? So he thought until he sees the photos. I'm real close. I know you are sitting at the edge of your seat - Border Wars??? The yellow has a spot of black - well touch that up. Oh man, I got some yellow on the red. This spot wicked paint under the mask - touch up with the red. Ahhhh, got some red on the black. And so it goes....... Been thinking about the materials used for rigging. Don't care for the kit lines. The small stuff just looks like thread. The larger sizes look OK except it's all right laid. The running lines are 3 different variations of beige. I would really like to make my own, but finding the material to make the small sizes has proved daunting. There's a good thread here. To make small cable laid rope you need very small left laid thread. If you know of a source please let me know. Mean time I'm going to use Chuck P's rope for this build. The rope thing came up because I finished all the yards and the plan that specs these shows stirrups and foot ropes. Yeah, I know no one but a modeller is going to know cable from shroud laid. But personally I want to do it right. And yes, that is a stirrup - eyesplice and all - hanging off the course yard. Trying to work on a system for that. I know the technique, but a third hand would help. A fourth too


- 843 replies
-
- 2
-
-
- niagara
- model shipways
- (and 2 more)
-
Rope Making Basics
mikiek replied to mikiek's topic in Rope Making/Ropewalks's Discussions about Rope Making
Hey Vaddoc - what size Perle do you use? All I have found is 2,5,8,12 which really tells me nothing. If Gaetan is talking 100, then likely none of those will be small enough. -
Rope Making Basics
mikiek replied to mikiek's topic in Rope Making/Ropewalks's Discussions about Rope Making
Thanks for clearing all that up Chuck. Sounds like I need to work on the unspinning angle. Maybe I should try thicker material first and work my way down to the small stuff. Did you ever think of writing a book? Your shipment should be here tomorrow, so I will have something to continue my build with. -
Rope Making Basics
mikiek replied to mikiek's topic in Rope Making/Ropewalks's Discussions about Rope Making
Chuck - I appreciate the feedback. When I was "unspinning" the RH thread I just had the thread tied to a nail at one end and was using a drill at the other - as described by JC Frankie earlier in this topic. The brute-force methods like that don't seem to provide much feel, at least with the fine thread I was using. BTW - I have an order of your rope on the way (all sizes) so this experiment is more long term. Regarding the monofilament thread, is that colored or can it be dyed? Ken - Hopefully this site may be what I'm looking for, although it's hard to say whether the Cordennet is right or left laid. If I am seeing your samples correctly, it looks like the size 30 sample is the only right laid. Can I assume you started that with left lay thread? Honestly, I'm turning out decent left lay rope, obviously made from various right lay sources. Where I'm struggling is the small dimension cable laid. -
Rope Making Basics
mikiek replied to mikiek's topic in Rope Making/Ropewalks's Discussions about Rope Making
Looking into DMC now. Assuming Perle and Pearl are the same thing? That definitely seems like a step in the right direction. Gaetan you mention size 100. I see 3, 5, 8 and 12 (12 being the finest). I have not found any dimension for this. Vaddoc, a while back I ordered some linen thread from a site here in the States. Two ended up being made in Germany, one in Ireland. The 2 German threads are left lay but are fairly thick - 18/3 and 28/3. The Irish thread appeared to be a Coats brand and is right layed - 35/3. All 3 are quite stiff and did not work well for me. The stuff is tough as can be, but it seems to be wound oddly. The silk thread I tried (Gutermann) definitely has a right twist to it. What were you using? -
Rope Making Basics
mikiek replied to mikiek's topic in Rope Making/Ropewalks's Discussions about Rope Making
Gaetan, it's OK if thread like that doesn't exist or is not available thru retail. I just want to make sure that is the case. At least from the pics, it looks like Chuck P's small rope (0.008 & 0.012) is right layed. It turns to left lay at and above 0.018. -
What a great kit. Thanks for the update Don. I'm curious how you are finding the plans/instructions? For instance you made mention of getting that decking in early. A few other build logs I follow have complained about things like that were not stated anywhere and it was difficult to impossible to add the decking in the steps listed.
- 653 replies
-
- 6
-
-
- trabakul
- marisstella
- (and 1 more)
-
Rope Making Basics
mikiek replied to mikiek's topic in Rope Making/Ropewalks's Discussions about Rope Making
I'm going to revive this thread for a question. All you rope makers out there - Do you make small diameter rope - 0.010" to 0.015" ? Right lay or left? I would really like to make some right layed of this size but of course that means I should be using smaller diameter left lay thread. IS THERE SUCH A THING? If you have some that was given to you or you found at a garage sale, please don't respond. I'm hoping to find an "actionable" source for this. There's gotta be some place. FWIW - I've tried JC Frankie's suggestion of re-spinning right lay thread but so far it has broken every time. -
Well, I think I am on the right track. Thank you John for the sanity check! Rough surface? What else would you do but sand? I did that early on, but it did not come out well. Acrylic paint is weird, it gets dry to the touch pretty quick, but if you drag a fingernail along the surface it doesn't feel right. Sort of like you could make a dent with your nail. I get the feeling it takes a lot longer to cure or harden. I believe that's what happened the first time - it wasn't cured. After a heavy layer of paint at those edges last night, this morning it had that uncured feeling. We had a beautiful day today (I know you'll agree John) with low humidity so I put the hull outside in the sun for about 6 hours. The surface felt much better after that (harder) and it sanded much better. It still took a heavier spray than normal but I think the starboard side is there. I've lost most of the grain in all the paint layers, but I couldn't move on until those edges were gone. I'll take the trade-off. Port had the same problem but I had yet to "hose down" with the paint. I tried sanding and spraying without that but there was still some signs of the edge, so I went ahead and doused that side. Hoping to get the hull outside again but the forecast doesn't look too good. It's drying in front of a fan overnight. I'll sand and paint sometime tomorrow. I'm sick of looking at the edges so I didn't take any before/after pics. I'm expecting a positive report tomorrow evening. There's lots of other things to log, so see you then........
- 843 replies
-
- 2
-
-
- niagara
- model shipways
- (and 2 more)
-
John - I tried sanding once before but I suspect the paint may not have been completely dry. It didn't come out well. Of course I was repainting the sanded spots by hand which didn't help. It does seem like the logical answer. Since I'm back to airbrushing again, I'm going to put the hull out in the sun this morning and get it bone dry and try again with a 1000 or 1500 sand sponge. Not much to lose at this point.......
- 843 replies
-
- 2
-
-
- niagara
- model shipways
- (and 2 more)
-
I'M TIRED OF PAINTING!!!! I'm still fighting the problem of the tape edge leaving a paint edge (there's a pic in my last log entry). I was hoping that I could hand paint some thick layers to fill up to the edge top, but 4 layers haven't helped much. The hand painting is starting to show on top of the airbrushed layer. To make matters worse, I guess I didn't mix the paint well one time, as there are some spots that are darker. So as a last ditch effort, I am back to the airbrush again. Against conventional wisdom, I am spraying a thick coat around the problem edges. I'm also leaving the hull on it's side - maybe gravity will work with me instead of against me. I figure I can go back and hand paint the insides of the ports again when this is done. I did get some good general tips from the thread I started in the paint forum. The only other alternative I see would be to strip down the paint. Is that even possible with acrylic on a model? There's more to report, but I'll do that when I am feeling a bit more positive. I do have the week off, so I am hoping to get a lot done.
- 843 replies
-
- 2
-
-
- niagara
- model shipways
- (and 2 more)
-
Masking Problem
mikiek replied to mikiek's topic in Painting, finishing and weathering products and techniques
Kurt - thanks man, you're bringing up a lot of good tips. I'm learning. Do you ever you frisket on wood? I had a post about that and did some experimenting. I had a tough time getting the frisket off the wood. The stuff I have took almost a day to dry. My impatience doesn't like to have to wait that long. -
Masking Problem
mikiek replied to mikiek's topic in Painting, finishing and weathering products and techniques
Harvey - I am using Tamiya tape in various widths. Never heard of anti-bleeding tape. -
After some further reading in Lever's book, he describes making "spun-yarn" from untwisted pieces of old cable. While being made, he describes placing the coils on a grate to keep the tar from getting on the deck. Later when he describes seizing, he refers to spun-yarn as the material used. From that, I gather the seizing line was already tarred when it is balled up for distribution. At the end of the day, it sounds like a user discretion situation. No real right or wrong (within limits). I'm leaning towards a dark brown for seizing, and sticking with the one color throughout.
-
Masking Problem
mikiek replied to mikiek's topic in Painting, finishing and weathering products and techniques
Kurt - that gives me the basic idea. I knew lite coverage is what is desired, but I didn't imagine that lite. I think I need to adjust the airbrush, it may be spraying too much paint. I usually end up with a lite, but solid first layer. If I could expand on that a little, how about primer? Do you always use it? Do you want to end up with a solid coat (built up from several applications)? -
Masking Problem
mikiek replied to mikiek's topic in Painting, finishing and weathering products and techniques
It's funny Ray - I see some builds here where it looks like they wanted to cover the grain. Filler over the entire hull, then sanded smooth. The result is almost glass-like. For the period builds we do, I prefer grain - the rougher the better. Sadly, after airbrushing a couple coats of primer and then a couple coats of color, most of the grain on my build is gone.