HOLIDAY DONATION DRIVE - SUPPORT MSW - DO YOUR PART TO KEEP THIS GREAT FORUM GOING! (Only 36 donations so far out of 49,000 members - C'mon guys!)
×


Turatopgun
-
Posts
55 -
Joined
-
Last visited
Content Type
Profiles
Forums
Gallery
Events
Everything posted by Turatopgun
-
Hi Clare Your vessel is quite beautiful and if I hadn't read your build log I would not have believed a paper (card) ship would have looked so solid. A wonderful job. Phill.
-
Thanks Grant and Nigel. I have sanded the first hull back and will put a picture up of it, My intention is to complete the other hull and then join them. At that stage I will fix up the stern and bow and adjust the bottom of the keel with more filler and undertake the final sanding of the the completed hull. After that I will undercoat with sand sealer and consider my next move. Like should I fix the portholes and rubbing strakes and propellors to the hull before final painting or even undercoating. I am not sure if glues will stick the various items to the hull if it is painted or undercoated. Any thoughts? Phill
-
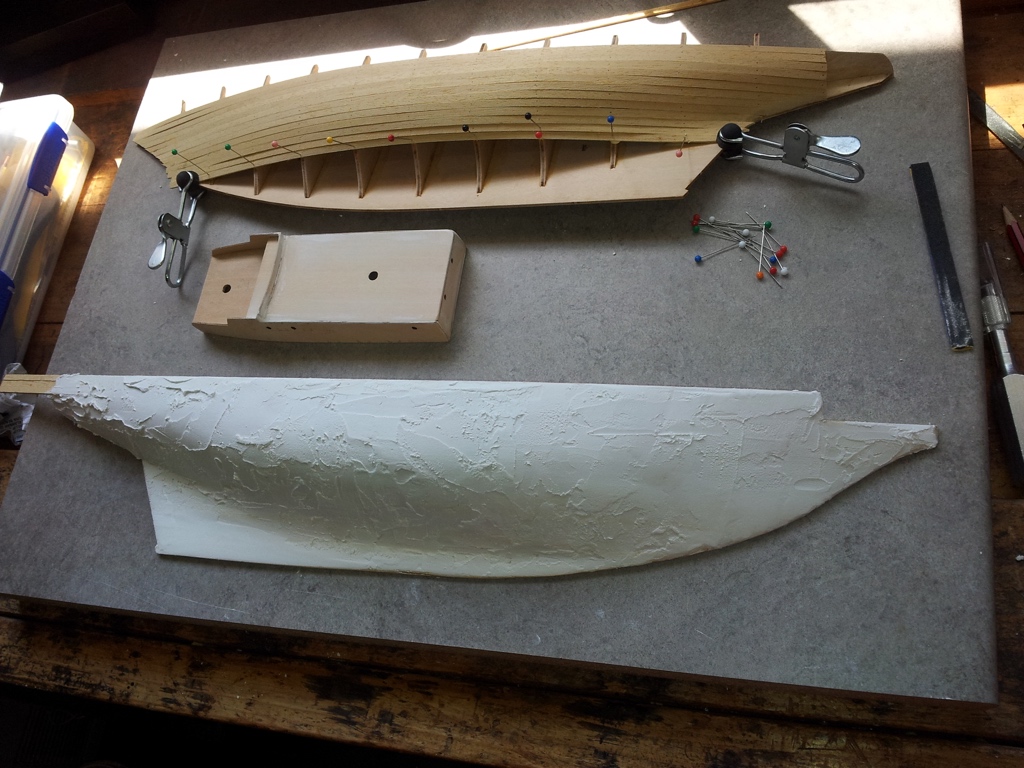
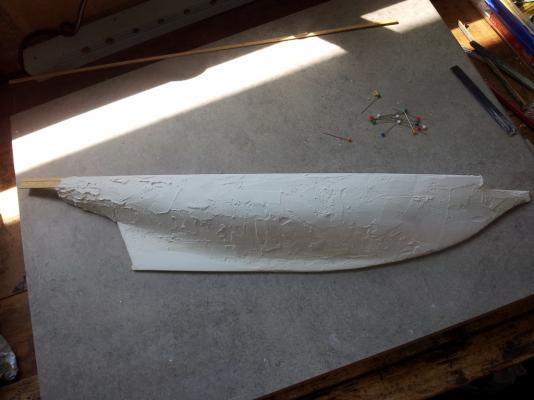
Ok. here we are again. I completed one of the hulls and spent about one and a half hours sanding the planking. It looked pretty good but I felt that it wasn't good enough so I decided to use polyfiller and then sand it back so it would provide solid base for for painting and hopefully presenting the ship as a steel built one rather than wood. I realise that most of you will feel I've done the wrong thing but with careful sanding and removing of any blemished by reducing the sanding pads down to about 800 I will get a clean flat surface.. We shall see if it works. Once I have sanded it I will then complete the second hull and join them. The task after that will be to finish any filling that needs to be done and undercoat it with sander sealer and then start the top coats. Hopefully all will go well.

-
Clare, Grant and Elijah Thanks for the info. I am almost at the stage of sanding the hull so my next few tasks will be filling sanding and painting, I am waiting on the paints delivery and will now search out the filler etc. Have to do a few other tasks in the meantime. Phill
-
Hi Elijah You are going brilliantly with your build. I must say that to take on the Phantom build as it could be considered a scratch build when one looks at the various task you have to complete to build it. Keep going. Phill
- 701 replies
-
- 2
-

-
- phantom
- model shipways
- (and 1 more)
-
Hi Clare, I have couple of queries for you as a new builder of boats. I have almost finished the hulls of the vessel and will need to sand,seal and paint. I know you have built a bluenose but Billings but unlike the Sir Winston I think that the bluenose is a fully wooden craft rather than a steel one. My questions are; 1. What do you use to fill any cracks in the hull to produce a sheer look' 2. Can you use a regular sander sealer after the hull has been filled and sanded. 3. Do you have to put an undercoat prior to final colour. If I was painting a house I would not need to ask these questions but with a model boat ...who knows. Anyway thanks again Phill
-
Hi thanks CatoPower, I have seen various parts of the YouTube clip that you included above but not the part at 4.13 minutes in which shows how the rubbing strake is strengthened to enable the shrouds to be fully tensioned. If you look under the rubbing strake there are three angled pieces (steel I imagine) that tie the strakes to the hull. In other photos and film I found it appeared from the angle of the pictures that there was a large bloc Non of this appears k of metal going the length of the rubbing strake but thanks to you I see exactly how it was done. You can also see that where three shrouds come down to the strake together the angle piece is three times larger than where a single is attached. Non of this is shown in the Billings plans and I would not have chased it up if the question had not been raised by Lory who is also building the Sir Winston and partially answered by Dan Vardis in his response to Lory. It set me thinking how it would be done. Now I shall make up a few pieces of ply to fit under the strake to strengthen it to hold the shrouds at full tension. Once again thank you. PhillB
-
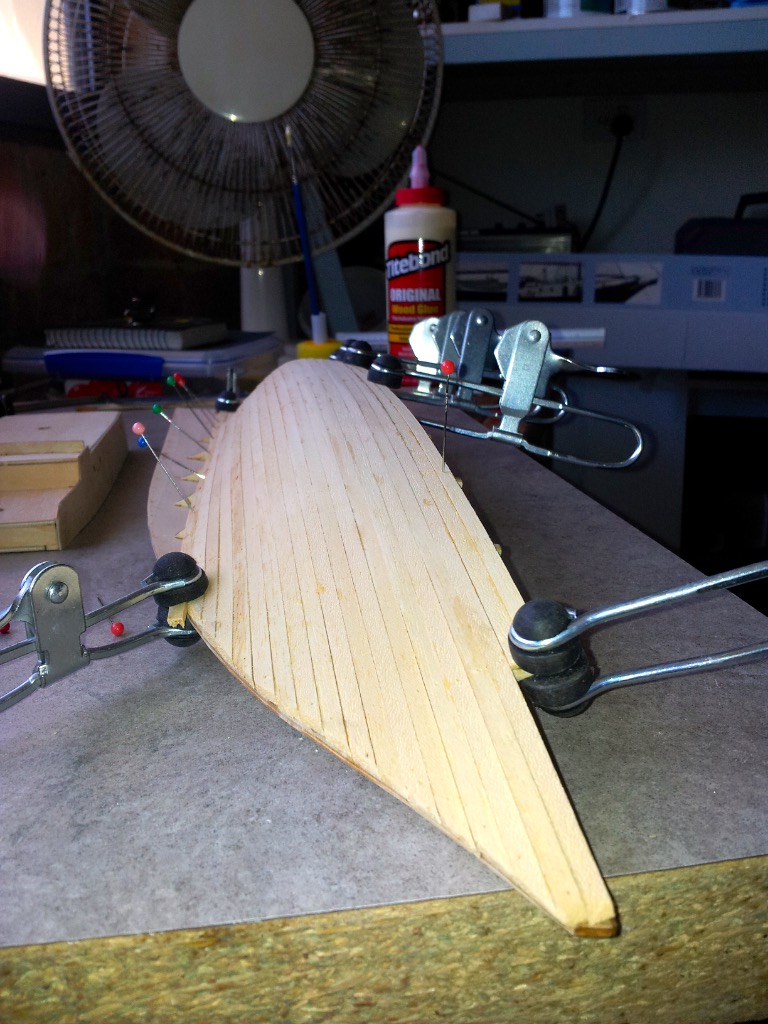
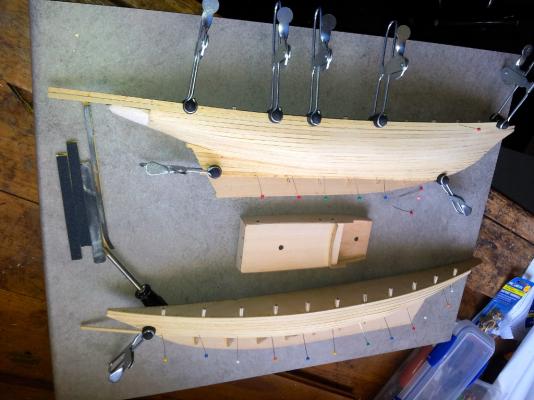
Here we are again after another couple of hours of work. I have almost completed one of the hulls an am partially through the second. Have had a couple of small but fixable errors and also put the deck cabin together and sanded it back. My next step after completing all the planking will be to sand the hulls and fill them and sand them and seal them then paint them and sand them and paint them etc etc. But first I have to determine the filler I will use and the sealer. Also do I put on an undercoat. I am going to use Humbrol paints as per directions but will have to nut out the approach to the task. I must say that the hull shape is quite good and will look great after it is sanded and sealed Fortunately, the ship is steel hulled so I am not concerned with seeing timber planking, just a smooth hull. Will get on with the job and talk (write) later. PhillB
-
Hi Elijah, Just popped in to see how your build is going, and it appears to be going very well. You really do have a good grasp on the process and respond to advice in a manner older than your years and reply with care and thoughtfulness. You appear to have considerable patience and I think this is probably a good thing in the building process. As you know I have only recently started model ship building myself and it is the pleasure of research and building correctly that makes the task worthwhile. Keep up the good work. Phill
- 701 replies
-
- 2
-
-
- phantom
- model shipways
- (and 1 more)
-
Still, it must have been a great experience. Re age , you 'll note I made no mention of it just the b'date, PhillB
-
Spyglass, just one other thing. You are the same age as me although you were born 4 days before me. Hows that for coincidence. PhillB
-
Hi Spyglass, I was responding to ETNZ above who was also on the Sir Malcolm. I was saying that I had been looking at how the shrouds (I think they are called) are attached to the rubbing strake (as I believe it is called) and the use of chainplates to attach to the deadeyes. The Billings model does not include any chainplates or other connection to ensure that the tension on the shrouds can be held at max tension. I found out that the Sir Malcolm (the sister ship to the Sir Winston) did have a large block under the rubbing strake which allowed the shrouds to be tensioned. This block is not shown on the Billings model so my research was worth it and I will make one for the ship. The Sir Malcolm was a beautiful ship especially after she was refitted. There is YouTube video of the refit if you wish to see it. It must have been great as the skipper. You should talk to ETNZ as he also sailed on the Sir Malcolm. Interesting isn't it. PhillB
-
Thank you Igorsky
-
Interesting comment ETNZ as I have been looking at any info I could find on the Winston C. My intent was to find out how the lines (I don't know yet what they are called) that come down from the mast are held. I believe LORY had the same question regarding the tightening of the lines as they did not appear to be held well enough to hold the lines under pressure. The Billings kit provides no explanation of this so I chased up all the info I could find including the Sir Malcolm Miller. The Refit of the Sir Malcolm Miller gave me the clue. There is a large block attached under where the lines are attached to the side of the ship and I imagine that the lines are held in that block. So when I get to that stage I will make up a similar block to attach the lines too. Hopefully when I reach that stage I will know what the lines and othere parts are called. PhillB
-
Thanks guys, Well, I am further down the line on the ship and really enjoying the journey. Time just flies when you are involved and one does get involved when trying to work out plans that jus don't seem to have everything in them. Will talk about that when I reach that point in the build. I have almost finished one side and have started the other side. Unlike the other builds I have seen I have to complete both sides of the hull and then glue them together. I have checked and so far they seem to fit ok. PhillB

-
Nigel I am going to enjoy watching you build the vessel but wont be offering any advice as I am just starting out on my first boat. Good luck and enjoy. PhillB
-
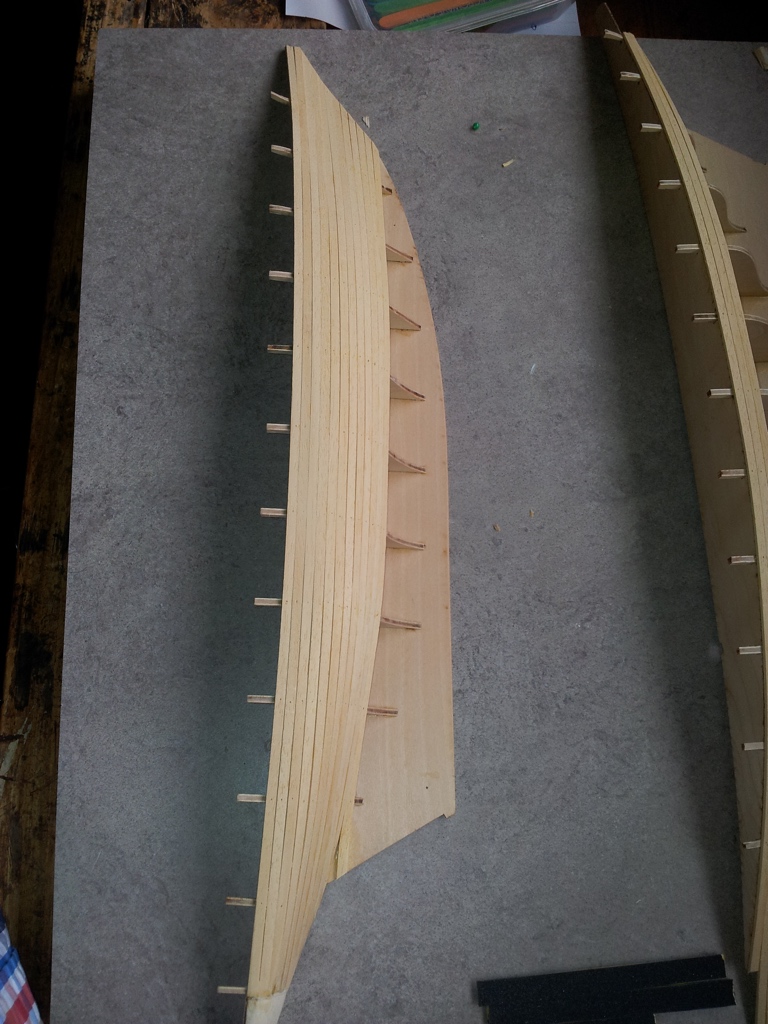
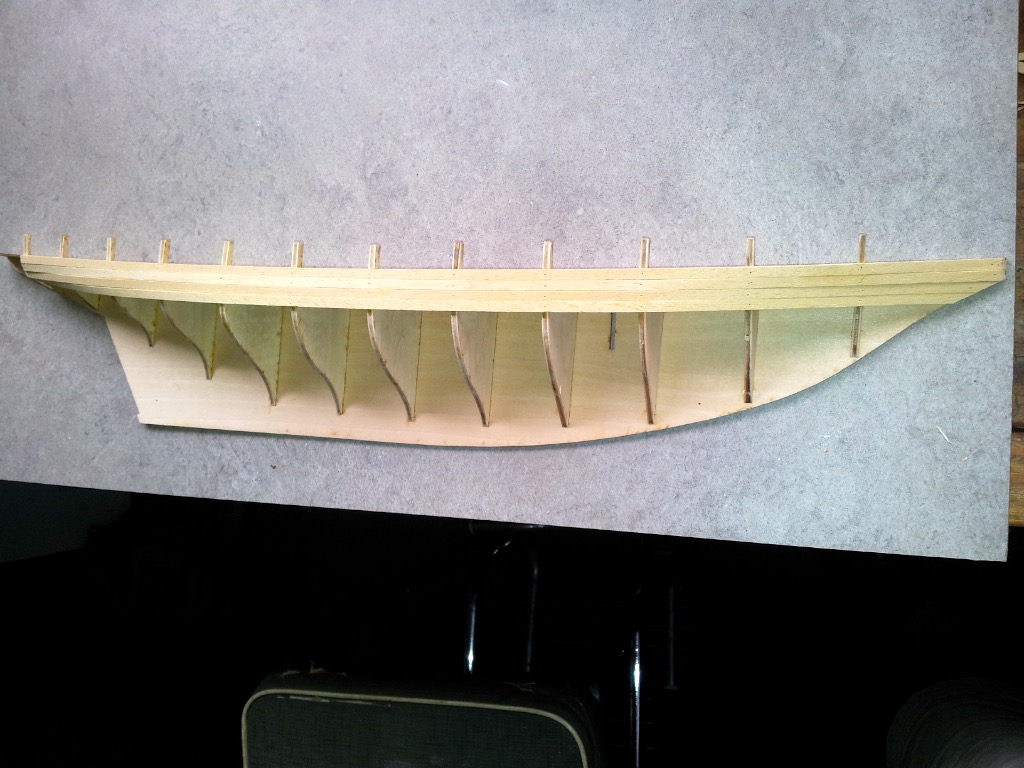
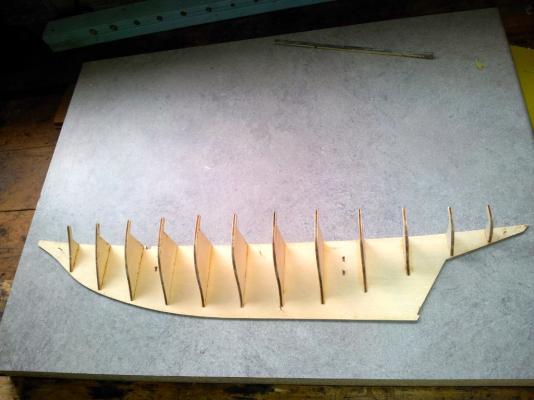
Thanks for the info Guys. I have sanded all the bulkheads and found that whilst the burn from the laser has been sanded off, the centre part of the ply retains a dark colour which may appear to look burnt. The planking so far appears to have held, but I have also run a smidgin of glue on the inside of each bulkhead where the planks touch. You will note from the photo which shows the planking done so far, that the planks at each end appear uneven. This is how they are; however, they are flat to the bulkhead and have enough thickness to be sanded evenly. As I mentioned previously I am taking things easy and slowly with regard to the planking and will attempt to dry run it before finally glueing. Hopefully I will not let you down, Thanks again PhillB
-
Thanks Elijah, I have been looking at your build. It looks great. Maybe we should encourage each other. PhillB
-
Hi Elijah You are doing really well on your boat. I have just started myself, on the Sir Winston Churchill but I am a lot older than you and I'm darned if I would have done as well as you at your age. Well done and keep going. By the time you are my age you will be building masterpieces. PhillB
- 701 replies
-
- 2
-
-
- phantom
- model shipways
- (and 1 more)
-
Here we are again. I have a few photos I hope to upload to show what has been done. Well it appears that I have managed to upload the first two photos. I don't think I need to explain them as I imagine they are self explanatory to the majority of builders on the site. Re Chuck's planking I have looked at the photos of the planked Sir Winston and it appears to be single planked the whole length. I think this is due to the narrowness of its beam unlike the boat that chuck used in his guide which appears to be more varied in the area being planked. Further, it may also be that my boat is not a scratch build. However, I will be very careful in my efforts and check thoroughly before glueing. Regards PhillB

-
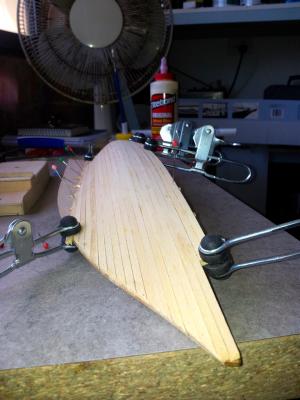
Well this is it. I have started Sir Winston after reading so many logs and build instructions, after buying the necessary tools and finding all the various web sites re wooden sailing ships. I spent the first few hours (and they went so quickly) on cutting out the bulk heads and sanding them. The next day I glued them in. I used an old paint brush and 'Titebond' wood glue. Worked very well too.I made a couple of small errors but fixed them up and all is ok. Yesterday I started the planking and am following the method suggested by Billings and by looking at the photos provided. It appears to be going ok although I have only put on two planks...hmmmm. Reading Chucks planking guide it appears that his is more for scratch built boats so I am just going ahead the way Billings suggest. We shall see if it works. I am enjoying it at the moment and can't wait to get into it today. I will attempt to take a photo and upload it for my next log in. Critical comments are welcomed as long as they are positive criticisms. PhillB (Turatopgun)
-
Samson The more I read the logs of the various ship builders the more I realise the mountain I have to climb. Your work is beautiful and if I can achieve a fraction of a percentage of the beauty you have created in this build I will be more than happy. A real pleasure to follow a master craftsman. Thank you. PhillB
- 188 replies
-
- 2
-
-
- cutty sark
- billing boats
- (and 1 more)
-
I am new to this site and model ship building and after reading your build log I am quite demoralised and wonder about my ability to build even a basic model. The ship looks amazing and the work that has gone into it is staggering. Even more so when one considers that it was a scratch build. You are an builder of the highest calibre. Thank you for providing us all with a look at the work and mind of a true artist. PhillB
- 2,625 replies
-
- 7
-
-
- kaiser wilhelm der grosse
- passenger steamer
- (and 1 more)
-
Lory Thanks for the support re sticking it out with the build. I will certainly keep your comments in minde when I want to toss it. PhillB