


Overworked724
-
Posts
1,219 -
Joined
-
Last visited
Content Type
Profiles
Forums
Gallery
Events
Posts posted by Overworked724
-
-
-
-
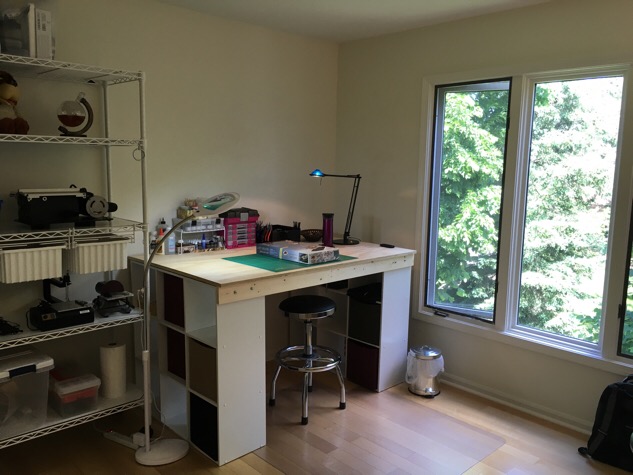
First, I thought I would post a pic of my new hobby shop (shipyard). After a flurry of packing/unpacking....we are slowly getting settled in...and my wife is extremely happy she can now 'send me to my room!' I now (finally) have some elbow room and storage which I did not have before. (I made the desk from 3/4" plywood, (2) cheap 9-hole cubby bookshelfs, and some 1" x 3" stock pine - all from Lowes)
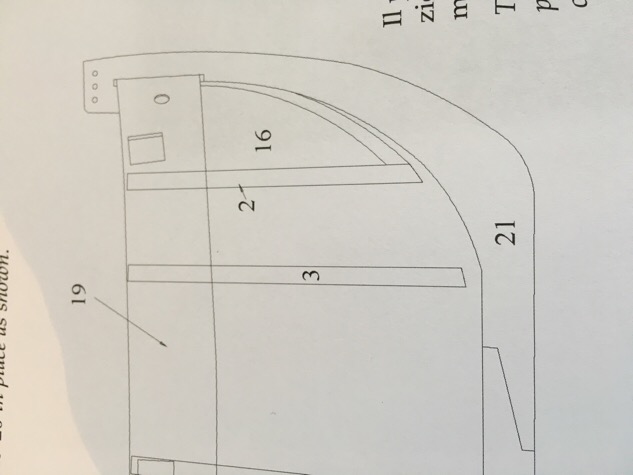
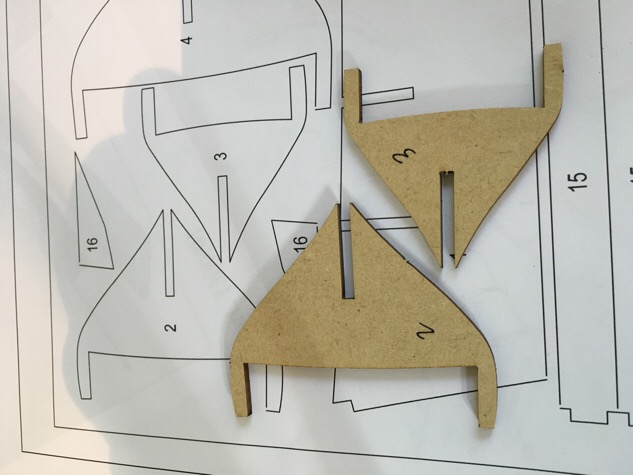
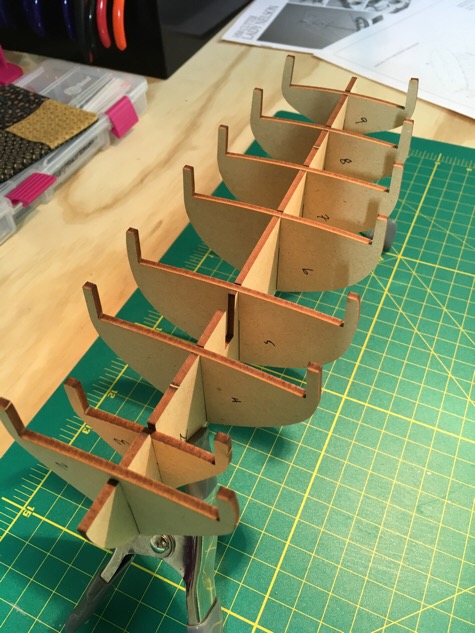
I thought I would also post my first (tiny) hiccup. (People have probably mentioned this before - but I haven't been reading any other forums yet....so I am proud of myself that I caught this mistake)..The plans call for the bulkheads to be placed within the frame sequentially from the bow beginning with 2, 3, 4 and so on... The problem is that the bulkheads #2 and #3 seem to be reversed. When I dry fit them, it was obvious that what the directions list as #3 is obviously incorrect.
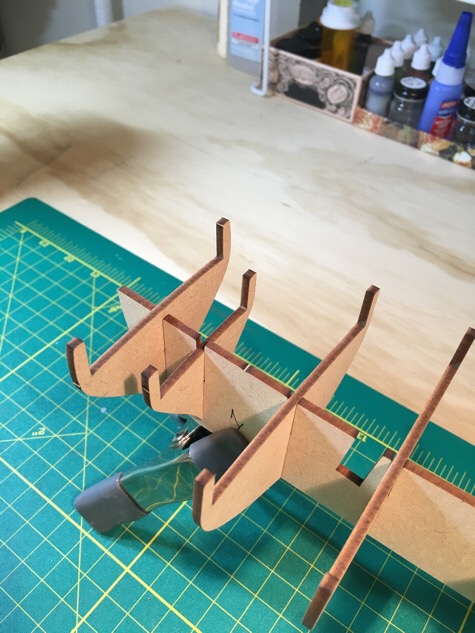
Needless to say, if I were to line up the bulkheads (see below for dry fit picture), I would have a bear of a time with the planking! (Not to mention my ship would end up with a very novel profile!)
Now in the process of glueing up the bulkheads (correctly). More to follow....
Patrick
Current questions:
1. Any particular brand of varnish which is best to use for wooden ship models?
2. Same question with regards to paint manufacturer? (I plan to use Acrylic)
-
-
-
-
-
OK folks....I have officially retired this build. For a number of reasons - life being the main obstacle.
We have recently moved from our tiny condo to a much larger town home, and I now have an official 'designated' shipyard for my relaxing (ahem) hobby. As part of the packing, moving, unpacking, re-organizing, etc...the baby Connie suffered a unfortunate accident. During the transit to our new home, I ran over it with my car...!
I know what you are thinking...how could I possibly have done that? Well, I simply wanted to ensure that when I broke it that it would stay broke. =-) In truth, I learned a lot about the hobby, and some of the pluses and minuses from building in plastic. I still love ships, and have decided to make the transition to wood kits for the very simple reason which is that was where I planned to go all along.
So...my next build log will be on a nice little starter kit, The Lady Nelson.
See you in the next thread! I will be posting that adventure in (hopefully) steady pace as we have now officially landed in more solid living circumstances! (Yay!)
Best
Pat
- CaptainSteve, Force9 and Elijah
-
 3
3
-
-
Hi Charlie.....following along with great interest! Although I am not as ambitious as yourself, your unique approach made me to decide finally upon my first sojourn into wood. Bought the Sultana kit...and will enjoy making and learning from my mistakes.
One thing this thread has taught me is how easily you can adjust with wood....and that it truly is forgiving. Many thanks and keep up with your awesome build!
Pat
- Elijah, mtaylor and CharlieZardoz
-
3
-
-
-
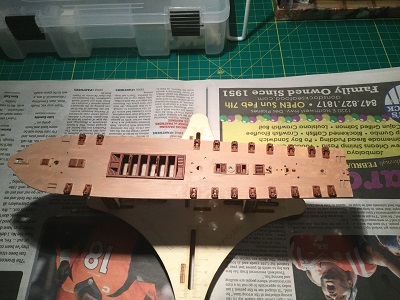
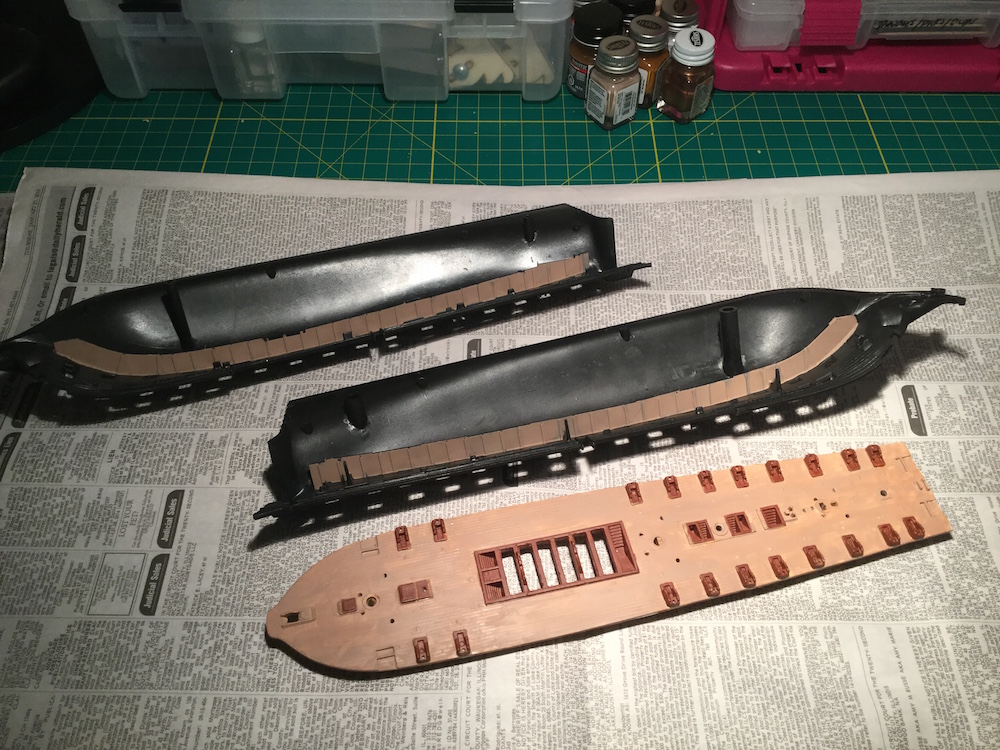
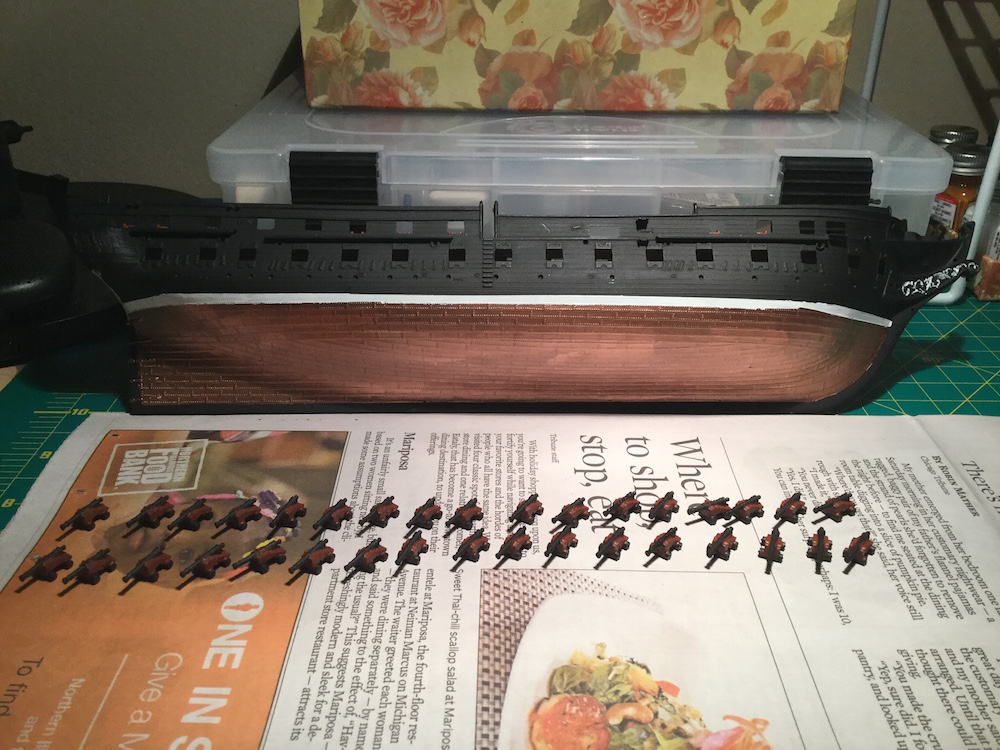
OK....too much work, so little time to play with the Baby Conny. However, I did get my fake gun deck made, as also got the cannon installed....including the fake one. (Can you find it? I will give you a hint...it is a black toothpick tip! )
Onward!....

- CaptainSteve, docidle, Elijah and 2 others
-
5
-
My wife vacuumed and looked in vain for the errant tiddly-wink cannon which took like a shot (pardon the pun) from the sprue the other day. Never fear...I will sally forth. Made a fake deck and will go for putting the hull together today...if I can still see after trying to get the tiny cannon on the main deck!
- docidle, Elijah and CaptainSteve
-
3
-
Hey guys....excellent advice on the vacuum detective solution. Will get it the old college try!
- Elijah, ScottRC and CaptainSteve
-
3
-
Tragedy! Was snipping the cannon of the Sprue and one them shot across the room like a 1950's tiddlywink! Alas, 'twas lost in the carpet forest. Neither my wife nor I could find the missing munition. Crap...
Lesson learned for today....this thing is small! Wondering if the 1:96 might be less difficult!
Onward! (Minus one cannon....will jury rig one using a toothpick....but don't think it will fool the enemy!)
Cheers
Pat
-
-
-
Hi Scott.
I have posted a couple of time the pics I have thus far....but for some reason they keep being deleted! Will try to post again, after this text only post....to see if they can catch. If not...will gladly enjoy some tips. A couple of questions:
1. Acrylic wash....recipe? As I said, I am new...and I know the term wash only from my own web research. Any additional info on the wash - recipe - technique would be greatly appreciated.
2. Ratlines...are you saying rig the ratlines and the shroud? If so...one or both are waaaaay out of my league at the moment. I can tie a granny knot and follow the 'picture only' graphics which Revell uses as an excuse for instructions....but setting up my own shroud/ratlines is a bit of a stretch my friend, unless you have some good information I can use to dumb it down to the 1st grade level.
3. Totally enjoying building, painting, dreaming...my wife is wondering what drugs I am on...but frankly, just enjoying the creative experience...but the rigging part of this is going to be a challenge...hence the reason I am starting at this scale. Keep in mind, this is my first ship. (But I am adventurous and bought the 1:96 scale for incentive - hopefully this little guy won't sink me before I have left port!)
See below for next couple of pics...and if they do not post...someone has to tell me what the heck I am doing wrong!
Best
Pat
-
-
-
-
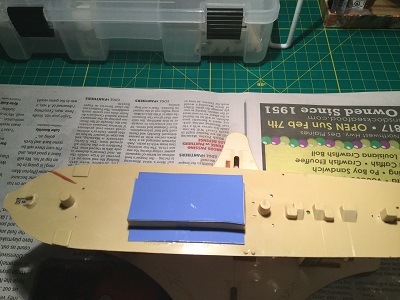
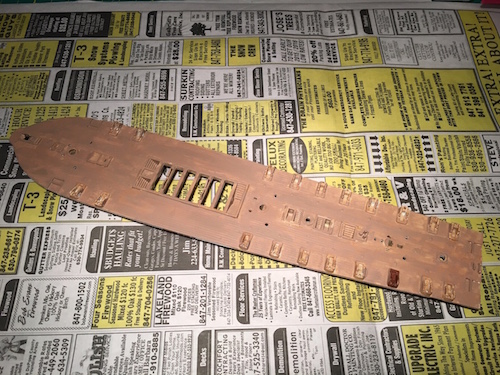
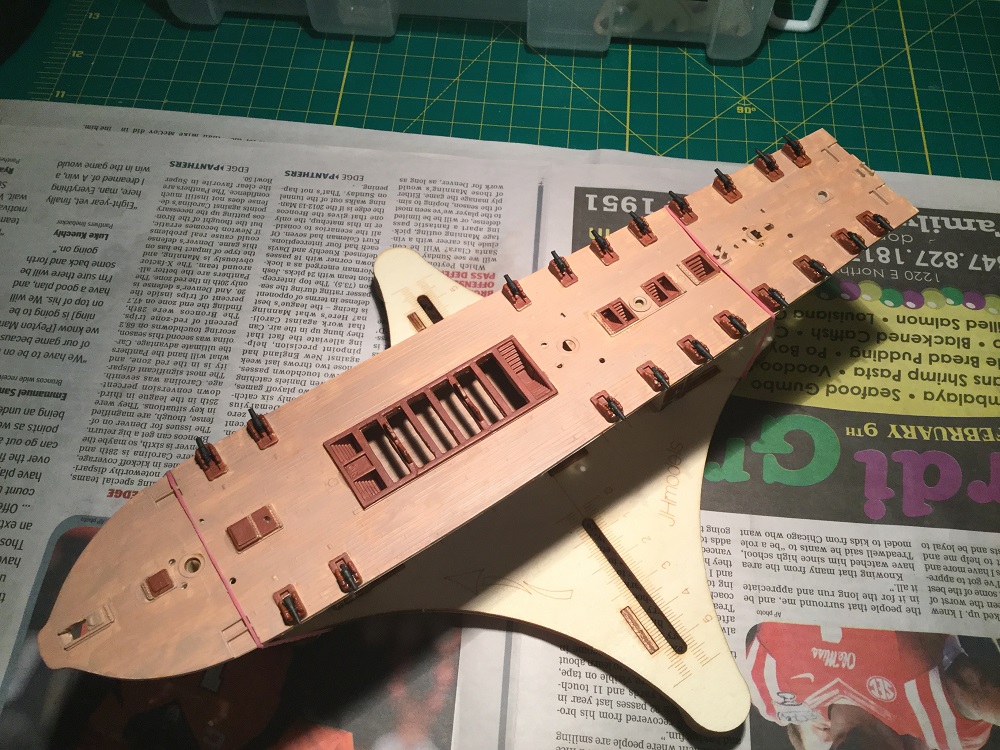
Progress is slow this week as I am being pulled in too many directions at work. However, I dug up a blog from someone who built the 1:196 Baby Conny and he made some nice changes to the main deck....including drilling out the grate to give options in perspective. I may leave it open, or try to create a 'faux' gun deck. Not going to kill myself over it, but I like the way the main deck looks now. Step by step...
So:
1. Painted with an enamel 'wood' followed by a second single coat of acrylic 'tan'. (Tan? Really) Anyhow, may try a wash to bring out the boards a bit more, but the overall effect is a nice non-homogenous view of the main deck.
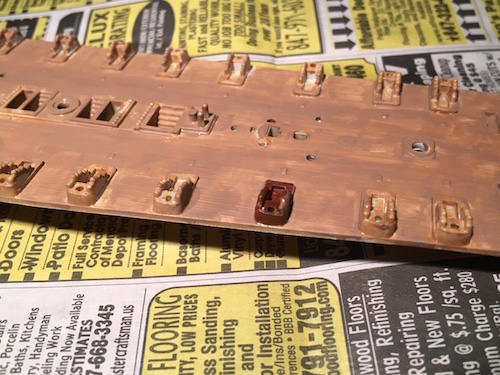
2. Tried a 'rust' for contrast for the cannon carriages...looks fairly nice, and not as stark as a red in the case of a smaller model.
To be continued....
-
Hi Steve,
Appreciate it. And yes, that it my goal....have fun, learn, and dream a bit during the creative past time (while I listen to old 80's music).
I had noticed the mold was made in 1957 I believe...before my time, but brilliant that Revell still makes it....good learning tool, and very reasonably priced. If you built her before, I may have some good questions for you and the forum as I am still very new to modeling.
Today I learned:
1. Painting can be dangerous and irritating - spilled and some thinner ran afoul of my left hull...now I have repairs to do and I haven't even put the hull together!!
2. Port = Left, Starboard = right, Grog = watered down rum
3. I am horribly bad at detailing! Must be patient...
Cheers
Patrick

Lady Nelson by Overworked724 - Amati/Victory Models - 1/64
in - Kit build logs for subjects built from 1801 - 1850
Posted
Well...the bulkheads were not perfectly square. Crap. But darn close. So I am taking a stab and deciding to push ahead. Seen a few posts (and recommendation from club member) to use filler blocks to shape the hull surface. Yeah...I agree. But the kit did not come with it and I need to learn from my mistakes. So darn it! I will make them!!!!
Put the deck on and will post pics later. Time to fair the hull. God help me.