HOLIDAY DONATION DRIVE - SUPPORT MSW - DO YOUR PART TO KEEP THIS GREAT FORUM GOING! (Only 13 donations so far - C'mon guys!)
×


Modeler12
-
Posts
1,716 -
Joined
-
Last visited
Content Type
Profiles
Forums
Gallery
Events
Everything posted by Modeler12
-
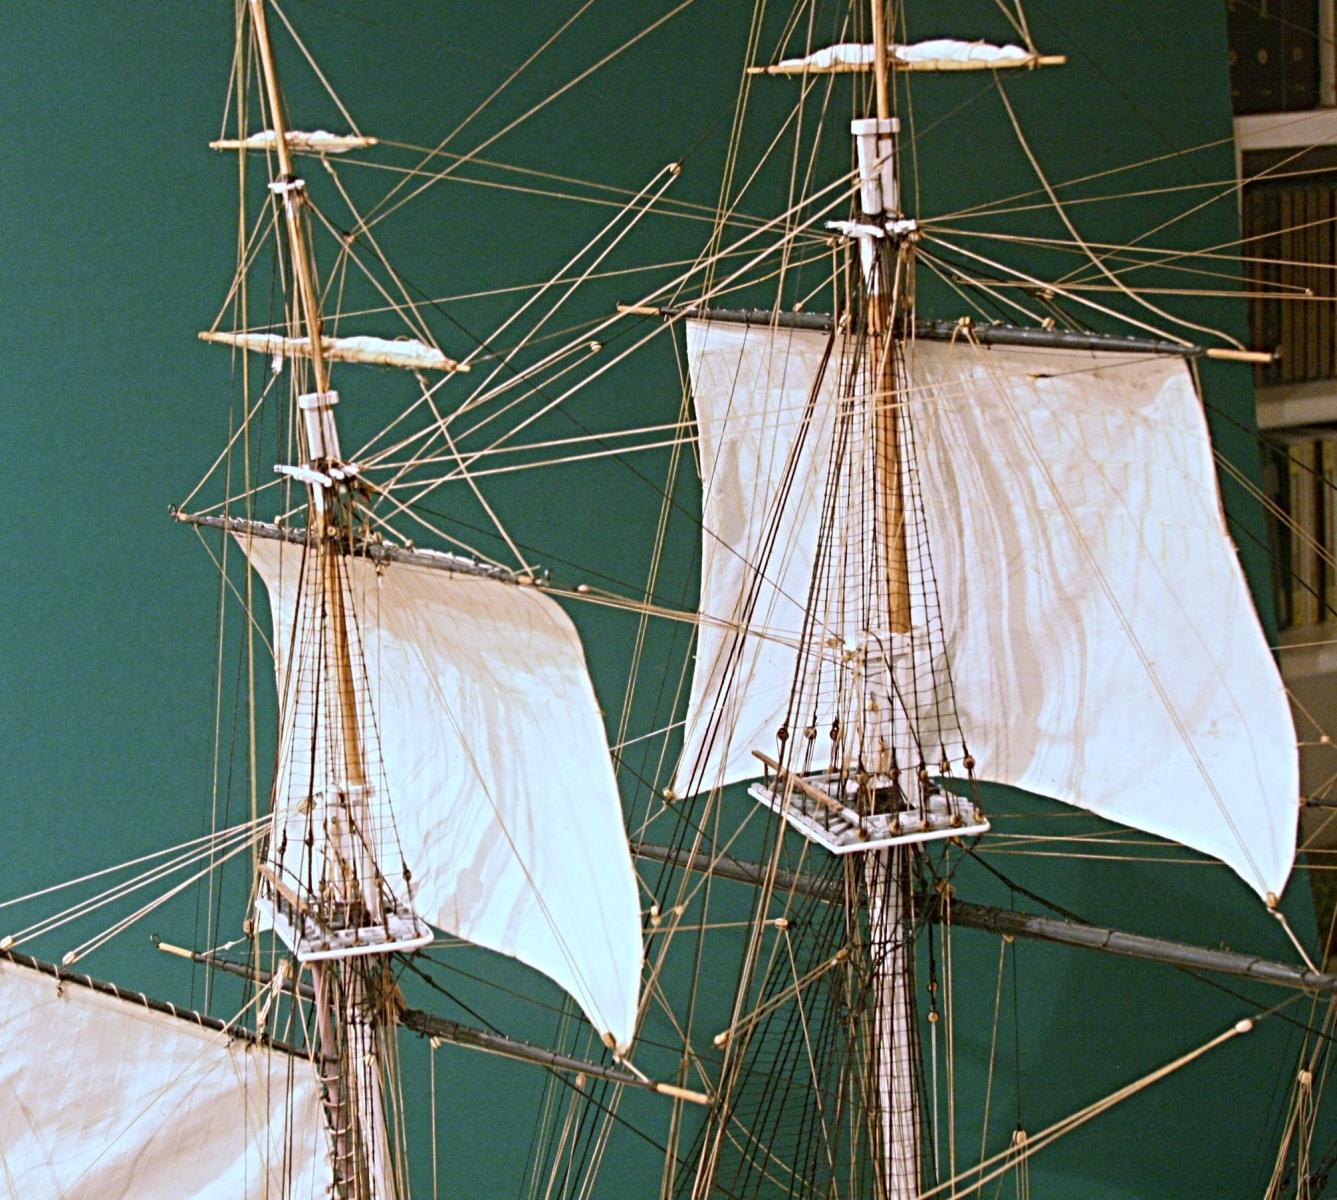
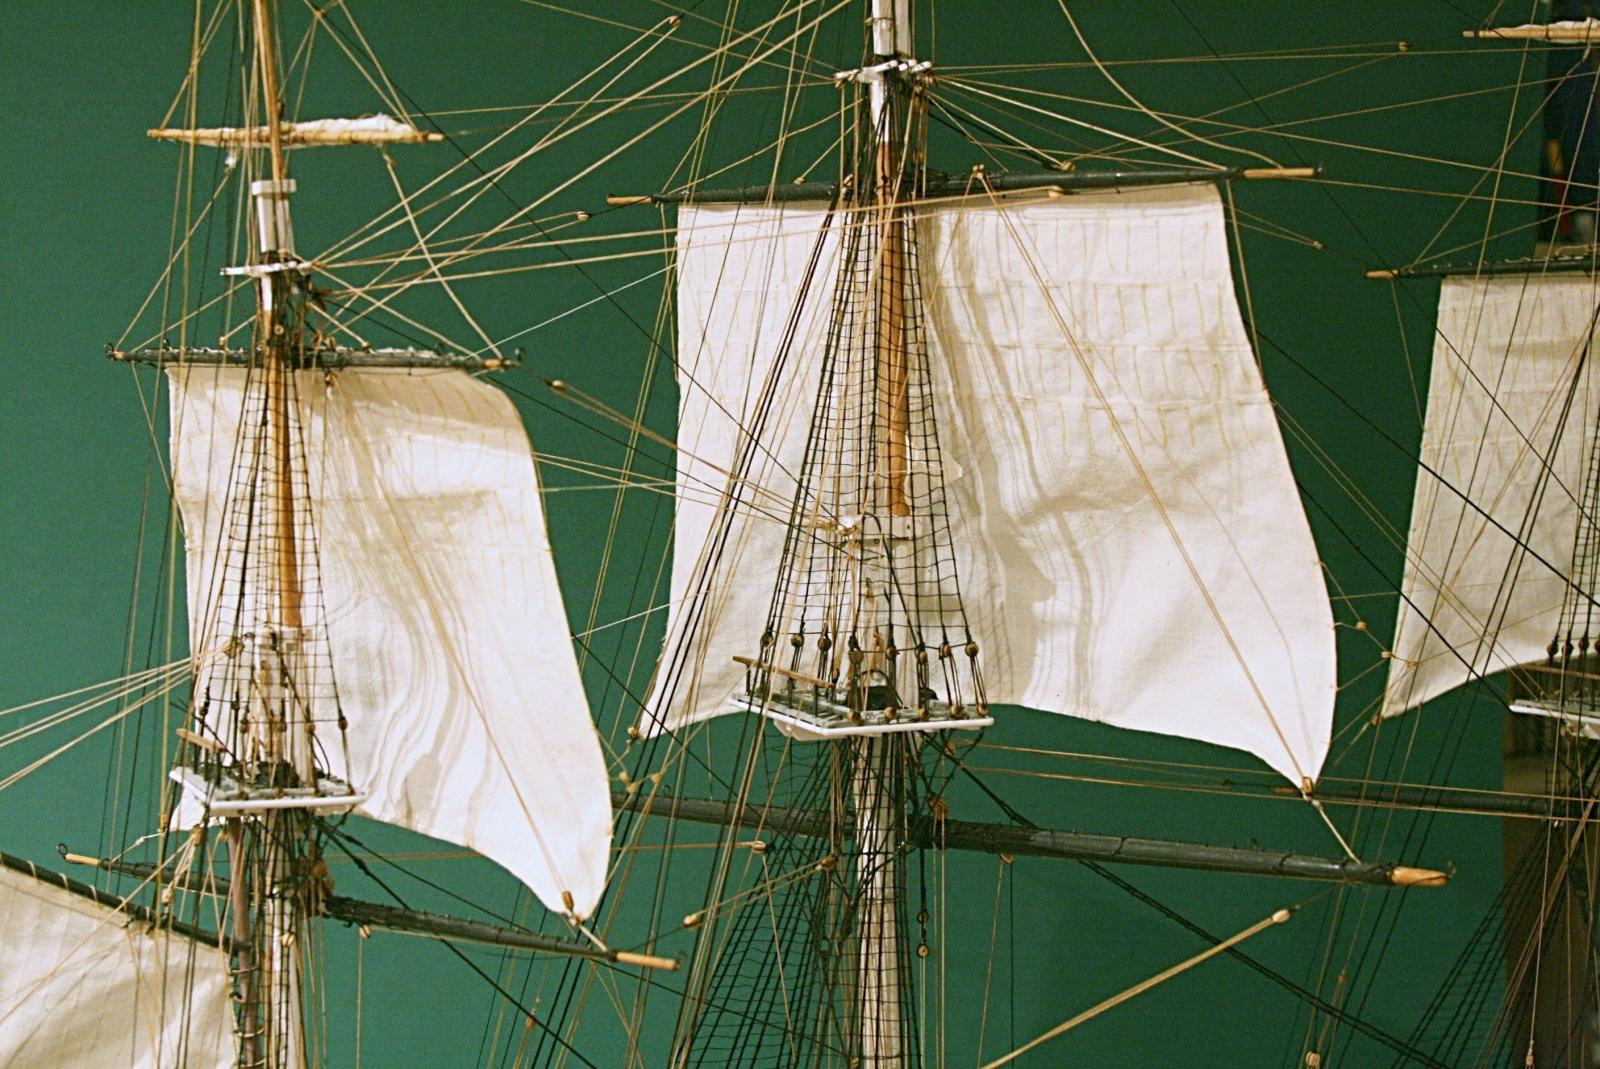
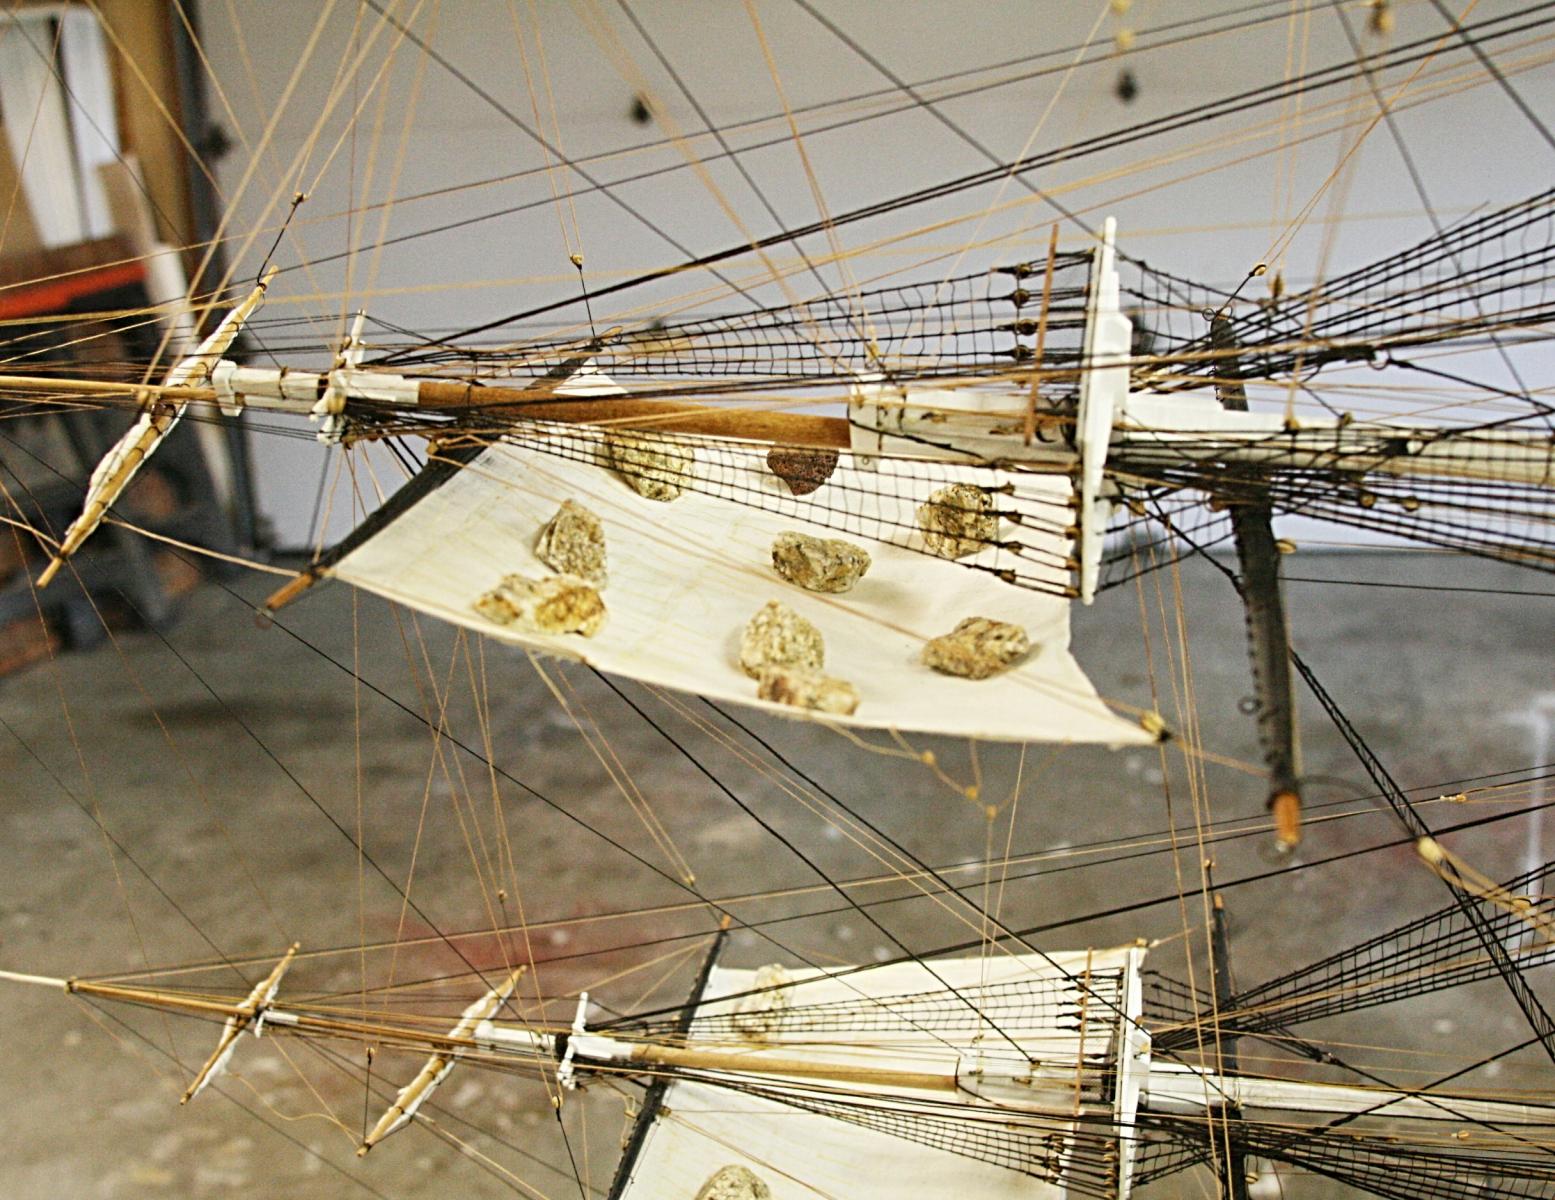
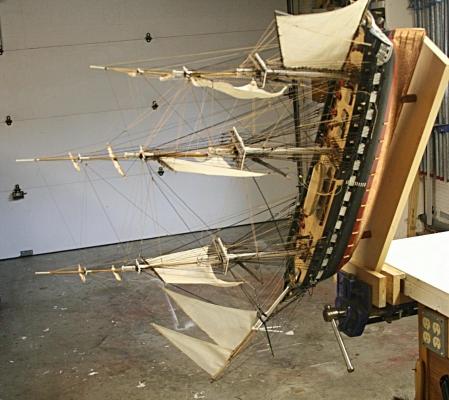
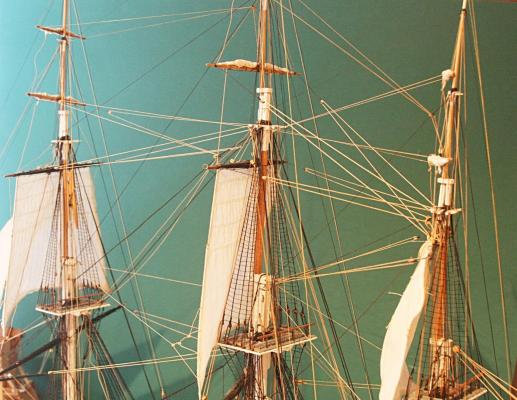
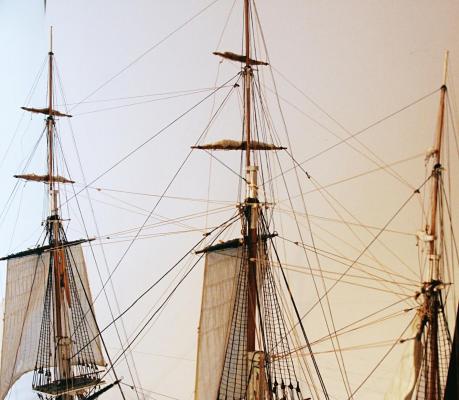
 Ok Henry, I am sure you are full of 'stories' such as this one. But I actually expected damage when the ship took this dive, but no such 'luck'. The upshot was that I didn't wait. The sails were dry and I wanted to see if my method worked. Here are the before and after shots. It is not perfect, but pictures do not show the sentiments involved when my admiral said 'Whowwweee, clean laundry'.. I think I will try the same with the other sails. Keep in mind that right from the start I wanted to show this ship on a starboard tack. The wind is coming from about three o'clock, hence the spars are pointed at a sharp angle. This way I wanted to show the rigging from behind the sail and all the other goodies that go with it. However, I will not list the ship towards the lee side. She will be a proud lady. Besides the netting on the rail and the boats along sides, the last thing I will add are the flags and they will correspond to this tack and the wind direction. More about this later.
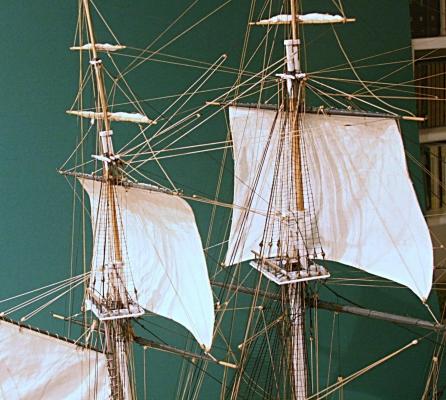

- 732 replies
-
- 2
-

-
- constitution
- model shipways
- (and 1 more)
-
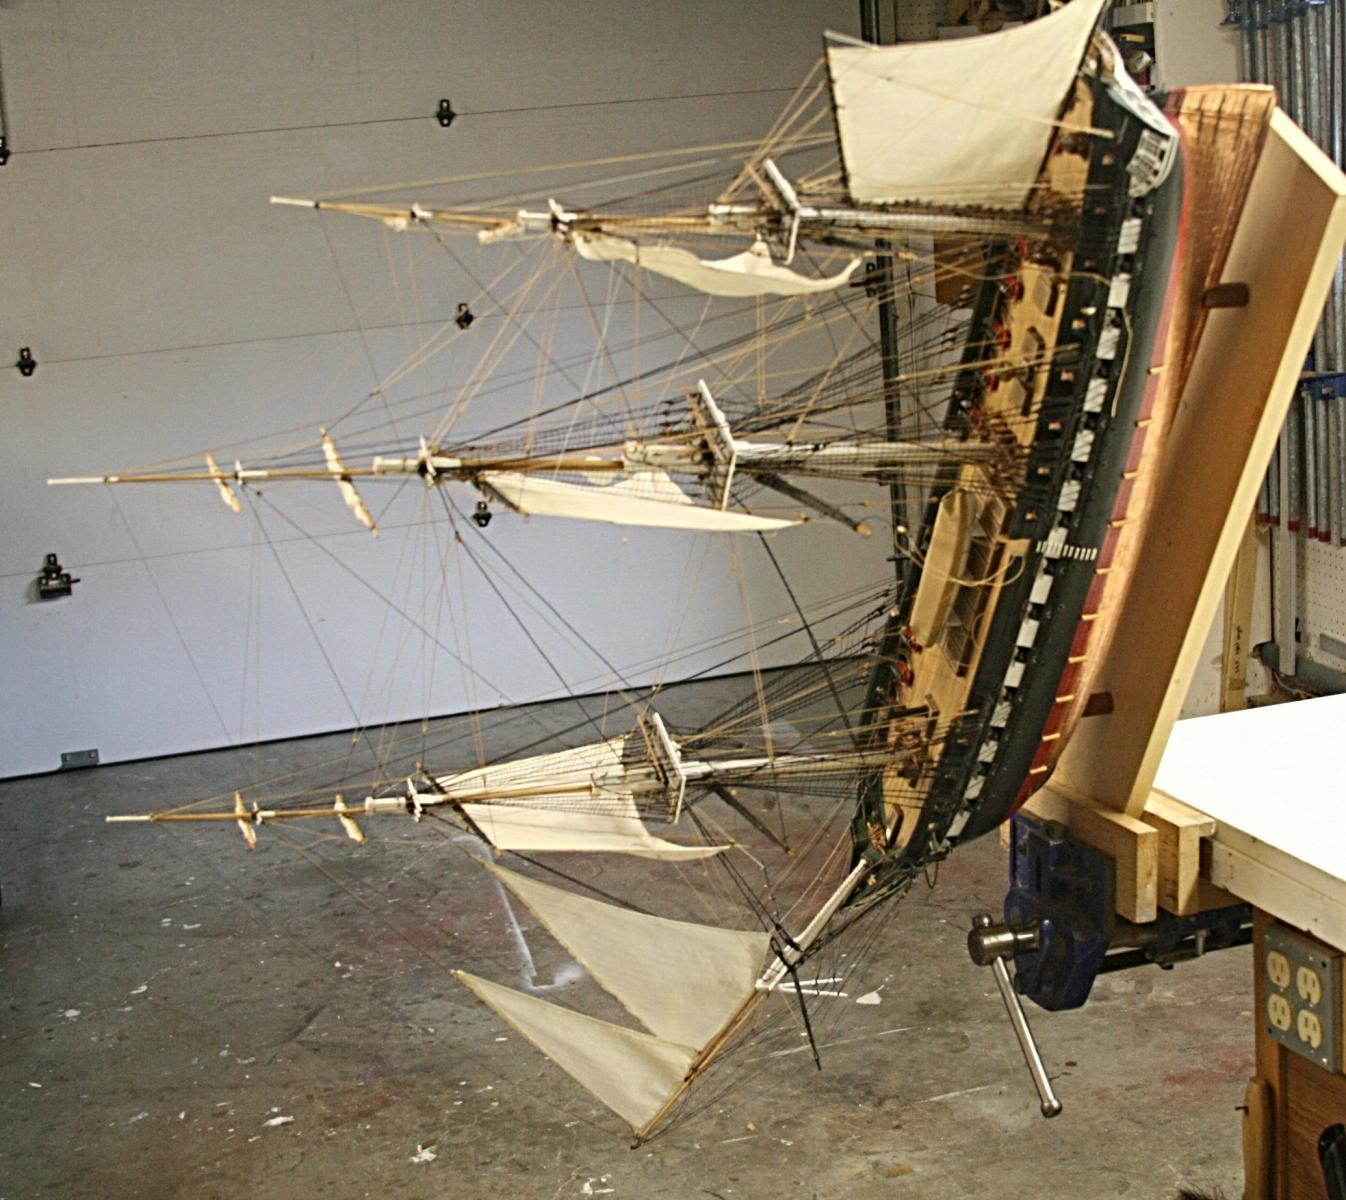
. . . . and watch out for those rocks coming down. You know, I expected some parts to fall down as I turned Connie on this 'dive'. Nothing happened! If this works, I also want to redo the jibs and spanker this way.
- 732 replies
-
- 1
-
-
- constitution
- model shipways
- (and 1 more)
-
Perhaps the following video might be of interest:
- 1,756 replies
-
- 4
-
-
- constitution
- constructo
- (and 1 more)
-
Rich, I don't know how far back I have to go in your log, but I am curious how you attached the netting on top of the rail and what you used to simulate the hammocks. Your plans are probably a bit different from mine, which did include some nice brass etched pieces for the stantions but nothing about the hammock storage.
- 1,756 replies
-
- 2
-
-
- constitution
- constructo
- (and 1 more)
-
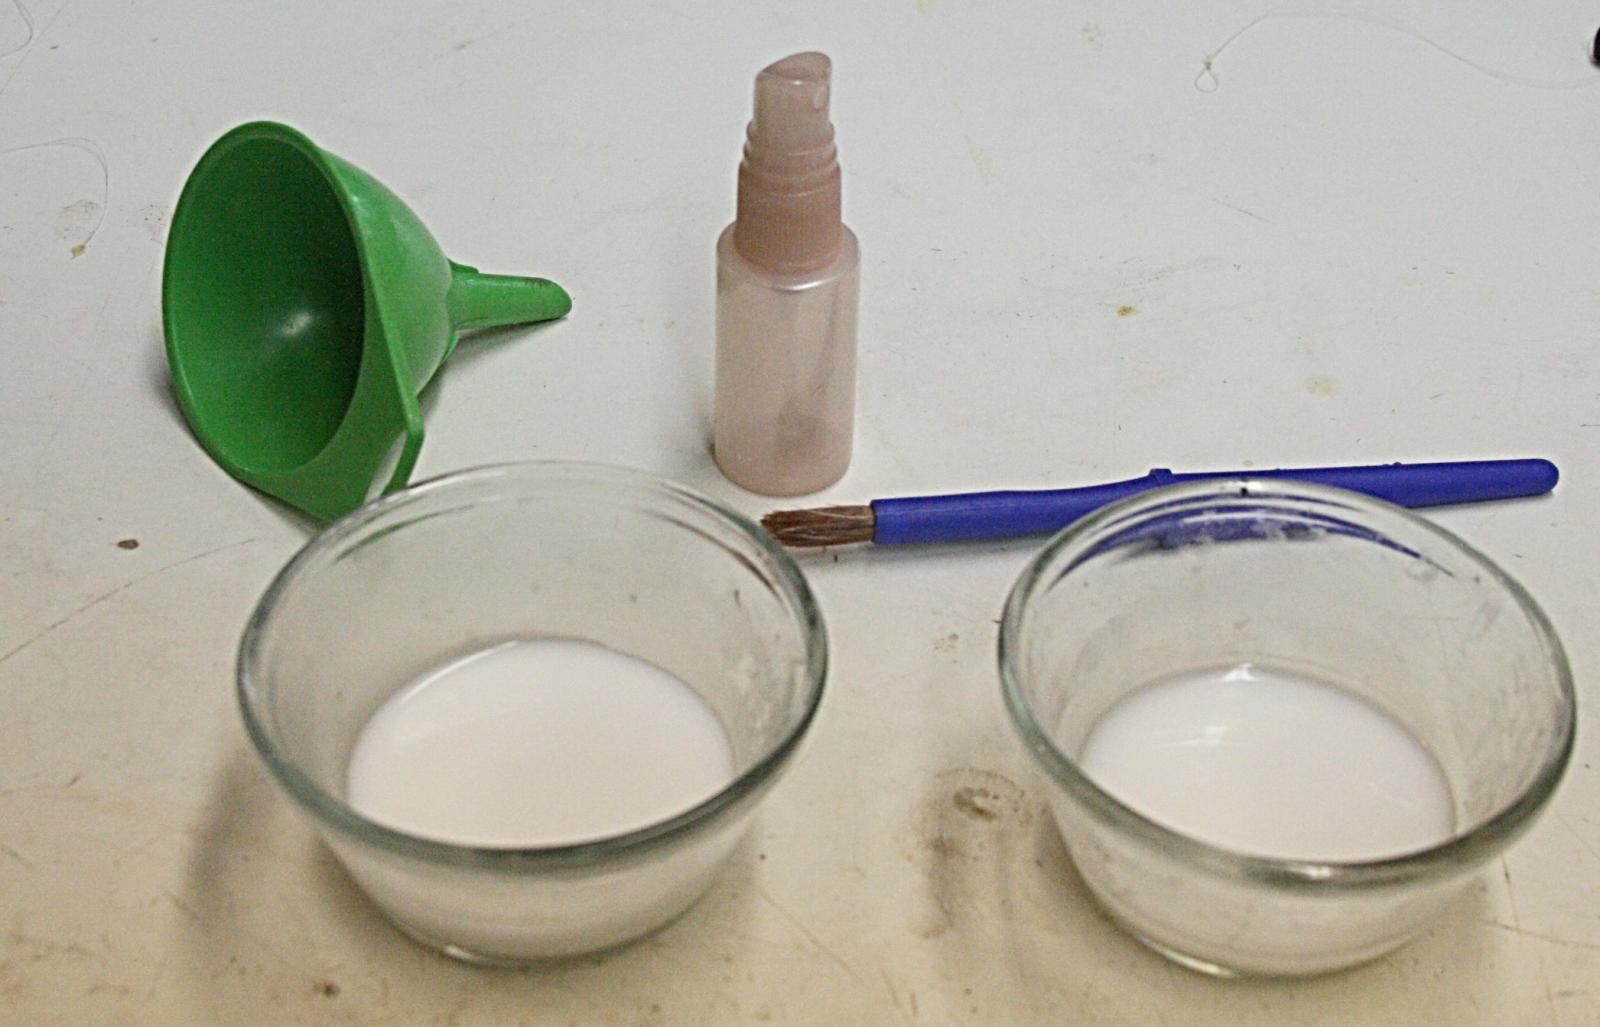
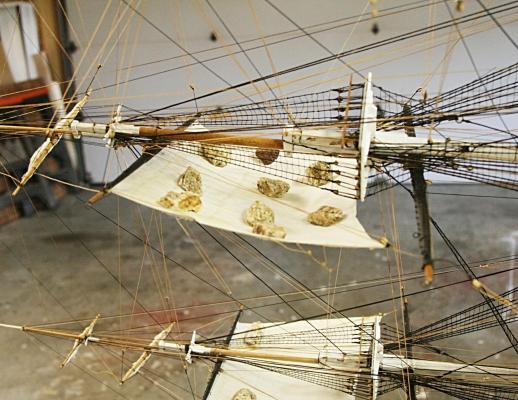
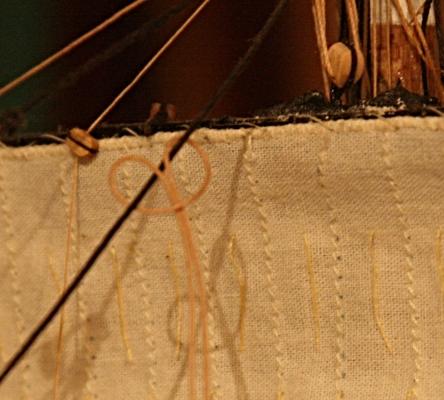
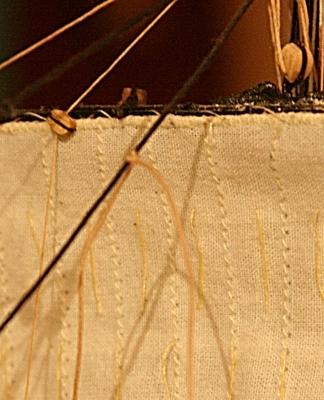
Danger! This is something you don't want to do every day. All along I have not been happy with the shape of the sails. I have followed what others have done such as use a fan to fill the sails while spraying hair spray or starch. I had limited success. The sails still looked 'droopy'. So, I decided to let gravity do the job, mounted the ship in a vise and applied diluted white glue to the sails with a brush and a small spray bottle. Then I put some rocks on various spots until the 'bulge' looked about right. Now it is a matter of letting this air dry until tomorrow. We'll see what comes from all of this.

- 732 replies
-
- 4
-
-
- constitution
- model shipways
- (and 1 more)
-
I felt the same way when I was at the stage you are now. The book that Robnbill recommended was an eye opener for me. Hardly any words but great pictures that clarify the rigging. Sometime ago someone mentioned that there is not a redundant line on one of those old ships, Now I understand why that is true. In California we have a public library system that allows us to get books from many libraries in the state as well as Nevada and Utah. I have been able to get all sorts of good books that way. You might check that out for Arizona. Your local library should be able to help.
- 1,756 replies
-
- 2
-
-
- constitution
- constructo
- (and 1 more)
-
I like it, Grant. How simple. You have to make sure the needles are pointing in the right direction.
-
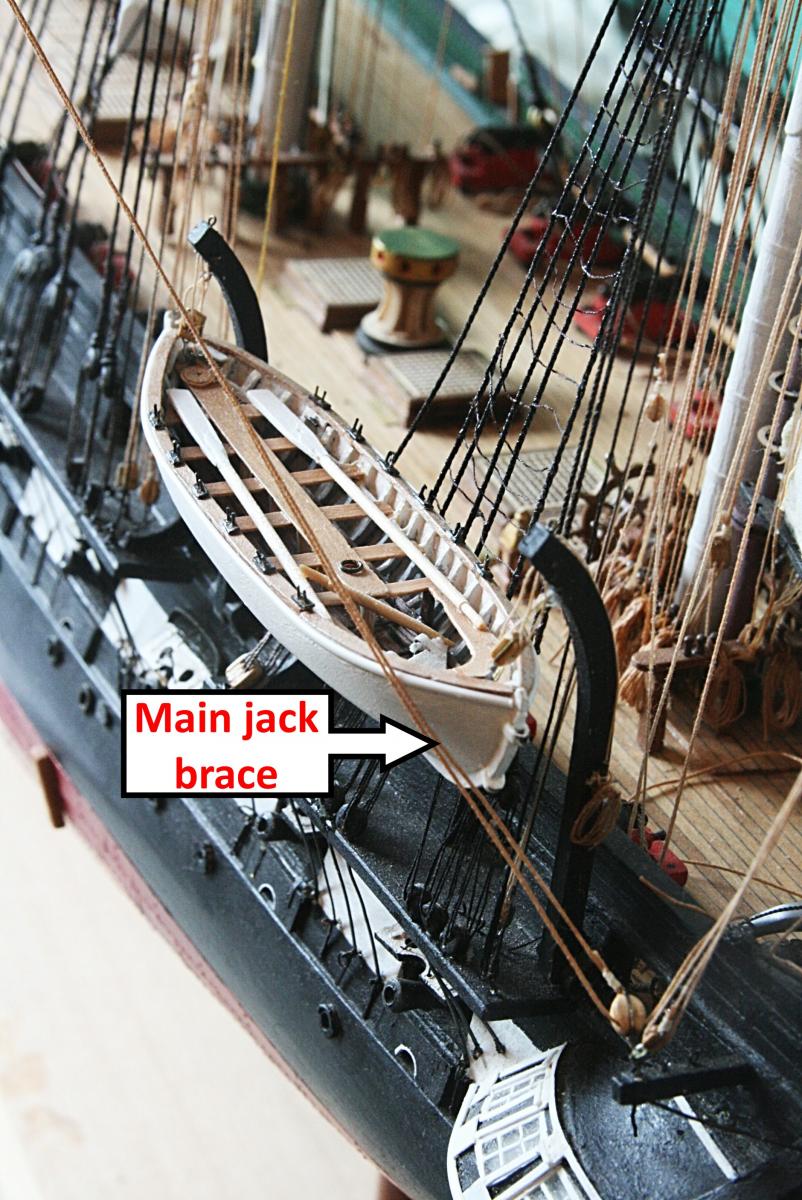
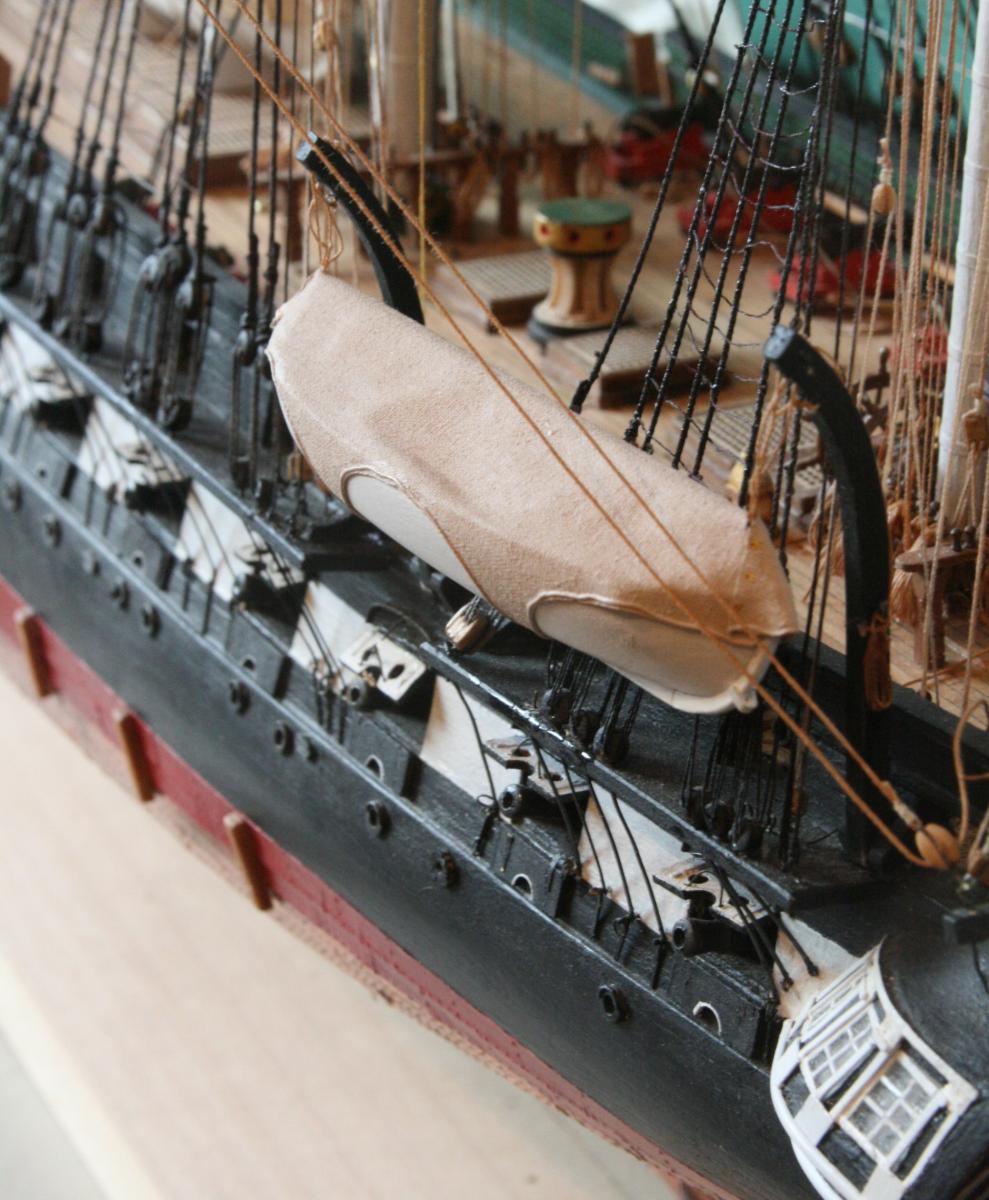
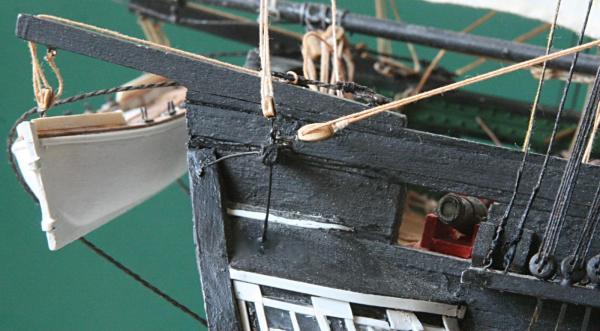
Here is the first trial of mounting the whale boats. Just as I expected there is interference with the brace line coming from the main jack. It rubs against the boat which already is pushed against the shrouds. I will put another eyebolt on the bumkin out as far as I can. Then the brace should clear the boat. But on the starboard side the line goes lower and further forward, and the problem may be worse. And yes, there is much more to those davits. Lot more lines and a 'griping spar' near the top holding the davits in place. One step at a time. The boats and braces have hooks, so they can be removed easily and adjustments are easily made. In fact this boat belongs on the starboard side. The covered boat will be on port against the wall when displayed.


- 732 replies
-
- 7
-
-
- constitution
- model shipways
- (and 1 more)
-
Although the tool worked fine, the craftmanship was lousy. Here is the new version. Now the hooks are better and the whole thing stronger.
-
No problem. I am not surprised that someone else thought of this before. The advantage of this one is that it has two prongs that fit around the pin. Pushing with one tip is harder. I have also used crochet hooks to pull lines, but they also are too bulky.
-
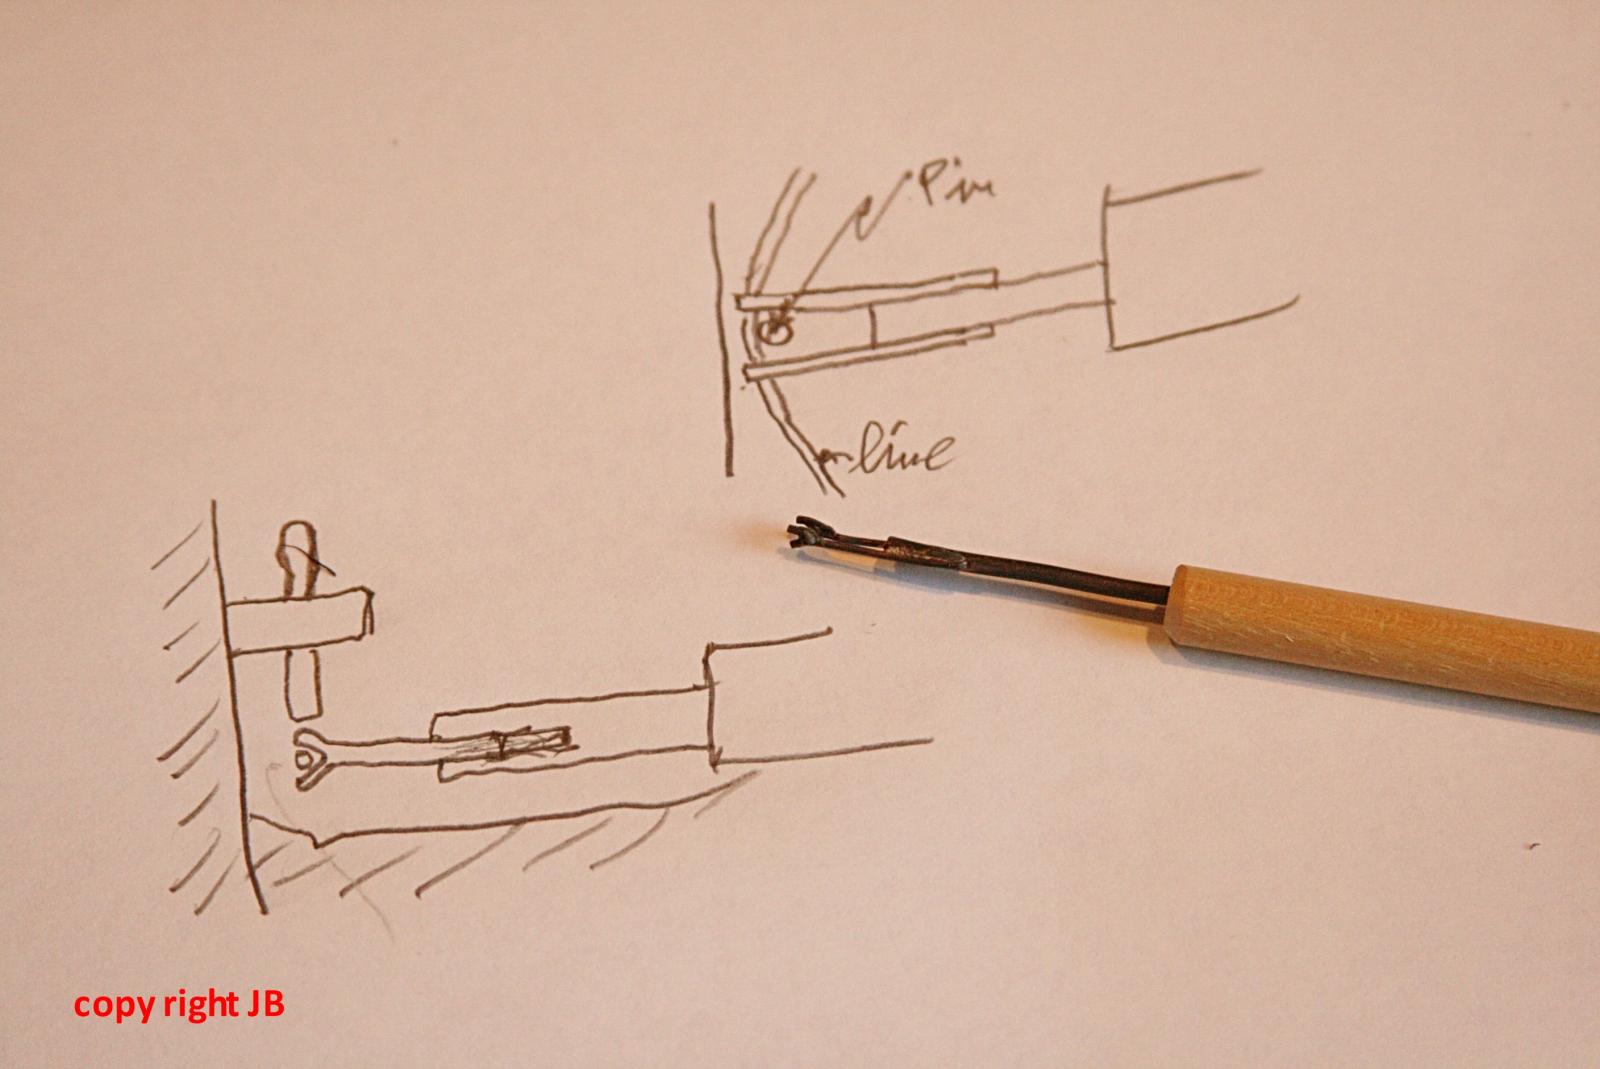
I am sorry guys, but this thing is so handy I decided to put a copy right on the pictures (above edits). I am not that interested in making these things, but to do this out of molded plastic would be much simpler and better. If anyone is interested (or know how to) commercialize something like this, let me know. As I play around with it, I find other spots where lines go around pins and even other lines. During the rigging phase I found several times that lines don't come down like you want them. They get tangled up or twisted and need some guidance. This, and a related 'pull type' would facilitate that. Anyway, I would appreciate comments.
-
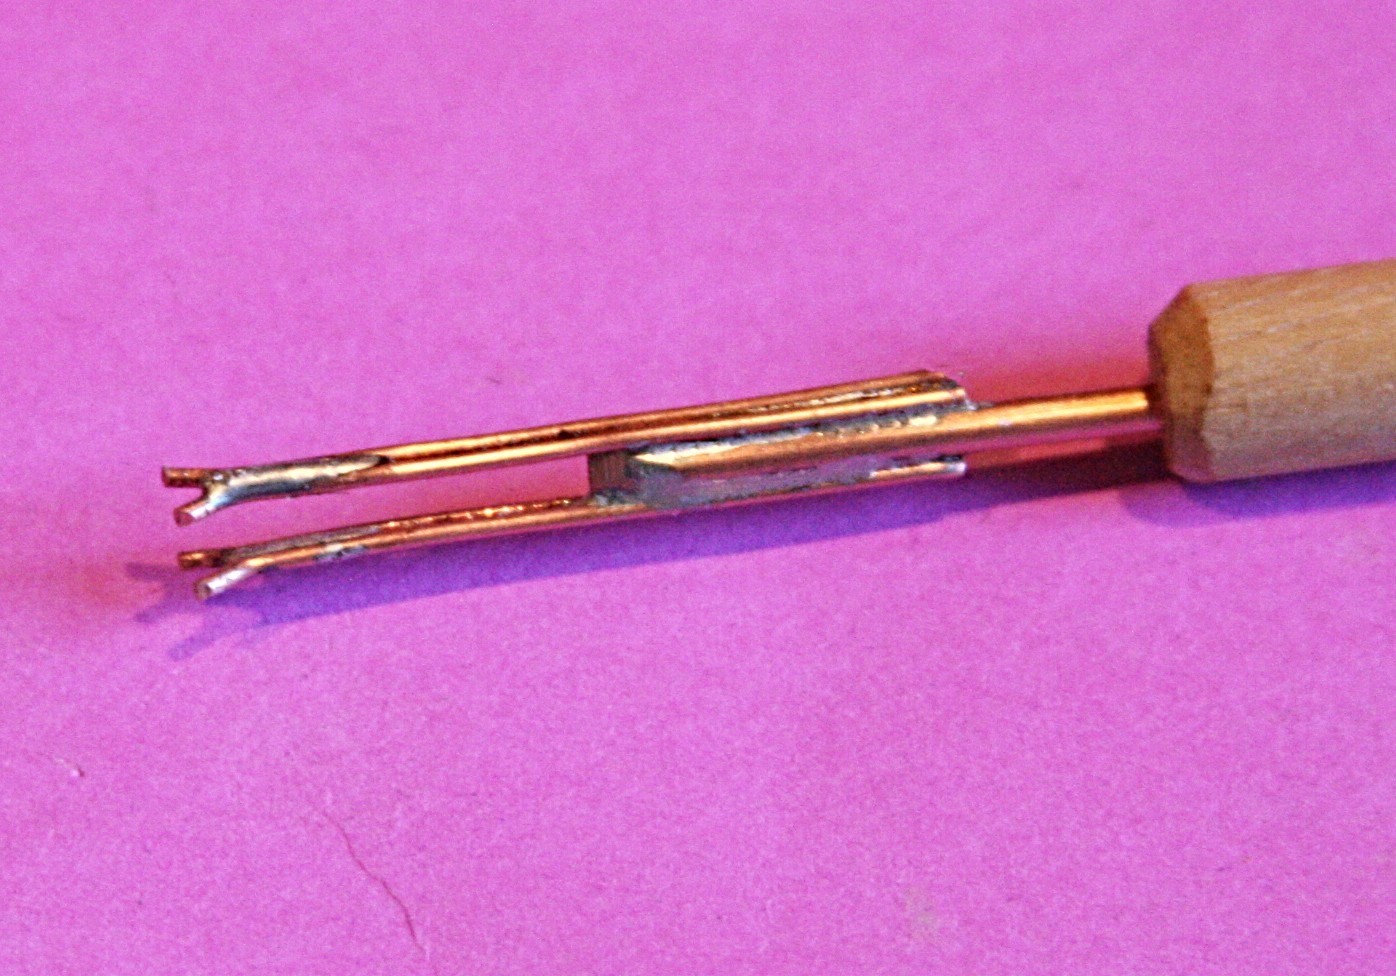
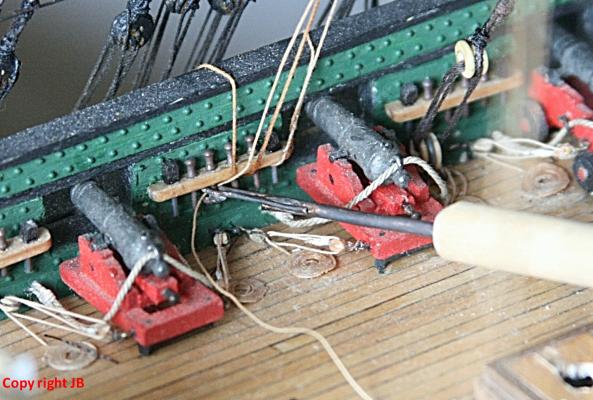
Here are two more pictures of the tool in action. The other end of the dowel holds a toothpick that I use to apply a tiny drop of AC when the line is in place. On the outside of the hull are some clamps to hold the line tight while the adhesive cures. When that is done I trim the line and cover the whole thing with some matching rope coils. I noticed again that Connie has a bad case of dandruff. Been sitting in the garage too long, I guess.
-
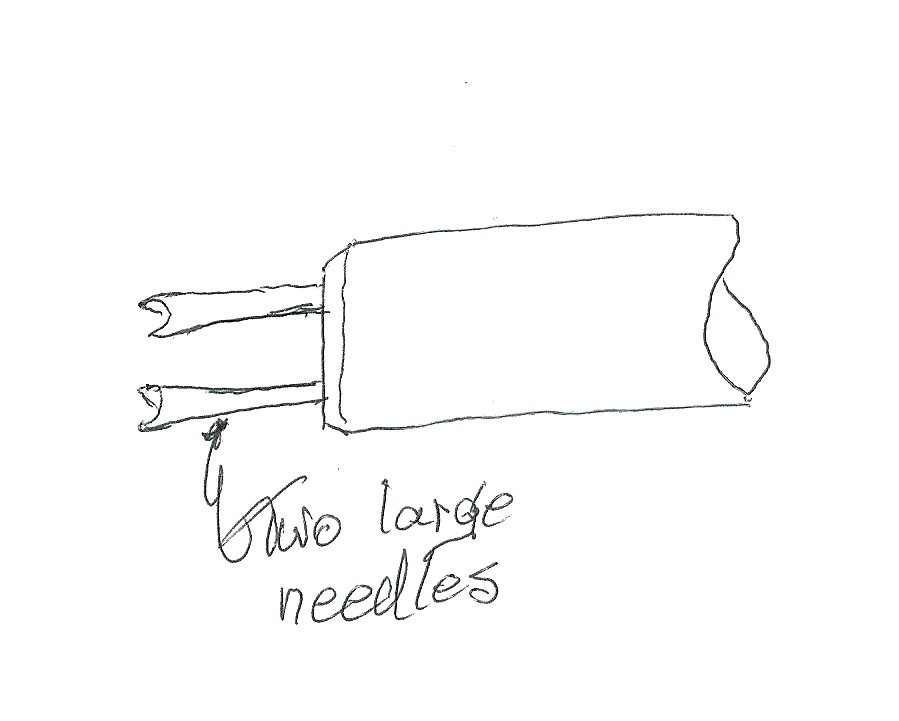
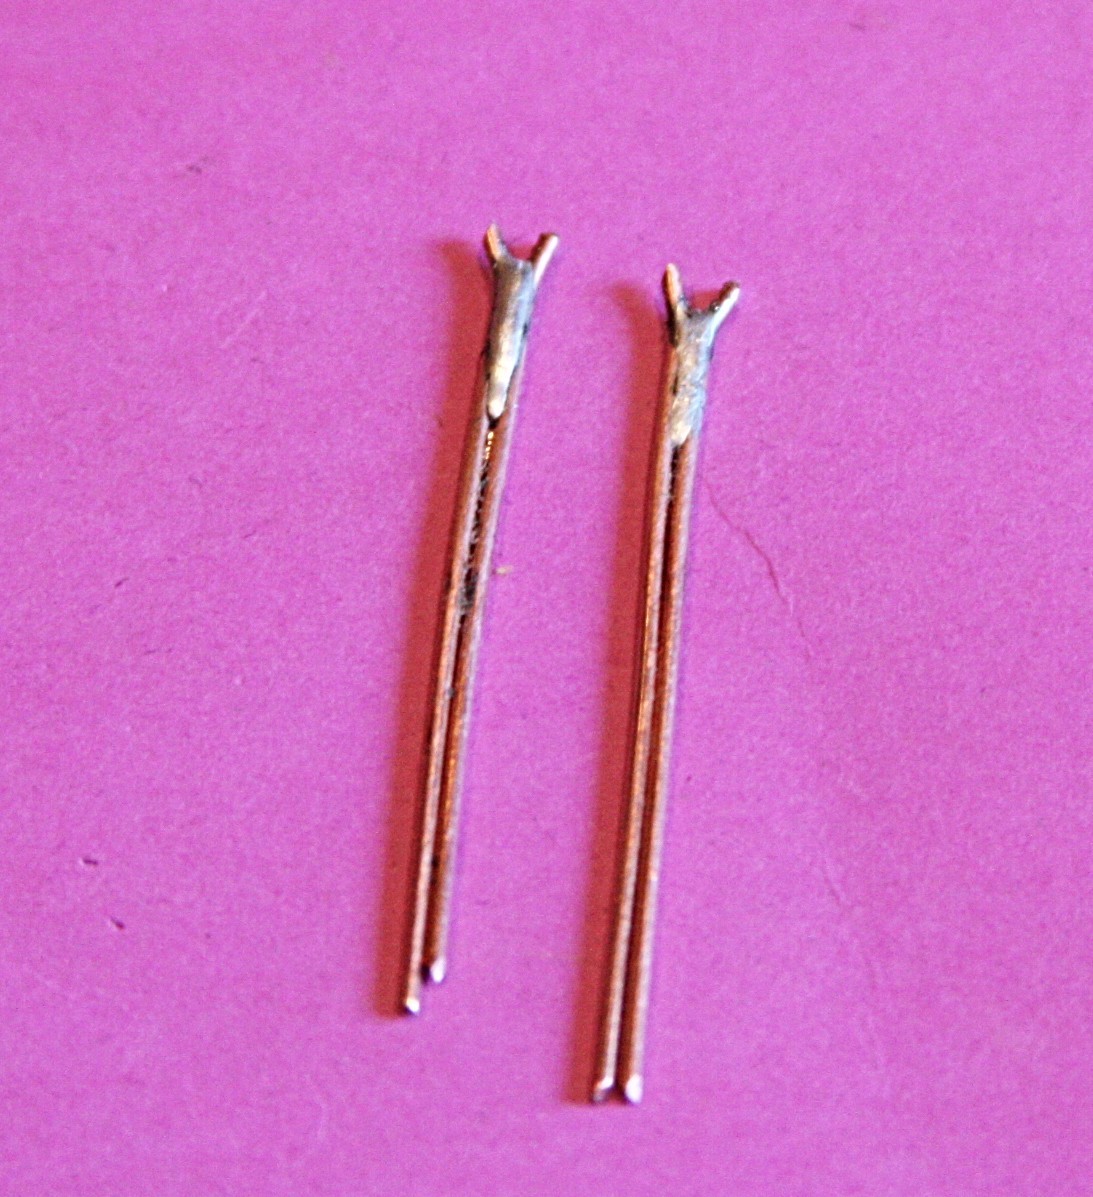
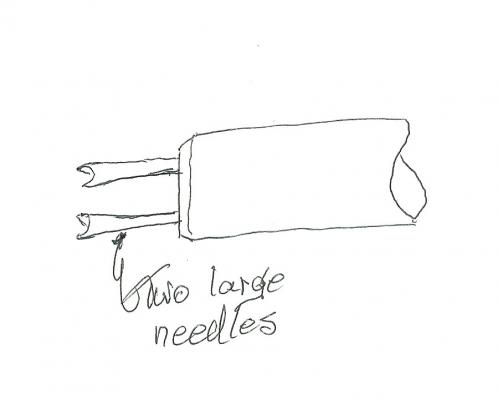
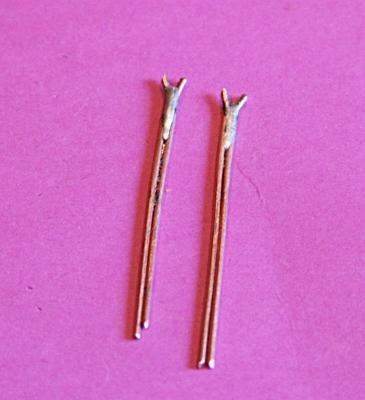
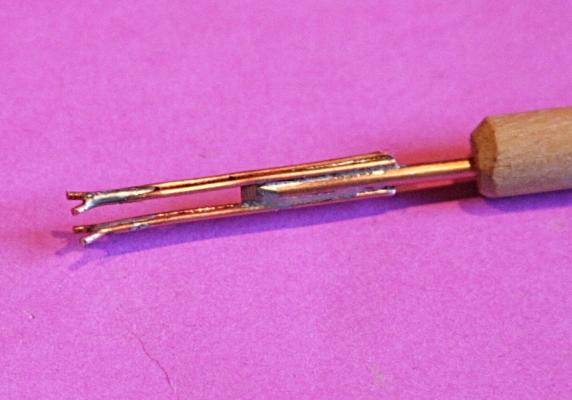
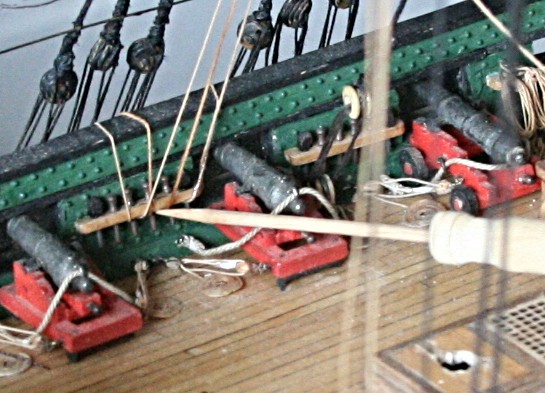
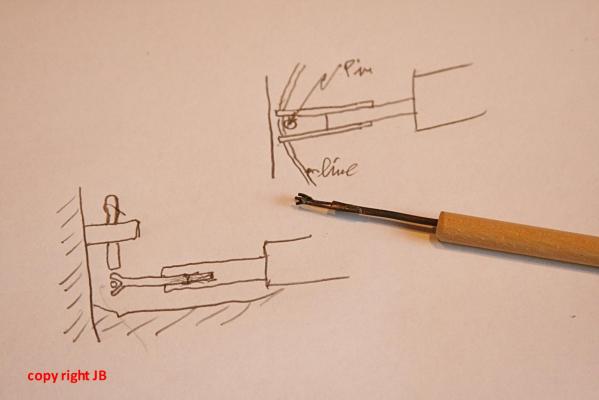
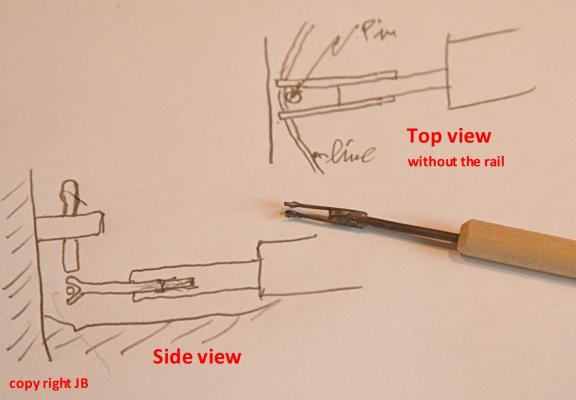
I had a heck of a time belaying lines to the pinrail on the other side. Bent tweezers and other gadgets just didn't do it for my clumsy fingers. Here is what I did. I took some brass wire, made two V shaped hooks at the end and silver soldered them to the side of a thicker wire. The idea is that I wanted to push the line underneath and behind the belaying pin. I spaced the two wires such that they cleared the pin. Now with the line slack on the deck, I can push the line with this two pronged tool as shown in the sketches below. Once there, I pull the line taut and hook it to the pin on top. I had success the first time I tried it.
- 18 replies
-
- 14
-
-

-
Right on Don. Here is another example of why it is important to keep the history and time frame of flags in mind. For my next project I am going to build a small ship that was captured by the British from the French in 1776. Even the British flags were different then from the current one. This could have been overlooked very easily. From the way I read the information, the flag could either have a red or white background, but the diagonal red cross came into being in 1801 with the start of the United Kingdom. It represents the addition of Scotland. But that was not the case in 1776.

-
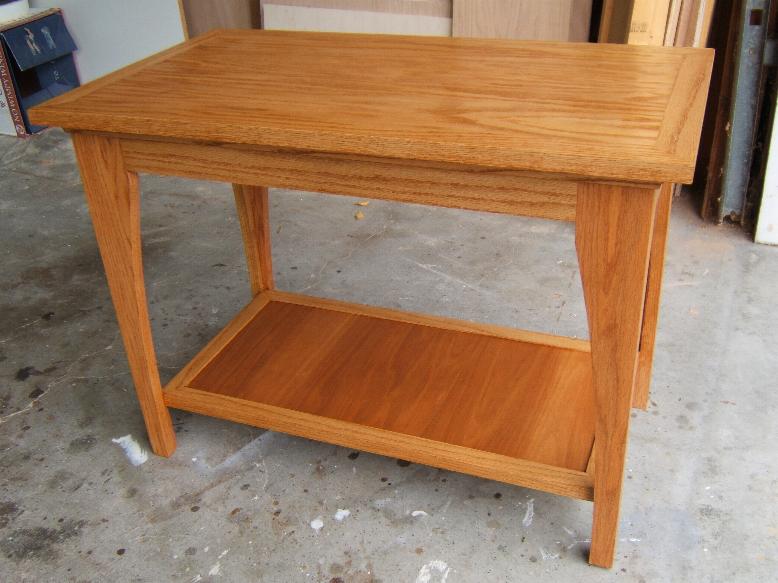
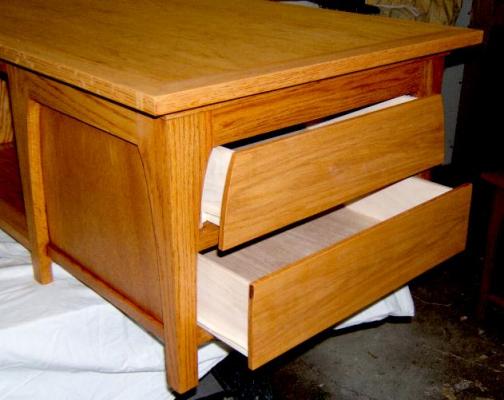
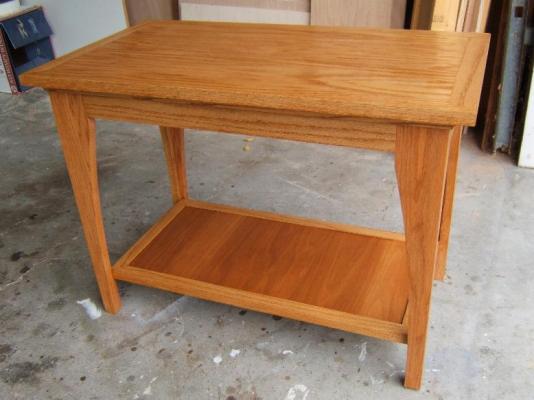
I really appreciate your comments, fellows. Here are some more of my thoughts: The table design should correspond to the furniture I made some time ago. Hence the legs will have the same look as shown below. However, the table will be a lot higher with book shelves underneath. I don't think I will incorporate drawers. Since the whole will be up against a wall and be rather permanent and stable, I will fasten the case to the wall. No need to move it. I also think that most viewing will be while standing up. Hence the keel of the ship will be approximately 40 inches off the floor. This also gives me clearance for a recliner chair which may sit off to the left and partially block that corner. The low table shown below will also be in that location, thus preventing very close contact with the glass case. I believe double pane glass will be sufficient. If this display were to be in our entry hall, I would be more concerned and use better glass like you, Bill. I have two spot lights in the ceiling, and that will be the main source of light (glass top). The back will be solid with a painted background or possibly a mat or cloth material. We will see how this goes when I put the drawings together. These are just some thoughts.
- 732 replies
-
- 7
-
-
- constitution
- model shipways
- (and 1 more)
-
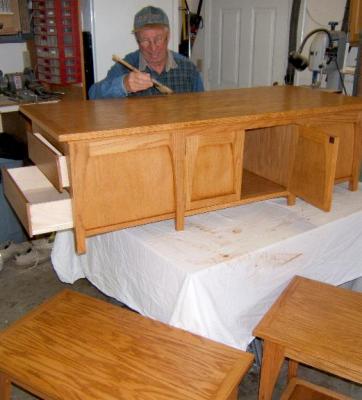
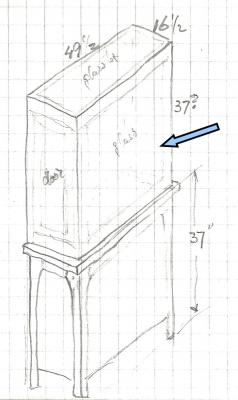
Here are my first thoughts about a display case. The admiral agreed to display this model instead of giving it away to friends or other good causes. The attic was one choice, my office second, but we did decide the 'family room' was best. I have built a lot of furniture and in that room it is mostly oak. So, oak it will be for the display case. I already mentioned that the ship will be against a wall with the starboard tack outwards. With the model in that position I measured the interior dimensions needed, then started with the wood. The rough sketch below is my first crack at doing it that way. I plan on using plain glass for the front, top and two sides. The back drop will be something else. But I do want a door to get the lady in and out when necessary. So, the left side will have a glass door (and plenty of room to slide the model in and out). The blue arrow is the most common view point. The table will have a design similar to what we already have. It will be 37 inches high. That would be enough to clear the back of all or most couches or recliner chairs that we could put in front or at an angle. It could have shelves or not (tbdt).That's how I arrived at the basic dimensions shown below. We will see if this flies. But now back to refining; which is what I should have been doing instead of dreaming.
- 732 replies
-
- 5
-
-
- constitution
- model shipways
- (and 1 more)
-
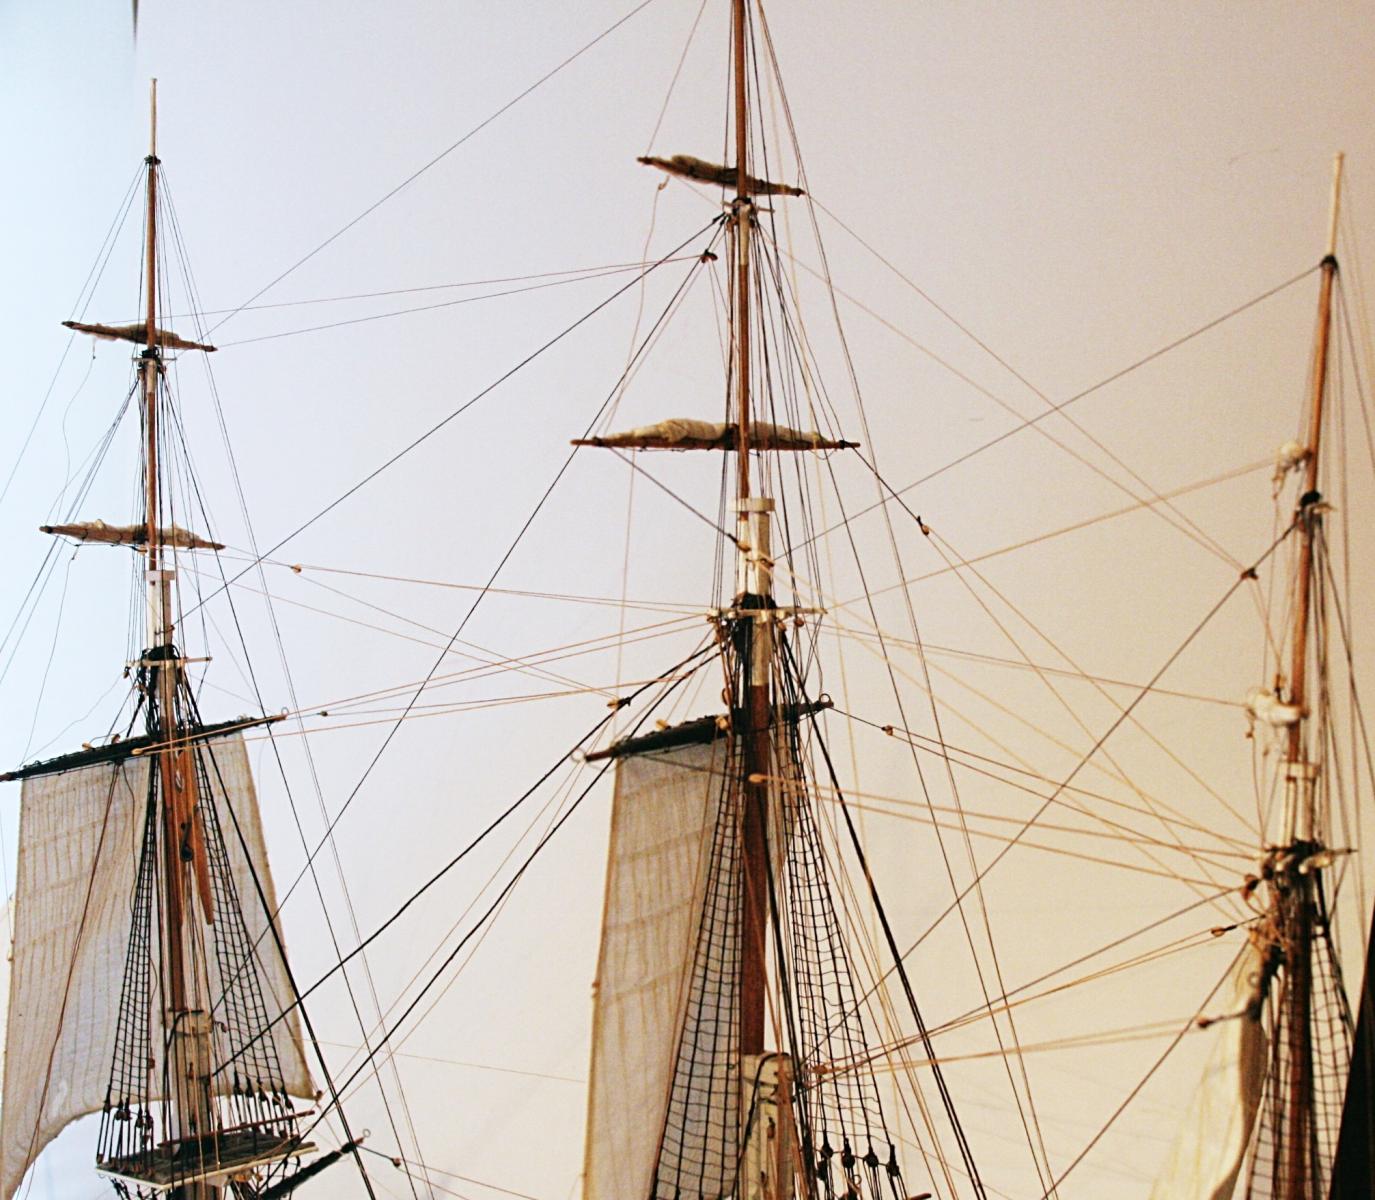
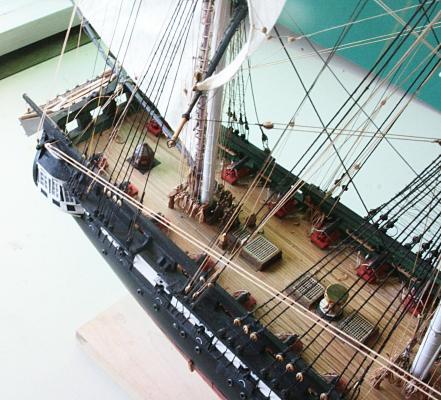
Every time, before I go to bed, I look at my Connie and have nightmares about her tangled lines. Well, not really tangled, but confusing, and then again, I know what each one of those represent. None are redundant!! But I show these two pictures because when taking shots, the background may make a difference. I use a sheet of matting material for most of what I shoot. I should try some light grey. Which brings me to the subject of 'display cases'. But I will have more about that later.
- 732 replies
-
- 4
-
-
- constitution
- model shipways
- (and 1 more)
-
Nice job, Don. And it is good to know that it has held up well for you. I assume that you made the adjustments before the glue stick kicked in. The waves look real. The fifteen stars would indicate that your model is from the time that a couple more states were added (1795 - 1818). The fifteen stripes were also something new. http://www.crwflags.com/fotw/flags/us-1795.html I also like the thought that there are more than one way to skin a flag. I recall there was also a good discussion here about the way or direction the flag should fly, depending on wind direction, speed, etc.
-
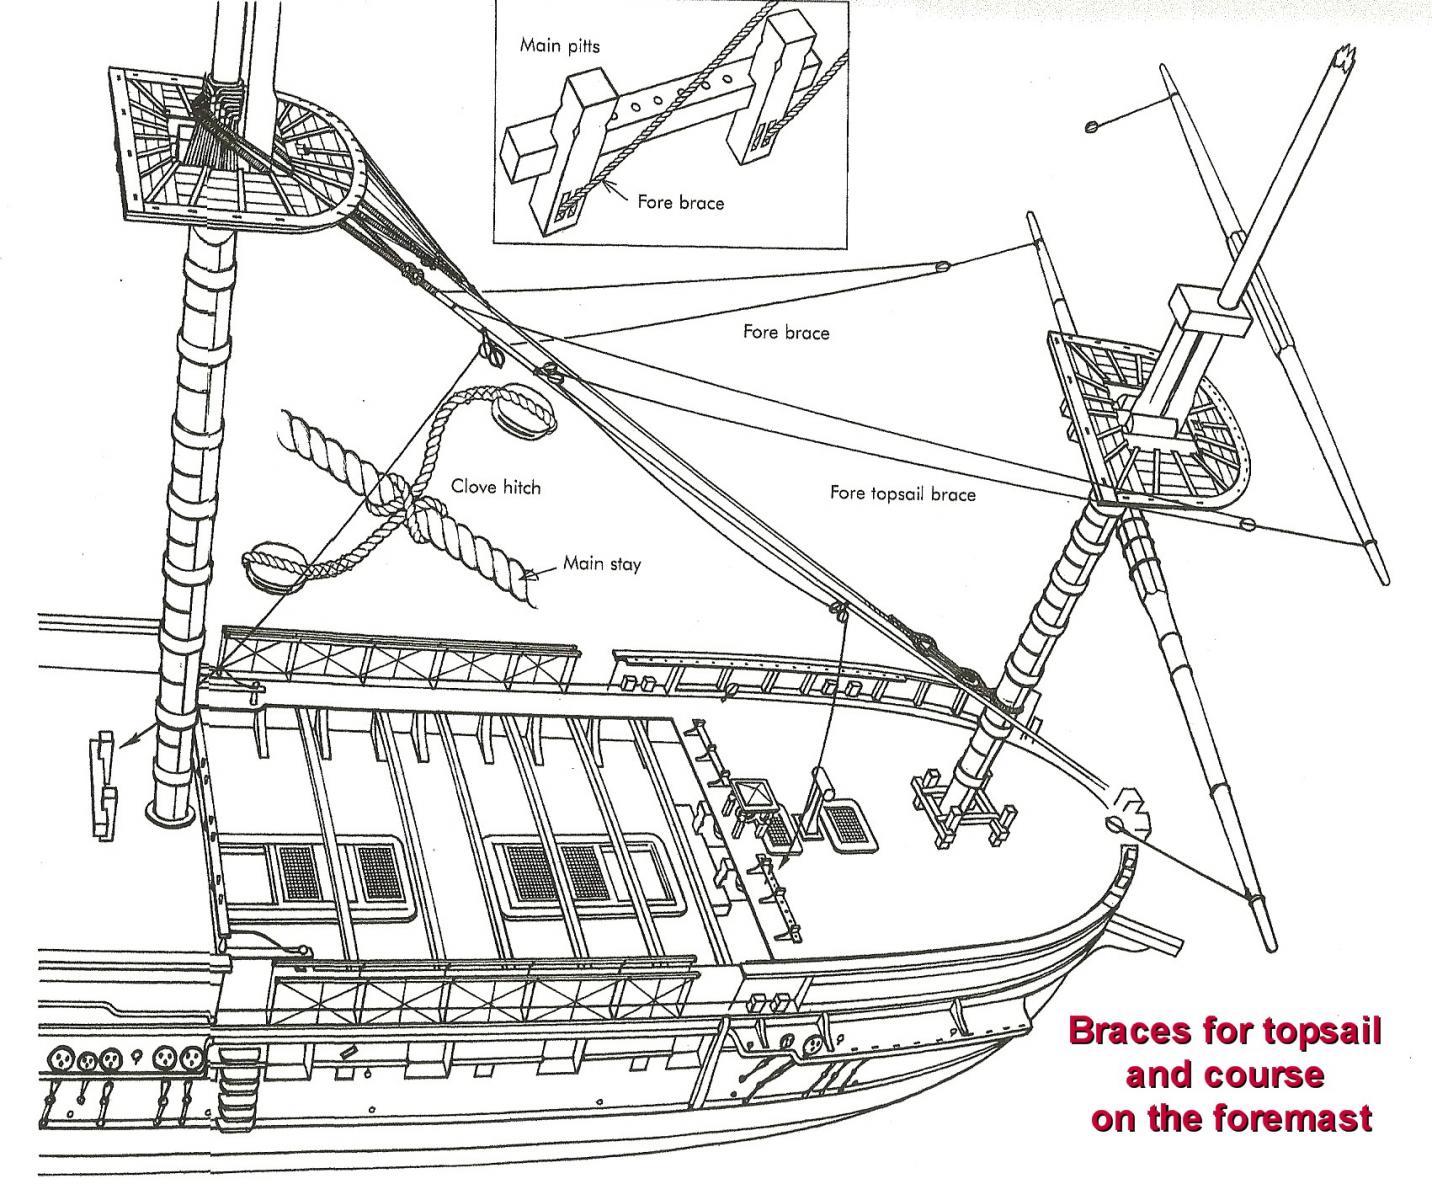
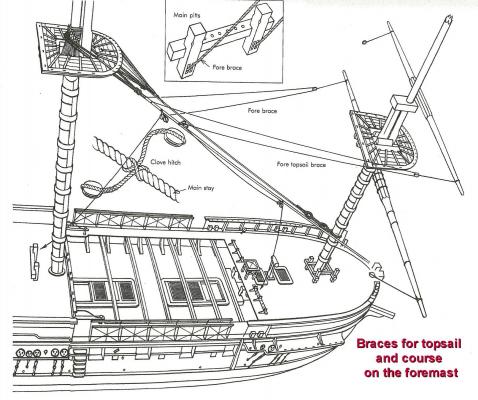
This is for my records. Fore topsail brace: Hitched to mainmast stay. .014 inch To yard with a .014" lead and 4mm WW block. Back to 4mm block attached to top with eyebolt, epoxy. Down to deck via inside top #152, 153. Keep loose until braces are lined up with spar both p/s.
- 732 replies
-
- 2
-
-
- constitution
- model shipways
- (and 1 more)
-
I mentioned that I had to do some repair and fine tuning. Here is one example of where in the future I need to take a bit more care. It involves the three steel rods that help to hold the bumpkin in place. It is the place where the main jack brace comes down from the right and goes through a sheave in the side of the hull. The bumpkin is the beam that sticks out away from the hull to the far aft end. The rods had come loose. I had simply butted them against the hull with a dab of epoxy. I took them off and this time drilled three holes where the rods go into the hull. A tiny drop of epoxy and some black paint took care of it. One thing about taking these close up pictures is that it shows every imperfection. I still have to straighten the rod to the left a bit. I had encountered more major problems like this when I relied on the glue to simply hold things in place. Now I know that I have to do more and anchor 'furniture' and other items more securely.
- 732 replies
-
- 3
-
-
- constitution
- model shipways
- (and 1 more)
-
Great stuff, Carl. Now I understand where all those variations came from. It has to do with the time frame!!! Since all along I have been thinking that my version might have been around the late 1800s, I feel better about what I ended up doing. I had to grin and explain to my wife what you wrote about the cow and rabbit. It reminded me also of my dad who could pull these Dutch proverbs out of a hat all day long. As a kid I always thought he talked in riddles.
- 732 replies
-
- 2
-
-
- constitution
- model shipways
- (and 1 more)
-
Actually, Evan, it was the picture that Petersson showed that got me thinking about this subject. He shows the topsail braces going forward along the main stay after they come back from the yard. I thought that was a very complicated arrangement, Hence, my inquiry. The fore jack braces below the topsail are as you mentioned.
- 732 replies
-
- 1
-
-
- constitution
- model shipways
- (and 1 more)
-
The website I mentioned above also has lots of interesting information. Here is an example when I brought up information about Dutch flags, an unusual way to honor your kids when they graduate. Mark Sensen, 22 February 1998 In May and June you can tell which families have students who have graduated. Outside the house the flag is put out, with the school bag at the top of the staff. Mark Sensen, 22 February 1998
-
I might add something that could be useful to others. There is a website that shows lots of details of flags from all around the world. http://www.crwflags.com/fotw/flags/index.html At the time I experimented with making flags I used a couple of the pictures. To do that I asked permission from the director Mr. Rob Raeside, explaining that this was strictly for the use of making flags for ship modeling. He sent me an email allowing me to copy his images for this purpose. I am sure that permission still stands, so, go at it with that understanding. I also want to caution you if you decide to add a flag (especially the US flag). Make sure you use one that is from the period that represents your model. In other words, don't use the one we now have. I used the image that has 38 stars.
-
Evan, that is essentially the same what Henry suggested, but it adds another block on the mainstay. I think I will keep it simple as I did with the fore jack braces. Thanks for your comment.
- 732 replies
-
- 1
-
-
- constitution
- model shipways
- (and 1 more)