Modeler12
-
Posts
1,716 -
Joined
-
Last visited
Content Type
Profiles
Forums
Gallery
Events
Everything posted by Modeler12
-
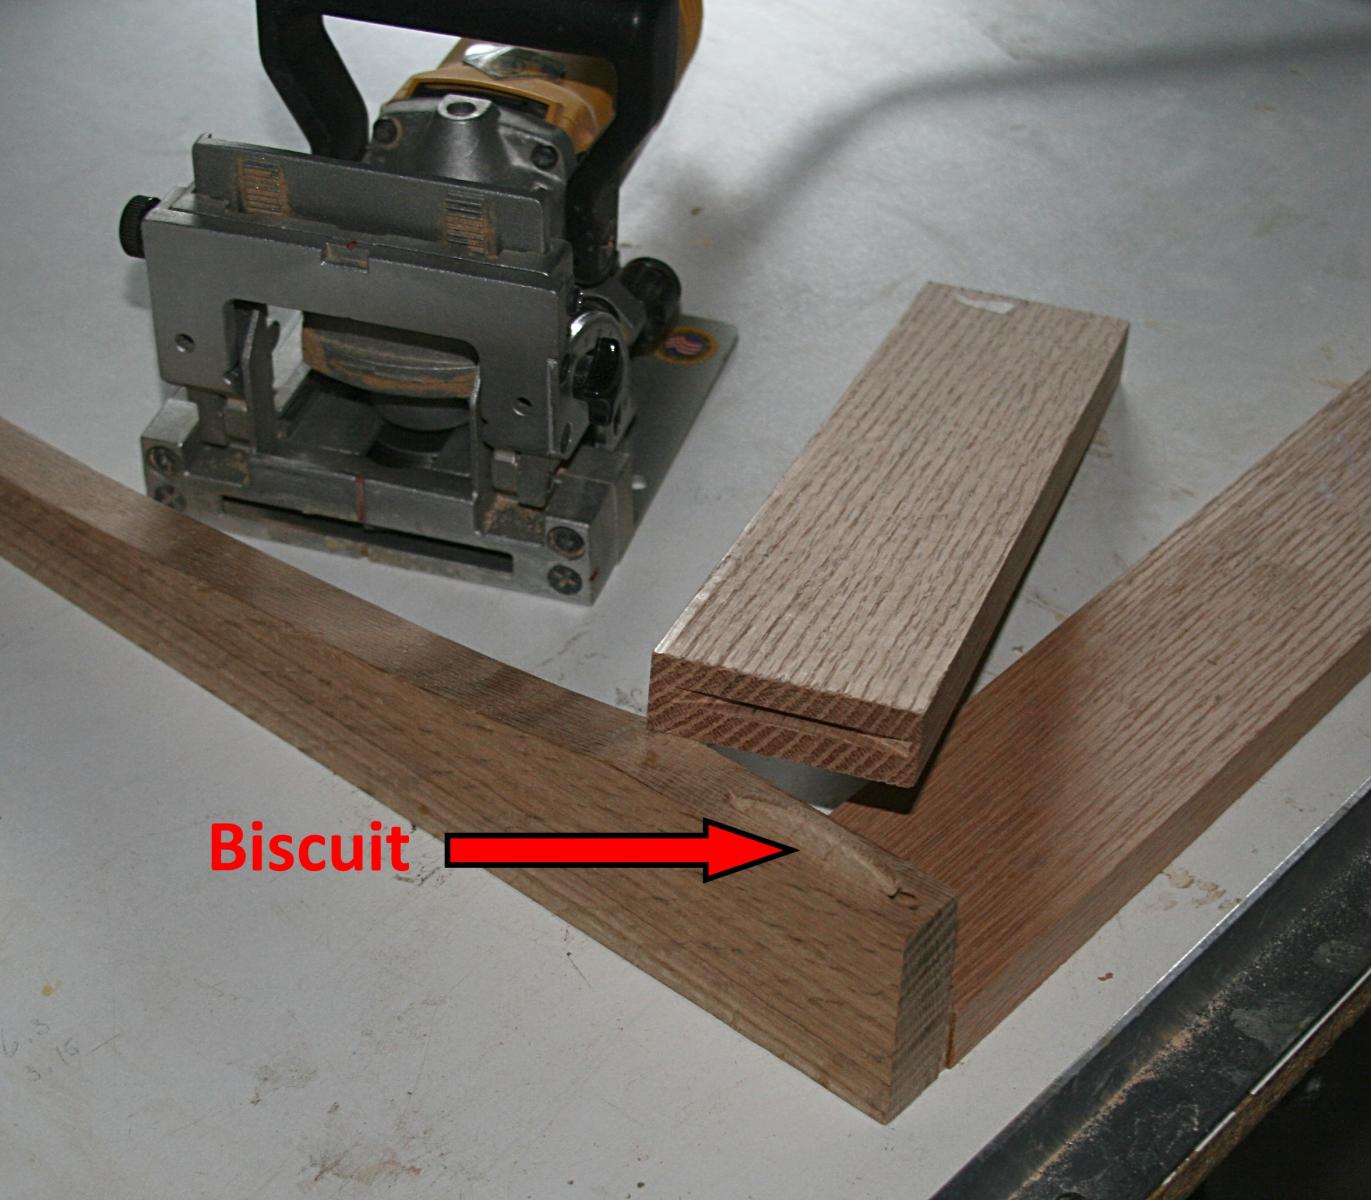
 Thanks Tim. The legs are a bit of a challenge. After I cut the pattern on my little bandsaw, there is a lot of sanding to be done. Then the two sections are glued up making sure the corners come together right with a minimum seam at the edge. The other joints are mostly made with biscuits. I should add that the picture is of a back leg. Only the front has the beveled pieces that have the edge seam I referred to above.
- 732 replies
-
- 2
-

-
- constitution
- model shipways
- (and 1 more)
-
True, and I had almost bought those from Micro-Mark, but being a cheapskate I decided that spending $25 (or so) versus $2 from a local sewing center was not much of a choice. Being 'robust' for this one time application was not an issue either. Sorry, Augie.
- 113 replies
-
- 1
-
-
- constitution
- mamoli
- (and 1 more)
-
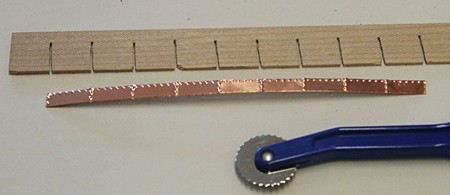
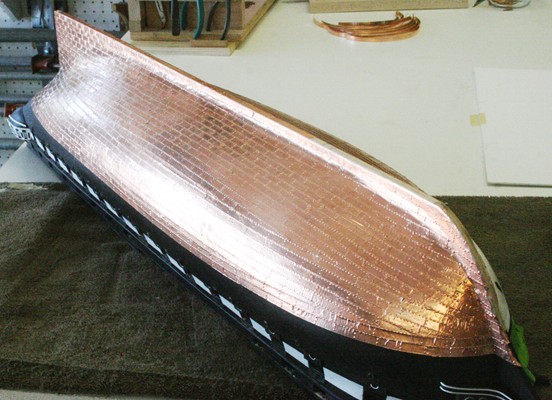
I don't know where you are with the coppering. But if you don't mind, here is the way I did mine using copper tape. It comes in different widths and is primarily marketed for the stained glass workers. I used a roll !/4 inch wide. Because of the scale I was working in, the rotary punch tool I bought at a fabric shop seemed to do the job. But you could easily modify it with a new wheel with the number of 'rivets' you want. Here are a couple pictures of what I was talking about.
- 113 replies
-
- 3
-
-
- constitution
- mamoli
- (and 1 more)
-
Interesting comparison. My dad was a sailor for several years and had a couple tattoos that he was ashamed of. He always wore long sleeved shirts. Nowadays it would be perfectly normal to show what he had on his arm. I am sure you run into many who love the idea, but then come back asking you to remove it. While others have their whole body done that way. It reminds me of the book by John Irving 'Until I Find You' where the character (an organist) had his body tattooed with musical lines of pieces by Back and others.
- 113 replies
-
- 3
-
-
- constitution
- mamoli
- (and 1 more)
-
Terrific, and always, I love those pictures. For close-ups like you have, the details always show up any little defect. I don't see any in your pictures. Do you make mistakes?
- 113 replies
-
- 2
-
-
- constitution
- mamoli
- (and 1 more)
-
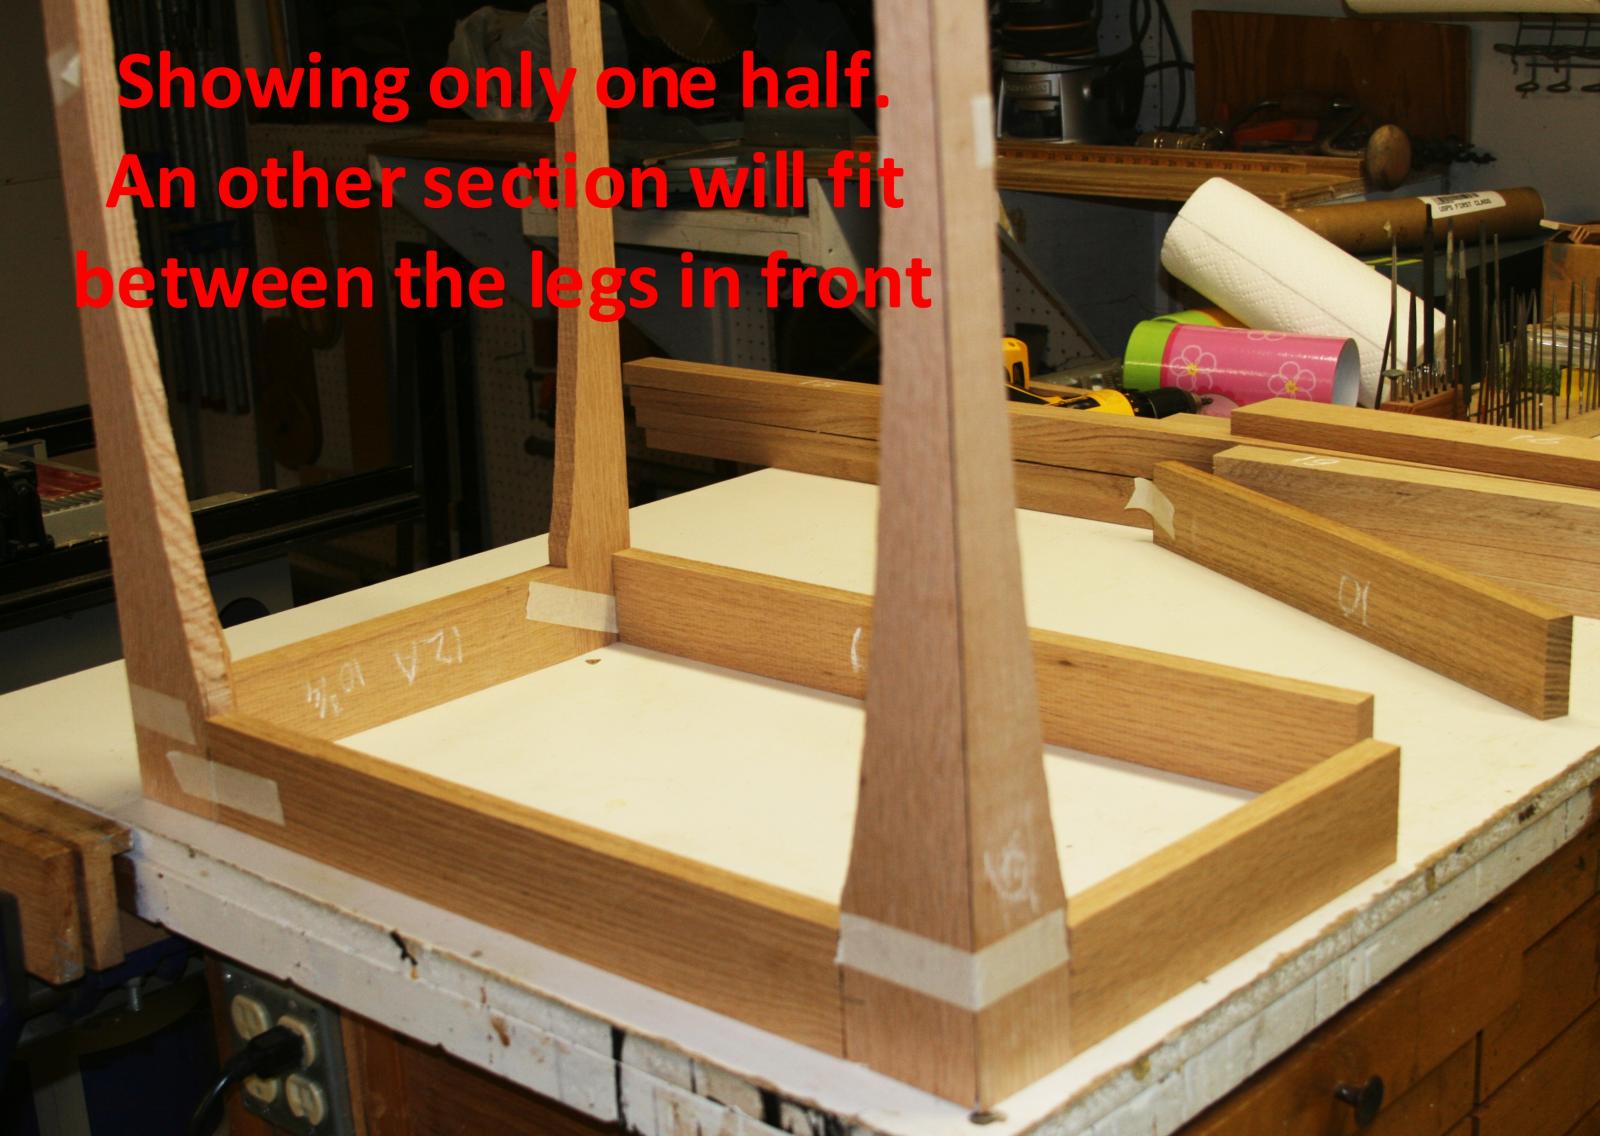
Let me add the following picture about the legs. The actual table will be much wider and what I don't show is the center post (yet to be cut, along with the other leg). I hope that clarifies the design.

- 732 replies
-
- 5
-
-
- constitution
- model shipways
- (and 1 more)
-
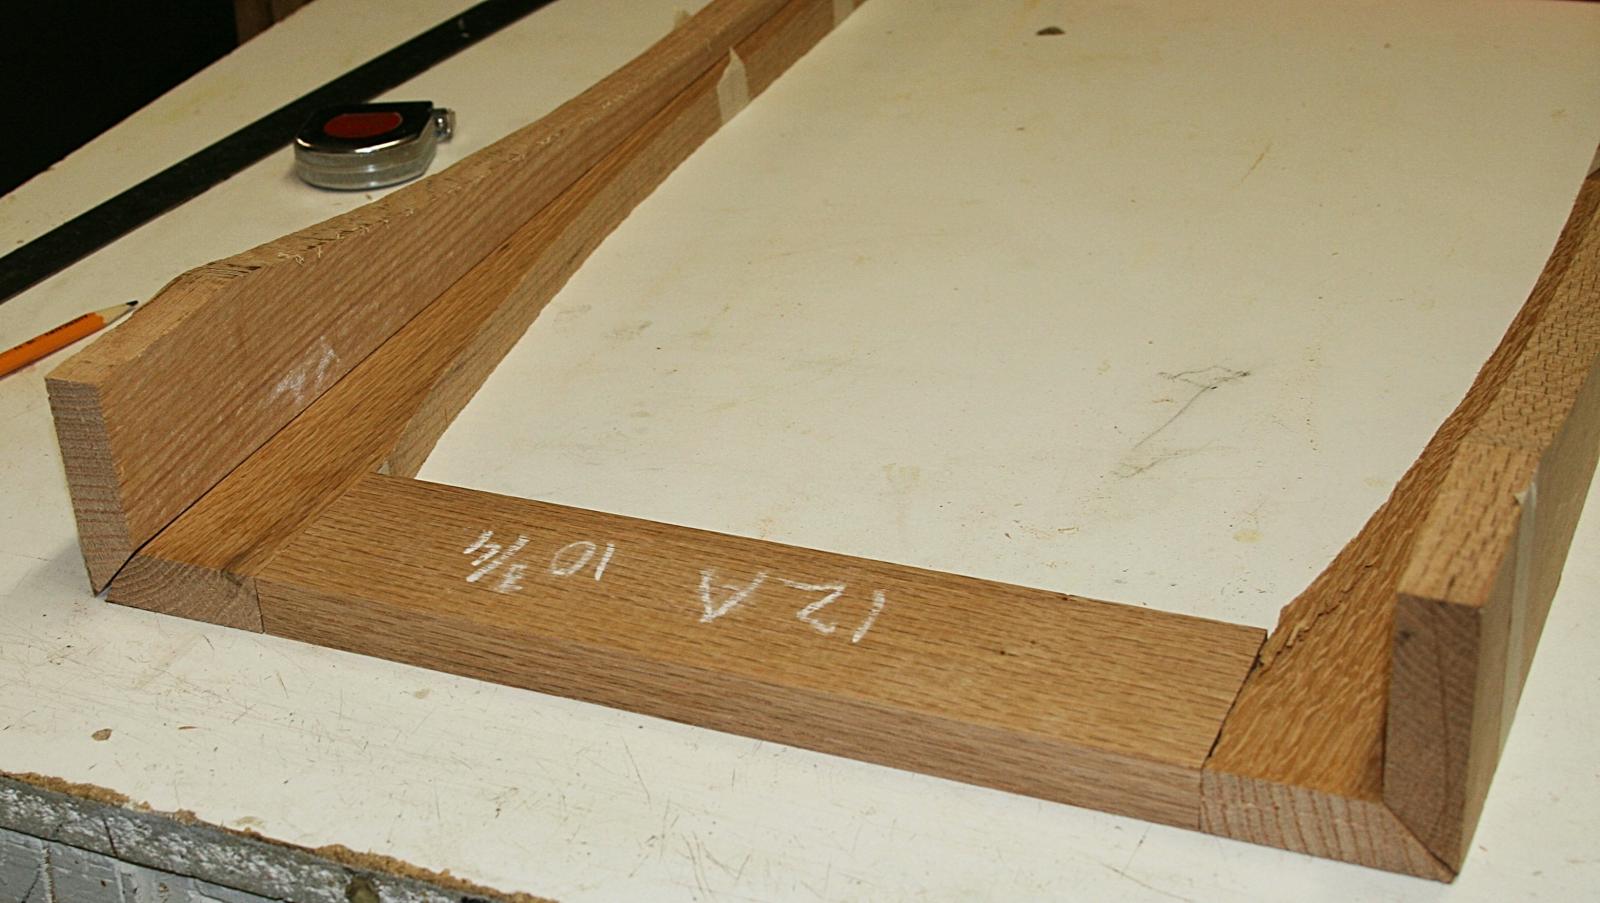
Actually George it did not go out of hand. It was fun. Bill, I totally agree with you. Here is one more picture of the way how I designed the legs to come together. The corner is a long bevel joint, up and down, held together with tape for now. I still have to do a lot of sanding of the curved parts, but I hope this will give you an idea of what it is all about. Slender; and it is matching what I did before. When viewed from the outside, the legs will look like they came from one piece.

- 732 replies
-
- 3
-
-
- constitution
- model shipways
- (and 1 more)
-
Go for it Henry. A little snow should not be a big problem for you Easterners. Seriously though, what are the deadlines for visiting and its subsequent repair work on the ship? Where will this be done? Just curious because we do want to take a trip east and see her again. Ten years would be too long for me.
- 16 replies
-
- 1
-
-
- USS Constitution
- Old Ironsides
- (and 2 more)
-
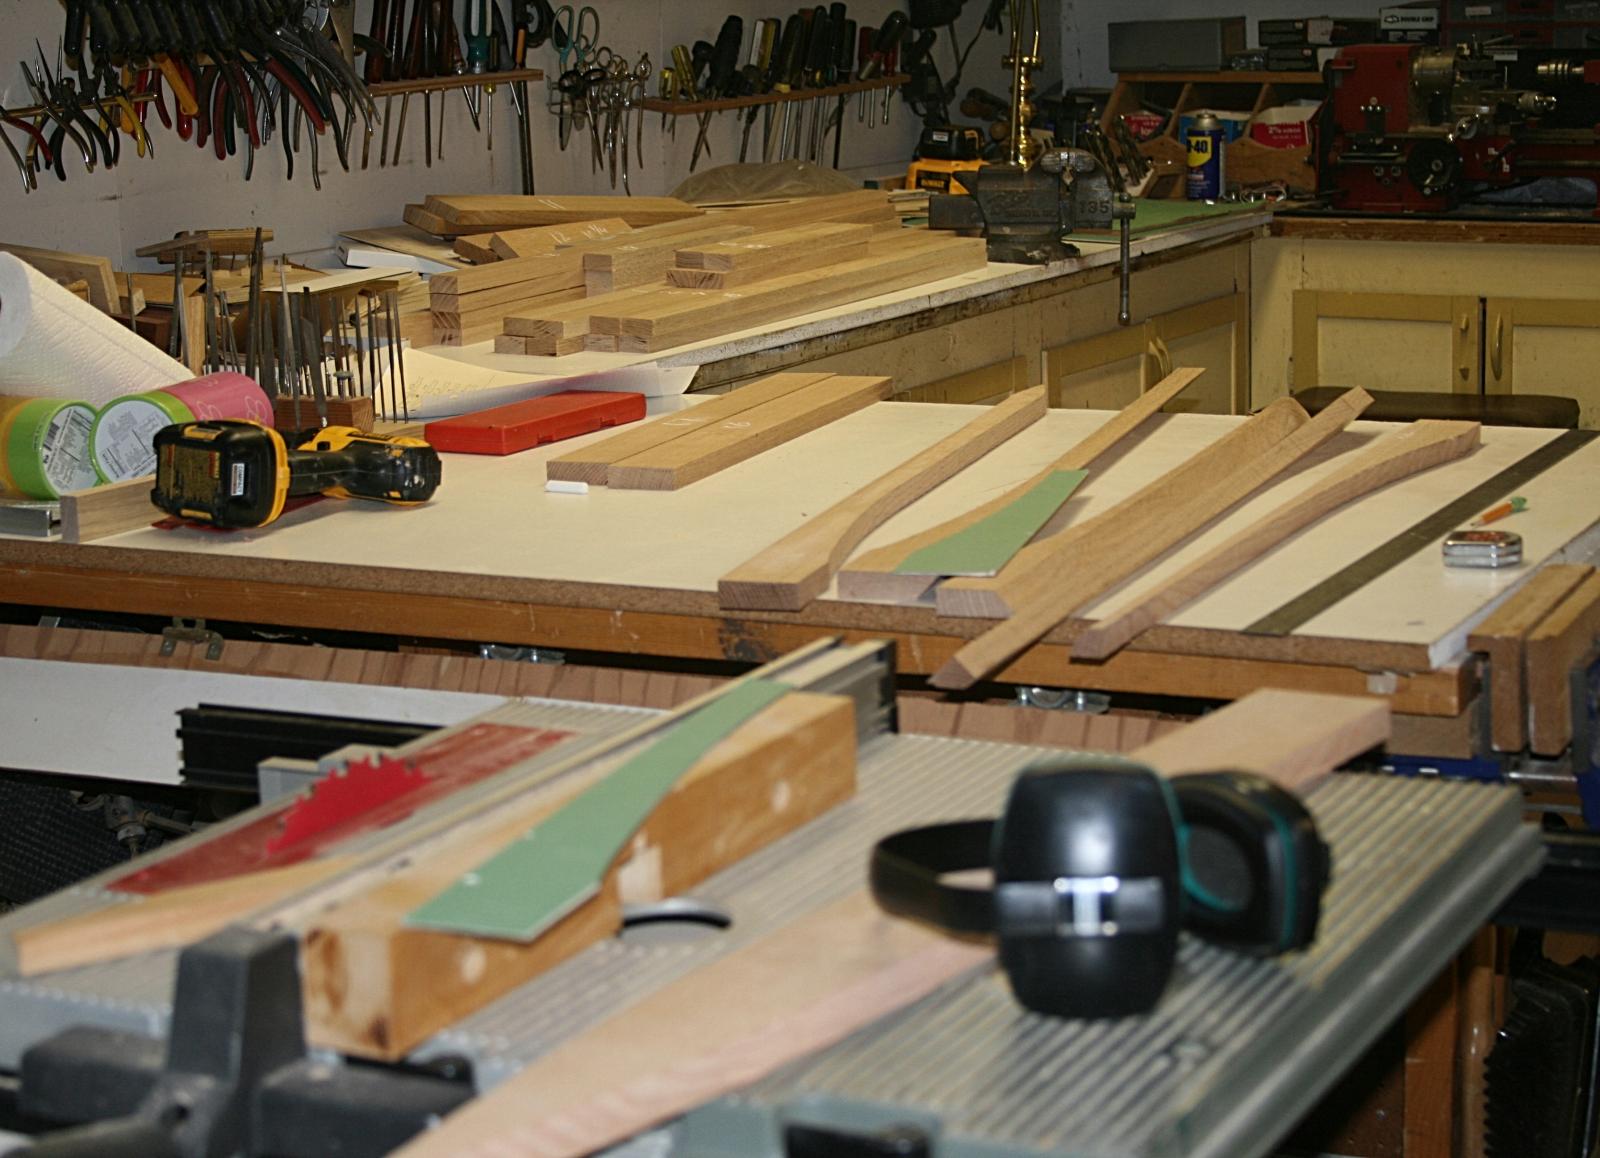
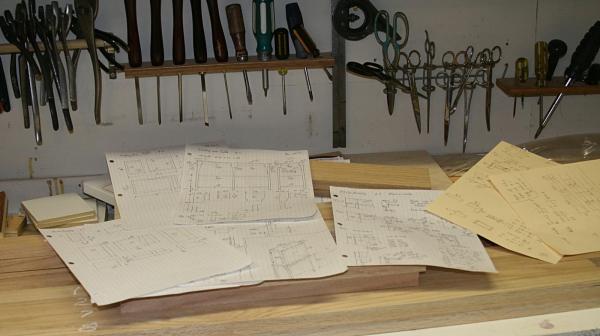
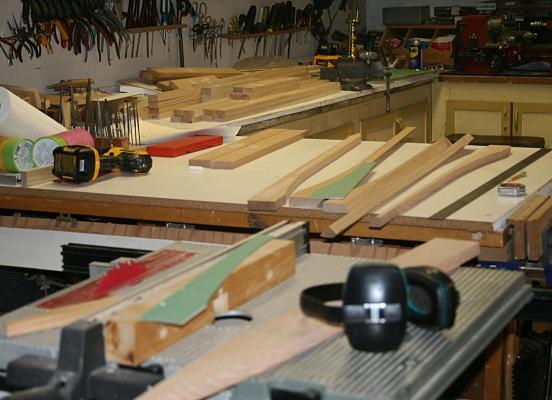
Display Case (right??) I like to do my designing on 8.5 x 11 inch paper (special note pad). It is easier to have this handy in the shop, rather than a large drawing. I include a lot of details but the first thing is to cut material to the lengths I need. I have a cut-off saw, not shown. In this case, because of the curved legs, I cheated a bit and tried to save lumber by crowding the legs together as much as possible (note green templates, two sizes). This is all for the table, not the case. I mentioned the furniture design of this earlier. The stack of 1.5 inch oak in the background is all for the case. More details will follow. Whow, it is nice to make some real sawdust again .
- 732 replies
-
- 4
-
-
- constitution
- model shipways
- (and 1 more)
-
Now it is back to the ship. I am installing the two whale boats, davits, etc. Not difficult and after that is done things are shaping up. Just spent a small fortune on oak wood for the displace 'cache', case. Wooden chips will be flying soon.
- 732 replies
-
- 3
-
-
- constitution
- model shipways
- (and 1 more)
-
Carl, I probably shouldn't do this, but that tiny, little country of yours has lots of linguistic problems. When I traveled around the Netherlands I could not understand people from one place to another, unless they spoke the Dutch language that they learned in school. I was born in Rotterdam and even now Dutch people notice that I talk differently from our Jordaanse neighbors, for example. It took me many years to realize that part of my accent (in English) was because I kept pronouncing words that end with a 'd' like it was a 't'. Bad would be pronounced 'bat', etc. I had a dear friend whose last name was 'van der Wardt'. No problem for you; it would be vanderWart, but an American would try to pronounce both the d and t at the end.
- 732 replies
-
- 3
-
-
- constitution
- model shipways
- (and 1 more)
-
Ok, George, you got me. What is a 'pot-ah-to'.?? Or what ever. It goes to show that folks even in the US are not in 'tune'. We talk differently and we think that Scotch, Irish, and (especially) the Welch understand each other. After all, they are on the same islands, or next door to the same one. But they have to refer to the 'English written language' to get along. I know they learn that in school. Like I mentioned; please start a new line on 'time out' or I will
- 732 replies
-
- 3
-
-
- constitution
- model shipways
- (and 1 more)
-
Oh my, did I start something Of course, Boston has its own language; and how do I know that 'color' and 'collar' are pronounced differently (phonetically they seem the same in my ears). Is this a bit like 'foot' and 'hoot'? 'Enough of this', my wife told me, as she 'pronounced 'color' and 'collar' (and indeed there is ever so slight a difference in the way she pronounced those two). How about those guys in Sweden, Thailand, Canada (for that matter), China, etc.?
-
OK you guys. So my English is not perfect. What I could have said is 'cage' but that would have been worse. That makes me think of all the errors and grammatical problems I have had with the 'King's English'. This being a very international site, it might be an interesting topic to start about this on 'time out'. Any volunteers? I have a lot to contribute. I still think 'color' is much easier than 'colour'. But it also could be 'collar' or do you pronounce them differently?
- 732 replies
-
- 4
-
-
- constitution
- model shipways
- (and 1 more)
-
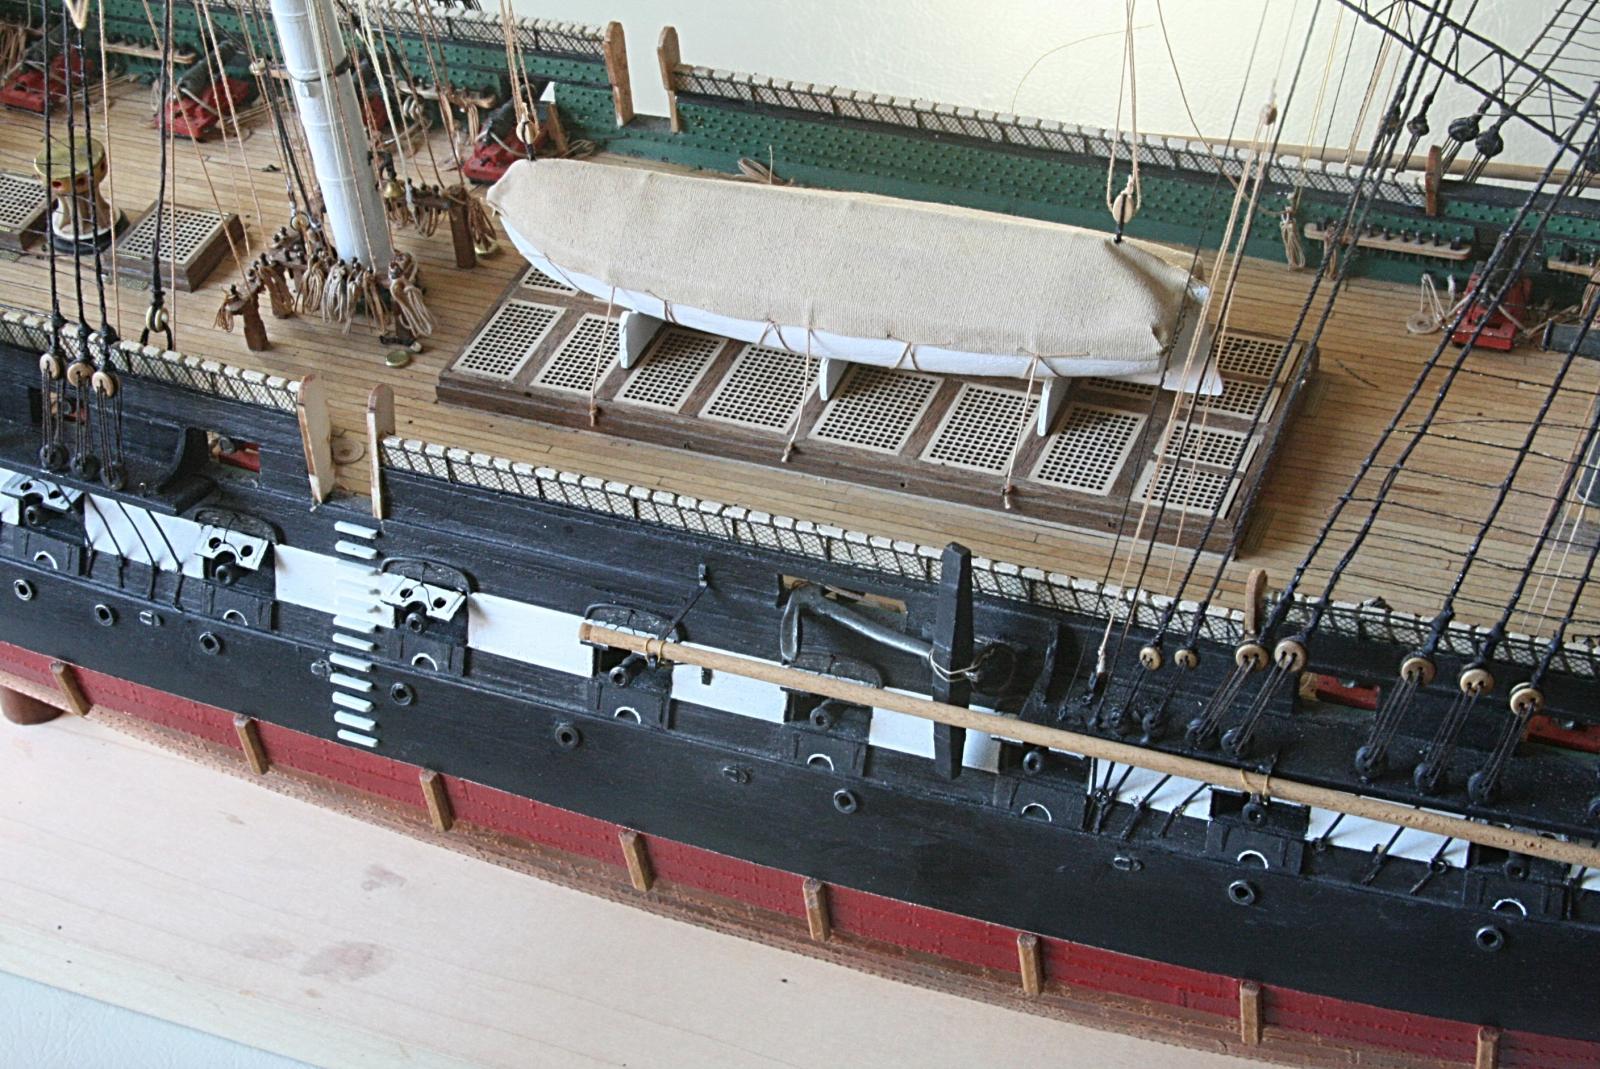
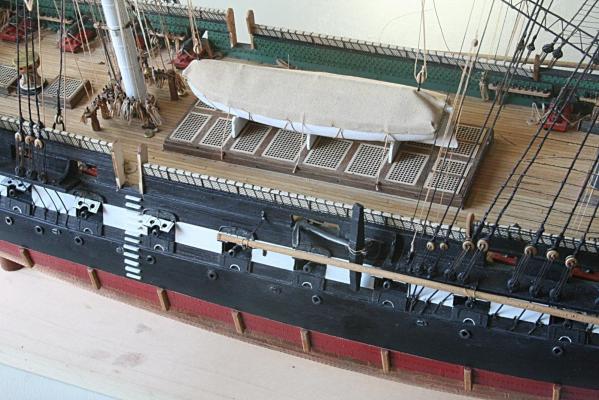
A little secret. Notice in the top right picture I had not really installed the netting/hammocks. That part is the 'curved rail' and it took a bit more doing to get the bend right. In fact, I just noticed that the port studding beam is not tied down right either. And as I look at those pictures, I can see a lot more improvements to be made. But Connie is getting ready to be on stage pretty soon. Actually she will be in a glass cache along with a whale of a boat (or two) and flags flying!! How am I going to make that 'glass cache' for her?
- 732 replies
-
- 2
-
-
- constitution
- model shipways
- (and 1 more)
-
About 280 hammocks later . . . It was tedious work, but worth it in the long run. In a way it also makes more sense to have the hammocks on the rail rather than down below. It would not look right to have the ship under way with sails raised and all the gun ports/lids open if this did not mean a battle or exercise The next step is to add the davits and whale boats. Oh, yea, the boat in these pictures is awful and will be replaced sometime. I mentioned before that I screwed up with the inside and took a short-cut. And, yes, it still is pointing in the wrong direction
- 732 replies
-
- 9
-
-
- constitution
- model shipways
- (and 1 more)
-
Office chair with back rest removed. It allows me to swivel back and forth between my work table and desk. Painted floor in my garage (around work bench) white so I could find those little things that seem to disappear with a blink of the eye.
-
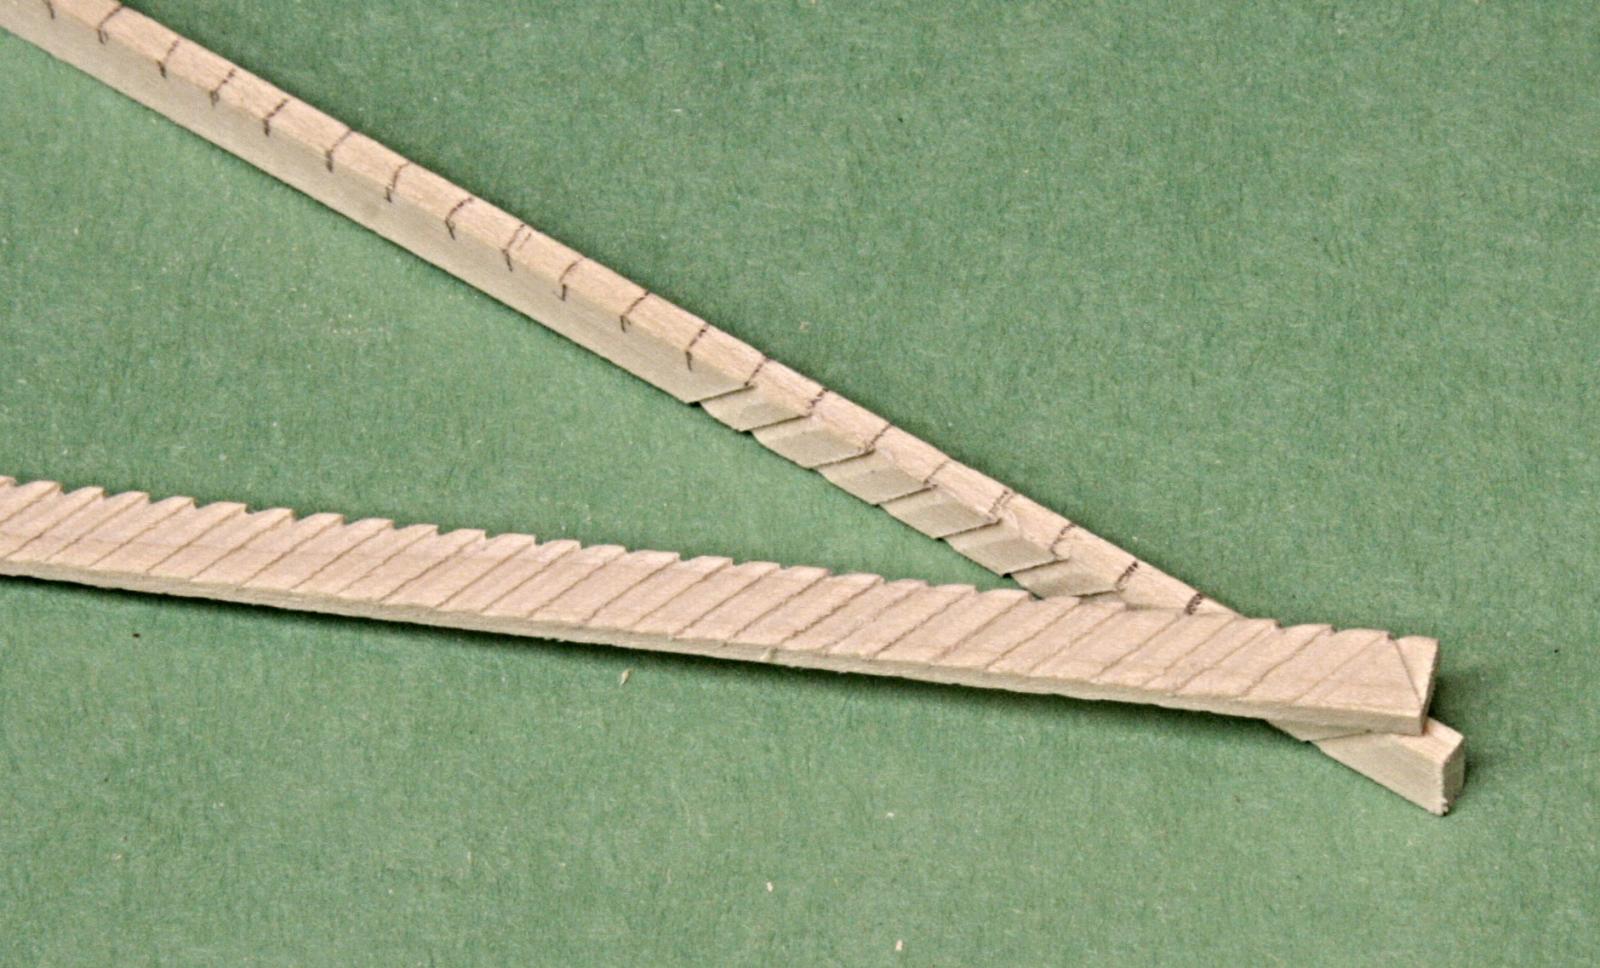
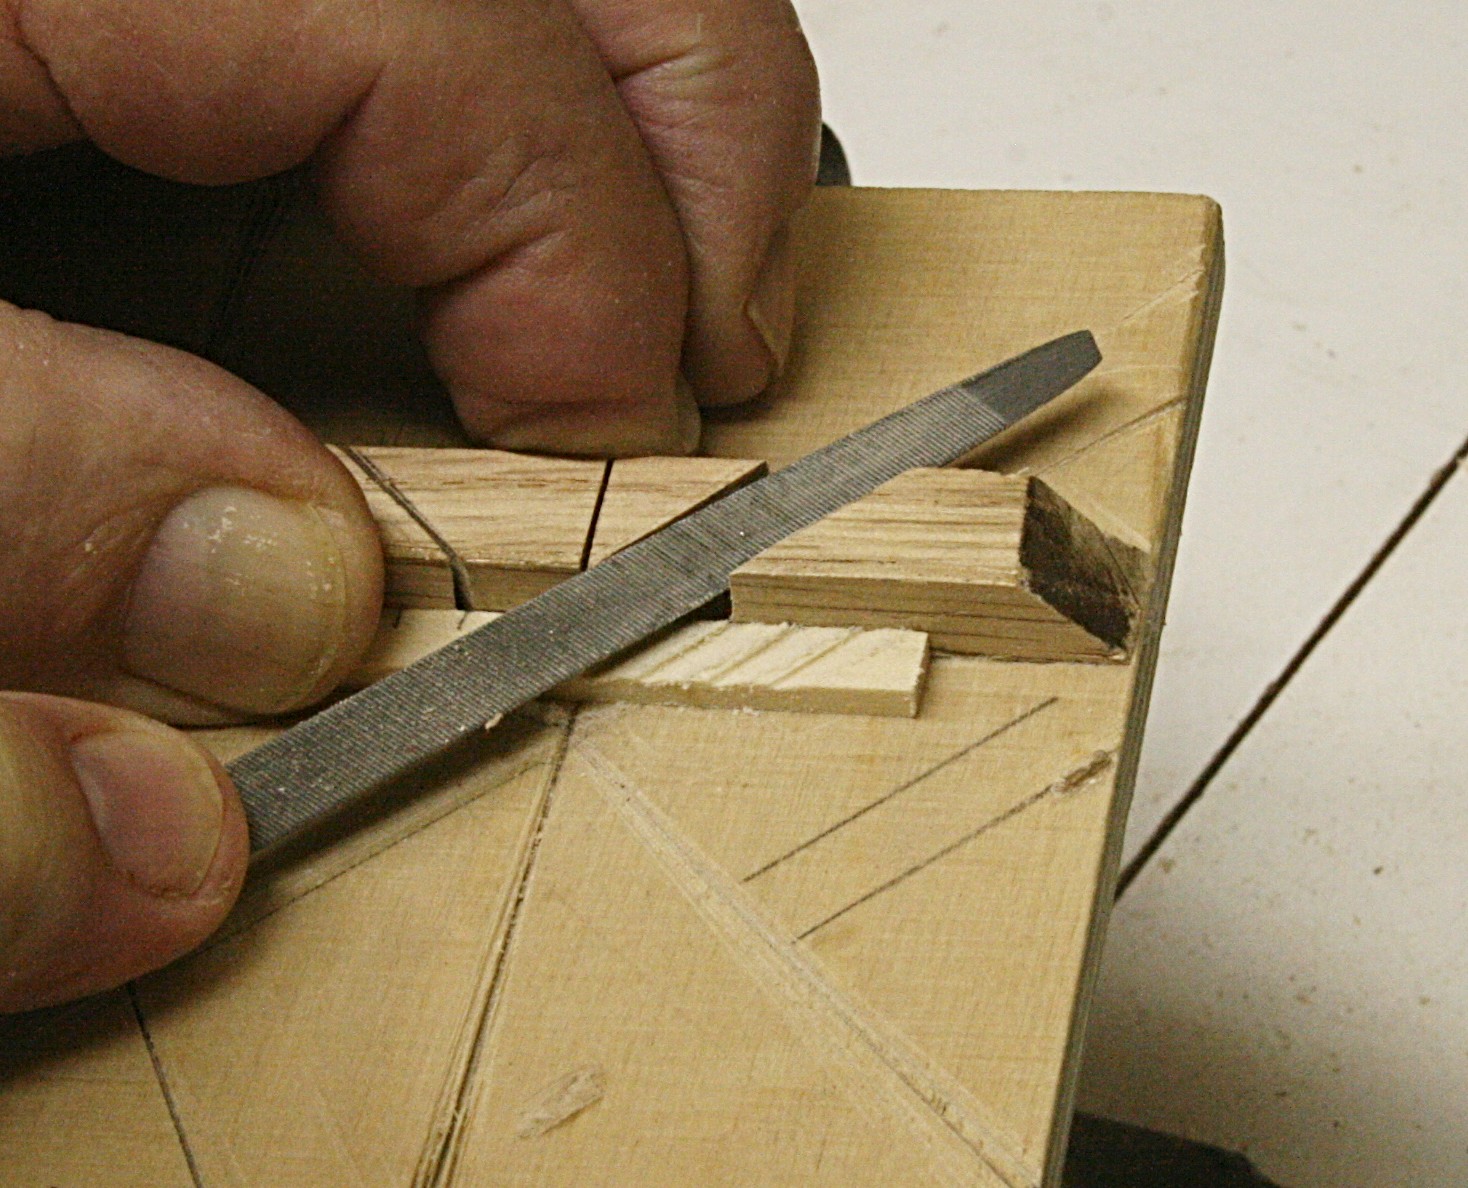
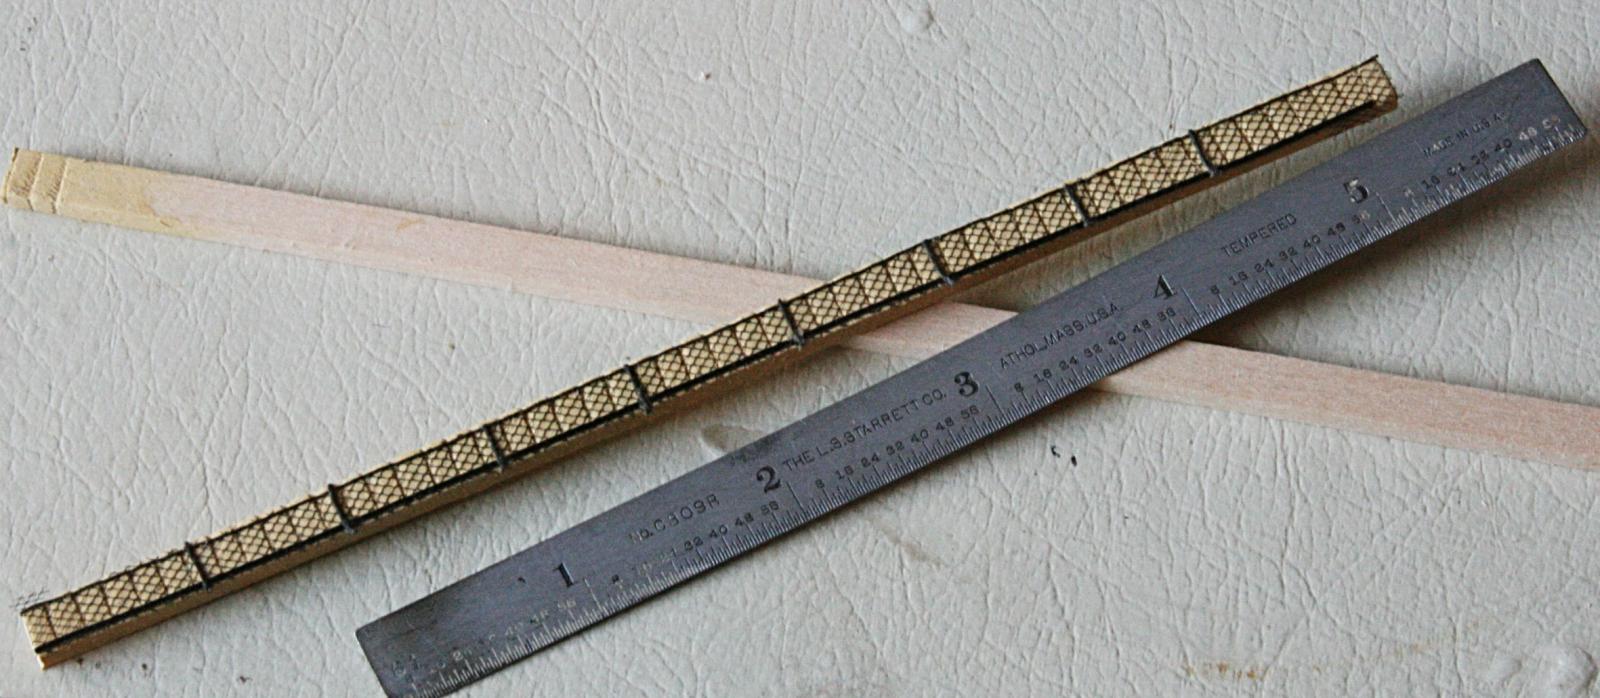
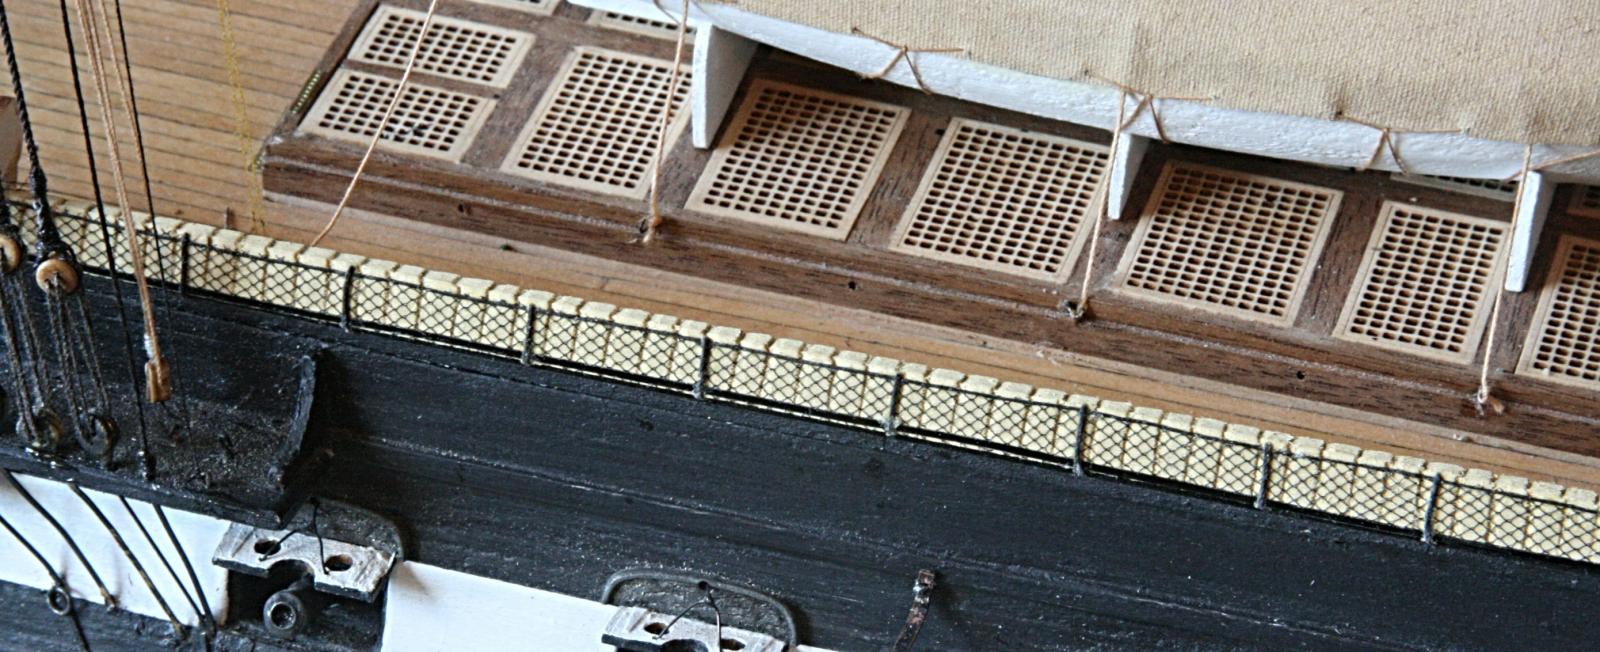
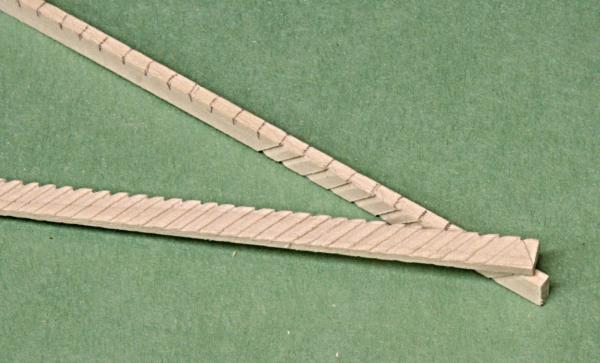
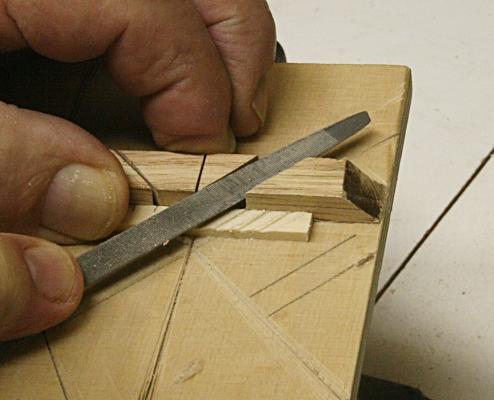
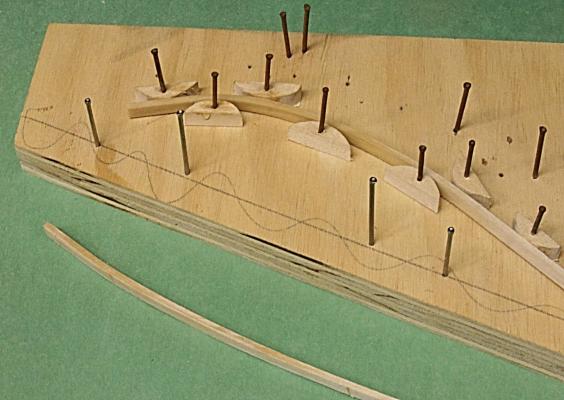
This is just for my records. The 1/4 x 1/8 inch basswood was marked (first into 1/8, then I switched to 3/16 inch divisions). I used my old wooden miter box, modified to take the width of a three sided file, and filed notches on the marks. On one side then the other and top. Too many!!!! I hate to count again. After this was lightly sanded and painted, the netting and ropes were glued in place. Towards the bow the rail curves inward and the netting block needed to be bent. I used my old (rusty) fixture to hold the tip part after soaking it in warm water for a while. I also tried this with the netting already attached, and, of course, found disasters. Filing and netting will be done after bending.
- 732 replies
-
- 4
-
-
- constitution
- model shipways
- (and 1 more)
-
Is there a better #11 blade handle
Modeler12 replied to roach101761's topic in Modeling tools and Workshop Equipment
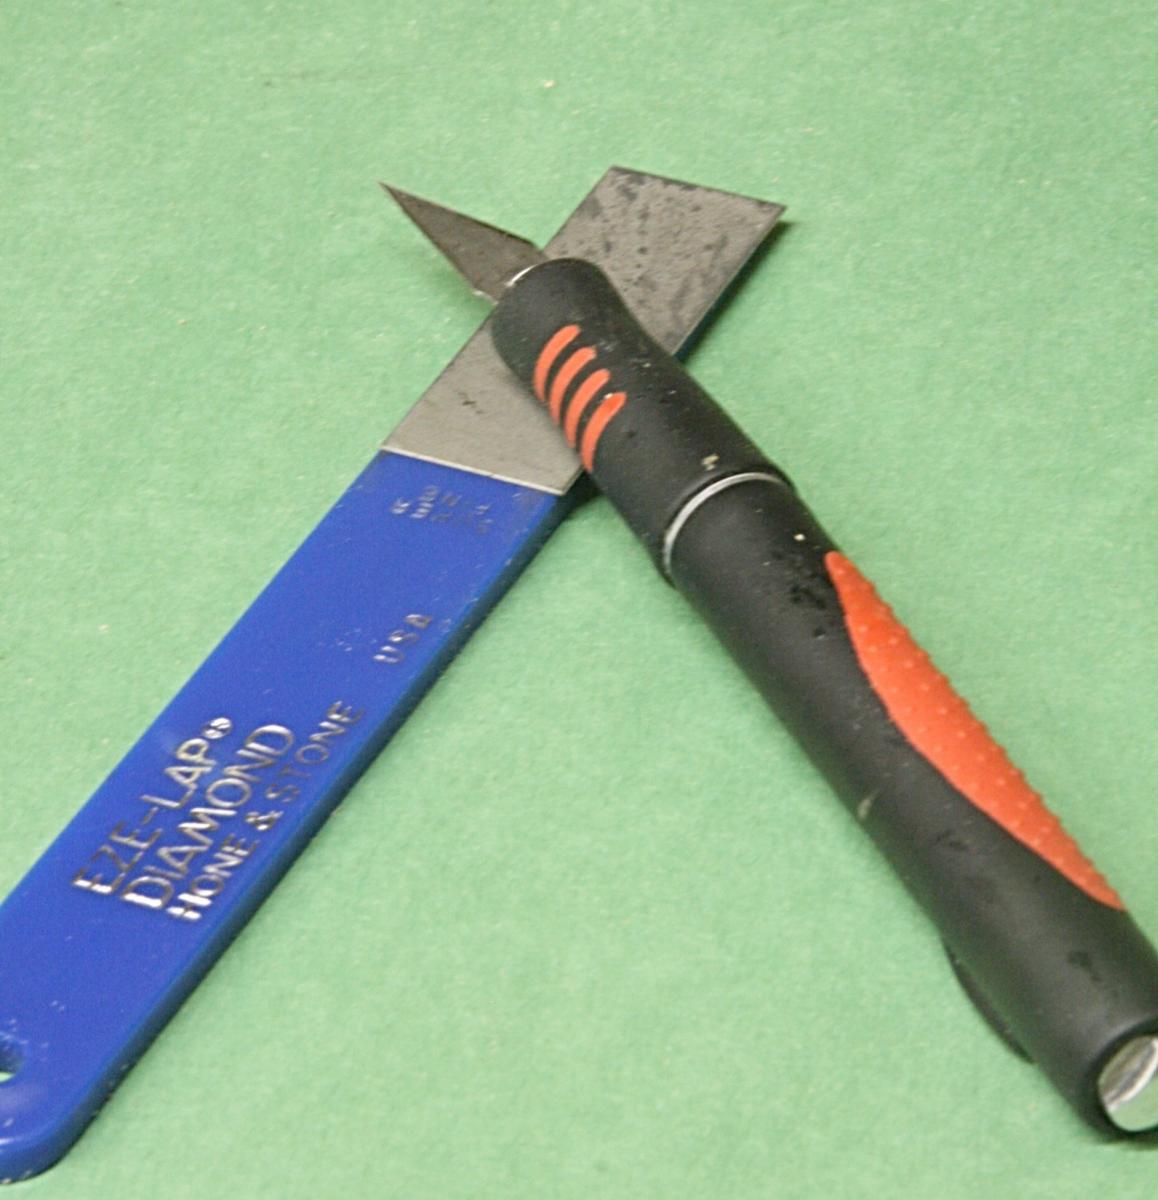
I know this is going to open Pandora's Box, but I use the old Exacto knifes in a rubber handled holder and never had a problem of the blade slipping, etc. I don' t remember where or when I got this holder, but it should not be that unusual. What I do want to mention is that I don't change blades that often. I find it easier and quicker to give the edge and tip of the blade a quick touch up with a diamond coated 'brush'. It works for me
-
Thanks George, but it is fun to do some math to find that there are a large number of old folks who used those hammocks and really slept in them as the ship tossed and heaved all night. I have been there for pleasure, but not for a living. Now I cannot image living in those close quarters with bodies bumping into each other in swinging hammocks, smelling like hell.
-
Interesting Bill. I have never seen that arrangement before, but then again I don't know too much about the history of those old ships. In the case of the USS Constitution there were a lot of people aboard. I read somewhere that : by 1813 the crew had grown to 30 officers, 51 petty officers, 343 sailors, and 57 enlisted Marines. That means that 400 men had to use hammocks. Even when they shared that means at least 200 on the ship. Looking at the picture you showed I cannot see enough of those aboard. The bundles surely are nicely wrapped and tied individually, but can that be the way it was? What about heavy seas and the ships dips, leans and tosses about? As I look at my way of doing those hammocks, I am afraid I am making too many. So a compromise for that is in order. In fact, if I reduce the width from 1/8 inch to 3/16 inch, each crew member's hammock would come to around 4 cubic feet. That should be enough for those old days, right??? Did any of you ever carry a gunny sack? That still means a lot of hammocks to make!!! And before someone counts, here is the upshot. Total rail with hammocks about 24 inches times two equals 48 inches. Divide that by 3/16 for the hammock spacing and, we end up with 256 hammocks. OK?
- 732 replies
-
- 2
-
-
- constitution
- model shipways
- (and 1 more)
-
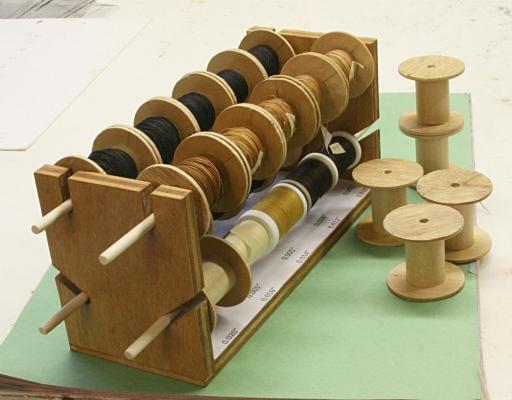
Tim: no problem; sharing is the way to go on this forum. And just like Tuffarts showed and suggested, slanting the hammocks looks better. I will do the same for all the others (maybe even replace my first one, besides the paint color for the 'canvas' is not good either). Jack the wooden spools were made from scratch using one inch dowel and some thin plywood. I had tried to get some sewing thread spools, but had no luck. JSGerson's link would help, but then I would still add the round plywood to keep the thicker lines on the spool. I have had problems getting them tangled up. I use small pieces of tape to hold the ends in place, because loose ends are also a problem. I might add that winding the threads onto the spools was tedious at first, but then I used my hand-drill with a big smile on my face. Each of the spools you see holds about 40 to 100 feet of line, but I can add more if needed.
- 732 replies
-
- 4
-
-
- constitution
- model shipways
- (and 1 more)
-
Netting, some assembly required! Here is my first try at making the netting and hammocks. Thanks again George. Instead of using the stanchions and the masking tape method of Mr. Hunt, I completely changed the process. I removed the stanchions from the top of the rail, took a piece of 1/8 x 1/4 wood and notched it to make it look a little like hammocks stored on end. Painted it and glued the netting on one side. After trimming, I added the rope (0.011 inch rigging line) along the top edge and some 1/32 inch wide tape I had for the bottom. The stanchions are simulated with pieces of 0.016 inch line and glued in place. All of this is done on the bench. I have not done the back side, so the 'installed' piece is still loose. I may also add some brown lines in the center of the hammocks to make it look more like they are separate bundles. At any rate, this is a heck of a lot easier and neater than what I tried to do before. PS Those close up photos do help. I just noticed that the stanchion to the far right needs a step to the right. But all that means is to remove the 'stanchion' and replace it with another one in the right place.


- 732 replies
-
- 8
-
-
- constitution
- model shipways
- (and 1 more)
-
I'll come back to the netting a bit later. I felt like making some sawdust, besides I was running low on rigging line. With the help of my wife, we coated a bunch more rope (both standing and running line). That also meant adding some spools to my old spool rack. Instead of doing that I decided to make a better and somewhat larger rack as shown below. I can have up to 20 spools but right now only use 14 plus four spools of sewing thread. One side holds the running lines and the other is for the 'Sepia colored' standing lines. I have found this a handy gizmo and can carry it around from place to place.
- 732 replies
-
- 5
-
-
- constitution
- model shipways
- (and 1 more)
-
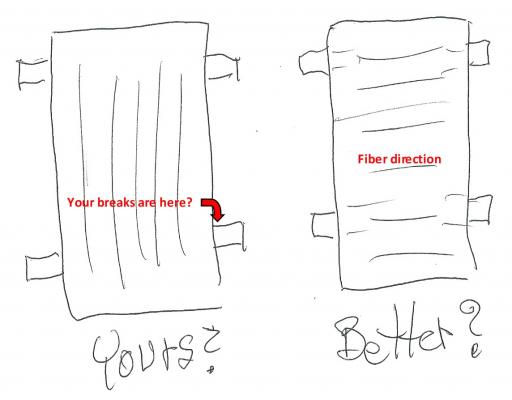
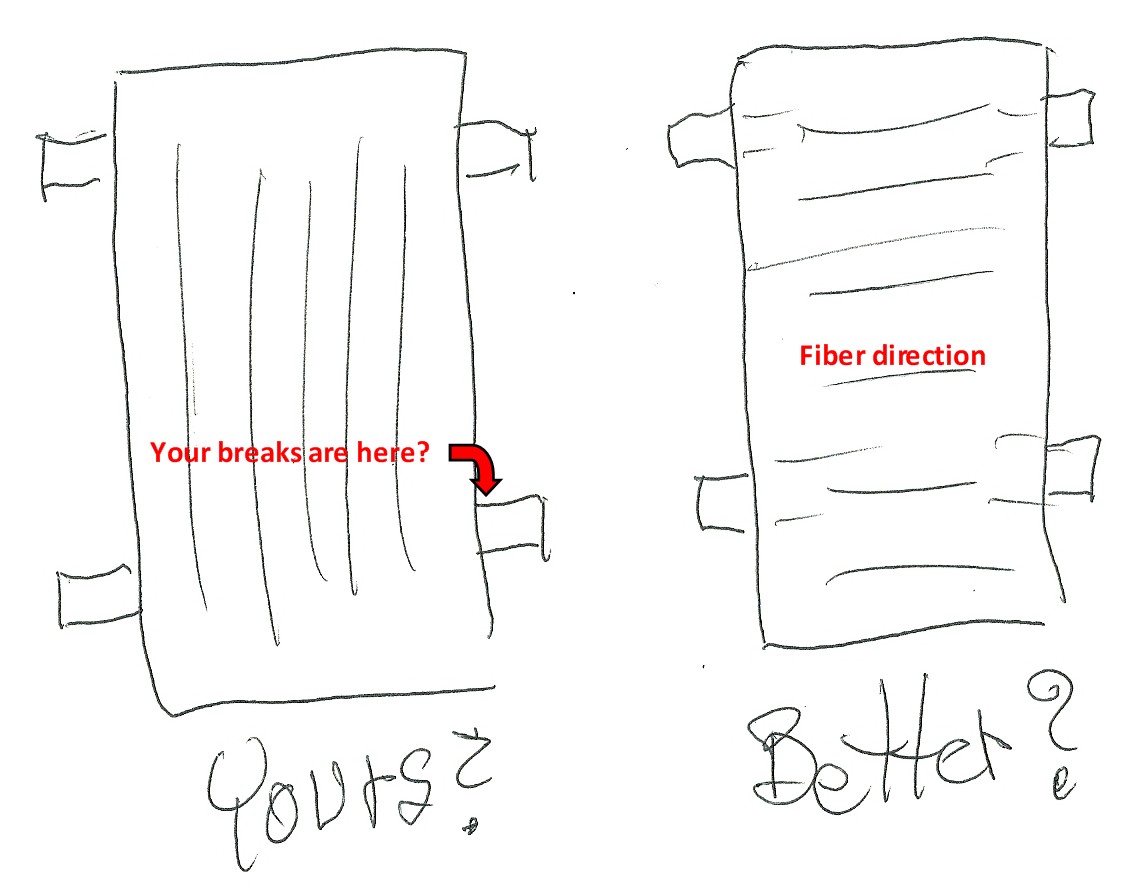
I have made gun carriages from scratch and am not familiar with your model and instructions. Can you add a picture of the problem? Others who are doing the same as yours may understand, but usually the problem is that laser cut parts are oriented the wrong fiber direction. Can you redo keeping this in mind? Or would it make sense to make the shafts separately out of a piece of thin stock and glue them on to the base? Here is what I understand: