HOLIDAY DONATION DRIVE - SUPPORT MSW - DO YOUR PART TO KEEP THIS GREAT FORUM GOING!
×


Modeler12
-
Posts
1,716 -
Joined
-
Last visited
Content Type
Profiles
Forums
Gallery
Events
Everything posted by Modeler12
-
 Jeff, I appreciate the candor of this effort. Instead of us telling you what we think we need, it would also help if you can tell us what you (and other suppliers) can do by way of thickness tolerances, surface finishes, etc. What is the difference in price (your labor) to open up the tolerance on certain sizes (wide pieces that we may need to re-cut)? Is there a way to ask you that when we order or could it be a addendum to your material tables?
 -
Setting flags - which way does the wind blow?
Modeler12 replied to rodgerdodger's topic in Masting, rigging and sails
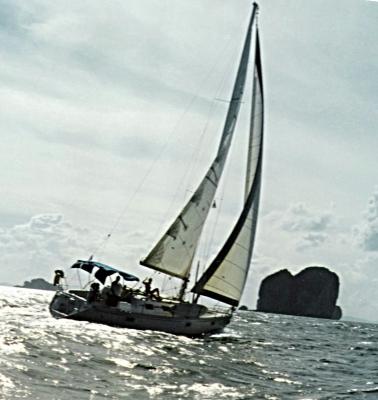
After seeing the picture above, I thought it might be interesting to go a bit further with sailing, wind direction, etc. If we consider that there are 360 on the compass, there are some points that should be avoided when sailing with any kind of rig. A sailboat does not do well going directly into the wind and typically has to veer off 30 to 40 degrees. In that case it is referred to as being 'close hauled'. Sloop rigged boats do a lot better with that than square sailed rigs. The diagram below is good: There is also a good explanation on Wikipedia: http://en.wikipedia.org/wiki/Points_of_sail Stockholm Tar also made a good point about ships sailing before the wind and the danger of the boom from swinging across when the wind shifts or the ship drifts off course a bit. Jibing is well known to skippers and helmsmen and should be 'planned' and not come as an 'accident'. To properly jibe, the boom, which is extended well outboard on the lee side, needs to be hauled in and gradually shifted as the ship makes a small adjustment in the course to let the wind fill the sails on the other side. Then the boom can be let out and the sails are fully filled. On small sailboats this can be readily done by hand, but on larger boats it takes some planning. Because of this we might include a small angle as another no-go zone. That is, stay away from winds coming from six o'clock. But even at that, most modern sailing ships can handle winds coming from 270 to 290 degrees (out of 360 for the compass). Square riggers do worse because they cannot be close hauled as well. Then there is the issue of speed. And as you can read, a wind coming from eight to about ten o'clock (or 2 to 4 o'clock) will give ships the best forward force and speed and not from a following wind.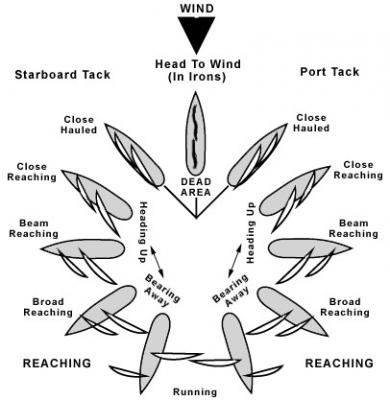
-
Setting flags - which way does the wind blow?
Modeler12 replied to rodgerdodger's topic in Masting, rigging and sails
Great picture, Frankie! I hope you don't mind if I repeat it here. I know that sailing with the wind on the beam or close hauled can get you more speed than the speed of the wind itself. Hence, this will give you more speed than if the wind is aft. The recent America Cup races showed this very clearly.
-
If I may interrupt here. During the many years that the British Navy controlled the seas and the Admiralty controlled the British Navy, very little progress was made to improve the whole idea of 'design and construction' of ships; and that includes guns, ammunition, hull design, etc. Many of the members on the board had never been at sea, hence a model was 'required' in order to introduce a new concept to this board and then it went on from there. To me it is like government putting on a leash on any new idea, and we all know that is bad. If the 20th century had occurred then with an open mind and a century earlier, the whole navy concepts would be totally different. Perhaps we would be more at peace at sea.
-
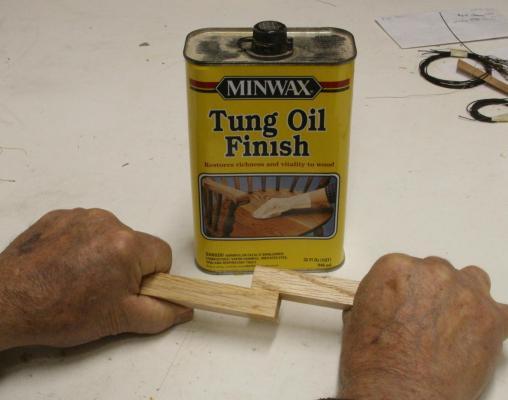
Chris, again you are doing it right with 'pure tung oil'. But would you agree that it takes some time to have that finish 'cure', settle, or harden, before you do the next step? Are you doing the sanding or scraping after the tung oil has saturated and the surface is nice and smooth? If you can sand it, it must be free of 'oil', NO??
-
Janos, first of all, I always liked your carving skills and results. I wished I has some, even a tiny bit of yours would help. Since I am not familiar with Feast Watson stain, I cannot comment about that. But, like I mentioned about the Tung oils experiments, if the surface is still 'wet' and you apply CA (or PVA) too soon things go wrong. Some epoxies react when wet (water) but that is not the norm.
-
Ok, Janos, and thanks. Please let me know how those 'oils' work out. I also would recommend not to be in a hurry when it comes to surface preparations. Most of this stuff takes time to 'heal' or cure. I may sound like an expert (sorry, didn't mean to), but after about thirty years of industry experience (and a lot of wood-working besides) I still maintain that the 'new' is not all that much different from the 'old' when it comes to common sense. Meaning that 1. anything 'grease' should be avoided. 2. let it cure or give it time to do so. 3. don't bond metals to anything with PVA (it is intended to chemically link to fibers, not metals). 4. be careful with bonding plastics (there may be a release agent on the surface). Solvent types are ok. Would anyone like to add to this?????
-
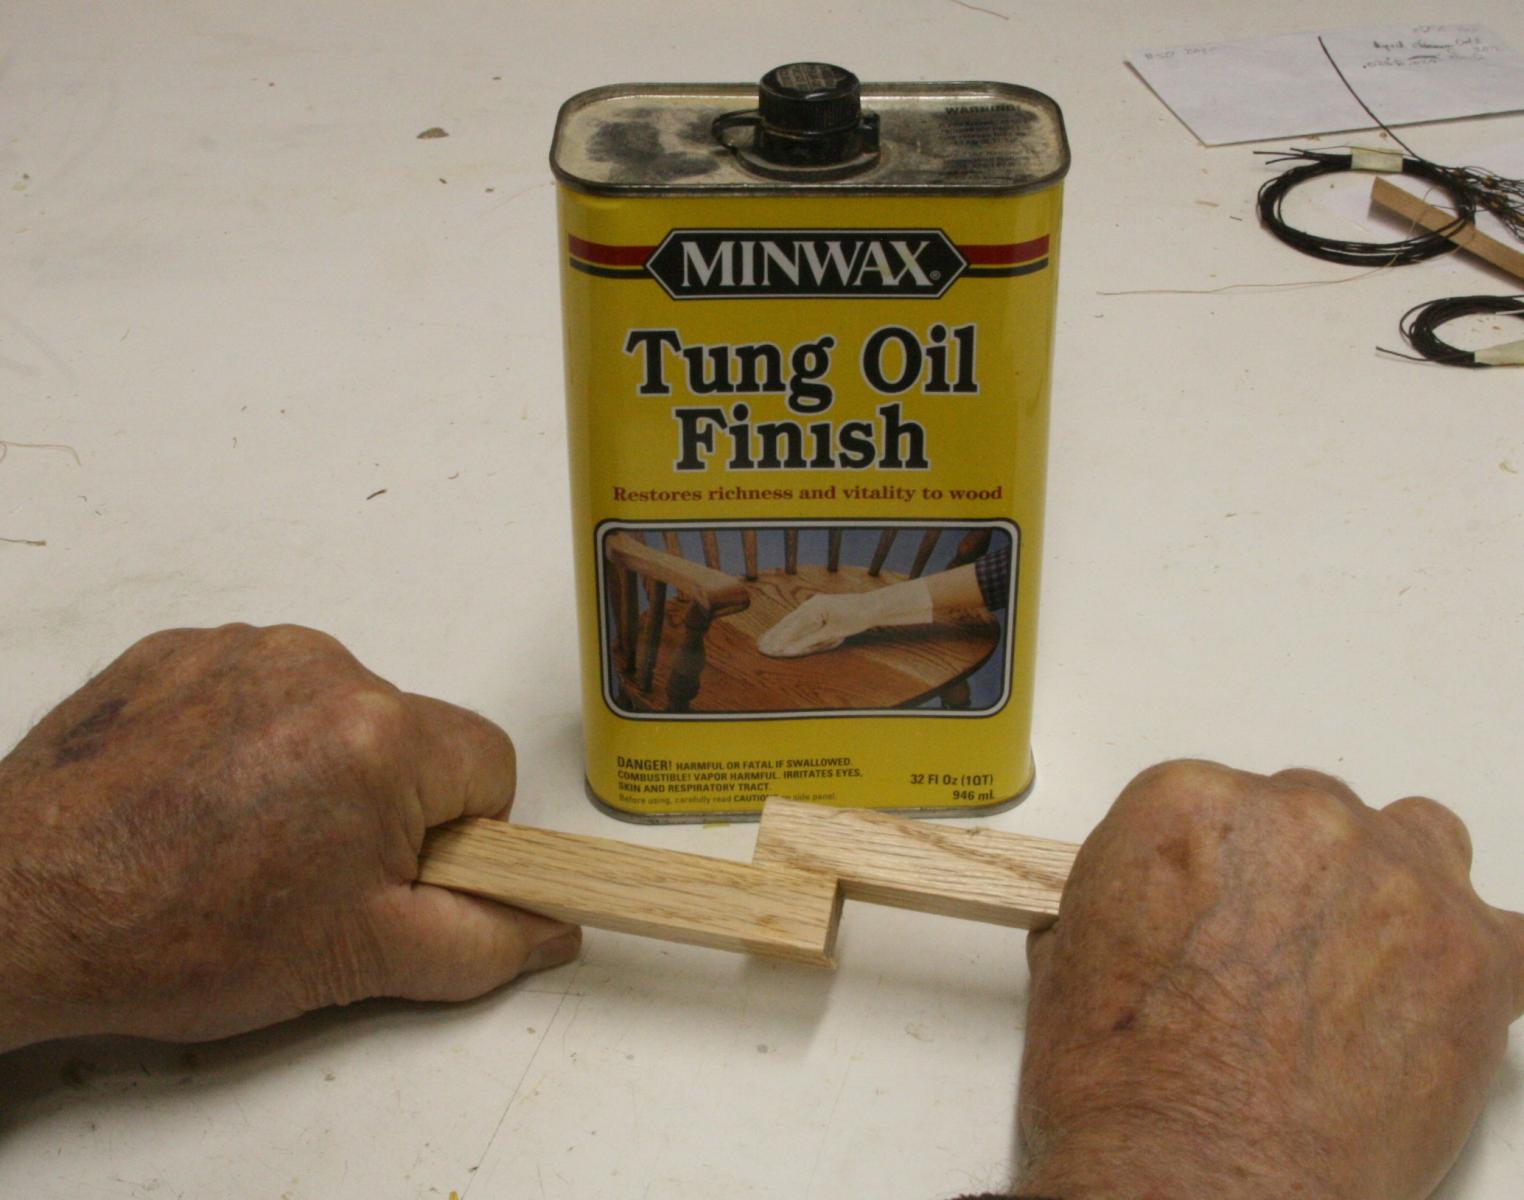
Janos, I am not surprised that real oil does not work. But then there is 'Tung Oil' which does work. Here is what I did. Took a couple pieces of bare oak (3/4 x 3/4), applied some Minwax tung oil and within five minutes applies some CA and clamped the pieces together. After a couple hours I was able to break them apart very readily. Then I repeated this. Applied a heavy coat of tung oil but let it dry (cure, whatever you want to call it). Then a few hours later I put on the CA, clamped it and about 24 hours later tried to break the joint. No go. I had to use a hammer to shear the pieces. My contention is that if the material has a chemical reaction that provides a 'hard' surface (as well as some penetration of the wood), some reasonable bond strength can be expected with CA, PVA and epoxy. If it is real oil, grease, wax, etc than all bets are off.
-
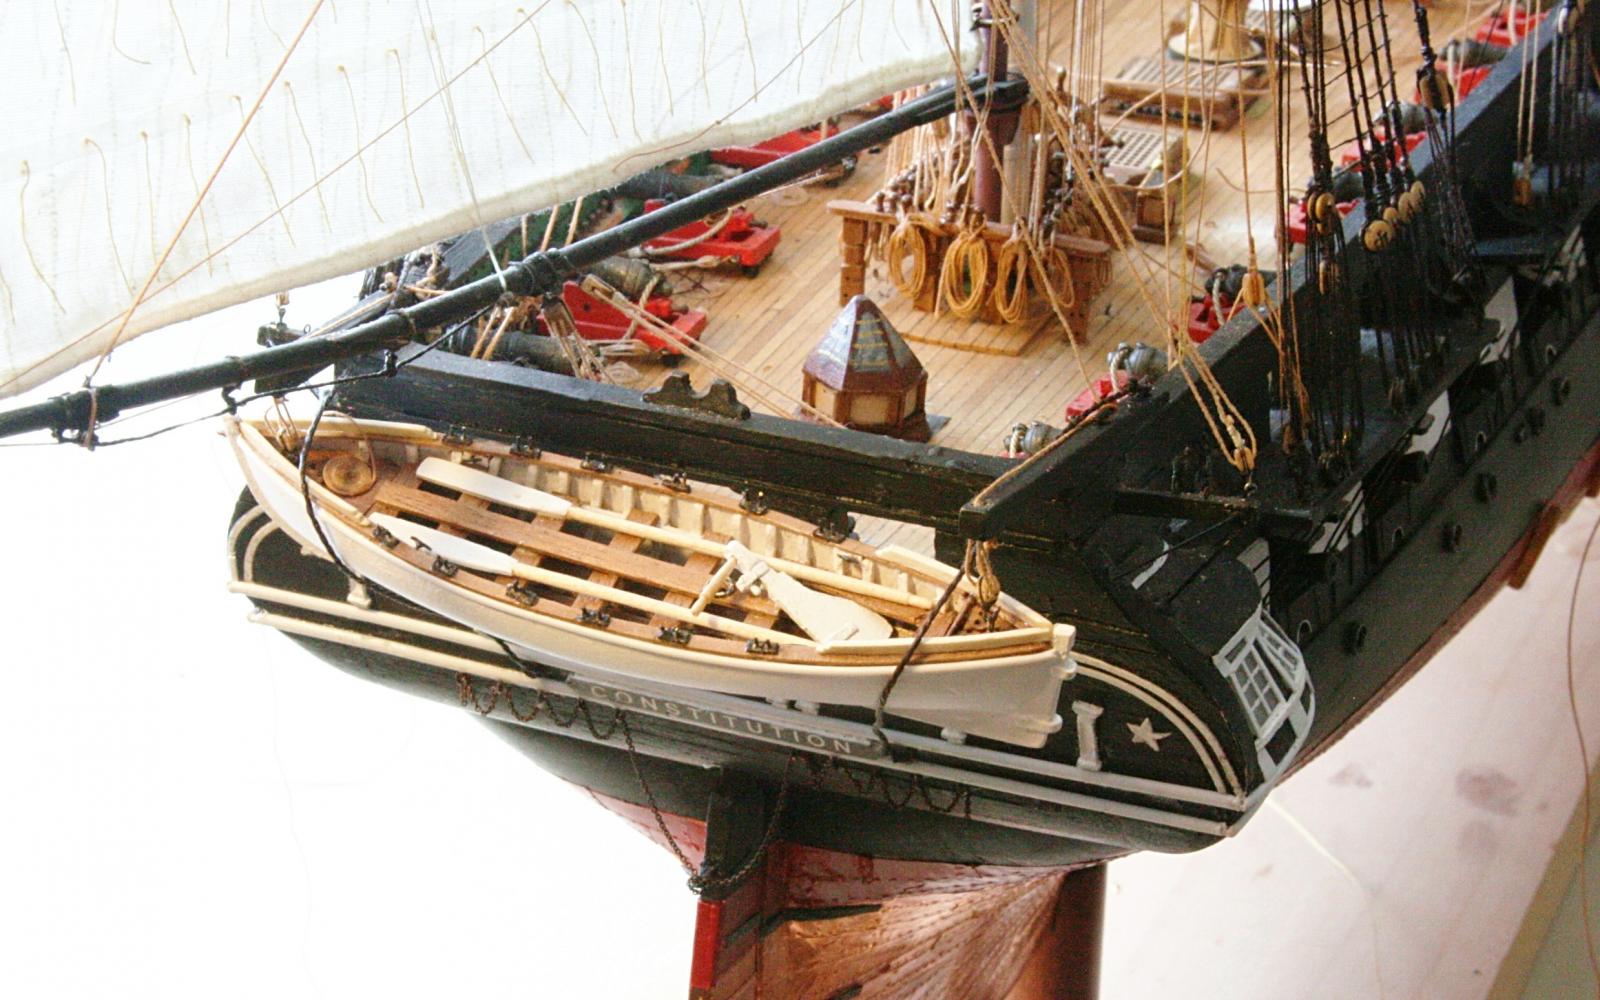
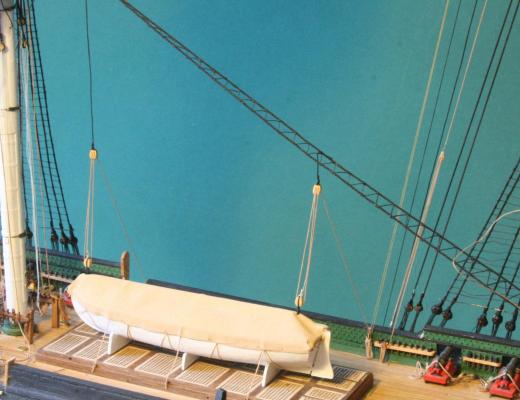
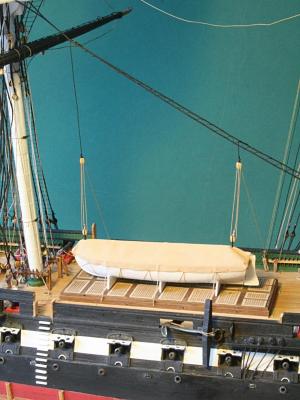
Doing these videos took away time from building. But it was fun to put them together. Below are a couple pictures of the tackles I rigged for the pinnace, The plans don't show this, but I wanted to add some details anyway. The idea here came from Longridge's book 'The Anatomy of Nelson's Ships'. What is shown here is the way the boat is raised, but to actually launch it would require additional tackles that come from the tip of the main jack (and possibly the foremast's spar as well). You can see that I still don't have the starboard shrouds and other details rigged. I am still going on the basis that the rigging goes from top on down and from the inside out. Hence the boat will not be in the way and without the shrouds it is much easier to get to the center. It also helps not to have parts like the wooden boards at the entrance in the way. I have broken several of them but will wait until later to make repairs.
- 732 replies
-
- 4
-

-
- constitution
- model shipways
- (and 1 more)
-
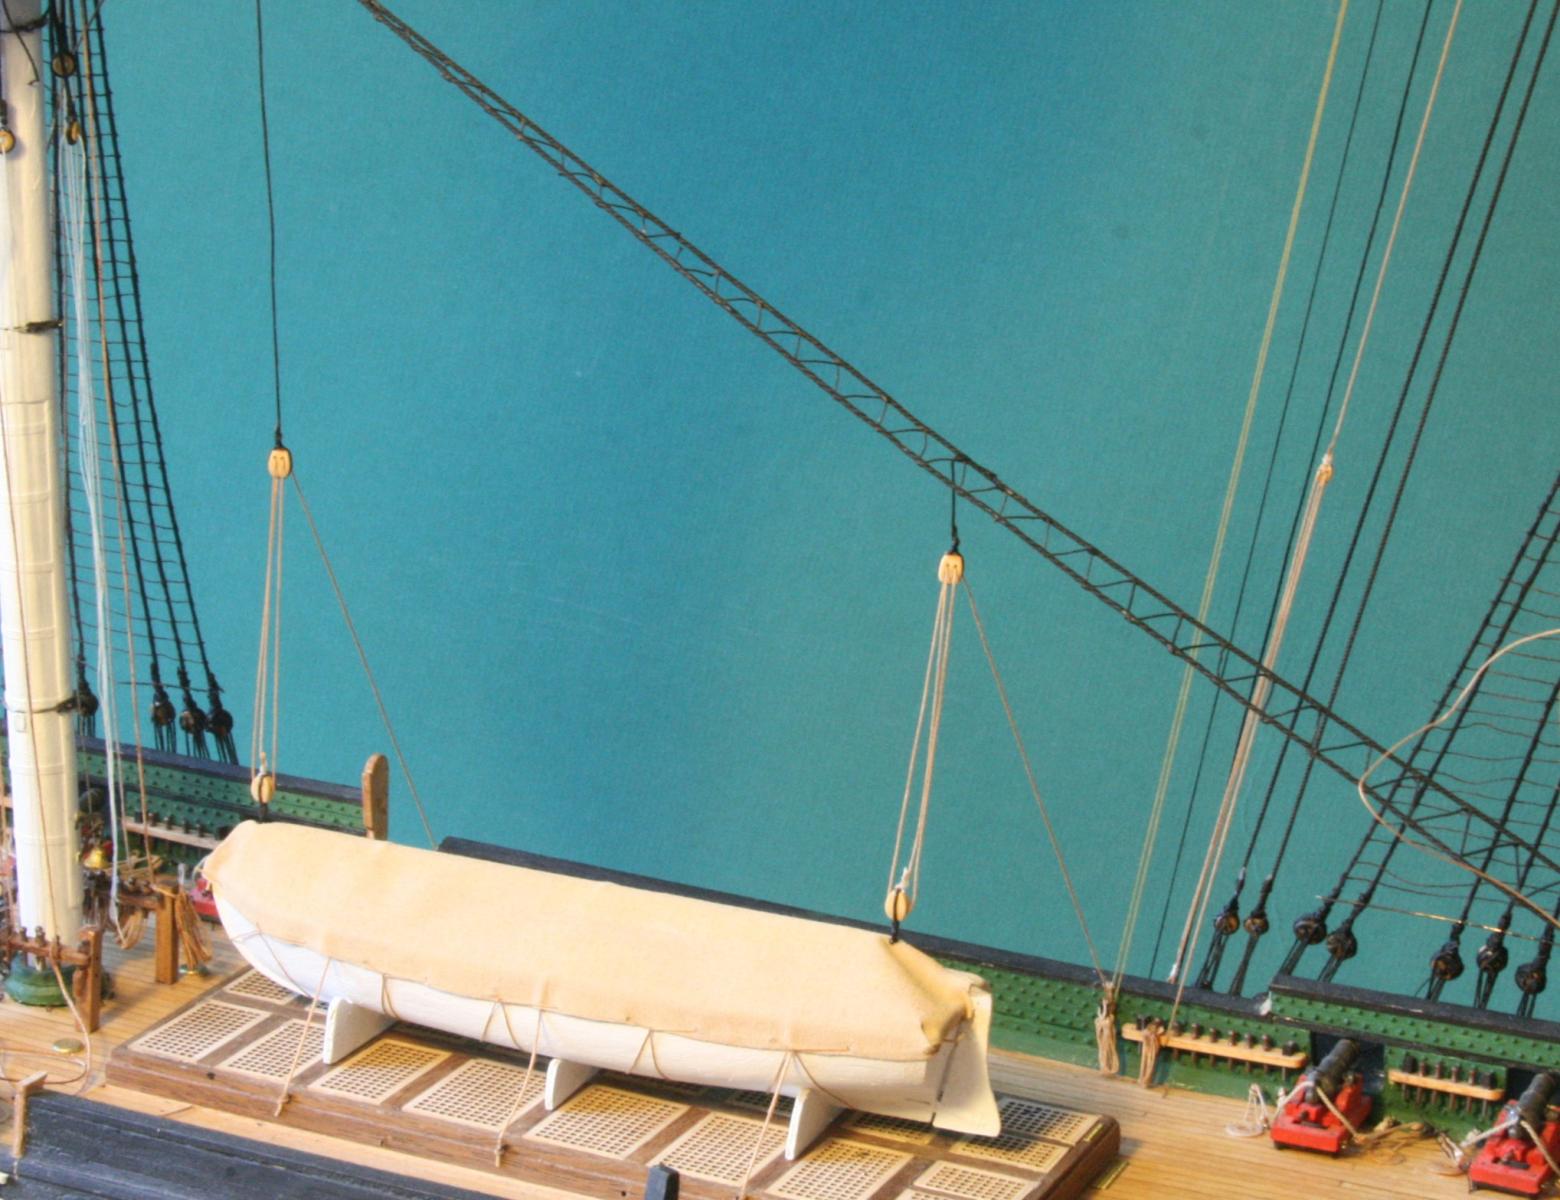
Thanks Steve. Here is another picture of the gig hanging from its tackles and the slings (or gripes) to hold it close to the stern and prevent it from swinging in the breeze.

- 732 replies
-
- 14
-
-
- constitution
- model shipways
- (and 1 more)
-
Here is the 4th (and last) of the videos I took to show how I made the boats. Included are the two whale boats, the gig and the pinnace. I took some liberties with these boats and some shortcuts because I wanted to get back to the rigging of the fore-topsail and other details. They come next.
- 732 replies
-
- 2
-
-
- constitution
- model shipways
- (and 1 more)
-
That's the way to do it Brett. However, if you don't mind, I would like to make one more comment about glue and paint 'sticking'. It really is a matter of degree in strength. I don't think we should bluntly say that glues and paint don't stick to wood surfaces that have been treated with any of the above mentioned materials. Surely it would be ok to say it is no good when you try to use carpenters glue to bond two pieces of metal or glass. But a product that is meant to be used on wood will produce some degree of strength when bonded. Just for fun I bonded two pieces of oak scrap that had a couple coats of urethane finish; two more were bare wood. One set was with CA glue, the other with PVA. Results??? I had to use a hammer to shear off the joints on all of them. I'll grant you that the bond area was about one square inch and the one with the PVA on bare wood was definitely stronger. But for all practical purposes, I would not hesitate using any of them for 'casual' bonding.
-
Careful Mark. Minwax is also a polyurethane and apparently there have not been issues about glue or paint not sticking to it. I haven't used it for years (it is hard to clean brushes, etc and does not last long in an opened can). Instead I am a firm believer in water based urethane (Varathane in particular). I have used it on many pieces of furniture and other projects and never had a problem with PVA, epoxy or CA glue sticking to it. The issue of the grain rising because of the water is, in my opinion, not that critical as long as you apply a thin coat. However, if you use water based stain (and apply a heavy coat) then, yes, fibers tend to raise their head up into the air. But a light brushing with fine steel wool takes care of that quickly.
-
Setting flags - which way does the wind blow?
Modeler12 replied to rodgerdodger's topic in Masting, rigging and sails
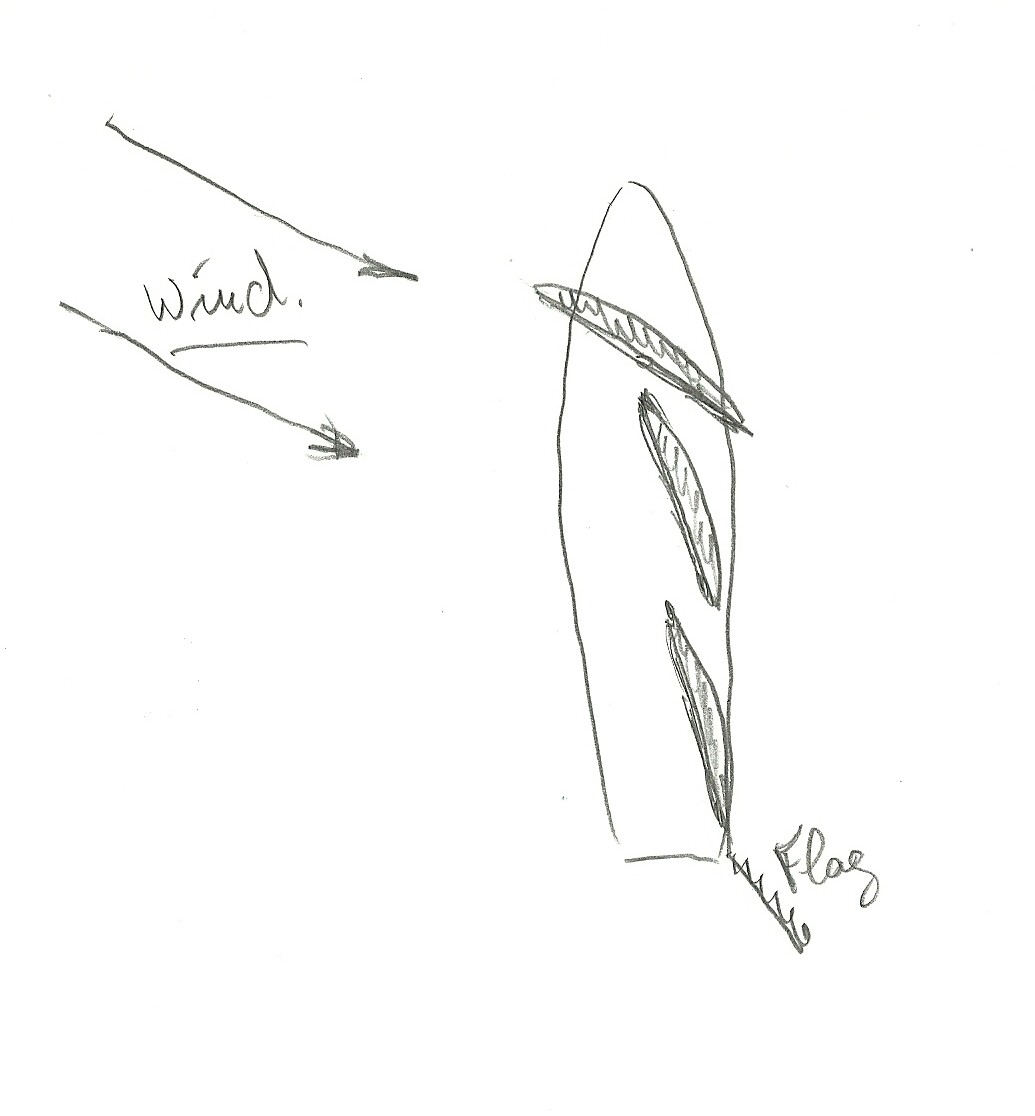
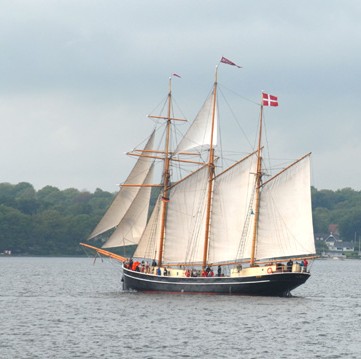
The picture that Michael shows (the Pride of Baltimore, I believe) shows some interesting points about the sails and directions. I think we all know that the sails of sloops, including square rigs, rely on the same principle as airplane wings. That is, when the wind comes abeam, the driving force does not come from the wind 'pushing' the ship, but actually 'pulling' the ship forward. It is the differential pressure on the front and back of the sail that causes the forward force. This will give a sloop-rigged boat more speed than having a following wind to fill the mainsail. The photograph clearly shows that the square sail spars are well ahead of the booms of the other sails. I don't know the actual direction of the wind, but my guess is that it is something like I show crudely below. Why not have the booms pointing in the direction of the wind (like the spar on the square sail???). That is another question and involves the shape of wings, leading edges, etc. In fact, if you think of a sloop or schooner rigged sail as being only one half of a square sail, you can see that the sail might behave more like the square sail. Conversely, if one half of the square sail were used, the spar would end at the mast and become a 'boom'. Then it would not have to point as much. Hence the advantage of the sloop or schooner rig. I still maintain that the flag is 'lagging' due to the forward motion of the ship.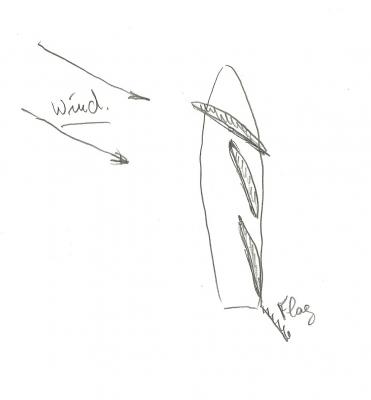
-
Setting flags - which way does the wind blow?
Modeler12 replied to rodgerdodger's topic in Masting, rigging and sails
-
Setting flags - which way does the wind blow?
Modeler12 replied to rodgerdodger's topic in Masting, rigging and sails
Let me add one comment about wind directions. Ships don't always go before the wind. In fact, more often they don't. Usually the wind would be coming from port or starboard and the ship would be on a port or starboard tack. In that case the flags would be pointing in a direction that is off to the side. The actual direction would be a bit more aft from the wind direction because of the ship moving forward (like your granddaughter pointed out).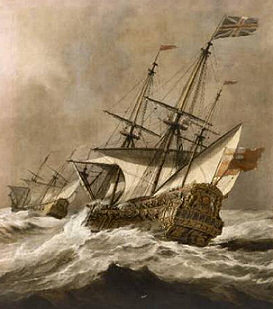
-
To me it would seem that the ship should definitely be 'horizontal' for a static display. In other words, if the keel should be at some angle from horizontal, fine. But the masts etc should reflect the required set with regards to vertical. If the plans call for a waterline, stick with that. BTW I don't go by angles for those small ones. Use the tangent or rise per linear dimension of the horizontal. It is a bit like pictures of the sea. If it is slanted a bit, it looks like water should be draining towards the down side. I always correct pictured because of that (including those that have nothing to do with the sea).
-
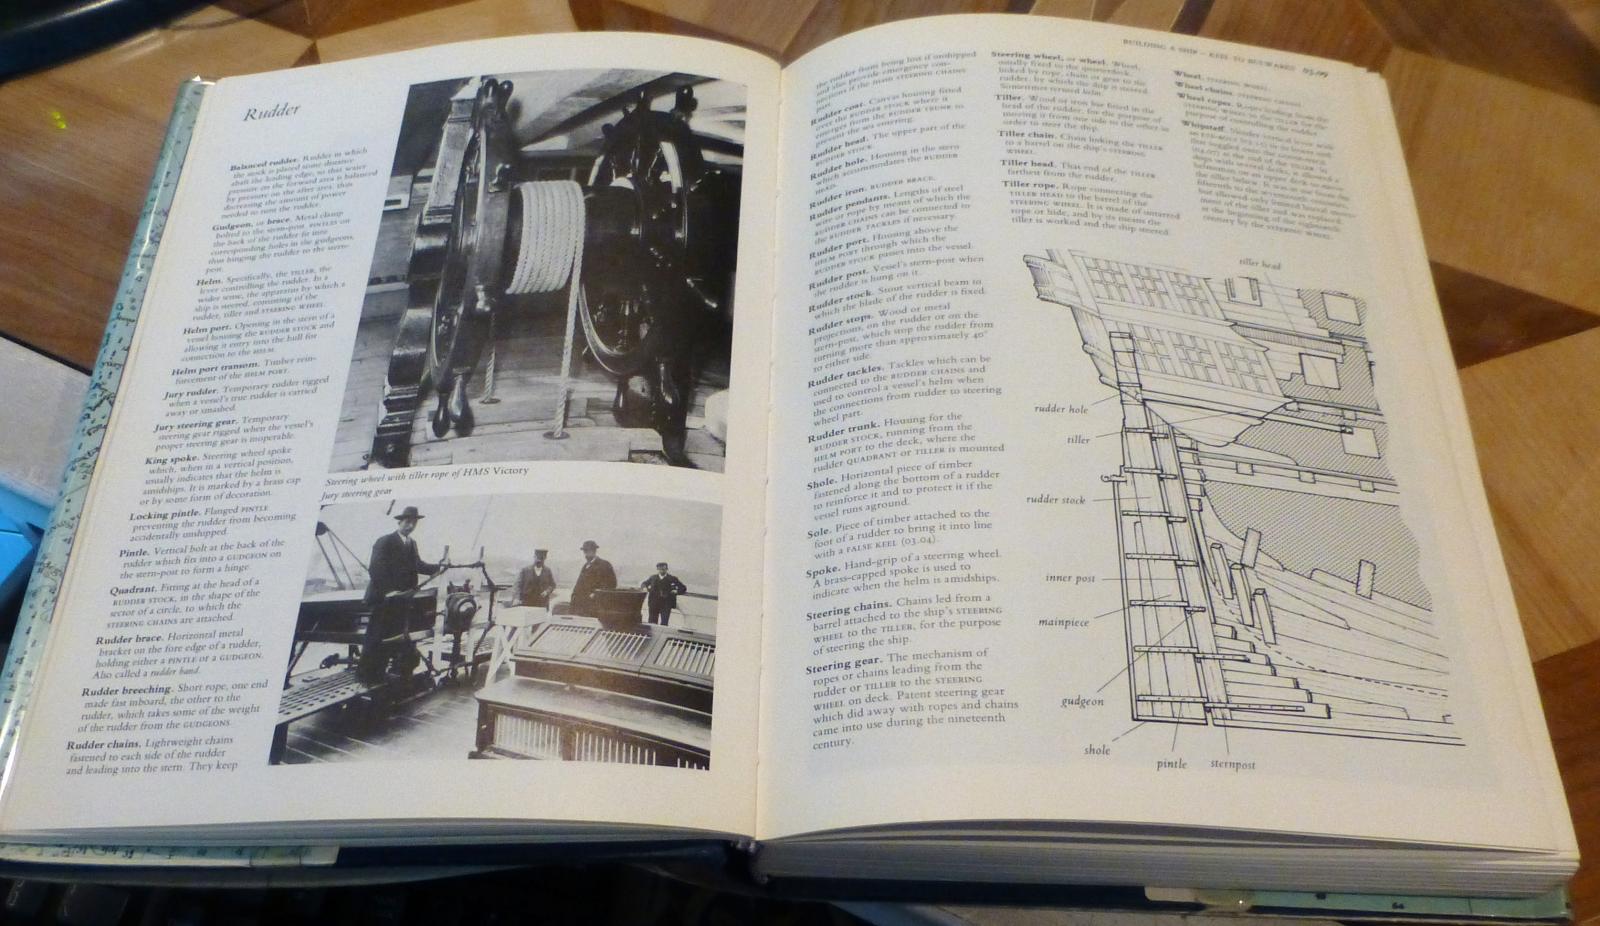
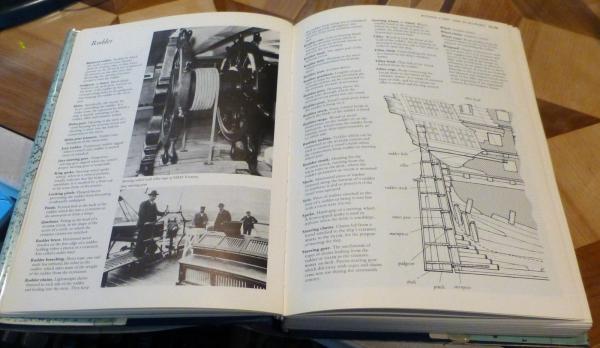
Thank you all for all those suggestions. I will try to find all or most of them through my library. When I posted this thread I was thinking of where I was a couple years ago when I started this model ship building. I had sailing experience, did some minor model building but was totally ignorant of all the terminology and the in-and-outs of old sailing ships. Since then many of you helped me with good references (such as Petersson's book on rigging). So, what I had in mind were some books for beginners in this hobby. Something that could be used in addition to the plans and explanations provided in kits. I found one book that serves that purpose (at least in my opinion). It is 'The Visual Encyclopedia of Nautical Terms Under Sail'. The tittle continues with 'An illustrated guide to the language of the great sailing ships and the men aboard them'. The book is full of great drawings, photographs, explanations of the various parts of sailing ships, etc. etc. Although not related to modeling, it even has a wonderful section about navigation, its history, tools and the mathematics involved. Below is one page picked at random.
- 26 replies
-
- 10
-
-
I used the steel wire because it was very thin (0.010 inch). After making the twisted eye, I blackened them which should protect them from any rusting. The rings were actually made of brass. Since then I have found copper and brass wire at the very thin gauges. But, again, I am not really that concerned. Thanks for those comments, my friends.
-
Many of you have or read books that may be of interest to others. I am, of course, referring to books (or articles) that have to do with model ship building. Titles and/or authors would help. English preferred, but other languages . . . go for it. Is this the right place to share???? BTW this could be too long and I ask your suggestions about how to abbreviate.
-
Vielen dank, Dafi. Hopefully the next video about these boats will be the last one. I tried to cover some of the 'special' techniques in the first three. But now it becomes more routine. I also need to finish the whale boat that has a cover. We'll see how long this might still take me.
- 732 replies
-
- 1
-
-
- constitution
- model shipways
- (and 1 more)
-
I continued with the interior of the whale boat. Here is part 3 that describes what I used for the frames, keelson and risings. I also show the walnut footlings after the inside was painted. Next come the seats and other details.
- 732 replies
-
- 3
-
-
- constitution
- model shipways
- (and 1 more)
-
I agree. Not only do the chainplates end up the wrong way, but I noticed also a block to the left that seems out of place. Some time ago I put together a video about the shrouds and chainplates. Perhaps it might help.
-
Sanding the inside of boat hulls.
Modeler12 replied to Modeler12's topic in Modeling tools and Workshop Equipment
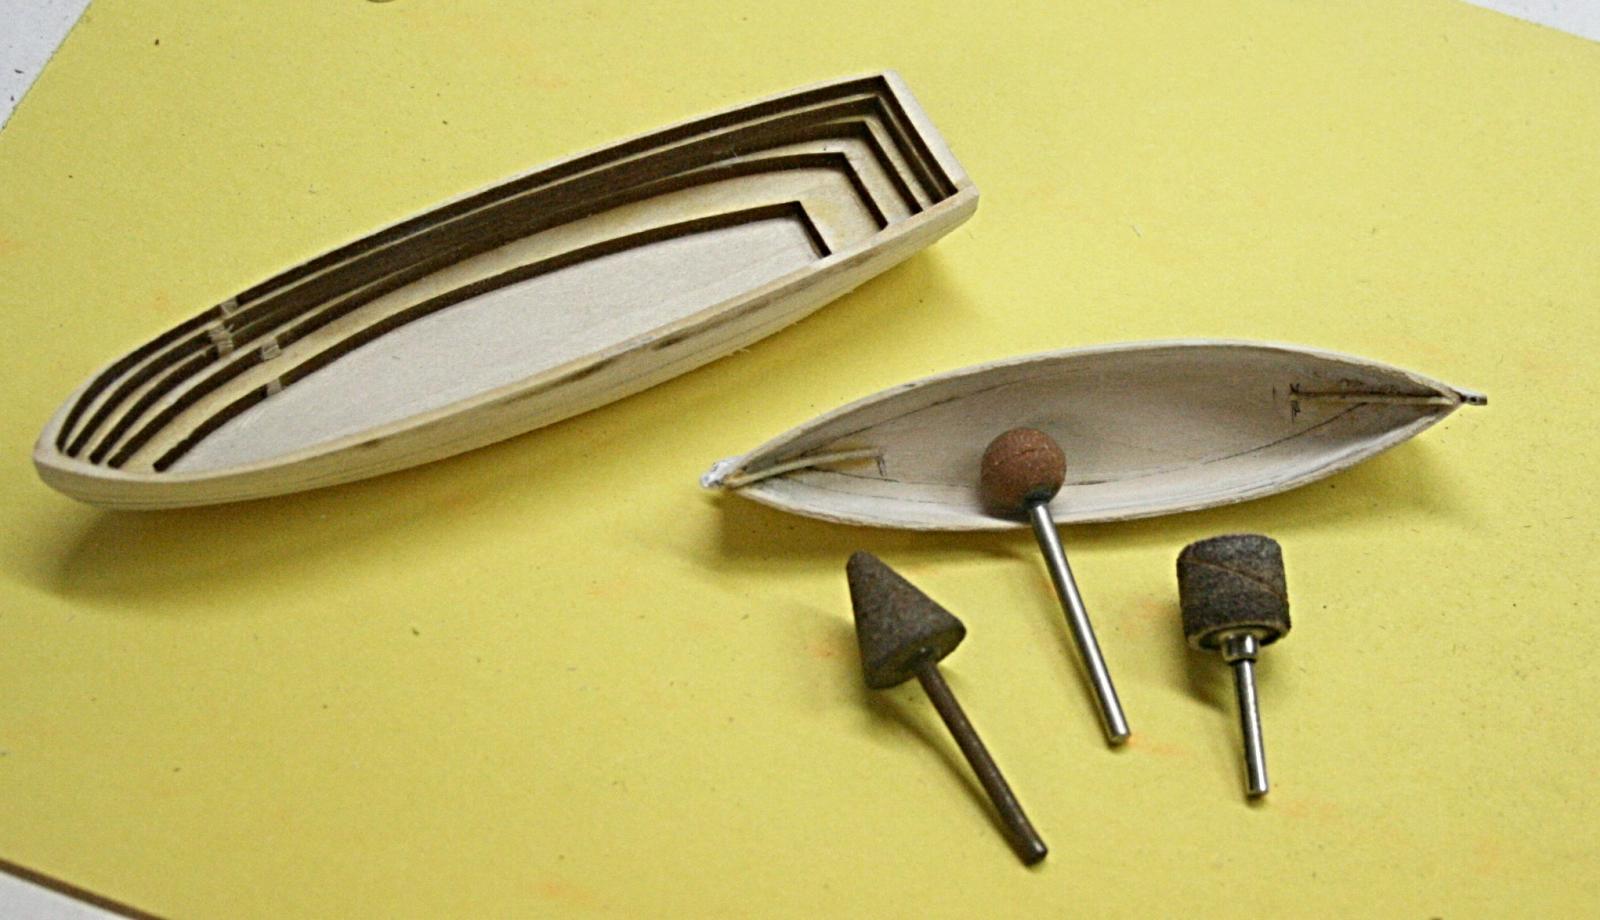
You apparently missed my whole point of posting this. I don't always polish manually. That is why this little converted toothbrush came in handy for what I was trying to do. Polishing is not necessary because the inside of these boats will be painted. I would be interested in the little drums in grit sizes down to about 400, but I don't see those any where. -
Sanding the inside of boat hulls.
Modeler12 replied to Modeler12's topic in Modeling tools and Workshop Equipment
Thanks guys, but Mike the drums for the Dremmel are way too course. Keep in mind that the wall thickness for these boats is only about .050 inch. I do have some other grinding wheels and they may help to 'hog' out the main parts, but not for the finishing. I have been trying to get some sanding drums for the dremmel with a fine grit, but no luck thus far. In fact, I have made my own drums for a thickness sander that works on my drill press, but those are larger diameter and not for 'special' usage. Jud, I remember 'rolling my own' right after WWII. The hardest thing to get was not the tobacco but the papers. My dad even had a little machine that worked like making sushi. Kind of ages me